Ghibli & Wirbel RACER R 85 FD 75 BC Lithium CHEM Use And Maintenance
- Tipo
- Use And Maintenance

www.ghibliwirbel.com
Professional Cleaning Machines Since 1968
RACER
RANGER
R 85 FD 65
R 85 FD 75
R 115 FD 75
R 115 FD 85
IT
Uso e Manutenzione
EN
Use and Maintenance
FR
Utilisation et Entretien
DE
Gebrauch und Wartung
ES
Uso y Mantenimiento
PT
Uso e manutenção
NL
Gebruik en Onderhoud
CS
RU
PL
AR
49.0296.00
ed. 09/2023
49029600_Copertina RACER_RANGER_8ed_04-2023.indd 149029600_Copertina RACER_RANGER_8ed_04-2023.indd 1 06/04/2023 12:06:5806/04/2023 12:06:58

www.ghibliwirbel.com
Professional Cleaning Machines Since 1968
2
2%
MADE IN ITALY
IPX3
Scrubber Dryer
GVW: ...........
Mod: ..................................
Battery: .................................... Art.: ..................
Charging: ................................
Year: ..............
s/n: ...........................
2%
MADE IN ITALY
IPX3
Scrubber Dryer
GVW: ..........
Mod: ................................
Battery: ........V .............W Art.: ..................
Charging: .......................................
Year: .............
s/n: .........................
1
2
3
4
8
7
6
95
49029600_Copertina RACER_RANGER_8ed_04-2023.indd 249029600_Copertina RACER_RANGER_8ed_04-2023.indd 2 06/04/2023 12:06:5906/04/2023 12:06:59

www.ghibliwirbel.com
Professional Cleaning Machines Since 1968
3
123
IT Produttore Caratteristiche elettriche N° Matricola
EN Manufacturer Electrical characteristics Serial N°
FR Producteur Caractéristiques électriques N° Matricule
DE Hersteller Elektrische Eigenschaften Serien-Nr.
ES Fabricante Características eléctricas N° Matrícola
PT Produtor Características elétricas Número de série
NL Producent Elektrische eigenschappen Serienummer
CS Výrobce Elektrické údaje Výrobní č.
RU Изготовитель Электрические характеристики Заводской №
PL Producent Specykacja elektryczna Numer seryjny
AR
456
IT Grado di protezione Peso in ordine di marcia Anno di costruzione
EN Degree of protection Weight in running order Year of manufacture
FR Degré de protection Poids en ordre de marche Année de construction
DE Schutzgrad Gewicht bei Betrieb Baujahr
ES Grado de protección Peso en orden de marcha Año de fabricación
PT Grau de protecção Peso em ordem de marcha Ano de construção
NL Beschermingsgraad Gewicht in rijklare toestand Bouwjaar
CS Úroveň ochrany Hmotnost v provozním stavu Rok výroby
RU Βαθμός προστασίας Βάρος στην λειτουργία Έτος κατασκευής
PL Stopień zabezpieczenia Ciężar podczas eksploatacji Rok produkcji
AR
7 8 9
IT Codice articolo Modello Massima pendenza superabile
EN Item code Model Maximum superable slope
FR Référence de l’article Modèle Pente maximum surmontable
DE Artikelnummer Modell Maximal befahrbare Steigung
ES Código del artículo Modelo Máxima pendiente que se puede superar
PT Código do artigo Modelo Máximo declive transponível
NL Artikelcode Model Maximaal berijdbare hellingsgraad
CS Kód položky Model Maximální překonatelný sklon
RU Код изделия Модель Максимальный преодолимый наклон
PL Kod artykułu Model Maksymalne superable stoku
AR
49029600_Copertina RACER_RANGER_8ed_04-2023.indd 349029600_Copertina RACER_RANGER_8ed_04-2023.indd 3 06/04/2023 12:06:5906/04/2023 12:06:59

www.ghibliwirbel.com
Professional Cleaning Machines Since 1968
4
49029600_Copertina RACER_RANGER_8ed_04-2023.indd 449029600_Copertina RACER_RANGER_8ed_04-2023.indd 4 06/04/2023 12:06:5906/04/2023 12:06:59

www.ghibliwirbel.com
Professional Cleaning Machines Since 1968
5
IT Italiano ................................................................................................................IT - 1
(Istruzioni originali)
EN English .............................................................................................................EN - 1
(Translation of original instructions)
FR Français ...........................................................................................................FR - 1
(Traduction des instructions d’origine)
DE Deutsch ............................................................................................................DE - 1
(Übersetzung der Originalanleitung)
ES Español ............................................................................................................ES - 1
(Traducción de las instrucciones originales)
PT Português .........................................................................................................PT - 1
(Tradução das instruções originais)
NL Nederlands ....................................................................................................... NL - 1
(Vertalinig van de originele instructies)
CS .............................................................................................................. CS - 1
(Překladoriginálníhonávodu)
RU ........................................................................................................... RU - 1
PL ................................................................................................................ PL - 1
(Tłumaczeniezoryginalnejinstrukcjiobsługi)
AR ........................................................................................................................ AR - 1
(
49029600_Copertina RACER_RANGER_8ed_04-2023.indd 549029600_Copertina RACER_RANGER_8ed_04-2023.indd 5 06/04/2023 12:06:5906/04/2023 12:06:59

49029600_Copertina RACER_RANGER_8ed_04-2023.indd 649029600_Copertina RACER_RANGER_8ed_04-2023.indd 6 06/04/2023 12:06:5906/04/2023 12:06:59

www.ghibliwirbel.com
Professional Cleaning Machines Since 1968
ITALIANO - 1
Gentile cliente,
La ringraziamo per aver scelto un nostro prodotto per la pulizia dei suoi ambienti.
La lavasciuga pavimenti da lei acquistata è stata progettata per soddisfare l’utilizzatore
in termini di semplicità di utilizzo e affidabilità nel tempo.
Noi siamo coscienti che un buon prodotto per restare tale, nel tempo, necessita di con-
tinui aggiornamenti mirati a soddisfare le aspettative di chi, quotidianamente, ne fa
uso. In tal senso, noi ci auguriamo di avere in lei non solo un cliente soddisfatto ma
anche un partner che non esita a trasmetterci opinioni e idee derivanti dalla personale
quotidiana esperienza.
49029600_Manuale RACER_RANGER_8ed_04-2023.indd 149029600_Manuale RACER_RANGER_8ed_04-2023.indd 1 06/04/2023 14:58:4806/04/2023 14:58:48

www.ghibliwirbel.com
Professional Cleaning Machines Since 1968
ITALIANO - 2
INDICE
INDICE ............................................................................................................................................ 2
DATI TECNICI ................................................................................................................................. 3
1.1 - INTRODUZIONE .................................................................................................................. 5
1.1.a - Posizione operatore ...................................................................................................... 5
1.1.b - Avvertenze generali durante l’uso della macchina ....................................................... 5
1.2 - USO NON PREVISTO DELLA MACCHINA ........................................................................ 5
2.1 - CONOSCENZA DELLA MACCHINA (Fig. A) .....................................................................5
3.1 - DISIMBALLO (Fig. B)..........................................................................................................5
3.1.a - Installazione batterie (Fig. A) ........................................................................................ 6
3.1.b - Scarico macchina dal bancale in legno (Fig. B) ........................................................... 6
4.1 - ASSEMBLAGGIO COMPONENTI ...................................................................................... 6
4.1.a - Installazione tergitore (Fig. C) ...................................................................................... 6
4.1.b - Installazione spazzole .................................................................................................. 6
5.1 - CARICA DELLA BATTERIA ................................................................................................ 6
5.1.a - Carica della batteria tramite caricabatterie esterno (Fig. G) ......................................... 7
5.1.b - Carica della batteria tramite caricabatterie di bordo (se presente) (Fig. G) .................. 7
6.1 - DESCRIZIONE COMANDI MACCHINA .............................................................................. 7
6.1.a - Pannello comandi (Fig. F) ............................................................................................ 7
6.1.b - Pedale acceleratore (Fig. A) ....................................................................................... 10
7.1 - DISPLAY (Fig. F) ...............................................................................................................10
8.1 - EMERGENZA .................................................................................................................... 11
9.1 - DISPOSITIVI DI SICUREZZA (Fig. A) ............................................................................... 11
10.1 - RIEMPIMENTO SERBATOIO (Fig. D)............................................................................... 12
10.2 - TANICA DETERGENTE CHIMICO (se presente) (Fig. E) ............................................... 12
11.1 - FUNZIONAMENTO (Fig. A-F) ........................................................................................ 12
11.1.a - Controlli prima dell’uso ............................................................................................... 12
11.1.b - Preparazione macchina e scelta ciclo ........................................................................ 12
11.1.c - Uso della macchina .................................................................................................... 13
11.1.d - Fine uso e spegnimento ............................................................................................. 14
12.1 - SCARICO ACQUA DI RECUPERO (Fig. H) .....................................................................14
13.1 - MANUTENZIONE E PULIZIA ............................................................................................ 14
13.2 - OPERAZIONI DA EFFETTUARE OGNI GIORNO ............................................................ 14
13.2.a - Svuotamento e pulizia serbatoio acqua pulita (Fig. I) ................................................. 14
13.2.b - Pulizia serbatoio acqua di recupero (Fig. J) ............................................................... 15
13.2.c - Pulizia tergitore (Fig. K) .............................................................................................. 15
13.3 - OPERAZIONI DA EFFETTUARE OGNI 3 MESI ............................................................... 15
13.3.a - Controllo stato di usura catena sterzo (Fig. L) ............................................................ 15
13.4 - OPERAZIONI DA EFFETTUARE SECONDO NECESSITÀ ............................................. 15
13.4.a - Sostituzione spazzole (Fig. M) ................................................................................... 15
13.4.b - Regolazione della gomma paraspruzzi (Fig. M) ......................................................... 16
13.4.c - Sostituzione gomme tergitore (Fig. K) ........................................................................ 16
13.4.d - Regolazione incidenza tergitore (Fig. N) .................................................................... 16
13.4.e - Regolazione pressione del tergitore (Fig. O) .............................................................. 17
13.4.f - Pulizia ltro acqua pulita (Fig. P) ................................................................................ 17
13.4.g - Rubinetto scarico vano batterie (Fig. A) ..................................................................... 17
13.4.h - Controllo stato di usura delle tre ruote (Fig. A) ........................................................... 17
14.1 - IMPOSTAZIONE PARAMETRI (Fig. F) ............................................................................. 18
14.1.a - Parametri OPERATORE ............................................................................................. 18
15.1 - CONTROLLO/SOSTITUZIONE DEI FUSIBILI .................................................................. 20
16.1 - ALLARMI DURANTE IL FUNZIONAMENTO (Fig. F) ....................................................... 20
17.1 - RICERCA GUASTI ............................................................................................................23
18.1 - DEMOLIZIONE DELLA MACCHINA ................................................................................. 24
19.1 - SCHEMA ELETTRICO ...................................................................................................... 25
49029600_Manuale RACER_RANGER_8ed_04-2023.indd 249029600_Manuale RACER_RANGER_8ed_04-2023.indd 2 06/04/2023 14:58:4806/04/2023 14:58:48

www.ghibliwirbel.com
Professional Cleaning Machines Since 1968
ITALIANO - 3
DATI TECNICI
RACER R 85 RANGER R 115
FD 65 FD 75 FD 75 FD 85
Tipo di guida Operatore a bordo
Caratteristiche
Funzionamento e alimentazione Batteria 24 V
Tipo di batterie
N° 2 - 12V 105Ah (C5) N° 4 - 6V 240Ah (C5)
N° 4 - 6V 180Ah (C5) N° 1 - 24V 320Ah (C5)
N° 1 - 24V 100Ah (Li) N° 1 - 24V 150Ah (Li)
Potenza installata 2160 W 2210 W
Autonomia di lavoro
2 h (105Ah C5) 5 h (240Ah C5)
4 h (180Ah C5) 7 h (320Ah C5)
2 h (100Ah Li) 3 h (150Ah Li)
Avanzamento Trazione avanti / indietro
Larghezza pista lavaggio 650 mm 750 mm 750 mm 850 mm
Larghezza di aspirazione 850 mm 950 mm 950 mm 1050 mm
Resa oraria teorica 4000 m2/h 4500 m2/h 4500 m2/h 5000 m2/h
Resa oraria pratica 2400 m2/h 2700 m2/h 2700 m2/h 3000 m2/h
Vibrazione sistema mano-braccio
(ISO 5349-1) < 2,5 m/s2
Vibrazione corpo intero (ISO 2631-1) < 0,5 m/s2
Pressione sonora (ISO 11203) (LpA) 63 dB(A)
Pressione sonora modalità silenziosa
(LpA) 57 dB(A)
Codice IP IPX3
Spazzole
Diametro / pad / numero 330 mm /
13” / 2
380 mm /
15” / 2
380 mm /
15” / 2
430 mm /
17” / 2
Potenza motore / numero 500 W / 2
Velocità di rotazione spazzola 165 giri/min.
Pressione specifica 30 gr/cm221 gr/cm221 gr/cm217 gr/cm2
Pressione specifica (extrapressione) 46 gr/cm232 gr/cm243 gr/cm234 gr/cm2
49029600_Manuale RACER_RANGER_8ed_04-2023.indd 349029600_Manuale RACER_RANGER_8ed_04-2023.indd 3 06/04/2023 14:58:4806/04/2023 14:58:48

www.ghibliwirbel.com
Professional Cleaning Machines Since 1968
ITALIANO - 4
RACER R 85 RANGER R 115
FD 65 FD 75 FD 75 FD 85
Trazione
Pendenza massima di utilizzo in fase di
lavoro 2 %
Pendenza massima superabile a vuoto (*)
12 %
Potenza motore 600 W
Velocità massima avanzamento in lavoro 6 km/h
Aspirazione
Potenza motore 550 W
Depressione (colonna acqua) 125 mbar / 1250 mmH2O
Portata d’aria 30 l/sec
Serbatoio
Tipologia Doppio serbatoio
Capacità soluzione 80 l 110 l
Capacità recupero 85 l 115 l
Dimensioni
Dimensioni corpo macchina
(lung. x larg. x alt.) 1375 x 705 x 1230 mm 1470 x 770 x 1365 mm
Larghezza macchina - testata spazzole 715 mm 785 mm 785 mm 890 mm
Larghezza macchina - tergitore 885 mm 950 mm 950 mm 1055 mm
Dimensioni vano batterie
(lung. x larg. x alt.) 380 x 540 x 310 mm 380 x 625 x 440 mm
Peso
Peso a vuoto 213 kg 246 kg
Peso con batterie Gel 12V 105Ah 285 kg -
Peso con batterie Gel 6V 180Ah 333 kg -
Peso con batteria Litio 24V 100Ah 249 kg -
Peso con batterie Gel 6V 240Ah - 432 kg
Peso con batteria Pb Wet 24V 320Ah - 506 kg
Peso con batteria Litio 24V 150Ah - 288 kg
Peso in ordine di marcia (GVW) 490 kg 691 kg
(*) La macchina è stata testata nelle seguenti condizioni:
• Batteria standard
• Serbatoi vuoti
• Rampa in cemento grezzo
• Lunghezza rampa 15 m
• 75 kg di operatore
1 -
49029600_Manuale RACER_RANGER_9ed_09-2023.indd 449029600_Manuale RACER_RANGER_9ed_09-2023.indd 4 04/09/2023 14:50:2704/09/2023 14:50:27

www.ghibliwirbel.com
Professional Cleaning Machines Since 1968
ITALIANO - 5
1.1 - INTRODUZIONE
NOTA:
I numeri e riferimenti figura riportati tra le pa-
rentesi si riferiscono ai componenti indicati
nel foglio illustrativo allegato.
PERICOLO:
Prima di utilizzare la macchina leg-
gere attentamente il libretto “AV-
VERTENZE DI SICUREZZA PER LA-
VASCIUGA PAVIMENTI” allegato al
presente e le integrazioni riportate di
seguito.
1.1.a - Posizione operatore
L’operatore, durante l’uso della macchina è
seduto sul sedile con le mani sul volante.
1.1.b - Avvertenze generali durante
l’uso della macchina
- NON abbandonare la macchina su super-
ci inclinate.
- È assolutamente vietato curvare in ram-
pa; pericolo di ribaltamento.
- Evitare di utilizzare la macchina in am-
bienti con rischio di caduta oggetti.
1.2 - USO NON PREVISTO
DELLA MACCHINA
- Non utilizzare la macchina con serbatoio
di recupero aperto.
- Non circolare con piedi/gambe a ciondo-
loni.
- Non eettuare sterzate repentine in parti-
colare in discesa.
AVVERTENZA:
La macchina è abilitata al trasporto di
una SOLA persona.
2 -
2.1 - CONOSCENZA DELLA
MACCHINA (Fig. A)
(1) Volante
(2) Cruscotto comandi
(3) Sedile
(4) Sensore presenza operatore
(5) Pulsante di EMERGENZA, per l’arresto
immediato di tutte le funzioni
(6) Pedana appoggiapiedi
(7) Pedale acceleratore
(8) Ruote posteriori
(9) Luce di lavoro (opzionale)
(10) Girofaro (opzionale)
(11) Serbatoio acqua di recupero
(12) Coperchio serbatoio acqua di recupero
(13) Serbatoio acqua pulita
(14) Tappo
(15) Tubo scarico acqua di recupero
(16) Tubo aspirazione acqua tergitore
(17) Tubo scarico acqua pulita
(18) Tubo di livello serbatoio acqua pulita
(19) Gruppo testata spazzole
(20) Gruppo tergitore
(21) Vano portadocumenti
(22) Filtro acqua
(23) Ruota direzionale e di trazione
(24) Aggancio supporto per tergitore
(25) Piede di sostegno serbatoio di recupero
3 -
3.1 - DISIMBALLO (Fig. B)
Una volta rimosso l’imballo come indicato nel
foglio istruzioni sull’imballo stesso, controlla-
re l’integrità della macchina e di tutti i compo-
nenti in dotazione.
Se si riscontrano danni evidenti contattare il
concessionario di zona e il trasportatore en-
tro 3 giorni dal ricevimento.
- Rimuovere la busta e le scatole (26) con-
tenente gli accessori in dotazione:
• (20) Gruppo tergitore.
• (32) N° 2 spazzole.
- Sollevare il gruppo serbatoio e prelevare
la documentazione dall’apposita busta:
• (33) Manuale d’uso e manutenzione
della macchina.
• (34) Manuale istruzioni caricabatterie
(se presente).
49029600_Manuale RACER_RANGER_8ed_04-2023.indd 549029600_Manuale RACER_RANGER_8ed_04-2023.indd 5 06/04/2023 14:58:5306/04/2023 14:58:53

www.ghibliwirbel.com
Professional Cleaning Machines Since 1968
ITALIANO - 6
3.1.a - Installazione batterie (Fig. A)
- Sollevare con cautela il serbatoio di recu-
pero (11).
- A seconda della congurazione (4 batterie
da 6 V, 2 batterie da 12 V, 1 pacco batteria
da 24), posizionare e collegare le batte-
rie come indicato nelle gure, utilizzando i
cavi e le spine in dotazione.
- Abbassare con cautela il serbatoio acqua
di recupero (11).
NOTA:
La connessione delle batterie deve essere
eseguita da personale specializzato.
3.1.b - Scarico macchina dal banca-
le in legno (Fig. B)
- Rimuovere il blocchetto di legno (27) posi-
zionato davanti alla ruota anteriore.
- Posizionare la rampa (28) davanti al ban-
cale in legno come indicato nel foglio
istruzioni sull’imballo.
- Sedersi sul sedile (3) in posizione di gui-
da.
- Ruotare la chiave (29) su “ON”.
- Agire sul pulsante di direzione marcia
(31a) “ ” (marcia avanti), quindi pre-
mere il pedale acceleratore (7) e con cau-
tela scendere dal bancale.
4 -
4.1 - ASSEMBLAGGIO
COMPONENTI
4.1.a - Installazione tergitore (Fig.
C)
- Inserire il tergitore (20) nella piastra di
supporto (35) e ssarlo avvitando i due
pomelli (36).
- Collegare il tubo di aspirazione (16) con il
raccordo (37) del tergitore.
4.1.b - Installazione spazzole
- Vedere procedura nel paragrafo “13.4.a -
Sostituzione spazzole (Fig. M)”.
5 -
5.1 - CARICA DELLA
BATTERIA
PERICOLO:
Effettuare la carica delle batterie in
locali ben areati e conformi alle nor-
me vigenti nel paese di utilizzo.
Per le informazioni relative alla sicu-
rezza attenersi a quanto descritto nel
capitolo 1 del presente manuale.
AVVERTENZA:
Per le informazioni e le avvertenze
relative alla batteria e al caricabatte-
ria di bordo (se presente) attenersi a
quanto indicato nel manuale del cari-
cabatteria allegato al presente.
La macchina esce dalla fabbrica tara-
ta per il funzionamento con batterie
a gel. Se si dovessero installare delle
batterie di altro tipo, vedere paragra-
fo “Impostazione parametri”.
E’ vietato utilizzare la macchina con
batterie a gel con taratura per batterie
ad acido o altro.
(Solo per versioni senza caricabatte-
rie a bordo) La macchina deve essere
ricaricata esclusivamente da carica-
batterie esterni SELV (safety extra-
low voltage).
NOTA:
(Solo per batterie al GEL) Per la ricarica
completa delle batterie sono necessarie 10
ore. Evitare ricariche parziali.
(Solo per batterie al litio) E’ possibile effet-
tuare ricariche parziali.
Caricare le batterie ad ogni ne lavoro o al-
meno quando il simbolo batteria “ ” sul
display (41 Fig. F) inizia a lampeggiare.
- Portarsi con la macchina nei pressi della
stazione di carica delle batterie.
- Sollevare il serbatoio acqua di recupero
(11) assicurandosi che sia vuoto.
49029600_Manuale RACER_RANGER_8ed_04-2023.indd 649029600_Manuale RACER_RANGER_8ed_04-2023.indd 6 06/04/2023 14:58:5706/04/2023 14:58:57

www.ghibliwirbel.com
Professional Cleaning Machines Since 1968
ITALIANO - 7
5.1.a - Carica della batteria tramite
caricabatterie esterno (Fig.
G)
- Controllare l’idoneità del caricabatterie
esterno facendo riferimento al relativo
Manuale. La tensione nominale del cari-
cabatterie deve essere pari a 24 V.
- Nell’apposito alloggiamento (38), preleva-
re il connettore (39) e collegarlo al carica-
batterie esterno.
- Collegare il caricabatterie alla rete elettri-
ca.
- Alla ne della ricarica scollegare il carica-
batterie dalla rete e dal connettore (39).
- Abbassare con cautela il serbatoio acqua
di recupero (11).
5.1.b - Carica della batteria tramite
caricabatterie a bordo (se
presente) (Fig. G)
- Nell’apposito alloggiamento (38), preleva-
re e collegare la spina del cavo caricabat-
terie (40) alla rete elettrica (la tensione e
la frequenza di rete devono essere uguali
ai valori corrispondenti del caricabatterie,
riportati sulla targhetta matricolare della
macchina).
NOTA:
Quando il caricabatterie è collegato alla rete
elettrica, tutte le funzioni della macchina ven-
gono automaticamente escluse.
- Sul display (41 Fig. F), quando sul sim-
bolo batteria si accendono i segmenti in
sequenza, indica che il caricabatterie sta
caricando le batterie.
- Quando tutti i segmenti nel simbolo bat-
teria sono accesi a luce ssa, il ciclo di
carica delle batterie è terminato.
- Scollegare la spina del cavo caricabat-
terie (40) dalla rete elettrica e inserirlo
nell’apposito alloggiamento (38).
- Abbassare con cautela il serbatoio acqua
di recupero (11).
6 -
6.1 - DESCRIZIONE COMANDI
MACCHINA
6.1.a - Pannello comandi (Fig. F)
(29) Chiave avviamento
- Ruotata in senso orario “ON” inserisce
tensione ai circuiti abilitando il funziona-
mento della macchina.
- Ruotata in senso antiorario “OFF” toglie
tensione ai circuiti ed è in posizione di
estrazione.
(30) Pulsanti regolazione velocità
massima
È possibile regolare la velocità massima di
avanzamento tramite i pulsanti (30a) “
” e (30b) “ ”.
- Premendo completamente il pedale acce-
leratore (7) la velocità sarà proporzionata
al valore massimo impostato.
- Quando sul display (41) tutti i simboli ve-
locità “ ” sono chiari il pedale accele-
ratore (7) è inibito e la macchina rimane
ferma.
(31) Pulsanti di direzione marcia
- Premendo il pulsante avanti (31a) “
” la macchina procede con marcia avanti;
sul display si visualizza l’icona “ ”.
- Premendo il pulsante indietro (31b) “
” la macchina procede in retromarcia e si
inserisce il cicalino di retromarcia; sul di-
splay si visualizza l’icona “ ”.
NOTA:
La velocità massima in retromarcia è impo-
stabile come la marcia in avanzamento tra-
mite i pulsanti (30).
49029600_Manuale RACER_RANGER_8ed_04-2023.indd 749029600_Manuale RACER_RANGER_8ed_04-2023.indd 7 06/04/2023 14:59:0706/04/2023 14:59:07

www.ghibliwirbel.com
Professional Cleaning Machines Since 1968
ITALIANO - 8
(41) Display
- Vedere al capitolo specico.
(42) Pulsante “Ready to go”
- Premendo il pulsante (42) sul display si
visualizza l’icona “ ” e si avviano ad
una impostazione standard le seguenti
funzioni:
• Abbassamento della testata e rotazio-
ne delle spazzole.
• Abbassamento del tergitore e avvio
dell’impianto di aspirazione.
• Velocità di lavoro = 3^ tacca (3,6 km/h).
• Flusso acqua = 3^ tacca.
• Agente chimico = 3^ tacca (1%).
• Aspirazione = normale (100%).
• Pressione spazzole = normale.
- Con questa funzione standard attivata è
possibile premere qualsiasi pulsante di la-
voro per ogni modica o regolazione.
Se necessario, quando è stata impostata
una modica sulle funzioni di lavoro, è pos-
sibile memorizzarla operando come indicato
di seguito:
- Premere e mantenere premuto per 3 se-
condi il pulsante (42); la conferma della
memorizzazione è indicata sul display
(41) dal lampeggio “UPLOADED”.
- Per disattivare il nuovo settaggio e ritor-
nare ai valori standard delle impostazio-
ni, premere nuovamente e mantenere
premuto per 3 secondi il pulsante (42); la
conferma è indicata sul display (41) dal
lampeggio “RESET”.
(43) Pulsante ECO
- In fase di lavoro, premendo il pulsante
(43) sul display si visualizza l’icona “
”, i parametri di acqua, agente chimico,
aspirazione e pressione testata assumo-
no i seguenti valori:
• Flusso acqua = 3^ tacca.
• Agente chimico = 3^ tacca (1%).
• Aspirazione = silenziosa (50%).
• Pressione spazzole a terra = normale.
(44) Pulsante aspiratore
- Premendo il pulsante (44) si avvia l’aspi-
ratore e sul display si visualizza l’icona “
” e, se è inserita la marcia avanti o se
la macchina è in folle, il tergitore si abbas-
sa.
- Premendo di nuovo il pulsante (44) l’aspi-
ratore si ferma e il tergitore si solleva.
- Con macchina ferma, tergitore abbassato
e chiave (29) in posizione “ON” dopo un
periodo di tempo di inattività il tergitore si
solleverà automaticamente.
(45) Pulsante funzionamento
silenzioso
- Premendo il pulsante (45) si riduce la velo-
cità della turbina di aspirazione riducendo
sensibilmente il rumore che la macchina
emette; con funzione abilitata sul display
si visualizza l’icona “ ”.
- Ripremendo il pulsante (45) si disabilita
la funzione e la macchina riprende a fun-
zionare in modo standard, sul display si
spegne l’icona “ ” e si visualizza l’icona
“ ”.
NOTA:
Spegnendo la turbina di aspirazione con la
modalità “funzionamento silenzioso” abili-
tata, il funzionamento della turbina stessa
si commuterà automaticamente in modalità
“funzionamento standard” per tutto il tempo
di ritardo di spegnimento.
(46) Pulsante spazzole
- Premendo il pulsante (46) si abbassa la
testata spazzole e sul display si visualizza
l’icona “ ”.
- Le spazzole iniziano a ruotare quando si
preme il pedale acceleratore, si fermano
quando il pedale acceleratore è sollevato.
49029600_Manuale RACER_RANGER_8ed_04-2023.indd 849029600_Manuale RACER_RANGER_8ed_04-2023.indd 8 06/04/2023 14:59:2306/04/2023 14:59:23

www.ghibliwirbel.com
Professional Cleaning Machines Since 1968
ITALIANO - 9
NOTA:
Le spazzole ruotano sia con la marcia avanti
che con la retromarcia e con regolazione ve-
locità (30) a “0”.
- Con macchina ferma, testata abbassata
e spazzole ferme con chiave (29) in po-
sizione “ON” dopo un periodo di tempo di
inattività la testata si solleverà automati-
camente.
- Se si preme il pulsante (46) con spazzo-
le in rotazione, le spazzole si fermano, la
testata spazzole si solleva e si spegne l’i-
cona “ ” sul display.
(47) Pulsante extra pressione
spazzole
Con testata spazzole abbassata è possibile
regolare la pressione delle spazzole a terra.
- Premendo il pulsante (47) si attiva l’extra
pressione; con funzione abilitata sul di-
splay si visualizza l’icona “ ”.
- Ripremendo il pulsante (47) la pressione
a terra ritorna normale e sul display si vi-
sualizza l’icona “ ”.
NOTA:
Ogni volta che la testata spazzole sale (posi-
zione di riposo), si disattiva anche la funzio-
ne extra pressione.
NOTA:
La funzione extra pressione è dotata di un
sistema di sicurezza che rileva automatica-
mente un eccessivo assorbimento di corren-
te dei motori spazzole ed è in grado di varia-
re automaticamente la pressione spazzole a
terra portandola nella posizione più idonea.
(48) Pulsante dosatore agente
chimico (se presente)
- Premere il pulsante (48) sul display si
visualizza l’icona “ ”, e si predispone il
dosaggio dell’agente chimico. Il funziona-
mento della pompa di dosaggio è coman-
dato dal pedale acceleratore premuto.
- Premendo ripetutamente il pulsante (48)
si aumenta la quantità di agente chimico;
arrivando alla quantità massima visualiz-
zata sul display dall’icona “ ”. Ripremen-
do il pulsante (48) si disattiva la funzione
e si spegne l’icona sul display.
NOTA:
In caso di svuotamento dell’impianto di do-
saggio agente chimico, dopo aver sostituito
la tanica, tenere e mantenere premuto per
almeno 5 secondi il pulsante (48) per attiva-
re la procedura di spurgo aria della durata di
circa 40 secondi; tale funzione si attiva solo
con macchina ferma, chiave (29) in posizio-
ne “ON” e con regolazione velocità (30) a “0”.
(49) Pulsante erogazione acqua
- Premendo il pulsante (49), sul display
si visualizza l’icona “ ” e si predispone
l’apertura dell’elettrovalvola acqua. Il fun-
zionamento della stessa è comandato dal
pedale acceleratore premuto.
- Premendo ripetutamente il pulsante (49)
si aumenta la quantità di acqua; arrivan-
do alla quantità massima, visualizzata
sul display dall’icona “ ”. Ripremendo il
pulsante (49) si disattiva la funzione e si
spegne l’icona sul display.
(50)
Pulsante avvisatore acustico
(51) Pulsante girofaro
49029600_Manuale RACER_RANGER_8ed_04-2023.indd 949029600_Manuale RACER_RANGER_8ed_04-2023.indd 9 06/04/2023 14:59:4006/04/2023 14:59:40

www.ghibliwirbel.com
Professional Cleaning Machines Since 1968
ITALIANO - 10
(52) Pulsante luce di lavoro
6.1.b - Pedale acceleratore (Fig. A)
- Premendo il pedale acceleratore (7), la
macchina si muove in avanti o indietro,
a seconda di quale pulsante di direzione
marcia è stato premuto.
- La velocità è regolabile con la maggiore o
minore pressione sul pedale acceleratore.
- Rilasciando il pedale acceleratore (7) la
macchina rallenta no a fermarsi. Dopo
qualche secondo con macchina ferma
si inserisce automaticamente il freno di
stazionamento; tale freno si disinserisce
premendo il pedale acceleratore (7) con
marcia avanti o indietro inserita.
7 -
7.1 - DISPLAY (Fig. F)
A macchina accesa, sul display (41) si visua-
lizzano le seguenti icone:
Batteria
Indica lo stato di carica delle batterie:
Batterie cariche
Batterie scariche
Velocità massima di avanza-
mento
Con i pulsanti (30a) “ ” e (30b) “ ”
s’imposta la velocità massima raggiungibile
dalla macchina con il pedale acceleratore (7)
completamente premuto:
km/h - 0 1,2 2,4 3,6 4,8 6,0
Direzione marcia
La freccia direzione marcia indica la funzione
di avanzamento selezionata tramite i pulsanti
(31a) “ ” e (31b) “ ”.
“Ready to go”
Si visualizza sul display quando si preme il
pulsante (42) “ ”.
Modalità ECO
Si visualizza sul display quando si preme il
pulsante (43) “ ”.
Aspiratore funzionante
Si visualizza sul display quando si preme il
pulsante (44) “ ” indicando che l’aspira-
tore è acceso e il tergitore abbassato.
Funzionamento silenzioso
Con aspiratore acceso.
Si visualizza sul display quando si preme il
pulsante (45) “ ” indicando che l’aspira-
tore funziona con un regime di giri ridotto.
Predisposizione rotazione
spazzola
Si visualizza sul display quando si preme il
pulsante (46) “ ” indicando che è abilitata
la rotazione della spazzola.
49029600_Manuale RACER_RANGER_8ed_04-2023.indd 1049029600_Manuale RACER_RANGER_8ed_04-2023.indd 10 06/04/2023 15:00:0406/04/2023 15:00:04

www.ghibliwirbel.com
Professional Cleaning Machines Since 1968
ITALIANO - 11
Extrapressione
Si visualizza sul display indicando la pressio-
ne di lavoro delle spazzole. Premere il pul-
sante (47) “ ” per cambiare la pressione
di lavoro.
Dosatore detergente (se
presente)
Si visualizza sul display quando si preme il
pulsante (48) “ ”.
Premere il pulsante per incrementare o dimi-
nuire la percentuale di detergente dosato:
0,2% 0,5% 1% 2% 3%
Predisposizione erogazione
acqua
Si visualizza sul display quando si preme il
pulsante (49) “ ” indicando che è abilitata
l’elettrovalvola di erogazione acqua.
Quando il livello dell’acqua nel serbatoio è al
minimo, si visualizza a tutto schermo l’icona
“ ” abbinata all’avviso acustico.
Riempire il serbatoio dell’acqua (13) come
indicato nel paragrafo specico, quindi spe-
gnere e riavviare la macchina
Assenza operatore sul sedile
di guida
Questa icona si visualizza quando l’operato-
re non è correttamente seduto sul sedile di
guida e blocca tutte le funzioni della macchi-
na.
Massimo livello liquido nel
serbatoio di recupero
Si visualizza quando il liquido nel serbatoio
di recupero ha raggiunto il livello massimo.
Pedale acceleratore premuto
Questa icona si visualizza all’avviamento
della macchina indicando una sequenza
errata di operazione di avvio, per eliminare
l’allarme inserito rilasciare il pedale accele-
ratore (7 Fig. A).
8 -
8.1 - EMERGENZA
Il pulsante di emergenza (5 Fig. A) è situa-
to in una posizione facilmente accessibile
all’operatore. Deve essere premuto con de-
cisione in caso di immediata necessità per
arrestare la macchina in ogni sua funzione.
Per riattivare la funzionalità della macchina
tirare il pulsante di emergenza fino allo scatto
e ripristino dello stesso.
AVVERTENZA:
Premere il pulsante di emergenza (5)
con macchina accesa solo in caso di
reale necessità, non utilizzare questo
procedimento per spegnere la mac-
china, potrebbe causare guasti anche
seri alla stessa.
9 -
9.1 - DISPOSITIVI DI
SICUREZZA (Fig. A)
La macchina è dotata delle seguenti sicurez-
ze:
Sensore presenza operatore (4)
Blocca tutte le funzioni della macchina quan-
do l’operatore non è presente al posto di gui-
da.
Sicurezza anti sbandata
Riduce ove necessario la velocità durante
le sterzate e in caso di inclinazione laterale
della macchina ad un valore di sicurezza per
evitare sbandate improvvise e accrescere la
stabilità della macchina in ogni condizione.
Freno elettromagnetico
È integrato nella ruota anteriore (23) e man-
tiene frenata la macchina quando è spenta e,
in ogni caso, a macchina ferma.
10 -
49029600_Manuale RACER_RANGER_8ed_04-2023.indd 1149029600_Manuale RACER_RANGER_8ed_04-2023.indd 11 06/04/2023 15:00:1906/04/2023 15:00:19

www.ghibliwirbel.com
Professional Cleaning Machines Since 1968
ITALIANO - 12
10.1 - RIEMPIMENTO
SERBATOIO (Fig. D)
AVVERTENZA:
Introdurre nel serbatoio acqua pulita
di rete con temperatura non superio-
re a 50°C.
- Tramite il tubo estraibile (52) introdurre
acqua nel serbatoio (13) no al riempi-
mento dello stesso.
- Non riempire completamente il serbatoio,
utilizzare come riferimento il tubo di livello
(18).
- Oppure se disponibile, aprire il tappo (14)
e utilizzare la presa acquastop (53, se
presente).
AVVERTENZA:
Controllare visivamente sempre il li-
vello di riempimento per non rischia-
re di bagnare il pavimento.
- Alla ne del riempimento del serbatoio
chiudere il tappo (14).
NOTA:
Per le macchine senza kit chimico, riempire il
serbatoio (13) con acqua pulita e miscelarla
con detergente chimico.
Attenersi sempre alle istruzioni di diluizione
riportate sull’etichetta della confezione del
prodotto chimico usato per comporre la so-
luzione detergente.
10.2 - TANICA DETERGENTE
CHIMICO (se presente) (Fig. E)
NOTA:
Utilizzare solo detergenti non schiumosi, per
la quantità attenersi alle istruzioni del produt-
tore del detergente e al tipo di sporco.
- Sollevare il serbatoio di recupero (11).
- Controllare che nella tanica (54) vi sia il
prodotto necessario per la giornata lavo-
rativa.
In caso di sostituzione della tanica agire
come segue:
- Rimuovere il tappo (55) estrarre la tanica
(54) e inserire una nuova tanica da 5 litri
quindi inserire il tappo (55) con il tubetto
di aspirazione.
PERICOLO:
In caso di contatto del detergente con
occhi e pelle o in caso di ingerimento
fare riferimento alla scheda di sicu-
rezza e di impiego del produttore del
detergente.
NOTA:
Le taniche (54) da utilizzare sono del tipo
standard da 5 litri che si trovano in commer-
cio.
- Abbassare con cautela il serbatoio acqua
di recupero (11).
- Eseguire lo spurgo aria (vedere procedu-
ra alla voce “Pulsante dosatore agente
chimico”).
11 -
11.1 - FUNZIONAMENTO
(Fig. A-F)
11.1.a - Controlli prima dell’uso
- Controllare che il tubo (15) di scarico del
serbatoio di recupero sia correttamente
agganciato e correttamente tappato.
- Controllare che il tubo (16) di aspirazione
acqua del tergitore sia correttamente in-
serito nel serbatoio di recupero.
- Controllare che il raccordo (37) posto sul
tergitore (20) non sia ostruito e che il tubo
(16) sia correttamente collegato.
- Controllare lo stato di carica delle batterie,
ruotando la chiave (29) su “ON” e l’indica-
zione di carica sul display (41).
11.1.b - Preparazione macchina e
scelta ciclo
- Sedersi al posto di guida.
- La macchina ha la possibilità di eettuare
4 cicli di lavoro:
49029600_Manuale RACER_RANGER_8ed_04-2023.indd 1249029600_Manuale RACER_RANGER_8ed_04-2023.indd 12 06/04/2023 15:00:2106/04/2023 15:00:21

www.ghibliwirbel.com
Professional Cleaning Machines Since 1968
ITALIANO - 13
Ciclo di lavaggio, spazzolatura,
asciugatura:
- Premere il pulsante “Ready to go” (42) “
” per predisporre all’erogazione del
detergente, della rotazione spazzole e av-
vio aspiratore.
Ciclo solo asciugatura:
- Per eettuare solo il ciclo di asciugatura
premere il pulsante (44) “ ”, si avvia
l’aspiratore.
Ciclo solo spazzolatura:
- Per eettuare solo il ciclo di spazzolatura
premere il pulsante (46) “ ”, si predi-
spone la rotazione delle spazzole.
- La rotazione delle spazzole si avvia quan-
do la macchina, con acceleratore (7)
premuto, inizia a muoversi in avanti o in-
dietro, oppure con acceleratore premuto
e impostazione della velocità di avanza-
mento su “0”.
Ciclo lavaggio, spazzolatura:
- Premere il pulsante (46) “ ” per predi-
sporre la rotazione delle spazzole e pre-
mere il pulsante (49) “ ” per predispor-
re l’erogazione dell’acqua.
- La rotazione delle spazzole e l’erogazione
dell’acqua si avviano quando si preme il
pedale acceleratore con marcia avanti o
indietro, oppure con impostazione della
velocità di avanzamento almeno sulla 1a
tacca.
11.1.c - Uso della macchina
PERICOLO:
Prestare la massima attenzione
nell’utilizzo della macchina su rampe,
in modo da evitare il ribaltamento o
situazioni che possano rendere pre-
caria la stabilità della macchina stes-
sa.
PERICOLO:
Evitare brusche sterzate ed effettuare
sterzate con volante completamente
ruotato solo a bassa velocità, tenen-
do comunque conto delle condizioni
del suolo.
- Ruotare la chiave (29) su “ON”; nei primi
2 secondi dall’accensione, il display (41)
indica la tipologia di batterie installate e le
ore di lavoro macchina.
- Scegliere il tipo di ciclo di lavoro da ese-
guire.
- Inserire la velocità di lavoro desiderata
agendo sui pulsanti (30).
- Azionare il girofaro (10, opzionale) e la
luce di lavoro (9, opzionale).
- Iniziare le operazioni di pulizia agendo
sull’acceleratore (7).
NOTA:
Rilasciando l’acceleratore la rotazione delle
spazzole e l’erogazione dell’acqua si ferma-
no.
NOTA:
La corretta pulizia e asciugatura del pavi-
mento si effettua procedendo con la mac-
china in avanti, procedendo con la macchina
in retromarcia il tergitore si solleva e non si
ha l’aspirazione dell’acqua presente nel pa-
vimento.
- Eventualmente regolare la quantità di so-
luzione di lavaggio tramite il pulsante (49)
“ ”.
- Controllare lo stato di carica delle batterie
tramite il display (41).
49029600_Manuale RACER_RANGER_8ed_04-2023.indd 1349029600_Manuale RACER_RANGER_8ed_04-2023.indd 13 06/04/2023 15:00:2306/04/2023 15:00:23

www.ghibliwirbel.com
Professional Cleaning Machines Since 1968
ITALIANO - 14
11.1.d - Fine uso e spegnimento
- Alla ne delle operazioni di pulizia fermare
in sequenza la rotazione delle spazzole e
l’aspiratore, agendo sui relativi comandi
in funzione al tipo di ciclo utilizzato.
- Ruotare la chiave (29) su “OFF”.
- Il freno di stazionamento si inserisce au-
tomaticamente.
- Svuotare e lavare il serbatoio di recupero
e il serbatoio della soluzione come indica-
to nei relativi paragra.
NOTA:
Quando l’operatore scende dalla macchina
si inserisce automaticamente il freno di sta-
zionamento.
PERICOLO:
È vietato parcheggiare la macchina in
rampa.
12 -
12.1 - SCARICO ACQUA DI
RECUPERO (Fig. H)
PERICOLO:
Assicurarsi che il serbatoio dell’ac-
qua di recupero (11) sia vuoto prima
di sollevarlo.
Alla ne del ciclo di lavaggio oppure quando
il serbatoio (11) dell’acqua di recupero risulta
pieno è necessario svuotarlo agendo come
segue:
NOTA:
Per lo smaltimento dell’acqua di recupero at-
tenersi alle norme vigenti nel paese di utiliz-
zo della macchina.
- Posizionarsi con la macchina vicino a una
piletta di scarico.
- Staccare il tubo (15) dagli appositi aggan-
ci, abbassarlo a terra sulla piletta di sca-
rico.
- Svitare il tappo (56) e scaricare completa-
mente l’acqua di recupero contenuta nel
serbatoio.
NOTA:
E’ possibile modulare la quantità di acqua
che fuoriesce premendo la parte finale del
tubo (15).
- Riavvitare il tappo (56) e riposizionare il
tubo (15) sul relativo supporto.
13 -
13.1 - MANUTENZIONE E
PULIZIA
AVVERTENZA:
Per le informazioni e le avvertenze
relative alle operazioni di manuten-
zione o pulizia attenersi a quanto in-
dicato nel libretto “AVVERTENZE DI
SICUREZZA PER LAVASCIUGA PA-
VIMENTI” allegato al presente.
13.2 - OPERAZIONI DA
EFFETTUARE OGNI GIORNO
13.2.a - Svuotamento e pulizia ser-
batoio acqua pulita (Fig. I)
AVVERTENZA:
Alla fine delle operazioni di lavag-
gio è obbligatorio scaricare e pulire
il serbatoio dell’acqua pulita (13) per
evitare depositi o incrostazioni.
Dopo aver scaricato il serbatoio dell’acqua
di recupero, scaricare il serbatoio dell’acqua
pulita (13) agendo come segue:
- Posizionarsi con la macchina su una pilet-
ta di scarico.
- Staccare il tubo (17) dagli appositi aggan-
ci, abbassarlo a terra sulla piletta di scari-
co, svitare il tappo (57) e lasciare scarica-
re completamente l’acqua.
49029600_Manuale RACER_RANGER_8ed_04-2023.indd 1449029600_Manuale RACER_RANGER_8ed_04-2023.indd 14 06/04/2023 15:00:2306/04/2023 15:00:23

www.ghibliwirbel.com
Professional Cleaning Machines Since 1968
ITALIANO - 15
- Lavare l’interno del serbatoio lasciando il
tubo di scarico aperto e introducendo ac-
qua pulita dall’apertura superiore.
- Alla ne della pulizia sollevare il tubo (17),
riavvitare il tappo (57) ad agganciare il
tubo negli appositi incastri.
13.2.b - Pulizia serbatoio acqua di
recupero (Fig. J)
AVVERTENZA:
Alla fine delle operazioni di lavag-
gio è obbligatorio pulire il serbatoio
dell’acqua di recupero per evitare de-
positi o incrostazioni ed il proliferare
di batteri, odori e muffe.
- Sollevare il coperchio (12).
- Rimuovere la vaschetta per raccolta detriti
(58) e aprire il suo coperchio, quindi pulire
con acqua corrente, togliendo eventuali
pezzi di carta, legno ecc... che lo ostrui-
scono.
- Rimuovere e pulire il ltro di aspirazione
(59) con acqua corrente.
- Lasciando il tubo di scarico (15 Fig. H)
abbassato e il tappo rimosso, introdurre
acqua dall’apertura superiore (60), quin-
di risciacquare l’interno del serbatoio no
a che dal tubo di scarico fuoriesce acqua
pulita.
- Rimontare il tutto procedendo in senso
inverso.
13.2.c - Pulizia tergitore (Fig. K)
Per eettuare una corretta pulizia del tergi-
tore (20) è necessario rimuoverlo agendo
come segue:
- Staccare il tubo (16 Fig. C) dal tergitore
(20).
- Allentare i pomelli (36 Fig. C) e rimuovere
il tergitore (20).
- Lavare il tergitore e in particolar modo le
gomme (60) e (61), quindi l’interno del
raccordo di aspirazione (62).
NOTA:
Se durante il lavaggio si nota che le gomme
(60) e (61) si presentano rovinate o usurate
è necessario sostituirle o girarle.
- Rimontare il tutto procedendo in senso
inverso.
13.3 - OPERAZIONI DA
EFFETTUARE OGNI 3 MESI
13.3.a - Controllo stato di usura
catena sterzo (Fig. L)
- Controllare lo stato di usura e di corrosio-
ne della catena (63) posta sotto la mac-
china nei pressi della ruota anteriore.
- Se la catena si presenta con tracce di cor-
rosione è necessario sostituirla rivolgen-
dosi al servizio di assistenza tecnica.
13.4 - OPERAZIONI DA
EFFETTUARE SECONDO
NECESSITÀ
13.4.a - Sostituzione spazzole (Fig.
M)
Si rende necessaria la sostituzione delle
spazzole quando le stesse si presentano
usurate con lunghezza setole inferiore a 2
cm oppure vanno sostituite in funzione al tipo
di pavimento da lavare; per la sostituzione,
agire come segue:
- Inlare una mano sotto la testata porta-
spazzole (19), per sganciare la spazzola
(32) ruotarla con un colpo secco nel sen-
so contrario alla rotazione.
- Posizionare sotto il gruppo portaspazzole
(19) le nuove spazzole.
- Sedersi al posto di guida, ruotare la chia-
ve (29 Fig. F) in posizione “ON”.
- Posizionare la velocità di avanzamento
sul valore “0”.
49029600_Manuale RACER_RANGER_8ed_04-2023.indd 1549029600_Manuale RACER_RANGER_8ed_04-2023.indd 15 06/04/2023 15:00:2306/04/2023 15:00:23

www.ghibliwirbel.com
Professional Cleaning Machines Since 1968
ITALIANO - 16
- Premere il pulsante (46 Fig. F) “ ”
per abilitare la rotazione delle spazzole; il
gruppo spazzole si abbassa.
- Premendo il pedale acceleratore (7 Fig.
A), le ange portaspazzole iniziano a ruo-
tare agganciando le spazzole, quindi rila-
sciare il pedale.
- Ripremere il pulsante (46 Fig. F) “ ” e
ruotare la chiave (29 Fig. F) in posizione
“OFF”.
13.4.b - Regolazione della gomma
paraspruzzi (Fig. M)
A seconda del tipo di pavimento da trattare o
dopo la sostituzione delle spazzole a disco,
potrebbe essere necessaria la regolazione
dell’altezza della gomma paraspruzzi (64).
Per la sua regolazione agire come segue:
- Ruotare la chiave (29 Fig. F) in posizione
“ON”.
- Premere il pulsante (46 Fig. F) “ ” per
abbassare la testata spazzole (19), quindi
ruotare la chiave (29 Fig. F) su “OFF”.
- Vericare la corretta altezza della gomma
paraspruzzi come indicato in gura M.
- Se necessario, agire manualmente sulla
gomma per ripristinare la corretta altezza.
NOTA:
La corretta altezza della gomma paraspruzzi
è quando, durante il funzionamento e la te-
stata spazzole è abbassata, la gomma stes-
sa è a lo pavimento.
- A ne regolazione riaccendere la macchi-
na e premere il pulsante (46 Fig. F) “
”, quindi ruotare la chiave (29 Fig. F) su
“OFF”.
13.4.c - Sostituzione gomme tergito-
re (Fig. K)
Quando si nota che l’asciugatura del pavi-
mento risulta difficoltosa o che nel pavimento
rimangono alcune tracce di acqua è neces-
sario controllare lo stato di usura delle gom-
me del gruppo tergitore (20):
- Rimuovere il gruppo tergitore (20) come
indicato nel paragrafo “Pulizia tergitore”.
- Premere il fermo (65) ed aprire la maniglia
a ripresa (66).
- Rimuovere le due barrette di fermo gom-
ma (67) e rimuovere la gomma esterna
(60).
- Allentare le due manopole (68) e rimuo-
vere la barra di fermo (69) e la gomma
interna (61).
NOTA:
Quando le gomme (60) o (61) sono usura-
te da un lato, per una volta, possono essere
capovolte.
- Sostituire o capovolgere le gomme (60) o
(61) senza invertirle.
- Rimontare il tutto procedendo in senso
inverso.
NOTA:
È possibile avere due tipi di gomme:
Gomme in para per tutti i tipi di pavimento e
gomme in poliuretano per pavimenti di offici-
ne meccaniche, sporchi di olio.
13.4.d - Regolazione incidenza tergi-
tore (Fig. N)
- Avviare la macchina e premere il pulsante
(44 Fig. F) “ ”.
- Portare la velocità massima sulla 1^ tacca
con i pulsanti (30 Fig. F), premere il pe-
dale acceleratore (7 Fig. A) e spostarsi di
qualche metro, quindi spegnere e scende-
re dalla macchina.
49029600_Manuale RACER_RANGER_8ed_04-2023.indd 1649029600_Manuale RACER_RANGER_8ed_04-2023.indd 16 06/04/2023 15:00:2306/04/2023 15:00:23

www.ghibliwirbel.com
Professional Cleaning Machines Since 1968
ITALIANO - 17
Agire sulla manopola (70) per regolare l’in-
cidenza che le racle (60) e (61) hanno con
il pavimento, ruotando in senso orario si ha
una maggiore incidenza viceversa si ha una
minore incidenza.
NOTA:
L’incidenza corretta è quando durante il fun-
zionamento non ci sono tralamenti di liquido
sul pavimento e la racla ha una incidenza co-
stante su tutta la sua lunghezza.
13.4.e - Regolazione pressione del
tergitore (Fig. O)
A seconda del tipo di pavimento da trattare o
dopo la sostituzione delle gomme tergitore,
potrebbe essere necessaria la regolazione
della pressione a pavimento del tergitore.
Per la sua regolazione agire come segue:
- Sollevare il serbatoio acqua di recupero
(11) assicurandosi che sia vuoto.
- Agire sulla vite di regolazione (71) tenen-
do conto che:
• Ruotando in senso orario si diminuisce
la pressione a pavimento del tergitore.
• Ruotando in senso antiorario si au-
menta la pressione a pavimento del
tergitore.
- A ne regolazione abbassare con cautela
il serbatoio acqua di recupero (11).
13.4.f - Pulizia ltro acqua pulita
(Fig. P)
- Accertarsi che il serbatoio (13 Fig. A) sia
vuoto.
- Rimuovere il tappo (22) ed estrarre la car-
tuccia ltro (72).
- Pulire la cartuccia ltro (72) con acqua
corrente.
- Rimontare il tutto procedendo in senso
inverso facendo attenzione che la guarni-
zione (73) sia posizionata correttamente.
13.4.g - Rubinetto scarico vano bat-
terie (Fig. A)
- Controllare periodicamente che nel vano
alloggiamento batterie non ci siano rista-
gni di acqua.
- Se necessario, posizionarsi con la mac-
china vicino a una piletta di scarico, sgan-
ciare la tubazione e aprire il rubinetto (74),
quindi scaricare i liquidi.
AVVERTENZA:
Ove previsto l’utilizzo di batterie al
piombo-acido, prestare la massima
attenzione sull’eventuale fuoruscita
di liquido dalle batterie stesse, ai ri-
schi annessi e alle normative per lo
smaltimento di liquidi/sostanze peri-
colose.
13.4.h - Controllo stato di usura del-
le tre ruote (Fig. A)
- Controllare periodicamente lo stato di
usura delle tre ruote (8) e (23); se si pre-
sentano usurate o rovinate è necessario
sostituirle rivolgendosi al servizio di assi-
stenza tecnica.
PERICOLO:
Procedere con le ruote usurate o
rovinate comporta un pericolo per
l’operatore in quanto la macchina
potrebbe avere una ridotta tenuta di
strada in curva.
14 -
49029600_Manuale RACER_RANGER_8ed_04-2023.indd 1749029600_Manuale RACER_RANGER_8ed_04-2023.indd 17 06/04/2023 15:00:2306/04/2023 15:00:23

www.ghibliwirbel.com
Professional Cleaning Machines Since 1968
ITALIANO - 18
14.1 - IMPOSTAZIONE
PARAMETRI (Fig. F)
14.1.a - Parametri OPERATORE
L’operatore ha la possibilità di accedere al
menù per impostare i seguenti parametri:
• Lingua
• Tipo di batterie
• Display - Contrasto
• Display - Luminosità
Per accedere al menù agire come segue:
- Premere e mantenere premuti i pulsanti
(31a) “ ” e (31b) “ ”, quindi ruo-
tare la chiave di accensione (29) su “ON”
per visualizzare la seguente videata:
General
General
Sets
Sets
--ID Check--
--ID Check--
insert password:
insert password:
0
0
000
000
General Sets Congurazioni generali
ID Check Controllo
Insert password Inserire password
- Rilasciare i pulsanti premuti.
- Inserire la Password a 4 cifre “0010” pre-
mendo i pulsanti (30a) “ ” o (30b) “
” per cambiare il numero della cifra
lampeggiante.
- Premere il pulsante (43) “ ” per con-
fermare e passare alla cifra successiva,
inne per confermare la password ed en-
trare nella lista dei parametri.
- Premere il pulsante (31a) “ ” o (31b) “
” per scorrere nelle seguenti videate:
General
General
Language
Language
Main
Main
selection:
selection:
ITA
ITA
General Main Congurazione principale
Language selection Selezione lingua
General
General
Battery
Battery
Main
Main
Type:
Type:
GEL
GEL
General Main Congurazione principale
Battery Type Selezione tipo di batteria
General
General
Display
Display
min:0
min:0
max:50
max:50
Main
Main
Tune:
Tune:
15
15
General Main Congurazione principale
Display Tune Contrasto display
General
General
Display
Display
min:0
min:0
max:10
max:10
Main
Main
Brightness:
Brightness:
0
0
General Main Congurazione principale
Display Brightness Luminosità display
49029600_Manuale RACER_RANGER_8ed_04-2023.indd 1849029600_Manuale RACER_RANGER_8ed_04-2023.indd 18 06/04/2023 15:00:3406/04/2023 15:00:34

www.ghibliwirbel.com
Professional Cleaning Machines Since 1968
ITALIANO - 19
Impostazione lingua:
General
General
Language
Language
Main
Main
selection:
selection:
ITA
ITA
General Main Congurazione principale
Language selection Selezione lingua
- Scegliere la lingua agendo sui pulsanti
(30a) “ ” o (30b) “ ”, quindi preme-
re il pulsante (43) “ ” per confermare
la scelta;
-ITA = Italiano
-ENG = Inglese
Impostazione tipo di batteria:
General
General
Battery
Battery
Main
Main
Type:
Type:
GEL
GEL
General Main Congurazione principale
Battery Type Selezione tipo di batteria
- Scegliere il tipo di batteria agendo sui pul-
santi (30a) “ ” o (30b) “ ”, quindi
premere il pulsante (43) “ ” per con-
fermare la scelta;
-GEL = Batteria a Gel
-AGM = Batteria AGM
-WET = Batteria ad ACIDO
Impostazione display - Contrasto:
General
General
Display
Display
min:0
min:0
max:50
max:50
Main
Main
Tune:
Tune:
15
15
General Main Congurazione principale
Display Tune Contrasto display
- Scegliere il tipo di contrasto del display
impostando un valore da “0 a 50” agendo
sui pulsanti (30a) “ ” o (30b) “ ”,
quindi premere il pulsante (43) “ ” per
confermare la scelta.
Impostazione display - Luminosità:
General
General
Display
Display
min:0
min:0
max:10
max:10
Main
Main
Brightness:
Brightness:
0
0
General Main Congurazione principale
Display Brightness Luminosità display
- Scegliere il tipo di luminosità del display
impostando un valore da “0 a 10” agendo
sui pulsanti (30a) “ ” o (30b) “ ”,
quindi premere il pulsante (43) “ ” per
confermare la scelta.
NOTA:
Alla conferma della impostazione scelta, la
macchina si riavvia e il display (41) si accen-
de nella modalità operativa di lavoro.
15 -
49029600_Manuale RACER_RANGER_8ed_04-2023.indd 1949029600_Manuale RACER_RANGER_8ed_04-2023.indd 19 06/04/2023 15:00:3406/04/2023 15:00:34

www.ghibliwirbel.com
Professional Cleaning Machines Since 1968
ITALIANO - 20
15.1 - CONTROLLO/SOSTITUZIONE DEI FUSIBILI
NOTA:
Tutti i circuiti elettrici della macchina sono protetti da dispositivi elettronici autoripristinanti, i
fusibili di sicurezza intervengono solamente in caso di guasto grave.
Si raccomanda pertanto di fare eseguire una eventuale sostituzione dei fusibili solamente da
personale qualificato.
16 -
16.1 - ALLARMI DURANTE IL FUNZIONAMENTO (Fig. F)
Quando si presenta un malfunzionamento della macchina, sul display (41) appare il tipo di
allarme come da elenco sotto riportato.
Consultare l’elenco ed eseguire la soluzione consigliata per ripristinare il corretto funziona-
mento della macchina.
Se i rimedi consigliati non dovessero avere un buon esito, contattare il Servizio di Assistenza
Tecnica.
ALLARME SIGNIFICATO SOLUZIONE
AL_1: General Errore memoria Riavviare la macchina.
AL_2: General Anomalia chiave Spegnere la macchina per almeno 10 secondi, poi
riaccendere.
AL_3: General Sottotensione
Spegnere la macchina, controllare lo stato di
carica della batteria, i fusibili, i contatti, i cablaggi
e le connessioni e riavviare la macchina.
AL_4: General Sovratensione
Spegnere la macchina, controllare, i fusibili, i
contatti, i cablaggi e le connessioni e riavviare la
macchina.
AL_6: General Assenza di comunicazio-
ne con cruscotto comandi
o display
Spegnere la macchina, controllare i contatti, i
cablaggi e le connessioni e riavviare la macchina.
AL_7: General Comunicazione ffm
Spegnere la macchina, controllare i contatti, i
cablaggi e le connessioni con modulo comunica-
zione e funzionamento di quest’ultimo e riavviare
la macchina.
AL_8: General Comunicazione
Interna 1 e 2 Riavviare la macchina.
AL_9: General
AL_10: General Inserire tag Visualizzazione Chiave “Tag” mancante: inserire
chiave.
AL_11: General Tag invalido Visualizzazione Chiave “Tag” errata: cambiare
chiave o chiave danneggiata.
AL_12: General Aggiornamento
in corso…
Visualizzazione aggiornamento parametri da
remoto in corso: attendere ne aggiornamento.
49029600_Manuale RACER_RANGER_8ed_04-2023.indd 2049029600_Manuale RACER_RANGER_8ed_04-2023.indd 20 06/04/2023 15:00:3406/04/2023 15:00:34

www.ghibliwirbel.com
Professional Cleaning Machines Since 1968
ITALIANO - 21
ALLARME SIGNIFICATO SOLUZIONE
AL_13: General Spegnere Visualizzazione aggiornamento parametri comple-
tato: riavviare macchina.
AL_41: Function Sovratemperatura
Spegnere e lasciar raffreddare la macchina.
Controllare gli assorbimenti dei motori spazzole
ed aspiratore, lo stato di ventilazione dell’ambien-
te e riavviare.
AL_42: Function Potenza danneggiata Spegnere la macchina per almeno 10 secondi, poi
riaccendere.
AL_44: Function Relè guasto
Mancata chiusura del Relè/Teleruttore.
Vericare funzionamento Teleruttore. In caso di
relè a bordo, se persiste sostituire scheda.
AL_45: Function Relè guasto cc
Rilevato Relè/Teleruttore chiuso all’accensione.
Vericare lo stato dei contatti Teleruttore. In caso
di relè a bordo, se persiste sostituire scheda.
AL_46: Function Sovracorrente
Spazzole
Spegnere la macchina, vericare il carico (moto-
re), la meccanica, il cablaggio e le connessioni, e
cercare la presenza di un corto circuito sull’uscita,
inne riavviare.
AL_47: Function Sovracorrente
Aspiratore
Spegnere la macchina, vericare il carico (moto-
re), la meccanica, il cablaggio e le connessioni, e
cercare la presenza di un corto circuito sull’uscita,
inne riavviare.
AL_48: Function Sovracorrente
Pompa acqua
Spegnere la macchina, vericare il carico (moto-
re), la meccanica, il cablaggio e le connessioni, e
cercare la presenza di un corto circuito sull’uscita,
inne riavviare.
AL_49: Function Amperometrica
Spazzola 1 e 2
Vericare consumo e modalità impiego della
funzione spazzole e riavviare la macchina.
AL_50: Function
AL_52: Function Amperometrica
Aspiratore 1
Vericare consumo della funzione aspiratore e
riavviare la macchina.
AL_54: Function Connessione
Spazzola 1 e 2 Vericare connessione motori spazzola.
AL_55: Function
AL_57: Function Connessione
Aspiratore 1 Vericare connessione motore aspiratore.
AL_59: Function Sbilanciamento Vericare assorbimenti motori spazzola
AL_61: Function Amperometrica
Attuatore spazzole
Vericare consumo motore attuatore e stato della
meccanica movimentata.
AL_62: Function Sovracorrente
Attuatore spazzole
Spegnere la macchina, vericare il carico (moto-
re), la meccanica, il cablaggio e le connessioni, e
cercare la presenza di un corto circuito sull’uscita.
49029600_Manuale RACER_RANGER_8ed_04-2023.indd 2149029600_Manuale RACER_RANGER_8ed_04-2023.indd 21 06/04/2023 15:00:3406/04/2023 15:00:34

www.ghibliwirbel.com
Professional Cleaning Machines Since 1968
ITALIANO - 22
ALLARME SIGNIFICATO SOLUZIONE
AL_63: Function Finecorsa
Attuatore spazzole
Vericare connessioni / stato necorsa. Controllo
attivo solo per versione BTO.
AL_65: Function Amperometrica
Attuatore tergitore
Vericare consumo motore attuatore e stato della
meccanica movimentata.
AL_66: Function Sovracorrente
Attuatore tergitore
Spegnere la macchina, vericare il carico (moto-
re), la meccanica, il cablaggio e le connessioni, e
cercare la presenza di un corto circuito sull’uscita.
AL_80: Traction Sovratemperatura
Motore Trazione
Spegnere e lasciar raffreddare la macchina.
Vericare consumo e modalità impiego della
trazione, lo stato di ventilazione dell’ambiente e
riavviare.
AL_85: Traction Sovracorrente
Motore Trazione
Spegnere la macchina, vericare il carico (moto-
re), la meccanica, il cablaggio e le connessioni, e
cercare la presenza di un corto circuito sull’uscita,
inne riavviare.
AL_86: Traction Amperometrica
Motore Trazione
Vericare consumo e modalità impiego della
funzione trazione e riavviare la macchina.
AL_87: Traction Lettura Motore Trazione Riavviare la macchina.
AL_88: Traction Anomalia Elettrofreno Spegnere la macchina, vericare il cablaggio del
freno, e riaccendere.
AL_89: Traction Guasto
Pedale Acceleratore
Spegnere la macchina, vericare connessioni e
cablaggio, e riaccendere.
AL_90: Traction Pedale Acceleratore
Premuto Rilasciare il pedale e riaccendere la macchina.
AL_91: Traction Guasto Encoder Spegnere la macchina, vericare connessioni e
cablaggio e riaccendere.
17 -
49029600_Manuale RACER_RANGER_8ed_04-2023.indd 2249029600_Manuale RACER_RANGER_8ed_04-2023.indd 22 06/04/2023 15:00:3406/04/2023 15:00:34

www.ghibliwirbel.com
Professional Cleaning Machines Since 1968
ITALIANO - 23
17.1 - RICERCA GUASTI
PROBLEMA CAUSA RIMEDIO
Ruotando la chiave la mac-
china non si avvia.
Batteria scarica. Controllare lo stato di carica
della batteria.
Fusibile generale bruciato. Sostituire il fusibile posiziona-
to sul cavo batteria. (*)
Chiave difettosa. Sostituire la chiave. (*)
Spazzola non ruota. Motore guasto. Sostituire il motore. (*)
Scheda guasta. Sostituire la scheda. (*)
Aspiratore non funziona. Serbatoio di recupero pieno. Svuotare il serbatoio.
Motore turbina guasto. Sostituire il motore. (*)
Scheda guasta. Sostituire la scheda. (*)
La macchina non asciuga o
non asciuga bene lasciando
tracce di acqua nel pavimen-
to.
Aspiratore spento. Avviare l’aspiratore.
Tubo di aspirazione intasato. Controllare e eventualmente
pulire il tubo di aspirazione
che collega il tergitore al ser-
batoio di recupero.
Serbatoio di recupero pieno. Svuotare il serbatoio di recu-
pero.
Gomme tergitore usurate. Capovolgere o sostituire le
gomme tergitore.
Non fuoriesce acqua. Serbatoio vuoto. Riempire il serbatoio.
Filtro intasato. Pulire il filtro.
Elettrovalvola pompa non
funzionante.
Sostituire l’elettrovalvola. (*)
Pompa acqua difettosa. Sostituire la pompa acqua. (*)
Scheda guasta. Sostituire la scheda. (*)
La macchina non si muove in
condizioni di lavoro.
Operatore non seduto corret-
tamente al posto di guida.
Sedersi correttamente sul se-
dile.
Motoruota difettosa. Sostituire la motoruota. (*)
Scheda guasta. Sostituire la scheda. (*)
Sensore presenza operatore
guasto.
Sostituire il sensore. (*)
49029600_Manuale RACER_RANGER_8ed_04-2023.indd 2349029600_Manuale RACER_RANGER_8ed_04-2023.indd 23 06/04/2023 15:00:3406/04/2023 15:00:34

www.ghibliwirbel.com
Professional Cleaning Machines Since 1968
ITALIANO - 24
PROBLEMA CAUSA RIMEDIO
Pulizia pavimento insucien-
te.
Spazzole o detergente inade-
guati.
Usare spazzole o detergenti
adatte al tipo di pavimento o
di sporco da pulire.
Spazzole consumate. Sostituire le spazzole.
Sul display l’icona “ ” eroga-
zione acqua continua a lam-
peggiare.
Serbatoio vuoto. Riempire il serbatoio.
Rubinetto chiuso. Aprire il rubinetto.
Flussometro guasto. Sostituire il flussometro. (*)
Nel vano batterie è presente
del ristagno di acqua.
Sensore di livello del serbato-
io di recupero guasto.
Scaricare l’acqua presente
nel vano batterie con l’appo-
sita tubazione e rubinetto.
Controllare o sostituire il sen-
sore di livello. (*)
(*) Chiamare il servizio di assistenza per la sostituzione.
18 -
18.1 - DEMOLIZIONE DELLA MACCHINA
PERICOLO:
Le batterie e le parti elettriche sono considerati rifiuti speciali e quindi devo
essere smaltite in appositi centri di raccolta come indicato dalle normative in
vigore nel paese di utilizzo.
19 -
49029600_Manuale RACER_RANGER_8ed_04-2023.indd 2449029600_Manuale RACER_RANGER_8ed_04-2023.indd 24 06/04/2023 15:00:3506/04/2023 15:00:35

www.ghibliwirbel.com
Professional Cleaning Machines Since 1968
ITALIANO - 25
19.1 - SCHEMA ELETTRICO
Legenda:
AC Acceleratore
BAT Batterie
BC Caricabatterie
BE Girofaro (opzionale)
BRK Freno elettromagnetico
C1 Connettore batterie
EB1 Scheda funzioni
EB2 Display
EB3 Pannello comandi
EV Elettrovalvola
F1 Fusibile caricabatterie (1A)
F2 Fusibile luce di lavoro (se presente) (3A)
F3 Fusibile clacson (1A)
F4 Fusibile girofaro (se presente) (1A)
F5 Fusibile elettrovalvola (5A)
F6 Fusibile attuatore testata spazzole (10A)
F7 Fusibile attuatore tergitore (10A)
F8 Fusibile elettrofreno (7.5A)
F9 Fusibile pompa acqua (5A)
F10 Fusibile pompa chem (se presente) (5A)
F11 Fusibile motore aspirazione (40A)
F12 Fusibile motore spazzola destra (40A)
F13 Fusibile motore spazzola sinistra (40A)
F14 Fusibile motore trazione (100A)
HN Clacson
KEY Chiave accensione
L1 Luce di lavoro (opzionale)
MA Motore aspirazione
MAS Motore attuatore testata spazzole
MAT Motore attuatore tergirore
MS-DX Motore spazzola destra
MS-SX Motore spazzola sinistra
MT Motore trazione
PA Pompa acqua
PC Pompa chimico
PE Pulsante emergenza
S1 Sensore livello acqua recupero
SW1 Microinterruttore sedile
TE Teleruttore esterno
Codici colore:
BK Nero
BU Azzurro
BN Marrone
GN Verde
GY Grigio
OG Arancione
PK Rosa
RD Rosso
VT Viola
WT Bianco
YE Giallo
49029600_Manuale RACER_RANGER_8ed_04-2023.indd 2549029600_Manuale RACER_RANGER_8ed_04-2023.indd 25 06/04/2023 15:00:3506/04/2023 15:00:35

www.ghibliwirbel.com
Professional Cleaning Machines Since 1968
ITALIANO - 26
PA MT PC EV
- +
-
-
-
-
+ -+ -+
+
+
+
MA MS MS
DX SX
C1
BC
TE
EB2
EB3
KEY
L1
BE
F4
F1
F2
F8
F9 F14 F10 F5 F11 F12 F13
F7
F6
F3
BRK
AC
M
SW1
M5
J8
4 3
2 1
4 3
2 1
1
4
2
5
3
6
9
1
10
2
11
3
4
1
5
2
6
3
4
1
5
2
6
3
4
1
5
2
6
3
12
4
4
8
1
2
3
7
2
6
1
5
3
6
2
5
1
1
12
3s
+
-
2
1
1
2
3
4
2 3
123
456 4
1
11
2
12
3
13
4
14
5
15
6
16
7
17
8
18
9
19
10
20
4
9
3
8
5
10
2
7
1
6
13
5
16
8
15
7
14
6
2
1
J9 J10 J11
J1
J8 J7
J2
S1
J3 J4 J5 J7J6
J12 J13 J14
M6
USB
HN
BATBAT MATMAT
PEPE
MASMAS
EB1
49029600_Manuale RACER_RANGER_8ed_04-2023.indd 2649029600_Manuale RACER_RANGER_8ed_04-2023.indd 26 06/04/2023 15:00:3706/04/2023 15:00:37

www.ghibliwirbel.com
Professional Cleaning Machines Since 1968
ENGLISH - 1
Dear Customer,
Thank you for choosing one of our cleaning products.
The floor scrubber dryer that you have purchased has been designed to satisfy the user
in terms of ease of use and reliability over time.
We are aware that in order for a good product to stay that way, over time, it requires
continuous updates aimed at meeting the expectations of those who use it on a daily
basis. For this reason, we hope that you will not only be a satisfied customer but also a
partner who does not hesitate to give us your opinions and ideas originating from your
personal day-to-day experience.
49029600_Manuale RACER_RANGER_8ed_04-2023.indd 149029600_Manuale RACER_RANGER_8ed_04-2023.indd 1 06/04/2023 15:01:3506/04/2023 15:01:35

www.ghibliwirbel.com
Professional Cleaning Machines Since 1968
ENGLISH - 2
INDEX
INDEX ............................................................................................................................................. 2
TECHNICAL DATA ......................................................................................................................... 3
1.1 - INTRODUCTION .................................................................................................................. 5
1.1.a - Operator position .......................................................................................................... 5
1.1.b - General warnings while using the machine .................................................................. 5
1.2 - NON-INTENDED MACHINE USE........................................................................................ 5
2.1 - GETTING TO KNOW THE MACHINE (Fig. A) .................................................................... 5
3.1 - UNPACKING (Fig. B) .......................................................................................................... 5
3.1.a - Battery installation (Fig. A) ............................................................................................ 6
3.1.b - Unloading the machine from the wooden pallet (Fig. B) ............................................... 6
4.1 - ASSEMBLY COMPONENTS ............................................................................................... 6
4.1.a - Squeegee installation (Fig. C) ...................................................................................... 6
4.1.b - Brushes installation ...................................................................................................... 6
5.1 - CHARGING THE BATTERY ............................................................................................... 6
5.1.a - Charging the battery with an external battery charger (Fig. G) .................................... 7
5.1.b - Battery charging with on-board battery charger (if present) (Fig. G) ............................ 7
6.1 - MACHINE CONTROLS ....................................................................................................... 7
6.1.a - Control panel (Fig. F) .................................................................................................... 7
6.1.b - Accelerator pedal (Fig. A) ........................................................................................... 10
7.1 - DISPLAY (Fig. F) ............................................................................................................... 10
8.1 - EMERGENCY .................................................................................................................... 11
9.1 - SAFETY DEVICES (Fig. A) ............................................................................................... 11
10.1 - FILLING THE TANK (Fig. D) ............................................................................................ 12
10.2 - DETERGENT CHEMICAL TANK (if present) (Fig. E) ...................................................... 12
11.1 - OPERATION (Fig. A-F)...................................................................................................... 12
11.1.a - Checks before use ...................................................................................................... 12
11.1.b - Preparing the machine and choosing the cycle .......................................................... 12
11.1.c - Using the machine ...................................................................................................... 13
11.1.d - End of use and shutdown ........................................................................................... 14
12.1 - DRAINING THE RECOVERY WATER (Fig. H) ................................................................. 14
13.1 - MAINTENANCE AND CLEANING ....................................................................................14
13.2 - OPERATIONS TO PERFORM DAILY ............................................................................... 14
13.2.a - Emptying and cleaning the clean water tank (Fig. I) ................................................... 14
13.2.b - Cleaning the recovery water tank (Fig. J) ................................................................... 15
13.2.c - Squeegee cleaning (Fig. K) ........................................................................................ 15
13.3 - OPERATIONS TO BE PERFORMED EVERY 3 MONTHS ...............................................15
13.3.a - Check the wear status of the steering chain (Fig. L) .................................................. 15
13.4 - OPERATIONS TO PERFORM WHEN NECESSARY ........................................................15
13.4.a - Brushes replacement (Fig. M) .................................................................................... 15
13.4.b - Splash guard rubber adjustment (Fig. M) ................................................................... 16
13.4.c - Replacing the squeegee rubber blades (Fig. K) ......................................................... 16
13.4.d - Squeegee incidence adjustment (Fig. N) ................................................................... 16
13.4.e - Squeegee pressure adjustment (Fig. O) .................................................................... 17
13.4.f - Cleaning the clean water lter (Fig. P) ....................................................................... 17
13.4.g - Battery compartment drain tap (Fig. A) ....................................................................... 17
13.4.h - Checking the wear status of the three wheels (Fig. A) ............................................... 17
14.1 - PARAMETER SETTING (Fig. F) ....................................................................................... 18
14.1.a - OPERATOR parameters ............................................................................................. 18
15.1 - FUSE CHECK/REPLACEMENT........................................................................................ 20
16.1 - ALARMS DURING THE FUNCTIONING (Fig. F).............................................................. 20
17.1 - TROUBLESHOOTING ....................................................................................................... 23
18.1 - DEMOLITION OF THE MACHINE .................................................................................... 24
19.1 - WIRING DIAGRAM ........................................................................................................... 25
49029600_Manuale RACER_RANGER_8ed_04-2023.indd 249029600_Manuale RACER_RANGER_8ed_04-2023.indd 2 06/04/2023 15:01:3606/04/2023 15:01:36

www.ghibliwirbel.com
Professional Cleaning Machines Since 1968
ENGLISH - 3
TECHNICAL DATA
RACER R 85 RANGER R 115
FD 65 FD 75 FD 75 FD 85
Driving type Ride-on
Features
Operation and Supply Battery 24 V
Type of batteries
N° 2 - 12V 105Ah (C5) N° 4 - 6V 240Ah (C5)
N° 4 - 6V 180Ah (C5) N° 1 - 24V 320Ah (C5)
N° 1 - 24V 100Ah (Li) N° 1 - 24V 150Ah (Li)
Installed power 2160 W 2210 W
Running time
2 h (105Ah C5) 5 h (240Ah C5)
4 h (180Ah C5) 7 h (320Ah C5)
2 h (100Ah Li) 3 h (150Ah Li)
Advancement Forward / reverse drive
Washing track width 650 mm 750 mm 750 mm 850 mm
Suction width 850 mm 950 mm 950 mm 1050 mm
Productivity theoretical 4000 m2/h 4500 m2/h 4500 m2/h 5000 m2/h
Productivity practical 2400 m2/h 2700 m2/h 2700 m2/h 3000 m2/h
Hand-arm vibration system (ISO 5349-1) < 2,5 m/s2
Whole body vibration (ISO 2631-1) < 0,5 m/s2
Sound pressure (ISO 11203) (LpA) 63 dB(A)
Sound pressure in silent mode (LpA) 57 dB(A)
IP code IPX3
Brushes
Diameter / pad / number 330 mm /
13” / 2
380 mm /
15” / 2
380 mm /
15” / 2
430 mm /
17” / 2
Motor power / number 500 W / 2
Brush speed 165 rpm
Specific pressure 30 gr/cm221 gr/cm221 gr/cm217 gr/cm2
Specific pressure (extra pressure) 46 gr/cm232 gr/cm243 gr/cm234 gr/cm2
49029600_Manuale RACER_RANGER_8ed_04-2023.indd 349029600_Manuale RACER_RANGER_8ed_04-2023.indd 3 06/04/2023 15:01:3606/04/2023 15:01:36

www.ghibliwirbel.com
Professional Cleaning Machines Since 1968
ENGLISH - 4
RACER R 85 RANGER R 115
FD 65 FD 75 FD 75 FD 85
Traction
Maximum slope of use during work 2 %
Maximum slope when empty (*) 12 %
Drive motor power 600 W
Maximum forward speed 6 km/h
Suction
Motor power 550 W
Depression (water column) 125 mbar / 1250 mmH2O
Air flow 30 l/sec
Tank
Typology Double tank
Solution capacity 80 l 110 l
Recovery capacity 85 l 115 l
Dimensions
Machine dimensions
(length x width x height) 1375 x 705 x 1230 mm 1470 x 770 x 1365 mm
Machine width - Brushes deck 715 mm 785 mm 785 mm 890 mm
Machine width - squeegee 885 mm 950 mm 950 mm 1055 mm
Battery compartment dimensions
(length x width x height) 380 x 540 x 310 mm 380 x 625 x 440 mm
Weight
Empty weight 213 kg 246 kg
Weight with Gel 12V 105Ah batteries 285 kg -
Weight with Gel 6V 180Ah batteries 333 kg -
Weight with Lithium 24V 100Ah battery 249 kg -
Weight with Gel 6V 240Ah batteries - 432 kg
Weight with Pb Wet 24V 320Ah battery - 506 kg
Weight with Lithium 24V 150Ah battery - 288 kg
Gross vehicle weight (GVW) 490 kg 691 kg
(*) The machine was tested under the following conditions:
• Standard battery
• Empty tanks
• Raw concrete ramp
• Ramp length 15 m
• 75 kg of operator
1 -
49029600_Manuale RACER_RANGER_9ed_09-2023.indd 449029600_Manuale RACER_RANGER_9ed_09-2023.indd 4 04/09/2023 14:51:0704/09/2023 14:51:07

www.ghibliwirbel.com
Professional Cleaning Machines Since 1968
ENGLISH - 5
1.1 - INTRODUCTION
NOTE:
The numbers and the figure references
shown in brackets refer to the components
indicated in the annexed illustrative sheet.
DANGER:
Before using the machine carefully
read the “SAFETY WARNINGS FOR
FLOORS WASHER-DRYER” manual
annexed to this one and the additions
indicated below.
1.1.a - Operator position
The operator, during the machine use is sit-
ting on the seat with his hands on the steer-
ing wheel.
1.1.b - General warnings while us-
ing the machine
- DO NOT leave the machine unattended
on inclined surfaces.
- It is absolutely forbidden to turn while on
ramps; danger of tipping/overturning.
- Avoid using the machine in environments
where there is a risk of falling objects.
1.2 - NON-INTENDED
MACHINE USE
- Do not operate the machine with the re-
covery tank open.
- Hands and feet must be kept on board
while the machine is in motion.
- Do not make sudden turns, especially dur-
ing downhill movements.
WARNING:
Only ONE PERSON at a time is to be
permitted on board the machine.
2 -
2.1 - GETTING TO KNOW THE
MACHINE (Fig. A)
(1) Steering-wheel
(2) Dashboard
(3) Seat
(4) Operator presence sensor
(5) EMERGENCY push-button, to stop im-
mediately all functions
(6) Foot rest
(7) Accelerator pedal
(8) Rear wheels
(9) Operating light (optional)
(10) Flashing light (optional)
(11) Recovery water tank
(12) Recovery water tank cover
(13) Clean water tank
(14) Plug
(15) Recovery water drain hose
(16) Squeegee water aspiration hose
(17) Clean water drain hose
(18) Clean water tank level tube
(19) Brushes deck
(20) Squeegee
(21) Document compartment
(22) Water lter
(23) Traction and directional wheel
(24) Squeegee support hook
(25) Recovery tank support peg
3 -
3.1 - UNPACKING (Fig. B)
Once the packaging has been removed as
indicated in the instruction sheet on the pack-
aging itself, check the integrity of the ma-
chine and all the components supplied.
If any obvious damage is found, contact your
local dealer and carrier within 3 days of re-
ceipt.
- Remove the envelope and boxes (26)
containing the supplied accessories:
• (20) Squeegee.
• (32) N ° 2 brushes.
- Lift the tank unit and take the documenta-
tion from the appropriate envelope:
• (33) Machine use and maintenance
manual.
• (34) Battery charger instruction manual
(if present).
49029600_Manuale RACER_RANGER_8ed_04-2023.indd 549029600_Manuale RACER_RANGER_8ed_04-2023.indd 5 06/04/2023 15:01:3806/04/2023 15:01:38

www.ghibliwirbel.com
Professional Cleaning Machines Since 1968
ENGLISH - 6
3.1.a - Battery installation (Fig. A)
- Lift the recovery tank carefully (11).
- Depending on the conguration (4 6 V
batteries, 2 12 V batteries, 1 package of
24 batteries), position and connect the
batteries as shown in gure, using the ca-
bles and plugs provided.
- Lower the recovery water tank carefully
(11).
NOTE:
The batteries must be installed and connect-
ed by qualified personnel.
3.1.b - Unloading the machine from
the wooden pallet (Fig. B)
- Remove the wooden block (27) positioned
in front of the front wheel.
- Place the ramp (28) in front of the wooden
pallet as indicated in the instruction sheet
on the packaging.
- Sit on the seat (3) in driving position.
- Turn the key (29) on “ON”.
- Press the travel direction button (31a) “
” (forward travel), then press the ac-
celerator pedal (7) and step o the pallet
carefully.
4 -
4.1 - ASSEMBLY
COMPONENTS
4.1.a - Squeegee installation (Fig.
C)
- Insert the squeegee (20) into its support
plate (35) and fasten it by tightening the
two knobs (36).
- Connect the suction tube (16) to the
squeegee’s intake opening (37).
4.1.b - Brushes installation
- See procedure in the “13.4.a - Brushes re-
placement (Fig. M)” paragraph.
5 -
5.1 - CHARGING THE
BATTERY
DANGER:
Charge the batteries in rooms which
are well-ventilated and comply with
applicable regulations in the country
of use.
For safety-related information, follow
what is described in chapter 1 of this
manual.
WARNING:
For information and warnings about
the battery and on board battery
charger (if present) follow what is de-
scribed in the battery charger manual
enclosed with this document.
When the machine leaves the factory,
it is calibrated to operate with gel bat-
teries. If other types of batteries are
installed, see the paragraph “Param-
eter setting”.
The use of gel batteries with calibra-
tion for acid or other batteries is pro-
hibited.
(Only for without on-board battery
charger versions) The appliance
must only be supplied at SELV (safe-
ty extra-low voltage) external battery
chargers.
NOTE:
(For GEL batteries only) 10 hours are need-
ed for complete battery charging. Avoid par-
tial recharges.
(For lithium batteries only) It is possible to
recharge partial.
Charge the batteries at the end of each job or
at least when the battery symbol “ ” on
the display (41 Fig. F) starts ashing.
- Drive the machine to the battery charging
station.
49029600_Manuale RACER_RANGER_8ed_04-2023.indd 649029600_Manuale RACER_RANGER_8ed_04-2023.indd 6 06/04/2023 15:01:4106/04/2023 15:01:41

www.ghibliwirbel.com
Professional Cleaning Machines Since 1968
ENGLISH - 7
- Lift the recovery water tank (11) making
sure it is empty.
5.1.a - Charging the battery with
an external battery charger
(Fig. G)
- Check the function of the battery charger
consulting the corresponding Manual.
- The nominal voltage of the battery charg-
er must be equal to 24 V.
- Take connector (39) from the appropriate
housing (38) and connect it to the external
battery charger.
- Connect the battery charger to the electri-
cal network.
- When the recharging is nished, discon-
nect the battery charger from the network
and from connector (39).
- Lower the recovery water tank carefully
(11).
5.1.b - Battery charging with on-
board battery charger (if
present) (Fig. G)
- From the appropriate housing (38), take
and connect the plug of the battery charg-
er cable (40) to the electrical network (the
network voltage and frequency must be
the same as the corresponding values
of the battery charger, shown in the ma-
chine’s registration plate).
NOTE:
When the battery charger is connected to the
electrical mains, all machine functions are
automatically disabled.
- On the display (41 Fig. F), when the seg-
ments light up in sequence on the bat-
tery symbol , this means that the battery
charger is charging the batteries.
- When all the segments in the battery
symbol are lighted up steadily, the battery
charging cycle has ended.
- Disconnect the battery charger cable (40)
from the electrical network and insert it
into the appropriate housing (38).
- Lower the recovery water tank carefully
(11).
6 -
6.1 - MACHINE CONTROLS
6.1.a - Control panel (Fig. F)
(29) Ignition key
- Turned in a clockwise direction to “ON” it
powers the circuits, enabling machine op-
eration.
- Turned in an anti-clockwise direction to
“OFF” it disconnects power to the circuits
and can be removed.
(30) Buttons for maximum speed
adjustment
It is possible to adjust the maximum travel
speed using buttons (30a) “ ” and (30b)
“ ”.
- Pressing the accelerator pedal (7) com-
pletely, the speed will be adjusted propor-
tionally to the maximum set value.
- When all speed symbols “ ” are lighted
on the display (41), the accelerator pedal
(7) is inhibited and the machine remains
stopped.
(31) Travel direction buttons
- When the forward button (31a) “ ” is
pressed, the machine travels forward; the
icon “ ” shows up on the display.
- When the backward button (31b) “ ”
is pressed, the machine travels backward
and the backward motion buzzer is actu-
ated; the icon “ ” shows up on the dis-
play.
NOTE:
The maximum backward speed can be set,
as in the forward travel, with buttons (30).
49029600_Manuale RACER_RANGER_8ed_04-2023.indd 749029600_Manuale RACER_RANGER_8ed_04-2023.indd 7 06/04/2023 15:01:4806/04/2023 15:01:48

www.ghibliwirbel.com
Professional Cleaning Machines Since 1968
ENGLISH - 8
(41) Display
- See the specic chapter.
(42) “Ready to go” button
- Pressing the button (42) on the display,
the icon “ ” shows up and the follow-
ing functions are started according to a
standard setting:
• Lowering of the brushes deck and rota-
tion of the brushes.
• Lowering of the squeegee and starting
of the suction device.
• Work speed = 3^ notch (3,6 km/h).
• Water ow = 3^ notch.
• Chemical agent = 3^ notch (1%).
• Suction = normal (100%).
• Brushes pressure = normal.
- With this standard function activated it is
possible to press any work button for any
modication or adjustment.
If necessary, when a modication is set in the
work functions, it is possible to save it acting
as indicated below:
- Press and keep pressed the button (42)
for 3 seconds; the saving conrmation is
indicated on the display (41) by the ash-
ing of “UPLOADED”.
- To deactivate the new setting and return
to the standard setting values, press
again and keep pressed the button (42)
for 3 seconds; the conrmation is indicat-
ed on the display (41) by the ashing of
“RESET”.
(43) ECO button
- When pressing the button (43) on the
display in the work phase, the icon “ ”
shows up, the parameters of water, chem-
ical agent, suction and holder pressure
assume the following values:
• Water ow = 3^ notch.
• Chemical agent = 3^ notch (1%).
• Suction = silent (50%).
• Brushes pressure on the oor = nor-
mal.
(44) Suction button
- Pressing the button (44) the suction de-
vice turns on and the icon “ ” shows up
on the display and, if the forward gear is
engaged or if the machine is in neutral,
the squeegee lowers.
- Press the button (44) again and the suc-
tion will stop and the squeegee lifts.
- If the machine is still, the squeegee is low-
ered and the key (29) is on “ON” after a
certain period of inactivity the squeegee
will automatically lift.
(45) Silent operation button
- Pressing the button (45) reduces the
speed of the suction turbine, signicantly
reducing the noise emitted by the ma-
chine; with the function enabled, the “
icon appears on the display.
- Pressing the button (45) again disables
the function and the machine resumes op-
erating in standard mode, the “ ” icon
turns o and the “ ” icon appears on
the display.
NOTE:
When turning o the aspiration turbine with
“silent operation” mode enabled, the opera-
tion of the turbine will automatically switch
to “standard operation” mode for the entire
shut-o delay time.
(46) Brushes button
- Pressing the button (46), the brushes
deck lowers and the icon “ ” shows up
on the display.
- The brushes start rotating when the accel-
erator pedal is pressed, they stop when
the accelerator pedal is raised.
49029600_Manuale RACER_RANGER_8ed_04-2023.indd 849029600_Manuale RACER_RANGER_8ed_04-2023.indd 8 06/04/2023 15:01:5706/04/2023 15:01:57

www.ghibliwirbel.com
Professional Cleaning Machines Since 1968
ENGLISH - 9
NOTE:
The brushes rotate both in forward and re-
verse mode and with speed adjustment (30)
at “0”.
- When the machine is still, with the head
lowered, the brushes still and the key (29)
on “ON” position, after a certain period of
inactivity the head will automatically lift.
- If you press the button (46) while the
brushes are rotating, they’ll stop, the unit
lifts and the symbol “ ” on the display
turns o.
(47) Brushes extra pressure
button
With the brush deck lowered it is possible to
adjust the pressure of the brush on the oor.
- Pressing the button (47) activates the ex-
tra pressure; with the function enabled,
the icon “ ” shows up on the display.
- By pressing the button (47) again the
pressure on the oor returns to normal
and the icon “ ” shows up on the display.
NOTE:
Each time the brushes deck lifts (rest posi-
tion), the brushes pressure sets at the mini-
mum value.
NOTE:
The extra pressure function is equipped with
a safety system that automatically recog-
nises an excessive current absorption of the
brushes motors and it’s able to automatically
change the lowered brushes pressure taking
it to the most useful position.
(48) Chemical agent dosing but-
ton (if present)
- Pressing the button (48) the icon “ ”
shows up on the display, and the dosing of
the chemical agent is prepared. The dos-
ing pump operation is commanded by the
accelerator pedal pressed.
- Pressing the button (48) repeatedly, the
quantity of chemical agent increases; up
to the maximum quantity viewed on the
display of icon “ ”. By pressing the but-
ton (48) the function is deactivated and
the icon turns o on the display.
NOTE:
In case of emptying of the chemical agent
dosing system, after replacing the tank, hold
and hold the button (48) pressed for at least
5 seconds to activate the air purge proce-
dure lasting about 40 seconds; this function
is activated only with the machine stopped,
the key (29) in the “ON” position and with the
speed adjustment (30) at “0”.
(49) Water ow button
- Pressing the button (49), the icon “ ”
shows up on the display and the opening
of the water solenoid valve is prepared.
The operation of the same is commanded
by the accelerator pedal pressed.
- Repeatedly press the button (49) to in-
crease the water quantity; when the maxi-
mum quantity is reached, it’ll be shown on
the display by the icon “ ”. If the button
(49) is pressed again the function will be
disabled.
(50) Acoustic warning button
(51) Rotating ashing light but-
ton
49029600_Manuale RACER_RANGER_8ed_04-2023.indd 949029600_Manuale RACER_RANGER_8ed_04-2023.indd 9 06/04/2023 15:02:0706/04/2023 15:02:07

www.ghibliwirbel.com
Professional Cleaning Machines Since 1968
ENGLISH - 10
(52) Operating light button
6.1.b - Accelerator pedal (Fig. A)
- Pressing the accelerator pedal (7), the
machine moves either forward or back-
ward, according to the travel direction but-
ton that was pressed.
- The speed can be adjusted by a higher or
lower pressure on the accelerator pedal.
- Release the accelerator pedal (7) to slow
down the machine until it stops. After a
few seconds after the machine is still the
parking brake automatically activates; this
brake will be disabled when the accelera-
tor pedal (7) is pressed with forward or re-
verse motion on.
7 -
7.1 - DISPLAY (Fig. F)
With the machine running, the following
icons show up on the display (41):
Battery
Indicates the charge status of the batteries:
Battery charged
Battery discharged
Maximum advance speed
With buttons (30a) “ ” and (30b) “ ”
the maximum speed attainable by the ma-
chine is set with the accelerator pedal (7)
completely pressed:
km/h - 0 1,2 2,4 3,6 4,8 6,0
Travel direction
The travel direction arrow indicates the se-
lected advance function by acting on buttons
(31a) “ ” and (31b) “ ”.
“Ready to go”
It is viewed on the display when the button
(42) “ ” is pressed.
ECO mode
Is shown when the ECO function is active
through the button (43) “ ”.
Suction device working
Is viewed on the display when the button (44)
“” is pressed, indicating that the suction
device is on and the squeegee is low.
Silent operation
With the suction device on.
Is viewed on the display when the button (45)
“” is pressed, indicating that the suction
device is working with a reduced rotation re-
gime.
Preparation of brushes rota-
tion
Is viewed on the display when the button (46)
“” is pressed, indicating that the brush
rotation is enabled.
49029600_Manuale RACER_RANGER_8ed_04-2023.indd 1049029600_Manuale RACER_RANGER_8ed_04-2023.indd 10 06/04/2023 15:02:2506/04/2023 15:02:25

www.ghibliwirbel.com
Professional Cleaning Machines Since 1968
ENGLISH - 11
Extra-pressure
Is viewed on the display indicating the brush
operation pressure.
Press the button (47) “ ” to change the
work pressure.
Detergent dispenser (if pre-
sent)
Is viewed on the display when the button (48)
“ ” is pressed.
Press the button to increase or reduce the
percentage of detergent being dosed:
0,2% 0,5% 1% 2% 3%
Preparation of the water ow
Is viewed on the display when the button (49)
“” is pressed, indicating that the water
ow solenoid valve is enabled.
When the water level in the tank is at a mini-
mum, the icon “ ” is viewed in full screen
combined with the acoustic signal.
Replenish the water tank (13) as indicated
in the specic paragraph, then turn o and
restart the machine
Absence of the operator on
the driver’s seat
This icon warns when the operator is not cor-
rectly seated on the driver’s seat and blocks
all the machine functions.
Maximum liquid level in re-
covery tank
This displays when the uid in the recovery
tank has reached the maximum level.
Accelerator pedal pressed
This icon inserts when the machine starts
indicating a wrong starting operation se-
quence, to remove the alarm release the ac-
celerator pedal (7 Fig. A).
8 -
8.1 - EMERGENCY
The emergency button (5 Fig. A) is located in
an easily accessible position for the operator.
It must be rmly pressed in case of an im-
mediate need to stop the machine in all its
functions.
To reactivate the machine functionality, pull
the emergency button until it disengages and
resets.
WARNING:
Only press the emergency button (5)
with the machine running in case of a
real need, do not use this procedure
to stop the machine, this may cause
also serious faults in the same.
9 -
9.1 - SAFETY DEVICES (Fig. A)
The machine is equipped with the following
safety functions:
Operator presence sensor (4)
It blocks all the machine functions when the
operator is not present in the driving seat.
Anti-skid safety system
This system reduces the speed when turning
and when the machine tilts laterally to avoid
sudden skids, this increasing the machine
stability in any condition.
Electromagnetic brake
It is built-in the rear driving wheels (23) and
keeps the machine braked when the ma-
chine is off or stopped.
10 -
49029600_Manuale RACER_RANGER_8ed_04-2023.indd 1149029600_Manuale RACER_RANGER_8ed_04-2023.indd 11 06/04/2023 15:02:3606/04/2023 15:02:36

www.ghibliwirbel.com
Professional Cleaning Machines Since 1968
ENGLISH - 12
10.1 - FILLING THE TANK
(Fig. D)
WARNING:
Only add clean mains water to the
tank at a temperature no greater than
50°C.
- Using the extractable pipe (52) ll water
into the tank (13) until it is replenished.
- Do not ll the tank completely, use the
level tube (18) as a reference.
- Or, if available, open cap (14) and use the
waterstop intake (53, if present).
WARNING:
Always visually check the fill level to
avoid the risk of floor wetting.
- At the end of the tank replenishment close
the cap (14).
NOTE:
For machines without the chemical kit, ll the
tank (13) with clean water and mix it with the
chemical detergent.
Always follow the dilution instructions indi-
cated in the label of the chemical product
packaging, to prepare the detergent solution.
10.2 - DETERGENT CHEMICAL
TANK (if present) (Fig. E)
NOTE:
Use non-foamy detergents only. For the
quantities, follow the instructions provided by
the detergent manufacturer according to the
type of dirt.
- Raise the recovery tank (11).
- Check that in the tank (54) there’s the
product necessary for the working day.
In case of tank replacement work as indicate
below:
- Remove the cap (55), extract the tank (54)
and insert a new 5 litres one then insert
the cap (55) using the small suction pipe.
DANGER:
In case of contact of the detergent
with the eyes and skin, or in case of
ingestion, please refer to the safety
and application bulletin of the deter-
gent manufacturer.
NOTE:
The tanks (54) to use are the standard 5 li-
tres type which can be found on the market.
- Lower the recovery water tank carefully
(11).
- Carry out the air purge (see the procedure
on item “Chemical agent dosing button”).
11 -
11.1 - OPERATION (Fig. A-F)
11.1.a - Checks before use
- Check that the recovery tank’s drain-
age tube (15) is properly connected and
sealed.
- Check that the squeegee’s water suction-
ing tube (16) is properly inserted into the
recovery tank.
- Check that the coupling (37) on the
squeegee (20) is not obstructed and that
the tube (16) is properly connected.
- Check the charge status of the batteries
by turning the key (29) to its “ON” position
and checking the charge indication on the
display (41).
11.1.b - Preparing the machine and
choosing the cycle
- Sit on the driving position.
- The machine can perform 4 working cy-
cles:
49029600_Manuale RACER_RANGER_8ed_04-2023.indd 1249029600_Manuale RACER_RANGER_8ed_04-2023.indd 12 06/04/2023 15:02:3706/04/2023 15:02:37

www.ghibliwirbel.com
Professional Cleaning Machines Since 1968
ENGLISH - 13
Washing, brushing, drying cycle:
- Press the button “Ready to go” (42) “ ”
to prepare the detergent ow, the brushes
rotation and the start of the suction device.
Drying only cycle:
- To perform only the drying cycle press the
button (44) “ ”, the aspirator activates.
Brushing only cycle:
- To perform only the brushing cycle press
the button (46) “ ”, the brushes rota-
tion is prepared.
- Brushes rotation starts when the machine,
with the accelerator (7) pressed, starts
moving forward or backward, or with the
accelerator pressed and setting the for-
ward speed to “0”.
Washing, brushing cycle:
- Press the button (46) “ ” to prepare
brushes rotation and press the button (49)
“ ” to prepare water supply.
- The brush rotation and the water ow start
when the accelerator pedal is pressed
with the forward or backward gear, or with
the setting of the advance speed at least
on the 1st notch.
11.1.c - Using the machine
DANGER:
Be extremely careful when using the
machine on ramps in order to avoid
roll over or situations which may
cause the machine to lose its bal-
ance.
DANGER:
Avoid sudden sharp turns. Turn the
wheel from lock to lock only at low
speed, always considering ground
conditions.
- Turn the key (29) to “ON”; in the rst 2
second after turning on, the display (41)
indicates the type of batteries installed
and the machine work time.
- Select the type of work cycle to be fol-
lowed.
- Insert the desired work speed acting on
buttons (30).
- Activate the ashing light (10, optional)
and the work light (9, optional).
- Use the accelerator (7) to begin the clean-
ing operations.
NOTE:
Release the accelerator to stop the rotation
of the brushes and the dispensing of water.
NOTE:
Proper floor cleaning and drying is performed
by driving the machine forwards. When driv-
ing in reverse, the squeegee is raised and
the suction unit, for removing the water from
the floor, is deactivated.
- Adjust the washing solution quantity with
the button (49) “ ” if its necessary.
- Check the charge status of the batteries
on the display (41).
49029600_Manuale RACER_RANGER_8ed_04-2023.indd 1349029600_Manuale RACER_RANGER_8ed_04-2023.indd 13 06/04/2023 15:02:3806/04/2023 15:02:38

www.ghibliwirbel.com
Professional Cleaning Machines Since 1968
ENGLISH - 14
11.1.d - End of use and shutdown
- Once all of the cleaning operations have
been completed, shut o, in sequence,
the rotation of the brushes and the suction
unit, using the relative controls according
to the type of cycle being employed.
- Turn the key (29) to its “OFF” position.
- The parking brake automatically activates.
- Empty and wash out the recovery tank
and the solution tank as indicated in the
relative sections.
NOTE:
When the operator gets out of the machine
the parking brake automatically activates.
DANGER:
It is forbidden to park the machine on
ramps.
12 -
12.1 - DRAINING THE
RECOVERY WATER (Fig. H)
DANGER:
Before lifting the recovery water tank
(11) make sure it is empty.
At the end of the washing cycle or when the
recovery water tank (11) is full, it is necessary
to empty the tank by proceeding as follows:
NOTE:
To dispose of the recovery water, comply
with the standards in force in the country in
which the machine is used..
- Position the machine near to a drain out-
let.
- Detach the pipe (15) from its proper hook,
descending it to the oor over the dis-
charge drain.
- Unscrew the cap (56) and discharge com-
pletely the recovery water contained in the
tank.
NOTE:
The amount of water that comes out can be
modulated by pressing on the end of the tube
(15).
- Tighten the cap (56) and replace the pipe
(15) on its corresponding support.
13 -
13.1 - MAINTENANCE AND
CLEANING
WARNING:
For information and warnings related
to maintenance and cleaning opera-
tions please follow what is indicated
in the “SAFETY WARNINGS FOR
FLOORS WASHER-DRYER” annexed
to this one.
13.2 - OPERATIONS TO
PERFORM DAILY
13.2.a - Emptying and cleaning the
clean water tank (Fig. I)
WARNING:
At the end of the washing operations,
it is compulsory to drain and clean
the clean water tank (13) to prevent
deposits or scaling.
After draining the recovery water tank, drain
the clean water tank (13) as follows:
- Position the machine over a drain outlet.
- Remove the hose (17) from the holding
hooks and lay it down on the drain outlet;
remove the cap (57) and drain all the wa-
ter contained in the tank.
- Wash the inside of the tank, leaving the
drain hose open and adding clean water
through the top opening.
49029600_Manuale RACER_RANGER_8ed_04-2023.indd 1449029600_Manuale RACER_RANGER_8ed_04-2023.indd 14 06/04/2023 15:02:3806/04/2023 15:02:38

www.ghibliwirbel.com
Professional Cleaning Machines Since 1968
ENGLISH - 15
- Once nished cleaning, lift the tube (17),
close it with its appropriate cap (57) and
position it within its appropriate lodgings.
13.2.b - Cleaning the recovery water
tank (Fig. J)
WARNING:
At the end of the washing operations,
it is compulsory to clean the recov-
ery water tank to prevent deposits or
scaling and the proliferation of bacte-
ria, odours or mould.
- Lift the cover (12).
- Remove the dirt collection basket (58)
and open its cover, then clean with run-
ning water, also removing eventual pieces
of paper, wood, etc... that are clogging it.
- Remove and clean the suction lter (59)
with running water.
- Leaving the discharge pipe (15 Fig. H)
low and the cover removed, ll with water
through the upper opening (60), then ush
inside the tank until clean water ows out
of the discharge pipe.
- Reassemble all parts working in the re-
verse order.
13.2.c - Squeegee cleaning (Fig. K)
In order to clean the squeegee correctly (20),
it is necessary to remove it as follows:
- Disconnect the hose (16 Fig. C) from the
squeegee (20).
- Loosen the knobs (36 Fig. C) and remove
the squeegee (20).
- Wash the squeegee and in particular the
rubber blades (60) and the inside of the
aspiration connector (56).
NOTE:
SIf, during washing, it is clear that the rubber
blades (60) and (61) are damaged or worn,
it is necessary to replace them or turn them
over.
- Replace all the components in reverse
order.
13.3 - OPERATIONS TO BE
PERFORMED EVERY 3 MONTHS
13.3.a - Check the wear status of the
steering chain (Fig. L)
- Check the wear and corrosion status of
the chain (63) found beneath the machine
near the front wheel.
- If the chain appears corroded, it must be
replaced.
- Contact the technical assistance service.
13.4 - OPERATIONS TO
PERFORM WHEN NECESSARY
13.4.a - Brushes replacement (Fig.
M)
The brushes must be replaced whenever
they appear worn or whenever their bristles
are shorter than 2 cm. They must also be
replaced based on the type of ooring to be
cleaned; in order to replace them, perform
the following operations:
- Insert a hand beneath the brush support
unit (19). In order to detach the brush, turn
it quickly and forcefully in the opposite di-
rection from that in which it rotates during
normal function.
- Place the new brushes beneath the brush
support unit (19).
- Get into the driver’s seat and turn the key
(29 Fig. F) to its “ON” position.
- Position the advance speed on value “0”.
- Press the button (46 Fig. F) “ ” to en-
able the brush rotation; the brush group
descends.
- Pressing the accelerator pedal (7 Fig. A),
the brushes hub starts to rotate gripping
the brushes, then release the pedal.
- Press the button (46 Fig. F) again “ ”
and turn the key (29 Fig. F) to the position
“OFF”.
49029600_Manuale RACER_RANGER_8ed_04-2023.indd 1549029600_Manuale RACER_RANGER_8ed_04-2023.indd 15 06/04/2023 15:02:3806/04/2023 15:02:38

www.ghibliwirbel.com
Professional Cleaning Machines Since 1968
ENGLISH - 16
13.4.b - Splash guard rubber adjust-
ment (Fig. M)
Depending on the type of oor to be treat-
ed or after replacing the brushes, it may be
necessary to adjust the height of the splash
guard rubber (64).
To adjust it, act as follows:
- Turn the key (29 Fig. F) to the “ON” posi-
tion.
- Press the button (46 Fig. F) “ ”, to low-
er the brush head (19), then turn the key
(29 Fig. F) to “OFF”.
- Check the correct height of the splash
guard rubber as shown in the gure.
- If necessary, manually act on the splash
guard rubber to restore the correct height.
NOTE:
The correct height of the splash guard rub-
ber is when, during operation and the brush
head is lowered, the rubber itself is ush with
the oor.
- At the end of the adjustment, restart the
machine and press the button (46 Fig.
F) “ ”, then turn the key (29 Fig. F) to
“OFF”.
13.4.c - Replacing the squeegee rub-
ber blades (Fig. K)
When it becomes clear that drying the floor
is difficult or traces of water remain on the
floor, it is necessary to check the wear on the
squeegee rubber blades (20):
- Remove the squeegee unit (20) as in-
dicated in the “Cleaning the squeegee”
paragraph.
- Press the locking device (65) and open
the handle (66).
- Remove the two rubber mounting strips
(67) and remove the outer rubber (60).
- Loosen the two turnbuckles (68) and re-
move the locking bar (69) and the inside
rubber (61).
NOTE:
When the rubber blades (60) or (61) are worn
on one side, on one occasion they may be
turned over.
- Replace or turn over the rubber blades
(60) or (61) without inverting them.
- Replace all the components in reverse
order.
NOTE:
Two types of rubber are available:
Para rubber for all types of flooring and poly-
urethane rubber for workshop floors with oily
residues.
13.4.d - Squeegee incidence adjust-
ment (Fig. N)
- Start the machine and press the button
(44 Fig. F) “ ”.
- Adjust the speed to maximum on the 1^
notch with the buttons (30 Fig. F), press
the accelerator pedal (7 Fig. A) and step
away a few metres, then turn the machine
o and on again.
- Use the threaded bar (70) to adjust the
squeegee blades (60) and (61) contact
with the oor. Turn it clockwise for in-
creased contact and counter clockwise for
less contact.
NOTE:
When the squeegee is making proper con-
tact with the oor, there will be no streaking
on the oor during machine function and the
entire length of the squeegee will be in con-
tact with the oor.
49029600_Manuale RACER_RANGER_8ed_04-2023.indd 1649029600_Manuale RACER_RANGER_8ed_04-2023.indd 16 06/04/2023 15:02:3906/04/2023 15:02:39

www.ghibliwirbel.com
Professional Cleaning Machines Since 1968
ENGLISH - 17
13.4.e - Squeegee pressure adjust-
ment (Fig. O)
Depending on the type of oor to be
treated or after replacing the squee-
gee rubbers, it may be necessary to
adjust the squeegee oor pressure.
To adjust it, act as follows:
- Lift the recovery water tank (11) making
sure it is empty.
- Act on the adjustment screw (71) taking
into account that:
• Turning clockwise decreases the
squeegee oor pressure.
• Turning counterclockwise increases
the squeegee oor pressure.
- At the end of the adjustment, carefully
lower the recovery water tank (11).
13.4.f - Cleaning the clean water
lter (Fig. P)
- Make sure that the tank (13 Fig A) is emp-
ty.
- Remove the cap (22) and take out the l-
ter cartridge (72).
- Clean the lter cartridge (72) using run-
ning water.
- Reassemble everything proceeding in re-
verse making sure that the gasket (73) is
placed correctly.
13.4.g - Battery compartment drain
tap (Fig. A)
- Periodically check that there are no stag-
nations of water in the battery compart-
ment.
- If necessary, position the machine near a
drain, unhook the tube and open the tap
(74), then drain the liquids.
WARNING:
Where the use of lead-acid batteries
is foreseen, pay close attention to
any leakage of liquid from the batter-
ies themselves, the associated risks
and the regulations for the disposal
of liquids hazardous substances.
13.4.h - Checking the wear status of
the three wheels (Fig. A)
- Check the wear status of the three wheels
(8) and (23) periodically; if they appear
worn or damaged, contact a technical
service centre in order to have them re-
placed.
DANGER:
Operating the machine with worn or
damaged wheels poses a danger to
the operator as the machine could
have less traction when turning.
14 -
49029600_Manuale RACER_RANGER_8ed_04-2023.indd 1749029600_Manuale RACER_RANGER_8ed_04-2023.indd 17 06/04/2023 15:02:3906/04/2023 15:02:39

www.ghibliwirbel.com
Professional Cleaning Machines Since 1968
ENGLISH - 18
14.1 - PARAMETER SETTING
(Fig. F)
14.1.a - OPERATOR parameters
It is possible for the operator to have access
to the menu to set the following parameters:
• Language
• Type of batteries
• Display - Contrast
• Display - Luminosity
To have access to the menu act as follows:
Press and keep pressed the buttons (31a)
“” and (31b) “ ”, then turn the
start key (29) to “ON” to view the following
screens:
General
General
Sets
Sets
--ID Check--
--ID Check--
insert password:
insert password:
0
0
000
000
General Sets General Sets
ID Check Check
Insert password Insert password
- Release the buttons pressed.
- Insert the 4-digit Password “0010” press-
ing the buttons (30a) “ ” or (30b) “
” to change the number of the ashing
digit.
- Press the button (43) “ ” to conrm
and go to the next digit, to nally conrm
the password and have access to the pa-
rameters list.
- Press the button (31a) “ ” or (31b) “
” to scroll along the following screens:
General
General
Language
Language
Main
Main
selection:
selection:
ITA
ITA
General Main Principal congurations
Language selection Language selection
General
General
Battery
Battery
Main
Main
Type:
Type:
GEL
GEL
General Main Principal congurations
Battery Type Battery type selection
General
General
Display
Display
min:0
min:0
max:50
max:50
Main
Main
Tune:
Tune:
15
15
General Main Principal congurations
Display Tune Display contrast
General
General
Display
Display
min:0
min:0
max:10
max:10
Main
Main
Brightness:
Brightness:
0
0
General Main Principal congurations
Display Brightness Display brightness
49029600_Manuale RACER_RANGER_8ed_04-2023.indd 1849029600_Manuale RACER_RANGER_8ed_04-2023.indd 18 06/04/2023 15:02:4606/04/2023 15:02:46

www.ghibliwirbel.com
Professional Cleaning Machines Since 1968
ENGLISH - 19
Language setting:
General
General
Language
Language
Main
Main
selection:
selection:
ITA
ITA
General Main Principal congurations
Language selection Language selection
- Select the language acting on buttons
(30a) “ ” or (30b) “ ”, then press
the button (43) “ ” to conrm the se-
lection;
-ITA = Italian
-ENG = English
Setting the type of battery:
General
General
Battery
Battery
Main
Main
Type:
Type:
GEL
GEL
General Main Principal congurations
Battery Type Battery type selection
- Select the type of battery acting on but-
tons (30a) “ ” or (30b) “ ”, then
press the button (43) “ ” to conrm the
selection;
-GEL = Gel battery
-AGM = AGM battery
-WET = ACID battery
Display setting - Contrast:
General
General
Display
Display
min:0
min:0
max:50
max:50
Main
Main
Tune:
Tune:
15
15
General Main Principal congurations
Display Tune Display contrast
- Select the type of display contrast setting
a value from “0 to 50” acting on buttons
(30a) “ ” or (30b) “ ”, then press
the button (43) “ ” to conrm the se-
lection.
Display setting - Brightness:
General
General
Display
Display
min:0
min:0
max:10
max:10
Main
Main
Brightness:
Brightness:
0
0
General Main Principal congurations
Display Brightness Display brightness
- Select the type of display brightness by
setting a value from “0 to 10” acting on the
buttons (30a) “ ” or (30b) “ ”, then
press the button (43) “ ” to conrm the
selection.
NOTE:
When the selected setting is confirmed, the
machine restarts and the display (41) lights
up in the work operation mode.
15 -
49029600_Manuale RACER_RANGER_8ed_04-2023.indd 1949029600_Manuale RACER_RANGER_8ed_04-2023.indd 19 06/04/2023 15:02:4706/04/2023 15:02:47

www.ghibliwirbel.com
Professional Cleaning Machines Since 1968
ENGLISH - 20
15.1 - FUSE CHECK/REPLACEMENT
NOTE:
All machine electrical circuits are protected by auto-resettable electronic devices. The safety
fuses activates only in case of serious damage.
It is recommended to have the fuses replaced by qualified personnel only.
16 -
16.1 - ALARMS DURING THE FUNCTIONING (Fig. F)
When a machine malfunction takes place, the display (41) indicates the type of alarm accord-
ing to the list shown below.
Consult the list and put in place the solution recommended to restore the correct functioning
of the machine.
Should the recommended remedy fail to solve the problem, get in contact with the Technical
Assistance Service.
ALARM MEANING SOLUTION
AL_1: General Memory error Restart the machine.
AL_2: General Key malfunction Turn off the machine for at least 10 seconds, then
restart.
AL_3: General Low voltage
Turn off the machine, check the status of the
battery charge, fuses, contacts, cabling and con-
nections, then restart the machine.
AL_4: General Excessive voltage
Turn off the machine, check the fuses, con-
tacts, cabling and connections, then restart the
machine.
AL_6: General Absence of communica-
tion with the command
dashboard or display
Turn off the machine, check the contacts, cabling
and connections, then restart the machine.
AL_7: General Ffm communication
Turn off the machine, check the contacts, cabling
and connections with the communication module
and the functioning of the later, then restart the
machine.
AL_8: General Communication
Internal 1 and 2 Restart the machine.
AL_9: General
AL_10: General Insert tag Visualisation of missing “Tag” key: insert key.
AL_11: General Invalid tag Visualisation of wrong “Tag” key: change key or
damaged key.
AL_12: General Updating in progress… Visualisation of remote parameter updating in
progress: wait for the end of the updating.
AL_13: General Turn off Visualisation of parameter updating completed:
restart the machine.
49029600_Manuale RACER_RANGER_8ed_04-2023.indd 2049029600_Manuale RACER_RANGER_8ed_04-2023.indd 20 06/04/2023 15:02:4706/04/2023 15:02:47

www.ghibliwirbel.com
Professional Cleaning Machines Since 1968
ENGLISH - 21
ALARM MEANING SOLUTION
AL_41: Function Overheating
Turn off and wait for the machine to cool down.
Check the consumption of the brush and suction
device motors, the status of the ambient ventila-
tion and restart.
AL_42: Function Power damaged Turn off the machine for at least 10 seconds, then
restart.
AL_44: Function Relay fault
The Relay/Remote switch does not close.
Check the remote switch operation.
In case of relay on board, if persists replace the
board.
AL_45: Function Relay fault dc
Detection of Relay/Remote switch closed at start.
Check the status of the remote switch contacts.
In case of relay on board, if persists replace the
board.
AL_46: Function Over-current
Brushes
Turn off the machine, check the load (motor),
the mechanics, the cabling and the connections,
then look for the presence of a short circuit on the
outlet, than restart.
AL_47: Function Over-current
Suction device
Turn off the machine, check the load (motor),
the mechanics, the cabling and the connections,
then look for the presence of a short circuit on the
outlet, than restart.
AL_48: Function Over-current
Water pump
Turn off the machine, check the load (motor),
the mechanics, the cabling and the connections,
then look for the presence of a short circuit on the
outlet, than restart.
AL_49: Function Current measurement
Brush 1 and 2
Check the consumption and the kind of ap-
plication of the brush function, then restart the
machine.
AL_50: Function
AL_52: Function Current measurement
Suction device 1
Check the consumption and the suction device
function, then restart the machine.
AL_54: Function Function
Connections
Brush 1 and 2
Check the brush motors connection.
AL_55: Function
AL_57: Function Connections
Suction device 1 Check the suction device motor connection.
AL_59: Function Unbalance Check the consumption of the brush motors.
AL_61: Function Current measurement
Brush actuator
Check the consumption of the actuator motor and
the status of the mechanical moving parts.
49029600_Manuale RACER_RANGER_8ed_04-2023.indd 2149029600_Manuale RACER_RANGER_8ed_04-2023.indd 21 06/04/2023 15:02:4706/04/2023 15:02:47

www.ghibliwirbel.com
Professional Cleaning Machines Since 1968
ENGLISH - 22
ALARM MEANING SOLUTION
AL_62: Function Over-current
Brush actuator
Turn off the machine, check the load (motor),
the mechanics, the cabling and the connections,
then look for the presence of a short circuit on the
outlet.
AL_63: Function Limit switch
Brush actuator
Check the limit switch connections / status.
Active control only for BTO version.
AL_65: Function Current measurement
Squeegee actuator
Check the consumption of the actuator motor and
the status of the mechanical moving parts.
AL_66: Function Over-current
Squeegee actuator
Turn off the machine, check the load (motor),
the mechanics, the cabling and the connections,
then look for the presence of a short circuit on the
outlet.
AL_80: Traction Overheating
Traction motor
Turn off and wait for the machine to cool down.
Check the consumption and the kind of applica-
tion of the traction, the status of the ambient
ventilation, then restart.
AL_85: Traction Over-current
Traction motor
Turn off the machine, check the load (motor),
the mechanics, the cabling and the connections,
then look for the presence of a short circuit on the
outlet, than restart.
AL_86: Traction Current measurement
Traction motor
Check the consumption and the kind of applica-
tion of the traction function, then restart the
machine.
AL_87: Traction Reading of Traction Motor Restart the machine.
AL_88: Traction Electric brake fault Turn off the machine, check the brake cabling,
then restart.
AL_89: Traction Fault
Accelerator Pedal
Turn off the machine, check the connections and
cabling, then restart.
AL_90: Traction Accelerator Pedal
Pressed Release the pedal and restart the machine.
AL_91: Traction Encoder fault Turn off the machine, check the connections and
cabling and restart.
17 -
49029600_Manuale RACER_RANGER_8ed_04-2023.indd 2249029600_Manuale RACER_RANGER_8ed_04-2023.indd 22 06/04/2023 15:02:4706/04/2023 15:02:47

www.ghibliwirbel.com
Professional Cleaning Machines Since 1968
ENGLISH - 23
17.1 - TROUBLESHOOTING
PROBLEM CAUSE SOLUTION
The machine does not start
up when the key is turned.
Low battery. Check that the battery is
charged.
Main fuse blown. Replace the fuse found on
the battery cable. (*)
Defective key. Change the key. (*)
The brush doesn’t turn. Gearmotor fault. Replace gearmotor. (*)
Faulty Electronic board. Replace the electronic board.
The suction unit does not
function.
Recovery tank full. Empty the tank.
Defective turbine motor. Replace the turbine motor. (*)
Faulty Electronic board. Replace the electronic board.
(*)
The machine does dry prop-
erly, leaving traces of water
on the oor.
Aspirator off. Start up the aspirator.
Aspiration tube blocked. Check and if necessary
clean the aspiration tube that
connects the squeegee to
the recovery tank.
Recovery tank full. Empty the recovery tank.
Squeegee rubber blades
worn.
Replace or turn over the
squeegee rubber blades.
No water comes out. Empty tank. Fill the tank.
Filter clogged. Clean the lter.
Pump solenoid valve not
functioning.
Replace the solenoid valve
pump. (*)
Defective water pump. Replace the water pump. (*)
Faulty Electronic board. Replace the electronic board.
(*)
49029600_Manuale RACER_RANGER_8ed_04-2023.indd 2349029600_Manuale RACER_RANGER_8ed_04-2023.indd 23 06/04/2023 15:02:4706/04/2023 15:02:47

www.ghibliwirbel.com
Professional Cleaning Machines Since 1968
ENGLISH - 24
PROBLEM CAUSE SOLUTION
The machine does not move
in working conditions.
Operator not properly seated
in the driver’s seat.
Sit properly in the driver’s
seat.
Defective motorwheel. Replace the motorwheel. (*)
Faulty Electronic board. Replace the electronic board.
(*)
Operator presence sensor
malfunction.
Replace the operator pres-
ence sensor. (*)
Insucient oor cleaning.Unsuitable brushes or deter-
gent.
Use brushes or detergents
which are suitable for the type
of oor or dirt to be cleaned.
Brushes worn. Replace the brushes.
The empty solution tank icon
“ ” keeps ashing.
Empty tank. Fill the tank.
Tap closed. Open the tap.
Faulty flowmeter. Replace the flowmeter. (*)
There is stagnation of water
in the battery compartment.
Faulty recovery tank level
sensor.
Drain the water in the battery
compartment with the appro-
priate pipe and tap.
Check or replace the level
sensor. (*)
(*) Call customer service to request replacement.
18 -
18.1 - DEMOLITION OF THE MACHINE
DANGER:
Batteries and electrical parts are to be considered as special waste and must
therefore be disposed of at appropriate collection facilities, as prescribed by
the current regulations in the country of use.
19 -
49029600_Manuale RACER_RANGER_8ed_04-2023.indd 2449029600_Manuale RACER_RANGER_8ed_04-2023.indd 24 06/04/2023 15:02:4706/04/2023 15:02:47

www.ghibliwirbel.com
Professional Cleaning Machines Since 1968
ENGLISH - 25
19.1 - WIRING DIAGRAM
Legend:
AC Accelerator
BAT Batteries
BC Battery charger
BE Flashing light (optional)
BRK Electromagnetic brake
C1 Battery connector
EB1 Functions table
EB2 Display
EB3 Command panel
EV Solenoid valve
F1 Battery charger fuse (1A)
F2 Illumination fuse (if present) (3A)
F3 Horn fuse (1A)
F4 Flashing light fuse (if present) (1A)
F5 Solenoid valve fuse (5A)
F6 Brush deck actuator fuse (10A)
F7 Squeegee actuator fuse (10A)
F8 Electric brake fuse (7.5A)
F9 Water pump fuse (5A)
F10 Chemicals pump fuse (if present) (5A)
F11 Suction motor fuse (40A)
F12 Right brush motor fuse (40A)
F13 Left brush motor fuse (40A)
F14 Traction motor fuse (100A)
HN Horn
KEY Start key
L1 Work light (optional)
MA Suction motor
MAS Brush deck actuator motor
MAT Squeegee actuator motor
MS-DX Right brush motor
MS-SX Left brush motor
MT Traction motor
PA Water pump
PC Chemicals pump
PE Emergency button
S1 Recovery water level sensor
SW1 Seat microswitch
TE External remote switch
Colour codes:
BK Black
BU Blue
BN Brown
GN Green
GY Grey
OG Orange
PK Pink
RD Red
VT Violet
WT White
YE Yellow
49029600_Manuale RACER_RANGER_8ed_04-2023.indd 2549029600_Manuale RACER_RANGER_8ed_04-2023.indd 25 06/04/2023 15:02:4706/04/2023 15:02:47

www.ghibliwirbel.com
Professional Cleaning Machines Since 1968
ENGLISH - 26
PA MT PC EV
- +
-
-
-
-
+ -+ -+
+
+
+
MA MS MS
DX SX
C1
BC
TE
EB2
EB3
KEY
L1
BE
F4
F1
F2
F8
F9 F14 F10 F5 F11 F12 F13
F7
F6
F3
BRK
AC
M
SW1
M5
J8
4 3
2 1
4 3
2 1
1
4
2
5
3
6
9
1
10
2
11
3
4
1
5
2
6
3
4
1
5
2
6
3
4
1
5
2
6
3
12
4
4
8
1
2
3
7
2
6
1
5
3
6
2
5
1
1
12
3s
+
-
2
1
1
2
3
4
2 3
123
456 4
1
11
2
12
3
13
4
14
5
15
6
16
7
17
8
18
9
19
10
20
4
9
3
8
5
10
2
7
1
6
13
5
16
8
15
7
14
6
2
1
J9 J10 J11
J1
J8 J7
J2
S1
J3 J4 J5 J7J6
J12 J13 J14
M6
USB
HN
BATBAT MATMAT
PEPE
MASMAS
EB1
49029600_Manuale RACER_RANGER_8ed_04-2023.indd 2649029600_Manuale RACER_RANGER_8ed_04-2023.indd 26 06/04/2023 15:02:4906/04/2023 15:02:49

www.ghibliwirbel.com
Professional Cleaning Machines Since 1968
FRANÇAIS - 1
Cher client,
Nous vous remercions pour avoir choisi un de nos produits pour le nettoyage de vos
locaux.
L’autolaveuse accompagnée que vous venez d’acquérir a été conçue pour satisfaire
l’utilisateur en termes de simplicité d’utilisation et de fiabilité dans le temps.
Nous sommes conscients que, pour qu’un produit reste tel quel dans le temps, il faut
constamment le renouveler afin de satisfaire les attentes de ceux l’utilisent quotidienne-
ment. Nous espérons donc que vous serez un client satisfait mais aussi un collaborateur
qui n’hésite pas à nous faire partager les opinions et les idées de ceux qui l’utilisent au
quotidien.
49029600_Manuale RACER_RANGER_8ed_04-2023.indd 149029600_Manuale RACER_RANGER_8ed_04-2023.indd 1 06/04/2023 15:02:5006/04/2023 15:02:50

www.ghibliwirbel.com
Professional Cleaning Machines Since 1968
FRANÇAIS - 2
TABLES DES MATIÈRES
TABLES DES MATIÈRES .............................................................................................................. 2
DONNÉES DES MATIÈRES ........................................................................................................... 3
1.1 - INTRODUCTION .................................................................................................................. 5
1.1.a - Position de l’opérateur .................................................................................................. 5
1.1.b - Avertissements généraux pédant l’utilisation de la machine ........................................ 5
1.2 - UTILISATION NON PRÉVUE DE LA MACHINE .................................................................5
2.1 - CONNAISSANCE DE LA MACHINE (Fig. A) ..................................................................... 5
3.1 - DÉSEMBALLAGE (Fig. B) .................................................................................................. 5
3.1.a - Installation batteries (Fig. A) ......................................................................................... 6
3.1.b - Déchargement de la machine de la palette de transport en bois (Fig. B) .................... 6
4.1 - ASSEMBLAGE COMPOSANTS ......................................................................................... 6
4.1.a - Installation du dispositif-suceur (Fig. C) ....................................................................... 6
4.1.b - Installation de la brosse ................................................................................................ 6
5.1 - CHARGEMENT DE LA BATTERIE ..................................................................................... 6
5.1.a - Charge de la batterie avec chargeur externe (Fig. G) .................................................. 7
5.1.b - Charge de la batterie via le chargeur embarqué ( si présent ) (Fig. G) ........................ 7
6.1 - DESCRIPTION DES COMMANDES DE LA MACHINE ...................................................... 7
6.1.a - Panneau de commande (Fig. F) ................................................................................... 7
6.1.b - Pédale d’accélérateur (Fig. A) .................................................................................... 10
7.1 - AFFICHER (Fig. F) ............................................................................................................ 10
8.1 - ARRÊT D’URGENCE ........................................................................................................ 11
9.1 - DISPOSITIFS DE SÉCURITÉ (Fig. A) .............................................................................. 11
10.1 - REMPLISSAGE DU RÉSERVOIR (Fig. D) .......................................................................12
10.2 - RÉSERVOIR NETTOYANT / CHIMIQUES (si présent) (Fig. E) ....................................... 12
11.1 - FONCTIONNEMENT (Fig. A-F) ........................................................................................ 12
11.1.a - Vérication avant l’utilisation ...................................................................................... 12
11.1.b - Préparation de la machine et choix du cycle .............................................................. 13
11.1.c - Utilisation de la machine ............................................................................................. 13
11.1.d - Fin d’utilisation et extinction ........................................................................................ 14
12.1 - VIDANGE EAU DE RÉCUPÉRATION (Fig. H) ................................................................. 14
13.1 - ENTRETIEN ET NETTOYAGE .......................................................................................... 14
13.2 - OPÉRATIONS À EFFECTUER TOUS LES JOURS ......................................................... 14
13.2.a - Vidange et nettoyage du réservoir d’eau propre (Fig. I) ............................................. 14
13.2.b - Nettoyage du réservoir d’eau de récupération (Fig. J) ............................................... 15
13.2.c - Nettoyage suceur (Fig. K) ........................................................................................... 15
13.3 - OPÉRATIONS A EFFECTUER TOUS LES 3 MOIS .......................................................... 15
13.3.a - Contrôle de l’état d’usure de la chaîne de direction (Fig. L) ....................................... 15
13.4 - OPÉRATIONS À EFFECTUER SELON LES BESOINS ................................................... 15
13.4.a - Remplacement brosses (Fig. M) ................................................................................ 15
13.4.b - Réglage du caoutchouc du pare-éclaboussures (Fig. M) ........................................... 16
13.4.c - Substitution des raclettes en caoutchouc (Fig. K) ...................................................... 16
13.4.d - Réglage incidence suceur (Fig. N) ............................................................................. 17
13.4.e - Réglage de la pression des suceur (Fig. O) ............................................................... 17
13.4.f - Nettoyage du ltre d’eau propre (Fig. P) .................................................................... 17
13.4.g - Robinet de vidange du compartiment à piles (Fig. A) .................................................17
13.4.h - Contrôle état d’usure des trois roues (Fig. A) ............................................................. 17
14.1 - RÉGLAGE DES PARAMÈTRES (Fig. F) .......................................................................... 18
14.1.a - Paramètres OPÉRATEUR .......................................................................................... 18
15.1 - CONTRÔLE / REMPLACEMENT DES FUSIBLES........................................................... 20
16.1 - ALARMES PENDANT LE FONCTIONNEMENT............................................................... 20
17.1 - DÉPISTAGE DES PANNES ............................................................................................... 23
18.1 - DÉMOLITION DE LA MACHINE ....................................................................................... 24
19.1 - SCHÉMA ÉLECTRIQUES ................................................................................................25
49029600_Manuale RACER_RANGER_8ed_04-2023.indd 249029600_Manuale RACER_RANGER_8ed_04-2023.indd 2 06/04/2023 15:02:5006/04/2023 15:02:50

www.ghibliwirbel.com
Professional Cleaning Machines Since 1968
FRANÇAIS - 3
DONNÉES DES MATIÈRES
RACER R 85 RANGER R 115
FD 65 FD 75 FD 75 FD 85
Type de conduction Conducteur porté
Caractéristiques
Fonctionnement et Alimentation Batteries 24 V
Type de Batteries
N° 2 - 12V 105Ah (C5) N° 4 - 6V 240Ah (C5)
N° 4 - 6V 180Ah (C5) N° 1 - 24V 320Ah (C5)
N° 1 - 24V 100Ah (Li) N° 1 - 24V 150Ah (Li)
Puissance installée 2160 W 2210 W
Autonomie de travail
2 h (105Ah C5) 5 h (240Ah C5)
4 h (180Ah C5) 7 h (320Ah C5)
2 h (100Ah Li) 3 h (150Ah Li)
Avancement Traction avant/arrière
Largeur piste de lavage 650 mm 750 mm 750 mm 850 mm
Largeur d’aspiration 850 mm 950 mm 950 mm 1050 mm
Rendement théorique 4000 m2/h 4500 m2/h 4500 m2/h 5000 m2/h
Rendement réel 2400 m2/h 2700 m2/h 2700 m2/h 3000 m2/h
Vibration système main-bras
(ISO 5349-1) < 2,5 m/s2
Vibration corps entier (ISO 2631-1) < 0,5 m/s2
Pression sonore (ISO 11203) (LpA) 63 dB(A)
Pression sonore en mode silencieux
(LpA) 57 dB(A)
Code IP IPX3
Brosses
Diamètre / pad / nombre 330 mm /
13” / 2
380 mm /
15” / 2
380 mm /
15” / 2
430 mm /
17” / 2
Puissance moteur / nombre 500 W / 2
Vitesse de rotation brosse 165 tr/min.
Pression spécifique 30 gr/cm221 gr/cm221 gr/cm217 gr/cm2
Pression spécifique (extrapression) 46 gr/cm232 gr/cm243 gr/cm234 gr/cm2
49029600_Manuale RACER_RANGER_8ed_04-2023.indd 349029600_Manuale RACER_RANGER_8ed_04-2023.indd 3 06/04/2023 15:02:5006/04/2023 15:02:50

www.ghibliwirbel.com
Professional Cleaning Machines Since 1968
FRANÇAIS - 4
RACER R 85 RANGER R 115
FD 65 FD 75 FD 75 FD 85
Traction
Pente maximale franchissable pendant
le nettoyage 2 %
Pente franchissable à vide (*) 12 %
Puissance moteur 600 W
Vitesse maximum avancement en travail 6 km/h
Aspiration
Puissance moteur 550 W
Dépression (colonne d’eau) 125 mbar / 1250 mmH2O
Débit d’air 30 l/sec
Réservoir
Type Double réservoir
Capacité solution 80 l 110 l
Capacité récupération 85 l 115 l
Dimensions
Dimensions de la machine
(longueur x largeur x hauteur) 1375 x 705 x 1230 mm 1470 x 770 x 1365 mm
Largeur de la machine - tête de brosse 715 mm 785 mm 785 mm 890 mm
Largeur de la machine - raclette 885 mm 950 mm 950 mm 1055 mm
Dimensions logement batteries
(longueur x largeur x hauteur) 380 x 540 x 310 mm 380 x 625 x 440 mm
Poids
Poids à vide 213 kg 246 kg
Poids avec batteries Gel 12V 105Ah 285 kg -
Poids avec batteries Gel 6V 180Ah 333 kg -
Poids avec batterie Lithium 24V 100Ah 249 kg -
Poids avec batteries Gel 6V 240Ah - 432 kg
Poids avec batteries Pb Wet 24V 320Ah - 506 kg
Poids avec batterie Lithium 24V 1500Ah - 288 kg
Poids dans l’ordre de marche (GVW) 490 kg 691 kg
(*) La machine a été testée dans les conditions suivantes:
• Batterie standard
• Réservoirs vides
• Rampe en béton brut
• Longueur de rampe 15 m
• 75 kg d’opérateur
1 -
49029600_Manuale RACER_RANGER_9ed_09-2023.indd 449029600_Manuale RACER_RANGER_9ed_09-2023.indd 4 04/09/2023 14:54:2604/09/2023 14:54:26

www.ghibliwirbel.com
Professional Cleaning Machines Since 1968
FRANÇAIS - 5
1.1 - INTRODUCTION
REMARQUE :
Les numéros et les références aux figures
indiqués entre parenthèses renvoient aux
composants indiqués dans la feuille illustra-
tive en annexe.
DANGER :
Avant d’utiliser la machine s’il vous
plaît lire le manuel «AVERTISSE-
MENTS DE SÉCURITÉ POUR SÉ-
CHEUSE DES PLANCHES » joint à la
présente et les additions ci-dessous.
1.1.a - Position de l’opérateur
L’opérateur, tout en utilisant la machine est
assis sur le siège avec les mains sur le vo-
lant.
1.1.b - Avertissements généraux
pédant l’utilisation de la
machine
- NE PAS abandonner la machine sur des
surfaces inclinées.
- Il est strictement interdit de échir en
pente ; danger de renversement.
- Éviter d’utiliser la machine dans des en-
vironnements comportant un risque de
chute d’objets.
1.2 - UTILISATION NON
PRÉVUE DE LA MACHINE
- Ne pas utiliser la machine avec le réser-
voir de récupération ouvert.
- Ne pas circuler avec les pieds/les jambes
sortant de la zone de protection de la ma-
chine.
- Ne pas eectuer des braquages soudains
en particulier lors de descente.
AVERTISSEMENT :
La machine est habilitée au transport
d’une SEULE personne.
2 -
2.1 - CONNAISSANCE DE LA
MACHINE (Fig. A)
(1) Volant
(2) Tableau de commandes
(3) Siège
(4) Capteur de présence opérateur
(5) Bouton-poussoir D’URGENCE, pour
l’arrêt immédiat de toutes les fonctions
(6) Estrade d’appui pour les pieds
(7) Pédale accélérateur
(8) Roues postérieures
(9) Lampe de travail ( optionnel )
(10) Feu clignotant ( optionnel )
(11) Réservoir d’eau de récupération
(12) Couvercle du réservoir d’eau de récu-
pération
(13) Réservoir d’eau propre
(14) Bouchon
(15) Tuyau de vidange de l’eau de récupéra-
tion
(16) Tuyau d’aspiration de l’eau du dispositif-
suceur
(17) Tuyau de vidange de l’eau propre
(18) Tube de niveau du réservoir d’eau
propre
(19) Groupe brosses
(20) Dispositif-suceur
(21) Compartiment à documents
(22) Filtre de l’eau
(23) Roue de direction et de traction
(24) Crochet de support de dispositif-suceur
(25) Pied de support groupe réservoir de
récupération
3 -
3.1 - DÉSEMBALLAGE (Fig. B)
Une fois l’emballage retiré comme indiqué
dans la feuille d’instructions sur l’embal-
lage lui-même, vérier l’intégrité de la ma-
chine et de tous les composants fournis.
En cas de dommage évident, contactez votre
revendeur et transporteur local dans les 3
jours suivant la réception.
- Retirez l’enveloppe et les boîtes (26)
contenant les accessoires fournis:
• (20) Dispositif-suceur.
• (32) Brosses N ° 2.
- Soulevez le réservoir et prenez la docu-
mentation de l’enveloppe appropriée:
• (33)
Manuel d’utilisation et d’entretien
de la machine
.
• (34)
Manuel d’instructions du chargeur
de batterie
(si présent).
49029600_Manuale RACER_RANGER_8ed_04-2023.indd 549029600_Manuale RACER_RANGER_8ed_04-2023.indd 5 06/04/2023 15:02:5406/04/2023 15:02:54

www.ghibliwirbel.com
Professional Cleaning Machines Since 1968
FRANÇAIS - 6
3.1.a - Installation batteries (Fig. A)
- Soulever avec précaution le réservoir de
récupération (11).
- Selon la conguration (4 batteries de 6 V,
2 batteries de 12 V, 1 pack batterie de 24),
placer et brancher les batteries comme
indiqué dans les gures ; en utilisant les
câbles et les prises fournis.
- Baisser avec précaution le réservoir d’eau
de récupération (11).
REMARQUE :
Le branchement des batteries doit être effec-
tué par un personnel spécialisé.
3.1.b - Déchargement de la ma-
chine de la palette de trans-
port en bois (Fig. B)
- Retirer la cale en bois (27) positionnée
devant la roue avant.
- Placer la rampe (28) devant la palette en
bois comme indiqué dans la feuille d’ins-
tructions sur l’emballage.
- Asseyez-vous sur le siège (3) en position
de conduite.
- Tourner la clé (29) sur «ON».
- Appuyez sur le bouton de sens de marche
(31a) « » (marche avant), puis ap-
puyez sur la pédale d’accélérateur (7) et
avec précaution descendez de la palette.
4 -
4.1 - ASSEMBLAGE
COMPOSANTS
4.1.a - Installation du dispositif-su-
ceur (Fig. C)
- Insérer le suceur (20) dans la plaque (35)
de support et le xer en vissant les deux
pommeaux (36).
- Raccorder le tuyau d’aspiration (16) sur la
bouche (37) du suceur.
4.1.b - Installation de la brosse
- Voir la procédure au paragraphe “13.4.a -
Remplacement brosses (Fig. M)”.
5 -
5.1 - CHARGEMENT DE LA
BATTERIE
DANGER :
Effectuer le chargement de la bat-
terie dans des locaux bien aérés et
conformes aux normes en vigueur
dans le pays d’utilisation.
Pour les informations relatives à la
sécurité, se référer à ce qui est décrit
dans le chapitre 1 de ce manuel.
AVERTISSEMENT :
Pour les informations relatives à la
batterie et au chargeur de bord (si
présent), se référer à ce qui est indi-
qué dans le manuel du chargeur de
batterie annexé à ce manuel.
La machine sort de l’usine tarée pour
un fonctionnement avec des batte-
ries au gel.
S’il faut installer des batteries d’un
autre type, voir au paragraphe «Ré-
glage des paramètres.
Il est interdit d’utiliser la machine
avec des batteries à gel alors que le
calibrage est prévu pour des batte-
ries à l’acide ou autre.
(Uniquement pour les versions sans
chargeur de batterie embarqué)
L’appareil doit être alimenté unique-
ment par des chargeurs de batterie
externes SELV (safety extra-low volt-
age).
REMARQUE :
(Pour les batteries GEL uniquement ) Il faut
10 heures pour charger complètement les
batteries. Eviter les recharges partielles.
(Pour les batteries au lithium uniquement) Et
‘possible de faire des recharges partielles.
Chargez les batteries à la n de chaque tâche
ou au moins lorsque le symbole de batterie
«» sur l’acher (41 Fig. F) commence
49029600_Manuale RACER_RANGER_8ed_04-2023.indd 649029600_Manuale RACER_RANGER_8ed_04-2023.indd 6 06/04/2023 15:02:5706/04/2023 15:02:57

www.ghibliwirbel.com
Professional Cleaning Machines Since 1968
FRANÇAIS - 7
à clignoter.
- Conduisez la machine jusqu’à la station
de charge de la batterie.
- Soulevez le réservoir d’eau de récupéra-
tion (11) en vous assurant qu’il est vide.
5.1.a - Charge de la batterie avec
chargeur externe (Fig. G)
- Contrôler la compatibilité du chargeur de
batterie externe en consultant le manuel
correspondant. La tension nominale du
chargeur de batterie doit être égale à 24
V.
- Dans le logement prévu à cet eet (38),
prélever le connecteur (39) et le brancher
au chargeur de batterie externe.
- Brancher le transformateur au secteur
électrique.
- À la n du rechargement, débrancher
le chargeur de batterie du secteur et du
connecteur (39).
- Baisser avec précaution le réservoir d’eau
de récupération (11).
5.1.b - Charge de la batterie via le
chargeur embarqué ( si pré-
sent ) (Fig. G)
- Dans le logement prévu à cet eet (38),
prélever et brancher la che du câble
du chargeur de batterie (40) au secteur
électrique (la tension et la fréquence du
réseau doivent être égales aux valeurs
correspondantes du chargeur de batterie,
indiquées sur la plaque d’identication de
la machine).
REMARQUE :
Quand le chargeur de batterie est branché
au secteur électrique, toutes les fonctions de
la machine sont automatiquement exclues.
- Sur l’écran (41 Fig. F), quand les seg-
ments s’allument en séquence sur le sym-
bole batterie, cela indique que le chargeur
de batterie est en train de recharger la
batterie.
- Quand tous les segments dans le symbole
batterie sont allumés en permanence, le
cycle de chargement des batteries est ter-
miné.
- Débrancher la che du câble du chargeur
de batterie (40) du secteur électrique et
l’insérer dans le logement prévu à cet
eet (38).
- Baisser avec précaution le réservoir d’eau
de récupération (11).
6 -
6.1 - DESCRIPTION DES
COMMANDES DE LA
MACHINE
6.1.a - Panneau de commande (Fig.
F)
(29) Clé de démarrage
- Tourner la clé dans le sens horaire sur «
ON » apporte de la tension aux circuits
permettant de faire fonctionner la ma-
chine.
- Tourner en sens contraire sur «OFF»
enlève la tension des circuits ; dans cette
position, la clé peut être enlevée.
(30) Boutons de réglage de la vitesse
maximum
Il est possible de régler la vitesse maximum
d’avancement au moyen des boutons (30a)
« » et (30b) « ».
- Lorsqu’on appuie complètement sur l’ac-
célérateur (7), la vitesse sera proportion-
nelle à la valeur maximum congurée.
- Quand tous les symboles vitesse « »
sont clairs sur l’écran (41), la pédale d’ac-
célérateur (7) est inhibée et la machine
reste à l’arrêt.
(31) Boutons de direction de marche
- Lorsqu’on appuie sur le bouton avant
(31a) « » la machine se déplace en
marche avant ; l’icône « » s’ache à
l’écran.
- Lorsqu’on appuie sur le bouton arrière
(31b) « » la machine se déplace en
marche arrière et la sonnerie de marche
arrière se déclenche ; l’icône « » s’af-
che à l’écran.
49029600_Manuale RACER_RANGER_8ed_04-2023.indd 749029600_Manuale RACER_RANGER_8ed_04-2023.indd 7 06/04/2023 15:03:0406/04/2023 15:03:04

www.ghibliwirbel.com
Professional Cleaning Machines Since 1968
FRANÇAIS - 8
REMARQUE :
La vitesse maximum en marche arrière peut
être congurée comme la marche avant au
moyen des boutons (30).
(41) Écran
- Voir le chapitre spécique.
(42) Bouton «Ready to go»
- Lorsqu’on appuie sur le bouton (42), l’icône
«» s’ache et les fonctions suivantes
s’activent dans une conguration standard:
• Abaissement de la tête et rotation des
brosses.
• Abaissement de la raclette et démar-
rage du système d’aspiration.
• Vitesse de travail = 3e encoche (3,6
km/h).
• Flux d’eau = 3e encoche.
• Agent chimique = 3e encoche (1%).
• Aspiration = normale (100%).
• Pression brosses = normale.
- Avec cette fonction standard activée, il est
possible d’appuyer sur n’importe quel bou-
ton de travail pour toute modication ou
réglage.
Le cas échéant, quand on a conguré une
modication sur les fonctions de travail, il est
possible de la mémoriser en opérant comme
indiqué ci-après :
- Appuyer et maintenir appuyé pendant 3 se-
condes le bouton (42) ; la conrmation de la
mémorisation est indiquée sur l’écran (41)
avec le clignotement de «UPLOADED».
- Pour désactiver le nouveau réglage et
revenir aux valeurs standards des con-
gurations, appuyer à nouveau et maintenir
appuyé pendant 3 secondes sur le bou-
ton (42) ; la conrmation est indiquée sur
l’écran (41) par le clignotement de «RE-
SET».
(43) Bouton ECO
- Pendant la phase de travail, lorsqu’on
appuie sur le bouton (43), l’icône « »
s’ache à l’écran, les paramètres d’eau,
d’agent chimique, d’aspiration et de
pression testée prennent les valeurs sui-
vantes:
• Flux d’eau = 3e encoche.
• Agent chimique = 3e encoche (1%).
• Aspiration = silencieuse (50%).
(44) Bouton aspirateur
- Lorsqu’on appuie sur le bouton (44), l’as-
pirateur s’active et l’icône « » s’ache
à l’écran ; d’autre part, si la marche avant
est enclenchée ou que la machine est au
point mort, la raclette s’abaisse.
- En appuyant sur la touche (44) l´aspirateur
arrête et la raclette soulèvera.
- Avec la machine à l’arrêt, le racle vers le
bas et la touche (29) sur «ON» après une
période d’inactivité, le racloir se lèvera
automatiquement.
(45) Bouton de fonctionnement
silencieux
- En poussant sur le bouton (45) on réduit
la vitesse de la turbine d’aspiration tout en
réduisant sensiblement le bruit de la ma-
chine ; lorsque la fonction est enclenchée,
le icône « » apparaît sur l’achage.
- Une nouvelle pression sur le bouton (45)
désactive la fonction et la machine re-
prend son fonctionnement en mode stan-
dard, l’icône « » s’éteint et l’icône «
» apparaît sur l’achage.
REMARQUE :
En coupant la turbine d’aspiration alors que
le mode «fonctionnement silencieux» est
enclenché, la machine passera automati-
quement en mode «fonctionnement stan-
dard» pendant tout le temps de temporisa-
tion d’arrêt.
(46) Bouton brosses
- Lorsqu’on appuie sur le bouton (46), la
tête des brosses s’abaissent et l’icône «
» s’ache à l’écran.
- Les brosses commencent à turner lorsque
vous appuyez sur la pédale d’accéléra-
teur, et arrêtent lorsque la pédale d’accé-
lérateur est soulevée.
49029600_Manuale RACER_RANGER_8ed_04-2023.indd 849029600_Manuale RACER_RANGER_8ed_04-2023.indd 8 06/04/2023 15:03:1306/04/2023 15:03:13

www.ghibliwirbel.com
Professional Cleaning Machines Since 1968
FRANÇAIS - 9
REMARQUE :
Les brosses tournent à la fois en mode avant
et arrière et avec le réglage de la vitesse (30)
à «0».
- -Avec la machine arrêtée, tête basse et
brosses ferme avec la clé (29) sur «ON»
après une période d’inactivité de la tête se
lèvera automatiquement.
- Si vous appuyez sur la touche (46)
avec des brosses en rotation, les brosses
arrêteront, l’unité soulèvera et sur l’a-
chage l’icône « » est désactive.
(47) Bouton extra pression
brosses
Avec la tête des brosses abaissée, il est pos-
sible de régler la pression des brosses sur
le sol.
- Lorsqu’on appuie sur le bouton (47), on
active l’extra pression ; avec la fonction
activée, l’icône « » s’ache à l’écran.
- Lorsqu’on appuie à nouveau sur le bou-
ton (47), la pression sur le sol redevient
normale et l’icône « » s’ache à l’écran.
REMARQUE :
Chaque fois que le groupe sort (position de
repos) de la tête, la pression des brosses est
positionné au minimum.
REMARQUE :
Cette fonction est équipée d’un système de
sécurité qui détecte automatiquement un
absorption excessif de courant des moteurs
de brosse et est capable de faire varier auto-
matiquement la pression sur les brosses au
sol les portant dans la position la plus appro-
priée.
(48) Bouton doseur agent
chimique (s’il est présent)
- Lorsqu’on appuie sur le bouton (48),
l’icône « » s’ache à l’écran, et le sys-
tème se prépare au dosage de l’agent
chimique. Le fonctionnement de la pompe
de dosage est commandé par la pédale
d’accélérateur enfoncée.
- En appuyant de manière répétée (48), on
augmente la quantité d’agent chimique ;
lorsqu’on arrive à la quantité maximum,
l’icône « » s’ache à l’écran. Si l’on
appuie à nouveau sur le bouton (48), la
fonction se désactive et l’icône sur l’écran
s’éteint
REMARQUE :
En cas de vidange du système de dosage
d’agent chimique, après avoir remplacé le
réservoir, maintenez le bouton (48) enfoncé
pendant au moins 5 secondes pour activer la
procédure de purge d’air d’une durée d’envi-
ron 40 secondes; cette fonction est activée
uniquement avec la machine à l’arrêt, la clé
(29) en position «ON» et avec le réglage de
la vitesse (30) sur «0».
(49) Bouton pour l’alimentation
de l’eau
- Lorsqu’on appuie sur le bouton (49),
l’icône « » s’ache à l’écran, et le sys-
tème se prépare à l’ouverture de l’électro-
vanne d’eau. Le fonctionnement de l’élec-
trovanne est commandé par la pédale
d’accélérateur enfoncée.
- En appuyant plusieurs fois sur le bouton
(49) augmente la quantité d’eau; arrivé à
la quantité maximale indiquée sur l’a-
cher par le symbole « » si le bouton
est pressé à nouveau (49) la fonction est
désactivée et l’icône sur l’acher s’éteint.
(50) Bouton avertisseur sonore
(51) Bouton feu clignotant
(52) Bouton lampe de travail
49029600_Manuale RACER_RANGER_8ed_04-2023.indd 949029600_Manuale RACER_RANGER_8ed_04-2023.indd 9 06/04/2023 15:03:2806/04/2023 15:03:28

www.ghibliwirbel.com
Professional Cleaning Machines Since 1968
FRANÇAIS - 10
6.1.b - Pédale d’accélérateur (Fig.
A)
- Lorsqu’on appuie sur la pédale d’accé-
lérateur (7), la machine se déplace vers
l’avant ou vers l’arrière, selon le bouton
de direction de marche sur lequel on a
appuyé.
- La vitesse est réglable en enfonçant plus
ou moins la pédale d’accélérateur.
- En relâchant la pédale d’accélérateur (7),
la machine ralentit jusqu’à l’arrêt. Après
quelques secondes, lorsque la machine
est arrêtée, s´enclenche automatique-
ment le frein de stationnement; le frein est
relâché en appuyant sur la pédale d’accé-
lérateur (7) vers l’avant ou vers l’arrière.
7 -
7.1 - AFFICHER (Fig. F)
Lorsque la machine est allumée, les icônes
suivantes s’achent (41) :
Batterie
Indique l’état de charge des batteries :
Batteries chargées
Batteries déchargées
Vitesse maximum d’avance-
ment
- Avec les boutons (30a) « » et (30b) «
», on congure la vitesse maximum
que peut atteindre la machine avec la
pédale d’accélérateur (7) complètement
enfoncée :
km/h - 0 1,2 2,4 3,6 4,8 6,0
Direction de marche
- La èche de direction indique la fonction
d’avancement sélectionnée au moyen des
boutons (31a) « » et (31b) « ».
«Ready to go»
Elle s’ache à l’écran quand on appuie sur le
bouton (42) « ».
Mode ECO
Elle s’ache à l’écran quand on appuie sur le
bouton (43) « » .
Aspirateur en fonction
Elle s’ache à l’écran quand on appuie sur
le bouton (44) « » pour indiquer que
l’aspirateur est allumé et que la raclette est
baissée.
Fonctionnement silencieux
Avec l’aspirateur allumé.
Elle s’ache à l’écran quand on appuie sur le
bouton (45) « » pour indiquer que l’aspi-
rateur fonctionne à régime réduit.
Préparation rotation brosse
Elle s’ache à l’écran quand on appuie sur
le bouton (46) « » pour indiquer que la
rotation de la brosse est activée.
Extra pression
Elle s’ache à l’écran pour indiquer la pres-
sion de travail des brosses.
Appuyer sur le bouton (47) « » pour
changer la pression de travail.
49029600_Manuale RACER_RANGER_8ed_04-2023.indd 1049029600_Manuale RACER_RANGER_8ed_04-2023.indd 10 06/04/2023 15:03:5306/04/2023 15:03:53

www.ghibliwirbel.com
Professional Cleaning Machines Since 1968
FRANÇAIS - 11
Distributeur d’agent chimique
(s’il est présent)
Elle s’ache à l’écran quand on appuie sur le
bouton (48) « ».
Appuyer sur bouton pour augmenter ou dimi-
nuer le pourcentage de détergent dosé :
0,2% 0,5% 1% 2% 3%
Préparation distribution d’eau
Elle s’ache à l’écran quand on appuie sur le
bouton (49) « » pour indiquer que l’élec-
trovanne de distribution d’eau est activée.
Quand le niveau d’eau dans le réservoir est
au minimum, l’icône « » est visualisée en
plein écran en combinaison avec le signal
sonore.
Remplir le réservoir d’eau (13) comme indi-
qué au paragraphe spécique, puis arrêter et
redémarrer la machine
Absence de l’opérateur sur le
siège de conduite
Cette icône s’ache quand l’opérateur n’est
pas assis correctement sur le siège de
conduite et elle bloque toutes les fonctions
de la machine.
Le niveau maximal du liquide
dans le réservoir de récupé-
ration
S’ache à l’acher lorsque le liquide dans
le réservoir de recyclage a atteint le niveau
maximum.
Pédale d’accélérateur vers le
bas
Ce symbole est inséré lorsque la machine si-
gnale une mauvaise opération de séquence de
démarrage, pour supprimer l’alarme insérée,
relâchez la pédale d’accélérateur (7 Fig. A).
8 -
8.1 - ARRÊT D’URGENCE
Le bouton d’arrêt d’urgence (5 Fig. A) est si-
tué dans une position facilement accessible
pour l’opérateur.
Il faut appuyer dessus avec décision en cas
de nécessité immédiate pour arrêter la ma-
chine et toutes ses fonctions.
Pour réactiver la fonctionnalité de la ma-
chine, tirer le bouton d’arrêt d’urgence
jusqu’au déclenchement et au rétablisse-
ment de celui-ci.
AVERTISSEMENT :
Appuyer sur le bouton d’arrêt d’ur-
gence (5) avec la machine allumée
uniquement en cas de réelle néces-
sité, ne pas utiliser cette procédure
pour éteindre la machine, cela peut
causer des pannes même sérieuses
de la machine.
9 -
9.1 - DISPOSITIFS DE
SÉCURITÉ (Fig. A)
La machine est équipée des fonctions de
sécurité suivantes:
Capteur de présence opérateur (4)
Il bloque toutes les fonctions de la machine
lorsque l’opérateur n’est pas présent sur le
siège du conducteur.
Système de sécurité anti-dérapage
Si besoin est, il réduit la vitesse lors des bra-
quages et en cas de dérapage latéral de la
machine à une valeur de sécurité, pour éviter
toute dérapage soudain et augmenter la sta-
bilité de la machine en toute condition.
Frein électromagnétique
Il est intégré dans la roue avant (23) et em-
pêche le déplacement de la machine quand
elle n’est pas démarrée et, de toute façon,
lorsqu’elle est à l’arrêt.
10 -
49029600_Manuale RACER_RANGER_8ed_04-2023.indd 1149029600_Manuale RACER_RANGER_8ed_04-2023.indd 11 06/04/2023 15:04:0506/04/2023 15:04:05

www.ghibliwirbel.com
Professional Cleaning Machines Since 1968
FRANÇAIS - 12
10.1 - REMPLISSAGE DU
RÉSERVOIR (Fig. D)
AVERTISSEMENT :
N’introduire dans le réservoir que de
l’eau propre du réseau, dont la tempé-
rature ne doit pas dépasser les 50°C.
- Au moyen du tuyau amovible (52), intro-
duire l’eau dans le réservoir (13) jusqu’au
remplissage de celui-ci.
- Ne remplissez pas complètement le réser-
voir, utilisez le tube de niveau (18) comme
référence.
- Ou bien, si cela est disponible, ouvrir le
bouchon (14) et utiliser la prise acquastop
(53, si elle est présente).
AVERTISSEMENT :
Vérifiez toujours visuellement le ni-
veau de remplissage pour éviter le
risque de mouiller le sol.
- À la n du remplissage du réservoir, fer-
mer le bouchon (14).
REMARQUE :
Pour les machines sans kit chimique, remplir
le réservoir (13) avec de l’eau propre et la
mélanger avec le détergent chimique.
Toujours suivre les instructions de dilution
indiquées sur l’étiquette de l’emballage du
produit chimique utilisé pour composer la
solution détergente.
10.2 - RÉSERVOIR
NETTOYANT / CHIMIQUES (si
présent) (Fig. E)
REMARQUE :
N’utiliser que du détergent qui ne mousse
pas ; en ce qui concerne les quantités, se
référer aux instructions du producteur du
détergent et selon le type de saleté.
- Soulevez le réservoir de récupération (11).
- Vérier que dans le réservoir (54), il est
le produit nécessaire pour la journée de
travail.
En cas de remplacement du réservoir , agir
comme suit :
- Retirer le bouchon (55) retirer la cartouche
(54) et insérer un nouveau réservoir de 5
litres et insérer le bouchon (55) avec le
tube d’aspiration.
DANGER :
En cas de contact du détergent avec
les yeux et la peau ou en cas d’inges-
tion, se référer à la fiche de sécurité
et d’utilisation du producteur du dé-
tergent.
REMARQUE :
Les réservoirs (54) pour être utilisés sont de
type standard de 5 litres, qui est disponible
dans le commerce.
- Baisser avec précaution le réservoir d’eau
de récupération (11).
- Eectuer la purge d’air (voir la procé-
dure à l’entrée «Bouton doseur agent
chimique»).
11 -
11.1 - FONCTIONNEMENT
(Fig. A-F)
11.1.a - Vérication avant l’utilisation
- Contrôler que le tuyau (15) d’évacuation
du réservoir soit correctement accroché
et bouché.
- Contrôler que le tuyau (16) d’aspiration de
l’eau du suceur soit correctement inséré
dans le réservoir de récupération.
- Contrôler que le raccord (37) situé sur le
suceur (20) ne soit pas obstrué et que le
tuyau soit correctement raccordé.
- Contrôler l’état de charge des batteries,
en tournant la clé (29) sur «ON» et l’in-
dication de charge apparaît sur l’acher
(41).
49029600_Manuale RACER_RANGER_8ed_04-2023.indd 1249029600_Manuale RACER_RANGER_8ed_04-2023.indd 12 06/04/2023 15:04:0606/04/2023 15:04:06

www.ghibliwirbel.com
Professional Cleaning Machines Since 1968
FRANÇAIS - 13
11.1.b - Préparation de la machine et
choix du cycle
- Asseyez-vous dans le siège du conduc-
teur.
- La machine a la possibilité d’eectuer 4
cycles de travail :
Cycle de lavage, brossage, séchage :
- Appuyer sur le bouton «Ready to go»
(42) « » pour préparer la distribution
du détergent, la rotation des brosses et le
démarrage de l’aspirateur.
Cycle de séchage seulement :
- Pour exécuter le cycle de séchage, ap-
puyez sur le bouton (44) « », vous
commencez l’aspirateur.
Cycle de brossage seulement :
- Pour exécuter le cycle de brossage, ap-
puyez sur le bouton (46) « », il pré-
paré la rotation de la brosse.
- La rotation des brosses commencera
lorsque la machine avec l’accélérateur (7)
enfoncée, commence à se déplacer vers
l’avant ou vers l’arrière, ou en appuyant
sur l’accélérateur et régler la vitesse
d’avance sur «0».
Cycle de lavage, brosses :
- Appuyez sur le bouton (46) « » pour
organiser la rotation des brosses et ap-
puyez sur le bouton (49) « » pour pré-
parer l’alimentation de l´eau.
- La rotation des brosses et la distribution
de l’eau démarrent quand on appuie sur
la pédale d’accélérateur avec la marche
avant ou arrière, ou bien avec le réglage
de la vitesse d’avancement au moins sur
la 1e encoche.
11.1.c - Utilisation de la machine
DANGER :
Faire particulièrement attention
lorsque l’on utilise la machine en
pente, pour éviter tout danger de ren-
versement ou des situations pouvant
rendre précaire la stabilité de la ma-
chine.
DANGER :
Eviter les braquages soudains et ef-
fectuer des braquages uniquement
avec le volant complètement tourné
et à basse vitesse, en tenant compte
des conditions du sol.
- Tourner la clé (29) sur «ON» ; pendant les
2 premières secondes d’allumage, l’écran
(41) indique le type de batteries installées
et les heures de travail de la machine.
- Sélectionner le type de cycle de travail à
réaliser.
- Enclencher la vitesse de travail souhaitée
en agissant sur les boutons (30).
- Allumer le gyrophare (10, en option) et les
feux de travail (9, en option).
- Procéder aux opérations de nettoyage en
agissant sur l’accélérateur (7).
REMARQUE :
En relâchant l’accélérateur la rotation des
brosses et la distribution de l’eau s’arrêtent.
REMARQUE :
Pour procéder correctement au nettoyage et
au séchage du sol, il est nécessaire d’utiliser
la machine en marche avant. Lorsque l’on
utilise la marche arrière, le suceur se soulève
et l’aspiration de l’eau résiduelle présente
sur le sol s’arrête.
- Si nécessaire, ajuster la quantité de solu-
tion de lavage à travers le bouton (49) «
».
- Contrôler l’état de charge des batteries
avec l’acher (41).
49029600_Manuale RACER_RANGER_8ed_04-2023.indd 1349029600_Manuale RACER_RANGER_8ed_04-2023.indd 13 06/04/2023 15:04:0806/04/2023 15:04:08

www.ghibliwirbel.com
Professional Cleaning Machines Since 1968
FRANÇAIS - 14
11.1.d - Fin d’utilisation et extinction
- Au terme des opérations de nettoyage
arrêter la machine en suivant les étapes
suivantes: rotation des brosses et aspira-
teur en agissant sur les commandes cor-
respondantes en fonction du type de cycle
utilisé.
- Tourner la clé (29) sur «OFF».
- Le frein de stationnement est activé auto-
matiquement.
- Vider et laver le réservoir de récupéra-
tion ainsi que le réservoir de la solution
comme indiqué dans les paragraphes cor-
respondants.
REMARQUE :
Lorsque l’opérateur sort hors de la machine,
le frein de stationnement est activé automa-
tiquement.
DANGER :
Il est interdit de garer la machine en
pente.
12 -
12.1 - VIDANGE EAU DE
RÉCUPÉRATION (Fig. H)
DANGER :
Prendre soin de vérifier que le réser-
voir de l’au de récupération (11) soit
vide avant de le soulever.
A la n du cycle de lavage ou bien quand le
réservoir (11) de l’eau de récupération est
plein, il faut le vider en opérant comme décrit
ci-dessous :
REMARQUE :
Pour l’élimination de l’eau de récupération se
référer aux normes en vigueur dans le pays
d’utilisation de la machine.
- Placer la machine près d’une bonde de
vidange.
- Décrocher le tuyau (15) de ses attaches,
le baisser jusqu’au sol sur la bonde de
vidange.
- Dévisser le bouchon (56) et vidanger com-
plètement l’eau de récupération contenue
dans le réservoir.
REMARQUE :
Il est possible de moduler la quantité d’eau
distribuée en appuyant sur la partie finale du
tuyau (15).
- Revisser le bouchon (56) et replacer le
tuyau (15) sur son support.
13 -
13.1 - ENTRETIEN ET
NETTOYAGE
AVERTISSEMENT :
Pour plus d’informations et les aver-
tissements relatifs à l’entretien ou
de nettoyage, suivre les instructions
données dans le livret «Consignes de
sécurité pour le machines de lavage»
joint à la présente.
13.2 - OPÉRATIONS À
EFFECTUER TOUS LES
JOURS
13.2.a - Vidange et nettoyage du ré-
servoir d’eau propre (Fig. I)
AVERTISSEMENT :
A la fin des opérations de lavage ; il
est obligatoire de vider et de nettoyer
le réservoir d’eau (13) propre pour
éviter les dépôts ou les incrustations.
Après avoir vider le réservoir d’eau de récu-
pération, vider le réservoir d’eau propre (13),
en procédant comme suit :
- Placer la machine près d’une bonde de
vidange.
49029600_Manuale RACER_RANGER_8ed_04-2023.indd 1449029600_Manuale RACER_RANGER_8ed_04-2023.indd 14 06/04/2023 15:04:0806/04/2023 15:04:08

www.ghibliwirbel.com
Professional Cleaning Machines Since 1968
FRANÇAIS - 15
- Débrancher le tube (17) des crochets spé-
ciaux, le baisser à terre sur la bonde de
vidange, enlever le bouchon (57) et vider
entièrement l’eau.
- Laver l’intérieur du réservoir en laissant le
tuyau de vidange ouvert et en introduisant
de l’eau propre par l’ouverture supérieure.
- Au terme du nettoyage soulever le tuyau
(17), refermer le bouchon (57) et accro-
cher le tuyau à ses supports.
13.2.b - Nettoyage du réservoir d’eau
de récupération (Fig. J)
AVERTISSEMENT :
Une fois les opérations de lavage
terminées, il faut obligatoirement
nettoyer le réservoir d’eau de récu-
pération pour éviter des dépôts ou
des incrustations et la prolifération
de bactéries, d’odeurs et de moisis-
sures.
- Soulever le couvercle (12).
- Enlever le bac de collecte des déchets
(58) et ouvrir son couvercle, puis nettoyer
à l’eau courante, en enlevant les éven-
tuels morceaux de papier, de bois, etc.
qui l’obstruent.
- Enlever et nettoyer le ltre d’aspiration
(59) à l’eau courante.
- Laisser le tuyau de vidange (15 Fig. H)
baissé et le bouchon enlevé, introduire
de l’eau par l’ouverture supérieure (60),
puis rincer l’intérieur du réservoir jusqu’à
ce que de l’eau propre sorte du tuyau de
vidange.
- Remonter l’ensemble en procédant dans
le sens inverse.
13.2.c - Nettoyage suceur (Fig. K)
Pour eectuer un nettoyage du groupe su-
ceur (20), il faut l’enlever comme indiqué ci-
dessous :
- Débrancher le tube (16 Fig. C) du groupe
suceur (20).
- Dévisser les volants de serrage (36 Fig.
C) et enlever le groupe suceur (20).
- Laver le groupe et plus particulièrement
les pièces en caoutchouc (60) et (61) et
l’intérieur du raccord d’aspiration (62).
REMARQUE :
Si au cours du nettoyage, il s’avère que les
caoutchoucs (60) et (61) sont abîmés ou
usés, il faut soit les remplacer soit les inver-
ser.
- Remonter le tout en procédant en sens
inverse.
13.3 - OPÉRATIONS A
EFFECTUER TOUS LES 3
MOIS
13.3.a - Contrôle de l’état d’usure de
la chaîne de direction (Fig. L)
- Contrôler l’état d’usure et de corrosion de
la chaîne (63) située sous la machine à
côté de la roue antérieure.
- Si la chaîne présente des traces de corro-
sion il est nécessaire de la remplacer en
s’adressant au service d’assistance tech-
nique.
13.4 - OPÉRATIONS À
EFFECTUER SELON LES
BESOINS
13.4.a - Remplacement brosses (Fig.
M)
Il est nécessaire de remplacer les brosses
lorsque celles-ci sont usées et présentent
une longueur inférieure à 2 cm ou bien
doivent être remplacées en fonction du type
de sol à nettoyer. Pour le remplacement pro-
céder de la manière suivante :
- Enler une main sous le groupe porte-
brosses (19), pour décrocher la brosse
la tourner d’un coup sec dans le sens
contraire à la rotation.
- Positionner sous le groupe porte-brosses
(19) les nouvelles brosses.
49029600_Manuale RACER_RANGER_8ed_04-2023.indd 1549029600_Manuale RACER_RANGER_8ed_04-2023.indd 15 06/04/2023 15:04:0806/04/2023 15:04:08

www.ghibliwirbel.com
Professional Cleaning Machines Since 1968
FRANÇAIS - 16
- S’asseoir au poste de conduite, tourner la
clé (29 Fig. F) en position «ON».
- Mettre la vitesse d’avancement sur la
valeur «0».
- Appuyer sur le bouton (46 Fig. F) «
» pour activer la rotation des brosses ; le
groupe brosses se baisse.
- Lorsqu’on appuie sur la pédale d’accélé-
rateur (7 Fig.
- A), les brides porte-brosses commencent
à tourner en accrochant les brosses, puis
relâcher la pédale.
- Appuyer à nouveau sur le bouton (46 Fig.
F) « » et tourner la clé (29 Fig. F) en
position «OFF».
13.4.b - Réglage du caoutchouc du
pare-éclaboussures (Fig. M)
Selon le type de sol à traiter ou après le rem-
placement des brosses à disques, il peut être
nécessaire de régler la hauteur du caout-
chouc de protection anti-éclaboussures (64).
Pour l’ajuster, procédez comme suit:
- Tournez la clé (29 Fig. F) en position
«ON».
- Appuyez sur le bouton (46 Fig. F) “ ”
pour abaisser la tête de brosse (19), puis
tournez la clé (29 Fig. F) sur “OFF”.
- Vériez la hauteur correcte du caoutchouc
du pare-éclaboussures comme indiqué
sur la gure M.
- Si nécessaire, agissez manuellement sur
le caoutchouc pour rétablir la bonne hau-
teur.
REMARQUE:
La hauteur correcte du caoutchouc de pro-
tection contre les éclaboussures est lorsque,
pendant le fonctionnement et la tête de
brosse est abaissée, le caoutchouc lui-
même aeure le sol.
- À la n du réglage, remettez la machine
en marche et appuyez sur le bouton (46
Fig. F) “ ”, puis tournez la clé (29 Fig.
F) sur «OFF».
13.4.c - Substitution des raclettes en
caoutchouc (Fig. K)
A partir du moment où le séchage du sol
s’avère difficile ou bien que des traces
d’eau restent sur le sol, il faut contrôler l’état
d’usure des raclettes en caoutchouc du
groupe suceur (20).
- Enlever le groupe suceur (20) comme
indiqué dans le paragraphe « nettoyage
groupe suceur ».
- Appuyez le dispositif de blocage (65) et
ouvrez la poignée (66).
- Sortez les deux colliers de xation du
pneu (67) et sortez le pneu extérieur (60).
- Desserrez les deux ridoirs (68) et sortez
la tringle de verrouillage (69) et le pneu
intérieur (61).
REMARQUE :
Lorsque les caoutchoucs (60) ou (61) sont
usés d’un côté, ils peuvent être retournés
une fois.
- Substituer ou retourner le caoutchouc
(60) ou (61) sans les intervertir.
- Remonter le tout en procédant en sens
contraire.
REMARQUE :
Il existe deux types de caoutchouc :
Le caoutchouc en para pour tous les types
de sols et le caoutchouc en polyuréthane
pour les sols d’atelier mécanique présentant
des traces d’huile.
49029600_Manuale RACER_RANGER_8ed_04-2023.indd 1649029600_Manuale RACER_RANGER_8ed_04-2023.indd 16 06/04/2023 15:04:0806/04/2023 15:04:08

www.ghibliwirbel.com
Professional Cleaning Machines Since 1968
FRANÇAIS - 17
13.4.d - Réglage incidence suceur
(Fig. N)
- Démarrer la machine et appuyer sur le
bouton (44 Fig. F) « ».
- Mettre la vitesse maximum sur la 1e en-
coche avec les boutons (30 Fig. F), ap-
puyer sur la pédale d’accélérateur (7 Fig.
A) et se déplacer de quelques mètres,
puis arrêter et descendre de la machine.
- Agir sur la barre letée (70) pour régler
l’incidence que les raclettes (60) et (61)
ont avec le sol, en tournant dans le sens
des aiguilles d’une montre, on obtient une
plus grande incidence et inversement, on
obtient une incidence moindre.
REMARQUE :
On obtient une incidence correcte lorsque
durant le fonctionnement il n’y a pas de
traces ni de lets de liquide sur le sol et que
la raclette a une incidence constante sur
toute sa longueur.
13.4.e - Réglage de la pression des
suceur (Fig. O)
Selon le type de sol à traiter ou après
le remplacement des caoutchoucs de la
raclette, il peut être nécessaire d’ajus-
ter la pression au sol de la raclette.
Pour l’ajuster, procédez comme suit:
- Soulevez le réservoir d’eau de récupéra-
tion (11) en vous assurant qu’il est vide.
- Agir sur la vis de réglage (71) en tenant
compte du fait que:
• Tourner dans le sens des aiguilles
d’une montre diminue la pression au
sol de la raclette.
• Tourner dans le sens inverse des ai-
guilles d’une montre augmente la pres-
sion au sol de la raclette.
- À la n du réglage, abaissez soigneuse-
ment le réservoir d’eau de récupération
(11).
13.4.f - Nettoyage du ltre d’eau
propre (Fig. P)
- Assurez-vous que le réservoir (13 Fig. A)
est vide.
- Enlever le bouchon (22) et extraire la car-
touche ltre (72).
- Nettoyer la cartouche ltre (72) à l’eau du
robinet.
- Remontez tout, suivant dans l’ordre in-
verse, en vous assurant que le joint (73)
est positionné correctement.
13.4.g - Robinet de vidange du com-
partiment à piles (Fig. A)
- Vériez périodiquement qu’il n’y a pas de
stagnation de l’eau dans le compartiment
de la batterie.
- Si nécessaire, placez-vous avec la ma-
chine près d’un drain de drainage, décro-
chez le tuyau et ouvrez le robinet (74),
puis vidangez les liquides.
AVERTISSEMENT :
Lorsque l’utilisation de batteries au
plomb-acide est envisagée, accordez
la plus grande attention à la fuite pos-
sible de liquide des batteries elles-
mêmes, aux risques attachés et à la
réglementation pour l’élimination des
liquides / substances dangereuses.
13.4.h - Contrôle état d’usure des
trois roues (Fig. A)
- Contrôler régulièrement l’état d’usure des
roues (8) et (23); si elles présentent des
traces d’usure ou si elles sont endomma-
gées, il est nécessaire de les remplacer
en s’adressant au service d’assistance
technique.
DANGER :
Opérer avec les roues usées ou
endommagées comporte un dan-
ger pour l’opérateur car la machine
pourrait avoir une tenue de conduite
réduite dans les virages.
14 -
49029600_Manuale RACER_RANGER_8ed_04-2023.indd 1749029600_Manuale RACER_RANGER_8ed_04-2023.indd 17 06/04/2023 15:04:0806/04/2023 15:04:08

www.ghibliwirbel.com
Professional Cleaning Machines Since 1968
FRANÇAIS - 18
14.1 - RÉGLAGE DES
PARAMÈTRES (Fig. F)
14.1.a - Paramètres OPÉRATEUR
L’opérateur a la possibilité d’accéder au
menu pour congurer les paramètres sui-
vants :
• Langue
• Type de batteries
• Écran - Contraste
• Écran - Luminosité
Pour accéder au menu, agir de la manière
suivante :
- Appuyer et maintenir appuyés les boutons
(31a) « » et (31b) « », puis tour-
ner la clé d’allumage (29) sur «ON» pour
acher la page-écran suivante :
General
General
Sets
Sets
--ID Check--
--ID Check--
insert password:
insert password:
0
0
000
000
General Sets Paramètres généraux
ID Check Contrôle
Insert password Saisir le mot de passe
- Relâcher les boutons appuyés.
- Saisir le mot de passe de 4 chires «0010»
en appuyant sur les boutons (30a) «
» ou (30b) « » pour modier la valeur
du chire qui clignote.
- Appuyer sur le bouton (43) « » pour
conrmer et passer au chire suivant,
mais aussi, à la n pour conrmer le mot
de passe et accéder à la liste des para-
mètres.
- Appuyer sur le bouton (31a) « » ou
(31b) « » pour faire déler les pages-
écrans suivantes :
General
General
Language
Language
Main
Main
selection:
selection:
ITA
ITA
General Main Conguration principale
Language selection Sélection langue
General
General
Battery
Battery
Main
Main
Type:
Type:
GEL
GEL
General Main Conguration principale
Battery Type Sélection du type de batterie
General
General
Display
Display
min:0
min:0
max:50
max:50
Main
Main
Tune:
Tune:
15
15
General Main Conguration principale
Display Tune Contraste écran
General
General
Display
Display
min:0
min:0
max:10
max:10
Main
Main
Brightness:
Brightness:
0
0
General Main Conguration principale
Display Brightness Luminosité écran
49029600_Manuale RACER_RANGER_8ed_04-2023.indd 1849029600_Manuale RACER_RANGER_8ed_04-2023.indd 18 06/04/2023 15:04:1706/04/2023 15:04:17

www.ghibliwirbel.com
Professional Cleaning Machines Since 1968
FRANÇAIS - 19
Conguration langue :
General
General
Language
Language
Main
Main
selection:
selection:
ITA
ITA
General Main Conguration principale
Language selection Sélection langue
- Choisir la langue en agissant sur les bou-
tons (30a) « » ou (30b) « », puis
appuyer sur le bouton (43) « » pour
conrmer le choix ;
-ITA = Italien
-ENG = Anglais
Conguration du type de batterie :
General
General
Battery
Battery
Main
Main
Type:
Type:
GEL
GEL
General Main Conguration principale
Battery Type Sélection du type de batterie
- Choisir le type de batterie en agissant sur
les boutons (30a) « » ou (30b) «
», puis appuyer sur le bouton (43) « »
pour conrmer le choix ;
-GEL = Batterie au Gel
-AGM = Batterie AGM
-WET = Batterie à l’ACIDE
Conguration écran - Contraste :
General
General
Display
Display
min:0
min:0
max:50
max:50
Main
Main
Tune:
Tune:
15
15
General Main Conguration principale
Display Tune Contraste écran
- Choisir le type de contraste de l’écran
en sélectionnant une valeur de «0 à 50»
au moyen des boutons (30a) « » ou
(30b) « », puis appuyer sur le bouton
(43) « » pour conrmer le choix.
Conguration écran - Luminosité :
General
General
Display
Display
min:0
min:0
max:10
max:10
Main
Main
Brightness:
Brightness:
0
0
General Main Conguration principale
Display Brightness Luminosité écran
- Choisir le type de luminosité de l’écran
en sélectionnant une valeur de «0 à 10»
au moyen des boutons (30a) « » ou
(30b) « », puis appuyer sur le bouton
(43) « » pour conrmer le choix.
REMARQUE :
Lors de la confirmation de la configuration
choisie, la machine redémarre et l’écran (41)
s’allume dans la modalité opérationnelle de
travail.
15 -
49029600_Manuale RACER_RANGER_8ed_04-2023.indd 1949029600_Manuale RACER_RANGER_8ed_04-2023.indd 19 06/04/2023 15:04:1706/04/2023 15:04:17

www.ghibliwirbel.com
Professional Cleaning Machines Since 1968
FRANÇAIS - 20
15.1 - CONTRÔLE / REMPLACEMENT DES FUSIBLES
REMARQUE :
Tous les circuits électriques de la machine sont protégés par des dispositifs électroniques
à réarmement automatique, les fusibles de sécurité agissent seulement en cas de pannes
graves.
Par conséquent, on conseille de contacter le personnel qualifié pour l’éventuel remplacement
des fusibles.
16 -
16.1 - ALARMES PENDANT LE FONCTIONNEMENT
Lorsqu’un dysfonctionnement se présente sur la machine, l’écran (41 Fig. F) ache le type
d’alarme, selon la liste fournie ci-après.
Consulter la liste et appliquer la solution conseillée pour rétablir le bon fonctionnement de la
machine.
Si les solutions conseillées ne donnent pas de résultat positif, contacter le Service d’Assis-
tance Technique.
ALARME SIGNIFICATION SOLUTION
AL_1: General Erreur mémoire Redémarrer la machine.
AL_2: General Anomalie clé Arrêter la machine pendant 10 secondes au moins,
puis redémarrer.
AL_3: General Sous-tension
Arrêter la machine, contrôler l’état de charge de la
batterie, les fusibles, les contacts, les câblages et
les connexions et redémarrer la machine.
AL_4: General Surtension
Arrêter la machine, contrôler les fusibles, les
contacts, les câblages et les connexions et redé-
marrer la machine.
AL_6: General Absence de communica-
tion avec le tableau de
bord ou l’écran
Arrêter la machine, contrôler les contacts, les câ-
blages et les connexions et redémarrer la machine.
AL_7: General Communication ffm
Arrêter la machine, contrôler les contacts, les
câblages et les connexions avec le module de
communication, ainsi que le fonctionnement de ce
dernier, puis redémarrer la machine.
AL_8: General Communication Interne
1 et 2 Redémarrer la machine.
AL_9: General
AL_10: General Insérer tag Visualisation manquante de la Clé «Tag» : insérer
la clé.
AL_11: General Tag non valable Erreur de visualisation de la Clé «Tag» : changer
de clé ou clé endommagée.
AL_12: General Mise à jour en cours...
Visualisation de la mise à jour des paramètres à
distance en cours : attendre jusqu’à la n de la
mise à jour.
49029600_Manuale RACER_RANGER_8ed_04-2023.indd 2049029600_Manuale RACER_RANGER_8ed_04-2023.indd 20 06/04/2023 15:04:1706/04/2023 15:04:17

www.ghibliwirbel.com
Professional Cleaning Machines Since 1968
FRANÇAIS - 21
ALARME SIGNIFICATION SOLUTION
AL_13: General Éteindre Visualisation mise à jour des paramètres terminée
: redémarrer la machine.
AL_41: Function Surchauffe
Arrêter et laisser refroidir la machine.
Contrôler l’absorption des moteurs des brosses et
de l’aspirateur, l’état de ventilation de l’environne-
ment et redémarrer.
AL_42: Function Puissance endommagée Arrêter la machine pendant 10 secondes au
moins, puis redémarrer.
AL_44: Function Relais défaillant
Non fermeture du Relais/Télérupteur.
Vérier le fonctionnement du Télérupteur. En cas
de relais embarqué, si la défaillance persiste,
remplacer la carte.
AL_45: Function Relais défaillant cc
Détection de Relais/Télérupteur fermé à l’allu-
mage.
Vérier l’état des contacts Télérupteur. En cas
de relais embarqué, si la défaillance persiste,
remplacer la carte.
AL_46: Function Surintensité Brosses
Arrêter la machine, vérier la charge (moteur),
la mécanique, le câblage et les connexions, et
rechercher la présence d’un court-circuit à la
sortie, puis redémarrer.
AL_47: Function Surintensité Aspirateur
Arrêter la machine, vérier la charge (moteur),
la mécanique, le câblage et les connexions, et
rechercher la présence d’un court-circuit à la
sortie, puis redémarrer.
AL_48: Function Surintensité Pompe eau
Arrêter la machine, vérier la charge (moteur),
la mécanique, le câblage et les connexions, et
rechercher la présence d’un court-circuit à la
sortie, puis redémarrer.
AL_49: Function Ampèremétrique
Brosse 1 et 2
Vérier la consommation et les modalités d’uti-
lisation de la fonction brosses et redémarrer la
machine.
AL_50: Function
AL_52: Function Ampèremétrique
Aspirateur 1
Vérier la consommation de la fonction aspirateur
et redémarrer la machine.
AL_54: Function Connexion
Brosse 1 et 2 Vérier la connexion des moteurs brosse.
AL_55: Function
AL_57: Function Connexion Aspirateur 1 Vérier la connexion du moteur aspirateur.
AL_59: Function Déséquilibre Vérier l’absorption des moteurs brosse
AL_61: Function Ampèremétrique Action-
neur brosses
Vérier la consommation du moteur de l’action-
neur et l’état de la mécanique actionnée.
49029600_Manuale RACER_RANGER_8ed_04-2023.indd 2149029600_Manuale RACER_RANGER_8ed_04-2023.indd 21 06/04/2023 15:04:1706/04/2023 15:04:17

www.ghibliwirbel.com
Professional Cleaning Machines Since 1968
FRANÇAIS - 22
ALARME SIGNIFICATION SOLUTION
AL_62: Function Surintensité Actionneur
brosses
Arrêter la machine, vérier la charge (moteur),
la mécanique, le câblage et les connexions, et
rechercher la présence d’un court-circuit à la
sortie.
AL_63: Function Fin de course Actionneur
brosses
Vérier les connexions / l’état de la n de course.
Contrôle actif uniquement pour la version BTO.
AL_65: Function Ampèremétrique Action-
neur raclette
Vérier la consommation du moteur de l’action-
neur et l’état de la mécanique actionnée.
AL_66: Function Surintensité Actionneur
raclette
Arrêter la machine, vérier la charge (moteur),
la mécanique, le câblage et les connexions, et
rechercher la présence d’un court-circuit à la
sortie.
AL_80: Traction Surchauffe Moteur
Traction
Arrêter et laisser refroidir la machine. Vérier la
consommation et les modalités d’utilisation de la
traction, l’état de la ventilation de l’environnement
et redémarrer.
AL_85: Traction Surintensité Moteur
Traction
Arrêter la machine, vérier la charge (moteur),
la mécanique, le câblage et les connexions, et
rechercher la présence d’un court-circuit à la
sortie, puis redémarrer.
AL_86: Traction Ampèremétrique Moteur
Traction
Vérier la consommation et les modalités d’uti-
lisation de la fonction traction et redémarrer la
machine.
AL_87: Traction Lecture Moteur Traction Redémarrer la machine.
AL_88: Traction Anomalie Frein électrique Arrêter la machine, vérier le câblage du frein et
redémarrer.
AL_89: Traction Défaillance Pédale d’accé-
lérateur
Arrêter la machine, vérier les connexions et le
câblage, puis redémarrer.
AL_90: Traction Pédale d’accélérateur
Enfoncée Relâcher la pédale et redémarrer la machine.
AL_91: Traction Encodeur défaillant Arrêter la machine, vérier les connexions et le
câblage, puis redémarrer.
17 -
49029600_Manuale RACER_RANGER_8ed_04-2023.indd 2249029600_Manuale RACER_RANGER_8ed_04-2023.indd 22 06/04/2023 15:04:1706/04/2023 15:04:17

www.ghibliwirbel.com
Professional Cleaning Machines Since 1968
FRANÇAIS - 23
17.1 - DÉPISTAGE DES PANNES
PROBLÈMES CAUSE RÉPARATIONS
La machine ne démarre
lorsque l’on tourne la clé.
La batterie est déchargée. Contrôler l’état de charge de
la batterie.
Le fusible général est grillé. Remplacer le fusible position-
né sur le câble batterie. (*)
Clé défectueuse. Remplacer la clé. (*)
La brosse ne tourne pas Problèmes de moteur. Remplacer le moteur. (*)
Échec du carte. Remplacez la carte. (*)
L’aspirateur ne fonctionne
pas.
Réservoir de récupération
plein.
Vider le réservoir.
Moteur à turbine défec-
tueuse.
Remplacer le moteur. (*)
Échec du carte. Remplacez la carte. (*)
La machine n’essuie pas ou
essuie mal en laissant des
traces d’eau sur le sol.
L’aspirateur est éteint. Démarrer l’aspirateur.
Le tuyau d’aspiration est en-
crassé.
Contrôler et éventuellement
nettoyer le tuyau d’aspiration
qui relie de groupe suceur au
réservoir de récupération.
Le réservoir de récupération
est plein
Vider le réservoir de récupé-
ration.
Les raclettes en caoutchouc
sont usées.
Retourner ou substituer les
raclettes en caoutchouc.
L’eau ne sort plus. Réservoir vide. Remplir le réservoir.
Filtre engorgé. Nettoyer le ltre.
L’électrovalve de la pompe
ne fonctionne pas.
Remplacez la pompe de
l’électrovanne. (*)
Pompe à eau défectueuse. Remplacer la pompe à eau.
(*)
Échec du carte. Remplacez la carte. (*)
49029600_Manuale RACER_RANGER_8ed_04-2023.indd 2349029600_Manuale RACER_RANGER_8ed_04-2023.indd 23 06/04/2023 15:04:1706/04/2023 15:04:17

www.ghibliwirbel.com
Professional Cleaning Machines Since 1968
FRANÇAIS - 24
PROBLÈMES CAUSE RÉPARATIONS
La machine ne se déplace
pas en condition de travail.
Opérateur non assis correc-
tement su poste de conduite.
S’asseoir correctement sur le
siège.
Moto roue défectueuse. Remplacement moto roue. (*)
Échec du carte. Remplacez la carte. (*)
Dysfonctionnement du cap-
teur de présence opérateur..
Remplacez le capteur. (*)
Le nettoyage du sol est insuf-
sant.
Les brosses ou les déter-
gents sont inadaptés.
Utiliser des brosses ou des
détergents adaptés au type
de sol ou selon le degré de
saleté à nettoyer.
Brosses usées. Remplacez les brosses.
L’icône du réservoir de solu-
tion vide « » continue de
clignoter.
Réservoir vide. Remplissez le réservoir.
Appuyez sur fermé. Ouvrez le robinet.
Débitmètre défectueux. Remplacez le débitmètre. (*)
Dans le compartiment de la
batterie, il y a une stagnation
de l’eau.
Capteur de niveau de réser-
voir de récupération défec-
tueux.
Vidangez l’eau dans le com-
partiment de la batterie avec
le tuyau et le robinet appro-
priés.
Vériez ou remplacez le cap-
teur de niveau. (*)
(*) Appelez le service client pour demander un remplacement.
18 -
18.1 - DÉMOLITION DE LA MACHINE
DANGER :
Les batteries et les pièces électriques doivent être considérées comme des
déchets spéciaux et doivent donc être éliminées dans des installations de col-
lecte appropriées, conformément à la réglementation en vigueur dans le pays
d’utilisation.
19 -
49029600_Manuale RACER_RANGER_8ed_04-2023.indd 2449029600_Manuale RACER_RANGER_8ed_04-2023.indd 24 06/04/2023 15:04:1806/04/2023 15:04:18

www.ghibliwirbel.com
Professional Cleaning Machines Since 1968
FRANÇAIS - 25
19.1 - SCHÉMA ÉLECTRIQUES
Légende :
AC Accélérateur
BAT Batteries
BC Chargeur de batterie
BE Lumière clignotante
BRK Frein électromagnétique
C1 Connecteur batteries
EB1 Carte fonctions
EB2 Écran
EB3 Panneau de commande
EV Électrovanne
F1 Fusible chargeur de batterie (1A)
F2 Fusible lumières (le cas échéant) (3A)
F3 Fusible klaxon (1A)
F4 Fusible lumière clignotante (1A)
F5 Fusible électrovanne (5A)
F6 Fusible actionneur tête brosses (10A)
F7 Fusible actionneur raclette (10A)
F8 Fusible frein électrique (7.5A)
F9 Fusible pompe eau (5A)
F10
Fusible pompe chem (le cas échéant) (5A)
F11 Fusible moteur aspiration (40A)
F12 Fusible moteur brosse droite (40A)
F13 Fusible moteur brosse gauche (40A)
F14 Fusible moteur traction (100A)
HN Klaxon
KEY Clé de démarrage
L1 Feux de travail (le cas échéant)
MA Moteur aspiration
MAS Moteur actionneur tête brosses
MAT Moteur actionneur raclette
MS-DX Moteurs brosse droite
MS-SX Moteurs brosse gauche
MT Moteur traction
PA Pompe eau
PC Pompe chimique
PE Bouton d’arrêt d’urgence
S1
Capteur du niveau d’eau de récupération
SW1 Micro-interrupteur siège
TE Télérupteur externe
Codes couleur :
BK Noir
BU Bleu
BN Marron
GN Vert
GY Gris
OG Orange
PK Rose
RD Rouge
VT Violet
WT Blanc
YE Jaune
49029600_Manuale RACER_RANGER_8ed_04-2023.indd 2549029600_Manuale RACER_RANGER_8ed_04-2023.indd 25 06/04/2023 15:04:1806/04/2023 15:04:18

www.ghibliwirbel.com
Professional Cleaning Machines Since 1968
FRANÇAIS - 26
PA MT PC EV
- +
-
-
-
-
+ -+ -+
+
+
+
MA MS MS
DX SX
C1
BC
TE
EB2
EB3
KEY
L1
BE
F4
F1
F2
F8
F9 F14 F10 F5 F11 F12 F13
F7
F6
F3
BRK
AC
M
SW1
M5
J8
4 3
2 1
4 3
2 1
1
4
2
5
3
6
9
1
10
2
11
3
4
1
5
2
6
3
4
1
5
2
6
3
4
1
5
2
6
3
12
4
4
8
1
2
3
7
2
6
1
5
3
6
2
5
1
1
12
3s
+
-
2
1
1
2
3
4
2 3
123
456 4
1
11
2
12
3
13
4
14
5
15
6
16
7
17
8
18
9
19
10
20
4
9
3
8
5
10
2
7
1
6
13
5
16
8
15
7
14
6
2
1
J9 J10 J11
J1
J8 J7
J2
S1
J3 J4 J5 J7J6
J12 J13 J14
M6
USB
HN
BATBAT MATMAT
PEPE
MASMAS
EB1
49029600_Manuale RACER_RANGER_8ed_04-2023.indd 2649029600_Manuale RACER_RANGER_8ed_04-2023.indd 26 06/04/2023 15:04:2006/04/2023 15:04:20

www.ghibliwirbel.com
Professional Cleaning Machines Since 1968
DEUTSCH - 1
Sehr verehrter Kunde,
Wir bedanken uns bei Ihnen dafür, dass Sie eines unserer Produkte zur Reinigung Ihrer
Räume gekauft haben.
Der von Ihnen erworbene Wasch-Trockenfußbodenreiniger wurde für eine unkompli-
zierte Handhabung und für eine lange Lebensdauer entwickelt.
Uns ist bewusst, dass ein gutes Produkt, um im Laufe der Zeit gut zu bleiben, ständig
verbessert we die jene zufrieden zu stellen, die tagtäglich mit ihm umgehen. Daher wün-
schen wir uns, dass Sie nicht nur ein zufriedener Kunde sind, sondern auch ein Partner,
der sich nicht davor scheut, uns seine Meinungen und seine jeden Tag mit dem Gerät
gemachten Erfahrungen mitteilt.
49029600_Manuale RACER_RANGER_8ed_04-2023.indd 149029600_Manuale RACER_RANGER_8ed_04-2023.indd 1 06/04/2023 15:04:2106/04/2023 15:04:21

www.ghibliwirbel.com
Professional Cleaning Machines Since 1968
DEUTSCH - 2
INHALTSANGABE
INHALTSANGABE ......................................................................................................................... 2
TECHNISCHE DATEN .................................................................................................................... 3
1.1 - EINLEITUNG........................................................................................................................5
1.1.a - Bedienerstellung ........................................................................................................... 5
1.1.b - Allgemeine Hinweise während des Gebrauchs ............................................................ 5
1.2 - NICHT VORGESEHENER GEBRAUCH DER MASCHINE ................................................ 5
2.1 - MASCHINENKENNTNISSE
(Abb. A) ..............................................................................5
3.1 - ENTPACKUNG (Abb. B) ..................................................................................................... 5
3.1.a - Installierung Batterien (Abb. A) ..................................................................................... 6
3.1.b - Abladen der Maschine von der Holzpalette (Abb. B) .................................................... 6
4.1 - ZUSAMMENBAU DER BAUTEILE ..................................................................................... 6
4.1.a - Installierung des Bodenwi schers (Abb. C) ................................................................... 6
4.1.b - Bürstenmontage ........................................................................................................... 6
5.1 - AUFLADEN DER BATTERIE .............................................................................................. 6
5.1.a - Auaden der Batterie durch externes Ladegerät (Abb. G) ........................................... 7
5.1.b - Batterieladung mit integriertem Ladegerät (falls vorhanden) (Abb. G) ......................... 7
6.1 - BESCHREIBUNG DER MASCHINENSTEUERUNG .......................................................... 7
6.1.a - Schalttafel (Abb. F) ....................................................................................................... 7
6.1.b - Beschleunigerpedal (Abb. A) ...................................................................................... 10
7.1 - DISPLAY (Abb. F).............................................................................................................. 10
8.1 - NOTFALL ........................................................................................................................... 11
9.1 - SICHERHEITSFUNKTIONEN
(Abb. A) ............................................................................ 11
10.1 - TANKAUFFÜLLUNG (Abb. D) .......................................................................................... 12
10.2 - TANK FÜR SPÜLMITTEL / CHEMISCHE STOFFE (Falls vorhanden) (Abb. E) ............ 12
11.1 - ARBEITSWEISE (Abb. A-F) ........................................................................................ 12
11.1.a - Kontrollen vor Arbeitsbeginn .......................................................................................12
11.1.b - Vorbereitung der Maschine und Funktionswahl ..........................................................13
11.1.c - Gebrauch der Maschine ............................................................................................. 13
11.1.d - Arbeitsende und Ausschalten ..................................................................................... 14
12.1 - ENTSORGUNG DES SCHMUTZWASSERS (Abb. H)......................................................14
13.1 - WARTUNG UND REINIGUNG...........................................................................................14
13.2 - TÄGLICH AUSZUFÜHRENDE MASSNAHMEN ............................................................... 14
13.2.a - Leeren und Reinigen des Frischwassertanks (Abb. I) ................................................ 14
13.2.b - Reinigung des Schmutzwassertanks (Abb. J) ............................................................ 15
13.2.c - Reinigung des Bodenwischers (Abb. K) ..................................................................... 15
13.3 - MASSNAHMEN, DIE ALLE 3 MONATE DURCHZUFÜHREN SIND ................................ 15
13.3.a - Überprüfen Sie den Verschleißzustand der Lenkerkette (Abb. L) .............................. 15
13.4 - BEI BEDARF DURCHZUFÜHRENDE MASSNAHMEN ................................................... 15
13.4.a - Auswechseln der Bürsten (Abb. M) ............................................................................ 15
13.4.b - Einstellen des Spritzschutzgummis (Abb. M) ............................................................. 16
13.4.c - Auswechseln des Wischergummis (Abb. K) ............................................................... 16
13.4.d - Einstellung der Schräge des Bodenwischers (Abb. N) ............................................... 17
13.4.e - Wischerdruckeinstellung (Abb. O) .............................................................................. 17
13.4.f - Reinigung des Frischwasserlters (Abb. P) ................................................................ 17
13.4.g - Batteriefach-Ablasshahn (Abb. A) .............................................................................. 17
13.4.h - Kontrolle des Verschleißzustandes der drei Räder (Abb. A) ......................................17
14.1 - EINSTELLUNG PARAMETER (Abb. F) ............................................................................ 18
14.1.a - OPERATOR-Parameter .............................................................................................. 18
15.1 - PRÜFUNG/AUSWECHSELN DER SICHERUNGEN ........................................................ 20
16.1 - ALARME WÄHREND DES BETRIEBS............................................................................. 20
17.1 - FEHLERSUCHE ................................................................................................................ 23
18.1 - ABBRUCH DER MASCHINE ............................................................................................ 24
19.1 - ELEKTRISCHE SCHALTPLÄNE ..................................................................................... 25
49029600_Manuale RACER_RANGER_8ed_04-2023.indd 249029600_Manuale RACER_RANGER_8ed_04-2023.indd 2 06/04/2023 15:04:2106/04/2023 15:04:21

www.ghibliwirbel.com
Professional Cleaning Machines Since 1968
DEUTSCH - 3
TECHNISCHE DATEN
RACER R 85 RANGER R 115
FD 65 FD 75 FD 75 FD 85
Führungstyp Aufsitzmaschine
Merkmale
Betrieb und Stromversorgung Batterie 24 V
Batterietyp
N° 2 - 12V 105Ah (C5) N° 4 - 6V 240Ah (C5)
N° 4 - 6V 180Ah (C5) N° 1 - 24V 320Ah (C5)
N° 1 - 24V 100Ah (Li) N° 1 - 24V 150Ah (Li)
Gesamtleistung 2160 W 2210 W
Betriebsdauer
2 h (105Ah C5) 5 h (240Ah C5)
4 h (180Ah C5) 7 h (320Ah C5)
2 h (100Ah Li) 3 h (150Ah Li)
Antrieb Fahrantrieb vor/zurück
Waschfußbreite 650 mm 750 mm 750 mm 850 mm
Saugfußbreite 850 mm 950 mm 950 mm 1050 mm
Theoretische Stundenleistung 4000 m2/h 4500 m2/h 4500 m2/h 5000 m2/h
Echte Stundenleistung 2400 m2/h 2700 m2/h 2700 m2/h 3000 m2/h
Vibration Hand-Arm (ISO 5349-1) < 2,5 m/s2
Vibration ganzer Körper (ISO 2631-1) < 0,5 m/s2
Schalldruck (ISO 11203) (LpA) 63 dB(A)
Schalldruck im lautlosen Modus (LpA) 57 dB(A)
IP-Schutzklasse IPX3
Bürsten
Durchmesser / pad / Anzahl 330 mm /
13” / 2
380 mm /
15” / 2
380 mm /
15” / 2
430 mm /
17” / 2
Motorleistung / Anzahl 500 W / 2
Drehgeschwindigkeit Bürste 165 U/min.
Spezifischer Druck 30 gr/cm221 gr/cm221 gr/cm217 gr/cm2
Spezifischer Druck (zusätzlicher Druck) 46 gr/cm232 gr/cm243 gr/cm234 gr/cm2
49029600_Manuale RACER_RANGER_8ed_04-2023.indd 349029600_Manuale RACER_RANGER_8ed_04-2023.indd 3 06/04/2023 15:04:2106/04/2023 15:04:21

www.ghibliwirbel.com
Professional Cleaning Machines Since 1968
DEUTSCH - 4
RACER R 85 RANGER R 115
FD 65 FD 75 FD 75 FD 85
Antrieb
Maximale Nutzungsneigung während der
Arbeit 2 %
Maximale Steigung im leeren Zustand (*) 12 %
Motorleistung 600 W
Höchstgeschwindigkeit im Arbeitsbetrieb 6 km/h
Saugen
Motorleistung 550 W
Unterdruck (Wassersäule) 125 mbar / 1250 mmH2O
Luftmenge 30 l/sec
Tank
Typ Doppeltank
Frischwasser 80 l 110 l
Schmutzwasser 85 l 115 l
Bemessungen
Maschinenabmessungen
(Länge x Weite x Höhe) 1375 x 705 x 1230 mm 1470 x 770 x 1365 mm
Maschinenbreite - Bürstendeck 715 mm 785 mm 785 mm 890 mm
Maschinenbreite - Rakel 885 mm 950 mm 950 mm 1055 mm
Abmessungen Batteriefach
(Länge x Breite x Höhe) 380 x 540 x 310 mm 380 x 625 x 440 mm
Gewicht
Leergewicht 213 kg 246 kg
Gewicht mit Batterien Gel 12V 105Ah 285 kg -
Gewicht mit Batterien Gel 6V 180Ah 333 kg -
Gewicht mit Lithium Batterie 24V 100Ah 249 kg -
Gewicht mit Batterien Gel 6V 240Ah - 432 kg
Gewicht mit Batterien Pb Wet 24V 320Ah - 506 kg
Gewicht mit Lithium Batterie 24V 150Ah - 288 kg
Betriebsgewicht (GVW) 490 kg 691 kg
(*) Die Maschine wurde unter folgenden Bedingungen getestet:
• Standardbatterie
• Leere Tanks
• Rohbetonrampe
• Rampenlänge 15 m
• 75 kg Bediener
1 -
49029600_Manuale RACER_RANGER_9ed_09-2023.indd 449029600_Manuale RACER_RANGER_9ed_09-2023.indd 4 04/09/2023 14:54:2904/09/2023 14:54:29

www.ghibliwirbel.com
Professional Cleaning Machines Since 1968
DEUTSCH - 5
1.1 - EINLEITUNG
HINWEIS:
Die Nummern und die in Klammern angege-
benen Zahlenangaben beziehen sich auf die
im beigefügten Abbildungsblatt angegebe-
nen Komponenten.
GEFAHR:
Bevor Sie das Gerät benutzen, lesen
Sie bitte die beigelegte Broschüre
„SICHERHEITSHINWEISE FÜR BO-
DENREINIGER“ und die Ergänzun-
gen.
1.1.a - Bedienerstellung
Der Betreiber sitzt während der Verwen-
dung der Maschine auf dem Sitz mit den
Händen auf dem Rad.
1.1.b - Allgemeine Hinweise wäh-
rend des Gebrauchs
- Lassen Sie die Maschine NICHT unbeauf-
sichtigt auf geneigten Flächen.
- Es ist absolut verboten in Schräglage zu
kurven; Umsturzgefahr.
- Vermeiden Sie es, die Maschine in Um-
gebungen zu benutzen, in denen Gegen-
stände herabfallen könnten.
1.2 - NICHT VORGESEHENER
GEBRAUCH DER MASCHINE
- Benutzen Sie die Maschine nicht bei ge-
önetem Schmutzwassertank.
- Fahren Sie nicht mit herab baumelnden
Füßen/Beinen.
- Führen Sie keine jähen Lenkmanöver, vor
allem bei Abfahrten, aus.
WARNUNG:
Die Maschine ist nur für den Trans-
port EINER Person geeignet.
2 -
2.1 - MASCHINENKENNTNISSE
(Abb. A)
(1) Lenker
(2) Schaltpult
(3) Bedienersitz
(4) Anwesenheitssensor des Bedieners
(5) Dieser NOT-AUS-KNOPF dient für das
sofortige Abschalten aller Funktionen
(6) Fußstütze
(7) Beschleunigungspedal
(8) Hinterräder
(9) Arbeitslicht (optional)
(10) Rundumleuchte (optional)
(11) Schmutzwassertank.
(12) Deckel vom Schmutzwassertank
(13) Frischwassertank
(14) Stecker
(15) Ablassschlauch für Schmutzwasser
(16)
Ansaugschlauch für Bodenwischerwasser
(17) Ablassschlauch für Frischwasser
(18) Reinigen Sie den Wassertank
(19) Bürstengruppe
(20) Bodenwischer
(21) Dokumentenfach
(22) Wasserlter
(23) Lenk- und Antriebsrad
(24) Halterung Sauglippenaufbewahrung
(25) Stützfuß Tankeinheit
3 -
3.1 - ENTPACKUNG (Abb. B)
Überprüfen Sie nach dem Entfernen der Ver-
packung, wie in der Gebrauchsanweisung
auf der Verpackung angegeben, die Unver-
sehrtheit der Maschine und aller mitgeliefer-
ten Komponenten.
Wenn oensichtliche Schäden festgestellt
werden, wenden Sie sich innerhalb von 3 Ta-
gen nach Erhalt an Ihren Händler und Spe-
diteur vor Ort.
- Entfernen Sie den Umschlag und die
Schachteln (26) mit dem mitgelieferten
Zubehör:
• (20) Bodenwischer.
• (32) Nr. 2 Bürsten.
- Heben Sie die Tankeinheit an und entneh-
men Sie die Dokumentation dem entspre-
chenden Umschlag:
• (33) Gebrauch und Wartungshandbuch
der Maschine.
• (34) Betriebsanleitung Batterieladege-
räte (wenn vorhanden).
49029600_Manuale RACER_RANGER_8ed_04-2023.indd 549029600_Manuale RACER_RANGER_8ed_04-2023.indd 5 06/04/2023 15:04:2606/04/2023 15:04:26

www.ghibliwirbel.com
Professional Cleaning Machines Since 1968
DEUTSCH - 6
3.1.a - Installierung Batterien (Abb.
A)
- Heben Sie vorsichtig den Sammelbehäl-
ter (11) hoch.
- Setzen Sie gemäß der Konguration die
Batterien (4 6 V-Batterien, 2 12 V-Batteri-
en, 1 Batteriesatz zu 24) wie in den Abbil-
dungen ein und schließen Sie sie mit den
mitgelieferten Kabeln und Steckern an.
- Setzen Sie den Wassersammeltank (11)
vorsichtig wieder ab.
HINWEIS:
Der Anschluss der Batterien muss von Fach-
personal vorgenommen werden.
3.1.b - Abladen der Maschine von
der Holzpalette (Abb. B)
- Entfernen Sie den Holzblock (27) vor dem
Vorderrad.
- Stellen Sie die Rampe (28) wie in der Ge-
brauchsanweisung auf der Verpackung
angegeben vor die Holzpalette.
- Auf dem Bedienersitz (3) Platz nehmen.
- Drehen Sie den Schlüssel (29) auf „ON„.
- Drücken Sie die Fahrtrichtungstaste (31a)
„ “ (Vorwärtsgang), drücken Sie dann
vorsichtig das Gaspedal (7) und steigen
Sie von der Palette.
4 -
4.1 - ZUSAMMENBAU DER
BAUTEILE
4.1.a - Installierung des Bodenwi
schers (Abb. C)
- Setzen Sie den Bodenwischer (20) in die
Halteplatte (35) und drehen Sie ihn mit
den Feststellknöpfen (36) fest.
- Verbinden Sie den Ansaugschlauch (16)
mit dem Stutzen des Bodenwischers.
4.1.b - Bürstenmontage
- Siehe Verfahren im Abschnitt „13.4.a -
Auswechseln der Bürsten (Abb. M)“.
5 -
5.1 - AUFLADEN DER BATTERIE
GEFAHR:
Laden Sie die Batterie in gut belüfte-
ten Räumen und gemäß der gelten-
den Vorschriften des Anwendungs-
landes auf.
Hinsichtlich von Informationen zur
Sicherheit halten Sie sich an das, was
im Kapitel 1 des vorliegenden Hand-
buchs steht.
WARNUNG:
Für Informationen und Hinweise
zur Batterie und zum Bordladegerät
(wenn vorhanden) halten Sie sich an
das mitgelieferte Handbuch des La-
degeräts.
Die Maschine ist ab Fabrik auf eine
Arbeit mit einer Gel-Zellen-Batterie
geeicht.
Bei der Installation von anderen Bat-
terien wird auf den Abschnitt „Ein-
stellung der Parameter“ verwiesen.
Es ist verboten, die Maschine mit Gel-
batterien zu betreiben, wenn sie für
Säure- oder andere Batterien einge-
stellt ist.
(Nur bei Ausführungen ohne Bordla-
degerät) Das Gerät darf nur an exter-
nen Batterieladegeräten SELV (safety
extra-low voltage) versorgt werden.
HINWEIS:
(Nur für GEL-Batterien) Für eine vollständi-
ge Auadung der Batterien benötigt man 10
Stunden. Vermeiden Sie unvollständige La-
dezeiten.
(Nur für Lithiumbatterien) Es ist möglich eine
teilweise Auadung aufzuführen.
Laden Sie die Batterien am Ende jedes Auf-
trags oder zumindest dann auf, wenn das
Batteriesymbol „ “ auf dem Display (41
Abb. F) zu blinken beginnt.
- Fahren Sie das Gerät zur Batterieladesta-
49029600_Manuale RACER_RANGER_8ed_04-2023.indd 649029600_Manuale RACER_RANGER_8ed_04-2023.indd 6 06/04/2023 15:04:3006/04/2023 15:04:30

www.ghibliwirbel.com
Professional Cleaning Machines Since 1968
DEUTSCH - 7
tion.
- Heben Sie den Rückgewinnungswasser-
tank (11) an und stellen Sie sicher, dass
er leer ist.
5.1.a - Auaden der Batterie durch
externes Ladegerät (Abb. G)
- Sehen Sie in der Betriebsanleitung nach,
ob das externe Ladegerät geeignet ist.
Das Ladegerät muss eine Bemessungs-
spannung von 24 V haben.
- Nehmen Sie den Steckanschluss (39) aus
seinem Fach (38) und stecken Sie ihn in
die Buchse des externen Ladegeräts.
- Schließen Sie das Ladegerät an das
Stromnetz.
- Nehmen Sie das Ladegerät am Ende des
Ladevorgangs vom Stromnetz und ziehen
Sie den Steckanschluss (39) heraus.
- Setzen Sie den Wassersammeltank (11)
vorsichtig wieder ab.
5.1.b - Batterieladung mit integrier-
tem Ladegerät (falls vorhan-
den) (Abb. G)
- Nehmen Sie den Stecker des Ladegerä-
tekabels (40) aus seinem Fach (38) und
stecken Sie es in die Netzstromdose (die
Netzspannung und die Netzfrequenz
müssen genauso hoch sein wie die des
Ladegeräts; die Werte sind auf dem Ty-
penschild der Maschine angegeben).
HINWEIS:
Wenn das Ladegerät an das Stromnetz an-
geschlossen ist, werden alle Funktionen der
Maschine automatisch ausgeschlossen.
- Auf dem Display (41 Abb. F) wird, wenn
auf dem Batteriesymbol die Segmente
nacheinander zu leuchten beginnen, an-
gezeigt, dass das Ladegerät die Batterien
lädt.
- Wenn alle Segmente auf dem Batte-
riesymbol leuchten, sind die Batterien voll
aufgeladen.
- Ziehen Sie den Stecker des Ladegeräte-
kabels (40) aus der Netzstromdose und
legen Sie ihn zurück in sein Fach (38).
- Setzen Sie den Wassersammeltank (11)
vorsichtig wieder ab.
6 -
6.1 - BESCHREIBUNG DER
MASCHINENSTEUERUNG
6.1.a - Schalttafel (Abb. F)
(29) Zündschlüssel
- Eine Drehung im Uhrzeigersinn „ON“ ver-
sorgt die Maschine mit Strom und macht
sie betriebsbereit.
- Eine Drehung im Gegenuhrzeigersinn
„OFF“ unterbricht dir Stromzufuhr, der
Schlüssel kann nun abgezogen werden.
(30) Tasten für die Einstellung der
Höchstgeschwindigkeit
- Mann kann die Höchstgeschwindigkeit
über die Tasten (30a) „ “ und (30b) „
“ einstellen.
- Wenn man das Gaspedal (7) voll durch-
drückt, wird die Geschwindigkeitshöhe
dem eingestellten Höchstwert entspre-
chen.
- Wenn auf dem Display (41) alle Ge-
schwindigkeitssymbole „ “ hell sind,
kann das Gaspedal (7) nicht herunterge-
drückt werden und die Maschine bewegt
sich nicht.
(31) Tasten für die Fahrrichtung
- Wenn man die Vorwärtsgangtaste (31a) „
“ drückt, fährt die Maschine vorwärts;
auf dem Display erscheint das Icon „ “.
- Wenn man die Rückwärtsgangtaste (31b)
„ “ drückt, fährt die Maschine rück-
wärts und der Summer für das Rückwärts-
fahren schaltet sich ein; auf dem Display
erscheint das Icon „ “.
HINWEIS:
Die Höchstgeschwindigkeit im Rückwärts-
gang kann wie die im Vorwärtsgang über die
Tasten (30) eingestellt werden.
49029600_Manuale RACER_RANGER_8ed_04-2023.indd 749029600_Manuale RACER_RANGER_8ed_04-2023.indd 7 06/04/2023 15:04:3506/04/2023 15:04:35

www.ghibliwirbel.com
Professional Cleaning Machines Since 1968
DEUTSCH - 8
(41) Display
- Lesen Sie den spezischen Kapitel.
(42) Taste „Ready to go“
- Wenn man die Taste (42) auf dem Display
drückt, erscheint das Icon „ “ und es
schalten sich die folgenden Funktionen in
den Standardeinstellungen ein:
• Senken des Kopfes und Drehung der
Bürsten.
• Senken des Wischers und Start der
Absauganlage.
• Arbeitsgeschwindigkeit = 3. Strich (3,6
km/h).
• Wasserstrom = 3. Strich.
• Chemikalie = 3. Strich (1%).
• Absaugung = normal (100%).
• Bürstendruck = normal.
- In dieser Standardfunktion kann man jede
Arbeitstaste zum Ändern oder Regulieren
der Einstellungen drücken.
Wenn notwendig, kann man die Arbeitsfunk-
tionen ändern und die Änderung speichern,
indem man wie folgt vorgeht:
- Drücken Sie die Taste (42) 3 Sekunden
lang; die Speicherung ist bestätigt, wenn
auf dem Display (41) die Schrift „UPLOA-
DED“ blinkt.
- Um die neue Einstellung zu deaktivieren
und zu den Standardwerten der Einstel-
lungen zurückzukehren, muss die Taste
(42) noch einmal 3 Sekunden lang ge-
drückt werden; wenn „RESET“ auf dem
Display (41) blinkt, ist der Vorgang bestä-
tigt.
(43) ECO - Taste
- Wenn man in der Arbeitsphase die
ECO-Taste (43) auf dem Display drückt,
erscheint das Icon „ “ und die Para-
meter für das Wasser, die Chemikalie,
Absaugung und Kopfdruck zeigen die fol-
genden Werte an:
• Wasserstrom = 3. Strich.
• Chemikalie = 3. Strich (1%).
• Absaugung = lautlos (50%).
• Bürstendruck auf Boden = normal.
(44) Saugertaste
- Wenn man die Taste (44) drückt, schaltet
sich der Sauger ein und auf dem Display
erscheint das Icon „ “. Wenn der Vor-
wärtsgang eingelegt ist oder die Maschine
im Leerlauf ist, senkt sich der Wischer.
- Durch Drücken der Taste (44) stoppt der
Lüfter und die Rakel wird aufgehoben .
- Mit der Maschine gestoppt, Rakel nach
unten und Taste (29) auf „ON“ nach einer
Leerlaufzeit , wird die Rakel automatisch
aufgehoben.
(45) Taste Geräuschloser Be-
trieb
- Die Taste (45) betätigen, um die Ge-
schwindigkeit der Saugturbine zu redu-
zieren, was zu einer beachtlichen Lärm-
reduzierung der Maschine führt. Ist diese
Funktion freigeschaltet, wird auf dem Dis-
play das Symbol „ “ angezeigt.
- Die Taste (45) erneut drücken, um die
Funktion zu deaktivieren und die Maschi-
ne im Standardbetriebsmodus zu betrei-
ben. Das Symbol „ “ erlischt und das
Symbol „ “ erscheint im Display.
HINWEIS:
Wird die Saugturbine im Betriebsmodus „Ge-
räuschloser Betrieb“ abgeschaltet, schaltet
der Betriebsmodus der Turbine automatisch
auf „Standardbetrieb“ um, bis die Abschalt-
verzögerungszeit abgelaufen ist.
(46) Taste für die Bürsten
- Wenn man die Taste (46) drückt, senkt
sich der Bürstenkopf und auf dem Display
erscheint das Icon „ “.
- Die Bürsten beginnen zu drehen, wenn
Sie das Gaspedal drücken, zu stoppen,
wenn das Gaspedal angehoben.
HINWEIS:
Die Bürsten drehen sich sowohl im Vorwärts-
49029600_Manuale RACER_RANGER_8ed_04-2023.indd 849029600_Manuale RACER_RANGER_8ed_04-2023.indd 8 06/04/2023 15:04:4406/04/2023 15:04:44

www.ghibliwirbel.com
Professional Cleaning Machines Since 1968
DEUTSCH - 9
als auch im Rückwärtsmodus und mit der
Geschwindigkeitseinstellung (30) auf „0“.
- Mit der Maschine gestoppt, gesenktem
Kopf und feste Bürsten still stehen und
der Schlüssel (29) auf „ON“ nach einer
Leerlaufzeit wird der Kopf automatisch
steigen.
- Wenn Sie die Taste (46) mit Bürsten in
Rotation drucken, stoppensich die Bürs-
ten die Gruppe wird angehoben und das
Symbol „ “ auf dem Display schaltet
sich aus.
(47) Taste für Extradruck der
Bürsten
Wenn der Bürstenkopf gesenkt ist, kann man
den Druck der Bürsten auf dem Boden ein-
stellen.
- Wenn man die Taste (47) drückt, schaltet
sich der Extradruck ein; wenn diese Funk-
tion eingeschaltet ist, erscheint auf dem
Display das Icon „ “.
- Wenn man die Taste (47) erneut drückt,
wird der Druck auf den Boden wieder nor-
mal und auf dem Display erscheint das
Icon „ “.
HINWEIS:
Jedes Mal, wenn die Kopfgruppe unten-
kommt (Ruhestellung), wird der Druck der
Bürsten auf Minimum gestellt.
HINWEIS:
Diese Funktion ist mit einem Sicherheits-
system ausgestattet, das automatisch eine
übermäßige Absorption des Stroms durch
die Bürstenmotoren ermittelt und in der Lage
ist, automatisch den Bürstendruck auf den
Boden zu variieren, und sie in die am besten
geeigneten Position zu bringen.
(48) Taste für die Chemikalien-
dosierung (wenn vorhanden)
- Wenn man die Dosiertaste (48) auf dem
Display drückt, erscheint das Icon „ “
und man dosiert die Chemikalie. Die Do-
sierpumpe wird durch Drücken des Gas-
pedals gesteuert.
- Wenn man die Taste (48) wiederholt
drückt, erhöht man die Chemikalienmen-
ge; wenn die Höchstmenge erreicht ist,
erscheint auf dem Display das Icon „
“. Wenn man die Taste (48) noch einmal
drückt, schaltet man die Funktion aus
und das Icon auf dem Display hört auf zu
leuchten.
HINWEIS:
Halten Sie beim Entleeren des Dosiersys-
tems für chemische Arbeitsstoe nach dem
Ersetzen des Tanks die Taste (48) mindes-
tens 5 Sekunden lang gedrückt, um den etwa
40 Sekunden dauernden Luftspülvorgang zu
aktivieren. Diese Funktion wird nur aktiviert,
wenn die Maschine gestoppt ist, der Schlüs-
sel (29) auf „ON“ steht und die Geschwindig-
keitseinstellung (30) auf „0“ steht.
(49) Taste für Wasserausgabe
- Wenn man die Taste (49) drückt, erscheint
auf dem Icon „ “ und das Magnetventil
für den Wasserzulauf wird aktiviert. Die
Wasserausgabe wird durch Drücken des
Gaspedals gesteuert.
- Durch Drücken der Taste (49) erhöht sich
die Menge an Wasser; nach dem Errei-
chen des maximalen Wertes gezeigt auf
dem Display durch das Symbol„ “, wenn
der Knopf erneut gedrückt wird (49) wird
diese Funktion deaktiviert.
(50) Taste für Akustisches Warn-
signal
(51) Taste für Blinklicht
(52) Taste für Arbeitslicht
49029600_Manuale RACER_RANGER_8ed_04-2023.indd 949029600_Manuale RACER_RANGER_8ed_04-2023.indd 9 06/04/2023 15:04:5406/04/2023 15:04:54

www.ghibliwirbel.com
Professional Cleaning Machines Since 1968
DEUTSCH - 10
6.1.b - Beschleunigerpedal (Abb. A)
- Wenn man das Gaspedal (7) drückt, fährt
die Maschine vorwärts und rückwärts, je
nachdem welcher Fahrtrichtungstaste ge-
drückt ist.
- Die Geschwindigkeit kann durch stärke-
res oder schwächeres Drücken des Gas-
pedals reguliert werden.
- Durch Loslassen des Gaspedals (7) ver-
langsamt sich die Maschine bis zum Still-
stand. Nach ein paar Sekunden mit der
Maschine gestoppt, schaltet sich automa-
tisch die Feststellbremse ein; die Bremse
wird durch Drücken des Gaspedals (7)
nach vorne oder hinten freigegeben.
7 -
7.1 - DISPLAY (Abb. F)
Bei eingeschalteter Maschine erscheinen auf
dem Display (41) die folgenden Icons:
Batterie
Anzeige des Ladezustands der Batterien:
Batterien voll
Batterien leer
Höchstgeschwindigkeit
Vorwärtsgang
Mit den Tasten (30a) „ “ und (30b) „
“ stellt man die maximal erreichbare Ge-
schwindigkeit der Maschine ein, die man er-
reichen kann, wenn man das Gaspedal (7)
ganz durchdrückt:
km/h - 0 1,2 2,4 3,6 4,8 6,0
Fahrrichtung
Der Fahrtrichtungspfeil zeigt den mit den
Tasten (31a) „ “ und (31b) „ “ aus-
gewählte Gang an.
„Ready to go“
Erscheint auf dem Display, wenn man die
Taste (42) „ “ drückt.
ECO-Funktion
Erscheint auf dem Display, wenn man die
Taste (43) „ “ aktiviert wird
Sauger läuft
Erscheint auf dem Display, wenn man die
Taste (44) „ “ drückt, um anzuzeigen,
dass der Sauger eingeschaltet und der Wi-
scher gesenkt ist.
Lautloser Betrieb
Bei eingeschaltetem Sauger.
Erscheint auf dem Display, wenn man die
Taste (45) „ “ drückt, um anzuzeigen,
dass der Sauger auf niedriger Drehzahl läuft.
Bürstendrehung aktiviert
Erscheint auf dem Display, wenn man die
Taste (46) „ “ drückt, um anzuzeigen,
dass die Drehung der Bürsten eingeschaltet
ist.
Extradruck
Erscheint auf dem Display und zeigt den Ar-
beitsdruck der Bürsten an.
Drücken Sie die Taste (47) „ “, um den
Arbeitsdruck zu wechseln.
Reinigungsmitteldosierer
(wenn vorhanden)
Erscheint auf dem Display, wenn man die
49029600_Manuale RACER_RANGER_8ed_04-2023.indd 1049029600_Manuale RACER_RANGER_8ed_04-2023.indd 10 06/04/2023 15:05:1406/04/2023 15:05:14

www.ghibliwirbel.com
Professional Cleaning Machines Since 1968
DEUTSCH - 11
Taste (48) „ “ drückt.
Drücken Sie die Taste, um den Prozentsatz
des dosierten Reinigungsmittel zu erhöhen
oder zu mindern:
0,2% 0,5% 1% 2% 3%
Vorbereitung der Wasseraus-
gabe
Erscheint auf dem Display, wenn man die
Taste (49) „ “ drückt, um anzuzeigen,
dass das Magnetventil für die Wasserausga-
be eingeschaltet ist.
Wenn der Wasserstand im Wassertank auf
Mindesthöhe gefallen ist, wird das Symbol
„“ im Vollbildmodus zusammen mit dem
akustischen Signal angezeigt..
Füllen Sie den Wassertank (13) wie im ent-
sprechenden Abschnitt beschrieben, auf,
dann schalten Sie die Maschine aus und
starten Sie neu.
Kein Maschinenbediener auf
dem Fahrersitz
Dieses Icon erscheint, wenn der Maschinen-
bediener nicht korrekt auf dem Fahrersitz
sitzt, gleichzeitig werden alle Maschinen-
funktionen gesperrt.
Maximale Flüssigkeitspegel
in dem Auangbehälter
Wird angezeigt, wenn die Flüssigkeit im
Sammeltank den Höchststand erreicht hat.
Beschleunigerpedal gedrückt
Dieses Symbol wird eingeführt, wenn die
Maschine eine falsche Reihenfolge des
Startvorganges anzeigt, um die eingefügte
Alarm zu entfernen, lassen Sie das Gaspe-
dal (7 Fig. A).
8 -
8.1 - NOTFALL
Die Nothalt-Taste (5 Abb. A) bendet sich in
einer vom Maschinenbediener leicht erreich-
baren Position. Sie muss kräftig gedrückt
werden, wenn die Maschine angehalten und
alle ihre Funktionen sofort stillgesetzt wer-
den müssen.
Damit sich die Maschinenfunktionen alle wie-
der einschalten, muss die Nothalt-Taste bis
zum Anschlag hochgezogen werden, damit
sie sich zurückstellt.
WARNUNG:
Drücken Sie die Nothalt-Taste (5)
bei laufender Maschine nur, wenn
es wirklich notwendig ist. Schalten
Sie die Maschine nicht über dieses
Verfahren ab, da sie auf diese Weise
Schaden nehmen kann.
9 -
9.1 - SICHERHEITSFUNKTIONEN
(Abb. A)
Das Gerät verfügt über die folgenden Sicher-
heitsfunktionen:
Anwesenheitssensor des Bedieners (4)
Es blockiert alle Maschinenfunktionen, wenn
der Bediener nicht auf dem Fahrersitz anwe-
send ist.
Schleuderschutzsystem
Das Schleuderschutzsystem verringert die
Gerätegeschwindigkeit während der Lenk-
manöver – sofern erforderlich – und im Fal-
le einer Seitenneigung des Geräts auf eine
sichere Geschwindigkeit, um unvorherge-
sehenes Schleudern zu verhindern und die
Gerätestabilität unter allen Bedingungen zu
erhöhen.
Wirbelstrombremse
Die Wirbelstrombremse ist in das Vorderrad
(23) integriert und bremst das Gerät, wenn
es ausgeschaltet ist oder stillsteht.
10 -
49029600_Manuale RACER_RANGER_8ed_04-2023.indd 1149029600_Manuale RACER_RANGER_8ed_04-2023.indd 11 06/04/2023 15:05:2306/04/2023 15:05:23

www.ghibliwirbel.com
Professional Cleaning Machines Since 1968
DEUTSCH - 12
10.1 - TANKAUFFÜLLUNG
(Abb. D)
WARNUNG:
Füllen Sie in den Tank nur sauberes
Wasser aus der Leitung mit einer
Temperatur nicht über 50°C ein.
- Füllen Sie den Tank (13) über den aus-
ziehbaren Schlauch (52) mit Wasser, bis
der Tank voll ist.
- Füllen Sie den Tank nicht vollständig, ver-
wenden Sie das Niveaurohr (18) als Re-
ferenz.
- Oder önen Sie den Tankdeckel (14) und
verwenden Sie die Aquastop-Gri (53,
wenn vorhanden).
WARNUNG:
Überprüfen Sie den Füllstand immer
visuell, um die Gefahr einer Benet-
zung des Bodens zu vermeiden.
- Wenn der Tank voll ist, den Tankdeckel
(14) wieder schließen.
HINWEIS:
Bei Maschinen ohne Chemikalienkit füllen
Sie den Tank (13) mit sauberem Wasser und
vermischen es mit einem chemischen Reini-
gungsmittel.
Halten Sie sich immer an die Verdünnungs-
anleitungen auf dem Aufkleber der Verpa-
ckung des chemischen Produkts, das sie für
die Reinigungslösung verwenden.
10.2 - TANK FÜR SPÜLMITTEL
/ CHEMISCHE STOFFE (Falls
vorhanden) (Abb. E)
HINWEIS:
Verwenden Sie nur nicht schäumende Reini-
gungsmittel, für die Menge sehen Sie in den
Angaben des Reinigungsmittelherstellers
und der Art des zu beseitigenden Schmut-
zes.
- Heben Sie den Auangbehälter (11) an.
- Prüfen Sie, ob in der Tank (54) das not-
wendige Produkt für den Arbeitstag ist .
Bei einem Austausch des Tanks handeln Sie,
wie folgt:
- Entfernen Sie die Kappe (55) entfernen
Sie den Tank (54) und einen neuen 5-Li-
ter-Tank und den Steckereinsatz (55) mit
dem Saugrohr einsetzen.
GEFAHR:
Falls Augen oder Haut mit dem Reini-
gungsmittel in Kontakt kommen oder
versehentlich Reinigungsmittel ge-
schluckt wird, unbedingt die Anwei-
sungen im Sicherheitsdatenblatt des
Reinigungsmittelhersteller beachten.
HINWEIS:
Die zu verwendenden Tanks (54) sind von
der Standardausführung 5 Liter, die im Han-
del erhältlich sind.
- Setzen Sie den Wassersammeltank (11)
vorsichtig wieder ab.
- Entlüften Sie den Tank (siehe für den Vor-
gang unter „Taste für die Chemikaliendo-
sierung“).
11 -
11.1 - ARBEITSWEISE
(Abb. A-F)
11.1.a - Kontrollen vor Arbeitsbeginn
- Kontrollieren Sie, dass der Auslauf-
schlauch (15) des Schmutzwassertanks
richtig eingehakt und korrekt verschlos-
sen ist.
- Kontrollieren Sie, dass der Ansaug-
schlauch (16) des Wassers für den Bo-
denwischer korrekt in den Schmutzwas-
sertank eingeführt ist.
- Kontrollieren Sie, dass der Anschluss (37)
auf dem Bodenwischer (20) nicht verstopft
ist und dass der Schlauch (16) korrekt an-
geschlossen ist.
- Kontrollieren Sie den Ladezustand der
Batterien, indem Sie den Schlüssel (29)
auf „ON“ drehen und die Ladeanzeige auf
dem Anzeige (41) prüfen.
49029600_Manuale RACER_RANGER_8ed_04-2023.indd 1249029600_Manuale RACER_RANGER_8ed_04-2023.indd 12 06/04/2023 15:05:2406/04/2023 15:05:24

www.ghibliwirbel.com
Professional Cleaning Machines Since 1968
DEUTSCH - 13
11.1.b - Vorbereitung der Maschine
und Funktionswahl
- Setzen Sie sich in den Fahrersitz.
- Die Maschine kann 4 Arbeitsdurchgänge
ausführen:
Zyklus Waschen, Bürsten, Trocknen:
Drücken Sie die Taste “Ready to go” (42) „
“ zur Vorbereitung der Reinigungsmitte-
lausgabe, Bürstendrehung und Saugerein-
schaltung.
Zyklus Trocknen:
- Um den Trocknungszyklus auszuführen,
drücken Sie den Taste (44) „ “, starten
Sie den Staubsauger.
Zyklus Bürsten:
- Um den Putzzyklus ausführen,drücken
Sie den Taste (46) „ “ es bereitet die
Rotation der Bürsten vor.
- Die Rotation der Bürsten wird gestartet,
wenn die Maschine mit dem Gaspedal (7)
gedrückt , beginnt sich nach vorne oder
hinten zu bewegen, oder bei gedrücktem
Gaspedal die Vorwärtsgeschwindigkeit
auf „0“ setzt.
Zyklus Waschen, Bürsten:
- Drücken Sie den Taste (46) „ “ um die
Rotation der Bürsten vorzubereiten und
drücken Sie den Taste (49) „ “ um die
Wasserversorgung vorzubereiten.
- Die Bürsten beginnen sich zu drehen und
das Wasser wird ausgegeben, sobald
man im Vorwärts- oder Rückwärtsgang
oder mit auf mindestens den 1. Strich
eingestellter Fahrgeschwindigkeit auf das
Gaspedal drückt.
11.1.c - Gebrauch der Maschine
GEFAHR:
Beim Einsatz der Maschine auf Ram-
pen immer sehr vorsichtig vorgehen,
um das Kippen der Maschine oder
Situationen, in den die Maschine aus
dem Gleichgewicht geraten kann, zu
vermeiden.
GEFAHR:
Brüskes Bremsen und Kurvenfahrt
mit voll eingedrehtem Lenker vermei-
den oder bei sehr langsamer Fahrge-
schwindigkeit vornehmen und auf die
Bedingungen des Fußbodens achten.
- Drehen Sie den Zündschlüssel (29) auf
“ON”; in den ersten 2 Sekunden nach dem
Anlassen, zeigt das Display (41) den ins-
tallierten Batterietyp und die Arbeitsstun-
den der Maschine an.
- Wählen Sie einen Arbeitszyklus aus.
- Geben Sie über die Taste (30) die ge-
wünschte Arbeitsgeschwindigkeit ein.
- Schalten Sie die Rundum-Kennleuchte
(10, optional) und die Arbeitsleuchten (9,
optional) ein.
- Beginnen Sie mit den Reinigungsarbeiten
durch Betätigung des Beschleunigers (7).
HINWEIS:
Wenn Sie den Beschleuniger nicht mehr be-
tätigen, halten die Drehung der Bürsten und
die Wasserabgabe an.
HINWEIS:
Die richtige Reinigung und Trocknung des
Bodens erzielt man, wenn die Maschine im
Vorwärtsgang betrieben wird. Im Rückwärts-
gang hebt sich der Bodenwischer an und
das auf dem Boden verbliebene Wasser wird
nicht abgesaugt.
- Falls erforderlich, passen Sie die Menge
an Waschlösung durch den Taste (49) „
“ an.
- Kontrollieren sie über das Anzeige (41)
den Ladezustand der Batterien.
49029600_Manuale RACER_RANGER_8ed_04-2023.indd 1349029600_Manuale RACER_RANGER_8ed_04-2023.indd 13 06/04/2023 15:05:2606/04/2023 15:05:26

www.ghibliwirbel.com
Professional Cleaning Machines Since 1968
DEUTSCH - 14
11.1.d - Arbeitsende und Ausschalten
- Am Ende der Reinigungsarbeiten halten
Sie in Reihen folge die Drehung der Bürs-
ten und den Ansauger an, indem Sie die
entsprechenden Steuerungsbefehle je
nach Betriebsmodus eingeben.
- Drehen Sie den Schlüssel (29) auf „OFF“.
- Die Feststellbremse greift automatisch ein.
- Leeren und säubern Sie den Schmutzwas-
sertank und den Lösungsmitteltank, wie
in den entsprechenden Abschnitten be-
schrieben.
HINWEIS:
Wenn die Bedienungsperson aus der Ma-
schine aussteigt, greift automatisch die Fest-
stellbremse ein.
GEFAHR:
Die Maschine nie auf einer Rampe
parken.
12 -
12.1 - ENTSORGUNG DES
SCHMUTZWASSERS (Abb. H)
GEFAHR:
Sicherstellen, dass der Schmutzwas-
sertank (11) leer ist, bevor er angeho-
ben wird.
Nach dem Arbeitsdurchgang oder wenn der
Schmutzwassertank (11) voll ist, muss er auf
folgende Art geleert werden:
HINWEIS:
Zur Entsorgung des Schmutzwassers halten
Sie sich an die Regeln des Landes, in dem
die Maschine eingesetzt wird.
- Stellen Sie sich mit der Maschine in die
Nähe eines Abusses.
- Nehmen Sie den Schlauch (15) vom Ha-
ken und führen Sie ihn zum Bodenabuss.
- Drehen Sie den Tankdeckel (56) ab und
lassen Sie das gesammelte Wasser im
Tank vollständig ablaufen.
HINWEIS:
Über einen Druck auf das Schlauchende (15)
kann die Menge des ausströmenden Was-
sers eingestellt werden.
- Drehen Sie den Tankdeckel (56) wieder
auf und hängen Sie den Schlauch (15)
wieder an seine Halterung.
13 -
13.1 - WARTUNG UND
REINIGUNG
WARNUNG:
Bezüglich Informationen und War-
nungen an die Wartung oder Rei-
nigung, folgen Sie den in der Bro-
schüre angegebenen Anweisungen
„SICHERHEITSHINWEISE FÜR BO-
DENREINIGER“.
13.2 - TÄGLICH
AUSZUFÜHRENDE
MASSNAHMEN
13.2.a - Leeren und Reinigen des
Frischwassertanks (Abb. I)
WARNUNG:
Am Ende der Reinigungsarbeiten muss
der Frischwassertank (13) entleert und
und gesäubert werden, um Ablagerun-
gen und Verkrustungen zu vermeiden.
Nach der Entleerung des Schmutzwasser-
tanks, entleeren Sie den Frischwassertank
(13) auf folgende Weise.
- Stellen Sie sich mit der Maschine in die
Nähe eines Abusses.
- Den Schlauch (17) aus der Halterung
ziehen, nach unten in Richtung Abuss
ziehen, den Stopfen (57) önen und das
Wasser abießen lassen.
49029600_Manuale RACER_RANGER_8ed_04-2023.indd 1449029600_Manuale RACER_RANGER_8ed_04-2023.indd 14 06/04/2023 15:05:2706/04/2023 15:05:27

www.ghibliwirbel.com
Professional Cleaning Machines Since 1968
DEUTSCH - 15
- Waschen Sie das Innere des Tanks, wo-
bei Sie den Auslaufschlauch oen lassen,
und füllen Sie Frischwasser in die obere
Önung.
- Am Ende der Reinigungsarbeit heben Sie
den Schlauch (17) hoch, verschließen Sie
ihn mit der Kappe (57) und hängen Sie
den Schlauch in die entsprechenden Hal-
terungen.
13.2.b - Reinigung des Schmutzwas-
sertanks (Abb. J)
WARNUNG:
Am Ende der Reinigungsarbeiten
muss der Schmutzwassertank gesäu-
bert werden, um zu vermeiden, dass
sich Ablagerungen und Krusten bil-
den und zur Vermeidung von Bakteri-
en, Gerüche und Schimmelpilzen.
- Heben Sie den Deckel hoch (12).
- Nehmen Sie die Abfallsammelwanne (58)
heraus und önen Sie ihren Deckel, rei-
nigen Sie die Wanne unter ießendem
Wasser und entfernen Sie eventuell an
ihr klebende Papierfetzen, Holzstückchen
usw.
- Nehmen Sie den Sauglter (59) heraus
und reinigen Sie ihn unter ießendem
Wasser.
- Lassen Sie den Ablaufschlauch (15 Abb.
H) unten und den Tankdeckel abge-
schraubt und füllen Sie in die obere Ö-
nung (60) Wasser, dann spülen Sie den
Tank innen, bis aus dem Ablaufschlauch
sauberes Wasser ießt.
- Bauen Sie alles wieder in umgekehrter
Reihenfolge ein.
13.2.c - Reinigung des Bodenwi-
schers (Abb. K)
Um den Wischer (20) richtig zu reinigen
muss er folgendermaßen entfernt werden:
- Den Schlauch (16 Abb. C) vom Wischer
(20) abziehen.
- Die Drehknöpfe (36 Abb. C) lockern und
den Wischer (20) entfernen.
- Den Wischer und besonders die die Gum-
mis (60) oder (61) säubern ebenso wie
das Innere des Ansauganschlusses (62).
HINWEIS:
Sollten Sie während der Reinigung feststel-
len, dass die Gummis (60) oder (61) defekt
oder abgenutzt sind, wechseln Sie sie aus
oder drehen Sie sie um.
- Bauen Sie alles wieder in umgekehrter
Reihenfolge ein.
13.3 - MASSNAHMEN,
DIE ALLE 3 MONATE
DURCHZUFÜHREN SIND
13.3.a - Überprüfen Sie den Ver-
schleißzustand der Lenker-
kette (Abb. L)
- Kontrollieren Sie den Verschleiß- und Ver-
rostungszustand der unter der Maschine
bei den Vorderrädern bendlichen Kette
(63).
- Wenn Die Kette Spuren von Verrostung
aufweist, muss Sie ausgetauscht werden.
Hierzu wenden Sie sich an den techni-
schen Kundendienst.
13.4 - BEI BEDARF
DURCHZUFÜHRENDE
MASSNAHMEN
13.4.a - Auswechseln der Bürsten
(Abb. M)
Eine Auswechselung der Bürste wird notwen-
dig, wenn die Borsten durch Abnutzung kürzer
wie 2cm geworden sind oder auch wenn in
Abhängigkeit des zu reinigenden Fußbodens.
Zum Auswechseln gehen Sie wie folgt vor:
- Führen Sie eine Hand unter die Bürsten-
haltergruppe (19) ein. Um die Bürste aus-
zuklinken, drehen Sie sie ruckartig in Ge-
gendrehrichtung.
49029600_Manuale RACER_RANGER_8ed_04-2023.indd 1549029600_Manuale RACER_RANGER_8ed_04-2023.indd 15 06/04/2023 15:05:2706/04/2023 15:05:27

www.ghibliwirbel.com
Professional Cleaning Machines Since 1968
DEUTSCH - 16
- Positionieren Sie unter die Bürstenhalter-
gruppe (19) die neuen Bürsten.
- Setzen Sie sich auf den Fahrsitz und dre-
hen Sie den Schlüssel (29 Abb. F) in Po-
sition „ON“.
- Stellen Sie die Fahrgeschwindigkeit auf „0“.
- Drücken Sie die Taste (46 Abb. F) „ “,
um die Bürsten einzuschalten; die Bürsten-
gruppe senkt sich.
- Wenn man jetzt das Gaspedal herunter-
drückt (7 Abb. A). beginnen die Bürsten-
trägeransche an, sich zu drehen, sodass
sich die Bürsten einhängen. Lassen Sie
das Pedal los.
- Drücken sie auf die Taste (46 Abb. F) „
“ und drehen Sie den Zündschlüssel
(29 Abb. F) auf “OFF”.
13.4.b - Einstellen des Spritzschutz-
gummis (Abb. M)
Abhängig von der Art des zu behandelnden
Bodens oder nach dem Ersetzen der Schei-
benbürsten kann es erforderlich sein, die
Höhe des Spritzschutzgummis (64) einzu-
stellen.
Gehen Sie zum Einstellen wie folgt vor:
- Drehen Sie den Schlüssel (29 Abb. F) in
die Position „ON“.
- Drücken Sie die Taste (46 Abb. F) „
“, um den Bürstenkopf (19) abzusenken,
und drehen Sie dann den Schlüssel (29
Fig. F) auf “OFF”.
- Überprüfen Sie die korrekte Höhe des
Spritzschutzgummis wie in Abbildung M
gezeigt.
- Bei Bedarf manuell auf das Gummi ein-
wirken, um die richtige Höhe wiederher-
zustellen.
HINWEIS:
Die richtige Höhe des Spritzschutzgummis
liegt vor, wenn der Gummi selbst während
des Betriebs und beim Absenken des Bürs-
tenkopfs bodenbündig ist.
- Schalten Sie am Ende der Einstellung die
Maschine wieder ein und drücken Sie die
Taste (46 Abb. F) „ “, dann drehen Sie
den Schlüssel (29 Fig. F) auf “OFF”.
13.4.c - Auswechseln des Wischer-
gummis (Abb. K)
Wenn Sie bemerken, dass die Trocknung
des Bodens schwierig wird oder dass auf
dem Boden einige Wasserspuren bleiben,
wird es nötig sein, den Verschleißgrad der
Wischergummis (20) zu kontrollieren:
- Entfernen Sie die Wischergruppe (20) wie
im Abschnitt „Reinigung des Wischers„
beschrieben.
- Den Riegel (65) drücken und den Hebel
(66) önen.
- Die beiden Gummihalter (67) und die äu-
ßere Gummi (60) entfernen.
- Die beiden Spannschlösser (68) lösen
und die Riegelstange (69) und die innere
Gummi (61) entfernen.
HINWEIS:
Wenn die Gummis (60) oder (61) nur auf ei-
ner Seite abgenutzt sind, können Sie gedreht
werden.
- Ersetzen oder drehen Sie die Gummis
(60) oder (61) um, ohne sie miteinander
zu vertauschen
- Bauen Sie alles wieder in umgekehrter
Reihenfolge ein.
HINWEIS:
Es können zwei Gummitypen verwendet
werden: Paragummis für alle Arten von Bö-
den oder in Polyurethan für mechanische
Werkstätten mit Ölverschmutzungen.
49029600_Manuale RACER_RANGER_8ed_04-2023.indd 1649029600_Manuale RACER_RANGER_8ed_04-2023.indd 16 06/04/2023 15:05:2706/04/2023 15:05:27

www.ghibliwirbel.com
Professional Cleaning Machines Since 1968
DEUTSCH - 17
13.4.d - Einstellung der Schräge des
Bodenwischers (Abb. N)
- Lassen Sie die Maschine an und drücken
Sie die Taste (44 Abb. F) „ “.
- Bringen Sie die Höchstgeschwindigkeit
auf den 1. Strich, indem Sie die Tasten
(30 Abb. F) drücken und drücken sie
gleichzeitig auf das Gaspedal (7 Abb. A).
Fahren Sie einige Meter, schalten sie die
Maschine aus und steigen Sie ab.
- Betätigen Sie die Gewindestange (70),
um den Winkel der Abstreifer (60) oder
(61) zum Boden einzustellen. Drehung in
Uhrzeigersinn, wenn sie einen höheren
Einfallswinkel haben, entgegengesetzt,
wenn sie einen niedrigeren Einfallswinkel
haben.
HINWEIS:
Der korrekte Winkel ist erreicht, wenn sich
während des Betriebs keine Flüssigkeits-
schlieren auf dem Boden bilden und der Ab-
streifer einen über die ganze Länge durchge-
henden Winkel aufweist.
13.4.e - Wischerdruckeinstellung
(Abb. O)
Abhängig von der Art des zu behandelnden
Bodens oder nach dem Austausch der Ra-
kelkautschuke kann es erforderlich sein, den
Rakeldruck anzupassen.
Gehen Sie zum Einstellen wie folgt vor:
- Heben Sie den Rückgewinnungswasser-
tank (11) an und stellen Sie sicher, dass
er leer ist.
- Auf die Einstellschraube (71) einwirken
und dabei Folgendes berücksichtigen:
• Durch Drehen im Uhrzeigersinn wird
der Druck auf den Boden der Rakel
verringert.
• Durch Drehen gegen den Uhrzeiger-
sinn wird der Bodendruck der Rakel
erhöht.
- Am Ende der Einstellung den Rückgewin-
nungswassertank (11) vorsichtig absen-
ken.
13.4.f - Reinigung des Frischwas-
serlters (Abb. P)
- Stellen Sie sicher, dass der Tank (13 Abb.
A) leer ist.
- Den Stopfen (22) lösen und den Filterein-
satz (72) herausnehmen.
- Den Filtereinsatz (72) herausnehmen un-
ter ießendem Wasser reinigen.
- Alles nach in umgekehrter Reihenfolge
zusammenbauen, so dass Sie die Dich-
tung (73) richtig positioniert ist.
13.4.g - Batteriefach-Ablasshahn
(Abb. A)
- Überprüfen Sie regelmäßig, ob das Was-
ser im Batteriefach nicht stagniert.
- Falls erforderlich, stellen Sie sich mit der
Maschine in die Nähe eines Abussab-
usses, lösen Sie die Rohrleitung und
önen Sie den Wasserhahn (74), dann
lassen Sie die Flüssigkeiten ab.
WARNUNG:
Wenn die Verwendung von Blei-Säu-
re-Batterien vorgesehen ist, achten
Sie auf das mögliche Austreten von
Flüssigkeit aus den Batterien selbst,
auf die damit verbundenen Risiken
und auf die Vorschriften für die Ent-
sorgung von Flüssigkeiten / gefährli-
chen Stoffen.
13.4.h - Kontrolle des Verschleißzu-
standes der drei Räder (Abb. A)
- Kontrollieren Sie regelmäßig den Ver-
schleißzustand der drei Räder (8) und
(23); wenn sich Abnutzungen oder Schä-
den zeigen müssen sie ausgetauscht
werden. Wenden Sie sich hierzu an den
technischen Kundendienst.
GEFAHR:
Ein Fortfahren der Arbeit mit ver-
schlissenen oder beschädigten Rä-
dern bedeutet eine Gefahr für den
Bediener, da die Maschine eine
schlechtere Bodenhaftung in den
Kurven hat.
14 -
49029600_Manuale RACER_RANGER_8ed_04-2023.indd 1749029600_Manuale RACER_RANGER_8ed_04-2023.indd 17 06/04/2023 15:05:2706/04/2023 15:05:27

www.ghibliwirbel.com
Professional Cleaning Machines Since 1968
DEUTSCH - 18
14.1 - EINSTELLUNG
PARAMETER (Abb. F)
14.1.a - OPERATOR-Parameter
Der Maschinenbediener hat die Möglichkeit,
im Menü die folgenden Parameter einzustel-
len:
• Sprache
• Batterietyp
• Display - Kontrast
• Display - Helligkeit
In das Menü kommt man auf folgende Weise:
- Drücken Sie die Tasten (31a) „ “ und
(31b) „ “ und halten Sie sie gedrückt.
Drehen Sie den Zündschlüssel (29) auf
“ON”. Jetzt önet sich die folgende Bild-
schirmseite:
General
General
Sets
Sets
--ID Check--
--ID Check--
insert password:
insert password:
0
0
000
000
General Sets Allgemeine Einstellungen
ID Check Kontrolle
Insert password Passwort eingeben
- Lassen Sie gedrückten Tasten los.
- Geben Sie das 4-stellige Passwort “0010”
über die Taste (30a) „ “ oder die Taste
(30b) „ “, um die Zahl der blinkenden
Zier zu ändern, ein.
- Drücken Sie die Taste (43) „ “ zum Be-
stätigen und zum Weitergehen zur nächs-
ten Zier, am Ende zum Bestätigen des
Passworts und Önen der Parameterliste.
- Drücken Sie die Taste (31a) „ “ oder
(31b) „ “, um durch die folgenden
Bildschirmseiten zu scrollen:
General
General
Language
Language
Main
Main
selection:
selection:
ITA
ITA
General Main Hauptkonguration
Language selection Sprachauswahl
General
General
Battery
Battery
Main
Main
Type:
Type:
GEL
GEL
General Main Hauptkonguration
Battery Type Batterietyp
General
General
Display
Display
min:0
min:0
max:50
max:50
Main
Main
Tune:
Tune:
15
15
General Main Hauptkonguration
Display Tune Display Kontraste
General
General
Display
Display
min:0
min:0
max:10
max:10
Main
Main
Brightness:
Brightness:
0
0
General Main Hauptkonguration
Display Brightness Display Helligkeit
49029600_Manuale RACER_RANGER_8ed_04-2023.indd 1849029600_Manuale RACER_RANGER_8ed_04-2023.indd 18 06/04/2023 15:05:3406/04/2023 15:05:34

www.ghibliwirbel.com
Professional Cleaning Machines Since 1968
DEUTSCH - 19
Spracheinstellungen:
General
General
Language
Language
Main
Main
selection:
selection:
ITA
ITA
General Main Hauptkonguration
Language selection Sprachauswahl
- Wählen Sie über die Taste (30a) „
“ oder (30b) „ “ die Sprache aus und
drücken Sie dann dieTaste (43) „ “,
um die Auswahl zu bestätigen;
-ITA = Italienisch
-ENG = Englisch
Batterietypeinstellungen:
General
General
Battery
Battery
Main
Main
Type:
Type:
GEL
GEL
General Main Hauptkonguration
Battery Type Batterietyp
- Wählen Sie über die Taste (30a) „ “
oder (30b) „ “ den Batterietyp aus und
drücken Sie dann die Taste (43) „ “,
um die Auswahl zu bestätigen;
-GEL = Gel-Batterie
-AGM = AGM-Batterie
-WET = Säurebatterie
Displayeinstellung - Kontrast:
General
General
Display
Display
min:0
min:0
max:50
max:50
Main
Main
Tune:
Tune:
15
15
General Main Hauptkonguration
Display Tune Display Kontraste
Wählen Sie den Kontrasttyp des Displays
aus, indem Sie über die Taste (30a) „
“ oder (30b) „ “ einen Wert zwischen „0
und 50“ einstellen, dann drücken Sie die Tas-
te (43) „ “, um die Auswahl zu bestätigen.
Displayeinstellung - Helligkeit:
General
General
Display
Display
min:0
min:0
max:10
max:10
Main
Main
Brightness:
Brightness:
0
0
General Main Hauptkonguration
Display Brightness Display Helligkeit
Wählen Sie den Helligkeitstyp des Displays
aus, indem Sie über die Taste (30a) „
“ oder (30b) „ “ einen Wert zwischen „0
und 10“ einstellen, dann drücken Sie die Tas-
te (43) „ “, um die Auswahl zu bestätigen.
HINWEIS:
Sobald die ausgewählte Einstellung bestätigt
wird, startet die Maschine und der Display
(41) schaltet sich im Arbeitsmodus ein.
15 -
49029600_Manuale RACER_RANGER_8ed_04-2023.indd 1949029600_Manuale RACER_RANGER_8ed_04-2023.indd 19 06/04/2023 15:05:3506/04/2023 15:05:35

www.ghibliwirbel.com
Professional Cleaning Machines Since 1968
DEUTSCH - 20
15.1 - PRÜFUNG/AUSWECHSELN DER SICHERUNGEN
HINWEIS:
Sämtliche Stromkreise des Geräts werden von selbstrückstellenden elektronischen Vorrich-
tungen geschützt. Die Sicherungen greifen nur im Falle einer schweren Störung ein.
Es wird daher empfohlen, Sicherungen gegebenenfalls nur durch Fachpersonal austauschen
zu lassen.
16 -
16.1 - ALARME WÄHREND DES BETRIEBS
Wenn die Maschine eine Betriebsstörung hat, erscheint auf dem Display (41 Abb. F) eine
Meldung mit dem Alarmtyp aus der Alarmliste unten.
Sehen Sie in der Liste nach und führen Sie die empfohlene Lösung aus, um den korrekten
Betrieb der Maschine wieder herzustellen.
Kontaktieren Sie den technischen Kundendienst, wenn die Störung mit den empfohlenen
Maßnahmen nicht behoben werden konnte.
ALARMMELDUNG BEDEUTUNG LÖSUNG
AL_1: General Speicherfehler Starten Sie die Maschine neu.
AL_2: General Störung Zündschlüssel Schalten Sie die Maschine für mindestens 10
Sekunden ab, dann wieder anlassen.
AL_3: General Unterspannung
Schalten Sie die Maschine ab, kontrollieren Sie
den Ladestatus der Batterie, die Sicherungen,
die Kontakte, die Kabel und die Anschlüsse und
starten Sie die Maschine wieder.
AL_4: General Überspannung
Schalten Sie die Maschine ab, kontrollieren Sie
die Sicherungen, die Kontakte, die Kabel und die
Anschlüsse und starten Sie die Maschine wieder.
AL_6: General Keine Kommunikation mit
dem Armaturenbrett oder
dem Display
Schalten Sie die Maschine ab, kontrollieren Sie
die Kontakte, die Kabel und die Anschlüsse und
starten Sie die Maschine wieder.
AL_7: General Kommunikation FFM
Schalten Sie die Maschine ab, kontrollieren Sie
die Kontakte, die Kabel und die Anschlüsse mit
dem Kommunikationsmodul und das Kommunika-
tionsmodul selbst, dann starten Sie die Maschine
wieder.
AL_8: General Kommunikation
Intern 1 und 2 Starten Sie die Maschine neu.
AL_9: General
AL_10: General Tag eingeben Anzeige Schlüssel „Tag“ fehlt: Zündschlüssel
einstecken.
AL_11: General Tag ungültig Anzeige Schlüssel „Tag“ falsch: Wechseln Sie den
Zündschlüssel oder der Zündschlüssel ist kaputt.
49029600_Manuale RACER_RANGER_8ed_04-2023.indd 2049029600_Manuale RACER_RANGER_8ed_04-2023.indd 20 06/04/2023 15:05:3506/04/2023 15:05:35

www.ghibliwirbel.com
Professional Cleaning Machines Since 1968
DEUTSCH - 21
ALARMMELDUNG BEDEUTUNG LÖSUNG
AL_12: General Aktualisierung läuft...
Anzeige Aktualisierung der Parameter im Remote
läuft: Warten Sie das Ende des Aktualisierungs-
vorgangs ab.
AL_13: General Abschalten Anzeige Aktualisierung der Parameter beendet:
Starten Sie die Maschine neu.
AL_41: Function Übertemperatur
Schalten Sie die Maschine aus und lassen Sie sie
abkühlen. Kontrollieren Sie die Stromaufnahmen
des Bürsten- und Saugermotors, die Belüftung im
Raum und starten Sie neu.
AL_42: Function Leistung beschädigt Schalten Sie die Maschine für mindestens 10
Sekunden ab, dann starten Sie sie neu.
AL_44: Function Relais defekt
Relais/Fernschalter nicht geschlossen. Prüfen Sie
den Fernschalter. Hat die Maschine ein Relais,
tauschen Sie die Karte aus, wenn das Problem
andauert.
AL_45: Function Relais defekt cc
Relais/Fernschalter bei Zündung geschlossen.
Prüfen Sie den Zustand der Kontakte des Fern-
schalters. Hat die Maschine ein Relais, tauschen
Sie die Karte aus, wenn das Problem andauert.
AL_46: Function Überstrom Bürsten
Schalten Sie die Maschine ab, prüfen Sie die
Ladung (Motor), die Mechanik, die Kabel und An-
schlüsse und suchen Sie nach einem Kurzschluss
am Ausgang, dann die Maschine neu starten.
AL_47: Function Überstrom Sauger
Schalten Sie die Maschine ab, prüfen Sie die
Ladung (Motor), die Mechanik, die Kabel und An-
schlüsse und suchen Sie nach einem Kurzschluss
am Ausgang, dann die Maschine neu starten.
AL_48: Function Überstrom Wasserpumpe
Schalten Sie die Maschine ab, prüfen Sie die
Ladung (Motor), die Mechanik, die Kabel und An-
schlüsse und suchen Sie nach einem Kurzschluss
am Ausgang, dann die Maschine neu starten.
AL_49: Function Strommessung Bürste 1
und 2
Prüfen Sie den Verbrauch und Einsatzmodus der
Bürstenfunktion und starten Sie die Maschine
neu.
AL_50: Function
AL_52: Function Strommessung Sauger 1 Prüfen Sie den Verbrauch der Saugerfunktion und
starten Sie die Maschine neu.
AL_54: Function Anschluss Bürste 1 und 2 Prüfen Sie den Anschluss der Bürstenmotoren.
AL_55: Function
AL_57: Function Anschluss Sauger 1 Prüfen Sie den Anschluss des Saugermotors.
AL_59: Function Ungleichgewicht Prüfen Sie die Stromaufnahmen der Bürstenmo-
toren
49029600_Manuale RACER_RANGER_8ed_04-2023.indd 2149029600_Manuale RACER_RANGER_8ed_04-2023.indd 21 06/04/2023 15:05:3506/04/2023 15:05:35

www.ghibliwirbel.com
Professional Cleaning Machines Since 1968
DEUTSCH - 22
ALARMMELDUNG BEDEUTUNG LÖSUNG
AL_61: Function Strommessung Bürsten-
aktor
Prüfen Sie den Verbrauch des Aktorenmotors und
den Zustand der bewegten Mechanik.
AL_62: Function Überstrom Bürstenaktor
Schalten Sie die Maschine ab, prüfen Sie die
Ladung (Motor), die Mechanik, die Kabel und An-
schlüsse und suchen Sie nach einem Kurzschluss
am Ausgang.
AL_63: Function Endschalter Bürstenaktor
Prüfen Sie die Anschlüsse / Zustand des
Endschalters. Kontrolle nur für die Version BTO
aktiviert.
AL_65: Function Strommessung Aktor für
den Wischer
Prüfen Sie den Verbrauch des Aktorenmotors und
den Zustand der bewegten Mechanik.
AL_66: Function Überstrom Aktor für den
Wischer
Schalten Sie die Maschine ab, prüfen Sie die
Ladung (Motor), die Mechanik, die Kabel und An-
schlüsse und suchen Sie nach einem Kurzschluss
am Ausgang.
AL_80: Traction Übertemperatur Motor-
antrieb
Schalten Sie die Maschine aus und lassen Sie
sie abkühlen. Prüfen Sie den Verbrauch und den
Einsatzmodus des Antriebs, die Raumbelüftung
und starten Sie die Maschine neu.
AL_85: Traction Überstrom Motorantrieb
Schalten Sie die Maschine ab, prüfen Sie die
Ladung (Motor), die Mechanik, die Kabel und An-
schlüsse und suchen Sie nach einem Kurzschluss
am Ausgang, dann die Maschine neu starten.
AL_86: Traction Strommessung Motoran-
trieb
Prüfen Sie den Verbrauch und Einsatzmodus der
Antriebsfunktion und starten Sie die Maschine
neu.
AL_87: Traction Anzeige Motorantrieb Starten Sie die Maschine neu.
AL_88: Traction Störung elektrische
Bremse
Schalten Sie die Maschine ab, prüfen Sie die
Bremskabel und starten Sie die Maschine neu.
AL_89: Traction Ausfall Gaspedal
Schalten Sie die Maschine ab, prüfen Sie die
Anschlüsse und Kabel, dann starten Sie die
Maschine neu.
AL_90: Traction Gaspedal Herunterge-
drückt
Lösen Sie das Pedal und starten Sie die Maschi-
ne neu.
AL_91: Traction Ausfall Encoder
Schalten Sie die Maschine ab, prüfen Sie die
Anschlüsse und Kabel, dann starten Sie die
Maschine neu.
17 -
49029600_Manuale RACER_RANGER_8ed_04-2023.indd 2249029600_Manuale RACER_RANGER_8ed_04-2023.indd 22 06/04/2023 15:05:3506/04/2023 15:05:35

www.ghibliwirbel.com
Professional Cleaning Machines Since 1968
DEUTSCH - 23
17.1 - FEHLERSUCHE
PROBLEM URSACHE BEHEBUNG
Bei Drehen des Schlüssels
schaltet sich die Maschine
nicht ein.
Batterie leer. Ladezustand der Batterien
überprüfen.
Hauptsicherung durchge-
brannt.
Ersetzen der Sicherung auf
dem Batteriekabel. (*)
Fehlerhafter Schlüssel
.
Ersetzen Sie den Schlüssel
.
(*)
Bürste dreht sich nicht.
Motorprobleme
.
Ersetzen Sie den Motor
. (*)
Platinenfehler. Ersetzen Sie die Karte. (*)
Ansauger funktioniert nicht.Schmutzwassertank voll. Den Tank leeren.
Fehlerhafter Turbinenmotor. Ersetzen Sie den Motor. (*)
Platinenfehler. Ersetzen Sie die Karte. (*)
Die Maschine trocknet nicht
oder trocknet nicht gut und
lässt Wasserstreifen auf dem
Boden.
Ansauger ausgeschaltet. Ansauger einschalten.
Ansaugschlauchverstopft.Den Ansaugschlauch,
der den Wischer mit dem
Schmutzwassertank verbin-
det, kontrollieren und eventu-
ell reinigen.
Schmutzwassertank voll.Den Schmutzwassertank lee-
ren.
Wischergummis verschlis-
sen.
Die Wischergummis umdre-
hen oder ersetzen.
Wasser tritt nicht aus. Tank ist leer. Den Tank füllen.
Filter verstopft. Den Filter reinigen.
Magnetventil funktioniert
nicht.
Ersetzen Sie das Magnetven-
til. (*)
Defekte Wasserpumpe. Ersetzen Sie die Wasser-
pumpe. (*)
Platinenfehler. Ersetzen Sie die Karte. (*)
49029600_Manuale RACER_RANGER_8ed_04-2023.indd 2349029600_Manuale RACER_RANGER_8ed_04-2023.indd 23 06/04/2023 15:05:3506/04/2023 15:05:35

www.ghibliwirbel.com
Professional Cleaning Machines Since 1968
DEUTSCH - 24
PROBLEM URSACHE BEHEBUNG
Die Maschine bewegt sich
nicht in Arbeitsbedingungen.
Der Bediener sitzt nicht kor-
rekt auf dem Fahrersitz.
Bitte korrekt auf dem Bedien-
ersitz Platz nehmen.
Motorwheel defekt. Motorwheel ersatz. (*)
Platinenfehler. Ersetzen Sie die Karte. (*)
Sensor “Bediener anwesend”
defekt.
Rufen Sie zur Auswechse-
lung den Kundendienst. (*)
Bodenreinigung ist unzurei-
chend.
Falsche Bürsten oder Reini-
gungsmittel.
Benutzen Sie dem Boden
oder dem Grad der Ver-
schmutzung angepasste
Bürsten und Reinigungsmit-
tel.
Bürste verbraucht. Bürste ersetzen.
Der Indikator „ “ Lösungs-
tank leer blinkt weiter.
Tank ist leer. Den Tank füllen.
Hahn zugedreht. Drehen Sie den Wasserhahn
auf.
Störungen des Messsystems. Ersetzen Sie den Durchfluss-
messer. (*)
Im Batteriefach staut sich
Wasser.
Füllstandssensor des
Schmutzwassertanks defekt.
Lassen Sie das Wasser im
Batteriefach mit dem entspre-
chenden Rohr und Hahn ab.
Füllstandssensor prüfen oder
ersetzen. (*)
(*) Rufen Sie den Kundendienst an, um Ersatz anzufordern.
18 -
18.1 - ABBRUCH DER MASCHINE
GEFAHR:
Batterien und elektrische Teile gelten als Sondermüll und müssen daher an
geeigneten Sammelstellen entsorgt werden, wie dies in den geltenden Vor-
schriften des Einsatzlandes vorgeschrieben ist.
19 -
49029600_Manuale RACER_RANGER_8ed_04-2023.indd 2449029600_Manuale RACER_RANGER_8ed_04-2023.indd 24 06/04/2023 15:05:3506/04/2023 15:05:35

www.ghibliwirbel.com
Professional Cleaning Machines Since 1968
DEUTSCH - 25
19.1 - ELEKTRISCHE SCHALTPLÄNE
Legende:
AC Gaspedal
BAT Batterie
BC Ladegerät
BE Blinklicht
BRK Elektromagnetische Bremse
C1 Batteriestecker
EB1 Funktionskarte
EB2 Display
EB3 Bedienfeld
EV Magnetventil
F1 Sicherung Ladegerät (1A)
F2 Sicherung Leuchten (wenn vorhanden)
(3A)
F3 Sicherung Hupe (1A)
F4 Sicherung Blinklicht (1A)
F5 Sicherung Magnetventil (5A)
F6 Sicherung Aktor Bürstenkopf (10A)
F7 Sicherung Aktor Wischer (10A)
F8 Sicherung elektrische Bremse (7.5A)
F9 Sicherung Wasserpumpe (5A)
F10 Sicherung Chemikalienpumpe (wenn
vorhanden) (5A)
F11 Sicherung Saugermotor (40A)
F12 Sicherung rechter Bürstenmotor (40A)
F13 Sicherung linker Bürstenmotor (40A)
F14 Sicherung Antriebsmotor (100A)
HN Hupe
KEY Zündschlüssel
L1 Arbeitsleuchten (wenn vorhanden)
MA Saugermotor
MAS Motor Aktor Bürstenkopf
MAT Motor Aktor Wischer
MS-DX Rechter Bürstenmotor
MS-SX Linker Bürstenmotor
MT Antriebsmotor
PA Wasserpumpe
PC Chemikalienmotor
PE Nothalt-Taste
S1 Sensor Auangwasserhöhe
SW1 Mikroschalter Sitz
TE Externer Fernschalter
Farbencode:
BK Schwarz
BU Hellblau
BN Braun
GN Grün
GY Grau
OG Orange
PK Rosa
RD Rot
VT Lila
WT Weiß
YE Gelb
49029600_Manuale RACER_RANGER_8ed_04-2023.indd 2549029600_Manuale RACER_RANGER_8ed_04-2023.indd 25 06/04/2023 15:05:3506/04/2023 15:05:35

www.ghibliwirbel.com
Professional Cleaning Machines Since 1968
DEUTSCH - 26
PA MT PC EV
- +
-
-
-
-
+ -+ -+
+
+
+
MA MS MS
DX SX
C1
BC
TE
EB2
EB3
KEY
L1
BE
F4
F1
F2
F8
F9 F14 F10 F5 F11 F12 F13
F7
F6
F3
BRK
AC
M
SW1
M5
J8
4 3
2 1
4 3
2 1
1
4
2
5
3
6
9
1
10
2
11
3
4
1
5
2
6
3
4
1
5
2
6
3
4
1
5
2
6
3
12
4
4
8
1
2
3
7
2
6
1
5
3
6
2
5
1
1
12
3s
+
-
2
1
1
2
3
4
2 3
123
456 4
1
11
2
12
3
13
4
14
5
15
6
16
7
17
8
18
9
19
10
20
4
9
3
8
5
10
2
7
1
6
13
5
16
8
15
7
14
6
2
1
J9 J10 J11
J1
J8 J7
J2
S1
J3 J4 J5 J7J6
J12 J13 J14
M6
USB
HN
BATBAT MATMAT
PEPE
MASMAS
EB1
49029600_Manuale RACER_RANGER_8ed_04-2023.indd 2649029600_Manuale RACER_RANGER_8ed_04-2023.indd 26 06/04/2023 15:05:3706/04/2023 15:05:37

www.ghibliwirbel.com
Professional Cleaning Machines Since 1968
ESPAÑOL - 1
Apreciado cliente,
Le agradecemos por haber elegido este producto, estamos seguros que le ayudará a
mantener limpio sus ambientes.
La fregadora-secadora de suelos que Usted ha adquirido ha sido diseñada para satis-
facer sus exigencias periódicas en términos de uso y confiabilidad.
Somos conscientes que para que un buen producto perdure en el tiempo requiere de
continuas actualizaciones que satisfagan las expectativas de quien diariamente lo usa.
Nosotros esperamos contar con Usted no sólo como cliente, sino como el socio que
transmite sus opiniones y sus ideas producto de la experiencia que en este sentido ha
adquirido.
49029600_Manuale RACER_RANGER_8ed_04-2023.indd 149029600_Manuale RACER_RANGER_8ed_04-2023.indd 1 06/04/2023 15:05:3806/04/2023 15:05:38

www.ghibliwirbel.com
Professional Cleaning Machines Since 1968
ESPAÑOL - 2
ÍNDICE
ÍNDICE ............................................................................................................................................ 2
DATOS TÉCNICOS ........................................................................................................................3
1.1 - INTRODUCCIÓN ................................................................................................................. 5
1.1.a - Posición del operador ................................................................................................... 5
1.1.b - Advertencias generales cuando se usa la máquina ..................................................... 5
1.2 - USO NO CONTEMPLADO DE LA MÁQUINA .................................................................... 5
2.1 - CONOCIMIENTO DE LA MÁQUINA (Fig. A) ...................................................................... 5
3.1 - DESEMBALAJE (Fig. B) ..................................................................................................... 5
3.1.a - Instalación de las baterías (Fig. A) ............................................................................... 6
3.1.b - Descarga de la máquina de la plataforma de madera (Fig. B) ..................................... 6
4.1 - ENSAMBLAJE COMPONENTES ....................................................................................... 6
4.1.a - Instalación del limpia pisos (Fig. C) .............................................................................. 6
4.1.b - Instalación del cepillo ................................................................................................... 6
5.1 - CARGA DE LA BATERÍA .................................................................................................... 6
5.1.a - Carga de la batería a través del cargador baterías externo (Fig. G) ............................ 7
5.1.b - Carga de la batería a través del cargador baterías de a bordo
(si está presente) (Fig. G) .......................................................................................................... 7
6.1 - DESCRIPCIÓN MANDOS DE LA MÁQUINA ...................................................................... 7
6.1.a - Panel de comunicaciones (Fig. F) ................................................................................ 7
6.1.b - Pedal acelerador (Fig. A) ............................................................................................ 10
7.1 - PANTALLA (Fig. F) ............................................................................................................10
8.1 - EMERGENCIA ................................................................................................................... 11
9.1 - SEGURIDAD (Fig. A) ........................................................................................................ 11
10.1 - LLENADO DEL DEPÓSITO (Fig. D) ................................................................................. 12
10.2 - TANQUE DETERGENTE/QUÍMICO (si está presente) (Fig. E) ...................................... 12
11.1 - FUNCIONAMIENTO (Fig. A-F) .......................................................................................12
11.1.a - Controles antes del uso .............................................................................................. 12
11.1.b - Preparación de la máquina y elección del ciclo .......................................................... 12
11.1.c - Uso de la máquina ...................................................................................................... 13
11.1.d - Fin de uso y apagado ................................................................................................. 14
12.1 - VACIADO DEL AGUA DE RETORNO (Fig. H) .................................................................14
13.1 - MANTENIMIENTO Y LIMPIEZA ........................................................................................ 14
13.2 - OPERACIONES QUE DEBEN EFECTUARSE DIARIAMENTE ....................................... 14
13.2.a - Vaciado y limpieza del depósito de agua limpia (Fig. I) .............................................. 14
13.2.b - Limpieza del depósito de agua de retorno (Fig. J) ..................................................... 15
13.2.c - Limpieza del limpiador (Fig. K) ................................................................................... 15
13.3 - OPERACIONES QUE DEBEN REALIZARSE CADA 3 MESES ......................................15
13.3.a - Control del estado de desgaste de la cadena de dirección (Fig. L) ........................... 15
13.4 - OPERACIONES QUE DEBEN EFECTUARSE SEGÚN LAS NECESIDADES ................ 15
13.4.a - Sustitución de las escobillas (Fig. M) ......................................................................... 15
13.4.b - Ajuste de la goma del protector contra salpicaduras (Fig. M) .................................... 16
13.4.c - Sustitución de los cauchos de la escobilla (Fig. K) .................................................... 16
13.4.d - Regulación incidencia del limpiador (Fig. N) .............................................................. 17
13.4.e - Ajuste de la presión del limpiaparabrisas (Fig. O) ...................................................... 17
13.4.f - Limpieza del ltro de agua limpia (Fig. P) .................................................................. 17
13.4.g - Grifo de drenaje del compartimento de la batería (Fig. A) .......................................... 17
13.4.h - Control del estado de desgaste de las tres ruedas (Fig. A) ........................................ 17
14.1 - CONFIGURACIÓN PARÁMETROS (Fig. F) ..................................................................... 18
14.1.a - Parámetros del OPERADOR ...................................................................................... 18
15.1 - CONTROL/SUSTITUCIÓN DE LOS FUSIBLES ............................................................... 20
16.1 - ALARMAS DURANTE el FUNCIONAMIENTO ................................................................. 20
17.1 - BÚSQUEDA AVERÍAS ...................................................................................................... 23
18.1 - DESINSTALACIÓN Y TRATAMIENTO COMO RESIDUO DE LA MÁQUINA .................. 24
19.1 - ESQUEMA ELÉCTRICOS ................................................................................................. 25
49029600_Manuale RACER_RANGER_8ed_04-2023.indd 249029600_Manuale RACER_RANGER_8ed_04-2023.indd 2 06/04/2023 15:05:3906/04/2023 15:05:39

www.ghibliwirbel.com
Professional Cleaning Machines Since 1968
ESPAÑOL - 3
DATOS TÉCNICOS
RACER R 85 RANGER R 115
FD 65 FD 75 FD 75 FD 85
Tipo de conducción Operador a bordo
Características
Operación y suministro de energía Batería 24 V
Tipo de baterías
N° 2 - 12V 105Ah (C5) N° 4 - 6V 240Ah (C5)
N° 4 - 6V 180Ah (C5) N° 1 - 24V 320Ah (C5)
N° 1 - 24V 100Ah (Li) N° 1 - 24V 150Ah (Li)
Potencia instalada 2160 W 2210 W
Autonomía de trabajo
2 h (105Ah C5) 5 h (240Ah C5)
4 h (180Ah C5) 7 h (320Ah C5)
2 h (100Ah Li) 3 h (150Ah Li)
Avance Tracción hacia delante / atrás
Anchura pista de lavado 650 mm 750 mm 750 mm 850 mm
Anchura de aspiración 850 mm 950 mm 950 mm 1050 mm
Rendimiento horario teórico 4000 m2/h 4500 m2/h 4500 m2/h 5000 m2/h
Rendimiento horario real 2400 m2/h 2700 m2/h 2700 m2/h 3000 m2/h
Vibración del sistema mano-brazo
(ISO 5349-1) < 2,5 m/s2
Vibración del cuerpo entero (ISO 2631-1) < 0,5 m/s2
Presión sonora (ISO 11203) (LpA) 63 dB(A)
Presión sonora modo silencioso (LpA) 57 dB(A)
Grado de protección IP IPX3
Cepillos
Diámetro / pad / número 330 mm /
13” / 2
380 mm /
15” / 2
380 mm /
15” / 2
430 mm /
17” / 2
Potencia motor / número 500 W / 2
Velocidad de rotación cepillo 165 rpm.
Presión específica 30 gr/cm221 gr/cm221 gr/cm217 gr/cm2
Presión específica (presión extra) 46 gr/cm232 gr/cm243 gr/cm234 gr/cm2
49029600_Manuale RACER_RANGER_8ed_04-2023.indd 349029600_Manuale RACER_RANGER_8ed_04-2023.indd 3 06/04/2023 15:05:3906/04/2023 15:05:39

www.ghibliwirbel.com
Professional Cleaning Machines Since 1968
ESPAÑOL - 4
RACER R 85 RANGER R 115
FD 65 FD 75 FD 75 FD 85
Tracción
Inclinación máxima superable durante la
operaciones de limpieza 2 %
Inclinación máxima superable a vuoto (*) 12 %
Potencia del motor 600 W
Velocidad máxima de avance durante el
trabajo 6 km/h
Aspiración
Potencia motor 550 W
Depresión (columna de agua) 125 mbar / 1250 mmH2O
Capacidad de aire 30 l/sec
Depósito
Tipología Doble tanque
Capacidad de solución 80 l 110 l
Capacidad de retorno 85 l 115 l
Dimensiones
Dimensiones de la máquina
(Largo x Ancho x Altura) 1375 x 705 x 1230 mm 1470 x 770 x 1365 mm
Ancho de la máquina: plataforma de cepillos
715 mm 785 mm 785 mm 890 mm
Ancho de la máquina: escobilla de goma 885 mm 950 mm 950 mm 1055 mm
Dimensiones compartimiento baterías
(Largo x Ancho x Altura) 380 x 540 x 310 mm 380 x 625 x 440 mm
Peso
Peso a vuoto 213 kg 246 kg
Peso con baterías Gel 12V 105Ah 285 kg -
Peso con baterías Gel 6V 180Ah 333 kg -
Peso con batería de Litio 24V 100Ah 249 kg -
Peso con baterías Gel 6V 240Ah - 432 kg
Peso con baterías Pb Wet 24V 320Ah - 506 kg
Peso con batería de Litio 24V 150Ah - 288 kg
Peso en orden de marcha (GVW) 490 kg 691 kg
(*) La máquina fue probada en las siguientes condiciones:
• Batería estándar
• Tanques vacíos
• Rampa de hormigón crudo
• Longitud de rampa 15 m
• 75 kg de operador
1 -
49029600_Manuale RACER_RANGER_9ed_09-2023.indd 449029600_Manuale RACER_RANGER_9ed_09-2023.indd 4 04/09/2023 14:54:3504/09/2023 14:54:35

www.ghibliwirbel.com
Professional Cleaning Machines Since 1968
ESPAÑOL - 5
1.1 - INTRODUCCIÓN
NOTA:
Los números y las referencias de figuras que
se muestran entre paréntesis se refieren a
los componentes indicados en la hoja ilus-
trativa adjunta.
PELIGRO:
Antes de utilizar la máquina leer cui-
dadosamente el manual “ADVERTEN-
CIA DE SEGURIDAD PARA SECADO-
RA DE SUELOS” anexo del presente
y los complementos indicados en lo
sucesivo.
1.1.a - Posición del operador
El operador, durante el uso de la máquina
está sentado en el asiento con su manos en
el volante.
1.1.b - Advertencias generales
cuando se usa la máquina
- NO abandonar la máquina sobre super-
cies inclinadas.
- Está absolutamente prohibido realizar
curvas en rampa; ya que hay peligro de
vuelque.
- Evitar utilizar la máquina en ambientes
con riesgo de caída de objetos.
1.2 - USO NO CONTEMPLADO
DE LA MÁQUINA
- No utilizar la máquina con un depósito de
recuperación abierto.
- No circular con pies / piernas colgando.
- No realizar maniobras repentinas sobre-
todo en bajada.
ADVERTENCIA:
La máquina está habilitada para el
transporte de una SOLA persona.
2 -
2.1 - CONOCIMIENTO DE LA
MÁQUINA (Fig. A)
(1) Volante
(2) Panel de mandos
(3) Asiento
(4) Sensor de presencia del operador
(5) Pulsador de EMERGENCIA, para la
interrupción inmediata de todas las
funciones
(6) Peana apoya pies
(7) Pedal acelerador
(8) Ruedas posteriores
(9) Luz de trabajo (opcional)
(10) Luz intermitente (opcional)
(11) Depósito agua de retorno
(12) Tapa depósito agua de retorno
(13) Depósito de agua limpia
(14) Enchufe
(15) Tubo de carga de agua limpia
(16) Tubo de aspiración de agua del limpia
pisos.
(17) Tubo de descarga de agua limpia
(18) Tubo de nivel del tanque de agua limpia
(19) Grupo de cepillos
(20) Limpia pisos
(21) Compartimento para documentos
(22) Filtro de agua
(23) Rueda de dirección y de tracción
(24) Gancho para boquilla
(25) Pie de soporte del conjunto depósitos
3 -
3.1 - DESEMBALAJE (Fig. B)
Una vez retirado el embalaje como se indica
en la hoja de instrucciones del propio emba-
laje, comprobar la integridad de la máquina
y de todos los componentes suministrados.
Si encuentra algún daño obvio, comuníque-
se con su distribuidor y transportista local
dentro de los 3 días posteriores a la recep-
ción.
- Retire el sobre y las cajas (26) que contie-
nen los accesorios suministrados:
• (20) Limpia pisos.
• (32) N° 2 cepillos.
- Levante la unidad de tanque y saque la
documentación del sobre correspondien-
te:
• (33) Manual de uso y mantenimiento
de la máquina.
• (34) Manual de instrucciones del recar-
ga baterías (si está presente).
49029600_Manuale RACER_RANGER_8ed_04-2023.indd 549029600_Manuale RACER_RANGER_8ed_04-2023.indd 5 06/04/2023 15:05:4306/04/2023 15:05:43

www.ghibliwirbel.com
Professional Cleaning Machines Since 1968
ESPAÑOL - 6
3.1.a - Instalación de las baterías
(Fig. A)
- Levante con cuidado el tanque de recu-
peración (11).
- Dependiendo de la conguración (4 bate-
rías de 6 V, 2 baterías de 12 V, 1 paquete de
baterías de 24), monte y conecte las bate-
rías, tal y como se indica en las guras, uti-
lizando los cables y los enchufes de serie.
- Baje con cuidado el tanque de agua de
recuperación (11).
NOTA:
La conexión de las baterías debe ser realiza-
da por personal especializado.
3.1.b - Descarga de la máquina de la
plataforma de madera (Fig. B)
- Retire el bloque de madera (27) situado
delante de la rueda delantera.
- Coloque la rampa (28) delante del palet
de madera como se indica en la hoja de
instrucciones del embalaje.
- Sentarse en el asiento (3) en posición de
conducción.
- Girar la llave (29) en “ON”.
- Presione el botón de dirección de la mar-
cha (31a) “ ” (marcha hacia adelan-
te), luego presione con cuidado el pedal
del acelerador (7) y bájese del palé.
4 -
4.1 - ENSAMBLAJE
COMPONENTES
4.1.a - Instalación del limpia pisos
(Fig. C)
- Introducir el limpia pisos (20) en la placa
(35) de sujeción y jarlo atornillando los
dos pomos (36).
- Conectar el tubo de aspiración (16) sobre
la boca (37) de llenado del limpia pisos.
4.1.b - Instalación del cepillo
- Consulte el procedimiento en el párra-
fo “13.4.a - Sustitución de las escobillas
(Fig. M)”.
5 -
5.1 - CARGA DE LA BATERÍA
PELIGRO:
Efectuar la carga de las baterías en
locales bien ventilados y conformes
con las normas vigentes en el país de
uso.
Para las informaciones relativas a la
seguridad sujetarse a lo descrito en
el capítulo 1 del presente manual.
ADVERTENCIA:
Para las informaciones y las adver-
tencias relativas a la batería y al car-
gador de baterías de a bordo (si está
presente) sujetarse a lo indicado en
el manual del cargador de baterías
que se adjunta al presente.
La máquina sale de fábrica calibrada
para el funcionamiento con baterías
de gel.
Si se tuvieran que instalar baterías de
otro tipo, ver el apartado “configura-
ción parámetros”.
Se prohíbe usar la máquina con ba-
terías de gel con calibrado para bate-
rías de ácido u otro.
(Solo para versiones sin cargador de
batería incorporado) El aparato debe
ser alimentado únicamente con car-
gadores de batería externos SELV
(safety extra-low voltage).
NOTA:
(Solo para baterías GEL) Para recargar com-
pletamente las baterías se requieren 10 ho-
ras. Evitar recargas parciales.
(Solo para baterías de litio) Se puede recar-
gar parcial.
Cargue las baterías al nal de cada trabajo
o al menos cuando el símbolo de batería “
” en la pantalla (41 Fig. F) comience
a parpadear.
49029600_Manuale RACER_RANGER_8ed_04-2023.indd 649029600_Manuale RACER_RANGER_8ed_04-2023.indd 6 06/04/2023 15:05:4606/04/2023 15:05:46

www.ghibliwirbel.com
Professional Cleaning Machines Since 1968
ESPAÑOL - 7
- Conduzca la máquina hasta la estación
de carga de baterías.
- Levante el depósito de agua de recupe-
ración (11) asegurándose de que esté
vacío.
5.1.a - Carga de la batería a través
del cargador baterías exter-
no (Fig. G)
- Controle la idoneidad del cargador de ba-
terías exterior consultando el manual co-
rrespondiente. La tensión nominal del car-
gador de baterías debe ser igual a 24 V.
- En el correspondiente alojamiento (38),
extraiga el conector (39) y conéctelo al
cargador de baterías exterior.
- Conecte el cargador de baterías a la red
eléctrica.
- Cuando nalice la recarga, desconecte el
cargador de baterías de la red y del co-
nector (39).
- Baje con cuidado el tanque de agua de
recuperación (11).
5.1.b - Carga de la batería a través
del cargador baterías de a
bordo (si está presente) (Fig.
G)
- En el alojamiento correspondiente (38),
extraiga y conecte el enchufe del cable del
cargador de baterías (40) a la red eléctri-
ca (la tensión y la frecuencia de red deben
ser iguales a los valores correspondiente
del cargador de baterías, indicados en la
placa de la matrícula de la máquina).
NOTA:
Cuando el cargador de baterías está conec-
tado a la red eléctrica, todas las funciones
de la máquina se detendrán de modo auto-
mático.
- En la pantalla (41 Fig. F), cuando en el
símbolo batería se encienden los seg-
mentos en secuencia, indica que el car-
gador de baterías está cargando las ba-
terías.
- Cuando todos los segmentos en el símbo-
lo batería están encendidos con una luz
ja signica que el ciclo de carga de las
baterías ha nalizado.
- Desconecte el enchufe del cable del car-
gador de baterías (40) de la red eléctrica
e introdúzcalo en su alojamiento corres-
pondiente (38).
- Baje con cuidado el tanque de agua de
recuperación (11).
6 -
6.1 - DESCRIPCIÓN MANDOS
DE LA MÁQUINA
6.1.a - Panel de comunicaciones
(Fig. F)
(29) Llave de encendido
- Girando a la derecha “ON” se provee de
tensión a los circuitos, habilitando el fun-
cionamiento de la máquina.
- Girando a la izquierda “OFF” se corta la
tensión a los circuitos y se puede extraer
la llave.
(30) Botones de ajuste de la veloci-
dad máxima
- Se puede regular la velocidad máxima de
avance utilizando los botones (30a) “
” y (30b) “ ”.
- Al presionar por completo el acelerador
(7) la velocidad será proporcional con res-
pecto al valor máximo congurado.
- Cuando en la pantalla (41) todos los sím-
bolos de velocidad “ ” son claros el pe-
dal acelerador (7) se bloquea y la máqui-
na permanece detenida.
(31) Botones de sentido de marcha
- Al presionar el botón hacia adelante (31a)
“” la máquina procede con el sentido
de marcha hacia adelante; en la pantalla
se visualiza el icono “ ”.
- Al presionar el botón hacia atrás (31b) “
” la máquina va marcha atrás y se
activa el zumbador de marcha hacia atrás;
en la pantalla se visualiza el icono “ ”.
49029600_Manuale RACER_RANGER_8ed_04-2023.indd 749029600_Manuale RACER_RANGER_8ed_04-2023.indd 7 06/04/2023 15:05:5406/04/2023 15:05:54

www.ghibliwirbel.com
Professional Cleaning Machines Since 1968
ESPAÑOL - 8
NOTA:
La velocidad máxima en la marcha atrás
puede congurarse como la marcha de
avance a través de los botones (30).
(41) Pantalla
- Véase el capítulo especíco.
(42) Botón “Ready to go”
- Al presionar el botón (42) en la pantalla se
visualiza el icono “ ” y se posicionan
en una conguración estándar las funcio-
nes siguientes:
• Bajada del cabezal y rotación de las
escobillas.
• Bajada del secador y activación del
sistema de aspiración.
• Velocidad de trabajo = 3ª muesca (3,6
km/h).
• Flujo de agua = 3ª muesca.
• Agente químico = 3ª muesca (1%).
• Aspiración = normal (100%).
• Presión de las escobillas = normal.
- Con esta función estándar activada se
puede presionar cualquier botón de tra-
bajo para realizar cualquier modicación
o ajuste.
En el caso que sea necesario, cuando se ha
congurado una modicación en las funcio-
nes de trabajo se puede memorizar como se
indica a continuación:
- Presione el botón y manténgalo presiona-
do durante 3 segundos (42); la conrma-
ción de que se ha memorizado se indica
en la pantalla (41) con la intermitencia
“UPLOADED”.
- Para desactivar la nuevo ajuste y volver a
los valores estándar de las conguracio-
nes, vuelva a presionar y mantenga pre-
sionado el botón durante 3 segundos (42);
la conrmación se indicará en la pantalla
(41) con la intermitencia “RESET”.
(43) Botón ECO
- Durante la fase de trabajo, al presionar
el botón (43) en la pantalla se visualiza
el icono “ ”, los parámetros de agua,
agente químico, aspiración y presión cali-
brada asumen los valores siguientes:
• Flujo de agua = 3^ muesca.
• Agente químico = 3^ muesca (1%).
• Aspiración = silenciosa (50%).
• Presión de las escobillas en el suelo =
normal.
(44) Botón aspirador
- Al presionar el botón (44) se activa el as-
pirador y en la pantalla se visualiza el ico-
no “ ” y, si el sentido de marcha hacia
adelante está conectada o la máquina se
encuentra en punto muerto, el secador
baja.
- Presionando el botón (44) una otra vez
la aspiradora se para y el enjugador se
levanta.
- Si la máquina está parada, enjugador ba-
jado y llave (29) en posición “ON” después
de un período de tiempo de inactividad el
enjugador se levantará automáticamente.
(45) Botón funcionamiento
silencioso
- Presionando el botón (45) se reduce la
velocidad de la turbina de aspiración re-
duciendo notablemente el ruido que la
máquina emite; con la función habilitada
en la pantalla aparece el icono “ ”.
- Volviendo a presionar el botón (45) se
deshabilita la función y la máquina reanu-
da su funcionamiento en modo estándar;
el icono “ ” se apaga y el icono “ ”
aparece en la pantalla.
NOTA:
Apagando la turbina de aspiración con la
modalidad “funcionamiento silencioso” ha-
bilitada, el funcionamiento de la turbina se
conmutará automáticamente en modalidad
“funcionamiento estándar” durante el tiempo
de retardo de apagado.
49029600_Manuale RACER_RANGER_8ed_04-2023.indd 849029600_Manuale RACER_RANGER_8ed_04-2023.indd 8 06/04/2023 15:06:0306/04/2023 15:06:03

www.ghibliwirbel.com
Professional Cleaning Machines Since 1968
ESPAÑOL - 9
(46) Botón escobillas
- Al presionar el botón (46) el cabezal de
las escobillas se baja y en la pantalla se
visualiza el icono “ ”.
- Los cepillo empiezan a girar cuando se
presiona el acelerador, se paran cuando
el acelerador está levantado.
NOTA:
Los cepillos giran tanto en avance como en
retroceso y con ajuste de velocidad (30) po-
sicionado en “0”.
- Con máquina parada, cabeza bajada y
cepillos parados con llave (29) en posi-
ción “ON” después de un periodo de tiem-
po de inactividad la cabeza se levanta
automáticamente.
- Si se presiona el botón (46) con cepillos
en rotación, los cepillos se paran, el grupo
se levanta y se apaga el icono “ ” en en
la pantalla.
(47) Botón presión extra de las
escobillas
Con el cabezal de las escobillas bajado se
puede regular la presión de las escobillas
que están en el suelo.
- Al presionar el botón (47) se activa la pre-
sión extra; con la función habilitada en la
pantalla se visualiza el icono “ ”.
- Pulsando de nuevo el botón (47) la pre-
sión en el suelo vuelve normal y en la
pantalla se visualiza el icono “ ”.
NOTA:
Cada vez que el grupo cabeza sube (posi-
ción de descanso), la presión cepillos se po-
siciona al mínimo.
NOTA:
Esta función está dotada de un sistema de
seguridad que señala automáticamente un
excesivo consumo de corriente de los moto-
res cepillos y es capaz de cambiar automá-
ticamente la presión cepillos al suelo lleván-
dola en la posición más adecuada.
(48) Botón del dosicador de
agente químico (si está presente)
- Presione el botón (48) en la pantalla se
visualiza el icono “ ”, y se prepara para
dosicar el agente químico.
- El funcionamiento de la bomba de dosi-
cación está dirigido al presionar el pedal
acelerador.
- Al presionar varias veces el botón (48) se
aumenta la cantidad de agente químico;
al alcanzar la cantidad máxima se visua-
liza en la pantalla el icono “ ”. Al presio-
nar de nuevo el botón (48) se desactiva la
función y se apaga el icono en la pantalla.
NOTA:
En caso de vaciado del sistema de dosica-
ción de agente químico, después de reem-
plazar el tanque, mantenga presionado el
botón (48) presionado durante al menos 5
segundos para activar el procedimiento de
purga de aire que dura aproximadamente 40
segundos; esta función se activa únicamen-
te con la máquina parada, llave (29) en la
posición “ON” y con el ajuste de velocidad
(30) en “0”.
(49) Botón de suministro de agua
- Al presionar el botón (49), en la pantalla
se visualiza el icono “ ” y se habilita la
apertura de la electroválvula de agua. Su
funcionamiento al presionar el pedal del
acelerador.
- Presionando repetidamente el botón (49)
se incrementa la cantidad de agua; lle-
gando a la cantidad máxima, mostrada en
el pantalla por el icono “ ”, si se presiona
el botón (49) se desactiva la función.
(50) Botón avisador acústico
(51) Botón luz intermitente
49029600_Manuale RACER_RANGER_8ed_04-2023.indd 949029600_Manuale RACER_RANGER_8ed_04-2023.indd 9 06/04/2023 15:06:1406/04/2023 15:06:14

www.ghibliwirbel.com
Professional Cleaning Machines Since 1968
ESPAÑOL - 10
(52) Botón luz de trabajo
6.1.b - Pedal acelerador (Fig. A)
- Al presionar el pedal acelerador (7), la
máquina se mueve hacia adelante o hacia
atrás, dependiendo del botón de dirección
de marcha que se haya presionado.
- La velocidad puede regularse presionan-
do más o menos el pedal acelerador.
- Liberando el acelerador (7) la máquina
retrasa hasta pararse. Unos segundos
después, con máquina parada, se inserta
automáticamente el freno de estaciona-
miento; este freno se desactivará presio-
nando el acelerador (7) con marcha ade-
lante o atrás insertada.
7 -
7.1 - PANTALLA (Fig. F)
Con la máquina encendida, en la pantalla
(41) se visualizan los iconos siguientes:
Batería
Indica el estado de carga de las baterías:
Baterías cargadas
Baterías descargadas
Velocidad máxima de avance
Con los botones (30a) “ ” y (30b) “ ”
se congura la velocidad máxima que la má-
quina puede alcanzar con el pedal acelera-
dor (7) completamente presionado:
km/h - 0 1,2 2,4 3,6 4,8 6,0
Dirección de marcha
La echa de dirección de marcha indica la
función de avance seleccionada a través de
los botones (31a) “ ” y (31b) “ ”.
“Ready to go”
Se visualiza en la pantalla cuando se presio-
na el botón (42) “ ”.
Modalidad ECO
Aparece en la pantalla cuando se presiona el
botón (43) “ ”.
Aspirador en funcionamiento
Se visualiza en la pantalla cuando se pre-
siona el botón (44) “ ” indicando que el
aspirador está encendido y el secador en
posición baja.
Funcionamiento silencioso
Con el aspirador encendido.
Se visualiza en la pantalla cuando se pre-
siona el botón (45) “ ” indicando que el
aspirador funciona con un régimen reducido
de vueltas.
Predisposición de rotación de
la escobilla
Se visualiza en la pantalla cuando se presio-
na el botón (46) “ ” indicando que se ha
habilitado la rotación de la escobilla.
49029600_Manuale RACER_RANGER_8ed_04-2023.indd 1049029600_Manuale RACER_RANGER_8ed_04-2023.indd 10 06/04/2023 15:06:3406/04/2023 15:06:34

www.ghibliwirbel.com
Professional Cleaning Machines Since 1968
ESPAÑOL - 11
Extrapresión
Se visualiza en la pantalla indicando la pre-
sión de trabajo de las escobillas. Presione el
botón (47) “ ” para cambiar la presión de
trabajo.
Dosicador de detergente (si
está presente)
Se visualiza en la pantalla cuando se presio-
na el botón (48) “ ”.
Presione el botón para aumentar o disminuir
el porcentaje de detergente dosificado:
0,2% 0,5% 1% 2% 3%
Predisposición de suministro
de agua
Se visualiza en la pantalla cuando se presio-
na el botón (49) “ ” indicando que se ha
habilitado la electroválvula de suministro de
agua.
Cuando el nivel de agua en el tanque se en-
cuentra al mínimo, el icono “ ” se visualiza
en pantalla completa combinado con la señal
acústica.
Llene el tanque de agua (13) como se indi-
ca en el correspondiente apartado, después
apague y reinicie la máquina
Ausencia del operador en el
asiento de conducción
Este icono se visualiza cuando el operador
no está sentado correctamente en el asiento
de conducción y bloquea todas las funciones
de la máquina.
Máximo nivel de líquido en el
tanque de recuperación
Se visualiza cuando el líquido en el tanque
de recuperación ha alcanzado el nivel máxi-
mo.
Acelerador presionado
Este símbolo se inserta al inicio de la máqui-
na indicando una secuencia errónea de ope-
ración de arranque, para eliminar la alarma
insertado eliminare liberar el acelerador (7
Fig. A).
8 -
8.1 - EMERGENCIA
El botón de emergencia (5 Fig. A) está si-
tuado en una posición de acceso fácil para
el operador. Después de haber presionado
con decisión en caso de necesidad inmedia-
ta para detener cualquier funcionamiento de
la máquina.
Para reactivar la funcionalidad de la máqui-
na, tire del botón de emergencia hasta que
se dispare y se restablezca.
ADVERTENCIA:
Presione el botón de emergencia (5)
con la máquina encendida solamente
en el caso de necesidad real, no utili-
ce este procedimiento para apagar la
máquina, ya que podría causarle da-
ños incluso de carácter grave.
9 -
9.1 - SEGURIDAD (Fig. A)
La máquina está equipada con los siguientes
dispositivos de seguridad:
Sensor de presencia del operador (4)
Bloquea todas las funciones de la máquina
cuando el operador no está presente en el
asiento del conductor.
Seguridad antideslizante
En caso necesario, reduce la velocidad al
girar y en caso de inclinación lateral de la
máquina a un valor de seguridad para evitar
derrapes bruscos y aumentar la estabilidad
de la máquina en todas las condiciones.
Freno electromagnético
Está integrado en la rueda delantera (23) y
mantiene la máquina frenada cuando está
apagada y, en cualquier caso, cuando la má-
quina está parada.
10 -
49029600_Manuale RACER_RANGER_8ed_04-2023.indd 1149029600_Manuale RACER_RANGER_8ed_04-2023.indd 11 06/04/2023 15:06:4606/04/2023 15:06:46

www.ghibliwirbel.com
Professional Cleaning Machines Since 1968
ESPAÑOL - 12
10.1 - LLENADO DEL
DEPÓSITO (Fig. D)
ADVERTENCIA:
Llenar el depósito sólo con agua lim-
pia y a una temperatura no superior a
los 50°C.
- A través del tubo extraíble (52) introduzca
agua en el tanque (13) hasta llenarlo por
completo.
- No llene completamente el tanque, use el
tubo de nivel (18) como referencia.
- O bien en el caso que esté disponible,
abra el tapón (14) y utilice la toma ac-
quastop (53, si está presente).
ADVERTENCIA:
Siempre verifique visualmente el ni-
vel de llenado para evitar el riesgo de
mojar el piso.
- Cierre el tapón cuando nalice de llenar el
tanque (14).
NOTA:
Para las máquinas sin kit químico, llene el
tanque (13) con agua limpia y mézclela con
detergente químico.
Siga siempre las instrucciones de dilución
que se indican en la etiqueta del envase del
producto químico que se utiliza para compo-
ner la solución detergente.
10.2 - TANQUE DETERGENTE/
QUÍMICO (si está presente)
(Fig. E)
NOTA:
Utilizar sólo detergentes que no sean espu-
mosos y en la cantidad que recomienda su
productor para el tipo de suciedad.
- Levante el tanque de recuperación (11).
- Controlar que en el tanque (54) exista el
producto necesario para el día de trabajo.
En caso de substitución del tanque actuar
como sigue:
- Quitar la tapa (55) extraer el tanque (54)
e insertar un nuevo tanque de 5 litros y
entonces insertar la tapa (55) con el tubo
de aspiración.
PELIGRO:
En el caso de contacto del detergente
con los ojos y la piel, o en el caso de
ingerirlo, consulte la ficha de seguri-
dad y de uso del fabricante del deter-
gente.
NOTA:
El tanque (54) que se utilizarán son del tipo
estándar de 5 litros que se encuentra en el
mercado.
- Baje con cuidado el tanque de agua de
recuperación (11).
- Realice el purgado de aire (véase proce-
dimiento en la opción “Botón dosicador
de agente químico”).
11 -
11.1 - FUNCIONAMIENTO
(Fig. A-F)
11.1.a - Controles antes del uso
- Controlar que el tubo (15) de descarga
del depósito de recuperación esté correc-
tamente enganchado y tapado.
- Controlar que el tubo (16) de aspiración
del agua de la fregadora-secadora esté
bien conectado en el depósito de retorno.
- Controlar que el acoplamiento (37) si-
tuado sobre el limpia suelos (20) no esté
obstruido y que el tubo (16) se encuentre
correctamente conectado.
- Controlar el estado de carga de las ba-
terías, girando la llave (29) en “ON” y la
indicación de carga sobre la pantalla (41).
11.1.b - Preparación de la máquina y
elección del ciclo
- Sentarse en el asiento del conductor.
49029600_Manuale RACER_RANGER_8ed_04-2023.indd 1249029600_Manuale RACER_RANGER_8ed_04-2023.indd 12 06/04/2023 15:06:4806/04/2023 15:06:48

www.ghibliwirbel.com
Professional Cleaning Machines Since 1968
ESPAÑOL - 13
- La máquina puede efectuar 4 ciclos de
trabajo:
Ciclo de lavado, cepillado, secado:
- Presione el botón “Ready to go” (42) “
” para realizar el suministro de de-
tergente, la rotación de las escobillas y la
puesta en marcha del aspirador.
Ciclo de sólo secado:
- Para efectuar sólo el ciclo de secado pre-
sionar el botón (44) “ ”, la aspiradora
se inicia.
Ciclo de sólo cepillado:
- Para efectuar sólo el ciclo de cepillado
presionar el botón(46) “ ”, se prepa-
rará la rotación de los cepillos.
- La rotación de los cepillos se inicia cuan-
do la máquina, con acelerador (7) presio-
nado, comienza a moverse hacia ade-
lante o hacia atrás, o con el acelerador
presionado y ajustando la velocidad de
avance a “0”.
Ciclo lavado, cepillado:
- Presionar el botón (46) “ ” para prepa-
rar la rotación de los cepillos y
- Presionar el botón (49) “ ” para prepa-
rar el suministro de agua.
- La rotación de las escobillas y el suminis-
tro de agua se activan cuando se presio-
na el pedal acelerador con el sentido de
marcha hacia adelante o hacia atrás, o
bien congurando la velocidad de avance
al menos en la 1ª muesca.
11.1.c - Uso de la máquina
PELIGRO:
Prestar la máxima atención durante
el uso de la máquina en rampas, para
evitar vuelques o situaciones en las
que la estabilidad de la máquina mis-
ma sea precaria.
PELIGRO:
Evitar maniobras repentinas y efec-
tuar maniobras con el volante total-
mente girado sólo a baja velocidad,
considerando siempre las condicio-
nes del suelo.
- Gire la llave (29) en “ON”; pasados 2 se-
gundos de su encendido, la pantalla (41)
indica la tipología de baterías instaladas y
las horas de trabajo de la máquina.
- Seleccione el tipo de ciclo de trabajo que
desea realizar.
- Introduzca la velocidad de trabajo que de-
sea utilizando los botones (30).
- Accione la luz rotativa (10, opcionales) y
las luces de trabajo (9, opcionales).
- Iniciar le operaciones de limpieza actuan-
do sobre el acelerador (7).
NOTA:
Soltando el acelerador la rotación de los ce-
pillos y la dispersión de agua se detienen.
NOTA:
La correcta limpieza y secado del suelo se
realiza procediendo con la máquina hacia
adelante, procediendo con la máquina mar-
cha atrás el limpia suelos se eleva y no pro-
duce la aspiración del agua presente en el
suelo.
- Eventualmente ajustar la cantidad de so-
lución de lavado a través del botón (49) “
”.
- Controlar el estado de carga de las bate-
rías a través de la pantalla (41).
49029600_Manuale RACER_RANGER_8ed_04-2023.indd 1349029600_Manuale RACER_RANGER_8ed_04-2023.indd 13 06/04/2023 15:06:5006/04/2023 15:06:50

www.ghibliwirbel.com
Professional Cleaning Machines Since 1968
ESPAÑOL - 14
11.1.d - Fin de uso y apagado
- Al nal de las operaciones de limpieza
detener en secuencia, la rotación de las
escobillas y el aspirador actuando sobre
los correspondientes mandos en función
al tipo de ciclo utilizado.
- Girar la llave (29) a “OFF”.
- El freno de estacionamiento se inserta au-
tomáticamente.
- Vaciar y lavar el depósito de recuperación
y el depósito de la solución como se indi-
ca en los apartados correspondientes.
NOTA:
Cuando el operador sale de la máquina se
inserta automáticamente el freno de estacio-
namiento.
PELIGRO:
Está prohibido estacionar la máquina
en rampa.
12 -
12.1 - VACIADO DEL AGUA DE
RETORNO (Fig. H)
PELIGRO:
Hay que asegurarse que el depósito
del agua de retorno (11) esté vacío
antes de levantarlo.
Al terminar el ciclo de lavado o cuando el de-
pósito (11) de agua de retorno está lleno, es
necesario vaciarlo de la siguiente manera:
NOTA:
Para eliminar el agua de retorno se deben
seguir los procedimientos establecidos por
la legislación del lugar donde opere la má-
quina.
- Mover la máquina cerca a un sifón de
desagüe.
- Separe el tubo (15) de los correspondien-
tes enganches, colóquelo en el suelo de-
positándolo sobre la pileta de descarga.
- Desatornille el tapón (56) y descargue por
completo el agua de recuperación que
está contenida en el tanque.
NOTA:
Es posible regular la cantidad de agua que
sale presionando la parte final de la mangue-
ra (15).
- Vuelva a atornillar el tapón (56) y vuelva a
colocar el tubo (15) en su correspondiente
soporte.
13 -
13.1 - MANTENIMIENTO Y
LIMPIEZA
ADVERTENCIA:
Para las informaciones y las adver-
tencias relativas a las operaciones de
mantenimiento o limpieza atenerse
a lo que se indica en el manual “AD-
VERTENCIAS DE SEGURIDAD PARA
SECADORA DE SUELOS” anexo al
presente.
13.2 - OPERACIONES QUE
DEBEN EFECTUARSE
DIARIAMENTE
13.2.a - Vaciado y limpieza del depó-
sito de agua limpia (Fig. I)
ADVERTENCIA:
Al terminar las operaciones de lava-
do es obligatorio vaciar y limpiar el
depósito (13) con el fin de evitar resi-
duos o incrustaciones.
Después de vaciar el depósito del agua de
retorno, descargar el depósito de agua lim-
pia (13), procediendo de la siguiente manera:
49029600_Manuale RACER_RANGER_8ed_04-2023.indd 1449029600_Manuale RACER_RANGER_8ed_04-2023.indd 14 06/04/2023 15:06:5106/04/2023 15:06:51

www.ghibliwirbel.com
Professional Cleaning Machines Since 1968
ESPAÑOL - 15
- Posicionarse con la máquina sobre un si-
fón de desagüe.
- Desconectar el tubo (17) de los engan-
ches correspondientes, bajarlo hasta el
suelo en el sifón de desagüe, quitar el ta-
pón (57) y dejar desaguar totalmente el
agua.
- Lavar el interior del tanque dejando el
tubo de descarga abierto e introduciendo
agua limpia desde la apertura superior.
- Al terminar la limpieza levantar el tubo
(17), cerrar el tapón (57) y engancharlo
en las respectivas lengüetas.
13.2.b - Limpieza del depósito de
agua de retorno (Fig. J)
ADVERTENCIA:
Al terminar las operaciones de lava-
do, es obligatorio limpiar el depósito
de agua de retorno para evitar resi-
duos o incrustaciones, y para que
no proliferen bacterias, olores y añu-
blos.
- Levante la tapa (12).
- Extraiga la cubeta de recogida de detri-
tos (58) y abra su tapa, después limpie
con agua corriente, eliminando posibles
restos de papel, madera, etc...que lo obs-
truyen.
- Extraiga y limpie el ltro de aspiración
(59) con agua corriente.
- Dejando el tubo de descarga (15 Fig. H)
bajado y el tapón extraído, introduzca
agua desde la apertura superior (60), a
continuación, enjuague el interior del tan-
que hasta que del tubo salga agua limpia.
- Vuelva a montar todo procediendo en
sentido contrario.
13.2.c - Limpieza del limpiador (Fig.
K)
Para efectuar una correcta limpieza de la es-
cobilla (20) es necesario quitarla procedien-
do como sigue:
- Conectar el tubo (16 Fig. C) desde la es-
cobilla (20).
- Aojar los mangos (36 Fig. C) y quitar la
escobilla (20).
- Lavar la escobilla, especialmente los cau-
chos (60) o (61)) y el interior de la unión
de aspiración (62).
NOTA:
Si durante el lavado se observa que los cau-
chos (60) o (61) están dañados o desgas-
tados, es necesario sustituirlos o invertirlos.
- Volver a poner todo, procediendo en sen-
tido contrario.
13.3 - OPERACIONES QUE
DEBEN REALIZARSE CADA 3
MESES
13.3.a - Control del estado de
desgaste de la cadena de
dirección (Fig. L)
- Controlar el estado de desgaste y de co-
rrosión de la cadena (63) situada debajo
de la máquina próxima a la rueda delan-
tera.
- Si la cadena se presenta con restos de
corrosión es necesario sustituirla ponién-
dose en contacto con el servicio técnico
de asistencia técnica.
13.4 - OPERACIONES QUE
DEBEN EFECTUARSE SEGÚN
LAS NECESIDADES
13.4.a - Sustitución de las escobillas
(Fig. M)
Es necesaria la sustitución de las escobillas
cuando las mismas se presentan desgasta-
das con una longitud inferior a 2 cm o bien
son sustituidas dependiendo del tipo de sue-
lo que se desea lavar; para la sustitución,
actuar del modo siguiente:
49029600_Manuale RACER_RANGER_8ed_04-2023.indd 1549029600_Manuale RACER_RANGER_8ed_04-2023.indd 15 06/04/2023 15:06:5106/04/2023 15:06:51

www.ghibliwirbel.com
Professional Cleaning Machines Since 1968
ESPAÑOL - 16
- Pasar una mano debajo del grupo porta
escobillas (19), para desenganchar la es-
cobilla girarla con un golpe seco en senti-
do contrario a la rotación.
- Colocar debajo del grupo porta escobillas
(19) las nuevas escobillas.
- Sentarse en el puesto de conducción, gi-
rar la llave (29 Fig. F) en posición “ON”.
- Establezca la velocidad de avance en el
valor “0”.
- Presione el botón (46 Fig. F) “ ” para
habilitar la rotación de las escobillas; el
grupo escobillas se bajará.
- Presionando el pedal acelerador (7 Fig.
A), las bridas del portaescobillas inician a
girar enganchando las escobillas, a conti-
nuación suelte el pedal.
- Vuelva a presionar el botón (46 Fig. F) “
” y gire la llave (29 Fig. F) en posi-
ción “OFF”.
13.4.b - Ajuste de la goma del pro-
tector contra salpicaduras
(Fig. M)
Dependiendo del tipo de piso a tratar o des-
pués de reemplazar los cepillos de disco,
puede ser necesario ajustar la altura de la
goma del protector contra salpicaduras (64).
Para ajustarlo, actúe de la siguiente manera:
- Girar la llave (29 Fig. F) a la posición “ON”.
- Presione el botón (46 Fig. F) “ ” para
bajar el cabezal del cepillo (19), luego gire
la llave (29 Fig. F) a “OFF”.
- Compruebe la altura correcta de la goma
del protector contra salpicaduras como se
muestra en la gura M.
- Si es necesario, actuar manualmente so-
bre la goma para restaurar la altura co-
rrecta.
NOTA:
La altura correcta de la goma del protector
contra salpicaduras es cuando, durante el
funcionamiento y el cabezal del cepillo está
bajado, la propia goma está al ras del suelo.
- Al nal del ajuste, vuelva a encender la
máquina y presione el botón (46 Fig. F)
“”, luego gire la llave (29 Fig. F) a
“OFF”.
13.4.c - Sustitución de los cauchos
de la escobilla (Fig. K)
Cuando el secado sobre el suelo es inefi-
ciente o quedan algunos residuos de agua
es necesario controlar el estado de desgaste
de los cauchos de la escobilla (20):
- Quitar el grupo escobilla (20) comose in-
dica en el apartado “Limpieza de la esco-
billa”.
- Presione el pestillo (65) y abra la palanca
(66).
- Quitar los dos retenciónes de goma (67) y
quitar la goma exterior (60).
- Aojar los dos tornillos tensores (68) y
quitar la barra de enganche (68) y el inte-
rior de goma (61).
NOTA:
Cuando los gauchos (60) o (61) están des-
gastados en un lado, pueden ser invertidos
por una sola vez.
- Sustituir o invertir los cauchos (60) o (61)
sin confundirlos.
- Volver a poner todo, procediendo en sen-
tido contrario.
NOTA:
Se pueden tener dos tipos de caucho:
Cauchos para todo tipo de suelos ycauchos
de poliuretano para suelos de talleres de me-
cánica, sucios de aceite, etc.
49029600_Manuale RACER_RANGER_8ed_04-2023.indd 1649029600_Manuale RACER_RANGER_8ed_04-2023.indd 16 06/04/2023 15:06:5106/04/2023 15:06:51

www.ghibliwirbel.com
Professional Cleaning Machines Since 1968
ESPAÑOL - 17
13.4.d - Regulación incidencia del
limpiador (Fig. N)
- Ponga en marcha la máquina y presione
el botón (44 Fig. F) “ ”.
- Lleve la velocidad máxima en la 1ª mues-
ca con los botones (30 Fig. F), presione el
pedal acelerador (7 Fig. A) y desplácese
algunos metros, a continuación apáguela
y descienda de la máquina.
- Actuar sobre la barra enroscada (70) para
regular la incidencia que las barras de ex-
tensión (60) y (61) tienen con el suelo, gi-
rando en sentido de las agujas del reloj si
posee una mayor incidencia, y viceversa
si posee una menor incidencia.
NOTA:
La incidencia correcta es cuando durante el
funcionamiento no hay pérdidas de líquido
sobre el pavimento y la barra de extensión
posee una incidencia constante en toda su
longitud.
13.4.e - Ajuste de la presión del lim-
piaparabrisas (Fig. O)
Dependiendo del tipo de piso a tratar o des-
pués de reemplazar las gomas de la esco-
billa de goma, puede ser necesario ajustar
la presión del piso de la escobilla de goma.
Para ajustarlo, actúe de la siguiente manera:
- Levantar el depósito de agua de recu-
peración (11) asegurándose de que esté
vacío.
- Actuar sobre el tornillo de ajuste (71) te-
niendo en cuenta que:
• Al girar en el sentido de las agujas del
reloj, disminuye la presión sobre el
suelo de la escobilla de goma.
• Girar en sentido antihorario aumenta
la presión del suelo de la escobilla de
goma.
- Al nal del ajuste, baje con cuidado el de-
pósito de agua de recuperación (11).
13.4.f - Limpieza del ltro de agua
limpia (Fig. P)
- Asegurarse que el tanque (13 Fig. A) esté
vacío.
- Quitar la tapa (22) y extraer el cartucho
ltro (72).
- Limpiar el cartucho ltro (72) con agua
corriente.
- Volver a montar todo procediendo en sen-
tido inverso teniendo cuidado de que el
forro (73) sea posicionada correctamente.
13.4.g - Grifo de drenaje del compar-
timento de la batería (Fig. A)
- Verique periódicamente que no haya es-
tancamiento de agua en el compartimien-
to de la batería.
- Si es necesario, colóquese con la máqui-
na cerca de un desagüe de drenaje, des-
engancha la tubería y abre el grifo (74),
luego drene los líquidos.
ADVERTENCIA:
Cuando se prevea el uso de baterías
de plomo-ácido, preste la máxima
atención a la posible fuga de líquido
de las propias baterías, a los riesgos
asociados y a las regulaciones para
la eliminación de líquidos / sustan-
cias peligrosas.
13.4.h - Control del estado de des-
gaste de las tres ruedas
(Fig. A)
- Controlar periódicamente el estado de
desgaste de las tres ruedas (8) y (23); si
presentan desgaste o están arruinadas es
necesario sostituirlas dirigiéndose al ser-
vicio técnico de asistencia.
PELIGRO:
Proceder con las ruedas desgastadas
o arruinadas comporta un peligro por
parte del usuario ya que la máquina
podría tener una resistencia reducida
de las curvas en carretera.
14 -
49029600_Manuale RACER_RANGER_8ed_04-2023.indd 1749029600_Manuale RACER_RANGER_8ed_04-2023.indd 17 06/04/2023 15:06:5106/04/2023 15:06:51

www.ghibliwirbel.com
Professional Cleaning Machines Since 1968
ESPAÑOL - 18
14.1 - CONFIGURACIÓN
PARÁMETROS (Fig. F)
14.1.a - Parámetros del OPERADOR
El operador tiene la posibilidad de acceder
al menú para congurar los parámetros si-
guientes:
• Idioma
• Tipo de baterías
• Pantalla - Contraste
• Pantalla - Luminosidad
Para acceder al menú actúe del siguiente
modo:
- Presione y mantenga presionados los bo-
tones (31a) “ ” y (31b) “ ”, des-
pués gire la llave de encendido (29) en
“ON” para visualizar la pantalla siguiente:
General
General
Sets
Sets
--ID Check--
--ID Check--
insert password:
insert password:
0
0
000
000
General Sets Conguraciones Generales
ID Check Control
Insert password Introducir la contraseña
- Introduzca la Contraseña de 4 cifras
“0010” presionando los botones (30a) “
” o (30b) “ ” para cambiar el nú-
mero de la cifra intermitente.
- Presione el botón (43) “ ” para conr-
mar y pasar a la cifra siguiente, por último
para conrmar la contraseña y entrar en
la lista de los parámetros.
- Presione el botón (31a) “ ” o (31b) “
” para desplazarse por las pantallas
siguientes
General
General
Language
Language
Main
Main
selection:
selection:
ITA
ITA
General Main Conguración principal
Language selection Selección del idioma
General
General
Battery
Battery
Main
Main
Type:
Type:
GEL
GEL
General Main Conguración principal
Battery Type Selección del tipo de batería
General
General
Display
Display
min:0
min:0
max:50
max:50
Main
Main
Tune:
Tune:
15
15
General Main Conguración principal
Display Tune Contraste de la pantalla
General
General
Display
Display
min:0
min:0
max:10
max:10
Main
Main
Brightness:
Brightness:
0
0
General Main Conguración principal
Display Brightness Brillo de la pantalla
49029600_Manuale RACER_RANGER_8ed_04-2023.indd 1849029600_Manuale RACER_RANGER_8ed_04-2023.indd 18 06/04/2023 15:06:5906/04/2023 15:06:59

www.ghibliwirbel.com
Professional Cleaning Machines Since 1968
ESPAÑOL - 19
Conguración del idioma:
General
General
Language
Language
Main
Main
selection:
selection:
ITA
ITA
General Main Conguración principal
Language selection Selección del idioma
- Seleccione el idioma presionando los bo-
tones (30a) “ ” o (30b) “ ”, a con-
tinuación presione el botón (43) “ ”
para conrmar la selección;
-ITA = Italiano
-ENG = Inglés
Conguración del tipo de batería:
General
General
Battery
Battery
Main
Main
Type:
Type:
GEL
GEL
General Main Conguración principal
Battery Type Selección del tipo de batería
- Seleccione el tipo de batería presionando
los botones (30a) “ ” o (30b) “ ”, a
continuación presione el botón (43) “
” para conrmar la selección;
-GEL = Batería de Gel
-AGM = Batería AGM
-WET = Batería de ÁCIDO
Conguración pantalla - Contraste:
General
General
Display
Display
min:0
min:0
max:50
max:50
Main
Main
Tune:
Tune:
15
15
General Main Conguración principal
Display Tune Contraste de la pantalla
- Seleccione el tipo de contraste de la pan-
talla congurando un valor de “0 a 50” uti-
lizando los botones (30a) “ ” o (30b)
“”, a continuación presione el botón
(43) “ ” para conrmar la selección.
Conguración pantalla - Luminosidad:
General
General
Display
Display
min:0
min:0
max:10
max:10
Main
Main
Brightness:
Brightness:
0
0
General Main Conguración principal
Display Brightness Brillo de la pantalla
- Seleccione el tipo de luminosidad de la
pantalla congurando un valor de “0 a
10” utilizando los botones (30a) “ ” o
(30b) “ ”, a continuación presione el
botón (43) “ ” para conrmar la selec-
ción.
NOTA:
Cuando confirme la configuración seleccio-
nada, la máquina se reinicia y la pantalla
(41) se enciende en la modalidad operativa
de trabajo.
15 -
49029600_Manuale RACER_RANGER_8ed_04-2023.indd 1949029600_Manuale RACER_RANGER_8ed_04-2023.indd 19 06/04/2023 15:06:5906/04/2023 15:06:59

www.ghibliwirbel.com
Professional Cleaning Machines Since 1968
ESPAÑOL - 20
15.1 - CONTROL/SUSTITUCIÓN DE LOS FUSIBLES
NOTA:
Todos los circuitos eléctricos de la máquina están protegidos por dispositivos electrónicos de
auto-reactivación. Los fusibles de seguridad se activan sólo en caso de avería grave.
Por lo tanto se recomienda que la sustitución de los fusibles sea efectuada sólo por el per-
sonal cualificado.
16 -
16.1 - ALARMAS DURANTE EL FUNCIONAMIENTO
Cuando se presenta un mal funcionamiento de la máquina, en la pantalla (41 Fig. F) aparece
el tipo de alarma como se muestra en la lista siguiente.
Consulte la lista y ejecute la solución recomendada para restablecer el funcionamiento co-
rrecto de la máquina.
Si las soluciones recomendadas no obtienen un buen resultado, póngase en contacto con el
Servicio de Asistencia Técnica.
ALARMA SIGNIFICADO SOLUCIÓN
AL_1: General Error en la memoria Reiniciar la máquina.
AL_2: General Anomalía en la llave Apagar la máquina durante al menos 10 segun-
dos, después vuelva a encenderla.
AL_3: General Subtensión
Apagar la máquina, controlar el estado de carga
de la batería, los fusibles, los contactos, los
cableados y las conexiones, después reiniciar la
máquina.
AL_4: General Sobretensión
Apagar la máquina, controlar los fusibles, los con-
tactos, los cableados y las conexiones, después
reiniciar la máquina.
AL_6: General Ausencia de comunica-
ción con panel de mandos
o pantalla
Apagar la máquina, controlar los contactos, los
cableados y las conexiones, después reiniciar la
máquina.
AL_7: General Comunicación ffm
Apagar la máquina, controlar los contactos,
los cableados y las conexiones con módulo de
comunicación y funcionamiento de este último,
después reiniciar la máquina.
AL_8: General Comunicación Interna
1 y 2 Reiniciar la máquina.
AL_9: General
AL_10: General Introducir etiqueta Visualización Llave “Etiqueta” ausente: introducir
llave.
AL_11: General Etiqueta inválida Visualización Llave “Etiqueta” incorrecta: cambiar
llave o llave dañada.
AL_12: General Actualización en curso… Visualización de la actualización de parámetros a
distancia en curso: esperar hasta la actualización.
49029600_Manuale RACER_RANGER_8ed_04-2023.indd 2049029600_Manuale RACER_RANGER_8ed_04-2023.indd 20 06/04/2023 15:06:5906/04/2023 15:06:59

www.ghibliwirbel.com
Professional Cleaning Machines Since 1968
ESPAÑOL - 21
ALARMA SIGNIFICADO SOLUCIÓN
AL_13: General Apagar Visualización de la actualización de parámetros
completado: reiniciar la máquina.
AL_41: Function Sobretemperatura
Apagar y dejar enfriar la máquina. Controlar las
absorciones de los motores de las escobillas y del
aspirador, el estado de ventilación del ambiente
y reiniciar.
AL_42: Function Potencia dañada Apagar la máquina durante al menos 10 segun-
dos, a continuación encenderla de nuevo.
AL_44: Function Relé dañado
Ausencia de cierre del Relé/Telerruptor. Vericar
el funcionamiento del Telerruptor. En el caso de
relé a bordo, si persiste sustituir la tarjeta.
AL_45: Function Relé dañado cc
Detectado Relé/Telerruptor cerrado al encen-
derse. Vericar el estado de los contactos del
Telerruptor. En el caso de relé a bordo, si persiste
sustituir la tarjeta.
AL_46: Function Sobrecorriente Escobillas
Apagar la máquina, vericar la carga (motor), la
mecánica, el cableado y las conexiones; buscar
la presencia de un cortocircuito en la salida, por
último reiniciar.
AL_47: Function Sobrecorriente Aspirador
Apagar la máquina, vericar la carga (motor), la
mecánica, el cableado y las conexiones; buscar
la presencia de un cortocircuito en la salida, por
último reiniciar.
AL_48: Function Sobrecorriente Bomba de
agua
Apagar la máquina, vericar la carga (motor), la
mecánica, el cableado y las conexiones; buscar
la presencia de un cortocircuito en la salida, por
último reiniciar.
AL_49: Function Amperométrica Escobilla
1 y 2
Vericar el consumo y la modalidad de uso de la
función escobillas y reiniciar la máquina.
AL_50: Function
AL_52: Function Amperométrica Aspira-
dor 1
Vericar el consumo de la función aspirador y
reiniciar la máquina.
AL_54: Function Conexión Escobilla 1 y 2 Vericar la conexión de los motores de la esco-
billa.
AL_55: Function
AL_57: Function Conexión Aspirador 1 Vericar la conexión del motor aspirador.
AL_59: Function Desequilibrio Vericar las absorciones de los motores de la
escobilla
AL_61: Function Amperométrica Actuador
de las escobillas
Vericar el consumo del motor actuador y el
estado de la mecánica en movimiento.
49029600_Manuale RACER_RANGER_8ed_04-2023.indd 2149029600_Manuale RACER_RANGER_8ed_04-2023.indd 21 06/04/2023 15:07:0006/04/2023 15:07:00

www.ghibliwirbel.com
Professional Cleaning Machines Since 1968
ESPAÑOL - 22
ALARMA SIGNIFICADO SOLUCIÓN
AL_62: Function Sobrecorriente Actuador
de las escobillas
Apagar la máquina, vericar la carga (motor), la
mecánica, el cableado y las conexiones; buscar la
presencia de un cortocircuito en la salida.
AL_63: Function Final de carrera Actuador
de las escobillas
Vericar las conexiones / estado del nal de
carrera. Control activo solo para la versión BTO.
AL_65: Function Amperométrica Actuador
del secador
Vericar el consumo del motor actuador y el
estado de la mecánica en movimiento.
AL_66: Function Sobrecorriente Actuador
del secador
Apagar la máquina, vericar la carga (motor), la
mecánica, el cableado y las conexiones; buscar la
presencia de un cortocircuito en la salida.
AL_80: Traction Sobretemperatura Motor
Tracción
Apagar y dejar enfriar la máquina. Vericar el
consumo y la modalidad de empleo de la tracción,
el estado de ventilación del ambiente y reiniciar.
AL_85: Traction Sobrecorriente Motor
Tracción
Apagar la máquina, vericar la carga (motor), la
mecánica, el cableado y las conexiones; buscar
la presencia de un cortocircuito en la salida, por
último reiniciar.
AL_86: Traction Amperométrica Motor
Tracción
Vericar el consumo y la modalidad de uso de la
función tracción y reiniciar la máquina.
AL_87: Traction Lectura del Motor Trac-
ción Reiniciar la máquina.
AL_88: Traction Anomalía Electrofreno Apagar la máquina, vericar el cableado del freno
y encender de nuevo.
AL_89: Traction Fallo Pedal Acelerador Apagar la máquina, vericar las conexiones y
cableado, y encender de nuevo.
AL_90: Traction Pedal Acelerador Presio-
nado Soltar el pedal y encender de nuevo la máquina.
AL_91: Traction Fallo Codicador Apagar la máquina, vericar las conexiones y
cableado, y encender de nuevo.
17 -
49029600_Manuale RACER_RANGER_8ed_04-2023.indd 2249029600_Manuale RACER_RANGER_8ed_04-2023.indd 22 06/04/2023 15:07:0006/04/2023 15:07:00

www.ghibliwirbel.com
Professional Cleaning Machines Since 1968
ESPAÑOL - 23
17.1 - BÚSQUEDA AVERÍAS
PROBLEMAS CAUSAS SOLUCIONES
Girando la llave la máquina
no se enciende.
Batería descargada. Controlar el estado de carga
de la batería.
Fusible general quemado. Sustituir el fusible colocado
sobre el cable de la batería.
(*)
Llave defectuosa. Reemplazar la llave. (*)
La escobilla no gira. Avería del motor. Reemplazar el motor. (*)
Avería de la placa. Reemplazar la placa. (*)
El aspirador no funciona. Depósito de recuperación lle-
no.
Vaciar el depósito.
Avería del motor turbina. Reemplazar el motor. (*)
Avería de la placa. Reemplazar la placa. (*)
La máquina no seca o no
seca bien dejando restos de
agua en el suelo.
Aspirador apagado. Encender el aspirador.
Tubo de aspiración obstruido.Controlar o limpiar el tubo
de aspiración que conecta la
escobilla con el depósito de
retorno.
Depósito de retorno lleno. Vaciar el depósito de retorno.
Cauchos de la escobilla des-
gastados.
Invertir o sustituir los cauchos
de la escobilla.
No sale agua. Depósito vació. Rellenar el depósito.
Filtro atascado. Limpiar el ltro.
Válvula solenoide bomba que
no funciona.
Reemplazar la válvula sole-
noide. (*)
Bomba agua defectuosa. Reemplazar bomba agua. (*)
Avería de la placa. Reemplazar la placa. (*)
49029600_Manuale RACER_RANGER_8ed_04-2023.indd 2349029600_Manuale RACER_RANGER_8ed_04-2023.indd 23 06/04/2023 15:07:0006/04/2023 15:07:00

www.ghibliwirbel.com
Professional Cleaning Machines Since 1968
ESPAÑOL - 24
PROBLEMAS CAUSAS SOLUCIONES
La máquina no se mueve en
condiciones de trabajo.
Operador no sentado correc-
tamente en el puesto de con-
ducción.
Sentarse correctamente en el
asiento.
Monorrueda defectuosa. Substitución monorrueda. (*)
Avería de la placa. Reemplazar la placa. (*)
Sensor de presencia del ope-
rador dañado.
Reemplazar el sensor. (*)
Limpieza del suelo ineficien-
te.
Cepillos o detergentes inade-
cuados.
Usar cepillos o detergentes-
aptos para el tipo de suelo o
para el tipo de sucio a limpiar.
Cepillo desgastado. Sustituir el cepilloI.
El indicador “ ” tanque solu-
ción vacío sigue parpadean-
do.
Tanque vacío. Riempire la tanica.
Grifo cerrado. Aprire il rubinetto.
Avería en el caudalímetro. Reemplazar el caudalímetro.
(*)
Hay estancamiento de agua
en el compartimento de la
batería.
Sensor de nivel del tanque de
recuperación defectuoso.
Drene el agua del compar-
timento de la batería con la
tubería y el grifo adecuados.
Revise o reemplace el sensor
de nivel. (*)
(*) Llame para solicitar asistencia para el reemplazo.
18 -
18.1 - DESINSTALACIÓN Y TRATAMIENTO COMO RESIDUO DE
LA MÁQUINA
PELIGRO:
Las baterías y los componentes eléctricos se consideran residuos especiales
y, por tanto, deben eliminarse en centros de recogida especiales según lo in-
dique la normativa vigente en el país de uso.
19 -
49029600_Manuale RACER_RANGER_8ed_04-2023.indd 2449029600_Manuale RACER_RANGER_8ed_04-2023.indd 24 06/04/2023 15:07:0006/04/2023 15:07:00

www.ghibliwirbel.com
Professional Cleaning Machines Since 1968
ESPAÑOL - 25
19.1 - ESQUEMA ELÉCTRICOS
Leyenda:
AC Acelerador
BAT Baterías
BC Cargador de baterías
BE Luz intermitente
BRK Freno electromagnético
C1 Conector de las baterías
EB1 Ficha de funciones
EB2 Pantalla
EB3 Panel de mandos
EV Electroválvula
F1 Fusible cargador de baterías (1A)
F2 Fusible luces (si está presente) (3A)
F3 Fusible bocina (1A)
F4 Fusible luz intermitente (1A)
F5 Fusible electroválvula (5A)
F6 Fusible act. cabezal escobillas (10A)
F7 Fusible actuador secador (10A)
F8 Fusible electrofreno (7.5A)
F9 Fusible bomba de agua (5A)
F10 Fusible bomba chem (si está pres.) (5A)
F11 Fusible motor de aspiración (40A)
F12 Fusible motor escobilla derecha (40A)
F13 Fusible motor escobilla izquierda (40A)
F14 Fusible motor tracción (100A)
HN Bocina
KEY Llave de encendido
L1 Luces de trabajo (si están presentes)
MA Motor de aspiración
MAS Motor act. del cabezal escobillas
MAT Motor actuador secador
MS-DX Motor escobilla derecha
MS-SX Motor escobilla izquierda
MT Motor tracción
PA Bomba de agua
PC Bomba químico
PE Botón de emergencia
S1 Sensor del nivel de agua de recup.
SW1 Microinterruptor del asiento
TE Telerruptor externo
Códigos de color:
BK Negro
BU Azul
BN Marrón
GN Verde
GY Gris
OG Naranja
PK Rosa
RD Rojo
VT Violeta
WT Blanco
YE Amarillo
49029600_Manuale RACER_RANGER_8ed_04-2023.indd 2549029600_Manuale RACER_RANGER_8ed_04-2023.indd 25 06/04/2023 15:07:0006/04/2023 15:07:00

www.ghibliwirbel.com
Professional Cleaning Machines Since 1968
ESPAÑOL - 26
PA MT PC EV
- +
-
-
-
-
+ -+ -+
+
+
+
MA MS MS
DX SX
C1
BC
TE
EB2
EB3
KEY
L1
BE
F4
F1
F2
F8
F9 F14 F10 F5 F11 F12 F13
F7
F6
F3
BRK
AC
M
SW1
M5
J8
4 3
2 1
4 3
2 1
1
4
2
5
3
6
9
1
10
2
11
3
4
1
5
2
6
3
4
1
5
2
6
3
4
1
5
2
6
3
12
4
4
8
1
2
3
7
2
6
1
5
3
6
2
5
1
1
12
3s
+
-
2
1
1
2
3
4
2 3
123
456 4
1
11
2
12
3
13
4
14
5
15
6
16
7
17
8
18
9
19
10
20
4
9
3
8
5
10
2
7
1
6
13
5
16
8
15
7
14
6
2
1
J9 J10 J11
J1
J8 J7
J2
S1
J3 J4 J5 J7J6
J12 J13 J14
M6
USB
HN
BATBAT MATMAT
PEPE
MASMAS
EB1
49029600_Manuale RACER_RANGER_8ed_04-2023.indd 2649029600_Manuale RACER_RANGER_8ed_04-2023.indd 26 06/04/2023 15:07:0106/04/2023 15:07:01

www.ghibliwirbel.com
Professional Cleaning Machines Since 1968
PORTUGUÊS - 1
Prezado Cliente,
Obrigado por escolher nossos produtos para a limpeza dos seus locais.
A máquina para lavar e secar pisos que você adquiriu é projectada com o objectivo de
satisfazer as necessidades do usuário em termos de facilidade de utilização e de propor-
cionar longa vida útil ao equipamento.
Estamos conscientes que, para manter um alto nível de qualidade do produto ao longo
do tempo, são necessárias actualizações e melhorias contínuas, destinadas a satisfazer
às necessidades e expectativas das pessoas que utilizam quotidianamente a máquina.
Por isso esperamos que voçe seja, além de um cliente satisfeito, um parceiro que não
hesita em apresentar opiniões e ideias decorrentes da sua experiência diária.
49029600_Manuale RACER_RANGER_8ed_04-2023.indd 149029600_Manuale RACER_RANGER_8ed_04-2023.indd 1 06/04/2023 15:07:0406/04/2023 15:07:04

www.ghibliwirbel.com
Professional Cleaning Machines Since 1968
PORTUGUÊS - 2
ÍNDICE
ÍNDICE ............................................................................................................................................ 2
DADOS TÉCNICOS ....................................................................................................................... 3
1.1 - INTRODUÇÃO ..................................................................................................................... 5
1.1.a - Postura do usuário durante a utilização da máquina ................................................... 5
1.1.b - Advertências gerais de uso .......................................................................................... 5
1.2 - USO NÃO PREVISTO .........................................................................................................5
2.1 - CONHECIMENTO DA MÁQUINA (Fig. A) ..........................................................................5
3.1 - DESEMBALAGEM (Fig. B) ................................................................................................. 5
3.1.a - Instalação baterias (Fig. A) ........................................................................................... 6
3.1.b - Descarregar a máquina do estrato em madeira (Fig. B) .............................................. 6
4.1 - MONTAGEM COMPONENTES ........................................................................................... 6
4.1.a - Instalação limpador de pavimento (Fig. C) ................................................................... 6
4.1.b - Instalação de escova .................................................................................................... 6
5.1 - CARGA DA BATERIA .......................................................................................................... 6
5.1.a - Carga da bateria através carregador de bateria externo (Fig. G) ................................ 7
5.1.b - Carga da bateria por meio do carregador integrado (se houver) (Fig. G) .................... 7
6.1 - CONTROLES DA MÁQUINA ...............................................................................................7
6.1.a - Painel de comando (Fig. F) .......................................................................................... 7
6.1.b - Pedal do acelerador (Fig. A) ....................................................................................... 10
7.1 - ECRÃ (Fig. F) .................................................................................................................... 10
8.1 - EMERGÊNCIA ................................................................................................................... 11
9.1 - FUNÇÕES DE SEGURANÇA (Fig. A) .............................................................................. 11
10.1 - ENCHIMENTO DO RESERVATÓRIO (Fig. D) .................................................................. 12
10.2 - TANQUE DE DETERGENTE / QUÍMICAS (se presente) (Fig. E) ................................... 12
11.1 - FUNCIONAMENTO (Fig. A-F) ........................................................................................12
11.1.a - Vericações que devem ser feitas antes da utilização ............................................... 12
11.1.b - Preparação da máquina e escolha do ciclo de limpeza ............................................. 13
11.1.c - Utilização da máquina ................................................................................................ 13
11.1.d - Finalização e encerramento ....................................................................................... 14
12.1 - DESCARGA DAS ÁGUAS SUJAS (Fig. H) ......................................................................14
13.1 - MANUTENÇÃO E LIMPEZA ............................................................................................. 14
13.2 - OPERAÇÕES QUE DEVEM SER EFECTUADAS TODOS OS DIAS .............................. 14
13.2.a - Esvaziamento e limpeza do reservatório de água limpa (Fig. I) ................................. 14
13.2.b - Limpeza do reservatório de águas sujas (Fig. J) ........................................................ 15
13.2.c - Limpar do limpador (Fig. K) ........................................................................................ 15
13.3 - OPERAÇÕES A SEREM EFECTUADAS EM CADA 3 MESES .......................................15
13.3.a - Controlar o estado de desgaste da engrenagem de direcção (Fig. L) ....................... 15
13.4 - OPERAÇÕES QUE DEVEM SER EFECTUADAS DE ACORDO COM NECESSIDADE 15
13.4.a - Substituição escovas (Fig. M) .................................................................................... 15
13.4.b - Ajustando a borracha de proteção contra respingos (Fig. M) .................................... 16
13.4.c - Substituição das partes em borracha do mecanismo limpador (Fig. K) ..................... 16
13.4.d - Regulação da incidência do limpador (Fig. N) ............................................................ 16
13.4.e - Ajuste da pressão do limpador (Fig. O) ...................................................................... 17
13.4.f - Limpeza do ltro do reservatório de água limpa (Fig. P) ............................................ 17
13.4.g - Torneira de drenagem do compartimento das pilhas (Fig. A) ..................................... 17
13.4.h - Controle estado de desgaste das três rodas (Fig. A) ................................................. 17
14.1 - PROGRAMAÇÃO PARÂMETROS (Fig. F) ....................................................................... 18
14.1.a - Parâmetros do OPERADOR ...................................................................................... 18
15.1 - CONTROLO/SUBSTITUIÇÃO DOS FUSÍVEIS................................................................. 20
16.1 - ALARMES DURANTE A OPERAÇÃO .............................................................................. 20
17.1 - RESOLUÇÃO DE PROBLEMAS ...................................................................................... 23
18.1 - DESTRUIÇÃO DA MÁQUINA ........................................................................................... 24
19.1 - ESQUEMA ELÉCTRICO .................................................................................................. 25
49029600_Manuale RACER_RANGER_8ed_04-2023.indd 249029600_Manuale RACER_RANGER_8ed_04-2023.indd 2 06/04/2023 15:07:0406/04/2023 15:07:04

www.ghibliwirbel.com
Professional Cleaning Machines Since 1968
PORTUGUÊS - 3
DADOS TÉCNICOS
RACER R 85 RANGER R 115
FD 65 FD 75 FD 75 FD 85
Sistema de condução Operador a bordo
Características
Operação e fonte de alimentação Bateria 24 V
Tipo de baterias
N° 4 - 6V 180Ah (C5) N° 4 - 6V 240Ah (C5)
N° 4 - 6V 180Ah (C5) N° 1 - 24V 320Ah (C5)
N° 1 - 24V 100Ah (Li) N° 1 - 24V 150Ah (Li)
Potência instalada 2160 W 2210 W
Autonomia de trabalho
2 h (105Ah C5) 5 h (240Ah C5)
4 h (180Ah C5) 7 h (320Ah C5)
2 h (100Ah Li) 3 h (150Ah Li)
Tipo de avanço Tracção avanços / recuos
Faixa de trabalho 650 mm 750 mm 750 mm 850 mm
Faixa de aspiração 850 mm 950 mm 950 mm 1050 mm
Capacidade teórica de trabalho 4000 m2/h 4500 m2/h 4500 m2/h 5000 m2/h
Capacidade real de trabalho 2400 m2/h 2700 m2/h 2700 m2/h 3000 m2/h
Vibração sistema mão-braço
(ISO 5349-1) < 2,5 m/s2
Vibração corpo inteiro (ISO 2631-1) < 0,5 m/s2
Pressão sonora (ISO 11203) (LpA) 63 dB(A)
Pressão do som no modo silencioso
(LpA) 57 dB(A)
Grau de proteção IP IPX3
Escovas
Diâmetro / Acessório(s) / de série 330 mm /
13” / 2
380 mm /
15” / 2
380 mm /
15” / 2
430 mm /
17” / 2
Potência do motor / de série 500 W / 2
Velocidade de rotação da escova 165 rpm.
Pressão específica 30 gr/cm221 gr/cm221 gr/cm217 gr/cm2
Pressão específica (pressão extra) 46 gr/cm232 gr/cm243 gr/cm234 gr/cm2
49029600_Manuale RACER_RANGER_8ed_04-2023.indd 349029600_Manuale RACER_RANGER_8ed_04-2023.indd 3 06/04/2023 15:07:0406/04/2023 15:07:04

www.ghibliwirbel.com
Professional Cleaning Machines Since 1968
PORTUGUÊS - 4
RACER R 85 RANGER R 115
FD 65 FD 75 FD 75 FD 85
Tração
Inclinação máxima superável durante as
operações de limpeza 2 %
Inclinação máxima superável quando
vazio (*) 12 %
Potência motor 600 W
Velocidade máxima rapidez no trabalho 6 km/h
Aspiração
Potência do motor 550 W
Vácuo (Coluna de água) 125 mbar / 1250 mmH2O
Fluxo de ar 30 l/sec
Reservatório
Tipologia Reservatório duplo
Capacidade de solução 80 l 110 l
Capacidade de recolhimento 85 l 115 l
Dimensões
Dimensões da máquina
(Comprimento x Largura x Altura) 1375 x 705 x 1230 mm 1470 x 770 x 1365 mm
Largura da máquina - Plataforma de
escovas 715 mm 785 mm 785 mm 890 mm
Largura da máquina - rodo 885 mm 950 mm 950 mm 1055 mm
Dimensão do compartimento das bate-
rias (Comprimento x Largura x Altura) 380 x 540 x 310 mm 380 x 625 x 440 mm
Peso
Peso da máquina 213 kg 246 kg
Peso com baterias Gel 12V 105Ah 285 kg -
Peso com baterias Gel 6V 180Ah 333 kg -
Peso com bateria de lítio 24V 100Ah 249 kg -
Peso com baterias Gel 6V 240Ah - 432 kg
Peso com baterias Pb Wet 24V 320Ah - 506 kg
Peso com bateria de lítio 24V 150Ah - 288 kg
Peso em ordem de marcha (GVW) 490 kg 691 kg
(*) A máquina foi testada nas seguintes condições:
• Bateria padrão
• Tanques vazios
• Rampa de concreto bruto
• Comprimento da rampa 15 m
• 75 kg de operador
1 -
49029600_Manuale RACER_RANGER_9ed_09-2023.indd 449029600_Manuale RACER_RANGER_9ed_09-2023.indd 4 04/09/2023 14:54:4104/09/2023 14:54:41

www.ghibliwirbel.com
Professional Cleaning Machines Since 1968
PORTUGUÊS - 5
1.1 - INTRODUÇÃO
NOTA:
Os números e as referências das figuras en-
tre parênteses referem-se aos componentes
indicados na folha ilustrativa em anexo.
PERIGO:
Antes de usar a máquina, leia o livre-
to “AVISOS DE SEGURANÇA PARA
ESFREGAR DO CHÃO” anexado a
este e adições abaixo.
1.1.a - Postura do usuário durante
a utilização da máquina
O operador, ao usar a máquina está sentado
no banco com as mãos no volante.
1.1.b - Advertências gerais de uso
- NÃO abandone a máquina em superfícies
com a inclina.
- É absolutamente proibido virar em ram-
pa; perigo de capotar.
- Evitar de usar a máquina em ambientes
com risco de queda de objectos.
1.2 - USO NÃO PREVISTO
- Não use a máquina com o reservatório de
recuperação aberto.
- Não circular com pés / pernas para fora
do apoio da máquina.
- Não efectuar desvios repentinos especial-
mente em descidas.
ADVERTÊNCIA:
A máquina está autorizada a trans-
portar APENAS uma pessoa.
2 -
2.1 - CONHECIMENTO DA
MÁQUINA (Fig. A)
(1) Volante
(2) Painel de comando
(3) Assento
(4) Sensor de presença do operador
(5) Botão de EMERGÊNCIA, para a parada
imediata de todas as funções
(6) Assento para os pés
(7) Pedal de acelerador
(8) Rodas traseiras
(9) Luz de trabalho (opcional)
(10) Luz piscante (opcional)
(11) Tanque de recuperação de água
(12) Tampa do tanque de recuperação de
água
(13) Limpar tanque de água
(14) Tampa
(15) Mangueira de drenagem da água de
recuperação
(16) Mangueira de aspiração do limpador de
pavimento
(17) Limpar a mangueira de sucção
(18) Tubo de nível do tanque de água limpa
(19) Grupo de escovas
(20) Limpador
(21) Compartimento de documentos
(22) Filtro de água
(23) Roda direccional de tração
(24) Gancho de suporte do rodo
(25) Pé de suporte do tanque de recupera-
ção
3 -
3.1 - DESEMBALAGEM (Fig. B)
Depois de retirada a embalagem conforme
indicado na folha de instruções da própria
embalagem, verique a integridade da má-
quina e de todos os componentes forneci-
dos. Se algum dano óbvio for encontrado,
entre em contato com seu distribuidor local
e transportadora dentro de 3 dias após o re-
cebimento.
- Remova o envelope e as caixas (26) con-
tendo os acessórios fornecidos:
• (20) Limpador
• (32) N° 2 escovas.
- Levante a unidade do tanque e retire a
documentação do envelope apropriado:
• (33) Manual de uso e manutenção da
máquina.
• (34) Manual de instruções carregador
de baterias (se presente).
49029600_Manuale RACER_RANGER_8ed_04-2023.indd 549029600_Manuale RACER_RANGER_8ed_04-2023.indd 5 06/04/2023 15:07:0706/04/2023 15:07:07

www.ghibliwirbel.com
Professional Cleaning Machines Since 1968
PORTUGUÊS - 6
3.1.a - Instalação baterias (Fig. A)
- Eleve com cuidado o reservatório de re-
cuperação (11).
- Consoante a conguração (4 baterias de
6 V, 2 baterias de 12 V, 1 conjunto de ba-
terias de 24), coloque e ligue as baterias
conforme indicado nas guras, utilizando
os cabos e as chas incluídas.
- Abaixe com cuidado o reservatório de
água de recuperação (11).
NOTA:
A conexão das baterias tem que ser execu-
tado por pessoal especializado.
3.1.b - Descarregar a máquina do
estrato em madeira (Fig. B)
- Remova o bloco de madeira (27) posicio-
nado na frente da roda dianteira.
- Posicione a rampa (28) em frente ao pale-
te de madeira conforme indicado na folha
de instruções da embalagem.
- Sente no assento (3) em posição para di-
rigir.
- Rodar a chave (29) para “ON”.
- Prima o botão de direcção de marcha
(31a) “ ” (marcha em frente), prima
cuidadosamente o pedal do acelerador
(7) e saia da palete.
4 -
4.1 - MONTAGEM
COMPONENTES
4.1.a - Instalação limpador de pavi-
mento (Fig. C)
- Inserir o limpador de pavimento (20) na
placa (35) de suporte e xar aparafusan-
do as duas maçanetas (36).
- Ligar o tubo de aspiração (16) na boca
(37) do limpador de pavimento.
4.1.b - Instalação de escova
- Veja o procedimento no parágrafo “13.4.a
- Substituição escovas (Fig. M)”.
5 -
5.1 - CARGA DA BATERIA
PERIGO:
Efectuar a carga das baterias em lo-
cais bem arejados e em conformida-
de com as normas no país de utiliza-
ção.
Para as informações relativas à segu-
rança respeitar o quanto descrito no
capítulo 1 do presente manual.
ADVERTÊNCIA:
Para as informações e os avisos re-
lativos à bateria e ao carregador de
baterias de bordo (se presente) res-
peitar o quanto indicado no manual
do carregador de baterias em anexo
ao presente.
A máquina sai da fábrica calibrada
para o funcionamento com baterias
de gel.
Se for necessário instalar baterias
de outro tipo, consultar o parágrafo
“Programações dos parâmetros”.
É proibido utilizar a máquina com ba-
terias de gel com calibração para ba-
terias de ácido ou outros.
(Apenas para versões sem carrega-
dor de bateria integrado) O aparelho
deve ser fornecido apenas com car-
regadores de bateria externos SELV
(safety extra-low voltage).
NOTA:
(Apenas para baterias GEL) São necessá-
rias 10 (dez) horas para recarregar comple-
tamente as baterias. Evite (ao máximo) fazer
recargas parciais.
(Apenas para baterias de lítio) Pode recar-
regar parcial.
Carregue as baterias no nal de cada tra-
balho ou pelo menos quando o símbolo da
bateria “ ” no ecrã (41 Fig. F) começar
a piscar.
49029600_Manuale RACER_RANGER_8ed_04-2023.indd 649029600_Manuale RACER_RANGER_8ed_04-2023.indd 6 06/04/2023 15:07:1006/04/2023 15:07:10

www.ghibliwirbel.com
Professional Cleaning Machines Since 1968
PORTUGUÊS - 7
- Dirija a máquina para a estação de carre-
gamento da bateria.
- Levante o reservatório de água de recu-
peração (11) vericando se está vazio.
5.1.a - Carga da bateria através car-
regador de bateria externo
(Fig. G)
- Controle a adequação do carregador de
baterias exterior, consultando o corres-
pondente Manual. A tensão nominal do
carregador de baterias deve ser igual a
24 V.
- No respetivo alojamento (38), pegue no
conector (39) e ligue-o ao carregador de
baterias exterior.
- Ligue o carregador de baterias à corrente.
- No m da recarga, desligue o carregador
de baterias da corrente e do conector
(39).
- Abaixe com cuidado o reservatório de
água de recuperação (11).
5.1.b - Carga da bateria por meio
do carregador integrado (se
houver) (Fig. G)
- No respetivo alojamento (38), pegue e li-
gue a cha do carregador de bateria (40)
à corrente (a tensão e a frequência de
rede devem ser iguais aos valores cor-
respondentes do carregador de bateria,
indicados na placa de série da máquina).
NOTA:
Quando o carregador de bateria estiver liga-
do à corrente, todas as funções da máquina
são automaticamente excluídas.
- No ecrã (41 Fig. F), quando no símbolo da
bateria se acenderem os segmentos em
sequência, indica que o carregador de ba-
teria está a carregar as baterias.
- Quanto todos os segmentos no símbolo
da bateria se acendem com luz xa, o
ciclo de carregamento das baterias está
concluído.
- Desligue a cha do cabo do carregador
de bateria (40) da rede elétrica e introdu-
za-o no correspondente alojamento (38).
- Abaixe com cuidado o reservatório de
água de recuperação (11).
6 -
6.1 - CONTROLES DA
MÁQUINA
6.1.a - Painel de comando (Fig. F)
(29) Chave (de ligação)
- Quando girada em sentido horário, em
direção à “ON” fornece corrente (tensão)
aos circuitos permitindo o funcionamento
da máquina.
- Quando girada no sentido anti-horário,
em direção à “OFF”, para de fornecer cor-
rente (tensão) aos circuitos, e encontra-
-se na posição correta para ser extraída.
(30) Botões de regulação da veloci-
dade máxima
É possível regular a velocidade máxima de
avanço através dos botões (30a) “ ” e
(30b) “ ”.
- Premindo completamente o pedal acele-
rador (7), a velocidade será proporcional
ao valor máximo congurado.
- Quando no ecrã (41) todos os símbolos
de velocidade “ ” estiverem claros, o
pedal acelerador (7) é inibido e a máquina
permanece parada.
(31) Botões de sentido de marcha
- Premindo o botão de avanço (31a) “
” a máquina procede à marcha em frente;
no ecrã é apresentado o ícone “ ”.
- Premindo o botão para trás (31b) “
” a máquina procede à marcha-atrás e
aciona o avisador acústico de marcha-a-
trás; no ecrã é apresentado o ícone “ ”.
49029600_Manuale RACER_RANGER_8ed_04-2023.indd 749029600_Manuale RACER_RANGER_8ed_04-2023.indd 7 06/04/2023 15:07:1806/04/2023 15:07:18

www.ghibliwirbel.com
Professional Cleaning Machines Since 1968
PORTUGUÊS - 8
NOTA:
A velocidade máxima em marcha-atrás é
congurável tal como a marcha em frente
através dos botões (30).
(41) Ecrã
- Consulte o capítulo especíco.
(42) Botão “Ready to go”
- Premindo o botão (42) no ecrã é apresen-
tado o ícone “ ” e são iniciadas com
uma conguração standard as funções
seguintes:
• Abaixamento da cabeça e rotação das
escovas.
• Abaixamento do limpador e arranque
do sistema de aspiração.
• Velocidade de trabalho = 3ª marca (3,6
km/h).
• Fluxo da água = 3ª marca.
• Produto químico = 3ª marca (1%).
• Aspiração = normal (100%).
• Pressão das escovas = normal.
- Com esta função standard ativa, é pos-
sível premir qualquer botão de trabalho
para cada modicação ou regulação.
Se necessário, quando tiver sido congura-
da uma modicação nas funções de traba-
lho, é possível memorizá-la operando con-
forme indicado de seguida:
- Prima e mantenha premido durante 3 se-
gundos o botão (42); a conrmação da
memorização é indicada no ecrã (41) pela
intermitência “UPLOADED”.
- Para desativar a nova conguração e
repor os valores predenidos, prima no-
vamente e mantenha premido durante 3
segundos o botão (42); a conrmação é
indicada no ecrã (41) pela intermitência
“RESET”.
(43) Botão ECO
- Na fase de trabalho, premindo o botão
(43) no ecrã é apresentado o ícone “ ”,
os parâmetros da água, produto químico,
aspiração e pressão da cabeça assumem
os seguintes valores:
• Fluxo da água = 3ª marca.
• Produto químico = 3ª marca (1%).
• Aspiração = silenciosa (50%).
• Pressão das escovas à terra = normal.
(44) Botão do aspirador
- Premindo o botão (44), arranca o aspira-
dor e no ecrã é apresentado o ícone “
” e, se for inserida a marcha em frente ou
se a máquina estiver em ponto-morto, o
limpador abaixa.
- Pressionando o botão (44) o ventilador
pára e o rodo irá levantar.
- Com a máquina parada, rodo para baixo
e chave (29) para “ON” após um período
de tempo de inactividade, ocioso, o rodo
irá subir automaticamente.
(45) Botão de funcionamento
silencioso
- Pressionando o botão (45) reduz-se a ve-
locidade da turbina de aspiração reduzin-
do sensivelmente o ruído que a máquina
emite; com a função activada no visor
aparece o símbolo “ ”
- Pressionando novamente (45) desactiva-
-se a função e a máquina começa nova-
mente a funcionar em modo padrão, do
visor desaparece o símbolo “ ” e o sím-
bolo “ ” é exibido.
NOTA:
Desligando a turbina de aspiração com o
modo de “funcionamento silencioso” activa-
do, o funcionamento da própria turbina mu-
dará automaticamente para o modo de “fun-
cionamento padrão” durante todo o tempo
de atraso de desligamento.
(46) Botão de escovas
- Premindo o botão (46), abaixa a cabeça
das escovas e no ecrã é apresentado o
ícone “ ”.
- As escovas começam a rodar quando
49029600_Manuale RACER_RANGER_8ed_04-2023.indd 849029600_Manuale RACER_RANGER_8ed_04-2023.indd 8 06/04/2023 15:07:3306/04/2023 15:07:33

www.ghibliwirbel.com
Professional Cleaning Machines Since 1968
PORTUGUÊS - 9
você pressiona o pedal do acelerador fa-
zer, param quando o pedal do acelerador
é levantado.
NOTA:
As escovas giram para frente e para trás e
com ajuste de velocidade (30) posicionado
sobre “0”.
- Com a máquina parou, cabeça abaixada
e as escovas rme com a tecla (29) para
“ON” após um período de tempo de inac-
tividade da cabeça vai subir automatica-
mente.
- Se você pressionar o botão (46) com es-
covas rotativas, as escovas vai parar, a
unidade irá levantar e fora do símbolo “
” no ecrã.
(47) Botão extra pressão das
escovas
Com a cabeça das escovas abaixada, é pos-
sível regular a pressão das escovas na terra.
- Premindo o botão (47) ativa-se a pressão
extra; com a função ativada, no ecrã é
apresentado o ícone “ ”.
- Premindo novamente o botão (47), a
pressão à terra regressa ao normal e no
ecrã é apresentado o ícone “ ”.
NOTA:
Cada vez que a unidade de cabeça abaixará
(posição de repouso), a pressão da escova
é, no mínimo.
NOTA:
Esta função está equipado com um sistema
de segurança, que detecta automaticamente
um consumo excessivo de corrente do motor
da escova e é capaz de variar automatica-
mente a pressão das escovas sobre o chão,
trazendo as escovas na posição mais ade-
quada.
(48) Botão doseador do produto
químico (se presente)
- Premindo o botão (48) no ecrã é apresen-
tado o ícone “ ”, e prepara-se a dosa-
gem do produto químico.
- O funcionamento da bomba de dosagem
é comandado pelo pedal acelerador pre-
mido.
- Premindo repetidamente o botão (48),
aumenta-se a quantidade de produto
químico; chegando à quantidade máxi-
ma apresentada no ecrã pelo ícone “
”. Retomando o ecrã (48), desativa-se a
função e desliga-se o ícone no ecrã.
NOTA:
Em caso de esvaziamento do sistema de
dosagem do agente químico, após a substi-
tuição do reservatório, mantenha pressiona-
do o botão (48) por pelo menos 5 segundos
para activar o procedimento de purga de ar
com duração de cerca de 40 segundos; esta
função é activada apenas com a máquina
parada, a chave (29) na posição “ON” e com
o ajuste de velocidade (30) em “0”.
(49) Botão de dispensação de
água
- Premindo o botão (49) no ecrã é apresen-
tado o ícone “ ”, e prepara-se a abertura
da eletroválvula de água. O funcionamen-
to da mesma é comandado pelo pedal
acelerador premido.
- Pressionar o botão repetidamente (49)
aumenta a quantidade de água; chegan-
do ao montante máximo indicado no ecrã
pelo símbolo “ ”, se o botão for pressio-
nado novamente (49) desativa esse re-
curso.
(50) Botão de aviso acústico
(51) Botão de beacon
49029600_Manuale RACER_RANGER_8ed_04-2023.indd 949029600_Manuale RACER_RANGER_8ed_04-2023.indd 9 06/04/2023 15:07:5006/04/2023 15:07:50

www.ghibliwirbel.com
Professional Cleaning Machines Since 1968
PORTUGUÊS - 10
(52) Botão de luz de trabalho
6.1.b - Pedal do acelerador (Fig. A)
- Premindo o pedal acelerador (7), a má-
quina move-se em frente ou para trás,
consoante o botão de sentido de marcha
que tenha sido premido.
- A velocidade pode ser regulada com uma
maior ou menor pressão do pedal acele-
rador.
- Soltar o pedal do acelerador (7), a má-
quina retarda a uma parada. Depois de
alguns segundos com a máquina parada,
automaticamente activa o freio de esta-
cionamento; o freio é liberado pressionan-
do o pedal do acelerador (7) com avançar
ou para trás inserido.
7 -
7.1 - ECRÃ (Fig. F)
Com a máquina ligada, no ecrã (41) são
apresentados os seguintes ícones:
Bateria
Indica o estado de carga das baterias:
Baterias carregadas
Baterias descarregadas
Velocidade máxima de avanço
Com os botões (30a) “ ” e (30b) “
” é congurada a velocidade máxima atingí-
vel pela máquina com o pedal acelerador (7)
completamente premido:
km/h - 0 1,2 2,4 3,6 4,8 6,0
Sentido de marcha
A seta de sentido de marcha indica a função
de avanço selecionada através dos botões
(31a) “ ” e (31b) “ ”.
“Ready to go”
Visualiza-se no ecrã quando se prime o bo-
tão (42) “ ”.
Modo ECO
Você vê, quando a função ECO é activado
através do botão (43) “ ”
Aspirador a funcionar
Visualiza-se no ecrã quando se prime o bo-
tão (44) “ ” indicando que o aspirador
está ligado e o limpador abaixado.
Funcionamento silencioso
Com o aspirador ligado.
Visualiza-se no ecrã quando se prime o bo-
tão (45) “ ” indicando que o aspirador
funciona com um regime de rotações redu-
zido.
Preparação de rotação da es-
cova
Visualiza-se no ecrã quando se prime o bo-
tão (46) “ ” indicando que está ativada a
rotação da escova.
49029600_Manuale RACER_RANGER_8ed_04-2023.indd 1049029600_Manuale RACER_RANGER_8ed_04-2023.indd 10 06/04/2023 15:08:1406/04/2023 15:08:14

www.ghibliwirbel.com
Professional Cleaning Machines Since 1968
PORTUGUÊS - 11
Pressão extra
Visualiza-se no ecrã indicando a pressão de
trabalho das escovas.
Prima o botão (47) “ ” para alterar a
pressão de trabalho.
Doseador de detergente (se
presente)
Visualiza-se no ecrã quando se prime o bo-
tão (48) “ ”.
Prima o botão para aumentar ou diminuir a
percentagem de detergente doseado:
0,2% 0,5% 1% 2% 3%
Preparação da dispensação de
água
Visualiza-se no ecrã quando se prime o bo-
tão (49) “ ” indicando que está ativada a
eletroválvula de dispensação de água.
Quando o nível da água no reservatório está
no mínimo, o ícone “ ” é visualizado em tela
cheia em combinação com o sinal acústico.
Encha o reservatório de água (13) conforme
indicado no parágrafo especíco e, em se-
guida, desligue e volte a ligar a máquina
Ausência de operador no
banco de condução
Este ícone é apresentado quando o opera-
dor não está corretamente sentado no banco
de condução e bloqueia todas as funções da
máquina.
Nível de líquido máximo no
tanque de recuperação
É mostrado quando o líquido no reservatório
de recuperação atingiu o nível máximo.
Pedal do acelerador premuto
Este símbolo é inserido ao começo da má-
quina,indicando uma operação de inicializa-
ção sequência incorrecta, para remover o
alarme inserido, solte o pedal do acelerador
(7 Fig. A).
8 -
8.1 - EMERGÊNCIA
O botão de emergência (5 Fig. A) situa-se
numa posição facilmente acessível pelo ope-
rador.
Deve ser premido com vigor em caso de
necessidade imediata, para parar todas as
funções da máquina.
Para reativar a funcionalidade da máquina,
puxe o botão de emergência até ao desen-
cadeamento e restabelecimento do mesmo.
ADVERTÊNCIA:
Prima o botão de paragem de emer-
gência (5) com a máquina ligada ape-
nas em caso de uma necessidade
real, não utilize este procedimento
para desligar a máquina, poderia cau-
sar avarias inclusivamente graves na
mesma.
9 -
9.1 - FUNÇÕES DE
SEGURANÇA (Fig. A)
A máquina possui as seguintes funções de
segurança:
Sensor de presença do operador (4)
Bloqueia todas as funções da máquina quan-
do o operador não está presente no assento
do motorista.
Sistema de segurança antipatinagem
Reduz a velocidade, sempre que for neces-
sário, ao curvar e em caso de inclinação late-
ral da máquina para um valor de segurança
para evitar a patinagem imprevista e aumen-
tar a estabilidade da máquina em qualquer
situação.
49029600_Manuale RACER_RANGER_8ed_04-2023.indd 1149029600_Manuale RACER_RANGER_8ed_04-2023.indd 11 06/04/2023 15:08:3006/04/2023 15:08:30

www.ghibliwirbel.com
Professional Cleaning Machines Since 1968
PORTUGUÊS - 12
Travão eletromagnético
Está integrado na roda dianteira (23) e man-
tém a máquina travada quando está desliga-
da e sempre que a máquina estiver parada.
10 -
10.1 - ENCHIMENTO DO
RESERVATÓRIO (Fig. D)
ADVERTÊNCIA:
Introduzida no reservatório somente
água limpa da rede de distribuição
hídrica e a uma temperatura não su-
perior a 50 °C.
- Através do tubo extraível (52) introduza
água no reservatório (13) até ao enchi-
mento do mesmo.
- Não encha o tanque completamente, use
o tubo de nível (18) como referência.
- Ou, se disponível, abra a tampa (14) e
utilize a tomada acquastop (53, se pre-
sente).
ADVERTÊNCIA:
Sempre verifique visualmente o nível
de enchimento para evitar o risco de
molhar o chão.
- No m do enchimento do reservatório, fe-
che a tampa (14).
NOTA:
Para as máquinas sem kit químico, encha o
reservatório (13) com água limpa e misture-a
com detergente químico.
Respeite sempre as instruções de diluição
indicadas na etiqueta da embalagem do pro-
duto químico usado para compor a solução
de detergente.
10.2 - TANQUE DE
DETERGENTE / QUÍMICAS (se
presente) (Fig. E)
NOTA:
Utilize apenas detergentes não espumosos,
em relação à quantidade de produto a ser
utilizado siga as instruções do fabricante do
detergente e leve em consideração o tipo de
sujidade.
- Levante o tanque de recuperação (11).
- Verique se o tanque (54), não é o produ-
to necessário para o dia de trabalho.
Ao substituir o tanque, faça o seguinte:
- Retire a tampa (55), remova o recipiente
(54) e inserir um novo tanque de 5 litros,
em seguida, inserir a cha (55) com o
tubo de sucção.
PERIGO:
Em caso de contacto do detergente
com os olhos e a pele ou em caso de
ingestão, consulte a ficha de segu-
rança e de utilização do fabricante do
detergente.
NOTA:
Os reservatórios (54) a ser utilizados são do
tipo de padrão de 5 litros que são encontra-
dos no comércio.
- Abaixe com cuidado o reservatório de
água de recuperação (11).
- Efetue a purga do ar (consulte o procedi-
mento no item “Botão doseador do produ-
to químico).
11 -
11.1 - FUNCIONAMENTO
(Fig. A-F)
11.1.a - Vericações que devem ser
feitas antes da utilização
- Controlar que o tubo (15) de descarga do
reservatório de recuperação seja correc-
tamente engatado e correctamente tapa-
do.
- Controlar que o tubo (16) de aspiração
do água do limpador de pavimento esteja
correctamente inserida no reservatório de
recuperação.
- Controlar que a ligação (37) colocada
no limpador de pavimento (20) não está
entupida e que o tubo (16) está correcta-
mente ligado.
- Controlar o estado de carga das baterias,
49029600_Manuale RACER_RANGER_8ed_04-2023.indd 1249029600_Manuale RACER_RANGER_8ed_04-2023.indd 12 06/04/2023 15:08:3206/04/2023 15:08:32

www.ghibliwirbel.com
Professional Cleaning Machines Since 1968
PORTUGUÊS - 13
girando a chave (29) em “ON” e a indica-
ção de carga no visor (41).
11.1.b - Preparação da máquina e
escolha do ciclo de limpeza
- Sente-se no assento do motorista.
- A máquina tem a capacidade de executar
4 (quatro) diferentes ciclos de trabalho:
Ciclo de lavagem, escovação e seca-
gem:
- Ciclo de lavagem, escovagem, secagem:
- Prima o botão “Ready to go” (42) “
” para preparar a dispensação do deter-
gente, a rotação das escovas e arranque
do aspirador.
Ciclo só secagem:
- Para executar o ciclo de secagem, pres-
sione o botão (44) “ ”, você começa o
aspirador de pó.
Ciclo só escovação:
- Para executar o ciclo de escovagem,
pressione o botão (46) “ ”, nós prepa-
ramos a rotação da escova.
- A rotação das escovas é iniciado, quan-
do a máquina com o acelerador (7) pres-
sionado, começa a se mover avançar ou
para trás, ou com o acelerador pressiona-
do e a velocidade de deslocamento ajus-
tada para “0”.
Ciclo de lavagem e escovação:
- Pressione o botão (46) “ ” para orga-
nizar a rotação das escovas e pressione
o botão (49) “ ” para preparar o abas-
tecimento de água.
- A rotação das escovas e a dispensação
da água têm início quando se prime o pe-
dal acelerador com marcha em frente ou
marcha-atrás, ou com a conguração da
velocidade de avanço pelo menos na 1ª
marca.
11.1.c - Utilização da máquina
PERIGO:
Seja extremamente cuidados ao utili-
zar a máquina em rampas para evitar
rolamentos ou situações que pos-
sam fazer com que a máquina perca
o equilíbrio.
PERIGO:
Evite movimentos bruscos repenti-
nos. Vire o volante para travar ape-
nas com a velocidade baixa, sempre
considerando as condições do solo.
- Rode a chave (29) para “ON”; nos primei-
ros 2 segundos da ligação, o ecrã (41)
indica o tipo de baterias instaladas e as
horas de funcionamento da máquina.
- Escolha o tipo de ciclo de trabalho a rea-
lizar.
- Insira a velocidade de trabalho desejada
usando os botões (30).
- Acione o farol giratório (10, opcionais) e
as luzes de trabalho (9, opcionais).
- Começar as operações de limpeza usan-
do o acelerador (7).
NOTA:
Libertando o acelerador a rotação das esco-
vas e a distribuição da água param.
NOTA:
A correcta limpeza e secagem do pavimento
efectua-se utilizando a máquina para frente,
utilizando a máquina em marcha atrás o lim-
pador de pavimento eleva-se e não efectua
a aspiração da água presente no pavimento.
- Se necessário, ajustar a quantidade de
solução de lavagem, utilizando o botão
(49) “ ”.
- Controlar o estado de carga das baterias
através do visor (41).
49029600_Manuale RACER_RANGER_8ed_04-2023.indd 1349029600_Manuale RACER_RANGER_8ed_04-2023.indd 13 06/04/2023 15:08:3406/04/2023 15:08:34

www.ghibliwirbel.com
Professional Cleaning Machines Since 1968
PORTUGUÊS - 14
11.1.d - Finalização e encerramento
- Ao terminar as operações de limpeza pa-
rar a sequência, a rotação das escovas e
o aspirador utilizando os relativos coman-
dos em função do tipo de ciclo utilizados.
- Girar a chave (29) para “OFF”.
- O freio de estacionamento é ativado auto-
maticamente.
- Esvaziar e lavar o reservatório de recupe-
ração e o reservatório da solução como
indicado nos relativos parágrafos.
NOTA:
Quando o operador deixa a máquina engata
automaticamente o freio de estacionamento.
PERIGO:
É proibido estacionar a máquina em
rampas.
12 -
12.1 - DESCARGA DAS
ÁGUAS SUJAS (Fig. H)
PERIGO:
Antes de levantar o tanque de recu-
peração de água (11) verifique que o
mesmo está vazio.
Após o término do ciclo lavagem ou quan-
do o reservatório (11) de águas sujas estiver
completo é necessário esvaziá-lo em pleno
respeito das seguintes instruções:
NOTA:
Em relação ao processo de escoamento das
águas sujas siga atentamente as normas em
vigor no país onde a máquina é utilizada.
- Posicione a máquina cerca de uma saída
de escoamento.
- Retire o tubo (15) dos respetivos gan-
chos, abaixe-o até ao solo no bujão de
descarga.
- Desaparafuse a tampa (56) e descarre-
gue completamente a água de recupera-
ção contida no reservatório.
NOTA:
É possível modular a quantidade de água
que sai premindo a parte final do tubo (15).
- Reaparafuse a tampa (56) e reposicione o
tubo (15) no correspondente suporte.
13 -
13.1 - MANUTENÇÃO E
LIMPEZA
ADVERTÊNCIA:
Para informações e advertências re-
lativas a operações de manutenção
ou limpeza, siga as instruções dadas
no folheto “AVISOS DE SEGURAN-
ÇA PARA ESFREGAR DO CHÃO” em
anexo à presente.
13.2 - OPERAÇÕES QUE
DEVEM SER EFECTUADAS
TODOS OS DIAS
13.2.a - Esvaziamento e limpeza do
reservatório de água limpa
(Fig. I)
ADVERTÊNCIA:
Após o término das operações de la-
vagem é necessário desacoplar e lim-
par (13) o reservatório de água limpa
a fim de evitar depósitos ou incrus-
tações.
Após o término do processo de escoamento
das águas sujas esvaziar o reservatório de
água limpa (13) agindo como descrito em
seguida:
- Posicione a máquina cerca de uma saída
de escoamento.
49029600_Manuale RACER_RANGER_8ed_04-2023.indd 1449029600_Manuale RACER_RANGER_8ed_04-2023.indd 14 06/04/2023 15:08:3406/04/2023 15:08:34

www.ghibliwirbel.com
Professional Cleaning Machines Since 1968
PORTUGUÊS - 15
- Remova a mangueira (17) dos ganchos
de xação e coloque a no reservatório de
dispersão; remova a tampa (57) e faça
drenagem de toda a água contida no tan-
que.
- Lavar o interior do reservatório deixando
o tubo de descarga aberto e introduzindo
água limpa pela apertura superior.
- No m da limpeza levantar o tubo (17),
fechar a tampa (57) e engatar o tubo nos
apropriados encaixes.
13.2.b - Limpeza do reservatório de
águas sujas (Fig. J)
ADVERTÊNCIA:
Após o término das operações de la-
vagem é necessário limpar o reserva-
tório de águas sujas a fim de evitar
a formação de depósitos ou incrus-
tações e a proliferação de bactérias,
odores e mofo.
- Eleve a tampa (12).
- Remova o recipiente para recolha de de-
tritos (58) e abra a sua tampa e, em se-
guida, limpe com água corrente, retirando
eventuais pedaços de papel, madeira,
etc. que o obstruam.
- Remova e limpe o ltro de aspiração (59)
com água corrente.
- Deixando o tubo de descarga (15 Fig. H)
abaixado e a tampa removida, introduza
água pela abertura superior (60) e, em
seguida, lave o interior do reservatório
até que pelo tubo de descarga saia água
limpa.
- Remonte o conjunto procedendo pelo
sentido inverso.
13.2.c - Limpar do limpador (Fig. K)
A m de executar uma boa operação de lava-
gem do mecanismo limpador (20), é neces-
sário removê-lo agindo da seguinte forma:
- Extraia o tubo (16 Fig. C) de sua cavidade
no mecanismo (20).
- Desaperte os suportes de xação (36 Fig.
C) e extraia o mecanismo limpador (20).
- Execute a operação de lavagem do meca-
nismo e limpe cuidadosamente as partes
em borracha (60) e (61) e a parte interna
do dispositivo de sucção (62).
NOTA:
Se durante a lavagem você notar que as par-
tes em borracha (60) e (61) estão desgasta-
das ou danicadas será necessário substi-
tuí-las ou girá-las.
- Monte novamente todos os componentes
após o término.
13.3 - OPERAÇÕES A SEREM
EFECTUADAS EM CADA 3 MESES
13.3.a - Controlar o estado de des-
gaste da engrenagem de
direcção (Fig. L)
- Controlar o estado de desgaste e de cor-
rosão da corrente (63) colocada por baixo
da máquina próximo da roda anterior.
- Se a corrente apresenta vestígios de cor-
rosão é necessário substituir contactando
para isso o serviço de assistência técnica.
13.4 - OPERAÇÕES QUE
DEVEM SER EFECTUADAS DE
ACORDO COM NECESSIDADE
13.4.a - Substituição escovas (Fig.
M)
Sendo necessária a substituição das esco-
vas quando as mesmas se apresentam com
desgaste com comprimento das cerdas in-
ferior a 2 cm ou devem ser substituídas em
função do tipo de pavimento a ser lavado;
para a substituição, agir como se segue:
- Enar uma mão debaixo do grupo porta-
-escovas (19), para desengatar a escova
rodá-la no sentido contrário à rotação.
- Posicionar em baixo o grupo porta-esco-
vas (19) as escovas novas.
49029600_Manuale RACER_RANGER_8ed_04-2023.indd 1549029600_Manuale RACER_RANGER_8ed_04-2023.indd 15 06/04/2023 15:08:3406/04/2023 15:08:34

www.ghibliwirbel.com
Professional Cleaning Machines Since 1968
PORTUGUÊS - 16
- Sentar-se no lugar de condução, girar a
chave, (29 Fig. F) na posição “ON”.
- Coloque a velocidade de avanço no valor
“0”.
- Prima o botão (46 Fig. F) “ ” para ha-
bilitar a rotação das escovas; o grupo de
escovas abaixa-se.
- Prima o pedal acelerador (7 Fig. A), as
anges porta-escovas começam a rodar
engatando as escovas e, em seguida, sol-
te o pedal.
- Volte a premir o botão (46 Fig. F) “ ”
e rode a chave (29 Fig. F) para a posição
“OFF”.
13.4.b - Ajustando a borracha de pro-
teção contra respingos (Fig.
M)
Dependendo do tipo de piso a ser tratado ou
após a substituição das escovas de disco,
pode ser necessário ajustar a altura da bor-
racha de proteção contra respingos (64).
Para ajustá-lo, proceda da seguinte forma:
- Rode a chave (29 Fig. F) para a posição
“ON”.
- Pressione o botão (46 Fig. F) “ ” para
baixar a cabeça da escova (19), depois
gire a chave (29 Fig. F) para “OFF”.
- Verique a altura correta da borracha
de proteção contra respingos, conforme
mostrado na gura M.
- Se necessário, atue manualmente na bor-
racha para restaurar a altura correta.
NOTA:
A altura correta da borracha de proteção
contra respingos é quando, durante a ope-
ração e a cabeça da escova é abaixada, a
própria borracha fica nivelada com o chão.
- Ao nal do ajuste, volte a ligar a máquina
e pressione o botão (46 Fig. F) “ ” de-
pois gire a chave (29 Fig. F) para “OFF”.
13.4.c - Substituição das partes em
borracha do mecanismo lim-
pador (Fig. K)
Quando o processo de secagem do piso re-
vela-se mais demorado e difícil ou quando,
após a secagem, permanecem vestígios de
água no piso é necessário verificar o estado
de desgaste das partes em borracha do me-
canismo limpador (20):
- Extraia o mecanismo (20) assim como
indicado no parágrafo “Processo de lava-
gem do mecanismo limpador”.
- Pressione a trava (65) e abrir a alavanca
(66).
- Retire as duas deduções de borracha (67)
e remova a borracha exterior (60).
- Solte os dois parafusos de xação (68) e
remover a barra de tração (69) e borracha
dentro (61).
NOTA:
Quando somente um lado das partes em
borracha (60) ou (61) estiver desgastado, é
possível virá-las (uma só vez).
- Substitua ou vire as partes em borracha
(60) ou (61), prestando atenção para não
inverter nenhuma posição.
- Monte novamente todos os componentes
após o término.
NOTA:
Existem dois tipos de borrachas:
Borrachas naturais para todos os tipos de
pisos e borrachas sintéticas (de poliuretano)
para executar limpeza dos pisos de oficinas
mecânicas, sujos de óleo.
13.4.d - Regulação da incidência do
limpador (Fig. N)
- Inicie a máquina e prima o botão (44 Fig.
- F) “ ”.
49029600_Manuale RACER_RANGER_8ed_04-2023.indd 1649029600_Manuale RACER_RANGER_8ed_04-2023.indd 16 06/04/2023 15:08:3406/04/2023 15:08:34

www.ghibliwirbel.com
Professional Cleaning Machines Since 1968
PORTUGUÊS - 17
- Coloque a velocidade máxima na 1ª mar-
ca com os botões (30 Fig. F), prima o pe-
dal acelerador (7 Fig. A) e desloque-se
alguns metros e, em seguida, desligue e
desça da máquina.
- Usar a barra roscada (70) para regular a
incidência que os limpador de borracha
(60) e (61) têm com o pavimento, rodan-
do no sentido horário haverá uma maior
incidência e viceversa se há uma menor
incidência.
NOTA:
A incidência correcta é quando durante o
funcionamento não se vericam fugas de
líquidos no pavimento e o limpador de bor-
racha tem uma incidência constante em todo
o comprimento.
13.4.e - Ajuste da pressão do limpa-
dor (Fig. O)
Dependendo do tipo de piso a ser tratado ou
após a substituição das borrachas do rodo,
pode ser necessário ajustar a pressão do
piso do rodo.
Para ajustá-lo, proceda da seguinte forma:
- Levante o reservatório de água de recu-
peração (11) certicando-se de que está
vazio.
- Atue no parafuso de ajuste (71) levando
em consideração que:
• Girar no sentido horário diminui a pres-
são no piso do rodo.
• Girar no sentido anti-horário aumenta
a pressão do rodo no piso.
- No nal do ajuste, baixe cuidadosamente
o depósito da água de recuperação (11).
13.4.f - Limpeza do ltro do reserva-
tório de água limpa (Fig. P)
- Certique-se o tanque (13 Fig. A) está
vazio.
- Remova a tampa (22) e retire o cartucho
do ltro (72).
- Limpe o cartucho do ltro (72) utilizando
água corrente.
- Remontar tudo em ordem inversa garantir
que a junta (73) está posicionada correc-
tamente.
13.4.g - Torneira de drenagem do
compartimento das pilhas
(Fig. A)
- Verique periodicamente se não há es-
tagnação de água no compartimento das
pilhas.
- Se necessário, coloque-se com a máqui-
na perto de um dreno de drenagem, desa-
perte a tubagem e abra a torneira (74), e
depois escorra os líquidos.
ADVERTÊNCIA:
Quando estiver prevista a utilização
de pilhas de ácido de chumbo, preste
atenção máxima à possível fuga de lí-
quido das próprias pilhas, aos riscos
associados e às normas de elimina-
ção de líquidos/substâncias perigo-
sas.
13.4.h - Controle estado de desgaste
das três rodas (Fig. A)
- Controlar periódicamente o estado de
desgaste das três das rodas (8) e (23);
caso se apresentem desgastadas ou da-
nicadas, sendo necessário substituí-las
contactando o serviço de assistência téc-
nica.
PERIGO:
Proceder com as rodas desgastadas
ou danificadas comporta perigos
para o operador, enquanto que a má-
quina poderá não ter uma adequada
adesão principalmente nas curvas.
14 -
49029600_Manuale RACER_RANGER_8ed_04-2023.indd 1749029600_Manuale RACER_RANGER_8ed_04-2023.indd 17 06/04/2023 15:08:3406/04/2023 15:08:34

www.ghibliwirbel.com
Professional Cleaning Machines Since 1968
PORTUGUÊS - 18
14.1 - PROGRAMAÇÃO
PARÂMETROS (Fig. F)
14.1.a - Parâmetros do OPERADOR
O operador tem a possibilidade de aceder ao
menu para congurar os seguintes parâme-
tros:
• Idioma
• Tipo de baterias
• Ecrã - Contraste
• Ecrã - Luminosidade
Para aceder ao menu, proceda conforme se
segue:
- Prima e mantenha premidos os botões
(31a) “ ” e (31b) “ ”, em seguida,
rode a chave de ligação (29) para “ON”
para visualizar o vídeo seguinte:
General
General
Sets
Sets
--ID Check--
--ID Check--
insert password:
insert password:
0
0
000
000
General Sets Denições gerais
ID Check Controlo
Insert password Inserir a palavra-passe
- Solte os botões premidos.
- Insira a palavra-passe de 4 algarismos
“0010” premindo os botões (30a) “ ”
ou (30b) “ ” para mudar o algarismo
intermitente.
- Prima o botão (43) “ ” para conrmar
e passar ao algarismo seguinte e, por m,
conrme a palavra-passe e entre na lista
dos parâmetros.
- Prima o botão (31a) “ ” ou (31b) “
” para percorrer os vídeos seguintes:
General
General
Language
Language
Main
Main
selection:
selection:
ITA
ITA
General Main Conguração principal
Language selection Seleção do idioma
General
General
Battery
Battery
Main
Main
Type:
Type:
GEL
GEL
General Main Conguração principal
Battery Type Seleção do tipo de bateria
General
General
Display
Display
min:0
min:0
max:50
max:50
Main
Main
Tune:
Tune:
15
15
General Main Conguração principal
Display Tune Ecrã de contraste
General
General
Display
Display
min:0
min:0
max:10
max:10
Main
Main
Brightness:
Brightness:
0
0
General Main Conguração principal
Display Brightness Ecrã de luminosidade
49029600_Manuale RACER_RANGER_8ed_04-2023.indd 1849029600_Manuale RACER_RANGER_8ed_04-2023.indd 18 06/04/2023 15:08:4606/04/2023 15:08:46

www.ghibliwirbel.com
Professional Cleaning Machines Since 1968
PORTUGUÊS - 19
Conguração do idioma:
General
General
Language
Language
Main
Main
selection:
selection:
ITA
ITA
General Main Conguração principal
Language selection Seleção do idioma
- Escolha o idioma usando os botões (30a)
“” ou (30b) “ ” e, em seguida, pri-
ma o botão (43) “ ” para conrmar a
escolha;
-ITA = Italiano
-ENG = Inglês
Conguração do tipo de bateria:
General
General
Battery
Battery
Main
Main
Type:
Type:
GEL
GEL
General Main Conguração principal
Battery Type Seleção do tipo de bateria
- Escolha o tipo de bateria usando os bo-
tões (30a) “ ” ou (30b) “ ” e, em
seguida, prima o botão (43) “ ” para
conrmar a escolha;
-GEL = Bateria a Gel
-AGM = Bateria AGM
-WET = Bateria a ÁCIDO
Conguração do ecrã - Contraste:
General
General
Display
Display
min:0
min:0
max:50
max:50
Main
Main
Tune:
Tune:
15
15
General Main Conguração principal
Display Tune Ecrã de contraste
- Escolha o tipo de contraste do ecrã con-
gurando um valor entre “0 e 50” usan-
do os botões (30a) “ ” ou (30b) “
” e, em seguida, prima o botão (43) “
” para conrmar a escolha.
Conguração do ecrã - Luminosidade:
General
General
Display
Display
min:0
min:0
max:10
max:10
Main
Main
Brightness:
Brightness:
0
0
General Main Conguração principal
Display Brightness Ecrã de luminosidade
- Escolha o tipo de luminosidade do ecrã
congurando um valor entre “0 e 10”
usando os botões (30a) “ ” ou (30b)
“” e, em seguida, prima o botão (43) “
” para conrmar a escolha.
NOTA:
Ao confirmar a configuração escolhida, a
máquina reinicia e o ecrã (41) acende-se no
modo operativo de trabalho.
15 -
49029600_Manuale RACER_RANGER_8ed_04-2023.indd 1949029600_Manuale RACER_RANGER_8ed_04-2023.indd 19 06/04/2023 15:08:4706/04/2023 15:08:47

www.ghibliwirbel.com
Professional Cleaning Machines Since 1968
PORTUGUÊS - 20
15.1 - CONTROLO/SUBSTITUIÇÃO DOS FUSÍVEIS
NOTA:
Todos os circuitos elétricos da máquina estão protegidos por dispositivos eletrónicos de repo-
sição automática. Os fusíveis de segurança atuam apenas em caso de avaria grave.
Recomenda-se portanto que a eventual substituição dos fusíveis seja exclusivamente reali-
zada por pessoal qualificado.
16 -
16.1 - ALARMES DURANTE A OPERAÇÃO
Quando se verica um mau funcionamento da máquina, no ecrã (41 Fig. F) aparece o tipo de
alarme contido na lista abaixo indicada.
Consulte a lista e implemente a solução aconselhada para restabelecer o funcionamento
correto da máquina.
Se as soluções aconselhadas não resultarem, contacte o Serviço de Assistência Técnica.
ALARME SIGNIFICADO SOLUÇÃO
AL_1: General Erro de memória Reinicie a máquina.
AL_2: General Anomalia da chave Desligue a máquina durante pelo menos 10
segundos e, em seguida, volte a ligar.
AL_3: General Subtensão
Desligue a máquina, controle o estado de carga
da bateria, os fusíveis, os contactos, as cabla-
gens e as ligações, e reinicie a máquina.
AL_4: General Sobretensão Desligue a máquina, os fusíveis, os contactos, as
cablagens e as ligações, e reinicie a máquina.
AL_6: General Ausência de comunicação
com o painel de instru-
ções ou ecrã
Desligue a máquina, controle os contactos, as
cablagens e as ligações, e reinicie a máquina.
AL_7: General Comunicação ffm
Desligue a máquina, controle os contactos, as
cablagens e as ligações com o módulo de comu-
nicação e funcionamento deste último, e reinicie
a máquina.
AL_8: General Comunicação Interna 1 e 2 Reinicie a máquina.
AL_9: General
AL_10: General Inserir tag Apresentação da chave “Tag” em falta: insira a
chave.
AL_11: General Tag inválida Apresentação da chave “Tag” errada: troque de
chave ou chave danicada.
AL_12: General Atualização em curso… Apresentação da atualização remota dos parâme-
tros em curso: aguarde o m da atualização.
49029600_Manuale RACER_RANGER_8ed_04-2023.indd 2049029600_Manuale RACER_RANGER_8ed_04-2023.indd 20 06/04/2023 15:08:4706/04/2023 15:08:47

www.ghibliwirbel.com
Professional Cleaning Machines Since 1968
PORTUGUÊS - 21
ALARME SIGNIFICADO SOLUÇÃO
AL_13: General Desligar Apresentação da atualização dos parâmetros
concluída: reinicie a máquina.
AL_41: Function Sobretemperatura
Desligue a máquina e deixe-a arrefecer. Controle
os consumos dos motores das escovas e do
aspirador, o estado de ventilação do ambiente e
reinicie.
AL_42: Function Potência danicada Desligue a máquina durante pelo menos 10
segundos e, em seguida, volte a ligar.
AL_44: Function Relé avariado
Ausência de fechamento do relé/telerrotor. Veri-
que o funcionamento do telerrotor. Em caso de
relé a bordo, se persistir, substitua a placa.
AL_45: Function Relé avariado cc
Foi detetado um relé/telerrotor avariado ao ligar.
Verique o estado dos contactos do telerrotor.
Em caso de relé a bordo, se persistir, substitua
a placa.
AL_46: Function Sobrecorrente Escovas
Desligue a máquina, verique a carga (motor), a
mecânica, a cablagem e as ligações, e procure a
presença de um curto circuito na saída e, por m,
reinicie.
AL_47: Function Sobrecorrente Aspirador
Desligue a máquina, verique a carga (motor), a
mecânica, a cablagem e as ligações, e procure a
presença de um curto circuito na saída e, por m,
reinicie.
AL_48: Function Sobrecorrente Bomba da
água
Desligue a máquina, verique a carga (motor), a
mecânica, a cablagem e as ligações, e procure a
presença de um curto circuito na saída e, por m,
reinicie.
AL_49: Function Amperímetro Escova 1 e 2 Verique o consumo e modo de utilização da
função das escovas e reinicialize a máquina.
AL_50: Function
AL_52: Function Amperímetro Aspirador 1 Verique o consumo da função do aspirador e
reinicie a máquina.
AL_54: Function Ligação Escova 1 e 2 Verique a ligação dos motores da escova.
AL_55: Function
AL_57: Function Ligação Aspirador 1 Verique a ligação do motor do aspirador.
AL_59: Function Desequilíbrio Verique os consumos dos motores da escova
49029600_Manuale RACER_RANGER_8ed_04-2023.indd 2149029600_Manuale RACER_RANGER_8ed_04-2023.indd 21 06/04/2023 15:08:4706/04/2023 15:08:47

www.ghibliwirbel.com
Professional Cleaning Machines Since 1968
PORTUGUÊS - 22
ALARME SIGNIFICADO SOLUÇÃO
AL_61: Function Amperímetro Atuador das
escovas
Verique o consumo do motor do atuador e o
estado da mecânica movimentada.
AL_62: Function Sobrecorrente Atuador
das escovas
Desligue a máquina, verique a carga (motor), a
mecânica, a cablagem e as ligações, e procure a
presença de um curto circuito na saída.
AL_63: Function Fim de curso Atuador das
escovas
Verique as ligações/estado do m de curso.
Controlo ativo só para a versão BTO.
AL_65: Function Amperímetro Atuador do
limpador
Verique o consumo do motor do atuador e o
estado da mecânica movimentada.
AL_66: Function Sobrecorrente Atuador do
limpador
Desligue a máquina, verique a carga (motor), a
mecânica, a cablagem e as ligações, e procure a
presença de um curto circuito na saída.
AL_80: Traction Sobretemperatura Motor
de tração
Desligue a máquina e deixe-a arrefecer. Verique
o consumo e modo de utilização da tração, o
estado da ventilação do ambiente e reinicie.
AL_85: Traction Sobrecorrente Motor de
tração
Desligue a máquina, verique a carga (motor), a
mecânica, a cablagem e as ligações, e procure a
presença de um curto circuito na saída e, por m,
reinicie.
AL_86: Traction Amperímetro Motor de
tração
Verique o consumo e modo de utilização da
função de tração e reinicialize a máquina.
AL_87: Traction Leitura do motor de tração Reinicie a máquina.
AL_88: Traction Anomalia do eletrotravão Desligue a máquina, verique a cablagem do
travão e volte a ligar a mesma.
AL_89: Traction Avaria Pedal acelerador Desligue a máquina, verique as ligações e a
cablagem e volte a ligar a mesma.
AL_90: Traction Pedal acelerador Premido Solte o pedal e volte a ligar a máquina.
AL_91: Traction Avaria do Encoder Desligue a máquina verique as ligações e a
cablagem e volte a ligar a mesma.
17 -
49029600_Manuale RACER_RANGER_8ed_04-2023.indd 2249029600_Manuale RACER_RANGER_8ed_04-2023.indd 22 06/04/2023 15:08:4706/04/2023 15:08:47

www.ghibliwirbel.com
Professional Cleaning Machines Since 1968
PORTUGUÊS - 23
17.1 - RESOLUÇÃO DE PROBLEMAS
PROBLEMA CAUSA SOLUÇÃO
Virando a chave em direcção
à “ON” a máquina não inicia.
Baterias com carga insu-
ciente.
Verique o estado de carga
da bateria.
Fusível destinado a protec-
ção geral do equipamento
queimado.
Substituir o fusível posiciona-
do no cabo bateria. (*)
Chave com defeito. Substitua a chave. (*)
Escova não roda. Problemas no motor. Substituir o motor. (*)
Falha na cartão. Substitua o cartão. (*)
Aspirador não funciona.Reservatório de recuperação
cheio.
Esvaziar o reservatório.
Motor de turbina com defeito. Substituir o motor. (*)
Falha na cartão. Substitua o cartão. (*)
A máquina não seca ou não
seca bem deixando vestígios
de água no pavimento.
Aspirador desligado. Ligue o aspirador.
Tubo de sucção entupido. Verique e eventualmente
limpe o tubo de sucção que
conecta o mecanismo limpa-
dor ao reservatório de águas
sujas.
Reservatório de águas sujas
cheio.
Esvazie o reservatório.
Partes em borracha do meca-
nismo limpador desgastadas.
Vire ou substitua as partes
em borracha.
Não sai água. Reservatório vazio. Encher o reservatório.
Filtro entupido. Limpar o ltro.
A válvula solenóide bomba
não funciona.
Substitua a válvula solenói-
de. (*)
Bomba de água com defeito.Substitua a bomba de água.
(*)
Falha na cartão. Substitua o cartão. (*)
49029600_Manuale RACER_RANGER_8ed_04-2023.indd 2349029600_Manuale RACER_RANGER_8ed_04-2023.indd 23 06/04/2023 15:08:4706/04/2023 15:08:47

www.ghibliwirbel.com
Professional Cleaning Machines Since 1968
PORTUGUÊS - 24
PROBLEMA CAUSA SOLUÇÃO
A máquina não se move em
condições de trabalho.
Operador não está sentado
correctamente no lugar de
condução.
Sente-se no assento de for-
ma apropriada.
Embraiagem do motor está
com defeito.
Roda de substituição. (*)
Falha na cartão. Substitua o cartão. (*)
Sensor presença do opera-
dor avariado.
Substitua o sensor. (*)
Limpeza insuficiente do piso.Escovas ou detergentes ina-
dequados.
Utilize escovas ou detergen-
tes adequados para o tipo de
piso ou sujidade.
Escova desgastada. Substitua a escova.
O indicador “ ” solução va-
zia do tanque, continua a pis-
car.
Tanque vazio. Encha o tanque.
Torneira está fechada. Abra a torneira.
Fluxômetro com defeito. Substituir o uxómetro. (*)
Há estagnação de água no
compartimento da bateria.
Sensor de nível do tanque de
recuperação com defeito.
Escoe a água do comparti-
mento da bateria com o cano
apropriado e torneira.
Verique ou substitua o sen-
sor de nível. (*)
(*) Ligue para o serviço pós-venda para substituição.
18 -
18.1 - DESTRUIÇÃO DA MÁQUINA
PERIGO:
As baterias são consideradas resíduos especiais por isso devem ser elimina-
dos em centros de recolha apropriados como indicado na norma em vigôr no
país de utilização.
19 -
49029600_Manuale RACER_RANGER_8ed_04-2023.indd 2449029600_Manuale RACER_RANGER_8ed_04-2023.indd 24 06/04/2023 15:08:5006/04/2023 15:08:50

www.ghibliwirbel.com
Professional Cleaning Machines Since 1968
PORTUGUÊS - 25
19.1 - ESQUEMA ELÉCTRICO
Legenda:
AC Acelerador
BAT Baterias
BC Carregador de bateria
BE Pisca-pisca
BRK Travão eletromagnético
C1 Conector da bateria
EB1 Placa de funções
EB2 Ecrã
EB3 Painel de comandos
EV Eletroválvula
F1 Fusível do carregador de bateria (1A)
F2 Fusível das luzes (se presente) (3A)
F3 Fusível da buzina (1A)
F4 Fusível do pisca-pisca (1A)
F5 Fusível da eletroválvula (5A)
F6 Fusível do atuador da cabeça das esco-
vas (10A)
F7 Fusível do atuador do limpador (10A)
F8 Fusível do eletrotravão (7.5A)
F9 Fusível da bomba da água (5A)
F10 Fusível bomba quím (se presente) (5A)
F11 Fusível motor aspiração (40A)
F12 Fusível motor escova direita (40A)
F13 Fusível motor escova esquerda (40A)
F14 Fusível motor tração (100A)
HN Buzina
KEY Chave de ignição
L1 Luzes de trabalho (se presentes)
MA Motor de aspiração
MAS Motor atuador cabeça escovas
MAT Motor atuador limpador
MS-DX Motor escova direita
MS-SX Motor escova esquerda
MT Motor de tração
PA Bomba da água
PC Bomba químico
PE Botão de emergência
S1 Sensor nível água recuperação
SW1 Microinterruptor banco
TE Telerrotor externo
Codici colore:
BK Preto
BU Azul
BN Castanho
GN Verde
GY Cinzento
OG Laranja
PK Rosa
RD Vermelho
VT Roxo
WT Branco
YE Amarelo
49029600_Manuale RACER_RANGER_8ed_04-2023.indd 2549029600_Manuale RACER_RANGER_8ed_04-2023.indd 25 06/04/2023 15:08:5006/04/2023 15:08:50

www.ghibliwirbel.com
Professional Cleaning Machines Since 1968
PORTUGUÊS - 26
PA MT PC EV
- +
-
-
-
-
+ -+ -+
+
+
+
MA MS MS
DX SX
C1
BC
TE
EB2
EB3
KEY
L1
BE
F4
F1
F2
F8
F9 F14 F10 F5 F11 F12 F13
F7
F6
F3
BRK
AC
M
SW1
M5
J8
4 3
2 1
4 3
2 1
1
4
2
5
3
6
9
1
10
2
11
3
4
1
5
2
6
3
4
1
5
2
6
3
4
1
5
2
6
3
12
4
4
8
1
2
3
7
2
6
1
5
3
6
2
5
1
1
12
3s
+
-
2
1
1
2
3
4
2 3
123
456 4
1
11
2
12
3
13
4
14
5
15
6
16
7
17
8
18
9
19
10
20
4
9
3
8
5
10
2
7
1
6
13
5
16
8
15
7
14
6
2
1
J9 J10 J11
J1
J8 J7
J2
S1
J3 J4 J5 J7J6
J12 J13 J14
M6
USB
HN
BATBAT MATMAT
PEPE
MASMAS
EB1
49029600_Manuale RACER_RANGER_8ed_04-2023.indd 2649029600_Manuale RACER_RANGER_8ed_04-2023.indd 26 06/04/2023 15:08:5206/04/2023 15:08:52

www.ghibliwirbel.com
Professional Cleaning Machines Since 1968
NEDERLANDS - 1
Geachte klant,
Dank u dat u één van onze reinigingsproducten voor uw werkomgeving gekozen heeft.
De schrob-/zuigmachine die u zojuist gekocht heeft is ontworpen om aan uw verwach-
tingen te voldoen, namelijk gebruiksvriendelijkheid en betrouwbaarheid.
We zijn ervan overtuigd dat een goed product, om optimaal te kunnen blijven functio-
neren, regelmatige updates vraagt om aan de vereisten van de dagelijkse gebruiker te
kunnen voldoen. We hopen dan ook dat u niet alleen een tevreden klant maar ook een
partner zult blijken en dat u er niet aan twijfelt om ons uw meningen en ideeën geba-
seerd op uw dagelijkse ervaring toe te sturen.
49029600_Manuale RACER_RANGER_8ed_04-2023.indd 149029600_Manuale RACER_RANGER_8ed_04-2023.indd 1 06/04/2023 15:23:5706/04/2023 15:23:57

www.ghibliwirbel.com
Professional Cleaning Machines Since 1968
NEDERLANDS - 2
INHOUDSOPGAVE
INHOUDSOPGAVE ........................................................................................................................ 2
TECHNISCHE GEGEVENS ........................................................................................................... 3
1.1 - INLEIDING ........................................................................................................................... 5
1.1.a - Stand operator .............................................................................................................. 5
1.1.b - Algemene waarschuwingen tijdens het gebruik ........................................................... 5
1.2 - NIET VOORZIEN GEBRUIK VAN DE MACHINE ................................................................ 5
2.1 - DE ONDERDELEN VAN DE MACHINE (Afb. A) ................................................................5
3.1 - UITPAKKEN (Afb. B) ........................................................................................................... 5
3.1.a - De batterijen plaatsen (Afb. A) ...................................................................................... 6
3.1.b - De machine van het houten laadbord halen (Afb. B) .................................................... 6
4.1 - ASSEMBLAGE ONDERDELEN .......................................................................................... 6
4.1.a - Installatie zuigmond (Afb. C) ........................................................................................ 6
4.1.b - Borstel installatie .......................................................................................................... 6
5.1 - DE BATTERIJ LADEN ......................................................................................................... 6
5.1.a - De batterij opladen met een externe batterijlader (Afb. G) ........................................... 7
5.1.b - De batterij opladen met boord van de acculader (indien aanwezig) (Afb. G) ............... 7
6.1 - BESCHRIJVING BEDIENINGSKNOPPEN MACHINE ....................................................... 7
6.1.a - Bedieningspaneel (Afb. F) ............................................................................................ 7
6.1.b - Gaspedaal (Afb. A) ..................................................................................................... 10
7.1 - DISPLAY (Afb. F)............................................................................................................... 10
8.1 - NOODGEVALLEN ............................................................................................................. 11
9.1 - BEVEILIGING (Afb. A) ...................................................................................................... 11
10.1 - DE TANK VULLEN (Afb. D) ............................................................................................ 12
10.2 - TANK WASMIDDEL / CHEMISCHE MIDDEL (indien aanwezig) (Afb. E)....................... 12
11.1 - WERKING (Afb. A-F) ......................................................................................................... 12
11.1.a - Controlli prima dell’uso ............................................................................................... 12
11.1.b - De machine gereedmaken en het programma kiezen ................................................ 12
11.1.c - Gebruik van de machine ............................................................................................. 13
11.1.d - Einde gebruik en uitschakeling ................................................................................... 14
12.1 - HET VUILE WATER AFVOEREN (Afb. H) ........................................................................ 14
13.1 - ONDERHOUD EN REINIGING .......................................................................................... 14
13.2 - DAGELIJKS UIT TE VOEREN HANDELINGEN ............................................................... 14
13.2.a - De schoonwatertank legen en reinigen (Afb. I) .......................................................... 14
13.2.b - De vuilwatertank reinigen (Afb. J) ............................................................................... 15
13.2.c - Reiniging zuigmond (Afb. K) ....................................................................................... 15
13.3 - HANDELINGEN DIE ELKE DRIE MAANDEN MOETEN WORDEN UITGEVOERD ....... 15
13.3.a - Controle slijtage stuurketting (Afb. L) ......................................................................... 15
13.4 - HANDELINGEN DIE UITGEVOERD MOETEN WORDEN INDIEN HET NODIG IS ......... 15
13.4.a - De borstels vervangen (Afb. M) .................................................................................. 15
13.4.b - Afstellen van het spatschermrubber (afb. M) .............................................................. 16
13.4.c - De rubbers van de zuigmond vervangen (Afb. K) ...................................................... 16
13.4.d - Afstelling druk zuigmond (Afb. N) ............................................................................... 16
13.4.e - Afstelling ruitenwisserdruk (Afb. O) ............................................................................ 17
13.4.f - Reiniging schoonwaterlter (Afb. P) ........................................................................... 17
13.4.g - Leegkraan batterijcompartiment (Afb. A) .................................................................... 17
13.4.h - De drie wielen op slijtage controleren (Afb. A) ............................................................17
14.1 - INSTELLING PARAMETERS (Afb. F) .............................................................................. 18
14.1.a - OPERATOR-parameters ............................................................................................ 18
15.1 - CONTROLE/VERVANGING VAN DE ZEKERINGEN ....................................................... 20
16.1 - ALARMEN TIJDENS DE WERKING ................................................................................. 20
17.1 - STORINGEN LOKALISEREN ...........................................................................................23
18.1 - ONTMANTELING VAN DE MACHINE .............................................................................. 24
19.1 - ELEKTRISCH SCHEMA ....................................................................................................25
49029600_Manuale RACER_RANGER_8ed_04-2023.indd 249029600_Manuale RACER_RANGER_8ed_04-2023.indd 2 06/04/2023 15:23:5706/04/2023 15:23:57

www.ghibliwirbel.com
Professional Cleaning Machines Since 1968
NEDERLANDS - 3
TECHNISCHE GEGEVENS
RACER R 85 RANGER R 115
FD 65 FD 75 FD 75 FD 85
Type besturing Operator aan boord
Eigenschappen
Werking en stroomvoorziening Batterij 24 V
Type batterijen
N° 2 - 12V 105Ah (C5) N° 4 - 6V 240Ah (C5)
N° 4 - 6V 180Ah (C5) N° 1 - 24V 320Ah (C5)
N° 1 - 24V 100Ah (Li) N° 1 - 24V 150Ah (Li)
Geïnstalleerd vermogen 2160 W 2210 W
Werkduur
2 h (105Ah C5) 5 h (240Ah C5)
4 h (180Ah C5) 7 h (320Ah C5)
2 h (100Ah Li) 3 h (150Ah Li)
Aandrijving D.m.v. tractie vooruit / achteruit
Schrobbreedte 650 mm 750 mm 750 mm 850 mm
Zuigbreedte 850 mm 950 mm 950 mm 1050 mm
Theoretische reinigingscapaciteit 4000 m2/h 4500 m2/h 4500 m2/h 5000 m2/h
Echte reinigingscapaciteit 2400 m2/h 2700 m2/h 2700 m2/h 3000 m2/h
Hand-armtrillingen (ISO 5349-1) < 2,5 m/s2
Lichaamstrillingen (ISO 2631-1) < 0,5 m/s2
Geluidsdruk (ISO 11203) (LpA) 63 dB(A)
Geluidsdruk in stille modus (LpA) 57 dB(A)
Beveiligingsclassicatie IP IPX3
Borstels
Diameter / pad / aantal 330 mm /
13” / 2
380 mm /
15” / 2
380 mm /
15” / 2
430 mm /
17” / 2
Vermogen motor / aantal 500 W / 2
Draaisnelheid van borstel 165 toeren/min.
Specifieke druk 30 gr/cm221 gr/cm221 gr/cm217 gr/cm2
Specifieke druk (extra druk) 46 gr/cm232 gr/cm243 gr/cm234 gr/cm2
49029600_Manuale RACER_RANGER_8ed_04-2023.indd 349029600_Manuale RACER_RANGER_8ed_04-2023.indd 3 06/04/2023 15:23:5706/04/2023 15:23:57

www.ghibliwirbel.com
Professional Cleaning Machines Since 1968
NEDERLANDS - 4
RACER R 85 RANGER R 115
FD 65 FD 75 FD 75 FD 85
Tractie
Maximale helling die tijdens het reinigen
kan worden overwonnen 2 %
Maximale helling leeg (*) 12 %
Vermogen motor 600 W
Maximumsnelheid werkvoortgang 6 km/h
Aanzuiging
Vermogen motor 550 W
Onderdruk (waterkolom) 125 mbar / 1250 mmH2O
Luchtverplaatsing 30 l/sec
Tank
Type Dubbele tank
Inhoud schoonwatertank 80 l 110 l
Inhoud vuilwatertank 85 l 115 l
Afmetingen
Machine afmetingen
(lengte x breedte x hoogte) 1375 x 705 x 1230 mm 1470 x 770 x 1365 mm
Machinebreedte - Borsteldek 715 mm 785 mm 785 mm 890 mm
Machinebreedte - zuigmond 885 mm 950 mm 950 mm 1055 mm
Afmetingen accuruimte
(lengte x breedte x hoogte) 380 x 540 x 310 mm 380 x 625 x 440 mm
Gewicht
Gewicht leeg 213 kg 246 kg
Gewicht met batterijen Gel 12V 105Ah 285 kg -
Gewicht met batterijen Gel 6V 180Ah 333 kg -
Gewicht met lithium batterij 24V 100Ah 249 kg -
Gewicht met batterijen Gel 6V 240Ah - 432 kg
Gewicht met batterijen Pb Wet 24V 320Ah - 506 kg
Gewicht met lithium batterij 24V 150Ah - 288 kg
Gewicht in bedrijfsklare toestand (GVW) 490 kg 691 kg
(*) De machine is getest onder de volgende omstandigheden:
• Standaard accu
• Lege tanks
• Ruwe betonnen oprit
• Hellinglengte 15 m
• 75 kg bestuurder
1 -
49029600_Manuale RACER_RANGER_9ed_09-2023.indd 449029600_Manuale RACER_RANGER_9ed_09-2023.indd 4 04/09/2023 14:54:4604/09/2023 14:54:46

www.ghibliwirbel.com
Professional Cleaning Machines Since 1968
NEDERLANDS - 5
1.1 - INLEIDING
OPMERKING:
De nummers en de figuurverwijzingen tus-
sen haakjes verwijzen naar de componenten
die zijn aangegeven in het bijgevoegde illus-
tratieve blad.
GEVAAR!
Voor het gebruik van de machine
lees het boekje “VEILIGHEIDSWAAR-
SCHUWINGEN VOOR VLOER WAS-
DROGER” aan deze en volgende toe-
voegingen.
1.1.a - Stand operator
De exploitant, terwijl het gebruik van de ma-
chine zit op de stoel met je handen op het
stuur.
1.1.b - Algemene waarschuwingen
tijdens het gebruik
- Laat de machine NOOIT achter op hellin-
gen.
- Het is absoluut verboden om op een hel-
ling te draaien vanwege kantelingsgevaar.
- Vermijd het gebruik van de machine in
omgevingen met gevaar voor vallende
objecten.
1.2 - NIET VOORZIEN
GEBRUIK VAN DE MACHINE
- Gebruik de machine niet met de vuilwa-
tertank open.
- Laat uw voeten of benen tijdens het ge-
bruik van de machine niet bungelen.
- Maak geen plotselinge stuurbewegingen,
zeker niet op een neerwaartse helling.
WAARSCHUWING:
De machine is geschikt voor het ver-
voer van ÉÉN persoon.
2 -
2.1 - DE ONDERDELEN VAN
DE MACHINE (Afb. A)
(1) Stuur
(2) Bedieningspaneel
(3) Zitting
(4) Aanwezigheidssensor operator
(5) NOODKNOP, alle functies worden
onmiddellijk gestopt
(6) Treeplank voetensteun
(7) Rijpedaal
(8) Achterwielen
(9) Werklicht (optioneel)
(10) Knipperlicht (optioneel)
(11) Vuilwatertank
(12) Deksel vuilwatertank
(13) Schoonwatertank
(14) Dop
(15) Afvoerslang vuil water
(16) Zuigslang water zuigmond
(17) Afvoerslang schoon water
(18) Reinig de peilbuis van de watertank
(19) Groep borstels
(20) Zuigmond
(21) Opbergvak en documentenhouder
(22) Waterlter
(23) Richtings- en tractiewiel
(24) Haak voor bewaren van de zuigmond
(25) Steunvoet tankeenheid
3 -
3.1 - UITPAKKEN (Afb. B)
Nadat de verpakking is verwijderd zoals aan-
gegeven op het instructieblad op de verpak-
king zelf, controleert u de integriteit van de
machine en alle meegeleverde onderdelen.
Als er duidelijke schade wordt gevonden,
neem dan binnen 3 dagen na ontvangst con-
tact op met uw plaatselijke dealer en trans-
porteur.
- Verwijder de envelop en dozen (26) met
de meegeleverde accessoires:
• (20) Zuigmond.
• (32) N ° 2 borstels.
- Til de tankeenheid op en neem de docu-
mentatie uit de juiste envelop:
• (33) Handleiding voor gebruik en on-
derhoud van de machine.
• (34) Gebruiksaanwijzing acculader (in-
dien aanwezig).
49029600_Manuale RACER_RANGER_8ed_04-2023.indd 549029600_Manuale RACER_RANGER_8ed_04-2023.indd 5 06/04/2023 15:24:0206/04/2023 15:24:02

www.ghibliwirbel.com
Professional Cleaning Machines Since 1968
NEDERLANDS - 6
3.1.a - De batterijen plaatsen (Afb.
A)
- Hef voorzichtig de terugwintank (11) op.
- Plaats de accu’s en sluit ze aan zoals ver-
meld op de afbeeldingen al naargelang
de conguratie (4 accu’s van 6V, 2 accu’s
van 12V, accupak van 24V), gebruik daar-
bij de bijgeleverde kabels en stekkers.
- Laat voorzichtig de waterterugwintank
(11) zakken.
OPMERKING:
Het aansluiten van de batterijen moet wor-
den uitgevoerd door gespecialiseerd perso-
neel.
3.1.b - De machine van het houten
laadbord halen (Afb. B)
- Verwijder het houten blok (27) dat zich
voor het voorwiel bevindt.
- Plaats de oprijplaat (28) voor de houten
pallet zoals aangegeven op het instructie-
blad op de verpakking.
- Ga op de bestuurdersstoel zitten (3).
- Draai de sleutel (29) op “ON”.
- Druk op de rijrichtingsknop (31a) “ ”
(vooruit), daarna voorzichtig het gaspe-
daal (7) intrappen en van de pallet stap-
pen.
4 -
4.1 - ASSEMBLAGE
ONDERDELEN
4.1.a - Installatie zuigmond (Afb. C)
- Steek de zuigmond (20) in de steunplaat
(35) en zet hem vast door de twee knop-
pen (36) aan te draaien.
- Verbind de zuigslang (16) aan de opening
van (37) de zuigmond.
4.1.b - Borstel installatie
- Zie de procedure in de paragraaf “13.4.a -
De borstels vervangen (Afb. M)”.
5 -
5.1 - DE BATTERIJ LADEN
GEVAAR!
Laad de batterijen op in goed ge-
ventileerde ruimtes die voldoen aan
de desbetreffende normen die in het
land van gebruik van kracht zijn.
Voor informatie met betrekking tot de
veiligheid, houd u aan hetgeen in het
hoofdstuk 1 van deze handleiding be-
schreven staat.
WAARSCHUWING:
Houd u voor de informatie en veilig-
heid, met betrekking tot de batterij en
de batterijlader op de machine (indien
aanwezig), aan hetgeen beschreven
staat in de bijgesloten handleiding
van de batterijlader.
Op het moment dat de machine de
fabriek verlaat, is hij geijkt voor de
functionering op gel-batterijen.
Als u om de andere batterijen te in-
stalleren, zie paragraaf “Parameter
instellingen”.
Het is verboden om de machine te ge-
bruiken met een gel accu met kalibra-
tie voor zuur batterijen of andere.
(Alleen voor versies zonder inge-
bouwde batterijlader) Het apparaat
mag alleen worden gevoed met SELV
(safety extra-low voltage) externe
batterijladers.
OPMERKING:
(Alleen voor GEL-batterijen) Het opladen
van de accu’s vereist 10 uur. Voorkom het
gedeeltelijk opladen van de accu’s.
(Alleen voor lithiumbatterijen) Er is mogelijk.
de accu’s gedeeltelijke te laden.
Laad de batterijen aan het einde van elke
taak of op zijn minst wanneer het batterijsym-
bool “ ” op het display (41 g. F) begint
te knipperen.
49029600_Manuale RACER_RANGER_8ed_04-2023.indd 649029600_Manuale RACER_RANGER_8ed_04-2023.indd 6 06/04/2023 15:24:0706/04/2023 15:24:07

www.ghibliwirbel.com
Professional Cleaning Machines Since 1968
NEDERLANDS - 7
- Breng de machine naar het oplaadstation
van de batterij.
- Til de terugwinningswatertank (11) op om
er zeker van te zijn dat deze leeg is.
5.1.a - De batterij opladen met een
externe batterijlader (Afb. G)
- Controleer met behulp van de desbetref-
fende handleiding of de externe acculader
geschikt is. De nominale spanning van de
acculader moet 24V zijn.
- Pak in de speciale behuizing (38) de con-
nector (39) en sluit deze aan op de exter-
ne acculader.
- Sluiting de acculader aan op het elektri-
citeitsnet.
- Koppel na het opladen de acculader los
van het elektriciteitsnet en van de connec-
tor (39).
- Laat voorzichtig de waterterugwintank
(11) zakken.
5.1.b - De batterij opladen met
boord van de acculader (in-
dien aanwezig) (Afb. G)
- Pak in de speciale behuizing (38) de stek-
ker en sluit deze aan op de acculaderka-
bel (40) op het elektriciteitsnet (de span-
ning en de frequentie van het net moeten
gelijk zijn aan de waarden van de accula-
der, deze zijn vermeld op het identicatie-
plaatje van de machine).
OPMERKING:
Wanneer de acculader op het elektriciteits-
net is aangesloten, worden alle functies van
de machine automatisch uitgesloten.
- Op het display (41 afb. F) wordt weerge-
geven, wanneer op het symbool accu de
segmenten opeenvolgend aangaan, dat
de acculader de accu’s aan het opladen
is.
- Wanneer alle segmenten in het symbool
accu aan zijn met vast brandend lampje,
is de laadcyclus van de accu’s beëindigd.
- Haal de stekker van de acculaderkabel
(40) uit het elektriciteitsnet en plaats hem
in de speciale behuizing (38).
- Laat voorzichtig de waterterugwintank
(11) zakken.
6 -
6.1 - BESCHRIJVING
BEDIENINGSKNOPPEN
MACHINE
6.1.a - Bedieningspaneel (Afb. F)
(29) Startsleutel
- Door de sleutel met de klok mee naar
“ON” te draaien worden de circuits van
spanning voorzien en wordt de werking
van de machine geactiveerd.
- Door de sleutel tegen de klok in naar
“OFF” te draaien wordt de spanning uitge-
schakeld en kan de sleutel eruit gehaald
worden.
(30) Regelknoppen maximum snel-
heid
De maximum voortgangssnelheid kan wor-
den geregeld met de knoppen (30a) “ ”
en (30b) “ ”.
- Door volledig op het gaspedaal (7) te
drukken, wordt de snelheid in overeen-
stemming gebracht met de maximum in-
gestelde waarde.
- Wanneer op het display (41) alle snel-
heidssymbolen “ ” helder zijn, wordt
het gaspedaal (7) geblokkeerd en blijft de
machine stilstaan.
(31) Knoppen voor de rijrichting
- Door te drukken op de knop vooruit (31a) “
” de machine gaat vooruit; op het dis-
play wordt weergegeven het icoon “ ”.
- Door te drukken op de knop achteruit
(31b) “ ” de machine gaat achteruit
en de zoemer van het achteruitrijden gaat
aan; op het display wordt weergegeven
het icoon “ ”.
49029600_Manuale RACER_RANGER_8ed_04-2023.indd 749029600_Manuale RACER_RANGER_8ed_04-2023.indd 7 06/04/2023 15:24:1406/04/2023 15:24:14

www.ghibliwirbel.com
Professional Cleaning Machines Since 1968
NEDERLANDS - 8
OPMERKING:
De maximum snelheid achteruit is instelbaar
als het vooruitrijden via de knoppen (30).
(41) Display
- Zie desbetreende hoofdstuk.
(42) Knop “Ready to go”
- Door op de knop (42) op het display te
drukken, wordt weergegeven het icoon “
” en worden met de standaard instel-
ling de volgende functies gestart:
• Het omlaag brengen van de kop en ro-
tatie van de borstels.
• Het omlaag brengen van de wisser en
het starten van de zuiginstallatie.
• Werksnelheid = 3de streepje (3,6
km/h).
• Debiet = 3de streepje.
• Chemische stof = 3de streepje (1%).
• Zuiging = normaal (100%).
• Druk borstels = normaal.
- Met deze geactiveerde standaardfunctie
kan elke werkknop worden ingedrukt voor
elke wijziging of afstelling.
Wanneer er een wijziging is ingesteld van de
werkfuncties, kan deze, zo nodig, worden op-
geslagen en wel op de volgende wijze:
- Druk op de knop (42) en houd deze gedu-
rende 3 seconden ingedrukt; de bevestiging
van de opslag wordt vermeld op het display
(41) via het knipperende “UPLOADED”.
- Voor het deactiveren van de nieuwe instel-
ling en om terug te keren naar de standaard
waarden van de instellingen, drukt u op-
nieuw op knop (42) en houdt u deze gedu-
rende 3 seconden ingedrukt; de bevestiging
wordt vermeld op het display (41) door de
knipperende “RESET”.
(43) ECO-knop
- Door tijdens de werkfase op knop (43) te
drukken, wordt op het display het icoon “
” weergegeven, de parameters van
het water, de chemische stof, de zuiging
en de druk van de kop nemen de volgen-
de waarden aan:
• Debiet = 3de streepje.
• Chemische stof = 3de streepje (1%).
• Zuiging = stil (50%).
• Druk borstels op de grond = normaal.
(44) Knop zuiginstallatie
- Door op knop (44) te drukken, wordt de
zuiginstallatie gestart en op het display
wordt weergegeven het icoon “ ” en,
als het vooruitrijden is ingeschakeld of als
de machine in de vrij staat, gaat de veger
omlaag.
- Door opnieuw drukken, op de knop (44)
stopt de ventilator en de zuigmond wordt
verhoogd.
- Met de machine gestopt, zuigmond om-
laag en toets (29) op “ON” na een periode
van inactiviteit, stijgt de zuigmond auto-
matisch.
(45) Knop stille werking
- Door indrukken van de knop (45) verlaagt
de snelheid van de inlaat turbine, aan-
zienlijk verminderen van de ruis die de
machine maakt; met functie ingeschakeld
verschijnt op het display het icoon “ ”.
- Door het opnieuw drukken van de knop
(45) de functie is uitgeschakeld en de ma-
chine is weer operationeel in de standaard
modus, wordt het icoon “ ” en wordt het
icoon “ ”. op het display weergegeven.
OPMERKING:
Het uitschakelen van de zuigturbine met de
“stille werking” ingeschakeld, de werking van
de turbine zelf schakelt automatisch in de
“standaardmodus” voor de hele tijd van uit-
schakelvertraging.
(46) Knop borstels
- Door te drukken op de knop (46) gaat de
borstelkop omlaag en op het display wordt
weergegeven het icoon “ ”.
- De borstels beginnen te draaien, wanneer
u op de gaspedaal drukt, ze stoppen wan-
neer het gaspedaal wordt opgeheven.
49029600_Manuale RACER_RANGER_8ed_04-2023.indd 849029600_Manuale RACER_RANGER_8ed_04-2023.indd 8 06/04/2023 15:24:2506/04/2023 15:24:25

www.ghibliwirbel.com
Professional Cleaning Machines Since 1968
NEDERLANDS - 9
OPMERKING:
De borstels draaien zowel naar voren, en
met de achteruitversnelling en de machine
stopt, met potentiometer (30) op “0”.
- Met de machine gestopt, gebogen hoofd
en gestopte borstels, met sleutel (29) op
“ON” na een periode van inactiviteit stijgt
het hoofd automatisch.
- Als u op de knop (46) drukt met roterende
borstels, zullen de borstels stoppen, de
groept wordt opgetild en het icoon “ ”
ga uit op het display.
(47) Knop extra druk borstels
Met omlaag gebrachte borstelkop kan de
druk van de borstels op de grond worden
geregeld.
- Door te drukken op de knop (47) wordt de
extra druk geactiveerd, met geactiveerde
functie wordt op het display weergegeven
het icoon “ ”.
- Door opnieuw te drukken op de knop (47)
gaat de druk op de grond terug naar nor-
maal en op het display wordt weergege-
ven het icoon “ ”.
OPMERKING:
Telkens wanneer de hoofdeenheid wordt
neergelaten (ruststand), de borsteldruk mi-
nimaal is.
OPMERKING:
Deze functie is uitgerust met een veiligheids-
systeem, dat automatisch een overmatig ge-
bruik van de borstel motorstroom detecteert
en kan de druk van de borstels op de vloer
automatisch variëren, waardoor de borstels
in de meest geschikte positie yijn gebracht.
(48) Knop doseerapparaat che-
mische stof (indien aanwezig)
- Druk op de knop (48), op het display wordt
weergegeven het icoon “ ”, nu wordt de
dosis van de chemische stof voorbereid.
- De werking van de doseerpomp wordt
gestuurd met het indrukken van het gas-
pedaal.
- Door herhaaldelijk te drukken op de knop
(48) wordt de hoeveelheid chemische
stof vergroot, waarbij de maximum hoe-
veelheid wordt weergegeven op het dis-
play met het icoon “ ”. Door opnieuw te
drukken op de knop (48) wordt de functie
gedeactiveerd en gaat het icoon op het
display uit.
OPMERKING:
In het geval van het legen van het doseer-
systeem voor chemicaliën, na het vervangen
van de tank, houdt u de knop (48) gedurende
minstens 5 seconden ingedrukt om de ont-
luchtingsprocedure te activeren die onge-
veer 40 seconden duurt; deze functie wordt
alleen geactiveerd als de machine stilstaat,
de sleutel (29) in de “ON” -positie en met de
snelheidsregeling (30) op “0”.
(49) Knop waterafgifte
- Door te drukken op de knop (49) wordt op
het display weergegeven het icoon “ ”,
nu wordt de elektromagnetische water-
klep geopend. De werking hiervan wordt
gestuurd met het indrukken van het gas-
pedaal.
- Herhaaldelijk op de knop (49) drukkend
verhoogt er de hoeveelheid water; ge-
komen naar het maximale bedrag wordt
het op het display weergegeven door het
icoon “ ”, als de knop opnieuw wordt in-
gedrukt (49) schakelt deze functie uit.
(50) Knop akoestisch waarschu-
wingssignaal
49029600_Manuale RACER_RANGER_8ed_04-2023.indd 949029600_Manuale RACER_RANGER_8ed_04-2023.indd 9 06/04/2023 15:24:3606/04/2023 15:24:36

www.ghibliwirbel.com
Professional Cleaning Machines Since 1968
NEDERLANDS - 10
(51) Knipperlichtknop
(52) Werklichtknop
6.1.b - Gaspedaal (Afb. A)
- Door te drukken op het gaspedaal (7) gaat
de machine naar voren of naar achteren,
al naargelang welke rijrichtingsknop is in-
gedrukt.
- De snelheid is regelbaar met het meer of
minder indrukken van het gaspedaal.
- Door het loslaten van het gaspedaal (7),
vertraagt de machine tot stilstand. Na een
paar seconden met de machine gestopt,
schakelt automatisch de parkeerrem; de
rem wordt losgelaten door het indrukken
van het gaspedaal (7) met opmars naar
voren of naar achteren.
7 -
7.1 - DISPLAY (Afb. F)
Bij ingeschakelde machine worden op het
display (41) de volgende iconen weergege-
ven:
Accu
Geeft het laadniveau van de accu’s aan:
Accu’s vol
Accu’s leeg
Maximum rijsnelheid
Met de knoppen (30a) “ ” en (30b) “
” stelt men de maximum haalbare snelheid
van de machine in met het gaspedaal (7) vol-
ledig ingedrukt:
km/h - 0 1,2 2,4 3,6 4,8 6,0
Rijrichting
Het pijltje van de rijrichting geeft de voort-
gangsfunctie aan die is geselecteerd via de
knoppen (31a) “ ” en (31b) “ ”.
“Ready to go”
Dit wordt weergegeven op het display wan-
neer men drukt op knop (42) “ ”.
ECO- modus
U ziet het, wanneer de ECO-functie wordt
geactiveerd via de knop (43) “ ”.
Zuiginstallatie in werking
Dit wordt weergegeven op het display wan-
neer men drukt op knop (44) “ ”, er wordt
nu aangegeven dat de zuiginstallatie aan is
en de veger omlaag gebracht.
Stille werking
Met zuiginstallatie aan.
Dit wordt weergegeven op het display wan-
neer men drukt op knop (45) “ ”, er wordt
nu aangegeven dat de zuiginstallatie op een
beperkt toerental werkt.
Voorbereiding rotatie borstel
Dit wordt weergegeven op het display wan-
neer u drukt op knop (46) “ ”, er wordt
nu aangegeven dat de rotatie van de borstel
ingeschakeld is.
49029600_Manuale RACER_RANGER_8ed_04-2023.indd 1049029600_Manuale RACER_RANGER_8ed_04-2023.indd 10 06/04/2023 15:24:5606/04/2023 15:24:56

www.ghibliwirbel.com
Professional Cleaning Machines Since 1968
NEDERLANDS - 11
Extra druk
Dit wordt weergegeven op het display waar-
bij de bedrijfsdruk van de borstels wordt ver-
meld. Druk op knop (47) “ ” om de be-
drijfsdruk te veranderen.
Doseerapparaat reinigings-
middel (indien aanwezig)
Dit wordt weergegeven op het display wan-
neer u drukt op knop (48) “ ”.
Druk op de knop voor het vergroten of ver-
kleinen van het percentage gedoseerde rei-
nigingsmiddel:
0,2% 0,5% 1% 2% 3%
Voorbereiding waterafgifte
Dit wordt weergegeven op het display wan-
neer u drukt op knop (49) “ ”, er wordt nu
aangegeven dat de elektromagnetische klep
waterafgifte ingeschakeld is.
Wanneer het niveau van het water in de tank
op het minimum staat, wordt het icoon “ ”
op volledig scherm weergegeven in combi-
natie met het akoestische signaal.
Vul de watertank (13) zoals aangegeven in
de desbetreende paragraaf, zet de machine
vervolgens uit en start hem opnieuw
Operator zit niet op de be-
stuurdersstoel
Dit icoon wordt weergegeven wanneer de
operator niet correct op de bestuurdersstoel
zit, alle functies van de machine worden ge-
blokkeerd.
Maximaal vloeistofniveau in
de vuilwatertank
Wordt weergegeven als de vloeistof in de
vuilwatertank het maximale niveau heeft be-
reikt.
Gaspedaal ingedrukt
Dit symbool wordt geplaatst wanneer de ma-
chine wordt gestart, wat wijst op een verkeer-
de volgorde van de opstarten operatie, om
de geplaatste alarm te verwijderen, laat het
gaspedaal (7) lot.
8 -
8.1 - NOODGEVALLEN
De noodstopknop (5 afb. A) bevindt zich op
een gemakkelijk door de operator te berei-
ken plaats. Deze moet met overtuiging wor-
den ingedrukt in geval van onmiddellijke
noodzaak voor het stopzetten van alle func-
ties van de machine.
Trek, voor het heractiveren van de werking
van de machine, aan de noodstopknop tot
het vrijkomen en herstel ervan.
WAARSCHUWING:
Druk alleen op de noodstopknop (5)
met ingeschakelde machine wanneer
echt noodzakelijk, volg deze proce-
dure niet voor het uitschakelen van
de machine, dit zou ernstige schade
eraan kunnen veroorzaken.
9 -
9.1 - BEVEILIGING (Afb. A)
De machine is voorzien van de volgende vei-
ligheidsfuncties:
Aanwezigheidssensor operator (4)
Het blokkeert alle machinefuncties wanneer
de machinist niet op de stoel zit.
Antislipsysteem
Dit systeem verlaagt waar nodig de snelheid
tijdens het sturen en als de machine met een
bepaalde veiligheidswaarde zijdelings over-
helt om plotseling slippen te vermijden en
verhoogt de stabiliteit van de machine onder
alle omstandigheden.
Elektromagnetische rem
Deze is geïntegreerd in het aandrijvende
achterwiel (23) en zorgt dat de machine niet
kan rijden als hij is uitgeschakeld en in elk
geval bij een stilstaande machine.
10 -
49029600_Manuale RACER_RANGER_8ed_04-2023.indd 1149029600_Manuale RACER_RANGER_8ed_04-2023.indd 11 06/04/2023 15:25:0806/04/2023 15:25:08

www.ghibliwirbel.com
Professional Cleaning Machines Since 1968
NEDERLANDS - 12
10.1 - DE TANK VULLEN
(Afb. D)
WAARSCHUWING:
Vul de tank met schoon kraanwater
dat niet warmer is dan 50°C.
- Breng met de uitneembare slang (52) wa-
ter in de tank (13) totdat deze vol is.
- Vul de tank niet volledig, gebruik de peil-
buis (18) als referentie.
- Of open de dop (14) zo mogelijk en ge-
bruik de waterstopaansluiting (53, indien
aanwezig).
WAARSCHUWING:
Controleer altijd visueel het vulniveau
om het risico van vloerbevochtiging
te voorkomen.
- Sluit na het vullen van de tank de dop
(14).
OPMERKING:
Vul bij machines zonder chemische set de
tank (13) met schoon water en meng dit met
een chemische stof.
Houd u zich altijd aan de verdunningsinstruc-
ties op het etiket van de verpakking van het
chemische product voor het aanmaken van
de reinigingsoplossing.
10.2 - TANK WASMIDDEL /
CHEMISCHE MIDDEL (indien
aanwezig) (Afb. E)
OPMERKING:
Gebruik alleen niet-schuimende reinigings-
middelen. Neem voor de dosering de aanwij-
zingen van de producent van het reinigings-
middel en het soort vuil in acht.
- Breng de vuilwatertank (11) omhoog.
- Controleer of in de tank (54) is er de nodi-
ge product voor de werkdag.
Bij het vervangen van de tank, ga als volgt
te werk:
- Verwijder de dop (55), verwijder de bus
(54) en plaats een nieuwe 5 liter tank,
steek de stekker (55) met de zuigbuis.
GEVAAR!
Bij aanraking van het reinigingsmid-
del met de ogen en de huid of bij in-
slikken, wordt verwezen naar het vei-
ligheids- en toepassingenblad van de
producent van het reinigingsmiddel.
OPMERKING:
De tanks (54) te gebruiken zijn stan-
daardrecht 5 liter, die in de handel te nden
zijn.
- Laat voorzichtig de waterterugwintank
(11) zakken.
- Voer de ontluchting uit (zie procedure on-
der het kopje “Knop doseerapparaat che-
mische stof”).
11 -
11.1 - WERKING (Afb. A-F)
11.1.a - Controlli prima dell’uso
- Controleer of de afvoerslang (15) van de
vuilwatertank goed is bevestigd en afge-
sloten.
- Controleer of de waterzuigslang (16) van
de zuigmond goed op de vuilwatertank is
aangesloten.
- Controleer of het verbindingsstuk (37) op
de zuigmond (20) niet verstopt is en of de
slang goed is aangesloten.
- Controleer of de batterijen geladen zijn
door de sleutel (29) naar “ON” te draai-
en en de indicator op het display (41) te
checken.
11.1.b - De machine gereedmaken
en het programma kiezen
- Zit in de stoel van de bestuurder.
- De machine kan 4 reinigingsprogramma’s
uitvoeren:
49029600_Manuale RACER_RANGER_8ed_04-2023.indd 1249029600_Manuale RACER_RANGER_8ed_04-2023.indd 12 06/04/2023 15:25:1006/04/2023 15:25:10

www.ghibliwirbel.com
Professional Cleaning Machines Since 1968
NEDERLANDS - 13
Wascyclus, afborstelen, droging:
- Druk op de knop “Ready to go” (42) “
” voor de afgifte van het reinigingsmiddel,
van de borstelrotatie en het starten van de
zuiginstallatie.
Cyclus alleen drogen:
- Om het te drogen lopen, druk op de knop
(44) “ ”, de stofzuiger start.
Cyclus alleen schrobben:
- Om de poetsbeurt te draaien, druk op de
knop (46) “ ”, het bereidt de rotatie
van de borstels voor.
- De rotatie van de borstels wordt gestart,
toen de machine met het gaspedaal (7) in-
gedrukt, het begint vooruit of achteruit te
bewegen, of met het gaspedaal ingedrukt
en de voorwaartse snelheid ingesteld op
“0”.
Cyclus reinigen, schrobben:
- Druk op de knop (46) “ ”, om de bor-
stel rotatie voor te bereiden en druk op
de knop (49) “ ”, om de watertoevoer
voor te bereiden.
- De rotatie van de borstels en de afgifte
van het water worden gestart wanneer
u op het gaspedaal drukt met rijrichting
vooruit of achteruit, of bij de instelling van
de rijsnelheid op ten minste het eerste
streepje.
11.1.c - Gebruik van de machine
GEVAAR!
Wees uiterst voorzichtig wanneer u
de machine op hellingen gebruikt.
Zo voorkomt u kanteling of situaties
waarbij de stabiliteit van de machine
in gevaar wordt gebracht.
GEVAAR!
Vermijd plotselinge stuurbewegingen
en draai het stuur alleen volledig om
als de machine langzaam rijdt. Houd
hierbij altijd rekening met de staat
van de vloer.
- Draai de sleutel (29) op “ON”; tijdens de
eerste 2 seconden van de inschakeling,
geeft het display (41) het type geïnstal-
leerde accu’s en de bedrijfsuren van de
machine aan.
- Kies het type uit te voeren werkcyclus.
- Voer met de knoppen (30) de gewenste
werksnelheid in.
- Doe het zwaailicht (10, optioneel) en de
werklampen aan (9, optioneel).
- Begin de reinigingswerkzaamheden door
het rijpedaal in te drukken (7).
OPMERKING:
Als u het rijpedaal loslaat, worden de rotatie
van de borstels en de waterafgifte gestopt.
OPMERKING:
Alleen als de machine vooruit rijdt wordt
de vloer op de juiste wijze gereinigd en ge-
droogd. Als de machine achteruit rijdt gaat
de zuigmond omhoog en wordt er geen wa-
ter van de vloer opgezogen.
- Stel indien nodig de hoeveelheid van was-
oplossing, met behulp van de knop (49) “
”.
- Controleer op het display (41) of de batte-
rijen geladen zijn.
49029600_Manuale RACER_RANGER_8ed_04-2023.indd 1349029600_Manuale RACER_RANGER_8ed_04-2023.indd 13 06/04/2023 15:25:1206/04/2023 15:25:12

www.ghibliwirbel.com
Professional Cleaning Machines Since 1968
NEDERLANDS - 14
11.1.d - Einde gebruik en
uitschakeling
- Schakel aan het eind van de werkzaam-
heden de rotatie van de borstels en de
zuiger uit met behulp van de betreende
bedieningsknoppen, afhankelijk van de
gebruikte cyclus.
- Draai de sleutel (29) naar “OFF”.
- De parkeerrem wordt automatisch geac-
tiveerd.
- Leeg en reinig de vuilwatertank en
schoonwatertank zoals staat aangegeven
in de betreende paragrafen.
OPMERKING:
Wanneer de operator de machine verlaat.
schakelt automatisch de parkeerrem in.
GEVAAR!
Het is verboden de machine op een
helling te parkeren.
12 -
12.1 - HET VUILE WATER
AFVOEREN (Afb. H)
GEVAAR!
Controleer of de vuilwatertank (11)
leeg is voor u hem omhoog doet.
Aan het eind van de reinigingscyclus of wan-
neer de vuilwatertank (11) vol is, dient u deze
te legen. Daarvoor gaat u als volgt te werk:
OPMERKING:
Neem voor de verwerking van het vuile wa-
ter de geldende normen van het land van ge-
bruik in acht.
- Plaats de machine dichtbij een afvoer.
- Maak de slang (15) los van de specia-
le haken, breng de slang omlaag tot de
grond op de afvoerbak.
- Draai de dop (56) los en verwijder al het
terugwinwater uit de tank.
OPMERKING:
U kunt de hoeveelheid water die wegloopt
veranderen door op het laatste deel van de
slang (15) te drukken.
- Draai de dop (56) weer vast en plaats de
slang (15) weer op de steun.
13 -
13.1 - ONDERHOUD EN
REINIGING
WAARSCHUWING:
Voor informatie en waarschuwingen
in verband met onderhoud of reini-
ging operaties, volg dan de instruc-
ties in het boekje “VEILIGHEIDS-
WAARSCHUWINGEN VOOR VLOER
WASDROGER” aan deze.
13.2 - DAGELIJKS UIT TE
VOEREN HANDELINGEN
13.2.a - De schoonwatertank legen
en reinigen (Afb. I)
WAARSCHUWING:
Aan het eind van de werkzaamheden
moet de schoonwatertank (13) ge-
leegd en gereinigd worden om aan-
slag of ophopingen te voorkomen.
Nadat u de vuilwatertank heeft geleegd,
leegt u de schoonwatertank (13) als volgt:
- Plaats de machine bij een afvoer.
- Haal de slang (17) uit zijn klemmen,
plaats hem boven de afvoer, haal de dop
eraf (57) en laat al het water weglopen.
- Reinig de binnenkant van de tank door de
afvoerslang open te laten en schoon wa-
ter in de bovenopening te laten lopen.
49029600_Manuale RACER_RANGER_8ed_04-2023.indd 1449029600_Manuale RACER_RANGER_8ed_04-2023.indd 14 06/04/2023 15:25:1206/04/2023 15:25:12

www.ghibliwirbel.com
Professional Cleaning Machines Since 1968
NEDERLANDS - 15
- Doe aan het eind de slang omhoog (17),
sluit de dop (57) en plaats de slang terug
in zijn klemmen.
13.2.b - De vuilwatertank reinigen
(Afb. J)
WAARSCHUWING:
Aan het eind van de reinigingswerk-
zaamheden moet de vuilwatertank
gereinigd worden om aanslag, op-
hopingen, bacteriegroei, onaangena-
me geurtjes en schimmel te voorko-
men.
- Hef het deksel op (12).
- Verwijder het bakje voor de opvang van
afval (58) en open het deksel ervan, reinig
vervolgens met stromend water, verwijder
eventueel stukjes papier, hout etc....die
het verstoppen.
- Verwijder en reinig het afzuiglter (59) met
stromend water.
- Laat de afvoerslang (15 afb. H) omlaag
en de dop verwijderd, voer water in via de
bovenste opening (60), spoel vervolgens
opnieuw de binnenkant van de tank totdat
er uit de afvoerslang schoon water komt.
- Hermonteer het geheel door in omgekeer-
de volgorde te werk te gaan.
13.2.c - Reiniging zuigmond (Afb. K)
Om de zuigmond (20) goed te kunnen reini-
gen, moet deze verwijderd worden. Ga als
volgt te werk:
- Maak de slang (16 Afb. C) los van de zuig-
mond (20).
- Draai de knoppen (36 Afb. C) los en ver-
wijder de zuigmond (20).
- Reinig de zuigmond en in het bijzonder de
rubbers (60) en (61) en de binnenkant van
het verbindingsstuk op de zuigmond (62).
OPMERKING:
Als tijdens de reiniging blijkt dat de rubbers
(60) en (61) beschadigd of versleten zijn,
moeten deze vervangen of omgekeerd wor-
den.
- Plaats in omgekeerde volgorde alle on-
derdelen terug.
13.3 - HANDELINGEN DIE
ELKE DRIE MAANDEN
MOETEN WORDEN
UITGEVOERD
13.3.a - Controle slijtage stuurket-
ting (Afb. L)
- Controleer de ketting (63), die onder de
machine bij het voorwiel zit, op slijtage en
corrosie.
- Indien de ketting corrosie vertoont, moet
hij vervangen worden. Neem hiervoor
contact op met de technische service.
13.4 - HANDELINGEN DIE
UITGEVOERD MOETEN
WORDEN INDIEN HET NODIG
IS
13.4.a - De borstels vervangen (Afb.
M)
De borstels moeten vervangen worden wan-
neer ze zo versleten zijn dat de haren kor-
ter dan 2 cm zijn of wanneer het soort vloer
daarom vraagt. Ga als volgt te werk:
- Steek een hand naar binnen, onder de
borstelhoudergroep (19). Draai de borstel
bruusk tegen de rotatierichting in om hem
los te maken.
- Plaats de nieuwe borstels onder de bor-
stelhoudergroep (19).
- Ga op de bestuurdersstoel zitten en draai
de sleutel (29 Afb. F) naar stand “ON”.
- Plaats de rijrichting op waarde “0”.
49029600_Manuale RACER_RANGER_8ed_04-2023.indd 1549029600_Manuale RACER_RANGER_8ed_04-2023.indd 15 06/04/2023 15:25:1206/04/2023 15:25:12

www.ghibliwirbel.com
Professional Cleaning Machines Since 1968
NEDERLANDS - 16
- Druk op knop (46 afb. F) “ ” voor het
inschakelen van de rotatie van de bor-
stels; de borstelgroep wordt omlaag ge-
bracht.
- Door te drukken op het gaspedaal (7 afb.
A), beginnen de enzen van de borstel-
houder te draaien waarbij de borstels
worden aangehaakt, laat vervolgens het
pedaal los.
- Druk opnieuw op knop (46 afb. F) “ ”
en draai de sleutel (29 afb. F) in de stand
“OFF”.
13.4.b - Afstellen van het spat-
schermrubber (afb. M)
Afhankelijk van het type vloer dat moet wor-
den behandeld of na het vervangen van
de schijfborstels, kan het nodig zijn om de
hoogte van het spatschermrubber (64) aan
te passen.
Ga als volgt te werk om het aan te passen:
- Draai de sleutel (29 Afb. F) naar de “ON”
-stand.
- Druk op de knop (46 Afb. F) “ ” om de
borstelkop (19) te laten zakken en draai
vervolgens de sleutel (29 Afb. F) naar
“OFF”.
- Controleer de juiste hoogte van het spat-
schermrubber zoals weergegeven in af-
beelding M.
- Handel eventueel handmatig op het rub-
ber om de juiste hoogte te herstellen.
OPMERKING:
De juiste hoogte van het spatschermrubber
is wanneer, tijdens het gebruik en de borstel-
kop naar beneden is gebracht, het rubber
zelf gelijk ligt met de vloer.
- Zet de machine aan het einde van de af-
stelling weer aan en druk op de knop (46
Afb. F) “ ”, en draai vervolgens de
sleutel (29 Afb. F) naar “OFF”.
13.4.c - De rubbers van de zuigmond
vervangen (Afb. K)
Als u opmerkt dat het drogen van de vloer
niet langer perfect plaatsvindt of dat op de
vloer water achterblijft is het noodzakelijk
de slijtagestaat van de rubbers van de zuig-
mond (20) te controleren.
- Verwijder de zuigmond (20) zoals in de
paragraaf “Reiniging zuigmond” beschre-
ven staat.
- Op de vergrendeling (65) drukken en de
hendel (66) openen.
- De twee rubber houder (67) en de buiten-
ste rubber (60) verwijderen.
- De twee spanschroeven (68) draaien en
de bout (69) en de binnenste rubber (61)
verwijderen.
OPMERKING:
Als de rubbers (60) of (61) aan een zijde ver-
sleten zijn kunt u ze eenmaal omkeren.
- Vervang of keer de rubbers (60) of (61)
om zonder dat u ze onderling verwisselt.
- Voer voor de montage de procedure in
omgekeerde volgorde uit.
OPMERKING:
Er bestaan twee verschillende soorten rub-
bers: crêperubber voor alle vloersoorten en
polyurethaan rubbers voor mechanische
werkplaatsen met olievlekken.
13.4.d - Afstelling druk zuigmond
(Afb. N)
- Start de machine en druk op knop (44 afb.
F) “ ”.
- Zet de maximum snelheid op het eerste
streepje met de knoppen (30 afb. F), druk
het gaspedaal in (7 afb. A) en verplaats de
machine enkele meters, doe hem vervol-
gens uit en stap uit.
49029600_Manuale RACER_RANGER_8ed_04-2023.indd 1649029600_Manuale RACER_RANGER_8ed_04-2023.indd 16 06/04/2023 15:25:1306/04/2023 15:25:13

www.ghibliwirbel.com
Professional Cleaning Machines Since 1968
NEDERLANDS - 17
- Beweeg de draadstang (70) om de druk in
te stellen die de rakels (60) en (61) op de
vloer uitoefenen. Als u met de klok mee
draait wordt de druk groter, en tegen de
klok in kleiner.
OPMERKING:
De druk is juist wanneer er tijdens het reini-
gen geen waterstrepen op de vloer achter-
blijven en de rakel een constante druk over
de gehele lengte uitoefent.
13.4.e - Afstelling ruitenwisserdruk
(Afb. O)
Afhankelijk van het type vloer dat moet wor-
den behandeld of na het vervangen van de
wisserrubbers, kan het nodig zijn om de
vloerdruk van de wisser aan te passen.
Ga als volgt te werk om het aan te passen:
- Til de vuilwatertank (11) op en zorg ervoor
dat deze leeg is.
- Gebruik de stelschroef (71) en houd er re-
kening mee dat:
• Met de klok mee draaien verlaagt de
druk op de vloer van de wisser.
• Linksom draaien verhoogt de vloerdruk
van de vloerwisser.
- Laat aan het einde van de afstelling de
vuilwatertank (11) voorzichtig zakken.
13.4.f - Reiniging schoonwaterlter
(Afb. P)
- Zorg ervoor dat de tank (13 Afb. A) is leeg.
- Verwijder de dop (22) en haal het lterpa-
troon (72) eruit.
- Reinig het lterpatroon (72) onder stro-
mend water.
- Monteer alles in omgekeerde volgorde er-
voor te zorgen dat de pakking (73) goed is
gepositioneerd.
13.4.g - Leegkraan batterijcomparti-
ment (Afb. A)
- Controleer regelmatig of er geen water-
stagnaties in het batterijcompartiment zijn.
- Plaats de machine indien nodig in de
buurt van een afvoer, maak de buis los en
open de kraan (74) en laat de vloeistoen
vervolgens leeglopen.
WAARSCHUWING:
Wanneer het gebruik van loodzuur-
batterijen is voorzien, let dan goed
op eventuele lekkage van vloeistof
uit de batterijen zelf, de bijbehorende
risico’s en de voorschriften voor de
verwijdering van vloeistoffen gevaar-
lijke stoffen.
13.4.h - De drie wielen op slijtage contro-
leren (Afb. A)
- Controleer regelmatig of de drie wielen (8)
en (23) slijtage vertonen. Indien er sprake
is van slijtage of beschadiging moeten ze
vervangen worden. Neem hiervoor con-
tact op met de technische service.
GEVAAR!
Rijden met versleten of beschadig-
de wielen kan gevaarlijk zijn voor de
operator, aangezien de machine in
bochten mogelijk minder grip heeft.
14 -
49029600_Manuale RACER_RANGER_8ed_04-2023.indd 1749029600_Manuale RACER_RANGER_8ed_04-2023.indd 17 06/04/2023 15:25:1306/04/2023 15:25:13

www.ghibliwirbel.com
Professional Cleaning Machines Since 1968
NEDERLANDS - 18
14.1 - INSTELLING
PARAMETERS (Afb. F)
14.1.a - OPERATOR-parameters
De operator kan het menu openen om de
volgende parameters in te stellen:
• Taal
• Type accu’s
• Display - Contrast
• Display - Helderheid
Ga als volgt te werk om het menu te openen:
- Druk op de knoppen (31a) “ ” en (31b)
“” en houd ze ingedrukt, draai vervol-
gens de startsleutel (29) op “ON” voor het
weergeven van het volgende scherm:
General
General
Sets
Sets
--ID Check--
--ID Check--
insert password:
insert password:
0
0
000
000
General Sets Algemene conguraties
ID Check Controle
Insert password Invoeren wachtwoord
- Laat de ingedrukte knoppen los.
- Voer het wachtwoord van 4 cijfers “0010”
in door te drukken op de knoppen (30a)
“ ” of (30b) “ ” voor het verande-
ren van het nummer van het knipperende
cijfer.
- Druk op knop (43) “ ” voor de beves-
tiging en het doorgaan naar het volgende
cijfer, en tenslotte voor de bevestiging van
het wachtwoord en toegang tot de para-
meterlijst.
- Druk op knop (31a) “ ” of (31b) “
” om naar de volgende schermen te scrol-
len:
General
General
Language
Language
Main
Main
selection:
selection:
ITA
ITA
General Main Hoofdconguratie
Language selection Taalkeuze
General
General
Battery
Battery
Main
Main
Type:
Type:
GEL
GEL
General Main Hoofdconguratie
Battery Type Selectie type accu
General
General
Display
Display
min:0
min:0
max:50
max:50
Main
Main
Tune:
Tune:
15
15
General Main Hoofdconguratie
Display Tune Contrast display
General
General
Display
Display
min:0
min:0
max:10
max:10
Main
Main
Brightness:
Brightness:
0
0
General Main Hoofdconguratie
Display Brightness Helderheid display
49029600_Manuale RACER_RANGER_8ed_04-2023.indd 1849029600_Manuale RACER_RANGER_8ed_04-2023.indd 18 06/04/2023 15:25:2106/04/2023 15:25:21

www.ghibliwirbel.com
Professional Cleaning Machines Since 1968
NEDERLANDS - 19
Taalinstelling:
General
General
Language
Language
Main
Main
selection:
selection:
ITA
ITA
General Main Hoofdconguratie
Language selection Taalkeuze
- Kies de taal door te drukken op de knop-
pen (30a) “ ” of (30b) “ ”, druk
vervolgens op knop (43) “ ” voor het
bevestigen van de keuze;
-ITA = Italiaans
-ENG = Engels
Instelling type accu:
General
General
Battery
Battery
Main
Main
Type:
Type:
GEL
GEL
General Main Hoofdconguratie
Battery Type Selectie type accu
- Kies het type accu door te drukken op
de knoppen (30a) “ ” of (30b) “ ”,
druk vervolgens op knop (43) “ ” voor
het bevestigen van de keuze;
-GEL = Gel-accu
-AGM = AGM-accu
-WET = ZUUR-accu
Instelling display - contrast:
General
General
Display
Display
min:0
min:0
max:50
max:50
Main
Main
Tune:
Tune:
15
15
General Main Hoofdconguratie
Display Tune Contrast display
- Kies het type contrast van het display
door een waarde van “0 t/m 50” in te stel-
len door te drukken op de knoppen (30a) “
” of (30b) “ ”, druk vervolgens op
knop (43) “ ” voor het bevestigen van
de keuze.
Instelling display - helderheid:
General
General
Display
Display
min:0
min:0
max:10
max:10
Main
Main
Brightness:
Brightness:
0
0
General Main Hoofdconguratie
Display Brightness Helderheid display
- Kies het type helderheid van het display
door een waarde van “0 t/m 10” in te stel-
len door te drukken op de knoppen (30a) “
” of (30b) “ ”, druk vervolgens op
knop (43) “ ” voor het bevestigen van
de keuze.
OPMERKING:
Na de bevestiging van de gekozen instelling
maakt de machine een herstart en gaat het
display (41) aan in de operationele werkmo-
dus.
15 -
49029600_Manuale RACER_RANGER_8ed_04-2023.indd 1949029600_Manuale RACER_RANGER_8ed_04-2023.indd 19 06/04/2023 15:25:2106/04/2023 15:25:21

www.ghibliwirbel.com
Professional Cleaning Machines Since 1968
NEDERLANDS - 20
15.1 - CONTROLE/VERVANGING VAN DE ZEKERINGEN
OPMERKING:
Alle elektrische circuits van de machine worden beschermd door zelfherstellende elektroni-
sche mechanismen. De veiligheidszekeringen grijpen alleen in bij ernstige problemen.
We raden u aan de zekeringen alleen door gekwalificeerd personeel te laten vervangen.
16 -
16.1 - ALARMEN TIJDENS DE WERKING
Wanneer de machine slecht werkt, verschijnt op het display (41 afb. F) het type alarm dat is
opgenomen in de onderstaande lijst.
Raadpleeg de lijst en voer de aanbevolen oplossing uit voor het herstellen van de correcte
werking van de machine.
Als de aanbevolen oplossingen geen goed resultaat mochten geven, neem dan contact op
met onze klantenservice.
ALARM BETEKENIS OPLOSSING
AL_1: General Fout geheugen Herstart de machine.
AL_2: General Storing sleutel Doe de machine uit gedurende ten minste 10
seconden, start hem vervolgens weer.
AL_3: General Onderspanning
Doe de machine uit, controleer het laadniveau
van de accu, de zekeringen, de contacten, de
bekabeling en de aansluitingen; start de machine
vervolgens weer.
AL_4: General Overspanning
Doe de machine uit, controleer de zekeringen,
de contacten, de bekabeling en de aansluitingen;
start de machine vervolgens weer.
AL_6: General Geen communicatie met
dashboard, bedieningsor-
ganen of display
Doe de machine uit, controleer de contacten, de
bekabeling en de aansluitingen; start de machine
vervolgens weer.
AL_7: General Ffm communicatie
Doe de machine uit, controleer de contacten, de
bekabeling en de aansluitingen met communica-
tiemodule en de werking ervan; start de machine
vervolgens weer.
AL_8: General Communicatie Intern 1
en 2 Herstart de machine.
AL_9: General
AL_10: General Voer tag in Weergave sleutel “Tag” ontbreekt: steek sleutel in.
AL_11: General Ongeldige tag Weergave sleutel foute “Tag”: verander van
sleutel of sleutel beschadigd.
49029600_Manuale RACER_RANGER_8ed_04-2023.indd 2049029600_Manuale RACER_RANGER_8ed_04-2023.indd 20 06/04/2023 15:25:2106/04/2023 15:25:21

www.ghibliwirbel.com
Professional Cleaning Machines Since 1968
NEDERLANDS - 21
ALARM BETEKENIS OPLOSSING
AL_12: General Bijwerking gaande... Weergave bijwerking parameters op afstand
gaande: wacht op einde bijwerking.
AL_13: General Schakel uit Weergave bijwerking parameters voltooid: start
machine opnieuw op.
AL_41: Function Te hoge temperatuur
Doe de machine uit en laat hem afkoelen. Contro-
leer de absorptie van de motoren van de borstels
en zuiginstallatie, de staat van de ventilatie van
de omgeving en start opnieuw op.
AL_42: Function Verminderd vermogen Doe de machine uit gedurende ten minste 10
seconden, start hem vervolgens weer.
AL_44: Function Relais defect
Relais/schakelaar sluit niet. Controleer werking
schakelaar. In geval van relais op machine, bij
aanhoudende storing kaart vervangen.
AL_45: Function Relais defect DC
Gedetecteerd relais/schakelaar gesloten bij in-
schakeling. Controleer de staat van de contacten
schakelaar. In geval van relais op machine, bij
aanhoudende storing kaart vervangen.
AL_46: Function Te hoge stroomsterkte
Borstels
Doe de machine uit, controleer de belasting
(motor), de constructie, de bekabeling en de aan-
sluitingen, en zoek een kortsluiting op de uitgang,
start tenslotte opnieuw op.
AL_47: Function Te hoge stroomsterkte
Zuiginstallatie
Doe de machine uit, controleer de belasting
(motor), de constructie, de bekabeling en de aan-
sluitingen, en zoek een kortsluiting op de uitgang,
start tenslotte opnieuw op.
AL_48: Function Te hoge stroomsterkte
Waterpomp
Doe de machine uit, controleer de belasting
(motor), de constructie, de bekabeling en de aan-
sluitingen, en zoek een kortsluitig op de uitgang,
start tenslotte opnieuw op.
AL_49: Function Amperometrisch Borstel
1 en 2
Controleer verbruik en wijze gebruik van de bor-
stelfunctie en start de machine opnieuw op.
AL_50: Function
AL_52: Function Amperometrisch Zuigin-
stallatie 1
Controleer verbruik van de zuiginstallatie en start
de machine opnieuw op.
AL_54: Function Aansluiting Borstel 1 en 2 Controleer aansluiting motoren borstel.
AL_55: Function
AL_57: Function Aansluiting Zuiginstal-
latie 1 Controleer aansluiting motor zuiginstallatie.
49029600_Manuale RACER_RANGER_8ed_04-2023.indd 2149029600_Manuale RACER_RANGER_8ed_04-2023.indd 21 06/04/2023 15:25:2106/04/2023 15:25:21

www.ghibliwirbel.com
Professional Cleaning Machines Since 1968
NEDERLANDS - 22
ALARM BETEKENIS OPLOSSING
AL_59: Function Onbalans Controleer absorptie motoren borstel
AL_61: Function Amperometrisch Aandrij-
ver borstels
Controleer verbruik motor aandrijver en staat van
de bewegende delen.
AL_62: Function Te hoge stroomsterkte
Aandrijver borstels
Doe de machine uit, controleer de belasting
(motor), de constructie, de bekabeling en de aan-
sluitingen, en zoek een kortsluiting op de uitgang.
AL_63: Function Eindschakelaar Aandrijver
borstels
Controleer aansluitingen / staat eindschakelaar.
Actieve controle alleen voor de BTO-versie.
AL_65: Function Amperometrisch Aandrij-
ver veger
Controleer verbruik motor aandrijver en staat van
de bewegende delen.
AL_66: Function Te hoge stroomsterkte
Aandrijver veger
Doe de machine uit, controleer de belasting
(motor), de constructie, de bekabeling en de aan-
sluitingen, en zoek een kortsluiting op de uitgang.
AL_80: Traction Te hoge temperatuur
Tractiemotor
Doe de machine uit en laat hem afkoelen. Con-
troleer verbruik en wijze gebruik van de tractie, de
staat van de ventilatie van de omgeving en start
opnieuw op.
AL_85: Traction Te hoge stroomsterkte
Tractiemotor
Doe de machine uit, controleer de belasting
(motor), de constructie, de bekabeling en de aan-
sluitingen, en zoek een kortsluiting op de uitgang,
start tenslotte opnieuw op.
AL_86: Traction Amperometrisch Tractie-
motor
Controleer verbruik en wijze gebruik van de trac-
tiefunctie en start de machine opnieuw op.
AL_87: Traction Aezing tractiemotor Herstart de machine.
AL_88: Traction Storing elektrorem Doe de machine, controleer de bekabeling van de
rem, start de machine vervolgens weer.
AL_89: Traction Storing Gaspedaal Doe de machine, controleer aansluitingen en
bekabeling, en start de machine vervolgens weer.
AL_90: Traction Gaspedaal Ingedrukt Laat het pedaal los en start de machine weer.
AL_91: Traction Storing encoder Doe de machine, controleer aansluitingen en
bekabeling, en start de machine vervolgens weer.
17 -
49029600_Manuale RACER_RANGER_8ed_04-2023.indd 2249029600_Manuale RACER_RANGER_8ed_04-2023.indd 22 06/04/2023 15:25:2106/04/2023 15:25:21

www.ghibliwirbel.com
Professional Cleaning Machines Since 1968
NEDERLANDS - 23
17.1 - STORINGEN LOKALISEREN
PROBLEEM OORZAAK OPLOSSING
De machine start niet als de
sleutel omgedraaid wordt.
De batterij is leeg. Controleer de lading van de
batterij.
De algemene zekering is
doorgebrand.
Vervang de zekering op de
batterijkabel. (*)
Sleutel defect. Vervang de sleutel. (*)
De borstel draait niet. Motor is gebroken. Vervang de motor. (*)
Kaart is defect. Vervang de kaart. (*)
De zuiger werkt niet. De vuilwatertank is vol. Leeg de tank.
Defecte motor turbine. Vervang de motor. (*)
Kaart is defect. Vervang de kaart. (*)
De machine droogt niet of
niet goed en laat water op de
vloer achter.
De zuiger is uitgeschakeld. Start de zuiger.
De zuigslang is verstopt. Controleer en reinig eventu-
eel de zuigslang die de zuig-
mond met de vuilwatertank
verbindt.
De vuilwatertank is vol. Leeg de vuilwatertank.
De rubbers van de zuigmond
zijn versleten.
Keer de rubbers van de zuig-
mond om of vervang ze.
Er komt geen water uit de
machine.
De schoonwatertank is leeg. Vul de tank.
Het filter is verstopt. Reinig het filter.
De magneetventiel van de
pomp werkt niet.
Leeg het magneetventiel. (*)
Defecte waterpomp. Vervang de waterpomp. (*)
Kaart is defect. Vervang de kaart. (*)
De machine beweegt niet. Operator zit niet correct op de
bestuurdersstoel.
Ga correct op de stoel zitten.
Defecte motor draait. Vervangende aandrijfwiel. (*)
Kaart is defect. Vervang de kaart. (*)
De sensor voor de detectie
operator is defect.
Vervang de sensor. (*)
49029600_Manuale RACER_RANGER_8ed_04-2023.indd 2349029600_Manuale RACER_RANGER_8ed_04-2023.indd 23 06/04/2023 15:25:2106/04/2023 15:25:21

www.ghibliwirbel.com
Professional Cleaning Machines Since 1968
NEDERLANDS - 24
PROBLEEM OORZAAK OPLOSSING
De vloer wordt niet goed ge-
reinigd.
Ongeschikte borstels of reini-
gingsmiddel.
Gebruik borstels of reini-
gingsmiddelen die geschikt
zijn voor het soort vloer of
vuil.
De borstel is versleten. Vervang de borstel.
De indicator “ ” oplossing
tank leeg, blijft knipperen.
Tank leeg. Vul de tank.
Tap is gesloten. Zet de kraan.
Storingen in de stroommete. Vervang de stroommeter. (*)
Er is stagnatie van water in
het batterijcompartiment.
Defecte niveausensor van de
vuilwatertank.
Tap het water in het batte-
rijcompartiment af met de
daarvoor bestemde leiding
en kraan.
Controleer of vervang de ni-
veausensor. (*)
(*) Bel de klantenservice om vervanging aan te vragen.
18 -
18.1 - ONTMANTELING VAN DE MACHINE
GEVAAR!
Batterijen en elektrische onderdelen moeten worden beschouwd als bijzonder
afval en moeten daarom worden afgevoerd naar geschikte inzamelingscentra,
zoals voorgeschreven door de huidige regelgeving in het land van gebruik.
19 -
49029600_Manuale RACER_RANGER_8ed_04-2023.indd 2449029600_Manuale RACER_RANGER_8ed_04-2023.indd 24 06/04/2023 15:25:2106/04/2023 15:25:21

www.ghibliwirbel.com
Professional Cleaning Machines Since 1968
NEDERLANDS - 25
19.1 - ELEKTRISCH SCHEMA
Legenda:
AC Gaspedaal
BAT Accu’s
BC Acculader
BE Knipperend lampje
BRK Elektromagnetische rem
C1 Accu-connector
EB1 Functiekaart
EB2 Display
EB3 Bedieningspaneel
EV Elektromagnetische klep
F1 Zekering acculader (1A)
F2 Zekering lampen (indien aanwezig) (3A)
F3 Zekering claxon (1A)
F4 Zekering knipperend lampje (1A)
F5 Zekering elektromagnetische klep (5A)
F6 Zekering aandrijver kop borstels (10A)
F7 Zekering aandrijver veger (10A)
F8 Zekering elektrorem (7.5A)
F9 Zekering waterpomp (5A)
F10 Zekering chemopomp (indien aanwezig)
(5A)
F11 Zekering motor zuiginstallatie (40A)
F12 Zekering motor rechter borstel (40A)
F13 Zekering motor linker borstel (40A)
F14 Zekering tractiemotor (100A)
HN Claxon
KEY Startsleutel
L1 Werklampen (indien aanwezig)
MA Motor zuiginstallatie
MAS Motor aandrijver kop borstels
MAT Motor aandrijver veger
MS-DX Motor rechter borstel
MS-SX Motor linker borstel
MT Tractiemotor
PA Waterpomp
PC Chemicaliënpomp
PE Noodstopknop
S1 Niveausensor terugwinwater
SW1 Microschakelaar stoel
TE Externe schakelaar
Kleurcodes:
BK Zwart
BU Blauw
BN Bruin
GN Groen
GY Grijs
OG Oranje
PK Roze
RD Rood
VT Paars
WT Wit
YE Geel
49029600_Manuale RACER_RANGER_8ed_04-2023.indd 2549029600_Manuale RACER_RANGER_8ed_04-2023.indd 25 06/04/2023 15:25:2106/04/2023 15:25:21

www.ghibliwirbel.com
Professional Cleaning Machines Since 1968
NEDERLANDS - 26
PA MT PC EV
- +
-
-
-
-
+ -+ -+
+
+
+
MA MS MS
DX SX
C1
BC
TE
EB2
EB3
KEY
L1
BE
F4
F1
F2
F8
F9 F14 F10 F5 F11 F12 F13
F7
F6
F3
BRK
AC
M
SW1
M5
J8
4 3
2 1
4 3
2 1
1
4
2
5
3
6
9
1
10
2
11
3
4
1
5
2
6
3
4
1
5
2
6
3
4
1
5
2
6
3
12
4
4
8
1
2
3
7
2
6
1
5
3
6
2
5
1
1
12
3s
+
-
2
1
1
2
3
4
2 3
123
456 4
1
11
2
12
3
13
4
14
5
15
6
16
7
17
8
18
9
19
10
20
4
9
3
8
5
10
2
7
1
6
13
5
16
8
15
7
14
6
2
1
J9 J10 J11
J1
J8 J7
J2
S1
J3 J4 J5 J7J6
J12 J13 J14
M6
USB
HN
BATBAT MATMAT
PEPE
MASMAS
EB1
49029600_Manuale RACER_RANGER_8ed_04-2023.indd 2649029600_Manuale RACER_RANGER_8ed_04-2023.indd 26 06/04/2023 15:25:2306/04/2023 15:25:23

www.ghibliwirbel.com
Professional Cleaning Machines Since 1968
ČESKY - 1
Vážený zákazníku,
Děkujeme, že jste si vybrali náš výrobek pro čištění prostředí, ve kterém žijete.
Stroj na mytí podlah, který jste si zakoupil, byl navržen tak, aby naplnil představy uži-
vatele, pokud jde o snadnost použití a spolehlivost.
Jsme si vědomi toho, že dobrý výrobek potřebuje neustále specifické aktualizace, aby
si zachoval úroveň kvality a aby odpovídal očekávání každodenních uživatelů. V této
souvislosti doufáme, že najdeme ve Vás nejen spokojeného zákazníka, ale i partnera,
který nám bude posílat své myšlenky a názory plynoucí z každodenní osobní zkušenosti.
49029600_Manuale RACER_RANGER_8ed_04-2023.indd 149029600_Manuale RACER_RANGER_8ed_04-2023.indd 1 06/04/2023 15:25:2406/04/2023 15:25:24

www.ghibliwirbel.com
Professional Cleaning Machines Since 1968
ČESKY - 2
INDEX
INDEX ............................................................................................................................................. 2
TECHNICKÉ ÚDAJE ...................................................................................................................... 3
1.1 - ÚVOD ................................................................................................................................... 5
1.1.a - Pozice operátor ............................................................................................................ 5
1.1.b - Všeobecná bezpečnostní opatření při používání stroje ................................................ 5
1.2 - POUŽÍVAJÍ SE NEVZTAHUJE NA STROJI ........................................................................ 5
2.1 - PŘEHLED ZAŘÍZENÍ (Obr. A) ........................................................................................... 5
3.1 - VYBALENÍ (Obr. B) ............................................................................................................. 5
3.1.a - Instalace baterií (Obr. A) ...............................................................................................6
3.1.b - Vypouštění zařízení z dřevěné paletě (Obr. B) ............................................................. 6
4.1 - MONTÁŽ SOUČÁSTÍ .......................................................................................................... 6
4.1.a - Montáž stírací lišty (Obr. C) .......................................................................................... 6
4.1.b - Instalace štětcem .......................................................................................................... 6
5.1 - NABÍJENÍ BATERIE ............................................................................................................ 6
5.1.a - Nabíjení baterie pomocí externí nabíječku (Obr. G) ..................................................... 7
5.1.b - Nabíjení baterie pomocí palubní nabíječky (je-li k dispozici) (Obr. G) .......................... 7
6.1 - POPIS ŘÍZENÍ STROJE ...................................................................................................... 7
6.1.a - Ovládací panel (Obr. F) ................................................................................................ 7
6.1.b - Plynový pedál (Obr. A) ................................................................................................10
7.1 - DISPLEJ (OBR. F) ............................................................................................................. 10
8.1 - NOUZOVÝ ......................................................................................................................... 11
9.1 - BEZPEČNOST (Obr. A) ..................................................................................................... 11
10.1 - NAPLNĚNÍ NÁDRŽE (Obr. D) ...........................................................................................12
10.2 - NADRZ DETERGENTU / CHEMICKÁ (je-li k dispozici) (Obr. E).................................... 12
11.1 - PROVOZ (Obr. A-F) ........................................................................................................... 12
11.1.a - Kontroly před použitím ................................................................................................ 12
11.1.b - Příprava stroje a výběr cyklu ...................................................................................... 12
11.1.c - Použití přístroje ........................................................................................................... 13
11.1.d - Použití objednávka a vypnutí ...................................................................................... 14
12.1 - ODVÁDĚNA VODA OBNOVA (Obr. H) ............................................................................. 14
13.1 - ÚDRŽBA A ČIŠTĚNÍ ..........................................................................................................14
13.2 - OPERACE DO NASTAVTE SI KAŽDÝ DEN ..................................................................... 14
13.2.a - Vyprazdňování a čištění nádrže čistou vodu (Obr. I) .................................................. 14
13.2.b - Čištění sběrné nádrže na vodu (Obr. J) ...................................................................... 15
13.2.c - Čisticí stírač (Obr. K) .................................................................................................. 15
13.3 - OPERACE DO NASTAVTE SI KAŽDÉ 3 MĚSÍCE ............................................................ 15
13.3.a - Kontrola opotřebení ozubeného řetězu (Obr. L) ......................................................... 15
13.4 - OPERACÍ, KTERÉ SE PODLE POTŘEBY USKUTEČNIT ............................................... 15
13.4.a - Výměna kartáče (Obr. M) ........................................................................................... 15
13.4.b - Seřízení gumy krytu proti stříkající vodě (obr. M) ....................................................... 16
13.4.c - Výměna gumových stěračů (Obr. K) ........................................................................... 16
13.4.d - Úprava incidence stěrače (Obr. N) ............................................................................ 16
13.4.e - Nastavení tlaku stěrače (obr. O) ................................................................................. 17
13.4.f - Čistící ltr na čištění vody (Obr. P) .............................................................................17
13.4.g - Vypouštěcí kohout prostoru pro baterie (Obr. A) ........................................................ 17
13.4.h - Kontrola stavu opotřebení koleček (Obr. A) ................................................................17
14.1 - NASTAVENÍ PARAMETRŮ (Obr. F).................................................................................. 18
14.1.a - PROVOZNÍ parametrů ............................................................................................... 18
15.1 - KONTROLA/VÝMĚNA POJISTEK .................................................................................... 20
16.1 - ALARMY BĚHEM PROVOZU ...........................................................................................20
17.1 - ŘEŠENÍ PROBLÉMŮ ........................................................................................................ 23
18.1 - STROJ DEMOLICE ........................................................................................................... 24
19.1 - ELEKTRICKÁ SCHÉMA ....................................................................................................25
49029600_Manuale RACER_RANGER_8ed_04-2023.indd 249029600_Manuale RACER_RANGER_8ed_04-2023.indd 2 06/04/2023 15:25:2406/04/2023 15:25:24

www.ghibliwirbel.com
Professional Cleaning Machines Since 1968
ČESKY - 3
TECHNICKÉ ÚDAJE
RACER R 85 RANGER R 115
FD 65 FD 75 FD 75 FD 85
Typ ovládání Operátor
Charakteristiky
Provoz a napájení Baterie 24 V
Působení
N° 2 - 12V 105Ah (C5) N° 4 - 6V 240Ah (C5)
N° 4 - 6V 180Ah (C5) N° 1 - 24V 320Ah (C5)
N° 1 - 24V 100Ah (Li) N° 1 - 24V 150Ah (Li)
Šířka vysávání 2160 W 2210 W
Provozní doba
2 h (105Ah C5) 5 h (240Ah C5)
4 h (180Ah C5) 7 h (320Ah C5)
2 h (100Ah Li) 3 h (150Ah Li)
Pokrok Trakční vpřed / vzad
Šířky , kartáč 650 mm 750 mm 750 mm 850 mm
Šířka sání 850 mm 950 mm 950 mm 1050 mm
Teoretická kapacita čištění 4000 m2/h 4500 m2/h 4500 m2/h 5000 m2/h
Skutečná kapacita čištění 2400 m2/h 2700 m2/h 2700 m2/h 3000 m2/h
Vibrace ruky a paže (ISO 5349-1) < 2,5 m/s2
Celotělové vibrace (ISO 2631-1) < 0,5 m/s2
Akustický tlak (ISO 11203) (LpA) 63 dB(A)
Akustický tlak v tichém režimu (LpA) 57 dB(A)
Třída ochrany IP IPX3
Kartáče / pad
Průměr / číslo 330 mm /
13” / 2
380 mm /
15” / 2
380 mm /
15” / 2
430 mm /
17” / 2
Výkon motoru / číslo 500 W / 2
Rychlost otáčení kartáče 165 ot/min.
Specifický tlak 30 gr/cm221 gr/cm221 gr/cm217 gr/cm2
Specifický tlak (extra tlak) 46 gr/cm232 gr/cm243 gr/cm234 gr/cm2
49029600_Manuale RACER_RANGER_8ed_04-2023.indd 349029600_Manuale RACER_RANGER_8ed_04-2023.indd 3 06/04/2023 15:25:2406/04/2023 15:25:24

www.ghibliwirbel.com
Professional Cleaning Machines Since 1968
ČESKY - 4
RACER R 85 RANGER R 115
FD 65 FD 75 FD 75 FD 85
Trakce
Maximální stoupavost při čištění 2 %
Stoupavost bez nákladu (*) 12 %
Výkon motoru 600 W
Maximální provozní rychlost 6 km/h
Vysávání
Výkon motoru 550 W
Deprese (vodní sloupec) 125 mbar / 1250 mmH2O
Průtok vzduchu 30 l/sec
Nádrž
Typologie Dvojče nádrž
Kapacita roztoku 80 l 110 l
Kapacita nádrže na odpadní vodu 85 l 115 l
Rozměry
Rozměry stroje
(Délka x Šířka x Výška) 1375 x 705 x 1230 mm 1470 x 770 x 1365 mm
Šířka stroje - Kartáčová paluba 715 mm 785 mm 785 mm 890 mm
Šířka stroje - stírací lišta 885 mm 950 mm 950 mm 1055 mm
Rozměry prostoru pro baterie
(Délka x Šířka x Výška) 380 x 540 x 310 mm 380 x 625 x 440 mm
Hmotnost
Vlastní hmotnost 213 kg 246 kg
Hmotnost s bateriemi Gel 12V 105Ah 285 kg -
Hmotnost s bateriemi Gel 6V 180Ah 333 kg -
Hmotnost s lithiová baterie 24V 100Ah 249 kg -
Hmotnost s bateriemi Gel 6V 240Ah - 432 kg
Hmotnost s bateriemi Pb Wet 24V 320Ah - 506 kg
Hmotnost s lithiová baterie 24V 150Ah - 288 kg
Hmotnost v provozním stavu (GVW) 490 kg 691 kg
(*) Stroj byl testován za následujících podmínek:
• Standardní baterie
• Prázdné nádrže
• Rampa ze surového betonu
• Délka rampy 15 m
• 75 kg obsluhy
1 -
49029600_Manuale RACER_RANGER_9ed_09-2023.indd 449029600_Manuale RACER_RANGER_9ed_09-2023.indd 4 04/09/2023 14:54:5104/09/2023 14:54:51

www.ghibliwirbel.com
Professional Cleaning Machines Since 1968
ČESKY - 5
1.1 - ÚVOD
POZNÁMKA:
Čísla a odkazy na obrázky uvedené v závor-
kách odkazují na komponenty uvedené v při-
loženém ilustrativním listu.
NEBEZPEČÍ:
Před použitím stroje si přečtěte Bro-
žura “BEZPEČNOSTNÍ UPOZORNĚNÍ
PRO ČIŠTĚNÍ” přiložený k této a ná-
sledující dodatky.
1.1.a - Pozice operátor
Provozovatel při používání stroje, sedí na se-
dadle s rukama na volantu.
1.1.b - Všeobecná bezpečnostní
opatření při používání stroje
- NENECHÁVEJTE stroj na svazích se
sklonem.
- Je zakázáno ohýbat v rampě; riziko pře-
vrácení.
- Vyhněte se používání terminálu v prostře-
dí s nebezpečím padajícími předměty.
1.2 - POUŽÍVAJÍ SE
NEVZTAHUJE NA STROJI
- Nepoužívejte přístroj s otevřeným sběrné
nádrže.
- Nejezděte s feet / nohy visící.
- Nedělají náhlé řízení zejména na sjezd.
UPOZORNĚNÍ:
Stroj je povoleno pro přepravu JED-
NÉ osobě.
2 -
2.1 - PŘEHLED ZAŘÍZENÍ
(Obr. A)
(1) Řízení
(2) Kontrolní Panel
(3) Sedadla
(4) Senzor přítomnosti obsluhy
(5) NOUZOVÉ tlačítko, k okamžitému
zastavení všech funkcí
(6) Plošina podnožky
(7) Plynový pedál
(8) Zadních kol
(9) Pracovní světlo (volitelně)
(10) Maják (volitelně)
(11) Vyprošťovací tank vodu
(12) Kryt nádrže na obnovení vody
(13) Nádrže čistou vodou
(14) Zástrčka
(15) Výfukové potrubí recyklované vody
(16) Stěrky sací hadice vody
(17) Vyčistěte odtokové potrubí vody
(18) Vyčistěte trubku hladiny vody
(19) Kartáčování jednotku
(20) Stěrka
(21) Přihrádka na dokumenty
(22) Vodní ltr
(23) Směrová kola a trakce
(24) Hák stěrky
(25) Opěrná patka sběrné nádrže
3 -
3.1 - VYBALENÍ (Obr. B)
Po odstranění obalu, jak je uvedeno v poky-
nech na samotném obalu, zkontrolujte nepo-
rušenost stroje a všech dodaných součástí.
Pokud zjistíte zjevné poškození, kontaktujte
svého místního prodejce a přepravce do 3
dnů od přijetí.
- Odstraňte obálku a krabice (26) obsahují-
cí dodávané příslušenství:
• (20) Stěrka.
• (32) Č. 2 kartáče.
- Zvedněte jednotku nádrže a vezměte do-
kumentaci z příslušné obálky:
• (33) Návod k použití a údržbě stroje.
• (34) Návod k obsluze nabíječky baterií
(je-li k dispozici).
49029600_Manuale RACER_RANGER_8ed_04-2023.indd 549029600_Manuale RACER_RANGER_8ed_04-2023.indd 5 06/04/2023 15:25:2906/04/2023 15:25:29

www.ghibliwirbel.com
Professional Cleaning Machines Since 1968
ČESKY - 6
3.1.a - Instalace baterií (Obr. A)
- Opatrně zvedněte sběrnou nádrž (11).
- V závislosti na konguraci (4 baterie po 6
V, 2 baterie po 12 V, 1 balení baterií po 24)
umístěte a připojte baterie podle obrázků
pomocí dodaných kabelů a zástrček.
- Opatrně spusťte dolů sběrnou nádrž na
vodu (11).
POZNÁMKA:
Připojení baterie musí být provedeno kvalifi-
kovanými pracovníky.
3.1.b - Vypouštění zařízení z dřevě-
né paletě (Obr. B)
- Demontujte dřevěný blok (27) umístěný
před předním kolem.
- Umístěte rampu (28) před dřevěnou pa-
letu, jak je uvedeno v pokynech na obalu.
- Posaďte se na sedadlo (3) do jízdní po-
lohy.
- Otočte klíčkem (29) na “ON”.
- Stiskněte tlačítko směru jízdy (31a) “
” (jízda vpřed), poté opatrně sešlápněte
pedál pojezdu (7) a vystupte z palety.
4 -
4.1 - MONTÁŽ SOUČÁSTÍ
4.1.a - Montáž stírací lišty (Obr. C)
- Vložte stěrku (20) opěrné desky (35) a
zajistěte ji zašroubováním dvou knoíků
(36).
- Připojte podtlakovou hadici (16) na stírací
(37) trysky.
4.1.b - Instalace štětcem
- Viz postup v odstavci „13.4.a - Výměna
kartáče (Obr. M)“.
5 -
5.1 - NABÍJENÍ BATERIE
NEBEZPEČÍ:
Nabíjejte baterii v dostatečně vět-
raných prostorách s dodržováním
norem platných v zemi, kde se stroj
používá.
Dodržujte bezpečnostní informace
uvedené v 1. kapitole tohoto návodu.
UPOZORNĚNÍ:
Informace a rady týkající se baterie a
nabíječky (je-li k dispozici) najdete v
návodu k použití baterie a nabíječky
připojené k tomuto návodu.
Stroj je od výrobce nastaven pro pou-
žití s gelovými bateriemi.
Pokud je potřeba namontovat baterie
jiného druhu, vizte část „Nastavení“.
Je zakázáno používat stroj s gelový-
mi bateriemi, s kalibrací pro kyselino-
vé baterie či jiné.
(Pouze pro verze bez palubní nabíječ-
ky baterií) Spotřebič smí být napájen
pouze externími nabíječkami baterií
SELV (safety extra-low voltage).
POZNÁMKA:
(Pouze pro baterie GEL) Úplné nabití baterie
si vyžaduje 10 hodin. Vyhněte se částečné-
mu nabíjení.
(Pouze pro lithiové baterie) Je možné čás-
tečné nabíjení.
Akumulátory nabíjejte na konci každé práce
nebo alespoň tehdy, když začne blikat sym-
bol baterie “ ” na displeji (41 obr. F).
- Jeďte se strojem k nabíjecí stanici baterie.
- Zvedněte sběrnou nádrž na vodu (11) a
ujistěte se, že je prázdná.
49029600_Manuale RACER_RANGER_8ed_04-2023.indd 649029600_Manuale RACER_RANGER_8ed_04-2023.indd 6 06/04/2023 15:25:3206/04/2023 15:25:32

www.ghibliwirbel.com
Professional Cleaning Machines Since 1968
ČESKY - 7
5.1.a - Nabíjení baterie pomocí ex-
terní nabíječku (Obr. G)
- Zkontrolujte vhodnost externí nabíječky
baterií podle příslušného návodu. Jmeno-
vité napětí nabíječky musí odpovídat 24 V.
- V příslušném krytu (38) uchopte konektor
(39) a připojte jej k externí nabíječce.
- Připojte nabíječku k elektrické síti.
- Na konci nabíjení odpojte nabíječku od
sítě a od konektoru (39).
- Opatrně spusťte dolů sběrnou nádrž na
vodu (11).
5.1.b - Nabíjení baterie pomocí
palubní nabíječky (je-li k
dispozici) (Obr. G)
- V příslušném krytu (38) uchopte a připoj-
te zástrčku kabelu nabíječky (40) k síti
(napětí a frekvence sítě musí odpovídat
odpovídajícím hodnotám nabíječky, které
jsou uvedeny na výrobním štítku stroje).
POZNÁMKA:
Pokud je nabíječka připojena k síti, jsou au-
tomaticky vyloučeny všechny funkce stroje.
- Když se na displeji (41 obr. F) postupně
rozsvěcují jednotlivé segmenty symbolu
baterie, znamená to, že nabíječka baterií
provádí nabíjení baterií.
- Pokud jsou všechny segmenty symbolu
baterie trvale rozsvícené, je cyklus nabí-
jení baterie dokončen.
- Odpojte zástrčku nabíjecího kabelu (40)
od elektrické sítě a zasuňte ji do přísluš-
ného uložení (38).
- Opatrně spusťte dolů sběrnou nádrž na
vodu (11).
6 -
6.1 - POPIS ŘÍZENÍ STROJE
6.1.a - Ovládací panel (Obr. F)
(29) Klíčem ke spuštění
- Otočený do polohy “ON”, ve směru hodi-
nových ručiček, dát napětí na obvody, což
umožňuje provoz stroje.
- Soustružené proti směru hodinových ru-
čiček do polohy “OFF”, odpojí napájení
obvodů a je v extrakční polohy.
(30) Tlačítka pro nastavení maximální
rychlosti
Maximální rychlost jízdy můžete upravit po-
mocí tlačítek (30a) “ ” a (30b) “ ”.
- Plným sešlápnutím pedálu akcelerátoru
(7) bude rychlost úměrná nastavené ma-
ximální hodnotě.
- Pokud jsou na displeji (41) všechny sym-
boly rychlosti “ ” světlé, je pedál akce-
lerátoru (7) deaktivován a stroj zůstane
zastavený.
(31) Tlačítka směru jízdy
- Stisknutím tlačítka dopředu (31a) “
” se stroj posune dopředu; na displeji se
zobrazí ikona “ ”.
- Stisknutím tlačítka dozadu (31b) “ ”
stroj couvá a aktivuje se bzučák zpátečky;
na displeji se zobrazí ikona “ ”.
POZNÁMKA:
Maximální rychlost při couvání lze nastavit
stejným způsobem jako jízdu vpřed pomocí
tlačítek (30).
49029600_Manuale RACER_RANGER_8ed_04-2023.indd 749029600_Manuale RACER_RANGER_8ed_04-2023.indd 7 06/04/2023 15:25:4106/04/2023 15:25:41

www.ghibliwirbel.com
Professional Cleaning Machines Since 1968
ČESKY - 8
(41) Displej
- Viz konkrétní kapitola.
(42) Tlačítko „Ready to go”
- Stisknutím tlačítka (42) se na displeji zob-
razí ikona “ ” a při standardním nasta-
vení se spustí následující funkce:
• Spuštění vrchní části dolů a otáčení
kartáčů.
• Snížení stírače a spuštění sacího sys-
tému.
• Pracovní rychlost = 3. značka (3,6
km/h).
• Průtok vody = 3. značka.
• Chemický prostředek = 3. značka (1%).
• Sání = normální (100%).
• Tlak kartáčů = normální.
- Když je tato standardní funkce aktivní,
lze stisknout jakékoli pracovní tlačítko pro
všechny změny nebo úpravy.
Je-li to nutné, po nastavení změny pracov-
ních funkcí lze změnu uložit následujícím
způsobem:
- Stiskněte a podržte tlačítko (42) po dobu 3
sekund; potvrzení uložení do paměti je na
displeji (41) indikováno blikáním “UPLO-
ADED”.
- Chcete-li nové nastavení deaktivovat a
vrátit se k hodnotám standardního na-
stavení, stiskněte znovu tlačítko (42) a
podržte ho po dobu 3 sekund; potvrzení
je indikováno na displeji (41) blikajícím
„RESET”.
(43) Tlačítko ECO
- Během práce se stisknutím tlačítka (43)
na displeji zobrazí ikona “ ”, parametry
vody, chemického prostředku, sání a tlak
vrchní části nabudou následující hodnoty:
• Průtok vody = 3. značka.
• Chemický prostředek = 3. značka (1%).
• Sání = tiché (50%).
• Tlak kartáče na zem = normální.
(44) Tlačítko vysavače
- Stisknutím tlačítka (44) spustíte vysavač
a na displeji se zobrazí ikona “ ” a, je-li
zařazen rychlostní stupeň vpřed nebo je-li
stroj v neutrálu, stírač se spustí dolů.
- Po stisknutí tlačítka (44), ventilátor se za-
staví a stírací odstoupí.
- S stroj zastavil, sklonil a klíč stěrka (29)
do polohy “ON” po určité době nečinnosti,
stírací lišta se automaticky stáhne.
(45) Tlačítko pro tichý provoz
- Stisknutím tlačítka (45) snížíte rychlost
sací turbíny, což výrazně sníží hluk vydá-
vaný strojem; pokud je tato funkce zapnu-
tá, na displeji se zobrazí znak “ ”.
- Opětovným stisknutím tlačítka (45) funkci
deaktivujete a stroj obnoví provoz ve stan-
dardním režimu, ikona “ ” zhasne a na
displeji se zobrazí ikona “ ”.
POZNÁMKA:
Pokud sací turbína bude vypnuta v aktivova-
ném režimu „tichý provoz“, turbína se auto-
maticky přepne do standardního provozního
režimu během zpožděného vypnutí.
(46) Tlačítko kartáčů
- Stisknutím tlačítka (46) se sníží vrchní
část s kartáči a na displeji se zobrazí iko-
na “ ”.
- Kartáče začnou otáčet, po stisknutí plyno-
vého pedálu, zastaví, když je pedál plynu
zvedla.
POZNÁMKA:
Kartáče se otáčejí jak vpřed, tak i vzad as
nastavením rychlosti (30) na „0“.
49029600_Manuale RACER_RANGER_8ed_04-2023.indd 849029600_Manuale RACER_RANGER_8ed_04-2023.indd 8 06/04/2023 15:25:5706/04/2023 15:25:57

www.ghibliwirbel.com
Professional Cleaning Machines Since 1968
ČESKY - 9
- S stroj zastavil, sklonil hlavu a kartáče r-
ma s klíčem (29) na “ON” po určité době
nečinnosti, hlava se automaticky vzros-
tou.
- Pokud stisknete tlačítko (46) s rotující kar-
táče, kartáče se zastaví, hlava kartáče se
zvedne a ikona “ ” na displeji zhasne.
(47) Tlačítko extra tlaku kartáčů
Con testata spazzole abbassata è possibile
regolare la pressione delle spazzole a terra.
- Stisknutím tlačítka (47) se aktivuje extra
tlak; se zapnutou funkcí se na displeji zob-
razí ikona “ ”.
- Opětovným stisknutím tlačítka (47) se tlak
na zem vrátí k normálu a na displeji se
zobrazí ikona “ ”.
POZNÁMKA:
Pokaždé, když se hlavová jednotka je sníže-
na (klidové poloze), je tlak kartáč je minimál-
ně.
POZNÁMKA:
Tato funkce je vybaven bezpečnostním sys-
témem, který automaticky detekuje nadměr-
né konzumaci kartáč motory na stejnosměr-
ný proud a je schopen automaticky měnit
tlak kartáčů na podlaze, čímž kartáče do
nejvhodnější poloh.
(48) Tlačítko dávkovače chemic-
kého prostředku (je-li k dispozici)
- Stiskněte tlačítko (48), na displeji se zob-
razí ikona “ ”, a nastaví se dávkování
chemického prostředku. Provoz dávkova-
cího čerpadla se ovládá sešlápnutím pe-
dálu akcelerátoru.
- Opakovaným stisknutím tlačítka (48) se
zvyšuje množství chemického prostřed-
ku; až k dosažení maximálního množství
zobrazeného na displeji ikonou “ ”. Opě-
tovným stisknutím tlačítka (48) se funkce
deaktivuje a ikona na displeji zhasne.
POZNÁMKA:
In het geval van het legen van het doseer-
systeem voor chemicaliën, na het vervangen
van de tank, houdt u de knop (48) geduren-
de minstens 5 seconden ingedrukt om de
ontluchtingsprocedure te activeren die onge-
veer 40 seconden duurt; deze functie wordt
alleen geactiveerd als de machine stilstaat,
de sleutel (29) in de “ON” -positie en met de
snelheidsregeling (30) op “0”.
(49) Tlačítko výdeje vody
- Stisknutím tlačítka (49) se na displeji zob-
razí ikona “ ” a otevře se elektromagne-
tický ventil vody. Jeho provoz se ovládá
sešlápnutím pedálu akcelerátoru.
- Opakovaným stisknutím tlačítka (49) se
zvýší množství vody; dosažení maximál-
ního množství, zobrazené na displeji iko-
nou “ ”. Opětovným stisknutím tlačítka
(49) se funkce deaktivuje a ikona na dis-
pleji zhasne.
(50) Tlačítko houkačky
(51) Tlačítko majáku
(52) Tlačítko pracovního světla
49029600_Manuale RACER_RANGER_8ed_04-2023.indd 949029600_Manuale RACER_RANGER_8ed_04-2023.indd 9 06/04/2023 15:26:1406/04/2023 15:26:14

www.ghibliwirbel.com
Professional Cleaning Machines Since 1968
ČESKY - 10
6.1.b - Plynový pedál (Obr. A)
- Sešlápnutím pedálu akcelerátoru (7) se
stroj pohybuje vpřed nebo vzad, podle
toho, které tlačítko směru jízdy bylo stisk-
nuto.
- Rychlost lze nastavit větším nebo menším
sešlápnutím pedálu akcelerátoru.
- Zvednout nohu z pedálu (7), stroj zpomalí
až do zastavení. Po několika sekundách
se stroj zastaven, automaticky zaskočí
parkovací brzdu; brzda se uvolní sešláp-
nutím pedálu (7) dopředu nebo dozadu
vložen.
7 -
7.1 - DISPLEJ (OBR. F)
Při zapnutém stroji se na displeji (41) zobra-
zují následující ikony:
Baterie
Udává stav nabití baterií:
Baterie nabité
Baterie vybité
Maximální rychlost jízdy vpřed
Pomocí tlačítek (30a) “ ” a (30b) “
” se nastaví maximální rychlost, které může
stroj dosáhnout při plně sešlápnutém pedálu
akcelerátoru (7):
km/h - 01,2 2,4 3,6 4,8 6,0
Směr jízdy
Šipka směru jízdy označuje funkci pojez-
du zvolenou pomocí tlačítek (31a) “ ” a
(31b) “ ”.
“Ready to go”
Zobrazí se na displeji při stisknutí tlačítka
(42) “ ”.
Režim ECO
Zobrazit, když je aktivní funkce ECO, díky
(43) “ ” tlačítko.
Vysavač v provozu
Zobrazí se na displeji při stisknutí tlačítka
(44) “ ” na znamení, že je vysavač za-
pnutý a stírač spuštěný dolů.
Tichý provoz
Se zapnutým vysavačem.
Zobrazí se na displeji při stisknutí tlačítka
(45) “ ”, na znamení, že vysavač pracuje
se sníženými otáčkami.
Predispozice otáčení kartáče
Zobrazí se na displeji při stisknutí tlačítka
(46) “ ” na znamení, že je aktivováno
otáčení kartáče.
49029600_Manuale RACER_RANGER_8ed_04-2023.indd 1049029600_Manuale RACER_RANGER_8ed_04-2023.indd 10 06/04/2023 15:26:3606/04/2023 15:26:36

www.ghibliwirbel.com
Professional Cleaning Machines Since 1968
ČESKY - 11
Extra tlak
Objeví se na displeji a indikuje pracovní tlak
kartáčů. Stiskněte tlačítko (47) “ ” pro
změnu pracovního tlaku
Dávkovač čistícího prostřed-
ku (je-li přítomen)
Zobrazí se na displeji po stisknutí tlačítka
(48) “ ”.
Stisknutím tlačítka zvýšíte nebo snížíte pro-
cento dávkovaného čistícího prostředku:
0,2% 0,5% 1% 2% 3%
Predispozice výdeje vody
Zobrazí se na displeji po stisknutí tlačít-
ka (49) “ ” na znamení, že je aktivován
elektromagnetický ventil přívodu vody.
Pokud je hladina vody v nádrži minimální,
zobrazí se ikona “ ” na celé obrazovce v
kombinaci s akustickým signálem.
Naplňte nádrž na vodu (13), jak je uvedeno
v konkrétním odstavci, poté stroj vypněte a
restartujte
Nepřítomnost pracovníka ob-
sluhy na sedadle řidiče
Tato ikona se zobrazí, když pracovník obslu-
hy není správně usazen na sedadle řidiče a
blokuje všechny funkce stroje.
Maximální hladina kapaliny v
nádržce
Objeví se na displeji, když hladina roztoku v
nádrži pro odpadní vodu dosáhne maximální
úrovně.
Stisknutí pedálu akcelerátoru
Tento symbol je vložen při spuštění stroje
což naznačuje nesprávnou operaci spouště-
cí sekvence, odstranit vložený alarm, uvolnit
pedál dělat acelerador (7).
8 -
8.1 - NOUZOVÝ
Nouzové tlačítko (5 obr. A) je umístěno na
snadno přístupném místě pro pracovníka
obsluhy. Musí být stisknuto rozhodným způ-
sobem v případě okamžité potřeby zastavit
stroj ve všech jeho funkcích.
Chcete-li znovu aktivovat provoz stroje, za-
táhněte za nouzové tlačítko, dokud necvak-
ne a neobnoví se.
UPOZORNĚNÍ:
Stiskněte nouzové tlačítko (5) se za-
pnutým strojem pouze v případě sku-
tečné potřeby, nepoužívejte tento
postup k vypnutí stroje, to může způ-
sobit jeho vážnému poškození.
9 -
9.1 - BEZPEČNOST (Obr. A)
Stroj je vybaven následujícími bezpečnostní-
mi funkcemi:
Senzor přítomnosti obsluhy (4)
Blokuje všechny funkce stroje, když řidič
není na sedadle řidiče.
Bezpečnostní systém proti prokluzo-
vání
Tento systém snižuje rychlost při zatáčení a
při naklonění stroje do strany, aby nedošlo k
náhlému sklouznutí, čímž se zvyšuje stabilita
stroje v každé situaci.
Elektromagnetická brzda
Je zabudována do zadních hnacích kol (23)
a udržuje stroj zabrzděný, když je stroj vy-
pnutý nebo zastavený.
10 -
49029600_Manuale RACER_RANGER_8ed_04-2023.indd 1149029600_Manuale RACER_RANGER_8ed_04-2023.indd 11 06/04/2023 15:26:5106/04/2023 15:26:51

www.ghibliwirbel.com
Professional Cleaning Machines Since 1968
ČESKY - 12
10.1 - NAPLNĚNÍ NÁDRŽE
(Obr. D)
UPOZORNĚNÍ:
Představení v nádrži čistou vodu s
teplotou sítí nepřesahující 50 ° C.
- Pomocí odnímatelné hadice (52) naplňte
vodu do nádrže (13), dokud není plná.
- Nenaplňujte nádrž úplně, použijte hladi-
novou trubici (18) jako referenční.
- Nebo, pokud je k dispozici, otevřete víč-
ko (14) a použijte zásuvku acquastop (53,
pokud je k dispozici).
UPOZORNĚNÍ:
Vždy vizuálně zkontrolujte hladinu
náplně, abyste zabránili riziku navlh-
nutí podlahy.
- Po naplnění nádrže zavřete víčko (14).
POZNÁMKA:
U strojů bez chemické soupravy naplňte ná-
drž (13) čistou vodou a promíchejte ji s che-
mickým čisticím prostředkem.
Vždy dodržujte pokyny pro ředění uvedené
na štítku balení chemického výrobku použi-
tého k přípravě čistícího roztoku.
10.2 - NADRZ DETERGENTU
/ CHEMICKÁ (je-li k dispozici)
(Obr. E)
POZNÁMKA:
Používejte pouze nepěnivý čisticí prostřed-
ky; pro množství pokynů výrobce a typ nečis-
tot detergentu.
- Zvedněte sběrnou nádrž (11).
- Zkontrolujte, zda je nádrž (54) je nezbytné
produkt pro pracovní den.
Při výměně zásobníku, postupujte následov-
ně:
- Sejměte uzávěr (55), vyjměte nádobku
(54) a vložte novou 5 litrový kanystr, vlož-
te zátku (55) s sací trubice.
NEBEZPEČÍ:
V případě kontaktu čisticího pro-
středku s očima a pokožkou, anebo
v případě požití, se řiďte bezpečnost-
ním listem od výrobce čisticího pro-
středku.
POZNÁMKA:
Nádrže (54), které mají být použity, jsou
standardní typ 5 litru, který je komerčně do-
stupný.
- Opatrně spusťte dolů sběrnou nádrž na
vodu (11).
- Proveďte odvzdušnění (viz postup v čás-
ti „Tlačítko dávkovače chemického pro-
středku“).
11 -
11.1 - PROVOZ (Obr. A-F)
11.1.a - Kontroly před použitím
- Zkontrolujte, zda je trubka (15) odtoku
sběrné nádrže je připojen správně a řád-
ně zapojen.
- Zkontrolujte, zda je sací trubice (16) pro
stírací vodu správně vložena do sběrné
nádrže.
- Zkontrolujte, zda je kování (37) na stírací
lišty (20) není omezována a že je (16) ha-
dice správně připojena.
- Zkontrolujte stav nabití baterií, když je klíč
(29) do polohy “ON” a indikátor nabíjení
na displeji (41).
11.1.b - Příprava stroje a výběr cyklu
- Posaďte se na sedadlo řidiče.
- Stroj má schopnost dělat 4 pracovní cykly:
49029600_Manuale RACER_RANGER_8ed_04-2023.indd 1249029600_Manuale RACER_RANGER_8ed_04-2023.indd 12 06/04/2023 15:26:5306/04/2023 15:26:53

www.ghibliwirbel.com
Professional Cleaning Machines Since 1968
ČESKY - 13
Cyklus mytí, kartáčování a sušení:
- Stiskněte tlačítko “Ready to go” (42) “
” pro přípravu výdeje čistícího prostředku,
otáčení kartáčů a spuštění vysavače.
Pouze sušení cyklus:
- Chcete-li spustit sušicí cyklus, stiskněte
tlačítko (44) “ ”, začnete vysavač.
Jen kartáčování cyklus:
Chcete-li provést pouze kartáčovací cyklus,
stiskněte tlačítko (46) “ ”, kartáče se otá-
čejí. Otáčení kartáčů se spustí, když se stroj
se sešlápnutým akcelerátorem (7) začne
pohybovat vpřed nebo vzad, nebo stlačený
plynový pedál a rychlost pojezdu nastavena
na „0“.
Mytí, čištění cyklus:
- Stiskněte tlačítko (46) “ ” zajistit rotaci
kartáčů a stiskněte tlačítko (49) “ ” při-
pravit přívod vody.
- Otáčení kartáčů a výdej vody se spustí při
sešlápnutí pedálu akcelerátoru pro jízdu
dopředu nebo dozadu, anebo nastavením
rychlosti pojezdu alespoň na 1. značce.
11.1.c - Použití přístroje
NEBEZPEČÍ:
Použijte zvýšené opatrnosti při pou-
žití zařízení na rampy, aby se zabrá-
nilo převrácení nebo situace, které
mohou učinit stabilita stroj nejistá.
NEBEZPEČÍ:
Vyhnout se ostré zatáčky a ostré za-
táčky s volantem otočil úplně sám při
nízkých rychlostech, při současném
zohlednění půdní podmínky.
- Otočte klíčem (29) do polohy “ON”; bě-
hem prvních 2 sekund od zapnutí displej
(41) označuje typ vložených baterií a pra-
covní hodiny stroje.
- Vyberte typ pracovního cyklu, který má
být proveden.
- Pomocí tlačítek (30) zařaďte požadova-
nou pracovní rychlost.
- Aktivujte maják (10, volitelné) a pracovní
světla (9, volitelné).
- Start čisticí operace, působením na urych-
lovači (7).
POZNÁMKA:
Po uvolnění pedálu, rotaci kartáčů a přívodu
vody zarážku.
POZNÁMKA:
Řádné čištění a podlaha Sušení se provádí
provedením stroje vpřed, přistoupí k zpáteč-
ku, stírací lišta je vypnutý a není provedeno
extrakcí vody přítomné v podlaze.
- Pokud je to nutné, upravit výši pracím roz-
toku, pomocí tlačítka (49) “ ”.
- Kontrola stavu nabití baterie, prostřednic-
tvím displeje (41).
49029600_Manuale RACER_RANGER_8ed_04-2023.indd 1349029600_Manuale RACER_RANGER_8ed_04-2023.indd 13 06/04/2023 15:26:5506/04/2023 15:26:55

www.ghibliwirbel.com
Professional Cleaning Machines Since 1968
ČESKY - 14
11.1.d - Použití objednávka a vypnutí
- Na konci čistících operací, zastavit v po-
řadí otáčení kartáčů a extraktoru, pomocí
příbuzných příkazů, v závislosti na typu
použitého cyklu.
- Otočte klíčkem (29 Obr. 9) na “OFF”.
- Parkovací brzda se aktivuje automaticky.
- Vyprázdněte a vypláchněte sběrnou ná-
drž a nádrž pro roztok, jak je uvedeno v
příslušném odstavci.
POZNÁMKA:
Když obsluha opustí stroj.automaticky za-
padne parkovací brzdu.
NEBEZPEČÍ:
Je zakázáno parkovat na rampě.
12 -
12.1 - ODVÁDĚNA VODA
OBNOVA (Obr. H)
NEBEZPEČÍ:
Ujistěte se, že sběrné nádrže (11) je
prázdný, před zvedáním.
Na konci pracího cyklu, nebo je-li nádrž na
vodu (11) je z plného využití musí být vy-
prázdněna tím, že působí následovně:
POZNÁMKA:
Pro likvidaci využití vody, dodržovat předpisy
platné v zemi používání stroje.
- Postavte se s přístrojem v blízkosti podla-
hové výpusti.
- Odpojte hadici (15) od speciálních háků a
spusťte ji na zem na odtok.
- Odšroubujte víčko (56) a zcela vypusťte
odpadní vodu obsaženou v nádrži.
POZNÁMKA:
Lze modulovat množství vody, která přichází
stiskem konec hadice (15).
- Našroubujte zpět víčko (56) a nasaďte ha-
dici (15) zpět na její podpěru.
13 -
13.1 - ÚDRŽBA A ČIŠTĚNÍ
UPOZORNĚNÍ:
Pro informace a varování týkající se
údržby nebo čištění operace, postu-
pujte podle pokynů uvedených v Bro-
žura “BEZPEČNOSTNÍ UPOZORNĚNÍ
PRO ČIŠTĚNÍ” přiložený k tomuto.
13.2 - OPERACE DO
NASTAVTE SI KAŽDÝ DEN
13.2.a - Vyprazdňování a čištění ná-
drže čistou vodu (Obr. I)
UPOZORNĚNÍ:
Na konci mytí operací, je nutné stáh-
nout a vyčistit nádrž čisté vody (13),
aby se zabránilo vkladů nebo zatvrd-
nutí.
Po stažení sběrnou nádrž, vypusťte nádržku
na čistou vodu (13), jednající takto:
- Postavte se s přístrojem na podlahové
vpusti.
- Odpojte hadici (17) speciálními háky, sní-
žit ji na zem na odtoku, odstraňte krytku
(57) a nechte vytéct vodu.
- Mytí vnitřek nádrže, přičemž otevřený vy-
pouštěcí potrubí a zavádění čisté vody
přes horní.
- Na konci čištění, zvedněte trubku (17),
zavřít víčko (57) pro zavěšení hadice ve
zvláštních kloubů.
49029600_Manuale RACER_RANGER_8ed_04-2023.indd 1449029600_Manuale RACER_RANGER_8ed_04-2023.indd 14 06/04/2023 15:26:5506/04/2023 15:26:55

www.ghibliwirbel.com
Professional Cleaning Machines Since 1968
ČESKY - 15
13.2.b - Čištění sběrné nádrže na
vodu (Obr. J)
UPOZORNĚNÍ:
Na konci promývání je povinné vy-
čistit sběrnou nádrž, aby se zabráni-
lo vkladů nebo usazeniny a množení
bakterií, pachy, plísně.
- Zvedněte víko (12).
- Odstraňte nádobu na nečistoty (58) a ote-
vřete její víko, vyčistěte tekoucí vodou a
odstraňte případné kousky papíru, dřeva
atd., které by ho mohly ucpat.
- Vyjměte a vyčistěte sací ltr (59) pod te-
koucí vodou.
- Ponechte vypouštěcí hadici (15 obr. H)
spuštěnou a víčko odstraněné, nalijte
vodu přes horní otvor (60) a poté vyplách-
něte vnitřek nádrže, dokud z odtokové ha-
dice nebude vytékat čistá voda.
- Znovu vše sestavte v opačném pořadí.
13.2.c - Čisticí stírač (Obr. K)
Důkladně vyčistit stírač (20), odstraňte ho,
jednající takto:
- Odpojte hadici (16 Obr. C) z stěračem
(20).
- Uvolněte knoíky (36 Obr. C) a vyjměte
stírač (20).
- Mytí stěrače a zejména pláště (60) a (61)
a vnitřní sací armatury (62).
POZNÁMKA:
Pokud se během mytí, zjistíte, že pneumati-
ky (60) a (61) se zdají poškozené nebo opo-
třebované, vyměňte je nebo proměnit je.
-
- Sestavte vše v obráceném pořadí.
13.3 - OPERACE DO
NASTAVTE SI KAŽDÉ 3
MĚSÍCE
13.3.a - Kontrola opotřebení ozube-
ného řetězu (Obr. L)
- Zkontrolujte opotřebení a korozi řetězu
(63) umístěnou pod auto v blízkosti před-
ního kola.
- Pokud se řetěz vykazuje známky koroze,
je nutné ji vyměnit, můžete kontaktovat
technickou podporu společnosti.
13.4 - OPERACÍ, KTERÉ
SE PODLE POTŘEBY
USKUTEČNIT
13.4.a - Výměna kartáče (Obr. M)
To je nutné nahrazení kartáčů, když stejný se
nosí, se délka štětin menší než 2 cm, nebo
se musí vyměnit v závislosti na typu podla-
hy, aby se promyje; pro výměnu, postupovat
následovně:
- Jednou rukou pod držáku kartáčů (19)
skupiny, aby se uvolnil kartáč, otočit jej s
ostrým úderem v opačném směru na otá-
čení.
- Umístěte nové kartáče pod prodejním kar-
táčové sestavy (19).
- Posaďte se na sedadlo řidiče, otočte klíč-
kem zapalování (29 Obr. F) na “ON”.
- Nastavte rychlost posuvu na hodnotu „0“.
- Stiskněte tlačítko (46 obr. F) “ ” pro
aktivaci otáčení kartáčů; jednotka kartáčů
se spustí dolů.
- Sešlápnutím pedálu akcelerátoru (7 obr.
A) se nosné příruby kartáčů začnou otáčet
uchopením kartáčů, poté pedál uvolněte.
- Znovu stiskněte tlačítko (46 obr. F) “
” a otočte klíčem (29 obr. F) do polohy
„OFF”.
49029600_Manuale RACER_RANGER_8ed_04-2023.indd 1549029600_Manuale RACER_RANGER_8ed_04-2023.indd 15 06/04/2023 15:26:5506/04/2023 15:26:55

www.ghibliwirbel.com
Professional Cleaning Machines Since 1968
ČESKY - 16
13.4.b - Seřízení gumy krytu proti
stříkající vodě (obr. M)
V závislosti na typu ošetřované podlahy
nebo po výměně kotoučových kartáčů může
být nutné upravit výšku gumy ochranného
krytu (64).
Chcete-li jej upravit, postupujte následovně:
- Otočte klíčem (29 obr. F) do polohy „ON“.
- Stisknutím tlačítka (46 obr. F) “ ”
sklopte hlavu kartáče (19), poté otočte klí-
čem (29 obr. F) do polohy „OFF“.
- Zkontrolujte správnou výšku gumy
ochranného krytu, jak je znázorněno na
obrázku M.
- V případě potřeby ručně působte na
gumu, abyste obnovili správnou výšku.
POZNÁMKA:
Správná výška gumy proti stříkající vodě je
taková, když během provozu a při spuštěné
hlavě kartáče je guma v jedné rovině s pod-
lahou.
- Na konci seřizování stroj znovu zapněte a
stiskněte tlačítko (46 obr. F) “ ” , poté
otočte klíčem (29 obr. F) do polohy „OFF“.
13.4.c - Výměna gumových stěračů
(Obr. K)
Když zjistíte, že podlaha se řádně nesuší a
že zůstávají na ní stopy vody, zkontrolujte
opotřebení gumových stěračů (20):
- Odmontujte stěrač (20), jak je uvedeno v
části “Čištění stěrače”.
- Stiskněte blokovací zařízení (65) a ote-
vřete svorku (66).
- Vyberte obě gumové upevňovací lišty (67)
a odmontujte externí gumu (60).
- Uvolněte oba upínače (68), vyberte bloko-
vací zařízení (69) a vnitřní gumu (61).
POZNÁMKA:
Když se gumové lamely (60) a (61) opotře-
bují na jednej straně, mohou být otočené na
druhou stranu, ale jen jednou.
- Vyměňte anebo otočte gumové lamely
(60) nebo (61); dbejte přitom na to, abyste
zachovali jejich správnou pozici.
- Při opětovné montáži postupujte obráce-
ně.
POZNÁMKA:
Existují dva typy gumových lamel:
Lamely pro všechny typy podlah a polyureta-
nové lamely pro podlahy mechanických dílen
s olejovými skvrnami.
13.4.d - Úprava incidence stěrače
(Obr. N)
- Nastartujte stroj a stiskněte tlačítko (44
obr. F) “ ”.
- Zařaďte maximální rychlost na 1. značce
použitím tlačítek (30 obr. F), stlačte pedál
akcelerátoru (7 obr. A) a posuňte se o ně-
kolik metrů, poté stroj vypněte a sestupte
z něj.
- Otočte závitovou tyč (70) pro nastavení
výskyt, že lopatky lékař (60) a (61) mají
na podlahu směru hodinových ručiček
chcete vyšší výskyt, viceversa chcete niž-
ší výskyt.
POZNÁMKA:
Výskyt je správné, pokud během provozu,
nejsou k dispozici žádné únik kapaliny na
podlahu a Žiletka má konstantní výskyt, na
celé své délce.
49029600_Manuale RACER_RANGER_8ed_04-2023.indd 1649029600_Manuale RACER_RANGER_8ed_04-2023.indd 16 06/04/2023 15:26:5506/04/2023 15:26:55

www.ghibliwirbel.com
Professional Cleaning Machines Since 1968
ČESKY - 17
13.4.e - Nastavení tlaku stěrače (obr.
O)
V závislosti na typu ošetřované podlahy
nebo po výměně gumy stírací lišty může být
nutné upravit tlak podlahy stírací lišty.
Chcete-li jej upravit, postupujte následovně:
- Zvedněte sběrnou nádrž na vodu (11) a
ujistěte se, že je prázdná.
- Seřiďte seřizovací šroub (71) s ohledem
na to, že:
• Otáčení ve směru hodinových ručiček
snižuje tlak na podlahu stírací lišty.
• Otáčení proti směru hodinových ruči-
ček zvyšuje tlak na podlahu stírací lišty.
- Na konci seřízení opatrně spusťte nádrž
na regenerační vodu (11).
13.4.f - Čistící ltr na čištění vody
(Obr. P)
- Ujistěte se, že nádrž (13 Obr. A) je prázd-
ný.
- Sundejte krytku (22) a vyjměte ltrační
vložku (72).
- Vyčistěte ltrační vložku (72) s tekoucí
vodou.
- Smontování vše v opačném pořadí zajiš-
ťuje, že těsnění (73) je ve správné poloze.
13.4.g - Vypouštěcí kohout prostoru
pro baterie (Obr. A)
- Pravidelně kontrolujte, zda v prostoru pro
baterie nejsou žádné stagnace vody.
- V případě potřeby umístěte stroj do blíz-
kosti odtoku, odpojte trubku a otevřete ko-
houtek (74) a poté vypusťte kapaliny.
UPOZORNĚNÍ:
Pokud se předpokládá použití olově-
ných baterií, věnujte velkou pozor-
nost jakémukoli úniku kapaliny ze sa-
motných baterií, souvisejícím rizikům
a předpisům pro likvidaci nebezpeč-
ných látek v kapalinách.
13.4.h - Kontrola stavu opotřebení
koleček (Obr. A)
- Pravidelně kontrolujte stav opotřebení kol
(8) a (23); pokud jste opotřebované nebo
poškozené, vyměňte je kontaktovat tech-
nickou podporu společnosti.
NEBEZPEČÍ:
Postupovat s opotřebenými nebo po-
škozenými koleček zahrnuje nebez-
pečí pro obsluhu, protože stroj může
mít sníženou silnice držení v zatáč-
kách.
14 -
49029600_Manuale RACER_RANGER_8ed_04-2023.indd 1749029600_Manuale RACER_RANGER_8ed_04-2023.indd 17 06/04/2023 15:26:5506/04/2023 15:26:55

www.ghibliwirbel.com
Professional Cleaning Machines Since 1968
ČESKY - 18
14.1 - NASTAVENÍ
PARAMETRŮ (Obr. F)
14.1.a - PROVOZNÍ parametrů
Obsluha má možnost vstoupit do nabídky a
nastavit následující parametry:
• Jazyk
• Typ baterie
• Displej - kontrast
• Displej - jas
Pro přístup do nabídky postupujte následov-
ně:
- Stiskněte a podržte stisknutá tlačítka
(31a) “ ” a (31b) “ ”, poté otočte
klíčem zapalování (29) na „ON” pro zob-
razení následující obrazovky:
General
General
Sets
Sets
--ID Check--
--ID Check--
insert password:
insert password:
0
0
000
000
General Sets Obecná nastavení
ID Check Kontrola ID
Insert password Zadejte heslo
- Uvolněte stisknutá tlačítka.
- Zadejte čtyřciferné heslo „0010” stisknu-
tím tlačítek (30a) “ ” nebo (30b) “
” pro změnu čísla blikající číslice.
- Stiskněte tlačítko (43) “ ” pro potvr-
zení a přechod na další číslici, nakonec
pro potvrzení hesla a vstup do seznamu
parametrů.
- Stiskněte tlačítko (31a) “ ” nebo (31b)
“” pro procházení následujícími ob-
razovkami:
General
General
Language
Language
Main
Main
selection:
selection:
ITA
ITA
General Main Hlavní nastavení
Language selection Volba jazyka
General
General
Battery
Battery
Main
Main
Type:
Type:
GEL
GEL
General Main Hlavní nastavení
Battery Type Volba typu baterie
General
General
Display
Display
min:0
min:0
max:50
max:50
Main
Main
Tune:
Tune:
15
15
General Main Hlavní nastavení
Display Tune Kontrast displeje
General
General
Display
Display
min:0
min:0
max:10
max:10
Main
Main
Brightness:
Brightness:
0
0
General Main Hlavní nastavení
Display Brightness Jas displeje
49029600_Manuale RACER_RANGER_8ed_04-2023.indd 1849029600_Manuale RACER_RANGER_8ed_04-2023.indd 18 06/04/2023 15:27:0606/04/2023 15:27:06

www.ghibliwirbel.com
Professional Cleaning Machines Since 1968
ČESKY - 19
Nastavení jazyka:
General
General
Language
Language
Main
Main
selection:
selection:
ITA
ITA
General Main Hlavní nastavení
Language selection Volba jazyka
- Vyberte jazyk pomocí tlačítek (30a) “
” nebo (30b) “ ”, poté stiskněte tlačítko
(43) “ ” pro potvrzení výběru;
-ITA = italština
-ENG = angličtina
Nastavení typu baterie:
General
General
Battery
Battery
Main
Main
Type:
Type:
GEL
GEL
General Main Hlavní nastavení
Battery Type Volba typu baterie
- Vyberte typ baterie pomocí tlačítek (30a)
“ ” nebo (30b) “ ”, poté stiskněte
tlačítko (43) “ ” pro potvrzení výběru;
-GEL = Gelová baterie
-AGM = Baterie AGM
-WET = KYSELÁ baterie
Nastavení displeje - kontrast:
General
General
Display
Display
min:0
min:0
max:50
max:50
Main
Main
Tune:
Tune:
15
15
General Main Hlavní nastavení
Display Tune Kontrast displeje
- Vyberte typ kontrastu displeje nastave-
ním hodnoty od „0 do 50” pomocí tlačí-
tek (30a) “ ” nebo (30b) “ ”, poté
stiskněte tlačítko (43) “ ” pro potvrzení
výběru.
Nastavení displeje - jas:
General
General
Display
Display
min:0
min:0
max:10
max:10
Main
Main
Brightness:
Brightness:
0
0
General Main Hlavní nastavení
Display Brightness Jas displeje
- Vyberte jas displeje nastavením hodnoty
od „0 do 10” pomocí tlačítek (30a) “ ”
nebo (30b) “ ”, poté stiskněte tlačítko
(43) “ ” pro potvrzení výběru.
POZNÁMKA:
Po potvrzení zvoleného nastavení se stroj
restartuje a displej (41) se rozsvítí v provoz-
ním režimu práce.
15 -
49029600_Manuale RACER_RANGER_8ed_04-2023.indd 1949029600_Manuale RACER_RANGER_8ed_04-2023.indd 19 06/04/2023 15:27:0606/04/2023 15:27:06

www.ghibliwirbel.com
Professional Cleaning Machines Since 1968
ČESKY - 20
15.1 - KONTROLA/VÝMĚNA POJISTEK
POZNÁMKA:
Veškeré elektrické obvody stroje chrání automaticky resetovatelná elektronická zařízení. Bez-
pečnostní pojistky se aktivují pouze v případě vážného poškození.
Doporučujeme, aby pojistky vyměňovali kvalifikovaní pracovníci.
16 -
16.1 - ALARMY BĚHEM PROVOZU
Dojde-li k nějaké poruše stroje, na displeji (41 obr. F) se zobrazí typ alarmu, jak je uvedeno v
níže uvedeném seznamu.
Projděte si seznam a proveďte řešení doporučené pro obnovení správného provozu stroje.
Pokud doporučená řešení nebudou úspěšná, obraťte se na technickou asistenční službu.
ALARM VÝZNAM ŘEŠENÍ
AL_1: General Chyba paměti Proveďte restart stroje.
AL_2: General Anomálie klíče Vypněte stroj alespoň na 10 sekund a poté jej
znovu zapněte.
AL_3: General Nedostatek napětí
Vypněte stroj, zkontrolujte stav nabití baterie,
pojistky, kontakty, kabelové zapojení a připojení a
stroj restartujte.
AL_4: General Přepětí Vypněte stroj, zkontrolujte pojistky, kontakty, kabe-
lové zapojení a připojení a stroj restartujte.
AL_6: General Chybí komunikace s
ovládacím panelem nebo
displejem
Vypněte stroj, zkontrolujte pojistky, kontakty, kabe-
lové zapojení a připojení a stroj restartujte.
AL_7: General Komunikace ffm
Vypněte stroj, zkontrolujte kontakty, kabelové
zapojení a připojení s komunikačním a provozním
modulem a restartujte stroj.
AL_8: General Komunikace Vnitřní 1 a 2 Proveďte restart stroje.
AL_9: General
AL_10: General Zadejte tag Zobrazení chybějícího klíče „Tag“: vložte klíč.
AL_11: General Neplatný Tag Zobrazení chybného klíče „Tag”: změňte klíč nebo
poškozený klíč.
AL_12: General Probíhá aktualizace… Probíhá zobrazení dálkové aktualizace parametrů:
počkejte na dokončení aktualizace.
AL_13: General Vypnout Zobrazení parametrů dokončeno: restartujte stroj.
AL_41: Function Nadměrná teplota
Vypněte stroj a nechte jej vychladnout. Zkontro-
lujte absorpci motorů kartáčů a vysavače, stav
ventilace prostředí a proveďte restart
AL_42: Function Poškozený výkon Vypněte stroj alespoň na 10 sekund a poté jej
znovu zapněte.
49029600_Manuale RACER_RANGER_8ed_04-2023.indd 2049029600_Manuale RACER_RANGER_8ed_04-2023.indd 20 06/04/2023 15:27:0606/04/2023 15:27:06

www.ghibliwirbel.com
Professional Cleaning Machines Since 1968
ČESKY - 21
ALARM VÝZNAM ŘEŠENÍ
AL_44: Function Porucha relé
Nedošlo k sevření relé/stykače. Zkontrolujte
funkčnost stykače. Pokud je přítomné relé, a
problém přetrvává, vyměňte kartu.
AL_45: Function Porucha relé cc
Detekována porucha relé/stykače při zapnutí.
Zkontrolujte stav kontaktů stykače. Pokud je pří-
tomné relé, a problém přetrvává, vyměňte kartu.
AL_46: Function Nadproud Kartáče
Vypněte stroj, zkontrolujte zátěž (motor), mecha-
niku, kabelové zapojení a připojení, vyhledejte
přítomnost zkratu na výstupu a poté restartujte.
AL_47: Function Nadproud Vysavač
Vypněte stroj, zkontrolujte zátěž (motor), mecha-
niku, kabelové zapojení a připojení, vyhledejte
přítomnost zkratu na výstupu a poté restartujte.
AL_48: Function Nadproud Vodní čerpadlo
Vypněte stroj, zkontrolujte zátěž (motor), mecha-
niku, kabelové zapojení a připojení, vyhledejte
přítomnost zkratu na výstupu a poté restartujte.
AL_49: Function Proud Kartáč 1 a 2 Zkontrolujte spotřebu a způsob použití funkce
kartáčů a restartujte stroj.
AL_50: Function
AL_52: Function Proud Vysavač 1 Zkontrolujte spotřebu funkce vysavače a restar-
tujte stroj.
AL_54: Function Připojení Kartáč 1 a 2 Zkontrolujte připojení motoru kartáče.
AL_55: Function
AL_57: Function Připojení Vysavač 1 Zkontrolujte připojení motoru vysavače.
AL_59: Function Nerovnováha Zkontrolujte spotřeby motorů kartáče
AL_61: Function Proud Aktuátor kartáčů Zkontrolujte spotřebu motoru aktuátoru a stav
pohybující se mechaniky.
AL_62: Function Nadproud Aktuátor
kartáčů
Vypněte stroj, zkontrolujte zátěž (motor), mecha-
niku, kabelové zapojení a připojení, vyhledejte
přítomnost zkratu na výstupu.
AL_63: Function Koncový spínač Aktuátor
kartáčů
Zkontrolujte připojení/stav koncového spínače.
Ovládání aktivní pouze pro verzi BTO.
AL_65: Function Proud Aktuátor stírače Zkontrolujte spotřebu motoru aktuátoru a stav
pohybující se mechaniky.
AL_66: Function Nadproud Aktuátor stírače
Vypněte stroj, zkontrolujte zátěž (motor), mecha-
niku, kabelové zapojení a připojení, vyhledejte
přítomnost zkratu na výstupu.
AL_80: Traction Nadměrná teplota Hnací
motor
Vypněte stroj a nechte jej vychladnout. Zkontroluj-
te spotřebu a způsob využití trakce, stav ventilace
prostředí a restartujte.
49029600_Manuale RACER_RANGER_8ed_04-2023.indd 2149029600_Manuale RACER_RANGER_8ed_04-2023.indd 21 06/04/2023 15:27:0606/04/2023 15:27:06

www.ghibliwirbel.com
Professional Cleaning Machines Since 1968
ČESKY - 22
ALARM VÝZNAM ŘEŠENÍ
AL_85: Traction Nadproud Hnací motor
Vypněte stroj, zkontrolujte zátěž (motor), mecha-
niku, kabelové zapojení a připojení, vyhledejte
přítomnost zkratu na výstupu a poté restartujte.
AL_86: Traction Proud Hnací motor Zkontrolujte spotřebu a způsob použití funkce
trakce a restartujte stroj.
AL_87: Traction Čtení motoru trakce Proveďte restart stroje.
AL_88: Traction Porucha elektrické brzdy Vypněte stroj, zkontrolujte kabeláž brzdy a znovu
zapněte.
AL_89: Traction Porucha Pedál akcelerá-
toru
Vypněte stroj, zkontrolujte připojení a kabelové
zapojení a znovu zapněte.
AL_90: Traction Pedál akcelerátoru
Stlačený Uvolněte pedál a stroj znovu zapněte.
AL_91: Traction Porucha enkodéru Vypněte stroj, zkontrolujte připojení a kabelové
zapojení a znovu zapněte.
17 -
49029600_Manuale RACER_RANGER_8ed_04-2023.indd 2249029600_Manuale RACER_RANGER_8ed_04-2023.indd 22 06/04/2023 15:27:0606/04/2023 15:27:06

www.ghibliwirbel.com
Professional Cleaning Machines Since 1968
ČESKY - 23
17.1 - ŘEŠENÍ PROBLÉMŮ
PORUCHA PŘÍČINA ŘEŠENÍ
Otočením klíčku zapalování,
auto bude nespustí.
Kapacita baterie je nízká.Zkontrolujte stav nabití bate-
rie.
Obecně pojistka spálí.Vyměnit pojistku umístěnou
na kabelu baterie. (*)
Klíčovým vadný.Vyměňte klíč. (*)
Kartáč se neotáčí.Motor je přerušeno.Vyměňte motor. (*)
Poruše kartu.Vyměňte kartu. (*)
Vysavač nefunguje.Tank úplné uzdravení.Vyprázdnit nádrž.
Vadný turbínových motorů.Vyměňte motor. (*)
Poruše kartu.Vyměňte kartu. (*)
Stroj není suchý nebo ne-
vysychá dobře, takže stopy
vody v podlaze.
Vysavač vypnutý.Spusťte vysavač.
Sací hadice ucpaná.Zkontrolujte a případně vyčis-
těte sací trubice, která spoju-
je stěrač do sběrné nádrže.
Tank úplné uzdravení.Vyprázdnit sběrnou nádrž.
Opotřebené gumy stěrky. Otočit nebo vyměnit gumy
stěrače.
Žádná voda vyjde.Prázdná nádrž.Naplňte nádrž.
Ucpaný ltr.Vyčistit ltr.
Elektromagnetický ventil čer-
padla nefunguje.
Vyměňte elektromagnetický
ventil. (*)
Vadné vodní čerpadlo.Vyměnit vodní čerpadlo. (*)
Poruše kartu.Vyměňte kartu. (*)
Stroj se nepohybuje v provo-
zuschopném stavu.
Operátor není správně usa-
zen v sedadle řidiče.
Správně sedět na sedadle.
Spojka motoru je vadná.Výměna hnacího kola. (*)
Poruše kartu.Vyměňte kartu. (*)
Čidlo přítomnosti operátora
poruchy.
Zavolejte zákaznický servis
na výměnu. (*)
49029600_Manuale RACER_RANGER_8ed_04-2023.indd 2349029600_Manuale RACER_RANGER_8ed_04-2023.indd 23 06/04/2023 15:27:0606/04/2023 15:27:06

www.ghibliwirbel.com
Professional Cleaning Machines Since 1968
ČESKY - 24
PORUCHA PŘÍČINA ŘEŠENÍ
Nedostatečné čištění podla-
hy.
Kartáče nebo nevhodný pro-
středek.
Použití kartáče nebo čisticí
prostředky, které jsou vhodné
pro typ podlahy nebo nečis-
tot, které mají být čištěny.
Opotřebovaný kartáček.Vyměňte stěrač.
Indikátor “” prázdná nádrž
řešení, stále bliká.
Tank prázdná.Naplňte nádrž.
Kohoutek je zavřený.Otevřete vodovodní kohou-
tek.
Selhání průtokoměr.Vyměňte průtokoměr. (*)
Er is stagnatie van water in
het batterijcompartiment.
Defecte niveausensor van de
vuilwatertank.
Tap het water in het batterij-
compartiment af met de da-
arvoor bestemde leiding en
kraan.
Controleer of vervang de ni-
veausensor. (*)
(*) O výměnu se obraťte na poprodejní servis.
18 -
18.1 - STROJ DEMOLICE
NEBEZPEČÍ:
Baterie a elektrické součásti jsou považovány za speciální odpad, a proto
musí být zlikvidovány ve speciálních sběrných střediscích, jak je uvedeno v
předpisech platných v zemi použití.
19 -
49029600_Manuale RACER_RANGER_8ed_04-2023.indd 2449029600_Manuale RACER_RANGER_8ed_04-2023.indd 24 06/04/2023 15:27:0806/04/2023 15:27:08

www.ghibliwirbel.com
Professional Cleaning Machines Since 1968
ČESKY - 25
19.1 - ELEKTRICKÁ SCHÉMA
Legenda:
AC Akcelerátor
BAT Baterie
BC Nabíječka baterie
BE Blikající světlo
BRK Elektromagnetická brzda
C1 Konektor baterie
EB1 Karta funkcí
EB2 Displej
EB3 Ovládací panel
EV Elektromagnetický ventil
F1 Pojistka nabíječky (1A)
F2 Pojistka světel (pokud přítomná) (3A)
F3 Pojistka klaksonu (1A)
F4 Pojistka blikajícího světla (1A)
F5
Pojistka elektromagnetického ventilu (5A)
F6
Pojistka aktuátoru vrchní části s kartáči (10A)
F7 Pojistka aktuátoru stírače (10A)
F8 Pojistka elektrické brzdy (7.5A)
F9 Pojistka vodního čerpadla (5A)
F10 Pojistka čerpadla chem. (pokud přítom-
né) (5A)
F11 Pojistka motoru sání (40A)
F12 Pojistka motoru pravého kartáče (40A)
F13 Pojistka motoru levého kartáče (40A)
F14 Pojistka hnacího motoru (100A)
HN Klakson
KEY Klíč zapalování
L1 Pracovní světla (pokud přítomná)
MA Motor sání
MAS Motor aktuátoru vrchní části s kartáči
MAT Motor aktuátoru stírače
MS-DX Motor pravého kartáče
MS-SX Motor levého kartáče
MT Hnací motor
PA Vodní čerpadlo
PC Čerpadlo chemikálie
PE Nouzové tlačítko
S1 Snímač hladiny rekuperace vody
SW1 Mikrospínač sedadla
TE Externí stykač
Kódy barev:
BK Černá
BU Modrá
BN Hnědá
GN Zelená
GY Šedá
OG Oranžová
PK Růžová
RD Červená
VT Fialová
WT Bílá
YE Žlutá
49029600_Manuale RACER_RANGER_8ed_04-2023.indd 2549029600_Manuale RACER_RANGER_8ed_04-2023.indd 25 06/04/2023 15:27:0806/04/2023 15:27:08

www.ghibliwirbel.com
Professional Cleaning Machines Since 1968
ČESKY - 26
PA MT PC EV
- +
-
-
-
-
+ -+ -+
+
+
+
MA MS MS
DX SX
C1
BC
TE
EB2
EB3
KEY
L1
BE
F4
F1
F2
F8
F9 F14 F10 F5 F11 F12 F13
F7
F6
F3
BRK
AC
M
SW1
M5
J8
4 3
2 1
4 3
2 1
1
4
2
5
3
6
9
1
10
2
11
3
4
1
5
2
6
3
4
1
5
2
6
3
4
1
5
2
6
3
12
4
4
8
1
2
3
7
2
6
1
5
3
6
2
5
1
1
12
3s
+
-
2
1
1
2
3
4
2 3
123
456 4
1
11
2
12
3
13
4
14
5
15
6
16
7
17
8
18
9
19
10
20
4
9
3
8
5
10
2
7
1
6
13
5
16
8
15
7
14
6
2
1
J9 J10 J11
J1
J8 J7
J2
S1
J3 J4 J5 J7J6
J12 J13 J14
M6
USB
HN
BATBAT MATMAT
PEPE
MASMAS
EB1
49029600_Manuale RACER_RANGER_8ed_04-2023.indd 2649029600_Manuale RACER_RANGER_8ed_04-2023.indd 26 06/04/2023 15:27:0906/04/2023 15:27:09

www.ghibliwirbel.com
Professional Cleaning Machines Since 1968
РУССКИЙ - 1
Уважаемый клиент,
Благодарим Вас за выбор нашего продукта для очистки окружающей среды.
Моющий пылесос, который Вы купили, был разработан для удовлетворения по-
требностей пользователей с точки зрения удобства использования и надежности
в течение долгого времени.
Мы знаем, что хороший продукт, чтобы оставаться таким долгое время, требует
постоянных обновлений, предназначены для удовлетворения ожиданий тех, кто
ежедневно использует его. Таким образом, мы надеемся найти не только удов-
летворенного клиента, но и партнер, который без колебаний, пришлёт нам свои
мнения и идеи, вытекающие из личного повседневного опыта.
49029600_Manuale RACER_RANGER_8ed_04-2023.indd 149029600_Manuale RACER_RANGER_8ed_04-2023.indd 1 06/04/2023 15:43:2106/04/2023 15:43:21

www.ghibliwirbel.com
Professional Cleaning Machines Since 1968
РУССКИЙ - 2
ИНДЕКС
ИНДЕКС .........................................................................................................................................2
ТЕХНИЧЕСКИЕ ХАРАКТЕРИСТИКИ ..........................................................................................3
1.1 - ВВЕДЕНИЕ ......................................................................................................................... 5
1.1.a - Позиция оператора ..................................................................................................... 5
1.1.b - Общие указания при работе с устройством ............................................................. 5
1.2 - НЕУПОТРЕБЛЕНИЕ АППАРАТА ...................................................................................... 5
2.1 - ЗНАНИЯ ОБ АППАРАТE (Рис. A) ..................................................................................... 5
3.1 - РАСПАКОВКА (Рис. B) ...................................................................................................... 5
3.1.a - Установка батареи (Рис. A) ........................................................................................ 6
3.1.b - Разгрузка аппарата с деревянного поддона (Рис. B) ............................................... 6
4.1 - МОНТАЖ КОМПОНЕНТОВ ................................................................................................ 6
4.1.a - Установка ракеля (Рис. C) .......................................................................................... 6
4.1.b - Установка кистью ........................................................................................................ 6
5.1 - ЗАРЯД БАТАРЕИ ............................................................................................................... 6
5.1.a - Зарядка батареи с внешним зарядным устройством (Рис. G) ................................ 7
5.1.b - Зарядка аккумулятора с помощью встроенного зарядного устройства
(при наличии) (Рис. G) ............................................................................................................. 7
6.1 - ОПИСАНИЕ БЛОКA УПРАВЛЕНИЯ ................................................................................. 7
6.1.a - Панель управления (Рис. F) .......................................................................................7
6.1.b - Педаль ускорения (Рис. A) ....................................................................................... 10
7.1 - ДИСПЛЕЙ (Рис. F) ........................................................................................................... 10
8.1 - СРОЧНОСТЬ .................................................................................................................... 11
9.1 - БЕЗОПАСНОСТЬ (Рис. A) .............................................................................................. 11
10.1 - ЗАПОЛНЕНИЕ РЕЗЕРВУАРA (Рис. D) ........................................................................... 12
10.2 - БИДОН МОЮЩЕГО СРЕДСТВА/ХИМИЧЕСКОГО ВЕЩЕСТВА
(при его наличии) (Рис. E) ........................................................................................................12
11.1 - ЭКСПЛУАТАЦИЯ МАШИНЫ (Рис. A-F) ......................................................................... 12
11.1.a - Kонтроль при использовании ................................................................................... 12
11.1.b - Подготовка аппарата и выбор цикла .......................................................................13
11.1.c - Использование аппарата .........................................................................................13
11.1.d - Oкончание использования и остановка ................................................................. 14
12.1 - СЛИВ ВОДЫ И ВОССТАНОВЛЕНИЕ (Рис. H) .............................................................. 14
13.1 - ОБСЛУЖИВАНИЕ И ОЧИСТКА ПЫЛЕСОСА ................................................................14
13.2 - ЕЖЕДНЕВНО ВЫПОЛНЯЕМЫЕ ОПЕРАЦИИ ............................................................... 14
13.2.a - Oпорожнение и очистка резервуара для сбора чистой воды (Рис. I) ................... 14
13.2.b - Oчистка резервуара для восстановленной воды (Рис. J) .....................................15
13.2.c - Очистка скребкa (Рис. K) .......................................................................................... 15
13.3 - ОПЕРАЦИИ ВЫПОЛНЯЕМЫЕ КАЖДЫЕ 3 МЕСЯЦА ..................................................15
13.3.a - Проверить степень износа рулевой цепи (Рис. L) .................................................. 15
13.4 - ОПЕРАЦИИ ВЫПОЛНЯЕМЫЕ В НЕОБХОДИМОСТИ .................................................15
13.4.a - Замена щетки (Рис. M) .............................................................................................15
13.4.b - Регулировка резины брызговика (Рис. M) ............................................................... 16
13.4.c - Замена резинового скребка (Рис. K) ....................................................................... 16
13.4.d - Pегулировка угла наклона скребка (Рис. N) .......................................................... 16
13.4.e - Регулировка давления стеклоочистителя (Рис. O) ................................................ 17
13.4.f - Очистка фильтра чистой воды (Рис. P) ................................................................... 17
13.4.g - Сливной кран батарейного отсека (Рис. А) ............................................................. 17
13.4.h - Проверка износa 3 колеса (Рис. A) .......................................................................... 17
14.1 - НАСТРОЙКИ ПАРАМЕТРЫ (Рис. F) .............................................................................. 18
14.1.a - Параметры ОПЕРАТОРА .......................................................................................... 18
15.1 - ПРОВЕРКА/ЗАМЕНА ПРЕДОХРАНИТЕЛЕЙ ................................................................. 20
16.1 - СИГНАЛИЗАЦИЯ ВО ВРЕМЯ ДЕЙСТВИЯ .................................................................... 20
17.1 - ПОИСК ПРОБЛЕМЫ ........................................................................................................ 23
18.1 - СНОС АППАРАТА ............................................................................................................ 24
19.1 - ЭЛЕКТРИЧЕСКАЯ СХЕМА ..............................................................................................25
49029600_Manuale RACER_RANGER_8ed_04-2023.indd 249029600_Manuale RACER_RANGER_8ed_04-2023.indd 2 06/04/2023 15:43:2206/04/2023 15:43:22

www.ghibliwirbel.com
Professional Cleaning Machines Since 1968
РУССКИЙ - 3
ТЕХНИЧЕСКИЕ ХАРАКТЕРИСТИКИ
RACER R 85 RANGER R 115
FD 65 FD 75 FD 75 FD 85
Вид использования Средство для мытья полов
Характеристики
Эксплуатация и питание Батареи 24 B
Тип батареи
N° 2 - 12B 105Ач (C5) N° 4 - 6B 240Ач (C5)
N° 4 - 6B 180Ач (C5) N° 1 - 24B 320Ач (C5)
N° 1 - 24B 100Ач (Li) N° 1 - 24B 150Ач (Li)
Мощность установленного двигателя 2160 Вт 2210 Вт
Время работы
2 час (105Ач C5) 5 час (240Ач C5)
4 час (180Ач C5) 7 час (320Ач C5)
2 час (100Ач Li) 3 час (100Ач Li)
Продвижение Вперед / назад
Ширина щетки 650 мм 750 мм 750 мм 850 мм
Ширина всасывающей балки 850 мм 950 мм 950 мм 1050 мм
Теоретическая производительность
очистки 4000 м2/ч 4500 м2/ч 4500 м2/ч 5000 м2/ч
Реальная производительность очистки 2400 м2/ч 2700 м2/ч 2700 м2/ч 3000 м2/ч
Уровень вибрации, передаваемый на
ладони и руки (ISO 5349-1) < 2,5 м/с 2
Вибрация всего тела (ISO 2631-1) < 0,5 м/с 2
Звуковое давление (ISO 11203) (LpA) 63 dB(A)
Звуковое давление в беззвучном режиме
(LpA) 57 dB(A)
Класс защиты IP IPX3
Щетки
Диаметр / колодки / номер 330 мм /
13” / 2
380 мм /
15” / 2
380 мм /
15” / 2
430 мм /
17” / 2
Мощность двигателя / номер 500 Вт / 2
Скорость щетки 165 об./мин
Удельное давление 30 г / см221 г / см221 г / см217 г / см2
Удельное давление (дополнительное
давление) 46 г / см232 г / см243 г / см234 г / см2
49029600_Manuale RACER_RANGER_8ed_04-2023.indd 349029600_Manuale RACER_RANGER_8ed_04-2023.indd 3 06/04/2023 15:43:2206/04/2023 15:43:22

www.ghibliwirbel.com
Professional Cleaning Machines Since 1968
РУССКИЙ - 4
RACER R 85 RANGER R 115
FD 65 FD 75 FD 75 FD 85
Тяга
Максимальная способность преодоле-
вать подъем при очистке 2 %
Максимальный наклон подъема без
нагрузки (*) 12 %
Мощность двигатель 600 Вт
Максимальная скорость при движении вперед
6 kм/ч
Аспирация
Мощность двигателя 550 Вт
Разрежениe (колонка воды) 125 мбар / 1250 ммH2O
Воздушный поток 30 л/сек
Резервуар
Тип Двойной резервуар
Емкость бака с раствором 80 л110 л
Емкость восстановления 85 л115 л
Размеры
Размеры машины
(Длина x Ширина x Высота) 1375 x 705 x 1230 мм 1470 x 770 x 1365 мм
Ширина машины - дека щеток 715 мм 785 мм 785 мм 890 мм
Ширина машины - ракель 885 мм 950 мм 950 мм 1055 мм
Размеры аккумуляторного отсека
(Длина x Ширина x Высота) 380 x 540 x 310 мм 380 x 625 x 440 мм
Вес
Масса 213 Кг 246 Кг
Вес с батареями Gel 12B 105Ач 285 Кг -
Вес с батареями Gel 6B 180Ач 333 Кг -
Вес с литиевой батареей 24 В, 100 Ач 249 kg -
Вес с батареями Gel 6B 240Ач - 432 kg
Вес с батареями Pb Wet 24B 320Ач - 506 kg
Вес с литиевой батареей 24 В, 150 Ач - 288 kg
Вес во время работы (GVW) 490 Кг 691 Кг
(*) Машина была испытана в следующих условиях:
• Стандартный аккумулятор
• Пустые резервуары
• Рампа из необработанного бетона
• Длина пандуса 15 м
• 75 кг оператора
1 -
49029600_Manuale RACER_RANGER_9ed_09-2023.indd 449029600_Manuale RACER_RANGER_9ed_09-2023.indd 4 04/09/2023 14:54:5704/09/2023 14:54:57

www.ghibliwirbel.com
Professional Cleaning Machines Since 1968
РУССКИЙ - 5
1.1 - ВВЕДЕНИЕ
ПРИМЕЧАНИЕ:
Цифры и ссылки на рисунки, указанные
в скобках, относятся к компонентам, ука-
занным в прилагаемом иллюстративном
листе.
ОПАСНО:
Перед использованием машины
прочитать брошюру «ПРЕДОСТЕ-
РЕЖЕНИЯ ПО ТЕХНИКЕ БЕЗОПАС-
НОСТИ МЫТЬЯ МАШИН», при-
ложенные к нему и дополнений,
внесенных позже.
1.1.a - Позиция оператора
Во время машины оператор сидит на сту-
ле с руками расположенными на руле.
1.1.b - Общие указания при рабо-
те с устройством
- Не оставляйте аппарата на наклонных
поверхностей.
- Категорически запрещается сгибание
когда вы находитесь на склоне; опас-
ность опрокидывания.
- Избегайте использования аппарата в
местах, где существует опасность па-
дения предметов.
1.2 - НЕУПОТРЕБЛЕНИЕ
АППАРАТА
- Не используйте аппарат с открытым
восстановительным бачком.
- не круговойс ног / свесив ноги.
- Не делайте резких поворотов, особен-
но на склонах.
ОСТОРОЖНО:
Аппарат предназначен для пере-
возки только одного человека.
2 -
2.1 - ЗНАНИЯ ОБ АППАРАТE
(Рис. A)
(1) Pулевое колесо
(2) Панель управления
(3) Cиденья
(4) Датчик присутствия оператора
(5) АВАРИЙНАЯ кнопка для мгновенного
отключения всех функций
(6) Подставка для ног
(7) Педаль акселератора
(8) Задние колеса
(9) Рабочий свет (опционально)
(10) Мигающий свет (опционально)
(11) Бак восстановительной воды
(12) Крышка резервуара для возвратной
воды
(13) Бак чистой воды
(14) Заглушка
(15) Спускной шланг чистой воды
(16) Всасывающий шланг ракеля
(17) Спускной шланг чистой воды
(18) Прочистить сливной шланг
(19) Щеточный блок
(20) Ракель
(21) Отсек для документов
(22) Водяной фильтр
(23) Тяговое рулевое колесо
(24) Крюк опоры ракеля
(25) Опорный штифт уловителя
3 -
3.1 - РАСПАКОВКА (Рис. B)
После удаления упаковки, как указано в
инструкции на самой упаковке, проверьте
целостность машины и всех поставляе-
мых компонентов.
Если обнаружены какие-либо очевидные
повреждения, обратитесь к местному ди-
леру и перевозчику в течение 3 дней с мо-
мента получения.
- Извлеките конверт и коробки (26) с при-
лагаемыми принадлежностями:
• (20) Ракель.
• (32) N ° 2 щетки.
- Поднимите резервуар и возьмите до-
кументацию из соответствующего кон-
верта:
• (33) Руководство по эксплуатации и
техническому обслуживанию станка.
• (34) Руководство по эксплуатации
зарядного устройства (при наличии).
49029600_Manuale RACER_RANGER_8ed_04-2023.indd 549029600_Manuale RACER_RANGER_8ed_04-2023.indd 5 06/04/2023 15:43:2406/04/2023 15:43:24

www.ghibliwirbel.com
Professional Cleaning Machines Since 1968
РУССКИЙ - 6
3.1.a - Установка батареи (Рис. A)
- Осторожно поднимите бак для грязной
воды (11).
- В зависимости от конфигурации (4 ба-
тареи на 6 В, 2 батареи на 12 В, 1 ба-
тарейный блок на 24 В) расположите и
подключите батареи, как показано на
рисунках, используя прилагаемые ка-
бели и вилки.
- Осторожно опустите бак для грязной
воды (11).
ПРИМЕЧАНИЕ:
Подключение батарей должно выпол-
няться квалифицированным персоналом.
3.1.b - Разгрузка аппарата с дере-
вянного поддона (Рис. B)
- Снимите деревянный брусок (27), рас-
положенный перед передним колесом.
- Поместите пандус (28) перед деревян-
ным поддоном, как указано в инструк-
ции на упаковке.
- Сядьте на сидение в положении вожде-
ния.
- Поверните ключ (29) в положение
«ON».
- Нажмите кнопку направления движе-
ния (31a) “ ” (вперед), затем осто-
рожно нажмите педаль акселератора
(7) и сойдите с поддона.
4 -
4.1 - МОНТАЖ
КОМПОНЕНТОВ
4.1.a - Установка ракеля (Рис. C)
- Вставьте ракель (20) в свою поддержку
пластины (35) и закрепите его, при по-
мощи винтов двух регуляторов (36).
- Подключите всасывающий шланг (16) в
устье (37) пространство ракеля.
4.1.b - Установка кистью
- См. Процедуру в параграфе «13.4.a -
Замена щетки (Рис. M)».
5 -
5.1 - ЗАРЯД БАТАРЕИ
ОПАСНО:
Выполняйте зарядку аккумулятор-
ных батарей в хорошо проветривае-
мых помещениях, как это предусмо-
трено правилами, действующими в
стране использования.
Для получения информации о без-
опасности, следовать тому, что на-
писано в 1 главе данного руковод-
ства.
ОСТОРОЖНО:
Для получения дополнительной
информации и предупреждений
питания от батареи следовать
тому, что указано в руководстве
зарядное устройство прикреплена
к настоящему руководству.
Аппарат откалиброван на заводе
для использования с гелевых акку-
муляторных батарей.
Если необходимо установить дру-
гие типы аккумуляторных батарей,
смотрите раздел «Настройка пара-
метров».
И «Запрещается использовать
устройства для всех видов кислот-
ных и гелевых аккумуляторов.
(Только для версий без встроенного
зарядного устройства) Устройство
должно питаться только от
внешних зарядных устройств SELV
(safety extra-low voltage).
ПРИМЕЧАНИЕ:
(Только для гелевых батарей) Нужное
время для полной зарядки батареи (акку-
мулятора) 10 часов. Избегайте частичные
зарядки батареи.
(Только для литиевых батарей) Допуска-
ется частичная зарядка устройства.
Заряжайте батареи в конце каждого за-
дания или, по крайней мере, когда символ
батареи “ ” на дисплее (41 Рис. F) на-
чинает мигать.
- Подъехать на станке к зарядной станции.
49029600_Manuale RACER_RANGER_8ed_04-2023.indd 649029600_Manuale RACER_RANGER_8ed_04-2023.indd 6 06/04/2023 15:43:2606/04/2023 15:43:26

www.ghibliwirbel.com
Professional Cleaning Machines Since 1968
РУССКИЙ - 7
- Поднимите резервуар возвратной воды
(11), убедившись, что он пустой.
5.1.a - Зарядка батареи с внеш-
ним зарядным устрой-
ством (Рис. G)
- Проверьте соответствие внешнего за-
рядного устройства, обратившись к
соответствующему руководству. Номи-
нальное напряжение зарядного устрой-
ства должно составлять 24 В.
- В соответствующем гнезде (38) возь-
мите коннектор (39) и подключите его к
внешнему зарядному устройству.
- Подключите зарядное устройство к
сети питания.
- По окончании зарядки отключите за-
рядное устройство от сети и от коннек-
тора (39).
- Осторожно опустите бак для грязной
воды (11).
5.1.b - Зарядка аккумулятора с
помощью встроенного за-
рядного устройства (при
наличии) (Рис. G)
- В соответствующем гнезде (38) возьми-
те вилку кабеля зарядного устройства
(40) и подключите к сети (напряжение и
частота сети должны совпадать с соот-
ветствующими значениями зарядного
устройства, указанными на идентифи-
кационной табличке машины).
ПРИМЕЧАНИЕ:
Когда зарядное устройство подключено к
сети, все функции машины автоматически
отключаются.
- Когда на дисплее (41, рис. F) последо-
вательно загораются сегменты на сим-
воле батареи, это означает, что заряд-
ное устройство заряжает батареи.
- Когда все сегменты символа батареи
горят постоянно, цикл зарядки батареи
завершен.
- Отсоедините вилку зарядного кабеля
(40) от сети и вставьте его в специаль-
ное гнездо (38).
- Осторожно опустите бак для грязной
воды (11).
6 -
6.1 - ОПИСАНИЕ БЛОКA
УПРАВЛЕНИЯ
6.1.a - Панель управления (Рис. F)
(29) Kлюч зажигания
- Поверните ключ по часовой стрелке
“ON”; приносит мощность в схемах для
эксплуатации машины.
- Вращения в противоположных направ-
лениях на “OFF” позволяет уменьшить
мощность в схемах цепей, в таком по-
ложении, ключ может быть удален.
(30) Кнопки регулировки макси-
мальной скорости
Максимальную скорость перемещения
можно регулировать с помощью кнопок
(30a) “ ” и (30b) “ ”.
- При полном нажатии педали акселе-
ратора (7) скорость будет пропорцио-
нальна установленному максимально-
му значению.
- Когда на дисплее (41) все символы ско-
рости “ ” светлые, педаль акселера-
тора (7) заблокирована, и машина оста-
ется неподвижной.
(31) Кнопки направления движения
- При нажатии кнопки перемещения
вперед (31a) “ ” машина движется
вперед; на дисплее отображается пик-
тограмма “ ”.
- При нажатии кнопки перемещения на-
зад (31b) “ ” машина движется на-
зад и включается зуммер заднего хода;
на дисплее отображается пиктограмма
“”.
ПРИМЕЧАНИЕ:
Максимальную скорость при движении
назад можно настроить так же, как и ско-
рость перемещения вперед, с помощью
кнопок (30).
49029600_Manuale RACER_RANGER_8ed_04-2023.indd 749029600_Manuale RACER_RANGER_8ed_04-2023.indd 7 06/04/2023 15:43:3206/04/2023 15:43:32

www.ghibliwirbel.com
Professional Cleaning Machines Since 1968
РУССКИЙ - 8
(41) Дисплей
- См. Конкретную главу.
(42) Кнопка “Ready to go”
- При нажатии кнопки (42) на дисплее
отображается пиктограмма “ ” и за-
пускаются следующие функции при
стандартных настройках:
• Опускание щеточного узла и враще-
ние щеток.
• Опускание всасывающей балки и за-
пуск системы всасывания.
• Рабочая скорость: 3-е деление (3,6
км/ч).
• Расход воды: 3-е деление.
• Химическое вещество: 3-е деление
(1 %).
• Всасывание: нормальное (100 %).
• Прижим щеток: нормальный.
- Когда эта стандартная функция активи-
рована, можно нажать любую рабочую
кнопку для любого изменения или на-
стройки.
При необходимости, когда в рабочих
функциях были внесены изменения, их
можно сохранить, выполнив следующие
действия:
- Нажмите и удерживайте кнопку (42) в
течение 3 секунд; подтверждение со-
хранения отображается на дисплее
(41) миганием надписи «UPLOADED».
- Чтобы отменить новую настройку и
вернуться к стандартным значениям,
снова нажмите кнопку (42) и удержи-
вайте ее в течение 3 секунд; подтверж-
дение отображается на дисплее (41)
мигающей надписью «RESET».
(43) Кнопка ECO
- Во время работы, при нажатии кнопки
(43) на дисплее появляется пиктограм-
ма “ ”, параметры воды, химического
вещества, всасывания и прижима ще-
точного узла принимают следующие
значения:
• Расход воды: 3-е деление.
• Химическое вещество: 3-е деление
(1 %).
• Всасывание: бесшумное (50 %).
• Прижим щеток к полу: нормальный.
(44) Кнопка пылесоса
- При нажатии кнопки (44) запускается
пылесос, на дисплее появляется пик-
тограмма “ ” и, если включен ход
вперед или если машина находится в
нейтральном положении, опускается
всасывающая балка.
- Нажатие кнопки (44) еще раз останав-
ливает пылесос и ракетка поднимает-
ся.
- При остановленной машине, опущен-
ном скребке и ключе (29) в положении
“ON” после периода неактивности,
скребок поднимается автоматически.
(45) Кнопка тихой работы
- При нажатии на кнопку (45) сила вса-
сывания турбины будет уменьшаться,
это позволяет значительно снизить
шум машины; если эта функция акти-
вирована, на дисплее отображается
символ “ ”.
- Повторное нажатие кнопки (45) отклю-
чает функцию, и машина возобновляет
работу в стандартном режиме, значок
“ ” гаснет, а значок “ ” появляется
на дисплее
ПРИМЕЧАНИЕ:
Остановка всасывающей турбиной с
кнопкой «тихой работы» активированной,
турбина будет автоматически перейдет
в стандартный режим работы, все время
задержки выключения.
(46) Кнопка щеток
- При нажатии кнопки (46) опускается
щеточный узел и на дисплее появляет-
ся пиктограмма “ ”.
- Щетки начинают вращаться при нажа-
тии на педаль ускорителя, и останав-
ливаются, когда дроссельная заслонка
поднимается.
49029600_Manuale RACER_RANGER_8ed_04-2023.indd 849029600_Manuale RACER_RANGER_8ed_04-2023.indd 8 06/04/2023 15:43:4106/04/2023 15:43:41

www.ghibliwirbel.com
Professional Cleaning Machines Since 1968
РУССКИЙ - 9
ПРИМЕЧАНИЕ:
Щетки вращаются как в прямом, так и в
обратном режиме и с регулировкой скоро-
сти (30) на «0».
- При остановленной машине, останов-
ленной головке щеток и ключом (29) в
положении “ON”, после периода не де-
ятельности, головка поднимается авто-
матически.
- Если вы нажмете кнопку (46) во вре-
мя вращения щеток, они остановятся,
устройство поднимется, и символ “
” на дисплее погаснет.
(47) Кнопка дополнительного
прижима щеток
С опущенным щеточным узлом можно ре-
гулировать прижим щеток к полу.
- При нажатии кнопки (47) активируется
дополнительный прижим и на дисплее
появляется пиктограмма “ ”.
- При нажатии кнопки (47) еще раз уси-
лие прижима возвращается к исходно-
му значению и на дисплее появляется
пиктограмма “ ”.
ПРИМЕЧАНИЕ:
Ogni volta che la testata spazzole sale
(posizione di riposo), si disattiva anche la
funzione extra pressione.
ПРИМЕЧАНИЕ:
La funzione extra pressione è dotata
di un sistema di sicurezza che rileva
automaticamente un eccessivo assorbimento
di corrente dei motori spazzole ed è in grado
di variare automaticamente la pressione
spazzole a terra portandola nella posizione
più idonea.
(48) Кнопка дозатора химиче-
ского вещества (при наличии)
- При нажатии кнопки (48) на дисплее
отображается пиктограмма “ ” и ак-
тивируется дозировка химического ве-
щества.
- Работой дозирующего насоса управля-
ет педаль акселератора.
- Повторное нажатие кнопки (48) уве-
личивает количество химического ве-
щества; достижение максимального
количества сопровождается отображе-
нием на дисплее пиктограммы “ ”. По-
вторное нажатие кнопки (48) отключает
функцию и выключает пиктограмму на
дисплее.
ПРИМЕЧАНИЕ:
В случае опорожнения системы дозиро-
вания химического агента после замены
бака удерживайте кнопку (48) нажатой
не менее 5 секунд, чтобы активировать
процедуру продувки воздухом продолжи-
тельностью около 40 секунд; эта функция
активируется только при остановленной
машине, когда кнопка (29) находится в по-
ложении «ON», а регулятор скорости (30)
находится в положении «0».
(49) Кнопка подачи воды
- При нажатии кнопки (49) на дисплее
отображается пиктограмма “ ” и ак-
тивируется открытие электроклапана
подачи воды.
- Работой электроклапана управляет пе-
даль акселератора.
- При неоднократном нажатии кнопки
(49) увеличивается объем воды, когда
дойдет до максимального количества,
отраженного на дисплее символом “
”, если нажать снова кнопку (49) – функ-
ция дезактивируется.
(50) Кнопка звукового пред-
упреждения
(51) Вращающаяся кнопка ми-
гающего света
49029600_Manuale RACER_RANGER_8ed_04-2023.indd 949029600_Manuale RACER_RANGER_8ed_04-2023.indd 9 06/04/2023 15:43:5206/04/2023 15:43:52

www.ghibliwirbel.com
Professional Cleaning Machines Since 1968
РУССКИЙ - 10
(52) Кнопка рабочего освеще-
ния
6.1.b - Педаль ускорения (Рис. A)
- При нажатии педали акселератора (7)
машина движется вперед или назад, в
зависимости от того, какая кнопка на-
правления движения нажата.
- Скорость можно регулировать путем
изменения усилия нажатия на педаль
акселератора.
- При отпуске педали ускорения (7), ма-
шина замедляет действие до полной
остановки. После нескольких секунд с
остановленной машиной, запускается
автоматически тормоз остановки. Этот
тормоз дезактивируется при нажатии
кнопки ускорения (7) при активирован-
ном ходе вперед или назад.
7 -
7.1 - ДИСПЛЕЙ (Рис. F)
Когда машина включена, на дисплее (41)
отображаются следующие пиктограммы:
Аккумулятор
Показывает уровень заряда аккумулято-
ров:
Аккумуляторные батареи заряжены
Аккумуляторные батареи разряжены
Максимальная скорость дви-
жения вперед
Кнопками (30а) “ ” и (30b) “ ” уста-
навливается максимальная скорость, ко-
торую машина может развивать при пол-
ностью нажатой педали акселератора (7):
km/h - 01,2 2,4 3,6 4,8 6,0
Направление движения
Стрелка направления движения указыва-
ет направление перемещения, выбранное
с помощью кнопок (31a) “ ” и (31b) “
”.
“Ready to go”
Появляется на дисплее при нажатии кноп-
ки (42) “ ”.
Способ ECO
Просматривается, когда активирована
функция ECO кнопкой (43) “ ”.
Работает пылесос
Появляется на дисплее при нажатии кноп-
ки (44) “ ”, сигнализируя о том, что
пылесос включен, и всасывающая балка
опущена.
Бесшумная работа
При включенном пылесосе.
Появляется на дисплее пр нажатии кнопки
(45) “ ”, сигнализируя о том, что пыле-
сос работает с пониженным числом обо-
ротов.
Активация вращения щетки
Появляется на дисплее при нажатии кноп-
ки (46) “ ”, сигнализируя о том, что ак-
тивировано вращение щетки.
49029600_Manuale RACER_RANGER_8ed_04-2023.indd 1049029600_Manuale RACER_RANGER_8ed_04-2023.indd 10 06/04/2023 15:44:1006/04/2023 15:44:10

www.ghibliwirbel.com
Professional Cleaning Machines Since 1968
РУССКИЙ - 11
Дополнительный прижим
Появляется на дисплее, указывая на ра-
бочее давление щеток. Нажмите кнопку
(47) “ ”, чтобы изменить рабочее дав-
ление.
Дозатор моющего средства
(при наличии)
Появляется на дисплее при нажатии кноп-
ки (48) “ ”.
Нажмите кнопку, чтобы увеличить или
уменьшить процентное содержание дози-
руемого моющего средства:
0,2% 0,5% 1% 2% 3%
Активация подачи воды
Появляется на дисплее при нажатии кноп-
ки (49) “ ”, сигнализируя о том, что ак-
тивирован электроклапан подачи воды.
Когда уровень воды в баке минимальный,
значок “ ” отображается в полноэкран-
ном режиме вместе со звуковым сигна-
лом.
Заполните бак для воды (13), как указано
в соответствующем разделе, затем вы-
ключите и снова включите машину.
Отсутствие оператора на
сиденье водителя
Эта пиктограмма отображается, когда
оператор неправильно сидит на сиденье
водителя, при этом блокируются все функ-
ции машины.
Максимальный уровень
жидкости в резервуаре
рекуперации
Отображается, когда уровень жидкость в
бачке утилизации достиг максимального
уровня.
Нажата педаль ускорения
Этот символ появляется при запуске ма-
шины и указывает ошибку в процедуре
запуска, для удаления активированного
сигнала надо освободить педаль ускоре-
ния (7).
8 -
8.1 - СРОЧНОСТЬ
Кнопка аварийного останова (5, рис. А)
расположена в легкодоступном для опе-
ратора месте. Ее необходимо сильно на-
жать при необходимости немедленной
остановки всех функций машины.
Чтобы возобновить работу машины, по-
тяните кнопку аварийного останова до
щелчка и восстановления ее исходного
положения.
ОСТОРОЖНО:
Нажимайте кнопку аварийного
останова (5) при включенной ма-
шине только в случае реальной
необходимости. Не используйте
ее для выключения машины, по-
скольку это может вызвать ее по-
ломку, в том числе серьезную.
9 -
9.1 - БЕЗОПАСНОСТЬ (Рис. A)
Машина оборудована следующими пре-
дохранительными устройствами:
Датчик присутствия оператора (4)
Он блокирует все функции машины, когда
оператор не находится на сиденье води-
теля.
Противоюзовая система безопас-
ности
Эта система снижает скорость в поворо-
тах и при боковых наклонах машины во
избежание неожиданного скольжения ко-
лес, что повышает устойчивость машины
в любых условиях.
Электромагнитный тормоз
Он встроен в переднее колесо (23) и за-
действуется, когда машина остановлена
или выключена.
10 -
49029600_Manuale RACER_RANGER_8ed_04-2023.indd 1149029600_Manuale RACER_RANGER_8ed_04-2023.indd 11 06/04/2023 15:44:2206/04/2023 15:44:22

www.ghibliwirbel.com
Professional Cleaning Machines Since 1968
РУССКИЙ - 12
10.1 - ЗАПОЛНЕНИЕ
РЕЗЕРВУАРA (Рис. D)
ОСТОРОЖНО:
Наполните резервуар чистой во-
дой с максимальной температурой
50 ° C.
- Используя съемный шланг (52), напол-
ните бак (13) водой.
- Не заполняйте бак полностью, исполь-
зуйте трубку уровня (18) в качестве
ориентира.
- Или, если возможно, откройте крыш-
ку (14) и воспользуйтесь разъемом
acquastop (53, если есть).
ОСТОРОЖНО:
Всегда визуально проверяйте уро-
вень заполнения, чтобы избежать
намокания пола.
- После наполнения бака закройте крыш-
ку (14).
ПРИМЕЧАНИЕ:
Для машин без химического набора на-
полните бак (13) чистой водой и смешайте
с химическим моющим средством.
Обязательно следуйте инструкциям по
разбавлению, приведенным на этикетке
упаковки химического вещества, исполь-
зованного для приготовления
моющего раствора.
10.2 - БИДОН МОЮЩЕГО
СРЕДСТВА/ХИМИЧЕСКОГО
ВЕЩЕСТВА (при его нали-
чии) (Рис. E)
ПРИМЕЧАНИЕ:
Используйте только непенящиеся мою-
щие средства. Для выполнения cледуйте
инструкциям изготовителя моющего сред-
ства и типа загрязнения.
- Поднимите бачок утилизации (11).
- Проверьте чтобы в бидоне (54) суще-
ствует достаточно продукта для целого
рабочего дня.
При замене бидона, поступайте следую-
щим образом:
- Удалите крышку (55), вытащите бидон
(54) и введите новый бидон на 5 ли-
тров, затем поставьте на место крышку
с засасывающей трубкой (55)..
ОПАСНО:
В случае попадания моющего сред-
ства в глаза и на кожу или в слу-
чае проглатывания см. инструкции
производителя моющего средства
по безопасности и использованию.
ПРИМЕЧАНИЕ:
Танки (54), которые будут использованы,
являются стандартного типа 5 литров, ко-
торый доступен в продаже.
- Осторожно опустите бак для грязной
воды (11).
- Удалите воздух (см. процедуру в разде-
ле «Кнопка дозирования химического
вещества»).
11 -
11.1 - ЭКСПЛУАТАЦИЯ
МАШИНЫ (Рис. A-F)
11.1.a - Kонтроль при
использовании
- Проверьте, что сливной шланг (15)
резервуарa для отработанной воды
правильно подсоединен и правильно
подключен.
- Проверьте что всасывающий шланг (16)
правильно подсоединен k резервуарy
для отработанной воды.
- Проверьте что соединитель (37) скреб-
ка (20) не забит и всасывающий шланг
(16 ) подключен правильно.
- Проверьте уровень заряда батареи при
повороте ключа (29) на “ON” индикатор
уровня заряда аккумулятора на дис-
плее (41).
49029600_Manuale RACER_RANGER_8ed_04-2023.indd 1249029600_Manuale RACER_RANGER_8ed_04-2023.indd 12 06/04/2023 15:44:2406/04/2023 15:44:24

www.ghibliwirbel.com
Professional Cleaning Machines Since 1968
РУССКИЙ - 13
11.1.b - Подготовка аппарата и вы-
бор цикла
- Сядьте на место управления.
- Машина имеет возможность выполнять
4 рабочих циклов:
Цикл мойки, чистки щетками, суш-
ки:
- Нажмите кнопку «Ready to go» (42) “
” для активации дозирования мо-
ющего средства, вращения щеток и
включения пылесоса.
Цикл только для сушки:
- Для выполнения функции лишь сушки
нажмите кнопку(44) “ ”, запускается
работа пылесоса.
Цикл только для чистки:
- Для выполнения функции лишь очистки
щеткой нажмите кнопку (46) “ ”, за-
пускается вращение щеток.
- Щетки начинают вращаться, когда ма-
шина с нажатой педалью ускорения
(7) начинает двигаться вперед и назад,
или при нажатой педали акселератора
и установке скорости движения на «0».
Цикл стирки, чистки:
- -Нажмите кнопку (46) “ ”для запуска
вращения щеток, нажмите кнопку (49)
“ ” для активирования использова-
ния воды.
- Вращение щеток и подача воды начи-
наются при нажатии педали акселера-
тора при движении вперед или назад,
или при установке скорости перемеще-
ния вперед не ниже 1-го деления.
11.1.c - Использование аппарата
ОПАСНО:
Уделять максимальное внимание
при использовании машины на
рампе, таким образом чтобы
предотвратить ситуаций, которые
могут влиять на устойчивость ма-
шины.
ОПАСНО:
Избегайте резких поворотов и де-
лать крутые повороты при пово-
роте руля на малых скоростях,
принимая во внимание почвенные
условия.
- Поверните ключ (29) в положение
«ON»; в первые 2 секунды после вклю-
чения дисплей (41) показывает тип
установленных аккумуляторов и время
работы машины.
- Выберите тип выполняемого рабочего
цикла.
- Введите требуемую рабочую скорость
с помощью кнопок (30).
- Включите проблесковый маячок (10,
опции) и рабочее освещение (9, опции).
- Выполните очистку при использовании
акселераторa (7).
ПРИМЕЧАНИЕ:
При отпускании педали акселератора, ро-
тационные щетки и поток воды они оста-
навливаются.
ПРИМЕЧАНИЕ:
Для правильного подметания/сушки по-
ловвыполняются при движении вперед;
при обратном направлении, скребок под-
нимается и всасывания воды с пола от-
ключена.
- Возможно отрегулируйте количество
моющего раствора с помощью кнопки
(49) “ ”.
- Проверьте уровень заряда батареи на
дисплее (41).
49029600_Manuale RACER_RANGER_8ed_04-2023.indd 1349029600_Manuale RACER_RANGER_8ed_04-2023.indd 13 06/04/2023 15:44:2606/04/2023 15:44:26

www.ghibliwirbel.com
Professional Cleaning Machines Since 1968
РУССКИЙ - 14
11.1.d - Oкончание использования
и остановка
- После окончания очистки выключите
в последовательности, ротационные
щетки и пылесос выключателемб с ис-
пользованием относительных элемен-
тов управления в зависимости от типа
цикла.
- Поверните ключ (29) к положение
“OFF”.
- Тормоз остановки активируется авто-
матически.
- Опорожните резервуар для отработан-
ной воды и резервуар для раствора с
помощьюкак указано в относительных
сечений.
ПРИМЕЧАНИЕ:
Тогда, когда оператор выходит из маши-
ны, автоматически активируется тормоз
остановки.
ОПАСНО:
Запрещается парковать машину на
пандус.
12 -
12.1 - СЛИВ ВОДЫ И
ВОССТАНОВЛЕНИЕ (Рис. H)
ОПАСНО:
Убедитесь, что резервуар для от-
работанной воды (11) пуст прежде
чем поднимать.
В конце цикла стирки, или когда резервуар
(11) для отработанной воды заполнен, не-
обходимо oпорожнить резервуарa, следу-
ющим образом:
ПРИМЕЧАНИЕ:
Для сливаотработанной воды, действо-
вать в соответствии с настоящими Прави-
лами в стране использовании устройства.
- Поставьте машину вблизи сливного ка-
нала.
- Отсоедините шланг (15) от специаль-
ных крючков, опустите его на сливной
трап.
- Отвинтите крышку (56) и полностью
слейте грязную воду, содержащуюся в
баке.
ПРИМЕЧАНИЕ:
Можно регулировать количество сбрасы-
ваемой воды, нажимая на длинный конец
трубки (15).
- Закрутите крышку (56) и установите
шланг (15) на опору.
13 -
13.1 - ОБСЛУЖИВАНИЕ И
ОЧИСТКА ПЫЛЕСОСА
ОСТОРОЖНО:
Для информации и предупрежде-
ний относительно операции очист-
ки и поддержания, прочитайте
инструкции, содержащиеся в бро-
шюре «ПРЕДОСТЕРЕЖЕНИЯ ПО
ТЕХНИКЕ БЕЗОПАСНОСТИ МЫТЬЯ
МАШИН».
13.2 - ЕЖЕДНЕВНО
ВЫПОЛНЯЕМЫЕ ОПЕРАЦИИ
13.2.a - Oпорожнение и очистка ре-
зервуара для сбора чистой
воды (Рис. I)
ОСТОРОЖНО:
В конце стиральных операции, не-
обходимо oпорожнить резервуар
(13) для отработанной воды, чтобы
избежать накопления.
После опорожнения резервуарa для от-
работанной воды oпорожнить резервуар
(13) следующим образом :
49029600_Manuale RACER_RANGER_8ed_04-2023.indd 1449029600_Manuale RACER_RANGER_8ed_04-2023.indd 14 06/04/2023 15:44:2606/04/2023 15:44:26

www.ghibliwirbel.com
Professional Cleaning Machines Since 1968
РУССКИЙ - 15
- Поставьте машину вблизи сливного ка-
нала.
- Отсоедините шланг (17) от крючков,
положил его на землю рядом вблизи
сливного канала, снимите крышку (57)
чтобы вода могла полностью стечь.
- Промыть внутри резервуара оставляя
сливного шланга открытым и введите
чистой воды сверху.
- После завершения цикла очистки, под-
нимите трубку (17), закройте крышку
(57) и прикрепите шланг и соответству-
ющие суставы.
13.2.b - Oчистка резервуара для
восстановленной воды
(Рис. J)
ОСТОРОЖНО:
В конце стиральных операции, не-
обходимо oпорожнить резервуар
для отработанной воды, чтобы из-
бежать накопления и распростра-
нения бактерий, запахов.
- Поднимите крышку (12).
- Выньте лоток для мусора (58) и открой-
те его крышку, затем промойте проточ-
ной водой, удалив все кусочки бумаги,
дерева и т. д.
- Снимите и промойте всасывающий
фильтр (59) проточной водой.
- Оставив сливной шланг (15 Рис. H)
опущенным, а крышку снятой, налей-
те воду через верхнее отверстие (60),
затем промойте бак изнутри, пока из
сливного шланга не пойдет чистая
вода.
- Соберите все, действуя в обратном по-
рядке.
13.2.c - Очистка скребкa (Рис. K)
Для того, чтобы очистить правильно
скребкa (20), необходимо удалить его сле-
дующим образом:
- Отсоедините всасывающий шланг (16
Рис. C) от скребка (20).
- Ослабьте ручки (36 Рис. C) и снимите
скребок (20).
- Промыть скребка и, oсобенно резино-
вые части (60) и (61) и внутри всасыва-
ющего патрубка (62).
ПРИМЕЧАНИЕ:
Если во время стирки вы заметили рези-
новые (60) и (61) шины были повреждены
или изношены, необходимо их заменить.
- Заменить все компоненты в порядке,
обратном описанной выше процедуре.
13.3 - ОПЕРАЦИИ
ВЫПОЛНЯЕМЫЕ КАЖДЫЕ 3
МЕСЯЦА
13.3.a - Проверить степень износа
рулевой цепи (Рис. L)
- Проверьте состояние износа и корро-
зии цепи (63) расположен под машину
возле переднего колеса.
- Если цепь показывает признаки корро-
зии должен быть заменен, обращени-
ем в службу Технической поддержки.
13.4 - ОПЕРАЦИИ
ВЫПОЛНЯЕМЫЕ В
НЕОБХОДИМОСТИ
13.4.a - Замена щетки (Рис. M)
Щетки нуждаются в замене когда они
имеют нить менее 2 см или заменены в
зависимости от типа пола для стирки для
замены, действуйте следующим образом:
- тавьте одну руку под щеткодержателя
(19), чтобы освободить щетку с резким
поворотом в противоположном направ-
лении.
- Установите новые щетки под щетко-
держателя (19).
- Садитесь в сиденье водителя и повер-
ните ключ (29 рис. F) в положении “ON”
- Posizionare la velocità di avanzamento
sul Установите скорость перемещения
на значение «0».
49029600_Manuale RACER_RANGER_8ed_04-2023.indd 1549029600_Manuale RACER_RANGER_8ed_04-2023.indd 15 06/04/2023 15:44:2606/04/2023 15:44:26

www.ghibliwirbel.com
Professional Cleaning Machines Since 1968
РУССКИЙ - 16
- Нажмите кнопку (46 рис. F) “ ”, что-
бы активировать вращение щеток; ще-
точный блок опустится.
- При нажатии на педаль акселератора
(7 рис. A) фланцы щеткодержателей
начинают вращаться, зацепляя щетки,
затем отпустите педаль.
- Снова нажмите кнопку (46 рис. F) “
” и поверните ключ (29 рис. F) в поло-
жение «OFF».
13.4.b - Регулировка резины брыз-
говика (Рис. M)
В зависимости от типа обрабатываемого
пола или после замены дисковых щеток
может потребоваться отрегулировать вы-
соту резинового брызговика (64).
Чтобы отрегулировать его, действуйте
следующим образом:
- Поверните ключ (29 pис. F) в положе-
ние «ON».
- Нажмите кнопку (46 pис. F) “ ”, что-
бы опустить головку щетки (19), затем
поверните ключ (29 pис. F) в положение
«OFF».
- Проверьте правильность высоты рези-
ны брызговика, как показано на рисун-
ке М.
- При необходимости вручную воздей-
ствуйте на резину, чтобы восстановить
правильную высоту.
ПРИМЕЧАНИЕ:
Правильная высота резины брызгозащит-
ного кожуха - это когда во время работы
при опускании насадки щетки сама резина
находится заподлицо с полом.
- По окончании регулировки снова вклю-
чите машину и нажмите кнопку (46 pис.
F) “ ”, затем поверните ключ (29
pис. F) в положение «OFF».
13.4.c - Замена резинового скреб-
ка (Рис. K)
Если вы заметили, что пол сложный или
сухой, что следы воды остаются, должны
проверить состояние износа шин скребка
(20):
- Удалить группу сопло (20), указанная в
пункте « Oчистка скребка».
- Нажмите на кнопку блокирующего ме-
ханизма (65) и откройте ручку (66).
- Снимите два зажима шины (67) и сни-
мите наружную шину (60).
- Ослабьте два талрепы (69) и удалите
фиксирующий стержень (69) и внутрен-
нею шину (61).
ПРИМЕЧАНИЕ:
Если шины (60) или (61) изношены на од-
ной стороне только один раз, можно по-
ставить наоборот.
- Заменить или повернуть шин (60) или
(61) без разворота.
- Соберите все в обратном порядке.
ПРИМЕЧАНИЕ:
Вы можете иметь два типа шин:
Простые резиновые шины для всех типов
полов и шины полиуретановые в семина-
рах c нефтяной грязи.
13.4.d - Pегулировка угла наклона
скребка (Рис. N)
- Запустите машину и нажмите кнопку
(44 рис. F) “ ”.
- Установите максимальную скорость
на 1-е деление с помощью кнопок (30
рис. F), нажмите педаль акселератора
(7 рис. A) и проедьте несколько метров,
затем выключите и выйдите из маши-
ны.
49029600_Manuale RACER_RANGER_8ed_04-2023.indd 1649029600_Manuale RACER_RANGER_8ed_04-2023.indd 16 06/04/2023 15:44:2606/04/2023 15:44:26

www.ghibliwirbel.com
Professional Cleaning Machines Since 1968
РУССКИЙ - 17
- Регулировка резьбовой шпильки (70)
для регулировки угла падения скребкa
на земле (60) и (61), При повороте по
часовой стрелке, если угол падения
выше, и наоборот, если есть более низ-
кий уровень.
ПРИМЕЧАНИЕ:
Угол падения считается правильным,
если в эксплуатации нет утечки жидкости
на пол,и когда скребки имеют постоянный
угол падения по всей длине.
13.4.e - Регулировка давления сте-
клоочистителя (Рис. O)
В зависимости от типа обрабатываемого
пола или после замены резиновых рези-
новых швабр может потребоваться регу-
лировка давления на пол швабры.
Чтобы отрегулировать его, действуйте
следующим образом:
- Поднимите резервуар возвратной воды
(11), убедившись, что он пустой.
- Поверните регулировочный винт (71),
учитывая, что:
• При повороте по часовой стрелке
давление ракеля на дно уменьша-
ется.
• Вращение против часовой стрелки
увеличивает давление ракеля на
пол.
- По окончании регулировки осторожно
опустите бак возвратной воды (11).
13.4.f - Очистка фильтра чистой
воды (Рис. P)
- Удостоверьтесь, что резервуар (13 Рис.
A) пустой.
- Снимите крышку (22) и снимите кар-
тридж фильтра (72).
- Очистите картридж фильтра (72) про-
точной водой.
- Установите снова все в обратном на-
правление и удостоверьтесь, что про-
кладка (73) была установлена правиль-
но.
13.4.g - Сливной кран батарейного
отсека (Рис. А)
- Периодически проверяйте, чтобы в ба-
тарейном отсеке не было застоев воды.
- При необходимости расположите ма-
шину рядом со сливом, отцепите труб-
ку и откройте кран (74), затем слейте
жидкости.
ОСТОРОЖНО:
В тех случаях, когда предусма-
тривается использование свинцо-
во-кислотных батарей, обратите
пристальное внимание на любую
утечку жидкости из самих батарей,
связанные с этим риски и правила
утилизации жидких опасных ве-
ществ.
13.4.h - Проверка износa 3 колеса
(Рис. A)
- Регулярно проверяйте износ трех коле-
сах (8) а также (23), если они изношены
или повреждены должны быть замене-
ны в службу технической поддержки.
ОПАСНО:
Движение на изношенных, повреж-
денных шинах, представляет опас-
ность для оператора, прибор мо-
жет иметь пониженную сцепление
в поворотах.
14 -
49029600_Manuale RACER_RANGER_8ed_04-2023.indd 1749029600_Manuale RACER_RANGER_8ed_04-2023.indd 17 06/04/2023 15:44:2706/04/2023 15:44:27

www.ghibliwirbel.com
Professional Cleaning Machines Since 1968
РУССКИЙ - 18
14.1 - НАСТРОЙКИ
ПАРАМЕТРЫ (Рис. F)
14.1.a - Параметры ОПЕРАТОРА
Оператор имеет возможность перейти к
меню для установки следующих параме-
тров:
• Язык
• Тип батарей
• Дисплей - Контрастность
• Дисплей - Яркость
Для доступа к меню выполните следую-
щие действия:
- Нажмите и удерживайте кнопки (31a) “
” и (31b) “ ”, затем поверни-
те ключ включения (29) в положение
«ON», чтобы отобразить следующую
страницу:
General
General
Sets
Sets
--ID Check--
--ID Check--
insert password:
insert password:
0
0
000
000
General Sets Общие настройки
ID Check контроля
Insert password Введите пароль
- Отпустите нажатые кнопки.
- Введите 4-значный пароль «0010», на-
жимая кнопки (30a) “ ” или (30b) “
” для изменения мигающей цифры.
- Нажмите кнопку (43) “ ” чтобы под-
твердить и перейти к следующей циф-
ре, затем подтвердите пароль и войти в
список параметров.
- Нажмите кнопку (31a) “ ” или (31b) “
” для просмотра следующих стра-
ниц:
General
General
Language
Language
Main
Main
selection:
selection:
ITA
ITA
General Main Основная конфигурация
Language selection Выбор языка
General
General
Battery
Battery
Main
Main
Type:
Type:
GEL
GEL
General Main Основная конфигурация
Battery Type Выбор типа аккумулятора
General
General
Display
Display
min:0
min:0
max:50
max:50
Main
Main
Tune:
Tune:
15
15
General Main Основная конфигурация
Display Tune Контрастность дисплея
General
General
Display
Display
min:0
min:0
max:10
max:10
Main
Main
Brightness:
Brightness:
0
0
General Main Основная конфигурация
Display Brightness Яркость дисплея
49029600_Manuale RACER_RANGER_8ed_04-2023.indd 1849029600_Manuale RACER_RANGER_8ed_04-2023.indd 18 06/04/2023 15:44:3406/04/2023 15:44:34

www.ghibliwirbel.com
Professional Cleaning Machines Since 1968
РУССКИЙ - 19
Настройка языка:
General
General
Language
Language
Main
Main
selection:
selection:
ITA
ITA
General Main Основная конфигурация
Language selection Выбор языка
- Выберите язык с помощью кнопок (30a)
“ ” или (30b) “ ”, затем нажмите
кнопку (43) “ ”, чтобы подтвердить
выбор.
-RU = русский
-ENG = английский
Установка типа аккумулятора:
General
General
Battery
Battery
Main
Main
Type:
Type:
GEL
GEL
General Main Основная конфигурация
Battery Type Выбор типа аккумулятора
- Выберите тип аккумулятора с помощью
кнопок (30a) “ ” или (30b) “ ”, за-
тем нажмите кнопку (43) “ ”, чтобы
подтвердить выбор.
-GEL = гелевый аккумулятор
-AGM = аккумулятор AGM
-WET = кислотный аккумулятор
Настройка дисплея - Контраст-
ность:
General
General
Display
Display
min:0
min:0
max:50
max:50
Main
Main
Tune:
Tune:
15
15
General Main Основная конфигурация
Display Tune Контрастность дисплея
- Выберите значение контрастности дис-
плея, установив значение от 0 до 50 с
помощью кнопок (30a) “ ” или (30b)
“ ”, затем нажмите кнопку (43) “
”, чтобы подтвердить выбор.
Настройка дисплея - Яркость:
General
General
Display
Display
min:0
min:0
max:10
max:10
Main
Main
Brightness:
Brightness:
0
0
General Main Основная конфигурация
Display Brightness Яркость дисплея
- Выберите значение яркости дисплея,
установив значение от 0 до 10 с помо-
щью кнопок (30a) “ ” или (30b) “
”, затем нажмите кнопку (43) “ ”, что-
бы подтвердить выбор.
ПРИМЕЧАНИЕ:
После подтверждения выбранной на-
стройки машина перезапускается, и ди-
сплей (41) загорается в рабочем режиме
работы.
15 -
49029600_Manuale RACER_RANGER_8ed_04-2023.indd 1949029600_Manuale RACER_RANGER_8ed_04-2023.indd 19 06/04/2023 15:44:3506/04/2023 15:44:35

www.ghibliwirbel.com
Professional Cleaning Machines Since 1968
РУССКИЙ - 20
15.1 - ПРОВЕРКА/ЗАМЕНА ПРЕДОХРАНИТЕЛЕЙ
ПРИМЕЧАНИЕ:
Все электрические цепи машины защищены электронными устройствами с функцией
автоматического возврата в исходное положение. Предохранители срабатывают толь-
ко в случае серьезного повреждения.
Рекомендуется привлекать к замене предохранителей только квалифицированный пер-
сонал.
16 -
16.1 - СИГНАЛИЗАЦИЯ ВО ВРЕМЯ ДЕЙСТВИЯ
Когда происходит сбой в работе машины, на дисплее появляется тип аварийного сигна-
ла (41 рис. F), как указано в списке ниже.
Просмотрите список и используйте рекомендуемый способ решения проблемы, чтобы
восстановить работоспособность машины.
Если рекомендованные способы не помогли, обратитесь в службу технической под-
держки.
АВАРИЙНЫЙ
СИГНАЛ
ЗНАЧЕНИЕ СПОСОБ УСТРАНЕНИЯ
AL_1: General Ошибка памяти Перезапустите машину.
AL_2: General Сбой ключа Выключите машину минимум на 10 секунд,
затем снова включите.
AL_3: General Низкое напряжение
Выключите машину, проверьте состояние за-
ряда аккумулятора, предохранители, контак-
ты, проводку и соединения и перезапустите
машину.
AL_4: General Перенапряжение
Выключите машину, проверьте предохраните-
ли, контакты, проводку и соединения и переза-
пустите машину.
AL_6: General Нет связи с панелью
управления или дис-
плеем
Выключите машину, проверьте контакты, про-
водку и соединения и перезапустите машину.
AL_7: General Связь ffm
Выключите машину, проверьте контакты, про-
водку и соединения с модулем связи, а так же
его работу и перезапустите машину.
AL_8: General Внутренняя связь 1 и 2 Перезапустите машину.
AL_9: General
AL_10: General Сообщение «вставить» Отображение сообщения «вставить ключ»:
вставьте ключ.
AL_11: General Сообщение «недействи-
тельный»
Отображение сообщения «ключ недействи-
тельный»: поменяйте ключ или ключ повреж-
ден.
49029600_Manuale RACER_RANGER_8ed_04-2023.indd 2049029600_Manuale RACER_RANGER_8ed_04-2023.indd 20 06/04/2023 15:44:3506/04/2023 15:44:35

www.ghibliwirbel.com
Professional Cleaning Machines Since 1968
РУССКИЙ - 21
АВАРИЙНЫЙ
СИГНАЛ
ЗНАЧЕНИЕ СПОСОБ УСТРАНЕНИЯ
AL_12: General Выполняется обновле-
ние...
Отображение удаленного обновления параме-
тров: дождитесь завершения обновления.
AL_13: General Выключите Отображение завершения обновления параме-
тров: перезагрузите машину.
AL_41: Function Перегрев
Отключите машину и дайте ей остыть. Про-
верьте потребление тока двигателями привода
щеток и пылесоса, вентиляцию помещения и
перезапустите.
AL_42: Function Недостаточная мощ-
ность
Выключите машину минимум на 10 секунд,
затем снова включите.
AL_44: Function Неисправное реле
Реле/дистанционный выключатель не замкнут.
Проверьте работу дистанционного выключа-
теля. В случае наличия реле, если проблему
устранить не удается, замените плату.
AL_45: Function Неисправное реле сс
Обнаружено замыкание реле/дистанционного
выключателя при включении питания. Про-
верьте состояние контактов дистанционного
выключателя. В случае наличия реле, если
проблему устранить не удается, замените
плату.
AL_46: Function Превышение тока Щетки
Выключите машину, проверьте нагрузку
(двигатель), механические узлы, проводку и
соединения, а также наличие короткого замы-
кания на выходе, затем перезапустите.
AL_47: Function Превышение тока Вса-
сывающее устройство
Выключите машину, проверьте нагрузку
(двигатель), механические узлы, проводку и
соединения, а также наличие короткого замы-
кания на выходе, затем перезапустите.
AL_48: Function Превышение тока Насос
подачи воды
Выключите машину, проверьте нагрузку
(двигатель), механические узлы, проводку и
соединения, а также наличие короткого замы-
кания на выходе, затем перезапустите.
AL_49: Function Амперометрическая
система Щетка 1 и 2
Проверьте потребление тока и способ исполь-
зования щеток и перезапустите машину.
AL_50: Function
AL_52: Function Амперометрическая
система пылесоса 1
Проверьте потребление тока при работе пыле-
соса и перезапустите машину.
AL_54: Function Соединение Щетка 1 и 2 Проверьте соединение двигателей щеток.
AL_55: Function
AL_57: Function Соединение пылесоса 1 Проверьте соединение двигателя пылесоса.
AL_59: Function Дисбаланс Проверьте потребление тока двигателей щеток
49029600_Manuale RACER_RANGER_8ed_04-2023.indd 2149029600_Manuale RACER_RANGER_8ed_04-2023.indd 21 06/04/2023 15:44:3506/04/2023 15:44:35

www.ghibliwirbel.com
Professional Cleaning Machines Since 1968
РУССКИЙ - 22
АВАРИЙНЫЙ
СИГНАЛ
ЗНАЧЕНИЕ СПОСОБ УСТРАНЕНИЯ
AL_61: Function Амперометрическая
система привода щеток
Проверьте потребление тока электродвигателя
привода и состояние приводимых механиче-
ских узлов.
AL_62: Function Превышение тока приво-
да щеток
Выключите машину, проверьте нагрузку
(двигатель), механические узлы, проводку и
соединения, а также наличие короткого за-
мыкания на выходе.
AL_63: Function Концевой выключатель
привода щеток
Проверить соединения/состояние концевого
выключателя. Проверка действительна только
для версии BTO.
AL_65: Function Амперометрическая
система привода всасы-
вающей балки
Проверьте потребление тока электродвигателя
привода и состояние приводимых механиче-
ских узлов.
AL_66: Function Превышение тока приво-
да всасывающей балки
Выключите машину, проверьте нагрузку
(двигатель), механические узлы, проводку и
соединения, а также наличие короткого за-
мыкания на выходе.
AL_80: Traction Перегрев тягового
двигателя
Отключите машину и дайте ей остыть. Про-
верьте потребление тока и способ использова-
ния тягового двигателя, вентиляцию помеще-
ния и перезапустите.
AL_85: Traction Превышение тока тяго-
вого двигателя
Выключите машину, проверьте нагрузку
(двигатель), механические узлы, проводку и
соединения, а также наличие короткого замы-
кания на выходе, затем перезапустите.
AL_86: Traction Амперометрическая
система тягового дви-
гателя
Проверьте потребление тока и способ исполь-
зования тягового двигателя и перезапустите
машину.
AL_87: Traction Считывание тягового
двигателя Перезапустите машину.
AL_88: Traction Неисправность электро-
тормоза
Выключите машину, проверьте проводку
тормоза и снова включите.
AL_89: Traction Неисправность педали
акселератора
Выключите машину, проверьте соединения и
проводку и снова включите.
AL_90: Traction Педаль акселератора
нажата Отпустите педаль и снова включите машину.
AL_91: Traction Неисправность энкодера Выключите машину проверьте соединения и
проводку и снова включите.
17 -
49029600_Manuale RACER_RANGER_8ed_04-2023.indd 2249029600_Manuale RACER_RANGER_8ed_04-2023.indd 22 06/04/2023 15:44:3506/04/2023 15:44:35

www.ghibliwirbel.com
Professional Cleaning Machines Since 1968
РУССКИЙ - 23
17.1 - ПОИСК ПРОБЛЕМЫ
ПРОБЛЕМЫ ПРИЧИНЫ УСТРАНЕНИЯ
При повороте ключа маши-
на не заводится.
Разряженные аккумулято-
ры.
Проверьте состояние заря-
да батареи.
Общий переключатели яв-
ляется сожжен.
Заменить предохранитель
расположен на кабель ба-
тареи. (*)
Сломанный ключ.Замените ключ. (*)
Щeткa не вращается.Сломанный мотор.Замените мотор. (*)
Сломанная карточка.Замените карточку. (*)
Пылесос не работает.Резервуар для отработан-
ной воды полон.
Опорожнитe pезервуар.
Сломанный мотор турбины.Замените мотор. (*)
Сломанная карточка.Замените карточку. (*)
Машина не сушит или не
сушит хорошо оставляя
влажных следов.
Пылесос выключен.Включите Пылесос.
Всасывающая труба заби-
та.
Проверьте и при необхо-
димости очистить всасы-
вающую трубку, которая
скребок и резервуар для от-
работанной воды.
Резервуар для отработан-
ной воды полон.
Опорожнитe pезервуар для
отработанной воды.
Изношенные шины скребка.Заменить или повернуть
шины скребка.
Вода не выходит.Резервуар пуст.Заполните pезервуар.
Фильтр заблокирован.Очистите фильтр.
Электромагнитный клапан
насоса не работает.
Заменить насос электро-
магнитного клапана. (*)
Сломанный водяной насос.Замените водяной насос.
(*)
Сломанная карточка.Замените карточку. (*)
49029600_Manuale RACER_RANGER_8ed_04-2023.indd 2349029600_Manuale RACER_RANGER_8ed_04-2023.indd 23 06/04/2023 15:44:3506/04/2023 15:44:35

www.ghibliwirbel.com
Professional Cleaning Machines Since 1968
РУССКИЙ - 24
ПРОБЛЕМЫ ПРИЧИНЫ УСТРАНЕНИЯ
Машина не двигается в ра-
бочем состоянии.
Оператор не правильно
вставлен в сиденье води-
теля.
Правильно сидеть на сиде-
нье.
Сломанное ведущее колесо
.Замените ведущее колесо.
(*)
Сломанная карточка.Замените карточку. (*)
Датчик присутствия операто-
ра в сиденье неисправен
.
Замените датчик. (*)
Недостаточной очистки
пола.
Щeтки или неподходящие
моющие средства.
Используйте щетки или чи-
стящие средства соответ-
ствующие типy пола или
грязи.
Щeтки изношеныe.Заменить щетки.
Цветовой сигнал “ ” бидон
с раствором пустой продол-
жает мигать.
Пустой бидон.Заполните бидон.
Кран закрыт.Откройте кран.
Неисправный расходомер. Заменить расходомер. (*)
V prostoru pro baterie
dochází ke stagnaci vody.
Vadný snímač hladiny sběrné
nádrže.
Vypusťte vodu z přihrádky
na baterie pomocí příslušné
trubky a kohoutku.
Zkontrolujte nebo vyměňte
snímač hladiny. (*)
(*) Обратитесь за помощью для замены.
18 -
18.1 - СНОС АППАРАТА
ОПАСНО:
Батареи и электрические детали считаются специальными отходами и
поэтому должны утилизироваться в специальных центрах сбора, как ука-
зано в правилах, действующих в стране использования.
19 -
49029600_Manuale RACER_RANGER_8ed_04-2023.indd 2449029600_Manuale RACER_RANGER_8ed_04-2023.indd 24 06/04/2023 15:44:3506/04/2023 15:44:35

www.ghibliwirbel.com
Professional Cleaning Machines Since 1968
РУССКИЙ - 25
19.1 - ЭЛЕКТРИЧЕСКАЯ СХЕМА
Условные обозначения:
AC
Акселератор
BAT
Аккумуляторные батареи
BC
Аккумуляторное зарядное устройство
BE
Проблесковый маячок
BRK
Электромагнитный тормоз
C1
Разъем аккумулятора
EB1
Функциональная плата
EB2
Дисплей
EB3
Панель управления
EV
Электроклапан
F1
Плавкий предохранитель зарядного
устройства (1 А)
F2
Плавкий предохранитель освещения
(при наличии) (3 А)
F3
Плавкий предохранитель клаксона (1 А)
F4
Плавкий предохранитель проблескового
маячка (1 А)
F5
Плавкий предохранитель электроклапа-
на (5 А)
F6
Плавкий предохранитель щеточного
узла (10 А)
F7
Плавкий предохранитель привода вса-
сывающей балки (10 А)
F8
Плавкий предохранитель электротормо-
за (7,5 А)
F9
Плавкий предохранитель водяного на-
соса (5 А)
F10
Плавкий предохранитель насоса хими-
ческого вещества (если имеется ) (5 А)
F11
Плавкий предохранитель двигателя
пылесоса (40 А)
F12
Плавкий предохранитель двигателя
правой щетки (40 А)
F13
Плавкий предохранитель двигателя
левой щетки (40 А)
F14
Плавкий предохранитель тягового дви-
гателя (100 А)
HN
Клаксон
KEY
Ключ зажигания
L1
Рабочие фары (если есть)
MA
Двигатель пылесоса
MAS
Двигатель привода щеточного узла
MAT
Двигатель привода всасывающей балки
MS-DX
Двигатель правой щетки
MS-SX
Двигатель левой щетки
MT
Тяговый двигатель
PA
Насос подачи воды
PC
Насос химического вещества
PE
Кнопка аварийного останова
S1
Датчик уровня грязной воды
SW1
Микровыключатель сиденья
TE
Внешний дистанционный выключатель
Коды цветов:
BK Черный
BU Голубой
BN Коричневый
GN Зеленый
GY Серый
OG Оранжевый
PK Розовый
RD Красный
VT Фиолетовый
WT Белый
YE Желтый
49029600_Manuale RACER_RANGER_8ed_04-2023.indd 2549029600_Manuale RACER_RANGER_8ed_04-2023.indd 25 06/04/2023 15:44:3506/04/2023 15:44:35

www.ghibliwirbel.com
Professional Cleaning Machines Since 1968
РУССКИЙ - 26
PA MT PC EV
- +
-
-
-
-
+ -+ -+
+
+
+
MA MS MS
DX SX
C1
BC
TE
EB2
EB3
KEY
L1
BE
F4
F1
F2
F8
F9 F14 F10 F5 F11 F12 F13
F7
F6
F3
BRK
AC
M
SW1
M5
J8
4 3
2 1
4 3
2 1
1
4
2
5
3
6
9
1
10
2
11
3
4
1
5
2
6
3
4
1
5
2
6
3
4
1
5
2
6
3
12
4
4
8
1
2
3
7
2
6
1
5
3
6
2
5
1
1
12
3s
+
-
2
1
1
2
3
4
2 3
123
456 4
1
11
2
12
3
13
4
14
5
15
6
16
7
17
8
18
9
19
10
20
4
9
3
8
5
10
2
7
1
6
13
5
16
8
15
7
14
6
2
1
J9 J10 J11
J1
J8 J7
J2
S1
J3 J4 J5 J7J6
J12 J13 J14
M6
USB
HN
BATBAT MATMAT
PEPE
MASMAS
EB1
49029600_Manuale RACER_RANGER_8ed_04-2023.indd 2649029600_Manuale RACER_RANGER_8ed_04-2023.indd 26 06/04/2023 15:44:3706/04/2023 15:44:37

www.ghibliwirbel.com
Professional Cleaning Machines Since 1968
POLSKI - 1
Drogi Kliencie,
dziękujemy za wybranie naszego produktu do czyszczenia.
Zmywarko-suszarka do podłóg zakupiona przez Państwa została zaprojektowana, by
zadowolić wymagania klientów związane z prostotą użytkowania i niezawodnością wraz
z upływem czasu.
Jesteśmy świadomi tego, że aby dobry produkt pozostał taki wraz z upływem czasu, ko-
nieczne są ciągłe aktualizacje, mające na celu spełnienie oczekiwań osób, które używają
go na co dzień. W związku z tym, życzylibyśmy sobie, by byli Państwo nie tylko zado-
woleni, ale również by stali się Państwo naszym partnerem, nie wahając się przekazać
opinii i pomysłów, wynikających z codziennych doświadczeń.
49029600_Manuale RACER_RANGER_8ed_04-2023.indd 149029600_Manuale RACER_RANGER_8ed_04-2023.indd 1 06/04/2023 15:44:3706/04/2023 15:44:37

www.ghibliwirbel.com
Professional Cleaning Machines Since 1968
POLSKI - 2
SPIS TREŚCI
SPIS TREŚCI .................................................................................................................................. 2
PARAMETRY TECHNICZNE ..........................................................................................................3
1.1 - WSTĘP .................................................................................................................................5
1.1.a - Stanowisko operatora ................................................................................................... 5
1.1.b - Podstawowe informacje dotyczące eksploatacji maszyny ........................................... 5
1.2 - NIEPRAWIDŁOWE UŻYTKOWANIE MASZYNY ................................................................ 5
2.1 - ZNAJOMOŚĆ MASZYNY (Rys. A) ..................................................................................... 5
3.1 - ROZPAKOWANIE (Rys. B) .................................................................................................5
3.1.a - Montaż akumulatora (Rys. A) ....................................................................................... 6
3.1.b - Rozładunek maszyny z drewnianej palety (Rys. B) ...................................................... 6
4.1 - MONTAŻ KOMPONENTÓW ................................................................................................ 6
4.1.a - Montaż wycieraczki do podłóg (Rys. C) ....................................................................... 6
4.1.b - Instalacja szczotek ....................................................................................................... 6
5.1 - ŁADOWANIE AKUMULATORA........................................................................................... 6
5.1.a - Ładowanie akumulatora w zewnętrznej ładowarce (Rys. G) ....................................... 7
5.1.b - Ładowanie akumulatora za pomocą wbudowanej ładowarki (jeśli jest) (Rys. G) ......... 7
6.1 - OPIS POLECEŃ MASZYNY ................................................................................................7
6.1.a - Panel sterowania (Rys. F) ............................................................................................ 7
6.1.b - Pedał przyspieszenia (Rys. A) .................................................................................... 10
7.1 - WYŚWIETLACZ (Rys. F) .................................................................................................. 10
8.1 - ZATRZYMANIE AWARYJNE ............................................................................................. 11
9.1 - BEZPIECZEŃSTWO (Rys. A) .......................................................................................... 11
10.1 - NAPEŁNIANIE ZBIORNIKA (Rys. D) ...............................................................................12
10.2 - POJEMNIK NA DETERGENT / ŚRODEK CHEMICZNY (jeśli obecny) (Rys. E) ............ 12
11.1 - DZIAŁANIE (Rys. A-F) ...................................................................................................... 12
11.1.a - Kontrole przed użyciem .............................................................................................. 12
11.1.b - Przygotowanie maszyny i wybór cyklu ....................................................................... 13
11.1.c - Eksploatacja maszyny ................................................................................................ 13
11.1.d - Zakończenie użytkowania i wyłączenie ...................................................................... 14
12.1 - ODPROWADZENIE ZANIECZYSZCZONEJ WODY (Rys. H) .......................................... 14
13.1 - KONSERWACJA I CZYSZCZENIE ................................................................................... 14
13.2 - CZYNNOŚCI, KTÓRE NALEŻY WYKONYWAĆ CODZIENNIE ....................................... 14
13.2.a - Opróżnianie i czyszczenie
zbiornika wody czystej (Rys. I) ............................................. 14
13.2.b - Czyszczenie zbiornika zanieczyszczonej wody (Rys. J) ............................................ 15
13.2.c - Montaż wycieraczki do podłóg (Rys. K) ...................................................................... 15
13.3 - CZYNNOŚCI, KTÓRE NALEŻY WYKONYWAĆ CO 3 MIESIĄCE ................................... 15
13.3.a - Kontrola zużycia łańcucha
drążka kierowniczego (Rys. L) .............................................15
13.4 - CZYNNOŚCI, KTÓRE NALEŻY WYKONYWAĆ W RAZIE POTRZEBY .......................... 15
13.4.a - Wymiana szczotek (Rys. M) ....................................................................................... 15
13.4.b - Regulacja gumowej osłony przeciwbryzgowej (Rys. M) ............................................. 16
13.4.c - Wymiana gumy ssawy (Rys. K) .................................................................................. 16
13.4.d - Regulacja kąta wycieraczki (Rys. N) .......................................................................... 16
13.4.e - Regulacja docisku wycieraczek (Rys. O) ................................................................... 17
13.4.f - Czyszczenie zbiornika czystej wody (Rys. P) ............................................................. 17
13.4.g - Kran spustowy komory baterii (Rys. A) ....................................................................... 17
13.4.h - Kontrola zużycia trzech kół (Rys. A) ........................................................................... 17
14.1 - USTAWIENIE PARAMETRÓW (Rys. F) ............................................................................ 18
14.1.a - Parametry OPERATORA ............................................................................................ 18
15.1 - SPRAWDZANIE / WYMIANA BEZPIECZNIKÓW ............................................................. 20
16.1 - ALARMY PODCZAS PRACY ............................................................................................20
17.1 - ROZWIĄZYWANIE PROBLEMÓW ................................................................................... 23
18.1 - ROZBIÓRKA MASZYNY ................................................................................................... 24
19.1 - SCHEMAT ELEKTRYCZNY .............................................................................................. 25
49029600_Manuale RACER_RANGER_8ed_04-2023.indd 249029600_Manuale RACER_RANGER_8ed_04-2023.indd 2 06/04/2023 15:44:3806/04/2023 15:44:38

www.ghibliwirbel.com
Professional Cleaning Machines Since 1968
POLSKI - 3
PARAMETRY TECHNICZNE
RACER R 85 RANGER R 115
FD 65 FD 75 FD 75 FD 85
Typ prowadzenia Operator w urządzeniu
Charakterystyka
Działanie i zasilanie Akumulator 24 V
Rodzaj akumulatora
N° 2 - 12V 105Ah (C5) N° 4 - 6V 240Ah (C5)
N° 4 - 6V 180Ah (C5) N° 1 - 24V 320Ah (C5)
N° 1 - 24V 100Ah (Li) N° 1 - 24V 150Ah (Li)
Moc zainstalowana 2160 W 2210 W
Czas działania
2 godziny (105Ah C5) 5 godziny (240Ah C5)
4 godziny (180Ah C5) 7 godziny (320Ah C5)
2 godziny (100Ah Li) 3 godziny (150Ah Li)
Przesuw Przesuw do przodu / do tyłu
Szerokość toru mycia 650 mm 750 mm 750 mm 850 mm
Szerokość zasysania 850 mm 950 mm 950 mm 1050 mm
Teoretyczna wydajność godzinowa 4000 m2/h 4500 m2/h 4500 m2/h 5000 m2/h
Rzeczywista wydajność godzinowa 2400 m2/h 2700 m2/h 2700 m2/h 3000 m2/h
Wibracje systemu ręka - ramię
(ISO 5349-1) < 2,5 m/s2
Wibracja całego ciała (ISO 2631-1) < 0,5 m/s2
Ciśnienie akustyczne (ISO 11203) (LpA) 63 dB(A)
Ciśnienie akustyczne tryb cichy (LpA) 57 dB(A)
Klasa zabezpieczeń IP IPX3
Szczotki
Średnica / pad / liczba 330 mm /
13” / 2
380 mm /
15” / 2
380 mm /
15” / 2
430 mm /
17” / 2
Moc silnika / liczba 500 W / 2
Prędkość szczotki 165 obr./min.
Specyficzne ciśnienie 30 gr/cm221 gr/cm221 gr/cm217 gr/cm2
Specyficzne ciśnienie (dodatkowe ciśnienie)
46 gr/cm232 gr/cm243 gr/cm234 gr/cm2
49029600_Manuale RACER_RANGER_8ed_04-2023.indd 349029600_Manuale RACER_RANGER_8ed_04-2023.indd 3 06/04/2023 15:44:3806/04/2023 15:44:38

www.ghibliwirbel.com
Professional Cleaning Machines Since 1968
POLSKI - 4
RACER R 85 RANGER R 115
FD 65 FD 75 FD 75 FD 85
Napęd
Maksymalne nachylenie podczas czysz-
czenia 2 %
Maksymalne nachylenie, które może
pokonać bez obciążenia (*) 12 %
Moc silnika 600 W
Prędkość maksymalna przesuw podczas
pracy 6 km/h
Ssanie
Moc silnika 550 W
Podciśnienie (słup wody) 125 mbar / 1250 mmH2O
Wydatek powietrza 30 l/sec
Zbiornik
Rodzaj Podwójny zbiornik
Pojemność roztworu 80 l 110 l
Pojemność zbiornika zanieczyszczonej
wody 85 l 115 l
Wymiary
Wymiary maszyny
(Długość x szerokość x wysokość) 1375 x 705 x 1230 mm 1470 x 770 x 1365 mm
Szerokość maszyny - zespół szczotek 715 mm 785 mm 785 mm 890 mm
Szerokość maszyny - ściągaczka 885 mm 950 mm 950 mm 1055 mm
Rozmiar komory akumulatora
(długość x szerokość x wysokość) 380 x 540 x 310 mm 380 x 625 x 440 mm
Ciężar
Ciężar bez obciążenia 213 kg 246 kg
Ciężar z baterią Gel 12V 105Ah 285 kg -
Ciężar z baterią Gel 6V 180Ah 333 kg -
Ciężar z baterią litową 24V 100Ah 249 kg -
Ciężar z baterią Gel 6V 240Ah - 432 kg
Ciężar z baterią Pb Wet 24V 320Ah -506 kg
Ciężar z baterią litową 24V 150Ah -288 kg
Ciężar podczas eksploatacji (GVW) 490 kg 691 kg
(*) Maszyna została przetestowana w następujących warunkach:
• Bateria standardowa
• Puste zbiorniki
• Rampa z surowego betonu
• Długość rampy 15 m
• 75 kg operatora
1 -
49029600_Manuale RACER_RANGER_9ed_09-2023.indd 449029600_Manuale RACER_RANGER_9ed_09-2023.indd 4 04/09/2023 14:55:0304/09/2023 14:55:03

www.ghibliwirbel.com
Professional Cleaning Machines Since 1968
POLSKI - 5
1.1 - WSTĘP
PAMIĘTAJ:
Numery i odniesienia do rysunków w nawia-
sach odnoszą się do elementów wskazanych
w załączonym arkuszu ilustracyjnym.
NIEBEZPIECZEŃSTWO:
Przed użyciem maszyny, przeczytać
uważnie broszurę „OSTRZEŻENIA
DOTYCZĄCE BEZPIECZEŃSTWA
PODCZAS EKSPLOATACJI ZMY-
WARKO - SUSZARKI DO PODŁÓG”
załączoną do niniejszego dokumentu
oraz informacje uzupełniające poda-
ne poniżej.
1.1.a - Stanowisko operatora
Podczas użytkowania maszyny, operator
siedzi na siedzeniu, trzymając ręce na kie-
rownicy.
1.1.b - Podstawowe informacje
dotyczące eksploatacji
maszyny
- NIE zostawiać nigdy maszyny na po-
wierzchniach o pochyleniu.
- Kategorycznie zabrania się skręcania na
rampie z uwagi na ryzyko przewrócenia.
- Unikać stosowania maszyny w otoczeniu
zagrożonym upadkiem przedmiotów.
1.2 - NIEPRAWIDŁOWE
UŻYTKOWANIE MASZYNY
- Nie używać maszyny z otwartym zbiorni-
kiem zanieczyszczonej wody;
- Nie prowadzić maszyny w pozycji, w któ-
rej stopy / nogi nie mają podparcia;
- Nie wykonywać gwałtownych ruchów kie-
rownicą, zwłaszcza na spadkach.
OSTROŻNIE:
Maszyna nadaje się do transportu
JEDNEJ osoby.
2 -
2.1 - ZNAJOMOŚĆ MASZYNY
(Rys. A)
(1) Kierownica
(2) Pulpit sterowania
(3) Siedzenie
(4) Czujnik obecności operatora
(5) WYŁĄCZNIK awaryjny służący do
natychmiastowego zatrzymania wszyst-
kich funkcji
(6) Stopień do oparcia stóp
(7) Pedał przyspieszenia
(8) Koła tylne
(9) Lampa zabiegowa (opcjonalnie)
(10) Migające światło (opcjonalnie)
(11) Zbiornik zanieczyszczonej wody
(12) Pokrywa zbiornika zanieczyszczonej
wody
(13) Zbiornik czystej wody
(14) Czapka
(15) Przewód odprowadzający zanieczysz-
czoną wodę
(16) Przewód zasysania wody myjącej pod-
łogę
(17) Przewód odprowadzający czystą wodę
(18) Rurka poziomu zbiornika czystą wodę
(19) Zespół szczotek
(20) Wycieraczka do podłóg
(21) Kieszeń na dokumenty
(22) Filtr wody
(23) Koło kierunkowe i napędowe
(24) Hak zgarniaka
(25) Pojemnik z kratką na odpady
3 -
3.1 - ROZPAKOWANIE (Rys. B)
Po usunięciu opakowania, jak wskazano w
instrukcji znajdującej się na samym opako-
waniu, należy sprawdzić integralność maszy-
ny i wszystkich dostarczonych komponentów.
Jeśli zostanie znalezione jakiekolwiek oczy-
wiste uszkodzenie, skontaktuj się z lokalnym
sprzedawcą i przewoźnikiem w ciągu 3 dni od
otrzymania.
- Usuń kopertę i pudełka (26) zawierające
dostarczone akcesoria:
• (20)
Wycieraczka do podłóg
.
• (32) 2 szczotki.
- Podnieś jednostkę zbiornika i zabierz do-
kumentację z odpowiedniej koperty:
• (33) Instrukcja obsługi i konserwacji
maszyny.
• (34) Instrukcja obsługi ładowarki aku-
mulatora (jeśli jest).
49029600_Manuale RACER_RANGER_8ed_04-2023.indd 549029600_Manuale RACER_RANGER_8ed_04-2023.indd 5 06/04/2023 15:44:4206/04/2023 15:44:42

www.ghibliwirbel.com
Professional Cleaning Machines Since 1968
POLSKI - 6
3.1.a - Montaż akumulatora (Rys. A)
- Ostrożnie podnieść zbiornik brudnej wody
(11).
- W zależności od konguracji (4 akumu-
latory 6 V, 2 akumulatory 12 V, 1 zestaw
akumulatorów 24 szt.), umieścić i podłą-
czyć akumulatory zgodnie z rysunkami,
używając dostarczonych kabli i wtyczek.
- Ostrożnie obniżyć zbiornik brudnej wody
(11).
PAMIĘTAJ:
Podłączenie akumulatora należy powierzyć
wyspecjalizowanemu personelowi.
3.1.b - Rozładunek maszyny z
drewnianej palety (Rys. B)
- Usuń drewniany klocek (27) umieszczony
przed przednim kołem.
- Umieść rampę (28) przed drewnianą pa-
letą, jak wskazano w instrukcji na opako-
waniu.
- Usiąść na siedzeniu (3) w ustawieniu do
prowadzenia.
- Obrócić klucz (29) na „ON”.
- Nacisnąć przycisk kierunku jazdy (31a)
“” (jazda do przodu), następnie
ostrożnie nacisnąć pedał jazdy (7) i zejść
z palety.
4 -
4.1 - MONTAŻ
KOMPONENTÓW
4.1.a - Montaż wycieraczki do pod-
łóg (Rys. C)
- Umieścić wycieraczkę do podłóg (20) w
płycie (35) wsporczej i przymocować ją,
dokręcając dwa pokrętła (36).
- Podłączyć przewód zasysania (16) do
otworu (37) wycieraczki do podłóg.
4.1.b - Instalacja szczotek
- Zobacz procedurę w akapicie “13.4.a -
Wymiana szczotek (Rys. M)”.
5 -
5.1 - ŁADOWANIE
AKUMULATORA
NIEBEZPIECZEŃSTWO:
Wykonać ładowanie akumulatora w
pomieszczeniach o dobrej wentylacji,
zgodnych z przepisami obowiązują-
cymi w kraju użytkowania.
Informacje dotyczące bezpieczeń-
stwa znajdują się w rozdziale 1 niniej-
szego podręcznika.
OSTROŻNIE:
Informacje i ostrzeżenia dotyczące
akumulatora i ładowarki w maszynie
(jeśli występuje) znajdują się w in-
strukcji ładowarki załączonej do ni-
niejszej dokumentacji.
Maszyna wypuszczana jest z fabryki
skalibrowana do pracy z akumula-
torami żelowymi. Jeśli instalowane
mają być akumulatory innego rodza-
ju, należy zapoznać się z paragrafem
„Ustawianie parametrów”.
Zabrania się korzystania z maszyny z
akumulatorami żelowymi skalibrowa-
nej dla akumulatorów kwasowych lub
innych.
(Tylko w przypadku wersji bez wbu-
dowanej ładowarki) Urządzenie może
być zasilane wyłącznie z zewnętrz-
nych ładowarek SELV (safety extra-
-low voltage).
PAMIĘTAJ:
(Tylko dla akumulatorów GEL) Do przepro-
wadzenia całkowitego ładowania akumula-
tora wymagane jest 10 godzin. Unikać łado-
wań częściowych.
(Tylko dla baterii litowych) Istnieje możliwość
częściowego załadowania.
Akumulatory należy naładować po zakoń-
czeniu każdej pracy lub przynajmniej wtedy,
gdy symbol baterii “ ” na wyświetlaczu
(41 Rys. F) zacznie migać.
- Podjechać maszyną do stacji ładowania
akumulatora.
49029600_Manuale RACER_RANGER_8ed_04-2023.indd 649029600_Manuale RACER_RANGER_8ed_04-2023.indd 6 06/04/2023 15:44:4506/04/2023 15:44:45

www.ghibliwirbel.com
Professional Cleaning Machines Since 1968
POLSKI - 7
- Podnieś zbiornik wody brudnej (11) i
upewnij się, że jest pusty.
5.1.a - Ładowanie akumulatora
w zewnętrznej ładowarce
(Rys. G)
- W odnośnej Instrukcji sprawdzić, czy ze-
wnętrzna ładowarka jest odpowiednia.
Napięcie znamionowe ładowarki powinno
wynosić 24 V.
- Wyjąć złącze (39) ze specjalnego gniazda
(38) i podłączyć je do zewnętrznej łado-
warki.
- Podłączyć ładowarkę do sieci elektrycz-
nej.
- Po zakończeniu ładowania odłączyć ła-
dowarkę od sieci elektrycznej i od złącza
(39).
- Ostrożnie obniżyć zbiornik brudnej wody
(11).
5.1.b - Ładowanie akumulatora za
pomocą wbudowanej łado-
warki (jeśli jest) (Rys. G)
- Wyjąć z gniazda (38) i podłączyć wtyczkę
kabla ładowarki (40) do sieci elektrycznej
(napięcie i częstotliwość sieci elektrycznej
muszą być równe odnośnym wartościom
ładowarki na tabliczce znamionowej ma-
szyny).
PAMIĘTAJ:
Gdy ładowarka jest podłączona do sieci elek-
trycznej, wszystkie funkcje maszyny są wyłą-
czane automatycznie.
- Na wyświetlaczu (41 Rys. F), gdy kreski
na symbolu akumulatora zapalają się
kolejno, oznacza to, że ładowarka ładuje
akumulator.
- Gdy wszystkie kreski na symbolu akumu-
latora będą świecić w sposób ciągły, cykl
ładowania baterii został zakończony.
- Odłączyć wtyczkę kabla ładowarki (40) od
sieci elektrycznej i włożyć ją do specjalne-
go gniazda (38).
- Ostrożnie obniżyć zbiornik brudnej wody
(11).
6 -
6.1 - OPIS POLECEŃ
MASZYNY
6.1.a - Panel sterowania (Rys. F)
(29) Klucz uruchamiający
- Po obróceniu w prawo na „ON” doprowa-
dza napięcie do obwodów, uruchamiając
pracę maszyny.
- Po obróceniu w lewo na „OFF” odcina na-
pięcie od obwodów i znajduje się w usta-
wieniu do wyciągnięcia.
(30) Przyciski do regulacji maksymal-
nej prędkości
Maksymalną prędkość posuwu można usta-
wić za pomocą przycisków (30a) “ ” i
(30b) “ ”.
- Całkowite wciśnięcie pedału przyspiesze-
nia (7) wywoła prędkość zgodną z maksy-
malną ustawioną wartością.
- Gdy wszystkie symbole prędkości “
” na wyświetlaczu (41) są jasne, pedał
przyspieszenia (7) jest wyłączony, a ma-
szyna pozostaje zatrzymana.
(31) Przyciski wyboru kierunku jazdy
- Naciśnięcie przycisku do przodu (31a) “
” powoduje przesuwanie maszyny
do przodu; na wyświetlaczu pojawia się
ikona “ ”.
- Naciśnięcie przycisku do tyłu (31b) “
” powoduje przesuwanie maszyny do tylu
i włączenie się brzęczyka cofania; na wy-
świetlaczu pojawia się ikona “ ”.
PAMIĘTAJ:
Maksymalną prędkość jazdy do tyłu można
ustawić w taki sam sposób, jak w przypadku
jazdy do przodu za pomocą przycisków (30).
49029600_Manuale RACER_RANGER_8ed_04-2023.indd 749029600_Manuale RACER_RANGER_8ed_04-2023.indd 7 06/04/2023 15:44:5606/04/2023 15:44:56

www.ghibliwirbel.com
Professional Cleaning Machines Since 1968
POLSKI - 8
(41) Wyświetlacz
- Zobacz odpowiedni rozdział.
(42) Przycisk „Ready to go”
Naciśnięcie przycisku (42) powoduje po-
jawienie się na wyświetlaczu ikony “ ” i
uruchomienie następujących funkcji z usta-
wieniem standardowym:
• Opuszczenie głowicy i obracanie
szczotek.
• Opuszczenie ściągaczki i uruchomie-
nie systemu zasysania.
• Prędkość pracy = 3^ kreska (3,6 km/h).
• Przepływ wody = 3^ kreska.
• Środek chemiczny = 3^ kreska (1%).
• Zasysanie = normalne (100%).
• Nacisk szczotek = normalny.
- Po włączeniu tej standardowej funkcji,
można nacisnąć dowolny przycisk robo-
czy w celu wykonania dowolnej zmiany
lub regulacji.
W razie potrzeby, po wprowadzeniu zmiany
w funkcjach roboczych, można ją zapisać,
postępując w sposób opisany poniżej:
- Nacisnąć i przytrzymać przycisk (42)
przez 3 sekundy; potwierdzenie zapisania
wskazywane jest na wyświetlaczu (41)
przez migający napis „UPLOADED”.
- Aby dezaktywować nowe ustawienie i po-
wrócić do standardowych wartości usta-
wień, należy ponownie nacisnąć przycisk
(42) i przytrzymać go przez 3 sekundy;
potwierdzenie jest sygnalizowane na wy-
świetlaczu (41) przez migający napis „RE-
SET”.
(43) Przycisk ECO
- W trakcie pracy, naciśnięcie przycisku (43)
powoduje pojawienie się na wyświetlaczu
ikony “ ”,, parametrów wody, środka
chemicznego, ssania i nacisku głowicy,
które przyjmują następujące wartości:
• Przepływ wody = 3^ kreska.
• Środek chemiczny = 3^ kreska (1%).
• Ssanie = ciche (50%).
• Nacisk szczotek na podłoże = normal-
ny
(44) Przycisk ssawy
- Naciśnięcie przycisku (44) uruchamia
ssawę, a na wyświetlaczu pojawia się iko-
na “ ”, jeśli włączony jest bieg do przo-
du lub jeśli maszyna jest na biegu neutral-
nym, ściągaczka obniża się.
- Ponowne wciśnięcie przycisku (44) po-
woduje zatrzymanie ssawy i podniesienie
wycieraczki do podłóg.
- Przy wyłączonej maszynie, obniżonej
wycieraczce do podłóg i kluczem (29) w
ustawieniu „ON” po pewnym czasie bez-
czynności, wycieraczka podnosi się auto-
matycznie.
(45) Przycisk cichej pracy
- Wciśnięcie przycisku (45) powoduje
zmniejszenie prędkości turbiny ssawy,
ograniczając znacząco hałas wydawany
przez maszynę. Jeśli funkcja jest urucho-
miona, na wyświetlaczu pojawia się sym-
bol “ ”.
- Ponowne naciśnięcie przycisku (45) wy-
łącza funkcję i urządzenie wznawia pra-
cę w trybie standardowym, symbol “
” gaśnie, a na wyświetlaczu pojawia się
symbol “ ”.
PAMIĘTAJ:
Wyłączenie turbiny ssawy przy uruchomio-
nym trybie „praca cicha” powoduje, że praca
turbiny przejdzie automatycznie w tryb „pra-
ca standardowa” przez cały czas opóźnienia
wyłączenia
(46) Przycisk szczotek
- Naciśnięcie przycisku (46) opuszcza gło-
wicę szczotkową, a na wyświetlaczu poja-
wia się ikona “ ”.
- Szczotki zaczną się obracać po wciśnię-
ciu pedału przyspieszenia. Szczotki za-
trzymają się, kiedy pedał przyspieszenia
jest w górze.
49029600_Manuale RACER_RANGER_8ed_04-2023.indd 849029600_Manuale RACER_RANGER_8ed_04-2023.indd 8 06/04/2023 15:45:1906/04/2023 15:45:19

www.ghibliwirbel.com
Professional Cleaning Machines Since 1968
POLSKI - 9
PAMIĘTAJ:
Szczotki obracają się zarówno do przodu, jak
i do tyłu oraz z regulacją prędkości (30) na
„0”.
- Przy wyłączonej maszynie, obniżonej
głowicy i szczotkami zablokowanymi klu-
czem (29) w ustawieniu „ON” po pewnym
czasie bezczynności, głowica podnosi się
automatycznie.
- Naciśnięcie przycisku (46) przy obracają-
cych się szczotkach powoduje zatrzyma-
nie szczotek, podniesienie ich głowicy i
zgaśnięcie ikony “ ” na wyświetlaczu.
(47) Przycisk dodatkowego naci-
sku szczotek
Nacisk szczotek na podłoże można regulo-
wać przy opuszczonej głowicy szczotkowej.
- Naciśnięcie przycisku (47) aktywuje do-
datkowy nacisk; przy włączonej funkcji na
wyświetlaczu pojawia się ikona “ ”.
- Po ponownym naciśnięciu przycisku (47)
nacisk na podłoże powraca do normy, a
na wyświetlaczu pojawia się symbol “ ”.
PAMIĘTAJ:
Za każdym razem, gdy zespół głowic pod-
nosi się (ustawienie spoczynkowe), docisk
szczotek ustawia się na poziomie minimal-
nym.
PAMIĘTAJ:
Funkcja ta posiada system zabezpieczają-
cy, który wykrywa automatycznie nadmier-
ny pobór prądu przez silniki szczotek oraz
jest w stanie zmienić automatycznie docisk
szczotek do podłoża, ustawiając jego najod-
powiedniejszą wartość.
(48) Przycisk dozownika środka
chemicznego (jeśli obecny)
- Naciśnięcie przycisku (48) powoduje po-
jawienie się na wyświetlaczu ikony “
” oraz przygotowanie dozowania środka
chemicznego.
- Pracą pompy dozującej steruje wciśnięty
pedał przyspieszenia.
- Wielokrotne naciśnięcie przycisku (48)
zwiększa ilość środka chemicznego; osią-
gnięcie maksymalnej ilości wskazane bę-
dzie na wyświetlaczu za pomocą ikony “
”. Ponowne naciśnięcie przycisku (48)
wyłącza funkcję, a ikona na wyświetlaczu
gaśnie.
PAMIĘTAJ:
W przypadku opróżnienia układu dozowania
środka chemicznego, po wymianie zbiornika
należy przytrzymać wciśnięty przycisk (48)
przez co najmniej 5 sekund, aby uruchomić
procedurę odpowietrzania trwającą około
40 sekund; funkcja ta jest aktywowana tylko
wtedy, gdy maszyna jest zatrzymana, przy-
cisk (29) w pozycji „ON” i regulacja prędkości
(30) w pozycji „0”.
(49) Przycisk podawania wody
- Naciśnięcie przycisku (49) powoduje po-
jawienie się na wyświetlaczu symbolu “
” oraz otwarcie elektrozaworu wody. Pra-
cą elektrozaworu steruje wciśnięty pedał
przyspieszenia.
- Wciskając kilkukrotnie przycisk (49) uzy-
ska się zwiększenie ilości wody. Po osią-
gnięciu maksymalnej ilości, kiedy na wy-
świetlaczu pojawi się symbol “ ”, jeśli
ponownie wciśnie się przycisk (49) nastą-
pi dezaktywacja funkcji.
(50) Przycisk sygnału dźwięko-
wego
49029600_Manuale RACER_RANGER_8ed_04-2023.indd 949029600_Manuale RACER_RANGER_8ed_04-2023.indd 9 06/04/2023 15:45:3706/04/2023 15:45:37

www.ghibliwirbel.com
Professional Cleaning Machines Since 1968
POLSKI - 10
(51) Przycisk migające światło
(52) Przycisk światło robocze
6.1.b - Pedał przyspieszenia (Rys. A)
- Naciśnięcie pedału przyspieszenia (7) po-
rusza maszyną do przodu lub do tyłu, w
zależności od tego, który przycisk kierun-
ku jazdy został naciśnięty.
- Prędkość można regulować, wciskając
mniej lub bardziej pedał przyspieszenia.
- Puszczenie pedału przyspieszenia (7)
powoduje zwolnienie maszyny aż do za-
trzymania. Po kilku sekundach nieaktyw-
ności maszyny, automatycznie włącza się
hamulec postojowy – można go wyłączyć,
wciskając pedał przyspieszenia (7) z usta-
wionym ruchem do przodu lub do tyłu.
7 -
7.1 - WYŚWIETLACZ (Rys. F)
Przy włączonej maszynie na wyświetlaczu
(41) pojawiają się następujące ikony:
Akumulator
Wskazuje stan naładowania akumulatorów:
Akumulator naładowany
Akumulator rozładowany
Maksymalna prędkość jazdy do
przodu
Za pomocą przycisków (30a) “ ” i (30b)
“” ustawia się maksymalną prędkość,
jaką maszyna może osiągnąć przy całkowi-
cie wciśniętym pedale przyspieszenia (7):
km/h - 01,2 2,4 3,6 4,8 6,0
Kierunek jazdy
Strzałka wyboru kierunku jazdy wskazuje
funkcję posuwu wybraną przyciskami (31a)
“” i (31b) “ ”.
“Ready to go”
Pojawia się na wyświetlaczu po naciśnięciu
przycisku (42) “ ”.
Tryb ECO
Wyświetla się po uruchomieniu funkcji ECO
przyciskiem (43) “ ”.
Ssawa w pracy
Pojawia się na wyświetlaczu po naciśnięciu
przycisku (44) “ ”, wskazując, że ssawa
jest włączona, a ściągaczka opuszczona.
Cicha praca
Z włączoną ssawą.
Pojawia się na wyświetlaczu po naciśnięciu
przycisku (45) “ ” wskazując, że ssawa
pracuje ze zmniejszoną prędkością obroto-
wą.
Predyspozycja obrotu szczotki
Pojawia się na wyświetlaczu po naciśnięciu
przycisku (46) “ ” wskazując, żeobroty
szczotki są włączone
49029600_Manuale RACER_RANGER_8ed_04-2023.indd 1049029600_Manuale RACER_RANGER_8ed_04-2023.indd 10 06/04/2023 15:46:0206/04/2023 15:46:02

www.ghibliwirbel.com
Professional Cleaning Machines Since 1968
POLSKI - 11
Dodatkowy nacisk
Pojawia się na wyświetlaczu, wskazując na-
cisk roboczy szczotek. Nacisnąć przycisk
(47) “ ”, aby zmienić nacisk roboczy.
Dozownik środka czyszczą-
cego (jeśli obecny)
Pojawia się na wyświetlaczu po naciśnięciu
przycisku (48) “ ”.
Nacisnąć przycisk, aby zwiększyć lub zmniej-
szyć procent dozowanego środka czyszczą-
cego:
0,2% 0,5% 1% 2% 3%
Predyspozycja do podawania
wody
Pojawia się na wyświetlaczu po naciśnięciu
przycisku (49) “ ”, wskazując, że włączo-
ny jest elektrozawór podawania wody.
Kiedy poziom wody w zbiorniku osiąga po-
ziom minimalny, na pełnym ekranie wyświe-
tlana jest ikona “ ” wraz z sygnałem dźwię-
kowym.
Napełnić zbiornik wody (13) zgodnie z opi-
sem w odpowiednim paragrae, a następnie
wyłączyć i ponownie uruchomić maszynę.
Brak operatora na siedzeniu
kierowcy
Ta ikona pojawia się, gdy operator nie siedzi
prawidłowo na siedzeniu kierowcy i blokuje
wszystkie funkcje maszyny.
Maksymalny poziom płynu w
zbiorniku wody zanieczysz-
czonej
Pojawia się, kiedy płyn w zbiorniku wody
zanieczyszczonej osiągnie maksymalny po-
ziom.
Pedał przyspieszenia wci-
śnięty
Ten symbol włącza się po uruchomieniu ma-
szyny, wskazując na błędną sekwencję czyn-
ności uruchomienia – aby usunąć alarm, wci-
snąć pedał przyspieszenia (7).
8 -
8.1 - ZATRZYMANIE
AWARYJNE
Przycisk awaryjny (5 Rys. A) znajduje się w
położeniu łatwo dostępnym dla operatora.
W przypadku natychmiastowej potrzeby za-
trzymania maszyny we wszystkich jej funk-
cjach należy mocno go docisnąć.
Aby przywrócić funkcjonalność maszyny, na-
leży pociągnąć przycisk awaryjny, aż do mo-
mentu kliknięcia i jego zresetowania.
OSTROŻNIE:
Nacisnąć przycisk awaryjny (5) przy
włączonej maszynie tylko w przypad-
ku rzeczywistej potrzeby, procedury
tej nie należy używać do wyłączania
maszyny, gdyż może to spowodować
nawet poważne jej awarie.
9 -
9.1 - BEZPIECZEŃSTWO
(Rys. A)
Maszyna jest wyposażona w następujące
funkcje zabezpieczające:
Czujnik obecności operatora (4)
Blokuje wszystkie funkcje maszyny, gdy ope-
rator nie jest obecny na siedzeniu kierowcy.
System przeciwpoślizgowy
System powoduje zmniejszenie prędkości
jazdy podczas pokonywania zakrętów lub
kiedy maszyna przechyla się na bok, tak aby
uniknąć poślizgu i zwiększyć stabilność ma-
szyny w każdych warunkach pracy.
Hamulec elektromagnetyczny
Jest on wbudowany w przednie koło (23) i
unieruchamia maszynę, kiedy jest ona wyłą-
czona lub zatrzymana.
10 -
49029600_Manuale RACER_RANGER_8ed_04-2023.indd 1149029600_Manuale RACER_RANGER_8ed_04-2023.indd 11 06/04/2023 15:46:2006/04/2023 15:46:20

www.ghibliwirbel.com
Professional Cleaning Machines Since 1968
POLSKI - 12
10.1 - NAPEŁNIANIE
ZBIORNIKA (Rys. D)
OSTROŻNIE:
Umieścić w zbiorniku czystą wodę
sieciową o temperaturze nieprzekra-
czającej 50°C.
- Za pomocą wyjmowanej rurki (52) napeł-
nić zbiornik (13) wodą, aż do jego całkowi-
tego wypełnienia.
- Nie napełniaj zbiornika całkowicie, użyj
rurki poziomu (18) jako odniesienia.
- Lub, jeśli dostępny, otworzyć korek (14) i
użyć gniazda acquastop (53, jeśli obec-
ny).
OSTROŻNIE:
Zawsze wizualnie sprawdzaj poziom
napełnienia, aby uniknąć ryzyka za-
moczenia podłogi.
- Pod koniec napełniania zbiornika za-
mknąć korek (14).
PAMIĘTAJ:
W przypadku maszyn bez zestawu chemicz-
nego, napełnić zbiornik (13) czystą wodą i
wymieszać z nią środek chemiczny.
Należy zawsze postępować zgodnie z in-
strukcjami dotyczącymi rozcieńczania poda-
nymi na etykiecie opakowania produktu che-
micznego użytego do sporządzenia
roztworu czyszczącego.
10.2 - POJEMNIK NA
DETERGENT / ŚRODEK
CHEMICZNY (jeśli obecny)
(Rys. E)
PAMIĘTAJ:
Używać wyłącznie detergentów, które nie
generują piany. Określając ilość środka,
przestrzegać wytycznych producenta deter-
gentu i dostosować ją do rodzaju brudu.
- Sprawdzić, czy w pojemniku (54) znajduje
się produkt niezbędny na dany dzień ro-
boczy.
W przypadku wymiany pojemnika, postępo-
wać w następujący sposób:
- Usunąć korek (55), wyciągnąć pojemnik
(54) i umieścić nowy 5 –litrowy pojemnik,
a następnie nałożyć korek (55) z rurką
ssącą.
NIEBEZPIECZEŃSTWO:
W przypadku kontaktu detergentu z
oczami i skórą lub w przypadku po-
łknięcia, należy się zapoznać z kartą
bezpieczeństwa i użytkowania do-
starczoną przez producenta deter-
gentu.
PAMIĘTAJ:
Pojemniki (54), których należy używać to
standardowe dostępne w handlu pojemniki o
pojemności 5 litrów.
- Ostrożnie obniżyć zbiornik brudnej wody
(11).
- Oczyszczanie powietrzem (patrz proce-
dura w pozycji „Przycisk dozowania środ-
ka chemicznego”).
11 -
11.1 - DZIAŁANIE (Rys. A-F)
11.1.a - Kontrole przed użyciem
- Sprawdzić, czy przewód (15) odprowa-
dzający zbiornika zanieczyszczonej wody
jest prawidłowo podłączony i należycie
zatkany.
- Sprawdzić, czy przewód (16) ssania wody
wycieraczki do podłóg jest prawidłowo
wprowadzony do zbiornika zanieczysz-
czonej wody.
- Sprawdzić, czy złącze (37) umieszczo-
ne w wycieraczce do podłóg (20) nie jest
zatkane a przewód (16) jest prawidłowo
podłączony.
- Sprawdzić stan naładowania akumula-
tora, przekręcając klucz (29) na “ON” i
patrząc na wskaźnik naładowania na wy-
świetlaczu (41).
49029600_Manuale RACER_RANGER_8ed_04-2023.indd 1249029600_Manuale RACER_RANGER_8ed_04-2023.indd 12 06/04/2023 15:46:2106/04/2023 15:46:21

www.ghibliwirbel.com
Professional Cleaning Machines Since 1968
POLSKI - 13
11.1.b - Przygotowanie maszyny i
wybór cyklu
- Usiąść na miejscu kierowcy.
- Maszyna może wykonać 4 cykle pracy:
Cykl: mycie, szczotkowanie, susze-
nie:
- Nacisnąć przycisk „Ready to go” (42) “
” aby przygotować się do dozowania
środka czyszczącego, obracania szczo-
tek i uruchomienia ssawy.
Cykl: tylko suszenie:
- Aby wykonać tylko cykl suszenia, wcisnąć
przycisk (44) “ ”, uruchomi się ssawa.
Cykl: tylko zamiatanie:
- Aby wykonać tylko cykl zamiatania, wci-
snąć przycisk (46) “ ”, przygotowa-
ne zostanie obracanie szczotek. Obrót
szczotek rozpoczyna się, gdy maszyna,
z wciśniętym pedałem przyspieszenia (7),
zacznie jechać do przodu lub do tyłu lub
z wciśniętym pedałem przyspieszenia, a
prędkość jazdy zostanie ustawiona na „0”.
Ciclo lavaggio, spazzolatura:
- Wcisnąć przycisk (46) “ ”, przygo-
towane zostanie obracanie szczotek, a
następnie wcisnąć przycisk (49) “ ”,
przygotowane zostanie podawanie wody.
- Obrót szczotek i dopływ wody rozpoczy-
nają się, gdy pedał przyspieszenia jest
wciśnięty z biegiem do przodu lub do tyłu,
lub przy ustawieniu prędkości jazdy do
przodu na co najmniej pierwszej kresce.
11.1.c - Eksploatacja maszyny
NIEBEZPIECZEŃSTWO:
Zachować szczególną ostrożność
podczas używania maszyn na ram-
pach, by uniknąć przewrócenia lub
sytuacji, które mogą zagrozić stabil-
ności maszyny.
NIEBEZPIECZEŃSTWO:
Unikać gwałtownych ruchów i wyko-
nywać manewry, trzymając kierow-
nicę całkiem przekręconą tylko przy
niskiej prędkości, biorąc jednak pod
uwagę warunki podłoża.
- Obrócić kluczyk (29) na „ON”; w ciągu
pierwszych 2 sekund od włączenia wy-
świetlacz (41) będzie wskazywał rodzaj
zainstalowanych akumulatorów i godziny
robocze maszyny.
- Wybrać rodzaj cyklu pracy, który che się
wykonać.
- Za pomocą przycisków (30) wprowadzić
żądaną prędkość roboczą.
- Włączyć światło ostrzegawcze (10, opcjo-
nalnie) i reektory robocze (9, opcjonal-
nie).
- Rozpocząć czyszczenie, wciskając pedał
przyspieszenia (7).
PAMIĘTAJ:
Puszczenie pedału przyspieszenia zatrzy-
muje obracanie szczotek i podawanie wody.
PAMIĘTAJ:
Prawidłowe czyszczenie i suszenie podłogi
wykonywane jest przy ruchu maszyny do
przodu - przy ruchu do tyłu, wycieraczka do
podłóg unosi się i nie następuje zasysanie
wody, znajdującej się na podłodze.
- Ewentualnie wyregulować ilość roztworu
myjącego przyciskiem (49) “ ”.
- Sprawdzić stan naładowania akumulato-
rów na wyświetlaczu (41).
49029600_Manuale RACER_RANGER_8ed_04-2023.indd 1349029600_Manuale RACER_RANGER_8ed_04-2023.indd 13 06/04/2023 15:46:2206/04/2023 15:46:22

www.ghibliwirbel.com
Professional Cleaning Machines Since 1968
POLSKI - 14
11.1.d - Zakończenie użytkowania i
wyłączenie
- Po zakończeniu czyszczenia, zatrzymać
kolejno obracanie szczotek i ssawę, uży-
wając odpowiednich poleceń w zależno-
ści od używanego cyklu.
- Przekręcić klucz (29) na „OFF”.
- Hamulec postojowy wprowadzany jest au-
tomatycznie.
- Opróżnić i wymyć zbiornik zanieczyszczo-
nej wody i zbiornik roztworu, jak opisano
w odnośnych paragrafach.
PAMIĘTAJ:
Kiedy operator schodzi z maszyny, automa-
tycznie włącza się hamulec postojowy.
NIEBEZPIECZEŃSTWO:
Zabrania się parkowania maszyny na
rampie.
12 -
12.1 - ODPROWADZENIE
ZANIECZYSZCZONEJ WODY
(Rys. H)
NIEBEZPIECZEŃSTWO:
Upewnić się, ze zbiornik zanieczysz-
czonej wody (11) jest pusty przed
podniesieniem go.
Po zakończeniu cyklu mycia lub kiedy zbior-
nik (11) zanieczyszczonej wody jest pełen,
należy opróżnić go, postępując w następu-
jący sposób:
PAMIĘTAJ:
Utylizację zanieczyszczonej wody przepro-
wadzać, zgodnie z przepisami obowiązują-
cymi w kraju użytkowania maszyny.
- Ustawić maszynę w pobliżu otworu odpro-
wadzania.
- Odłączyć węża (15) od specjalnych ha-
czyków, opuścić go na ziemię na wpuście
kanalizacyjnym.
- Odkręć korek (56) i całkowicie spuść
brudną wodę znajdującą się w zbiorniku.
PAMIĘTAJ:
Można regulować ilość wychodzącej wody,
dociskając końcówkę przewodu (15).
- Ponownie przykręcić korek (56) i ponow-
nie założyć rurkę (15) na jej uchwycie.
13 -
13.1 - KONSERWACJA I
CZYSZCZENIE
OSTROŻNIE:
Informacje i ostrzeżenia dotyczące
konserwacji i czyszczenia znajdują
się w instrukcji „OSTRZEŻENIA DO-
TYCZĄCE BEZPIECZEŃSTWA POD-
CZAS EKSPLOATACJI ZMYWARKO -
SUSZARKI DO PODŁÓG” załączonej
do niniejszego dokumentu.
13.2 - CZYNNOŚCI, KTÓRE
NALEŻY WYKONYWAĆ
CODZIENNIE
13.2.a - Opróżnianie i czyszczenie
zbiornika wody czystej (Rys. I)
OSTROŻNIE:
Po zakończeniu mycia, należy obo-
wiązkowo opróżnić i wymyć zbiornik
czystej wody (13), aby nie dopuścić
do powstania osadów, czy zaschnię-
tego brudu.
Po opróżnieniu zbiornika z zanieczyszczonej
wody, opróżnić zbiornik wody czystej (13),
postępując w następujący sposób:
- Ustawić maszynę w pobliżu otworu odpro-
wadzania.
49029600_Manuale RACER_RANGER_8ed_04-2023.indd 1449029600_Manuale RACER_RANGER_8ed_04-2023.indd 14 06/04/2023 15:46:2206/04/2023 15:46:22

www.ghibliwirbel.com
Professional Cleaning Machines Since 1968
POLSKI - 15
- Odłączyć przewód (17) z zaczepów, ob-
niżyć go na podłogę w otworze odprowa-
dzania, zdjąć korek (57) i pozwolić całko-
wicie wypłynąć wodzie.
- Wymyć wnętrze zbiornika, pozostawiając
otwarty przewód odprowadzający i wpro-
wadzając czystą wodę przez górny otwór.
- Po zakończeniu czyszczenia podnieść
przewód (17), zamknąć korek (57) i przy-
mocować przewód do odpowiednich za-
czepów.
13.2.b - Czyszczenie zbiornika zanie-
czyszczonej wody (Rys. J)
OSTROŻNIE:
Po zakończeniu mycia, należy obo-
wiązkowo wymyć zbiornik zanie-
czyszczonej wody, aby nie dopuścić
do powstania osadów, czy zaschnię-
tego brudu i rozwoju bakterii, brzyd-
kich zapachów, czy pleśni.
- Podnieść pokrywę (12).
- Wyjąć pojemnik na odpady (58) i otworzyć
jego pokrywę, następnie wyczyść pod bie-
żącą wodą, usuwając wszelkie kawałki
papieru, drewna itp., które go zatykają.
- Wyjąć i wyczyścić ltr ssący (59) pod bie-
żącą wodą.
- Pozostawiając opuszczoną rurę spustową
(15 Rys. H) i zdjętą nasadkę, wprowadzić
wodę przez górny otwór (60), następnie
przepłukać wnętrze zbiornika, aż z rury
spustowej zacznie wypływać czysta woda.
- Ponownie zamontować całość, wykonu-
jąc wyżej wskazane czynności w odwrot-
nej kolejności.
13.2.c - Montaż wycieraczki do pod-
łóg (Rys. K)
Aby wykonać prawidłowe czyszczenie wy-
cieraczki (20), należy zdjąć ją w następujący
sposób:
- Odłączyć przewód (16 Rys. C) od wycie-
raczki (20).
- Poluzować pokrętła (36 Rys. C) i zdjąć
wycieraczkę (20).
- Wymyć wycieraczkę, a w szczególności
gumy (60) i (61) i wnętrze złącza zasysa-
nia (62).
PAMIĘTAJ:
Jeśli podczas mycia zauważy się, że gumy
(60) i (61) są zniszczone lub zużyte, należy
je wymienić lub odwrócić.
- Ponownie ustawić wszystko na swoim
miejscu, wykonując powyższe czynności
w odwrotnej kolejności.
13.3 - CZYNNOŚCI, KTÓRE
NALEŻY WYKONYWAĆ CO 3
MIESIĄCE
13.3.a - Kontrola zużycia łańcucha
drążka kierowniczego (Rys. L)
- Sprawdzić stan zużycia i korozji łańcucha
(63) umieszczonego pod maszyną w po-
bliżu przedniego koła.
- Jeśli łańcuch nosi ślady korozji, należy
wymienić go, zwracając się o pomoc do
serwisu.
13.4 - CZYNNOŚCI, KTÓRE
NALEŻY WYKONYWAĆ W
RAZIE POTRZEBY
13.4.a - Wymiana szczotek (Rys. M)
Wymiana szczotek jest konieczna, kiedy wy-
stępują w nich ślady zużycia a długość wło-
sia wynosi mniej niż 2 cm. Należy je również
wymienić w zależności od rodzaju mytej pod-
łogi - w celu wymiany, postępować w nastę-
pujący sposób:
- Wsunąć jedną rękę pod zespół prowadnic
szczotek (19). Odczepić szczotkę, obra-
cając ją lekko uderzając w kierunku prze-
ciwnym do obracania.
- Ustawić pod zespołem prowadnic szczo-
tek (19) nowe szczotki.
- Usiąść na miejscu kierowcy i przekręcić
klucz (29 Rys. F) w ustawienie „ON”.
49029600_Manuale RACER_RANGER_8ed_04-2023.indd 1549029600_Manuale RACER_RANGER_8ed_04-2023.indd 15 06/04/2023 15:46:2206/04/2023 15:46:22

www.ghibliwirbel.com
Professional Cleaning Machines Since 1968
POLSKI - 16
- Ustawić prędkość posuwu na wartość „0”.
- Nacisnąć przycisk (46 Rys. F) “ ”, aby
włączyć obrót szczotek; zespół szczotek
obniża się.
- Naciśnięcie pedału przyspieszenia (7
Rys. A) powoduje, że kołnierze uchwytu
szczotek zaczynają się obracać, zacze-
piając szczotki, następnie zwolnić pedał.
- Ponownie nacisnąć przycisk (46 Rys. F) “
” i obrócić klucz (29 Rys. F) w pozy-
cję „OFF”.
13.4.b - Regulacja gumowej osłony
przeciwbryzgowej (Rys. M)
W zależności od rodzaju podłogi, która ma
być poddawana obróbce lub po wymianie
szczotek talerzowych, może być konieczna
regulacja wysokości gumowej osłony prze-
ciwbryzgowej (64).
Aby to zmienić, wykonaj następujące
czynności:
- Obrócić kluczyk (29 Rys. F) do pozycji
„ON”.
- Nacisnąć przycisk (46 Rys. F) “ ”,
aby opuścić główkę szczoteczki (19), a
następnie obrócić kluczyk (29 Rys. F) w
położenie „OFF”.
- Sprawdź prawidłową wysokość gumowej
osłony przeciwbryzgowej, jak pokazano
na rysunku M.
- W razie potrzeby ręcznie działać na gu-
mie, aby przywrócić prawidłową wyso-
kość.
PAMIĘTAJ:
Prawidłowa wysokość gumy chroniącej
przed rozpryskami to sytuacja, gdy podczas
pracy przy opuszczonej główce szczotki
sama guma przylega do podłogi.
- Po zakończeniu regulacji włączyć ponow-
nie maszynę i wcisnąć przycisk (46 Rys.
F) “ ”, a następnie obrócić kluczyk (29
Rys. F) do pozycji „OFF”.
13.4.c - Wymiana gumy ssawy (Rys.
K)
Kiedy zauważy się, że odsysanie nie jest
poprawne lub na podłodze pozostają ślady
wody, konieczne jest skontrolowanie stanu
zużycia gum ssawy (20):
- Odłączyć ssawę (20) w sposób opisany
w paragrae ”Czyszczenie ssawy”.
- Naciśnij zatrzask (65) i otwórz uchwyt
(66).
- Wyciągnij dwa pałąki gumowe do moco-
wania (67) i usuń gumę zewnętrzną (60).
- Rozluźnij dwie śruby do dokręcania (68) i
usuń pasek do zablokowania (69) i gumę
wewnętrzną (61).
PAMIĘTAJ:
Kiedy gumy (60) lub (61) są zużyte z jednej
ze stron, można je obrócić na drugą stronę.
- Wymienić lub obrócić gumy (60) lub (61)
bez odwracania ich.
- Ponownie złożyć elementy ssawy.
PAMIĘTAJ:
Dostępne są dwa typy gum:
Guma kauczukowa do wszystkich typów
podłogi oraz guma poliuretanowa do podłóg
znajdujących się w warsztatach mechanicz-
nych, zabrudzonych olejem.
13.4.d - Regulacja kąta wycieraczki
(Rys. N)
- Uruchomić maszynę i nacisnąć przycisk
(44 Rys. F) “ ”.
- Ustawić maksymalną prędkość na pierw-
szej kresce za pomocą przycisków (30
Rys. F), nacisnąć pedał przyspieszenia (7
Rys. A) i przejechać kilka metrów, następ-
nie wyłączyć i zejść z maszyny.
- Użyć gwintowanego drążka (70) i wyre-
gulować kąt ściągaczek (60) i (61) wzglę-
dem podłogi - obracając w prawo, kąt się
zwiększa, w drugą stronę, kąt się zmniej-
sza.
49029600_Manuale RACER_RANGER_8ed_04-2023.indd 1649029600_Manuale RACER_RANGER_8ed_04-2023.indd 16 06/04/2023 15:46:2306/04/2023 15:46:23

www.ghibliwirbel.com
Professional Cleaning Machines Since 1968
POLSKI - 17
PAMIĘTAJ:
Prawidłowy kąt uzyskuje się, kiedy podczas
pracy nie ma wycieków płynu na podłogę a
ściągaczka ma stały kąt nachylenia na całej
długości.
13.4.e - Regulacja docisku wyciera-
czek (Rys. O)
W zależności od rodzaju podłogi, która ma
być poddawana obróbce lub po wymianie
gumy belki ssącej, może być konieczna re-
gulacja nacisku na podłogę belki ssącej.
Aby to zmienić, wykonaj następujące czyn-
ności:
- Podnieść zbiornik wody brudnej (11),
upewniając się, że jest pusty.
- Działaj na śrubę regulacyjną (71) biorąc
pod uwagę, że:
• Obracanie w prawo zmniejsza nacisk
na podłogę ssawki.
• Obracanie w kierunku przeciwnym do
ruchu wskazówek zegara zwiększa na-
cisk na podłogę belki ssącej.
- Po zakończeniu regulacji ostrożnie opu-
ścić zbiornik wody brudnej (11).
13.4.f - Czyszczenie zbiornika czy-
stej wody (Rys. P)
- Upewnić się, że zbiornik (13 Rys. A) jest
pusty.
- Zdjąć korek (22) i wyjąć wkład ltra (72).
- Wymyć wkład ltra (72) bieżącą wodą.
- Zamontować wszystko, wykonując czyn-
ności opisane powyżej w odwrotnej kolej-
ności, dbając o to, by uszczelka (73) była
prawidłowo założona.
13.4.g - Kran spustowy komory bate-
rii (Rys. A)
- Okresowo sprawdzaj, czy w komorze ba-
terii nie ma stagnacji wody.
- W razie potrzeby ustaw maszynę w pobli-
żu odpływu, odczepij rurkę i otwórz kran
(74), a następnie spuść płyny.
OSTROŻNIE:
W przypadku gdy przewiduje się sto-
sowanie akumulatorów kwasowo-
-ołowiowych, należy zwrócić szcze-
gólną uwagę na wszelkie wycieki
cieczy z samych akumulatorów, zwią-
zane z tym ryzyko i przepisy dotyczą-
ce usuwania płynnych substancji nie-
bezpiecznych.
13.4.h - Kontrola zużycia trzech kół
(Rys. A)
- Sprawdzać okresowo stan zużycia trzech
kół (8) i (23) - jeśli okażą się zużyte lub
zniszczone, należy je wymienić, zwraca-
jąc się do obsługi technicznej.
NIEBEZPIECZEŃSTWO:
Kontynuowanie pracy, jeśli koła są
zużyte lub zniszczone, powoduje nie-
bezpieczeństwo dla operatora, ponie-
waż maszyna może mieć ograniczone
utrzymanie w zakrętach.
14 -
49029600_Manuale RACER_RANGER_8ed_04-2023.indd 1749029600_Manuale RACER_RANGER_8ed_04-2023.indd 17 06/04/2023 15:46:2306/04/2023 15:46:23

www.ghibliwirbel.com
Professional Cleaning Machines Since 1968
POLSKI - 18
14.1 - USTAWIENIE
PARAMETRÓW (Rys. F)
14.1.a - Parametry OPERATORA
Operator może uzyskać dostęp do menu w
celu ustawienia następujących parametrów:
• Język
• Rodzaj akumulatora
• Wyświetlacz - Kontrast
• Wyświetlacz - Jasność
Aby uzyskać dostęp do menu, należy wyko-
nać następujące czynności:
Wcisnąć i przytrzymać przyciski (31a) “
” i (31b) “ ”, następnie przekręć kluczyk
zapłonu (29) w pozycję „ON”, aby wyświetlić
następujący ekran:
General
General
Sets
Sets
--ID Check--
--ID Check--
insert password:
insert password:
0
0
000
000
General Sets Ogólne konguracje
ID Check Kontrola
Insert password Wprowadź hasło
- Zwolnić wciśnięte przyciski.
- Wprowadzić 4-cyfrowe Hasło „0010”, na-
ciskając przyciski (30a) “ ” lub (30b) “
”, aby zmienić numer migającej cyfry.
- Nacisnąć przycisk (43) “ ”, aby za-
twierdzić i przejść do kolejnej cyfry, na
końcu zatwierdzić hasło i wejść do listy
parametrów.
- Nacisnąć przycisk (31a) “ ” lub (31b) “
”, aby przewijać następujące ekrany:
General
General
Language
Language
Main
Main
selection:
selection:
ITA
ITA
General Main Główna konguracja
Language selection Wybór języka
General
General
Battery
Battery
Main
Main
Type:
Type:
GEL
GEL
General Main Główna konguracja
Battery Type Wybór rodzaju akumulatora
General
General
Display
Display
min:0
min:0
max:50
max:50
Main
Main
Tune:
Tune:
15
15
General Main Główna konguracja
Display Tune Kontrast wyświetlacza
General
General
Display
Display
min:0
min:0
max:10
max:10
Main
Main
Brightness:
Brightness:
0
0
General Main Główna konguracja
Display Brightness Jasność wyświetlacza
49029600_Manuale RACER_RANGER_8ed_04-2023.indd 1849029600_Manuale RACER_RANGER_8ed_04-2023.indd 18 06/04/2023 15:46:3506/04/2023 15:46:35

www.ghibliwirbel.com
Professional Cleaning Machines Since 1968
POLSKI - 19
Ustawienie języka:
General
General
Language
Language
Main
Main
selection:
selection:
ITA
ITA
General Main Główna konguracja
Language selection Wybór języka
- Wybrać język za pomocą przycisków
(30a) “ ” lub (30b) “ ”, następnie
nacisnąć przycisk (43) “ ”, aby po-
twierdzić wybór;
-ITA = Włoski
-ENG = Angielski
Ustawienie rodzaju akumulatora:
General
General
Battery
Battery
Main
Main
Type:
Type:
GEL
GEL
General Main Główna konguracja
Battery Type Wybór rodzaju akumulatora
- Wybrać rodzaj akumulatora za pomocą
przycisków (30a) “ ” lub (30b) “ ”,
następnie nacisnąć przycisk (43) “ ”,
aby potwierdzić wybór;
-GEL = Akumulator żelowy
-AGM = Akumulator AGM
-WET = Akumulator KWASOWY
-
Ustawienie wyświetlacza - Kontrast:
General
General
Display
Display
min:0
min:0
max:50
max:50
Main
Main
Tune:
Tune:
15
15
General Main Główna konguracja
Display Tune Kontrast wyświetlacza
- Wybrać rodzaj kontrastu wyświetlacza,
ustawiając wartość od “0 do 50” za po-
mocą przycisków (30a) “ ” lub (30b) “
”, następnie nacisnąć przycisk (43) “
”, aby potwierdzić wybór.
Ustawienie wyświetlacza - Jasność:
General
General
Display
Display
min:0
min:0
max:10
max:10
Main
Main
Brightness:
Brightness:
0
0
General Main Główna konguracja
Display Brightness Jasność wyświetlacza
- Wybrać rodzaj jasności wyświetlacza,
ustawiając wartość od “0 do 10” za po-
mocą przycisków (30a) “ ” lub (30b) “
”, następnie nacisnąć przycisk (43) “
”, aby potwierdzić wybór.
PAMIĘTAJ:
Po potwierdzeniu wybranego ustawienia ma-
szyna uruchamia się ponownie, a wyświe-
tlacz (41) zapala się w trybie roboczym.
15 -
49029600_Manuale RACER_RANGER_8ed_04-2023.indd 1949029600_Manuale RACER_RANGER_8ed_04-2023.indd 19 06/04/2023 15:46:3506/04/2023 15:46:35

www.ghibliwirbel.com
Professional Cleaning Machines Since 1968
POLSKI - 20
15.1 - SPRAWDZANIE / WYMIANA BEZPIECZNIKÓW
PAMIĘTAJ:
Wszystkie obwody elektryczne maszyny są chronione za pomocą samoczynnie zerowanych
urządzeń zabezpieczających. Do wyzwolenia bezpiecznika dochodzi tylko w najpoważniej-
szych awariach.
Zalecamy, aby wymianę bezpieczników powierzać wyłącznie wykwalifikowanym osobom.
16 -
16.1 - ALARMY PODCZAS PRACY
W przypadku wystąpienia usterki maszyny na wyświetlaczu (41 Rys. F) pojawia się rodzaj
alarmu, jak pokazano na poniższej liście.
Zapoznać się z listą i wykonać zalecane rozwiązanie, aby przywrócić prawidłowe działanie
maszyny.
Jeśli zalecane środki zaradcze nie przyniosą skutku, należy skontaktować się z Serwisem
Pomocy Technicznej.
ALARM ZNACZENIE ROZWIĄZANIE
AL_1: General Błąd pamięci Ponownie uruchomić maszynę.
AL_2: General Anomalia kluczyka Wyłączyć maszynę na co najmniej 10 sekund, a
następnie ponownie ją włączyć.
AL_3: General Zbyt niskie ciśnienie
Wyłączyć maszynę, sprawdzić stan naładowania
akumulatora, bezpieczniki, styki, okablowanie i
połączenia, a następnie ponownie uruchomić ma-
szynę.
AL_4: General Zbyt wysokie ciśnienie
Wyłączyć maszynę, sprawdzić bezpieczniki, styki,
okablowanie i połączenia i ponownie uruchomić
maszynę.
AL_6: General Brak komunikacji z
panelem sterowania lub
wyświetlaczem
Wyłączyć maszynę, sprawdzić styki, okablowanie i
połączenia i ponownie uruchomić maszynę.
AL_7: General Komunikacja ffm
Wyłączyć maszynę, sprawdzić styki, okablowanie
i połączenia z modułem komunikacyjnym i jego
modułem operacyjnym oraz ponownie uruchomić
maszynę.
AL_8: General Komunikacja Wewnętrzna
1 i 2 Ponownie uruchomić maszynę.
AL_9: General
AL_10: General Wstawić tag Brak wyświetlanego Klucza „Tag”: wprowadzić
klucz.
AL_11: General Nieprawidłowy tag Nieprawidłowe wyświetlanie Klucza „Tag”: zmienić
klucz lub uszkodzony klucz.
AL_12: General Aktualizacja w toku... Wyświetlanie zdalnej aktualizacji parametrów w
toku: proszę czekać na zakończenie aktualizacji.
49029600_Manuale RACER_RANGER_8ed_04-2023.indd 2049029600_Manuale RACER_RANGER_8ed_04-2023.indd 20 06/04/2023 15:46:3606/04/2023 15:46:36

www.ghibliwirbel.com
Professional Cleaning Machines Since 1968
POLSKI - 21
ALARM ZNACZENIE ROZWIĄZANIE
AL_13: General Wyłączyć Wyświetlanie aktualizacji parametrów zakończo-
ne: ponownie uruchomić maszynę.
AL_41: Function Zbyt wysoka temperatura
Wyłączyć i pozostawić maszynę do ostygnięcia.
Sprawdzić pochłanianie silników szczotek i ssawy,
stan wentylacji otoczenia i ponownie uruchomić.
AL_42: Function Uszkodzona moc Wyłączyć maszynę na co najmniej 10 sekund, a
następnie ponownie ją włączyć.
AL_44: Function Uszkodzony przekaźnik
Brak zamknięcia Przekaźnika/Stycznika. Spraw-
dzić działanie Stycznika. W przypadku przekaź-
nika na pokładzie maszyny, jeśli nadal występuje,
należy wymienić kartę.
AL_45: Function Uszkodzony przekaźnik cc
Po włączeniu wykryto zamknięty Przekaźnik/
Stycznik. Sprawdzić stan styków Stycznika. W
przypadku przekaźnika na pokładzie maszyny, jeśli
nadal występuje, należy wymienić kartę.
AL_46: Function Zbyt wysoki prąd Szczotki
Wyłączyć maszynę, sprawdzić obciążenie (silnik),
mechanikę, okablowanie i połączenia oraz poszu-
kać obecności zwarcia na wyjściu, a następnie po-
nownie uruchomić.
AL_47: Function Zbyt wysoki prąd Ssawa
Wyłączyć maszynę, sprawdzić obciążenie (silnik),
mechanikę, okablowanie i połączenia oraz poszu-
kać obecności zwarcia na wyjściu, a następnie po-
nownie uruchomić.
AL_48: Function Zbyt wysoki prąd Pompa
wody
Wyłączyć maszynę, sprawdzić obciążenie (silnik),
mechanikę, okablowanie i połączenia oraz poszu-
kać obecności zwarcia na wyjściu, a następnie po-
nownie uruchomić.
AL_49: Function Amperometryczna Szczot-
ka 1 i 2
Sprawdzić zużycie i sposób zastosowania funkcji
szczotek oraz ponownie i uruchomić maszynę.
AL_50: Function
AL_52: Function Amperometryczna Ssawa
1
Sprawdzić zużycie ssawy i ponownie uruchomić
maszynę.
AL_54: Function Połączenie Szczotka 1 i 2 Sprawdzić połączenie silników szczotki.
AL_55: Function
AL_57: Function Połączenie Ssawa 1 Sprawdzić połączenie silnika ssawy.
AL_59: Function Niezrównoważenie Sprawdzić pochłanianie silników szczotki
AL_61: Function Amperometryczna Siłow-
nik szczotek
Sprawdzić zużycie silnika siłownika i stan porusza-
nej mechaniki.
AL_62: Function Zbyt wysoki prąd Siłownik
szczotek
Wyłączyć maszynę, sprawdzić obciążenie (silnik),
mechanikę, okablowanie i połączenia oraz poszu-
kać obecności zwarcia na wyjściu.
49029600_Manuale RACER_RANGER_8ed_04-2023.indd 2149029600_Manuale RACER_RANGER_8ed_04-2023.indd 21 06/04/2023 15:46:3606/04/2023 15:46:36

www.ghibliwirbel.com
Professional Cleaning Machines Since 1968
POLSKI - 22
ALARM ZNACZENIE ROZWIĄZANIE
AL_63: Function Wyłącznik krańcowy
Siłownik szczotek
Sprawdzić połączenia / stan wyłączników krańco-
wych. Kontrola aktywna tylko dla wersji BTO.
AL_65: Function Amperometryczna Silnik
ściągaczki
Sprawdzić zużycie silnika siłownika i stan poru-
szanej mechaniki.
AL_66: Function Zbyt wysoki prąd Silnik
ściągaczki
Wyłączyć maszynę, sprawdzić obciążenie (sil-
nik), mechanikę, okablowanie i połączenia oraz
poszukać obecności zwarcia na wyjściu.
AL_80: Traction Zbyt wysoka temperatura
Silnik Trakcji
Wyłączyć i pozostawić maszynę do ostygnięcia.
Sprawdzić zużycie i sposób zastosowania trakcji,
stan wentylacji otoczenia i ponownie uruchomić.
AL_85: Traction Zbyt wysoki prąd Silnik
Trakcji
Wyłączyć maszynę, sprawdzić obciążenie
(silnik), mechanikę, okablowanie i połączenia
oraz poszukać obecności zwarcia na wyjściu, a
następnie ponownie uruchomić.
AL_86: Traction Amperometryczna Silnik
Trakcji
Sprawdzić zużycie i sposób zastosowania funkcji
szczotek oraz ponownie i uruchomić maszynę.
AL_87: Traction Odczyt Silnika Trakcji Ponownie uruchomić maszynę.
AL_88: Traction Anomalia hamulca elek-
trycznego
Wyłączyć maszynę, sprawdzić okablowanie
hamulca i ponownie włączyć.
AL_89: Traction Uszkodzenie Pedał Przy-
spieszenia
Wyłączyć maszynę, sprawdzić połączenia i
okablowanie oraz ponownie włączyć.
AL_90: Traction Pedał Przyspieszenia
Wciśnięty Zwolnić pedał i ponownie włączyć maszynę.
AL_91: Traction Uszkodzenie Kodera Wyłączyć maszynę, sprawdzić połączenia i
okablowanie oraz ponownie włączyć.
17 -
49029600_Manuale RACER_RANGER_8ed_04-2023.indd 2249029600_Manuale RACER_RANGER_8ed_04-2023.indd 22 06/04/2023 15:46:3606/04/2023 15:46:36

www.ghibliwirbel.com
Professional Cleaning Machines Since 1968
POLSKI - 23
17.1 - ROZWIĄZYWANIE PROBLEMÓW
PROBLEM PRZYCZYNA ROZWIĄZANIE
Po przekręceniu klucza, ma-
szyna się nie uruchamia.
Akumulator jest rozładowany.Sprawdzić stan naładowania
akumulatora.
Bezpiecznik ogólny jest prze-
palony.
Wymienić bezpiecznik
umieszczony na przewodzie
akumulatora. (*)
Wadliwy klucz.Wymienić klucz. (*)
Szczotka się nie obraca.Uszkodzony silnik.Wymienić silnik. (*)
Uszkodzona karta. Wymienić kartę. (*)
Ssawa nie działa.Zbiornik zanieczyszczonej
wody jest pełen.
Opróżnić zbiornik.
Uszkodzony silnik turbiny.Wymienić silnik. (*)
Uszkodzona karta. Wymienić kartę. (*)
Maszyna nie suszy lub nie
suszy dość dobrze, pozosta-
wiając ślady wody na podło-
dze.
Ssawa wyłączona.Uruchomić ssawę.
Rura ssąca zapchana.Sprawdzić i ewentualnie wy-
czyścić rurę ssącą, łączącą
wycieraczkę ze zbiornikiem
wody zanieczyszczonej.
Zbiornik zanieczyszczonej
wody jest pełen.
Opróżnić zbiornik wody za-
nieczyszczonej.
Zużyte gumy wycieraczki.Obrócić lub wymienić gumy
wycieraczki.
Woda nie wychodzi.Zbiornik jest pusty.Riempire il serbatoio.
Filtr zapchany.Wyczyścić filtr.
Zawór elektromagnetyczny
pompy nie działa.
Wymienić elektrozawór. (*)
Uszkodzona pompa wody. Wymienić pompę wody. (*)
Uszkodzona karta. Wymienić kartę. (*)
49029600_Manuale RACER_RANGER_8ed_04-2023.indd 2349029600_Manuale RACER_RANGER_8ed_04-2023.indd 23 06/04/2023 15:46:3606/04/2023 15:46:36

www.ghibliwirbel.com
Professional Cleaning Machines Since 1968
POLSKI - 24
PROBLEM PRZYCZYNA ROZWIĄZANIE
Maszyna nie porusza się w
warunkach roboczych.
Operator siedzi nieprawidło-
wo na stanowisku kierowcy.
Usiąść prawidłowo na siedze-
niu.
Wadliwe koło napędowe.Wymiana koła napędowego.
(*)
Uszkodzona karta. Wymienić kartę. (*)
Czujnik obecności operatora
uszkodzony.
Wymienić czujnik. (*)
Czyszczenie podłogi jest nie-
wystarczające.
Nieodpowiednie szczotki lub
detergent.
Używać szczotek lub deter-
gentów dostosowanych do
rodzaju podłogi i brudu.
Szczotka zużyta.Wymienić szczotkę.
Kontrolka “ ” pojemnik roz-
tworu pusty cały czas miga.
Pusty pojemnik.Napełnić pojemnik.
Zawór zamknięty.Otworzyć zawór.
Uszkodzony przepływomierz.Wymienić przepływomierz.
(*)
W komorze baterii jest zastój
wody.
Wadliwy czujnik poziomu w
zbiorniku odzysku.
Spuść wodę z komory baterii
za pomocą odpowiedniej rur-
ki i kranu.
Sprawdź lub wymień czujnik
poziomu. (*)
(*) Zadzwoń do serwisu posprzedażnego w celu wymiany.
18 -
18.1 - ROZBIÓRKA MASZYNY
NIEBEZPIECZEŃSTWO:
Baterie i części elektryczne są uważane za odpady specjalne i dlatego należy
je usuwać w specjalnych punktach zbiórki zgodnie z przepisami obowiązują-
cymi w kraju użytkowania.
19 -
49029600_Manuale RACER_RANGER_8ed_04-2023.indd 2449029600_Manuale RACER_RANGER_8ed_04-2023.indd 24 06/04/2023 15:46:3606/04/2023 15:46:36

www.ghibliwirbel.com
Professional Cleaning Machines Since 1968
POLSKI - 25
19.1 - SCHEMAT ELEKTRYCZNY
Legenda:
AC Pedał Przyspieszenia
BAT: Akumulatory
BC Ładowarki
BE Migające światło
BRK Hamulec elektromagnetyczny
C1 Złącze akumulatorów
EB1 Zakładka funkcji
EB2 Wyświetlacz
EB3 Panel sterowania
EV Elektrozawór
F1 Bezpiecznik ładowarki (1A)
F2 Bezpiecznik świateł (jeśli obecny) (3A)
F3 Bezpiecznik klaksonu (1A)
F4 Bezpiecznik migającego światła (1A)
F5 Bezpiecznik elektrozawór (5A)
F6 Bezpiecznik siłownika głowicy szczotko-
wej (10A)
F7 Bezpiecznik siłownika ściągaczki (10A)
F8 Bezpiecznik hamulca elektrycznego
(7,5A)
F9 Bezpiecznik pompy wody (5A)
F10 Bezpiecznik pompa chem (jeśli obecna)
(5A)
F11 Bezpiecznik silnika zasysania (40A)
F12 Bezpiecznik silnika prawej szczotki (40A)
F13 Bezpiecznik silnika lewej szczotki (40A)
F14 Bezpiecznik silnika trakcji (100A)
HN Klakson
KEY Kluczyk zapłonowy
L1 Światła robocze (jeśli obecne)
MA Silnik zasysania
MAS Silnik siłownika głowicy szczotkowej
MAT Silnik siłownika ściągaczki
MS-DX Silnik prawej szczotki
MS-SX Silnik lewej szczotki
MT Silnik trakcji
PA Pompa wody
PC Pompa chemiczna
PE Przycisk awaryjny
S1 Czujnik poziom wody brudnej
SW1 Mikrowyłącznik siedzenia
TE Zewnętrzny stycznik
Kody koloru:
BK Czarny
BU Błękitny
BN Brązowy
GN Zielony
GY Szary
OG Pomarańczowy
PK Różowy
RD Czerwony
VT Fioletowy
WT Biały
YE Żółty
49029600_Manuale RACER_RANGER_8ed_04-2023.indd 2549029600_Manuale RACER_RANGER_8ed_04-2023.indd 25 06/04/2023 15:46:3606/04/2023 15:46:36

www.ghibliwirbel.com
Professional Cleaning Machines Since 1968
POLSKI - 26
PA MT PC EV
- +
-
-
-
-
+ -+ -+
+
+
+
MA MS MS
DX SX
C1
BC
TE
EB2
EB3
KEY
L1
BE
F4
F1
F2
F8
F9 F14 F10 F5 F11 F12 F13
F7
F6
F3
BRK
AC
M
SW1
M5
J8
4 3
2 1
4 3
2 1
1
4
2
5
3
6
9
1
10
2
11
3
4
1
5
2
6
3
4
1
5
2
6
3
4
1
5
2
6
3
12
4
4
8
1
2
3
7
2
6
1
5
3
6
2
5
1
1
12
3s
+
-
2
1
1
2
3
4
2 3
123
456 4
1
11
2
12
3
13
4
14
5
15
6
16
7
17
8
18
9
19
10
20
4
9
3
8
5
10
2
7
1
6
13
5
16
8
15
7
14
6
2
1
J9 J10 J11
J1
J8 J7
J2
S1
J3 J4 J5 J7J6
J12 J13 J14
M6
USB
HN
BATBAT MATMAT
PEPE
MASMAS
EB1
49029600_Manuale RACER_RANGER_8ed_04-2023.indd 2649029600_Manuale RACER_RANGER_8ed_04-2023.indd 26 06/04/2023 15:46:3606/04/2023 15:46:36

www.ghibliwirbel.com
Professional Cleaning Machines Since 1968
26
-
PA MT PC EV
- +
-
-
-
-
+ -+ -+
+
+
+
MA MS MS
DX SX
C1
BC
TE
EB2
EB3
KEY
L1
BE
F4
F1
F2
F8
F9 F14 F10 F5 F11 F12 F13
F7
F6
F3
BRK
AC
M
SW1
M5
J8
4 3
2 1
4 3
2 1
1
4
2
5
3
6
9
1
10
2
11
3
4
1
5
2
6
3
4
1
5
2
6
3
4
1
5
2
6
3
12
4
4
8
1
2
3
7
2
6
1
5
3
6
2
5
1
1
12
3s
+
-
2
1
1
2
3
4
2 3
123
456 4
1
11
2
12
3
13
4
14
5
15
6
16
7
17
8
18
9
19
10
20
4
9
3
8
5
10
2
7
1
6
13
5
16
8
15
7
14
6
2
1
J9 J10 J11
J1
J8 J7
J2
S1
J3 J4 J5 J7J6
J12 J13 J14
M6
USB
HN
BATBAT MATMAT
PEPE
MASMAS
EB1
49029600_Manuale RACER_RANGER_8ed_04-2023.indd 149029600_Manuale RACER_RANGER_8ed_04-2023.indd 1 06/04/2023 15:46:3206/04/2023 15:46:32

www.ghibliwirbel.com
Professional Cleaning Machines Since 1968
BK
BU
BN
GN
GY
OG
PK
RD
VT
WT
YE
25
-
AC
BAT
BC
BE
BRK
C1
EB1
EB2
EB3
EV
)1A F1
)3A F2
)1A F3
)1A F4
)5A F5
)10A F6
)10A F7
)7.5A F8
)5A F9
)5A
F10
)40A F11
)40A F12
)40A F13
)100A F14
HN
KEY
L1
MA
MAS
MAT
MS-DX
MS-SX
MT
PA
PC
PE
S1
SW1
TE
19.1
49029600_Manuale RACER_RANGER_8ed_04-2023.indd 249029600_Manuale RACER_RANGER_8ed_04-2023.indd 2 06/04/2023 15:46:3306/04/2023 15:46:33

www.ghibliwirbel.com
Professional Cleaning Machines Since 1968
24
-
18.1
:
49029600_Manuale RACER_RANGER_8ed_04-2023.indd 349029600_Manuale RACER_RANGER_8ed_04-2023.indd 3 06/04/2023 15:46:3506/04/2023 15:46:35

www.ghibliwirbel.com
Professional Cleaning Machines Since 1968
23
-
17.1
49029600_Manuale RACER_RANGER_8ed_04-2023.indd 449029600_Manuale RACER_RANGER_8ed_04-2023.indd 4 06/04/2023 15:46:3606/04/2023 15:46:36

www.ghibliwirbel.com
Professional Cleaning Machines Since 1968
22
-
.BTO
AL_63: Function
AL_65: Function
AL_66: Function
AL_80: Traction
AL_85: Traction
AL_86: Traction
AL_87: Traction
AL_88: Traction
AL_89: Traction
AL_90: Traction
AL_91: Traction
49029600_Manuale RACER_RANGER_8ed_04-2023.indd 549029600_Manuale RACER_RANGER_8ed_04-2023.indd 5 06/04/2023 15:46:3606/04/2023 15:46:36

www.ghibliwirbel.com
Professional Cleaning Machines Since 1968
21
-
AL_41: Function
10
AL_42: Function
AL_44: Function
cc AL_45: Function
AL_46: Function
AL_47: Function
AL_48: Function
21
AL_49: Function
AL_50: Function
1 AL_52: Function
21
AL_54: Function
AL_55: Function
1 AL_57: Function
AL_59: Function
AL_61: Function
AL_62: Function
49029600_Manuale RACER_RANGER_8ed_04-2023.indd 649029600_Manuale RACER_RANGER_8ed_04-2023.indd 6 06/04/2023 15:46:3606/04/2023 15:46:36

www.ghibliwirbel.com
Professional Cleaning Machines Since 1968
20
-
15.1
:
F16.1
41
AL_1: General
10
AL_2: General
AL_3: General
AL_4: General
AL_6: General
ffm AL_7: General
21
AL_8: General
AL_9: General
AL_10: General
AL_11: General
AL_12: General
AL_13: General
49029600_Manuale RACER_RANGER_8ed_04-2023.indd 749029600_Manuale RACER_RANGER_8ed_04-2023.indd 7 06/04/2023 15:46:3706/04/2023 15:46:37

www.ghibliwirbel.com
Professional Cleaning Machines Since 1968
19
-
General
General
Language
Language
Main
Main
selection:
selection:
ITA
ITA
General Main
Language selection
“ )30a
“ )43 “ )30b
ITA
ENG
General
General
Battery
Battery
Main
Main
Type:
Type:
GEL
GEL
General Main
Battery Type
“ )30a
“ )43 “ )30b
GEL
AGM AGM
WET
General
General
Display
Display
min:0
min:0
max:50
max:50
Main
Main
Tune:
Tune:
15
15
General Main
Display Tune
“ )30a500«
“ )43 “ )30b
General
General
Display
Display
min:0
min:0
max:10
max:10
Main
Main
Brightness:
Brightness:
0
0
General Main
Display Brightness
“ )30a100«
“ )43 “ )30b
:
41
49029600_Manuale RACER_RANGER_8ed_04-2023.indd 849029600_Manuale RACER_RANGER_8ed_04-2023.indd 8 06/04/2023 15:46:4306/04/2023 15:46:43

www.ghibliwirbel.com
Professional Cleaning Machines Since 1968
18
-
14.1
)31a
“ )31b“
ON29(
General
General
Sets
Sets
--ID Check--
--ID Check--
insert password:
insert password:
0
0
000
000
General Sets
ID Check
Insert password
00104
“ )30a
“ )30b(
43
“ )31b “ )31a
General
General
Language
Language
Main
Main
selection:
selection:
ITA
ITA
General Main
Language selection
General
General
Battery
Battery
Main
Main
Type:
Type:
GEL
GEL
General Main
Battery Type
General
General
Display
Display
min:0
min:0
max:50
max:50
Main
Main
Tune:
Tune:
15
15
General Main
Display Tune
General
General
Display
Display
min:0
min:0
max:10
max:10
Main
Main
Brightness:
Brightness:
0
0
General Main
Display Brightness
49029600_Manuale RACER_RANGER_8ed_04-2023.indd 949029600_Manuale RACER_RANGER_8ed_04-2023.indd 9 06/04/2023 15:46:4906/04/2023 15:46:49

www.ghibliwirbel.com
Professional Cleaning Machines Since 1968
17
-
11
71
.)11(
A13
.)7222
72
73(
74
:
238
:
49029600_Manuale RACER_RANGER_8ed_04-2023.indd 1049029600_Manuale RACER_RANGER_8ed_04-2023.indd 10 06/04/2023 15:46:5206/04/2023 15:46:52

www.ghibliwirbel.com
Professional Cleaning Machines Since 1968
16
-
.)64
F29
ON«
“ )F46
2919
OFFF
.M
:
“ )F46
OFFF29(
20
20
65
.)66(
67
.)60
68
.)6169
:
6160
)60
61
:
44
.“ )F
F30
A7
70
6160
:
49029600_Manuale RACER_RANGER_8ed_04-2023.indd 1149029600_Manuale RACER_RANGER_8ed_04-2023.indd 11 06/04/2023 15:46:5606/04/2023 15:46:56

www.ghibliwirbel.com
Professional Cleaning Machines Since 1968
15
-
:
.)12
58
59
H15
60(
20
.)20C16
C36
.)20(
)6160
.)62
:
)6160
63
2
.)19
.)19
.“ONF29(
0
“ )F46
A7
“ )F46
OFFF29
49029600_Manuale RACER_RANGER_8ed_04-2023.indd 1249029600_Manuale RACER_RANGER_8ed_04-2023.indd 12 06/04/2023 15:46:5606/04/2023 15:46:56

www.ghibliwirbel.com
Professional Cleaning Machines Since 1968
14
-
.“OFF29
:
:
H12.1
:
11
11
:
15
56
:
.)15
)1556
:
:
13
17
57(
17
57(
49029600_Manuale RACER_RANGER_8ed_04-2023.indd 1349029600_Manuale RACER_RANGER_8ed_04-2023.indd 13 06/04/2023 15:46:5606/04/2023 15:46:56

www.ghibliwirbel.com
Professional Cleaning Machines Since 1968
13
-
“ )42
“ )44
“ )46
)7
0
“ )46
“ )49
:
:
ON29 -
41
.)30
10
9(
.)7
:
:
“ )49
.)41
49029600_Manuale RACER_RANGER_8ed_04-2023.indd 1449029600_Manuale RACER_RANGER_8ed_04-2023.indd 14 06/04/2023 15:47:0006/04/2023 15:47:00

www.ghibliwirbel.com
Professional Cleaning Machines Since 1968
12
-
10.1
D
:
50
52
13
)18
14
53
:
.)14
:
13
10.2
E
:
.)11
54
5455
555
:
:
554
.)11
11.1
15
16
)2037
16
ON29(
.)41
4
49029600_Manuale RACER_RANGER_8ed_04-2023.indd 1549029600_Manuale RACER_RANGER_8ed_04-2023.indd 15 06/04/2023 15:47:0006/04/2023 15:47:00

www.ghibliwirbel.com
Professional Cleaning Machines Since 1968
“ )47
“ )48
“ )49
13
7
.)A
8.1
A5
:
5
A9.1
4
23
11
-
49029600_Manuale RACER_RANGER_8ed_04-2023.indd 1649029600_Manuale RACER_RANGER_8ed_04-2023.indd 16 06/04/2023 15:47:2306/04/2023 15:47:23

www.ghibliwirbel.com
Professional Cleaning Machines Since 1968
7
7
7
F7.1
41
“ )30b “ )30a
7
“ )31b “ )31a
“ )42
“ )43ECO
“ )44
“ )45
“ )46
10
-
49029600_Manuale RACER_RANGER_8ed_04-2023.indd 1749029600_Manuale RACER_RANGER_8ed_04-2023.indd 17 06/04/2023 15:47:5806/04/2023 15:47:58

www.ghibliwirbel.com
Professional Cleaning Machines Since 1968
9
-
:
030
ON29(
46
“
47(
47
47
:
:
48(
“48
48
.“
48
:
)29
5
40
ON29
030
49(
49
49
“
49
50(
51(
52(
49029600_Manuale RACER_RANGER_8ed_04-2023.indd 1849029600_Manuale RACER_RANGER_8ed_04-2023.indd 18 06/04/2023 15:48:1306/04/2023 15:48:13

www.ghibliwirbel.com
Professional Cleaning Machines Since 1968
8
-
41(
42(
42
“
3.6
.)1%
.)100%
3
42
UPLOADED41(
423
RESET41
(
43
“
.)1%
.)50%
44(
44
44
29
ON“
45(
45
45
:
46(
46
49029600_Manuale RACER_RANGER_8ed_04-2023.indd 1949029600_Manuale RACER_RANGER_8ed_04-2023.indd 19 06/04/2023 15:48:2306/04/2023 15:48:23

www.ghibliwirbel.com
Professional Cleaning Machines Since 1968
7
-
11
24
39
38(
.)39
.)11
40
38
:
F41
40
.)38
.)11
6.1
29(
ON
OFF
(
“ )30b“ )30a(
7
)41
7
(
“ )31a
“
“ )31b
“
:
.)30
49029600_Manuale RACER_RANGER_8ed_04-2023.indd 2049029600_Manuale RACER_RANGER_8ed_04-2023.indd 20 06/04/2023 15:48:2806/04/2023 15:48:28

www.ghibliwirbel.com
Professional Cleaning Machines Since 1968
6
-
.)11
264
24112
.)11
:
27
28
3
ON29
“ )31a
7
4.1
3520
.)36
16
.)37(
5.1
:
:
:
GEL
10
41
49029600_Manuale RACER_RANGER_8ed_04-2023.indd 2149029600_Manuale RACER_RANGER_8ed_04-2023.indd 21 06/04/2023 15:48:3106/04/2023 15:48:31

www.ghibliwirbel.com
Professional Cleaning Machines Since 1968
5
-
1.1
:
:
1.2
:
A2.1
1(
2(
3(
4(
5(
6(
7(
8(
9(
10(
11(
12(
13(
14(
15(
16(
17(
18(
19(
20(
21(
22(
23(
24(
25(
B
3
26
20( -
N ° 2 )32( -
33( -
34( -
49029600_Manuale RACER_RANGER_8ed_04-2023.indd 2249029600_Manuale RACER_RANGER_8ed_04-2023.indd 22 06/04/2023 15:48:3106/04/2023 15:48:31

www.ghibliwirbel.com
Professional Cleaning Machines Since 1968
4
-
RANGER R 115 RACER R 85
FD 85 FD 75 FD 75 FD 65
% 2
% 12
600
6
550
H2O1250125 )
30
110 80
115 85
1370 x 770 x 1470 1250 x 705 x 1400
890 785 785 715
1055 950 950 885
x440 x 625 x 380 x310 x 540 x 380
246 213
-285 Ah105 V12 Gel
-333 Ah180 V6 Gel
-249 Ah100 V24
432 - Ah240 V6 Gel
506 - Ah320 V24 Wet Pb
288 - Ah150 V24
691 490 )GVW
•
•
•
15 •
75 •
49029600_Manuale RACER_RANGER_9ed_09-2023.indd 2349029600_Manuale RACER_RANGER_9ed_09-2023.indd 23 04/09/2023 14:50:0604/09/2023 14:50:06

www.ghibliwirbel.com
Professional Cleaning Machines Since 1968
3
-
V 24
N° 4 - 6V 240Ah )C5( N° 2 - 12V 105Ah )C5(
N° 1 - 24V 320Ah )C5( N° 4 - 6V 180Ah )C5(
N° 1 - 24V 150Ah )Li( N° 1 - 24V 100Ah )Li(
2210 2160
)C5 240Ah(5 )C5 105Ah(2
)C5 320Ah (7 )C5 180Ah(4
)C5 150Ah (3 )C5 100Ah (2
850 750 750 650
1050 950 950 850
²5000 ²4500 ²4500²4000
²3000 ²2700 ²2700²2400
²2,5 < )ISO 5349-1(
²0,5 < )ISO 2631-1(
63 )LpA - ISO 11203(
57 )LpA(
IPX3 IP
430
217
380
215
380
215
330
213
x 2500
165
²17 ²21 ²21 ²30
²34 ²43 ²32 ²46 )
49029600_Manuale RACER_RANGER_8ed_04-2023.indd 2449029600_Manuale RACER_RANGER_8ed_04-2023.indd 24 06/04/2023 15:48:3206/04/2023 15:48:32

www.ghibliwirbel.com
Professional Cleaning Machines Since 1968
2
3
5
5
5
5
5
5
6
6
6
6
6
6
7
7
7
7
10
10
11
11
12
12
12
12
13
14
14
14
14
14
15
15
15
15
15
15
16
16
16
16
17
17
17
18
18
18
20
20
23
24
25
A
B
A
B
C
G
G
F
A
F
A
D
E
H
I
J
K
L
M
M
K
N
O
P
A
A
F
a1.1
1.1
1.1
a1.2
a2.1
a
3.1
3.1
a4.1
4.1
4.1
a5.1
5.1
5.1
a6.1
6.1
6.1
a7.1
a8.1
a9.1
a10.1
a10.2
a11.1
11.1
11.1
11.1
11.1
a12.1
a
a
13.2
13.2
13.2
a
13.3
a
13.4
13.4
13.4
13.4
13.4
13.4
13.4
13.4
a14.1
14.1
a15.1
a16.1
a17.1
a18.1
a19.1
2
-
49029600_Manuale RACER_RANGER_8ed_04-2023.indd 2549029600_Manuale RACER_RANGER_8ed_04-2023.indd 25 06/04/2023 15:48:3206/04/2023 15:48:32

www.ghibliwirbel.com
Professional Cleaning Machines Since 1968
1
-
49029600_Manuale RACER_RANGER_8ed_04-2023.indd 2649029600_Manuale RACER_RANGER_8ed_04-2023.indd 26 06/04/2023 15:48:3206/04/2023 15:48:32

49029600_Copertina RACER_RANGER_8ed_04-2023.indd 749029600_Copertina RACER_RANGER_8ed_04-2023.indd 7 06/04/2023 12:06:5906/04/2023 12:06:59

49029600_Copertina RACER_RANGER_8ed_04-2023.indd 849029600_Copertina RACER_RANGER_8ed_04-2023.indd 8 06/04/2023 12:06:5906/04/2023 12:06:59

49029600_Copertina RACER_RANGER_8ed_04-2023.indd 949029600_Copertina RACER_RANGER_8ed_04-2023.indd 9 06/04/2023 12:06:5906/04/2023 12:06:59

Professional Cleaning Machines Since 1968
DEALER
Cod. 49.0296.00 - 9^ ed. - 09/2023
GHIBLI & WIRBEL S.p.A.
Registered office:
Headquarters:
100% MADE IN ITALY
49029600_Copertina RACER_RANGER_8ed_04-2023.indd 1049029600_Copertina RACER_RANGER_8ed_04-2023.indd 10 06/04/2023 12:07:0106/04/2023 12:07:01
-
 1
1
-
 2
2
-
 3
3
-
 4
4
-
 5
5
-
 6
6
-
 7
7
-
 8
8
-
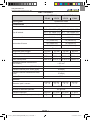 9
9
-
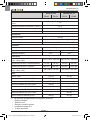 10
10
-
 11
11
-
 12
12
-
 13
13
-
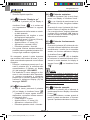 14
14
-
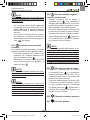 15
15
-
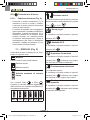 16
16
-
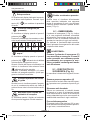 17
17
-
 18
18
-
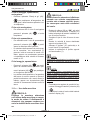 19
19
-
 20
20
-
 21
21
-
 22
22
-
 23
23
-
 24
24
-
 25
25
-
 26
26
-
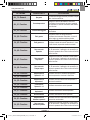 27
27
-
 28
28
-
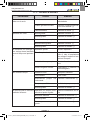 29
29
-
 30
30
-
 31
31
-
 32
32
-
 33
33
-
 34
34
-
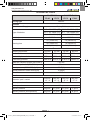 35
35
-
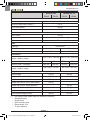 36
36
-
 37
37
-
 38
38
-
 39
39
-
 40
40
-
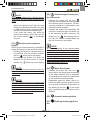 41
41
-
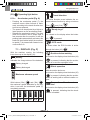 42
42
-
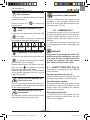 43
43
-
 44
44
-
 45
45
-
 46
46
-
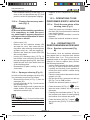 47
47
-
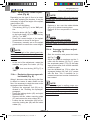 48
48
-
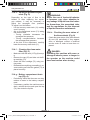 49
49
-
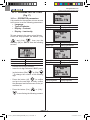 50
50
-
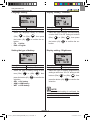 51
51
-
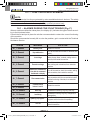 52
52
-
 53
53
-
 54
54
-
 55
55
-
 56
56
-
 57
57
-
 58
58
-
 59
59
-
 60
60
-
 61
61
-
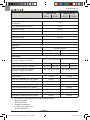 62
62
-
 63
63
-
 64
64
-
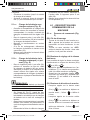 65
65
-
 66
66
-
 67
67
-
 68
68
-
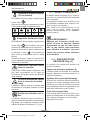 69
69
-
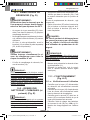 70
70
-
 71
71
-
 72
72
-
 73
73
-
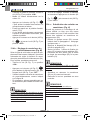 74
74
-
 75
75
-
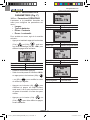 76
76
-
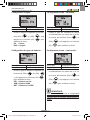 77
77
-
 78
78
-
 79
79
-
 80
80
-
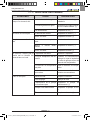 81
81
-
 82
82
-
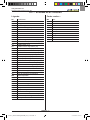 83
83
-
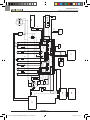 84
84
-
 85
85
-
 86
86
-
 87
87
-
 88
88
-
 89
89
-
 90
90
-
 91
91
-
 92
92
-
 93
93
-
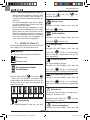 94
94
-
 95
95
-
 96
96
-
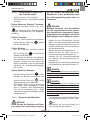 97
97
-
 98
98
-
 99
99
-
 100
100
-
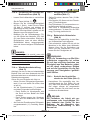 101
101
-
 102
102
-
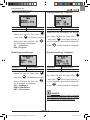 103
103
-
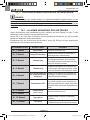 104
104
-
 105
105
-
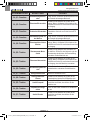 106
106
-
 107
107
-
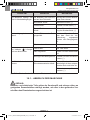 108
108
-
 109
109
-
 110
110
-
 111
111
-
 112
112
-
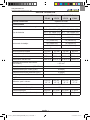 113
113
-
 114
114
-
 115
115
-
 116
116
-
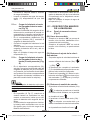 117
117
-
 118
118
-
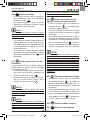 119
119
-
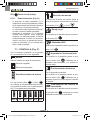 120
120
-
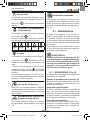 121
121
-
 122
122
-
 123
123
-
 124
124
-
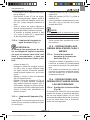 125
125
-
 126
126
-
 127
127
-
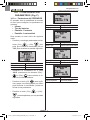 128
128
-
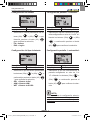 129
129
-
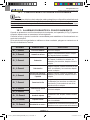 130
130
-
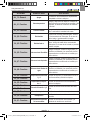 131
131
-
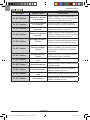 132
132
-
 133
133
-
 134
134
-
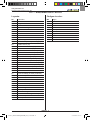 135
135
-
 136
136
-
 137
137
-
 138
138
-
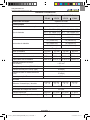 139
139
-
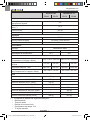 140
140
-
 141
141
-
 142
142
-
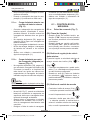 143
143
-
 144
144
-
 145
145
-
 146
146
-
 147
147
-
 148
148
-
 149
149
-
 150
150
-
 151
151
-
 152
152
-
 153
153
-
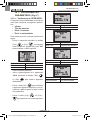 154
154
-
 155
155
-
 156
156
-
 157
157
-
 158
158
-
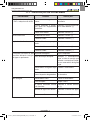 159
159
-
 160
160
-
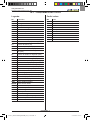 161
161
-
 162
162
-
 163
163
-
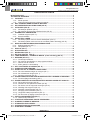 164
164
-
 165
165
-
 166
166
-
 167
167
-
 168
168
-
 169
169
-
 170
170
-
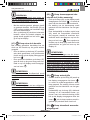 171
171
-
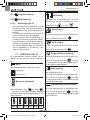 172
172
-
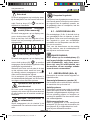 173
173
-
 174
174
-
 175
175
-
 176
176
-
 177
177
-
 178
178
-
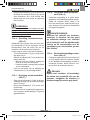 179
179
-
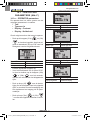 180
180
-
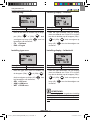 181
181
-
 182
182
-
 183
183
-
 184
184
-
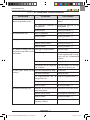 185
185
-
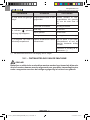 186
186
-
 187
187
-
 188
188
-
 189
189
-
 190
190
-
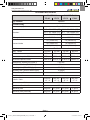 191
191
-
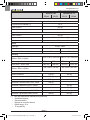 192
192
-
 193
193
-
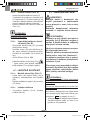 194
194
-
 195
195
-
 196
196
-
 197
197
-
 198
198
-
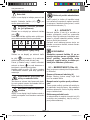 199
199
-
 200
200
-
 201
201
-
 202
202
-
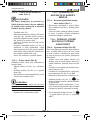 203
203
-
 204
204
-
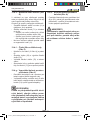 205
205
-
 206
206
-
 207
207
-
 208
208
-
 209
209
-
 210
210
-
 211
211
-
 212
212
-
 213
213
-
 214
214
-
 215
215
-
 216
216
-
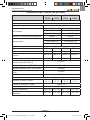 217
217
-
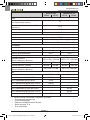 218
218
-
 219
219
-
 220
220
-
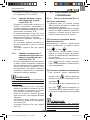 221
221
-
 222
222
-
 223
223
-
 224
224
-
 225
225
-
 226
226
-
 227
227
-
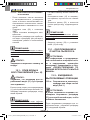 228
228
-
 229
229
-
 230
230
-
 231
231
-
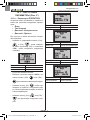 232
232
-
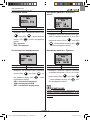 233
233
-
 234
234
-
 235
235
-
 236
236
-
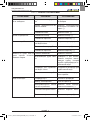 237
237
-
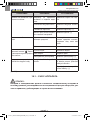 238
238
-
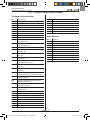 239
239
-
 240
240
-
 241
241
-
 242
242
-
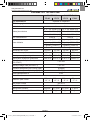 243
243
-
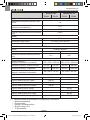 244
244
-
 245
245
-
 246
246
-
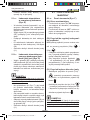 247
247
-
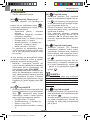 248
248
-
 249
249
-
 250
250
-
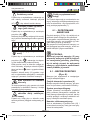 251
251
-
 252
252
-
 253
253
-
 254
254
-
 255
255
-
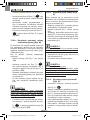 256
256
-
 257
257
-
 258
258
-
 259
259
-
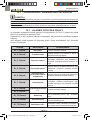 260
260
-
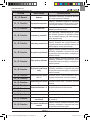 261
261
-
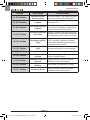 262
262
-
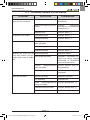 263
263
-
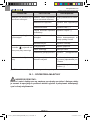 264
264
-
 265
265
-
 266
266
-
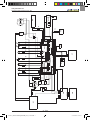 267
267
-
 268
268
-
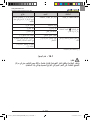 269
269
-
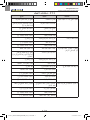 270
270
-
 271
271
-
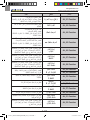 272
272
-
 273
273
-
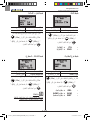 274
274
-
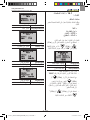 275
275
-
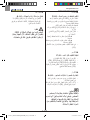 276
276
-
 277
277
-
 278
278
-
 279
279
-
 280
280
-
 281
281
-
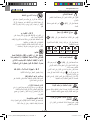 282
282
-
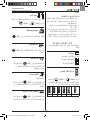 283
283
-
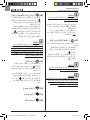 284
284
-
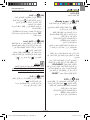 285
285
-
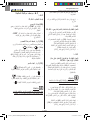 286
286
-
 287
287
-
 288
288
-
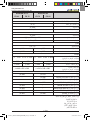 289
289
-
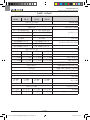 290
290
-
 291
291
-
 292
292
-
 293
293
-
 294
294
-
 295
295
-
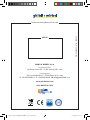 296
296


Ghibli & Wirbel RACER R 85 FD 75 BC Lithium CHEM Use And Maintenance
- Tipo
- Use And Maintenance
en otros idiomas
Artículos relacionados
-
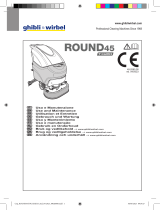 Ghibli & Wirbel ROUND 45 M 55 BC CHEM TOUCH Use And Maintenance
-
 Ghibli & Wirbel RUNNER R 150 FD 100 BC CHEM Use And Maintenance
-
 Ghibli & Wirbel ROUND 45 SD 55 BC TOUCH Use And Maintenance
-
 Ghibli & Wirbel FR 30 SM 45 TOUCH Use And Maintenance
-
 Ghibli & Wirbel HS R 110 BC Use And Maintenance
-
 Ghibli & Wirbel TOOL PRO WDA 40 L Use And Maintenance
-
 Ghibli & Wirbel O 143 U 10 Use And Maintenance
-
 Ghibli & Wirbel O 143 S 10 Use And Maintenance
-
 Ghibli & Wirbel POWER EXTRA 7 I Use And Maintenance
-
 Ghibli & Wirbel POWER WD 80.2 I TPT Use And Maintenance


