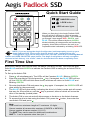
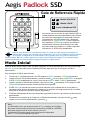
Apricorn Aegis Padlock SSD Guía de inicio rápido
- Tipo
- Guía de inicio rápido
Apricorn Aegis Padlock SSD es un dispositivo de almacenamiento externo seguro y portátil que utiliza un sistema de bloqueo con PIN para proteger tus datos. Con una capacidad de almacenamiento de hasta 1 TB, este SSD es ideal para almacenar y transportar archivos confidenciales, como documentos financieros, información personal y proyectos de trabajo. El Aegis Padlock SSD está equipado con una función de autocomprobación que verifica que todos los componentes de seguridad funcionen correctamente.
Apricorn Aegis Padlock SSD es un dispositivo de almacenamiento externo seguro y portátil que utiliza un sistema de bloqueo con PIN para proteger tus datos. Con una capacidad de almacenamiento de hasta 1 TB, este SSD es ideal para almacenar y transportar archivos confidenciales, como documentos financieros, información personal y proyectos de trabajo. El Aegis Padlock SSD está equipado con una función de autocomprobación que verifica que todos los componentes de seguridad funcionen correctamente.


-
 1
1
-
 2
2
-
 3
3
-
 4
4
-
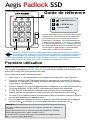 5
5
-
 6
6
-
 7
7
-
 8
8
-
 9
9
-
 10
10


Apricorn Aegis Padlock SSD Guía de inicio rápido
- Tipo
- Guía de inicio rápido
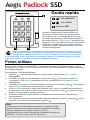
Apricorn Aegis Padlock SSD es un dispositivo de almacenamiento externo seguro y portátil que utiliza un sistema de bloqueo con PIN para proteger tus datos. Con una capacidad de almacenamiento de hasta 1 TB, este SSD es ideal para almacenar y transportar archivos confidenciales, como documentos financieros, información personal y proyectos de trabajo. El Aegis Padlock SSD está equipado con una función de autocomprobación que verifica que todos los componentes de seguridad funcionen correctamente.
En otros idiomas
Documentos relacionados
-
Apricorn Aegis Padlock DT Guía de inicio rápido
-
Apricorn Padlock DT FIPS Guía de inicio rápido
-
Apricorn Aegis Secure 3NXC Guía de inicio rápido
-
Apricorn Aegis Padlock 3 Guía de inicio rápido
-
-
-
-
-
-
Otros documentos
-
iStorage diskAshur2 Guía de inicio rápido
-
-
-
-
-
-