iStorage diskAshur PRO2 Guía de inicio rápido
- Tipo
- Guía de inicio rápido

diskAshur PRO2 QSG v1.6F
English: QUICK START GUIDE ................................................2
Deutsch: SCHNELLSTARTANLEITUNG ....................................7
Français: GUIDE DE DÉMARRAGE RAPIDE ............................12
Español: GUÍA DE INICIO RÁPIDO .........................................18
Italiano: GUIDA DI AVVIO RAPIDO .......................................23
FIPS 140-2 LEVEL 3

2 2
diskAshur PRO2 QSG v1.6F
iStorage provides the following helpful resources:
• website: www.istorage-uk.com • email: [email protected] • Telephone: +44 (0) 20 8991-6260
iStorage Technical Support Specialists are available from 9:00 a.m to 5:30 p.m GMT, Mon- Fri.
English
diskAshur PRO2
Quick Start Guide

3
diskAshur PRO2 QSG v1.6F
Thank you for purchasing the iStorage diskAshur PRO2. Your diskAshur PRO2 is preformatted in exFAT and shipped
with a default Admin PIN of 11223344 and although it can be used straight out of the box with the default Admin
PIN, for security reasons, we highly recommend that a new Admin PIN be created immediately by following the
instructions under the heading ‘Changing the Admin PIN’.
Quick Start Guide
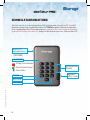
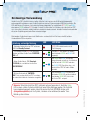
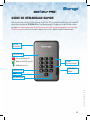
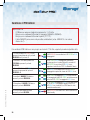
LED LIGHTS
LOCK
UNLOCK
SHIFT
DESK LOCK
SLOT CONNECTION
- Standby State/Locked
- User Mode/Unlocked
- Admin Mode
Alphanumeric
Keypad
Integrated
USB 3.1 Cable

4 4
diskAshur PRO2 QSG v1.6F
Your diskAshur PRO2 undergoes a rapid self-test to verify all security components are working properly each time
you plug into a powered USB port. The LEDs will go through 3 test stages, blinking in sequence RED, GREEN and
BLUE, followed by two GREEN blinks and then to RED (Standby State) on a successful test. Any test failure will
force the diskAshur PRO2 to securely reset itself and automatically resume the self-test without affecting the security
characteristics or any data stored on the drive.
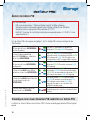
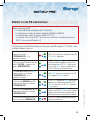
Please follow the instructions in the table below to unlock the diskAshur PRO2 for the first time with the default
Admin PIN.
Note: Once the diskAshur PRO2 has been successfully unlocked, the GREEN LED will remain on
and in a solid state and will only blink when data is being transferred. It can be locked down
immediately by pressing the ‘LOCK’ button once or by (strongly recommended) clicking the
‘Safely Remove Hardware/Eject’ icon within your operating system.
Instructions - first time use LED LED State
1. Connect the diskAshur PRO2 to a USB port -
Standby State RED LED will be solid awaiting PIN entry
2. In Standby State (solid RED LED), press and
hold down ‘UNLOCK + 1’ buttons
Solid RED LED will change to blinking
GREEN and BLUE LEDs
3. Enter the Admin PIN (default - 11223344)
and press ‘UNLOCK’ button
GREEN and BLUE LEDs blink rapidly
together for a few seconds then to a
solid GREEN and finally a solid BLUE LED
indicating the diskAshur PRO2 is in “Admin
Mode”
4. Press the ‘UNLOCK’ button once again to
unlock diskAshur PRO2 and access drive contents
Solid BLUE LED will change to a blinking
GREEN, and finally a solid GREEN LED
indicating the diskAshur PRO2 is unlocked
First Time Use

5
diskAshur PRO2 QSG v1.6F
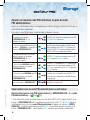
1. In Standby State (solid RED LED),
press and hold down both the ‘UNLOCK
and number ’1’ buttons.
Solid RED LED will change to blinking GREEN and
BLUE LEDs
2. Enter your Admin PIN (default
‘11223344’) and press the ‘UNLOCK’
button.
GREEN and BLUE LEDs blink rapidly together for
a few seconds then to a solid GREEN and finally a
solid BLUE LED indicating the diskAshur PRO2 is in
‘Admin Mode’.
3. In Admin mode (solid BLUE LED), press
and hold down ‘UNLOCK + 2’ buttons.
Solid BLUE LED will change to blinking GREEN and
solid BLUE LEDs.
4. Enter your NEW Admin PIN and press
‘UNLOCK’ button.
Blinking GREEN and solid BLUE LEDs will switch to
a single GREEN LED blink and then back to blinking
GREEN and solid BLUE LEDs.
5. Re-enter your NEW Admin PIN and
press ‘UNLOCK’ button.
Blinking GREEN and solid BLUE LEDs change to
a rapidly blinking BLUE LED and finally to a solid
BLUE LED indicating the Admin PIN has been
successfully changed.
6. To exit Admin Mode press the ‘LOCK’
button.
Solid RED LED indicates the drive is locked and in
the standby state.
PIN Requirement
• PINs must be a minimum length of 7 and maximum 15 digits.
• Cannot contain all sequential numbers (2345678 or 9876543).
• Cannot contain all repeating numbers (1111111).
• The SHIFT key can be used for additional combinations (e.g. SHIFT+1 is a separate
value to just 1).
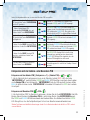
Changing the Admin PIN
To change the Admin PIN to your own unique 7-15 digit PIN, follow the steps below.

6 6
diskAshur PRO2 QSG v1.6F
iStorage Limited, iStorage House, 13 Alperton Lane, Perivale, Middlesex, UB6 8DH, England
Telephone: +44 (0) 20 8991 6260 - Website: www.istorage-uk.com - Email: [email protected]
1. In Standby State (solid RED LED),
press and hold down both the ‘UNLOCK
and number ’1’ buttons.
Solid RED LED will change to blinking GREEN and
BLUE LEDs.
2. Enter your Admin PIN (default
‘11223344’) and press the
‘UNLOCK’ button.
GREEN and BLUE LEDs blink rapidly together for
a few seconds then to a solid GREEN and finally a
solid BLUE LED indicating the diskAshur PRO2 is in
‘Admin Mode’.
3. In Admin mode (solid BLUE LED), press
and hold down ‘UNLOCK + 3’ buttons.
Solid BLUE LED will change to blinking GREEN and
solid BLUE LEDs.
4. Enter your NEW User PIN and press
‘UNLOCK’ button.
Blinking GREEN and solid BLUE LEDs will switch to
a single GREEN LED blink and then back to blinking
GREEN and solid BLUE LEDs.
5. Re-enter your NEW User PIN and press
‘UNLOCK’ button. GREEN LED rapidly blinks for a few seconds then
changes to a solid BLUE LED indicating the User PIN
has been successfully created.
6. To exit Admin Mode press the ‘LOCK’
button. Solid RED LED indicates the drive is locked and in
the standby state.
In addition to the Admin PIN, the diskAshur PRO2 can be configured with an independent User PIN.
To create a new User PIN follow the steps below.
Adding a New User PIN in addition to the Admin PIN
Unlocking with either the Admin or User PIN
Unlock with Admin PIN [ (UNLOCK + 1) + (Admin PIN) + ( ) + ( ) ]
1. To unlock as the Administrator, in Standby state (RED LED) press and hold down both ‘UNLOCK + 1’ buttons
(GREEN and BLUE LEDs will blink together), next, enter the Admin PIN and press the “UNLOCK” button, LED will
change to a solid BLUE and finally press the ‘UNLOCK’ button again - LED changes to GREEN indicating the drive
is unlocked.
Unlock with User PIN ( + User PIN + )
2. To unlock the diskAshur PRO2 as the User, press the ‘UNLOCK’ button, all LEDs will blink on and
off, then enter your User PIN and press the ‘UNLOCK’ button again. GREEN and BLUE LEDs will al-
ternately blink several times and finally changing to a solid GREEN LED indicating the drive is unlocked
and ready to use as the User.
For more features and detailed instructions please refer to the user manual pre-loaded on your new diskAshur PRO2
and also available on our website.

7
diskAshur PRO2 QSG v1.6F
iStorage bietet die folgenden nützlichen Ressourcen:
• website: www.istorage-uk.com • email: [email protected] • Telefon: +44 (0) 20 8991-6260
Die Technical Support-Spezialisten von iStorage sind Montag bis Freitag von 9:00 bis 17:30 Uhr GMT erreichbar.
Deutsch
diskAshur PRO2
SCHNELLSTARTANLEITUNG

8 8
diskAshur PRO2 QSG v1.6F
Vielen Dank, dass Sie sich für die iStorage diskAshur PRO2 entschieden haben. Ihre diskAshur PRO2 ist in exFAT
vorformatiert und wird mit der standardmäßigen Admin-PIN 11223344 ausgeliefert. Obwohl die Festplatte direkt
mit der standardmäßigen Admin-PIN verwendet werden kann, empfehlen wird aus Sicherheitsgründen dringend die
umgehende Erstellung einer neuen Admin-PIN. Befolgen Sie dabei die Anweisungen unter „Ändern der Admin-PIN“.
SCHNELLSTARTANLEITUNG
LED-ANZEIGEN
SPERREN
ENTSPERREN
SHIFT-TASTE
Anschluss für
Kensington-Schloss
- Standby-Zustand/Gesperrt
- Benutzermodus/Entsperrt
- Admin-Modus
Alphanumerisches
Ziffernfeld
Integriertes
USB 3.1-Kabel
ENTSPERREN

9
diskAshur PRO2 QSG v1.6F
Integriertes
USB 3.1-Kabel
Bitte befolgen Sie die Anweisungen in der Tabelle unten, um den diskAshur Pro2 zum ersten Mal mit dem
Standard-admin-PIN zu entsperren.
Anleitung- erstmalige Nutzung
LED LED State
1. Verbinden Sie den diskashur PRO2 mit einem
USB-Port-Standby Zustand
ROTE LED leuchtetet warten auf die
Pin-Eintragung
2. Im Standby-Zustand (ROTE LED leuchtetet),
drücken und halten Sie die Tasten “ENTSPER-
REN + 1”
Statt der ROT leuchtenden LED werden
eine blinkende GRÜNE und BLAUE LED
angezeigt
3. Geben Sie die Admin -PIN (Standard-
11223344) ein, und drücken sie die Taste
“ENTSPERREN”
Die GRÜNE und BLAUE LED blinken
einige Sekunden schnell auf. Anschließend
leuchtet erst die GRÜNE LED und dann
die BLAUE LED. Dies gibt an, dass sich
der diskAshur PRO2 im Admin- Modus
befindet.
4. Drücken Sie einmal die “ENTSPER-
REN”-Taste, um den diskAshur PRO2 zu entsper-
ren und auf die inhalte des Laufwerkes zuzugreifen
Die Leuchtende BLAUE LED wechselt zu
blinkende GRÜNE LED und Anschließend
leuchtenden GRÜNE LED. Jetzt ist der
diskAshur PRO2 entsperrt.
Ihre diskAshur PRO2 durchläuft einen schnellen Selbsttest, um zu prüfen, ob alle Sicherheitskomponenten
ordnungsgemäß funktionieren, wenn Sie die Festplatte an einen mit Strom versorgten USB-Port anschließen. Die
LEDs durchlaufen 3 Testphasen. Sie leuchten bei einem erfolgreichen Test nacheinander ROT, GRÜN und BLAU,
dann zweimal GRÜN und dann ROT (Standby-Zustand). Ein fehlerhafter Test führt dazu, dass die diskAshur PRO2
sich sicher selbst zurücksetzt und den Selbsttest automatisch wieder aufnimmt, ohne die Sicherheitsmerkmale oder
die auf der Festplatte gespeicherten Daten zu beeinträchtigen.
Erstmalige Verwendung
Hinweis: Sobald der diskAshur PRO2 erfolgreich entsperrt geworden ist, bleibt die Grüne
LED in einem soliden Zustand und blinkt nur wenn Daten übertragen werden. Die Festplatte
kann umgehende gesperrt werden, indem Sie einmal die Taste SPERREN drücken oder
(dringend empfohlen) auf das Symbol „Hardware sicher entfernen/Auswerfen“ Ihres
Betriebssystems klicken.

10 10
diskAshur PRO2 QSG v1.6F
1. Halten Sie im Standby-Zustand (ROTE
LED leuchtet) die Tasten „ENTSPERREN
und Zahl 1“ gedrückt.
Statt der ROT leuchtenden LED werden eine
blinkende GRÜNE und BLAUE LED angezeigt.
2. Geben Sie die standardmäßige
Admin-PIN 11223344 ein, und drücken
Sie die Taste ENTSPERREN.
Die GRÜNE und BLAUE LED blinken einige
Sekunden schnell. Anschließend leuchtet die GRÜNE
LED und dann die BLAUE LED. Dies gibt an, dass
sich die diskAshur PRO2 im Admin-Modus befindet.
3. Halten Sie im Admin-Modus (BLAUE
LED leuchtet) die Tasten ENTSPERREN
und 2 gedrückt.
Statt der BLAU leuchtenden LED wird eine
blinkende GRÜNE LED und eine leuchtende BLAUE
LED angezeigt.
4. Geben Sie Ihre NEUE Admin-PIN ein,
und drücken Sie die Taste ENTSPERREN.
Statt der blinkenden GRÜNEN LED und der
leuchtenden BLAUEN LED wird einzelne blinkende
GRÜNE LED und dann wieder eine blinkende GRÜNE
LED und eine leuchtende BLAUE LED angezeigt.
5. Geben Sie Ihre NEUE Admin-PIN erneut
ein, und drücken Sie die Taste
ENTSPERREN.
Statt der blinkenden GRÜNEN und leuchtenden
BLAUEN LED wird eine schnell blinkende BLAUE
LED und dann eine leuchtende BLAUE LED
angezeigt. Dies gibt an, dass die Admin-PIN
erfolgreich geändert wurde.
6. Um den Admin-Modus zu verlassen,
drücken Sie die Taste SPERREN.
Eine leuchtende ROTE LED gibt an, dass die
Festplatte gesperrt ist und sich im Standby-Zustand
befindet.
PIN – Anforderungen
• PINs müssen mindestens 7 Ziffern und dürfen maximal 15 Ziffern aufweisen.
• Sie dürfen nicht nur aufeinanderfolgende Ziffern enthalten (2345678 oder 9876543).
• Sie dürfen nicht nur sequenzielle Ziffern enthalten (1111111).
• Die SHIFT-Taste kann für zusätzliche Kombinationen verwendet werden (z. B. SHIFT+1 ist ein
separater Wert zu 1).
Ändern der Admin-PIN
Um die Admin-PIN in Ihre eigene einzigartige 7- bis 15-stellige PIN zu ändern, befolgen Sie die
Schritte unten.
Zusätzlich zur Admin-PIN kann die diskAshur PRO2 mit einer unabhängigen Benutzer-PIN konfiguriert
werden.
Hinzufügen einer neuen Benutzer-PIN zusätzlich zur Admin-PIN

11
diskAshur PRO2 QSG v1.6F
1. Halten Sie im Standby-Zustand (ROTE
LED leuchtet) die Tasten „ENTSPERREN
und Zahl 1“ gedrückt.
Statt der ROT leuchtenden LED werden eine
blinkende GRÜNE und BLAUE LED angezeigt.
2. Geben Sie die Admin-PIN
(standardmäßig 11223344) ein, und
drücken Sie die Taste ENTSPERREN.
Die GRÜNE und BLAUE LED blinken einige Se-
kunden schnell. Anschließend leuchtet die GRÜNE
LED und dann die BLAUE LED. Dies gibt an, dass
sich die diskAshur PRO2 im Admin-Modus befindet.
3. Halten Sie im Admin-Modus (BLAUE
LED leuchtet) die Tasten ENTSPERREN
und 3 gedrückt
Statt der BLAU leuchtenden LED wird eine
blinkende GRÜNE LED und eine leuchtende BLAUE
LED angezeigt..
4. Geben Sie Ihre NEUE Benutzer-PIN ein,
und drücken Sie die Taste ENTSPERREN.
Statt der blinkenden GRÜNEN LED und der
leuchtenden BLAUEN LED wird einzelne blinkende
GRÜNE LED und dann wieder eine blinkende GRÜNE
LED und eine leuchtende BLAUE LED angezeigt.
5. Geben Sie Ihre NEUE Benutzer-PIN
erneut ein, und drücken Sie die Taste
ENTSPERREN.
Die GRÜNE LED-Anzeige blinkt schnell einige
Sekunden lang, gefolgt von einer dauerhaften
BLAUEN LED-Anzeige. Dies bedeutet, dass die
Benutzer-PIN erfolgreich erstellt wurde.
6. Um den Admin-Modus zu verlassen,
drücken Sie die Taste SPERREN.
Eine leuchtende ROTE LED gibt an, dass die
Festplatte gesperrt ist und sich im Standby-Zustand
befindet.
Entsperren mit der Admin- oder Benutzer-PIN
Entsperren mit der Admin-PIN [ (Entsperren + 1) + (Admin-PIN) + ( ) + ( ) ]
1. Um als Administrator zu entsperren müssen sie im Stand-by zustand (ROTE LED) die Tasten
´ENTSPERREN + 1´ gedrückt halten (GRÜNE und BLAUE LEDS leuchten zusammen) danach geben
sie die Admin PIN ein und drücken die “ENTSPERREN” taste das LED wechselt zu einen soliden
BLAU als letztes drücken sie die “ENTSPERREN” taste wieder LED wechselt zu GRÜN das Laufwerk
ist entsperrt.
Entsperren mit Benutzer-PIN ( + PIN + )
2. Um die diskAshur PRO2 als Benutzer zu entsperren, drücken Sie die Taste ENTSPERREN. Alle LEDs
blinken. Geben Sie dann Ihre Benutzer-PIN ein, und drücken Sie die Taste ENTSPERREN erneut.
Die GRÜNE und BLAUE LED blinken abwechselnd mehrere Male. Anschließend leuchtet die GRÜNE
LED. Dies gibt an, dass die Festplatte entsperrt ist und vom Benutzer verwendet werden kann.
Weitere Funktionen und detaillierte Anweisungen finden Sie im Benutzerhandbuch der diskAshur PRO2 und auf
unserer Website.
Gehen Sie folgendermaßen vor, um eine neue Benutzer-PIN zu erstellen.

12 12
diskAshur PRO2 QSG v1.6F
Français
iStorage fournit les ressources utiles suivantes :
• site web: www.istorage-uk.com • email: [email protected] • Téléphone: +44 (0) 20 8991-6260
Les spécialistes de l’assistance technique d’iStorage sont disponibles de 9 h 00 à 17 h 30 GMT, du lundi au
vendredi.
diskAshur PRO2
GUIDE DE DÉMARRAGE RAPIDE

13
diskAshur PRO2 QSG v1.6F
Merci d’avoir acheté un diskAshur PRO2 d’iStorage. Le diskAshur PRO2 est préformaté exFAT et livré avec le code PIN
administrateur par défaut de 11223344. Même s’il est directement prêt à l’emploi avec le code PIN administrateur
par défaut, nous recommandons fortement, pour des raisons de sécurité, de créer immédiatement un nouveau code
PIN administrateur en suivant les instructions indiquées sous l’en-tête « Modifier le code PIN administrateur ».
GUIDE DE DÉMARRAGE RAPIDE
VOYANTS LED
VERROUILLER
DÉVERROUILLER
SHIFT
Encoche
de sécurité
- État de veille/Verrouillé
- Mode utilisateur/Déverrouillé
- Mode administrateur
Clavier
alphanumérique
Câble USB 3.1
intégré

14 14
diskAshur PRO2 QSG v1.6F
Le diskAshur PRO2 est soumis à un rapide autotest pour vérifier que tous les composants de sécurité fonctionnent
correctement à chaque fois que vous le connectez à un port USB alimenté. Les LED passent par 3 phases de test,
en clignotant d’abord en ROUGE, en VERT, puis en BLEU, suivi de deux clignotements en VERT, avant de passer au
ROUGE (état de veille) si le test est réussi. En cas d’échec du test, le diskAshur PRO2 se réinitialise en toute sécurité
et reprend automatiquement l’autotest sans modifier les caractéristiques de sécurité ni les données stockées sur le
disque.
Merci de suivre les instructions indiquées dans le tableau ci-dessous afin de déverrouiller le diskAshur PRO2 pour
la première fois avec le code PIN administrateur par défaut.
Première utilisation
Instructions (première utilisation) LED État de la LED
1. Branchez le diskAshur PRO2 à un port USB -
Mode Veille
La LED ROUGE est continue en attente de la
saisie du code PIN
2. En mode Veille (LED ROUGE continue),
appuyez sur les boutons « DÉVERROUILLER +
1 » et maintenez-les enfoncés
La LED ROUGE continue est remplacée par
les LED VERTE et BLEUE clignotantes
3. Saisissez le code PIN administrateur (par
défaut : 11223344) et appuyez sur le bouton «
DÉVERROUILLER »
Les LED VERTE et BLEUE clignotent rapide-
ment simultanément pendant quelques sec-
ondes avant d’être remplacées par la LED
VERTE continue, et enfin par la LED BLEUE
continue, indiquant que le diskAshur PRO2
est en mode Administrateur.
4. Appuyez une fois sur le bouton « DÉVER-
ROUILLER » pour déverrouiller le diskAshur
PRO2 et accéder au contenu du disque
La LED BLEUE continue devient VERTE
clignotante puis VERTE continue, indiquant
que le diskAshur PRO2 est déverrouillé
Remarque: une fois que le diskAshur PRO2 a été déverrouillé avec succès, le voyant LED VERT
reste allumé, fixe et ne clignote que lorsque les données sont en cours de transfert. Vous pouvez
le verrouiller immédiatement en appuyant une fois sur le bouton « LOCK » (VERROUILLER) ou en
cliquant sur l’icône « Safely Remove Hardware/Eject » (Supprimer le périphérique en toute
sécurité/Éjecter) (fortement recommandé) dans votre système d’exploitation.

15
diskAshur PRO2 QSG v1.6F
1. En état de veille (LED ROUGE continue),
appuyez sur les boutons
« DÉVERROUILLER + 1 » et
maintenez-les enfoncés.
La LED ROUGE continue est remplacée par des LED
VERTE et BLEUE clignotantes.
2. Saisissez le code PIN administrateur par
défaut « 11223344 » et appuyez sur le
bouton « DÉVERROUILLER ».
Les LED VERTE et BLEUE clignotent rapidement
simultanément pendant quelques secondes avant
d’être remplacées par la LED VERTE continue, puis
enfin par la LED BLEUE continue, indiquant que le
diskAshur PRO2 est en mode administrateur.
3. En mode administrateur (LED BLEUE
continue), appuyez sur les boutons
« DÉVERROUILLER + 2 » et
maintenez-les enfoncés.
La LED BLEUE continue est remplacée par les LED
VERTE clignotante et BLEUE continue.
4. Saisissez votre NOUVEAU code PIN
administrateur et appuyez sur le bouton
« DÉVERROUILLER ».
Les LED VERTE clignotante et BLEUE continue sont
remplacées par un clignotement rapide de la LED
VERTE, puis reviennent aux LED VERTE clignotante
et BLEUE continue.
5. Ressaisissez votre NOUVEAU code PIN
administrateur et appuyez sur le bouton
« DÉVERROUILLER ».
Les LED VERTE clignotante et BLEUE continue sont
remplacées par la LED BLEUE qui se met à clignoter
rapidement avant d’être continue, indiquant que le
code PIN administrateur a été correctement modifié.
6. Pour quitter le mode administrateur, ap-
puyez sur le bouton « VERROUILLER ».
La LED ROUGE continue indique que le disque est
verrouillé et en mode veille.
Exigences pour le code PIN
• Les codes PIN doivent comprendre entre 7 et 15 chiffres.
• Ils ne peuvent pas contenir de numéros séquentiels (2345678 ou 9876543).
• Ils ne peuvent pas contenir de numéros répétitifs (1111111).
• Vous pouvez utiliser la touche SHIFT pour saisir des combinaisons supplémentaires (par ex.
SHIFT+1 est une valeur différente de 1).
Modifier le code PIN administrateur
Pour remplacer le code PIN administrateur par votre propre code PIN unique de 7 à 15 chiffres, suivez
les étapes indiquées ci-dessous.

16 16
diskAshur PRO2 QSG v1.6F
1. En état de veille (LED ROUGE contin-
ue), appuyez sur les boutons
« DÉVERROUILLER + 1 » et
maintenez-les enfoncés.
La LED ROUGE continue est remplacée par les LED
VERTE et BLEUE clignotantes.
2. Saisissez votre code PIN administrateur
(par défaut « 11223344 ») et appuyez sur
le bouton « DÉVERROUILLER ».
Les LED VERTE et BLEUE clignotent rapidement
simultanément pendant quelques secondes avant
d’être remplacées par la LED VERTE continue, puis
enfin par la LED BLEUE continue, indiquant que le
diskAshur PRO2 est en mode administrateur.
3. En mode administrateur (LED BLEUE
continue), appuyez sur les boutons
« DÉVERROUILLER + 3 » et
maintenez-les enfoncés.
La LED BLEUE continue est remplacée par les LED
VERTE clignotante et BLEUE continue.
4. Saisissez votre NOUVEAU code PIN
utilisateur et appuyez sur le bouton
« DÉVERROUILLER ».
Les LED VERTE clignotante et BLEUE continue sont
remplacées par un clignotement rapide de la LED
VERTE, puis reviennent aux LED VERTE clignotante
et BLEUE continue.
5. Ressaisissez votre NOUVEAU code PIN
utilisateur et appuyez sur le bouton
« DÉVERROUILLER ».
La LED VERTE clignote rapidement pendant quelques
secondes, puis est remplacée par une LED BLEUE
continue, ce qui indique que le code PIN utilisateur
a bien été créé.
6. Pour quitter le mode administrateur, ap-
puyez sur le bouton « VERROUILLER ».
La LED ROUGE continue indique que le disque est
verrouillé et en mode veille.
En plus du code PIN administrateur, il est également possible de configurer le diskAshur PRO2 avec un
code PIN utilisateur indépendant.
Pour créer un code PIN utilisateur, suivez les étapes indiquées ci-dessous.
Ajouter un nouveau code PIN utilisateur en plus du code
PIN administrateur
Déverrouiller avec le code PIN administrateur ou utilisateur
Déverrouiller avec le code PIN administrateur [ ( DÉVERROUILLER +1) + (code
PIN administrateur) + ( ) + ( ) ]
1. Pour déverrouiller en tant qu’administrateur, en mode Veille (LED ROUGE), appuyez d’abord sur les
boutons « DÉVERROUILLER +1 » et maintenez-les enfoncés (les LED VERTE et BLEUE clignotent
simultanément), puis saisissez le code PIN administrateur et appuyez sur le bouton « DÉVER-
ROUILLER ». La LED est remplacée par une LED BLEUE. Pour terminer, appuyez à nouveau sur le
bouton « DÉVERROUILLER ». La LED devient VERTE, indiquant que le disque est déverrouillé.

17
diskAshur PRO2 QSG v1.6F
Déverrouiller avec le code PIN utilisateur ( + code PIN + )
2. Pour déverrouiller le diskAshur PRO2 en tant qu’utilisateur, appuyez sur le bouton « DÉVER-
ROUILLER » (toutes les LED se mettent à clignoter), puis saisissez votre code PIN utilisateur
et appuyez à nouveau sur le bouton « DÉVERROUILLER ». Les LED VERTE et BLEUE clignotent
plusieurs fois en alternance, puis la LED VERTE s’allume en continu, indiquant que le disque est déver-
rouillé et prêt à l’emploi en tant qu’utilisateur.
Pour davantage de fonctionnalités et d’instructions détaillées, consultez le manuel d’utilisation préchargé sur votre
nouveau diskAshur PRO2, également disponible sur notre site Web.

18 18
diskAshur PRO2 QSG v1.6F
iStorage ofrece estos útiles recursos:
• sitio web: www.istorage-uk.com • correo electrónico: [email protected]
• teléfono: +44 (0) 20 8991-6260
Los especialistas en asistencia técnica de iStorage están disponibles de 9:00 a 17:00 GMT de lunes a viernes.
Español
diskAshur PRO2
GUÍA DE INICIO RÁPIDO

19
diskAshur PRO2 QSG v1.6F
Gracias por adquirir una unidad diskAshur PRO2 de iStorage. La unidad diskAshur PRO2 se preformatea en exFAT y
se envía con el PIN de administrador predeterminado 11223344 y, aunque se puede utilizar directamente sin necesi-
dad de configuración con el PIN de administración predeterminado, por motivos de seguridad, le recomendamos
encarecidamente que cree de inmediato un nuevo PIN de administrador siguiendo las instrucciones de la sección
titulada “Modificación del PIN de administrador”.
GUÍA DE INICIO RÁPIDO
INDICADORES LED
BLOQUEO
DESBLOQUEO
SHIFT
Ranura de seguridad
- Estado en espera/bloqueado
- Modo usuario/desbloqueado
- Modo administrador
Teclado
alfanumérico
Cable USB 3.1
integrado

20 20
diskAshur PRO2 QSG v1.6F
Cada vez que se conecta a un puerto USB alimentado, el diskAshur PRO2 se somete a una rápida prueba automática
para comprobar si todos los componentes de seguridad funcionan correctamente. Los indicadores LED pasan por 3
fases de prueba. Parpadean siguiendo la secuencia ROJO, VERDE y AZUL, seguida de dos parpadeos VERDES y, si
la prueba es satisfactoria, vuelven a ponerse de color ROJO (estado de espera). Cualquier error en la prueba forzará
el reinicio seguro de la unidad diskAshur PRO2 y la prueba automática se reanudará de forma automática sin que
ello afecte a las características de seguridad ni a los datos almacenados en la unidad.
Siga las instrucciones de la tabla de abajo para desbloquear la unidad diskAshur PRO2 por primera vez con el Admin
PIN (n.º de identificación personal de administrador) por defecto.
Primer uso
Instrucciones: cuando se utilice
por primera vez
LED Estado del LED
1. Conecte la diskAshur PRO2 a un puerto
USB - Estado en espera
El indicador LED ROJO se encenderá y
se quedará fijo a la espera de que usted
introduzca el PIN
2. En el estado de espera (LED ROJO fijo),
mantenga pulsados el botón de DESBLOQUEO
y el botón 1.
El LED ROJO fijo se cambiará por los LED
VERDE y AZUL parpadeantes.
3. Introduzca el Admin PIN (11223344 por
defecto) y pulse el botón de DESBLOQUEO.
Los indicadores LED VERDE y AZUL
parpadearán rápidamente al mismo tiempo
durante unos segundos; de ahí se pasará a
un VERDE fijo y, por último, a un AZUL fijo,
lo que indicará que la unidad diskAshur
PRO2 está en modo de administrador.
4. Pulse el botón de DESBLOQUEO una vez para
desbloquear la unidad diskAshur PRO2 y acceder
a su contenido.
El LED AZUL fijo cambiará a un VERDE
parpadeante y por último a un VERDE fijo,
lo que indicará que la unidad diskAshur
PRO2 está desbloqueada
Nota: Cuando se haya desbloqueado satisfactoriamente el diskAshur PRO2, el LED VERDE
quedará encendido fijo y solo parpadeará cuando se estén transmitiendo datos. Se puede bloquear
inmediatamente pulsando el botón de bloqueo una vez o (cosa que recomendamos
encarecidamente) haciendo clic en el icono de extracción segura del hardware/expulsión del
sistema operativo.

21
diskAshur PRO2 QSG v1.6F
1. En el estado de espera (indicador
LED ROJO fijo), mantenga pulsados los
botones de Desbloqueo y número 1
El indicador LED ROJO fijo cambiará a los
indicadores VERDE y AZUL intermitentes.
2. Introduzca el PIN de administrador
predeterminado “11223344” y pulse el
botón de Desbloqueo
Los indicadores LED VERDE y AZUL parpadearán
rápidamente al mismo tiempo durante unos segun-
dos; de ahí se pasará a un VERDE fijo y, por último, a
uno AZUL fijo que indicará que la unidad diskAshur
PRO2 está en modo de administrador.
3. En el modo de administrador (indicador
LED AZUL fijo), mantenga pulsados los
botones de Desbloqueo y el del 2
El indicador LED AZUL fijo cambiará a los
indicadores VERDE intermitente y AZUL fijo.
4. Introduzca su NUEVO PIN de adminis-
trador y pulse el botón de Desbloqueo
Los indicadores LED de color VERDE intermitente y
AZUL fijo cambiarán a un solo parpadeo del
indicador LED VERDE y, después, a los indicadores
LED VERDE intermitente y AZUL fijo
5. Vuelva a introducir su NUEVO PIN
de administrador y pulse el botón de
Desbloqueo
Los indicadores LED de color VERDE intermitente y
AZUL fijo cambiarán al indicador LED AZUL con un
rápido parpadeo y, por último, a un LED AZUL fijo
que le indicará que se ha cambiado correctamente el
PIN de administración
6. Para salir del modo de administración,
pulse el botón de Desbloqueo.
El indicador LED de color ROJO fijo indica que la
unidad está bloqueada y en el estado de espera.
Requisitos del PIN
• Los PIN deben tener un mínimo de 7 dígitos y un máximo de 15.
• Los números que contengan no pueden ser todos secuenciales (2345678 o 9876543).
• No puede contener el mismo número repetido (1111111).
• Puede utilizar la tecla SHIFT para obtener más combinaciones (p. ej. SHIFT+1 es un valor
distinto de 1).
Modificación del PIN de administrador
Para cambiar el PIN de administrador por su propio PIN único de 7 a 15 dígitos, siga los pasos que se
indican a continuación.
Adición de un nuevo PIN de usuario además del PIN
de administrador.
Además del PIN de administrador, la unidad diskAshur PRO2 se puede configurar con un PIN de
usuario independiente.

22 22
diskAshur PRO2 QSG v1.6F
1. En el estado de espera (indicador
LED ROJO fijo), mantenga pulsados los
botones de Desbloqueo y número 1
El indicador LED ROJO fijo cambiará a los
indicadores VERDE y AZUL intermitentes.
2. Introduzca el PIN de administrador
predeterminado “11223344” y pulse el
botón de Desbloqueo
Los indicadores LED VERDE y AZUL parpadearán
rápidamente al mismo tiempo durante unos
segundos; de ahí se pasará a un VERDE fijo y, por
último, a uno AZUL fijo que indicará que la unidad
diskAshur PRO2 está en modo de administrador.
3. En el modo de administrador (indicador
LED AZUL fijo), mantenga pulsados los
botones de Desbloqueo y el del 3
El indicador LED AZUL fijo cambiará a los
indicadores VERDE intermitente y AZUL fijo.
4. Introduzca su NUEVO PIN de usuario y
pulse el botón de Desbloqueo
Los indicadores LED de color VERDE intermitente y
AZUL fijo cambiarán a un solo parpadeo del
indicador LED VERDE y, después, a los indicadores
LED VERDE intermitente y AZUL fijo
5. Vuelva a introducir su NUEVO PIN de
usuario y pulse el botón de Desbloqueo
El LED VERDE parpadeará rápidamente durante unos
segundos y luego cambiará a un LED AZUL fijo que
indica que el PIN de usuario se ha creado
correctamente.
6. Para salir del modo de administración,
pulse el botón de Desbloqueo.
El indicador LED de color ROJO fijo indica que la
unidad está bloqueada y en el estado de espera.
Para crear un nuevo PIN de usuario, siga los pasos que se indican a continuación.
Desbloqueo con el PIN de administrador o el de usuario
Desbloqueo con el PIN de administrador [ (DESBLOQUEO y el botón 1) + (Admin PIN) +
( ) + ( ) ]
1. Para desbloquear como administrador, en el estado de espera (LED ROJO), mantenga pulsados el botón de
DESBLOQUEO y el botón 1 (los LED VERDE y AZUL empezarán a parpadear al mismo tiempo), a continuación,
introduzca el Admin PIN y pulse el botón de DESBLOQUEO, el LED AZUL se quedará fijo. Por último, pulse el
botón de DESBLOQUEO otra vez y el LED VERDE se quedará fijo, lo que indicará que la unidad está desbloqueada.
Desbloqueo con el PIN de usuario ( + PIN + )
2. Para desbloquear la unidad diskAshur PRO2 como usuario, pulse el botón de Desbloqueo (todos los indica-
dores LED se encenderán y apagarán de forma intermitente) y, a continuación, introduzca su PIN de usuario y
vuelva a pulsar el botón de Desbloqueo. Los indicadores VERDE y AZUL parpadearán de forma alterna varias
veces y, por último, cambiarán a una luz VERDE FIJA para indicarle que la unidad está desbloqueada y lista para que
la utilice como usuario.
Para obtener información sobre más características e instrucciones detalladas, consulte el manual de usuario
precargado en su nueva unidad diskAshur PRO2 y que también está disponible en nuestro sitio web.

23
diskAshur PRO2 QSG v1.6F
Italiano
iStorage mette a disposizione le seguenti utili risorse:
• Sito web: www.istorage-uk.com •e-mail: [email protected] • Telefono: +44 (0) 20 8991-6260
Gli specialisti dell’assistenza tecnica di iStorage sono disponibili dalle 9:00 a.m alle 17:30 p.m GMT, dal lunedì al
venerdì.
diskAshur PRO2
GUIDA DI AVVIO RAPIDO

24 24
diskAshur PRO2 QSG v1.6F
Grazie per aver acquistato diskAshur PRO2 di iStorage. diskAshur PRO2 è preformattato in exFAT e spedito con un
PIN Admin predefinito 11223344. Anche se può essere usato da subito con questo PIN, per motivi di sicurezza è
fortemente consigliato crearne subito uno nuovo seguendo le istruzioni riportate in “Modifica del PIN Admin”.
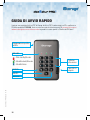
GUIDA DI AVVIO RAPIDO
SPIE LED
BLOCCA
SBLOCCA
MAIUSC
Alloggiamento dispositivo
antifurto
- Stato standby/Bloccato
- Modalità utente/Sbloccato
- Modalità Admin
Tastierino
alfanumerico
Cavo USB 3.1
integrato

25
diskAshur PRO2 QSG v1.6F
Tastierino
alfanumerico
Cavo USB 3.1
integrato
diskAshur PRO2 effettua un rapido autotest per verificare che tutti i componenti di sicurezza funzionino corretta-
mente ogni volta che viene inserito in una porta USB alimentata. I LED mostreranno un test in 3 fasi, lampeggiando
in sequenza in ROSSO, VERDE e BLU. Seguiranno poi due lampeggi VERDI prima di passare sul ROSSO (Stato
standby) se il test ha esito positivo. L’insuccesso di uno dei test forzerà diskAshur PRO2 a resettarsi in modo sicuro
e a riprendere automaticamente l’auto-test senza incidere sulle caratteristiche di sicurezza o su qualsiasi dato
memorizzato nell’unità.
Seguire le istruzioni riportate nella tabella seguente per sbloccare diskAshur PRO2 per la prima volta con il PIN
Admin predefinito.
Primo utilizzo
Istruzioni - primo utilizzo LED Stato LED
1. Connect the diskAshur PRO2 to a USB port -
Standby State
IL LED ROSSO rimarrà fisso in attesa
dell’inserimento del PIN
2. Nello stato Standby (LED ROSSO fisso),
premere e tenere premuti i pulsanti
SBLOCCA + 1
Il LED ROSSO fisso cambierà nei LED
VERDE e BLU lampeggianti
3. Immettere il PIN Admin (predefinito -
11223344) e premere il pulsante SBLOCCA
I LED VERDE e BLU lampeggiano rapida-
mente assieme per alcuni secondi, quindi
si accende il LED VERDE fisso e infine il
LED BLU fisso a segnalare che diskAshur
PRO2 èin Modalità Admin
4. Premere il pulsante SBLOCCA una sola
volta per sbloccare diskAshur PRO2 e accedere
all’indice del drive
Il LED BLU fisso cambierà prima nel LED
VERDE lampeggiante e quindi di nuovo
nel LED VERDE fisso a segnalare che
diskAshur PRO2 è sbloccato
Nota: Cuando se haya desbloqueado satisfactoriamente el diskAshur PRO2, el LED VERDE
quedará encendido fijo y solo parpadeará cuando se estén transmitiendo datos. Se puede bloquear
inmediatamente pulsando el botón de bloqueo una vez o (cosa que recomendamos
encarecidamente) haciendo clic en el icono de extracción segura del hardware/expulsión del
sistema operativo.

26 26
diskAshur PRO2 QSG v1.6F
1. In Stato standby (LED ROSSO fisso),
premere e tenere premuto sia il pulsante
SBLOCCA che il pulsante 1
Il LED ROSSO fisso cambierà nei LED VERDE e BLU
lampeggianti
2. Immettere il PIN Admin predefinito
11223344 e premere il pulsante
SBLOCCA.
I LED VERDE e BLU lampeggiano rapidamente
assieme per alcuni secondi, quindi si accenderà il
LED VERDE fisso e infine il LED BLU fisso a
segnalare che diskAshur PRO2 è in Modalità Admin
3. In modalità Admin (LED BLU fisso),
premere e tenere premuto i pulsanti
SBLOCCA + 2
Il LED BLU fisso cambierà prima nel LED VERDE
lampeggiante e quindi di nuovo nel LED BLU fisso.
4. Immettere il NUOVO PIN Admin e
premere il pulsante SBLOCCA
I LED VERDE lampeggiante e BLU fisso passeranno
al lampeggio del solo LED VERDE, quindi torneranno
ad essere LED VERDE lampeggiante e BLU fisso
5. Reimmettere il NUOVO PIN Admin e
premere il pulsante SBLOCCA
I LED VERDE lampeggiante e BLU fisso cambieranno
in un LED BLU a lampeggio rapido e infine in un
LED BLU fisso a indicare che il PIN Admin è stato
cambiato correttamente
6. Per uscire dalla modalità Admin
premere il pulsante BLOCCA
Il LED ROSSO fisso indica che l’unità è bloccata e in
stato standby
Requisiti del PIN
• I PIN devono avere una lunghezza compresa tra 7 e 15 cifre.
• Non possono contenere tutti numeri in sequenza (2345678 o 9876543).
• Non possono contenere tutti numeri ripetuti (1111111).
• Il tasto MAIUSC può essere usato per altre combinazioni (ad es. MAIUSC+1 è un valore
diverso da 1).
Cambiare il PIN Admin
Per cambiare il PIN Admin con uno proprio esclusivo di 7-15 cifre, seguire la procedura riportata sotto.

27
diskAshur PRO2 QSG v1.6F
1. In Stato standby (LED ROSSO fisso),
premere e tenere premuto sia il pulsante
SBLOCCA che il pulsante 1
Il LED ROSSO fisso cambierà nei LED VERDE e BLU
lampeggianti
2. Immettere il PIN Admin
(predefinito 11223344) e premere il
pulsante SBLOCCA
I LED VERDE e BLU lampeggiano rapidamente
assieme per alcuni secondi, quindi si accende il LED
VERDE fisso e infine il LED BLU fisso a segnalare
che diskAshur PRO2 è in Modalità Admin
3. In modalità Admin (LED BLU fisso),
premere e tenere premuto i pulsanti
SBLOCCA + 3
Il LED BLU fisso cambierà prima nel LED VERDE
lampeggiante e quindi di nuovo nel LED BLU fisso
4. Immettere il NUOVO PIN utente e
premere il pulsante SBLOCCA
I LED VERDE lampeggiante e BLU fisso passeranno
al lampeggio del solo LED VERDE, quindi torneranno
ad essere LED VERDE lampeggiante e BLU fisso
5. Reimmettere il NUOVO PIN utente e
premere il pulsante SBLOCCA Il LED VERDE lampeggia rapidamente per alcuni
secondi prima di passare al LED BLU fisso per
segnalare che la creazione del PIN utente è riuscita.
6. Per uscire dalla modalità Admin
premere il pulsante BLOCCA
Il LED ROSSO fisso indica che l’unità è bloccata e in
stato standby
Oltre al PIN Admin, diskAshur PRO2 può essere configurato con un PIN utente indipendente.
Per creare un nuovo PIN utente, seguire la procedura indicata sotto.
Aggiunta di un nuovo PIN utente oltre a quello Admin
Sbloccaggio con il PIN Admin o utente
Sbloccare con il PIN Admin [ (SBLOCCA + 1 ) + (PIN Admin ) + ( ) + ( ) ]
1. Per sbloccare come Amministratore, nello stato Standby (LED ROSSO) premere e tenere premuti en-
trambi i pulsanti SBLOCCA + 1 (i LED VERDE e BLU lampeggeranno insieme), poi immettere il PIN
Admin e premere il pulsante SBLOCCA (il LED cambierà in BLU fisso) e, infine, premere di nuovo il
pulsante SBLOCCA (il LED cambierà in VERDE a segnalare che il drive è sbloccato).
Sbloccare con il PIN utente ( + PIN + )
2. Per sbloccare diskAshur PRO2 come Utente, premere il pulsante SBLOCCA, tutti i LED si accen-
deranno e spegneranno, quindi immettere il proprio PIN utente e premere nuovamente il pulsante
SBLOCCA. I LED VERDE e BLU lampeggeranno alternatamente diverse volte prima di passare al LED
VERDE fisso per segnalare che l’unità è sbloccata e pronta per l’uso come Utente.
Per maggiori funzioni e istruzioni dettagliate, fare riferimento al manuale utente precaricato nel nuovo
diskAshur PRO2 e disponibile anche sul nostro sito Web.

28
diskAshur PRO2 QSG v1.6F
iStorage Limited, iStorage House, 13 Alperton Lane, Perivale, Middlesex, UB6 8DH, England
Telephone: +44 (0) 20 8991 6260 - Website: www.istorage-uk.com - Email: [email protected]
Product Range
-
 1
1
-
 2
2
-
 3
3
-
 4
4
-
 5
5
-
 6
6
-
 7
7
-
 8
8
-
 9
9
-
 10
10
-
 11
11
-
 12
12
-
 13
13
-
 14
14
-
 15
15
-
 16
16
-
 17
17
-
 18
18
-
 19
19
-
 20
20
-
 21
21
-
 22
22
-
 23
23
-
 24
24
-
 25
25
-
 26
26
-
 27
27
-
 28
28


iStorage diskAshur PRO2 Guía de inicio rápido
- Tipo
- Guía de inicio rápido
en otros idiomas
Artículos relacionados
-
iStorage diskAshur PRO2 Guía de inicio rápido
-
-
iStorage DISKASHUR M2 Guía de inicio rápido
-
-
-
-
-
-
-
Otros documentos
-
Apricorn Aegis Padlock SSD Guía de inicio rápido
-
Apricorn Aegis Fortress Guía de inicio rápido
-
-
Apricorn Aegis Padlock DT Guía de inicio rápido
-
-
-
Apricorn Aegis Padlock 3 Guía de inicio rápido
-
Belkin OMNIVIEW SMB CAT5 KVM SWITCH El manual del propietario