Panasonic FVHBVK1 Instrucciones de operación
- Categoría
- Enrutadores
- Tipo
- Instrucciones de operación

System Setup Guide
Home Network System
HUB
Model No. FV-HBVK1
Thank you for purchasing a Panasonic product.
This document explains how to configure the hub and access it using a mobile
device. These steps must be followed before you can use the system.
For details about how to use the system, refer to the User’s Guide (page
18).
Please read this document before using the unit and save it for future reference.
Printed in China
FV-HBVK1_(en_en)_0106_ver.101.pdf 1 2017/01/06 19:17:59

Introduction
Accessory information ..................................3
Important Information
Graphical symbols for use on equipment and
their descriptions ..........................................6
About this system .........................................7
For your safety .............................................7
Important safety instructions ........................8
Security cautions ..........................................8
For best performance ...................................9
Other information .........................................9
Setup
Part names and functions ..........................11
LED indicator ..............................................
11
Connections ...............................................12
Wi-Fi
®
settings ...........................................13
Registering another mobile device .............16
Registering other devices to the hub ..........16
Appendix
Wireless communication range (DECT) .....18
Accessing the User’s Guide .......................18
Wall mounting ............................................19
Specifications .............................................21
Open source software notice .....................21
Software information ..................................21
FCC and other information .........................22
Customer services .....................................24
Limited Warranty ........................................25
2
Table of Contents
FV-HBVK1_(en_en)_0106_ver.101.pdf 2 2017/01/06 19:17:59

Accessory information
Supplied accessories
No. Accessory item/Part number Quantity
A AC adaptor/PNLV236-0Y 1
B Wall mounting adaptor/PNKL1049Z1 1
A B
Additional accessories
m
icroSD card (not supplied)
A commercially-available microSD card must be inserted into the hub in order to record images
from cameras. The following types of microSD cards are supported.
R microSD / SDHC card: Up to 32 GB
Other information
R D
esign and specifications are subject to change without notice.
R The illustrations in these instructions may vary slightly from the actual product.
Trademarks
R m
icroSDHC Logo is a trademark of SD-3C, LLC.
R iPhone and iPad are trademarks of Apple Inc., registered in the U.S. and other countries.
R Android and Google Play are registered trademarks or trademarks of Google Inc.
R Microsoft, Windows, and Internet Explorer are either registered trademarks or trademarks of
Microsoft Corporation in the United States and/or other countries.
R Wi-Fi
®
, WPA™, and WPA2™ are registered trademarks or trademarks of Wi-Fi Alliance
®
.
R All other trademarks identified herein are the property of their respective owners.
Notice
R T
he hub supports microSD and microSDHC memory cards. In this document, the term
“microSD card” is used as a generic term for any of the supported cards.
3
Introduction
FV-HBVK1_(en_en)_0106_ver.101.pdf 3 2017/01/06 19:17:59

Expanding the Panasonic Home Network System
The Panasonic Home Network System is a wireless system that lets you create a powerful
network of devices, such as cameras, sensors, and smart plugs, and control them all with an
easy-to-use app.
Compatible devices are explained below. For information about the Home Network app, refer to
the User’s Guide (page 18).
The maximum number of devices for each device type is listed below.
Digital Cordless Handset (KX-HNH100: 6 max.
*
1
)
R Makes and receives calls using your home landline
R Can be used to change the system’s arm mode
R Displays system status
R Receives notification when the sensors are triggered
Indoor Camera (KX-HNC210: 4 max.
*
2
)
R Full-color camera and built-in microphone for live monitoring
and recording
R Built-in visual sensor, audio sensor, and temperature sensor
can be used to trigger other actions (camera recording, turning
on a light, etc.)
R Built-in microphone and speaker for two-way communication
Outdoor Camera (KX-HNC600: 4 max.
*
2
)
R Full-color camera with built-in microphone for live monitoring
and recording
R Built-in visual sensor and infrared sensor can be used to trigger
other actions (camera recording, turning on a light, etc.)
R Built-in microphone and speaker for two-way communication
R Splash proof design for permanent, outdoor installation
Window/Door Sensor (KX-HNS101: 50 max.
*
2
)
R Detects when the corresponding window or door is opened
R Can be used to trigger other events (camera recording, turning
on a light, etc.)
Motion Sensor (KX-HNS102: 50 max.
*
2
)
R Detects motion in the surrounding area
R Can be used to trigger other events (camera recording, turning
on a light, etc.)
4
Introduction
FV-HBVK1_(en_en)_0106_ver.101.pdf 4 2017/01/06 19:17:59

Smart Plug (KX-HNA101: 50 max.
*
2
)
R Can be turned on and off using the handset or Home Network
app, when triggered by a sensor, or according to a schedule
R Built-in overcurrent and overwattage detection for added peace
of mind
R Power consumption is logged for your reference
*1 Optional handsets may be a different color from that of the handset supplied as part of a
p
re-configured bundle.
*2 A total of 6 cordless handsets, 4 cameras, and 50 fans or other devices (motion sensors,
window/door sensors, smart plugs, etc.) can be registered to the hub.
The Home Network System product lineup is growing!
Y
ou can look forward to new devices that will make your Home Network System even more
useful and convenient.
For information about the latest devices and bundles, visit the website below.
http://shop.panasonic.com/support
Mobile devices
Your mobile devices: 8 max.
*
1
You can expand the system by installing the Home Network
a
pp on your mobile devices (smartphones, tablets, etc.) and
registering your mobile devices to the hub.
See page 13 for more information about the Home Network
app.
Note:
R You must configure the hub’s Wi-Fi settings before you can
use the app.
*1 8 mobile devices can be registered to the hub, however, only the first 4 can use phone
f
eatures.
5
Introduction
FV-HBVK1_(en_en)_0106_ver.101.pdf 5 2017/01/06 19:17:59

Graphical symbols for use on equipment and their
d
escriptions
Symbol Explanation Symbol Explanation
Alternating current (A.C.) Class P
equipment
(equipment in which
protection against electric
shock relies on Double
Insulation or Reinforced
Insulation)
Direct current (D.C.) “ON” (power)
Protective earth “OFF” (power)
Protective bonding earth Stand-by (power)
Functional earth “ON”/“OFF” (power;
push-push)
For indoor use only Caution, risk of electric
s
hock
6
Important Information
FV-HBVK1_(en_en)_0106_ver.101.pdf 6 2017/01/06 19:17:59

About this system
R T
his system is an auxiliary system; it is not
designed to provide complete protection
from property loss. Panasonic will not be
held responsible in the event that property
loss occurs while this system is in operation.
R The system’s wireless features are subject
to interference, therefore functionality in all
situations cannot be guaranteed.
Panasonic will not be held responsible for
injury or damage to property that occurs in
the event of wireless communication error
or failure.
For your safety
T
o prevent severe injury and loss of life/
property, read this section carefully before
using the product to ensure proper and safe
operation of your product.
WARNING
Power connection
R U
se only the power source marked on the
product.
R Do not overload power outlets and
extension cords. This can result in the risk
of fire or electric shock.
R Completely insert the AC adaptor/power
plug into the power outlet. Failure to do so
may cause electric shock and/or excessive
heat resulting in a fire.
R Regularly remove any dust, etc. from the
AC adaptor/power plug by pulling it from
the power outlet, then wiping with a dry
cloth. Accumulated dust may cause an
insulation defect from moisture, etc.
resulting in a fire.
R Unplug the product from power outlets if it
emits smoke, an abnormal smell, or makes
an unusual noise. These conditions can
cause fire or electric shock. Confirm that
smoke has stopped emitting and contact us
at http://shop.panasonic.com/support
R Unplug from power outlets and never touch
the inside of the product if its casing has
been broken open. Danger of electric shock
e
xists.
R Never touch the plug with wet hands.
Danger of electric shock exists.
R Do not connect non-specified devices.
Installation
R T
o prevent the risk of fire or electrical
shock, do not expose the product to rain or
any type of moisture.
R Do not place or use this product near
automatically controlled devices such as
automatic doors and fire alarms. Radio
waves emitted from this product may cause
such devices to malfunction resulting in an
accident.
R Do not allow the AC adaptor or telephone
line cord to be excessively pulled, bent or
placed under heavy objects.
R Keep small parts, such as microSD cards,
out of the reach of children. There is a risk
of swallowing. In the event they are
swallowed, seek medical advice
immediately.
Operating safeguards
R U
nplug the product from power outlets
before cleaning. Do not use liquid or
aerosol cleaners.
R Do not disassemble the product.
R Do not spill liquids (detergents, cleansers,
etc.) onto the telephone line cord plug, or
allow it to become wet at all. This may
cause a fire. If the telephone line cord plug
becomes wet, immediately pull it from the
telephone wall jack, and do not use.
R Never put metal objects inside the product.
If metal objects enter the product, turn off
the circuit breaker and contact an
authorized service center.
Medical
R C
onsult the manufacturer of any personal
medical devices, such as pacemakers or
hearing aids, to determine if they are
adequately shielded from external RF
(radio frequency) energy. DECT features
operate between 1.92 GHz and 1.93 GHz
with a peak transmission power of 115 mW.
Wi-Fi features operate between 2.412 GHz
7
Important Information
FV-HBVK1_(en_en)_0106_ver.101.pdf 7 2017/01/06 19:18:00

and 2.462 GHz with a peak transmission
p
ower of 100 mW.
R Do not use the product in health care
facilities if any regulations posted in the
area instruct you not to do so. Hospitals or
health care facilities may be using
equipment that could be sensitive to
external RF energy.
CAUTION
Installation and location
R N
ever install wiring during a lightning storm.
R Never install telephone line jacks in wet
locations unless the jack is specifically
designed for wet locations.
R Never touch uninsulated telephone wires or
terminals unless the telephone line has
been disconnected at the network interface.
R Use caution when installing or modifying
telephone lines.
R The AC adaptor is used as the main
disconnect device. Ensure that the AC
outlet is installed near the product and is
easily accessible.
R This product is unable to make calls when:
– there is a power failure.
– when the cordless handset or mobile
device’s batteries need recharging or
have failed.
Important safety
instructions
When using your product, basic safety
precautions should always be followed to
reduce the risk of fire, electric shock, and
injury to persons, including the following:
1. Do not use this product near water for
example, near a bathtub, washbowl,
kitchen sink, or laundry tub, in a wet
basement or near a swimming pool.
2. Avoid using a telephone (other than a
cordless type) during an electrical storm.
There may be a remote risk of electric
shock from lightning.
3. Do not use the telephone to report a gas
leak in the vicinity of the leak.
4. Use only the power cord indicated in this
d
ocument.
SAVE THESE INSTRUCTIONS
Security cautions
T
ake appropriate measures to avoid the
following security breaches when using this
product.
– Leaks of private information
– Unauthorized use of this product
– Unauthorized interference or suspension of
the use of this product
Take the following measures to avoid security
breaches.
R Configure the wireless router that connects
your mobile device to this product to use
encryption for all wireless communication.
R You may be vulnerable to security
breaches if the unit is used with the login
password, disarm code, or PIN code, or
other settings at their defaults values.
Configure your own values for these
settings.
R Do not use passwords that could be easily
guessed by a third party. If you keep a
record of your passwords, protect that
record. Change passwords regularly.
R If you lose your mobile device, change the
password used to access this product.
R If you enable the product’s auto login
feature, enable the screen lock or similar
security feature on your mobile device.
R Take care when performing important
security related operations such as deleting
MAC address, unit IDs, etc.
R To prevent disclosure of personal
information, enable the screen lock or
similar security feature on your mobile
device.
R When submitting the product for repair,
make a note of any important information
stored in the product, as this information
may be erased or changed as part of the
repair process.
R Before handing the product over to a third
party for repair or other purposes, perform
a factory data reset to erase any data
8
Important Information
FV-HBVK1_(en_en)_0106_ver.101.pdf 8 2017/01/06 19:18:00

stored in the product and remove the
m
icroSD card. Use only trusted repair
services authorized by Panasonic.
R Before disposing of the product, perform a
factory data reset to erase any data stored
in the product. Remove and erase the
microSD card.
R If your mobile device will no longer be used
with the product, delete your mobile
device’s registration from the product and
delete the corresponding app from your
mobile device.
R If this product experiences a power outage,
its date and time setting may become
incorrect. In this case, the date and time
setting will be automatically corrected when
your mobile device and this product are
connected to the same wireless network.
Additionally, note the following.
R Multiple hubs cannot be used on the same
network.
R Only one mobile device can access this
product while away from home. If a second
mobile device connects to this product
while away from home, the first mobile
device is disconnected.
R Communications may be interrupted
depending on network conditions and
wireless signal quality.
R This product may be used in ways that
violate the privacy or publicity rights of
others. You are responsible for the ways in
which this product is used.
For best performance
Hub location/avoiding noise
T
he hub and other compatible Panasonic
devices use radio waves to communicate with
each other.
R For maximum coverage and noise-free
communications, place your hub:
– at a convenient, high, and central
location with no obstructions between
the devices and hub in an indoor
environment.
– away from electronic appliances such as
T
Vs, radios, personal computers,
wireless devices, or other phones.
– facing away from radio frequency
transmitters, such as external antennas
of mobile phone cell stations. (Avoid
putting the hub on a bay window or near
a window.)
R Coverage and voice quality depends on the
local environmental conditions.
R If the reception for a hub location is not
satisfactory, move the hub to another
location for better reception.
Environment
R K
eep the product away from electrical noise
generating devices, such as fluorescent
lamps and motors.
R The product should be kept free from
excessive smoke, dust, high temperature,
and vibration.
R The product should not be exposed to
direct sunlight.
R Do not place heavy objects on top of the
product.
R When you leave the product unused for a
long period of time, unplug the product from
the power outlet.
R The product should be kept away from heat
sources such as heaters, kitchen stoves,
etc. It should not be placed in rooms where
the temperature is less than 0 °C (32 °F) or
greater than 40 °C (104 °F). Damp
basements should also be avoided.
R The maximum communication range may
be shortened when the product is used in
the following places: Near obstacles such
as hills, tunnels, underground, near metal
objects such as wire fences, etc.
R Operating the product near electrical
appliances may cause interference. Move
away from the electrical appliances.
Other information
Routine care
R W
ipe the outer surface of the product with a
soft moist cloth.
9
Important Information
FV-HBVK1_(en_en)_0106_ver.101.pdf 9 2017/01/06 19:18:00

R D
o not use benzine, thinner, or any
abrasive powder.
Protecting your recordings
R D
o not remove the microSD card or
disconnect the hub’s AC adaptor while
reading or writing data to the microSD card.
Data on the card could become corrupted.
R If a microSD card malfunctions or is
exposed to electromagnetic waves or static
electricity, data on the card could become
corrupted or erased. Therefore we
recommend backing up important data to a
computer or other device.
Notice for product disposal, transfer,
o
r return
R This product can store your private/
confidential information. To protect your
privacy/confidentiality, we recommend that
you erase information such as phonebook
or caller list entries from the memory before
you dispose of, transfer, or return the
product.
Notice
10
Important Information
FV-HBVK1_(en_en)_0106_ver.101.pdf 10 2017/01/06 19:18:00

Part names and functions
C
BA
ED
G H I
F
Speaker
LED indicator
DC jack
LINE jack
MW
i-Fi SETUPN
Used when performing initial setup.
microSD card slot
U
sed when inserting a microSD card.
Remove the label when inserting.
M HANDSET/LOCATORN
U
sed when registering a handset. You
can also press this button to locate a
misplaced handset.
M CAMERAN
U
sed when registering a camera.
M OTHER DEVICEN
U
sed when registering other devices,
such as sensors and smart plugs.
LED indicator
Y
ou can use the LED indicator to confirm the
hub’s status.
Indicator Status
Off No power, or LED
i
ndicator is turned
off
*1
Green, lit Normal operation,
c
onnected to
wireless router
*1
Green, blinking
s
lowly
Registration mode
Green, blinking
q
uickly
Hub is searching for
wireless router
Alternating:
G
reen, blinking
slowly
Yellow, blinking
slowly
Hub is starting up
(cannot be used
yet)
*2
Red, lit Alarm system is
a
rmed
*1
Red, blinking quickly Alarm system was
t
riggered
Yellow, lit Initial setup required
Yellow, blinking
s
lowly
Initial setup in
progress, mobile
device connected
Yellow, blinking Initial setup is
s
tarting
*1 You can configure the hub so that its LED
i
ndicator does not light during normal
operation. For more information, refer to
the User’s Guide (page 18).
*2 It may take some time for the hub to finish
starting up.
11
Setup
FV-HBVK1_(en_en)_0106_ver.101.pdf 11 2017/01/06 19:18:00

Connections
Insert the AC adaptor plug firmly into the
DC jack.
Secure the AC adaptor cord by wrapping
it around the hook.
Connect the AC adaptor to the power
outlet.
Insert the telephone line cord into the
LINE jack and a single-line telephone jack
(RJ11C) until you hear a click.
*1
DSL/ADSL service users only: Connect
your DSL/ADSL filter (not supplied).
*1
Outdoor Camera (KX-HNC600) or
Indoor Camera (KX-HNC210) users
only: Remove the label covering the card
slot and then insert the microSD card (not
supplied) into the slot. Make sure the
notched corner of the card is in the
position shown (A).
*1 This step is only necessary if you want to
use the landline phone features. For
details about the landline phone features,
refer to the User’s Guide (page 18).
Note:
R Use only the supplied Panasonic AC
adaptor PNLV236.
R A microSD card (not supplied) is required to
record images from cameras. Refer to the
information about the available microSD
card (page 3).
R To remove the microSD card, push in the
microSD card and then remove it.
D
C
D
E
B
A
F
A
Note about power connections
AC adaptor connection
R T
he AC adaptor must remain connected at
all times. (It is normal for the adaptor to feel
warm during use.)
R The AC adaptor should be connected to a
vertically oriented or floor-mounted AC
outlet. Do not connect the AC adaptor to a
ceiling-mounted AC outlet, as the weight of
the adaptor may cause it to become
disconnected.
12
Setup
FV-HBVK1_(en_en)_0106_ver.101.pdf 12 2017/01/06 19:18:00

Power failure
R T
he hub will not work during a power failure.
R The hub’s telephone features will not work
during a power failure. We recommend
connecting a corded-type telephone that
does not use an AC adaptor to your
telephone line.
Wi-Fi
®
settings
After you have connected your hub, here is
what you will need to do in order to access the
system from your mobile device. Each
procedure is explained in this chapter.
1 Download
Download the [Home Network] app to
your mobile device.
2 Initial setup
Use the [Home Network] app to
configure the hub to connect to your
wireless router, and then register your
mobile device to the hub.
Downloading the [Home
N
etwork] app
Download information is available at the web
page listed below.
www.panasonic.net/pcc/support/tel/
homenetwork/
Compatible mobile devices
–
iPhone 4 and later, iPad (iOS 6.0 and later)
– Android™ smartphones and tablets
(Android 4.0 and later)
Note:
R The [Home Network] app may not function
properly depending on the system
environment, such as the model of your
mobile device, peripherals connected to
your mobile device, and the apps installed
on your mobile device.
R The following Android devices are not
compatible with the [Home Network] app.
– Android devices that are not supported
by Google Play™
– Android devices with limited hardware
features (Bluetooth, Wi-Fi, and
microphone support are required.)
Initial setup
C
onfirm the following before you begin.
– Make sure you have installed the [Home
Network] app on your mobile device
– Make sure the hub and your wireless router
are turned on and the hub’s LED indicator
is lit in yellow
– Make sure the hub is located within range
of your wireless router
– Make sure your mobile device is connected
to your wireless router
– Make sure your mobile device can connect
to the Internet
– Make sure you know the network name
(SSID) and password assigned to your
wireless router
Initial setup for iPhone, iPad
1 S
tart the [Home Network] app.
R If prompted, follow the on-screen
instructions and select the appropriate
region/country.
R If prompted to select the device to be
set up, tap [Hub].
2 When prompted, tap [Set up the Hub].
3 When prompted, press MWi-Fi SETUPN
on the hub.
R The LED indicator blinks in yellow.
13
Setup
FV-HBVK1_(en_en)_0106_ver.101.pdf 13 2017/01/06 19:18:00

4 C
hange your mobile device’s Wi-Fi
setting temporarily so that it connects to
the hub directly.
R Open your mobile device’s [Settings]
app, tap [Wi-Fi], select
“HOME_NETWORK_Panasonic”,
enter “00000000” as the password,
and then tap [Join].
R If more than 1 item named
“HOME_NETWORK_Panasonic” is
displayed, wait approx. 10 minutes and
perform this procedure from the
beginning.
5 Start the [Home Network] app again.
6 If necessary, enter the password required
to connect to your wireless router and
then tap [Next].
R The hub and your mobile device
connect to your wireless router.
R If prompted, follow the on-screen
instructions and connect your mobile
device to your wireless router, start the
app again, and then tap [Add This
Mobile Device].
R If you enter the wrong Wi-Fi password,
[Setup failed.] is displayed and the
hub’s LED indicator lights.
Proceed as follows according to the
color of the hub’s LED indicator.
– If the LED indicator is lit in yellow,
repeat the initial setup procedure
from the beginning.
– If the LED indicator is blinking in
green, you must reset the hub’s
Wi-Fi settings. See “If the hub’s LED
indicator blinks in green”, page 14.
7 When prompted, press MWi-Fi SETUPN
on the hub.
R Your mobile device will be registered
to the hub.
8 When prompted, follow the on-screen
instructions and set the password used to
log in to the hub while away from home
and then tap [OK].
9 When prompted, enter a name for the
hub and for your mobile device and then
tap [OK].
R The hub name setting is used by your
mobile device to identify the hub. This
is useful when you have multiple hubs.
R T
he mobile device name setting is
used by the hub and other system
users to identify your mobile device.
This is useful when performing certain
operations, such as deregistering or
making intercom calls using a cordless
handset.
10 When prompted, select whether you want
to customize device profiles, i.e., the
device name, location, and other settings
for your devices.
R If you choose not to customize the
device profiles now, you can change
them later if desired. For details about
customizing device profiles, refer to the
User’s Guide (page 18).
R If you choose to customize the device
profiles now, change each setting as
desired. When finished, tap
repeatedly until the “completed”
m
essage is displayed.
R The app’s home screen is displayed
when initial setup is complete.
If the hub’s LED indicator blinks in green
If you enter the wrong Wi-Fi password during
the initial setup procedure for iPhone or iPad,
[Setup failed.] is displayed and the hub’s LED
indicator blinks quickly in green. In this case,
perform the following.
1. Press and hold the 3 registration buttons
on the side of the hub and MWi-Fi SETUPN
on the back of the hub at the same time (4
buttons total) until the hub’s LED indicator
blinks slowly in green and yellow.
2. Wait for the hub’s LED indicator to light in
yellow.
3. Repeat the initial setup procedure (“Initial
setup for iPhone, iPad”, page 13).
14
Setup
FV-HBVK1_(en_en)_0106_ver.101.pdf 14 2017/01/06 19:18:00

Initial setup for Android devices
1 S
tart the [Home Network] app.
R If prompted, follow the on-screen
instructions and select the appropriate
region/country.
R If prompted to select the device to be
set up, tap [Hub].
2 When prompted, tap [Set up the Hub].
3 When prompted, press MWi-Fi SETUPN
on the hub.
R The LED indicator blinks in yellow.
R The app temporarily changes your
mobile device’s Wi-Fi setting so that it
connects to the hub directly.
4 If necessary, enter the password required
to connect to your wireless router and
then tap [Next].
R The hub and your mobile device
connect to your wireless router.
5 When prompted, press MWi-Fi SETUPN
on the hub.
R Your mobile device will be registered
to the hub.
6 When prompted, follow the on-screen
instructions and set the password used to
log in to the hub while away from home
and then tap [OK].
7 When prompted, enter a name for the
hub and for your mobile device and then
tap [OK].
R The hub name setting is used by your
mobile device to identify the hub. This
is useful when you have multiple hubs.
R The mobile device name setting is
used by the hub and other system
users to identify your mobile device.
This is useful when performing certain
operations, such as deregistering or
making intercom calls using a cordless
handset.
8 When prompted, select whether you want
to customize device profiles, i.e., the
device name, location, and other settings
for your devices.
R If you choose not to customize the
device profiles now, you can change
them later if desired. For details about
customizing device profiles, refer to the
U
ser’s Guide (page 18).
R If you choose to customize the device
profiles now, change each setting as
desired. When finished, press your
device’s “back” button repeatedly until
the “completed” message is displayed.
R The app’s home screen is displayed
when initial setup is complete.
Information about Wi-Fi
c
ommunication
The hub uses Wi-Fi to communicate with your
wireless router. Refer to the following
information when planning where to place the
hub.
R Do not use the hub in the following areas or
locations. Malfunction or interference to
radio communication may result.
– Indoor areas that have certain types of
radio or mobile communications
equipment
– Locations near microwave ovens or
Bluetooth devices
– Indoor areas where antitheft devices or
2.4 GHz frequency devices such as POS
systems are used
R Do not place the hub in areas where the
following materials or objects are located
between the hub and the wireless router.
These materials and objects may interfere
with wireless communication or cause
wireless transmission speed to become
slower.
– Metallic doors or shutters
– Walls containing aluminum-sheet
insulation
– Walls made of concrete, stone, brick, or
tin
– Multiple walls
– Steel shelving
– Fireproof glass
15
Setup
FV-HBVK1_(en_en)_0106_ver.101.pdf 15 2017/01/06 19:18:00

Registering another mobile
d
evice
In order to access the system from a mobile
device, you must first register the mobile
device to the hub. You can register up to 8
mobile devices to a hub.
Confirm the following before you begin.
– Make sure you have completed the initial
setup procedure
– Make sure your mobile device can connect
to the Internet
– Make sure your wireless router and the hub
are turned on
– Make sure your mobile device and the hub
are connected to the same wireless router
1 Using the mobile device that you want to
register, download the [Home Network]
app and then start the app.
R If prompted, follow the on-screen
instructions and select the appropriate
region/country.
R If prompted to select the device to be
set up, tap [Hub].
2 When prompted, tap [Add This Mobile
Device].
3 When prompted, press MWi-Fi SETUPN
on the hub.
R Your mobile device will be registered
to the hub.
4 When prompted, follow the on-screen
instructions and enter the password used
to log in to the hub while away from home.
5 When prompted, enter a name for your
mobile device and then tap [OK].
R This setting allows you to change the
name assigned to your device. It can
help you identify your mobile device
when performing certain operations,
such as deregistering or making
intercom calls using a cordless
handset.
R The app’s home screen is displayed
when initial setup is complete.
Registering other devices
t
o the hub
This procedure is not required for
c
ompatible fans already installed in your
home.
Before you can use devices such as cameras,
s
ensors, and smart plugs, they must be
registered to the hub.
You can register each device by using the
registration buttons or the [Home Network]
app.
Using registration buttons
1 P
ress and hold the appropriate
registration button on the side of the hub
(page 11) until the hub’s LED indicator
blinks slowly in green.
– When registering a handset:
M
HANDSET/LOCATORN
–
When registering a camera:
M
CAMERAN
–
When registering any other device:
M
OTHER DEVICEN
2 W
hen registering a handset:
Place the handset on the charger.
When registering any other device:
Press and hold the device’s registration
button until the device’s LED indicator
blinks slowly in green.
R When registration is complete, the hub
sounds one long beep.
Note:
R If registration fails, the hub sounds several
short beeps.
R To register a mobile device, use the
procedure described on page 16.
Using the app
1 S
tart the [Home Network] app.
2 From the [Home Network] app home
screen, tap [Settings].
3 Tap [Device Registration].
4 Tap [Registration].
16
Setup
FV-HBVK1_(en_en)_0106_ver.101.pdf 16 2017/01/06 19:18:00

5 S
elect the type of device that you want to
register.
6 When registering a handset:
Place the handset on the charger.
When registering any other device:
Press and hold the registration button on
the device you want to register until the
device’s LED indicator blinks slowly in
green.
R When registration is complete, the hub
sounds one long beep.
Note:
R If registration fails, the hub sounds several
short beeps.
17
Setup
FV-HBVK1_(en_en)_0106_ver.101.pdf 17 2017/01/06 19:18:00

Wireless communication
r
ange (DECT)
The wireless communication range of each
device in the system from the hub is
approximately 50 m (160 feet) indoors and
approximately 300 m (1,000 feet) outdoors.
Wireless communication may be unreliable
when the following obstacles are located
between the hub and other system devices.
R Metal doors or screens
R Walls containing aluminum-sheet insulation
R Walls made of concrete or corrugated iron
R Double-pane glass windows
R Multiple walls
R When using each device on separate floors
or in different buildings
Accessing t
he User’s Guide
The User’s Guide is a collection of online
documentation that helps you get the most out
of the [Home Network] app.
1 iPhone/iPad
Tap
in the app’s home screen.
A
ndroid devices
Tap
or press your mobile device’s
menu button in the app’s home screen.
2 Tap [User’s Guide].
Note:
R Microsoft
®
Windows
®
Internet Explorer
®
8
and earlier versions are not supported.
R Android 4.1 or later versions are
recommended.
R You can also access the User’s Guide at
the web page listed below.
www.panasonic.net/pcc/support/tel/
h
omenetwork/manual/
DECT Module Installation Manual
f
or installers
In order for the hub to communicate with a
compatible fan or other compatible device, a
DECT Module must be installed in the device.
To download the Installation Manual or check
the latest information about installing and
configuring the DECT Module, please visit the
following web page.
www.panasonic.net/pcc/support/tel/
homenetwork/
18
Appendix
FV-HBVK1_(en_en)_0106_ver.101.pdf 18 2017/01/06 19:18:00

Wall mounting
Y
ou can use the included wall mounting
adaptor to wall mount the hub if desired.
Note:
R Make sure that the wall and the fixing
method are strong enough to support the
weight of the unit.
1 Connect the AC adaptor and the
telephone line cord to the hub.
R Secure the AC adaptor cord by
wrapping it around the hook.
2 S
lide the wall mounting adaptor up until it
clicks into place.
R Make sure the “UP” mark on the wall
mounting adaptor faces upwards.
R Align and insert the tabs (A) of the
wall mounting adaptor to the grooves
(B) of the hub.
UP
UP
UP
A
B
19
Appendix
FV-HBVK1_(en_en)_0106_ver.101.pdf 19 2017/01/06 19:18:00

3 M
ount the hub on a wall then slide down
to secure in place.
R Pass the AC adaptor cord and the
telephone line cord through the groove
(A) in the wall mounting adaptor.
Wrap up the telephone line cord as
shown to prevent the cord from being
pinched.
R This product is compliant with the
following wall phone plate sizes (2
types).
B 83 mm (3 1/4 inches)
C 102 mm (4 inches)
R Fit the slots of the hub onto the
corresponding wall phone plate tabs
for (D) and (E) respectively.
B
C
D
D
E
E
A
E
D
Removing the wall mounting adaptor
W
hile pushing the release levers (A) away
from the center of the wall mounting adaptor,
slide the adaptor down (B).
A A
B
20
Appendix
FV-HBVK1_(en_en)_0106_ver.101.pdf 20 2017/01/06 19:18:00

Specifications
R S
tandards
DECT:
DECT (Digital Enhanced Cordless
Telecommunications)
Wi-Fi:
IEEE 802.11b/g/n
R Frequency range
DECT:
1.92 GHz – 1.93 GHz
Wi-Fi:
2.412 GHz – 2.462 GHz
(channels 1 – 11)
R RF transmission power
DECT:
115 mW (max.)
Wi-Fi:
100 mW (peak transmission power)
R Encryption
WPA2™-PSK (TKIP/AES), WPA™-PSK
(TKIP/AES), WEP (128/64 bit)
R Simplified configuration
WPS (PBC)
R Power source
120 V AC, 60 Hz
R Power consumption
Standby: Approx. 3.5 W
Maximum: Approx. 4.0 W
R Operating conditions
0 °C – 40 °C (32 °F – 104 °F)
20 % – 80 % relative air humidity (dry)
R Alert tone volume
High alert level: approx. 90 dB
Low alert level: approx. 73 dB
(measured approx. 10 cm (3 15/16 inches)
in front of the center of the unit)
R Dimensions (height × width × depth)
Approx. 42 mm ´ 130 mm ´ 130 mm
(1 21/32 inches ´ 5 1/8 inches ´
5 1/8 inches)
R Mass (weight)
Approx. 257 g (0.57 lb)
Open source software
n
otice
R Parts of this product use open source
software supplied based on the relevant
conditions of the Free Software
Foundation’s GPL and/or LGPL and other
conditions. Please read all licence
information and copyright notices related to
the open source software used by this
product. This information is available at the
following web page:
www.panasonic.net/pcc/support/tel/
homenetwork/
At least three (3) years from delivery of this
product, Panasonic Corporation will give to
any third party who contacts us at the
contact information provided below, for a
charge of no more than the cost of
physically distributing source code, a
complete machine-readable copy of the
corresponding source code and the
copyright notices covered under the GPL
and the LGPL. Please note that software
licensed under the GPL and the LGPL is
not under warranty.
www.panasonic.net/pcc/support/tel/
homenetwork/
Software information
R T
he End User License Agreement (EULA)
for the Home Network app is available at
the following web page:
www.panasonic.net/pcc/support/tel/
homenetwork/
21
Appendix
FV-HBVK1_(en_en)_0106_ver.101.pdf 21 2017/01/06 19:18:00

FCC and other information
T
his equipment complies with Part 68 of the
FCC rules and the requirements adopted by
the ACTA. On the bottom of this equipment is
a label that contains, among other information,
a product identifier in the format
US:ACJ----------.
If requested, this number must be provided to
the telephone company.
R Registration No.............(found on the
bottom of the unit)
R Ringer Equivalence No. (REN).......0.1B
A plug and jack used to connect this
equipment to the premises wiring and
telephone network must comply with the
applicable FCC Part 68 rules and
requirements adopted by the ACTA. A
compliant telephone cord and modular plug is
provided with the product. It is designed to be
connected to a compatible modular jack that is
also compliant.
The REN is used to determine the number of
devices that may be connected to a telephone
line. Excessive RENs on a telephone line may
result in the devices not ringing in response to
an incoming call. In most but not all areas, the
sum of RENs should not exceed five (5.0). To
be certain of the number of devices that may
be connected to a line, as determined by the
total RENs, contact the local telephone
company. For products approved after July
23, 2001, the REN for the product is part of
the product identifier that has the format
US:AAAEQ##TXXXX. The digits represented
by ## are the REN without a decimal point
(e.g., 03 is a REN of 0.3).
If this equipment causes harm to the
telephone network, the telephone company
will notify you in advance that temporary
discontinuance of service may be required.
But if advance notice isn’t practical, the
telephone company will notify the customer as
soon as possible. Also, you will be advised of
your right to file a complaint with the FCC if
you believe it is necessary.
The telephone company may make changes
i
n its facilities, equipment, operations or
procedures that could affect the operation of
the equipment. If this happens the telephone
company will provide advance notice in order
for you to make necessary modifications to
maintain uninterrupted service.
If trouble is experienced with this equipment,
for repair or warranty information, please
contact a Factory Service Center or other
Authorized Servicer. If the equipment is
causing harm to the telephone network, the
telephone company may request that you
disconnect the equipment until the problem is
resolved.
Connection to party line service is subject to
state tariffs. Contact the state public utility
commission, public service commission or
corporation commission for information.
If your home has specially wired alarm
equipment connected to the telephone line,
ensure the installation of this equipment does
not disable your alarm equipment. If you have
questions about what will disable alarm
equipment, consult your telephone company
or a qualified installer.
This equipment is hearing aid compatible as
defined by the FCC in 47 CFR Section 68.316.
When you hold the phone to your ear, noise
might be heard in your Hearing Aid. Some
Hearing Aids are not adequately shielded from
external RF (radio frequency) energy. If noise
occurs, use an optional headset accessory or
the speakerphone option (if applicable) when
using this phone. Consult with your audiologist
or Hearing Aid manufacturer about the
availability of Hearing Aids which provide
adequate shielding to RF energy commonly
emitted by digital devices.
WHEN PROGRAMMING EMERGENCY
NUMBERS AND(OR) MAKING TEST CALLS
TO EMERGENCY NUMBERS:
1. Remain on the line and briefly explain to
the dispatcher the reason for the call.
22
Appendix
FV-HBVK1_(en_en)_0106_ver.101.pdf 22 2017/01/06 19:18:00

2. Perform such activities in the off-peak
h
ours, such as early morning or late
evenings.
This device complies with Part 15 of the FCC
Rules. Operation is subject to the following
two conditions:
(1) This device may not cause harmful
interference, and (2) this device must accept
any interference received, including
interference that may cause undesired
operation.
Privacy of communications may not be
ensured when using this device.
CAUTION:
Any changes or modifications not expressly
approved by the party responsible for
compliance could void the user’s authority to
operate this device.
NOTE:
This equipment has been tested and found to
comply with the limits for a Class B digital
device, pursuant to Part 15 of the FCC Rules.
These limits are designed to provide
reasonable protection against harmful
interference in a residential installation. This
equipment generates, uses, and can radiate
radio frequency energy and, if not installed
and used in accordance with the instructions,
may cause harmful interference to radio
communications. However, there is no
guarantee that interference will not occur in a
particular installation. If this equipment does
cause harmful interference to radio or
television reception, which can be determined
by turning the equipment off and on, the user
is encouraged to try to correct the interference
by one or more of the following measures:
– Reorient or relocate the receiving antenna.
– Increase the separation between the
equipment and receiver.
– Connect the equipment into an outlet on a
circuit different from that to which the
receiver is connected.
– Consult the dealer or an experienced radio/
TV technician for help.
Some devices operate at frequencies that may
cause interference to nearby TVs and VCRs.
To minimize or prevent such interference, this
device should not be placed near or on top of
a
TV or VCR. If interference is experienced,
move this device further away from the TV or
VCR. This will often reduce or eliminate
interference.
FCC RF Exposure Warning:
R This product complies with FCC radiation
exposure limits set forth for an uncontrolled
environment.
R To comply with FCC RF exposure
requirements, the hub must be installed
and operated 20 cm (8 inches) or more
between the product and all person’s body.
R This product may not be collocated or
operated in conjunction with any other
antenna or transmitter.
R For body-worn operation, the device must
be used only with a non-metallic accessory.
Use of other accessories may not ensure
compliance with FCC RF exposure
requirements.
Notice:
R FCC ID can be found on the bottom of the
unit.
23
Appendix
FV-HBVK1_(en_en)_0106_ver.101.pdf 23 2017/01/06 19:18:00

Customer services
Obtain Product Information and Operating Assistance; locate your
nearest distributor, or make Customer Service and Literature
requests by visiting our Web Site at:
You may also contact us directly at:
1-866-292-7299 Monday-Friday 9 am-8 pm, EST.
For hearing or speech impaired TTY users, TTY: 1-877-833-8855
or send your request by E-mail to:
us.panasonic.com/ventfans
Customer Services Directory
Purchase Parts and Accessories for Panasonic Ventilation
Products by visiting our Website:
Send your request by Email to: [email protected]
You may also contact us directly at 1-800-332-5368
(Monday-Friday 8 am to 6 pm, EST.)
You may also contact us directly at 1-866-292-7299
(Monday-Friday 10 am to 6 pm, EST.)
Panasonic Consumer Electronics Company
Customer Experience Group
For hearing or speech impaired TTY users, TTY: 1-877-833-8855
2 Riverfront Plaza, Newark, NJ 07102
or send your request by Email to: [email protected]
Distributors:
Consumers:
www.buypanasonicparts.com
Accessory Purchases
24
Appendix
FV-HBVK1_(en_en)_0106_ver.101.pdf 24 2017/01/06 19:18:01

Limited Warranty
Panasonic Eco Solutions North America (PESNA)
LIMITS AND EXCLUSIONS
Unit of Panasonic Corporation of North America
2 Riverfront Plaza
Newark, NJ 07102
Panasonic Eco Solutions North America (“the Warrantor”) will, at its sole discretion,
replace this product with new parts or exchange this product, free of charge, in the
USA, in the event of defects in material or workmanship in accordance to the following:
Service, in the USA, can be obtained during the warranty period by contacting the
selling Distributor or Panasonic Customer Call Center at 866-292-7299, toll free.
This warranty does not cover labor charges for removal and installation of parts. This
warranty is extended only to the original purchaser of a new product, which was not
sold “as is”. This warranty only applies to products purchased in the United States.
This warranty only covers failures due to defects in materials or workmanship that
occur during normal use and does not cover shipping damages, whether visible or
concealed, normal wear or cosmetic damage. The warranty does not cover failures that
are caused by products and peripherals not supplied by the Warrantor, or failures which
result from accident, misuse, abuse, negligence, mishandling, misapplication,
alteration, modification, faulty installation, improper setups or adjustments, improper or
lack of maintenance, alterations or modifications, power line surge, improper line
voltage, lightning damage, or damage that is attributable to acts of God.
There are no express warranties except as listed above. THE WARRANTOR SHALL
NOT BE LIABLE FOR INCIDENTAL CONSEQUENTIAL, OR PUNITIVE DAMAGES,
INCLUDING, WITHOUT LIMITATION, LOSS OF GOODWILL, PROFITS OR
REVENUE, LOSS OF USE OF THIS PRODUCT OR ANY ASSOCIATED EQUIPMENT,
COST OF SUBSTITUTE PRODUCT, DOWNTIME COST, OR CLAIMS OF ANY PARTY
DEALING WITH BUYER FOR SUCH DAMAGES, RESULTING FROM THE USE OF
THIS PRODUCT OR ARISING FROM BREACH OF WARRANTY OR CONTRACT,
NEGLIGENCE OR ANY OTHER LEGAL THEORY, EXCEPT AS EXPRESSLY
PROVIDED ABOVE. THERE IS NO WARRANTY OR ANY OTHER KIND, EXPRESS
OR IMPLIED, THERE ARE NO WARRANTIES WHICH EXTEND BEYOND THE
DESCRIPTION ON THE FACE HEREOF.
Panasonic Hub Limited Warranty
Hub: For period of 1 year (12 months) from the date of the original purchase.
25
Appendix
FV-HBVK1_(en_en)_0106_ver.101.pdf 25 2017/01/06 19:18:01

Some states do not allow the exclusion or limitation of incidental or consequential
damages, or limitations on how long an implied warranty lasts, so the above exclusions
or limitations may not apply to you.
This warranty gives you specific legal rights and you may also have other rights which
vary from state to state.
If a problem with this product develops during or after the warranty period, you may
contact your Distributor or Panasonic Customer Call Center.
If the problem is not handled to your satisfaction, then write to Panasonic Eco Solutions
North America at the address listed at the top of the warranty.
26
Appendix
FV-HBVK1_(en_en)_0106_ver.101.pdf 26 2017/01/06 19:18:01

27
Notes
FV-HBVK1_(en_en)_0106_ver.101.pdf 27 2017/01/06 19:18:01

If your product is not working properly. . .
IMPORTANT!
Visit our Web site: http://shop.panasonic.com/support
• FAQ and troubleshooting hints are available.
A Make sure the AC adaptor is connected.
B Use the Home Network app to access the User’s Guide
and refer to the Troubleshooting section.
For your future reference
W
e recommend keeping a record of the following information to assist with any repair under
warranty.
Serial No. Date of purchase
(found on the bottom of the unit)
N
ame and address of dealer
Attach your purchase receipt here.
Two Riverfront Plaza, Newark, NJ 07102
© Panasonic Corporation 2016
FV-HBVK1_(en_en)_0106_ver.101.pdf 28 2017/01/06 19:18:01

Guía de configuración del sistema
Sistema de red doméstico
HUB
Modelo n° FV-HBVK1
Gracias por adquirir un producto Panasonic.
Este documento explica cómo configurar el hub y cómo acceder a él desde un dispositivo
móvil. Se deben seguir estos pasos para poder usar el sistema.
Para obtener detalles sobre cómo usar el sistema, consulte la Guía del usuario (pági-
na 10).
Lea este documento antes de usar la unidad, y guárdelo para consultarlo en el futuro.
PNQX8338YA CC1016WK1126 (E)
FV-HBVK1_(es_es)_0110_ver.101.pdf 1 2017/01/10 13:50:57

Configuración
Nombres de los componentes y funciones ..........3
Led indicador ........................................................3
Conexiones ..........................................................4
Configuraciones de Wi-Fi
®
...................................5
Registro de otro dispositivo móvil ........................8
Registro de otros dispositivos al hub ...................8
Apéndice
Alcance de la comunicación inalámbrica
(DECT) ...............................................................10
Acceso a la Guía del usuario .............................10
Montaje en la pared ...........................................11
Atención al Cliente .............................................13
Garantía limitada ................................................14
2
Tabla de Contenido
FV-HBVK1_(es_es)_0110_ver.101.pdf 2 2017/01/10 13:50:57

Nombres de los componentes
y funciones
C
BA
ED
G H I
F
Altavoz
Led indicador
Clavija de corriente continua
Clavija LINE
MWi-Fi SETUPN
Se usa durante la configuración inicial.
Ranura para tarjeta microSD
Se usa mientras inserta una tarjeta microSD.
Retire la etiqueta cuando la inserte.
M HANDSET/LOCATORN
Se usa al registrar un auricular. También
puede presionar este botón para ubicar un
auricular perdido.
M CAMERAN
Se usar al registrar una cámara.
M OTHER DEVICEN
Se usa al registrar otros dispositivos, como
sensores y conectores inteligentes.
Led indicador
Puede usar el Led indicador para confirmar el
estado del hub.
Indicador Estado
Apagado Sin energía, o el Led
indicador está apaga-
do
*1
Verde, encendido Funcionamiento nor-
mal, conectado al enru-
tador inalámbrico
*1
Verde, parpadeando
lentamente
Modo de registro
Verde, parpadeo rápi-
do
El hub está buscando
el enrutador inalámbri-
co
Alterna entre:
Verde, parpadeando
lentamente
Amarillo, parpadeo len-
to
El hub se está inician-
do (no se puede usar
aún)
*2
Rojo, encendido El sistema de alarma
está arm
ado
*1
Rojo, parpadeo rápido Se disparó el sistema
de alarma
Amarillo, encendido Se debe realizar la con-
figuración inicial
Amarillo, parpadeo len-
to
Configuración inicial
en progreso, dispositi-
vo móvil conectado
Amarillo, parpadeante La configuración inicial
está arrancando
*1 Puede configurar el hub de forma tal que el
Led indicador no se encienda durante el
funcionamiento normal. Para obtener más
información, consulte la Guía del usuario
(página 10).
*2 Es posible que el hub tarde un tiempo en
terminar de iniciar.
3
Configuración
FV-HBVK1_(es_es)_0110_ver.101.pdf 3 2017/01/10 13:50:57

Conexiones
Inserte el enchufe del adaptador de corriente
firmemente en la clavija de corriente continua.
Asegure el cable del adaptador de corriente
alterna enrollándolo en el gancho.
Conecte el adaptador de corriente a la toma
de corriente.
Inserte el cable de línea telefónica en la clavija
de LINE y la toma telefónica de una sola línea
(RJ11C) hasta que escuche un clic.
*1
Solo para los usuarios de servicio DSL/
ADSL: conecte su filtro DSL/ADSL (no
incluido).
*1
Solo usuarios de Cámara exterior
(KX-HNC600) o Cámara interior
(KX-HNC210): retire la etiqueta que cubre la
ranura de la tarjeta y luego inserte la tarjeta
microSD (no se incluye) en la ranura.
Asegúrese de que la esquina dentada de la
tarjeta esté en la posición indicada (A).
*1 Este paso solo es necesario si desea usar
funciones de telefonía fija. Para obtener
detalles sobre las funciones de telefonía fija,
consulte la Guía del usuario (página 10).
Nota:
R Use solo el adaptador de corriente alterna
Panasonic PNLV236 que se suministra.
R Se necesita una tarjeta microSD (no incluida)
para grabar imágenes de cámaras.
R Para extraer la tarjeta microSD, presiónela hacia
dentro primero y luego extráigala.
D
C
D
E
B
A
F
A
Nota acerca de las conexiones de
alimentación
Adaptador de corriente alterna
R El adaptador de corriente debe permanecer
conectado en todo momento (es normal que el
adaptador se caliente durante su uso).
R El adaptador de corriente debe estar conectado
a un enchufe de corriente orientado
verticalmente o en una toma de corriente alterna
colocada en el piso. No conecte el adaptador de
corriente alterna a una toma de corriente
montada en el techo, ya que el peso del
adaptador puede hacer que se desconecte.
4
Configuración
FV-HBVK1_(es_es)_0110_ver.101.pdf 4 2017/01/10 13:50:57

Falla en el suministro eléctrico
R El hub no funciona durante las fallas del
suministro eléctrico.
R Las funciones telefónicas del hub no trabajarán
durante un corte de energía. Recomendamos
que conecte un teléfono con cable que no utilice
un adaptador de CA a su línea telefónica.
Configuraciones de Wi-Fi
®
Después de conectar el hub, necesitará lo siguiente
para acceder al sistema desde su dispositivo móvil.
En este capítulo se explica cada procedimiento.
1 Descarga
Descargue la aplicación [Home Network] a
su dispositivo móvil.
2 Configuración inicial
Use la aplicación [Home Network] para
configurar el hub y que se conecte al
enrutador inalámbrico; a continuación, registre
el dispositiv
o móvil en el hub.
Cómo descargar la aplicación [Home
Network]
La información de descarga está disponible en la
siguiente página web.
www.panasonic.net/pcc/support/tel/
homenetwork/
Dispositivos móviles compatibles
– iPhone 4 y posterior, iPad (iOS 6.0 y posterior)
– Teléfonos inteligentes y tabletas con Android™
(Android 4.0 y posterior)
Nota:
R Es posible que la aplicación [Home Network]
no funcione correctamente dependiendo del
entorno del sistema, como el modelo de su
dispositivo móvil, los periféricos conectados al
mismo y las aplicaciones instaladas en él.
R Los siguientes dispositivos Android no son
compatibles con la aplicación [Home Network].
– Dispositivos Android que no son compatibles
con Google Play™
– Dispositivos con Android, con características
de hardware limitadas (se requiere
compatibilidad con Bluetooth, Wi-Fi y
micrófono).
Configuración inicial
Confirme lo siguiente antes de comenzar.
– Asegúrese de haber instalado la aplicación
[Home Network] en su dispositivo móvil
– Asegúrese de que el hub y su enrutador
inalámbrico estén encendidos y que el Led
indicador del hub esté encendido en amarillo
– Asegúrese de que el hub esté ubicado dentro
del alcance del enrutador inalámbrico
– Asegúrese de que el dispositivo móvil esté
conectado
al enrutador inalámbrico
– Asegúrese de que su dispositivo móvil pueda
conectarse a Internet
– Asegúrese de conocer el nombre de la red
(SSID) y la clave que se asignó al enrutador
inalámbrico
Configuración inicial para iPhone, iPad
1 Inicie la aplicación [Home Network].
R Si se le solicita, siga las instrucciones en
pantalla y seleccione la región y el país
apropiados.
R Si se le solicita que seleccione el
dispositivo que desea configurar, toque
[Hub].
2 Cuando se le solicite, toque [Configurar el
Hub].
5
Configuración
FV-HBVK1_(es_es)_0110_ver.101.pdf 5 2017/01/10 13:50:57

3 Cuando se le solicite, oprima MWi-Fi SETUPN
en el hub.
R El Led indicador parpadea en amarillo.
4 Cambie la configuración de Wi-Fi de su
dispositivo móvil temporalmente para que se
conecte directamente al hub.
R Abra la aplicación [Configuración] en su
dispositivo móvil, toque [Wi-Fi], seleccione
“HOME_NETWORK_Panasonic”,
introduzca “00000000” como clave y luego
toque [Conectar].
R Si aparece más de 1 elemento
llamado
“HOME_NETWORK_Panasonic”, espere
aprox. 10 minutos y realice este
procedimiento desde el inicio.
5 Inicie de nuevo la aplicación [Home Network].
6 Si es necesario, introduzca la clave requerida
para conectarse al enrutador inalámbrico y, a
continuación, presione [Sig.].
R El hub y su dispositivo móvil se conectan a
su enrutador inalámbrico.
R Si se le solicita, siga las instrucciones en la
pantalla y con
ecte su dispositivo móvil a su
enrutador inalámbrico, reinicie la aplicación
y luego toque [Añadir este dispositivo
móvil].
R Si introduce una clave de Wi-Fi incorrecta,
aparece [La instalación ha fallado.] y el
LED indicador del hub se encenderá.
Proceda de la siguiente manera según el
color del LED indicador del hub.
– Si la luz del LED indicador es amarilla,
repita el procedimiento de instalación
desde el comienzo.
– Si la luz del LED indicador parpadea en
verde, debe reiniciar la configuración
Wi-Fi del hub. Consulte “Si el LED
indicador del hub parpadea en verde”,
página 6.
7 Cuando se le solicite, oprima MWi-Fi SETUPN
en el hub.
R Se registrará el dispositivo móvil en el hub.
8 Cuando se le solicite, siga las instrucciones en
la pantalla y establezca la clave usada para
acceder al hub mientras está fuera de su
c
asa. A continuación, toque [Aceptar].
9 Cuando se le solicite, introduzca un nombre
para el hub y para el dispositivo móvil y toque
[Aceptar].
R Su dispositivo móvil utiliza la configuración
del nombre del hub para identificar el hub.
Esto resulta útil cuando tiene varios hubs.
R Los usuarios del hub y otros sistemas
utilizan la configuración del nombre del
dispositivo móvil para identificar su
dispositivo móvil. Esto puede ser útil al
realizar ciertas operaciones, como anular
el registro o realizar llamadas de
intercomunicador con un auricular
inalámbrico.
10 Cuando se le solicite, seleccione si desea
personalizar perfiles de dispositivos, como el
nombre del dispositivo, ubicación y otros
ajustes de configuración para sus dispositivos.
R Si opta por no personalizar los perfiles del
dispositivo en este momento, puede
cambiarlos más tarde si lo desea.
Para
obtener detalles sobre personalización de
perfiles de dispositivos, consulte la Guía
del usuario (página 10).
R Si opta por personalizar los perfiles de los
dispositivos en este momento, cambie
cada uno de los ajustes de configuración
según lo desee. Al finalizar, toque
reiteradamente hasta que aparezca el
mensaje “completado”.
R Aparecerá la pantalla de inicio de la
aplicación una vez completada la
configuración inicial.
Si el LED indicador del hub parpadea en verde
Si introduce una clave de Wi-Fi incorrecta durante
el procedimiento de configuración inicial para
iPhone o iPad, aparece [La instalación ha
fallado.] y el LED indicador del hub parpadea
rápidamente en verde. En
este caso, realice lo
siguiente.
1. Mantenga oprimidos al mismo tiempo los 3
botones de registro en el lateral del hub y
MWi-Fi SETUPN en la parte trasera del hub (4
botones en total) hasta que el Led indicador del
hub parpadee lentamente en verde y amarillo.
2. Espere hasta que el Led indicador del hub se
mantenga en amarillo.
3. Repita el procedimiento de configuración inicial
(“Configuración inicial para iPhone, iPad”,
página 5).
6
Configuración
FV-HBVK1_(es_es)_0110_ver.101.pdf 6 2017/01/10 13:50:57

Configuración inicial para dispositivos
Android
1 Inicie la aplicación [Home Network].
R Si se le solicita, siga las instrucciones en
pantalla y seleccione la región y el país
apropiados.
R Si se le solicita que seleccione el
dispositivo que desea configurar, toque
[Hub].
2 Cuando se le solicite, toque [Configurar el
Hub].
3 Cuando se le solicite, oprima MWi-Fi SETUPN
en el hub.
R El Led indicador parpadea en amaril
lo.
R La aplicación cambia temporalmente la
configuración Wi-Fi de su dispositivo móvil
para que se conecte de forma directa al
hub.
4 Si es necesario, introduzca la clave requerida
para conectarse al enrutador inalámbrico y, a
continuación, presione [Sig.].
R El hub y su dispositivo móvil se conectan a
su enrutador inalámbrico.
5 Cuando se le solicite, oprima MWi-Fi SETUPN
en el hub.
R Se registrará el dispositiv
o móvil en el hub.
6 Cuando se le solicite, siga las instrucciones en
la pantalla y establezca la clave usada para
acceder al hub mientras está fuera de su
casa. A continuación, toque [Aceptar].
7 Cuando se le solicite, introduzca un nombre
para el hub y para el dispositivo móvil y toque
[Aceptar].
R Su dispositivo móvil utiliza la configuración
del nombre del hub para identificar el hub.
Esto resulta útil cua
ndo tiene varios hubs.
R Los usuarios del hub y otros sistemas
utilizan la configuración del nombre del
dispositivo móvil para identificar su
dispositivo móvil. Esto puede ser útil al
realizar ciertas operaciones, como anular
el registro o realizar llamadas de
intercomunicador con un auricular
inalámbrico.
8 Cuando se le solicite, seleccione si desea
personalizar perfiles de dispositivos, como el
nombre del dispositivo, ubicación y otros
ajustes de configuración para sus dispositivos.
R Si opta por no personalizar los perfiles del
dispositivo en este momento, puede
cambiarlos más tarde si lo desea. Para
obtener detalles sobre personalización de
perfiles de dispositivos, consulte la Guía
del usuario (página 10).
R Si opta por personalizar los perfiles de los
dispositivos en este momento, cambie
cada uno de los ajustes de configuración
según lo desee. Al finalizar, oprima
reiteradamente el botón “volver” del
dispositivo hasta que aparezca el mensaje
“completado”.
R Aparecerá la pantalla de inicio de la
aplicación una vez completada la
configuración inicial.
Información acerca de la
comunicación Wi-Fi
El hub usa Wi-Fi para comunicarse con su
enrutador inalámbrico. Consulte la siguiente
información cuando piense en dónde colocar el hub.
R No coloque el hub en las siguientes áreas o
ubicaciones. Es posible que existan fallas o
interferencias en la comunicación por radio.
– Interiores donde haya equipos con cierto tipo
de comunicación por radio o móvil
– Ubicaciones
cerca de hornos microondas o
dispositivos Bluetooth
– Interiores donde haya dispositivos antirrobos
o dispositivos en frecuencias de 2.4 GHz
como los sistemas POS
R No coloque un hub en áreas donde se
encuentren los siguientes materiales u objetos
entre el hub y el enrutador inalámbrico. Dichos
materiales y objetos pueden interferir con la
comunicación inalámbrica o pueden provocar
que la velocidad de transmisión se reduzca.
– Puertas metálicas
– Paredes que contengan aislamiento de
aluminio
– Paredes de hormigón, piedra, ladrillo o estaño
– Varias paredes
– Repisas de acero
– Vidrio a prueba de incendios
7
Configuración
FV-HBVK1_(es_es)_0110_ver.101.pdf 7 2017/01/10 13:50:58

Registro de otro dispositivo
móvil
Para acceder al sistema desde un dispositivo móvil,
primero debe registrarlo en el hub. Puede registrar
hasta 8 dispositivos móviles en un hub.
Confirme lo siguiente antes de comenzar.
– Asegúrese de haber completado el
procedimiento de configuración inicial
– Asegúrese de que su dispositivo móvil pueda
conectarse a Internet
– Asegúrese de que el el enrutador inalámbrico y
el
hub estén encendidos
– Asegúrese de que el dispositivo móvil y el hub
estén conectados al mismo enrutador
1 Desde el dispositivo móvil que desea registrar,
descargue la aplicación [Home Network] y
luego iníciela.
R Si se le solicita, siga las instrucciones en
pantalla y seleccione la región y el país
apropiados.
R Si se le solicita que seleccione el
dispositivo que desea configurar, toque
[Hub].
2 Cuando se le sol
icite, toque [Añadir este
dispositivo móvil].
3 Cuando se le solicite, oprima MWi-Fi SETUPN
en el hub.
R Se registrará el dispositivo móvil en el hub.
4 Cuando se le solicite, siga las instrucciones en
la pantalla e introduzca la clave usada para
acceder al hub.
5 Cuando se le solicite, introduzca un nombre
para el dispositivo móvil y toque [Aceptar].
R Esta configuración le permite cambiar el
nombre asignado a e
ste dispositivo. Esto
puede ser útil para identificar el dispositivo
móvil cuando realice ciertas operaciones,
como anular el registro o realizar llamadas
de intercomunicación con un auricular
inalámbrico.
R Aparecerá la pantalla de inicio de la
aplicación una vez completada la
configuración inicial.
Registro de otros dispositivos
al hub
Este procedimiento no es necesario para ventila-
dores compatibles que ya estén instalados en su
hogar.
Antes de poder usar dispositivos como cámaras,
sensores y conectores inteligentes, se deben
registrar en el hub.
Puede registrar cada unidad mediante los botones
de registro o la aplicación [Home Network].
Uso de los botones de registro
1 Mantenga oprimido el botón de registro
adecuado junto al hub (página 3) hasta que el
Led indicador del hub parpadee lentamente
en verde.
– Al registrar un auricular:
M
HANDSET/LOCATORN
– Al registrar una cámara:
M CAMERAN
– Al registrar otro dispositivo:
M OTHER DEVICEN
2 Al registrar un auricular:
Coloque el auricular en el cargador.
Al registrar otro dispositivo:
Mantenga presionado el botón de registro del
dispositivo hasta que el Led indicador
parpadee lentamente en verde.
R Cuando se ha completado el registro, el
hub emitirá un pitido largo.
Nota:
R Si el registro falla, el hub emitirá varios pitidos
cortos.
R Para registrar un dispositivo móvil, use el
proced
imiento descrito en página 8.
Uso de la aplicación
1 Inicie la aplicación [Home Network].
2 Desde la pantalla de inicio de la aplicación
[Home Network], toque [Configuración].
3 Toque [Registro de dispositivos].
4 Toque [Registro].
8
Configuración
FV-HBVK1_(es_es)_0110_ver.101.pdf 8 2017/01/10 13:50:58

5 Seleccione el tipo de dispositivo que desea
registrar.
6 Al registrar un auricular:
Coloque el auricular en el cargador.
Al registrar otro dispositivo:
Mantenga presionado el botón de registro del
dispositivo que desea registrar hasta que el
Led indicador parpadee lentamente en verde.
R Cuando se ha completado el registro, el
hub emitirá un pitido largo.
Nota:
R Si el registro falla, el hub emitirá varios piti
dos
cortos.
9
Configuración
FV-HBVK1_(es_es)_0110_ver.101.pdf 9 2017/01/10 13:50:58

Alcance de la comunicación
inalámbrica (DECT)
El alcance de la comunicación inalámbrica de cada
dispositivo en el sistema del hub es de
aproximadamente 50 m (160 pies) en interiores y
de aproximadamente 300 m (1,000 pies) en el
exterior. Es posible que la comunicación
inalámbrica no sea tan confiable cuando se
encuentran los obstáculos siguientes entre el hub y
otros dispositivos del sistema.
R Puertas o pan
tallas metálicas
R Paredes que contengan aislamiento de aluminio
R Paredes de hormigón o hierro corrugado
R Ventanas de vidrio doble
R Varias paredes
R Cuando los dispositivos están en pisos o
edificios diferentes
Acceso a la Guía del usuario
La Guía del usuario es una colección de
documentación en línea que lo ayuda a aprovechar
al máximo la aplicación [Home Network].
1 iPhone/iPad
Toque
en la pantalla de inicio de la
aplicación.
Dispositivos Android
Toque
u oprima el botón menú de su
dispositivo en la pantalla de inicio de la
aplicación.
2 Toque [Guía del Usuario].
Nota:
R No se admite Microsoft
®
Windows
®
Internet
Explorer
®
8 y versiones anteriores.
R Se recomienda Android 4.1 y versiones
posteriores.
R También puede acceder a la Guía del usuario
mediante la página web a continuación.
www.panasonic.net/pcc/support/tel/
homenetwork/manual/
Módulo de DECT Installation Manual
(Manual de instalación) para
instaladores
Para que el hub se comunique con un ventilador
compatible u otro dispositivo compatible, debe
haber un Módulo de DECT instalado en el
dispositivo.
Para descargar el Installation Manual (Manual de
instalación) o comprobar la información más
reciente sobre la instalación y configuración de
Módulo de DECT, visite la siguiente página w
eb.
www.panasonic.net/pcc/support/tel/homenetwork/
10
Apéndice
FV-HBVK1_(es_es)_0110_ver.101.pdf 10 2017/01/10 13:50:58

Montaje en la pared
Puede usar el adaptador de instalación en pared
incluido para instalar el hub de dicha forma si lo
desea.
Nota:
R Asegúrese de que la pared y el método de
colocación sean lo suficientemente resistentes
para soportar el peso de la unidad.
1 Conecte el adaptador de corriente y el cable
de línea telefónica al hub.
R Asegure el cable del adaptador de
corriente alterna enrollándolo en el gancho.
2 Deslice el adaptador de instalación en pared
hasta que encaje y haga clic.
R Asegúrese de que la marca “UP” en el
adaptador de instalación en pared mire
hacia arriba.
R Alinee e inserte las lengüetas (A) del
adaptador de instalación en pared en las
ranuras (B) del hub.
UP
UP
UP
A
B
11
Apéndice
FV-HBVK1_(es_es)_0110_ver.101.pdf 11 2017/01/10 13:50:58

3 Monte el hub en la pared y deslícelo para
asegurarlo en su sitio.
R Pase el cable del adaptador de corriente y
el de la línea telefónica por la ranura (A)
en el adaptador de instalación en pared.
Enrolle el cable de línea telefónica como se
muestra para evitar que se quede pillado.
R Este producto es compatible con los
siguientes tamaños de placas de los
teléfonos (tipos 2).
B 83 mm (3 1/4 pulgadas)
C 102 mm (4 pulgadas)
R Ajuste las ranuras del hub en las lengüetas
correspondientes de la placa del teléfono
(D) y (E) respectivamente.
B
C
D
D
E
E
A
E
D
Extracción del adaptador de instalación
en pared
Mientras aleja las palancas de desbloqueo (A) del
adaptador de instalación en pared, deslice el
adaptador hacia abajo (B).
A A
B
12
Apéndice
FV-HBVK1_(es_es)_0110_ver.101.pdf 12 2017/01/10 13:50:58

Atención al Cliente
También puede llamarnos directamente al:
1-866-292-7299 de lunes a veirnes de 9 am a 8 pm, EST.
o envíe su solicitud por correo electrónico a:
us.panasonic.com/ventfans
Directorio de servicios al cliente
Para usuarios discapacitados del habla o el oído, TTY: 1-877-833-8855
Distribuidores:
Consumidores:
www.buypanasonicparts.com
Compra de accesorios
Obtenga información y ayuda con el funcionamiento de productos;
encuentre al distribuidor más cercano, y efectúe peticiones sobre
servicio a clientes y de documentos visitando nuestro sitio web en:
Para usuarios discapacitados del habla o el oído, TTY: 1-877-833-8855
Compre los repuestos y accesorios para los productos de de
ventilación de Panasonic visitando nuestro sitio web en:
o envíe su solicitud por correo electrónico a:
También puede llamarnos directamente al: 1-800-332-5368
(de lunes a viernes de las 8 am a las 6 pm, EST)
Envíe su solicitud por correo electrónico a: [email protected]
También puede llamarnos directamente al: 1-866-292-7299
(de lunes a viernes de las 10 am a las 6 pm, EST)
Panasonic Consumer Electronics Company
Customer Experience Group
2 Riverfront Plaza, Newark, NJ 07102
13
Apéndice
FV-HBVK1_(es_es)_0110_ver.101.pdf 13 2017/01/10 13:50:58

Garantía limitada
Panasonic Eco Solutions North America (PESNA)
LÍMITES Y EXCLUSIONES
Una unidad de Panasonic Corporation of North America
2 Riverfront Plaza
Newark, NJ 07102
Panasonic Eco Solutions North America (“el garante”), a su sola discreción, reemplazará este
producto con repuestos nuevos o lo intercambiará, sin cargo alguno, en EE.UU., en caso de
que existan defectos en materiales o mano de obra de acuerdo a lo siguiente:
Durante el período de la garantía, para obtener servicio en EE.UU. debe ponerse en contacto
con el concesionario vendedor o puede llamar gratis al Departamento de Servicio al Cliente
de Panasonic, teléfono 866-292-7299.
Esta garantía no cubre los cargos de mano de obra por remoción e instalación de piezas o
repuestos. Esta garantía se ofrece solamente al comprador original de productos nuevos que
no hayan sido vendidos “tal como están”. Esta garantía es aplicable solamente a productos
comprados en Estados Unidos.
Esta garantía cubre solamente fallas debidas a defectos en materiales o mano de obra que
se producen durante el uso normal y no cubre daños durante el envío, ya sean visibles u
ocultos, desgaste normal ni daños estéticos. Esta garantía no cubre fallas provocadas por
productos o accesorios que no han sido suministrados por el garante, ni fallas que resulten
de accidentes, mal trato, abuso, negligencia, manejo inadecuado, mala aplicación, alteración,
modificación, instalación defectuosa, calibraciones o ajustes inapropiados, falta de
mantenimiento o mantenimiento inapropiado, alteraciones o modificaciones, sobretensión
transitoria, voltaje inapropiado, daños por relámpagos ni daños atribuibles a situaciones
fortuitas.
No se otorgan garantías expresas salvo las indicadas anteriormente. EL GARANTE NO
SERÁ RESPONSABLE DE DAÑOS INCIDENTALES, CONSECUENTES NI PUNITIVOS,
INCLUYENDO, ENTRE OTROS, PÉRDIDAS DE FONDO DE COMERCIO, GANANCIAS O
INGRESOS, PÉRDIDA DEL USO DE ESTE PRODUCTO O CUALQUIER OTRO EQUIPO
RELACIONADO, COSTO DE PRODUCTOS SUSTITUTOS, COSTOS POR TIEMPO
IMPRODUCTIVO NI RECLAMACIONES DE TERCEROS QUE HAYAN ESTABLECIDO
NEGOCIACIONES CON EL COMPRADOR POR TALES DAÑOS, RESULTANTES DEL USO
DE ESTE PRODUCTO O PROVENIENTES DE INCUMPLIMIENTO DE LA GARANTÍA O
ROMPIMIENTO DE CONTRATO, NEGLIGENCIA O CUALQUIER OTRA TEORÍA LEGAL,
SALVO COMO SE HA PRESENTADO ANTERIORMENTE EN FORMA EXPRESA. NO SE
OFRECE NINGUNA OTRA GARANTÍA DE CUALQUIER FORMA, EXPRESA O IMPLÍCITA,
NI HAY GARANTÍAS QUE SE EXTIENDAN MÁS ALLÁ DE LO QUE AQUÍ SE DESCRIBE.
Hub Panasonic Garantía limitada
Hub: Por período de 1 año (12 meses) a partir de la fecha de la compra original.
14
Apéndice
FV-HBVK1_(es_es)_0110_ver.101.pdf 14 2017/01/10 13:50:58

Algunos estados no permiten las exclusiones ni limitaciones de los daños incidentales o
consecuentes ni las limitaciones al tiempo de duración de las garantías implícitas, por lo que
las exclusiones y limitaciones anteriores podrían no aplicarse a su caso.
Esta garantía le otorga derechos legales específicos y además podría gozar de otros, que
pueden variar de un estado a otro.
Si se produjera un problema relacionado con este producto durante o después del período
de garantía, póngase en contacto con el Distribuidor o con el Departamento de Servicio al
Cliente de Panasonic. Si no está satisfecho con la forma en que se maneja el problema,
escriba a Panasonic Eco Solutions North America a la dirección que aparece en la parte
superior de la garantía.
15
Apéndice
FV-HBVK1_(es_es)_0110_ver.101.pdf 15 2017/01/10 13:50:58

FV-HBVK1_(es_es)_0110_ver.101.pdf 16 2017/01/10 13:50:58
-
 1
1
-
 2
2
-
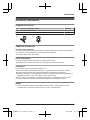 3
3
-
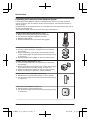 4
4
-
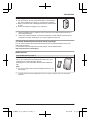 5
5
-
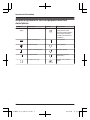 6
6
-
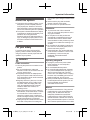 7
7
-
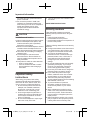 8
8
-
 9
9
-
 10
10
-
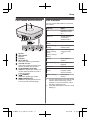 11
11
-
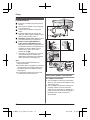 12
12
-
 13
13
-
 14
14
-
 15
15
-
 16
16
-
 17
17
-
 18
18
-
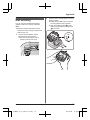 19
19
-
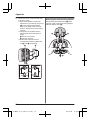 20
20
-
 21
21
-
 22
22
-
 23
23
-
 24
24
-
 25
25
-
 26
26
-
 27
27
-
 28
28
-
 29
29
-
 30
30
-
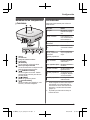 31
31
-
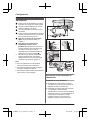 32
32
-
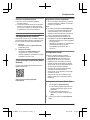 33
33
-
 34
34
-
 35
35
-
 36
36
-
 37
37
-
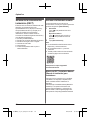 38
38
-
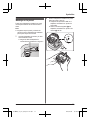 39
39
-
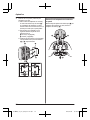 40
40
-
 41
41
-
 42
42
-
 43
43
-
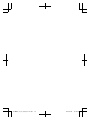 44
44


Panasonic FVHBVK1 Instrucciones de operación
- Categoría
- Enrutadores
- Tipo
- Instrucciones de operación
En otros idiomas
Documentos relacionados
-
Panasonic KXHN6001 Instrucciones de operación
-
-
Panasonic KXHN6001 Instrucciones de operación
-
-
-
-
-
-
-