Right Weigh 310-PP Series Manual de usuario
- Tipo
- Manual de usuario

ONBOARD LOAD SCALE
EXTERIOR ANALOG | 310-PP SERIES
INSTALLATION & OPERATION MANUAL
MANUAL DE INSTALACIÓN Y OPERACIÓN
BÁSCULA DE CARGA A BORDO
ANALÓGICO EXTERIOR | SERIE 310-PP

2
WELCOME / BIENVENIDOS
Thank you for choosing to drive more and scale less! Here at Right Weigh, we are commied to making our
products simple to install and easy to use. If your vehicle configuraon is not described in this manual, our technical
support team is ready to answer your quesons!
(503) 628-0838
(888) 818-2058 - Toll Free (USA ONLY)
+61 418 622840 - Australia & New Zealand
[email protected] - Australia & New Zealand
www.rwls.com/how-to-calibrate-install/
rightweigh.com.au - Australia & New Zealand
¡Gracias por elegir conducir más y escalar menos! Aquí en Right Weigh, estamos compromedos hacer que nuestros
productos sean simples de instalar y fáciles de usar. Si la configuración de su vehículo no se describe en
este manual, ¡nuestro equipo de soporte técnico está listo para responder sus preguntas!
(503) 628-0838
(888) 818-2058 - Número gratuito (SOLO EE. UU.)
+61 418 622840 - Australia y Nueva Zelanda
[email protected] - Australia y Nueva Zelanda
www.rwls.com/how-to-calibrate-install/
rightweigh.com.au - Australia y Nueva Zelanda

3
Parts Required / Piezas Necesarias
Specificaons & Overview / Especificaciones y Descripción General
Installaon / Instalación
Calibraon / Calibración
Operate & Weigh / Operar y Pesar
Troubleshoot a Problem / Resolver un Problema
Warranty Statement, Return Policy, & Repairs / Declaración de Garana,
Políca de Devoluciones y Reparaciones
4 / 13
5 / 14
7 / 16
10 / 19
11 / 20
12 / 21
22 / 23
CONTENTS / CONTENIDO
IMPORTANT! / ¡IMPORTANTE!
Please read instrucons COMPLETELY and thoroughly before installaon. Right Weigh, Inc. is not responsible or liable for product failure or
vehicle damage due to improper installaon. The installaon requirements are outlined in this manual and should be followed thoroughly to avoid
inaccuracy or damage to the product.
It is also important to be aware of vehicle manufacturer policies before making modificaons to the vehicle. Right Weigh, Inc. is not liable or
responsible for issues regarding warranes with other manufacturers. This is the responsibility of the customer. If you are unsure about how
these installaon pracces apply to your vehicle, please contact your vehicle or component manufacturer.
Lea las instrucciones COMPLETAMENTE y detenidamente antes de la instalación. (ATENCION) Right Weigh no es responsable por daños en el
producto o al vehículo, debido a una instalación incorrecta. Los requisitos de instalación se describen en este manual y debe seguirse paso a paso
para evitar equivocarse o daños al producto.
También es importante conocer las polícas del fabricante del vehículo antes de realizar modificaciones en el vehículo. Right Weigh, Inc. no se
hace responsable de los problemas relacionados con las garanas de otros fabricantes. Este es la responsabilidad de el cliente. Si no está seguro
de cómo se aplican estas práccas de instalación a su vehículo, por favor
comuníquese con el fabricante de su vehículo o componente.

4
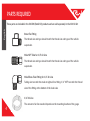
PARTS REQUIRED
These parts are included in the 310-RK (Retail Kit) products and are sold separately in the 101-SK kit:
Street Tee Fing
The thread size and type should match the thread size and type of the vehicle
suspension
Male NPT Tube for 1/4” Air Line
The thread size and type should match the thread size and type of the vehicle
suspension
Male Elbow Tube Fing for 1/4” Air Line
Tubing size to match the male straight air line fing. 1/4“ NPT to match the thread
size of the fing at the boom of the load scale
1/4” Air Line
The amount of air line needed depends on the mounng locaon of the gauge
English

5
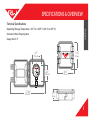
SPECIFICATIONS & OVERVIEW
Technical Specificaons
Operang/Storage Temperature: -40° F to +185° F (-40° C to +85° C)
Enclosure: Black Polypropylene
Gauge Size: 3.5”
192 mm
216 mm
8.51”
7.56”
87 mm
2.97”
114 mm
114 mm
4.5”
4.5”
453 mm
17.84”
English

6
SPECIFICATIONS & OVERVIEW
The 310-PP series is designed for use on an axle group with a single height control valve suspension system.
Within this series, there are different products designed for different axle group configuraons. Before
installaon, make sure you have the proper gauge for your applicaon:
If you have the wrong gauge for your applicaon, please call our technical support listed on page 2.
*For use with Hendrickson VANTRAAX HKANT 40K or ULTRAA-K UTKNT 40K air suspension only
**Packaged kit including air line installaon components
Suspension
Single Axle
Tandem Axle
Tri Axle
310-30-PP
310-54-PP
*310-HKANT40K-PP
**310-54-RK
310-80-PP
310-16KG-PP
310-25KG-PP
310-30KG-PP
Gauge - Pounds (LBS) Gauge - Kilograms (KGS)
English

7
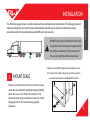
INSTALLATION
The 310 Series gauge comes in a protecve box with a mounng bracket and hardware. The following steps will
walk you through how to correctly mount and install the scale. Be sure to choose a locaon that is easily
accessible and safe from potenal damage (forkli posts, re caps, etc.)
DO NOT mount the scale directly to the chassis
or any other main beam unless it is approved by
the vehicle manufacturer. Doing so may void
the warranty with the vehicle manufacturer.
MOUNT SCALE
1
Choose a locaon to mount the scale that is easily
accessible and safe from potenal damage (forkli
posts, re caps, etc.). Mount the bracket in the
chosen locaon using two bolts to secure it. Install
the gauge box to the bracket using supplied
hardware.
Make sure to use BOTH supplied mounng bolts to secure
the bracket to the vehicle. Using only one bolt can result in
a cracked bracket and the scale falling off the vehicle.
!
English

8
INSTALLATION
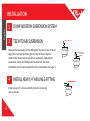
DUMP AIR FROM SUSPENSION SYSTEM
INSTALL NEW 1/4” AIR LINE & FITTING
Install a new 1/4” air line and fing into the remaining
port on the tee.
Remove the suspension air line fing from the top of one of the air
bags. Insert a street tee fing into the top of the air bag that
matches the thread size of the vehicle suspension. Reinstall the
suspension air line and fing into the street tee. For more
informaon on the parts needed for air line installaon, see page 4.
Air Bag
Street tee
tting
Air Bag
Air Bag
TEE INTO AIR SUSPENSION
2
3
4
English

INSTALLATION
9
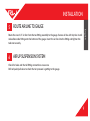
ROUTE AIR LINE TO GAUGE
Route the new 1/4” air line from the tee fing assembly to the gauge. Secure air line with zip es. Install
male elbow tube fing onto the boom of the gauge. Insert the air line into the fing and ghten the
tube nut securely.
AIR UP SUSPENSION SYSTEM
Check for leaks and that all fing connecons are secure.
Pull red push/pull valve to check that air pressure is geng to the gauge.
5
6
English

10
CALIBRATION
1: The vehicle must be fully loaded. For best results, calibrate with a loaded weight within 1500lbs or 750kgs of
your typical axle group weight (DO NOT calibrate empty!)
2: Using a cerfied in-ground scale, obtain a loaded weight for the axle group aached to the gauge.
3: Park on a level surface. Shi the transmission to neutral and set the parking brakes.
4: Chock the wheels to prevent unexpected vehicle movement.
5: Release the parking brakes.
6: Make sure the Height Control Valve (HCV) has fully inflated the air bags. If needed, briefly dump the air from the
suspension and allow the HCV to refill the system.
7: Pull the red push/pull valve so that it is in the fully open posion.
8: Using a flathead screwdriver, turn the calibraon screw on the dial face unl the gauge matches the cerfied
axle group weight.
CALIBRATION
SCREW
PUSH/PULL
VALVE
English

11
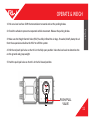
OPERATE & WEIGH
1: Park on a level surface. Shi the transmission to neutral and set the parking brakes.
2: Chock the wheels to prevent unexpected vehicle movement. Release the parking brakes.
3: Make sure the Height Control Valve (HCV) has fully inflated the air bags. If needed, briefly dump the air
from the suspension and allow the HCV to refill the system.
4: Pull the red push/pull valve so that it is in the fully open posion. View the load scale to determine the
on-the-ground axle group weight.
5: Push the push/pull valve so that it is in the full closed posion.
PUSH/PULL
VALVE
English

12
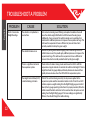
TROUBLESHOOT A PROBLEM
PROBLEM CAUSE SOLUTION
Errac / Inaccurate
Weight Readings
The vehicle is not parked on a
level surface
Park on level concrete ground.
Parking on sloped or banked surfaces will
cause the vehicle weight distribuon to shi between the axle groups.
Addionally,
if one or more of the vehicle’s wheels are in a pothole, that
could result in addional pressure or torque on the suspension air bags. This
will cause the suspension to have a different air pressure than what is
normally needed to hold up the given weight.
The vehicle’s brakes are on
Release the parking brakes when weighing and/or calibrang. When the
vehicle brakes are set, they could apply addional pressure or torque on the
suspension air bags. This will cause the suspension to have a different air
pressure than what is normally needed to hold up the given weight.
There is a significant air leak in
the suspension system
Check air lines for leaks. Having a leak could cause the
HCV to refill the
suspension at regular intervals to maintain the vehicle’s ride height. If there is
a significant leak, the gauge display will slowly decrease in value and then
quickly increase in value when the HCV refills the suspension system.
The Height Control Valve (HCV)
is malfunconing or broken
If the HCV is not funconing correctly, the air pressure applied to the
suspension system could be inconsistent and/or errac. To test for an HCV
problem, acquire a weight reading from the Right Weigh gauge and write it
down (refer to gauge operang instrucons for proper procedure). Drive the
vehicle around the block and return to the same locaon. Acquire a second
reading from the Right Weigh gauge. If the two readings are significantly
different, then the HCV might be malfunconing.
English

13
PIEZAS NECESARIAS
Estas piezas se incluyen solamente en el producto 310-RK (kit minorista) El resto de nuestro productos
310 series se venden por separado en el kit 101-SK:
Accesorio en T para calle
El tamaño y el po de rosca deben coincidir con el tamaño y el po de rosca del
vehículo suspensión.
Tubo macho NPT para línea de aire de 1/4”
El tamaño y el po de rosca deben coincidir con el tamaño y el po de rosca del
vehículo suspensión.
Accesorio de tubo de codo macho para línea de aire de 1/4”
Tamaño de tubería para que coincida con el accesorio de línea de aire recto
macho. 1/4“ NPT para que coincida con la rosca tamaño del accesorio en la
parte inferior de la escala de carga.
Línea de aire de 1/4”
La candad de línea de aire necesaria depende de la ubicación de montaje del
manómetro.
Español

14
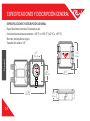
ESPECIFICACIONES Y DESCRIPCI
Ó
N GENERAL
ESPECIFICACIONES Y DESCRIPCIÓN GENERAL
Especificaciones técnicas Temperatura de
funcionamiento/almacenamiento: -40 °F a +185 °F (-40 °C a +85 °C)
Recinto: polipropileno negro
Tamaño del calibre: 3.5”
192 mm
216 mm
8.51”
7.56”
87 mm
2.97”
114 mm
114 mm
4.5”
4.5”
453 mm
17.84”
Español

15
ESPECIFICACIONES Y DESCRIPCI
Ó
N GENERAL
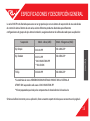
La serie 310-PP está diseñada para usarse en un grupo de ejes con un sistema de suspensión de una sola válvula
de control de altura. Dentro de esta serie, existen diferentes productos diseñados para diferentes
configuraciones de grupos de ejes. Antes instalación, asegúrese de tener el calibre adecuado para su aplicación:
Si ene el calibre incorrecto para su aplicación, llame a nuestro soporte técnico que se encuentra en la página 2.
*Si usted ene la marca HENDRICKSON VANTRAAX HKANT 40K or ULTRAA-K
UTKNT 40K suspensión soló usara el 310-HKANT40K-PP
**Kit empaquetado que incluye los componentes de instalación de la línea de aire
Suspensión
Eje Simple
Eje Tand
ém
Tri Eje
310-30-PP
310-54-PP
*310-HKANT40K-PP
**310-54-RK
310-80-PP
310-16KG-PP
310-25KG-PP
310-30KG-PP
Medir - Libras (LBS) Medir - Kilogramos (KGS)
Español

16
INSTALACI
Ó
N
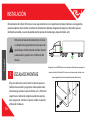
El manómetro de la Serie 310 viene en una caja protectora con un soporte de montaje y hardware. Los siguientes
pasos le explicará cómo montar e instalar correctamente la báscula. Asegúrese de elegir una ubicación que sea
fácilmente accesible y a salvo de posibles daños (postes de montacargas, tapas de llantas, etc.)
NO monte la báscula directamente en el chasis
o cualquier otra viga principal a menos que esté
aprobada por el fabricante del vehículo. Hacerlo
puede anular la garana con el fabricante del
ehículo.
ESCALA DE MONTAJE
1
Elija una ubicación para montar la báscula que sea
fácilmente accesible y seguro de daños potenciales
(montacargas postes, tapas de llantas, etc.). Monte el
soporte en el ubicación elegida usando dos pernos
para asegurarlo. Instalar la caja de calibre al soporte
ulizando hardware.
Asegúrese de usar AMBOS pernos de montaje suministrados para asegurar el
soporte al vehículo. (Atención) El uso de un solo perno puede resultar en un
soporte agrietado y la báscula puede desprender del vehículo.
!
Español

17
INSTALACI
Ó
N
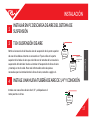
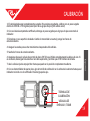
INSTALAR EN PC DESCARGA DE AIRE DEL SISTEMA DE
SUSPENSIÓN
INSTALE UNA NUEVA TUBERÍA DE AIRE DE 1/4” Y CONEXIÓN
Instale una nueva línea de aire de 1/4” y colóquela en el
resto puerto en el tee.
Rere el accesorio de la línea de aire de suspensión de la parte superior
de una de las bolsas. Inserte un accesorio en T para calle en la parte
superior de la bolsa de aire que coincide con el tamaño de la rosca de la
suspensión del vehículo. Vuelva a instalar el Suspensión de línea de aire
y montaje en te de calle. Para más información sobre las piezas
necesarias para la instalación de la línea de aire, consulte a página 4.
Bolsa
De Aire
ajuste de la
camiseta de
la calle
Bolsa
De Aire
Bolsa
De Aire
T EN SUSPENSIÓN DE AIRE
2
3
4
Español

18
INSTALACI
Ó
N
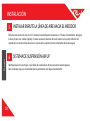
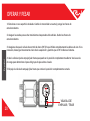
INSTALAR ENRUTE LA LÍNEA DE AIRE HACIA EL MEDIDOR
Dirija la nueva línea de aire de 1/4” desde el ensamblaje del accesorio en T hasta el manómetro. Asegure
la línea de aire con cables (zipes). Instalar accesorio de tubo de codo macho en la parte inferior del
manómetro. Inserte la línea de aire en el accesorio y apriete la tuerca del tubo de forma segura.
SISTEMA DE SUSPENSIÓN AIR UP
Verifique que no haya fugas y que todas las conexiones de los accesorios estén seguras.
Jale la válvula roja para comprobar que la presión de aire llega al manómetro.
5
6
Español

19
CALIBRACI
Ó
N
1: El vehículo debe estar completamente cargado. Para mejores resultados, calibrar con un peso cargado
dentro de 1500 lb o 750 kg de el peso pico de su grupo de ejes (¡NO calibre vacío!)
2: Con una báscula empotrada cerficada, obtenga un peso cargado para el grupo de ejes conectado al
indicador.
3: Estacione en una superficie nivelada. Cambie la transmisión a neutral y ponga los frenos de
estacionamiento.
4: Asegure las ruedas para evitar movimientos inesperados del vehículo.
5: Suelte los frenos de estacionamiento.
6: Asegúrese de que la válvula de control de altura (HCV) haya inflado completamente las bolsas de aire. Si
es necesario, descargue brevemente el aire del suspensión y permita que el HCV rellene el sistema.
7: Jale la válvula roja de empujar/rar hasta que quede en la posición completamente abierta.
8: Con un destornillador de punta plana, gire el tornillo de calibración en la esfera del cuadrante hasta que el
indicador coincida con el cerficado. Peso del grupo de ejes.
TORNILLO DE
CALIBRACIÓN
VÁLVULA DE
EMPUJAR / TIRAR
Español

20
OPERAR Y PESAR
1: Estacione en una superficie nivelada. Cambie la transmisión a neutral y ponga los frenos de
estacionamiento.
2: Asegure las ruedas para evitar movimientos inesperados del vehículo. Suelte los frenos de
estacionamiento.
3: Asegúrese de que la válvula de control de altura (HCV) haya inflado completamente las bolsas de aire. Si es
necesario, descargue brevemente el aire de la suspensión y permita que el HCV rellene el sistema.
4: Jale la válvula roja de empujar/jalar hasta que quede en la posición completamente abierta. Vea la escala
de carga para determinar el peso del grupo de ejes sobre el suelo.
5: Empuje la válvula de empujar/jalar hasta que esté en la posición completamente cerrada.
VÁLVULA DE
EMPUJAR / TIRAR
Español

21
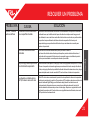
RESOLVER UN PROBLEMA
PROBLEMA CAUSA SOLUCIÓN
Erráco / Inexacto
Lecturas de Peso
El vehículo no está estacionado
en un superficie nivelada
Estacione en un suelo nivelado de concreto. El estacionamiento en superficies inclinadas o
inclinadas hacer que la distribución del peso del vehículo se desplace entre los grupos de
ejes. Además, si una o más de las ruedas del vehículo están en un bache, eso podría resultar
en presión o torque adicional en las bolsas de aire de suspensión. Este hará que la
suspensión tenga una presión de aire diferente a la que normalmente se necesita para
sostener el peso dado.
Los frenos del vehículo están
acvados
Suelte los frenos de estacionamiento al pesar y/o calibrar. Cuando el
los frenos del vehículo están acvados, podrían aplicar presión o torsión adicional en el
bolsas de aire de suspensión. Esto hará que la suspensión tenga un aire diferente presión
que la que normalmente se necesita para sostener el peso dado.
Hay una fuga de aire importante
en el sistema de suspensión
Revise las líneas de aire para ver si hay fugas. Tener una fuga podría hacer que el HCV vuelva
a llenar el suspensión a intervalos regulares para mantener la altura de manejo del vehículo.
Si hay una fuga significava, la pantalla del indicador disminuirá lentamente en valor y luego
aumenta rápidamente de valor cuando el HCV vuelve a llenar el sistema de suspensión.
La válvula de control de altura
(HCV) funciona mal o está roto
Si la HCV no funciona correctamente, la presión de aire aplicada a la sistema de suspensión
podría ser inconsistente y/o erráco. Para probar un HCV problema, adquiera una lectura de
peso del indicador Right Weigh y escríbala hacia abajo (consulte las instrucciones de
funcionamiento del manómetro para conocer el procedimiento adecuado). conducir el
vehículo alrededor de la manzana y volver al mismo lugar. Adquiere un segundo lectura del
indicador de peso derecho. Si las dos lecturas son significavamente diferente, entonces el
HCV podría estar funcionando mal.
Español

22
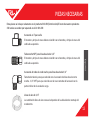
WARRANTY & RETURN POLICY
Right Weigh is commied to providing quality products that funcon as intended, and we always stand behind our workmanship. Our industry leading
warranty is our best effort to express this commitment. Products manufactured or sold by Right Weigh, Inc. are warraned to be free from significant
defects in material and workmanship 3 years from date of purchase. During this me, and within the boundaries set forth in this warranty statement,
Right Weigh, Inc. will, at its sole discreon, correct the product problem or replace the product.
This warranty shall not apply to product problems resulng from: (1) Improper applicaon, installaon, incorrect wiring, or operaon outside of the
approved specificaons of the product. (2) Accidents, faulty suspension parts or power surges (3) Inadequate maintenance or preparaon by the buyer
or user (4) Abuse, misuse, or unauthorized modificaon. (5) Acts of God, lightning strike, floods, fire, earthquake, etc.
Right Weigh, Inc. assumes no responsibility or liability for any loss or damages resulng from use of Right Weigh, Inc. products.
In no event shall Right Weigh, Inc. be liable for direct, indirect, special, incidental or consequenal damages (including loss of profits or loss of me)
resulng from the performance of a Right Weigh, Inc. product. In all cases, Right Weigh, Inc. liability will be limited to the original cost of the product in
queson. Right Weigh, Inc. reserves the right to make improvements in design, construcon, and appearance of products without noce
Return Policy and Authorizaon
Before returning any product, please obtain a Return Merchandise Authorizaon number (RMA#) by calling Customer Service at 503-628-0838 or
e-mailing [email protected]. Include the RMA# and informaon regarding the reason for the return with the returned product. Shipping costs for
returns must be prepaid by the customer. For your protecon, items must be carefully packed to prevent damage in shipment and insured against
possible damage or loss. Right Weigh, Inc. will not be responsible for damage resulng from careless or insufficient packing or loss in transit.
An RMA# must be obtained by the original purchaser before any product can be returned. Only new, unused products may be returned. Installed,
used, damaged, modified or customized products can not be returned for credit. Credit will be issued to the original purchaser aer evaluaon by
Right Weigh, Inc.
Repairs/Replacements
An RMA# must be obtained before any product can be returned. Right Weigh, Inc. will evaluate returned products at no charge. If Right Weigh, Inc.
determines that the returned product is under warranty it will repair the product or parts thereof at no charge, or if unrepairable, replace it with the
same or funconally equivalent product whenever possible. Right Weigh, Inc. will return the product at its expense via a shipping method (carrier to be
at sole discreon of Right Weigh, Inc.) equal to or faster than the method used by the customer. Products or parts thereof not covered by warranty will
be repaired or replaced at customer expense upon authorizaon by the customer. Right Weigh, Inc. will return the repaired product at customer
expense via a shipping method (carrier to be at sole discreon of Right Weigh, Inc.) equal to or faster than the method used by the customer.

23
POLÍTICA DE GARANTÍA Y DEVOLUCIÓN
Right Weigh se compromete a proporcionar productos de calidad que funcionen según lo previsto, y siempre respaldamos nuestra mano de obra. Nuestra
industria líder garana es nuestro mejor esfuerzo para expresar este compromiso. Se garanza que los productos fabricados o vendidos por Right Weigh, Inc.
están libres de defectos de material y mano de obra 3 años a parr de la fecha de compra. Durante este empo, y dentro de los límites establecidos en esta
declaración de garana, Right Weigh, Inc., a su sola discreción, corregirá el problema del producto o reemplazará el producto.
Esta garana no se aplicará a los problemas del producto que resulten de: (1) Aplicación, instalación incorrecta, cableado incorrecto u operación fuera del
especificaciones aprobadas del producto. (2) Accidentes, piezas de suspensión defectuosas o subidas de tensión (3) Mantenimiento o preparación inadecuados
por parte del comprador o usuario (4) Abuso, mal uso o modificación no autorizada. (5) Casos fortuitos, relámpagos, inundaciones, incendios, terremotos, etc.
Right Weigh, Inc. no asume responsabilidad alguna por ninguna pérdida o daño que resulte del uso de los productos de Right Weigh, Inc.
En ningún caso, Right Weigh, Inc. será responsable por daños directos, indirectos, especiales, incidentales o consecuentes (incluida la pérdida de ganancias o la
pérdida de empo) como resultado del desempeño de un producto de Right Weigh, Inc. En todos los casos, la responsabilidad de Right Weigh, Inc. se limitará al
costo original del producto en pregunta. Right Weigh, Inc. se reserva el derecho de realizar mejoras en el diseño, la construcción y la apariencia de los productos
sin previo aviso.
Políca de devolución y autorización
Antes de devolver cualquier producto, obtenga un número de autorización de devolución de mercancía (RMA#) llamando a Servicio al cliente al 503-628-0838 o
enviando un correo electrónico a [email protected]. Incluya el número de RMA y la información sobre el movo de la devolución con el producto devuelto.
Gastos de envío para las devoluciones deben ser prepagadas por el cliente. Para su protección, los arculos deben embalarse cuidadosamente para evitar daños
durante el envío y asegurarse contra posible daño o pérdida. Right Weigh, Inc. no será responsable de los daños que resulten de un embalaje inadecuado o
descuidado o de pérdidas durante el transporte.
El comprador original debe obtener un número de RMA antes de poder devolver cualquier producto. Solo se pueden devolver productos nuevos y sin usar.
Instalado, usado, los productos dañados, modificados o personalizados no se pueden devolver para recibir crédito. El crédito se emirá al comprador original
después de la evaluación de Right Weigh, inc.
Reparaciones/Reemplazos
Se debe obtener un número de RMA antes de que se pueda devolver cualquier producto. Right Weigh, Inc. evaluará los productos devueltos sin cargo. Si Right
Weigh, Inc. determina que el producto devuelto está bajo garana, reparará el producto o partes del mismo sin cargo, o si no se puede reparar, lo reemplazará con
el producto igual o funcionalmente equivalente siempre que sea posible. Right Weigh, Inc. devolverá el producto a su cargo a través de un método de envío
(transporsta a ser a discreción exclusiva de Right Weigh, Inc.) igual o más rápido que el método ulizado por el cliente. Los productos o partes de los mismos no
cubiertos por la garana serán repararse o reemplazarse a expensas del cliente previa autorización del cliente. Right Weigh, Inc. devolverá el producto reparado al
cliente costo a través de un método de envío (el transporsta será a discreción exclusiva de Right Weigh, Inc.) igual o más rápido que el método ulizado por el
cliente.

©2015-2022 Right Weigh, Inc. All rights reserved.
Right Weigh, Inc.
Hillsboro, Oregon USA
PP-003-0000 Revision I
June 2022
THANK YOU
FOR YOUR BUSINESS
GRACIAS POR HACER NEGOCIOS
RightWeighInc rwlsincrightweigh_inc right-weigh-inc-
www.rwls.com/manuals-resources/
SCAN HERE FOR ADDITIONAL
RESOURCES AND VIDEOS
ESCANEA AQUÍ PARA OBTENER
RECURSOS Y VIDEOS ADICIONALES
-
 1
1
-
 2
2
-
 3
3
-
 4
4
-
 5
5
-
 6
6
-
 7
7
-
 8
8
-
 9
9
-
 10
10
-
 11
11
-
 12
12
-
 13
13
-
 14
14
-
 15
15
-
 16
16
-
 17
17
-
 18
18
-
 19
19
-
 20
20
-
 21
21
-
 22
22
-
 23
23
-
 24
24


Right Weigh 310-PP Series Manual de usuario
- Tipo
- Manual de usuario
en otros idiomas
Otros documentos
-
Lincoln 2008 Navigator Manual de usuario
-
Ford 2008 Escape El manual del propietario
-
Wacker Neuson PT6LS Manual de usuario
-
-
-
Wacker Neuson LTW6K-V S Manual de usuario
-
Sunrise Medical Z-Bop Manual de usuario
-
Wacker Neuson E3000 Manual de usuario
-
Porsche 912E 76 Service Information