
1
PLEASE READ THIS MANUAL CAREFULLY BEFORE USING YOUR WALL
OVEN AND KEEP IT FOR FUTURE REFERENCE.
Model MCSWOE24S
24-Inch Built-In Wall Oven
User’s Manual

2
PRODUCT REGISTRATION
Thank you for purchasing this Magic Chef® product� The first step to protect your new product is to complete the product
registration on our website: www�mcappliance�com/register� The benefits of registering your product include the following:
1� Registering your product will allow us to contact you regarding a safety notification or product update�
2� Registering your product will allow for more efficient warranty service processing when warranty service is required�
3� Registering your product could act as your proof of purchase in the event of insurance loss�
Once again, thank you for purchasing this Magic Chef product�

3
CONTENTS
PRODUCT REGISTRATION � � � � � � � � � � � � � � � � � � � � � � � � � � � � � � � � � � � � � � � � � � � � � � � � � � � � � 2
PRECAUTIONS � � � � � � � � � � � � � � � � � � � � � � � � � � � � � � � � � � � � � � � � � � � � � � � � � � � � � � � � � � � � � � � 4
IMPORTANT SAFETY INSTRUCTIONS � � � � � � � � � � � � � � � � � � � � � � � � � � � � � � � � � � � � � � � � � � � 5
SPECIFICATIONS� � � � � � � � � � � � � � � � � � � � � � � � � � � � � � � � � � � � � � � � � � � � � � � � � � � � � � � � � � � � � � 7
PARTS AND FEATURES � � � � � � � � � � � � � � � � � � � � � � � � � � � � � � � � � � � � � � � � � � � � � � � � � � � � � � � � 8
INSTALLATION INSTRUCTIONS � � � � � � � � � � � � � � � � � � � � � � � � � � � � � � � � � � � � � � � � � � � � � � � � 9
BEFORE USE � � � � � � � � � � � � � � � � � � � � � � � � � � � � � � � � � � � � � � � � � � � � � � � � � � � � � � � � � � � � � � � � � 13
OPERATION INSTRUCTIONS� � � � � � � � � � � � � � � � � � � � � � � � � � � � � � � � � � � � � � � � � � � � � � � � � � 14
CARE AND MAINTENANCE � � � � � � � � � � � � � � � � � � � � � � � � � � � � � � � � � � � � � � � � � � � � � � � � � � � 18
TROUBLESHOOTING� � � � � � � � � � � � � � � � � � � � � � � � � � � � � � � � � � � � � � � � � � � � � � � � � � � � � � � � � 21
LIMITED WARRANTY � � � � � � � � � � � � � � � � � � � � � � � � � � � � � � � � � � � � � � � � � � � � � � � � � � � � � � � � 22

4
PRECAUTIONS
EXPLANATION OF SYMBOLS
WARNING
Hazards or unsafe practices which COULD result in severe personal injury or death�
CAUTION
Hazards or unsafe practices which COULD result in minor personal injury�
WARNING: Read and understand all safety precautions� Failure to follow all instructions described in this user
manual may result in electric shock, fire and/or serious personal injury� The warnings, cautions and instructions
discussed in this user manual cannot cover all possible conditions and situations that may occur�

5
IMPORTANT SAFETY INSTRUCTIONS
WARNING: When properly cared for, your wall oven has been designed to be safe and reliable� Read all
instructions carefully before use� These precautions will reduce the risk of burns, electric shock, fire and injury
to people� When using this kitchen appliance, basic safety precautions must be followed; including those in the
following pages�
PROPER INSTALLATION AND MAINTENANCE
IMPORTANT: Save this manual for the local electrical inspectors use�
• Have the installer show you the location of the circuit breaker or fuse� Mark it for easy reference�
• Be sure your appliance is properly installed and grounded by a qualified service personnel� Connect only to
a properly grounded outlet� (Refer to "Installation Instructions" on page 9 for details�)
• This appliance is intended for normal family household use only� It is not approved for outdoor use� If you
have any questions, contact the manufacturer�
• DO NOT store or use corrosive chemicals, vapors, flammables or nonfood products in or near this
appliance� It is specifically designed for use when heating or cooking food� The use of corrosive chemicals in
heating or cleaning will damage the appliance and could result in injury�
• DO NOT operate this appliance if it is not working properly, or if it has been damaged� Contact an qualified
service personnel�
• DO NOT obstruct oven vents�
• DO NOT repair or replace any part of the appliance, unless specifically recommended in this manual� Refer
all servicing of this appliance to a qualified service personnel�
FIRE SAFETY
• DO NOT use aluminum foil or protective liners to line any part of the appliance, especially the oven
bottom� Installing these liners may result in risk of electric shock or fire�
• If materials inside an oven should ignite, keep door closed� Turn off the appliance and disconnect the circuit
at the circuit breaker box�
• Use this appliance only for its intended purpose as described in this manual� For example, NEVER use the
appliance for warming or heating the room� NEVER use the appliance for storage�
• ALWAYS have a working smoke detector near the kitchen�
• In the event that personal clothing or hair catches fire, drop and roll immediately to extinguish flames�
Smother flames from food fires other than grease fires with baking soda�
• Have an appropriate fire extinguisher available, nearby, highly visible and easily accessible near the oven�
WARNING: To reduce the risk of personal injury in the event of a grease fire, observe the following�
• Smother flames with a close-fitting lid, cookie sheet, or metal tray, then turn off the burner� Exercise
caution to prevent burns� If the flames do not go out immediately, evacuate and call the fire department�
• NEVER pick up a flaming pan� You may be burned�
• DO NOT use water on grease fires�
• Smother the fire or flame� Or use dry chemical or foam-type extinguishers�

6
• Use an extinguisher ONLY if:
1) You know you have a Class ABC extinguisher, and you already know how to operate it�
2) The fire is small and contained in the area where it started�
3) The fire department is being called�
4) You can fight the fire with your back to an exit�
BURN PREVENTION
• DO NOT touch heating elements or interior surfaces of oven� Heating elements may be hot even though they
are dark in color� Interior surfaces of an oven become hot enough to cause burns� During and after use, DO
NOT touch, or let clothing, potholders, or other flammable materials contact heating elements or interior
surfaces of oven until they have had sufficient time to cool� Other surfaces of the appliance may become hot
enough to cause burns� Among these surfaces are oven vent openings, surfaces near these openings and oven
doors�
• Exercise caution when opening the appliance� Standing to the side, open the door slowly and slightly to let
hot air and/or steam escape� Keep your face clear of the opening and make sure there are no children or
pets near the unit� After the release of hot air and/or steam, proceed with your cooking� Keep doors shut
unless necessary for cooking or cleaning purposes� DO NOT leave open doors unattended�
• DO NOT heat or warm unopened food containers� Build-up of pressure may cause the container to burst
and cause injury�
• ALWAYS place oven racks in desired location while oven is cool� If a rack must be moved while oven is hot,
DO NOT let potholder contact the heating elements�
• ALWAYS use dry potholders� Moist or damp potholders on hot surfaces may result in burns from steam� DO
NOT let potholder touch hot heating elements� DO NOT use a towel or other bulky cloth�
• Secure all loose garments before beginning� Tie long hair so that it does not hang loose, and DO NOT wear
loose fitting clothing or hanging garments, such as ties, scarves, jewelry, or dangling sleeves�
CHILD SAFETY
• When children become old enough to use the appliance, it is the legal responsibility of the parents or legal
guardians to ensure that they are instructed in safe operation of the appliance by qualified persons�
• DO NOT allow anyone to climb, stand, lean, sit, or hang on any part of the appliance, especially a door,
warming drawer or storage drawer� This can damage the appliance, and the unit may tip over, potentially
causing severe injury�
• DO NOT allow children to use this appliance unless closely supervised by an adult� Children and pets should
not be left alone or unattended in the area where the appliance is in use� They should NEVER be allowed to
play in its vicinity, whether or not the appliance is in use�
• Items of interest to children should NOT be stored in an appliance, in cabinets above an appliance or on the
backsplash� Children climbing on an appliance to reach items could be potentially cause serious injury�
SAVE THESE INSTRUCTIONS
FOR FUTURE REFERENCE

7
SPECIFICATIONS
Width 23�4” (594 mm)
Height 23�2” (589 mm)
Depth 21�4” (543 mm)
Weight 72 lbs� (32�5 kg)
Power Supply 240 V / 60 Hz
Capacity 2�2 Cu� Ft�
Rated Power 2300 W
21�4” (543 mm)
23�2” (589 mm)
23�4” (594 mm)
Figure 1

8
PARTS AND FEATURES
PRODUCT PARTS & ACCESSORIES
Figure 1
a� Control Panel
b� Cooling Vents
c� Oven Interior Light
d� Top Central Heating Element
e� Rack Position Guide
f� Convection Fan and Heating Element
g� Oven Door
h� Door Handle
i� Oven Rack (2)
j� Broiler Pan
k� Broiler Pan Rack
c
b
e
g
a
f
i
j
k
h
d

9
Figure 2
INSTALLATION INSTRUCTIONS
23�2”
(589 mm)
21�4” (543 mm)
22�3”
(566�5 mm)
21�5” (545�4 mm)
1�0”
(24 mm)
0�4”
(10 mm)
0�4” (10 mm)
22�5”
(570 mm)
22�0”
(558 mm)
23�5”
(590 mm)
22�5" - 23�0”
(575 mm
- 585 mm)
WARNING: Only a qualified service personnel in compliance with the instructions provided must install the
appliance� The manufacturer declines all responsibility for improper installation, which may harm persons and
animals and damage property�
LOCATION REQUIREMENTS
In order to ensure that the built-in appliance functions properly, the cabinet containing it must be appropriate�
The figures below and the next page give the dimensions of the cut-out for installation in a wall cabinet unit or
under the counter� (Refer to Figure 2 and 3�)
Installation in a Wall Cabinet Unit
23�4” (594 mm)

10
23�2”
(589 mm)
21�4” (543 mm)
22�3”
(566�5 mm)
21�5” (545�4 mm)
1�0”
(24 mm)
0�4”
(10 mm)
0�4” (10 mm)
23�4” (594 mm)
Figure 3
22�5”
(570 mm)
22�0”
(558 mm)
22�5" - 23�0”
(575 mm - 585 mm)
IMPORTANT: Installation must be
in compliance with the consumption
declaration� In order to ensure
adequate ventilation, the back panel
of the cabinet unit must be removed�
Installing the oven so that it rests on
two strips of wood is preferable� If
the oven rests on a continuous, flat
surface, there must be an aperture
of at least 1 ¾” x 22” (45 x 560mm)�
(Refer to Figure 4�)
Figure 4
1�8”
(45 mm)
• The panels of the adjacent cabinets must be made of heat-resistant material� In particular, cabinets with a
veneer exterior must be assembled with glues which can withstand temperatures of up to 212°F�
• In compliance with current safety standards, contact with the electrical parts of the oven must not be
possible once it has been installed�
• All parts, which ensure the safe operation of the appliance, must be removable only with the aid of a tool�
• To fasten the oven to the cabinet, open the door of the oven and attach it by inserting the 4 wooden screws
into the 4 holes located on the perimeter of the frame�
Installation Under the Counter

11
CIRCUIT REQUIRED
208V, 60Hz 240V,60Hz
12 AMP 15 AMP
This oven is dual rated, designed to be connected to either 208/240V AC,
60Hz, 3-wire, two-phase power supply�
The electrical supply should be 3-wire two-phase AC� Install a suitable conduit
box (not furnished)� An appropriately-sized, U-listed conduit connector must
be used to correctly attach the conduit to the junction box�
3-WIRE BRANCH CIRCUIT
Where local codes allow the connection of green
ground wire from the oven to the branch circuit white
neutral wire:
• If local codes permit, connect the green ground
wire from the oven and the white neutral wire
from the oven to the branch circuit neutral wire
(gray or white colored wire)�
• Connect the red and black wires from the oven
to the corresponding wires in the junction box�
• Refer to Figure 5�
ELECTRICAL REQUIREMENTS
WARNING: Electrical Shock Hazard
• DO NOT use an extension cord�
• Failure to follow these instructions can result in death, fire, or electrical shock�
• Any additions, changes or conversions required in order for this appliance to satisfactorily meet the
application needs must be made by a qualified service personnel in accordance with the manufacturer’s
instructions and all codes and requirements of the authority having jurisdiction� Failure to follow the
instructions could result in serious injury or property damage� The qualified service personnel performing
this work assumes responsibility for the conversion�
• This appliance needs to be installed directly to the main (without a plug)� To do so, follow instructions in
the “Three-Wire Connection” section on page 12� If you wish to install this appliance directly to the main
(without a plug), it must be installed by a qualified service personnel�
• DO NOT operate this appliance using a 2-prong adapter or an extension cord� If a 2-prong wall receptacle
is the only available outlet, it is the personal responsibility of the consumer to have it replaced with a
properly grounded 3-prong or 4-prong wall receptacle installed by a qualified service personnel� Severe
shock or damage to the range may occur if the range is not installed by a qualified service personnel�
• This appliance features a pilotless electric ignition for energy savings and reliability� It operates on a
208-240V/50-60Hz 12-15 Amp power supply�
• A separate circuit, protected by a 15 amp time delay fuse or circuit breaker, is required�
• For personal safety, the appliance must be properly grounded�
ELECTRICAL INSTALLATION
WARNING: It is the responsibility and obligation of the consumer to contact a qualified service personnel to
ensure the electrical installation is adequate and conformance with all local codes and ordinances�
IMPORTANT: The power supply to the appliance must be cut off before any adjustments or maintenance work
is done on it� Air duct is supposed to use in ventilation�
Figure 5
Black Wires
Red Wires
Green Wire
Neutral Wire
White Wire
Cable from Oven
Cable from Power Supply
UL Listed Conduit
Connector

12
4-WIRE BRANCH CIRCUIT
• Disconnect ground from neutral at free end of
conduit�
• Connect the green ground wire from the oven
to the bare or green ground wire in the juction
box�
• Connect the red and black wires from the oven
to the corresponding wires in the junction box�
• Connect the white wire from the oven to the
white neautral wire in the junction box�
Black Wires
Red Wires
Green Wire
White Wire
Cable from Oven
Cable from Power Supply
UL Listed Conduit
Connector
Figure 6

13
BEFORE USE
This multi-function oven combines the advantages of traditional convection ovens with those of the more
modern fan assisted models in a single appliance� It is an extremely versatile appliance that allows you to choose
easily and safely between different cooking modes�
IMPORTANT: The first time you use your appliance, we recommend that set the thermostat to the highest
setting and leave the oven on for about half an hour with nothing in it, with the oven door shut� Then open the
oven door and let the room air in� The odor that is often detected during this initial use is due to the evaporation
of substances used to protect the oven during storage and until it is installed�
IMPORTANT: Place the dripping pan provided on the bottom shelf of the oven to prevent any sauce and/or
grease from dripping onto the bottom of the oven only when grilling food�
• For all other types of cooking, NEVER use the bottom shelf and NEVER place anything on the bottom of the
oven when it is in operation because this could damage the enamel�
• ALWAYS place your cookware (dishes, aluminum foil, etc�) on the grid provided with the appliance inserted
especially along the oven guides�

14
HIGH BROIL
OVEN LIGHT
FAN GRILL
OFFOFF
CONVECTION
COOKING
DEFROST
150
°F
250450
300400
350
200Broil
COOKING MODES
• Oven Light: Turns the oven light on when selected�
• Broil: Best for melting cheese, toasting and browning� For optimal results, use in conjunction with the Broil
temperature setting�
• Fan Grill: Utilizes a high heat grilling element and fan to circulate hot air throughout the oven� Ideal for
cooking large cuts of meats so that they are moist inside and crisp on the outside� Use a thermometer to
check the internal temperature� It is recommended to set the temperature no higher than 400°F�
• Convection Cooking: Utilizes the powerful heating element surrounding the fan to evenly distribute heat
throughout the oven� This is great for multi-shelf cooking because the fan ensures each rack is heated�
• Defrost: Circulates air at room temperature to defrost food� For foods such as meat, fish, and bread,
Convection Cooking Mode, set between 175°~225°F, can be used to accelerate the Defrosting process�
DIGITAL CLOCK
1� Once the oven is connected to electrical power, the clock display will show "12:00" with the " " symbol
above " "� (Refer to Figure 6�)
2� Press the " + " or " - " button to increase or decrease the number until it reaches the right time�
3� After 5 seconds the clock will start automatically or you can press the "
" button to make it work�
TIMER
Kitchen Timer Setting
1� Press the "
" button repeatedly until the " " symbol above " " flashes�
2� Press " + " or " - " button until the time you wish shows on the display� The longest cooking time that can be
set is 23 hours and 59 minutes�
OPERATION INSTRUCTIONS
Figure 6
Oven Indicator LightTimer End Cooking Time Set
Start Cooking Time Set Clock
Cooking Mode
Selection Knob
Function Buttons
Cooking Temperature
Selection Knob
Max/

15
3� After setting the proper time (hour/minute), the " " symbol above the " " begins to flash�
4� The time countdown begins�
5� When it reaches the set time, the "
" symbol above the " " flashes, and the alarm will ring�
6� To stop the alarm ringing, press any button�
NOTE: This setting does not control the oven�
IMPORTANT:
• The setting must be carried out in 5 seconds�
• If electricity fails suddenly, all the set procedure and the proper clock time (hour/minute) will disappear�
• After electrical power is on again, "12:00" and the "
" symbol above " " will show on the display, you
will need to set it again�
Full Automatic Timer Setting
1� Press the "
" button repeatedly until the " " symbol above the " " flashes, and press " + " or " - "
button to set how long oven needs to cook�
2� Press the "
" button repeatedly until the " " symbol above the " " flashes, and press " + " or " - "
button to set the time for the oven to stop cooking and switch off�
3� Adjust knobs to select cooking mode and temperature�
4� The "
" symbols above the " " and " " will flash� It indicates the cooking timer has been set� The
cooking will start and finish as per programmed into the timer�
For example, if the food is required to bake for 45 minutes, and it is supposed to stop at "2:00":
1� Press the "
" button repeatedly until the " " symbol above " " flashes, and set the time of baking to
45 minutes�
2� Press the function button repeatedly until the "
" symbol above " " flashed, and set the finish of
baking at "2:00"�
3� The proper time (hour/minute) and the "
" symbol will show on the display� It indicates the setting of
cooking timer has been set�
4� When the clock shows "1:15", the oven will switch on automatically and cooking will start�
5� During the cooking time, the "
" symbol will keep flashing�
6� When the clock shows "2:00", cooking will stop and the oven will switch off automatically, the alarm will
ring, and the "
" symbol will flash�
7� To stop the alarm ringing, press any button�
Semi-Automatic Timer Setting
A� Setting Timer for How Long to Cook
1� Longest time that can be set is 10 hours maximum�
2� Press the "
" button repeatedly until the " " symbol above " " flashes� Press " + " or " - " button
and set the timer for how long the oven needs to cook�
3� Adjust knobs to select cooking mode and temperature�
4� When the full amount of time set has passed, the cooking will stop and the oven will switch off
automatically�
5� The "
" symbol above " " will flash and the alarm will ring�
6� To stop the alarm ringing, press any button�

16
B� Setting timer with the end time of cooking
1� Longest time that can be set is 23 hours and 59 minutes�
2� Press the "
" button repeatedly until the " " symbol above " " flashes� Press " + " or " - " button
and set the time for oven to stop cooking�
3� Immediately adjust knobs to select cooking mode and temperature�
4� When it reaches the time set, cooking will stop and the oven will switch off automatically�
5� The "
" symbol above " " flashes, and the alarm will ring�
6� To stop the alarm ringing, press any button�
NOTE: The set timer procedure could be seen by pressing any function button repeatedly at any time�
NOTE: By adjusting the end time of cooking to the current time, the set timer procedure can be cancelled�
PRACTICAL COOKING ADVICE
Broil
1� Position temperature knob between 150°F and Max/Broil�
2� The top central heating element will come on�
3� The extremely high and direct temperature of the heating element makes it possible to brown the surface
of meats and roasts while locking the juices in to keep them tender�
4� The "Broil" mode is also highly recommended for dishes that require a high temperature on the surface like
beef steaks, veal, rib steak, filets, and hamburgers�
Fan Grill
1� Position temperature knob between 150°F and 400°F�
2� The top central heating element and fan will come on�
3� This combination of features increases the effectiveness of the unidirectional thermal radiation of the
heating element through forced circulation of the air throughout the oven�
4� This helps prevent food from burning on the surface, allowing the heat to penetrate right into the food�
5� Excellent results are achieved with kebabs made with meats and vegetables, sausages, ribs lamb chops,
chicken in a spicy sauce, quail, and pork chops�
6� The "Fan Grill" mode is also ideal for cooking fish steaks like swordfish and stuffed cuttlefish�
Convection Cooking
1� Position temperature knob between 150°F and 475°F�
2� The rear heating element and fan will come on, guaranteeing delicate heat distributed uniformly
throughout the oven�
3� The "Convection Cooking" mode is also ideal for baking and cooking delicate foods, especially cakes
that need to rise and for the preparation of certain tartlets on 3 shelves at the same time� Here are a few
examples: cream puffs, sweet and savory biscuits, savory puffs, Swiss rolls and small portions of vegetables
au gratin�
Defrost
1� Position temperature knob to any temperature�

17
2� The fan in the oven will circulate the air at room temperature around the food�
3� This is recommended for defrosting of any type of food, but in particular for delicate types of food which
do not require heat, such as ice cream cakes, cream or custard desserts, and fruitcakes�
4� By using the fan, the defrosting time is approximately halved� In case of meat, fish and bread, it is possible
to accelerate the process using the “Convection Cooking” and setting the temperature between 175°F and
225°F�
Cooling Ventilation
In order to cool down the exterior of the appliance, this model is equipped with a cooling fan, which comes on
automatically when the oven is hot� When the fan is on, a normal flow of air can be heard exiting between the
oven door and the control panel�
NOTE: When cooking is done, the fan stays on until the oven cools down sufficiently�

18
CARE AND MAINTENANCE
CLEANING
WARNING: To avoid the risk of electric shock, ALWAYS ensure the appliance is turned off and completely cool
before cleaning or doing any sort of maintenance�
CAUTION:
• To avoid possible burns, use care when cleaning the appliance�
• DO NOT attempt to clean the appliance whenever the oven or burner heads are still hot�
• To avoid possible burns, DO NOT attempt any of the following cleaning instructions before turning off all of
the surface burners and allowing them to cool�
NOTE: ALWAYS follow label instructions on cleaning products�
Control Knobs
• For general cleaning, use hot, soapy water and a cloth�
• For more difficult soils and built-up grease, apply a liquid detergent directly onto the soil� Rinse with a
damp cloth and dry�
• DO NOT use steel wool or acidic cleaners on the knobs as they can scratch�
Stainless Steel Exterior
• Clean stainless steel with hot, soapy water and a dishcloth� Rinse with clean water and a cloth�
• DO NOT use cleaners with high concentrations of chlorides or chlorines� DO NOT use harsh scrubbing
cleaners� Only use kitchen cleaners that are especially made for cleaning stainless steel�
Glass Door Exterior
• Clean the glass door using non-abrasive products or sponges and dry it with a soft cloth�
• Use glass cleaner� Apply glass cleaner to soft cloth or sponge, not directly on panel�
Oven Interior
• This appliance DOES NOT have a self-cleaning feature�
• Use an appropriate cleaning product designed specifically to clean the inside of ovens�
• The soap should be rinsed away and the interior dried thoroughly�
• Avoid using abrasive detergents (for example cleaning powders, etc) and abrasive sponges for dishes or
acids (such as lime scale – remover, etc) as these could damage the enamel�
• If the grease spots and dirt are particularly tough to remove, use a special product for oven cleaning,
following the instructions provided on the packet�
• NEVER use a steam cleaner for cleaning inside of oven�
• If you use your oven for an extended period of time, condensation may form� Dry it using a soft cloth�
• There is a rubber seal surrounding the oven opening which guarantees its perfect functioning� Check the
condition of this seal on a regular basis� If necessary, clean it and avoid using abrasive products or objects to
do so� If damaged, contact the vendor� It is recommend to avoid using the oven until it has been repaired�
• NEVER line the oven bottom with aluminum foil, as the consequent accumulation of heat could
compromise the cooking and even damage the enamel�

19
NOTE: ALWAYS follow label instructions on cleaning products�
Interior Lower Grill Element
• To remove the element, support one side with your hand while removing the retainer with the other�
• When cleaning, make sure not to apply excessive force on the element as it is fragile�
• Reposition the element and secure the retainer back in place�
• DO NOT use the oven with the grill element hanging down – it must be repositioned after cleaning�
Removing Oven Door
WARNING:
• Make sure oven is cool and power to the oven has been turned off before removing the door� Failure to do
so could result in electrical shock or burns�
• The oven door is heavy and fragile� Use both hands to remove the oven door� The door front is glass� Handle
carefully to avoid breaking�
• Grasp only the sides of the oven door� DO NOT grasp the handle as it may swing in your hand and cause
damage or injury�
• Failure to grasp the oven door firmly and properly could result is personal injury or product damage�
• To avoid injury from hinge bracket snapping closed, be sure that both levers are securely in place before
removing the door� Also, DO NOT force door open or closed� The hinge could be damaged and injury could
result�
Follow these instructions:
1� Open the door fully� (Refer to Figure 7�)
2� Lift up and push the small levers located on the two hinges all the way back� (Refer to Figure 8�)
3� While holding the door on each side, shut the door until it touches the levers� Then continue closing the
door until it is about 4 inches (10cm) from being fully closed�
4� Pull the door towards you, pulling it out of its seat� Door will gently come away from the oven� (Refer to
Figure 9�)
5� To replace the door, perform the reverse of the above procedure�
NOTE: If door does not come away from oven easily, DO NOT force it�
Figure 7 Figure 8 Figure 9
REPLACING OVEN INTERIOR LIGHT
WARNING: Electrical Shock Hazard
Failure to follow these instructions can result in death, fire, or electrical shock�

20
Figure 11
2� Remove the glass cover of the light bulb holder turning
counter-clockwise� (Refer to Figure 10�)
3� Replace the old light bulb with a new oven-safe light bulb with
the following characteristics:
• Voltage: 208-240V
• Wattage: 25W
• Type: E14
4� Put the glass cover back and reconnect the oven to the main
power supply�
TRANSPORTING
WARNING: Electrical Shock Hazard
Failure to follow these instructions can result in death, fire,
or electrical shock�
1� Before moving your oven, or performing maintenance,
disconnect it from the power supply�
2� To avoid damage to the oven vent, use transpotation
that is wide enough to hold the entire bottom of the
unit� (Refer to Figure 11�)
1� Disconnect the oven from the power supply by means of the omni-polar switch used to connect the
appliance to the electrical mains, or unplug the appliance if the plug is accessible�
Figure 10

21
TROUBLESHOOTING
Problem Possible Causes Solutions
Will not operate or
turn on�
No power
Verify that the electrical wires are connected to the mains
properly� Refer to “Electrical Installation” section on page 11�
Household fuse is blown or
circuit breaker is tripped�
Replace the fuse or reset the circuit breaker�
Oven will not operate� Oven controls are set incorrectly� Make sure the oven is on and set on the correct cooking mode�
Cooling fan runs during
baking and broiling�
No problem
It is normal for the fan to automatically run while the oven is
in use and for some time after to cool�
Oven temperature too
high or too low�
Oven was not preheated�
Allow the oven to preheat so it is at the proper temperature
when your food goes in�
Racks are positioned incorrectly� Try changing the rack position�
Batter is not evenly distributed� Check that the batter is level in the pan�
Improper cook time was being
used�
Adjust the cook time�
Oven door was opened while
cooking�
Oven peeking releases oven heat and can result in longer cook
times�
Baked items are too
brown on the bottom�
Oven rack is placed too low� Move rack to a higher position in the oven�
Pie crust edges are
browning early�
Temperature is too hot�
Use aluminum foil to cover the edge of the crust and/or
reduce baking temperature�
Oven light does not
work�
Light bulb is loose or defective� Tighten or replace the bulb�
Switch operating light is broken� Contact a qualified technician�
Oven makes clicking
noise�
No problem
This is the sound of the heating element turning on and off
and is normal�
Display flashes� Power outage or surge Reset the clock� If the oven was in use, reset it�

22
LIMITED WARRANTY
MC Appliance Corporation warrants each new Wall Oven to be free from defects in material and workmanship, and agrees to
remedy any such defect or to furnish a new part(s), at the company’s option, for any part(s) of the unit that has failed during the
warranty period� Parts and labor expenses are covered on this unit for a period of one year from the date of purchase� A copy of
the dated sales receipt/invoice is required to receive warranty service, replacement or refund�
This warranty covers appliances in use within the contiguous United States, Alaska, Hawaii and Puerto Rico� This warranty does not
cover the following:
• Damages due to shipping damage or improper installation�
• Damages due to misuse or abuse�
• Content losses due to failure of the unit�
• Repairs performed by unauthorized service agents�
• Service calls that do not involve defects in material and workmanship such as instructions on proper use of the
product or improper installation�
• Replacement or resetting of house fuses or circuit breakers�
• Failure of this product if used for other purposes than its intended purpose�
• Disposal costs for any failed unit not returned to our factory�
• Any delivery/installation costs incurred as the result of a unit that fails to perform as specified�
• Expenses for travel and transportation for product service if your appliance is located in a remote area where
service by an authorized service technician is not available�
• The removal and reinstallation of your appliance if it is installed in an inaccessible location or is not installed in
accordance with published installation instructions�
• Refunds for non repairable products are limited to the price paid for the unit per the sales receipt�
• This warranty is non transferable� This warranty applies only to the original purchaser and does not extend to any
subsequent owner(s)�
Limitations of Remedies and Exclusions:
Product repair in accordance with the terms herein, is your sole and exclusive remedy under this limited warranty� Any and all
implied warranties including merchantability and fitness for a particular purpose are hereby limited to one year or the shortest
period allowed by law� MC Appliance Corporation is not liable for incidental or consequential damages and no representative or
person is authorized to assume for us any other liability in connection with the sale of this product� Under no circumstances is
the consumer permitted to return this unit to the factory without the prior written consent of MC Appliance Corporation�
Some states prohibit the exclusion or limitation of incidental or consequential damages, or limitations on implied warranties�
This warranty gives you specific legal rights, and you may also have other rights which vary from state to state�
Model Parts Labor Type of Service
MCSWOE24S One Year One Year Carry In
For Service or Assistance please call 888-775-0202 or visit us on the web at www.mcappliance.com to request warranty service
or order parts�

23
CNA International, Inc. d/b/a MC Appliance Corporation. All rights reserved.
Magic Chef® logo is a registered trademark of CNA International, Inc.
www.mcappliance.com Printed in China

24

25
LEA ESTE MANUAL ANTES DE UTILIZAR SU HORNO DE PARED Y
GUÁRDELO PARA FUTURA REFERENCIA.
Modelo MCSWOE24S
Horno de Pared para Empotrar
de 24 pulgadas
Manual del usuario

26
REGISTRACIÓN DEL PRODUCTO
Gracias por comprar el producto Magic Chef®� El primer paso para proteger su nuevo producto es completar la forma de
registración en nuestra pagina web: www�mcappliance�com/register� Los beneficios de registrar su producto incluyen lo siguiente:
1� Al registrar su producto nos permite contactarle para notificarle de un cambio de seguridad o actualización del
producto�
2� Si llegara a necesitar servicio bajo garantía, registrando su producto nos permite ser más eficiente en procesar el
servicio�
3� En el evento que usted tenga una perdida que esta cubierto por un seguro, registrando su producto puede servir
como prueba de su compra�
Una vez más gracias por comprar un producto marca Magic Chef�

27
ÍNDICE
REGISTRO DEL PRODUCTO � � � � � � � � � � � � � � � � � � � � � � � � � � � � � � � � � � � � � � � � � � � � � � � � � � � 25
PRECAUCIONES � � � � � � � � � � � � � � � � � � � � � � � � � � � � � � � � � � � � � � � � � � � � � � � � � � � � � � � � � � � � � 27
INSTRUCCIONES DE SEGURIDAD IMPORTANTES � � � � � � � � � � � � � � � � � � � � � � � � � � � � � � � � 28
ESPECIFICACIONES � � � � � � � � � � � � � � � � � � � � � � � � � � � � � � � � � � � � � � � � � � � � � � � � � � � � � � � � � � �31
PARTES Y FUNCIONES � � � � � � � � � � � � � � � � � � � � � � � � � � � � � � � � � � � � � � � � � � � � � � � � � � � � � � � 32
INSTRUCCIONES DE INSTALACIÓN � � � � � � � � � � � � � � � � � � � � � � � � � � � � � � � � � � � � � � � � � � � � 33
ANTES DE SU USO� � � � � � � � � � � � � � � � � � � � � � � � � � � � � � � � � � � � � � � � � � � � � � � � � � � � � � � � � � � 37
INSTRUCCIONES DE FUNCIONAMIENTO� � � � � � � � � � � � � � � � � � � � � � � � � � � � � � � � � � � � � � � 38
CUIDADO Y MANTENIMIENTO � � � � � � � � � � � � � � � � � � � � � � � � � � � � � � � � � � � � � � � � � � � � � � � 42
SOLUCIÓN DE PROBLEMAS� � � � � � � � � � � � � � � � � � � � � � � � � � � � � � � � � � � � � � � � � � � � � � � � � � � 45
GARANTÍA LIMITADA � � � � � � � � � � � � � � � � � � � � � � � � � � � � � � � � � � � � � � � � � � � � � � � � � � � � � � � � 46

28
PRECAUCIONES
EXPLICACIÓN DE LOS SÍMBOLOS
ADVERTENCIA
Peligros o prácticas inseguras que PODRÍAN provocar lesiones personales graves o la muerte�
PRECAUCIÓN
Peligros o prácticas inseguras que PODRÍAN provocar lesiones personales leves�
ADVERTENCIA: Lea y comprenda todas las precauciones de seguridad� La inobservancia de todas las
instrucciones descritas en este manual del usuario podría resultar en descarga eléctrica, incendio y/o lesiones
personales graves� Las advertencias, precauciones e instrucciones planteadas en este manual del usuario no
cubren todas las eventuales condiciones y situaciones que podrían suscitarse�

29
INSTRUCCIONES DE SEGURIDAD IMPORTANTES
ADVERTENCIA: Cuando se cuida apropiadamente, su horno de pared ha sido diseñado para ser seguro y
confiable� Lea cuidadosamente todas las instrucciones antes de usarlo� Estas precauciones reducirán el riego
de quemaduras, descarga eléctrica, incendio y lesiones a personas� Cuando utilice este aparato de cocina, las
precauciones de seguridad básicas deben ser observadas; incluyendo aquellas en las páginas siguientes�
INSTALACIÓN ADECUADA Y MANTENIMIENTO�
IMPORTANTE: Guarde este manual para el uso del inspector de electricidad local�
• Haga que el instalador le indique la ubicación del interruptor o fusible� Márquelo para una fácil referencia�
• Asegúrese de que su aparato esté instalado apropiadamente y conectado a tierra por un personal de
servicio calificado� Conecte solamente a un tomacorriente conectado correctamente a tierra� (Para conocer
más detalles, consulte las «Instrucciones de instalación» en la página 33)�
• Este aparato tiene por objeto ser utilizado sólo para uso doméstico familiar normal� No esta aprobado para
uso al aire libre� Si usted tiene cualesquiera preguntas, contacte al fabricante�
• NO almacene o utilice químicos corrosivos, vapores, productos inflamables o que no sean alimentos en o
cerca de este aparato� Ha sido diseñado específicamente para ser usado al calentar o cocinar alimentos� El
uso de químicos corrosivos al calentar o limpiar dañará el aparato y puede resultar en lesiones�
• NO OPERE este aparato si no está funcionando correctamente, o ha sido dañado� Póngase en contacto con
un personal de servicio calificado�
• NO obstruya los orificios de ventilación del horno�
• NO repare o cambie ninguna pieza del aparato, a menos que esté específicamente recomendado en este
manual� Refiera todos los servicios de mantenimiento de este aparato a un personal de servicio calificado�
SEGURIDAD CONTRA INCENDIOS
• NOuse papel de aluminio o forros de protección para forrar ninguna parte del aparato, especialmente la
parte inferior del horno� Instalar esos forros puede causar riesgo de descarga eléctrica o incendio�
• Si los materiales adentro del horno se encienden, mantenga la puerta cerrada� Apague el aparato y
desconecte el interruptor en la caja de interruptores�
• Utilice este aparato sólo para el propósito para el que fue construido tal como se describe en este manual�
Por ejemplo, NUNCA use el aparato para calentar la habitación� NUNCA use el aparato para almacenar�
• Tenga SIEMPRE un detector de humo cerca de la cocina que funcione�
• En el caso que la ropa o el cabello personal agarre fuego, de inmediato tírese al suelo y de vueltas para
extinguir las llamas� Ahogue las llamas de fuego de alimentos, distintas de fuego de grasa con bicarbonato
de sodio�
• Tenga disponible un extinguidor de incendio apropiado, cercano, altamente visible y de fácil acceso cerca
del horno�
ADVERTENCIA: Para reducir el riesgo de lesiones personales en el caso de fuego por causa de grasa, haga lo
siguiente�
• Ahogue las llamas con una tapa ajustada, una lámina para hacer galletas o bandeja de metal, luego apague
el quemador� Actúe con cautela para prevenir quemaduras� Si las llamas no se extinguen inmediatamente,
salga y llame al departamento de bomberos�

30
• NUNCA agarre un recipiente en llamas� Usted puede resultar quemado�
• NO utilice agua en fuego de grasa�
• Asfixiar el fuego o la llama� O utilice extinguidores o quimicas secos para asfixiar las llamas�
• Use un extinguidor SÓLO si:
1) Usted conoce que tiene un extinguidor Clase ABC, y usted sabe cómo utilizarlo�
2) El incendio es pequeño y está contenido en el área donde comenzó�
3) El departamento de bomberos está siendo llamado�
4) Usted puede luchar contra el incendio con su espalda hacia una salida�
PREVENCIÓN DE QUEMADURA
• NO toque los elementos calentadores o las superficies interiores del horno� Los elementos calentadores
pueden estar calientes incluso si ellos están en color obscuro� Las superficies interiores de un horno se
ponen suficientemente calientes para causar quemaduras� Durante y después del uso, NO toque, o permita
que la ropa, los agarra ollas u otros materiales inflamables hagan contacto con los elementos calentadores
o superficies interiores del horno hasta que ellos hayan tenido suficiente tiempo para enfriarse� Otras
superficies del aparato pueden llegar a calentarse lo suficiente para causar quemaduras� Entre esas
superficies hay aberturas de ventilación del horno, superficies cerca de esas aberturas y puertas del horno�
• Actúe con cautela cuando abra el aparato� Párese al lado, abra la puerta despacio y poco a poco para
permitir que el aire caliente y/o el vapor salgan� Mantenga su cara apartada mientras lo abre y asegúrese de
que no haya niños o mascotas cerda de la unidad� Luego de que se libere el aire caliente y/o vapor, proceda
con su cocción de alimentos� Mantenga las puertas cerradas salvo que sea necesario para cocinar o para
propósitos de limpieza� NO deje desatendidas las puertas abiertas�
• NO caliente contenedores de alimentos que estén cerrados� La presión que se forme puede causar que el
contenedor explote y cause lesiones�
• SIEMPRE coloque las parrillas del horno en la posición deseada mientras el horno esté frío� Si una parrilla
debe ser movida mientras el horno está caliente, NO permita que el agarra ollas haga contacto con los
elementos calentadores�
• SIEMPRE utilice agarra ollas secos� Los agarra ollas húmedos o mojados en superficies calientes pueden
resultar en quemaduras por vapor� NO permita que el agarra ollas toque los elementos calentadores� NO
utilice un paño u otra tela voluminosa�
• Asegure todas las prendas sueltas antes de comenzar� Recoja el pelo largo de manera que no cuelgue
suelto, y NO utilice ropa holgada o prendas colgantes, tales como corbatas, pañuelos, joyas o mangas que
cuelguen�
SEGURIDAD PARA NIÑOS
• Cuando los niños cumplen edad suficiente para usar el aparato, los padres o tutores legales tienen la
responsabilidad legal de garantizar que se les instruya en el funcionamiento seguro del aparato por
personas calificadas�
• NO permita a nadie subirse, pararse, recostarse, sentarse o colgarse de ninguna parte del aparato,
especialmente de la puerta, el cajón para mantener caliente o el cajón para almacenar� Esto puede dañar el
aparato, y la unidad se puede volcar, causando potenciales lesiones graves�

31
• NO permita a los niños usar este aparato salvo que estén supervisados de cerca por un adulto� Los niños
y las mascotas no se deben dejar solos o desatendidos en el área donde el aparato esté en uso� A ellos
NUNCA se les debe permitir jugar en las cercanías, sea que el aparato esté o no en uso�
• Los artículos de interés para los niños NO deben ser almacenados en el aparato, en los gabinetes encima del
aparato o en el protector contra salpicaduras� Los niños que se suban en el aparato para alcanzar artículos
pueden resultar gravemente lesionados�
GUARDE ESTAS INSTRUCCIONES
PARA FUTURAS REFERENCIAS

32
ESPECIFICACIONES
Ancho 23,4” (594 mm)
Altura 23,2” (589 mm)
Profundidad 21,4” (543 mm)
Peso 72 lbs� (32,5 kg)
Suministro eléctrico 240 V / 60 Hz
Capacidad: 2�2 pies cúbicos
Voltaje nominal: 2300 W
21,4” (543 mm)
23,2” (589 mm)
23,4” (594 mm)
Figura 1

33
PARTES Y FUNCIONES
ACCESORIOS & PARTES DEL PRODUCTO
Figura 1
a� Panel de control
b� Rejillas de ventilación
c� Luz interior del horno
d� Elemento calentador central
superior
e� Guía de colocación de la parrilla
f� Ventilador de convección y
elemento calentador
g� Puerta del horno
h� Manija de la puerta
i� Parrilla del horno (2)
j� Bandeja para asar
k� Parrilla para la
bandeja para asar
c
b
e
g
a
f
i
j
k
h
d

34
23,2”
(589 mm)
21,4” (543 mm)
22,3”
(566,5 mm)
21,5” (545,4 mm)
1,0”
(24 mm)
0,4”
(10 mm)
0,4” (10 mm)
23,4” (594 mm)
Figura 2
INSTRUCCIONES DE INSTALACIÓN
22,5”
(570 mm)
22,0”
(558 mm)
23,5”
(590 mm)
22,5" - 23,0”
(575 mm
- 585 mm)
ADVERTENCIA: Solo personal de servicio calificado que cumpla con las instrucciones que le sean suministradas
debe instalar el aparato� El fabricante rechaza toda responsabilidad por instalación inapropiada, que pueda causar
lesiones a personas, animales y daños materiales�
REQUISITOS DE UBICACIÓN
Con el objeto de asegurar que el aparato empotrado funcione adecuadamente, el gabinete que lo contenga debe
ser apropiado� Las figuras que aparecen abajo y en la próxima página dan las dimensiones de la abertura para
instalación en una unidad de gabinete de pared o debajo de una encimera� (Consulte las Figuras 2 y 3)�
Instalación en una unidad de gabinete de pared

35
23,2”
(589 mm)
21,4” (543 mm)
22,3”
(566,5 mm)
21,5” (545,4 mm)
1,0”
(24 mm)
0,4”
(10 mm)
0,4” (10 mm)
23,4” (594 mm)
Figura 3
22,5”
(570 mm)
22,0”
(558 mm)
22,5" - 23,0”
(575 mm - 585 mm)
IMPORTANTE: La instalación debe
realizarse en cumplimiento con la
declaración de consumo� Con el objeto
de asegurar que haya una ventilación
adecuada, el panel posterior del
gabinete debe ser removido� Instalar
el horno de manera que el mismo
descanse en dos tiras de madera es
preferible� Si el horno descansa en una
superficie plana, continua, debe haber
una abertura de al menos 1 ¾” x 22” (45
x 560 mm)� (Consulte la Figura 4)�
Figura 4
1,8”
(45 mm)
• Los paneles de los gabinetes adyacentes deben estar hechos de un material resistente al calor� En particular,
los gabinetes con un exterior enchapado deben ser ensamblados con pegamentos que puedan soportar
temperaturas de hasta 212°F�
• En cumplimiento a los estándares de seguridad actuales, el contacto con las partes eléctricas del horno no
debe ser posible una vez que el horno se haya instalado�
• Todas las partes, que aseguren el funcionamiento seguro del aparato, deben ser removibles sólo con la
ayuda de una herramienta�
• Para fijar el horno al gabinete, abra la puerta del horno y fíjelo insertando los 4 tornillos de madera en los 4
orificios localizados en el perímetro del marco�
Instalación debajo de la encimera

36
CIRCUITO REQUERIDO
208V, 60Hz 240V, 60Hz
12 amp 15 amp
Este horno es doble clasificación, diseñado para ser conectado bien sea a 208/240
V AC, 60Hz, 3 cables, suministro eléctrico de dos-fases�
El suministro eléctrico debe ser de dos-fases de AC 3 cables� Instale una caja de
conexión adecuada (no suministrada)� Un conector de conducto listado-U de tamaño
adecuado, debe utilizarse para fijar correctamente el conducto a la caja de conexión�
CIRCUITO DERIVADO DE 3 CABLES
En los lugares donde los códigos locales permiten la
conexión del cable verde a tierra desde el horno al
cable neutro blanco del ramal del interruptor:
• Si los códigos locales permiten, conecte el cable
verde a tierra desde el horno y el cable neutro
blanco desde el horno al cable neutro del ramal
del interruptor (cable gris o de color blanco)�
• Conecte el cable rojo y el negro desde el horno a
los cables correspondientes en la caja de conexión�
• Consulte la Figura 5�
REQUISITOS ELÉCTRICOS
ADVERTENCIA: Peligro de descarga eléctrica
• NO utilice un cable de extensión�
• No seguir estas instrucciones puede resultar en muerte, incendio o descarga eléctrica�
• Cualesquiera adiciones, cambios o conversiones requeridos para que este aparato alcance satisfactoriamente
las necesidades de aplicación deben ser hechos por personal de servicio calificado de conformidad con
las instrucciones del fabricante y con todos los códigos y requerimientos de las autoridades que tengan
jurisdicción� No seguir las instrucciones puede resultar en serias lesiones o daños materiales� El personal de
servicio calificado que realice este trabajo asume responsabilidad por la conversión�
• Este aparato necesita ser instalado directamente a la red eléctrica (sin un enchufe)� Para hacer eso, siga las
instrucciones en la sección de la «Conexión a tres cables» en la página 35� Si usted desea instalar este aparato
directamente a la red eléctrica (sin un enchufe), debe ser instalado por un personal de servicio calificado�
• NO encienda este aparato utilizando un adaptador de 2 puntas o un cable de extensión� Si un receptáculo
de pared de 2 puntas es el único tomacorriente disponible, es responsabilidad personal exclusiva de
consumidor hacerlo reemplazar por un receptáculo a tierra adecuado de 3 puntas o receptáculo de pared
de 4 puntas instalado por un personal de servicio calificado� Descarga o daños severos a la estufa pueden
ocurrir si la estufa no está instalada por un personal de servicio calificado�
• Este aparato cuenta con una función de encendido eléctrico sin piloto para ahorro de energía y
confiabilidad� Este funciona en un suministro eléctrico de 208-240V/50-60Hz 12-15 amp�
• Un interruptor separado, protegido por un fusible de retardo de tiempo de 15 amp o un interruptor, es requerido�
• Para la seguridad personal, el aparato debe estar correctamente conectado a tierra�
INSTALACIÓN ELÉCTRICA
ADVERTENCIA: Es responsabilidad y obligación del consumidor contactar unpersonal de servicio calificado
para asegurarse de que la instalación eléctrica es adecuada y conforme a las ordenanzas y códigos locales�
IMPORTANTE: El suministro eléctrico al aparato debe ser cortado antes de realizar cualesquiera ajustes o
trabajo de mantenimiento en el aparato� Conducto de aire se supone que se use en la ventilación�
Figura 5
Cables
negros
Cables
rojos
Cable
verde
Cable
neutro
Cable
blanco
Cable del horno
Cable desde el suministro eléctrico
Conector
de conducto
listado-UL

37
CIRCUITO DERIVADO DE 4 CABLES
• Desconecte la tierra del neutro en el extremo
libre del conducto�
• Conecte el cable verde a tierra desde el hornoal
cable desnudo o cable verde a tierra en la caja
de conexiones�
• Conecte el cable rojo y el negro desde el horno
a los cables correspondientes en la caja de
conexión�
• Conecte el cable blanco desde el horno al cable
neutral blanco en la caja de conexión�
Cables
negros
Cables rojos
Cable verde
Cable blanco
Cable del horno
Cable desde el suministro eléctrico
Conector
de conducto listado-UL
Figura 6

38
ANTES DE USAR
Este horno de funciones múltiples combina en un solo aparato las ventajas de los hornos tradicionales con
aquellas de los modelos másmodernos asistidos por ventilación� Este es un aparato extremadamente versátil que
le permite escoger fácilmente y de forma segura entre diferentes modos de cocción�
IMPORTANTE: La primera vez que usted utilice su aparato, nosotros recomendamos que ajuste el termostato a
la configuración más elevada y deje el horno encendido por sobre media hora sin nada adentro, con la puerta del
horno cerrada� Luego abra la puerta del horno y permita que el aire del cuarto entre� El olor que con frecuencia se
detecta durante este uso inicial se debe a la evaporación de sustancias empleadas para proteger el horno durante
su almacenaje y hasta que es instalado�
IMPORTANTE: Coloque la bandeja colectora suministrada, en el estante inferior del horno para prevenir que
cualquier salsa y/o grasa gotee a la parte baja del horno sólo cuando estén cocinando alimentos a la parilla�
• Para todos los otros tipos de cocción, NUNCA utilice el estante inferior y NUNCA coloque nada en la parte
inferior del horno cuando esté funcionando porque esto puede dañar el esmalte�
• SIEMPRE coloque sus utensilios de cocina (platos, papel de aluminio, etc�) en la rejilla suministrada con el
aparato insertado especialmente junto con las guías del horno�

39
MODOS DE COCCIÓN
• Luz del horno: Enciende las luces del horno cuando se selecciona�
• Asar (Broil): Mejor para fundir quesos, tostar o dorar� Para resultados óptimos, use en conjunto con el ajuste
de temperatura para Asar�
• Parilla de ventilación (Fan grill): Utiliza el elemento de parilla de calor alto y el ventilador para circular al
aire caliente en todo el horno� Ideal para cocinar cortes de carnes grandes de manera que queden jugosos
por dentro y crujientes por fuera� Use un termómetro para verificar la temperatura interna� Se recomienda
no colocar la temperatura a más de 400ºF�
• Cocción de convección (Convección cooking): Utiliza el elemento calentador potente alrededor del
ventilador para distribuir uniformemente el calor en todo el horno� Esto es genial para cocción en múltiples
parrillas porque el ventilador asegura que cada parrilla es calentada�
• Descongelar (Defrost): Circula aire a temperatura ambiente para descongelar alimentos� Para la comida
como la carne, el pescado y el pan, el modo de cocinar situado entre 175~225°F (350~400°C), se puede
utilizar para acelerar el proceso de descongelación�
RELOJ DIGITAL (DIGITAL CLOCK)
1� Una vez que el horno esté conectado a la corriente eléctrica, el reloj mostrará las «12:00» con el símbolo «
» arriba de « »� (Consulte la Figura 6)�
2� Presione el botón « + » o « - » para aumentar o disminuir el número hasta que llegue a la hora correcta�
3� Después de 5 segundos el reloj comenzará automáticamente o usted puede presionar el botón «
» para
hacerlo funcionar�
TEMPORIZADOR (TIMER)
Ajuste del temporizador de cocina (Kitchen timer setting)
INSTRUCCIONES DE FUNCIONAMIENTO
Figura 6
Luz indicadora del horno
Temporizador Tiempo ajustado a
cocción final
Tiempo ajustado a inicio
de cocción
Reloj
Modo de cocción
Perilla de selección
Botones de funciones
Temperatura de cocción
Perilla de selección
HIGH BROIL
OVEN LIGHT
FAN GRILL
OFFOFF
CONVECTION
COOKING
DEFROST
150
°F
250450
300400
350
200Broil
Max/

40
1� Presione el botón « » repetidamente hasta que el símbolo « » arriba de « » parpadee�
2� Presione el botón « + » o « - » hasta que la hora que usted desee se muestre en la pantalla� El tiempo de
cocción más largo que puede ser fijado es 23 horas y 59 minutos�
3� Luego de fijar el tiempo adecuado (hora / minutos), el símbolo «
» arriba de « » comienza a parpadear�
4� Comienza la cuenta regresiva�
5� Cuando llegue al tiempo fijado, el «
» símbolo arriba del « » parpadea, y la alarma sonará�
6� Para apagar el timbre de la alarma, presione cualquier botón�
NOTA: Esta configuración no controla al horno�
IMPORTANTE:
• La configuración debe ser efectuada en 5 segundos�
• Si la electricidad falla repentinamente, todo el procedimiento de fijación y la propia hora del reloj (hora /
minutos) desaparecerán�
• Después de que la fuerza eléctrica vuelva nuevamente, «12:00» y el símbolo «
» arriba de « » se
muestre en la pantalla, usted necesitará fijar la hora otra vez�
Ajuste del temporizador totalmente automático (Full automatic timer setting)
1� Presione el botón «
» repetidamente hasta que el símbolo « » arriba de « » parpadee, y presione el
botón « + » o « - » para establecer cuanto tiempo necesita cocinar el horno�
2� Presione el botón «
» repetidamente hasta que el símbolo « » arriba de « » parpadee, y presione el
botón « + » o « - » para establecer el tiempo para que el horno pare de cocinar y se apague�
3� Ajuste las perillas para seleccionar modo de cocción y temperatura�
4� Los símbolos «
» arriba de « » y « » parpadearán� Esto indica que el temporizador de cocción ha
sido puesto� La cocción comenzará y finalizará conforme a lo programado en el temporizador�
Por ejemplo, si el alimento es requerido que sea horneado por 45 minutos y está supuesto a parar a las «2:00»:
1� Presione el botón «
» repetidamente hasta que el símbolo « » arriba de « » parpadee, y fije el
tiempo de cocción a 45 minutos�
2� Presione el botón de la función repetidamente hasta que el símbolo«
» arriba de « » haya
parpadeado, y fije la terminación de la cocción a las «2:00»�
3� El propio tiempo (hora / minuto) y el símbolo «
» se mostrará en la pantalla� Esto indica que la fijación
del temporizador de cocción ha sido puesta�
4� Cuando el reloj muestre «1:15», el horno se encenderá automáticamente y comenzará la cocción�
5� Durante el tiempo de cocción, el símbolo «
» se mantendrá parpadeando�
6� Cuando el reloj muestre las «2:00», se detendrá la cocción y el horno se apagará automáticamente, la
alarma sonará, y el símbolo «
» parpadeará�
7� Para apagar el timbre de la alarma, presione cualquier botón�
Ajuste del temporizador semiautomático (Semi-automatic timer setting)
A� Ajustando el temporizador a la duración del tiempo de cocción
1� El tiempo máximo que puede ser fijado es 10 horas�
2� Presione el botón «
» repetidamente hasta que el símbolo « » arriba de « » parpadee�
Presione el botón « + » o « - » y fije el temporizador por el tiempo que el horno necesite cocinar�
3� Ajuste las perillas para seleccionar modo de cocción y temperatura�

41
4� Cuando la cantidad total de tiempo fijado ha pasado, la cocción se detendrá y el horno se apagará
automáticamente�
5� El símbolo «
» arriba de « » parpadeará y la alarma sonará�
6� Para apagar el timbre de la alarma, presione cualquier botón�
B� Ajustando el temporizador con la hora de terminación de cocción
1� El tiempo de cocción más largo que puede ser fijado es 23 horas y 59 minutos�
2� Presione el botón «
» repetidamente hasta que el símbolo « » arriba de « » parpadee�
Presione el botón « + » o « - » y fije la hora para que el horno pare la cocción�
3� Ajuste las perillas para seleccionar modo de cocción y temperatura�
4� Cuando alcance la hora establecida, la cocción se detendrá y el horno se apagará automáticamente�
5� El «
» símbolo arriba « » parpadea, y la alarma sonará�
6� Para apagar el timbre de la alarma, presione cualquier botón�
NOTA: El procedimiento de ajuste de temporizador puede verse presionando cualquier botón de función
repetidas veces en cualquier momento�
NOTA: Ajustando la hora final de la cocción a la hora actual, el procedimiento de fijación del temporizador
puede ser cancelado�
CONSEJOS PRÁCTICOS DE COCINA
Asar (Broil)
1� Coloque la perilla de temperatura entre 150°F y Max/Broil�
2� El elemento calentador central superior se encenderá�
3� La temperatura extremadamente alta y directa del elemento calentador hace posible dorar la superficie de
carnes y asados mientras que bloquea los jugos para mantenerlas tiernas�
4� El modo «Asar (Broil)» también se recomienda ampliamente para platos que requieren una alta temperatura
en la superficie como bistec de carne de vaca, ternera, bistec de costilla, filetes y hamburguesas�
Parilla de ventilación (Fan grill)
1� Coloque la perilla de temperatura entre 150°F y 400°F�
2� El elemento calentador central superior se encenderá�
3� Esta combinación de funciones aumenta la eficacia de la radiación térmica unidireccional del elemento
calentador mediante la circulación forzada del aire en todo el horno�
4� Esto ayuda a prevenir que los alimentos se quemen en la superficie, permitiendo que el calor penetre
directo en los alimentos�
5� Excelentes resultados son logrados con las brochetas hechas con carne y vegetales, salchichas, chuletas de
costillas de cordero pollo en salsa picante, codornices y chuletas de cerdo�
6� El modo «Parilla de ventilación (Fan grill)» es ideal para cocinar filetes de pescado tales como pez espada y
sepia rellena�
Cocción de convección (Convection cooking)
1� Coloque la perilla de temperatura entre 150°F y 475°F�
2� El elemento calentador de la parte posterior y el ventilador se encenderán, garantizando calor delicado
distribuido uniformemente en todo el horno�

42
3� El modo de «Cocción de convección (Convection cooking)» es también ideal para hornear y cocinar
alimentos delicados, especialmente pasteles que necesitan levantar y para la preparación de ciertas
tartaletas en 3 estantes al mismo tiempo� He aquí algunos ejemplos: bombas de crema, galletas dulces y
sabrosas, hojaldres sabrosos, rollos suizos y pequeñas porciones de vegetales al gratín�
Descongelar (Defrost)
1� Coloque la perilla de temperatura en cualquier temperatura�
2� El ventilador en el horno hará circular el aire la temperatura de la habitación alrededor del alimento�
3� Este es recomendado para descongelar cualquier tipo de alimentos, pero en particular alimentos delicados
que no requieren calor tales como helados, cremas o postre de crema y tartas de fruta�
4� Utilizando el ventilador, el tiempo de descongelación es de aproximadamente la mitad� En caso de carne,
pescado y pan, es posible acelerar el proceso usando la «Cocción de convección (Convection cooking)»
fijando la temperatura entre 175°F y 225°F�
Ventilador de refrigeración (Cooling ventilation)
Para enfriar el exterior del aparato, este modelo está equipado con un ventilador de refrigeración, que se
enciende automáticamente, cuando el horno está caliente� Cuando el ventilador está prendido, se puede
escuchar una corriente de aire normal saliendo entre la puerta del horno y el panel de control�
NOTA: Cuando la cocción esté lista, el ventilador permanece prendido hasta que el horno se haya enfriado
suficientemente�

43
CUIDADO Y MANTENIMIENTO
LIMPIEZA
ADVERTENCIA:Para evitar el riesgo de descarga eléctrica, SIEMPRE asegúrese de que el aparato se haya
apagado y esté completamente frío antes de limpiarlo o realizar cualquier tipo de mantenimiento�
PRECAUCIÓN:
• Para evitar posibles quemaduras, tenga cuidado cuando limpie el aparato�
• NO intente limpiar el aparato cuando el horno o los cabezales de los quemadores estén todavía calientes�
• Para evitar posibles quemaduras, NO intente ninguna de las instrucciones de limpieza siguientes antes de
apagar todos los quemadores de la superficie permitiendo que se enfríen�
NOTA: SIEMPRE siga las instrucciones en la etiqueta de los productos de limpieza�
Perillas de control
• Para la limpieza general, utilice agua caliente, jabonosa y un paño�
• Para sucios más difíciles y grasa acumulada, aplique detergente líquido directamente sobre el sucio�
Enjuague con un paño húmedo y seque�
• NO utilice lana de acero o limpiadores ácidos en las perillas ya que pueden rayar�
Exterior de acero inoxidable
• Limpie el acero inoxidable con agua caliente, jabonosa y una esponja� Enjuague con agua limpia y un paño�
• NO use limpiadores con altas concentraciones de cloruros o cloros� NO use limpiadores abrasivos� Utilice
sólo limpiadores de cocina que sean hechos especialmente para limpiar acero inoxidable�
Puerta de vidrio exterior
• Limpia la puerta de vidrio utilizando productos no abrasivos o esponjas y séquela con un paño suave�
• Use limpiador de vidrios� Aplique limpiador de vidrios al paño suave o a la esponja, no directamente en el panel�
Interior del horno
• Este aparato NO tiene función auto limpiante�
• Utilice un producto de limpieza apropiado designado especialmente para limpiar la parte interior de los hornos�
• El jabón debe ser enjuagado y el interior secado por completo�
• Evite utilizar detergentes abrasivos (por ejemplo, polvos de limpieza, etc�) y esponjas abrasivas para vajillas
o ácidos (tales como removedores - cal, etc�) dado que estos pueden dañar el esmalte�
• Si las manchas de grasa y el sucios son particularmente difíciles de remover, use un producto especial para
limpieza de horno, siguiendo las instrucciones suministradas en el paquete�
• NUNCA utilice un limpiador de vapor para limpiar adentro del horno�
• Si usted utiliza su horno por un período de tiempo extendido, se puede formar condensación� Séquela
usando un paño suave�
• Hay un sello de goma que rodea la abertura del horno que garantiza su perfecto funcionamiento� Verifique
la condición de este sello regularmente� Si es necesario, límpielo y evite usar productos abrasivos u objetos
para hacer eso� Si está dañado, comuníquese con el vendedor� Se recomienda evitar el uso del horno hasta
que haya sido reparado�
• NUNCA forre el fondo del horno con papel aluminio, dado que la acumulación de calor consecuente puede
comprometer la cocción y hasta dañar el esmalte�

44
NOTA: SIEMPRE siga las instrucciones en la etiqueta de los productos de limpieza�
Elemento de parrilla inferior interior
• Para quitar el elemento, apoye un lado con su mano mientras retira el retenedor con la otra�
• Cuando limpie, asegúrese de no aplicar excesiva fuerza en el elemento dado que es frágil�
• Coloque de nuevo el elemento y asegure el retenedor de vuelta a su lugar�
• NO utilice el horno con el elemento de parrilla colgando hacia abajo – este debe ser colocado de nuevo en
su lugar después de la limpieza�
Quitar la puerta del horno
ADVERTENCIA:
• Asegúrese de que el horno esté frío y la electricidad al horno haya sido apagada antes de quitar la puerta�
De no hacerlo así podría provocar descarga eléctrica o quemaduras�
• La puerta del horno es pesada y frágil� Utilice ambas manos para quitar la puerta del horno� La puerta del
frente es vidrio� Manéjela cuidadosamente para evitar que se rompa�
• Sostenga sólo los lados de la puerta del horno� NO agarre la manija dado que podría balancearse en su
mano y causar daños o lesiones�
• No sostener la puerta del horno firme y adecuadamente podría resultar en lesiones personales o daño al
producto�
• Para evitar lesiones porque la bisagra de soporte se cierre, asegúrese de que las manijas estén aseguradas
en su lugar antes de quitar la puerta� Además,NO FUERCE la puerta abierta o cerrada� La bisagra podría ser
dañada y podrían resultar lesiones�
Siga estas instrucciones:
1� Abra la puerta completamente� (Consulte la Figura 7)�
2� Levante y empuje las manijas pequeñas ubicadas en las dos bisagras hacia atrás� (Consulte la Figura 8)�
3� Mientras sujeta la puerta por cada lado, cierre la puerta hasta que la unidad toque las manijas� Luego
continúe cerrado la puerta hasta que esté como a 4 pulgadas (10 cm) de estar completamente cerrada�
4� Hale la puerta hacia usted, sacándola afuera de su puesto� La puerta saldrá suavemente del horno� (Consulte
la Figura 9�)
5� Para colocar nuevamente la puerta, realice el procedimiento anterior a la inversa�
Figura 7 Figura 8 Figura 9
NOTA: Si la puerta no sale del horno con facilidad, NO la fuerce�
REEMPLAZAR LA LUZ INTERIOR DEL HORNO
ADVERTENCIA: Peligro de descarga eléctrica

45
No seguir estas instrucciones puede resultar en muerte, incendio odescarga eléctrica�
1� Desconecte el horno de la fuente de alimentación mediante el interruptor omnipolar utilizado para la
conexión a la red eléctrica, o desenchufe el aparato si el enchufe es accesible�
2� Quite la cubierta de vidrio de la bombilla girándola en el sentido contrario al de las agujas del reloj�
(Consulte la Figura 10)�
Figura 11
Figura 10
3� Reemplace la bombilla vieja con una bombilla de horno nueva
o con las mismas características siguientes:
• Voltaje: 208 - 240V
• Vatiaje: 25W
• Tipo: E14
4� Ponga la cubierta de vidrio de nuevo y reconecte el horno a la
fuente de alimentación principal�
TRANSPORTE
ADVERTENCIA: Peligro de descarga eléctrica
No seguir estas instrucciones puede resultar en muerte,
incendio o descarga eléctrica�
1� Antes de mover su horno, o realizar mantenimiento,
desconéctelo de la fuente de alimentación�
2� Para evitar daños a la ventilación del horno, utilice un
trasporte que sea suficientemente ancho para sostener
la totalidad de la parte inferior de la unidad� (Consulte
la Figura 11)�

46
SOLUCIÓN DE PROBLEMAS
Problema Posibles causas Soluciones
No funciona o no
enciende�
Sin electricidad
Verifique que los cables eléctricos estén conectados a la red
eléctrica correctamente� Consulte la sección «Instalación
eléctrica» en la página 35�
El fusible del hogar se fundió o
el interruptor se disparó�
Reemplace el fusible o reestablezca el interruptor�
El horno no funciona�
Los controles del horno no
están fijados correctamente�
Asegúrese de que el horno esté prendido y fijado en el modo
correcto de cocción�
Los ventiladores de
enfriamiento funcionan
cuando se está
horneando o asando�
No hay problema
Es normal que el ventilador se encienda automáticamente
cuando el horno está en uso y por algún tiempo después para
enfriar�
La temperatura del
horno es muy alta o
muy baja�
El horno no fue precalentado�
Permita que el horno se precaliente de manera que llegue a la
temperatura adecuada cuando sus alimentos se lleven adentro�
Las parrillas están colocadas
incorrectamente�
Trate cambiando la posición de la parrilla�
La masa no esta distribuida de
manera uniforme�
Verifique que la masa esté nivelada en el recipiente�
Se ha utilizado un tiempo de
cocción incorrecto�
Ajuste el tiempo de cocción�
La puerta del horno estaba
abierta durante la cocción�
Abrir el horno para mirar los alimentos libera calor del horno y
puede resultar en mayor tiempo de cocción�
Los artículos horneados
están muy dorados en
el fondo�
La parrilla del horno está
colocada muy baja�
Mueva la parrilla a una posición más alta en el horno�
Los bordes de las
cortezas de los pays
se están dorando muy
pronto�
La temperatura está muy
caliente�
Utilice papel de aluminio para cubrir el borde de la corteza
y/o reduzca la temperatura de cocción al horno�
La luz del horno no
funciona�
La bombilla de luz está floja o
defectuosa�
Apriete o reemplace la bombilla�
El interruptor de funcionamien-
to de la luz está roto�
Póngase en contacto con un técnico calificado�
El horno hace ruidos� No hay problema
Ese es el sonido del elemento calentador encendiéndose y
apagándose y es normal�
Parpadeos de la
pantalla�
Corte de electricidad o sobre-
carga de tensión
Reajuste el reloj� Si el horno estaba en uso, reajústelo�

47
GARANTÍA LIMITADA
MC Appliance Corporation garantiza que todas las Horno de pared carecen de defectos en el material y la mano de obra y acuerda
solucionar cualquiera de estos defectos o instalar la(s) parte(s) nueva(s) (a elección de la compañía) en caso de que la unidad haya
fallado durante el periodo de garantía� Las partes y gastos de reparación están cubiertos en esta unidad por un periodo de un año a
partir de la fecha de compra� Es necesario presentar una copia del recibo o factura de compra con fecha para obtener los servicios
de la garantía, el reemplazo o el reembolso�
Esta garantía cubre los aparatos que se usen dentro de los Estados Unidos contiguos, Alaska, Hawái y Puerto Rico� La garantía no
cubre lo siguiente:
• Daños debido al daño del envío o a la instalación incorrecta�
• Daños debido al mal uso o abuso�
• Pérdidas de contenido debido a falla de la unidad�
• Las reparaciones se realizaron por los agentes desautorizados del servicio�
• Llamadas de servicio que no implican defectos en material y la ejecución tal como instrucción en el uso apropiado
del producto o de la instalación incorrecta�
• Reemplazo o reajuste de los fusibles o de los interruptores de la casa�
• Falla de este producto si se usa con fines distintos a los que fue diseñado�
• Costes de la disposición de unidades falladas no vueltas a nuestra fábrica�
• Todos los gastos de entrega/instalación incurridos como resultado de una unidad que no cumple con lo especificado�
• Gastos de viajes y el transporte de los productos principales de servicio si su aparato está situado en una zona remota
donde el servicio por un técnico de servicio no está disponible�
• La remoción y reinstalación de su gran aparato, si está instalado en un lugar inaccesible o no está instalado de
conformidad con las instrucciones de instalación publicadas�
• Restituciones por productos no reparables se limita al precio pagado por la unidad por el recibo de compra�
• Esta garantía es intransferible� Esta garantía es válida exclusivamente para el comprador original y no se extiende a
ningún otro propietario o propietarios subsiguientes�
Limitaciones de remedios y exclusiones:
La reparación del producto de acuerdo con los términos de este documento, es el único y exclusivo remedio determinado en
esta garantía limitada� Todas y cada una de las garantías implicadas, incluyendo la calidad de comerciable y capacidad para un
propósito particular, se limitan mediante la presente a un año o el periodo más corto permitido por la ley� MC Appliance
Corporation no es responsable por daños incidentales ni resultantes y ningún representante o persona alguna están autorizados
para asumir de parte nuestra ninguna otra responsabilidad en relación con la venta de este producto� Bajo ninguna circunstancia
se le permite al consumidor regresar esta unidad a la fábrica sin consentimiento previo por escrito de MC Appliance Corporation�
Algunos estados prohíben la exclusión o limitación por daños incidentales o resultantes, o limitaciones en las garantías implícitas�
Esta garantía le otorga a usted derechos legales específicos, y usted puede también tener otros derechos que varían según la
entidad federa!va donde se encuentre�
Modelo Piezas Trabajo Tipo de servicio
MCSWOE24S Uno año Uno año Lleve adentro
Para servicio o asistencia, llame por favor al 888-775-0202� O visítenos en www.mcappliance.com para solicitar el servicio de
garantía o repuestos�

48
CNA International, Inc. realiza negocios bajo el nombre de MC Appliance
Corporation. Derechos reservados.
El logotipo Magic Chef® es una marca registrada de CNA International, Inc.
www.mcappliance.com Impreso en China
-
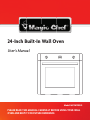 1
1
-
 2
2
-
 3
3
-
 4
4
-
 5
5
-
 6
6
-
 7
7
-
 8
8
-
 9
9
-
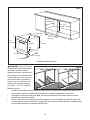 10
10
-
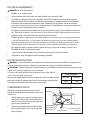 11
11
-
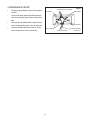 12
12
-
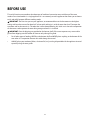 13
13
-
 14
14
-
 15
15
-
 16
16
-
 17
17
-
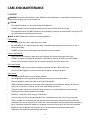 18
18
-
 19
19
-
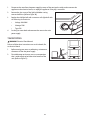 20
20
-
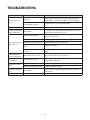 21
21
-
 22
22
-
 23
23
-
 24
24
-
 25
25
-
 26
26
-
 27
27
-
 28
28
-
 29
29
-
 30
30
-
 31
31
-
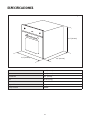 32
32
-
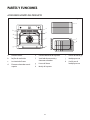 33
33
-
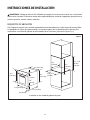 34
34
-
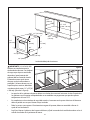 35
35
-
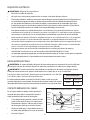 36
36
-
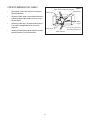 37
37
-
 38
38
-
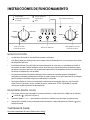 39
39
-
 40
40
-
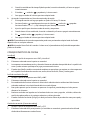 41
41
-
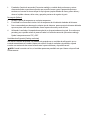 42
42
-
 43
43
-
 44
44
-
 45
45
-
 46
46
-
 47
47
-
 48
48


