HOTPOINT/ARISTON BWMD 742 (EU) Guía del usuario
- Categoría
- Lavadoras
- Tipo
- Guía del usuario

GB
1
Contents
Installation, 2-3-4-5
Unpacking and levelling
Connecting the electricity and water supplies
The first wash cycle
Technical data
Instructions for the fitter
Description of the washing machine, 6-7
Control panel
Display
Running a wash cycle, 8
Wash cycles and functions, 9
Table of wash cycles
Wash functions
Detergents and laundry, 10
Detergent dispenser drawer
Preparing the laundry
Special wash cycles
Load balancing system
Precautions and tips, 11
General safety
Disposal
Opening the porthole door manually
Care and maintenance, 12
Cutting off the water or electricity supply
Cleaning the washing machine
Cleaning the detergent dispenser drawer
Caring for the door and drum of your appliance
Cleaning the pump
Checking the water inlet hose
Troubleshooting, 13
Service, 14
BWMD 742
Instructions for use
WASHING MACHINE
English,1
GB
ES
Español,29Italiano,15
I
Русский,43
CIS
DE
Deutsch,57

2
GB
! This instruction manual should be kept in a safe place for
future reference. If the washing machine is sold, transferred
or moved, make sure that the instruction manual remains
with the machine so that the new owner is able to familiari-
se himself/herself with its operation and features.
! Read these instructions carefully: they contain vital infor-
mation relating to the safe installation and operation of the
appliance.
Unpacking and levelling
Unpacking
1. Remove the washing machine from its packaging.
2. Make sure that the washing machine has not been
damaged during the transportation process. If it has been
damaged, contact the retailer and do not proceed any
further with the installation process.
3. Remove the 4 protective
screws (used during tran-
sportation) and the rubber
washer with the correspon-
ding spacer, located on the
rear part of the appliance
(see figure).
4. Close off the holes using the plastic plugs provided.
5. Keep all the parts in a safe place: you will need them
again if the washing machine needs to be moved to ano-
ther location.
! Packaging materials should not be used as toys for
children.
Levelling
1. Install the washing machine on a flat sturdy floor, without
resting it up against walls, furniture cabinets or anything
else.
2. If the floor is not perfectly
level, compensate for any
unevenness by tightening
or loosening the adjusta-
ble front feet (see figure);
the angle of inclination,
measured in relation to the
worktop, must not exceed
2°.
Levelling the machine correctly will provide it with stability,
help to avoid vibrations and excessive noise and prevent it
from shifting while it is operating. If it is placed on carpet or
a rug, adjust the feet in such a way as to allow a sufficient
ventilation space underneath the washing machine.
Connecting the electricity and water
supplies
Connecting the water inlet hose
1. Connect the supply pipe
by screwing it to a cold
water tap using a ¾ gas
threaded connection (see
figure).
Before performing the con-
nection, allow the water to
run freely until it is perfectly
clear.
2. Connect the inlet hose
to the washing machine by
screwing it onto the corre-
sponding water inlet of the
appliance, which is situa-
ted on the top right-hand
side of the rear part of the
appliance (see figure).
3. Make sure that the hose is not folded over or bent.
! The water pressure at the tap must fall within the values
indicated in the Technical details table (see next page).
! If the inlet hose is not long enough, contact a specialised
shop or an authorised technician.
! Never use second-hand hoses.
! Use the ones supplied with the machine.
Installation

GB
3
Connecting the drain hose
Connect the drain hose,
without bending it, to a drai-
nage duct or a wall drain
located at a height between
65 and 100 cm from the
floor;
alternatively, rest it on
the side of a washbasin
or bathtub, fastening the
duct supplied to the tap
(see figure). The free end
of the hose should not be
underwater.
! We advise against the use of hose extensions; if it is
absolutely necessary, the extension must have the same
diameter as the original hose and must not exceed 150 cm
in length.
Electrical connections
Before plugging the appliance into the electricity socket,
make sure that:
• the socket is earthed and complies with all applicable
laws;
• the socket is able to withstand the maximum power load
of the appliance as indicated in the Technical data table
(see opposite);
• the power supply voltage falls within the values indicated
in the Technical data table (see opposite);
• the socket is compatible with the plug of the washing
machine. If this is not the case, replace the socket or the
plug.
! The washing machine must not be installed outdoors,
even in covered areas. It is extremely dangerous to leave
the appliance exposed to rain, storms and other weather
conditions.
! When the washing machine has been installed, the elec-
tricity socket must be within easy reach.
! Do not use extension cords or multiple sockets.
! The cable should not be bent or compressed.
! The power supply cable must only be replaced by autho-
rised technicians.
Warning! The company shall not be held responsible in the
event that these regulations are not respected.
The first wash cycle
Once the appliance has been installed, and before you use
it for the first time, run a wash cycle with detergent and no
laundry, using the wash cycle (60°C).
65 - 100 cm
Technical data
Model
BWMD 742
Dimensions
width 59.5 cm
height 81.5 cm
depth 54.5 cm
Capacity
from 1 to 7 kg
Electrical
connections
please refer to the technical data plate
fixed to the machine
Water connections
maximum pressure 1 MPa (10 bar)
minimum pressure 0.05 MPa (0.5 bar)
drum capacity 52 litres
Spin speed
up to 1400 rotations per minute
Test wash cycles
in accordance
with directives
1061/2010 and
1015/2010
programme
(60°) (1st press of the button);
Standard Cotton 60°C.
programme (40°) (2nd press of the button);
Standard Cotton 40°C.
This appliance conforms to the following
EC Directives:
- 2004/108/EC (Electromagnetic Compatibility)
- 2006/95/EC (Low Voltage)
- 2012/19/EU

4
GB
Instructions for the fitter
Mounting the wooden panel onto the door and inser-
ting the machine into cabinets:
In the case where the machine must be shipped for final
installation after the wooden panel has been mounted, we
suggest leaving it in its original packaging. The packaging was
designed to make it possible to mount the wooden panel
onto the machine without removing it completely (see figures
below).
The wooden panel that covers the face of the machine must
not be less than 18 mm in thickness and can be hinged on
either the right or left. For the sake of practicality when using
the machine, we recommend that the panel be hinged on the
same side as the door for the machine itself - the left.
A
B
C
D
E
Tur seite
Door Mounting Accessories (Fig. 1-2-3-4-5).
Fig. 1
N° 2 Hinges
N° 1 Magnet N° 1 Magnet plate
N° 1 Rubber plug
N° 2 Hinge Supports
N° 4 Spacers
Fig. 2
Fig. 3 Fig. 4
Fig. 5
Fig. 4/B
- No. 6 type A self-threading screws, l =13 mm.
- No. 2 type B metric, countersunk screws, l =25; for faste-
ning the magnet plate to the cabinet.
- No. 4 type C metric screws, l =15 mm; for mounting the
hinge supports to the cabinet.
- No. 4 type D metric screws, l =7 mm; for mounting the
hinges on the supports.
Mounting the Parts onto the Face of the Machine.
- Fit the hinge supports to the appliance front panel, positioning
the hole marked with an arrow in fig. 1 so that it is on the inner
side of the front panel. Fit a spacer (fig. 4/B) between the
surfaces using type C screws.
- Fit the magnet plate at the top of the opposite side, using
type B screws to fix two spacers (fig. 4/B) between the plate
and the surface.

GB
5
Using the Drilling Template.
- To trace the positions of the holes on the left-hand side of
the panel, align the drilling template to the top left side of the
panel using the lines traced on the extremities as a reference.
- To trace the positions of the holes on the right-hand side of
the panel, align the drilling template to the top right side of the
panel.
- Use an appropriately sized router to mill the holes for the two
hinges, the rubber plug and the magnet.
Mounding the Parts onto the Wooden Panel (Door).
- Insert the hinges into the holes (the movable part of the hin-
ge must be positioned facing away from the panel) and fasten
them with the 4 type A screws.
- Insert the magnet into the top hole on the opposite side of
the hinges and fasten it with the two type B screws.
- Insert the rubber plug into the bottom hole.
The panel is now ready to be mounted onto the machine.
Mounting the Panel into the machine.
Insert the nib of the hinge (indicated by the arrow in fig. 2) into
the hole for the hinge and push the panel towards the front of
the machine. Fasten the two hinges with the type D screws.
Fastening the plinth guide.
If the machine is installed at the end of a set of modular
cabinets, mount either one or both of the guides for the base
molding (as shown in fig. 8). Adjust them for depth based on
the position of the base molding, and, if necessary, fasten the
base to the guides (fig. 9).
This is how to assemble the plinth guide (fig. 8):
Fasten angle P using screw R, insert plinth guide Q into the
special slot and once it is in the desired position, lock it in
place using angle P and screw R.
Inserting the machine into the Cabinet.
- Push the machine into the opening, aligning it with the cabi-
nets (fig. 6).
- Regulate the adjustable feet to raise the machine to the
appropriate height.
- To adjust the position of the wooden panel in both the
vertical and horizontal directions, use the C and D screws, as
shown in fig. 7.
Important: close the lower part of the appliance front by
ensuring that the plinth rests against the floor.
Fig. 8 Fig. 9
Accessories provided for the height adjustment.
The following can be found inside the polystyrene lid (fig. 10): 2
crossbars (G), 1 strip (M)
the following can be found inside
the appliance drum:
4 additional feet (H),
4 screws (I),
4 screws (R),
4 nuts (L),
2 plinth guides (Q)
Adjusting the appliance height.
The height of the appliance can be adjusted (from 815 mm to
835 mm), by turning the 4 feet.
Should you require the appliance to be placed higher than the
above height, you need to use the following accessories to
raise it to up to 870 mm:
the two crossbars (G); the 4 feet (H); the 4 screws (I); the 4
nuts (L) then perform the following operations (fig. 11):
remove the 4 original feet, place a crossbar G at the front of the
appliance, fastening it in place using screws I (screwing them in
where the original feet were) then insert the new feet H.
Repeat the same operation at the back of the appliance.
Now adjust feet H to raise or lower the appliance from 835 mm
to 870 mm.
Once you have reached the desired height, lock nuts L onto
crossbar G.
To adjust the appliance to a height between 870 mm and 900
mm, you need to mount strip M, adjusting feet H to the requi-
red height.
Insert the strip as follows:
loosen the three screws N situated at the front of the Top cover
of the appliance, insert strip M as shown in fig. 12, then fasten
screws N.
D
C
C
570
min
815
540
595
820 ÷ 900
600 min
Fig. 6 Fig. 7
L
I
H
G
M
Fig. 11 Fig. 12
Fig. 10

6
GB
Detergent dispenser drawer: used to dispense
detergents and washing additives (see “Detergents and
laundry”).
ON/OFF button : press this briefly to switch the ma-
chine on or off. The START/PAUSE indicator light, which
flashes slowly in a green colour shows that the machine is
switched on. To switch off the washing machine during the
wash cycle, press and hold the button for approximately 2
seconds; if the button is pressed briefly or accidentally the
machine will not switch off. If the machine is switched off
during a wash cycle, this wash cycle will be cancelled.
WASH CYCLE SELECTOR buttons: used to set the
desired wash cycle (see “Table of wash cycles”).
MEMORY button: press and hold the button to store a
cycle with your own set of preferences in the memory of
the machine. To recall a previously stored cycle, press the
MEMORY button.
FUNCTION buttons: press the button to select the
desired function. The corresponding indicator light on the
display will switch on.
SPIN button : press to reduce or completely exclude
the spin cycle - the value is indicated on the display.
TEMPERATURE button : press to decrease the tem-
perature: the value will be shown on the display.
CONTROL PANEL LOCK button : to activate
the control panel lock, press and hold the button for
approximately 2 seconds. When the symbol is
illuminated, the control panel is locked. This means it
is possible to prevent wash cycles from being modified
accidentally, especially where there are children in the
home. To deactivate the control panel lock, press and
hold the button for approximately 2 seconds.
DELAYED START button : press to set a delayed start
time for the selected wash cycle. The delay time will be
shown on the display.
START/PAUSE button with indicator light: when the gre-
en indicator light flashes slowly, press the button to start a
wash cycle. Once the cycle has begun the indicator light
will remain lit in a fixed manner. To pause the wash cycle,
press the button again; the indicator light will flash in an
orange colour. If the symbol is not illuminated, the door
may be opened. To start the wash cycle from the point at
which it was interrupted, press the button again.
Standby mode
This washing machine, in compliance with new energy sa-
ving regulations, is fitted with an automatic standby system
which is enabled after about 30 minutes if no activity is
detected. Press the ON-OFF button briefly and wait for the
machine to start up again.
Description of the washing
machine
SPIN SPEED
Button
START/PAUSE
button with indicator
light
Control panel
TEMPERATURE
Button
WASH
CYCLE
SELECTOR
Buttons
Detergent dispenser drawer
FUNCTION
buttons
ON/OFF
button
DISPLAY
DELAYED
START
Button
MEMORY
Button
CONTROL PANEL
LOCK button

GB
7
Display
The display is useful when programming the machine and provides a great deal of information.
The two upper strings A and B provide details of the wash cycle selected, the wash cycle phase in progress and all informa-
tion relating to the progress status of the wash cycle.
String C shows the time remaining until the end of the wash cycle in progress and, if a DELAYED START has been set, the
time remaining until the start of the selected wash cycle.
String D shows the maximum spin speed value (this depends on the selected wash cycle); if the wash cycle does not include
a spin cycle, the string remains unused.
String E shows the maximum temperature value which may be selected (this depends on the wash cycle used); if the tempe-
rature of the wash cycle cannot be modified, the string remains unused.
Indicator lights F correspond to the functions and light up when the selected function is compatible with the set wash cycle.
Door locked symbol
If the symbol is lit, this indicates that the washing machine door is blocked to prevent it from being opened accidentally. To
prevent any damage from occurring, wait for the symbol to switch itself off before opening the appliance door.
N.B.: if the DELAYED START function has been activated, the door cannot be opened; pauses the machine by pressing the
START/PAUSE button if you wish to open it.
! The first time the machine is switched on, you will be asked to select the language and the display will automatically show
the language selection menu.
To select the desired language press the X and Y buttons; to confirm the selection press the Z button.
To change the language switch off the machine and press buttons X, Y, Z simultaneously until an alarm is heard: the
language-selection menu will be displayed again.
A
B
C
D
E
Z
X
Y
START/PAUSE
button with indicator
light
F

8
GB
Running a wash cycle
1. SWITCH THE MACHINE ON. Press the button;
the text HELLO will appear on the display and the
START/PAUSE indicator light will flash slowly in a green
colour.
2. LOAD THE LAUNDRY. Open the porthole door.
Load the laundry, making sure you do not exceed
the maximum load value indicated in the table of
programmes on the following page.
3. MEASURE OUT THE DETERGENT. Pull out the
detergent dispenser drawer and pour the detergent into
the relevant compartments as described in “Detergents
and laundry”.
4. CLOSE THE DOOR.
5. SELECT THE WASH CYCLE. Press one of the WASH
CYCLE SELECTOR buttons to select the required wash
cycle; the name of the wash cycle will appear on the
display. A temperature and spin speed is set for each
wash cycle; these may be adjusted. The duration of the
cycle will appear on the display.
6. CUSTOMISE THE WASH CYCLE. Use the relevant
buttons:
Modifying the temperature and/or spin
speed. The machine automatically selects the
maximum temperature and spin speed set for the
selected wash cycle; these values cannot therefore
be increased. The temperature can be decreased by
pressing the button, until the cold wash “OFF”
setting is reached. The spin speed may be progressively
reduced by pressing the button, until it is completely
excluded (the “OFF” setting). If these buttons are
pressed again, the maximum values are restored.
! Exception: if the (60°C)
(1st press of the button)
programme is selected, the temperature can be
increased up to a value of 90°C.
Setting a delayed start.
To set a delayed start for the selected programme,
press the corresponding button repeatedly until the
required delay period has been reached. When this
option is enabled, the symbol lights up on the
display. To remove the delayed start function press the
button until the text “OFF” appears on the display.
Modifying the cycle settings.
• Press the button to enable the function; the indicator
light corresponding to the button will switch on.
• Press the button again to disable the function; the
indicator light will switch off.
! If the selected function is not compatible with the
programmed wash cycle, the indicator light will flash
and the function will not be activated.
! If the selected function is not compatible with
another function which has been selected previously,
the indicator light corresponding to the first function
selected will flash and only the second function will
be activated; the indicator light corresponding to the
enabled function will remain lit.
! The functions may affect the recommended load value
and/or the duration of the cycle.
7. START THE PROGRAMME. Press the START/
PAUSE button. The corresponding indicator light will
become green, remaining lit in a fixed manner, and the
door will be locked (the DOOR LOCKED symbol will
be on). During the wash cycle, the name of the phase
in progress will appear on the display. To change a
wash cycle while it is in progress, pause the washing
machine using the START/PAUSE button (the START/
PAUSE indicator light will flash slowly in an orange
colour); then select the desired cycle and press the
START/PAUSE button again.
To open the door while a cycle is in progress, press
the START/PAUSE button; if the DOOR LOCKED
symbol is switched off the door may be opened. Press
the START/PAUSE button again to restart the wash
cycle from the point at which it was interrupted.
8. THE END OF THE WASH CYCLE. This will be
indicated by the text “END OF CYCLE” on the display;
when the DOOR LOCKED symbol switches off
the door may be opened. Open the door, unload the
laundry and switch off the machine.
! If you wish to cancel a cycle which has already begun,
press and hold the button. The cycle will be stopped
and the machine will switch off.

GB
9
Wash cycles and functions
Wash functions
Super Wash
This option offers a high-
performance wash due to the
greater quantity of water used
in the initial phase of the cycle,
and due to the increased wash
cycle duration, is particular-
ly useful for the removal of
stubborn stains. It can be used
with or without bleach. If you
desire bleaching, insert the
extra tray compartment (4) into
compartment 1. When pouring
in the bleach, be careful not
to exceed the “max” level marked on the central pivot (see
figure). To bleach laundry without carrying out a full wash
cycle, pour the bleach into the extra compartment 4, select
the “Rinse” cycle and activate the “Super Wash” option.
! The use of extra compartment 4 excludes the “Pre-wash”
function.
! It cannot be used with the , , , , “Fast Spin Cottons”,
“Pump out”.
Extra Rinse
By selecting this option, the efficiency of the rinse is increased
and optimal detergent removal is guaranteed. It is particularly
useful for sensitive skin.
! It cannot be used with the “Fastwash 30’”, , , “Fast Spin
Cottons”, “Pump out”.
Table of wash cycles
Easy Iron
By selecting this function, the wash and spin cycles will be modified
in order to reduce the formation of creases. At the end of the cycle
the washing machine will perform slow rotations of the drum; the
EASY IRON and START/PAUSE indicator lights will flash (orange)
and the text “END OF CYCLE” will appear on the display. To end
the cycle, press the START/PAUSE button or the EASY IRON
button. To drain the water so that the laundry may be removed,
press the START/PAUSE button or the EASY IRON button.
! It cannot be used with the , “Fastwash 30’”, , , .
Prewash
If this function is selected, the pre-wash cycle will run; this is
useful for removing stubborn stains.
N.B.: put the detergent in the relevant compartment.
! It cannot be used with the , , , , ,
(60°), (40°),
.
Eco Wash
The Eco Wash function saves energy by not heating the
water used to wash your laundry – an advantage both to the
environment and to your energy bill. Instead, intensified wash
action and water optimisation ensure great wash results in the
same average time of a standard cycle.
For the best washing results we recommend the usage of a
liquid detergent.
! It cannot be used with the , , , , , .
M
AX
1
2
4
3
Wash cycles
Description of the wash cycle
Max. temp.
(°C)
Max. speed
(rpm)
Detergents
Max. load
(kg)
Residual dam-
pness %
Energy con-
sumption kWh
Total water lt
Cycle duration
Prewash
Wash
Fabric
softener
Bleach
Anti Stain
40° 1400
4 - -
-
180’
Standard Cotton 60° (1) (1st press of the button): heavily soiled whites and
delicate colours.
60°
(Max. 90°)
1400
(3)
7 53 1,10 52,5 190’
Standard Cotton 40° (2) (2nd press of the button): lightly soiled whites and
delicate colours.
40° 1400 -
7 53 0,99
82
185’
Standard Cotton 20° (3rd press of the button): lightly soiled whites and
delicate colours.
20° 1400 -
7 - -
-
170’
Synthetics Resistant (1st press of the button): heavily soiled resistant colours. 60° 800
3 44 0,93 47 110’
Synthetics Resistant (4) (1st press of the button): lightly soiled resistant colours. 40° 800
3 44 0,57 46 95’
Synthetics Delicate (2nd press of the button): lightly soiled resistant colours. 40° 800
3 - - - 70’
Fastwash 60' (1st press of the button): to refresh normal soiled garments quic-
kly (not suitable for wool, silk and clothes which require washing by hand).
60° 1400 -
- 3,5 53 0,81 40 60’
Fastwash 30' (2nd press of the button): to refresh lightly soiled garments quic-
kly (not suitable for wool, silk and clothes which require washing by hand).
30° 800 -
- 3 71 0,15 35 30’
M
My Cycle: allows for any wash cycle to be stored.
Anti Allergy
60° 1400 -
- 4 - - - 195’
Woolmark Platinum (Wool): for wool, cashmere, etc. 40° 800 -
- 1,5 - - - 70’
Delicates
30° 0 -
- 1 - - - 80’
Fast Spin Cottons (1st press of the button) - 1400 - - - - 7 - - - 16’
Rinse Cottons (2nd press of the button) - 1400 - -
7 - - - 36’
Pump out (3rd press of the button) - 0 - - - - 7 - - - 2’
The length of cycle shown on the display or in this booklet is an estimation only and is calculated assuming standard working conditions. The actual duration can vary according to factors
such as water temperature and pressure, the amount of detergent used, the amount and type of load inserted, load balancing and any wash options selected.
1) Test wash cycle in compliance with directive 1061/2010: set wash cycle 60°C (1st press of the button).
This cycle is designed for cotton loads with a normal soil level and is the most efficient in terms of both electricity and water consumption; it should be used for garments which can be
washed at 60°C. The actual washing temperature may differ from the indicated value.
2) Test wash cycle in compliance with directive 1061/2010: set wash cycle 40°C (2nd press of the button).
This cycle is designed for cotton loads with a normal soil level and is the most efficient in terms of both electricity and water consumption; it should be used for garments which can be
washed at 40°C. The actual washing temperature may differ from the indicated value.
3) At 60 °C the “Prewash” function cannot be selected.
For all Test Institutes:
2) Long wash cycle for cottons: set wash cycle 40°C (2nd press of the button).
4) Long wash cycle for synthetics: set wash cycle 60°C (1st press of the button); temperature of 40°C (press TEMPERATURE button).

10
GB
Detergent dispenser drawer
Good washing results also depend on the correct dose of
detergent: adding too much detergent will not necessa-
rily result in a more efficient wash, and may in fact cause
build up on the inside of your appliance and contribute to
environmental pollution.
! Use powder detergent for white cotton garments, for
pre-washing, and for washing at temperatures over 60°C.
! Follow the instructions given on the detergent packaging.
! Do not use hand washing detergents because these
create too much foam.
Open the detergent di-
spenser drawer and pour
in the detergent or washing
additive, as follows.
compartment 1: Pre-wash detergent (powder)
Before pouring in the detergent, make sure that extra com-
partment 4 has been removed.
compartment 2: Detergent for the wash cycle
(powder or liquid)
Liquid detergent should only be poured in immediately
prior to the start of the wash cycle.
compartment 3: Additives (fabric softeners, etc.)
The fabric softener should not overflow the grid.
extra compartment 4: Bleach
Preparing the laundry
• Divide the laundry according to:
- the type of fabric/the symbol on the label
- the colours: separate coloured garments from whites
• Empty all garment pockets and check the buttons.
• Do not exceed the listed values, which refer to the
weight of the laundry when dry: see “Table of wash
cycles”.
How much does your laundry weigh?
1 sheet 400-500 g
1 pillow case 150-200 g
1 tablecloth 400-500 g
1 bathrobe 900-1200 g
1 towel 150-250 g
Special wash cycles
Anti Stain : this programme is suitable to heavily-soiled
garments with resistant colours. It ensures a washing
class that is higher than the standard class (A class). When
running the programme, do not mix garments of different
colours. We recommend the use of powder detergent.
Pre-treatment with special additives is recommended if
there are obstinate stains.
Standard Cotton 20°: ideal for lightly soiled cotton loads.
The effective performance levels achieved at cold tempe-
ratures, which are comparable to washing at 40°, are gua-
ranteed by a mechanical action which operates at varying
speed, with repeated and frequent peaks.
Anti Allergy: use programme to remove major allergens
such as pollen, mites, cat’s and dog’s hair.
Wool: the wool wash cycle on this Hotpoint/Ariston ma-
chine has been tested and approved by The Woolmark
Company for washing wool garments labelled as hand wa-
shable provided that the garments are washed according
to the instructions on the garment label and those issued
by the manufacturer of this washing machine. Hotpoint/
Ariston is the first washing machine brand to be approved
by The Woolmark Company for Apparel Care- Platinum for
its washing performance and consumption of energy and
water. (M1126)
Delicates: use programme to wash very delicate
garments with decorative features, such as diamantes and
sequins.
We recommend turning the garments inside out before
washing and placing small items into the special bag
for washing delicates. Use liquid detergent on delicate
garments for best results.
To wash Silk garments and Curtains, select cycle and
then function (in this case it will also be possible
to enable the “Extra Rinse” function); the machine will
end the cycle while the laundry is soaking and the
indicator light will flash. To drain the water so that the
laundry may be removed, press the START/PAUSE button
or the button.
Load balancing system
Before every spin cycle, to avoid excessive vibrations and
to distribute the load in a uniform manner, the drum rotates
continuously at a speed which is slightly greater than the
washing rotation speed. If, after several attempts, the load
is not balanced correctly, the machine spins at a reduced
spin speed. If the load is excessively unbalanced, the
washing machine performs the distribution process instead
of spinning. To encourage improved load distribution and
balance, we recommend small and large garments are
mixed in the load.
Detergents and laundry
M
AX
1
2
4
3

GB
11
Precautions and tips
! This washing machine was designed and constructed in
accordance with international safety regulations. The fol-
lowing information is provided for safety reasons and must
therefore be read carefully.
General safety
• This appliance was designed for domestic use only.
• This appliance is not intended for use by persons (inclu-
ding children) with reduced physical, sensory or mental
capabilities, or lack of experience and knowledge, unless
they have been given supervision or instruction concer-
ning use of the appliance by a person responsible for
their safety. Children should be supervised to ensure that
they do not play with the appliance.
• Do not touch the machine when barefoot or with wet or
damp hands or feet.
• Do not pull on the power supply cable when unplugging
the appliance from the electricity socket. Hold the plug
and pull.
• Do not open the detergent dispenser drawer while the
machine is in operation.
• Do not touch the drained water as it may reach extreme-
ly high temperatures.
• Never force the porthole door. This could damage the safety
lock mechanism designed to prevent accidental opening.
• If the appliance breaks down, do not under any circum-
stances access the internal mechanisms in an attempt
to repair it yourself.
• Always keep children well away from the appliance while
it is operating.
• The door can become quite hot during the wash cycle.
• If the appliance has to be moved, work in a group of two
or three people and handle it with the utmost care. Never
try to do this alone, because the appliance is very heavy.
• Before loading laundry into the washing machine, make
sure the drum is empty.
Disposal
• Disposing of the packaging materials: observe local regu-
lations so that the packaging may be re-used.
• The European Directive 2012/19/EU on Waste Electrical
and Electronic Equipment, requires that old household
electrical appliances must not be disposed of in the normal
unsorted municipal waste stream. Old appliances must be
collected separately in order to optimise the recovery and
recycling of the materials they contain and reduce the im-
pact on human health and the environment. The crossed
out “wheeled bin” symbol on the product reminds you of
your obligation, that when you dispose of the appliance it
must be separately collected. Consumers should contact
their local authority or retailer for information concerning the
correct disposal of their old appliance.
Opening the porthole door manually
In the event that it is not possible to open the porthole
door due to a powercut, and if you wish to remove the
laundry, proceed as follows:
1. remove the plug from the electrical socket.
2. make sure the water level inside the machine is lower
than the door opening; if it is not, remove excess water
using the drain hose, collecting it in a bucket as indicated
in the figure.
3. pull outwards using the tab as indicated in the figure,
until the plastic tie-rod is freed from its stop position; pull
downwards and open the door at the same time.

12
GB
Care and maintenance
Cutting off the water and electricity
supplies
• Turn off the water tap after every wash cycle. This will limit
wear on the hydraulic system inside the washing machine
and help to prevent leaks.
• Unplug the washing machine when cleaning it and du-
ring all maintenance work.
Cleaning the washing machine
The outer parts and rubber components of the appliance
can be cleaned using a soft cloth soaked in lukewarm
soapy water. Do not use solvents or abrasives.
Cleaning the detergent dispenser dra-
wer
Remove the dispenser by
raising it and pulling it out
(see figure).
Wash it under running wa-
ter; this operation should be
repeated frequently.
Caring for the door and drum of your
appliance
• Always leave the porthole door ajar in order to prevent
unpleasant odours from forming.
Cleaning the pump
The washing machine is fitted with a self-cleaning pump
which does not require any maintenance. Sometimes,
small items (such as coins or buttons) may fall into the pre-
chamber which protects the pump, situated in its bottom
part.
! Make sure the wash cycle has finished and unplug the
appliance.
To access the pre-chamber:
1. unscrew the lid by rota-
ting it anti-clockwise (see
figure): a little water may
trickle out. This is perfectly
normal;
2. clean the inside thoroughly;
3. screw the lid back on;
Checking the water inlet hose
Check the inlet hose at least once a year. If there are any
cracks, it should be replaced immediately: during the wash
cycles, water pressure is very strong and a cracked hose
could easily split open.
! Never use second-hand hoses.
1
2

GB
13
Troubleshooting
Your washing machine could fail to work. Before contacting the Technical Assistance Centre (see “Assistance”), make sure
that the problem cannot be solved easily using the following list.
Problem:
The washing machine does not
switch on.
The wash cycle does not start.
The washing machine does not
take in water (the text “NO WATER,
CHECK SUPPLY” appears on the
display).
The washing machine continuously
takes in and
drains water.
The washing machine does not
drain or spin.
The washing machine vibrates a lot
during the spin cycle.
The washing machine leaks.
The machine is locked and the display
flashes, indicating an error code (e.g.
F-01, F-..).
There is too much foam.
Possible causes / Solutions:
• The appliance is not plugged into the socket fully, or is not making contact.
• There is no power in the house.
• The washing machine door is not closed properly.
• The ON/OFF button has not been pressed.
• The START/PAUSE button has not been pressed.
• The water tap has not been opened.
• A delayed start has been set (see “Running a wash cycle”).
• The water inlet hose is not connected to the tap.
• The hose is bent.
• The water tap has not been opened.
• There is no water supply in the house.
• The pressure is too low.
• The START/PAUSE button has not been pressed.
• The drain hose is not fitted at a height between 65 and 100 cm from the floor
(see “Installation”).
• The free end of the hose is under water (see “Installation”).
• The wall drainage system is not fitted with a breather pipe.
If the problem persists even after these checks, turn off the water tap, switch
the appliance off and contact the Assistance Service. If the dwelling is on one of
the upper floors of a building, there may be problems relating to water drainage,
causing the washing machine to fill with water and drain continuously. Special
anti-draining valves are available in shops and help to avoid this inconvenience.
• The wash cycle does not include draining: some wash cycles require the drain
phase to be started manually (see “Wash cycles and functions”).
• The EASY IRON function has been activated: To complete the wash cycle,
press the START/PAUSE button (see “Wash cycles and functions”).
• The drain hose is bent (see “Installation”).
• The drainage duct is clogged.
• The drum was not unlocked correctly during installation (see “Installation”).
• The washing machine is not level (see “Installation”).
• The washing machine is trapped between cabinets and walls (see “Installation”).
• The water inlet hose is not screwed on properly (see “Installation”).
• The detergent dispenser drawer is blocked (for cleaning instructions, see
“Care and maintenance”).
• The drain hose is not fixed properly (see “Installation”).
• Switch off the machine and unplug it, wait for approximately 1 minute and
then switch it back on again.
If the problem persists, contact the Technical Assistance Service.
• The detergent is not suitable for machine washing (it should display the text
“for washing machines” or “hand and machine wash”, or the like).
• Too much detergent was used.

14
GB
Service
Before calling for Assistance:
• Check whether you can solve the problem alone (see “Troubleshooting”);
• Restart the programme to check whether the problem has been solved;
• If this is not the case, contact an authorised Technical Assistance Centre using the telephone number provided on the
guarantee certificate.
! Always request the assistance of authorised technicians.
Have the following information to hand:
• the type of problem;
• the appliance model (Mod.);
• the serial number (S/N).
This information can be found on the data plate applied to the rear of the washing machine, and can also be found on the
front of the appliance by opening the door.

15
I
Italiano
Sommario
Installazione, 16-17-18-19
Disimballo e livellamento
Collegamenti idraulici ed elettrici
Primo ciclo di lavaggio
Dati tecnici
Istruzioni per l’installatore
Descrizione della lavabiancheria, 20-21
Pannello di controllo
Display
Come effettuare un ciclo di lavaggio, 22
Programmi e funzioni, 23
Tabella dei programmi
Funzioni di lavaggio
Detersivi e biancheria, 24
Cassetto dei detersivi
Preparare la biancheria
Programmi particolari
Sistema bilanciamento del carico
Precauzioni e consigli, 25
Sicurezza generale
Smaltimento
Apertura manuale della porta oblò
Manutenzione e cura, 26
Escludere acqua e corrente elettrica
Pulire la lavabiancheria
Pulire il cassetto dei detersivi
Curare oblò e cestello
Pulire la pompa
Controllare il tubo di alimentazione dell’acqua
Anomalie e rimedi, 27
Assistenza, 28
Assistenza Attiva 7 giorni su 7
I
LAVABIANCHERIA
BWMD 742
Istruzioni per l’uso

16
I
! È importante conservare questo libretto per poterlo con-
sultare in ogni momento. In caso di vendita, di cessione o
di trasloco, assicurarsi che resti insieme alla lavabiancheria
per informare il nuovo proprietario sul funzionamento e sui
relativi avvertimenti.
! Leggere attentamente le istruzioni: ci sono importanti
informazioni sull’installazione, sull’uso e sulla sicurezza.
Disimballo e livellamento
Disimballo
1. Disimballare la lavabiancheria.
2. Controllare che la lavabiancheria non abbia
subìto danni nel trasporto. Se fosse danneggiata
non collegarla e contattare il rivenditore.
3. Rimuovere le 4 viti di
protezione per il trasporto
e il gommino con il relativo
distanziale, posti nella parte
posteriore (vedi figura).
4. Chiudere i fori con i tappi di plastica in dotazione.
5. Conservare tutti i pezzi: qualora la lavabiancheria debba
essere trasportata, dovranno essere rimontati.
! Gli imballaggi non sono giocattoli per bambini.
Livellamento
1. Installare la lavabiancheria su un pavimento piano e rigi-
do, senza appoggiarla a muri, mobili o altro.
2. Se il pavimento non fosse
perfettamente orizzontale,
compensare le irregolarità
svitando o avvitando i piedini
anteriori (vedi figura); l’ango-
lo di inclinazione, misurato
sul piano di lavoro, non deve
superare i 2°.
Un accurato livellamento dà stabilità alla macchina ed
evita vibrazioni, rumori e spostamenti durante il funzio-
namento. In caso di moquette o di un tappeto, regolare i
piedini in modo da conservare sotto la lavabiancheria uno
spazio sufficiente per la ventilazione.
Collegamenti idraulici ed elettrici
Collegamento del tubo di alimentazione dell’acqua
1. Collegare il tubo di
alimentazione avvitandolo
a un rubinetto d’acqua
fredda con bocca filettata
da 3/4 gas (vedi figura).
Prima di allacciare, far
scorrere l’acqua finché
non sia limpida.
2. Collegare il tubo di ali-
mentazione alla lavabian-
cheria avvitandolo all’ap-
posita presa d’acqua,
nella parte posteriore in
alto a destra (vedi figura).
3. Fare attenzione che nel tubo non ci siano né pieghe né
strozzature.
! La pressione idrica del rubinetto deve essere compresa
nei valori della tabella Dati tecnici
(vedi pagina a fianco).
! Se la lunghezza del tubo di alimentazione non fosse
sufficiente, rivolgersi a un negozio specializzato o a un
tecnico autorizzato.
! Non utilizzare mai tubi già usati.
! Utilizzare quelli in dotazione alla macchina.
Installazione

17
I
Collegamento del tubo di scarico
Collegare il tubo di scari-
co, senza piegarlo, a una
conduttura di scarico o a
uno scarico a muro posti
tra 65 e 100 cm da terra;
oppure appoggiarlo al
bordo di un lavandino o
di una vasca, legando la
guida in dotazione al
rubinetto (vedi figura).
L’estremità libera del tubo
di scarico non deve rima-
nere immersa nell’acqua.
! È sconsigliato usare tubi di prolunga; se indispensabile,
la prolunga deve avere lo stesso diametro del tubo origi-
nale e non superare i 150 cm.
Collegamento elettrico
Prima di inserire la spina nella presa della corrente, accer-
tarsi che:
• la presa abbia la messa a terra e sia a norma
di legge;
• la presa sia in grado di sopportare il carico
massimo di potenza della macchina, indicato nella
tabella Dati tecnici (vedi a fianco);
• la tensione di alimentazione sia compresa nei
valori indicati nella tabella Dati tecnici (vedi a
fianco);
• la presa sia compatibile con la spina della
lavabiancheria. In caso contrario sostituire la
presa o la spina.
! La lavabiancheria non va installata all’aperto, nemmeno
se lo spazio è riparato, perché è molto pericoloso lasciar-
la esposta a pioggia e temporali.
! A lavabiancheria installata, la presa della corrente deve
essere facilmente raggiungibile.
! Non usare prolunghe e multiple.
! Il cavo non deve subire piegature o compressioni.
! Il cavo di alimentazione deve essere sostituito solo da
tecnici autorizzati.
Attenzione! L’azienda declina ogni responsabilità qualora
queste norme non vengano rispettate.
Primo ciclo di lavaggio
Dopo l’installazione, prima dell’uso, effettuare un ciclo di
lavaggio con detersivo e senza biancheria impostando il
programma
(60° C).
65 - 100 cm
Dati tecnici
Modello
BWMD 742
Dimensioni
larghezza cm 59,5
altezza cm 81,5
profondità cm 54,5
Capacità
da 1 a 7 kg
Collegamenti
elettrici
Vedi targhetta caratteristiche tecniche
applicata sulla macchina
Collegamenti
idrici
pressione massima 1 MPa (10 bar)
pressione minima 0,05 MPa (0,5 bar)
capacità del cesto 52 litri
Velocità di cen-
trifuga
sino a 1400 giri al minuto
Programmi di
prova
secondo la
direttive
1061/2010 e
1015/2010
programma
(60°) (1° pressione del tasto);
Cotone standard 60°C.
programma
(40°) (2° pressione del tasto);
Cotone standard 40°C.
Questa apparecchiatura è conforme alle
seguenti Direttive Comunitarie:
- 2004/108/CE (Compatibilità
Elettromagnetica)
- 2006/95/CE (Bassa Tensione)
- 2012/19/EU

18
I
Istruzioni per l’installatore
Applicazione del pannello in legno alla porta e inse-
rimento della macchina nei mobili:
Nel caso in cui, dopo il montaggio del pannello in legno, sia
necessario spedire la macchina per l’installazione finale,
consigliamo di lasciarla nel suo imballo originale. A questo
scopo l’imballo è stato realizzato in modo da permettere il
montaggio del pannello di legno sulla macchina senza disim-
ballare completamente il prodotto (vedi figure sottostanti).
Il pannello di legno che copre la facciata non deve essere di
spessore inferiore a 18 mm e può essere incernierato sia sul
lato destro che sinistro. Per ragioni di praticità d’uso della
macchina consigliamo lo stesso senso di apertura dell’oblò
con le cerniere applicate sul lato sinistro.
A
B
C
D
E
Tur seite
Accessori montaggio portina (Fig. 1-2-3-4-5).
Fig. 1
N° 2 cerniere
N° 1 Magnete N° 1 Riscontro magnete
N° 1 Tassello in gomma
N° 2 Supporti cerniera
N° 4 Distanziali
Fig. 2
Fig. 3 Fig. 4
Fig. 5
Fig. 4/B
- n° 6 viti autofilettanti l = 13 mm “tipo A”.
- n° 2 viti metriche testa svasata l = 25 mm “tipo B”; per il
fissaggio del riscontro magnete al mobile.
- n° 4 viti metriche l = 15 mm “tipo C”; per il montaggio dei
supporti cerniera al mobile.
- n° 4 viti metriche l = 7 mm “tipo D”; per il montaggio delle
cerniere ai supporti.
Montaggio dei particolari sulla facciata della macchina.
- Montare i supporti cerniera alla facciata posizionando il
foro indicato da una freccia nella fig. 1 verso l’interno della
facciata interponendo un distanziale (fig. 4/B), utilizzando le
viti tipo C.
- Montare il riscontro magnete dalla parte opposta in alto
interponendo due distanziali (fig. 4/B) utilizzando le due viti
tipo B.

19
I
Uso della maschera di foratura.
- Per tracciare le posizioni dei fori sul lato sinistro del pan-
nello, allinerare la maschera di foratura al lato superiore e
sinistro del pannello facendo riferimento alle linee tracciate
alle estremità.
- Per tracciare le posizioni dei fori sul lato destro del pannel-
lo, allinerare la maschera di foratura al lato superiore e destro
del pannello.
- Con una fresa di adeguate dimensioni realizzare le quattro
sedi che dovranno alloggiare le due cerniere, il tassello di
gomma e il magnete.
Montaggio dei particolari sul pannello di legno (Antina).
- Inserire le cerniere nelle sedi predisposte (la parte mobile
della cerniera deve trovarsi verso l’esterno del pannello) e
fissarle con 4 viti del tipo A.
- Inserire il magnete nella sede in alto dalla parte opposta
alle cerniere e fissarlo con due viti tipo B.
- Inserire il tassello in gomma nella sede in basso.
Il pannello è ora pronto per essere montato sulla macchina.
Montaggio del pannello alla macchina.
Inserire il nasello della cerniera indicato dalla freccia nella fig.
2 nella sede del supporto cerniera spingere il pannello verso
la facciata della macchina e fissare le due cerniere con le
due viti tipo D.
Fissaggio della guida zoccolo.
Se la macchina è installata ad una estremità della cucina
componibile montare una o entrambe le guide zoccolo
come indicato in fig. 8, regolandone la profondità in funzione
della posizione dello zoccolo e se necessario fissarlo alle
stesse (fig. 9).
Per montare la guida zoccolo agire cone segue (fig. 8):
Fissare la squadretta P con la vite R, infilare la guida zoccolo
Q nell’apposita asola e una volta posizionata nel punto desi-
derato bloccarla alla squadretta P con la vite R.
Inserimento della macchina nei mobili.
- Spingere l’apparecchio nell’apertura allineandola con gli
altri mobili (fig. 6).
- Agire sui piedini di regolazione per portare la macchina
all’altezza desiderata.
- Per regolare la posizione del pannello in legno in senso
verticale ed orizzontale, agire sulle viti C e D come indicato
in fig. 7.
Importante: chiudere la parte inferiore della facciata con lo
zoccolo a battuta sul pavimento.
Fig. 8 Fig. 9
Accessori in dotazione per la regolazione in altezza.
Alloggiate nel coperchio di polistirolo (fig. 10) si trovano:
2 traverse (G); 1 listello (M)
all’interno del cestello si trovano:
4 piedini supplementari (H)
4 viti (I)
4 viti (R)
4 dadi (L)
2 guide zoccolo (Q)
Regolazione in altezza della macchina.
La macchina può essere regolata in altezza (da 815 mm a 835
mm) agendo sui 4 piedini.
Se si desidera portarla ad un’altezza superiore a quella soprain-
dicata, arrivando fino a 870 mm, occorre utilizzare i seguenti
accessori:
le 2 traverse (G); i 4 piedini (H); le 4 viti (I); i 4 dadi (L), quindi
agire come segue (fig. 11):
togliere i 4 piedini originali, posizionare una traversa G nella par-
te anteriore della macchina, fissarla con le viti I (avvitandole nei
fori dove erano montati i piedini originali) quindi inserire i nuovi
pedini H.
Ripetere la stessa operazione nella parte posteriore della macchina.
A questo punto regolando i piedini H la macchina può essere
abbassata o alzata da 835 mm a 870 mm.
Una volta raggiunta l’altezza desiderata bloccare i dadi L alla
traversa G.
Per regolare la macchina ad un’altezza compresa tra 870 mm e
900 mm occorre montare il listello M regolando i piedini H fino
all’altezza desiderata. Per inserire il listello agire come segue:
allentare le tre viti N poste nella parte anteriore della copertu-
ra Top, inserire il listello M come indicato nella fig. 12, quindi
bloccare le viti N.
D
C
C
570
min
815
540
595
820 ÷ 900
600 min
Fig. 6 Fig. 7
L
I
H
G
M
Fig. 11 Fig. 12
Fig. 10

20
I
Descrizione della lavabiancheria
Cassetto dei detersivi: per caricare detersivi e additivi
(vedi “Detersivi e biancheria”).
Tasto ON/OFF : premere brevemente il tasto per ac-
cendere o spegnere la macchina. La spia START/PAUSE
che lampeggia lentamente di colore verde indica che la
macchina è accesa. Per spegnere la lavabiancheria du-
rante il lavaggio è necessario tenere premuto il tasto più
a lungo, circa 2 sec.; una pressione breve o accidentale
non permetterà lo spegnimento della macchina.
Lo spegnimento della macchina durante un lavaggio in
corso annulla il lavaggio stesso.
Tasti SELETTORE PROGRAMMI: per impostare il pro-
gramma desiderato (vedi “Tabella dei programmi”).
Tasto MEMO: tenere premuto il tasto per memorizzare
un ciclo e le proprie personalizzazioni preferite. Per richia-
mare un ciclo precedentemente memorizzato premere il
tasto MEMO.
Tasti FUNZIONE: premere il tasto per selezionare la fun-
zione desiderata. Sul display si illuminerà la spia relativa.
Tasto CENTRIFUGA : premere per ridurre o escludere
del tutto la centrifuga; il valore viene indicato nel display.
Tasto TEMPERATURA : premere per ridurre la tem-
peratura; il valore viene indicato nel display.
Tasto BLOCCO TASTI : per attivare il blocco del
pannello di controllo, tenere premuto il tasto per circa
2 secondi. Il simbolo acceso indica che il pannello
di controllo è bloccato. In questo modo si impediscono
modifiche accidentali dei programmi, soprattutto se in
casa ci sono dei bambini.
Per disattivare il blocco del pannello di controllo, tenere
premuto il tasto per circa 2 secondi.
Tasto PARTENZA RITARDATA : premere per impo-
stare una partenza ritardata del programma prescelto; il
ritardo viene indicato nel display.
Tasto con spia START/PAUSE: quando la spia verde
lampeggia lentamente, premere il tasto per avviare un
lavaggio. A ciclo avviato la spia diventa fissa. Per mettere
in pausa il lavaggio, premere nuovamente il tasto; la spia
lampeggerà con colore arancione. Se il simbolo non è
illuminato, si potrà aprire l’oblò. Per far ripartire il lavaggio
dal punto in cui è stato interrotto, premere nuovamente il
tasto.
Modalità di stand by
Questa lavatrice, in conformità alle nuove normative
legate al risparmio energetico, è dotata di un sistema
di autospegnimento (stand by) che entra in funzione
dopo circa 30 minuti nel caso di non utilizzo. Premere
brevemente il tasto ON/OFF e attendere che la macchina
si riattivi.
Tasto con spia
START/
PAUSE
Tasto
TEMPERATURA
Tasto
CENTRIFUGA
Pannello di controllo
Tasto
BLOCCO
TASTI
Tasti
FUNZIONE
Tasto ON/OFF
Tasto
MEMO
Tasto
PARTENZA
RITARDATA
Tasti
SELETTORE
PROGRAMMI
Cassetto dei detersivi
DISPLAY

21
I
Display
A
B
C
D
E
Z
X
Y
Il display è utile per programmare la macchina e fornisce molteplici informazioni.
Nelle due stringhe superiori A e B vengono visualizzati il programma di lavaggio selezionato, la fase di lavaggio in corso e
tutte le indicazioni relative allo stato d’avanzamento del programma.
Nella stringa C viene visualizzato il tempo residuo alla fine del ciclo di lavaggio in corso e nel caso fosse stata impostata una
PARTENZA RITARDATA, il tempo mancante all’avvio del programma selezionato.
Nella stringa D viene visualizzato il valore massimo della velocità della centrifuga che la macchina può effettuare in base al
programma impostato; se il programma non prevede la centrifuga la stringa resta spenta.
Nella stringa E viene visualizzato il valore massimo della temperatura che si può selezionare in base al programma impostato;
se il programma non prevede l’impostazione della temperatura la stringa resta spenta.
Le spie F sono relative alle funzioni e si accendono quando la funzione selezionata è compatibile con il programma imposta-
to.
Simbolo Oblò bloccato
Il simbolo acceso indica che l’oblò è bloccato per impedire aperture accidentali. Per evitare danni è necessario attendere che
il simbolo si spenga prima di aprire l’oblò.
N.B.: se è attiva la funzione PARTENZA RITARDATA l’oblo non si può aprire, per aprirlo mettere la macchina in pausa pre-
mendo il tasto START/PAUSE.
! Alla prima accensione verrà richiesto di selezionare la lingua ed il display entrerà automaticamente nel menu di selezione
lingua.
Per scegliere la lingua desiderata premere i tasti X e Y, per confermare la scelta premere il tasto Z.
Se si vuole cambiare lingua, spegnere la macchina, premere contemporaneamente i tasti X, Y, Z fino a sentire un segnale
acustico, verrà visualizzato di nuovo il menu di selezione lingua.
F

22
I
Come effettuare un ciclo di
lavaggio
1. ACCENDERE LA MACCHINA. Premere il tasto , sul
display comparirà la scritta BENVENUTI; la spia START/
PAUSE lampeggerà lentamente di colore verde.
2. CARICARE LA BIANCHERIA. Aprire la porta oblò.
Caricare la biancheria facendo attenzione a non
superare la quantità di carico indicata nella tabella
programmi della pagina seguente.
3. DOSARE IL DETERSIVO. Estrarre il cassetto e
versare il detersivo nelle apposite vaschette come
spiegato in “Detersivi e biancheria”.
4. CHIUDERE L’OBLO’.
5. SCEGLIERE IL PROGRAMMA. Premere uno dei
tasti del SELETTORE PROGRAMMI per selezionare
il programma desiderato; il nome del programma
comparirà sul display; ad esso è associata una
temperatura e una velocità di centrifuga che possono
essere modificate. Sul display comparirà la durata del
ciclo.
6. PERSONALIZZARE IL CICLO DI LAVAGGIO.
Agire sugli appositi tasti:
Modificare la temperatura e/o la centrifuga. La
macchina seleziona automaticamente la temperatura
e la centrifuga massime previste per il programma
impostato e non possono pertanto essere aumentate.
Premendo il tasto si riduce progressivamente
la temperatura sino al lavaggio a freddo “OFF”.
Premendo il tasto si riduce progressivamente la
centrifuga sino alla sua esclusione “OFF”. Un’ulteriore
pressione dei tasti riporterà i valori a quelli massimi
previsti.
! Eccezione: selezionando il programma
(60°C)
(1° pressione del tasto) la temperatura può essere portata
sino a 90°.
Impostare una partenza ritardata.
Per impostare la partenza ritardata del programma
prescelto, premere il tasto relativo fino a raggiungere
il tempo di ritardo desiderato. Quando tale opzione
è attiva, sul display si illumina il simbolo . Per
rimuovere la partenza ritardata premere il tasto fino a
che sul display compare la scritta “OFF”.
Modificare le caratteristiche del ciclo.
• Premere il tasto per attivare la funzione; la spia
corrispondente al pulsante si accenderà.
• Premere nuovamente il tasto per disattivare la
funzione; la spia si spegnerà.
! Se la funzione selezionata non è compatibile con
il programma impostato, la spia lampeggerà e la
funzione non verrà attivata.
! Se la funzione selezionata non è compatibile con
un’altra precedentemente impostata, la spia relativa
alla prima funzione selezionata lampeggerà e verrà
attivata solo la seconda, la spia della funzione attivata
si illuminerà.
! Le funzioni possono variare il carico raccomandato
e/o la durata del ciclo.
7. AVVIARE IL PROGRAMMA. Premere il tasto
START/PAUSE. La spia relativa si illuminerà di
colore verde fisso e l’oblò si bloccherà (simbolo
OBLO’BLOCCATO acceso). Durante il lavaggio,
sul display comparirà il nome della fase in corso. Per
cambiare un programma mentre un ciclo è in corso,
mettere la lavabiancheria in pausa premendo il tasto
START/PAUSE (la spia START/PAUSE lampeggerà
lentamente di colore arancione); selezionare quindi il
ciclo desiderato e premere nuovamente il tasto START/
PAUSE.
Per aprire la porta mentre un ciclo è in corso premere il
tasto START/PAUSE; se il simbolo OBLO’BLOCCATO
è spenta sarà possibile aprire l’oblò. Premere
nuovamente il tasto START/PAUSE per far ripartire il
programma dal punto in cui era stato interrotto.
8. FINE DEL PROGRAMMA. Viene indicata dalla
scritta “FINE CICLO” sul display, quando il simbolo
OBLO’BLOCCATO si spegnerà sarà possibile
aprire l’oblò. Aprire l’oblò, scaricare la biancheria e
spegnere la macchina.
! Se si desidera annullare un ciclo già avviato, premere a
lungo il tasto . Il ciclo verrà interrotto e la macchina si
spegnerà.

23
I
Programmi e funzioni
Funzioni di lavaggio
Super Wash
Questa opzione garantisce
un lavaggio di alte prestazioni
grazie all’utilizzo di una maggior
quantità d’ acqua nella fase
iniziale del ciclo e alla maggior
durata del programma ed è utile
per eliminare le macchie più
resistenti. Può essere utilizzata
con o senza candeggina. Se
si desidera effettuare anche il
candeggio inserire la vaschetta
aggiuntiva 4, in dotazione,
nella vaschetta 1. Nel dosare la
candeggina non superare il livello
“max” indicato sul perno centrale (vedi figura). Se si desidera solo
candeggiare senza effettuare il lavaggio completo, versare la
candeggina nella vaschetta aggiuntiva 4, impostare il programma
“Risciacquo” e attivare l’opzione “Super Wash”.
! L’utilizzo della vaschetta aggiuntiva 4 esclude il prelavaggio.
! Non è attivabile sui programmi , , , , “Centrifuga
Resistenti”, “Scarico”.
Extra Risciacquo
Selezionando questa opzione si aumenta l’efficacia del
risciacquo, e si assicura la massima rimozione del detersivo. E’
utile per pelli particolarmente sensibili.
! Non è attivabile sui programmi “Rapido 30’”, , ,
Centrifuga Resistenti”, “Scarico”.
Tabella dei programmi
Stira facile
Selezionando questa funzione, il lavaggio e la centrifuga saranno
opportunamente modificati per ridurre la formazione di pieghe. Al
temine del ciclo la lavabiancheria effettuerà delle lente rotazioni
del cestello; lla spia della funzione STIRA FACILE e quella di
START/PAUSE lampeggeranno (arancione) e la scritta “FINE
CICLO” apparirà su display. Per terminare il ciclo si dovrà
premere il tasto START/PAUSE o il tasto STIRA FACILE. Per
scaricare l’acqua e poter rimuovere il bucato sarà necessario
premere il tasto START/PAUSE o il tasto STIRA FACILE.
! Non è attivabile sui programmi , “Rapido 30’”, , , .
Prelavaggio
Selezionando questa funzione si effettua il prelavaggio, utile
per rimuovere macchie ostinate.
N.B.: Aggiungere il detersivo nell’apposito scomparto.
! Non è attivabile sui programmi , , , , ,
(60°),
(40°),
.
Eco wash
La funzione Eco Wash contribuisce al risparmio energetico
non riscaldando l’acqua utilizzata per lavare il bucato – un
vantaggio sia per l’ambiente, sia per la bolletta elettrica. Infatti,
l’azione rafforzata e il consumo ottimizzato dell’acqua garan-
tiscono ottimi risultati nella stessa durata media di un ciclo
standard. Per ottenere i migliori risultati di lavaggio, si consiglia
l’uso di un detersivo liquido.
! Non è attivabile sui programmi , , , , , .
M
AX
1
2
4
3
1) Programma di controllo secondo la direttiva 1061/2010: impostare il programma
a 60°C
(1° pressione del tasto)
.
Questo ciclo è adatto per pulire un carico di cotone normalmente sporco ed è il più efficiente in termini di consumo combinato di energia e di acqua, da usare su capi lavabili a 60°C. La
temperatura effettiva di lavaggio può differire da quella indicata.
2) Programma di controllo secondo la direttiva 1061/2010: impostare il programma
a 40°C
(2° pressione del tasto).
Questo ciclo è adatto per pulire un carico di cotone normalmente sporco ed è il più efficiente in termini di consumo combinato di energia e di acqua, da usare su capi lavabili a 40°C. La
temperatura effettiva di lavaggio può differire da quella indicata.
3) Alla temperatura di 60 °C la funzione “Prelavaggio” non può essere attivata.
Per tutti Test Institutes:
2) Programma cotone lungo: impostare il programma
a 40°C
(2° pressione del tasto).
4) Programma sintetico lungo: impostare il programma
a 60°C
(1° pressione del tasto)
; temperaura di 40°C
(premere il tasto TEMPERATURA).
La durata del ciclo indicata sul display o sul libretto è una stima calcolata in base a condizioni standard. Il tempo effettivo può variare in base a numerosi fattori quali la temperatura e la pressione
dell’acqua in ingresso, la temperatura ambiente, la quantità di detersivo, la quantità ed il tipo di carico, il bilanciamento del carico, le opzioni aggiuntive selezionate.
Programmi
Descrizione del Programma
Temp. max.
(°C)
Velocità max.
(giri al minuto)
Detersivi
Carico max. (Kg)
Umidità residua
%
Consumo ener-
gia kWh
Acqua totale lt
Durata ciclo
Prelavag-
gio
Lavaggio
Ammobi-
dente
Candeg-
gina
Antimacchia
40° 1400
4 - - - 180’
Cotone standard 60° (1) (1° pressione del tasto): bianchi e colorati resi-
stenti molto sporchi.
60°
(Max. 90°)
1400
(3)
7 53 1,10 52,5 190’
Cotone standard 40° (2) (2° pressione del tasto): bianchi e colorati delicati
poco sporchi.
40° 1400 -
7 53 0,99
82
185’
Cotone standard 20° (3° pressione del tasto): bianchi e colorati delicati
poco sporchi.
20° 1400 -
7 - -
-
170’
Sintetici Resistenti (1° pressione del tasto): colori resistenti molto sporchi. 60° 800
3 44 0,93 47 110’
Sintetici Resistenti (4) (1° pressione del tasto): colori resistenti poco sporchi. 40° 800
3 44 0,57 46 95’
Sintetici Delicati (2° pressione del tasto): colori resistenti poco sporchi. 40° 800
3 - - - 70’
Rapido 60' (1° pressione del tasto): per rinfrescare rapidamente capi nor-
malmente (non indicato per lana, seta e capi da lavare a mano).
60° 1400 -
- 3,5 53 0,81 40 60’
Rapido 30' (2° pressione del tasto): per rinfrescare rapidamente capi poco
(non indicato per lana, seta e capi da lavare a mano).
30° 800 -
- 3 71 0,15 35 30’
M
Memo: permette di memorizzare un qualsiasi ciclo di lavaggio.
Antiallergy
60° 1400 -
- 4 - - - 195’
Woolmark Platinum (Lana): per lana, cachemire, ecc. 40° 800 -
- 1,5 - - - 70’
Delicati
30° 0 -
- 1 - - - 80’
Centrifuga Resistenti (1° pressione del tasto) - 1400 - - - - 7 - - - 16’
Risciacquo Resistenti (2° pressione del tasto) - 1400 - -
7 - - - 36’
Scarico (3° pressione del tasto) - 0 - - - - 7 - - - 2’

24
I
Cassetto dei detersivi
Il buon risultato del lavaggio dipende anche dal corretto
dosaggio del detersivo: eccedendo non si lava in modo
più efficace e si contribuisce a incrostare le parti interne
della lavabiancheria e a inquinare l’ambiente.
! Usare detersivi in polvere per capi in cotone bianchi e per il
prelavaggio e per lavaggi con temperatura superiore a 60°C.
! Seguire le indicazioni riportate sulla confezione di deter-
sivo.
! Non usare detersivi per il lavaggio a mano, perché for-
mano troppa schiuma.
Estrarre il cassetto dei de-
tersivi e inserire il detersivo
o l’additivo come segue.
vaschetta 1: Detersivo per prelavaggio
(in polvere)
Prima di versare il detersivo verificare che non sia inserita
la vaschetta aggiuntiva 4.
vaschetta 2: Detersivo per lavaggio
(in polvere o liquido)
Il detersivo liquido va versato solo prima dell’avvio.
vaschetta 3: Additivi (ammorbidente, ecc.)
L’ammorbidente non deve fuoriuscire dalla griglia.
vaschetta aggiuntiva 4: Candeggina
Preparare la biancheria
• Suddividere la biancheria secondo:
- il tipo di tessuto / il simbolo sull’etichetta.
- i colori: separare i capi colorati da quelli bianchi.
• Vuotare le tasche e controllare i bottoni.
• Non superare i valori indicati nella “Tabella dei Programmi”
riferiti al peso della biancheria asciutta.
Quanto pesa la biancheria?
1 lenzuolo 400-500 gr.
1 federa 150-200 gr.
1 tovaglia 400-500 gr.
1 accappatoio 900-1200 gr.
1 asciugamano 150-250 gr.
Programmi particolari
Antimacchia: il programma è adatto al lavaggio di
capi molto sporchi, con colori resistenti. Il programma
garantisce una classe di lavaggio superiore alla classe
standard (classe A). Non eseguire il programma me-
scolando capi di colore diverso. Si consiglia l’utilizzo di
detersivo in polvere. Per macchie ostinate è consigliato il
pretrattamento con additivi specifici.
Cotone standard 20°: ideale per carichi in cotone
sporchi. Le buone performance anche a freddo, compa-
rabili con un lavaggio a 40°, sono garantite da un’azione
meccanica che lavora con variazione di velocità a picchi
ripetuti e ravvicinati.
Antiallergy: utilizzare il programma per la rimozione dei
principali allergeni come polline, acari, peli del gatto e cane.
Lana: Il ciclo di lavaggio “Lana” di questa lavatrice
Hotpoint-Ariston è stato testato e approvato dalla
Woolmark Company per il lavaggio di capi in lana
classificati come “lavabili a mano”, purché il lavaggio
venga eseguito nel rispetto delle istruzioni riportate
sull’etichetta dell’indumento e delle indicazioni fornite dal
produttore dell’elettrodomestico. Hotpoint-Ariston è la
prima marca di lavatrici ad aver ottenuto dalla Woolmark
Company la certificazione Woolmark Apparel Care -
Platinum per le sue prestazioni di lavaggio e il consumo di
acqua ed energia. (M1126)
Delicati: utilizzare il programma per il lavaggio dei capi
molto delicati, che presentano applicazioni quali strass o
paillettes.
Si raccomanda di rovesciare i capi prima del lavaggio e di
inserire gli indumenti piccoli nell’apposito sacchetto per il
lavaggio dei capi delicati.
Per risultati migliori si raccomanda l’utilizzo del detersivo
liquido per capi delicati.
Per il lavaggio dei capi in seta e tende, selezionare il ciclo
e attivare la funzione (in questo caso la funzione
“Extra Risciacquo” sarà attiva); la macchina terminerà il
ciclo con la biancheria in ammollo e la spia della funzione
lampeggerà. Per scaricare l’acqua e poter rimuovere
il bucato sarà necessario premere il tasto START/PAUSE
o il tasto .
Sistema bilanciamento del carico
Prima di ogni centrifuga, per evitare vibrazioni eccessive
e per distribuire il carico in modo uniforme, il cestello
effettua delle rotazioni ad una velocità leggermente
superiore a quella del lavaggio. Se al termine di ripetuti
tentativi il carico non fosse ancora correttamente
bilanciato la macchina effettua la centrifuga ad una
velocità inferiore a quella prevista.
In presenza di eccessivo sbilanciamento la lavabiancheria
effettua la distribuzione anzichè la centrifuga. Per favorire
una migliore distribuzione del carico e il suo corretto
bilanciamento si consiglia di mescolare capi grandi e
piccoli.
Detersivi e biancheria
M
AX
1
2
4
3

25
I
Precauzioni e consigli
! La lavabiancheria è stata progettata e costruita in
conformità alle norme internazionali di sicurezza. Queste
avvertenze sono fornite per ragioni di
sicurezza e devono essere lette attentamente.
Sicurezza generale
• Questo apparecchio è stato concepito esclusiva-
mente per un uso di tipo domestico.
• L’apparecchio non deve essere utilizzato da
persone (bambini compresi) con capacità fisiche,
sensoriali o mentali ridotte e con esperienze e
conoscenze insufficienti, a meno che tale utilizzo
non avvenga sotto la supervisione o le istruzioni di
una persona responsabile della loro sicurezza. I
bambini devono essere sorvegliati per garantire
che non giochino con l’apparecchio.
• Non toccare la macchina a piedi nudi o con le
mani o i piedi bagnati o umidi.
• Non staccare la spina dalla presa della corrente
tirando il cavo, bensì afferrando la spina.
• Non aprire il cassetto dei detersivi mentre la
macchina è in funzione.
• Non toccare l’acqua di scarico, che può
raggiungere temperature elevate.
• Non forzare in nessun caso l’oblò: potrebbe
danneggiarsi il meccanismo di sicurezza che
protegge da aperture accidentali.
• In caso di guasto, in nessun caso accedere ai
meccanismi interni per tentare una riparazione.
• Controllare sempre che i bambini non si avvicinino
alla macchina in funzione.
• Durante il lavaggio l’oblò tende a scaldarsi.
• Se dev’essere spostata, lavorare in due o tre
persone con la massima attenzione. Mai da soli
perché la macchina è molto pesante.
• Prima di introdurre la biancheria controlla che il
cestello sia vuoto.
Smaltimento
• Smaltimento del materiale di imballaggio:
attenersi alle norme locali, così gli imballaggi
potranno essere riutilizzati.
• La direttiva Europea 2012/19/EU sui rifiuti di
apparecchiature elettriche ed elettroniche, prevede
che gli elettrodomestici non debbano essere
smaltiti nel normale flusso dei rifiuti solidi urbani. Gli
apparecchi dismessi devono essere raccolti
separatamente per ottimizzare il tasso di recupero
e riciclaggio dei materiali che li compongono ed
impedire potenziali danni per la salute e l’ambiente.
Il simbolo del cestino barrato è riportato su tutti i
prodotti per ricordare gli obblighi di raccolta separata.
Per ulteriori informazioni, sulla corretta dismissione
degli elettrodomestici, i detentori potranno rivolgersi
al servizio pubblico preposto o ai rivenditori.
Apertura manuale dell’oblò
Nel caso non sia possibile aprire l’oblò a causa della
mancanza di energia elettrica e volete stendere il bucato,
procedere come segue:
1. togliere la spina dalla presa di corrente.
2. verificate che il livello dell’acqua all’interno della
macchina sia inferiore rispetto all’apertura dell’oblò; in
caso contrario togliere l’acqua in eccedenza attraverso il
tubo di scarico raccogliendola in un secchio.
3. utilizzando la linguetta indicata in figura tirare
verso l’esterno fino a liberare il tirante in plastica
dal fermo; tirarlo successivamente verso il basso e
contemporaneamente aprire la porta.

26
I
Manutenzione e cura
Escludere acqua e corrente elettrica
• Chiudere il rubinetto dell’acqua dopo ogni
lavaggio. Si limita così l’usura dell’impianto
idraulico della lavabiancheria e si elimina il pericolo
di perdite.
• Staccare la spina della corrente quando si
pulisce la lavabiancheria e durante i lavori di
manutenzione.
Pulire la lavabiancheria
La parte esterna e le parti in gomma possono essere
puliti con un panno imbevuto di acqua tiepida e sapone.
Non usare solventi o abrasivi.
Pulire il cassetto dei detersivi
Sfilare il cassetto solle-
vandolo e tirandolo verso
l’esterno (vedi figura).
Lavarlo sotto l’acqua
corrente; questa pulizia va
effettuata
frequentemente.
Curare oblò e cestello
• Lasciare sempre socchiuso l’oblò per evitare che
si formino cattivi odori.
Pulire la pompa
La lavabiancheria è dotata di una pompa autopulente che
non ha bisogno di manutenzione. Può però succedere
che piccoli oggetti (monete, bottoni) cadano nella preca-
mera che protegge la pompa, situata nella parte inferiore
di essa.
! Assicurarsi che il ciclo di lavaggio sia terminato e stac-
care la spina.
Per accedere alla precamera:
1. svitare il coperchio
ruotandolo in senso
antiorario (vedi figura): è
normale che fuoriesca un
po’ d’acqua;
2. pulire accuratamente l’interno;
3. riavvitare il coperchio;
Controllare il tubo di alimentazione
dell’acqua
Controllare il tubo di alimentazione almeno una volta
all’anno. Se presenta screpolature e fessure va sostituito:
durante i lavaggi le forti pressioni potrebbero provocare
improvvise spaccature.
! Non utilizzare mai tubi già usati.
1
2

27
I
Può accadere che la lavabiancheria non funzioni. Prima di telefonare all’Assistenza (vedi “Assistenza”), controllare che non si
tratti di un problema facilmente risolvibile aiutandosi con il seguente elenco.
Anomalie e rimedi
Anomalie:
La lavabiancheria
non si accende.
Il ciclo di lavaggio
non inizia.
La lavabiancheria non carica ac-
qua (nel display apparirà la sctitta
“MANCA L’ACQUA, APRI IL RUBI-
NETTO”).
La lavabiancheria carica e scarica
acqua di continuo.
La lavabiancheria non scarica
o non centrifuga.
La lavabiancheria vibra
molto durante la centrifuga.
La lavabiancheria perde acqua.
La macchina è bloccata, il display
lampeggia e segnala un codice di
anomalia (es.: F-01, F-..).
Si forma troppa schiuma.
Possibili cause / Soluzione:
• La spina non è inserita nella presa della corrente, o non abbastanza
da fare contatto.
• In casa non c’è corrente.
• L’oblò non è ben chiuso.
• Il tasto ON/OFF non è stato premuto.
• Il tasto START/PAUSE non è stato premuto.
• Il rubinetto dell’acqua non è aperto.
• Si è impostato un ritardo sull’ora di avvio.
• Il tubo di alimentazione dell’acqua non è collegato al rubinetto.
• Il tubo è piegato.
• Il rubinetto dell’acqua non è aperto.
• In casa manca l’acqua.
• Non c’è sufficiente pressione.
• Il tasto START/PAUSE non è stato premuto.
• Il tubo di scarico non è installato fra 65 e 100 cm da terra (vedi “Installazione”).
• L’estremità del tubo di scarico è immersa nell’acqua (vedi “Installazione”).
• Lo scarico a muro non ha lo sfiato d’aria.
Se dopo queste verifiche il problema non si risolve, chiudere il rubinetto dell’ac-
qua, spegnere la lavabiancheria e chiamare l’Assistenza. Se l’abitazione si trova
agli ultimi piani di un edificio, è possibile che si verifichino fenomeni di sifonag-
gio, per cui la lavabiancheria carica e scarica acqua di continuo. Per eliminare
l’inconveniente sono disponibili in commercio apposite valvole anti-sifonaggio.
• Il programma non prevede lo scarico: con alcuni programmi occorre
avviarlo manualmente.
• È attiva la funzione STIRA FACILE: per completare il programma
premere il tasto START/PAUSE (“Programmi e funzioni”).
• Il tubo di scarico è piegato (vedi “Installazione”).
• La conduttura di scarico è ostruita.
• Il cestello, al momento dell’installazione, non è stato sbloccato
correttamente (vedi “Installazione”).
• La lavabiancheria non è in piano (vedi “Installazione”).
• La lavabiancheria è stretta tra mobili e muro (vedi “Installazione”).
• Il tubo di alimentazione dell’acqua non è ben avvitato (vedi “Installazione”).
• Il cassetto dei detersivi è intasato (per pulirlo vedi “Manutenzione e cura”).
• Il tubo di scarico non è fissato bene (vedi “Installazione”).
• Spegnere la macchina e togliere la spina dalla presa, attendere circa 1 minu-
to quindi riaccenderla.
Se l’anomalia persiste, chiamare l’Assistenza.
• Il detersivo non è specifico per lavabiancheria (deve esserci la dicitura “per
lavatrice”, “a mano e in lavatrice”, o simili).
• Il dosaggio è stato eccessivo.

28
I
Assistenza
Prima di contattare l’Assistenza:
• Verificare se l’anomalia può essere risolta da soli (vedi “Anomalie e rimedi”).
• Riavviare il programma per controllare se l’inconveniente è stato ovviato;
• In caso negativo, contattare il Numero Unico 199.199.199*.
! Non ricorrere mai a tecnici non autorizzati.
Comunicare:
• il tipo di anomalia;
• il modello della macchina (Mod.);
• il numero di serie (S/N).
Queste informazioni si trovano sulla targhetta applicata nella parte posteriore della lavabiancheria e nella parte anteriore aprendo l’oblò.
Assistenza Attiva 7 giorni su 7
*
In caso di necessità d’intervento chiamare il Numero Unico Nazionale 199.199.199*. Un operatore sarà a completa disposi-
zione per fissare un appuntamento con il Centro Assistenza Tecnico Autorizzato più vicino al luogo da cui si chiama. È attivo
7 giorni su 7, sabato e domenica compresi, e non lascia mai inascoltata una richiesta.
* Al costo di 14,25 centesimi di Euro al minuto (iva inclusa) dal Lun. al Ven. dalle 08:00 alle 18:30, il Sab. dalle 08:00 alle 13:00 e di 5,58 centesimi di
Euro al minuto (iva inclusa) dal Lun. al Ven. dalle 18:30 alle 08:00, il Sab. dalle 13:00 alle 08:00 e i giorni festivi, per chi chiama da telefono fisso. Per
chi chiama da radiomobile le tariffe sono legate al piano tariffario dell’operatore telefonico utilizzato. Le suddette tariffe potrebbero essere soggette a
variazione da parte dell’operatore telefonico; per maggiori informazioni consultare il sito www.aristonchannel.com.

ES
29
Español
Sumario
Instalación, 30-31-32-33
Desembalaje y nivelación
Conexiones hidráulicas y eléctricas
Primer ciclo de lavado
Datos técnicos
Instrucciones para el instalador
Descripción de la lavadora, 34-35
Panel de control
Pantalla
Cómo efectuar un ciclo de lavado, 36
Programas y funciones, 37
Tabla de programas
Funciones de lavado
Detergentes y ropa, 38
Contenedor de detergentes
Preparar la ropa
Programas particulares
Sistema de equilibrado de la carga
Precauciones y consejos, 39
Seguridad general
Eliminaciones
Apertura manual de la puerta
Mantenimiento y cuidados, 40
Interrumpir el agua y la corriente eléctrica
Limpiar la lavadora
Limpiar el contenedor de detergentes
Cuidar la puerta y el cesto
Limpiar la bomba
Controlar el tubo de alimentación de agua
Anomalías y soluciones, 41
Asistencia, 42
ES
BWMD 742
Manual de instrucciones
LAVADORA

30
ES
! Es importante conservar este manual para poder consul-
tarlo en cualquier momento. En caso de venta, de cesión o
de traslado, verifique que permanezca junto con la lava-
dora para informar al nuevo propietario sobre el funciona-
miento y brindar las correspondientes advertencias.
! Lea atentamente las instrucciones: ellas contienen
importante información sobre la instalación, el uso y la
seguridad.
Desembalaje y nivelación
Desembalaje
1. Desembale la lavadora.
2. Controle que la lavadora no haya sufrido daños durante
el transporte. Si estuviera dañada no la conecte y llame al
revendedor.
3. Quite los 4 tornillos de
protección para el transpor-
te y la arandela de goma
con el correspondiente
distanciador ubicados en
la parte posterior (ver la
figura).
4. Cubra los orificios con los tapones de plástico sumini-
strados con el aparato.
5. Conserve todas las piezas: cuando la lavadora deba ser
transportada nuevamente, deberán volver a colocarse.
! Los embalajes no son juguetes para los niños.
Nivelación
1. Instale la lavadora sobre un piso plano y rígido, sin apo-
yarla en las paredes, muebles ni en ningún otro aparato.
2. Si el piso no está perfec-
tamente horizontal, com-
pense las irregularidades
desenroscando o enro-
scando las patas delanteras
(ver la figura); el ángulo de
inclinación medido sobre
la superficie de trabajo, no
debe superar los 2º.
Una cuidadosa nivelación brinda estabilidad a la máquina y
evita vibraciones, ruidos y desplazamientos durante el fun-
cionamiento. Cuando se instala sobre moquetas o alfom-
bras, regule los pies para conservar debajo de la lavadora
un espacio suficiente para la ventilación.
Conexiones hidráulicas y eléctricas
Conexión del tubo de alimentación de agua
1. Conectar el tubo de tubo
enroscándolo a un grifo de
agua fría con la boca rosca-
da de 3/4 gas (ver la figura).
Antes de conectarlo, haga
correr el agua hasta que
esté límpida.
2. Conecte el tubo de
alimentación a la lavadora
enroscándolo en la toma
de agua correspondiente
ubicada en la parte poste-
rior derecha (arriba) (ver la
figura).
3. Controle que en el tubo no hayan pliegues ni estrangu-
laciones.
! La presión de agua del grifo debe estar comprendida
dentro de los valores contenidos en la tabla de Datos
técnicos (ver la página correspondiente).
! Si la longitud del tubo de alimentación no es la suficiente,
diríjase a un negocio especializado o a un técnico autori-
zado.
! No utilice nunca tubos ya usados.
! Utilice los suministrados con la máquina.
Instalación

ES
31
Conexión del tubo de descarga
Conecte el tubo de de-
scarga, sin plegarlo, a una
tubería de descarga o a una
descarga de pared colo-
cadas a una altura del piso
entre 65 y 100 cm;
o apóyelo en el borde
de un lavamanos o de
una bañera, uniendo la
guía suministrada con el
aparato, al grifo (ver la
figura). El extremo libre del
tubo de descarga no debe
permanecer sumergido en
el agua.
! No se aconseja utilizar tubos de prolongación, si fuera in-
dispensable hacerlo, la prolongación debe tener el mismo
diámetro del tubo original y no superar los 150 cm.
Conexión eléctrica
Antes de enchufar el aparato, verifique que:
• la toma tenga la conexión a tierra y haya sido hecha
según las normas legales;
• la toma sea capaz de soportar la carga máxima de
potencia de la máquina indicada en la tabla de Datos
técnicos (ver al costado);
• la tensión de alimentación esté comprendida dentro de
los valores indicados en la tabla de Datos técnicos (ver
al costado);
• la toma sea compatible con el enchufe de la lavadora. Si
no es así, sustituya la toma o el enchufe.
! La lavadora no debe ser instalada al aire libre, ni siquiera
si el lugar está reparado, ya que es muy peligroso dejarla
expuesta a la lluvia o a las tormentas.
! Una vez instalada la lavadora, la toma de corriente debe
ser fácilmente accesible.
! No utilice prolongaciones ni conexiones múltiples.
! El cable no debe estar plegado ni sufrir compresiones.
! El cable de alimentación debe ser sustituido sólo por
técnicos autorizados.
¡Atención! La empresa fabricante declina toda responsabi-
lidad en caso de que estas normas no sean respetadas.
Primer ciclo de lavado
Después de la instalación y antes del uso, realice un ciclo
de lavado con detergente y sin ropa, seleccionando el
programa (60°C).
65 - 100 cm
Datos técnicos
Modelo
BWMD 742
Dimensiones
ancho 59,5 cm.
altura 81,5 cm.
profundidad 54,5 cm.
Capacidad
de 1 a 7 kg.
Conexiones
eléctricas
ver la placa de características técnicas aplicada
en la máquina
Conexiones
hídricas
presión máxima 1 MPa (10 bar)
presión mínima 0,05 MPa (0,5 bar)
capacidad del cesto 52 litros
Velocidad de
centrifugado
máxima 1400 r.p.m.
Programas de
control según
las directivas
1061/2010 y
1015/2010
programa
(60°) (1° vez que se presiona el botón);
Algodón normal 60ºC.
programa
(40°) (2° vez que se presiona el botón);
Algodón normal 40ºC.
Esta máquina cumple con lo establecido por las
siguientes Directivas de la Comunidad:
- 2004/108/CE (Compatibilidad Electromagnética)
- 2012/19/EU
- 2006/95/CE (Baja Tensión)

32
ES
Instrucciones para el instalador
Aplicación del panel de madera en la puerta e intro-
ducción de la máquina en los muebles:
En el caso en que, después del montaje del panel de ma-
dera, sea necesario trasladar la máquina para su instalación
final, aconsejamos dejarla en su embalaje original. Debido a
ello, el embalaje ha sido realizado en modo tal que permita el
montaje del panel de madera en la máquina sin desembalar
completamente el producto (ver las figuras siguientes).
El panel de madera que cubre la parte delantera debe ser de
un espesor mayor de 18 mm y puede ser embisagrado ya
sea a la derecha o a la izquierda. Por motivos de practicidad
en el uso de la máquina, se aconseja el mismo sentido de
apertura de la portilla, o sea con las bisagras aplicadas a la
izquierda.
A
B
C
D
E
Tur seite
Accesorios montaje puerta (Fig. 1-2-3-4-5).
Fig. 1
N° 2 Bisagra
N° 1 Imán
N° 1 Imán de atracción
N° 1 Taco de goma
N° 2 Portabisagra
N° 4 Riostras
Fig. 2
Fig. 3 Fig. 4
Fig. 5
Fig. 4/B
- n° 6 tornillos de autoenroscado l = 13 mm “tipo A”.
- n° 2 tornillos métricos de cabeza avellanada l = 25 mm
“tipo B”; para la fijación, al mueble, del imán de atracción.
- n° 4 tornillos métricos l = 15 mm “tipo C”; para el montaje
de los portabisagra en el mueble.
- n° 4 tornillos métricos l = 7 mm “tipo D”; para el montaje
de las bisagras en los portabisagra.
Montaje de las piezas en la parte delantera de la
máquina.
- Montar los soportes cremallera en la parte frontal posicio-
nando el orificio indicado con una flecha en la fig. 1 hacia
adentro de la cara interponiendo una riostra (fig. 4/B), em-
pleando los tornillos tipo C.
- Montar el tope magneto de la parte opuesta arriba interpo-
niendo dos riostras (fig. 4/B) utilizando los dos tornillos tipo B.

ES
33
Uso de la guía para taladrar.
- Para marcar las posiciones de los orificios en la parte
izquierda del panel, alinear el patrón de perforación en la
parte superior e izquierda de dicho panel, tomando como
referencia las líneas trazadas en los extremos.
- Para marcar las posiciones de los orificios en la parte de-
recha del panel, alinear el patrón de perforación en la parte
superior y derecha de dicho panel.
- Con una fresa de las dimensiones adecuadas realizar los cuatro orificios
que deberán alojar las dos bisagras, el taco de goma y el imán.
Montaje de las piezas en la puerta.
- Introducir las bisagras en los orificios correspondientes (la
parte móvil de la bisagra debe encontrarse hacia el exterior
del panel) y fijarlas con 4 tornillos de tipo A.
- Introducir el imán en el orificio ubicado arriba en la parte
opuesta a las bisagras y fijarlo con dos tornillos de tipo B.
- Introducir el taco de goma en el orificio ubicado abajo.
A partir de este momento, el panel está listo para ser mon-
tado en la máquina.
Montaje del panel en la máquina.
Introducir la punta de la bisagra, indicada por la flecha en la
fig. 2 en el orificio del portabisagra, empujar el panel hacia la
parte delantera de la máquina y fijar las dos bisagras con los
dos tornillos de tipo D.
Fijación de la guía del zócalo.
Si la máquina ha sido instalada en un extremo de los muebles de
la cocina, montar una o ambas guías del zócalo como se indica
en la fig. 8, regulando su profundidad en función de la posi-
ción del zócalo y si es necesario fijarlo a las mismas (fig. 9).
Para instalar la guía del zócalo realice las siguientes opera-
ciones (fig. 8):
Fije la escuadra P con el tornillo R, introduzca la guía del
zócalo Q en la ranura correspondiente y una vez ubicada en
el punto deseado, fije la escuadra P con el tornillo R.
Colocación de la máquina en los muebles.
- Empujar la máquina en el espacio destinado a él alineán-
dola con los otros muebles (fig. 6).
- Accionar las patitas de regulación para llevar la máquina a
la altura deseada.
- Para regular la posición del panel de madera en sentido
vertical y horizontal, accionar los tornillos C y D como se
indica en la fig. 7.
Importante: cierre la parte inferior del frente con el zócalo
apoyado en el piso.
Fig. 8 Fig. 9
Accesorios suministrados con la lavadora para regular la altura.
Ubicados en la tapa de poliestireno (fig. 10) se encuentran:
2 travesaños (G); 1 listón (M)
dentro del cesto se encuentran:
4 patas adicionales (H),
4 tornillos (I),
4 tornillos (R),
4 tuercas (L),
2 guías para el zócalo (Q)
Regulación de la altura de la lavadora.
Se puede regular la altura de la lavadora (de 815 mm a 835
mm) mediante las 4 patas.
Si se desea instalar a una altura superior a la indicada prece-
dentemente, hasta 870 mm, es necesario utilizar los siguientes
accesorios:
- los 2 travesaños (G); las 4 patas (H); los 4 tornillos (I); las 4
tuercas (L), actuando del siguiente modo (fig. 11):
extraer las 4 patas originales, colocar un travesaño G en la
parte delantera de la lavadora, fijarlo con los tornillos I (enro-
scándolos en los orificios donde estaban montadas las patas
originales), luego introducir las nuevas patas H.
Repetir la misma operación en la parte posterior de la lavadora.
A continuación, regulando las nuevas patas H, la lavadora se
puede bajar o levantar de 835 mm a 870 mm.
Una vez alcanzada la altura deseada, bloquear las tuercas L al
travesaño G. Para regular la lavadora a una altura comprendi-
da entre 870 mm y 900 mm., es necesario montar el listón M
regulando las patas H hasta la altura deseada.
Para instalar el listón, realice las siguientes operaciones:
afloje los tres tornillos N ubicados en la parte delantera de la
cubierta Top, introduzca el listón M como se indica en la fig. 12,
luego aprete los tornillos N.
D
C
C
570
min
815
540
595
820 ÷ 900
600 min
Fig. 6 Fig. 7
L
I
H
G
M
Fig. 11 Fig. 12
Fig. 10

34
ES
Contenedor de detergentes: para cargar detergentes
y aditivos (ver “Detergentes y ropa”).
Botón ON/OFF : presione brevemente el botón para
encender o apagar la máquina. El piloto START/PAUSE
que centellea lentamente de color verde indica que la
máquina está encendida. Para apagar la lavadora duran-
te el lavado, es necesario mantener presionado el botón
durante más tiempo, aproximadamente 2 seg.; si se
presiona en forma más breve o accidental, la máquina no
se apagará. Si la máquina se apaga durante un lavado en
curso, dicho lavado se anulará.
Botones SELECTOR DE PROGRAMAS: para seleccio-
nar el programa deseado (ver “Tabla de programas”).
Botón MEMORIA: mantenga presionado el botón para
memorizar un ciclo y las personalizaciones deseadas. Para
llamar un ciclo precedentemente memorizado, presione el
botón MEMO.
Botones FUNCIÓN: presione el botón para seleccionar
la función deseada. En la pantalla se iluminará el piloto
correspondiente.
Botón CENTRIFUGADO : presiónelo para disminuir o
excluir totalmente el centrifugado - el valor se indica en la
pantalla.
Botón TEMPERATURA : presiónelo para disminuir la
temperatura: el valor se indica en la pantalla.
Botón BLOQUEO DE BOTONES : para activar
el bloqueo del panel de control, mantenga presionado
el botón durante 2 segundos aproximadamente. El
símbolo encendido indica que el panel de control
está bloqueado. De este modo, se evitan modificaciones
accidentales de los programas, sobre todo si en la
casa hay niños. Para desactivar el bloqueo del panel
de control, mantenga presionado el botón durante 2
segundos aproximadamente.
Botón COMIENZO RETRASADO : presiónelo para
seleccionar el comienzo retrasado del programa elegido. El
retraso se indicará en la pantalla.
Botón con piloto START/PAUSE: cuando el piloto verde
centellea lentamente, presione el botón para que comien-
ce el lavado. Una vez que el ciclo ha comenzado, el piloto
se mantiene fijo. Para poner en pausa el lavado, presione
nuevamente el botón; el piloto centelleará con un color
anaranjado. Si el símbolo no está iluminado, se podrá
abrir la puerta. Para que el lavado se reanude a partir del
momento en el cual fue interrumpido, presione nuevamen-
te el botón.
Modalidad de stand by
Esta lavasecadora está en conformidad con las nuevas
normativas vinculadas al ahorro energético. Está dotada
de un sistema de auto-apagado (stand by) que, en caso
de no funcionamiento, se activa pasados aproximadamen-
te 30 minutos. Presionar brevemente el botón ON/OFF y
esperar que la máquina se active.
Descripción de la lavadora
Botón con
piloto START/
PAUSE
Botón
CENTRIFUGADO
Botón
BLOQUEO DE
BOTONES
Panel de control
Botón
TEMPERATURA
Botones
SELECTOR DE
PROGRAMAS
Contenedor de detergentes
Botones
FUNCIÓN
Botón de ON/OFF
PANTALLA
Botón
COMIENZO
RETRASADO
Botón
MEMORIA

ES
35
Pantalla
La pantalla es útil para programar la máquina y brinda múltiple información.
En las dos series superiores A y B se visualizan el programa de lavado seleccionado, la fase de lavado en curso y todas las
indicaciones correspondientes al estado de avance del programa.
En la serie C se visualiza el tiempo que falta para que finalice el ciclo de lavado en curso y, si se hubiera fijado un COMIENZO
RETRASADO, el tiempo que falta para que comience el programa seleccionado.
En la serie D se visualiza el valor máximo de velocidad de centrifugado que la máquina puede desarrollar según el programa
seleccionado; si el programa no prevé el centrifugado, la serie permanece apagada.
En la serie E se visualiza el valor máximo de temperatura que se puede fijar según el programa seleccionado; si el programa
no prevé la selección de temperatura, la serie permanece apagada.
Las series F corresponden a las funciones y se encienden cuando la función seleccionada es compatible con el programa
elegido.
Símbolo Puerta bloqueada
El símbolo encendido indica que la puerta está bloqueada para impedir aperturas accidentales. Para evitar daños, se debe
esperar que el símbolo se apague, antes de abrir la puerta.
Nota: si la función COMIENZO RETRASADO está activada, la puerta no se puede abrir, para abrirla se debe poner en pausa
la máquina presionando el botón START/PAUSE.
! La primera vez que se enciende, se solicitará la elección del idioma y, para ello, la pantalla entrará automáticamente en el
menú de selección de idioma.
Para elegir el idioma deseado, presione los botones X y Y, para confirmar la elección, presione el botón Z.
Si desea cambiar el idioma, apague la máquina, pulse simultáneamente los botones X, Y, Z hasta escuchar una señal
sonora. Se visualizará de nuevo el menú de selección del idioma.
A
B
C
D
E
Z
X
Y
F

36
ES
Cómo efectuar un ciclo de lavado
1. ENCENDER LA MÁQUINA. Presione el botón , en
la pantalla aparecerá la palabra BIENVENIDO; el piloto
START/PAUSE centelleará lentamente de color verde.
2. CARGAR LA ROPA. Abra la puerta. Cargue la ropa,
cuidando no superar la cantidad de carga indicada en la
tabla de programas de la página siguiente.
3. DOSIFICAR EL DETERGENTE. Extraiga el
contenedor y vierta el detergente en las cubetas
correspondientes como se explica en “Detergentes y
ropa”.
4. CERRAR LA PUERTA.
5. ELEGIR EL PROGRAMA. Presione uno de los
botones del SELECTOR DE PROGRAMAS para
seleccionar el programa deseado; el nombre del
programa aparecerá en la pantalla; a dicho programa
se le asociará una temperatura y una velocidad de
centrifugado que se pueden modificar. En la pantalla
aparecerá la duración del ciclo.
6. PERSONALIZAR EL CICLO DE LAVADO. Utilice los
botones correspondientes:
Modificar la temperatura y/o el centrifugado.
La máquina selecciona automáticamente la temperatura
y el centrifugado máximos previstos para el programa
seleccionado y, por lo tanto, no se pueden aumentar.
Presionando el botón se disminuye progresivamente
la temperatura hasta llegar al lavado en frío “OFF”.
Presionando el botón se disminuye progresivamente
el centrifugado hasta su exclusión “OFF”. Si se
presionan una vez más los botones, se volverá a los
valores máximos previstos.
! Excepción: cuando se selecciona el programa
(60°C)
(1° vez que se presiona el botón)
, la temperatura se
puede aumentar hasta 90°.
Seleccionar un comienzo retrasado.
Para seleccionar el comienzo retrasado del programa
elegido, presione el botón correspondiente hasta
alcanzar el tiempo de retraso deseado. Cuando dicha
opción está activada, en la pantalla aparece el símbolo
. Para eliminar el comienzo retrasado, presione el
botón hasta que aparezca el mensaje OFF.
Modificar las características del ciclo.
• Presione el botón para activar la función; el piloto
correspondiente al botón se encenderá.
• Presione nuevamente el botón para desactivar la
función; el piloto se apagará.
! Si la función seleccionada no es compatible con el
programa elegido, el piloto centelleará y la función no se
activará.
! Si la función elegida no es compatible con
otra seleccionada precedentemente, el piloto
correspondiente a la primera función seleccionada
centelleará y se activará sólo la segunda, el piloto de la
función activada se iluminará.
! Las funciones pueden variar la carga recomendada
y/o la duración del ciclo.
7. PONER EN MARCHA EL PROGRAMA. Presione
el botón START/PAUSE. El piloto correspondiente se
iluminará de color verde fijo y la puerta se bloqueará
(símbolo PUERTA BLOQUEADA encendido).
Durante el lavado, en la pantalla aparecerá el nombre
de la fase en curso. Para cambiar un programa mientras
un ciclo está en curso, ponga la lavadora en pausa
presionando el botón START/PAUSE (el piloto START/
PAUSE centelleará lentamente de color anaranjado);
luego seleccione el ciclo deseado y presione
nuevamente el botón START/PAUSE.
Para abrir la puerta mientras un ciclo está en curso,
presione el botón START/PAUSE; si el símbolo PUERTA
BLOQUEADA está apagado, será posible abrir la
puerta. Presione nuevamente el botón START/PAUSE
para reanudar el programa a partir del momento en el
que se había interrumpido.
8. FIN DEL PROGRAMA. En la pantalla aparecerá el
mensaje “FIN DEL CICLO”, cuando el símbolo PUERTA
BLOQUEADA se apague, será posible abrir la
puerta. Abra la puerta, descargue la ropa y apague la
máquina.
! Si desea anular un ciclo que ya ha comenzado, presione
más tiempo el botón . El ciclo se interrumpirá y la
máquina se apagará.

ES
37
Programas y funciones
Tabla de programas
Funciones de lavado
Super Wash
Gracias al uso de una mayor
cantidad de agua en la fase
inicial del ciclo y a la mayor
duración del programa, esta
opción garantiza un lavado
con óptimos resultados, es
útil para eliminar las manchas
más resistentes. Puede
emplearse con o sin lejía. Si
se desea efectuar también
el blanqueado introducir la
cubeta adicional 4 en dotación,
en la cubeta 1. Al dosificar
el blanqueador, no supere el
nivel “max” indicado en el perno central (ver la figura). Para
realizar sólo el blanqueo, sin realizar un lavado completo,
verter el blanqueador en la cubeta adicional 4, seleccionar el
programa “Aclarado” y activar la opción “Super Wash”.
El uso de la cubeta adicional 4 excluye el prelavado.
! No se puede activar con los programas , , , ,
“Centrifugado Rápido”, “Descarga”.
Aclarado Extra
Al elegir esta opción aumentará la eficacia del aclarado y se
asegurará la máxima eliminación del detergente. Es útil para
pieles particularmente sensibles.
! No se puede activar con los programas “Lavado Rápido 30’”,
, , “Centrifugado Rápido”, “Descarga”.
Fácil Planchado
Cuando se selecciona esta función, el lavado y el centrifugado
se modificarán oportunamente para disminuir la formación de
arrugas. Al finalizar el ciclo, la lavadora realizará lentas rotaciones
del cesto; el indicador de función FÁCIL PLANCHADO y el de
ON/OFF centellearán (naranja) y el mensaje “FIN DEL CICLO”
aparecerá en la pantalla. Para finalizar el ciclo se deberá presionar
el botón START/PAUSE o el botón FÁCIL PLANCHADO. Para
descargar el agua y poder sacar la ropa, es necesario presionar el
botón START/PAUSE o el botón FÁCIL PLANCHADO.
! No se puede activar con los programas , “Lavado Rápido 30’”,
, , .
Prelavado
Seleccionando esta función, se realiza el prelavado, muy útil
para eliminar manchas difíciles.
Nota: agregue el detergente en el compartimento
correspondiente.
! No se puede activar con los programas , , , , ,
(60°), (40°),
.
Eco Wash
La función Eco Wash contribuye al ahorro energético porque
no calienta el agua utilizada para lavar la ropa, esto constituye
una ventaja tanto para el ambiente como para la factura de
electricidad. La mayor potencia y el consumo optimizado del
agua, garantizan óptimos resultados para la misma duración
promedio de un ciclo estándar. Para obtener los mejores resul-
tados de lavado, se aconseja el uso de un detergente líquido.
! No se puede activar con los programas , , , , , .
M
AX
1
2
4
3
La duración del ciclo que se indica en el visor o en el manual es una estimación calculada en base a condiciones estándar. El tiempo efectivo puede variar en función de numerosos factores como la
temperatura y la presión del agua de entrada, la temperatura ambiente, la cantidad de detergente, la cantidad y el tipo de carga, el equilibrado de la carga y las opciones adicionales seleccionadas.
1) Programa de control según la directiva 1061/2010:
seleccione el programa
a 60°C (1° vez que se presiona el botón).
Este ciclo es adecuado para limpiar una carga de algodón normalmente sucia, es el más eficiente en lo que se refiere al consumo combinado con la energía y la cantidad de agua y se usa con
prendas lavables a 60ºC. La temperatura efectiva de lavado puede diferir de la indicada.
2) Programa de control según la directiva 1061/2010:
seleccione el programa
a 40°C (2° vez que se presiona el botón).
Este ciclo es adecuado para limpiar una carga de algodón normalmente sucia, es el más eficiente en lo que se refiere al consumo combinado con la energía y la cantidad de agua y se usa con
prendas lavables a 40ºC. La temperatura efectiva de lavado puede diferir de la indicada.
3) A la temperatura de 60ºC no se puede activar la función “Prelavado”.
Para todos los Test Institutes:
2) Programa algodón largo: seleccione el programa
a
a 40°C (2° vez que se presiona el botón).
4) Programa sintético largo: seleccione el programa
a 60°C
(1° vez que se presiona el botón)
; temperatura de 40°C
(pulse el botón TEMPERATURA).
Programas
Descripción del Programa
Temp. max.
(°C)
Velocidad máx.
(r.p.m.)
Detergents
Carga máx. (Kg.)
Humedad resi-
dual %
Consumo de
energía kWh
Agua total lt
Duración
del ciclo
Prelavado
Lavado
Suavi-
zante
Blanque-
ador
Antimanchas
40° 1400
4 - - - 180’
Algodón normal 60° (1) (1° vez que se presiona el botón): blancos y colores
resistentes muy sucios.
60°
(Max. 90°)
1400
(3)
7 53 1,10 52,5 190’
Algodón normal 40° (2) (2° vez que se presiona el botón): blancos y colores
delicados poco sucios.
40° 1400 -
7 53 0,99
82
185’
Algodón normal 20° (3° vez que se presiona el botón): blancos y colores delica-
dos poco sucios.
20° 1400 -
7 - -
-
170’
Sintético Resistente (1° vez que se presiona el botón): colores resistentes muy sucios.
60° 800
3 44 0,93 47 110’
Sintético Resistente (4) (1° vez que se presiona el botón): colores resistentes poco sucios.
40° 800
3 44 0,57 46 95’
Sintético Delicado (2° vez que se presiona el botón): colores resistentes poco sucios.
40° 800
3 - - - 70’
Lavado Rápido 60’ (1° vez que se presiona el botón): para refrescar rápidamente
prendas sucias (no se aconseja utilizarlo para lana, seda y prendas para lavar a mano).
60° 1400 -
- 3,5 53 0,81 40 60’
Lavado Rápido 30’ (2° vez que se presiona el botón): para refrescar rápidamente prendas
poco sucias (no se aconseja utilizarlo para lana, seda y prendas para lavar a mano).
30° 800 -
- 3 71 0,15 35 30’
M
Memoria: permite memorizar cualquier tipo de lavado.
Antialérgico
60° 1400 -
- 4 - - - 195’
Woolmark Platinum (Lana): para lana, cachemira, etc.
40° 800 -
- 1,5 - - - 70’
Delicados
30° 0 -
- 1 - - - 80’
Centrifugado Rápido (1° vez que se presiona el botón)
- 1400 - - - - 7 - - - 16’
Aclarado Algodón (2° vez que se presiona el botón)
- 1400 - -
7 - - - 36’
Descarga (3° vez que se presiona el botón)
- 0 - - - - 7 - - - 2’

38
ES
Detergentes y ropa
Contenedor de detergentes
El buen resultado del lavado depende también de la cor-
recta dosificación del detergente: si se excede la cantidad,
no se lava de manera más eficaz, sino que se contribuye a
encostrar las partes internas de la lavadora y a contaminar
el medio ambiente.
! Utilice detergentes en polvo para prendas de algodón
blancas, para el prelavado y para lavados con una tempe-
ratura mayor que 60ºC.
! Respete las indicaciones que se encuentran en el enva-
se de detergente.
! No use detergentes para el lavado a mano porque pro-
ducen demasiada espuma.
Extraiga el contenedor de
detergentes e introduzca el
detergente o el aditivo de la
siguiente manera:
cubeta 1: Detergente para prelavado (en polvo)
Antes de verter el detergente, verifique que no esté colo-
cada la cubeta adicional 4.
cubeta 2: Detergente para lavado (en polvo o
líquido)
El detergente líquido se debe verter sólo antes de la pue-
sta en marcha.
cubeta 3: Aditivos (suavizante, etc.)
El suavizante no se debe volcar fuera de la rejilla.
cubeta adicional 4: Blanqueador
Preparar la ropa
• Subdivida la ropa según:
- el tipo de tejido / el símbolo en la etiqueta.
- los colores: separe las prendas de color y las blancas.
• Vacíe los bolsillos y controle los botones.
• No supere los valores indicados en la “Tabla de Progra-
mas” referidos al peso de la ropa seca.
¿Cuánto pesa la ropa?
1 sábana 400/500 g
1 funda 150/200 g
1 mantel 400/500 g
1 albornoz 900/1200 g
1 toalla 150/250 g
M
AX
1
2
4
3
Programas particulares
Antimancha: el programa es adecuado para el lavado de
prendas muy sucias, con colores resistentes. El programa
garantiza una clase de lavado superior a la clase estándar
(clase A). No ejecute el programa mezclando prendas de
distintos colores. Se aconseja el uso de detergente en polvo.
Si las manchas son difíciles de eliminar, realice un pretrata-
miento con aditivos específicos.
Algodón normal 20°: ideal para cargas de prendas de algo-
dón sucias. Los buenos rendimientos aún en frío, compara-
bles con los de un lavado a 40º, están garantizados por una
acción mecánica que trabaja con variación de velocidad con
picos repetidos y cercanos.
Antialérgico: utilice el programa para la eliminación de
los principales alérgenos como polen, ácaros, pelos de gato
y de perro.
Lana: el ciclo de lavado “Lana” de esta lavadora Hotpoint-
Ariston ha sido probado y aprobado por la Woolmark
Company para el lavado de prendas de lana clasificadas
como “lavables a mano”, siempre que el lavado se realice
respetando las instrucciones contenidas en la etiqueta de
la prenda y las indicaciones suministradas por el fabricante
del electrodoméstico. Hotpoint-Ariston es la primera marca
de lavadoras que ha obtenido de la Woolmark Company
la certificación Woolmark Apparel Care - Platinum por sus
prestaciones de lavado y por el consumo de agua y energía.
(M1126)
Delicados: utilice el programa para el lavado de las prendas
muy delicadas que tienen aplicaciones como strass o lentejuelas.
Se recomienda voltear las prendas antes del lavado e
introducir las más pequeñas en la bolsa para el lavado de
prendas delicadas.
Para obtener mejores resultados, se recomienda el
uso de detergente líquido para prendas delicadas.
Para el lavado de las prendas de Seda y Cortinas, seleccione
el ciclo y active la función (en este caso también será
posible activar la función “Aclarado Extra”); a máquina terminará
el ciclo dejando la ropa en remojo y el piloto centelleará.
Para descargar el agua y poder sacar la ropa, es necesario
presionar el botón START/PAUSE o el botón .
Sistema de equilibrado de la carga
Antes de cada centrifugado, para evitar vibraciones excesivas
y para distribuir la carga de modo uniforme, el cesto realiza
rotaciones a una velocidad ligeramente superior a la del la-
vado. Si después de varios intentos, la carga todavía no está
correctamente equilibrada, la máquina realiza el centrifugado
a una velocidad inferior a la prevista. Cuando existe un ex-
cesivo desequilibrio, la lavadora realiza la distribución antes
que el centrifugado. Para obtener una mejor distribución
de la carga y su correcto equilibrado, se aconseja mezclar
prendas grandes y pequeñas.

ES
39
Precauciones y consejos
! La lavadora fue proyectada y fabricada en conformidad
con las normas internacionales de seguridad. Estas adver-
tencias se suministran por razones de seguridad y deben
ser leídas atentamente.
Seguridad general
• Este aparato ha sido fabricado para un uso de tipo do-
méstico exclusivamente.
• El aparato no debe ser empleado por personas (niños
incluidos) con capacidades físicas, sensoriales o men-
tales reducidas y con experiencias y conocimientos in-
suficientes, a menos que dicho uso no se realice bajo la
supervisión o las instrucciones de una persona respon-
sable de su seguridad. Los niños deben ser vigilados
para asegurarse que no jueguen con el aparato.
• No toque la máquina con los pies desnudos ni con las
manos o los pies mojados o húmedos.
• No desenchufe la máquina tirando el cable, sino toman-
do el enchufe.
• No abra el contenedor de detergentes mientras la
máquina está en funcionamiento.
• No toque el agua de descarga porque puede alcanzar
temperaturas elevadas.
• En ningún caso fuerce la puerta: podría dañarse el
mecanismo de seguridad que la protege de aperturas
accidentales.
• En caso de avería, no acceda nunca a los mecanismos
internos para intentar una reparación.
• Controle siempre que los niños no se acerquen a la
máquina cuando está en funcionamiento.
• Durante el lavado, la puerta tiende a calentarse.
• Si debe ser trasladada, deberán intervenir dos o más
personas, procediendo con el máximo cuidado. La
máquina no debe ser desplazada nunca por una sola
persona ya que es muy pesada.
• Antes de introducir la ropa controle que el cesto esté
vacío.
Eliminaciones
• Eliminación del material de embalaje: respete las normas
locales, de ese modo, los embalajes podrán volver a ser
utilizados.
• En base a la Norma europea 2012/19/EU de Residuos
de aparatos Eléctricos y Electrónicos, los electrodomé-
sticos viejos no pueden ser arrojados en los contene-
dores municipales habituales; tienen que ser recogidos
selectivamente para optimizar la recuperación y recicla-
do de los componentes y materiales que los constituyen,
y reducir el impacto en la salud humana y el medioam-
biente. El símbolo del cubo de basura tachado se marca
sobre todos los productos para recordar al consumidor
la obligación de separarlos para la recogida selectiva.
El consumidor debe contactar con la autoridad local o
con el vendedor para informarse en relación a la correc-
ta eleminación de su electrodoméstico viejo.
Apertura manual de la puerta
Si desea sacar la ropa de la lavasecadora y no es posible
abrir la puerta debido a un corte de energía eléctrica, pro-
ceda del siguiente modo:
1. desenchufe la máquina.
2. verifique que el nivel de agua en el interior de la máquina
sea inferior al hueco de la puerta; si no es así, extraiga el
agua en exceso utilizando el tubo de descarga y recogién-
dola en un balde.
3. utilizando la lengüeta indicada en la figura, tire hacia
fuera hasta liberar la varilla de plástico del retén; posterior-
mente tire hacia abajo y simultáneamente abra la puerta.

40
ES
Mantenimiento y cuidados
Interrumpir el agua y la corriente elé-
ctrica
• Cierre el grifo de agua después de cada lavado. De
este modo se limita el desgaste de la instalación
hidráulica de la lavadora y se elimina el peligro de pér-
didas.
• Desenchufe la máquina cuando la debe limpiar y du-
rante los trabajos de mantenimiento.
Limpiar la lavadora
La parte externa y las partes de goma se pueden limpiar
con un paño embebido en agua tibia y jabón. No use
solventes ni productos abrasivos.
Limpiar el contenedor de detergentes
Extraiga el contenedor
levantándolo y tirándolo
hacia fuera (ver la figura).
Lávelo debajo del agua
corriente, esta limpieza se
debe realizar frecuente-
mente.
Cuidar la puerta y el cesto
• Deje siempre semicerrada la puerta para evitar que se
formen malos olores.
Limpiar la bomba
La lavadora posee una bomba autolimpiante que no ne-
cesita mantenimiento. Pero puede suceder que objetos
pequeños (monedas, botones) caigan en la precámara
que protege la bomba, situada en la parte inferior de la
misma.
! Verifique que el ciclo de lavado haya terminado y de-
senchufe la máquina.
Para acceder a la precámara:
1. desenrosque la tapa
girándola en sentido an-
tihorario (ver la figura): es
normal que se vuelque un
poco de agua;
2. limpie con cuidado el interior;
3. vuelva a enroscar la tapa.
Controlar el tubo de alimentación de
agua
Controle el tubo de alimentación al menos una vez al año.
Si presenta grietas o rajaduras debe ser sustituido: durante
los lavados, las fuertes presiones podrían provocar roturas
imprevistas.
! No utilice nunca tubos ya usados.
1
2

ES
41
Anomalías y soluciones
Puede suceder que la lavadora no funcione. Antes de llamar al Servicio de Asistencia Técnica (ver “Asistencia”), controle que
no se trate de un problema de fácil solución utilizando la siguiente lista.
Anomalías:
La lavadora no se enciende.
El ciclo de lavado no comienza.
La lavadora no carga agua (En la
pantalla aparecerá el mensaje “Sin
agua, revisar suministro”).
La lavadora carga y descarga agua
continuamente.
La lavadora no descarga o no cen-
trifuga.
La lavadora vibra mucho durante la
centrifugación.
La lavadora pierde agua.
La máquina está bloqueada, la pan-
talla centellea e indica un código
de anomalía (por ej.: F-01, F-..).
Se forma demasiada espuma.
Posibles causas / Solución:
• El enchufe no está introducido en la toma de corriente, o no hace contacto.
• En la casa no hay corriente.
• La puerta no está correctamente cerrada.
• El botón ON/OFF no ha sido presionado.
• El botón START/PAUSE no ha sido presionado.
• El grifo de agua no está abierto.
• Se fijó un retraso de la hora de puesta en marcha.
• El tubo de alimentación de agua no está conectado al grifo.
• El tubo está plegado.
• El grifo de agua no está abierto.
• En la casa no hay agua.
• No hay suficiente presión.
• El botón START/PAUSE no ha sido presionado.
• El tubo de descarga no está instalado entre los 65 y 100 cm. del suelo (ver “Instalación”).
• El extremo del tubo de descarga está sumergido en el agua (ver “Instalación”).
• La descarga de pared no posee un respiradero.
Si después de estas verificaciones, el problema no se resuelve, cierre el grifo de
agua, apague la lavadora y llame a la Asistencia. Si la vivienda se encuentra en
uno de los últimos pisos de un edificio, es posible que se verifiquen fenómenos de
sifonaje, por ello la lavadora carga y descarga agua de modo continuo. Para eliminar
este inconveniente se encuentran disponibles en el comercio válvulas especiales
que permiten evitar el sifonaje.
• El programa no prevé la descarga: con algunos programas es necesario poner-
la en marcha manualmente (“Programas y funciones”).
• Se puede utilizar la función FÁCIL PLANCHADO: para completar el programa,
pulse el botón START/PAUSE (“Programas y funciones”).
• El tubo de descarga está plegado (ver “Instalación”).
• El conducto de descarga está obstruido.
• El cesto, en el momento de la instalación, no fue desbloqueado correctamen-
te (ver “Instalación”).
• La máquina no está instalada en un lugar plano (ver “Instalación”).
• Existe muy poco espacio entre la máquina, los muebles y la pared (ver “Insta-
lación”).
• El tubo de alimentación de agua no está bien enroscado (ver “Instalación”).
• El contenedor de detergentes está obstruido (para limpiarlo ver “Mantenimien-
to y cuidados”).
• El tubo de descarga no está bien fijado (ver “Instalación”).
• Apague la máquina y desenchúfela, espere aproximadamente 1 minuto y
luego vuelva a encenderla.
Si la anomalía persiste, llame al Servicio de Asistencia Técnica.
• El detergente no es específico para la lavadora (debe contener algunas de las
frases “para lavadora”, “a mano o en lavadora” o similares).
• La dosificación fue excesiva.

42
ES
Asistencia
Antes de llamar al Servicio de Asistencia Técnica:
• Verifique si la anomalía la puede resolver Ud. solo (ver “Anomalías y soluciones”);
• Vuelva a poner en marcha el programa para controlar si el inconveniente fue resuelto;
• Si no es así, llame al Servicio de Asistencia técnica autorizado, al número de teléfono indicado en el certificado de garantía.
! No recurra nunca a técnicos no autorizados.
Comunique:
• el tipo de anomalía;
• el modelo de la máquina (Mod.);
• el número de serie (S/N ).
Esta información se encuentra en la placa aplicada en la parte posterior de la lavadora y en la parte delantera abriendo la puerta.
La siguiente información es válida solo para España. Para otros países de habla hispana consulte a su vendedor.
Ampliación de garantía
Llame al 902.363.539 y le informaremos sobre el fantástico plan de ampliación de garantía hasta 5 años.
Consiga una cobertura total adicional de
• Piezas y componentes
• Mano de obra de los técnicos
• Desplazamiento a su domicilio de los técnicos
Y NO PAGUE AVERIAS NUNCA MAS
Servicio de asistencia técnica (SAT)
Llame al 902.133.133 y nuestros técnicos intervendrán con rapidez y eficacia, devolviendo el electrodoméstico a sus condi-
ciones óptimas de funcionamiento. En el SAT encontrará recambios, accesorios y productos específicos para la limpieza y
mantenimiento de su electrodoméstico a precios competitivos. ESTAMOS A SU SERVICIO

CIS
43
Русский
Содержание
Установка 44-45-46-47
Распаковка и нивелировка
Подключение к водопроводной и электрической сети
Первый цикл стирки
Технические характеристики
Инструкции по монтажу оборудования
Описание стиральной машины, 48-49
Панель управления
Дисплей
Порядок выполнения цикла стирки, 50
Программы и функции, 51
Таблица программ
Функции стирки
Стиральные вещества и типы белья, 52
Распределитель моющих средств
Подготовка белья
Специальные программы
Система балансировки белья
Предосторожности и рекомендации, 53
Общие требования к безопасности
Утилизация
Аварийное открытие люка
Техническое обслуживание и уход, 54
Отключение воды и электрического тока
Уход за стиральной машиной
Уход за распределителем моющих средств
Уход за люком и барабаном
Уход за насосом
Проверка водопроводного шланга
Неисправности и методы их устранения, 55
Сервисное обслуживание, 56
CIS
BWMD 742
Руководство по
эксплуатации
СТИРАЛЬНАЯ МАШИНА

44
CIS
Установка
! Сохраните данное руководство. Оно должно быть в
комплекте со стиральной машиной в случае продажи,
передачи оборудования или при переезде на новую
квартиру, чтобы новый владелец оборудования мог
ознакомиться с правилами его функционирования и
обслуживания.
! Внимательно прочитайте руководство: в нем
содержатся важные сведения по установке и
безопасной эксплуатации стиральной машины.
Распаковка и выравнивание
Распаковка
1. Распакуйте стиральную машину.
2. Убедитесь, что оборудование не было повреждено
во время транспортировки. При обнаружении
повреждений – не подключайте машину –
свяжитесь с поставщиком немедленно.
3. Удалите четыре
транспортировочных
винта и резиновые
пробки с прокладками,
расположенные в задней
части стиральной
машины (см. рис.).
4. Закройте отверстия прилагающимися
пластиковыми заглушками.
5. Сохраняйте все детали: они Вам понадобятся
при последующей транспортировке стиральной
машины.
! Не разрешайте детям играть с упаковочными
материалами.
Выравнивание
1. Установите стиральную машину на ровном и
прочном полу, так чтобы она не касалась стен,
мебели и прочих предметов.
2. После установки
машины на место
отрегулируйте ее
устойчивое положение
путем вращения передних
ножек (см. рис.). Для
этого сначала ослабьте
контргайку, после
завершения регулировки
контргайку затяните.
После установки машины на
место проверьте по уровню горизонтальность верхней
крышки корпуса, отклонение горизонтали должно быть
не более 2°.
Правильное выравнивание оборудования поможет
избежать шума, вибраций и смещений во время работы
машины.
Если стиральная машина стоит на полу, покрытом
ковром, убедитесь, что ее основание возвышается
над ковром. В противном случае вентиляция будет
затруднена или вовсе невозможна.
Подключение к водопроводной и
электрической сети
Подсоединение заливного шланга
1. Прикрутите шланг
подачи к крану холодной
воды с резьбовым
отверстием 3/4 газ (см.
схему).
Перед подсоединением
откройте водопроводный
кран до тех пор, пока из
него не потечет чистая
вода.
2. Подсоедините
заливной шланг к
стиральной машине,
навинтив его на
водоприемник,
расположенный в задней
верхней части справа
(см. рис.).
3. Убедитесь, что шланг не перекручен и не пережат.
! Давление воды должно быть в пределах значений,
указанных в таблице Технических характеристик
(см. с. 3).
! Если длина водопроводного шланга окажется
недостаточной, обратитесь в Авторизованный
cервисный центр.
! Никогда не используйте шланги, бывшие в
употреблении.

CIS
45
Первый цикл стирки
По завершении установки, перед началом эксплуатации
необходимо произвести один цикл стирки со стиральным
порошком, но без белья, по программе
(60° C).
65 - 100 cm
Подсоединение сливного шланга
Подсоедините сливной
шланг, не перегибая его,
к сливной трубе или к
настенному сливному
отверстию, распложенному
на высоте от 65 до 100 см
от пола,
или поместите шланг в
раковину или в ванну,
закрепив прилагающуюся
направляющую к крану (см.
схему). Свободный конец
сливного шланга не должен
быть погружен в воду.
! Не рекомендуется использовать удлинительные
шланги. При необходимости удлинение должно иметь
такой же диаметр, что и оригинальный шланг, и его
длина не должна превышать 150 см.
Подключение к электросети
Перед включением изделия в розетку электросети
необходимо проверить следующее:
• заземляющий контакт двухполюсной розетки
должен быть соединён с заземлением и
соответствовать нормативам;
• розетка электросети должна быть расчитана на
максимальную мощность стиральной машины,
указанную в таблице Технические данные (см.
таблицу сбоку);
• напряжение электросети должно соответствовать
значениям, указанным в таблице Технические
данные (см. таблицу сбоку);
• электрическая розетка и штепсельная вилка
стиральной машины должны быть одного типа. В
противном случае необходимо заменить розетку.
! Запрещается устанавливать стиральную машину на
улице, даже под навесом, так как опасно подвергать
ее воздействию дождя и грозы.
! Стиральная машина должна быть расположена
таким образом, чтобы доступ к розетке электросети
оставался свободным.
! Не используйте удлинители и тройники.
! Сетевой кабель изделия не должен быть согнут или сжат.
! Замена сетевого кабеля может осуществляться
только уполномоченными сервисными центрами.
Внимание! Фирма снимает с себя всякую ответственность
в случае несоблюдения вышеописанных правил.
Технические данные
Модель BWMD 742
Страна-
изготовитель
Италия
Габаритные
размеры
ширина 59,5 см.
высота 81,5 см.
глубина 54,5 см.
Вместимость от 1 до 7 кг
Номинальное
значение
напряжения
электропитания
или диапазон
напряжения
220-240 V ~
максимальную
мощность
1850 W
Условное
обозначение рода
электрического тока
или номинальная
частота
переменного тока
50 Hz
Класс зашиты
от поражения
электрическим
током
Класс защиты I
Водопроводное
подсоединение
максимальное давление 1 МПа (10 бар)
минимальное давление 0,05 МПа (0,5 бар)
емкость барабана 52 литра
Скорость отжима до 1400 оборотов в минуту
Программы
управления в
соответствии с
Директивой
EN 60456
(1 íàæàòèå êíîïêè)
Данное изделие соответствует
следующим Директивам Европейского
Сообщества:
- 2004/108/СЕ (Электромагнитная
совместимость);
- 2006/95/CE (Низкое напряжение)
- 2012/19/EU
Ñòåïåíü çàùèòû îò ïîïàäàíèÿ òâåðäûõ ÷àñòèö è âëàãè,
îáåñïå÷èâàåìàÿ çàùèòíîé îáîëî÷êîé, çà èñêëþ÷åíèåì
íèçêîâîëüòíîãî îáîðóäîâàíèÿ, íå èìåþùåãî çàùèòû îò
âëàãè:
IPX4
Дату производства
данной техники
можно получить из
серийного номера,
расположенного
под штрих-кодом
(S/N XXXXXXXXX),
следующим
образом
- 1-ая цифра в S/N соответствует
последней цифре года,
- 2-ая и 3-я цифры в S/N -
порядковому номеру месяца года,
- 4-ая и 5-ая цифры в S/N - день
Класс
энергопотребления
A

46
CIS
Инструкции по монтажу
Установка деревянной панели на дверцу и
встраивание машины в модуль кухонной мебели
В случае, когда стиральная машина должна быть
перевезена для окончательной установки после
того, как деревянная панель уже была навешена,
мы предлагаем оставить машину в ее оригинальной
упаковке. Конструкция упаковки позволяет навесить
деревянную панель на машину, не извлекая
последнюю полностью из упаковки (см. рис. 7).
Деревянная панель, которая закрывает лицевую
сторону машины, должна быть толщиной не менее
18 мм и может навешиваться или справа, или слева.
В целях практичного использования машины мы
рекомендуем навешивать панель слева, чтобы она
открывалась в ту же самую сторону, что и дверца
машины.
Аксессуары для монтажа дверной панели
Петля (2 шт.)
Магнит
(1 шт.)
Магнитная пластинка (1
шт.)
Резиновый ограничитель
(1 шт.)
Рамка петли (2 шт.)
Прокладка защелки
(1 шт.)
- самонарезные винты тип А дл. 13 мм – 6 шт.,
- метрические винты с потайной головкой тип В дл.
25 мм (для крепления магнитной пластинки к корпусу
мебели) – 2 шт.,
- метрические винты тип С дл. 15 мм (для прикрепления
рамок петель к корпусу мебели) – 4 шт.,
- метрические винты тип D дл. 7 мм (для закрепления
петель на рамках) – 4 шт.
Крепление элементов с лицевой стороны машины
- Винтами типа С закрепите рамки петель таким
образом, чтобы отверстие, обозначенное стрелкой на
рис. 8-1, было направлено к внутренней части
лицевой стороны машины.
- Установите с противоположной стороны вверху
ответную часть магнитной защелки, используя два
винта типа В.
- Поместите прокладку, изображенную на рис. 8-4В,
между лицевой стороной оборудования и ответной
частью магнитной защелки.
Магнитная защелка
1
2
3
4
5
4/B
A
B
C
D
E
Tur seite

CIS
47
Приспособления для регулировки высоты
стиральной машины
Под крышкой из полистирола
(рис. 13) находятся: 2
поперечные накладки (G); 1
планка (М).
Внутри барабана машины:
4 дополнительные ножкки (Н);
4 винта (I);
4 винта (R);
4 гайки (L);
2 направляющих для плинтуса
(нижней декоративной
панели) (Q).
Регулировка высоты стиральной машины
Вращением 4-х ножек высота стиральной машины может
быть отрегулирована от 815 до 835 мм.
Если требуется установить машину на бо ’льшую высоту
(до 870 мм), следует использовать 2 накладки (G); 4
дополнительные ножки (Н); 4 винта (I); 4 гайки (L) (см.
рис. 14).
Выполните следующее:
выверните 4 имеющиеся ножки, поместите поперечную
накладку G в передней части оборудования и закрепите
ее винтами I (вкрутив их в отверстия, где ранее были
закреплены ножки). Затем вкрутите дополнительные
ножки Н. Повторите указанные шаги для задней стороны
оборудования. Теперь отрегулируйте высоту машины от
835 до 870 мм с помощью дополнительных ножек Н.
Установив желаемую высоту, зафиксируйте гайки L
на поперечной накладке G. Для установки машины
на высоту 870–900 мм, следует установить планку М,
отрегулировав ножки Н на требуемую высоту. Чтобы
вставить планку М, ослабьте 3 винта N, расположенные
в передней части верхней крышки машины, поместите
планку М, как показано на рис. 15, и заверните винты N.
Использование шаблона
- Чтобы разметить положение отверстий на левой
стороне панели, выровняйте шаблон с ее верхним
левым краем, сверяясь с контрольными линиями
шаблона.
- Чтобы разметить положение отверстий на правой
стороне панели, выровняйте шаблон с ее верхним
правым краем.
- Просверлите отверстия для двух петель,
резинового ограничителя и магнитного замка,
используя сверло подходящего размера.
Крепление элементов на деревянную панель (дверцу)
- Вставьте петли в отверстия (подвижная часть
петли должна быть установлена лицевой
стороной по направлению от панели) и закрепите их 4
винтами типа А.
- Вставьте магнитную защелку (рис. 8-3) в верхнее
отверстие на стороне, противоположной петлям,
и зафиксируйте ее 2 винтами типа В.
- Вставьте резиновый ограничитель в нижнее
отверстие.
Теперь панель (дверца) готова к установке на машину.
Установка деревянной панели (дверцы) на машину
Вставьте кончик петли (отмеченный стрелкой на рис.
8-2) в отверстие для петли и продвиньте на панель по
направлению к лицевой стороне машины. Закрепите 2
петли винтами типа D.
Крепление направляющих плинтуса (нижней
декоративной панели)
Если машина устанавливается в конце мебельного
модуля, для плинтуса (нижней декоративной панели)
производится монтаж одной или обеих направляющих,
как показано на рис. 9. Отрегулируйте их на глубину
плинтуса и при необходимости прикрепите плинтус к
направляющим (рис. 10)
Установка направляющей (рис. 9):
- закрепите уголок Р винтом R, вставьте
направляющую Q в специальное отверстие,
разместите ее в желаемом положении и
закрепите с помощью уголка Р и винта R.
Встраивание машины в корпус кухонной мебели
- Вставьте машину в нишу, выровняв ее с мебелью
(рис. 11).
- Отрегулируйте ножки машины, чтобы поднять ее
на подходящую высоту.
- Отрегулируйте положение деревянной панели в
горизонтальном и вертикальном направлениях,
используя винты С и D, как показано на рис. 12.
Важно: плинтус должен закрывать нижнюю
лицевую часть машины до пола.
D
C
C
9
10
11
12
M
15
L
I
H
G
14
570
min
815
540
595
820 ÷ 900
600 min
13
11

48
CIS
Ячейки для стирального вещества: для загрузки
стиральных веществ и добавок (см. «Стиральные
вещества и типы белья»).
Кнопка ON/OFF : быстро нажмите эту кнопку для
включения или выключения машины. Индикатор
START/PAUSE, редко мигающий зеленым цветом,
означает, что машина включена. Для выключения
стиральной машины в процессе стирки необходимо
держать нажатой кнопку, примерно 2 секунды.
Короткое или случайное нажатие не приведет к
отключению машины. В случае выключения машины
в процессе стирки текущий цикл отменяется.
Кнопки ВЫБОРА ПРОГРАММ: служат для выбора
нужной программы (см. «Таблица программ»).
Кнопка MEMO: держите нажатой эту кнопку для
сохранения цикла и персонализированных вами
программ. Для вызова ранее сохраненного цикла
нажмите кнопку MEMO.
Кнопки ДОПОЛНИТЕЛЬНЫХ ФУНКЦИЙ: нажмите
кнопку для выбора нужной вам функции. На дисплее
загорится соответствующий индикатор.
Кнопка ОТЖИМ : нажмите эту кнопку для
сокращения скорости или полного исключения
отжима – значение показывается на дисплее.
Кнопка ТЕМПЕРАТУРА : нажмите эту кнопку
для уменьшения значения температуры: значение
показывается на дисплее.
Кнопка БЛОКИРОВКА КНОПОК : для включения
блокировки консоли управления держите кнопку
нажатой примерно 2 секунды. Включенный символ
означает, что консоль управления заблокирована.
Таким образом, программа не может быть случайно
изменена, особенно если в доме дети. Для
отключения блокировки консоли управления держите
кнопку нажатой примерно 2 секунды.
Кнопка ПУСК С ЗАДЕРЖКОЙ : нажмите
для программирования времени задержки
пуска выбранной программы. Время задержки
показывается на дисплее.
Кнопка с индикатором START/PAUSE: когда зеленый
индикатор редко мигает, нажмите кнопку для
запуска цикла стирки. После пуска цикла индикатор
перестает мигать. Для прерывания стирки вновь
нажмите эту кнопку; индикатор замигает оранжевым
цветом. Если символ не горит, можно открыть люк
машины. Для возобновления стирки с момента, когда
она была прервана, вновь нажмите эту кнопку.
Режим ожидания
Настоящая стиральная машина отвечает
требованиям новых нормативов по экономии
электроэнергии, укомплектована системой
автоматического отключения (режим сохранения
энергии), включающейся через 30 минут простоя
машины. Нажмите один раз кнопку ON/OFF. и
подождите, пока машина вновь включится.
Описание стиральной машины
Панель управления
Кнопка
ТЕМПЕРАТУРЫ
Кнопки
ВЫБОРА
ПРОГРАММ
Ячейка для стирального
вещества
Кнопки
ДОПОЛНИТЕЛЬНЫХ
ФУНКЦИИ
Кнопка ON/OFF
Кнопка
ОТЖИМА
Кнопка с
индикатором
START/PAUSE
Кнопки
БЛОКИРОВКА
КНОПОК
Дисплей
Кнопки
ЗАДЕРЖКА
ЗАПУСКА
Кнопка
MEMO

CIS
49
Дисплей
Дисплей служит для программирования машины и предоставляет пользователю множество сведений.
На двух верхних строках А и В показываются выбранная программа стирки, текущая фаза стирки и все сведения
о выполнении программы.
На строке С показывается время, остающееся до конца текущего цикла стирки и, если был задан ЗАДЕРЖКА
ЗАПУСКА, время, остающееся до запуска выбранной программы.
На строке D показывается максимальное значение скорости отжима, который машина может выполнить в
зависимости от выбранной программы; если выбранная программа не предусматривает отжим, данная строка не
включается.
На строке Е показывается максимальное значение температуры, которое можно выбрать в зависимости от
выбранной программы; если выбранная программа не предусматривает настройку температуры, данная строка
не включается.
Индикаторы F относятся к функциям и загораются, когда выбранная функция является совместимой с заданной
программой.
Символ заблокированного люка
Включенный символ означает, что люк заблокирован во избежание его случайного открывания. Во избежание
повреждений, перед тем как открыть люк, необходимо дождаться, пока погаснет символ.
ПРИМЕЧАНИЕ: если включена функция ЗАПУСК С ЗАДЕРЖКОЙ, люк открыть нельзя. Для этого необходимо
переключить машину в режим паузы при помощи кнопки START/PAUSE.
! При первом включении машины потребуется выбрать язык, и дисплей автоматически покажет страницу меню
выбора языка.
Для выбора нужного языка нажмите кнопки X и Y, для подтверждения выбора нажмите кнопку Z.
ЕЕсли требуется сменить язык, выключите машину, нажмите одновременно кнопки X, Y, Z подождите до звукового
сигнала, откроется меню выбора языка.
A
B
C
D
E
Z
X
Y
F

50
CIS
Порядок выполнения цикла
стирки
1. ПОРЯДОК ВКЛЮЧЕНИЯ МАШИНЫ. Нажмите
кнопку , на дисплее появится надпись ДОБРО
ПОЖАЛОВАТЬ. Индикатор START/PAUSE редко
мигает зеленым цветом.
2. ПОРЯДОК ЗАГРУЗКИ БЕЛЬЯ. Откройте люк
машины. Загрузите в барабан белье, не превышая
максимальный допустимый вес, указанный в
таблице программ на следующей странице.
3. ДОЗИРОВКА МОЮЩЕГО СРЕДСТВА. Выньте
распределитель и засыпьте моющее средство в
специальные ячейки, как описано в разделе
«Стиральные вещества и типы белья».
4. ЗАКРОЙТЕ ЛЮК.
5. ВЫБОР ПРОГРАММЫ. Нажмите одну из кнопок
ВЫБОР ПРОГРАММЫ для выбора нужной
программы. Название программы появится на
дисплее. Вместе с программой будет показана
температура и скорость отжима, которые могут
быть изменены. На дисплее показывается
продолжительность данного цикла.
6. ПЕРСОНАЛИЗАЦИЯ ЦИКЛА СТИРКИ. Нажмите
соответствующие кнопки:
Порядок изменения температуры и/
или скорости отжима. Машина автоматически
устанавливает максимальные температуру и
скорость отжима, допустимые для выбранной
программы, следовательно, эти значения не могут
быть увеличены. При помощи кнопки можно
постепенно уменьшить температуру вплоть до
стирки в холодной воде “OFF”. При помощи кнопки
можно постепенно уменьшить скорость отжима
вплоть до его исключения “OFF”. При еще одном
нажатии этих кнопок вернутся максимальные
допустимые значения.
! Исключение: при выборе программы
(60°C)
(1 íàæàòèå êíîïêè) температура может быть
увеличена до 90°.
Программирование
за
держка
зап
уска.
Для программирования задержки пуска выбранной
программы нажмите соответствующую кнопку
вплоть до получения нужного значения задержки.
Когда включена функция задержки, на дисплее
загорается символ . Для отмены задержки пуска
нажмите кнопку вплоть до появления на дисплее
надписи OFF.
Изменение параметров цикла.
• Нажмите кнопку для включения функции;
загорится индикатор соответствующей кнопки.
• Вновь нажмите кнопку для отключения функции;
индикатор погаснет.
! Если выбранная функция является
несовместимой с заданной программой, индикатор
будет мигать, и такая функция не будет включена.
! Если выбранная функция является
несовместимой с другой, ранее заданной
дополнительной функцией, будет мигать индикатор
первой выбранной функции, и будет включена
только вторая дополнительная функция, индикатор
включенной функции загорится.
! Дополнительные функции могут изменить
рекомендуемую загрузку машины и/или
продолжительность цикла.
7. ПУСК ПРОГРАММЫ. Нажмите кнопку START/
PAUSE: Соответствующий индикатор загорится
зеленым светом, и люк заблокируется (символ
ЛЮК ЗАБЛОКИРОВАН загорится). В процессе
стирки на дисплее показывается название
текущей фазы. Для изменения программы в
процессе выполнения цикла переключите машину
в режим паузы при помощи кнопки START/
PAUSE (индикатор START/PAUSE редко мигает
оранжевым цветом). Затем выберите новый цикл и
вновь нажмите кнопку START/PAUSE.
Если требуется открыть люк после пуска цикла,
нажмите кнопку START/PAUSE. Когда погаснет
индикатор, ЛЮК ЗАБЛОКИРОВАН , можно
открыть люк. Вновь нажмите кнопку START/PAUSE
для возобновления программы с момента, в
который она была прервана.
8. ЗАВЕРШЕНИЕ ПРОГРАММЫ. Показывается
сообщением на дисплее «КОНЕЦ ЦИКЛА». После
того, как погаснет символ ЛЮК ЗАБЛОКИРОВАН
, можно будет открыть люк. Откройте люк,
выгрузите белье и выключите машину.
! Для отмены уже запущенного цикла нажмите
на несколько секунд кнопку . Цикл прервется и
машина выключится.

CIS
51
Программы и функции
Функции стирки
Суперстирка
Благодаря использованию большего объема воды в
начале цикла и большей
продолжительности эта
функция обеспечивает
оптимальную стирку.
Эта функция служит для
удаления наиболее трудных
пятен. Может использоваться
как с отбеливателем,
так и без него. Если
требуется произвести
также отбеливание,
вставьте дополнительный
прилагающийся дозатор 4 в
ячейку 1. При заливе отбеливателя не превышайте “макс.”
уровень, указанный на стержне в центре (см. схему).
Для выполнения только отбеливания без полного
цикла стирки залейте отбеливатель в дополнительный
дозатор 4, выберите программу «Пoлockaниe»и включите
дополнительную функцию “Суперстирка”.
! Функция не может быть включена с программами , ,
, , “СИЛЬНЫЙ ОТЖИМ”, “СЛИВ”.
Дополнительное Полоскание
При выборе этой функции повышается эффективность
полоскания, обеспечивая максимальное удаление
стирального вещества. Эта функция особенно удобна для
людей с кожей, чувствительной к стиральным веществам.
! Функция не может быть включена с программами
“БЫСТРАЯ СТИРКА 30’”, , , “СИЛЬНЫЙ ОТЖИМ”,
“СЛИВ”.
1) Программы управления соответствует нормативу EN 60456: задайте программу
(1 íàæàòèå êíîïêè)
для х/б белья с температурой 60°C.
2) При температуре 60°C нельзя включить функцию “
Предварительная стирка”
.
Легкая глажка
При выборе этой функции циклы стирки и отжима
изменяются таким образом, чтобы сократить сминаемость
белья. По завершении цикла машина производит
медленное вращение барабана. Индикатор функции
ЛЕГКАЯ ГЛАЖКА загорается, и индикатор START/PAUSE
редко мигает оранжевым цветом. Для завершения цикла
нажмите кнопку START/PAUSE или кнопку ЛЕГКАЯ
ГЛАЖКА. Для слива воды и выгрузки белья необходимо
нажать кнопку START/PAUSE или кнопку ЛЕГКАЯ ГЛАЖКА.
! Функция не может быть включена с программами
, “БЫСТРАЯ СТИРКА 30’”, , , .
Предварительная стирка
При выборе данной функции производится
предварительная стирка, способствующая удалению
наиболее трудновыводимых пятен.
ПРИМЕЧАНИЕ: Поместите стиральный порошок в
специальную ячейку.
! Функция не может быть включена с программами
, , , , ,
(60°), (40°),
.
Eco wash
Функция Eco Wash позволяет экономить энергию за счет
отсутствия необходимости подогрева воды для стирки
белья – неоценимого преимущества как для окружающей
среды, так и для счета за электроэнергию. Действительно,
усиленное действие и оптимальное потребление воды
гарантируют отличный результат за ту же продолжительность
стандартного цикла. Для более эффективной стирки
рекомендуется использовать жидкое моющее средство.
! Функция не может быть включена с программами
, , , , , .
M
AX
1
2
4
3
Таблица программ
Продолжительность цикла, показанная на дисплее или указанная в инструкциях является рассчетом, сделанным на основании стандартных условий. Фактическая продолжительность
может варьировать в зависимости от многочисленных факторов таких как температура и давление воды на подаче, температура помещения, количество моющего средства, количество
и тип загруженного белья, балансировка белья, выбранные дополнительные функции.
Программы
УДАЛЕНИЕ ПЯТЕН
40° 1400
4
Продолжительность программ стирки можно проверять по
дисплею.
ХЛОПОК СТАНДАРТ. 60° (1) (1 íàæàòèå êíîïêè):
60°
(Max. 90°)
1400
(2)
7
ХЛОПОК СТАНДАРТ. 40° ( íàæàòèå êíîïêè):
40° 1400
-
7
ХЛОПОК СТАНДАРТ. 20° ( íàæàòèå êíîïêè):
20° 1400
-
7
СИНТЕТИКА ИНТЕНСИВ (1 íàæàòèå êíîïêè):
60° 800
3
СИНТЕТИКА ДЕЛИКАТНАЯ ( íàæàòèå êíîïêè):
40° 800
3
БЫСТРАЯ СТИРКА 60' (1 íàæàòèå êíîïêè):
з
60° 1400
-
-
3,5
БЫСТРАЯ СТИРКА 30’ ( íàæàòèå êíîïêè):
з
30° 800
-
-
3
M
ПАМЯТЬ: Позволяет ввести в память машины любую программу стирки.
АНТИ-АЛЛЕРГИЯ
60° 1400
-
-
7
ШЕРСТЬ УХОД ПЛАТИНУМ
40° 800
-
-
1,5
ДЕЛИКАТНАЯ СТИРКА
30° 0
-
-
1
СИЛЬНЫЙ ОТЖИМ (1 íàæàòèå êíîïêè)
- 1400
- - - -
7
ПОЛОСКАНИЕ ХЛОПКА ( íàæàòèå êíîïêè)
- 1400
- -
7
СЛИВ ( íàæàòèå êíîïêè)
- 0
- - - -
7

52
CIS
Стиральные вещества
и типы белья
Распределитель моющих средств
Хороший результат стирки зависит также от
правильной дозировки стирального вещества:
избыток стирального вещества не гарантирует
более эффективную стирку, напротив, способствует
образованию налетов внутри стиральной машины и
загрязнению окружающей среды.
! Не используйте моющие средства для ручной
стирки, так как они образуют слишком много пены.
Выньте распределитель
и поместите в него
моющее средство или
добавку в следующем
порядке.
отделение 1: моющее средство для
предварительной стирки (порошок)
Перед засыпкой стирального порошка необходимо
проверить, чтобы не был установлен дополнительный
отделение 4.
отделение 2: Моющее средство для стирки
(порошок или жидкое)
Моющее средство для стирки заливается
непосредственно перед запуском машины.
отделение 3: Добавки (ополаскиватель и т.д.)
Не наливайте ополаскиватель выше решетки
отделения.
дополнительное отделение 4: Отбеливатель
Подготовка белья
• Разделите белье по следующим признакам:
- тип ткани / обозначения на этикетке.
- цвет: отделите цветное белье от белого.
• Выньте из карманов все предметы и проверьте
пуговицы.
• Не превышайте значения, указанные в «Таблице
программ», указывающие вес сухого белья.
Сколько весит белье?
1 простыня 400-500 гр.
1 наволочка 150-200 гр.
1 скатерть 400-500 гр.
1 халат 900-1200 гр.
1 полотенце 150-250 гр.
M
AX
1
2
4
3
Специальные программы
УДАЛЕНИЕ ПЯТЕН: программа для стирки
очень грязного белья . Программа обеспечивает
уровень стирки выше стандартного (уровень А).
Не пользуйтесь этой программой, при стирке
белья разных цветов. Рекомендуется использовать
стиральный порошок. Для трудновыводимых пятен
рекомендуется обработать их специальными
добавками.
ХЛОПОК СТАНДАРТ. 20°: Х/б белья стандартная
программа идеально подходит для стирки х/б белья
со средним загрязнением. Отличные результаты
получаются также при стирке в холодной воде,
сравнимые со стиркой при 40°, обеспечиваются
механическим действием с разной скоростью с
повторяющимися частыми пиками.
АНТИ-АЛЛЕРГИЯ: используйте программу для
удаления основных аллергенов таких как пыльца,
чесоточных клещей, собачьей или кошачьей шерсти.
ШЕРСТЬ: Цикл стирки “Шерсть» данной стиральной
машины Hotpoint-Ariston прошел тестирование и был
твержден Компанией Woolmark Company для стирки
шерстяных изделий, классифицированных как «для
ручной стирки» с тем, чтобы тирка выполнялась
в соответствии с инсрукциями на этикетке вещи и
инструкциями, прилагаемым изготовителем бытового
электроприбора. Hotpoint-Ariston – это первая марка
стиральных машин, получившая от Woolmark Com-
pany сертификацию Woolmark Apparel Care - Platinum
за качество стирки и за экономный расход воды и
электроэнергии.(M1126)
ДЕЛИКАТНАЯ СТИРКА: используйте программу
для стирки очень деликатного белья со стразами или
блестками.
Рекомендуется вывернуть наизнанку белье перед
стиркой и поместить мелкое белье в специальный
мешочек для стирки деликатного белья.
Для оптимизации результатов рекомендуется
использовать жидкое стиральное вещество для
деликатного белья.
Для стирки шелковых изделий или занавесок
используйте цикл и включите дополнительную
функцию (В этом случае можно активировать также
функцию «Дополнительное Полоскание»); машина
завершает цикл без слива воды, и индикатор
мигает. Для слива воды и выгрузки белья необходимо
нажать кнопку START/PAUSE или кнопку .
Система балансировки белья
Перед каждым отжимом во избежание чрезмерных
вибраций и для равномерного распределения
белья в барабане машина производит вращения со
скоростью, слегка превышающей скорость стирки.
Если после нескольких попыток белье не будет
правильно сбалансировано, машина произведет
отжим на меньшей скорости по сравнению с
предусмотренной.

CIS
53
Предосторожности и
рекомендации
! Стиральная машина спроектирована и изготовлена
в соответствии с международными нормативами по
безопасности. Необходимо внимательно прочитать
настоящие предупреждения, составленные в целях
вашей безопасности.
Общие требования к безопасности
• После использования машины обязательно
отключайте ее от сети переменного тока и
закрывайте водопроводный кран.
• Данное изделие предназначено исключительно для
домашнего использования.
• Не разрешайте пользоваться машиной лицам
(включая детей) с ограниченными физическими,
сенсорными, умственными способностями и не
обладающих достаточными знаниями и опытом,
если только они не пользуются машиной под
наблюдением и после инструктажа со стороны лиц,
ответственных за их безопасность. Не разрешайте
детям играть с машиной.
• Стиральной машиной должны пользоваться
только взрослые лица, соблюдающие инструкции,
приведенные в данном техническом руководстве.
• Не прикасайтесь к изделию влажными руками,
босиком или во влажной одежде.
• Не тяните за сетевой кабель для отсоединения
изделия из электро розетки, возьмитесь за вилку
рукой.
• Не открывайте распределитель порошка в процессе
стирки.
• Избегайте контактов со сливаемой водой, так как
она может быть очень горячей.
• Категорически запрещается открывать люк силой:
это может привести к повреждению защитного
механизма, предохраняющего от случайного
открытия машины.
• В случае неисправности категорически
запрещается открывать внутренние механизмы
изделия с целью их самостоятельного ремонта.
• Избегайте контактов детей с работающей
стиральной машиной.
• В процессе стирки люк стиральной машины может
нагреться.
• При необходимости переместить стиральную
машину следует выполнять эту операцию вдвоем
или втроем с предельной осторожностью. Никогда
не перемещайте машину в одиночку, так как
машина очень тяжелая.
• Перед загрузкой в стиральную машину белья
проверьте, чтобы барабан был пуст.
Утилизация
• Уничтожение упаковочных материалов: соблюдайте
местные нормативы с целью повторного
использования упаковочных материалов.
• Согласно Европейской Директиве 2012/19/
EU касательно утилизации электронных и
электрических электроприборов электроприборы
не должны выбрасываться вместе с обычным
городским мусором. Выведенные из строя приборы
должны собираться отдельно для оптимизации
Аварийное открытие люка
Если по причине отключения электроэнергии
невозможно открыть люк машины, чтобы выгрузить
чистое белье, действуйте следующим образом:
1. выньте штепсельную вилку машины из электро
розетки.
2. проверьте, чтобы уровень воды в машине был
ниже отверстия люка. В противном случае слейте
излишек воды через сливную трубу в ведро, как
показано на схеме.
3. потяните наружу язычок, показанный на
схеме, вплоть до освобождения пластикового
блокировочного винта. Затем потяните его вниз и
одновременно откройте люка.
их утилизации и рекуперации составляющих их
материалов, а также для безопасности окружающей
среды и здоровья. Символ зачеркнутая мусорная
корзинка, имеющийся на всех приборах, служит
напоминанием об их отдельной утилизации.
За более подробной информацией о правильной
утилизации бытовых электроприборов
пользователи могут обратиться в специальную
государственную организацию или в магазин.

54
CIS
Техническое обслуживание
и уход
Отключение воды и электрического
тока
• Перекрывайте водопроводный кран после каждой стирки.
Таким образом сокращается износ водопроводной
системы машины и сокращается риск утечек.
• Выньте штепсельную вилку из электро розетки
в процессе чистки и технического обслуживания
стиральной машины.
Уход за стиральной машиной
Для чистки наружных и резиновых частей стиральной
машины используйте тряпку, смоченную теплой
водой с мылом. Не используйте растворители или
абразивные чистящие средства.
Уход за распределителем моющих средств
Выньте распределитель,
приподняв ее и потянув
наружу (см. схему).
Промойте
распределитель теплой
водой. Эта операция
должна выполняться
регулярно.
Уход за люком и барабаном
• После использования стиральной машины всегда
следует оставлять люк полуоткрытым во избежание
образования неприятных запахов в барабане.
Уход за насосом
Стиральная машина оснащена самочистящимся
насосом, не нуждающимся в техническом
обслуживании. Тем не менее мелкие предметы
(монеты, пуговицы) могут упасть за кожух,
предохраняющий насос, расположенный в его нижней
части.
! Проверьте, чтобы цикл стирки завершился, и выньте
штепсельную вилку из сетевой розетки.
Для доступа к кожуху:
1. отвинтите крышку,
повернув ее против
часовой стрелки (см.
схему): небольшая
утечка воды является
нормальным явлением;
2. тщательно прочистите внутри кожуха;
3. завинтите крышку на место;.
Проверка водопроводного шланга
Проверяйте шланг подачи воды не реже одного раза
в год. При обнаружении трещин или разрывов шланга
замените его: в процессе стирки сильное воды в
водопроводе давление может привести к внезапному
отсоединению шланга.
! Никогда не пользуйтесь б/у шлангами.
1
2

CIS
55
Неисправности и методы
их устранения
Если ваша стиральная машина не работает. Прежде чем обратиться в Центр Сервисного обслуживания
(см. Сервисное обслуживание), проверьте, можно ли устранить неисправность, следуя рекомендациям,
приведенным в следующем перечне.
Неисправности:
Стиральная машина не включается.
Цикл стирки не запускается.
Стиральная машина не заливает
воду (На дисплее показывается
сообщение «Вода слита, открыть
кран»).
Машина непрерывно заливает и
сливает воду.
Стиральная машина не сливает
воду и не отжимает белье.
Стиральная машина сильно
вибрирует в процессе отжима.
Утечки воды из стиральной
машины.
Машина заблокирована, дисплей
мигает и показывает код
неисправности (наприм., F-01, F-..).
В процессе стирки образуется
слишком обильная пена.
Возможные причины / Методы устранения:
• Штепсельная вилка не соединена с электро розеткой или отходит и не
обеспечивает контакта.
• В доме отключено электричество.
• Люк машины закрыт неплотно.
• Не была нажата кнопка ON/OFF.
• Не была нажата кнопка START/PAUSE.
• Перекрыт водопроводный кран.
• Была запрограммирована задержка запуска цикла.
• Водопроводный шланг не подсоединен к крану.
• Шланг согнут.
• Перекрыт водопроводный кран.
• В доме нет воды.
• Недостаточное водопроводное давление.
• Не была нажата кнопка START/PAUSE.
• Сливной шланг не находится на высоте 65 – 100 см. от пола (см. «Установка»).
• Конец сливного шланга погружен в воду (см. «Установка»).
• Настенное сливное отверстие не оснащено вантузом для выпуска
воздуха.
Если после вышеперечисленных проверок неисправность не будет
устранена, следует перекрыть водопроводный кран, выключить
стиральную машину и обратиться в Центр Сервисного Обслуживания.
Если ваша квартира находится на последних этажах здания, могут
наблюдаться явления сифона, поэтому стиральная машина производит
непрерывный залив и слив воды. Для устранения этой аномалии в
продаже имеются специальные клапаны против явления сифона.
• Выбранная программа не предусматривает слив воды: для некоторых
программ необходимо включить слив вручную.
• Включена функция ЛЕГКАЯ ГЛАЖКА: для завершения программы
нажмите кнопку START/PAUSE (см. «Программы и функции»).
• Сливной шланг согнут (см. «Установка»).
• Засорен сливной трубопровод.
• В момент установки стиральной машины барабан был разблокирован
неправильно (см. «Установка»).
• Стиральная машина установлена неровно (см. «Установка»).
• Машина зажата между стены и мебелью (см. «Установка»).
• Плохо прикручен водопроводный шланг (см. «Установка»).
• Засорен распределитель моющего средства (порядок его чистки см. в
параграфе «Техническое обслуживание и уход»).
• Сливной шланг плохо закреплен (см. «Установка»).
• Выключите машину и выньте штепсельную вилку из сетевой розетки,
подождите 1 минуту и вновь включите машину.
Если неисправность не устраняется, обратитесь в Сервисную Службу.
• Моющее средство непригодно для стирки в стиральной машине (на
упаковке должно быть указано «для стирки в стиральной машине»,
«для ручной и машинной стирки» или подобное).
• В распределитель было помещено чрезмерное количество моющего
средства.

56
CIS
Сервисное
обслуживание
Мы заботимся о своих покупателях и стараемся сделать сервисное обслуживание наиболее
качественным. Мы постоянно совершенствуем наши продукты, чтобы сделать Ваше общение с техникой
простым и приятным.
Уход за техникой
Продлите срок эксплуатации и снизьте вероятность поломки техники.
Воспользуйтесь профессиональными средствами для ухода за техникой от Indesit Professional для наиболее
простого, эффективного и легкого ухода за Вашей бытовой техникой.
Продукты Indesit Professional производятся в Италии с соблюдением высоких европейских стандартов в области
качества, экологии и безопасности использования и созданы с учетом многолетнего опыта производителя
техники. Узнайте подробнее на сайте www.hotpoint-ariston.com в разделе «Сервис» и спрашивайте в магазинах
Вашего города.
Авторизованные сервисные центры
Чтобы быть ближе к нашим потребителям, мы создали широкую сервисную сеть, особенностью которой является
высокая подготовка, профессионализм и честность сервисных мастеров. На сегодняшний день она насчитывает
около 350 сервисных центров на территории России и СНГ.
Их контакты Вы можете найти в сервисном сертификате и на сайте www.hotpoint-ariston.com в разделе «Сервис».
Если вам надо обратиться в сервисный центр:
Внимание! При ремонте требуйте использования оригинальных запасных частей.
Перед тем как обратиться в Службу Сервиса:
• Проверьте, нельзя ли устранить неисправность самостоятельно (см. «Неисправности и методы их
устранения»);
• Вновь запустите программу для проверки исправности машины;
• В протвном случае обратиться в Авторизованный Сервисный Центр по телефонам, указанным в гарантийном
таллоне.
! Никогда не обращайтесь к неавторизованным сервисным центрам.
При обращении в Сервисную Службу необходимо сообщить:
• тип неисправности;
• номер гарантийного документа (сервисной книжки, сервисного сертификата и т.п.);
• модель машины (Мод.) и серийный номер (S/N), указанные в информационной табличке, расположенной на
задней панели стиральной машины.
Другую полезную информацию и новости Вы можете найти на сайте www.hotpoint-ariston.com в разделе
«Сервис».
Производитель: Indesit Company
Виале А. Мерлони 47, 60044, Фабриано (АН), Италия
Импортер: ООО “Индезит РУС”
С вопросами (в России) до 01.01.2011: Россия, 129223, Москва, Проспект Мира, ВВЦ, пав. 46
обращаться по адресу: с 01.01.2011: Россия, 127018, Москва, ул. Двинцев, дом 12, корп. 1

DE
57
Deutsch
INHALTSVERZEICHNIS
Installation, 58-59-60-61
Auspacken und Aufstellen
Wasser- und Elektroanschlüsse
Erster Waschgang
Technische Daten
Anleitungen für den Installateur
Beschreibung Ihres Waschvollautomaten, 62-63
Bedienblende
Display
Durchführung eines Waschprogramms, 64
Programme und Funktionen, 65
Programmtabelle
Waschfunktionen
Waschmittel und Wäsche, 66
Waschmittelschublade
Vorsortieren der Wäsche
Sonderprogramme
Unwuchtkontrollsystem
Vorsichtsmaßregeln und Hinweise, 67
Allgemeine Sicherheit
Entsorgung
Manuelles Öffnen der Gerätetür
Reinigung und Pflege, 68
Abstellen der Wasser- und Stromversorgung
Reinigung des Gerätes
Reinigung der Waschmittelschublade
Pflege der Gerätetür und Trommel
Reinigung der Pumpe
Kontrolle des Wasserzulaufschlauchs
Störungen und Abhilfe, 69
Kundendienst, 70
DE
BWMD 742
Bedienungsanleitungen
WASCHVOLLAUTOMAT

58
DE
Installation
! Es ist äußerst wichtig, diese Bedienungsanleitung sorgfältig
aufzubewahren, um sie jederzeit zu Rate ziehen zu können.
Sorgen Sie dafür, dass sie im Falle eines Umzugs oder einer
Übergabe an einen anderen Benutzer das Gerät stets beglei-
tet, damit auch der neue Inhaber die Möglichkeit hat, diese zu
Rate zu ziehen.
! Lesen Sie die Hinweise bitte aufmerksam durch, sie liefern
wichtige Informationen hinsichtlich der Installation, des Gebrau-
chs und der Sicherheit.
Auspacken und Aufstellen
Auspacken
1. Gerät auspacken.
2. Sicherstellen, dass der Waschvollautomat keine Tran-
sportschäden erlitten hat. Im Falle einer Beschädigung Gerät
bitte nicht anschließen, sondern den Kundendienst anfordern.
3. Die 4 Transportschutz-
schrauben herausschrau-
ben und die an der
Geräterückwand befindli-
chen Distanzstücke aus
Gummi entfernen (siehe
Abbildung).
4. Die Öffnungen mittels der mitgelieferten Abdeckungen
verschliessen.
5. Sämtliche Teile aufbewahren: Sollte der Waschautomat
erneut transportiert werden, müssen diese Teile wieder
eingesetzt werden.
! Verpackungsmaterial ist kein Spielzeug für Kinder.
Nivellierung
1. Der Waschvollautomat muss auf einem ebenen, festen,
schwingungsfreien Untergrund aufgestellt werden ohne diesen
an Wände, Möbel etc. direkt anzulehnen.
2. Sollte der Boden nicht
perfekt eben sein, müssen
die Unebenheiten durch An-
bzw. Ausdrehen der vorde-
ren Stellfüße ausgeglichen
werden (siehe Abbildung),
der auf der Arbeitsfläche zu
ermittelnde Neigungsgrad
darf 2° nicht überschreiten.
Eine präzise Nivellierung
verleiht dem Gerät die er-
forderliche Stabilität, durch die Vibrationen, Betriebsgeräu-
sche und ein Verrücken des Gerätes vermieden werden.
Bei Teppichböden müssen die Stellfüße so reguliert wer-
den, dass ein ausreichender Freiraum zur Belüftung unter
dem Waschvollautomaten gewährleistet ist.
Wasser- und Elektroanschlüsse
Anschluss des Zulaufschlauches
1. Schrauben Sie den
Wasserschlauch an einen
Kaltwasserhahn mit ¾-Zoll-
Gewindeanschluss an
(siehe Abbildung).
Lassen Sie das Wasser vor
dem Anschluss so lange
auslaufen, bis klares Was-
ser austritt.
2. Das andere Ende des
Schlauches an den oben
rechts am Rückteil des
Waschvollautomaten befin-
dlichen Wasseranschluss
anschließen (siehe Abbil-
dung).
3. Der Schlauch darf hierbei nicht eingeklemmt oder ab-
geknickt werden.
! Der Wasserdruck muss innerhalb der Werte liegen, die in
der Tabelle der technischen Daten angegeben sind (siehe
nebenstehende Seite).
! Sollte der Zulaufschlauch nicht lang genug sein, dann
wenden Sie sich bitte an einen Fachhändler oder an einen
autorisierten Fachmann.
! Verwenden Sie niemals bereits gebrauchte Schläuche.
! Verwenden Sie die Schläuche, die mit dem Gerät geliefert
wurden.

DE
59
Technische Daten
Modell
BWMD 742
Abmessungen
Breite 59,5 cm
Höhe 81,5 cm
Tiefe 54,5 cm
Fassungsver-
mögen
1 bis 7 kg
Elektroan-
schlüsse
Siehe das am Gerät befindliche
Typenschild.
Wasseran-
schlüsse
Höchstdruck 1 MPa (10 bar)
Mindestdruck 0,05 MPa (0,5 bar)
Trommelvolumen 52 Liter
Schleudertouren
bis zu 1400 U/min.
Prüfprogram-
me gemäß der
Richtlinien
1061/2010 und
1015/2010
Programm
(60°) (1° Drücken der
Taste): Baumwolle standard 60°C.
Programm
(40°) (2° Drücken der
Taste): Baumwolle standard 40°C.
Dieses Gerät entspricht den folgen-
den EG-Richtlinien:
- 2004/108/CE (elektromagnetische
Verträglichkeit)
- 2006/95/CE (Niederspannung)
- 2012/19/EU
Anschluss des Ablaufschlauches
Schließen Sie den Ablau-
fschlauch ohne ihn dabei
abzuknicken an einen
geeigneten Abfluss an. Die
Mindestablaufhöhe beträgt 65
- 100 cm (gemessen vom
Boden), oder hängen Sie
diesen mittels des Schlau-
chhalters gesichert in ein
Becken oder Wanne ein;
Befestigen Sie diesen
mittels des mitgelieferten
Schlauchhalters z.B. an
einen Wasserhahn (siehe
Abbildung). Das freie Ablau-
fschlauchende darf nicht
unter Wasser positioniert
werden.
! Verlängerungsschläuche sollten nicht eingesetzt werden.
Sollte dies unvermeidlich sein, muss die Verlängerung den-
selben Durchmesser des Originalschlauchs aufweisen und
darf eine Länge von 150 cm nicht überschreiten.
Stromanschluss
Vor Einfügen des Netzsteckers in die Steckdose ist sicher-
zustellen, dass:
• die Steckdose über eine normgerechte Erdung verfügt;
• die Steckdose die in den Technischen Daten
angegebenen Höchstlast des Gerätes trägt (siehe neben-
stehende Tabelle);
• die Stromspannung den in den Technischen Daten
angegebenen Werten entspricht (siehe nebenstehen-
de Tabelle);
• die Steckdose mit dem Netzstecker des Waschvollau-
tomaten kompatibel ist. Andernfalls muss der Netzstecker
(oder die Steckdose) ersetzt werden.
! Der Waschvollautomat darf nicht im Freien installiert
werden, auch nicht, wenn es sich um einen geschützten
Platz handelt. Es ist gefährlich, das Gerät Gewittern und
Unwettern auszusetzen.
! Die Steckdose sollte nach installiertem Gerät leicht
zugänglich sein.
! Verwenden Sie bitte keine Verlängerungen oder Mehrfa-
chstecker.
! Das Netzkabel darf nicht gebogen bzw. eingeklemmt
werden.
! Das Versorgungskabel darf nur durch autorisierte Fa-
chkräfte ausgetauscht werden.
Achtung! Der Hersteller übernimmt keinerlei Haftung, sol-
lten diese Vorschriften nicht genau beachtet werden.
Erster Waschgang
Lassen Sie nach der Installation bzw. vor erstmaligem
Gebrauch erst einen Waschgang (mit Waschmittel) ohne
Wäsche durchlaufen. Stellen Sie hierzu das Waschpro-
gramm (60°C) ein.
65 - 100 cm

60
DE
Anleitungen für den Installateur
Montage des Holzpaneels auf die Tür und Einfügen
der maschine in die Möbel:
Falls nach der Montage des Holzpaneels eine Versendung zur
End-Installation der Maschine notwendig ist, empfehlen wir,
die Maschine in ihrer ursprünglichen Verpackung zu belassen.
Die Verpackung ist deshalb so beschaffen, daß eine Anbrin-
gung des Holzpaneels auf die Maschine möglich ist, ohne
dabei die Verpackung ganz entfernen zu müssen (siehe untere
Abbildung).
Die Stärke des die Frontseite bedeckenden Holzpaneels darf
18 mm nicht unterschreiten und das Paneel kann sowohl auf
der rechten als auch auf der linken Seite montiert werden. Aus
praktischen Gründen empfehlen wir eine Montage in dersel-
ben Öffnungsrichtung wie die des Einfüllfensters, d.h. mit auf
der linken Seite montierten Scharnieren.
A
B
C
D
E
Tur seite
Montagezubehör für die Tür (Abb. 1-2-3-4-5).
Abb. 1
N° 2 Scharnier
N° 1 Magnet
N° 1 Magnetanschlag
N° 1 Gummidübel
N° 2 Scharnierhalterung
N° 4 Distanzstücke
Abb. 2
Abb. 3 Abb. 4
Abb. 5
Abb. 4/B
- 6 selbsteinschneidende Schrauben l = 13 mm “Typ A”.
- 2 metrische Senkkopfschrauben l = 25 mm “Typ B”; zur
Befestigung des Magnetan-schlags am Gehäuse.
- 4 metrische Schrauben l = 15 mm “Typ C”; zur Anbringung
der Scharnierhalterungen am Gehäuse.
- 4 metrische Schrauben l = 7 mm “Typ D”; zur Anbringung
der Scharniere an den Halterungen.
Montage der Einzelteile auf die Maschine-nvorderseite.
- Montieren Sie die Scharnierhalterungen an der Front, dabei
wird die Bohrung (siehe Pfeil auf Abb. 1) nach innen zur Front
positioniert und ein Distanzstück eingelegt
(Abb. 4/B), verwenden Sie Schrauben vom Typ C.
- Montieren Sie das Magnetgegenstück auf der gegenüber lie-
genden Seite oben und legen Sie zwei Distanzstücke ein (Abb.
4/B) verwenden Sie die beiden Schrauben vom Typ B.

DE
61
Gebrauch der Bohrschablone.
a) Zur Positionsmarkierung der Bohrungen auf der linken Seite
des Paneels, legen Sie die Bohrmaske oben links am Paneel an
und halten Sie sich an die an den Enden markierten Linien. b)
Zur Positionsmarkierung der Bohrungen auf der rechten Seite
des Paneels, legen Sie die Bohrmaske oben rechts am Paneel
an. c) Mit einem Fräser von entsprechender Größe die vier Sit-
ze fräsen, die die zwei Scharniere, den Gummidübel und den
Magnet aufnehmen sollen.
Montage der Einzelteile auf das Holzpaneel (Tür).
- Setzen Sie die Scharniere in die vorgesehenen Sitze ein (das
bewegliche Scharnierteil muß auf die Außenseite des Scharniers
weisen) und befestigen Sie sie mit den 4 Schrauben des Typs A.
- Setzen Sie den Magnet in den Sitz ein, und zwar oben von der
den Scharnieren entgegensetzten Seite und befestigen Sie ihn
mit zwei Schrauben den Typs B.
- Setzen Sie den Gummidübel in den Sitz unten ein.
Das Paneel kann nun auf die maschine montiert werden.
Montage des Paneels auf die maschine.
Setzen Sie die von dem Pfeil in abb. 2 angegebene Scharnier-
nase in den Sitz der Scharnierhalterung ein, drücken Sie das
Paneel gegen die Frontseite der maschine und befestigen Sie
die beiden Scharniere mit den Schrauben des Typs D.
Befestigung der Sockelführung
Wenn die maschine am Ende einer Küchenzeile installiert werden
soll, montieren Sie eine oder beide Sockelführungen wie in abb.
8 angegeben, passen Sie deren Tiefe der Sockelposition an und
wenn nötig, befestigen Sie den Sockel an denselben (abb. 9).
Zur Montage der Sockelführung verfahren Sie wie folgt (Abb.
8): Befestigen Sie das Winkelstück P mittels der Schraube R,
setzen Sie die Sockelführung Q in den entsprechenden Schlitz
ein, bringen Sie diese in die gewünschte Lage und befestigen
Sie sie daraufhin mittels der Schraube R an dem Winkelstück P.
Einfügen der maschine in das Möbel.
- Schieben Sie die maschine in die Öffnung und passen Sie sie
der Möbelfront an (abb. 6).
- Regulieren Sie die verstellbaren Füße auf die gewünschte Höhe
der maschine.
- Drehen Sie die Schrauben C und D wie in abb. 7 angegeben,
um die Position des Holzpaneels in vertikaler und horizontaler
Richtung einzustellen.
Wichtig: Schließen Sie den unteren Teil der Frontseite durch den
Sockel, und zwar so, dass letzterer mit dem Boden abschließt.
Abb. 8
Abb. 9
Beiliegendes Zubehör zur Höhenregulierung.
Im Polystyroldeckel (Abb. 10) befinden sich folgende Teile:
2 Querstreben (G); 1 Leiste (M)
In der Wäschetrommel befinden sich:
4 zusätzliche Stellfüße (H),
4 Schrauben (I),
4 Schrauben (R),
4 Schraubenmuttern (L),
2 Sockelführungen (Q)
Höhenregulierung des Waschvollautomaten.
Mit Hilfe der 4 Stellfüße kann die Höhe des Gerätes reguliert
werden (von 815 mm bis 835 mm). Sollte diese Höhe jedoch
nicht ausreichen, kann das Gerät durch Einsatz nachfolgenden
Zubehörs bis auf eine Höhe von 870 mm gebracht werden:
2 Querstreben (G); 4 Stellfüße (H); 4 Schrauben (I); 4 Schrau-
benmuttern (L), Verfahren Sie hierzu wie folgt (Abb. 11):
Nehmen Sie die 4 ursprünglich montierten Stellfüße ab, legen Sie
eine Querstrebe G am Vorderteil des Gerätes an und befestigen
Sie dieses mittels der Schrauben I (schrauben Sie diese in die
Löcher ein, in denen sich die ursprünglich montierten Stellfüße
befanden), setzen Sie daraufhin die neuen Stellfüße H ein.
Verfahren Sie auf gleiche Weise am hinteren Teil des Gerätes.
Durch Einstellen der Füße H kann das Gerät nun auf eine Höhe
von 835 mm bis 870 mm gebracht werden.
Nach Erreichen der gewünschten Höhe befestigen Sie die
Schraubenmuttern L an der Querstrebe G.
Zur Einstellung des Gerätes auf eine Höhe von 870 mm bis
900 mm ist die Leiste M anzubringen, regulieren Sie daraufhin
die Stellfüße H bis auf die gewünschte Höhe.
Die Leiste wird wie folgt eingesetzt:
Lösen Sie die drei an der vorderen Deckelblende befindlichen
Schrauben N, setzen Sie die Leiste M so wie auf Abb. 12 ve-
ranschaulicht ein und ziehen Sie die Schrauben N wieder an.
D
C
C
570
min
815
540
595
820 ÷ 900
600 min
Abb. 6 Abb. 7
L
I
H
G
M
Abb. 11 Abb. 12
Abb. 10

62
DE
Waschmittelschublade: für Waschmittel und Zusätze
(siehe „Waschmittel und Wäsche“).
Taste ON/OFF : Drücken Sie kurz auf die Taste, um das
Gerät ein- bzw. auszuschalten. Die Kontrollleuchte START/
PAUSE, die langsam grün blinkt, zeigt an, dass das Gerät
eingeschaltet ist. Um den Waschvollautomaten während
eines Waschgangs auszuschalten, muss die Taste etwas
länger gedrückt werden (ca. 2 Sekunden); ein kurzer
oder ein ungewollter Druck bewirkt kein Ausschalten des
Gerätes. Das Ausschalten des Gerätes während eines
laufenden Waschprogramms löscht den gesamten Wa-
schzyklus.
Tasten PROGRAMMWAHL: zur Einstellung des gewün-
schten Programms (siehe “Programmtabelle”).
Taste SPEICHER: Halten Sie die Taste gedrückt, um ei-
nen Waschzyklus und die gewünschten Individualisierung-
seinstellungen zu speichern. Um einen bereits gespeicher-
ten Zyklus abzurufen, drücken Sie die Taste SPEICHER.
Tasten FUNKTIONEN: Drücken Sie die Taste, um die
gewünschte Funktion auszuwählen. Auf dem Display
schaltet sich die entsprechende Kontrollleuchte ein.
Taste SCHLEUDERN : Drücken Sie die Taste, um
die Schleudergeschwindigkeit herabzusetzen oder das
Schleudern ganz auszuschließen. Der Wert wird auf dem
Display angezeigt.
Taste TEMPERATUR : Drücken Sie die Taste, um die
Temperatur herabzusetzen: Der Wert wird auf dem Display
angezeigt.
Taste TASTENSPERRE : Zur Aktivierung der Sperre
der Bedienblende halten Sie die Taste ca. 2 Sekunden lang
gedrückt. Das eingeschaltete Symbol zeigt an, dass die
Bedienblende gesperrt ist (Mit Ausnahme der Taste ON/
OFF). Auf diese Weise wird verhindert, dass ein Programm
aus Versehen geändert wird, vor allem, wenn kleine Kinder im
Hause sind. Zur Deaktivierung der Sperre der Bedienblende
halten Sie die Taste ca. 2 Sekunden lang gedrückt.
Taste STARTZEITVORWAHL : Zur Vorwahl der Start-
zeit des gewählten Programms drücken Sie bitte diese
Taste. Die Zeitverzögerung wird auf dem Display angezeigt.
Taste mit Kontrollleuchte START/PAUSE: Sobald die
grüne Kontrollleuchte auf langsames Blinklicht schaltet,
drücken Sie die Taste, um den Waschgang zu starten.
Nach Ingangsetzung des Programms schaltet die Kon-
trollleuchte auf Dauerlicht. Um den Waschgang zu unter-
brechen, drücken Sie erneut die Taste; die Kontrollleuchte
schaltet auf orangefarbenes Blinklicht. Wenn das Symbol
nicht leuchtet, kann die Gerätetür geöffnet werden
(etwa 3 Minuten). Um das Programm an der Stelle, an der
es unterbrochen wurde, wieder in Gang zu setzen, drü-
cken Sie die Taste erneut.
Funktion Standby
Zur Erfüllung der neuen Richtlinien zum Energieverbrauch
ist diese Waschmaschine mit einem automatischen Aus-
schaltsystem (Standby) ausgestattet, das nach 30 Minuten
des Nichtgebrauchs in Funktion tritt. Drücken Sie kurz
die Taste ON/OFF und warten Sie, bis sich die Maschine
wieder einschaltet.
Beschreibung Ihres
Waschvollautomaten
Taste mit
Kontrollleuchte
START/PAUSE
Bedienblende
Taste
TEMPERATUR
Tasten
FUNKTIONEN
Waschmittelschublade
Taste ON/OFF
Tasten
PROGRAMMWAHL
Taste
SCHLEUDERN
Taste
TASTENSPERRE
DISPLAY
Taste
STARTZEITVORWAHL
Taste
SPEICHER

DE
63
Das Display dient nicht nur zur Programmierung des Gerätes, sondern liefert auch zahlreiche Informationen.
In den beiden oberen Zeilenreihen A und B werden das ausgewählte Waschprogramm, die laufende Waschphase und alle
Angaben zum Programmfortschritt angezeigt.
In der Zeilenreihe C werden die Restzeit bis zum Ende des laufenden Waschvorgangs und bei Einstellung einer STARTZEI-
TVORWAHL die bis zum Start des ausgewählten Programms verbleibende Zeit angezeigt.
In der Zeilenreihe D wird der Höchstwert der Schleudergeschwindigkeit angezeigt, die das Gerät für das eingestellte Pro-
gramm zulässt; wenn das Programm keinen Schleudervorgang vorsieht, bleibt die Zeilenreihe ausgeschaltet.
In der Zeilenreihe E wird der Höchstwert der Temperatur angezeigt, der für das eingestellte Programm ausgewählt werden
kann; wenn das Programm keine Temperatureinstellung vorsieht, bleibt die Zeilenreihe ausgeschaltet.
Die Kontrollleuchten F sind den Funktionen zugeordnet und leuchten, wenn die ausgewählte Funktion mit dem eingestellten
Programm kompatibel ist.
Symbol Gerätetür gesperrt
Durch Leuchten des Symbols meldet das Gerät, dass die Gerätetür gesperrt ist, um ein versehentliches Öffnen zu vermei-
den. Zur Vermeidung einer evtl. Beschädigung warten Sie bis das Symbol erlischt, bevor Sie die Gerätetür öffnen.
NB: Wenn die Funktion STARTZEITVORWAHL aktiviert ist, kann die Gerätetür nicht geöffnet werden. Zum Öffnen schalten
Sie das Gerät mittels der Taste START/PAUSE auf Pause.
! Vor dem ersten Einschalten werden Sie zur Auswahl der Sprache aufgefordert, und das Display blendet automatisch das
Menü zur Sprachauswahl ein.
Wählen Sie die gewünschte Sprache mittels der Tasten X und Y aus und drücken Sie dann zum Bestätigen der Auswahl auf
die Taste Z.
Um die Sprache zu ändern, schalten Sie das Gerät aus und drücken gleichzeitig die in der Abbildung mit X, Y und Z
gekennzeichneten Tasten. Nach dem ertönen eines akustischen Signals wird das Menü der Sprachauswahl angezeigt
Display
A
B
C
D
E
F
Z
X
Y

64
DE
Durchführung eines
Waschprogramms
1. EINSCHALTEN DES GERÄTES. Drücken Sie auf
die Taste , woraufhin auf dem Display die Meldung
WILLKOMMEN erscheint; die Kontrollleuchte START/
PAUSE blinkt langsam grün.
2. EINFÜLLEN DER WÄSCHE. Öffnen Sie die
Gerätetür. Füllen Sie die Wäsche ein. Achten Sie
hierbei bitte darauf, die in der Programmtabelle (auf der
nächsten Seite) angegebene Wäschemenge nicht zu
überschreiten.
3. DOSIERUNG DES WASCHMITTELS. Ziehen Sie
die Waschmittelschublade heraus und füllen Sie das
Waschmittel in die entsprechenden Kammern (siehe
“Waschmittel und Wäsche”).
4. SCHLIESSEN SIE DIE GERÄTETÜR.
5. WAHL DES WASCHPROGRAMMS. Wählen
Sie das gewünschte Programm mittels einer der
PROGRAMMWAHL-Tasten aus; die Bezeichnung
des Programms wird auf dem Display angezeigt;
dem Programm sind eine Temperatur und eine
Schleudergeschwindigkeit zugeordnet, die jedoch
geändert werden können. Auf dem Display wird die
Programmdauer angezeigt.
6. INDIVIDUALISIERUNG DES WASCHGANGS.
Verwenden Sie hierzu die entsprechenden Tasten:
Änderung der Temperatur und/oder
Schleudern. Das Gerät wählt automatisch die
für das eingestellte Programm vorgesehene
maximale Temperatur sowie die maximale
Schleudergeschwindigkeit. Diese können demnach
nicht erhöht werden. Durch Drücken der Taste
kann die Temperatur bis auf Kaltwäsche “OFF”
herabgesetzt werden. Durch Drücken der Taste kann
die Schleudergeschwindigkeit herabgesetzt oder der
Schleudervorgang auf “OFF” ausgeschlossen werden.
Ein weiterer Druck auf die Tasten bewirkt die Einstellung
der möglichen Maximalwerte.
! Ausnahme: Wird das Waschprogramm
(60 °C)
(erster Tastendruck) eingestellt, kann die Temperatur bis
auf 90° erhöht werden.
Startzeitvorwahl.
Zur Vorwahl der Startzeit des eingestellten Programms
drücken Sie die entsprechende Taste bis die
gewünschte Zeitverschiebung angezeigt wird. Sobald
diese Zusatzfunktion aktiviert wird, leuchtet auf dem
Display das Symbol auf. Um die Startzeitvorwahl
wieder zu deaktivieren, drücken Sie die Taste bis auf
dem Display der Schriftzug “OFF” eingeblendet wird.
Änderung der Eigenschaften des Waschgangs.
• Drücken Sie die Taste zum Aktivieren der Funktion;
die der Taste entsprechende Kontrollleuchte schaltet
sich dabei ein.
• Durch erneutes Drücken der Taste kann die Funktion
wieder ausgeschaltet werden; die Kontrollleuchte
erlischt.
! Ist die gewählte Funktion nicht vereinbar mit dem
eingestellten Programm, schaltet die Kontrollleuchte auf
Blinklicht und die Funktion wird nicht aktiviert.
! Ist die gewählte Funktion mit einer anderen bereits
eingestellten nicht kompatibel, schaltet die der
ersten Funktion entsprechende Kontrollleuchte auf
Blinklicht und nur die zweite Funktion wird aktiviert, die
Kontrollleuchte der aktivierten Funktion schaltet auf
Dauerlicht.
! Die Funktionen können eine Änderung der
empfohlenen Beladungsmenge und/oder der Waschzeit
bewirken.
7. STARTEN DES PROGRAMMS. Drücken Sie die
Taste START/PAUSE. Die zugehörige Kontrollleuchte
schaltet auf grünes Dauerlicht und die Gerätetür
wird gesperrt (Symbol GERÄTETÜR GESPERRT
leuchtet.) Während des Programmablaufs erscheint
auf dem Display die Bezeichnung der laufenden
Programmphase. Um ein Programm während eines
laufenden Waschgangs zu ändern, schalten Sie den
Waschvollautomat mittels der Taste START/PAUSE
auf Pause (die Kontrollleuchte START/PAUSE blinkt
nun langsam orangefarben); wählen Sie daraufhin das
gewünschte Programm aus und drücken Sie erneut auf
die Taste START/PAUSE.
Um während eines laufenden Programms die Gerätetür
zu öffnen, drücken Sie die Taste START/PAUSE; wenn
das Symbol GERÄTETÜR GESPERRT erloschen ist,
kann die Gerätetür geöffnet werden (etwa 3 Minuten).
Drücken Sie die Taste START/PAUSE erneut, um das
Programm an der Stelle an der es unterbrochen wurde,
wieder in Gang zu setzen.
8. ENDE DES PROGRAMMS. Das Programmende wird
durch die Anzeige “PROGRAMMENDE” auf dem Display
angezeigt. Wenn das Symbol GERÄTETÜR GESPERRT
erlischt, kann die Gerätetür geöffnet werden (etwa
3 Minuten). Öffnen Sie die Gerätetür, nehmen Sie die
Wäsche heraus und schalten Sie das Gerät aus.
! Möchten Sie ein bereits in Gang gesetztes
Waschprogramm löschen, drücken Sie die Taste etwas
länger. Der Waschgang wird unterbrochen und das Gerät
schaltet sich aus.

DE
65
Programme und Funktionen
Programmtabelle
Die auf dem Display und in der Bedienungsanleitung genannte Zyklusdauer wird ausgehend von Standardbedingungen berechnet. Die effektiv benötigte Zeit kann aufgrund zahlreicher Faktoren wie
Temperatur und Druck des Zulaufwassers, Raumtemperatur, Waschmittelmenge, Art, Menge und Verteilung der Waschladung sowie der gewählten Zusatzfunktionen variieren.
1) Prüfprogramm gemäß 1061/2010: Wählen Sie das Programm
bei 60 °C (erster Tastendruck).
Dieser Zyklus ist für den Waschvorgang von normal schmutziger Baumwollwäsche geeignet; es ist der wirksamste in Bezug auf den kombinierten Energie-Wasser-Verbrauch; für bei 60°C. zu wa-
schende Wäsche zu verwenden. Die effektive Waschtemperatur kann von der angegebenen abweichen.
2) Prüfprogramm gemäß 1061/2010: wählen Sie das Programm
bei 40 °C (zweiter Tastendruck).
Dieser Zyklus ist für den Waschvorgang von normal schmutziger Baumwollwäsche geeignet; es ist der wirksamste in Bezug auf den kombinierten Energie-Wasser-Verbrauch; für bei 40°C. zu wa-
schende Wäsche zu verwenden. Die effektive Waschtemperatur kann von der angegebenen abweichen.
3) Die “Vorwasche” funktion kann beim Temperaturwert 60 °C nicht aktiviert werden.
Für alle Testinstitute:
2) Langes Baumwollprogramm: wählen Sie das Programm
bei 40 °C (zweiter Tastendruck).
4) Langes Kunstfaserprogramm: wählen Sie das Programm
bei 60 °C (erster Tastendruck); Temperatur von 40 °C (drücken Sie die Taste TEMPERATUR).
Waschfunktionen
Super Wash
Diese Zusatzfunktion verbessert
die Waschergebnisse durch eine
erhöhte Wassermenge am Anfang
des Programms und eine verlän-
gerte Programmlaufzeit. Diese
Funktion ermöglicht das Entfernen
selbst der hartnäckigsten Flecken.
Kann mit oder ohne Bleichmittel
verwendet werden. Möchten Sie
auch Bleichen, dann setzen Sie die
mitgelieferte, zusätzliche Kammer 4
in Kammer 1 ein. Bei der Dosierung
des Bleichmittels darf der auf dem
Zentralstift mit „max“ gekennzeichnete Höchststand (siehe Abbildung)
nicht überschritten werden. Wenn Sie nur bleichen möchten, ohne
einen kompletten Waschgang durchzuführen, dann geben Sie das
Bleichmittel in die Zusatzkammer 4, stellen Sie das Programm „Spül-
gang“ ein und aktivieren Sie die Funktion „Super Wash”.
! Die Verwendung von Extrafach 4 schließt die “Pre-wash”-Funktion.
! Diese Funktion kann zu den Programmen , , , ,
“Schleudern”, “Abpumpen”.
Extraspülgang
Wählen Sie diese Zusatzfunktion, wird die Spülwirkung erhöht und somit
ein optimales Ausspülen des Waschmittels garantiert. Dies ist besonders
angezeigt bei sehr empfindlicher Haut bzw. Waschmittelallergien.
! Diese Funktion kann zu den Programmen “Schnell 30’” , ,
, “Schleudern”, “Abpumpen” nicht zugeschaltet werden.
M
AX
1
2
4
3
Wasch-
programme
Beschreibung des Programms
Max.
Tempe-
ratur
(°C)
Max.
Schleu-
derGe-
schwindi-
gkeit
(U/min)
Waschmittel
Max.
Beladungsmenge
(kg)
Restfeuchtigkeit %
Energieverbrauch
kWh
Wasser gesamt lt
Programm- dauer
Vor-wäsche
Hauptwä-
sche
Bleichmittel
Weich-
spüler
Flecken
40° 1400
4 - - - 180’
Baumwolle 60° (1) (erster Tastendruck): stark verschmutzte Weiß- und
farbechte Buntwäsche.
60°
(Max. 90°)
1400
(3)
7 53 1,10 52,5 190’
Baumwolle 40° (2) (zweiter Tastendruck): leicht verschmutzte Weißwäsche
und empfindliche Buntwäsche.
40° 1400 -
7 53 0,99
82
185’
Baumwolle 20° (dritter Tastendruck): leicht verschmutzte Weißwäsche und
empfindliche Buntwäsche.
20° 1400 -
7 - -
-
170’
Synthetik Robust (erster Tastendruck): stark verschmutzte, farbechte Buntwäsche. 60° 800
3 44 0,93 47 110’
Synthetik Robust (4) (erster Tastendruck): leicht verschmutzte, farbechte Buntwäsche. 40° 800
3 44 0,57 46 95’
Synthetik Fein (zweiter Tastendruck): leicht verschmutzte farbechte Buntwäsche. 40° 800
3 - - - 70’
Schnell 60' (erster Tastendruck): zum kurzen Auffrischen verschmutzter Wä-
sche (nicht geeignet für Wolle, Seide und Handwäsche).
60° 1400 -
- 3,5 53 0,81 40 60’
Schnell 30' (zweiter Tastendruck): zum kurzen Auffrischen leicht verschmutzter
Wäsche (nicht geeignet für Wolle, Seide und Handwäsche).
30° 800 -
- 3 71 0,15 35 30’
M
MY CYCLE (Speicher): hiermit kann jede beliebige Art von Waschgang gespeichert werden
Antiallergen
60° 1400 -
- 4 - - - 195’
WOOLMARK PLATIN (Wolle): wolle, Kaschmir usw. 40° 800 -
- 1,5 - - - 70’
Feinwäsche
30° 0 -
- 1 - - - 80’
Schleudern (erster Tastendruck) - 1400 - - - - 7 - - - 16’
Spülen (zweiter Tastendruck) - 1400 - -
7 - - - 36’
Abpumpen (dritter Tastendruck) - 0 - - - - 7 - - - 2’
Bügelleicht
Bei Einstellung dieser Funktion wird zur Vermeidung einer
Knitterbildung der Wasch- und Schleudergang entsprechend
geändert. Am Ende des Waschgangs erfolgen langsame
Umdrehungen der Trommel; die Kontrollleuchte der Funktion
BÜGELLEICHT und die der Taste START/PAUSE blinken (orange)
und auf dem Display wird “PROGRAMMENDE” angezeigt. Um
den Waschgang abzuschließen, drücken Sie die Taste START/
PAUSE oder die Taste BÜGELLEICHT.
! D i e s e F u n k t i o n k a n n z u d e n P r o g r a m m e n
, “Schnell 30’”, , , , nicht zugeschaltet werden.
Vorwäsche
Beim Wählen dieser Funktion wird eine Vorwäsche aktiviert, so
dass auch hartnäckige Flecken beseitigt werden.
NB: Füllen Sie das Waschpulver in die entsprechende Kammer ein.
! Diese Funktion kann zu den Programmen , , , , ,
(60°), (40°), , nicht zugeschaltet werden.
Eco Wash
Die Funktion Eco Wash trägt dazu bei, Energie zu sparen, indem
das Wasser für die Wäsche nicht aufgeheizt wird - ein Vorteil sowohl
für die Umwelt als auch für die Stromrechnung. Tatsächlich sichern
die verstärkte Waschaktion und der optimierte Wasserverbrauch
hervorragende Ergebnisse bei gleicher durchschnittlicher Dauer
eines Standardzyklusses zu. Für maximale Waschergebnisse
empfehlen wir den Einsatz eines Flüssigwaschmittels.
! Diese Funktion kann zu den Programmen , , , , ,
, nicht zugeschaltet werden.

66
DE
Waschmittel und Wäsche
Waschmittel und Wäsche
Ein gutes Waschergebnis hängt auch von einer korrekten
Waschmitteldosierung ab: Eine zu hohe Dosierung bedeu-
tet nicht unbedingt reinere Wäsche, sie trägt nur dazu bei,
die Maschineninnenteile zu verkrusten und die Umwelt zu
belasten.
! Waschmittel in Pulverform für Baumwollweißwäsche, für
die Vorwäsche und für Waschprogramme bei Temperatu-
ren über 60°C verwenden.
! Bitte befolgen Sie den auf der Waschmittelverpackung
angegebenen Anweisungen.
! Verwenden Sie keine Handwaschmittel, sie verursachen
eine zu hohe Schaumbildung.
Schublade herausziehen
und Waschmittel oder Zu-
sätze wie folgt einfüllen:
Kammer 1: Waschpulver für die Vorwäsche (Wa-
schpulver)
Vergewissern Sie sich vor Einfüllen des Waschmittels, dass die
Zusatzkammer 4 nicht eingesetzt wurde.
In Kammer 2: Waschmittel für die Hauptwäsche
(Waschpulver oder Flüssigwaschmittel)
Flüssigwaschmittel nur kurz vor dem Start einfüllen.
In Kammer 3: Zusätze (Weichspüler usw.)
Der Weichspüler darf das Gitter nicht übersteigen.
Zusätzliche Kammer 4: Bleichmittel
Vorsortieren der Wäsche
• Sortieren Sie die Wäsche nach:
- Gewebeart / Waschetikettensymbol.
- und Farben: Buntwäsche von Weißwäsche trennen.
• Entleeren Sie alle Taschen.
• Das angegebene Gewicht, das sich auf die maximale La-
dung an Trockenwäsche bezieht, sollte nicht überschritten
werden: siehe “Programmtabelle“.
Wie schwer ist Wäsche?
1 Betttuch 400-500 gr
1 Kissenbezug 150-200 gr
1 Tischdecke 400-500 gr
1 Bademantel 900-1.200 gr
1 Handtuch 150-250 gr
Besondere Wäscheteile
Flecken: das Programm ist für die Reinigung stark versch-
mutzter Kleidung mit widerstandsfähigen Farben geeignet. Das
Programm gewährleistet einen Waschgang, der besser als der
Standard (Klasse A) ist. Mischen Sie bei diesem Programm keine
Kleidungsstücke mit unterschiedlicher Farbe. Es empfiehlt sich
die Verwendung von Pulverwaschmittel. Bei hartnäckigen Flecken
empfiehlt sich die Vorbehandlung mit spezifischen Zusatzstoffen.
Baumwolle 20°C : ideal für normalverschmutze Bau-
mwolle. Die auch mit kaltem Wasser erreichten Leistungen,
vergleichbar mit einer Wäsche bei 40°, werden mechanisch
erzielt. Die Trommel arbeitet mit wiederholten, kurz auf einan-
der folgenden Beschleunigungen.
Antiallergen: Verwenden Sie das Programm für die En-
tfernung der wichtigsten Allergene, wie etwa Pollen, Milben
oder Katzen- und Hundehaare.
Wolle: das Waschprogramm „Wolle” dieser Waschmaschine
Hotpoint-Ariston wurde von der Woolmark Company für die
Wäsche von mit „Handwäsche“ gekennzeichneten Wollklei-
dungsstücken getestet und anerkannt, vorausgesetzt die Wä-
sche erfolgt gemäß der Anweisungen auf Etikett des Kleidung-
sstück und den Angaben des Herstellers des Haushaltsgeräts.
Hotpoint-Ariston ist die erste Waschmaschinenmarke, die von
der Woolmark Company die Zertifizierung Woolmark Apparel
Care - Platinum für ihre Waschleistungen und den Verbrauch von
Wasser und Energie erhalten hat. (M1126)
Ultra Fein: Verwenden Sie das Programm für die Reinigung
von Feinwäsche, die Applikationen wie Strass oder Pailletten
aufweist. Es wird empfohlen, die Kleidungsstücke vor der
Reinigung umzudrehen und kleinere Kleidungsstücke in den
entsprechenden Reinigungsbeutel für Feinwäsche zu geben.
Um bessere Ergebnisse zu erzielen, wird für die Reinigung
von Feinwäsche die Verwendung von Flüssigwaschmittel
empfohlen. Wählen Sie für die Reinigung von Kleidungsstücken
aus Seide oder Gardinen (sie sollten zusammengelegt und
in den mitgelieferten Beutel gesteckt werden) den Zyklus
und aktivieren Sie die Option (in diesem Fall kann auch
die Option „Extra Spülen” aktiviert werden); unterbricht Ihr Gerät
das Programm, ohne das Wasser abzupumpen. Ihre Wäsche
bleibt so im letzen Spülwasser liegen, und die Kontrollleuchte
blinkt. Zum Abpumpen des Wassers zu muss die Taste
START/PAUSE oder die Taste gedrückt werden.
Unwuchtkontrollsystem
Um starke Vibrationen oder eine Unwucht beim Schleu-
dern zu vermeiden, verfügt das Gerät über ein Schleude-
runwuchtsystem. Die Waschladung wird durch eine erhöhte
Rotation der Trommel als die des WAschgangs ausbalanciert.
Sollte die Wäscheladung nach Ablauf mehrerer Versuche
immer noch nicht korrekt verteilt sein, schleudert das Gerät
die Wäsche bei einer niedrigeren Geschwindigkeit als die der
vorgesehenen Schleudergeschwindigkeit. Sollte die Wäsche
extrem ungleichmäßig verteilt sein, führt das Gerät anstelle
des Schleudergangs einen Wäscheverteilungs-Zyklus durch.
Um eine optimale Verteilung der Wäscheladung und somit
eine korrekte Auswuchtung zu fördern, sollten große und
kleine Wäscheteile gemischt eingefüllt werden.
M
AX
1
2
4
3

DE
67
Vorsichtsmaßregeln und
Hinweise
! Der Waschvollautomat wurde nach den strengsten inter-
nationalen Sicherheitsvorschriften entworfen und gebaut.
Nachstehende Hinweise werden aus Sicherheitsgründen
geliefert und sollten aufmerksam gelesen werden.
Allgemeine Sicherheit
• Dieses Gerät wurde ausschließlich für den Einsatz im pri-
vaten Haushalt konzipiert.
• Dieses Gerät ist nicht zur Verwendung durch Personen
(einschließlich Kinder) mit eingeschränkten körperlichen,
geistigen oder sensorialen Fähigkeiten oder ohne aus-
reichende Erfarhung und Kenntnis geeignet, es sei denn,
sie werden durch eine für ihre Sicherheit verantwortliche
Person beaufsichtigt und eingewiesen. Kinder müssen
beaufsichtigt werden, um sicherzustellen, dass sie nicht
mit dem Gerät spielen.
• Berühren Sie das Gerät nicht, wenn Sie barfuß sind, und
auch nicht mit nassen oder feuchten Händen oder Füßen.
• Ziehen Sie den Gerätestecker nicht am Kabel aus der
Steckdose, sondern nur am Netzstecker selbst.
• Öffnen Sie die Waschmittelschublade nicht, wenn das Gerät
in Betrieb ist.
• Berühren Sie nicht das Ablaufwasser, es könnte sehr heiß
sein.
• Öffnen Sie die Gerätetür nicht mit Gewalt: Der Sicherheits-
Schließmechanismus könnte hierdurch beschädigt werden.
• Bei etwaigen Störungen versuchen Sie bitte nicht, Innenteile
selbst zu reparieren.
• Halten Sie Kinder stets von dem in Betrieb befindlichen
Gerät fern.
• Während des Waschgangs kann die Gerätetür sehr heiß
werden.
• Muss das Gerät versetzt werden, sollten hierfür zwei oder
drei Personen verfügbar sein. Versetzen Sie es niemals
allein, das Gerät ist äußerst schwer.
• Bevor Sie die Wäsche einfüllen, stellen Sie bitte sicher, dass
die Wäschetrommel leer ist.
Entsorgung
• Entsorgung des Verpackungsmaterials: Befolgen Sie die
lokalen Vorschriften, Verpackungsmaterial kann wiederver-
wertet werden.
• Gemäß der Europäischen Richtlinie 2012/19/EU über
Elektro- und Elektronik-Altgeräte dürfen Elektrohaushalts-
Altgeräte nicht über den herkömmlichen Haushaltsmül-
lkreislauf entsorgt werden. Altgeräte müssen separat
gesammelt werden, um die Wiederverwertung und das
Recycling der beinhalteten Materialien zu optimieren und
die Einflüsse auf die Umwelt und die Gesundheit zu reduzie-
ren. Das Symbol „durchgestrichene Mülltonne“ auf jedem
Produkt erinnert Sie an Ihre Verpflichtung, dass Elektrohau-
shaltsgeräte gesondert entsorgt werden müssen.
Manuelles Öffnen der Gerätetür
Sollte die Gerätetür aufgrund eines Stromausfalls nicht
geöffnet werden können, gehen Sie wie folgt vor, um die
Wäsche entnehmen und somit aufhängen zu können:
1. Ziehen Sie den Netzstecker aus der Steckdose.
2. Stellen Sie sicher, dass der Wasserstand im Innern des
Gerätes die Gerätetür nicht übersteigt, andernfalls lassen
Sie das überschüssige Wasser, so wie auf der Abbildung
veranschaulicht, durch den Ablaufschlauch in einen Eimer
ablaufen.
3. Befreien Sie mithilfe der auf der Abbildung veranschau-
lichten Zunge (nach vorne ziehen) die Kunststoff-Spann-
vorrichtung aus der Arretierung; ziehen Sie letztere dann
nach unten und öffnen Sie gleichzeitig die Gerätetür.
Endverbraucher können sich an Abfallämter der Gemein-
den wenden, um mehr Informationen über die korrekte
Entsorgung ihrer Elektrohaushaltsgeräte zu erhalten.

68
DE
Reinigung und Pflege
Abstellen der Wasser- und Stromver-
sorgung
• Drehen Sie den Wasserhahn nach jedem Waschvorgang
zu. Hierdurch wird der Verschleiß der Wasseranlage
verringert und Wasserlecks vorgebeugt.
• Ziehen Sie den Netzstecker aus der Steckdose, bevor
Sie Ihren Waschvollautomaten reinigen.
Reinigung des Gerätes
Die Gehäuseteile und die Teile aus Gummi können mit
einem mit warmer Spülmittellauge angefeuchteten Tuch
gereinigt werden. Vermeiden Sie Löse- und Scheuermittel
Reinigung der Waschmittelschublade
Heben Sie die Schublade
leicht an und ziehen Sie
sie nach vorne hin heraus
(siehe Abbildung).
Spülen Sie sie regelmäßig
unter fließendem Wasser
gründlich aus.
Pflege der Gerätetür und Trommel
• Lassen Sie die Gerätetür stets leicht offen stehen, um die
Bildung unangenehmer Gerüche zu vermeiden.
Reinigung der Pumpe
Ihr Gerät ist mit einer selbstreinigenden Pumpe ausgerü-
stet, eine Wartung ist demnach nicht erforderlich. Es könn-
te jedoch vorkommen, dass kleine Gegenstände (Münzen,
Knöpfe) in die zum Schutz der Pumpe dienende Vorkam-
mer (befindlich unter der Pumpe) fallen.
! Vergewissern Sie sich, dass der Waschgang abgeschlos-
sen ist und ziehen Sie den Netzstecker heraus.
1
2
Zugang zur Vorkammer:
1. Drehen Sie den Deckel
gegen den Uhrzeigersinn
ab (siehe Abbildung): es ist
ganz normal, wenn etwas
Wasser austritt;
2. Reinigen Sie das Innere gründlich;
3. Schrauben Sie den Deckel wieder auf.
Kontrolle des Wasserzulaufschlauchs
Kontrollieren Sie den Zulaufschlauch mindestens einmal im
Jahr. Weist er Risse bzw. Brüche auf, muss er ausgetau-
scht werden. Der starke Druck während des Waschpro-
gramms könnte zu plötzlichem Platzen führen.
! Verwenden Sie niemals bereits gebrauchte Schläuche.

DE
69
Störungen und Abhilfe
Bei Funktionsstörung: Bevor Sie sich an den Technischen Kundendienst wenden (siehe „Kundendienst“), vergewissern Sie
sich zuerst, ob es sich nicht um eine Kleinigkeit handelt, die Sie selbst beheben können. Ziehen Sie hierzu nachstehendes
Verzeichnis zu Rate.
Störungen:
Der Waschvollautomat schaltet sich
nicht ein.
Der Waschgang startet nicht.
Der Waschvollautomat lädt kein
Wasser (auf dem Display wird die
Meldung “WASSERZULAUF PRÜ-
FEN” eingeblendet).
Der Waschvollautomat lädt laufend
Wasser und pumpt es laufend ab.
Der Waschvollautomat pumpt nicht
ab und schleudert nicht.
Der Waschvollautomat vibriert zu
stark während des Schleuderns.
Der Waschvollautomat ist undicht.
Das Gerät ist blockiert, das Display
blinkt und zeigt einen Fehlercode an
(zum Beispiel: F-01, F-..).
Es bildet sich zu viel Schaum.
Mögliche Ursachen / Lösungen:
• Der Stecker steckt nicht in der Steckdose, oder nicht so, dass der Kontakt herge-
stellt wird.
• Der Strom ist ausgefallen.
• Die Gerätetür wurde nicht vorschriftsmäßig geschlossen.
• Die ON/OFF-Taste wurde nicht gedrückt.
• Die Taste START/PAUSE wurde nicht gedrückt.
• Der Wasserhahn ist nicht aufgedreht.
• Es wurde ein verzögerter Start gewählt (siehe „Durchführung eines Waschprogramms“).
• Der Zufuhrschlauch ist nicht am Wasserhahn angeschlossen.
• Der Schlauch ist geknickt.
• Der Wasserhahn ist nicht aufgedreht.
• Es ist kein Wasser da.
• Der Druck ist unzureichend.
• Die Taste START/PAUSE wurde nicht gedrückt.
• Der Ablaufschlauch befindet sich nicht auf der vorgeschriebenen Höhe, d.h. 65 – 100 cm
vom Boden (siehe „Installation“).
• Das Schlauchende liegt unter Wasser (siehe „Installation”).
• Der Abfluss der Hausinstallation wurde nicht mit einer Entlüftungsöffnung versehen.
Konnte die Störung durch diese Kontrollen nicht behoben werden, dann drehen Sie den
Wasserhahn zu, schalten das Gerät aus und fordern den Kundendienst an. Falls Sie in einer
der obersten Etagen eines Gebäudes wohnen, kann es vorkommen, dass sich im Syphon
ein Vakuum bildet, und der Waschvollautomat ständig Wasser ansaugt und wieder abpumpt.
Zur Lösung dieser Probleme bietet der Handel spezielle Syphonventile.
• Das Programm siehe kein Abpumpen vor: Bei einigen Programmen muss es von
Hand eingestellt werden (siehe „Programme und Funktionen“).
• Die Funktion “Leichtbügeln” wurde aktiviert: zur Beendung des Programms Taste
START/PAUSE drücken (siehe „Programme und Funktionen“).
• Der Ablaufschlauch ist geknickt (siehe „Installation“).
• Die Ablaufleitung ist verstopft.
• Die Trommel wurde bei der Installation nicht korrekt befreit (siehe „Installation“).
• Der Waschvollautomat steht nicht eben (siehe „Installation“).
• Der Waschvollautomat steht zu eng zwischen der Wand und einem Möbel (siehe
„Installation“).
• Der Zulaufschlauch wurde nicht ordnungsgemäß aufgeschraubt (siehe „Installation“).
• Die Waschmittelschublade ist verstopft (zur Reinigung siehe „Wartung und Pflege“).
• Der Ablaufschlauch ist nicht korrekt befestigt (siehe „Installation“).
• Schalten Sie das Gerät aus und ziehen Sie den Netzstecker; warten Sie daraufhin
ca. 1 Minute und schalten Sie es wieder ein.
Bleibt die Störung bestehen, kontaktieren Sie bitte den Kundendienst.
• Das Waschmittel ist für Waschmaschinen nicht geeignet (es muss mit der Aufschrift „Für
Waschmaschinen“, „Für Handwäsche und Waschmaschinen“ usw. versehen sein.
• Es wurde zu hoch dosiert.

70
DE
Kundendienst
Bevor Sie sich an den Kundendienst wenden:
• Sollten einige Kontrollen vorab selbst durchgeführt werden (siehe „Störungen und Abhilfe“);
• Starten Sie daraufhin das Programm erneut, um sicherzustellen, dass die Störung auch wirklich behoben wurde;
• Ist dies nicht der Fall, dann kontaktieren Sie den autorisierten Kundendienst unter der auf dem Garantieschein befindlichen
Telefonnummer.
! Wenden Sie sich auf keinen Fall an nicht autorisierte Techniker.
Geben Sie bitte Folgendes an:
• die Art der Störung;
• das Maschinenmodell (Mod.);
• die Seriennummer (S/N).
Diese Daten entnehmen Sie bitte dem auf der Rückseite des Waschvollautomaten und auf der Vorderseite (Gerätetür öffnen)
befindlichen Typenschild.
195117149.00
09/2013 - Xerox Fabriano
-
 1
1
-
 2
2
-
 3
3
-
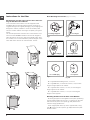 4
4
-
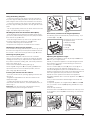 5
5
-
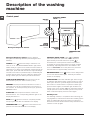 6
6
-
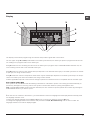 7
7
-
 8
8
-
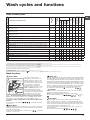 9
9
-
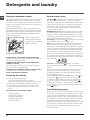 10
10
-
 11
11
-
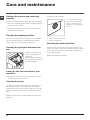 12
12
-
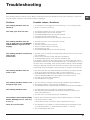 13
13
-
 14
14
-
 15
15
-
 16
16
-
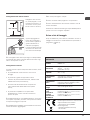 17
17
-
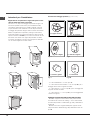 18
18
-
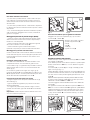 19
19
-
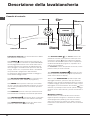 20
20
-
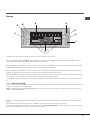 21
21
-
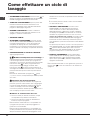 22
22
-
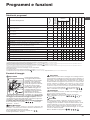 23
23
-
 24
24
-
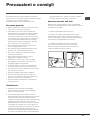 25
25
-
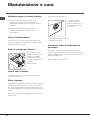 26
26
-
 27
27
-
 28
28
-
 29
29
-
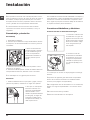 30
30
-
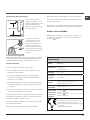 31
31
-
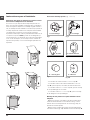 32
32
-
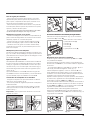 33
33
-
 34
34
-
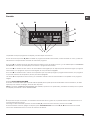 35
35
-
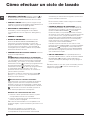 36
36
-
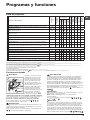 37
37
-
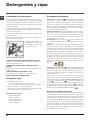 38
38
-
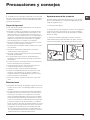 39
39
-
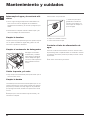 40
40
-
 41
41
-
 42
42
-
 43
43
-
 44
44
-
 45
45
-
 46
46
-
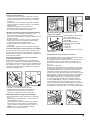 47
47
-
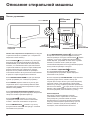 48
48
-
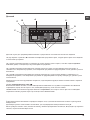 49
49
-
 50
50
-
 51
51
-
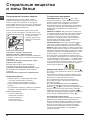 52
52
-
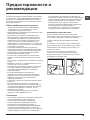 53
53
-
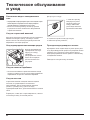 54
54
-
 55
55
-
 56
56
-
 57
57
-
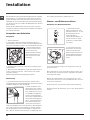 58
58
-
 59
59
-
 60
60
-
 61
61
-
 62
62
-
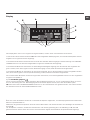 63
63
-
 64
64
-
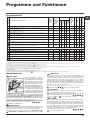 65
65
-
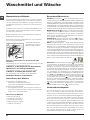 66
66
-
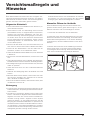 67
67
-
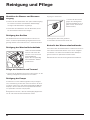 68
68
-
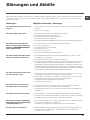 69
69
-
 70
70


HOTPOINT/ARISTON BWMD 742 (EU) Guía del usuario
- Categoría
- Lavadoras
- Tipo
- Guía del usuario
en otros idiomas
Artículos relacionados
-
Whirlpool FMD 923XR EU.C El manual del propietario
-
HOTPOINT/ARISTON BWMD 742 (EU) Guía del usuario
-
-
Hotpoint-Ariston BWMD 742 (EU) El manual del propietario
-
HOTPOINT/ARISTON WMD 942K EU Guía del usuario
-
Whirlpool WMD 942K EU Guía del usuario
-
Hotpoint-Ariston WMD 942K EU El manual del propietario
-
-
-