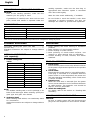
Hitachi SB 8V2 Instrucciones de operación
- Categoría
- Herramientas eléctricas
- Tipo
- Instrucciones de operación
El Hitachi SB 8V2 es una lijadora de banda potente y versátil con un motor de 1020 W que proporciona un lijado rápido y eficiente. Cuenta con un sistema de recolección de polvo integrado para un funcionamiento limpio y una zapata de lijado ajustable para un control preciso. Es ideal para una variedad de aplicaciones, incluyendo acabado de carpintería, pulido de superficies metálicas y eliminación de óxido. Con su diseño ergonómico y fácil de usar, el Hitachi SB 8V2 es la herramienta perfecta para cualquier proyecto de lijado.
El Hitachi SB 8V2 es una lijadora de banda potente y versátil con un motor de 1020 W que proporciona un lijado rápido y eficiente. Cuenta con un sistema de recolección de polvo integrado para un funcionamiento limpio y una zapata de lijado ajustable para un control preciso. Es ideal para una variedad de aplicaciones, incluyendo acabado de carpintería, pulido de superficies metálicas y eliminación de óxido. Con su diseño ergonómico y fácil de usar, el Hitachi SB 8V2 es la herramienta perfecta para cualquier proyecto de lijado.


Transcripción de documentos
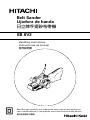
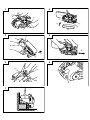
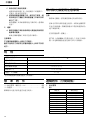
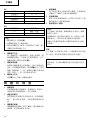
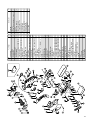
Belt Sander Lijadora de banda 日立牌手提砂布帶機 SB 8V2 Handling instructions Instrucciones de manejo 使用說明書 Read through carefully and understand these instructions before use. Leer cuidadosamente y comprender estas instrucciones antes del uso. 使用前務請詳加閱讀。 1 2 2 3 2 6 4 1 3 5 4 7 0 9 8 5 6 A B D C 7 1 1 2 3 4 5 6 7 8 9 0 A B C D 2 English Lever Idle pulley Drive pulley Shoe plate Sanding belt Rotational direction Adjust screw Inside Outside Move Trigger switch Stopper Dial Support bar Español Palanca Polea no traccionada Polea de tracción Zapata Banda de esmerilado Dirección rotacional Tornillo de ajuste Cara interior Cara exterior Mover Interruptor de activación Parador Dial Barra de soporte 中國語 拉桿 惰輪 驅動輪 履帶板 砂帶 旋轉方向 調整螺絲 內側 外側 移動 起動開關 止推器 圓盤 支撐桿 English GENERAL SAFETY RULES WARNING! Read all instructions Failure to follow all instructions listed below may result in electric shock, fire and/or serious injury. The term “power tool” in all of the warnings listed below refers to your mains operated (corded) power tool or battery operated (cordless) power tool. SAVE THESE INSTRUCTIONS 1) Work area a) Keep work area clean and well lit. Cluttered and dark areas invite accidents. b) Do not operate power tools in explosive atmospheres, such as in the presence of flammable liquids, gases or dust. Power tools create sparks which may ignite the dust of fumes. c) Keep children and bystanders away while operating a power tool. Distractions can cause you to lose control. 2) Electrical safety a) Power tool plugs must match the outlet. Never modify the plug in any way. Do not use any adapter plugs with earthed (grounded) power tools. Unmodified plugs and matching outlets will reduce risk of electric shock. b) Avoid body contact with earthed or grounded surfaces such as pipes, radiators, ranges and refrigerators. There is an increased risk of electric shock if your body is earthed or grounded. c) Do not expose power tools to rain or wet conditions. Water entering a power tool will increase the risk of electric shock. d) Do not abuse the cord. Never use the cord for carrying, pulling or unplugging the power tool. Keep cord away from heat, oil, sharp edges or moving parts. Damaged or entangled cords increase the risk of electric shock. e) When operating a power tool outdoors, use an extension cord suitable for outdoor use. Use of a cord suitable for outdoor use reduces the risk of electric shock 3) Personal safety a) Stay alert, watch what you are doing and use common sense when operating a power tool. Do not use a power tool while you are tired or under the influence of drugs, alcohol or medication. A moment of inattention while operating power tools may result in serious personal injury. b) Use safety equipment. Always wear eye protection. Safety equipment such as dust mask, non-skid safety shoes, hard hat, or hearing protection used for appropriate conditions will reduce personal injuries. c) Avoid accidental starting. Ensure the switch is in the off position before plugging in. Carrying power tools with your finger on the switch or plugging in power tools that have the switch on invites accidents. d) Remove any adjusting key or wrench before turning the power tool on. A wrench or a key left attached to a rotating part of the power tool may result in personal injury. e) Do not overreach. Keep proper footing and balance at all times. This enables better control of the power tool in unexpected situations. f) Dress properly. Do not wear loose clothing or jewellery. Keep your hair, clothing and gloves away from moving parts. Loose clothes, jewellery or long hair can be caught in moving parts. g) If devices are provided for the connection of dust extraction and collection facilities, ensure these are connected and properly used. Use of these devices can reduce dust related hazards. 4) Power tool use and care a) Do not force the power tool. Use the correct power tool for your application. The correct power tool will do the job better and safer at the rate for which it was designed. b) Do not use the power tool if the switch does not turn it on and off. Any power tool that cannot be controlled with the switch is dangerous and must be repaired. c) Disconnect the plug from the power source before making any adjustments, changing accessories, or storing power tools. Such preventive safety measures reduce the risk of starting the power tool accidentally. d) Store idle power tools out of the reach of children and do not allow persons unfamiliar with the power tool or these instructions to operate the power tool. Power tools are dangerous in the hands of untrained users. e) Maintain power tools. Check for misalignment or binding of moving parts, breakage of parts and any other condition that may affect the power tools operation. If damaged, have the power tool repaired before use. Many accidents are caused by poorly maintained power tools. f) Keep cutting tools sharp and clean. Properly maintained cutting tools with sharp cutting edges are less likely to bind and are easier to control. g) Use the power tool, accessories and tool bits etc., in accordance with these instructions and in the manner intended for the particular type of power tool, taking into account the working conditions and the work to be performed. Use of the power tool for operations different from intended could result in a hazardous situation. 5) Service a) Have your power tool serviced by a qualified repair person using only identical replacement parts. This will ensure that the safety of the power tool is maintained. PRECAUTION Keep children and infirm persons away. When not in use, tools should be stored out of reach of children and infirm persons. 3 English PRECAUTIONS ON USING BELT SANDER CAUTION Prior to the sanding operation, make sure the material you are going to sand. If generation of harmful/ toxic ducts such as lead paint, woods and metals is expected under the sanding operation, make sure the dust bag or appropriate dust extraction system is connected with dust outlet tightly. Wear the dust mask additionally, if available. Do not inhale or touch the harmful / toxic dusts generated in sanding operation, the dust can endanger the health of yourself and bystanders. SPECIFICATIONS Voltage (by areas)* Power input* No–load belt speed Sanding belt size Weight (without cord) (110V, 220V, 230V, 240V) 1020 W 250 – 450 m / min 76 × 533 mm 4.3 kg * Be sure to check the nameplate on product as it is subject to change by areas. STANDARD ACCESSORIES APPLICATIONS (1) Endless sanding belt (Grain size: #80) ................ 1 (2) Dust bag .................................................................... 1 Standard accessories are subject to change without notice. 䡬 Finish sanding and finish flooring of woodwork products. 䡬 Base polishing of wood-coated surfaces. 䡬 Finish sanding of metal surface. 䡬 Base polishing of metal-coated surfaces, rust removal, or paint removal prior to refinishing. 䡬 Surface finishing of slate, concrete, and similar materials. OPTIONAL ACCESSORIES (sold separately) 1. Endless sanding belts PRIOR TO OPERATION Table1 Grain size 30 40 60 80 100 120 150 180 240 320 400 Grain Type AA AA, WA AA, WA AA, WA AA, WA AA, WA AA, WA AA, WA AA, WA AA AA NOTE: The endless sanding belt is sold in package of 10 belts of the same type. When ordering, specify the grain type and grain size desired. 1. Power source Ensure that the power source to be utilized conforms to the power requirements specified on the product nameplate. 2. Power switch Ensure that the power switch is in the OFF position. If the plug is connected to a receptacle while the power switch is in the ON position, the power tool will start operating immediately, which could cause a serious accident. 3. Extension cord When the work area is removed from the power source, use an extension cord of sufficient thickness an rated capacity. The extension cord should be kept as short as practicable. 4. Attach the sanding belt For details, refer to the section on “Sanding Belt Assembly”. HOW TO HANDLE SANDING BELT 2. Stationary Stand When sanding small articles, use a stationary stand for convenience. Optional accessories are subject to change without notice. 4 CAUTION: Be sure to switch power OFF and disconnect the plug from the receptacle to avoid serious trouble. English 1. How to attach sanding belt (1) Pull lever with finger, idle pulley will then move backward. (Fig. 1) (2) Place on drive pulley and idle pulley passing it over the outside of shoe plate and making sure that arrow on inside of belt coincides with rotational direction of drive pulley. (Fig. 2) (3) Push lever with finger, idle pulley will then move forward and give proper tension to sanding belt. In this case, be careful not to be hit your finger by lever. Then, adjust sanding belt position. CAUTION: Sanding belt installed in the wrong direction will lower work efficiency and shorten life of sanding belt. 2. How to remove sanding belt Pull lever with finger, sanding belt will then sag and can be taken off pulleys eqsily. DUST REMOVAL When an excessive amount of dust is deposited in the dust bag, dust-collecting efficiency will sharply drop. Remove dust from the bag when it is deposited up to about 2/3 the bag capacity, where by dust collecting efficiency (as well as working efficiency) will be ensured. Remove dust from the bag as follows: (1) Loosen the support bar and remove the dust bag. (Fig. 5) (2) The bag inlet can be opened by unzipping the slide fastener. HOW TO USE THE BELT SANDER 1. How to adjust sanding position. Push switch and turn sanding belt te check position. Adjust sanding belt so that both edges protrude 1.6mm – 3mm past edges of pulleys. lf sanding belt is operated too far on the inside, it may ceuse abrasion and damage machine. Adjust sanding belt position by turning adjust screw. (Fig. 3) 䡬 Turn adjust screw clockwise to move belt in. 䡬 Turn adjust screw counterclockwise to move belt out. CAUTION: If sanding belt moves during operation, adjustment can be made while in operation. 2. To turn on switch Turn on switch while holding machine away from surface to be worked on. If machine is placed on surface when switch is pushed, surface may be badly scratched. The same applies when stopping the machine. 3. How to hold machine Grasp handle and handle knob and hold machine against surface to be worked on so that it contacts surface lightly. Weight of machine itself is sufficient for sanding and polishing at highest efficiency. Do not apply any additional pressure, for this would place unnecessary load on motor, shorten life of sanding belt and lower work efficiency.(Fig. 4) 4. How to move machine Move mechine forward first and then backward, repeating this motion.(Fig. 4) 5. How to select proper sanding belt Choose sanding belt of proper grain size and grain type for your specific purpose, by referring to Table 2 and 3 below. Table 2 Derived finish Coarse finish Medium finish Semi fine finish Fine finish Proper grain size 30 – 40 40 – 100 80 – 240 180 – 400 Table 3 Grain type AA WA Surface to be worked on Steel, Wood Wood, Bamboo CAUTION: 䡬 For grain sizes, refer to Table 3 䡬 Sanding belt grain should be coarser than sandpaper used for manual work. 䡬 Use sanding belt of same grain size until uniform surface is obtained. Changing grain sizes may result in poor finish. 6. How to operate switch The power switch is turned ON when the trigger is pulled, and if the stopper is once depressed, the power switch becomes locked, allowing continuous operation. The stopper can be released pulling the trigger. (Fig. 5) 7. Adjusting the belt speed The Belt Sander is equipped with the electric control circuit which enables stepless speed control. To adiust the speed, turn the dial shown in Fig. 6. When the dial is set to “1”, the belt sander operates at the minimum speed. When the dial is set to “5”, the belt sander operetes at the maximum speed. 8. How to work on corner Corners can be sanded and polished by using machine as in Fig. 7. MAINTENANCE AND INSPECTION 1. Inspecting the sanding belt Since continued use of a worn-out sanding belt will degrade efficiency, replace the sanding belt as soon as excessive abrasion is noted. 2. Inspecting the mounting screws Regularly inspect all mounting screws and ensure that they are properly tightened. Should any of the screws be loose, retighten them immediately. Failure to do so could result in serious hazard. 3. Maintenance of the motor The motor unit winding is the very “heart” of the power tool. Exercise due care to ensure the winding does not become damaged and/or wet with oil or water. 4. Inspecting the carbon brushes For your continued safety and electrical shock protection, carbon brush inspection and replacement 5 English on this tool should ONLY be performed by a Hitachi Authorized Service Center. 5. Replacing supply cord If the supply cord of Tool is damaged, the Tool must be returned to Hitachi Authorized Service Center for the cord to be replaced. 6. Service parts list CAUTION Repair, modification and inspection of Hitachi Power Tools must be carried out by a Hitachi Authorized Service Center. This Parts List will be helpful if presented with the tool to the Hitachi Authorized Service Center when requesting repair or other maintenance. In the operation and maintenance of power tools, the safety regulations and standards prescribed in each country must be observed. MODIFICATION Hitachi Power Tools are constantly being improved and modified to incorporate the latest technological advancements. Accordingly, some parts may be changed without prior notice. NOTE: Due to HITACHI’s continuing program of research and development, the specifications herein are subject to change without prior notice. 6 Español NORMAS GENERALES DE SEGURIDAD ¡ADVERTENCIA! Lea todas las instrucciones Si no se siguen las instrucciones de abajo podría producirse una descarga eléctrica, un incendio y/o daños graves. El término “herramienta eléctrica” en todas las advertencias indicadas a continuación hace referencia a la herramienta eléctrica que funciona con la red de suministro (con cable) o a la herramienta eléctrica que funciona con pilas (sin cable). CONSERVE ESTAS INSTRUCCIONES 1) Área de trabajo a) Mantenga la zona de trabajo limpia y bien iluminada. Las zonas desordenadas y oscuras pueden provocar accidentes. b) No utilice las herramientas eléctricas en entornos explosivos como, por ejemplo, en presencia de líquidos inflamables, gases o polvo. Las herramientas eléctricas crean chispas que pueden hacer que el polvo desprenda humo. c) Mantenga a los niños y transeúntes alejados cuando utilice una herramienta eléctrica. Las distracciones pueden hacer que pierda el control. 2) Seguridad eléctrica a) Los enchufes de las herramientas eléctricas tienen que ser adecuados a la toma de corriente. No modifique el enchufe. No utilice enchufes adaptadores con herramientas eléctricas conectadas a tierra. Si no se modifican los enchufes y se utilizan tomas de corriente adecuadas se reducirá el riesgo de descarga eléctrica. b) Evite el contacto corporal con superficies conectadas a tierra como tuberías, radiadores y frigoríficos. Hay mayor riesgo de descarga eléctrica si su cuerpo está en contacto con el suelo. c) No exponga las herramientas eléctricas a la lluvia o a la humedad. La entrada de agua en una herramienta eléctrica aumentará el riesgo de descarga eléctrica. d) No utilice el cable incorrectamente. No utilice el cable para transportar, tirar de la herramienta eléctrica o desenchufarla. Mantenga el cable alejado del calor, del aceite, de bordes afilados o piezas móviles. Los cables dañados o enredados aumentan el riesgo de descarga eléctrica. e) Cuando utilice una herramienta eléctrica al aire libre, utilice un cable prolongador adecuado para utilizarse al aire libre. La utilización de un cable adecuado para usarse al aire libre reduce el riesgo de descarga eléctrica. 3) Seguridad personal a) Esté atento, preste atención a lo que hace y utilice el sentido común cuando utilice una herramienta eléctrica. No utilice una herramienta eléctrica cuando esté cansado o esté bajo la influencia de drogas, alcohol o medicación. La distracción momentánea cuando utiliza herramientas eléctricas puede dar lugar a importantes daños personales. b) Utilice equipo de seguridad. Utilice siempre una protección ocular. El equipo de seguridad como máscara para el polvo, zapatos de seguridad antideslizantes, casco o protección para oídos utilizado para condiciones adecuadas reducirá los daños personales. c) Evite un inicio accidental. Asegúrese de que el interruptor está en “off” antes de enchufarlo. El transporte de herramientas eléctricas con el dedo en el interruptor o el enchufe de herramientas eléctricas con el interruptor encendido puede provocar accidentes. d) Retire las llaves de ajuste antes de encender la herramienta eléctrica. Si se deja una llave en una pieza giratoria de la herramienta eléctrica podrían producirse daños personales. e) No se extralimite. Mantenga un equilibrio adecuado en todo momento. Esto permite un mayor control de la herramienta eléctrica en situaciones inesperadas. f) Vístase adecuadamente. No lleve prendas sueltas o joyas. Mantenga el pelo, la ropa y los guantes alejados de las piezas móviles. La ropa suelta, las joyas y el pelo largo pueden pillarse en las piezas móviles. g) Si se proporcionan dispositivos para la conexión de extracción de polvo e instalaciones de recogida, asegúrese de que están conectados y se utilizan adecuadamente. La utilización de estos dispositivos puede reducir los riesgos relacionados con el polvo. 4) Utilización y mantenimiento de las herramientas eléctricas a) No fuerce la herramienta eléctrica. Utilice la herramienta eléctrica correcta para su aplicación. La herramienta eléctrica correcta trabajará mejor y de forma más segura si se utiliza a la velocidad para la que fue diseñada. b) No utilice la herramienta eléctrica si el interruptor no la enciende y apaga. Las herramientas eléctricas que no pueden controlarse con el interruptor son peligrosas y deben repararse. c) Desconecte el enchufe de la fuente eléctrica antes de hacer ajustes, cambiar accesorios o almacenar herramientas eléctricas. Estas medidas de seguridad preventivas reducen el riesgo de que la herramienta eléctrica se ponga en marcha accidentalmente. d) Guarde las herramientas eléctricas que no se utilicen para que no las cojan los niños y no permita que utilicen las herramientas eléctricas personas no familiarizadas con las mismas o con estas instrucciones. Las herramientas eléctricas son peligrosas si son utilizadas por usuarios sin formación. e) Mantenimiento de las herramientas eléctricas. Compruebe si las piezas móviles están mal alineadas o unidas, si hay alguna pieza rota u otra condición que pudiera afectar al funcionamiento de las herramientas eléctricas. Si la herramienta eléctrica está dañada, llévela a reparar antes de utilizarla. 7 Español Se producen muchos accidentes por no realizar un mantenimiento correcto de las herramientas eléctricas. f) Mantenga las herramientas de corte afiladas y limpias. Las herramientas de corte correctamente mantenidas con los bordes de corte afilados son más fáciles de controlar. g) Utilice la herramienta eléctrica, los accesorios y las brocas de la herramienta, etc., de acuerdo con estas instrucciones y de la manera adecuada para el tipo de herramienta eléctrica, teniendo en cuenta las condiciones laborales y el trabajo que se va a realizar. La utilización de la herramienta eléctrica para operaciones diferentes a pretendidas podría dar lugar a una situación peligrosa. 5) Revisión a) Lleve su herramienta a que la revise un experto cualificado que utilice sólo piezas de repuesto idénticas. Esto garantizará el mantenimiento de la seguridad de la herramienta eléctrica. PRECAUCIONES AL UTILIZAR LA LIJADORA DE BANDA ATENCIÓN Antes de proceder al lijado, compruebe el material que va a lijar. Si se prevé que se genere polvo tóxico / nocivo como pintura de plomo, madera y metales al realizar el lijado, asegúrese de conectar con firmeza la bolsa para el polvo o el sistema adecuado de extracción de polvo a la salida del polvo. Asimismo, colóquese la máscara para el polvo, si está disponible. No inhale o toque polvo tóxico / nocivo generado durante el lijado, ya que el polvo puede poner en peligro su salud y la de los viandantes. PRECAUCIÓN Mantenga a los niños y a las personas enfermas alejadas. Cuando no se utilicen, las herramientas deben almacenarse fuera del alcance de los niños y de las personas enfermas. ESPECIFICACIONES Voltaje (por áreas)* Acometida* Entrada de potencia Medida de la banda de esmerilado Peso (sin cable) (110V, 220V, 230V, 240V) 1020 W 250 – 450 m / min 76 × 533 mm 4,3 kg * Verificar indefectiblemente los datos de la placa de características de la máquina, pues varían de acuerdo al país de destino. ACCESORIOS NORMALES (1) Banda de esmerilado sin fin (Medida de grano: 80) ............................................ 1 (2) Colector de polvo .................................................... 1 Los accesorios normales están sujetos a cambio sin previo aviso. ACCESORIOS FACULTATIVOS (de venta por separado) 1. Banda de esmerilado sin fin Tabla 1 Medida de grano 30 40 60 80 100 120 150 180 240 320 400 8 Tipo de grano AA AA, WA AA, WA AA, WA AA, WA AA, WA AA, WA AA, WA AA, WA AA AA Español OBSERVACÍON: La banda de esmerilado sin fin se vende en paquetes de 10 bandas del mismo tipo. Al hacer el pedido especificar el tipo y la medida de grano deseado. 2. Soporte estacionario Para esmerilar artículos pequeños, usar convenientemente un soporte estacionario. Los accesorios facultativos están sujetos a cambio sin previo aviso. APLICACION 䡬 Acabado de esmerilado y acabado de solado de productos de madera. 䡬 Pulimentado en base de superficies de revestimiento de madera. 䡬 Acabado de esmerilado de superficies metálicos. 䡬 Pulimentado en base de superficies de revestimiento metálico, eliminación de oxidación o eliminación de pintura antes del nuevo acabado. 䡬 Acabado de superficies de pizarra, hormigón y materiales similares. ANTES DE LA PUESTA EN MARCHA 1. Alimentación Asegurarse de que la alimentación de red que ha de ser utilizada responda a las exigencias de corriente especificadas en la placa de características del producto. 2. Conmutador de alimentación Asegurarse de que el conmutador de alimentación está en la posición OFF (desconectado). Si la clavija está conectada en la caja del enchufe mientras el conmutador de alimentación está en posición ON (conectado) las herramientas eléctricas empezarán a trabajar inmediatamente, provocando un serio accidente. 3. Cable de prolongación Cuando está alejada el área de trabajo de la red de alimentación, usar un cable de prolongación de un grosor y potencia nominal suficiente. El cable de prolongación debe ser mantenido lo más corto posible. 4. Aplicar la banda de esmerilado. Para detalles, dirigirse a la sección de "Montaje de banda de esmerilado". CÓMO MANEJAR LA CINTA DE LIJADO PRECAUCIÓN: Asegúrese de desconectar (OFF) el interruptor y de desenchufar la clavija del tomacorriente para evitar serios contratiempos. 1. Cómo conectar la cinta lijadora (1) Tire de la palanca con el dedo; la polea de marcha lenta se desplazará hacia atrás. (Fig. 1) (2) Coloque la polea de conducción y la polea de marcha lenta pasándola por encima de la parte externa de la placa de zapata y asegurándose de que la flecha dentro de la cinta coincide con la dirección de giro de la polea de conducción. (Fig. 2) (3) Pulse la palanca con el dedo; la polea de marcha lenta se desplazará hacia delante y proporcionará una tensión adecuada a la cinta de lijado. En este caso, tenga cuidado de no golpearse el dedo con la palanca. A continuación, ajuste la posición de la cinta de lijado. PRECAUCIÓN: La cinta de lijado instalada en la dirección incorrecta reducirá la eficacia del trabajo y acortará la vida de la cinta de lijado. 2. Cómo retirar la cinta de lijado Tire de la palanca con el dedo; la cinta de lijado se combará y puede retirarse de las poleas fácilmente. ELIMINACIÓN DE POLVO Cuando hay demasiado polvo depositado en la bolsa para polvo, la eficacia de la recogida de polvo descenderá en gran medida. Retire el polvo de la bolsa cuando esté depositado hasta 2/3 aproximadamente de la capacidad de la bolsa, donde se garantizará la eficacia de recogida de polvo (así como la eficacia de funcionamiento). Retire el polvo de la bolsa de la siguiente manera: (1) Afloje la barra de soporte y retire la bolsa para polvo. (Fig. 5) (2) La entrada de la bolsa puede abrirse abriendo el fijador de deslizamiento. CÓMO UTILIZAR LA LIJADORA DE BANDA 1. Cómo ajustar la posición de lijado. Pulse el interruptor y gire la cinta lijadora a la posición de verificación. Ajuste la cinta lijadora de forma que ambos bordes sobresalgan 1,6 mm – 3 mm de los bordes de las poleas. Si la cinta de lijado se opera demasiado lejos en la parte interna, puede causar abrasión y dañar la máquina. Ajuste la posición de la cinta de lijado girando el tornillo de ajuste (Fig. 3) 䡬 Gire el tornillo de ajuste en dirección de las agujas del reloj para introducir la cinta. 䡬 Gire el tornillo de ajuste en dirección contraria a las agujas del reloj para sacar la cinta. PRECAUCIÓN: Si la cinta de lijado se mueve durante la operación, pueden realizarse ajustes mientras está en funcionamiento. 2. Encender el interruptor Encienda el interruptor mientras sujeta la máquina alejada de la superficie en la que se trabaje. Si la máquina se coloca en la superficie cuando se pulsa el interruptor, la superficie puede resultar muy arañada. Lo mismo ocurre al parar la máquina. 3. Cómo sujetar la máquina Agarre el mango y utilice el botón. Sujete la máquina contra la superficie en la que se trabaje de forma que contacte con la superficie ligeramente. El peso de la misma máquina es suficiente para lijar y pulir con una eficacia superior. 9 Español No aplique presión adicional, ya que se colocaría una carga innecesaria en el motor, acortando la vida de la cinta de lijado y reduciendo la eficacia del trabajo. (Fig. 4) 4. Cómo mover la máquina Mueva la máquina hacia delante primero y luego hacia atrás, repitiendo este movimiento. (Fig. 4) 5. How to select proper sanding belt Consulte la Tabla 1 y 2 de abajo para seleccionar una cinta adecuada de lijado de tamaño y tipo de grano adecuados para su fin específico. Tabla 2 Acabado Acabado Acabado Acabado Acabado derivado grueso medio semi-fino fino Tabla 3 Tipo de grano AA WA Tamaño adecuado de grano 30 – 40 40 – 100 80 – 240 180 – 400 Superficie a trabajar Acero, madera Madera, bambú PRECAUCIÓN: 䡬 Para tamaños de grano, consulte la Tabla 3 䡬 El grano de la cinta de lijado debe ser más grueso que el papel de lija utilizado para trabajo manual. 䡬 Utilice cinta de lijado del mismo tamaño de grano hasta que se obtenga una superficie uniforme. Al cambiar los tamaños de grano podría obtenerse un acabado pobre. 6. Cómo utilizar el interruptor El interruptor de corriente se enciende cuando se tira del activador, y si el parador se pulsa una vez, el interruptor de corriente se bloquea, permitiendo un funcionamiento continuo. El parador puede soltarse tirando del activador. (Fig. 5) 7. Ajuste de la velocidad de la cinta La lijadora de cinta está equipada con el circuito de control eléctrico que permite un control de velocidad sin pisar. Para ajustar la velocidad, gire la rueda mostrada en la Fig. 6. Cuando el dial se ajusta en “1”, la lijadora de cinta opera a la velocidad mínima. Cuando el dial se ajusta en “5”, la lijadora de cinta se opera a velocidad mínima. 8. Cómo trabajar en las esquinas Las esquinas pueden lijarse y pulirse utilizando la máquina como en la Fig. 7. MANTENIMIENTO E INSPECCION 1. Inspeccionar la banda de esmerilado: Como un uso continuo de una banda de esmerilado y desgastada disminuiría la eficiencia del labor, reemplazer la banda tan pronto como se note un desgaste excesivo. 2. Inspeccionar los tornillos de montaje Regularmente inspeccionar todos los tornillos de montaje y asegurarse de que estén apretados firmemente. Si cualquier tornillo estuviera suelto, volver a apretarlo inmediatamente. El no hacer esto provocaría un riesgo serio. 10 3. Mantenimiento de motor La unidad de bobinado del motor es el verdadero “corazón” de las herramientas eléctricas. Prestar el mayor cuidado y asegurarse de que el bobinado no se dañe y/o se humedezca con aceite o agua. 4. Inspección de las escobillas Por motivos de seguridad contra descargas eléctricas, la inspección y el reemplazo de las escobillas deberán realizarse solamente en un Centro de Servicio Autorizado de Hitachi. 5. Reemplazo del cable de alimentación Si el cable de alimentación de la herramienta está dañado, envíe la herramienta al Centro de Servicio Autorizado de Hitachi para que le cambien el cable de alimentación. 6. Lista de repuestos PRECAUCIÓN La reparación, modificación e inspección de las herramientas eléctricas Hitachi deben ser realizadas por un Centro de Servicio Autorizado de Hitachi. Esta lista de repuestos será de utilidad si es presentada junto con la herramienta al Centro de Servicio Autorizado de Hitachi, para solicitar la reparación o cualquier otro tipo de mantenimiento. En el manejo y el mantenimiento de las herramientas eléctricas, se deberán observar las normas y reglamentos vigentes en cada país. MODIFICACIONES Hitachi Power Tools introduce constantemente mejoras y modificaciones para incorporar los últimos avances tecnológicos. Por consiguiente, algunas partes pueden ser modificadas sin previo aviso. OBSERVACION Debido al programa continuo de investigación y desarrollo de HITACHI éstas especificaciones están sujetas a cambio sin previo aviso. 中國語 一般安全規則 警告! 閱讀所有說明,未遵守下列之說明可能導致電擊、火 災及/或嚴重傷害。 「電動工具」一詞在下列警告中,關係到電源操作 (有線)之電動工具或電池操作(無線)之電動工 具。 記住這些說明 1) 工作場所 a) 保持工作場所清潔及明亮。 b) 使用安全裝備,常時佩戴安全眼鏡。 安全裝備有防塵口罩、防滑安全鞋、硬帽,或 在適當情況下使用聽覺防護,可減少人員傷 害。 c) 避 免 意 外 地 啟 動 。 在 插 電 前 確 認 開 關 是 在 “off”的位置。 以手指放在開關握持電動工具,或在電動工具 的開關於“on”的狀況下插上插頭,都會導致 意外發生。 d) 在將電動工具啟動前,先卸下任何調整用鑰匙 或扳手。 雜亂及昏暗區域易發生意外。 b) 勿在易產生爆炸之環境中操作,譬如有易燃液 體、瓦斯或粉塵存在之處。 扳手或鑰匙遺留在電動工具的轉動部位時,可 能導致人員傷害。 e) 身體勿過度伸張,任何時間要保持站穩及平 衡。 電動工具產生火花會引燃粉塵或煙氣。 c) 當操作電動工具時,保持兒童及過往人員遠 離。 以便在不預期的狀態下,能對電動工具有較好 的控制。 f) 衣著要合宜,別穿太鬆的衣服或戴首飾。 分神會讓你失去控制。 2) 電氣安全 a) 電動工具插頭必須與插座配合,絕不可以任何 方法修改插頭,且不得使用任何轉接插頭於有 接地之電動工具。 不修改插頭及所結合之插座可減少電擊。 b) 避免身體接觸到接地面諸如管子、散熱器、爐 灶及冰箱。 如果你的身體接地或搭地,會增加電擊的危 險。 c) 勿讓電動工具淋雨或曝露在潮濕的環境下。 電動工具進水會增加電繫的危險。 d) 勿濫用電源線。絕勿使用電源線去纏繞、拖拉 電動工具或拔插頭,保持電源線遠離熱氣、油 氣、尖角或可動零件。 損壞或纏繞的電源線會增加電繫之危險。 e) 電動工具在室外操作時要使用一適合室外用的 延長線。 使用合適之室外用延長線會減少電擊的危險。 3) 人員安全 a) 保持機警,注意你正在做什麼,並運用普通常 識操作電動工具。 當你感到疲勞或受藥品、酒精或醫療影響時, 勿操作電動工具。 操作中瞬間的不注意可能造成人員嚴重的傷 害。 保持你的頭髮、衣服及手套遠離轉動部位。 寬鬆的衣服、手飾及長髮會被捲入轉動部位。 g) 如果裝置要用於粉塵抽取及集塵設施,要確保 其連接及正當使用。 使用此類裝置能減少與粉塵有關之危害。 4) 電動工具之使用及注意事項 a) 勿強力使用電動工具,使用正確之電動工具為 你所需。 正確使用電動工具會依其設計條件使工作做得 更好更安全。 b) 如果開關不能轉至開及關的位置,勿使用電動 工具。 任何電動工具不能被開關所控制是危險的,必 須要修理。 c) 在做任何調整、更換配件或收存電動工具時, 要將插頭與電源分開,且/或將電池從電動工具 中取出。 此種預防安全措施可減少意外開啟電動機之危 險。 d) 收存停用之電動工具,遠離兒童,且不容許不 熟悉電動工具或未瞭解操作電動工具說明書的 人操作電動工具。 在未受過訓練的人手裡,電動工具極為危險。 e) 保養電動工具,檢核是否有可動零件錯誤的結 合或卡住、零件破裂及可能影響電動工具操作 的任何其他情形。 電動工具如果損壞,在使用前要修好。許多意 外皆肇因於不良的保養。 11 中國語 f) 保持切割工具銳利清潔。 適當的保養切割工具,保持銳利之切削鋒口, 可減少卡住並容易控制。 g) 按照說明書使用電動工具、配件及刀具等,使 用特殊型式之電動工具時要考量工作條件及所 執行之工作。 使用電動工具未如預期用途之操作時,會導致 危害。 5) 維修 a) 讓你的電動工具由合格修理人員僅使用相同的 維修零件更換。 帶式砂光機使用注意事項 注意 操作砂光機前,請先確認要砂光的材料為何。 若砂光作業中預料會產生鉛漆、木屑或金屬屑等 有害/有毒粉塵,請確認粉塵出口裝妥粉塵袋或合 適之集塵系統。 若有防塵面罩,請戴上。 如此可確保電動工具的安全得以維持。 注意事項: 不可讓孩童和體弱人士靠近工作場所。 應將不使用的工具存放在孩童和體弱人士伸手不及的 地方。 規 請勿吸入或接觸砂光作業中產生之有害/ 有毒粉 塵,因這類粉塵會危害您個人及旁人的健康。 格 電壓(按地區)* (110V, 220V, 230V, 240V) 輸入功率* 1020 W 額定輸出功率 無負載砂帶速度 460 W 250-450 m 分 76 × 533 mm 砂紙帶尺寸 重量(不含線纜) 4.3 kg *當須改變地區時應檢查產品上的銘牌。 標 準 附 件 (1) 砂光環帶 (顆粒度:#80) ................ 1個 (2) 粉塵袋 ................................ 1個 標準附件可能不預先通告而徑予更改。 12 選購附件(分開銷售) 1. 砂光環帶 表1 顆粒度 30 40 60 80 100 120 150 180 240 320 400 顆粒類型 AA AA, WA AA, WA AA, WA AA, WA AA, WA AA, WA AA, WA AA, WA AA AA 中國語 註: 砂光環帶以同型10條砂帶成組出售。 訂購時,請指定所需之顆粒類型及顆粒度。 注意: 若砂帶安裝方向錯誤,會降低工作效率及減損砂帶 壽命。 2. 固定式機台 研磨細粒時,請使用固定式機台以利作業。 選購附件可能不預先通告而徑予更改。 2. 如何砂帶拆卸 以手指拉動推桿,使砂帶下垂,便可輕易將其從 帶輪上取下。 用 清 䡬 䡬 䡬 䡬 䡬 作 途 木製產品及地板拋光 木製表層基底拋光 金屬表面拋光 金屬塗層表面基底拋光、表面再處理前除鏽或去漆 石板、混凝土或類似材質之表面拋光。 業 之 前 1. 電源 確認所使用的電源與工具銘牌上標示的規格是否 相符。 2. 電源開關 確認電源開關是否切斷。若電源開關接通,則插 頭插入電源插座時電動工具將出其不意地立刻轉 動,從而招致嚴重事故。 3. 延伸線纜 若作業場所移到離開電源的地點,應使用容量足 夠、鎧裝合適的延伸線纜,並且要盡可能地短 些。 4. 安裝砂帶 詳細資訊,請參閱〈砂帶總成〉一節。 砂帶操作方法 注意: 請務必先關閉電源並將插頭從插座拔除,以避免造 成嚴重後果。 1. 如何安裝砂帶 (1) 以手指拉動拉桿,使惰輪向後移動。(圖1) (2) 將驅動輪及惰輪安裝於履帶板外,確認砂帶內側 的箭頭與驅動輪旋轉方向相符。(圖2) (3) 以手指推動拉桿,使惰輪向前移動,並給予砂帶 適當張力。此時,請小心手指不要受拉桿撞擊。 然後調整砂帶位置。 除 粉 塵 若粉塵袋積有過多粉塵,集塵效率則會大幅降低。 當粉塵積至粉塵袋容量2/3時,請清除袋內粉塵,以確 保集塵效率 (及工作效率)。 依下列程序清除袋內粉塵: (1) 將支撐桿鬆開,取下粉塵袋。(圖5) (2) 拉開滑鍊便可開啟粉塵袋口。 砂帶砂光機使用方法 1. 砂光位置調整方法 按下開關,轉動砂帶檢查其位置。調整砂帶使其兩端 超出帶輪邊緣1.6至3mm。 若砂帶過於靠近機台內側,會產生摩擦而損壞機台。 旋轉調整螺絲(圖3)便可調整砂帶位置。 䡬 順時針旋轉螺絲可將砂帶內移。 䡬 逆時針旋轉螺絲則可將砂帶外移。 注意: 若砂帶於運轉時偏移,可在運轉中進行調校。 2. 開啟開關 將機台推離受磨表面,再開啟開關。若按下開關 時,機台置於受磨表面,該表面將會嚴重刮損。 停止機台時亦遵照此原則。 3. 機台握持方法 握住手柄及手柄頭,將機台輕輕抵住受磨表面。 依賴機台本身重量已足以有效研磨及拋光。 請勿額外施加力量,否則會對馬達增加不必要的 負載、縮短砂帶壽命及降低工作效率。(圖4) 4. 如何移動機台 先將機台往前移,再往後移,不斷重複此前後動 作。(圖4) 5. 砂帶選擇方法 參照下表2及表3依個人特定目的選擇具備合適顆 粒度及顆粒類型的砂帶。 13 中國語 表2 成形拋光 粗粒拋光 合適之顆粒度 30 - 40 中等拋光 半精細拋光 精細拋光 40 - 100 80 - 240 180 - 400 顆粒類型 AA WA 受磨表面 鋼製、木製 木製、竹製 4. 檢查碳刷 為了保證長期安全操作和防止觸電,必須僅由經 授權的日立維修中心檢查和更換碳刷。 5. 更換電源線 如果工具的電源線破損,必須將工具送回日立授 權的服務中心來更換電源線。 6. 維修零部件一覽表 表3 注意 䡬 關於顆粒度,請參閱表3 䡬 砂帶顆粒應比手工砂紙粗糙。 䡬 使用相同顆粒度之砂帶,以便取得均勻表面。變 更顆粒度會導致拋光不良。 6. 開關操作方法 扳下起動裝置,電源即開啟。按壓止推器時,電 源開關將會鎖定,以利砂光作業持續進行。拉下 起動裝置便可釋放止推器(圖5)。 7. 調整砂帶速度 砂帶砂光機配備電力控制電路,可執行無段速度 控制。若要調整砂帶速度,請旋轉圖6所示之刻度 圓盤。圓盤設為「1」時,砂帶砂光機將以最低速 作業;設為「5」時,則以最高速作業。 8. 圓角砂光方法 使用圖7所示之機台可磨拋出圓角。 維 護 和 檢 查 1. 檢查砂帶 若砂帶磨損後仍持續使用,將會降低工作效率。 發現砂帶有過度磨損情形,請立即更換。 2. 檢查安裝螺釘 要經常檢查安裝螺釘是否緊固妥善。若發現螺釘 鬆了,應立即重新扭緊,否則會導致嚴重的事 故。 3. 電動機的維護 電動機繞線是電動工具的心臟部。應仔細檢查有 無損傷,是否被油液或水沾濕。 14 注意: 日立電動工具的修理、維護和檢查必須由日立維修 服務中心進行。 需要維修時,將此零件目錄和工具一同交給日立維 修服務中心,將有助於進行維修或其他保養。 電動工具的操作與保養必須遵照各國家的安全規定 及標準。 改進 日立電動工具不斷進行改進,以適應最新的科技發 展。因此,部份零件的變更可能無法事先通知。 註: 為求改進,本手冊所載規格可能不預先通告而徑予 更改。 15 Item No. 1 2 3 4 5 6 7 8 9 10 11 12 13 14 15 16 17 18 19 20 21 22 23 24 25 26 27 28 29 30 31 32 33 34 35 36 37 38 39 40 41 42 43 44 45 46 47 48 49 50 51 Q’TY 1 1 1 1 1 2 1 2 1 1 2 1 1 4 1 1 2 1 1 1 2 1 1 2 2 2 1 1 1 1 8 1 1 1 2 2 1 1 1 1 1 3 1 1 1 5 1 1 1 1 1 Part Name PULLEY(A) BALL BEARING DUST GUIDE ARMATURE ASS‘Y BALL BEARING HEX. HD. TAPPING SCREW D5×55 STATOR ASS‘Y MACHINE SCREW (W/WASHERS) M4×12 BEARING LOCK FAN GUIDE BRUSH TERMINAL TERMINAL BELT COVER TAPPING SCREW (W/FLANGE) D5×45 DUST COVER HANDLE COVER TAPPING SCREW (W/FLANGE) D4×16 CORD CLIP CORD ARMOR HOUSING ASS‘Y HEX. SOCKET SET SCREW M5×8 CORD NAME PLATE BRUSH HOLDER CARBON BRUSH BRUSH CAP SWITCH(E) CONNECTOR 50091 TERMINAL M3.5 CONTROL TAPPING SCREW (W/FLANGE) D4×16 TAPPING SCREW (W/FLANGE) D4×30 MACHINE SCREW (W/WASHERS) M4×8 CLEAR COVER WASHER (B) METAL D10×14×12 IDLE PULLEY ASS'Y ADJUSTING SCREW SPRING BODY ASS‘Y STRIKING GUIDE FT-MACHINE SCREW M4×10 RETAINING RING FOR D10 SHAFT SHAFT(B) BELT TENSIONER ASS‘Y FT-MACHINE SCREW M4×14 SPRING BELT PULLEY(B) GEAR COVER BALL BEARING Item No. 52 53 54 55 56 57 58 59 60 61 62 63 501 Part Name PINION METAL RETAINING RING FOR D10 SHAFT GEAR WASHER (B) D19 METAL D10×14×12 FEATHER KEY 3×3×8 SHOE PLATE SHOE CUSION WASHER (B) D19 DRIVE PULLEY SANDING BELT DUST BAG 1 1 1 1 2 2 1 1 1 2 1 1 1 Q’TY Hitachi Koki Co., Ltd. 612 Code No. C99159531 Printed in Malaysia-
 1
1
-
 2
2
-
 3
3
-
 4
4
-
 5
5
-
 6
6
-
 7
7
-
 8
8
-
 9
9
-
 10
10
-
 11
11
-
 12
12
-
 13
13
-
 14
14
-
 15
15
-
 16
16
-
 17
17


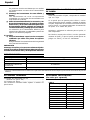
Hitachi SB 8V2 Instrucciones de operación
- Categoría
- Herramientas eléctricas
- Tipo
- Instrucciones de operación
El Hitachi SB 8V2 es una lijadora de banda potente y versátil con un motor de 1020 W que proporciona un lijado rápido y eficiente. Cuenta con un sistema de recolección de polvo integrado para un funcionamiento limpio y una zapata de lijado ajustable para un control preciso. Es ideal para una variedad de aplicaciones, incluyendo acabado de carpintería, pulido de superficies metálicas y eliminación de óxido. Con su diseño ergonómico y fácil de usar, el Hitachi SB 8V2 es la herramienta perfecta para cualquier proyecto de lijado.