Martin Yale papermonster F100 Operating Instructions Manual
- Tipo
- Operating Instructions Manual

Postfach / p.o.box 1420
D-88672 Markdorf / Germany
Tel.: +49(0)7544/60-0
Fax: +49(0)7544/60-248
E-mail: [email protected]
Internet: www.martinyale.de
Typ/Type/Type/Tipo/Típus:
395
F100
(Seite 2-3)
(page 4-5)
(page 6-7)
(página 8-9)
(pagina 10-11)
(strana 12-13)
D
GB
F
E
I
CZ
Bedienungsanleitung
Operating instructions
Instructions d’opération
Instrucciones de uso
Istruzioni per l’uso
Návod k obsluze
Vor der Inbetriebnahme die Bedienungsanleitung durchlesen!
Before operating, please read the Operating Instructions!
Veuillez lire le mode d’emploi avant la mise en service!
Leer las instrucciones de uso antes de la puesta en servicio!
Prima della messa in funzione leggere attentamente le istruzioni!
Před uvedením do provozu si přečtěte návod k obsluze!

F100
2
Abb. 1
Papieranschlag
Abb. 2 Abb. 3
Brieffaltung nach innen
Brieffaltung nach aussen
D
TISCHFALTGERÄT
WICHTIGE SICHHEITSHINWEISE
Verletzungsgefahr! Lose
Teile von Bekleidung, Kra
-
watten, Schmuck, langes
Haar, oder andere lose Ge
-
genstände von der Einlaß
-
öffnung fernhalten!
Verletzungsgefahr
!
Nicht mit den Fingern in die Ein-
lassöffnung fassen!
Verletzungsgefahr
!
Keine leicht entzündbare Flüssig
-
keiten oder Gase in die Einlassöff
-
nung sprühen!
Im Gefahrenfalle die Maschine
am Hauptschalter, oder NOT-AUS-
Schalter ausschalten, oder den
Netzstecker ziehen!
Vor dem Öffnen der Maschine Netz-
stecker ziehen!
«
«
«
«
«
Das Gerät darf nicht von mehre-
ren Personen gleichzeitig bedient
werden!
Die Auslegung der Sicherheitsele
-
mente beruhen auf einer gefahrlosen
Bedienung im “Einmannbetrieb“.
Die Maschine ist kein Spielzeug
und für Einsatz und Benutzung
durch Kinder nicht geeignet!
Die sicherheitstechnische Gesamt
-
konzeption (Abmessungen, Zuführ-
öffnungen, Sicherheitsabschaltun
-
gen etc.) dieser Maschine beinhaltet
keinerlei Garantien einer gefahrlosen
Handhabung durch Kinder.
Reparaturen dürfen nur von einem
Fachmann durchgeführt werden!
«
«
«
INBETRIEBNAHME
EINSTELLUNG DES PAPIERANSCHLAGS
Bevor Sie mit dem Falten beginnen, müssen Sie
sicherstellen, dass der Papieranschlag (siehe
Abb. 1) für das verwendete Papier richtig einge-
stellt ist.
Wenn Sie auf die Unterseite des Tischfaltgeräts
sehen, wie in Abb. 1 gezeigt, ist das obere Paar
der linken und rechten Schlitze für 8 1/2“ x 11“
Papier vorgesehen.
Das untere Paar der linken und rechten Schlitze
ist für A4 Papier vorgesehen.
Wenn Sie die Stellung des Papieranschlags än
-
dern müssen, nehmen Sie diesen vorsichtig ab,
indem Sie ihn der Mitte leicht biegen und mit ei
-
nem Ende zuerst herausziehen.
Dann setzen Sie den Papieranschlag in das
andere Schlitzpaar ein, indem Sie den Papieran
-
schlag wieder vorsichtig biegen und mit einem
Ende zuerst einsetzen.
BEDIENUNG
BETRIEB
1. Wickeln Sie das Kabel für die Stromversor-
gung vorsichtig vom Netzsteckerteil ab und
stecken Sie das entsprechende Ende in den
Anschluss auf der rechten Seite des Papier
-
falters.
2. Stecken Sie das Netzsteckerteil in eine ge-
eignete Steckdose.
3. Stecken Sie bis zu 3 Blatt Papier etwa 1 1/2“
in den hinteren Schlitz (bezeichnet „IN“). Hal-
ten Sie das Papier, damit es quadratisch in
die Klemmung (Klemmpunkt) der darunterlie
-
genden Walzen kommt.
Nach kurzer Verzögerungszeit beginnt das
Faltgerät automatisch mit dem Faltzyklus.
Sobald das Falten beginnt, muss das Papier
losgelassen werden.
Um genaue Faltungen zu erreichen, muss Ihr
Dokument am oberen Ende der Blätter gehal-
ten werden (siehe Abb. 2).
Die beste Faltung wird erreicht, wenn man
das Papier locker hält, so dass es sich selbst
auf den Faltwalzen ausrichtet.
4. Entnehmen Sie das gefaltete Papier aus dem
vorderen Schlitz.
-
-
TIPPS FÜR EINEN OPTIMALEN BETRIEB
1. Legen Sie nie mehr als 3 Papierblätter gleich-
zeitig in das Faltgerät.
2. Mit Klammern geheftete Seiten können in
das Faltgerät eingegeben werden, achten Sie
jedoch darauf, dass sich die Klammern nicht
an den Faltpositionen befinden (im Abstand
von 1/3 von oben und unten des Blattes).
Das geheftete Ende des Blattes muss zuerst
in das Gerät eingegeben werden.
3. Für das Falten von Papier für einen Fenster
-
briefumschlag muss das Papier mit der Kopf-
seite oben und Schriftseite zum Bedienenden
eingegeben werden (Brieffaltung nach innen,
siehe Abb. 3).
Zum Falten eines Geschäftsbriefes (Schrift-
seite nach innen), muss das Papier mit der
Kopfseite oben und Schriftseite weg vom Be
-
dienenden eingegeben werden (Brieffaltung
nach aussen, siehe Abb. 3).
Griff zum Beseitigen
des Papierstaus

F100
3
Gerät
D-Welle
Bohrung für
Welle
Abb. 4
BLOCKSCHALTBILD
Infrarotsender Infrarotempfänger
rot
schwarz
gelb
blau
blau
schwarz
schwarz
rot
Gedruckte
Schaltung
24 V DC
24 V DC Motor
TISCHFALTGERÄT
D
ANWEISUNGEN ZUM BEHEBEN VON PAPIER-
STAUS
1. Im Falle eines Papierstaus ziehen Sie das
Netzsteckerteil aus der Steckdose her
-
aus.
2. Entfernen Sie den Papieranschlag von der
Unterseite des Geräts her (siehe Abb. 1), in-
dem Sie diesen in der Mitte vorsichtig biegen
und mit einem Ende zuerst herausziehen.
3. Entfernen Sie ebenfalls den Entstaugriff, in-
dem Sie diesen hin und her bewegen wäh
-
rend Sie vorsichtig ziehen.
4. Stecken Sie den Entstaugriff durch die Öff-
nung in der Geräteabdeckung in die D-för-
mige Welle innerhalb des Geräts (siehe
Abb. 4).
5. Drehen Sie den Griff in beide Richtungen und
ziehen Sie vorsichtig das Papier nach oben
oder nach unten heraus.
Wenn der Papierstau nicht behoben werden
kann, gehen Sie entsprechend den nachste
-
henden AUSBAUANLEITUNGEN vor.
Nachdem der Papierstau behoben ist, stel-
len Sie den Griff für die Behebung des Pa-
pierstaus und den Papieranschlag in ihre
normalen Positionen zurück. Stecken Sie das
Netzsteckerteil wieder in die Steckdose.
AUSBAUANLEITUNGEN
Verwenden Sie diese Verfahren zur Behebung
eines schwierigen Papierstaus oder zur Reini-
gung der Faltwalzen.
1. Ziehen Sie das Netzsteckerteil aus der Steck
-
dose.
2. Entfernen Sie die vier Schrauben am Boden
des Faltgeräts und nehmen Sie die Abde-
ckung ab. Stellen Sie das Faltgerät wieder in
seine normale aufrechte Stellung.
3. Zum Beheben eines Papierstaus nehmen Sie
den Papieranschlag aus Kunststoff vom Bo-
den des Faltgeräts ab (siehe Abb. 1). Drehen
Sie die große Riemenscheibe auf der linken
Seite hin und her während Sie das Papier
vorsichtig von der Ober- oder Unterseite des
Geräts ziehen.
4. Zum Reinigen der Gummiwalze sprühen Sie
Martin Yale Roller Cleaner auf ein saube
-
res, fusselfreies Tuch und reiben Sie damit
die Walzen sauber.
Drehen Sie die Walzen durch Hin- und Her
-
drehen der Riemenscheibe.
Wiederholen Sie das Verfahren bis die Gum
-
mi- und Stahlwalzen sauber und ganz trocken
sind.
Achtung:
Wenn Sie einen anderen als den
Martin Yale Roller Cleaner verwen
-
den, können die Walzen eventuell
Schaden erleiden.
STÖRUNGSSUCHE
Wenn das Faltgerät nicht funktioniert und kein
Papierstau vorliegt, kann eventuell die Siche
-
rung die Stromzufuhr unterbrochen haben.
Ziehen Sie das Netzsteckerteil für ca. 1 Minute
aus der Steckdose. Sobald der Abkühlvorgang
abgeschlossen ist, ist das Papierfaltgerät wieder
einsatzbereit.
Vergessen Sie nicht zu prüfen, ob das Netzste
-
ckerteil an eine stromführende AC-Steckdose
angeschlossen ist.
Die Ursache eines ungleichmäßigen oder pro-
blematischen Faltens sind meistens schmutzige
oder verschmutzte Faltwalzen. Reinigen Sie die
Walzen wie unter Abschnitt AUSBAUANLEI-
TUNGEN beschrieben.
ENTSORGUNG
ENTSORGUNG DER MASCHINE:
Entsorgen Sie die Maschine am
Ende ihrer Lebensdauer stets um-
weltgerecht. Geben Sie keine Teile
der Maschine oder der Verpackung
in den Hausmüll.
SONDERZUBEHÖR
Benennung Best.-Nr.
Martin Yale Roller Cleaner 99977
Hinweis: Bei Nachbestellung von Sonderzubehörteilen und bei Ersatzteilbedarf wenden Sie sich
bitte an Ihren Fachhändler.
TECHNISCHE DATEN
Betrieb: Handzufuhr, Automatik EIN/AUS, 1800 Faltungen pro Stunde
Papiergrößen: Einstellbar für 2 Standardpapiergrößen; 8 1/2” X 11” passend in ei-
nen #10 Umschlag und ISO A4 Papier (210 x 297 mm) passend in
einen DL-Umschlag
Kapazität: 1–3 Blätter aus 16–24# Bondpapier.
Die Blätter können mit Klammern geheftet sein.
Spannungsversorgung: 1,2 Amp 24 Volt mit Netzsteckerteil
Abmessungen(BxTxH): 12 3/4“ Breite x 6“ Höhe x 5 1/2“ Tiefe
(326 mm Breite x 153 mm Höhe x 140 mm Tiefe)
Gewicht: 3,4 kg (7.5 lbs)

F100
4
DESKTOP FOLDER
GB
IMPORTANT SAFETY NOTES
Danger of injury! Keep all
loose articles of clothing,
ties, jewelery, long hair or
other loose objects away
from opening!
Danger of injury!
Never insert fingers into opening!
Danger of injury!
Do not spray and flammable liq-
uids or gases into the inlet open-
ing!
In case of danger switch the ma-
chine off with the mains switch, or
with the emergency switch, or un
-
plug the machine!
Always unplug the machine from
the mains power supply before
opening the machine!
«
«
«
«
«
The machine may not be operated
by more than one person at any
given time!
The machine was designed for safe
operation by “one person only”.
The machine is not a toy, and is
not suitable for use by children!
The overall technical safety concept
of this machine (dimensions, feed
openings, emergency shutdown de-
vices etc.) does not provide for any
guarantee regarding hazard-free op-
eration by children.
Repairs may only be performed by
trained personnel!
«
«
«
INITIATION
PAPER STOP ADJUSTMENT
Before beginning to fold, make sure the paper
stop (see Figure 1) is properly positioned for the
paper you are using.
When you view the bottom of the paper folder as
shown in Figure 1, the top pair of left and right
slots is for 8 1/2“ x 11“ paper.
The bottom pair of left and right slots is for
A4 paper.
If you need to change the position of the paper-
stop, remove it by gently flexing it in the middle
and with drawing one end first.
Then insert it into the other pair of slots by gen-
tly flexing the paper stop and inserting one end
first.
Figure 1
Figure 2 Figure 3
Dejamming handle
Paper stop
OPERATION
OPERATION
1. Carefully unwind the wall power supply and
firmly insert the appropriate end into the con
-
nector on the right side of the paperfolder.
2. Plug power supply into an appropriate outlet.
3. Insert up to three sheets of paper approxi
-
mately 1 1/2“ into the rear slot (labeled “IN”).
Hold paper so that it lies squarely in the nip
(pinch point) of the rollers underneath.
There will be a brief time delay, then the fold
-
er will automatically initiate the folding cycle.
Once the folding starts, the paper should be
released.
For accurate folds, hold your document at
the top center of the sheets, as shown in fig
-
ure 2.
Many users find that the folder functions best
when the paper is held very lightly allowing it
to square itself on the folding rollers.
4. Remove the folded paper from the front slot.
-
-
TIPS FOR BETTER OPERATION
1. Never put more than three sheets of paper
into the folder at one time.
2. Stapled pages may be used in the folder;
however, do not place sheets to be folded into
the folder with staples located at the fold po
-
sitions (1/3 of the distance from the top and
bottom of the sheet).
Stapled end of paper must enter machine
first.
3. To fold for a window envelope, insert paper
with the top up and facing the operator (see
Figure 3, fold letter in).
To fold for a business letter (writing facing in),
insert paper top up and writing facing away
from operator (see Figure 3, fold letter out).
fold letter in
fold letter out

F100
5
GB
DESKTOP FOLDER
MALFUNCTION
DISPOSING OF THE MACHINE:
Dispose of the machine in an envi
-
ronmentally sound fashion at the
end of its usefull service life. Do not
dispose of any of the parts included
in the machine or its packing with
household trash.
SPECIAL ACCESSOIRES
Description Order-No.
Martin Yale Roller Cleaner 99977
Note: For orders of special accessoires and spare parts, please contact your dealer.
TECHNICAL DATA
Operation: Manual feed, automatic on/off,1800 letter folds per hour
Paper Sizes: Adjustable for 2 standard paper sizes; 8 1/2” x 11” to fit a #10 enve-
lope and ISO A4 paper (210 x 297 mm)
Capacity: 1–3 sheets of 16-–24# bond paper.
Sheets may be stapled.
Power: 1,2 Amp 24 Volt wall pack power supply
Size: 12 3/4” W x 6” H x 5 1/1” D (326 mm W x 153 mm H x 140 mm D)
Weight: 7.5 lbs. (3.4 kg)
Figure 4
UNJAMMING INSTRUCTIONS
1. If paper becomes jammed, unplug the fold
-
er.
2. From the bottom of the folder, remove the pa-
per stop (see Figure 1) by gently flexing it in
the middle and with drawing one end first.
3. Also remove the dejamming handle by turn-
ing it in either direction while pulling gently.
4. Insert the dejamming handle through the hole
in the folder cover onto the D-shaped shaft
inside the unit (see Figure 4).
5. Turn the han-dle in either direction while care
-
fully pulling the paper out the top or bottom of
the folder.
If unable to clear the jam, see the DISAS-
SEMBLY INSTRUCTIONS below.
After the jam has been cleared, return the
dejamming handle and paper stop to their
normal positions. Plug in the folder.
DISASSEMBLY INSTRUCTIONS
Use this procedure to clear a difficult paper jam
or to clean the folding rollers.
1. Unplug the folder.
2. Remove the four screws from the bottom of
the folder and lift off cover. Return the folder
to its normal upright position.
3. To clear a paper jam, remove the plastic pa
-
per stop from the bottom of the folder (see
Figure 1). Turn the large pulley on the left side
in either direction while carefully pulling the
paper from the top or bottom of the folder.
4. To clean the rubber rollers, spray Martin Yale
Roller Cleaner on a clean, lint-free cloth and
rub the rollers to wipe them clean. Rotate the
rollers by turning the large pulley in either di
-
rection.
Repeat the process until the rubber and steel
rollers are clean and completely dry.
Note:
Use of a cleaner other than
Martin
Yale Roller Cleaner could damage
the rollers.
TROUBLESHOOTING
If the folder does not function and no paper jam
is present, the circuit breaker may have tripped.
Reset by unplugging the folder for at least
1 minute to allow circuit breaker to cool. Paper
folder should then function again.
Don’t forget to check that the folder is plugged
into a working AC outlet.
Inconsistent or otherwise problematic folding is
most often caused by dirty or contaminated fold-
ing rollers. Clean rollers as outlined in section
DISASSEMBLY INSTRUCTIONS.
Housing
„D“ shaft
Hole plug
WIRING SCHEMATIC
Infrared transmitter Infrared receicer
red
black
yellow
blue
blue
black
black
red
Circuit board
24 V.D.C.
24 V.D.C. Motor

F100
6
La machine ne doit pas être utili-
sée par plusieurs personnes en
même temps!
La conception des éléments de sécu
-
rité repose sur une mise en service
sans danger pour “L’utilisation de la
machine par une seule personne”.
La machine n’est pas un jouet et
ne convient pas pour être utilisée
par des enfants!
Le concept global de sécurité (di
-
mensions, orifices d‘alimentation,
mises hors circuit de sécurité, etc.)
de cette machine ne fournit aucune
garantie pour une manipulation sans
danger par les enfants.
Les travaux de réparation doivent
être effectués uniquement par un
spécialiste!
«
«
«
F
PLIEUSE POUR BURAUX
RECOMMANDATIONS IMPORTANTES DE SÉCURITÉ
Risque de blessure! N’ap-
prochez jamais du bloc
de coupe les vêtements
amples, colliers, cheveux
longs, cravates etc!
Risque de blessure!
N’introduisez jamais les doigts
dans l’ouverture!
Risque de blessure!
Ne pas asperger de liquides ou
de gaz inflammables dans l’orifice
d’entrée!
En cas de danger, arrêter la ma-
chine par l’interrupteur principal,
ou par l’interrupteur d’urgence, ou
débranchez la machine!
Débrancher le raccordement ré
-
seau avant d’ouvrir l’installation!
«
«
«
«
«
MISE EN MARCHE
AJUSTEMENT DE LA BUTÉE DES PAPIERS
Vérifier que la butée des papiers est bien ajus
-
tée (voir fig. 1) avant de procéder au pliage des
papiers.
En regardant la plieuse du bas comme le mon
-
tre fig. 1, la paire supérieure de fentes gauche
et droite sert pour des papiers 8½“ x 11“, tandis
que la paire inférieure de fentes gauche et droite
est prévue pour des papiers au format A4.
S‘il devient nécessaire de changer la position de
la butée, la retirer en la fléchissant légèrement
au milieu et en la retirant d‘abord d‘un côté.
Ensuite, l‘introduire dans l‘autre paire de fentes
en la fléchissant de nouveau légèrement et en
l‘introduisant d‘abord d‘un côté.
fig. 1
fig. 2 fig. 3
DERANGEMENT
FONCTIONNEMENT
1. Déballer prudemment le câble de raccorde-
ment au mur et le brancher dans le connec
-
teur sur la droite de la plieuse.
2. Brancher le câble de raccordement dans une
prise de courant appropriée.
3. Insérer jusqu‘à 3 feuilles de papier sur env.
1½“ dans la fente arrière (repérée „IN“). Te
-
nir le papier de sorte qu‘il repose à angles
droits dans la prise des rouleaux se trouvant
en dessous.
La plieuse commencera le pliage après un
certain moment. Lâcher le papier dès que le
pliage a commencé.
Pour assurer des pliages précis, tenir les
feuilles en haut au milieu tel que le montre
fig. 2.
Beaucoup d‘utilisateurs préfèrent tenir légè
-
rement le papier afin qu‘il se dresse lui-même
en entrant dans les rouleaux de pliage.
4. Retirer le papier plié de la fente avant.
-
-
INDICATIONS POUR FACILITER LE FONC
-
TIONNEMENT
1. Ne jamais introduire plus de trois feuilles
dans la plieuse.
2. La plieuse se prête au pliage de feuilles agra
-
fées à condition que les feuilles ne soient
pas introduites avec les agrafes aux endroits
du pliage (1/3 resp. du haut et du bas des
feuilles).
Introduire les papiers par leurs côtés agra
-
fés.
3. Pour le pliage d‘enveloppes à fenêtres, in-
troduire le papier la tête en haut et l‘écriture
donnant vers l‘utilisateur (voir fig. 3, Pliage
avec écriture à l’intérieur).
Pour les lettres commerciales (écriture à l‘in
-
térieur), introduire le papier la tête en haut et
l‘écriture du côté éloigné de l‘utilisateur (voir
fig. 3, Pliage avec écriture à l’extérieur).
Pliage avec écriture
à l’intérieur
Pliage avec écriture
à l’extérieur
Levier de décon-
gestion
Butée du papier

F100
7
F
PLIEUSE POUR BURAUX
ACCESSOIRES
Designation Ordre-No.
Martin Yale Roller Cleaner 99977
Notez: Pour les accessoires et pièces détachées, veuillez contacter votre agent.
ELIMINATION
ELIMINATION DE LA MACHINE:
En fin de vie, éliminez toujours la ma-
chine de façon conforme à l‘environ
-
nement. Ne jetez aucun composant
de la machine ou de son emballage
dans les ordures ménagères.
CARACTÉRISTIQUES TECHNIQUES
Fonctionnement: Alimentation manuelle, démarrage/arrêt automatique, 1.800 pliages
d’enveloppes par heure
Tailles du papier: Réglable pour 2 tailles standard: 8 1/2” x 11“ et format ISO A4
(210 x 297 mm) pour enveloppes DL
Capacité: 1–3 feuilles de papier 16-24# avec possibilité d‘agrafe des feuilles
Puissance: 24V / 1,2 A, prise murale
Taille: 12 3/4” x 6” x 5 1/2” (326 mm x 153 mm x 140,5 mm) (largeur/hau-
teur/profondeur)
Poids: 7,5 lbs. (3,45 kg)
fig. 4
INSTRUCTIONS DE DÉCONGESTION
1. En cas de congestion, débrancher la plieu
-
se.
2. Démonter la butée du papier du bas de la
plieuse (voir fig. 1) en la fléchissant légère-
ment au milieu et en la retirant d‘abord d‘un
côté.
3. De plus, démonter le levier de décongestion
en le tournant dans les deux sens et en le
tirant légèrement.
4. Emmancher le levier de décongestion à tra
-
vers l‘ouverture dans le capot de la plieuse
sur l‘arbre à section „D“ qui se trouve à l‘inté
-
rieur (voir fig. 4).
5 . Tourner le levier dans les deux sens et retirer
prudemment le papier par le haut ou le bas
de la plieuse.
Si la congestion persiste, voir les INSTRUC-
TIONS DE DÉSASSEMBLAGE en bas.
La décongestion une fois terminée, remettre
le levier de décongestion et la butée du pa
-
pier en place. Rebrancher la plieuse.
INSTRUCTIONS DE DÉSASSEMBLAGE
Procéder comme décrit par la suite pour éliminer
une congestion plus tenace ou pour nettoyer les
rouleaux de pliage.
1. Débrancher la plieuse.
2. Dévisser les quatre vis au bas de la plieuse et
retirer le recouvrement. Tourner la plieuse en
position normale.
3. Pour éliminer une congestion, démonter la
butée de papier en matière plastique au bas
de la plieuse (voir fig. 1). Tourner la grande
poulie sur la gauche dans les deux sens tout
en retirant prudemment le papier par le haut
ou le bas de la plieuse.
4. Pour le nettoyage des rouleaux en caout-
chouc, pulvériser du Martin Yale Roller
Cleaner sur un torchon propre et non effilo-
chant, et frotter les rouleaux jusqu‘à ce qu‘ils
soient propres.
Tourner les rouleaux en tournant la grande
poulie dans les deux sens.
Répéterce processus jusqu‘à ce que les rou
-
leaux en caoutchouc et en acier soient pro
-
pres et complètement secs.
Nota:
L‘utilisation d‘un produit autre
que le Produit de nettoyage et de
régénération de Martin Yale risque
d‘entraîner l‘endommagement des
rouleaux.
Transmetteur infrarouge Récepteur infrarouge
SCHÉMA DE CABLAGE
jaune
bleu
bleue
rouge
noir
rouge
noir
noir
24 V.D.C
Moteur 24 V.D.C
Circuit imprimé
RECHERCHE DES DÉFAUTS
Si la plieuse ne fonctionne pas sans qu‘il y ait
une congestion, le coupe-circuit pourrait avoir
réagi. Débrancher alors la plieuse pendant au
moins une minute afin que le coupe-circuit puis-
se refroidir. Maintenant, la plieuse devrait fonc-
tionner de nouveau.
Vérifier que la plieuse est branchée dans une
prise de courant CA sous tension.
Un pliage irrégulier ou présentant d‘autres ano-
malies provient pour la plupart du temps de la
salissure des rouleaux de pliage. Nettoyer les
rouleaux comme décrit sous
INSTRUCTIONS
DE DÉSASSEMBLAGE.
Boîtier
Arbre à sec
-
tion „D“
Bouchon

F100
8
¡El aparato no debe ser opera-
do por varias personas al mismo
tiempo!
La concepción de los elementos de
seguridad se basa en un manejo sin
peligro en un „servicio por una sola
persona“.
¡La máquina no es un juguete y
no
es apropiada para el empleo y uso
por parte de niños!
El concepto global en razón de la
seguridad (dimensiones, orificios
de alimentación, desconexiones de
seguridad, etc.) de esta máquina no
incluye ningún tipo de garantía en
cuanto a un manejo inofensivo por
parte de niños.
¡Las reparaciones solamente debe
efectuarlas un técnico especialis-
ta!
«
«
«
E
PLEGADORA DE SOBREMESA
INDICACIONES DE SEGURIDAD IMPORTANTES
¡Peligro de lesión! No acer-
car a la apertura de alimen-
tación piezas sueltas de
ropa, corbatas, bisutería,
cabello largo u otros obje-
tos sueltos!
¡Peligro de lesión!
No introducir los dedos en la aper
-
tura de alimentación!
¡Peligro de lesión!
¡No rociar líquidos de fácil com-
bustión ni gases en el orificio de
entrada!
¡En caso de emergencia desco
-
nectar el aparato usando el inte-
rruptor principal o el interruptor
de emergencia, o extraer la clavija
de red!
Antes de abrir el aparato hay que
extraer la clavija de red!
«
«
«
«
«
PUESTA EN SERVICIO
CÓMO AJUSTAREL TOPE DE PAPEL
Antes de comenzar a plegar hay que asegurarse
de que el tope de papel (ver Fig. 1) está coloca
-
do correctamente para el papel utilizado.
Si se mira el fondo de la plegadora de papel
como mostrado en la Fig. 1, el par superior de
las ranuras izquierda y derecha es para papel
de 8 1/2“ x 11“.
El par inferior de las ranuras izquierda y derecha
es para papel A4.
En el caso de que sea necesario modificar la
posición del tope de papel, se deberá retirar
doblándolo suavemente en el centro y elevando
primero un extremo.
A continuación, insertarlo en el otro par de ra-
nuras doblando con cuidado el tope de papel
y entrando primero un extremo.
Fig. 1
Manivela Para
Desatascar
Tope De Papel
MANEJO
FUNCIONAMIENTO
1. Desenrolle con cuidado el cable para el su-
ministro de corriente eléctrica e inserte firme
-
mente el extremo apropiado en el conectador
situado en el lado derecho de la plegadora de
papel.
2. Enchufe el cable de suministro de corriente
eléctrica en el tomacorriente adecuado.
3. Inserte hasta tres folios de papel de aproxi
-
madamente 1 1/2“ en la ranura trasera (mar
-
cada con „IN“). Sujete el papel de tal modo
que esté colocado recto en la ranura de en
-
trada (punto de sujeción) de los rodillos situa
-
dos debajo.
Después de transcurrir un breve retraso de
tiempo, la plegadora iniciará automática
-
mente el ciclo de plegado. Soltar el papel en
cuanto comience el plegado.
A fin de lograr un plegado preciso, mantenga
el documento por arriba y el centro, como se
muestra en la Fig. 2.
Según la experiencia de muchos usuarios, el
mejor método para un funcionamiento óptimo
de la máquina es sujetar el papel muy ligera-
mente y dejarlo que se encuadre el mismo en
los rodillos de plegado.
4. Retire el papel doblado que se encuentra en
la ranura frontal.
-
-
CONSEJOS PARA MEJORAR EL MODO DE
FUNCIONAMIENTO
1. No ponga nunca más de tres folios de papel
de una vez en la plegadora.
2. Se pueden utilizar pilas de hojas de papel
en la plegadora; sin embargo, no coloque los
folios por doblar en la plegadora con el api-
lamiento localizado en las posiciones de do
-
blado (1/3 de la distancia desde arriba hasta
abajo del folio).
El extremo apilado de papel deberá entrar
primero en la máquina.
3. A fin de plegar para un sobre con ventana,
inserte el papel con la parte superior pues-
ta arriba y frente al usuario (ver Fig. 3, Carta
Plegada Dentra).
A fin de plegar una carta comercial (par-
te escrita dentro), inserte la parte superior
del papel arriba y la parte escrita en el lado
opuesto al usuario (ver Fig. 3, Carta Plegada
Fuera).
Carta Plegada Dentra
Carta Plegada Fuera
Fig. 2 Fig. 3

F100
9
E
PLEGADORA DE SOBREMESA
ELIMINACIÓN
ELIMINACIÓN DE LOS RESIDUOS DE LA MÁ-
QUINA:
Elimine los residuos de la máquina
al final de su vida útil respetando
siempre las normas medioambienta
-
les. No tire partes de la máquina ni
el embalaje junto con la basura do
-
méstica.
ACCESSORIO ESPECIAL
Denominación N° de pedido
Martin Yale Roller Cleaner 99977
Inicación: En el caso de pedidos ulteriores de accesorios especiales y de piezas de re-
puesto, rogamos se dirija a nuestro representante oficial.
CARACTERISTICAS TECNICAS
Funcionamiento: avance manual, conexión / desconexión automática, 1800 plegados
de cartas por hora.
Tamaño de papel: ajustable para 2 tamaños estándar de papel; 8 1/2” x 11” para ajustar
en sobre de 10#, y papel según la OIE norma ISO A4 (210 x 297
mm) para ajustar en sobre tipo DL.
Capacidad: 1–3 folios de 16-24# de papel unido.
Los folios pueden estar apilados.
Corriente: 1,2 amperios 24 voltios de abastecimiento de corriente de pared
Dimensiones: 12 3/4“ W x 6“ H x 5 1/2“ D (326 mm ancho x 153 mm alto x 240 mm
profundo)
Cargo: 7,5 libras (3,4 kg.)
CÓMO DESATASCARLA MÁQUINA
1. Si el papel se atasca, desenchufe primero
la plegadora.
2. Retire entonces el tope de papel situado en
el fondo de la plegadora (ver Fig. 1) doblando
con cuidado en el centro y elevando primero
un extremo.
3. Retire igualmente la manivela para desatas-
car girándola en cualquier dirección mientras
se empuja suavemente.
4. Inserte la manivela para desatascar por el
orificio en la cubierta de la plegadora por en-
cima del eje en forma de D situado dentro de
la unidad (ver Fig. 4).
Fig. 4
5. Gire la manivela en la dirección deseada
mientras empuja con cuidado el papel hacia
fuera por arriba o por el fondo de la plegado
-
ra.
De no poder desatascar, lea por favor las si
-
guientes instrucciones para el desmontaje.
Una vez se haya eliminado el atasco, vuelva
a colocar en su sitio la manivela para des
-
atascar y el tope de papel. Enchufe la plega
-
dora.
CÓMO DESMONTAR LA PLEGADORA
Proceda como sigue para eliminar un atasco
difícil de papel o para limpiar los rodillos de ple-
gado:
1. Desenchufe la plegadora.
2. Retirar los cuatro tornillos colocados en el
fondo de la plegadora y desmontar la cubier
-
ta. Volver a colocar la plegadora en su posi-
ción correcta.
3. A fin de quitar el papel atascado, retire el
tope de plástico de papel situado en el fon-
do de la plegadora (ver Fig. 1). Gire la polea
grande en el lado izquierdo en la dirección
deseada mientras se empuja el papel con
cuidado hacia la parte superior o inferior de
la plegadora.
4. Para limpiar los rodillos de goma, aplique el
limpiador y Martin Yale Roller Cleaner con
un trapo limpio, sin hilachas y restriegue los
rodillos para limpiarlos.
Ruede los rodillos girando la polea grande en
la dirección deseada.
Repita el proceso hasta que la parte de goma
y los rodillos de acero estén completamente
limpios y secos.
Nota:
El uso de otro agente de limpieza
diferente al limpiador y rejuvene
-
cedor para rodillos de goma de la
casa Martin Yale podría dañarlos
rodillos.
CÓMO ELIMINAR PROBLEMAS
EN EL FUNCIONAMIENTO
Si la plegadora no funciona y no hay papel atas-
cado, el interruptor automático (o cortacircuito)
deberá ser disparado. Restablecer desenchu-
fando la plegadora por lo menos durante 1 mi-
nuto para permitir que se enfríe el interruptor
automático. Una vez hecho esto, la plegadora
de papel deberá volver a funcionar de nuevo.
No olvide comprobar que la plegadora esté en-
chufada a un tomacorriente de corriente alterna
que funciona.
Los rodillos de plegado sucios o contamina
-
dos causan a menudo un plegado no uniforme
o problemático. Limpie los rodillos como descrito
en la sección CÓMO DESMONTAR LA PLEGA-
DORA.
Transmisor infrarrojo Receptor infrarrojo
ESQUEMA DE CABLEADO
amarillo
azzul
azzul
rojo
rojo
negro
negro
negro
24 V.D.C
Motor de 24 V de corriente continua
Panel de
circuitos
Caja
Eje „D“
Tapón De
Orificio

F100
10
Abb. 1
Griff zum Beseitigen
des Papierstaus
Papieranschlag
Brieffaltung nach innen
Brieffaltung nach aussen
L‘apparecchio non deve essere
usato contemporaneamente da più
persone!
La disposizione degli elementi di si-
curezza si basa su un uso esente da
pericoli in „Funzionamento con un
solo operatore“.
Questa macchina non è un giocat
-
tolo e non è pertanto adatta all’uso
da parte di bambini!
La concezione di sicurezza della
macchina (dimensioni, aperture di
alimentazione, interdizioni di sicurez
-
za ecc.) non prevede una manipola-
zione sicura da parte dei bambini.
Eventuali riparazioni andranno
eseguite esclusivamente da per
-
sonale specializzato!
«
«
«
I
PIEGATRICE DA DESKTOP
IMPORTANTI ISTRUZIONI DI SICUREZZA
Pericolo di lesioni! Evitare
l‘avvicinamento alla bocca
d‘immission di parti di in-
dumenti, cravatte, monili,
capelli lunghi o altri ogget
-
ti sciolti!
Pericolo di lesioni!
Non avvicinarsi con le dita alla
bocca d‘immissione!
Pericolo di lesioni!
Non spruzzare liquidi o gas facil
-
mente infiammabili nell’apertura
d’entrata!
IIn casi di pericolo disinnestare la
macchina mediante l‘interruttore
principale, oppure tramite il pul-
sante d‘emergenza o staccando la
spina!
Innanzi l‘apertura della macchina
staccare la spina!
«
«
«
«
«
Fig. 3Fig. 2
manopola di
disinceppamento
arresto della carta
piegatura di lettere
verso l’interno
piegatura di lettere
verso l’esterno
MESSA IN FUNZIONE
REGOLAZIONE DELL’ARRESTO DELLA
CARTA
Prima di iniziare la piegatura, assicurarsi che
l’arresto della carta (vedi Fig. 1) sia regolato
in maniera adeguata per il formato di carta
utilizzato.
Se si osserva il fondo della piegatrice da desktop
si potrà notare che, come mostrato nella Fig. 1,
la coppia di fessure superiori, destra e sinistra, è
predisposta per carta in formato 8 1/2“ x 11“.
La coppia di fessure inferiori, destra è sinistra, è
invece adatta per carta di formato A4.
Se si rende necessario modificare la posizione
dell’arresto della carta, eseguire questa
operazione con cautela, piegando lievemente
l’arresto della carta al relativo centro e iniziando
a estrarlo da una estremità.
Successivamente inserire l’arresto della carta fra
l’altra coppia di fessure piegando nuovamente
l’arresto della carta con cautela e iniziando
l’inserimento da una estremità.
USO
FUNZIONAMENTO
1. Disimballare con attenzione il cavo di
alimentazione e inserire l’estremità
appropriata nel connettore situato sul lato
destro della piegatrice per carta.
2. Inserire il cavo di alimentazione in una presa
adatta.
3. Inserire un massimo di 3 fogli di carta nella
fessura posteriore (contrassegnata con la
scritta “IN”), finché i fogli non siano circa 1
1/2“ all’interno della piegatrice. Tenere la
carta in modo tale che essa venga pinzata
(punto di pinzatura) in maniera simmetrica
nei rulli posteriori.
Dopo un breve ritardo la piegatrice inizia
automaticamente il ciclo di piegatura. Non
appena la piegatura ha inizio, rilasciare la
carta.
- Per ottenere piegature accurate, mantenere
il foglio dal centro del margine superiore (vedi
Fig. 2).
- La piegatrice funziona meglio quando
si mantiene la carta con delicatezza
permettendole di regolarsi da sola sui rulli di
piegatura.
4. Prelevare la carta piegata dalla fessura
anteriore.
CONSIGLI PER UN FUNZIONAMENTO
OTTIMALE
1. Non inserire più di 3 fogli di carta alla volta
nella piegatrice.
2. È possibile piegare fogli uniti con graffette;
esse tuttavia non devono trovarsi nei punti
della piegatura (1/3 dalla parte superiore e
inferiore del foglio).
Il margine con la graffetta deve essere inserito
per primo.
3. Per piegare fogli per buste con finestra,
inserire il foglio di carta con il margine
superiore verso l’alto e con il testo che
apparirà nella finestra di fronte all’operatore
(piegatura di lettere verso l’interno, vedi Fig.
3).
Per le lettere commerciali (scritto all’interno),
inserire il foglio con il margine superiore
verso l’alto e il testo rivolto dalla parte
opposta all’operatore (piegatura di lettere
verso l’esterno, vedi Fig. 3).

F100
11
Gerät
D-Welle
Bohrung für
Welle
BLOCKSCHALTBILD
Infrarotsender Infrarotempfänger
rot
schwarz
gelb
blau
blau
schwarz
schwarz
rot
Gedruckte
Schaltung
24 V DC
24 V DC Motor
4. Per pulire i rulli di gomma, spruzzare il
detergente Martin Yale Roller Cleaner su un
panno pulito non sfilacciato e strofinare i rulli
per pulirli.
Ruotare i rulli facendo girare la grossa
puleggia in entrambe le direzioni.
Ripetere la procedura finché i rulli di gomma
e quelli di acciaio non siano completamente
puliti e asciutti.
Attenzione:
se si utilizza un detergente diverso
dal Martin Yale Roller Cleaner, i
rulli potrebbero subire dei danni.
PIEGATRICE DA DESKTOP
I
SMALTIMENTO DELLA MACCHINA:
Smaltire la macchina nel rispetto
dell’ambiente al termine della dura-
ta d‘utilizzo. Non gettare parti della
macchina o dell’imballaggio nei rifiuti
domestici.
SMALTIMENTO
ACCESSORI SPECIALI
Denominazione N. di matricola.
Martin Yale Roller Cleaner 99977
Nota: Per le ordinazioni di pezzi accessori speciali si prega di rivolgersi al proprio riven-
ditore specializzato.
DATI TECNICI
Fig. 4
macchina
albero a D
foro per
albero
SCHEMA A BLOCCHI
trasmettitore a infrarossi ricevitore a infrarossi
rosso
nero
giallo
blu
blu
nero
nero
rosso
circuito
stampato
24 V DC
motore da 24 V DC
Funzionamento: alimentazione manuale, spegnimento e accensione automatici, 1800
piegature all’ora.
Formato della carta: regolabile per 2 formati standard; carta 8 1/2” x 11” per buste #10 e
carta ISO A4 (210 x 297 mm) per buste DL.
Capacità: 1-3 fogli di carta bond 16-24#.
I fogli possono essere graffettati.
Alimentazione di tensione: 1,2 Amp 24 Volt con cavo di alimentazione.
Dimensioni (LxPxA): 12 3/4“ larghezza x 6“ altezza x 5 1/2“ profondità
(326 mm larghezza x 153 mm altezza x 140 mm profondità).
Peso: 3,4 kg (7.5 lb)
ISTRUZIONI PER IL DISINCEPPAMENTO
DELLA CARTA
1. In caso di carta inceppata estrarre il cavo di
rete dalla presa elettrica.
2. Rimuovere l’arresto della carta dal lato
inferiore della macchina (vedi Fig. 1)
piegandolo lievemente al centro e iniziando
a estrarlo da una estremità.
3. Rimuovere anche la manopola di
disinceppamento spostandola in entrambe le
direzioni e contemporaneamente tirando.
4. Infilare la manopola nell’albero a D presente
all’interno della macchina, facendola passare
attraverso l’apertura ricavata nel coperchio
(vedi Fig. 4).
5. Girare la manopola in entrambe le direzioni,
estraendo con delicatezza la carta dal lato
superiore o inferiore della piegatrice.
Qualora non si sia in grado di porre rimedio
all’inceppamento, vedere le
ISTRUZIONI
PER IL DISASSEMBLAGGIO
più in basso.
Una volta rimediato l’inceppamento,
ricollocare nella loro normale posizione la
manopola di disinceppamento e l’arresto
della carta. Reinserire il cavo di alimentazione
nella presa elettrica.
ISTRUZIONI PER IL DISASSEMBLAGGIO
Utilizzare questa procedura per rimuovere della
carta inceppata o per pulire i rulli di piegatura.
1. Estrarre il cavo di alimentazione dalla presa.
2. Svitare le quattro viti sul fondo della
piegatrice e rimuovere la copertura. Disporre
nuovamente la piegatrice nella sua normale
posizione verticale.
3. Per risolvere un problema di carta inceppata
estrarre l’arresto della carta in plastica dal
fondo della piegatrice (vedi Fig. 1). Girare la
grande puleggia sulla sinistra in entrambe le
direzioni e tirare al contempo con delicatezza
la carta dal lato superiore o inferiore della
macchina.
RICERCA DEGLI ERRORI
Se la piegatrice non funziona ma non si è in
presenza di un inceppamento della carta, per
sicurezza è bene interrompere l’alimentazione
elettrica. Estrarre il cavo di alimentazione dalla
presa per ca. 1 minuto. Dopo il raffreddamento
la piegatrice per carta sarà nuovamente
utilizzabile.
Ricordarsi sempre di verificare che il cavo di
alimentazione sia collegato a una presa AC sotto
corrente.
Una piegatura non corretta o problematica il
più delle volte è causata da rulli di piegatura
sporchi. Pulire i rulli come descritto nella sezione
ISTRUZIONI PER IL DISASSEMBLAGGIO
.

F100
12
CZ
STOLNÍ SKLÁDAČKA DOPISŮ
DŮLEŽITÁ BEZPEČNOSTNÍ UPOZORNĚNÍ
Nebezpečí poranění! Vol-
né části oděvu, krava
-
ty, šperky, dlouhé vlasy
nebo jiné volné předměty
musejí být udržovány v
bezpečné vzdálenosti od
přívodního otvoru!
Nebezpečí poranění!
Nestrkejte prsty do přívodního
otvoru!
Nebezpečí poranění!
Do otvoru nestříkat žádné snad
-
no zápalné kapaliny nebo plyny!
V případě nebezpečí vypněte
stroj hlavním vypínačem, nouzo
-
vým vypínačem nebo vytáhněte
síťovou zástrčku!
Před otevřením stroje vytáhněte
síťovou zástrčku!
«
«
«
«
«
Stroj nesmí být současně obslu-
hován více osobami!
Rozmístění bezpečnostních prvků je
dimenzováno pro bezpečnou obslu-
hu „jedním člověkem“.
Stroj není
žádná hračka a není
vhodný k tomu, aby ho používaly
děti!
Celková bezpečnostně technická
koncepce (rozměry, přívodní otvory,
bezpečnostní vypínání atd.) tohoto
stroje nezaručuje bezpečnou mani
-
pulaci od dětí.
Opravy smějí být prováděny pou
-
ze odborníkem!
«
«
«
UVEDENÍ DO PROVOZU
NASTAVENÍ DORAZU PAPÍRU
Před začátkem skládání se ujistěte o správném
nastavení dorazu papíru (viz. Obr. 1) v závislosti
na papíru, který skládáte.
Pokud se díváte na skládačku papíru zespo-
du, jak je ukázáno na Obr. 1, horní dvojice levé
a pravé štěrbiny je určena pro papír o rozměru
8 1/2“ x 11”.
Spodní dvojice levé a pravé štěrbiny je potom
pro papír velikosti A4.
Pokud chcete změnit polohu dorazu papíru, vy-
montujte jej tak, že lehce prohnete jeho střední
část a vysunete nejdříve jeden konec.
Poté jej pomocí mírného prohnutí vložíte za
-
sunutím nejprve jednoho konce do druhé dvo-
jice štěrbin.
Obr. 1
OBSLUHA
OBSLUHA
1. Opatrně odviňte kabel napájení a pevně
zasuňte správný konec do zásuvky na pravé
straně skládačky.
2. Napájecí kabel zapojte do vhodné zásuvky.
3. Do zadní štěrbiny (označené „IN“) zasuňte
maximálně 3 listy papíru přibližně do hloub-
ky 1 �“.
Držte papír tak, aby ležel kolmo v mezeře
válců (kde se dotýkají) vespod.
Po krátkém časovém zpoždění začne
skládačka automaticky proces skládání.
Jakmile začne skládání, měli byste papír
Klika pro uvolnění
zmačkaného papíru
Doraz papíru
Obr. 2 Obr. 3
uvolnit.
Pro správné složení, držte vaše dokumenty
v horní části uprostřed, jak je ukázáno na
Obr 2.
Mnoho uživatelů nalézá pro nejlepší
funkčnost skládačky jemné držení papírů
pro zachování kolmého směru na válce.
4. Složený papír vytáhněte z přední štěrbiny.
-
-
TIPY PRO LEPŠÍ OBSLUHU
1. Nikdy do skládačky nevkládejte současně
více než tři listy papíru.
2. Ve skládačce je možno použít sešité listy
papíru, ovšem nevkládejte do skládačky li
-
sty které jsou sešité v blízkosti skladů (v 1/3
od vrchu nebo spodu listu).
Do přístroje musíte nejprve zasunout sešitý
konec papírů.
3. Pro složení dokumentu do obálky s okén-
kem, vložte papír tak, aby popisek směřoval
k obsluze a horní částí vzhůru (viz. Obr 3,
Dopis složený dovnitř).
Pro složení obchodního dopisu (popsanou
částí dovnitř), vložte papír tak, aby popisek
směřoval od obluhy a horní částí vzhůru
(viz. Obr 3, Dopis složený vně).
Dopis složený vně
Dopis složený dovnitř

F100
13
CZ
STOLNÍ SKLÁDAČKA DOPISŮ
LIKVIDACE
LIKVIDACE STROJE:
Stroj na konci jeho životnosti lik
-
vidujte vždy s ohledem na životní
prostředí. Žádné díly stroje nebo ob-
alu nedávejte do domácího odpadu.
ZVLÁŠTNÍ PŘÍSLUŠENSTVÍ
Název Obj. čís.
Martin Yale Roller Cleaner 99977
Upozornění: Při dodatečném objednání dílů zvláštního příslušenství a potřebě náhradních dílů se
prosím obraťte na Vašeho odborného prodejce.
TECHNICKÉ ÚDAJE
Ovládání: Manuální vkládání, automatické zapnutí a vypnutí, skládá 1800
dopisů za hodinu.
Rozměry papírů: Nastavitelná pro dva standardní rozměry papíru: 8 1/2“ x 11” pro
obálku č. 10 a A4 ISO (210 x 297 mm) pro obálku DL.
Kapacita: 1–3 listy papíru č. 16–24.
Listy papíru mohou být sešité sešívačkou.
Napájení: Zdroj 24 V 1,2 A
Rozměry: 326 mm (Š) x 153 mm (V) x 140 mm (H)
Hmotnost: 3,4 kg
INSTRUKCE PRO UVOLNĚNÍ ZMAČKANÉHO
PAPÍRU
1. Pokud dojde ke zmačkání papíru,
odpojte
skládačku od sítě.
2. Ze spodní části skládačky vymontujte doraz
papíru tak, že lehce prohnete střední část
a vysunete nejdřív jeden konec (viz. Obr. 1).
3. Dále opatrným tahem v jednom směru
vysuňte kliku pro uvolnění zmačkaného
papíru.
4. Vsuňte rukojeť pro uvolnění zmačkaného
papíru skrz otvor v krytu skládačky do otvoru
ve tvaru D (viz. Obr. 4).
Obr. 4
5. Otáčejte klikou kterýmkoli směrem, až
úplně vytlačíte papír horní nebo spodní částí
skládačky.
Pokud není možné uvolnění zmačkaného
papíru, postupujte podle
POKYNY
K DEMONTÁŽI.
Jakmile je zmačkaný papír uvolněn, vraťte
kliku pro uvolnění zmačkaného papíru
a doraz papíru do obvyklých poloh. Zapojte
skládačku do zásuvky.
POKYNY K DEMONTÁŽI
Tento postup použijte pro vyčištění těžko od-
stranitelného zmačkaného papíru nebo pro
čištění gumových válců.
1. Vypojte skládačku ze zásuvky.
2. Ze spodní části skládačky vyšroubujte čtyři
šrouby. Otočte skládačku do normální polo-
hy.
3. Pro odstranění zmačkaného papíru sun-
dejte plastový doraz papíru ze spodní části
skládačky (viz. Obr. 1). Otáčejte velkou
kladkou na levé straně kterýmkoliv směrem,
zatímco opatrně táhnete papír ze spodní
nebo horní strany skládačky.
Kryt
“D”Otvor Pro
Rukojeť
Otvor V Kry
-
tu
4. Pro vyčištění gumových válců nastříkejte
přípravek Martin Yale Roller Cleaner na
čistou látku nepouštějící vlasy a otírejte vál
-
ce, dokud se nevyčistí. Válce otáčejte po
-
mocí velké kladky kterýmkoliv směrem.
Tento postup opakujte až jsou gumové válce
čisté a úplně suché.
Poznámka:
Použití jiného přípravku než
Mar-
tin Yale Roller Cleaner může vál
-
ce poškodit.
ODSTRAŇOVÁNÍ POTÍŽÍ
Pokud skládačka nefunguje a není v ní zmačkán
papír, může být rozpojen jistič. Znovu zapněte
jistič odpojením skládačky na minimálně 1 mi-
nutu, aby se jistič mohl vychladit. Poté by měla
skládačka opět začít fungovat.
Nezapomeňte zkontrolovat, zda je skládačka
připojena do funkční zásuvky.
Nejednotné nebo jinak problematické skládání
je většinou způsobeno znečištěnými skládacími
válci. Vyčistěte válce podle popisu v části PO-
KYNY K DEMONTÁŽI.
Infračervený vysílač Infračervený přijímač
SCHÉMA ZAPOJENÍ
Žlutý
Modrý
Modrý
Červený Černý
Červený
Černý
Černý
Jistič
24 V.D.C
Motor 24 V.D.C

F100
14

F100
15
Konformitätserklärung
Certifi cate of Conformity
Attestation de Conformité
Certifi cado de Conformidad
Bezeichnung der Maschine: Tischfaltgerät
Type of machine: Desktop Folder
Description de la machine: Plieuse pour Buraux
Descripcion de la máquina: Plegadora de Sobremesa
Modell / Model / Modèle / Modelo:
papermonster F100
Typ / Type / Type / Tipo: 395
Hiermit wird bestätigt, daß o. g. Gerät den Anforderungen der Maschinen-Richtlinie 98/37/EG sowie der EMV-
Richtlinie 2004/108/EG einschließlich allen bis heute veröffentlichten Änderungen bzw. Nachträgen entspricht. Das
o. g. Gerät entspricht folgenden Normen bzw. Richtlinien:
We do hereby certify that the above mentioned product meets the requirements set forth in EEC-Guidelines 98/37
and EMC directive 2004/108/EC including all changes and addendums to date thereto. The above mentioned product
meets the following standards and guidelines:
Nous Vous Confi rmons que l‘appareils cité ci-dessus correspond aux exigences des directives 98/37/CEE ainsi qu’
à la directive CEM 2004/108/CEE, ci-inclus toutes les modifi cations ainsi que tous les suppléments publiés jusqu’à
ce jour. L‘appareil mentionné correspond aux normes citées ci-après:
Confi rmamos que los productos arriba citados cumplen las exigencias de las directivas 98/37/CEE y las directivas
CEM 2004/108/CEE, incluidas todas las modifi caciones publicadas hasta la fecha. Los productos citados corres-
ponden con las siguientes normas:
EN 60950-1: 2001+A11
EG-Richtinie / EG-Guidelines / EG-Directives / EG-directivas, 87/308/EG
EN 61000-3-2: 2006
EN 61000-3-3: 1995+A1+A2
EN 55014-1: 2000+A1+A2
EN 55014-2: 1997+A1
Postfach / p.o.box 1420
D-88672 Markdorf / Germany
2009/08
ppa. K. Grundmann i. V. W. Madena
Leiter Technik Leiter Elektrik
Head of Technical Dpt. Head of Electrical Dpt.
Responsable Dép. Technique Responsable Dép. Electricité
Jefe del Departamento Técnico Jefe del Departamento Eléctrico

16
90177 1 11/09
Dieses Papier ist aus 100 % Altpapier ohne optische Aufheller hergestellt
This paper made from 100 % unbleached recycled paper
Papier recyclable à 100 %
International Network
Headquarters
USA MARTIN YALE GROUP ☏ +1 / 260 563-0641
251 Wedcor Avenue fax +1 / 260 563-4575
www.martinyale.com
Germany MARTIN YALE INTERNATIONAL GmbH
☏ +49 / (0) 7544 60-0
Bergheimer Straße 6-12 fax +49 / (0) 7544 60-248
www.martinyale.de, www.intimus.com
Branch Offices
South Africa MARTIN YALE Africa ☏ +27 / (0) 11 838 72 81
S & B House, 7 Loveday Street fax +27 / (0) 11 838 73 22
P. O. BOX 1291, Houghton 2041
www.martinyale.co.za
United Kingdom MARTIN YALE International
☏ +44 / (0) 1293 44 1900
Unit C 2 The Fleming Centre, Fleming Way fax +44 / (0) 1293 61 11 55
www.intimus.co.uk
France MARTIN YALE International S.A.R.L.
☏ +33 / (1) 70 00 69 00
40 Avenue Lingenfeld fax +33 / (1) 70 00 69 24
www.martinyale.fr
Spain MARTIN YALE Ibérica S.L.
☏ +34 / 9 02 22 31 31
C/Maestrat, n° 26 fax +34 / 9 02 22 31 32
Pol. Indus. Les Salines info@desmar.com
08880 Cubelles (Barcelona)
www.martinyale.es
Italy Martin Yale Italia srl
☏ +39 / 335 618 4924
Via A. Manzoni, 37 fax +39 / 039 689 3124
www.martinyale.it
Sweden MARTIN YALE Nordic
☏ +46 / 8 556 165 20
Rotebergsvägen 1 fax +46 / 8 748 02 85
www.martinyale.se
P.R. China MARTIN YALE Beijing
☏ +86 / (0) 10 84 47 10 70
Room 2003 D Building fax +86 / (0) 10 84 47 10 75
Chaoyang District, Beijing 100027
www.martinyale.com.cn
Transcripción de documentos
F100 Postfach / p.o.box 1420 D-88672 Markdorf / Germany Tel.: +49(0)7544/60-0 Fax: +49(0)7544/60-248 E-mail: [email protected] Internet: www.martinyale.de Typ/Type/Type/Tipo/Típus: 395 Vor der Inbetriebnahme die Bedienungsanleitung durchlesen! Before operating, please read the Operating Instructions! Veuillez lire le mode d’emploi avant la mise en service! Leer las instrucciones de uso antes de la puesta en servicio! Prima della messa in funzione leggere attentamente le istruzioni! Před uvedením do provozu si přečtěte návod k obsluze! Bedienungsanleitung Operating instructions Instructions d’opération Instrucciones de uso Istruzioni per l’uso Návod k obsluze (Seite 2-3) D (page 4-5) GB (page 6-7) F (página 8-9) E (pagina 10-11) I (strana 12-13) CZ TISCHFALTGERÄT D WICHTIGE SICHHEITSHINWEISE INBETRIEBNAHME « Das Gerät darf nicht von mehreren Personen gleichzeitig bedient werden! Die Auslegung der Sicherheitselemente beruhen auf einer gefahrlosen Bedienung im “Einmannbetrieb“. « Verletzungsgefahr! Lose Teile von Bekleidung, Krawatten, Schmuck, langes Haar, oder andere lose Gegenstände von der Einlaßöffnung fernhalten! « Die Maschine ist kein Spielzeug und für Einsatz und Benutzung durch Kinder nicht geeignet! Die sicherheitstechnische Gesamtkonzeption (Abmessungen, Zuführöffnungen, Sicherheitsabschaltungen etc.) dieser Maschine beinhaltet keinerlei Garantien einer gefahrlosen Handhabung durch Kinder. « Verletzungsgefahr! Nicht mit den Fingern in die Einlassöffnung fassen! « Verletzungsgefahr! Keine leicht entzündbare Flüssigkeiten oder Gase in die Einlassöffnung sprühen! « Im Gefahrenfalle die Maschine am Hauptschalter, oder NOT-AUSSchalter ausschalten, oder den Netzstecker ziehen! « Reparaturen dürfen nur von einem Fachmann durchgeführt werden! F100 « Vor dem Öffnen der Maschine Netzstecker ziehen! EINSTELLUNG DES PAPIERANSCHLAGS Bevor Sie mit dem Falten beginnen, müssen Sie sicherstellen, dass der Papieranschlag (siehe Abb. 1) für das verwendete Papier richtig eingestellt ist. Wenn Sie auf die Unterseite des Tischfaltgeräts sehen, wie in Abb. 1 gezeigt, ist das obere Paar der linken und rechten Schlitze für 8 1/2“ x 11“ Papier vorgesehen. Das untere Paar der linken und rechten Schlitze ist für A4 Papier vorgesehen. Wenn Sie die Stellung des Papieranschlags ändern müssen, nehmen Sie diesen vorsichtig ab, indem Sie ihn der Mitte leicht biegen und mit einem Ende zuerst herausziehen. Dann setzen Sie den Papieranschlag in das andere Schlitzpaar ein, indem Sie den Papieranschlag wieder vorsichtig biegen und mit einem Ende zuerst einsetzen. Griff zum Beseitigen des Papierstaus Papieranschlag Abb. 1 BEDIENUNG BETRIEB 1. Wickeln Sie das Kabel für die Stromversorgung vorsichtig vom Netzsteckerteil ab und stecken Sie das entsprechende Ende in den Anschluss auf der rechten Seite des Papierfalters. - Nach kurzer Verzögerungszeit beginnt das Faltgerät automatisch mit dem Faltzyklus. Sobald das Falten beginnt, muss das Papier losgelassen werden. Um genaue Faltungen zu erreichen, muss Ihr Dokument am oberen Ende der Blätter gehalten werden (siehe Abb. 2). Die beste Faltung wird erreicht, wenn man das Papier locker hält, so dass es sich selbst auf den Faltwalzen ausrichtet. 2. Stecken Sie das Netzsteckerteil in eine geeignete Steckdose. - 3. Stecken Sie bis zu 3 Blatt Papier etwa 1 1/2“ in den hinteren Schlitz (bezeichnet „IN“). Halten Sie das Papier, damit es quadratisch in die Klemmung (Klemmpunkt) der darunterliegenden Walzen kommt. 4. Entnehmen Sie das gefaltete Papier aus dem vorderen Schlitz. Brieffaltung nach innen Brieffaltung nach aussen Abb. 2 Abb. 3 2 TIPPS FÜR EINEN OPTIMALEN BETRIEB 1. Legen Sie nie mehr als 3 Papierblätter gleichzeitig in das Faltgerät. 2. Mit Klammern geheftete Seiten können in das Faltgerät eingegeben werden, achten Sie jedoch darauf, dass sich die Klammern nicht an den Faltpositionen befinden (im Abstand von 1/3 von oben und unten des Blattes). Das geheftete Ende des Blattes muss zuerst in das Gerät eingegeben werden. 3. Für das Falten von Papier für einen Fensterbriefumschlag muss das Papier mit der Kopfseite oben und Schriftseite zum Bedienenden eingegeben werden (Brieffaltung nach innen, siehe Abb. 3). Zum Falten eines Geschäftsbriefes (Schriftseite nach innen), muss das Papier mit der Kopfseite oben und Schriftseite weg vom Bedienenden eingegeben werden (Brieffaltung nach aussen, siehe Abb. 3). TISCHFALTGERÄT D ANWEISUNGEN ZUM BEHEBEN VON PAPIERSTAUS 1. Im Falle eines Papierstaus ziehen Sie das Netzsteckerteil aus der Steckdose heraus. 2. Entfernen Sie den Papieranschlag von der Unterseite des Geräts her (siehe Abb. 1), indem Sie diesen in der Mitte vorsichtig biegen und mit einem Ende zuerst herausziehen. F100 4. Zum Reinigen der Gummiwalze sprühen Sie Martin Yale Roller Cleaner auf ein sauberes, fusselfreies Tuch und reiben Sie damit die Walzen sauber. Drehen Sie die Walzen durch Hin- und Herdrehen der Riemenscheibe. Wiederholen Sie das Verfahren bis die Gummi- und Stahlwalzen sauber und ganz trocken sind. Achtung: 3. Entfernen Sie ebenfalls den Entstaugriff, indem Sie diesen hin und her bewegen während Sie vorsichtig ziehen. Wenn Sie einen anderen als den Martin Yale Roller Cleaner verwenden, können die Walzen eventuell Schaden erleiden. 4. Stecken Sie den Entstaugriff durch die Öffnung in der Geräteabdeckung in die D-förmige Welle innerhalb des Geräts (siehe Abb. 4). Gerät Infrarotsender STÖRUNGSSUCHE Wenn das Faltgerät nicht funktioniert und kein Papierstau vorliegt, kann eventuell die Sicherung die Stromzufuhr unterbrochen haben. Ziehen Sie das Netzsteckerteil für ca. 1 Minute aus der Steckdose. Sobald der Abkühlvorgang abgeschlossen ist, ist das Papierfaltgerät wieder einsatzbereit. Vergessen Sie nicht zu prüfen, ob das Netzsteckerteil an eine stromführende AC-Steckdose angeschlossen ist. Die Ursache eines ungleichmäßigen oder problematischen Faltens sind meistens schmutzige oder verschmutzte Faltwalzen. Reinigen Sie die Walzen wie unter Abschnitt AUSBAUANLEITUNGEN beschrieben. Infrarotempfänger BLOCKSCHALTBILD D-Welle Bohrung für Welle gelb blau rot schwarz 24 V DC Motor blau Gedruckte Schaltung 24 V DC rot schwarz schwarz Abb. 4 5. Drehen Sie den Griff in beide Richtungen und ziehen Sie vorsichtig das Papier nach oben oder nach unten heraus. Wenn der Papierstau nicht behoben werden kann, gehen Sie entsprechend den nachstehenden AUSBAUANLEITUNGEN vor. Nachdem der Papierstau behoben ist, stellen Sie den Griff für die Behebung des Papierstaus und den Papieranschlag in ihre normalen Positionen zurück. Stecken Sie das Netzsteckerteil wieder in die Steckdose. AUSBAUANLEITUNGEN Verwenden Sie diese Verfahren zur Behebung eines schwierigen Papierstaus oder zur Reinigung der Faltwalzen. ENTSORGUNG ENTSORGUNG DER MASCHINE: Entsorgen Sie die Maschine am Ende ihrer Lebensdauer stets umweltgerecht. Geben Sie keine Teile der Maschine oder der Verpackung in den Hausmüll. SONDERZUBEHÖR Benennung Best.-Nr. Martin Yale Roller Cleaner 99977 Hinweis: Bei Nachbestellung von Sonderzubehörteilen und bei Ersatzteilbedarf wenden Sie sich bitte an Ihren Fachhändler. 1. Ziehen Sie das Netzsteckerteil aus der Steckdose. 2. Entfernen Sie die vier Schrauben am Boden des Faltgeräts und nehmen Sie die Abdeckung ab. Stellen Sie das Faltgerät wieder in seine normale aufrechte Stellung. 3. Zum Beheben eines Papierstaus nehmen Sie den Papieranschlag aus Kunststoff vom Boden des Faltgeräts ab (siehe Abb. 1). Drehen Sie die große Riemenscheibe auf der linken Seite hin und her während Sie das Papier vorsichtig von der Ober- oder Unterseite des Geräts ziehen. TECHNISCHE DATEN Betrieb: Papiergrößen: Kapazität: Spannungsversorgung: Abmessungen(BxTxH): Gewicht: 3 Handzufuhr, Automatik EIN/AUS, 1800 Faltungen pro Stunde Einstellbar für 2 Standardpapiergrößen; 8 1/2” X 11” passend in einen #10 Umschlag und ISO A4 Papier (210 x 297 mm) passend in einen DL-Umschlag 1–3 Blätter aus 16–24# Bondpapier. Die Blätter können mit Klammern geheftet sein. 1,2 Amp 24 Volt mit Netzsteckerteil 12 3/4“ Breite x 6“ Höhe x 5 1/2“ Tiefe (326 mm Breite x 153 mm Höhe x 140 mm Tiefe) 3,4 kg (7.5 lbs) DESKTOP FOLDER GB IMPORTANT SAFETY NOTES F100 INITIATION « The machine may not be operated by more than one person at any given time! The machine was designed for safe operation by “one person only”. « Danger of injury! Keep all loose articles of clothing, ties, jewelery, long hair or other loose objects away from opening! PAPER STOP ADJUSTMENT Before beginning to fold, make sure the paper stop (see Figure 1) is properly positioned for the paper you are using. « The machine is not a toy, and is not suitable for use by children! The overall technical safety concept of this machine (dimensions, feed openings, emergency shutdown devices etc.) does not provide for any guarantee regarding hazard-free operation by children. « Danger of injury! Never insert fingers into opening! When you view the bottom of the paper folder as shown in Figure 1, the top pair of left and right slots is for 8 1/2“ x 11“ paper. « Repairs may only be performed by trained personnel! « In case of danger switch the machine off with the mains switch, or with the emergency switch, or unplug the machine! « Danger of injury! Do not spray and flammable liquids or gases into the inlet opening! The bottom pair of left and right slots is for A4 paper. If you need to change the position of the paperstop, remove it by gently flexing it in the middle and with drawing one end first. Then insert it into the other pair of slots by gently flexing the paper stop and inserting one end first. « Always unplug the machine from the mains power supply before opening the machine! Dejamming handle Paper stop Figure 1 OPERATION OPERATION 1. Carefully unwind the wall power supply and firmly insert the appropriate end into the connector on the right side of the paperfolder. 2. Plug power supply into an appropriate outlet. 3. Insert up to three sheets of paper approximately 1 1/2“ into the rear slot (labeled “IN”). Hold paper so that it lies squarely in the nip (pinch point) of the rollers underneath. There will be a brief time delay, then the folder will automatically initiate the folding cycle. Once the folding starts, the paper should be released. - For accurate folds, hold your document at the top center of the sheets, as shown in figure 2. Many users find that the folder functions best when the paper is held very lightly allowing it to square itself on the folding rollers. 4. Remove the folded paper from the front slot. 2. Stapled pages may be used in the folder; however, do not place sheets to be folded into the folder with staples located at the fold positions (1/3 of the distance from the top and bottom of the sheet). Stapled end of paper must enter machine first. 3. To fold for a window envelope, insert paper with the top up and facing the operator (see Figure 3, fold letter in). To fold for a business letter (writing facing in), insert paper top up and writing facing away from operator (see Figure 3, fold letter out). fold letter in fold letter out Figure 2 TIPS FOR BETTER OPERATION 1. Never put more than three sheets of paper into the folder at one time. Figure 3 4 DESKTOP FOLDER GB UNJAMMING INSTRUCTIONS 1. If paper becomes jammed, unplug the folder. 2. From the bottom of the folder, remove the paper stop (see Figure 1) by gently flexing it in the middle and with drawing one end first. F100 4. To clean the rubber rollers, spray Martin Yale Roller Cleaner on a clean, lint-free cloth and rub the rollers to wipe them clean. Rotate the rollers by turning the large pulley in either direction. Repeat the process until the rubber and steel rollers are clean and completely dry. 3. Also remove the dejamming handle by turning it in either direction while pulling gently. Don’t forget to check that the folder is plugged into a working AC outlet. Note: Use of a cleaner other than Martin Yale Roller Cleaner could damage the rollers. 4. Insert the dejamming handle through the hole in the folder cover onto the D-shaped shaft inside the unit (see Figure 4). Housing TROUBLESHOOTING If the folder does not function and no paper jam is present, the circuit breaker may have tripped. Reset by unplugging the folder for at least 1 minute to allow circuit breaker to cool. Paper folder should then function again. Infrared transmitter Inconsistent or otherwise problematic folding is most often caused by dirty or contaminated folding rollers. Clean rollers as outlined in section DISASSEMBLY INSTRUCTIONS. Infrared receicer WIRING SCHEMATIC „D“ shaft Hole plug yellow blue red black 24 V.D.C. Motor blue Circuit board 24 V.D.C. red black black Figure 4 5. Turn the han-dle in either direction while carefully pulling the paper out the top or bottom of the folder. If unable to clear the jam, see the DISASSEMBLY INSTRUCTIONS below. After the jam has been cleared, return the dejamming handle and paper stop to their normal positions. Plug in the folder. DISASSEMBLY INSTRUCTIONS Use this procedure to clear a difficult paper jam or to clean the folding rollers. 1. Unplug the folder. 2. Remove the four screws from the bottom of the folder and lift off cover. Return the folder to its normal upright position. 3. To clear a paper jam, remove the plastic paper stop from the bottom of the folder (see Figure 1). Turn the large pulley on the left side in either direction while carefully pulling the paper from the top or bottom of the folder. MALFUNCTION DISPOSING OF THE MACHINE: Dispose of the machine in an environmentally sound fashion at the end of its usefull service life. Do not dispose of any of the parts included in the machine or its packing with household trash. SPECIAL ACCESSOIRES Description Martin Yale Roller Cleaner Note: For orders of special accessoires and spare parts, please contact your dealer. Order-No. 99977 TECHNICAL DATA Operation: Paper Sizes: Manual feed, automatic on/off,1800 letter folds per hour Adjustable for 2 standard paper sizes; 8 1/2” x 11” to fit a #10 envelope and ISO A4 paper (210 x 297 mm) 1–3 sheets of 16-–24# bond paper. Sheets may be stapled. 1,2 Amp 24 Volt wall pack power supply 12 3/4” W x 6” H x 5 1/1” D (326 mm W x 153 mm H x 140 mm D) 7.5 lbs. (3.4 kg) Capacity: Power: Size: Weight: 5 PLIEUSE POUR BURAUX F RECOMMANDATIONS IMPORTANTES DE SÉCURITÉ « Risque de blessure! N’approchez jamais du bloc de coupe les vêtements amples, colliers, cheveux longs, cravates etc! « La machine ne doit pas être utilisée par plusieurs personnes en même temps! La conception des éléments de sécurité repose sur une mise en service sans danger pour “L’utilisation de la machine par une seule personne”. « Risque de blessure! N’introduisez jamais les doigts dans l’ouverture! « La machine n’est pas un jouet et ne convient pas pour être utilisée par des enfants! Le concept global de sécurité (dimensions, orifices d‘alimentation, mises hors circuit de sécurité, etc.) de cette machine ne fournit aucune garantie pour une manipulation sans danger par les enfants. « Risque de blessure! Ne pas asperger de liquides ou de gaz inflammables dans l’orifice d’entrée! « En cas de danger, arrêter la machine par l’interrupteur principal, ou par l’interrupteur d’urgence, ou débranchez la machine! « Les travaux de réparation doivent être effectués uniquement par un spécialiste! F100 MISE EN MARCHE AJUSTEMENT DE LA BUTÉE DES PAPIERS Vérifier que la butée des papiers est bien ajustée (voir fig. 1) avant de procéder au pliage des papiers. En regardant la plieuse du bas comme le montre fig. 1, la paire supérieure de fentes gauche et droite sert pour des papiers 8½“ x 11“, tandis que la paire inférieure de fentes gauche et droite est prévue pour des papiers au format A4. S‘il devient nécessaire de changer la position de la butée, la retirer en la fléchissant légèrement au milieu et en la retirant d‘abord d‘un côté. Ensuite, l‘introduire dans l‘autre paire de fentes en la fléchissant de nouveau légèrement et en l‘introduisant d‘abord d‘un côté. « Débrancher le raccordement réseau avant d’ouvrir l’installation! Levier de décongestion Butée du papier fig. 1 DERANGEMENT FONCTIONNEMENT 1. Déballer prudemment le câble de raccordement au mur et le brancher dans le connecteur sur la droite de la plieuse. 2. Brancher le câble de raccordement dans une prise de courant appropriée. 3. Insérer jusqu‘à 3 feuilles de papier sur env. 1½“ dans la fente arrière (repérée „IN“). Tenir le papier de sorte qu‘il repose à angles droits dans la prise des rouleaux se trouvant en dessous. La plieuse commencera le pliage après un certain moment. Lâcher le papier dès que le pliage a commencé. - Pour assurer des pliages précis, tenir les feuilles en haut au milieu tel que le montre fig. 2. Beaucoup d‘utilisateurs préfèrent tenir légèrement le papier afin qu‘il se dresse lui-même en entrant dans les rouleaux de pliage. 4. Retirer le papier plié de la fente avant. 2. La plieuse se prête au pliage de feuilles agrafées à condition que les feuilles ne soient pas introduites avec les agrafes aux endroits du pliage (1/3 resp. du haut et du bas des feuilles). Introduire les papiers par leurs côtés agrafés. 3. Pour le pliage d‘enveloppes à fenêtres, introduire le papier la tête en haut et l‘écriture donnant vers l‘utilisateur (voir fig. 3, Pliage avec écriture à l’intérieur). Pour les lettres commerciales (écriture à l‘intérieur), introduire le papier la tête en haut et l‘écriture du côté éloigné de l‘utilisateur (voir fig. 3, Pliage avec écriture à l’extérieur). Pliage avec écriture à l’intérieur Pliage avec écriture à l’extérieur fig. 2 INDICATIONS POUR FACILITER LE FONCTIONNEMENT 1. Ne jamais introduire plus de trois feuilles dans la plieuse. fig. 3 6 PLIEUSE POUR BURAUX F INSTRUCTIONS DE DÉCONGESTION 1. En cas de congestion, débrancher la plieuse. 2. Démonter la butée du papier du bas de la plieuse (voir fig. 1) en la fléchissant légèrement au milieu et en la retirant d‘abord d‘un côté. 3. De plus, démonter le levier de décongestion en le tournant dans les deux sens et en le tirant légèrement. F100 4. Pour le nettoyage des rouleaux en caoutchouc, pulvériser du Martin Yale Roller Cleaner sur un torchon propre et non effilochant, et frotter les rouleaux jusqu‘à ce qu‘ils soient propres. Tourner les rouleaux en tournant la grande poulie dans les deux sens. Répéterce processus jusqu‘à ce que les rouleaux en caoutchouc et en acier soient propres et complètement secs. Nota: 4. Emmancher le levier de décongestion à travers l‘ouverture dans le capot de la plieuse sur l‘arbre à section „D“ qui se trouve à l‘intérieur (voir fig. 4). L‘utilisation d‘un produit autre que le Produit de nettoyage et de régénération de Martin Yale risque d‘entraîner l‘endommagement des rouleaux. Boîtier Transmetteur infrarouge Arbre à section „D“ jaune Bouchon bleu RECHERCHE DES DÉFAUTS Si la plieuse ne fonctionne pas sans qu‘il y ait une congestion, le coupe-circuit pourrait avoir réagi. Débrancher alors la plieuse pendant au moins une minute afin que le coupe-circuit puisse refroidir. Maintenant, la plieuse devrait fonctionner de nouveau. Vérifier que la plieuse est branchée dans une prise de courant CA sous tension. Un pliage irrégulier ou présentant d‘autres anomalies provient pour la plupart du temps de la salissure des rouleaux de pliage. Nettoyer les rouleaux comme décrit sous INSTRUCTIONS DE DÉSASSEMBLAGE. Récepteur infrarouge rouge SCHÉMA DE CABLAGE noir Moteur 24 V.D.C bleue Circuit imprimé 24 V.D.C rouge noir noir fig. 4 5 . Tourner le levier dans les deux sens et retirer prudemment le papier par le haut ou le bas de la plieuse. Si la congestion persiste, voir les INSTRUCTIONS DE DÉSASSEMBLAGE en bas. La décongestion une fois terminée, remettre le levier de décongestion et la butée du papier en place. Rebrancher la plieuse. INSTRUCTIONS DE DÉSASSEMBLAGE Procéder comme décrit par la suite pour éliminer une congestion plus tenace ou pour nettoyer les rouleaux de pliage. ELIMINATION ELIMINATION DE LA MACHINE: En fin de vie, éliminez toujours la machine de façon conforme à l‘environnement. Ne jetez aucun composant de la machine ou de son emballage dans les ordures ménagères. ACCESSOIRES Designation Ordre-No. Martin Yale Roller Cleaner 99977 Notez: Pour les accessoires et pièces détachées, veuillez contacter votre agent. 1. Débrancher la plieuse. 2. Dévisser les quatre vis au bas de la plieuse et retirer le recouvrement. Tourner la plieuse en position normale. 3. Pour éliminer une congestion, démonter la butée de papier en matière plastique au bas de la plieuse (voir fig. 1). Tourner la grande poulie sur la gauche dans les deux sens tout en retirant prudemment le papier par le haut ou le bas de la plieuse. CARACTÉRISTIQUES TECHNIQUES Fonctionnement: Alimentation manuelle, démarrage/arrêt automatique, 1.800 pliages d’enveloppes par heure Réglable pour 2 tailles standard: 8 1/2” x 11“ et format ISO A4 (210 x 297 mm) pour enveloppes DL 1–3 feuilles de papier 16-24# avec possibilité d‘agrafe des feuilles 24V / 1,2 A, prise murale 12 3/4” x 6” x 5 1/2” (326 mm x 153 mm x 140,5 mm) (largeur/hauteur/profondeur) 7,5 lbs. (3,45 kg) Tailles du papier: Capacité: Puissance: Taille: Poids: 7 PLEGADORA DE SOBREMESA E INDICACIONES DE SEGURIDAD IMPORTANTES « ¡El aparato no debe ser operado por varias personas al mismo tiempo! La concepción de los elementos de seguridad se basa en un manejo sin peligro en un „servicio por una sola persona“. « ¡Peligro de lesión! No acercar a la apertura de alimentación piezas sueltas de ropa, corbatas, bisutería, cabello largo u otros objetos sueltos! « ¡Peligro de lesión! No introducir los dedos en la apertura de alimentación! « ¡La máquina no es un juguete y no es apropiada para el empleo y uso por parte de niños! El concepto global en razón de la seguridad (dimensiones, orificios de alimentación, desconexiones de seguridad, etc.) de esta máquina no incluye ningún tipo de garantía en cuanto a un manejo inofensivo por parte de niños. « ¡Peligro de lesión! ¡No rociar líquidos de fácil combustión ni gases en el orificio de entrada! « ¡En caso de emergencia desconectar el aparato usando el interruptor principal o el interruptor de emergencia, o extraer la clavija de red! « ¡Las reparaciones solamente debe efectuarlas un técnico especialista! F100 PUESTA EN SERVICIO CÓMO AJUSTAREL TOPE DE PAPEL Antes de comenzar a plegar hay que asegurarse de que el tope de papel (ver Fig. 1) está colocado correctamente para el papel utilizado. Si se mira el fondo de la plegadora de papel como mostrado en la Fig. 1, el par superior de las ranuras izquierda y derecha es para papel de 8 1/2“ x 11“. El par inferior de las ranuras izquierda y derecha es para papel A4. En el caso de que sea necesario modificar la posición del tope de papel, se deberá retirar doblándolo suavemente en el centro y elevando primero un extremo. A continuación, insertarlo en el otro par de ranuras doblando con cuidado el tope de papel y entrando primero un extremo. « Antes de abrir el aparato hay que extraer la clavija de red! Manivela Para Desatascar Tope De Papel Fig. 1 MANEJO FUNCIONAMIENTO 1. Desenrolle con cuidado el cable para el suministro de corriente eléctrica e inserte firmemente el extremo apropiado en el conectador situado en el lado derecho de la plegadora de papel. - Después de transcurrir un breve retraso de tiempo, la plegadora iniciará automáticamente el ciclo de plegado. Soltar el papel en cuanto comience el plegado. CONSEJOS PARA MEJORAR EL MODO DE FUNCIONAMIENTO 1. No ponga nunca más de tres folios de papel de una vez en la plegadora. 2. Enchufe el cable de suministro de corriente eléctrica en el tomacorriente adecuado. - 3. Inserte hasta tres folios de papel de aproximadamente 1 1/2“ en la ranura trasera (marcada con „IN“). Sujete el papel de tal modo que esté colocado recto en la ranura de entrada (punto de sujeción) de los rodillos situados debajo. A fin de lograr un plegado preciso, mantenga el documento por arriba y el centro, como se muestra en la Fig. 2. Según la experiencia de muchos usuarios, el mejor método para un funcionamiento óptimo de la máquina es sujetar el papel muy ligeramente y dejarlo que se encuadre el mismo en los rodillos de plegado. 2. Se pueden utilizar pilas de hojas de papel en la plegadora; sin embargo, no coloque los folios por doblar en la plegadora con el apilamiento localizado en las posiciones de doblado (1/3 de la distancia desde arriba hasta abajo del folio). El extremo apilado de papel deberá entrar primero en la máquina. 4. Retire el papel doblado que se encuentra en la ranura frontal. 3. A fin de plegar para un sobre con ventana, inserte el papel con la parte superior puesta arriba y frente al usuario (ver Fig. 3, Carta Plegada Dentra). A fin de plegar una carta comercial (parte escrita dentro), inserte la parte superior del papel arriba y la parte escrita en el lado opuesto al usuario (ver Fig. 3, Carta Plegada Fuera). Carta Plegada Dentra Carta Plegada Fuera Fig. 2 Fig. 3 8 PLEGADORA DE SOBREMESA E CÓMO DESATASCARLA MÁQUINA 1. Si el papel se atasca, desenchufe primero la plegadora. 2. Retire entonces el tope de papel situado en el fondo de la plegadora (ver Fig. 1) doblando con cuidado en el centro y elevando primero un extremo. 3. Retire igualmente la manivela para desatascar girándola en cualquier dirección mientras se empuja suavemente. 4. Para limpiar los rodillos de goma, aplique el limpiador y Martin Yale Roller Cleaner con un trapo limpio, sin hilachas y restriegue los rodillos para limpiarlos. Ruede los rodillos girando la polea grande en la dirección deseada. Repita el proceso hasta que la parte de goma y los rodillos de acero estén completamente limpios y secos. Nota: El uso de otro agente de limpieza diferente al limpiador y rejuvenecedor para rodillos de goma de la casa Martin Yale podría dañarlos rodillos. 4. Inserte la manivela para desatascar por el orificio en la cubierta de la plegadora por encima del eje en forma de D situado dentro de la unidad (ver Fig. 4). Caja Transmisor infrarrojo F100 CÓMO ELIMINAR PROBLEMAS EN EL FUNCIONAMIENTO Si la plegadora no funciona y no hay papel atascado, el interruptor automático (o cortacircuito) deberá ser disparado. Restablecer desenchufando la plegadora por lo menos durante 1 minuto para permitir que se enfríe el interruptor automático. Una vez hecho esto, la plegadora de papel deberá volver a funcionar de nuevo. No olvide comprobar que la plegadora esté enchufada a un tomacorriente de corriente alterna que funciona. Los rodillos de plegado sucios o contaminados causan a menudo un plegado no uniforme o problemático. Limpie los rodillos como descrito en la sección CÓMO DESMONTAR LA PLEGADORA. Receptor infrarrojo ESQUEMA DE CABLEADO Eje „D“ Tapón De Orificio amarillo azzul rojo negro Motor de 24 V de corriente continua azzul Panel de circuitos 24 V.D.C rojo negro negro Fig. 4 5. Gire la manivela en la dirección deseada mientras empuja con cuidado el papel hacia fuera por arriba o por el fondo de la plegadora. De no poder desatascar, lea por favor las siguientes instrucciones para el desmontaje. Una vez se haya eliminado el atasco, vuelva a colocar en su sitio la manivela para desatascar y el tope de papel. Enchufe la plegadora. CÓMO DESMONTAR LA PLEGADORA Proceda como sigue para eliminar un atasco difícil de papel o para limpiar los rodillos de plegado: 1. Desenchufe la plegadora. 2. Retirar los cuatro tornillos colocados en el fondo de la plegadora y desmontar la cubierta. Volver a colocar la plegadora en su posición correcta. 3. A fin de quitar el papel atascado, retire el tope de plástico de papel situado en el fondo de la plegadora (ver Fig. 1). Gire la polea grande en el lado izquierdo en la dirección deseada mientras se empuja el papel con cuidado hacia la parte superior o inferior de la plegadora. ELIMINACIÓN ELIMINACIÓN DE LOS RESIDUOS DE LA MÁQUINA: Elimine los residuos de la máquina al final de su vida útil respetando siempre las normas medioambientales. No tire partes de la máquina ni el embalaje junto con la basura doméstica. ACCESSORIO ESPECIAL Denominación N° de pedido Martin Yale Roller Cleaner 99977 Inicación: En el caso de pedidos ulteriores de accesorios especiales y de piezas de repuesto, rogamos se dirija a nuestro representante oficial. CARACTERISTICAS TECNICAS Funcionamiento: avance manual, conexión / desconexión automática, 1800 plegados de cartas por hora. ajustable para 2 tamaños estándar de papel; 8 1/2” x 11” para ajustar en sobre de 10#, y papel según la OIE norma ISO A4 (210 x 297 mm) para ajustar en sobre tipo DL. 1–3 folios de 16-24# de papel unido. Los folios pueden estar apilados. 1,2 amperios 24 voltios de abastecimiento de corriente de pared 12 3/4“ W x 6“ H x 5 1/2“ D (326 mm ancho x 153 mm alto x 240 mm profundo) 7,5 libras (3,4 kg.) Tamaño de papel: Capacidad: Corriente: Dimensiones: Cargo: 9 PIEGATRICE DA DESKTOP I IMPORTANTI ISTRUZIONI DI SICUREZZA « L‘apparecchio non deve essere usato contemporaneamente da più persone! La disposizione degli elementi di sicurezza si basa su un uso esente da pericoli in „Funzionamento con un solo operatore“. « Questa macchina non è un giocattolo e non è pertanto adatta all’uso da parte di bambini! La concezione di sicurezza della macchina (dimensioni, aperture di alimentazione, interdizioni di sicurezza ecc.) non prevede una manipolazione sicura da parte dei bambini. MESSA IN FUNZIONE « Pericolo di lesioni! Evitare l‘avvicinamento alla bocca d‘immission di parti di indumenti, cravatte, monili, capelli lunghi o altri oggetti sciolti! REGOLAZIONE DELL’ARRESTO DELLA CARTA Prima di iniziare la piegatura, assicurarsi che l’arresto della carta (vedi Fig. 1) sia regolato in maniera adeguata per il formato di carta utilizzato. « Pericolo di lesioni! Non avvicinarsi con le dita alla bocca d‘immissione! Se si osserva il fondo della piegatrice da desktop si potrà notare che, come mostrato nella Fig. 1, la coppia di fessure superiori, destra e sinistra, è predisposta per carta in formato 8 1/2“ x 11“. « Pericolo di lesioni! Non spruzzare liquidi o gas facilmente infiammabili nell’apertura d’entrata! La coppia di fessure inferiori, destra è sinistra, è invece adatta per carta di formato A4. « IIn casi di pericolo disinnestare la macchina mediante l‘interruttore principale, oppure tramite il pulsante d‘emergenza o staccando la spina! « Eventuali riparazioni andranno eseguite esclusivamente da personale specializzato! F100 « Innanzi l‘apertura della macchina staccare la spina! Se si rende necessario modificare la posizione dell’arresto della carta, eseguire questa operazione con cautela, piegando lievemente l’arresto della carta al relativo centro e iniziando a estrarlo da una estremità. Successivamente inserire l’arresto della carta fra l’altra coppia di fessure piegando nuovamente l’arresto della carta con cautela e iniziando l’inserimento da una estremità. Griff zum Beseitigen des Papierstaus manopola di disinceppamento arresto della carta Papieranschlag Abb. 1 USO FUNZIONAMENTO 1. Disimballare con attenzione il cavo di alimentazione e inserire l’estremità appropriata nel connettore situato sul lato destro della piegatrice per carta. - 2. Inserire il cavo di alimentazione in una presa adatta. - 3. Inserire un massimo di 3 fogli di carta nella fessura posteriore (contrassegnata con la scritta “IN”), finché i fogli non siano circa 1 1/2“ all’interno della piegatrice. Tenere la carta in modo tale che essa venga pinzata (punto di pinzatura) in maniera simmetrica nei rulli posteriori. Dopo un breve ritardo la piegatrice inizia automaticamente il ciclo di piegatura. Non appena la piegatura ha inizio, rilasciare la carta. Per ottenere piegature accurate, mantenere il foglio dal centro del margine superiore (vedi Fig. 2). La piegatrice funziona meglio quando si mantiene la carta con delicatezza permettendole di regolarsi da sola sui rulli di piegatura. 4. Prelevare la carta piegata dalla fessura anteriore. piegatura di nach lettereinnen Brieffaltung verso l’interno piegatura lettere Brieffaltung nachdiaussen verso l’esterno Fig. 2 Fig. 3 10 CONSIGLI PER UN FUNZIONAMENTO OTTIMALE 1. Non inserire più di 3 fogli di carta alla volta nella piegatrice. 2. È possibile piegare fogli uniti con graffette; esse tuttavia non devono trovarsi nei punti della piegatura (1/3 dalla parte superiore e inferiore del foglio). Il margine con la graffetta deve essere inserito per primo. 3. Per piegare fogli per buste con finestra, inserire il foglio di carta con il margine superiore verso l’alto e con il testo che apparirà nella finestra di fronte all’operatore (piegatura di lettere verso l’interno, vedi Fig. 3). Per le lettere commerciali (scritto all’interno), inserire il foglio con il margine superiore verso l’alto e il testo rivolto dalla parte opposta all’operatore (piegatura di lettere verso l’esterno, vedi Fig. 3). PIEGATRICE DA DESKTOP I ISTRUZIONI PER IL DISINCEPPAMENTO DELLA CARTA 1. In caso di carta inceppata estrarre il cavo di rete dalla presa elettrica. 2. Rimuovere l’arresto della carta dal lato inferiore della macchina (vedi Fig. 1) piegandolo lievemente al centro e iniziando a estrarlo da una estremità. F100 4. Per pulire i rulli di gomma, spruzzare il detergente Martin Yale Roller Cleaner su un panno pulito non sfilacciato e strofinare i rulli per pulirli. Ruotare i rulli facendo girare la grossa puleggia in entrambe le direzioni. Ripetere la procedura finché i rulli di gomma e quelli di acciaio non siano completamente puliti e asciutti. 3. Rimuovere anche la manopola di disinceppamento spostandola in entrambe le direzioni e contemporaneamente tirando. Attenzione: se si utilizza un detergente diverso dal Martin Yale Roller Cleaner, i rulli potrebbero subire dei danni. 4. Infilare la manopola nell’albero a D presente all’interno della macchina, facendola passare attraverso l’apertura ricavata nel coperchio (vedi Fig. 4). macchina Gerät trasmettitore a infrarossi Infrarotsender albero a D D-Welle Bohrung für foro per Welle albero giallo gelb RICERCA DEGLI ERRORI Se la piegatrice non funziona ma non si è in presenza di un inceppamento della carta, per sicurezza è bene interrompere l’alimentazione elettrica. Estrarre il cavo di alimentazione dalla presa per ca. 1 minuto. Dopo il raffreddamento la piegatrice per carta sarà nuovamente utilizzabile. Ricordarsi sempre di verificare che il cavo di alimentazione sia collegato a una presa AC sotto corrente. Una piegatura non corretta o problematica il più delle volte è causata da rulli di piegatura sporchi. Pulire i rulli come descritto nella sezione ISTRUZIONI PER IL DISASSEMBLAGGIO. ricevitore a infrarossi Infrarotempfänger blu blau rosso rot SCHEMA A BLOCCHI BLOCKSCHALTBILD nero schwarz motore da 24 V DC 24 V DC Motor blu blau circuito Gedruckte stampato Schaltung 24 V DC rosso rot nero schwarz nero schwarz Fig. 4 SMALTIMENTO 5. Girare la manopola in entrambe le direzioni, estraendo con delicatezza la carta dal lato superiore o inferiore della piegatrice. Qualora non si sia in grado di porre rimedio all’inceppamento, vedere le ISTRUZIONI PER IL DISASSEMBLAGGIO più in basso. Una volta rimediato l’inceppamento, ricollocare nella loro normale posizione la manopola di disinceppamento e l’arresto della carta. Reinserire il cavo di alimentazione nella presa elettrica. ISTRUZIONI PER IL DISASSEMBLAGGIO Utilizzare questa procedura per rimuovere della carta inceppata o per pulire i rulli di piegatura. 1. Estrarre il cavo di alimentazione dalla presa. 2. Svitare le quattro viti sul fondo della piegatrice e rimuovere la copertura. Disporre nuovamente la piegatrice nella sua normale posizione verticale. 3. Per risolvere un problema di carta inceppata estrarre l’arresto della carta in plastica dal fondo della piegatrice (vedi Fig. 1). Girare la grande puleggia sulla sinistra in entrambe le direzioni e tirare al contempo con delicatezza la carta dal lato superiore o inferiore della macchina. SMALTIMENTO DELLA MACCHINA: Smaltire la macchina nel rispetto dell’ambiente al termine della durata d‘utilizzo. Non gettare parti della macchina o dell’imballaggio nei rifiuti domestici. ACCESSORI SPECIALI Denominazione Martin Yale Roller Cleaner N. di matricola. 99977 Nota: Per le ordinazioni di pezzi accessori speciali si prega di rivolgersi al proprio rivenditore specializzato. DATI TECNICI Funzionamento: Formato della carta: Capacità: Alimentazione di tensione: Dimensioni (LxPxA): Peso: 11 alimentazione manuale, spegnimento e accensione automatici, 1800 piegature all’ora. regolabile per 2 formati standard; carta 8 1/2” x 11” per buste #10 e carta ISO A4 (210 x 297 mm) per buste DL. 1-3 fogli di carta bond 16-24#. I fogli possono essere graffettati. 1,2 Amp 24 Volt con cavo di alimentazione. 12 3/4“ larghezza x 6“ altezza x 5 1/2“ profondità (326 mm larghezza x 153 mm altezza x 140 mm profondità). 3,4 kg (7.5 lb) STOLNÍ SKLÁDAČKA DOPISŮ CZ DŮLEŽITÁ BEZPEČNOSTNÍ UPOZORNĚNÍ « Stroj nesmí být současně obsluhován více osobami! Rozmístění bezpečnostních prvků je dimenzováno pro bezpečnou obsluhu „jedním člověkem“. « Nebezpečí poranění! Volné části oděvu, kravaty, šperky, dlouhé vlasy nebo jiné volné předměty musejí být udržovány v bezpečné vzdálenosti od přívodního otvoru! « Stroj není žádná hračka a není vhodný k tomu, aby ho používaly děti! Celková bezpečnostně technická koncepce (rozměry, přívodní otvory, bezpečnostní vypínání atd.) tohoto stroje nezaručuje bezpečnou manipulaci od dětí. « Nebezpečí poranění! Nestrkejte prsty do přívodního otvoru! « Nebezpečí poranění! Do otvoru nestříkat žádné snadno zápalné kapaliny nebo plyny! « Opravy smějí být prováděny pouze odborníkem! « V případě nebezpečí vypněte stroj hlavním vypínačem, nouzovým vypínačem nebo vytáhněte síťovou zástrčku! F100 UVEDENÍ DO PROVOZU NASTAVENÍ DORAZU PAPÍRU Před začátkem skládání se ujistěte o správném nastavení dorazu papíru (viz. Obr. 1) v závislosti na papíru, který skládáte. Pokud se díváte na skládačku papíru zespodu, jak je ukázáno na Obr. 1, horní dvojice levé a pravé štěrbiny je určena pro papír o rozměru 8 1/2“ x 11”. Spodní dvojice levé a pravé štěrbiny je potom pro papír velikosti A4. Pokud chcete změnit polohu dorazu papíru, vymontujte jej tak, že lehce prohnete jeho střední část a vysunete nejdříve jeden konec. Poté jej pomocí mírného prohnutí vložíte zasunutím nejprve jednoho konce do druhé dvojice štěrbin. « Před otevřením stroje vytáhněte síťovou zástrčku! Klika pro uvolnění zmačkaného papíru Doraz papíru Obr. 1 OBSLUHA OBSLUHA 1. Opatrně odviňte kabel napájení a pevně zasuňte správný konec do zásuvky na pravé straně skládačky. 2. Napájecí kabel zapojte do vhodné zásuvky. 3. Do zadní štěrbiny (označené „IN“) zasuňte maximálně 3 listy papíru přibližně do hloubky 1 �“. Držte papír tak, aby ležel kolmo v mezeře válců (kde se dotýkají) vespod. Po krátkém časovém zpoždění začne skládačka automaticky proces skládání. Jakmile začne skládání, měli byste papír - uvolnit. Pro správné složení, držte vaše dokumenty v horní části uprostřed, jak je ukázáno na Obr 2. Mnoho uživatelů nalézá pro nejlepší funkčnost skládačky jemné držení papírů pro zachování kolmého směru na válce. 4. Složený papír vytáhněte z přední štěrbiny. 2. Ve skládačce je možno použít sešité listy papíru, ovšem nevkládejte do skládačky listy které jsou sešité v blízkosti skladů (v 1/3 od vrchu nebo spodu listu). Do přístroje musíte nejprve zasunout sešitý konec papírů. 3. Pro složení dokumentu do obálky s okénkem, vložte papír tak, aby popisek směřoval k obsluze a horní částí vzhůru (viz. Obr 3, Dopis složený dovnitř). Pro složení obchodního dopisu (popsanou částí dovnitř), vložte papír tak, aby popisek směřoval od obluhy a horní částí vzhůru (viz. Obr 3, Dopis složený vně). Dopis složený dovnitř Dopis složený vně Obr. 2 TIPY PRO LEPŠÍ OBSLUHU 1. Nikdy do skládačky nevkládejte současně více než tři listy papíru. Obr. 3 12 STOLNÍ SKLÁDAČKA DOPISŮ CZ INSTRUKCE PRO UVOLNĚNÍ ZMAČKANÉHO PAPÍRU 1. Pokud dojde ke zmačkání papíru, odpojte skládačku od sítě. 2. Ze spodní části skládačky vymontujte doraz papíru tak, že lehce prohnete střední část a vysunete nejdřív jeden konec (viz. Obr. 1). F100 4. Pro vyčištění gumových válců nastříkejte přípravek Martin Yale Roller Cleaner na čistou látku nepouštějící vlasy a otírejte válce, dokud se nevyčistí. Válce otáčejte pomocí velké kladky kterýmkoliv směrem. Tento postup opakujte až jsou gumové válce čisté a úplně suché. Nezapomeňte zkontrolovat, zda je skládačka připojena do funkční zásuvky. Poznámka: 3. Dále opatrným tahem v jednom směru vysuňte kliku pro uvolnění zmačkaného papíru. Použití jiného přípravku než Martin Yale Roller Cleaner může válce poškodit. 4. Vsuňte rukojeť pro uvolnění zmačkaného papíru skrz otvor v krytu skládačky do otvoru ve tvaru D (viz. Obr. 4). Kryt Infračervený vysílač “D”Otvor Pro Rukojeť Nejednotné nebo jinak problematické skládání je většinou způsobeno znečištěnými skládacími válci. Vyčistěte válce podle popisu v části POKYNY K DEMONTÁŽI. Infračervený přijímač Červený Otvor V Krytu ODSTRAŇOVÁNÍ POTÍŽÍ Pokud skládačka nefunguje a není v ní zmačkán papír, může být rozpojen jistič. Znovu zapněte jistič odpojením skládačky na minimálně 1 minutu, aby se jistič mohl vychladit. Poté by měla skládačka opět začít fungovat. SCHÉMA ZAPOJENÍ Černý Modrý Žlutý Motor 24 V.D.C Modrý Jistič 24 V.D.C Červený Černý Černý Obr. 4 5. Otáčejte klikou kterýmkoli směrem, až úplně vytlačíte papír horní nebo spodní částí skládačky. Pokud není možné uvolnění zmačkaného POKYNY papíru, postupujte podle K DEMONTÁŽI. Jakmile je zmačkaný papír uvolněn, vraťte kliku pro uvolnění zmačkaného papíru a doraz papíru do obvyklých poloh. Zapojte skládačku do zásuvky. POKYNY K DEMONTÁŽI Tento postup použijte pro vyčištění těžko odstranitelného zmačkaného papíru nebo pro čištění gumových válců. LIKVIDACE LIKVIDACE STROJE: Stroj na konci jeho životnosti likvidujte vždy s ohledem na životní prostředí. Žádné díly stroje nebo obalu nedávejte do domácího odpadu. ZVLÁŠTNÍ PŘÍSLUŠENSTVÍ Název Obj. čís. Martin Yale Roller Cleaner 99977 Upozornění: Při dodatečném objednání dílů zvláštního příslušenství a potřebě náhradních dílů se prosím obraťte na Vašeho odborného prodejce. 1. Vypojte skládačku ze zásuvky. 2. Ze spodní části skládačky vyšroubujte čtyři šrouby. Otočte skládačku do normální polohy. 3. Pro odstranění zmačkaného papíru sundejte plastový doraz papíru ze spodní části skládačky (viz. Obr. 1). Otáčejte velkou kladkou na levé straně kterýmkoliv směrem, zatímco opatrně táhnete papír ze spodní nebo horní strany skládačky. TECHNICKÉ ÚDAJE Ovládání: Manuální vkládání, automatické zapnutí a vypnutí, skládá 1800 dopisů za hodinu. Nastavitelná pro dva standardní rozměry papíru: 8 1/2“ x 11” pro obálku č. 10 a A4 ISO (210 x 297 mm) pro obálku DL. 1–3 listy papíru č. 16–24. Listy papíru mohou být sešité sešívačkou. Zdroj 24 V 1,2 A 326 mm (Š) x 153 mm (V) x 140 mm (H) 3,4 kg Rozměry papírů: Kapacita: Napájení: Rozměry: Hmotnost: 13 F100 14 F100 Konformitätserklärung Certificate of Conformity Attestation de Conformité Certificado de Conformidad Bezeichnung der Maschine: Type of machine: Description de la machine: Descripcion de la máquina: Tischfaltgerät Modell / Model / Modèle / Modelo: papermonster F100 Typ / Type / Type / Tipo: 395 Desktop Folder Plieuse pour Buraux Plegadora de Sobremesa Hiermit wird bestätigt, daß o. g. Gerät den Anforderungen der Maschinen-Richtlinie 98/37/EG sowie der EMVRichtlinie 2004/108/EG einschließlich allen bis heute veröffentlichten Änderungen bzw. Nachträgen entspricht. Das o. g. Gerät entspricht folgenden Normen bzw. Richtlinien: We do hereby certify that the above mentioned product meets the requirements set forth in EEC-Guidelines 98/37 and EMC directive 2004/108/EC including all changes and addendums to date thereto. The above mentioned product meets the following standards and guidelines: Nous Vous Confirmons que l‘appareils cité ci-dessus correspond aux exigences des directives 98/37/CEE ainsi qu’ à la directive CEM 2004/108/CEE, ci-inclus toutes les modifications ainsi que tous les suppléments publiés jusqu’à ce jour. L‘appareil mentionné correspond aux normes citées ci-après: Confirmamos que los productos arriba citados cumplen las exigencias de las directivas 98/37/CEE y las directivas CEM 2004/108/CEE, incluidas todas las modificaciones publicadas hasta la fecha. Los productos citados corresponden con las siguientes normas: EN 60950-1: 2001+A11 EG-Richtinie / EG-Guidelines / EG-Directives / EG-directivas, 87/308/EG EN 61000-3-2: 2006 EN 61000-3-3: 1995+A1+A2 EN 55014-1: 2000+A1+A2 EN 55014-2: 1997+A1 2009/08 ppa. K. Grundmann Leiter Technik Head of Technical Dpt. Responsable Dép. Technique Jefe del Departamento Técnico Postfach / p.o.box 1420 D-88672 Markdorf / Germany 15 i. V. W. Madena Leiter Elektrik Head of Electrical Dpt. Responsable Dép. Electricité Jefe del Departamento Eléctrico International Network Headquarters MARTIN YALE GROUP 251 Wedcor Avenue Wabash, IN 46992 www.martinyale.com ☏ +1 / 260 563-0641 MARTIN YALE INTERNATIONAL GmbH Bergheimer Straße 6-12 88677 Markdorf / Bodensee www.martinyale.de, www.intimus.com ☏ +49 / (0) 7544 60-0 MARTIN YALE Africa S & B House, 7 Loveday Street Marshall Town, Johannesburg P. O. BOX 1291, Houghton 2041 www.martinyale.co.za ☏ +27 / (0) 11 838 72 81 United Kingdom MARTIN YALE International Unit C 2 The Fleming Centre, Fleming Way Crawley, West Sussex, RH10 9NN www.intimus.co.uk ☏ +44 / (0) 1293 44 1900 fax +44 / (0) 1293 61 11 55 [email protected] France MARTIN YALE International S.A.R.L. 40 Avenue Lingenfeld 77200 Torcy www.martinyale.fr ☏ +33 / (1) 70 00 69 00 MARTIN YALE Ibérica S.L. C/Maestrat, n° 26 Pol. Indus. Les Salines 08880 Cubelles (Barcelona) www.martinyale.es ☏ +34 / 9 02 22 31 31 Martin Yale Italia srl Via A. Manzoni, 37 20052 Monza (MI) www.martinyale.it ☏ +39 / 335 618 4924 MARTIN YALE Nordic Rotebergsvägen 1 S-192 78 Sollentuna www.martinyale.se ☏ +46 / 8 556 165 20 MARTIN YALE Beijing Room 2003 D Building Guojiang No 2 Dong Sanhuan Bei Lu Chaoyang District, Beijing 100027 www.martinyale.com.cn ☏ +86 / (0) 10 84 47 10 70 USA Germany fax +1 / 260 563-4575 [email protected] fax +49 / (0) 7544 60-248 [email protected] Branch Offices Spain Italy Sweden P.R. China fax +27 / (0) 11 838 73 22 [email protected] fax +33 / (1) 70 00 69 24 [email protected] fax +34 / 9 02 22 31 32 [email protected] fax +39 / 039 689 3124 [email protected] fax +46 / 8 748 02 85 [email protected] fax +86 / (0) 10 84 47 10 75 [email protected] Dieses Papier ist aus 100 % Altpapier ohne optische Aufheller hergestellt This paper made from 100 % unbleached recycled paper Papier recyclable à 100 % 16 90177 1 11/09 South Africa-
 1
1
-
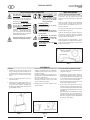 2
2
-
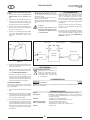 3
3
-
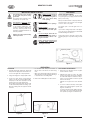 4
4
-
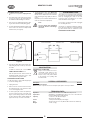 5
5
-
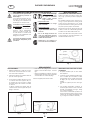 6
6
-
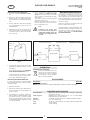 7
7
-
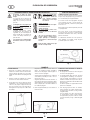 8
8
-
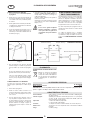 9
9
-
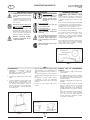 10
10
-
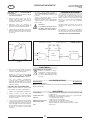 11
11
-
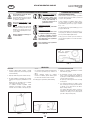 12
12
-
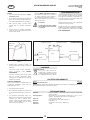 13
13
-
 14
14
-
 15
15
-
 16
16


Martin Yale papermonster F100 Operating Instructions Manual
- Tipo
- Operating Instructions Manual
en otros idiomas
- français: Martin Yale papermonster F100
- italiano: Martin Yale papermonster F100
- English: Martin Yale papermonster F100
- Deutsch: Martin Yale papermonster F100
- čeština: Martin Yale papermonster F100
Artículos relacionados
-
Martin Yale papermonster F200 Operating Instructions Manual
-
MyBinding Martin Yale 1611 AutoFolder Paper Folding Machine Manual de usuario
-
Martin Yale 1711 Instrucciones de operación
-
-
-
-
-

