Panasonic KXTGA651 Instrucciones de operación
- Categoría
- Telefonos
- Tipo
- Instrucciones de operación

Thank you for purchasing a Panasonic product.
Please read this installation manual before using the unit and
save it for future reference.
For assistance, visit our Web site:
http://shop.panasonic.com/
support for customers in the
U.S.A.
This unit is an additional handset compatible with the following
series of Panasonic Digital Cordless Phone:
KX-TG4011/KX-TG4021/KX-TG4031/KX-TG4051/
KX-TG6511/KX-TG6521/KX-TG6531/KX-TG6541/
KX-TG6581/KX-TG7531
You must register this handset with your base unit before it can
be used. This installation manual describes only the steps
needed to register and begin using the handset. Please read
the base unit’s operating instructions for further details.
Charge the batteries for about 7 hours before initial use.
Additional Digital Cordless Handset
Model No.
KX-TGA651
Installation Manual
PNQX2405XA DM0410DM2027
Printed in Malaysia
TGA651(e).fm Page 1 Wednesday, February 8, 2017 11:40 AM

2 For assistance, please visit http://shop.panasonic.com/support
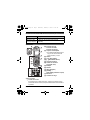
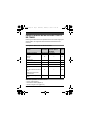
Accessory information
Supplied accessories
*1 The handset cover comes attached to the handset.
Note:
LPlease read the base unit’s operating instructions for additional/
replacement accessories.
– Optional headsets: KX-TCA60, KX-TCA93, KX-TCA94,
KX-TCA400, KX-TCA430
Setting up
Connections/Wall mounting
Accessory item/Order number Quantity
Charger/PNLC1010ZB 1
AC adaptor/PQLV219-0Z 1
Rechargeable batteries/HHR-4DPA
(Part No. HHR-55AAABU or N4DHYYY00004)
2
Handset cover
*1
/PNYNTGA652BR 1
Belt clip/PNKE1054Z1 1
Hooks
25.4 mm
(1 inch)
(120 V AC, 60 Hz)
Screws
(Not supplied)
TGA651(e).fm Page 2 Wednesday, February 8, 2017 11:40 AM

For assistance, please visit http://shop.panasonic.com/support 3
Note:
LUse only the supplied Panasonic AC adaptor PQLV219.
LThe AC adaptor must remain connected at all times. (It is normal for
the adaptor to feel warm during use.)
LMake sure that the wall is strong enough to support the weight of the
unit.
Battery installation/Battery charge
Important:
LUse the supplied rechargeable batteries. For replacement, we
recommend using the Panasonic rechargeable batteries noted on
page 2.
LWipe the battery ends (S, T) with a dry cloth.
LAvoid touching the battery ends (S, T) or the unit contacts.
LConfirm correct polarities (S, T).
LUSE ONLY Ni-MH batteries AAA (R03) size.
LDo NOT use Alkaline/Manganese/Ni-Cd batteries.
Charge for about 7 hours.
LWhen the batteries are fully charged, the charge indicator goes off and
“Fully charged” is displayed.
Note:
LIf the batteries are fully charged, but the operating time seems to be
shorter, clean the battery ends (S, T) and the charge contacts with a
dry cloth and charge again.
Charge indicator
Confirm
“Charging”
is displayed.
Rechargeable
Ni-MH ONLY
TGA651(e).fm Page 3 Wednesday, February 8, 2017 11:40 AM

4 For assistance, please visit http://shop.panasonic.com/support
Panasonic Ni-MH battery performance (supplied batteries)
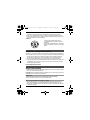
Controls
NControl type
A Soft keys
The handset features 3 soft keys. By pressing a soft key, you can
select the feature shown directly above it on the display.
Operation Operating time
In continuous use 13 hours max. (If Eco mode is on.)
Not in use (standby) 11 days max. (If Eco mode is on.)
A Charge indicator
Ringer indicator
Message indicator
B Nonslip pad
LNonslip pad offers support
when you cradle the
handset between your
shoulder and ear.
C Speaker
D {C} (TALK)
E {s} (SP-PHONE:
Speakerphone)
F Headset jack
G Dial keypad ({*}: TONE)
H Receiver
I Display
J {OFF}
K {FLASH} {CALL WAIT}
L Microphone
M Charge contacts
B C
M
A
G
F
D
E
J
K
I
H
L
A
B
TGA651(e).fm Page 4 Wednesday, February 8, 2017 11:40 AM

For assistance, please visit http://shop.panasonic.com/support 5
B Navigator key
– {^}, {V}, {<}, or {>}: Scroll through various lists and items.
– ? VOL. (Volume: {^} or {V}): Adjust the receiver or speaker
volume while talking.
– {<} CID (Caller ID): View the caller list.
– {>} REDIAL: View the redial list.
Note:
LThe preset melodies used for the ringer tone in this product are used
with permission of © 2009 Copyrights Vision Inc.
For KX-TG4011/KX-TG4021 series users
NUsing the soft keys (operational differences between handsets)
KX-TGA651 features 3 soft keys, different to your original handset
which features keys with printed function names.
Press the soft key corresponding to the desired operation
(page 4: A).
Example: When selecting/setting the desired item in programming
LSome KX-TGA651 soft key names are different to the button names
described in your base unit’s operating instructions.
Registering a handset to a base unit
1
Base unit:
NKX-TG4011/KX-TG6511 series
Press and hold {LOCATOR} for about 5 seconds. (No registration
tone)
NKX-TG4021/KX-TG4031/KX-TG4051/KX-TG6521/KX-TG6531/
KX-TG6541/KX-TG6581/KX-TG7531 series
Press and hold {LOCATOR} for about 5 seconds until the
registration tone sounds.
LIf all registered handsets start ringing, press the same button to
stop. Then repeat this step.
Original handset (printed key name) KX-TGA651 soft keys
{OK}{SELECT}{SAVE}
TGA651(e).fm Page 5 Wednesday, February 8, 2017 11:40 AM

6 For assistance, please visit http://shop.panasonic.com/support
2 Handset:
Place the handset on the base unit or charger, then wait until a long
beep sounds and w is displayed.
Note:
LIf an error tone sounds, or if _ is displayed, register the handset
according to the base unit’s operating instructions.
Display language
1
{MENU} i {#}{1}{1}{0}
2 {V}/{^}: Select the desired setting.
3 {SAVE} i {OFF}
Date and time
1
{MENU} i {#}{1}{0}{1} i Enter the current month, date, and
year by selecting 2 digits for each. i {OK}
Example: For July 15, 2010, enter {0}{7}{1}{5}{1}{0}.:
2 Enter the current hour and minute (12-hour clock format) by selecting
2 digits for each.
Example: For 9:30, enter {0}{9}{3}{0}.
3 {AM/PM}: Select “AM” or “PM”. i {SAVE} i {OFF}
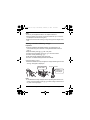
Belt clip
NTo attach NTo remove
TGA651(e).fm Page 6 Wednesday, February 8, 2017 11:40 AM

For assistance, please visit http://shop.panasonic.com/support 7
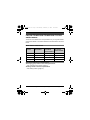
For KX-TG4031/KX-TG4051/KX-TG7531
series users
There are some differences in the specification of your original handset
and the KX-TGA651. The feature differences are described in the chart
below.
Main feature differences
Operational differences in other features
NChanging group names in the shared phonebook
See “Changing group names” (page 9).
NEditing entries in the shared phonebook
See “Editing entries” (page 10).
Feature KX-TGA651
KX-TG4031/
KX-TG4051
series handset
KX-TG7531
series handset
Display size 1.8 inches 1.8 inches 2.1 inches
Button size Large Extra large Large
Display mode — — r
Message list — — r
TGA651(e).fm Page 7 Wednesday, February 8, 2017 11:40 AM

8 For assistance, please visit http://shop.panasonic.com/support
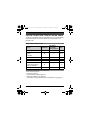
For KX-TG4011/KX-TG4021 series users
There are some differences in the specification of your original handset
and the KX-TGA651. The feature differences are described in the
following chart.
Main feature differences
Operational differences in other features
– Date and time (page 6)
– Chain dial (page 10)
– Voice guidance language (page 11)
– Selecting “Greeting only” (page 11)
– Calling back during playback (Caller ID subscribers only) (page 11)
Feature KX-TGA651
KX-TG4011/
KX-TG4021
series handset
Page
Display size 1.8 inches 1.4 inches —
Phonebook settings
– Group
– All erase
r —9, 10
Message alert r — 11, 15
Alarm r —13
Silent mode r —13
Voice mail settings
– Voice mail access no.
– VM tone detection
r —14
Time adjustment setting r —15
TGA651(e).fm Page 8 Wednesday, February 8, 2017 11:40 AM

For assistance, please visit http://shop.panasonic.com/support 9
– Caller list operations (Caller ID subscribers only):
Editing a caller’s phone number before calling back (page 12)
Erasing all caller information (page 12)
Storing caller information to the phonebook (page 12)
– Transferring calls, conference calls (page 12)
– Deregistering a handset (page 13)
Differences in the shared phonebook operations
Adding entries
When adding an entry to the phonebook, you can assign it to one of 9
groups.
1 {C} i {ADD}
2 Enter the party’s name (16 characters max.). i {OK}
3 Enter the party’s phone number (24 digits max.). i {OK}
4 {V}/{^}: Select the desired group. i {SELECT} 2 times
LTo add other entries, repeat from step 2.
5 {OFF}
Changing group names
The default group name is “Group 1” to “Group 9”.
1 {C} i {MENU} i {V}/{^}: “Group” i {SELECT}
2 {V}/{^}: Select the desired group. i {SELECT}
3 {V}/{^}: “Group name” i {SELECT}
4 Edit the name (10 characters max.). i {SAVE} i {OFF}
Finding and calling a phonebook entry: Searching by group
1 {C} i {GROUP}
2 {V}/{^}: Select the group you want to search. i {SELECT}
LIf you select “All groups”, the unit ends the group search.
3 {V}/{^}: Select the desired entry. i {C}
TGA651(e).fm Page 9 Wednesday, February 8, 2017 11:40 AM

10 For assistance, please visit http://shop.panasonic.com/support
Group ringer tone (Caller ID subscribers only)
You can assign a different ringer tone to the desired group.
If you select “Current ringer” (default), the unit uses the same
ringer tone as for other incoming calls when calls from this group are
received.
1 {C} i {MENU} i {V}/{^}: “Group” i {SELECT}
2 {V}/{^}: Select the desired group. i {SELECT}
3 {V}/{^}: Select the current setting of the group ringer tone. i
{SELECT}
4 {V}/{^}: Select the desired ringer tone. i {SAVE} i {OFF}
Editing entries
1 {C} i {V}/{^}: Select the desired entry. i {EDIT}
2 Edit the name if necessary (16 characters max.). i {OK}
3 Edit the phone number if necessary (24 digits max.). i {OK}
4 {V}/{^}: Select the desired group. i {SELECT} 2 times i {OFF}
Erasing all entries
1 {C} i {MENU} i {V}/{^}: “Erase all” i {SELECT}
2 {V}/{^}: “Yes” i {SELECT}
3 {V}/{^}: “Yes” i {SELECT} i {OFF}
Chain dial
1 During an outside call, press {MENU}.
2 {V}/{^}: “Phonebook” i {SELECT}
3 {V}/{^}: Select the desired entry. i {CALL}
TGA651(e).fm Page 10 Wednesday, February 8, 2017 11:40 AM

For assistance, please visit http://shop.panasonic.com/support 11
Differences in the answering system operations
(KX-TG4021 series only)
Voice guidance language
1 {MENU} i {#}{1}{1}{2}
2 {V}/{^}: Select the desired setting. i {SAVE} i {OFF}
Selecting “Greeting only”
The unit announces a greeting message to callers but not record
messages.
{MENU} i {#}{3}{0}{5} i {V}/{^}: “Greeting only” i
{SAVE} i {OFF}
Note:
LWhen you select “Greeting only”:
If you do not record your own message, the unit will play the pre-
recorded greeting-only message asking callers to call again later.
Calling back (Caller ID subscribers only)
While caller information is displayed during playback, press {PAUSE}.
i {V}/{^}: “Call back” i {SELECT}
NEditing the number before calling back
Press {PAUSE} during playback. i {V}/{^}: “Edit & Call” i
{SELECT} i Press {EDIT} repeatedly until the phone number is
shown in the desired format. i {C}
Message alert (default: on)
You can select whether or not the message indicator on the handset
flashes slowly when new messages are recorded.
Important:
LIf you stored the voice mail access number (page 14), the message
indicator also flashes for newly recorded voice mail messages.
1 {MENU} i {#}{3}{4}{0}
2 {V}/{^}: Select the desired setting. i {SAVE} i {OFF}
TGA651(e).fm Page 11 Wednesday, February 8, 2017 11:40 AM

12 For assistance, please visit http://shop.panasonic.com/support
Note:
LWhile message alert is on, battery operating time is shortened
(page 4).
Operational differences in other features
Caller list operations (Caller ID subscribers only)
NEditing a caller’s phone number before calling back
You can edit a phone number in the caller list by removing its area
code and/or the long distance code “1”.
1 {<} CID i {V}/{^}: Select the desired entry.
2 Press {EDIT} repeatedly until the phone number is shown in the
desired format. i {C}
NErasing all caller information
1 {<} CID
2 {ERASE} i {V}/{^}: “Yes” i {SELECT} i {OFF}
NStoring caller information to the phonebook
1 {<} CID i {V}/{^}: Select the desired entry.
LTo edit the number, press {EDIT} repeatedly until the phone
number is shown in the desired format.
2 {SAVE} i {V}/{^}: “Phonebook” i {SELECT}
3 Continue from step 2, “Editing entries”, page 10.
Transferring calls, conference calls
1 During an outside call, press {INT} to put the call on hold.
2 {V}/{^}: Select the desired unit. i {SELECT} i Wait for the
paged party to answer.
LIf the paged party does not answer, press {C} to return to the
outside call.
3 To complete the transfer: Press {OFF}.
To establish a conference call: Press {CONF}.
LTo leave the conference, press {OFF}.
LTo put the outside call on hold, press {HOLD}. To resume the
conference, press {CONF}.
TGA651(e).fm Page 12 Wednesday, February 8, 2017 11:40 AM

For assistance, please visit http://shop.panasonic.com/support 13
Deregistering a handset
1 {MENU} i {#}{1}{3}{1}
2 {V}/{^}: Select the handset you want to cancel. i {SELECT}
3 {V}/{^}: “Yes” i {SELECT} i {OFF}
Features only available for KX-TGA651
Alarm
An alarm sounds at the set time for 3 minutes once or daily.
Important:
LSet the date and time beforehand (page 6).
1 {MENU} i {#}{7}{2}{0}
2 {V}/{^}: “Daily” i {SELECT}
LWhen you select “Once”, enter the desired month and date. i
{OK}
LWhen you select “Off”, go to step 5.
3 Set the desired time. i {AM/PM}: Select “AM” or “PM”. i {OK}
4 {V}/{^}: Select the desired alarm tone. i {SELECT}
5 {SELECT} i {OFF}
LWhen the alarm is set, E is displayed.
Note:
LTo stop the alarm, press any dial key or place the handset on the base
unit or charger.
Silent mode
Silent mode allows you to select a period of time during which the
handset will not ring for outside calls.
Important:
LSet the date and time beforehand (page 6).
LWe recommend turning the base unit ringer off in addition to turning
the silent mode on. (KX-TG4021 series)
LIf you have set the alarm, the alarm sounds even if the silent mode is
turned on.
TGA651(e).fm Page 13 Wednesday, February 8, 2017 11:40 AM

14 For assistance, please visit http://shop.panasonic.com/support
1 {MENU} i {#}{2}{3}{8}
2 {V}/{^}: Select “On” or “Off”. i {SAVE}
LIf you select “Off”, press {OFF} to exit.
3 Enter the desired hour and minute you wish to start this feature.
4 {AM/PM}: Select “AM” or “PM”. i {OK}
5 Enter the desired hour and minute you wish to end this feature.
6 {AM/PM}: Select “AM” or “PM”. i {SAVE} i {OFF}
LWhen the silent mode is set, & is displayed.
NChanging the start and end time
{MENU} i {#}{2}{3}{7} i Continue from step 3.
Voice mail service: Storing the voice mail (VM) access number
Once you have stored your service provider/telephone company’s voice
mail access number, you can dial it automatically to listen to your voice
mail messages. You need to store the voice mail access number to
activate the message alert feature (page 11) for voice mail service.
1 {MENU} i {#}{3}{3}{1}
2 Enter your access number (24 digits max.).
3 {SAVE} i {OFF}
Note:
LWhen storing your voice mail access number and your mailbox
password, press {PAUSE} to add pauses between the access number
and the password as necessary. Contact your service provider/
telephone company for the required pause time.
LTo erase the voice mail access number: Press and hold {CLEAR}
until all digits are erased in step 2. i {SAVE} i {OFF}
Voice mail service: Voice mail (VM) tone detection
Your service provider/telephone company sends special signals
(sometimes called “voice mail tones” or “stutter tones”) to the unit to let
you know you have new voice mail messages after you press {C}.
Soon after you hang up a call or after the phone stops ringing, your unit
checks the phone line to see if new voice mail messages have been
recorded. The default setting is “On”. Turn this feature off when:
– You do not subscribe to voice mail service.
TGA651(e).fm Page 14 Wednesday, February 8, 2017 11:40 AM

For assistance, please visit http://shop.panasonic.com/support 15
– Your service provider/telephone company does not send voice mail
tones.
– Your phone is connected to a PBX.
If you are not sure which setting is required, contact your service
provider/telephone company.
1 {MENU} i {#}{3}{3}{2}
2 {V}/{^}: Select the desired setting. i {SAVE} i {OFF}
Voice mail service: Listening to voice mail messages
The unit lets you know that you have new voice mail messages:
– “New Voice Mail” is displayed if message indication service is
available.
– The message indicator flashes slowly if the message alert feature is
turned on (page 11).
1 {VM}
or
{MENU} i {#}{3}{3}{0}
LThe speakerphone turns on.
LIf there are no new messages in the voice mail, {VM} is not
displayed.
2 Follow the pre-recorded instructions. i When finished, press
{OFF}.
Note:
LIf the handset still indicates there are new messages even after you
have listened to all new messages, turn it off by pressing and holding
{#} until the handset beeps.
Turning the time adjustment on/off (Caller ID subscribers only)
This feature allows the unit to automatically adjust the date and time
each time caller information including date and time is received. To turn
this feature on, select “Caller ID auto”. To turn this feature off,
select “Manual”. The default setting is “Caller ID auto”.
To use this feature, set the date and time first (page 6).
1 {MENU} i {#}{2}{2}{6}
2 {V}/{^}: Select the desired setting. i {SAVE} i {OFF}
TGA651(e).fm Page 15 Wednesday, February 8, 2017 11:40 AM

16 For assistance, please visit http://shop.panasonic.com/support
For your safety
To prevent severe injury and loss of life/property, read this section carefully before
using the product to ensure proper and safe operation of your product.
kWARNING
Power connection
L Completely insert the AC adaptor/power plug into the power outlet. Failure to do
so may cause electric shock and/or excessive heat resulting in a fire.
L Regularly remove any dust, etc. from the AC adaptor/power plug by pulling it
from the power outlet, then wiping with a dry cloth. Accumulated dust may cause
an insulation defect from moisture, etc. resulting in a fire.
L Unplug the product from power outlets if it emits smoke, an abnormal smell, or
makes an unusual noise. These conditions can cause fire or electric shock.
Confirm that smoke has stopped emitting and contact us at
http://shop.panasonic.com/support
Installation
L To prevent the risk of fire or electrical shock, do not expose the product to rain or
any type of moisture.
L Do not place or use this product near automatically controlled devices such as
automatic doors and fire alarms. Radio waves emitted from this product may
cause such devices to malfunction resulting in an accident.
kCAUTION
Installation and location
L The AC adaptor is used as the main disconnect device. Ensure that the AC outlet
is installed near the product and is easily accessible.
Battery
L We recommend using the supplied batteries or additional/replacement batteries
noted on page 2 for replacement battery information. USE ONLY rechargeable
Ni-MH batteries AAA (R03) size.
L Do not mix old and new batteries.
L Do not open or mutilate the batteries. Released electrolyte from the batteries is
corrosive and may cause burns or injury to the eyes or skin. The electrolyte is
toxic and may be harmful if swallowed.
L Exercise care when handling the batteries. Do not allow conductive materials
such as rings, bracelets, or keys to touch the batteries, otherwise a short circuit
may cause the batteries and/or the conductive material to overheat and cause
burns.
TGA651(e).fm Page 16 Wednesday, February 8, 2017 11:40 AM

For assistance, please visit http://shop.panasonic.com/support 17
L Charge the batteries provided with or identified for use with this product only, in
accordance with the instructions and limitations specified in this manual.
L Only use a compatible base unit (or charger) to charge the batteries. Do not
tamper with the base unit (or charger). Failure to follow these instructions may
cause the batteries to swell or explode.
Attention:
Important safety instructions
When using your product, basic safety precautions should always be followed to
reduce the risk of fire, electric shock, and injury to persons, including the following:
1. Do not use this product near water for example, near a bathtub, washbowl,
kitchen sink, or laundry tub, in a wet basement or near a swimming pool.
2. Do not use the telephone to report a gas leak in the vicinity of the leak.
3. Use only the power cord and batteries indicated in this manual. Do not dispose
of batteries in a fire. They may explode. Check with local codes for possible
special disposal instructions.
SAVE THESE INSTRUCTIONS
Other information
L Operating the product near electrical appliances may cause interference. Move
away from the electrical appliances.
CAUTION: Risk of explosion if battery is replaced by an incorrect type. Dispose of
used batteries according to the instructions.
Routine care
L Wipe the outer surface of the product with a soft moist cloth.
L Do not use benzine, thinner, or any abrasive powder.
Notice for product disposal, transfer, or return
L This product can store your private/confidential information. To protect your
privacy/confidentiality, we recommend that you erase information such as
phonebook or caller list entries from the memory before you dispose of, transfer,
or return the product.
A nickel metal hydride battery that is
recyclable powers the product you have
purchased.
Please call 1-800-8-BATTERY (1-800-822-
8837) for information on how to recycle this
battery.
TGA651(e).fm Page 17 Wednesday, February 8, 2017 11:40 AM

18 For assistance, please visit http://shop.panasonic.com/support
FCC and other information
This equipment is hearing aid compatible as defined by the FCC in 47 CFR Section
68.316.
When you hold the phone to your ear, noise might be heard in your Hearing Aid.
Some Hearing Aids are not adequately shielded from external RF (radio frequency)
energy. If noise occurs, use an optional headset accessory or the speakerphone
option (if applicable) when using this phone. Consult with your audiologist or
Hearing Aid manufacturer about the availability of Hearing Aids which provide
adequate shielding to RF energy commonly emitted by digital devices.
WHEN PROGRAMMING EMERGENCY NUMBERS AND(OR) MAKING TEST
CALLS TO EMERGENCY NUMBERS:
1) Remain on the line and briefly explain to the dispatcher the reason for the call.
2) Perform such activities in the off-peak hours, such as early morning or late
evenings.
This device complies with Part 15 of the FCC Rules. Operation is subject to the
following two conditions:
(1) This device may not cause harmful interference, and (2) this device must accept
any interference received, including interference that may cause undesired
operation.
Privacy of communications may not be ensured when using this phone.
CAUTION:
Any changes or modifications not expressly approved by the party responsible for
compliance could void the user’s authority to operate this device.
NOTE:
This equipment has been tested and found to comply with the limits for a Class B
digital device, pursuant to Part 15 of the FCC Rules. These limits are designed to
provide reasonable protection against harmful interference in a residential
installation. This equipment generates, uses, and can radiate radio frequency
energy and, if not installed and used in accordance with the instructions, may
cause harmful interference to radio communications. However, there is no
guarantee that interference will not occur in a particular installation. If this
equipment does cause harmful interference to radio or television reception, which
can be determined by turning the equipment off and on, the user is encouraged to
try to correct the interference by one or more of the following measures:
– Reorient or relocate the receiving antenna.
– Increase the separation between the equipment and receiver.
– Connect the equipment into an outlet on a circuit different from that to which the
receiver is connected.
– Consult the dealer or an experienced radio/TV technician for help.
TGA651(e).fm Page 18 Wednesday, February 8, 2017 11:40 AM

For assistance, please visit http://shop.panasonic.com/support 19
FCC RF Exposure Warning:
L This product complies with FCC radiation exposure limits set forth for an
uncontrolled environment.
L This handset may not be collocated or operated in conjunction with any other
antenna or transmitter.
L The handset may be carried and operated with only the specific provided belt-
clip. Other non-tested belt-clips or similar body-worn accessories may not
comply and must be avoided.
Notice:
L FCC ID can be found inside the battery compartment or on the bottom of the unit.
Compliance with TIA-1083 standard:
Notice
Telephone handsets identified with this logo have reduced
noise and interference when used with T-Coil equipped hearing
aids and cochlear implants.
T
Compatible with
Hearing Aid T-Coil
TIA-1083
LThis product is designed for use in the United States of America. Sale or use
of this product in other countries may violate local laws.
LCet appareil est conçu pour être utilisé aux États-Unis d’Amérique. La vente
ou l’emploi de cet appareil dans certains autres pays peut constituer une
infraction à la législation locale.
LEste producto está diseñado para usarse en los Estados Unidos de América.
La venta o el empleo de este producto en ciertos países puede constituir
violación de la legislación local.
Lҏࠢட࣏छٺҢՄ೩Ȅषӵڏтড়୵ܖٺҢȂџོႂІ࿋ӴݲٽȄ
Lߎߩຠߪޔᣣᧄ࿖ᄖߢߩ↪ࠍ⋡⊛ߣߒߡ⸳⸘ߐࠇߡ߅ࠅޔᣣᧄ࿖ౝߢߩ
↪ߪᴺᓞ㆑ߣߥࠅ߹ߔޕᓥߞߡޔᒰ␠ߢߪᣣᧄ࿖ౝߦ߅ߡߪේೣߣߒ
ߡୃℂߥߤߩࠨࡆࠬߪ⥌ߒ߆ߨ߹ߔޕ
TGA651(e).fm Page 19 Wednesday, February 8, 2017 11:40 AM

20 For assistance, please visit http://shop.panasonic.com/support
Copyright:
This material is copyrighted by Panasonic Corporation, and may be
reproduced for internal use only. All other reproduction, in whole or in
part, is prohibited without the written consent of Panasonic Corporation.
© Panasonic Corporation 2010
1 Reconnect AC adaptor to the base unit.
2 Check if telephone line cord is connected.
3 Use rechargeable Ni-MH batteries.
(Alkaline/Manganese/Ni-Cd batteries CANNOT be used.)
4 Read troubleshooting page in the base unit’s
Operating Instructions.
IMPORTANT!
If your product is not working properly. . .
Visit our Web site: http://shop.panasonic.com/support
LFAQ and troubleshooting hints are available.
Two Riverfront Plaza, Newark, NJ 07102-5490
TGA651(e).fm Page 20 Wednesday, February 8, 2017 11:40 AM

Gracias por adquirir un producto Panasonic.
Lea este manual de instalación antes de usar la unidad y guárdelo para
consultarlo en el futuro.
Para obtener ayuda, visite nuestro sitio web:
http://shop.panasonic.com/support
para clientes de EE. UU. (solo
en inglés).
Esta unidad es un auricular adicional compatible con la siguiente
serie de teléfonos inalámbricos digitales Panasonic:
KX-TG4011/KX-TG4021/KX-TG4031/KX-TG4051/KX-TG6511/
KX-TG6521/KX-TG6531/KX-TG6541/KX-TG6581/KX-TG7531
Debe registrar este auricular en su unidad base antes de poder
usarlo. Este manual de instalación solo describe los pasos
necesarios para registrar y comenzar a usar el auricular. Lea las
instrucciones de operación de la unidad base para obtener más
detalles.
Cargue las baterías aproximadamente durante 7 horas antes de
usarse por primera vez.
Auricular Inalámbrico Digital Adicional
Modelo N°
KX-TGA651
Manual de instalación
TGA651(sp).fm Page 1 Wednesday, February 8, 2017 11:47 AM

(2)
Información de los accesorios
Accesorios que se suministran
*1 La cubierta del auricular viene unida a él.
Nota:
L
Lea las instrucciones de operación de la unidad base para obtener
información sobre accesorios adicionales o de repuesto.
– Audifonos opcionales: KX-TCA60, KX-TCA93, KX-TCA94, KX-TCA400,
KX-TCA430
Instalación
Conexiones/Montaje en la pared
Accesorio/Número de pedido Cantidad
Cargador/PNLC1010ZB 1
Adaptador de corriente/PQLV219-0Z 1
Baterías recargables/HHR-4DPA
(Pieza N.° HHR-55AAABU o N4DHYYY00004)
2
Cubierta del auricular
*1
/PNYNTGA652BR 1
Sujetador para cinturón/PNKE1054Z1 1
Ganchos
25.4 mm
(1 pulgada)
(120 V CA, 60 Hz)
Tornillos
(no se suministran)
TGA651(sp).fm Page 2 Wednesday, February 8, 2017 11:47 AM

(3)
Nota:
L
Use solo el adaptador de corriente Panasonic PQLV219 que se suministra.
L
El adaptador de corriente debe permanecer conectado todo el tiempo. (Es
normal que el adaptador se caliente durante su uso.)
L
Asegúrese de que la pared sea lo suficientemente resistente para soportar el
peso de la unidad.
Instalación y carga de la batería
Importante:
L
Utilice las baterías recargables que se suministran. Para reemplazarlas,
recomendamos el uso de las baterías recargables Panasonic que se
especifican en la página 2.
L
Limpie los extremos de las baterías (
S
,
T
) con un paño seco.
L
Evite tocar los extremos de las baterías (
S
,
T
) o los contactos de la unidad.
L
Confirme que las polaridades estén correctas (
S
,
T
).
L
UTILICE SOLO baterías de Ni-MH tamaño AAA (R03).
L
NO utilice baterías Alcalinas, de Manganeso o de Ni-Cd.
Cargue aproximadamente durante 7 horas.
L
Cuando las baterías estén completamente cargadas, el indicador de carga se
apagará y aparecerá
“Carg. Comp.”
.
Nota:
L
Si las baterías están completamente cargadas pero el tiempo de
funcionamiento parece ser más corto, limpie los extremos de las baterías (
S
,
T
) y los contactos de carga con un paño seco y cárguelas de nuevo.
Indicador de carga
SOLO baterías
Ni-MH recargables
Confirme que
aparezca
“Cargando”.
TGA651(sp).fm Page 3 Wednesday, February 8, 2017 11:47 AM

(4)
Rendimiento de las baterías Ni-MH de Panasonic (baterías que se suministran)
Controles
N
Tipo de control
A Teclas de función
El auricular incluye 3 teclas de función. Al oprimir una tecla de función,
puede seleccionar la función que aparece directamente encima de ella en
la pantalla.
Operación Tiempo de funcionamiento
En uso continuo
13 horas máx. (si el modo de economía está encendido).
Mientras no esté
en uso (en espera)
11 días máx. (si el modo de economía está
encendido).
A
Indicador de carga
Indicador de timbre
Indicador de mensaje
B
Cojincillo antiderrapante
L
El cojincillo antiderrapante ofrece
apoyo si se coloca el auricular
entre el hombro y el oído.
C
Altavoz
D
{C}
(TALK: Hablar)
E
{s}
(SP-PHONE: Altavoz)
F
Toma para audífono
G
Teclado de marcación
{*}
(TONE: Tono)
H
Receptor
I
Pantalla
J
{
OFF
}
(Apagado)
K
{
FLASH
}
{
CALL WAIT
}
(Llamada en espera)
L
Micrófono
M
Contactos de carga
B C
M
A
G
F
D
E
J
K
I
H
L
A
B
TGA651(sp).fm Page 4 Wednesday, February 8, 2017 11:47 AM

(5)
B
Tecla navegadora
–
{^}
,
{V}
,
{
<
}
, o
{
>
}
: Navegue por diversas listas y elementos.
–
?
VOL. (Volumen:
{^}
o
{V}
): Ajuste el volumen del receptor o del
altavoz mientras habla.
–
{
<
}
CID (identificador de llamadas): Vea la lista de personas que
llamaron.
–
{
>
}
REDIAL (Remarcación): Vea la lista de remarcación.
Nota:
L
Las melodías preconfiguradas que se usan para el tono de timbre de este
producto se utilizan con permiso de
©
2009 Copyrights Vision Inc.
Para los usuarios de las series KX-TG4011/KX-TG4021
N
Cómo usar las teclas de función (diferencias operativas entre
auriculares)
KX-TGA651 incluye 3 teclas de función, y es diferente a su auricular original
que incluye teclas con nombres de funciones impresos.
Oprima la tecla de función que corresponde a la operación deseada
(página 4:
A
).
Ejemplo:
Al seleccionar o configurar el elemento deseado durante la
programación
L
Los nombres de algunas teclas de función del KX-TGA651 son diferentes a
los nombres de los botones descritos en las instrucciones de operación de
su unidad base.
Cómo registrar un auricular a una unidad base
1
Unidad base:
N
Series KX-TG4011/KX-TG6511
Oprima y mantenga oprimido
{
LOCATOR
}
durante aproximadamente 5
segundos. (No hay tono de registro)
N
Series KX-TG4021/KX-TG4031/KX-TG4051/KX-TG6521/KX-TG6531/
KX-TG6541/KX-TG6581/KX-TG7531
Oprima y mantenga oprimido
{
LOCATOR
}
durante aproximadamente 5
Auricular original (nombre impreso
en la tecla)
Teclas de función del
KX-TGA651
{
OK
}{
SELEC.
}{
GUARDA
}
TGA651(sp).fm Page 5 Wednesday, February 8, 2017 11:47 AM

(6)
segundos hasta que suene el tono de registro.
L
Si todos los auriculares registrados comienzan a timbrar, oprima el mismo
botón para detenerlos. Después repita este paso.
2
Auricular:
Coloque el auricular en la unidad base o cargador, y espere hasta que suene
un pitido largo y aparezca
w
.
Nota:
L
Si suena un tono de error, o si se muestra
_
, registre el auricular de acuerdo
con las instrucciones de operación de la unidad base.
Idioma de la pantalla
1
{
MENU
}
i
{
#
}{
1
}{
1
}{
0
}
2
{V}
/
{^}
: Seleccione la configuración deseada.
3
{
GUARDA
}
i
{
OFF
}
Fecha y hora
1
{
MENU
}
i
{
#
}{
1
}{
0
}{
1
}
i
Introduzca el día, mes y año actuales
seleccionando 2 dígitos para cada uno.
i
{
OK
}
Por ejemplo:
Para el 15 de julio de 2010, introduzca
{
1
}{
5
}{
0
}{
7
}{
1
}{
0
}
.
:
2
Introduzca la hora y minutos actuales (en formato de reloj de 24 horas)
seleccionando 2 dígitos para cada uno.
Por ejemplo:
Para las 21:30, introduzca
{
2
}{
1
}{
3
}{
0
}
.
3
{
GUARDA
}
i
{
OFF
}
Sujetador para cinturón
N
Para colocarlo
N
Para retirarlo
TGA651(sp).fm Page 6 Wednesday, February 8, 2017 11:47 AM

(7)
Para los usuarios de las series KX-TG4031/
KX-TG4051/KX-TG7531
Existen algunas diferencias en las especificaciones de su auricular original y las
del KX-TGA651. En la tabla que se muestra a continuación se describen las
diferencias en las funciones.
Principales diferencias en las funciones
Diferencias operativas en otras funciones
N
Cómo cambiar los nombres de los grupos en el directorio telefónico
compartido
Consulte “Cómo cambiar los nombres de los grupos” (página 9).
N
Cómo editar entradas en el directorio telefónico compartido
Consulte “Cómo editar entradas” (página 10).
Función KX-TGA651
Auricular de las
series KX-TG4031/
KX-TG4051
Auricular de la
serie
KX-TG7531
Tamaño de la
pantalla
1.8 pulgadas 1.8 pulgadas 2.1 pulgadas
Tamaño de los
botones
Grande Extra grande Grande
Modo de
pantalla
——
r
Lista de
mensajes
——
r
TGA651(sp).fm Page 7 Wednesday, February 8, 2017 11:47 AM

(8)
Para los usuarios de las series KX-TG4011/
KX-TG4021
Existen algunas diferencias en las especificaciones de su auricular original y las
del KX-TGA651. En la siguiente tabla se describen las diferencias en las
funciones.
Principales diferencias en las funciones
Diferencias operativas en otras funciones
– Fecha y hora (página 6)
– Marcación en cadena (página 11)
– Idioma de la guía de voz (página 11)
Función KX-TGA651
Auricular de las
series KX-TG4011/
KX-TG4021
Página
Tamaño de la pantalla 1.8 pulgadas 1.4 pulgadas —
Configuración del directorio
telefónico
–Grupo
– Borrar todo
r
— 9, 10
Alerta de mensajes
r
—12, 15
Alarma
r
—13
Modo silencioso
r
—14
Configuración del correo de
voz
– N.° de acceso del correo de
voz
– Detección de tonos del
correo de voz
r
—14, 15
Configuración del ajuste del
tiempo
r
—16
TGA651(sp).fm Page 8 Wednesday, February 8, 2017 11:47 AM

(9)
– Cómo seleccionar “Sólo Saludo” (página 11)
– Devolución de llamadas durante la reproducción (solo para suscriptores al
servicio de identificador de llamadas) (página 11)
– Operaciones de la lista de personas que llamaron (solo para suscriptores al
servicio de identificador de llamadas):
Cómo editar el número telefónico de una persona que llama antes de
devolver la llamada (página 12)
Cómo borrar toda la información de la persona que llama (página 12)
Cómo almacenar información de la persona que llama en el directorio
telefónico (página 12)
– Transferencia de llamadas, llamadas en conferencia (página 13)
– Cómo cancelar el registro de un auricular (página 13)
Diferencias en las operaciones del directorio telefónico
compartido
Para añadir entradas
Al añadir una entrada al directorio telefónico, puede asignarla a uno de 9 grupos.
1
{
C
}
i
{
AÑAD.
}
2
Introduzca el nombre de la persona (máx. 16 caracteres).
i
{
OK
}
3
Introduzca el número telefónico de la persona (máx. 24 dígitos).
i
{
OK
}
4
{V}
/
{^}
: Seleccione el grupo deseado.
i
{
SELEC.
}
2 veces
L
Para añadir otras entradas, repita desde el paso 2.
5
{
OFF
}
Cómo cambiar los nombres de los grupos
El nombre predeterminado del grupo es
“
Grupo 1
”
a
“
Grupo 9
”
.
1
{
C
}
i
{
MENU
}
i
{V}
/
{^}
:
“
Grupo
”
i
{
SELEC.
}
2
{V}
/
{^}
: Seleccione el grupo deseado.
i
{
SELEC.
}
3
{V}
/
{^}
:
“
Nombre de Grupo
”
i
{
SELEC.
}
4
Edite el nombre (máx. 10 caracteres).
i
{
GUARDA
}
i
{
OFF
}
TGA651(sp).fm Page 9 Wednesday, February 8, 2017 11:47 AM

(10)
Cómo encontrar y llamar a una entrada del directorio telefónico: Búsqueda
por grupo
1
{
C
}
i
{
GRUPO
}
2
{V}
/
{^}
: Seleccione el grupo que desea buscar.
i
{
SELEC.
}
L
Si selecciona
“
Todos los Grupos
”
, la unidad termina la búsqueda por
grupo.
3
{V}
/
{^}
: Seleccione la entrada deseada.
i
{C}
Tono de timbre de un grupo (solo para suscriptores al servicio de
identificador de llamadas)
Puede asignar un tono de timbre diferente para el grupo deseado.
Si selecciona
“
Sonido Predet.
”
(predeterminado), la unidad utiliza el mismo
tono de timbre que para otras llamadas entrantes cuando se reciben llamadas
de este grupo.
1
{
C
}
i
{
MENU
}
i
{V}
/
{^}
:
“
Grupo
”
i
{
SELEC.
}
2
{V}
/
{^}
: Seleccione el grupo deseado.
i
{
SELEC.
}
3
{V}
/
{^}
: Seleccione la configuración actual del tono de timbre del grupo.
i
{
SELEC.
}
4
{V}
/
{^}
: Seleccione el tono de timbre deseado.
i
{
GUARDA
}
i
{
OFF
}
Cómo editar entradas
1
{
C
}
i
{V}
/
{^}
: Seleccione la entrada deseada.
i
{
EDIT
}
2
Edite el nombre si es necesario (máx. 16 caracteres).
i
{
OK
}
3
Edite el número telefónico si es necesario (máx. 24 dígitos).
i
{
OK
}
4
{V}
/
{^}
: Seleccione el grupo deseado.
i
{
SELEC.
}
2 veces
i
{
OFF
}
Cómo borrar todas las entradas
1
{
C
}
i
{
MENU
}
i
{V}
/
{^}
:
“
Borrar Todo
”
i
{
SELEC.
}
2
{V}
/
{^}
:
“
Sí
”
i
{
SELEC.
}
3
{V}
/
{^}
:
“
Sí
”
i
{
SELEC.
}
i
{
OFF
}
TGA651(sp).fm Page 10 Wednesday, February 8, 2017 11:47 AM

(11)
Marcación en cadena
1
Durante una llamada externa, oprima
{
MENU
}
.
2
{V}
/
{^}
:
“
Directorio
”
i
{
SELEC.
}
3
{V}
/
{^}
: Seleccione la entrada deseada.
i
{
LLAMA
}
Diferencias en las operaciones del sistema contestador de
llamadas (Solo en la serie KX-TG4021)
Idioma de la guía de voz
1
{
MENU
}
i
{
#
}{
1
}{
1
}{
2
}
2
{V}
/
{^}
: Seleccione la configuración deseada.
i
{
GUARDA
}
i
{
OFF
}
Cómo seleccionar “Sólo Saludo”
La unidad reproduce un mensaje de saludo para las personas que llaman, pero
no graba mensajes.
{
MENU
}
i
{
#
}{
3
}{
0
}{
5
}
i
{V}
/
{^}
:
“
Sólo Saludo
”
i
{
GUARDA
}
i
{
OFF
}
Nota:
L
Cuando seleccione
“
Sólo Saludo
”
:
Si no graba su propio mensaje, la unidad reproducirá el mensaje pregrabado
de solo saludo y le pedirá a quien llame que vuelva a llamar más tarde.
Devolución de llamadas (solo para suscriptores al servicio de identificador
de llamadas)
Oprima
{
PAUSA
}
mientras se muestra la información de la persona que llama
durante la reproducción.
i
{V}
/
{^}
:
“
Regresar llamada
”
i
{
SELEC.
}
N
Cómo editar el número antes de devolver la llamada
Oprima
{
PAUSA
}
durante la reproducción.
i
{V}
/
{^}
:
“
Editar y
Llamar
”
i
{
SELEC.
}
i
Oprima
{
EDIT
}
repetidamente hasta que el
número telefónico se muestre en el formato deseado.
i
{C}
TGA651(sp).fm Page 11 Wednesday, February 8, 2017 11:47 AM

(12)
Alerta de mensajes (predeterminado: encendido)
Puede seleccionar si desea que el indicador de mensajes del auricular parpadee
lentamente cuando se graben mensajes nuevos.
Importante:
L
Si almacenó el número de acceso al correo de voz (página 14), el indicador de
mensaje también parpadea para los mensajes nuevos de correo de voz.
1
{
MENU
}
i
{
#
}{
3
}{
4
}{
0
}
2
{V}
/
{^}
: Seleccione la configuración deseada.
i
{
GUARDA
}
i
{
OFF
}
Nota:
L
El tiempo de funcionamiento de la batería se reduce cuando la alerta de
mensajes está encendida (página 4).
Diferencias operativas en otras funciones
Operaciones de la lista de personas que llamaron (solo para suscriptores
al servicio de identificador de llamadas)
N
Cómo editar el número telefónico de una persona que llama antes de
devolver la llamada
Puede editar un número telefónico en la lista de personas que llamaron
quitando su código de área y/o el código de larga distancia “1”.
1
{
<
}
CID
i
{V}
/
{^}
: Seleccione la entrada deseada.
2
Oprima
{
EDIT
}
repetidamente hasta que el número telefónico se muestre
en el formato deseado.
i
{C}
N
Cómo borrar toda la información de la persona que llama
1
{
<
}
CID
2
{
BORRA
}
i
{V}
/
{^}
:
“
Sí
”
i
{
SELEC.
}
i
{
OFF
}
N
Cómo almacenar información de la persona que llama en el directorio
telefónico
1
{
<
}
CID
i
{V}
/
{^}
: Seleccione la entrada deseada.
L
Para editar el número, oprima
{
EDIT
}
repetidamente hasta que el
número telefónico se muestre en el formato deseado.
2
{
GUARDA
}
i
{V}
/
{^}
:
“
Directorio
”
i
{
SELEC.
}
3
Continúe desde el paso 2, “Cómo editar entradas”, página 10.
TGA651(sp).fm Page 12 Wednesday, February 8, 2017 11:47 AM

(13)
Transferencia de llamadas, llamadas en conferencia
1
Durante una llamada externa, oprima
{
INT.
}
para poner la llamada en
espera.
2
{V}
/
{^}
: Seleccione la unidad deseada.
i
{
SELEC.
}
i
Espere a que la
persona a quien busca conteste.
L
Si la persona a quien busca no contesta la llamada, oprima
{C}
para
volver a la llamada externa.
3
Para
completar la transferencia:
Oprima
{
OFF
}
.
Para establecer una llamada en conferencia:
Oprima
{
CONF.
}
.
L
Para salir de la conferencia, oprima
{
OFF
}
.
L
Para poner en espera la llamada externa, oprima
{
ESPER
}
. Para volver a
la conferencia, oprima
{
CONF.
}
.
Cómo cancelar el registro de un auricular
1
{
MENU
}
i
{
#
}{
1
}{
3
}{
1
}
2
{V}
/
{^}
: Seleccione el auricular que desea cancelar.
i
{
SELEC.
}
3
{V}
/
{^}
:
“
Sí
”
i
{
SELEC.
}
i
{
OFF
}
Funciones disponibles solo para el KX-TGA651
Alarma
En el momento programado suena una alarma durante 3 minutos una vez o
diariamente.
Importante:
L
Ajuste la fecha y la hora de antemano (página 6).
1
{
MENU
}
i
{
#
}{
7
}{
2
}{
0
}
2
{V}
/
{^}
:
“
Diariamente
”
i
{
SELEC.
}
L
Cuando seleccione
“
Una vez
”
, introduzca el día y mes deseados.
i
{
OK
}
L
Cuando seleccione
“
Apagado
”
, vaya al paso 5.
3
Configure la hora deseada.
i
{
OK
}
4
{V}
/
{^}
: Seleccione el tono de alarma deseado.
i
{
SELEC.
}
5
{
SELEC.
}
i
{
OFF
}
TGA651(sp).fm Page 13 Wednesday, February 8, 2017 11:47 AM

(14)
L
Cuando la alarma está configurada, se muestra
E
.
Nota:
L
Para detener la alarma, oprima cualquier tecla de marcación o coloque el
auricular en la unidad base o cargador.
Modo silencioso
El modo silencioso le permite seleccionar un periodo de tiempo durante el cual
el auricular no sonará si entra una llamada externa.
Importante:
L
Ajuste la fecha y la hora de antemano (página 6).
L
Le recomendamos que apague el timbre de la unidad base además de
encender el modo silencioso (serie KX-TG4021).
L
Si programó la alarma, ésta suena aunque el modo silencioso esté encendido.
1
{
MENU
}
i
{
#
}{
2
}{
3
}{
8
}
2
{V}
/
{^}
: Seleccione
“
Encendido
”
o
“
Apagado
”
.
i
{
GUARDA
}
L
Si selecciona
“
Apagado
”
, oprima
{
OFF
}
para salir.
3
Introduzca la hora y minuto en que desee que se inicie esta función.
4
{
OK
}
5
Introduzca la hora y minuto en que desee que termine esta función.
6
{
GUARDA
}
i
{
OFF
}
L
Cuando el modo silencioso está configurado, se muestra
&
.
N
Cómo cambiar el tiempo de inicio y terminación
{
MENU
}
i
{
#
}{
2
}{
3
}{
7
}
i
Continúe desde el paso 3.
Servicio de correo de voz: Cómo almacenar el número de acceso al correo
de voz (CV)
Una vez que almacene el número de acceso al correo de voz de su proveedor de
servicio o compañía telefónica, puede marcarlo automáticamente para escuchar
sus mensajes de voz. Es necesario que almacene el número de acceso al correo
de voz para activar la función de alerta de mensajes (página 12) para el servicio
de correo de voz.
1
{
MENU
}
i
{
#
}{
3
}{
3
}{
1
}
2
Introduzca su número de acceso (máx. 24 dígitos).
3
{
GUARDA
}
i
{
OFF
}
TGA651(sp).fm Page 14 Wednesday, February 8, 2017 11:47 AM

(15)
Nota:
L
Al almacenar su número de acceso y su contraseña del correo de voz, oprima
{
PAUSA
}
para añadir pausas entre el número de acceso y la contraseña
según sea necesario. Comuníquese con su proveedor de servicio o compañía
telefónica para que le informe acerca del tiempo de pausa requerido.
L
Para borrar el número de acceso al correo de voz:
Oprima y mantenga oprimido
{
BORRA
}
hasta que se borren todos los dígitos
en el paso 2.
i
{
GUARDA
}
i
{
OFF
}
Servicio de correo de voz: Detección de tonos del correo de voz (CV)
Su proveedor de servicio o compañía telefónica envía señales especiales
(conocidas a veces como “tonos de correo de voz” o “tonos intermitentes”) a la
unidad para informarle que tiene nuevos mensajes de correo de voz después de
oprimir
{C}
. Poco después de que cuelgue una llamada o de que el teléfono
deje de timbrar, su unidad revisa la línea telefónica para ver si hay grabados
nuevos mensajes de correo de voz. La configuración predeterminada es
“
Encendido
”
. Apague esta función cuando:
– No esté suscrito al servicio de correo de voz.
– Su proveedor de servicio o compañía telefónica no envíe tonos de correo de
voz.
– Su teléfono esté conectado a un PBX.
Si no está seguro de qué configuración se requiere, comuníquese con su
proveedor de servicio o compañía telefónica.
1
{
MENU
}
i
{
#
}{
3
}{
3
}{
2
}
2
{V}
/
{^}
: Seleccione la configuración deseada.
i
{
GUARDA
}
i
{
OFF
}
Servicio de correo de voz: Cómo escuchar los mensajes del correo de voz
La unidad le informa que tiene nuevos mensajes de correo de voz:
–
“
Nvo. Msj. voz
”
aparece si el servicio de indicación de mensajes está
disponible.
– El indicador de mensajes parpadea lentamente si la función de alerta de
mensajes está encendida (página 12).
1
{
MV
}
o
{
MENU
}
i
{
#
}{
3
}{
3
}{
0
}
L
El altavoz se enciende.
TGA651(sp).fm Page 15 Wednesday, February 8, 2017 11:47 AM

(16)
L
Si no hay mensajes nuevos en el correo de voz,
{
MV
}
no aparece.
2
Siga las instrucciones pregrabadas.
i
Cuando termine, oprima
{
OFF
}
.
Nota:
L
Si el auricular continúa indicando que hay mensajes nuevos aun después de
que haya escuchado todos los mensajes nuevos, apáguelo oprimiendo y
manteniendo oprimido
{
#
}
hasta que emita un pitido.
Cómo encender y apagar el ajuste de tiempo (solo para suscriptores al
servicio de identificador de llamadas)
Esta función permite que la unidad ajuste automáticamente la fecha y la hora
cada vez que reciba información de la persona que llama, incluso fecha y hora.
Para encender esta función, seleccione
“
ID de Llamada Automático
”
. Para
apagar esta función, seleccione
“
Manual
”
. La configuración predeterminada es
“
ID de Llamada Automático
”
.
Para usar esta función, primero ajuste la fecha y la hora (página 6).
1
{
MENU
}
i
{
#
}{
2
}{
2
}{
6
}
2
{V}
/
{^}
: Seleccione la configuración deseada.
i
{
GUARDA
}
i
{
OFF
}
TGA651(sp).fm Page 16 Wednesday, February 8, 2017 11:47 AM
-
 1
1
-
 2
2
-
 3
3
-
 4
4
-
 5
5
-
 6
6
-
 7
7
-
 8
8
-
 9
9
-
 10
10
-
 11
11
-
 12
12
-
 13
13
-
 14
14
-
 15
15
-
 16
16
-
 17
17
-
 18
18
-
 19
19
-
 20
20
-
 21
21
-
 22
22
-
 23
23
-
 24
24
-
 25
25
-
 26
26
-
 27
27
-
 28
28
-
 29
29
-
 30
30
-
 31
31
-
 32
32
-
 33
33
-
 34
34
-
 35
35
-
 36
36


Panasonic KXTGA651 Instrucciones de operación
- Categoría
- Telefonos
- Tipo
- Instrucciones de operación
en otros idiomas
Artículos relacionados
-
Panasonic KXTGA651 Instrucciones de operación
-
-
-
-
-
Panasonic KXTG2388 Instrucciones de operación
-
-
-
-