Pfaff 138 El manual del propietario
- Categoría
- Máquinas de coser
- Tipo
- El manual del propietario
Este manual también es adecuado para
La página se está cargando ...

Important
notes
Zur
besonderen
Beachtung
Urn
Stdrungen
oder
Schtidan
zu
vernieiden,
sind
nachstehende
Punide
unbedingt
zu
beachteri.
•
Vor
der
orslen
lnbetriebnahmo
Maschine
griindlich
situbem
und
anschlieltend
OIen
(siefle
Seite4
±
5).
•
Kontrollieren,
ob
die
Netzspannung
mit
dec
auf
dern
Motor-Leistungsschild
angegebenen
Spannung
iibereinstimmt.
Eel
Abweichung,
Maschine
auf
ketnen
Fall
in
Betrieb
$etzen.
•
Del
laufender
Maschine
moB
sich
das
Handrad
zur
Bedienungsperson
hun
drehen
—
andem
falls
Motor
umklemmen
lassen.
•
In
den
ersten
2
Wochen,
Maschine
nur
mit
3/4
ihrer
Hdchslgeschwindigkeit
lauten
lassen.
•
Nur
das
vorgescitriebene
Nadelsystem
wendon
(siehe
Seile
7).
•
Maschine
regolmtiflig
reinigen
(siehe
Seile
21).
To
avoid
trouble
or
damage
ills
absolutely
neces
sary
to
observe
the
following
instiuctions:
•
Bøfpr
‘bu
put
the
machine
into
operation
for
the
first
time
clean
it
fhoroughly,
remove
all
dust
which
has
accumulated
on
it
in
transit
and
oil
it
well
(see
pages
4
+
5).
•
Check
to
make
sure
the
line
vottage
agrees
with
the
voltage
indicated
on
the
motor
rating
plate,
If
It
does
not,
be
sure
not
to
plug
ri
the
machine.
•
The
balance
wheel
should
always
rotate
to
ward
you.
If
it
does
not,
exchange
the
wires
on
the
motor.
•
During
the
first
two
weeks
of
operation
run
the
machine
atu,
of
its
top
speed
only.
•
Use
the
specified
needle
system
only
(see
page
7).
•
Clean
the
machine
regularly
(see
page
21).
Conseils
importants
Observer
rigoureusement
es
recommandations
suivarites
pour
évifer
tous
derangements
et
de
térioratlons.
•
Un
nettoyage
at
huilage
soignewc
do
Ia
ma
chine
s’imposent,
avant
Ia
premiere
mise
en
service,
salon
los
prescriptions
(pages
4
at
5).
•
S’assurer
qua
Ia
tension
do
sectaur
concorde
avec
Ia
tension
indiquea
sur
Ia
plaque
signs
létique
du
moleur.
En
cas
de
divergence,
ne
pas
mettra
Ia
machine
en
marche.
•
La
volant
de
Ia
machine
devra
toumer,
vu
d’en
haul
vera
Ia
mécanicienne.
Sinon,
inverser
Ia
polatité.
•
Pendant
las
deux
premieres
semaines,
n’utili
oar
Ia
machine
qu’aux
3/4
do
as
vitessa
maxi
male.
•
Nutilisar
que
lea
aiguilles
du
système
prescrif
(voir
page
7).
•
Nettoyer
regulièrement
Ia
machine
(page
21).
Observaciones
Importantes
Con
el
fin
do
evitar
fallos
y
averlas,
deberán
tenerse
muy
en
cuenta
los
siguienfes
purtlos:
•
Ant
as
do
poner
Ia
máquina
en
marcha
por
pri
mere
vez,
hágase
una
limpieza
y
engrase
general
do
Ia
misma
(vitanse
págs.
4
y
5).
•
Compruebo
si
Ia
tensiOn
de
Ia
red
coincide
con
Iatenaión
indicada
en
Ia
plaquita
do
ospecifica
ciones
del
motor.
En
caso
contrario,
no
ponga
en
marcha
Ia
máquina
de
ninguna
manera.
•
Al
ponor
Ia
máquine
on
marcha,
asegOrase
do
qua
el
volante
giro
hacia
Ia
operaria.
En
caso
contrarlo,
daberân
conmuterse
los
polos
del
motor.
•
Durante
las2primerassemanas,
Ia
mitquinano
deberá
macchar
max
qua
a
3
/
4
do
so
velocidad
maxima.
•
Utificense
Onicamente
agujas
del
sistema
indicado
(V.
pág.
7).
•
Limpia
Ia
maquina
con
regularidad
(v.
p4g.
21).
Sicherheits-Hinwelse
•
Die
Maschine
dad
nur
ihrer
Bostimmung
gemtttt
verwendot
warden.
Beim
Umbau
in
andere
AusfLihrungen
sind
sIlo
gUlligen
Schulzbestim
mungen
zu
berticksichtigen.
•
Din
Betrieb
tier
Maschine
ohne
die
vom
Werk
engobrachten
Schutzoinrichtungen
ist
nicht
erlaubt.
•
Das
Elnochallen
und
Betreiben
dec
Maschine
dart
nor
durch
die
entsprechend
unterwiesene
Bedienpersori
erfolgon.
•
Beim
Wechseln
von
Ntihwerlczeugen,
wie
z.B.
Nadel,
Ntihful3,
Stichplatte,
Stoffschieber
und
Spule
beim
Einfitdeln,
beim
Vertassen
des
Arbeitsplatzes
und
bei
Wartungaarbeiten,
ist
die
Maschine
durch
Betittigen
des
Haupt
schalfers
odor
durch
Herausziohen
des
Nets-
stockers
vom
Nets
zu
trennen.
Bat
horeech
betbtitoo
Kepplungsowto,on
st
dot
ste.
BlOnd
dna
Motom
nbZuwarleo.
•
Bei
Wartungs-
und
Reparaturarbeiten
an
pnou
matiachen
Einrichtungen
ist
die
Maschine
vom
pneumatiachen
Vorsorgungsnelz
zu
Ironnen.
Aunoahwen
sind
our
bat
Justrorurh&ten
005
Funktioosprd
k,ngoudurhentuprechonduntorwlesnneFodrkrhhn
ordduul.
•
Arbeiten
an
dec
elektrischen
Ausrustung
ditrfen
nut
durch
Elektrolachkrtifle
odor
entsprechend
unterwiesene
Personen
durcligeKihrt
werden.
Athettan
at
actor
Sponorrrg
slehwdoc
Thtlen
tart
CloneS.
tungorngnd.
nannhen
con
rotbnutgondlnwoirthnogsngemaa
DIN
57
305
hew.
VDE
0155,
COnt
onloobt.
Safety
instructions
•
The
machine
must
Only
be
used
for
the
purpose
it
was
designed
for.
In
case
of
conversion
into
another
version
all
valid
safety
instructions
have
to
be
considered.
•
Do
not
operate
the
machine
without
the
safety
devices
It
is
equipped
with.
•
The
machine
musI
only
be
switched
on
and
operalad
by
persons
who
have
been
instructed
accordingly.
•
When
eschanging
gauge
parts
(e.g.
needle,
presser
toot,
needle
plate,
feed
dog,
bobbin).
threading
the
machine
or
leaving
it,
arid
when
making
maintenance
work,
the
machine
must
be
disconnected
either
by
actuating
the
master
switch
or
by
removing
the
mains
plug.
In
cane
or
honlvelly.oetnwtod
ototob
motors
watt
For
the
motor
to
stand
still.
•
When
carrying
out
maintenance-
or
repair
work
on
pneumatic
devices
the
machine
must
be
disconnected
fmm
the
pneumatic
supply
source.
The
only
onrnepbnnns
perodttod
ore
odiusnnents
end
parlor
,nernoechooinn
made
by
competont
ponsonool.
•
Work
on
the
electrical
equipment
of
ttre
machine
must
only
be
carried
out
by
electricians
or
other
persons
who
have
boon
instructed
accordingly.
Apanthorn
the
permIssIble
deviations
according
to
DIN
57105,
ansI
voe
0105,
work
on
One
pets
and
eqndproent
In
not
per
,sltlod.
Recommandations
de
securité
•
N’utiliser
Ia
machine
quo
pour
las
travaux
aux
quels
ella
est
dostinéa.
En
cas
tie
transtorma
lion
en
one
autre
version,
respecter
toutes
los
prescriptions
do
sécurlté
vslables.
•
N
pas
utillser
Ia
machine
saris
las
dispoattits
do
sécurlté.
•
Saute
I’opératrice
instrulte
on
consequence
devra
mettre
Ia
machine
en
circuit
at
coudre.
•
Avantle
chartgementd’organas
de
couture
tels
quo
l’aiguille.
le
pied
presseur,
Ia
plaque
a
at
guilte,
Is
grlffe
ella
canette,
avant
I’entllago,
avant
de
quitter
Ia
machine
SI
avant
len
travaux
d’entrellon.
Ia
machine
ost
a
mettre
hors
circuit
ti
I’interrupteur
general
ou
par
enlèvemont
de
Ia
fiche
secteur,
Pour
Ins
motevnrs-trwrsorottesrs
troloedoyjas.
aatodm
totem
dot,wteor.
•
Pour
los
travaux
d’ontretien
etde
reparation
au
système
pnaumatique,
couper
Ia
machine
du
rAsoau
pneumatiquo.
Scole000ccyltoss
entwines:
rdglagen
ot
contrides
par
do
per
000eotcompelant.
•
Las
travaux
sux
équipements
électriques
sont
4
confier
un
électricten
ou
4
du
personnel
competent.
les
moose
eon
pièces
at
disposels
soon
tension
no
semI
yes
n&rds,
Saul
es
nooepboos
Solon
to
norma
OtN
57
105
as
VDE
slob.
Normas
de
seguridad
•
No
utilico
Ia
máquina
m4s
qua
pare
los
traba(os
pars
los
qua
esté
deslinada.
Al
transtormatla
en
otrotipo,
ténganae
an
cuontatodaa
las
normas
de
seguridad
vigontes.
•
No
asta
permitido
usar
Ia
máquina
sin
los
dis
positivos
do
prolacciOn
montadoa
en
f4brica.
•
La
máquina
sOlo
debor4
sor
conectada
y
mane
jada
per
a
persona
instruida
al
respacto.
•
Al
cambiar
Organos
tie
costura
(agu(a,
prensa
telas,
placa
tie
agu(a,
fransportador,
canilla
etc.),
to
misrno
quo
al
enhebrar,
at
abandonar
el
puesto
de
costura
y
al
hacer
traba(os
de
mantenimiento,
Ia
máquina
deberé
desconac
tarse
eléctricamente
con
et
interruptur
general
o
retirando
el
enchute
do
Ia
red.
En
rnotores
tin
norbraguo
oceonedos
enaodnloamente
bay
quo
aspetor
etUO
SO
pare
at
flOriSt.
•
Al
afecluar
trabajos
tie
roparaciOn
y
manteni
miento,
habr4
quo
desconectar
Ia
máquina
do
la
red
de
alimentaciOn
noumática.
Odin
Se
adrnilen
oncopolonen
coat
canada
niosteon
rontncdou
efactuaclos
pot
personal
enpecratneodo.
•
Los
traba(os
en
el
equipo
oléctrico
deberán
sor
realizados
por
electrlcistas
cornpelonles
o
por
personal
instruido
al
caso.
Noootdperrndhdo
roabmartrabaiosen
preresydinponlhoosque
esttin
bole
Iewtbn,
salvo
en
Ins
eucepolones
do
Ia
00000
otNanls5ovOEstob.
3

Cilen
Bel
neuen
Maschinon
ate
blanken
Tails
mit
sau
harem
Lappen
abwischon.
Anschliellend
an
ails
roto
markierten
Cistollen
(in
Fig.
1
his
3
durch
Pfeile
gekennzoichnot)
etwas
Petroleum
goben
und
Maschine
hal
hochgestetltem
Nithfu8,
oboe
Faden
und
Spulenkapsel,
kurz
tauten
assert.
Danach
alle
tilstetlen
mit
etwas
Pfaff
Nähma
schlnenôI
Nr.
280-1-120144
odor
siturefreiem
CII
mit
airier
Viskosititt
von
15,0
mrn
2
/s
bei
50°C
und
einer
Dichte
von
0,865
glcrn
3
bei
15°C
ver
sorgen.
Das
blon
2
mat
wSchenttich,
bei
indu
striellem
Einsatz
taglich
sowie
hal
extremen
Be
dirigungen
(zO.
viol
Ntihstaub,
hoho
Drehzahi
usw.)
2
mat
titgtich
wiederholen.
Kapsellaufbahn.
Grail
or
und
Kopfteilo
besonders
berUcksichtigen.
Die
Kegelritdor
einmat
Im
Jahr
mit
Natronseiten
tett(Tropfpunkt
150°C)
Pfatf-Sest.-Nr.
280-1-120
243
dunn
eintetten.
Oiling
Before
you
put
a
new
machine
into
operation,
wipe
all
bright
metal
parts
with
a
clean
rag.
Apply
a
few
drops
of
kerosene
to
all
oiling
points
marked
red
on
the
machine
(end
by
arrows
in
Figs.
1103>
and
run
the
machine
briefly
with
needle
thread
and
bobbin
case
removed
and
the
presser
foot
raised.
Then
apply
a
few
drops
ot
Ptaff
sewing
machine
oil
No.
280-1-120144
or
an
acid-free
oil
with
a
viscosity
0115.0
mm
2
/s
at
50°C
and
a
den
sity
of
0.865
g/cmi
at
15°C
to
all
oiling
points.
Oil
the
machine
twice
a
week,
including
especially
the
bobbin
case
raceway
in
the
sewing
hook
and
the
machine
head
parts.
When
the
machine
is
employed
in
sewing
factories,
oil
it
once
a
day,
under
extreme
conditions
(e.g.
large
amount
of
lint
or
high
speed)
even
twice
a
day.
Apply
a
thin
film
of
sods
soap
grease
with
a
drip
ping
point
of
150°C
(Ptaff
No.
280-1-120
243>
to
the
bevel
gears,
once
a
year.
Huilage
Sur
lea
machines
neuvos,
nettoyer
toules
los
parties
non
pointes
avec
Un
lorchon
propre.
Puis,
verser
quelques
gouttes
do
pétrole
stir
toua
lea
points
do
graissage
marques
de
peinture
rouge
(fig.
1
a
3,
fléches).
Faire
burner
to
mécanisme
quelque
lamps
sans
fit
ni
boSe
a
canette,
it
pied
presseur
levé.
Puia,
graisser
bus
lea
points
indiquès
ci-dessos
evec
do
Ihuite
Pfaff,
ret.
280-1-120144
ou
do
l’huile
exernpte
d’aclde
dune
viscoaité
do
15,0
mm°/sec
a
so°c
et
d’une
densité
do
0,865
g/cm°
a
15°C.
Huller
normale
mont
deux
tots
par
semaine,
une
tots
par
Jour
en
cas
d’utiiiaation
induatrielle
01
deux
lois
par
jour
a
des
conditions
d’emploi
extremes
(p.
ex.
beaucoup
do
bourres,
vitesses
étevéos,
etc.),
en
particufierlscoursière
du
crochet,
le
crochet
et
lea
pièces
do
beta.
Une
tots
par
an,
enduireles
pignons
dune
légère
couche
do
graisso
so
savon
do
soude
(tempera-
lure
de
auutoment
150°C),
tél.
Pfaff
280-1-120
243.
Engrase
En
el
caso
de
máquines
nuevas,
limpie
todas
las
piezas
pulidas.
A
continuaciôn
eche
un
poco
do
potróleo
en
todos
los
puntos
do
engrase
marca
dos
con
-roto”
(indicados
con
Ilechas
en
las
figs.
1
a3)
y,
con
el
pie
prensatolas
levantado,
sin
hilo
y
sin
cápaula
de
Ia
canulta,
ponga
Ia
mAquina
on
marcha
duranle
un
corto
tiempo.
Soguidamente
provea
todos
lox
punlos
do
engrase
con
on
poco
do
acelte
Plaff
para
máqulnaa
do
coser,
N’
280-
1-120144,
6
do
eceite
oxento
do
ácidos
con
una
viscosidad
do
15,0
mm
2
/s
a
50°C
y
una
clonsidod
do
0,865
9/cm°
a
15°C.
Ropita
este
engrese
dos
veces
a
Ia
semana;
ci
se
usa
como
máquina
in
dustrial,
uris
vex
at
dia
yen
condiciones
extremes
(p.
ej.
mucho
polvo
do
costura,
etevada
volocidad,
etc.),
2
vecea
at
dis,
sin
olvidarso
do
a
pisla
do
Ia
corredera
del
garlio
y
do
las
piezas
de
Ia
cabeza.
Engrase
los
engranajes
cOnicos
una
vex
at
año
con
uris
capa
fina
do
grosa
sOdica
(punto
de
go
tao
150°C),
N°
do
pedido
Pfatf
280-1-120
243.
07811
F,g.2
07810
5

Nadel-
und
Garndicke
Mit
der
Pfaff
138
in
Ausfuhnurrg
A
kSnnen
teine,
in
AusfUhnung
B
mittlere
Malerialieri
verarboilet
werden.
Nadel-
und
Gamdicke
richion
sich
dabei
nach
dem
zu
vemithenden
Material.
Die
nachslehenden
Angaben
sollen
als
Anhalls
punkte
dienen.
Needle
and
thread
sizes
In
model
A
the
Pfafl
138
is
used
for
sewing
light
weight
materials,
in
model
B
for
medium-weight
materials.
Needle
size
and
thread
weight
depend
on
the
material
to
be
sewn.
Select
the
proper
needle
and
thread
sizes
from
the
chart
below:
Aiguille
et
fil
La
PlaIt
138
en
modéle
A
Iravaille
les
matières
fInes;
is
models
B
convient
pour
les
matières
moyennes.
La
grosseur
de
l’aiguille
at
dii
fit
sont
tonction
des
mallAres.
La
tableau
ci-dessous
ne
donne
qua
des
valeurs
approximatives.
Inserting
the
needle
Use
needles
of
the
specified
system
only,
as
indi
cated
below:
Subdass
Needle
system
-6/21;
-6/21-915102;
-34/01;
-45/01-915/02;-45/02-915102;
438
KK
-66/01
-6/21-915105;
-45/01-915/05;
1308
-45/02915/05
-275/01-277/01
134
EtC
Switch
off
the
machine.
Loosen
needle
set
screw
A.
Insert
the
needle
with
its
long
groove
facing
toward
you
and
push
it
up
into
the
needle
holder
as
far
as
it
will
go.
Tighten
the
needle
set
screw.
Mise
en
place
de
l’aiguille
N’ufiliaer
que
des
aiguilles
du
système
preacrit:
Sous-classe
Système
d’aiguille
-6/21;
-6/21-915/02;
-34/01;
-45/01-915/02;-45/02-915102;
438
1(1<
-66/01
-6/21-915/05;
-45/01-915/05;
1308
-45/02-915105
-275/01;-277/01
134
EtC
MaItre
Is
machine
hors
circuit.
Desserrer
Ia
via
de
fIxation
A
cia
laiguille.
Intro
duire
laiguille
jusquit
Ia
butée
clans
le
pince
sigullie,
Is
rainure
longue
loumée
Vera
ravant.
Rebloquer
levis
de
fixation
de
laiguulle.
Colocación
de
Ia
aguja
Use
excluaivsrnente
agujas
del
sistema
indicado:
Subclase
Sisteme
deaguaja
-6/21;
-6/21-915/02;
-34/01;
-45/01-915/02;-45/02-915102;
438
1(1<
-66/01
-6/21-915/05;
-45/01-915/05;
1308
-45/02-915/05
-275/01
;-277/01
134
EtC
Dasconecte
a
maquina.
Atloje
el
tomillo
A
pare
fijaciOn
de
Ia
agujs.
Intro
duzca
Ia
aguja
haste
el
tops
anal
portaagujas,
de
fcrms
qua
su
ranura
larga
mire
hacia
el
frente.
Finalemante,
apriele
at
lornillo
pare
fijación
cia
Is
aguja.
Hilos
y
agujas
El
tipo
de
maquirra
A
asIa
ideado
para
generos
ligaroa
yeT
B
pare
semuligeros.
El
grosor
del
hilo
y
da
a
aguja
depends
del
ma
terial
qua
se
coss.
El
cuadro
slguienfe
ofrece
al
gunos
puntos
de
referenda
pare
Ia
corrects
alec
don
de
Ta
aguja
y
del
hllo
respadto
vi
tipo
de
máquina.
F.
4
R7187
.
.9-
•
Be
a
c
E-eot
.
z-°
0
,
5
0
B
.9
are
oars’-
5
-0
s,ar.tt
c
S
2
srtt
E
0
at
rfl0•OO
o5
car
o
0000.
5500
ao,c.2r
tI=Sar
>>-=__
5St
<l
ZZCIE)
5lO..,<
uicd7uflO
(oc0uc0
60
100—80
140
200—150
A
70
70—60
120
180—120
80
60—50
100
120—100
B
90
50—40
80
100—80
70
100
40—30
70
80—60
60
Achtung:
Shine
Flngerschutz
Verlefzungsgefahrl
DangerI
Do
not
operate
without
finger
guardl
Attention:
Sans
protège-doigts,
risque
d’accidenti
MansIOn:
No
rosa
sin
saisadedos.
lffellgro
de
accidental
*
Nadeldicke
in
hundertstel
mm
*
Needle
size
in
hundredths
of
mm
Nadel
einsetzen
Nur
Nadaln
des
vorgeschriebenen
Systems
var
wenden:
Unterfdasse
Nadalsystam
-6/21;
-6/21-91
5/02;
-34/01;
-45/01-915/02;-45/02-915102
438
KK
-66/01
-6/21-915/05;
-45/01-915/05;
1308
-45/02-915/05
-275/01-277/01
134
BK
*
Grossaur
de
l’aiguilla
an
canlièmes
da
mm
*
Groaor
de
Ia
aguja
en
Vim
da
mm
Maachine
ausschaltan.
Nadelbefastigungsschraube
A
lSsen.
Nadel,
mit
dec
langan
Nadeirille
nach
vorn,
his
zum
Ansciilag
in
den
Nadelhalter
ainsetzen.
Nadelbefestigungs
schraube
feslziehen.

Devanado
del
hilo
inferior
Bobinage
du
fil
de
canette
Winding
the
bobbin
lntroduzca
Ia
canilla
en
at
husillo
5’
el
Carrete
en
Unterfaden
aufspulen
Placer
Ia
canette
sur
laxe
5
eta
bobine
de
Ill
sot
Ia
espiga
1.
Pase
el
hito
pot
et
sgujero
2
y
a
con-
Place
a
bobbin
on
spindle
5
and
a
spool
of
thread
Ia
broche
1.
Passerle
fit
part’miltet
2,
dana
Ia
sans
tinuaciOn
en
el
sentido
de
las
agulas
del
retoj,
Sputa
aut
Spindel
5,
Gamrotte
auf
Stift
1
stecken.
on
pin
1
Pass
the
thread
through
eyelet
2,
clock-
des
aiguittes
dune
moritre
entre
las
disques
de
pot
antre
ba
ptatiltos
tensores
3
y
arrolte,
tam
Fadan
dutch
Ose
2,
rn
Uhrzeigersinn
zwischen
wise
around
and
between
tension
discs
3,
arid
tension
3
puis,
anrouler
Ia
fit
de
quolques
tours,
bién
en
at
mismo
sentido,
unas
vueltas
de
hilo
en
dieSpannungsscheiben3führenundeinigeMale
windat&tumsofthreadonthebobbininaclock-
dans
le
aena
des
aiguilles
dune
montre,
sot
Ia
Ia
canilta.
Ponga
at
devanador
an
marcha
pre
rn
Uhrzeigerainn
auf
die
Sputa
wicketn,
Spuler
wise
direction.
Startthe
bobbin
winder
by
puahing
canette.
Embrayer
te
dévidoir
par
pression
sur
Is
sionando
Ia
patanca
6.
La
canitta
lena
Ce
des-
dutch
Dnjcl<
aut
den
Hebet
6
einschalten.
Getoilte
in
lever
6.
The
bobbIn
winder
stops
automatically
levier
6.
A
canette
pleine,
Ia
dévidoir
se
débraye
corrects
por
at
aota.
Sputa
schaltet
setbsttatig
ab.
when
the
bobbin
is
full.
Turn
screw
7
clockwise
autornatiquement.
Parvissagede
Is
vis
7:
canetle
Girandoel
tomitto7
hacia
a
derecha,
Ia
canitla
se
Schraube
7
nach
rechb
drehari
Spule
wird
mehr,
for
more
thread,
or
counter-clockwise
for
less
mieux
remplie;
par
dévtssage
de
cage
vis:
ca-
Ilana
más.
y
viceversa.
Si
Ia
canilla
Se
Ilena
irre
nach
links
dreflen
Sputa
wird
weniger
geftlltt.
thread,
If
the
thread
piles
up
on
one
side
of
the
naSa
moths
remplie.
La
bobinage
irrégutier
se
gularrnanle,
aflojeeltomltlo4ycorra
tateralmente
Ungtetchrntit3igas
Aufaputen,
nach
Lhsen
der
bobbin,
loosen
screw
4
and
adjust
the
position
of
règle,
après
desserrage
data
via
4,
pare
déptace-
at
soporte
del
lensahitos,
Regule
Ia
tension
del
Schraube
4,
dutch
Var
schieben
des
Spannungs-
the
tension
bracket
sideways.
The
thread
tension
ment
du
support
de
tension.
Regler
Ia
pretension
hilo
mediante
Ia
tuerca
8.
Irtigers
ragutieren.
is
regulated
by
turning
nut
8.
‘0
t’aide
de
l’Ocrou
B.
La
fig.
5
muestra
a
disposiciOn
del
dispositivo
Fig.
S
zeigt
die
Anordnung
dat
Spulereinrlchtung
The
arrangement
of
the
bobbin
winder
on
power-
La
fig.
5
montre
a
disposition
du
dOvtdoir
sur
las
devanador
en
mOquinas
con
accionamienlo
a
bet
Maschinen
mit
Motorantrieb,
Fig.
6
bet
Ma-
driven
machines
is
illustrated
In
Fig.
5,
that
of
machines
ti
moteur
at
Ia
fig.
6
celte
sot
las
ma-
motor
y
Ia
fig.
6,
para
et
caso
do
rnOquinas
accio
schinen
mit
Treteiririchtung.
foot-driven
machines
in
Fig.
6.
chines
S
pédalier.
nadas
a
pedal.
S

Threading
and
inserting
the
bobbin
case
Insert
the
bobbin
into
the
bobbin
case
so
that
it
turns
in
the
direction
of
the
arrow
when
the
thread
is
pulled
(Fig.
7).
Draw
the
thread
into
slot
1
end
pull
it
under
the
tension
spring
until
it
emerges
at
tip
2.
SwItch
off
the
machine.
Turn
the
balance
wheel
to
bring
the
take-up
lever
to
its
highest
point.
Lift
the
bobbin
case
latch
and
insert
the
bobbin
case
with
the
bobbin
into
the
sewing
hook.
Close
the
latch
and
press
against
the
bobbin
case
lightly
until
you
hear
it
snap
into
place.
Enfilage
et
mise
en
place
de
Ia
bofte
a
canette
Placer
Ia
canette
gamin
dens
Ia
boite
a
canette
de
manière
que
le
lii
as
déroule
dans
le
sans
indiqué
par
Ia
flèche
(fig.
7),
enfilerle
lii
par
Ia
tents
I
•
sous
Ia
tanguette
2
du
ressort
el
engager
Ia
canette
a
fond.
MaItre
a
machine
hors
circuit.
Par
rotation
du
volant,
placer
Is
levier
releveur
de
I
ii
au
point
haut.
Lever
le
loquet
de
Is
bolts
a
canette
at
placer
cello-cl
avec
Ia
cariette
dana
le
crochet.
Coucher
le
loquel
at
veiller
a
l’ernboilage
perceptible
de
Ia
boite
a
canelle.
Threading
the
needle
Switch
off
the
machine.
Lead
the
thread
through
thread
guide
1,
then,
as
shown
in
Fig.
8,
through
guide
2,
around
wire
3,
from
the
right
between
tensions
discs
4,
around
guide
disc
5,
over
thread
check
spring
6
and
in
sert
in
hook
7.
Afterwards
lead
the
thread
from
the
right
through
the
hole
of
thread
lever
8,
wires
9,
10
and
II
and
thread
the
needle
from
front
to
back;
pull
about
6
or
7cm
of
thread
through
the
needle
eye.
Enfilage
du
fil
supérieur
Mettre
Ia
machine
hors
circuit.
Enfiter
lo
lit,
venant
de
Ia
bobine,
parts
broche
1,
puis,
salon
fig.
8,
par
le
guide-fil
2.
sous
létrie-
3,
de
Ia
droite
ontre
lea
disques
de
tension
4,
autour
du
disque
5,
cur
Is
reason
contrôleur
6,
sous
le
crochet
7.
Ensuite,
anther
he
releveur
8
de
Ia
droile,
passer
Ia
III
par
es
guide-fit
9,
bet
11.
Enfiler
laiguille
do
lavant
en
laissant
dépasser
any,
7cm
de
III.
Spulenkapsel
einfädeln
und
einsetzen
Spule
so
in
die
Spulenkapsel
einsetzen,
dalI
eta
sich
bel
Fadenabzug
in
Plellflchtung
dreht
(siehe
Fig.
7)
dabel
den
Faden
in
Schlitz
1
elnhflngen
und
unter
die
Federzunge
2
ziehen.
Faden
sotl
Ca.
5
cr0
herausragen.
Maschinie
ausechallen.
Am
Handrad
drehen
bie
Fadenhebel
in
höchster
Stellung
steht.
Spulen
kapsetklappe
anheben
und
Kapsel
mit
Spule
in
den
Greifenelnsetzen.
KIappe
umiegen
und
Ieicht
nachdrlIcken
bis
die
Kapsel
httrbar
einrastet.
ColocaclOn
y
enhebrado
de
Ia
cápsula
de
Ia
canilla
Coloque
Is
canitls
en
Ia
cápsula
de
forma
qua
at
tirar
del
hilo.
Ia
carlitla
gire
en
el
sentido
de
Ia
flecha
(V.
fig.
7),
y
enganche
al
mierno
tiempo
el
hito
en
Ia
ranura
I
hasta
que
aparezca
per
detrás
de
Ia
Iengueta
etáatica
2.
Deaconecle
Ia
maquina.
Dire
elvolanlehastaque
a
palanca
tirahilos
quede
en
su
posiclôn
superior.
Levante
Is
bisagrita
de
Ia
cépsula
y
coloque
eats
(unto
con
Ia
canilla
en
el
garflo.
Suelte
Ia
bisagrita
y
presione
ligeramente
basis
que
Ia
cépsula
encaje
perceptiblernente.
Oberfaden
einfädeln
Macchine
ausschatten.
Den
von
der
Gamrolle
kommenden
Faden
durch
den
Fadenfithrungsstift
I
fédetn,
denach
wie
in
Fig.
8
gezeigt
durch
die
Ftthrung
2,
urn
den
Biigel
3,
von
rechts
zwischen
die
Spannungsscheiben
urn
die
FUhrungsscheibe
5,
iiber
die
Fadenan
zugsfeder
6
fUhreri
und
in
den
Haken
7
einhtin
geri.
Anschlie8end
tien
Faderi
von
rechts
durch
die
Bobbing
lm
Fadenhebel
8,
die
Biigel
9,
10
und
11
ftthren
und
die
Nadel
von
vome
each
hlnten
sin
fridein.
Das
Fadenende
etwa
6-7cm
durchziehen.
Enhebrado
del
hilo
superior
Desconecle
Ia
mAquina.
Pace
el
bib
desde
el
carrels
pot
el
guiahilos
1
y,
como
se
mueslra
en
Ia
fIg.
8,
ports
guia
2,
alrede
dor
del
muello
3,
desde
Ia
derecha
por
afire
los
platitlos
tenaores
4,
alrededor
del
discos,
por
en-
dma
del
muello
recuperador
6y,
enganchandolo
en
el
gancho
7.
páselo
deeds
Ia
derecha
pot
el
agujero
dot
tirahilos
8,
pot
las
gulas
9,
10
y
11
y,
deeds
el
frente,
pot
el
0(0
de
Ia
aguja.
Baja
un
cabo
de
bib
do
unios
657cm.
11
.1’
/2
I
:9
:,
FO.
8
Il
161756

Drawing
up
the
bobbin
thread
Tension
Achtung:
Ohna
Fingerschutz
Verletzungsgetahrl
Dangert
Do
not
operate
without
tnger
guard
Attention:
Sans
protège-doigts,
nsque
daccident!
Atenctôn:
No
cosa
otn
salvadedos.
iPetigro
de
accidental
Switch
off
the
machine.
Hold
the
end
of
the
needle
thread
and
turn
the
balance
wheel
in
its
normal
direction
of
rotation
until
the
bobbin
thread
comes
up
through
the
needle
hole
ins
loop.
Draw
the
bobbin
thread
out
of
the
needle
hole
and
lay
both
threads
back
under
the
presser
toot.
Remonter
le
fil
inférleur
Mettre
Ia
machine
hors
circuit.
Tenir
Ia
tit
superieur
at
burner
le
volant
dans
Ia
sans
normal
jusqu’ti
lapparition
clans
Ia
trou
dai
guille
du
fit
inférieur
eous
forme
de
boucle,
Tiror
Ia
fIt
complètement
du
trou
daiguille
de
Ia
plaque
et
coucher
lea
flis
daiguille
at
de
crochet
vera
l’arrière.
A
iA
I
3
3
3
-
-
Ag.12
Regulate
both
tensions
so
that
the
needle
and
bobbin
threads
interlock
In
the
center
of
the
mate-
hal
and
the
stitches
are
tightly
set
(Fig.
10)
Upper
tension
too
loose
or
tower
tension
too
tight
(Ag.
11).
Upper
tension
too
tight
or
lower
tension
too
loose
(Ag.
12).
Tension
des
fils
Rrigler
las
tensions
de
manitire
qua
Ins
deux
fits
ne
torment
pas
de
boucles
else
nouont
au
milieu
de
t’ouvrage
(fig.
10).
Tension
du
fit
supérleur
frop
talbie
ou
tension
du
fit
infériour
trop
forte
(fig.
11).
Tension
du
fit
supérieur
trop
forte
ou
tension
du
fit
infitneurtrop
faible
(fig.
12).
Fadenspannung
Tension
de
los
hilos
Unterfaden
heraufholen
Macchine
ausachalten.
Obertaden
festhalten
und
am
Handrad
in
Dreh
richtung
drehen,
bis
der
Unterfaden
ats
Schlinge
mis
dam
Stichloch
kommt.
Unterfadert
aus
dam
Stichloch
herausziehen
und
zusammen
mit
dam
Obertaden
nach
hinten
uniter
den
Stepptutf
legen.
ExtracciOn
del
hilo
inferior
Desconecte
Ia
méqulna
Sujete
at
fib
superior
y
gire
el
volante
en
sentido
normal
haste
qua
aparezca
at
hilo
inferior
en
forms
de
lazada
por
at
agu)ero
de
Ia
place
de
aguja
Saque
ahora
Ia
punts
del
hito
interior
y
cotoqueto
haute
atrás
por
debajo
del
pie
pmensatelas.
Ober-
und
Untertsdenspannung
so
aufeinander
abstimmen,
daB
die
beiden
Ftiden
gut
einge
zogen
sind
und
die
Verschlingung
in
der
Mine
des
Nahgutes
erfolgt
(Fig
10).
Oberfadenspannung
zu
schwach
outer
Unterfadanspannung
zu
stark
(Fig.
11).
Obertadenspannung
zu
stark
oder
Unterfadertspannvng
zu
schwach
(Fig.
12).
La
tensiOn
del
hlto
superior
e
Inferior
debe
cci
ordinarae
de
forma
qua
ambos
hitos
queden
bien
asentados
y
qua
at
entrelazado
tenga
tugar
dentro
del
material
(Fig.
10).
TensiOn
del
hito
superior
demasiado
ftoja
o
ten
sian
del
fib
interior
demasiado
fuerte
(Fig.
11).
TensiOn
del
hito
superior
demasiado
fuerte
o
ten
siOn
dot
hilo
interior
demaslado
tioja
(FIg
12).
13

Regulating
the
stitch
length
Turn
thumb
nut
S
clockwise
for
shorter
stitches,
or
counter-clockwise
for
longer
stitches.
The
numbers
on
the
scale
indicate
the
approximate
stitch
length
in
millimeters.
Reverse
sewing
Push
feed
regutator
lever
S
up
as
far
as
it
wilt
go
and
hold
in
there.
The
reverse
sthches
are
as
tong
as
the
ones
set
for
forward
sewing.
Reglage
de
Ia
long
ueur
du
point
Oberfadenspannung
regulieren
Oberfadenspannung
nur
bei
herabgelassener
StoftdrUckerstange
regulieren.
Durch
Drehen
der
Prindelmutlerl
bzw.
2nach
rechts(+”)wirddie
Spannung
starker,
nach
links
(,,—“)
schwticher.
Unterfadenspannung
regulieren
Durch
Drehert
der
Schlitzschrauba
nach
rechls
(±“)
wird
die
Spannung
starker, nach
links
(fl—”)
achwticher.
Par
vissage
data
poignée
S.
le
point
deviant
plus
court
par
dévissage
de
celia
poignee,
Ia
point
deviant
plus
tong.
Léchelte
graduée
indiquo
Ia
tongueur
approxima
live
du
point
on
mm.
Couture
en
inarche
arrière
Regulating
the
needle
thread
tension
Always
lower
the
presser
bar
before
you
regulate
the
needle
thread
tension.
To
increase
the
ten
sion,
turn
knurled
nut
I
or
2
clockwise,
to
de
crease
the
tension,
turn
It
counter-clockwise.
Regulating
the
bobbin
thread
tension
Turn
the
regulating
screw
clockwise
for
a
tighter
tension,
or
counter-clockwise
for
a
weaker
ten
sion.
Flelever
Ia
poignée
S
jusqu’à
Ia
bulée
ella
main
tenir
dens
cotta
position.
La
longueur
du
point
en
marche
arrière
correspond
a
celIa
du
point
en
marche
avant.
Réglage
de
a
tension
du
fil
superieur
Avant
de
regler
Ins
tensions.
sbaisser
lv
pied
presseur.
Par
rotation
des
rlcrous
I
at
2
vers
Ia
droile,
Ia
tension
des
Ills
augmente;
ella
diminue
par
rotation
vera
Is
gauche,
Regulacion
de
Ia
tension
del
hilo
superior
La
regulacion
de
Ia
tensiOn
del
hilo
superior
solamente
debarA
efectuarse
cuando
Ia
barra
del
prensatelas
esté
bajada.
Girando
las
tuercas
mo
letoadas
1
y
2
hacia
Ia
derecha,
a
tensiOn
au
macta,
y
viceversa.
Reglage
de
Ia
tension
du
fil
inférieur
Par
rotation
dv
Ia
via
vers
Is
drolle
(+),
Ia
tension
du
lii
augmente;
ella
diminue
par
rotation
vera
Ia
gauche
(--).
Regulacion
de
Ia
tensián
del
hilo
inferior
Girando
at
tornillo
hacia
Ia
derecha,
Ia
tension
aumenta,
y
viceversa.
Stichlange
einstellen
Durch
Drahen
der
Stichstellerrnutter
S
nach
rechts
wird
die
Stichllinge
kleiner,
nach
links
grotter.
Die
Skate
gibt
die
ungeféhre
Stichltinge
in
mm
an.
Rückwärtsnähen
Stichstallermulter
S
bis
sum
Anschtag
nach
oben
dnicken
und
festhatfen.
Der RFickwãrtsstich
entsprlcht
dabel
der
einge.
stetlten
Stichlange
des
Vorwärtsstiches.
Ajuste
del
largo
de
puntada
Girando
Ia
tuerca
del
regulador
de
puntada
S
hacia
Ia
derecha,
el
argo
dv
puntada
disminuye,
y
viceversa.
La
ascala
Indica
at
largo
de
puntada
aproximado
en
mm.
Costura
en
retroceso
Levante
at
regulador
de
puntada
S
hasta
at
lope
y
sujételo.
La
puntada
en
retroceso
tiene
Ia
misma
largura
qua
Ia
puntada
ajustada
para
Ia
costura
en
avarice.
Fts.
13
R16175b
Fig.14
R
9787
IS

I—
J.
—+
ZD
cD
c
,Il
4-
D
cID
cE
.
Stichiage
einstellen
Mit
dam
Hebel
H
wird
die
Stichlage
aingesteift.
Hebel
H
in
Stellung:
I
Stichiage
links
II
=
Stichlaga
mute
Ill
=
Stichiage
rechts.
Em
Wechsel
der
Stichiage
kann
wahrend
des
NTihens
ertolgen.
Bei
stilistehender
Maschine
dart
em
Wechsel
der
Stichlaga
cur
bet
hochste
hender
Nadel
vorgenomrnen
warden.
Zickzackstich
(Oberstich)
einstellen
Mittels
des
Grilles
G
wird
die
Breite
desZickzack
stiches
eingestetlt.
Wird
Tier
Grill
G
so
gedreht,
dali
der
Zeiger
Z
auf
0
zeigt,
nitht
die
Maschine
Geradstich.
Setting
the
needle
position
Lever
H
serves
to
Set
the
needle
position.
Its
three
positions
are
as
follows:
left
needle
position
II
central
needle
position
Ill
=
Tight
needle
position
The
needle
position
can
be
changed
during
sew
ing.
However,
when
the
machine
is
not
in
operation,
always
raise
the
needle
belore
you
change
the
needle
positron.
Regulating
the
stitch
width
The
stitch
width
is
regulated
by
turning
knob
G.
When
knob
0
is
turned
so
that
pointer
Z
points
at
0,
the
machine
sews
straight
stitches.
Deport
de
l’aigullle
Le
deport
de
l’aiguille
se
ritgle
a
aide
du
levier
H.
A
levier
H
en
position
=
Aigullle
it
gauche
II
=
Aiguulle
au
milieu
Ill
=
Aiguille
it
droite.
L’aiguille
peut
itlre
ditportèe
pendant
Ia
couture.
A
machine
srrêtite,
relever
l’aigullle
avant
de
pro
ceder
it
son
deport.
Réglage
du
point
zigzag
La
targaur
du
point
se
régle
it
l’aide
du
boston
0.
A
index
2
Tie
Ia
poignee
G
stir
‘O”,
Is
machine
coud
au
point
droit.
Ajuste
de
Ia
posición
de
Ia
aguja
La
poslciOn
do
Ia
sgujs
se
sjusta
colocando
Ia
patance
H
en
Isa
rnuescas
siguientes:
=
posiclón
izquierds
Tie
Is
agujs
II
=
posiclOn
centro
de
Ia
aguja
Ill
=
posiciOn
derecha
Tie
Ia
aguja
El
canibio
de
poaición
de
Ia
agujs
puede
rash
zarse
tambiitn
durante
Ia
costura.
Estsndo
Is
mitqulna
parada,
el
carnbio
de
posidon
do
ha
aguja
deberit
hacerse
soismente
con
ha
aguja
en
su
posicion
superior.
Ajuste
del
ancho
de
zigzag
Se
etectoa
girando
at
botén
0.
Si
el
indicador
Z
so
hatha
completamente
a
Ia
derecha.
en
0.
a
mitquina
coae
en
punto
recilo.
Oberstichbreite
tixieren
Schrsube
B
festziehen.
Grill
0
Tirehen,
so
dali
Zeiger
2
in
Schiebor
S
ainrastet.
Schraube
B
lösen
und
Oberstich
mittels
Gruff
0
einstellen.
Schraube
B
wieder
artziehen.
Die
Ijberstichbreite
ist
nun
tixiert,
so
dali
such
nach
einem
Oberstich
brelte-Wechseh
beim
Zurückstellen
die
exakt
gleiche
Brelte
errelchtwird.
Locking
the
stitch
width
slide
in
position
lighten
screw
B.
Turn
knob
0
so
that
pointer
Z
snaps
in
place
in
slideS.
Loosen
screw
B
and
turn
knob
0
to
the
desired
stitch
width.
Again
tighten
screw
Bto
lock
the
stitch
width
slide.
When
knob
G
is
turned
back
after
a
change
in
stitch
width,
the
original
setting
will
thus
be
restored
exactly.
Fixation
de
Ia
largeur
du
point
Serrerlavis
B.Toumerhe
bouton
Gjusqu’ace
que
le
talon
Tie
h’indes
Z
s’engage
dens
te
cran
Tie
Ia
coulisse
S.
Desserrer
Is
via
B,
ritglerhe
point
voulu
it
‘aide
de
a
poignée
0.
Resserrer
Ia
via
B,
Si
maintenant,
apres
couture
en
tine
jetite
d’aiguille
dill
érente,
on
ramitne
he
bouton
G
dana
Ia
position
préalable,
Is
machine
coud
it
nouveau
exacte
ment
it
Ia
largeur
Tie
point
ritglite
auparavant.
Bloqueo
del
ancho
de
zigzag
Apnete
et
tomllto
B.
Gire
el
bated
G
de
forms
qua
el
irrdicadorZ
encaje
ants
muesca
do
Ia
corredera
S.
Afloje
el
tornillo
B
y
ajuste
at
ancho
Tie
zigzag
mediante
el
botén
G.
Apriete
de
nuavo
eI
tar
nitlo
B.
El
ancho
Tie
zigzag
quads
asl
bloqueado,
do
forma
que,incluso
al
cambiar
de
ancho
Tie
zig
zag,se
consigue
exactamente
el
mismo
ancho
si
girar
hacia
atrits
at
baton
0.
17

Regulating
the
pressure
on
the
material
The
presser
foot
pressure
must
be
adapted
to
the
material
being
sewn.
Heavy
and
stiff
materials
require
a
stronger
pressure,
while
light
and
thin
materials
are
sewn
with
a
weaker
presser
foot
pressure.
Turn
regulaling
screw
V
clockwise
for
a
stronger
pressure,
or
counter-clockwise
for
a
weaker
pres
sure.
Raising
the
presser
foot
The
presser
foot
can
be
raised
by
means
of
the
hand
lever
at
the
back
of
the
machine
head
or
by
operating
the
knee
lever.
(This
also
applies
to
the
top
roller
of
subcl.
-905/.
.).
Pression
du
pied
presseur
La
preasion
du
pied
presseur
dolt
être
adaptée
aux
matières
mises
en
ceuvre.
Las
matières
épaisses
ou
dures
exigent
une
pression
plus
forte
que
las
matières
lêgeres.
Rotation
tie
Ia
doullle
V
a
tiroite,
pression
plus
forte;
rotation
tie
Ia
doulila
V
a
gauche,
pression
plus
faible.
Relevage
du
pied
presseur
II
est
possible
de
relever
le
pled
pressour
tant
ti
l’aide
du
levier
releveur
ala
face
arrièra
tie
Ia
tête
de
machine
qua
tie
a
genouillltre.
(Cad
eat
vala
ble
aussi
pour
le
rouleau
supérleur
en
ss-d.
-905/.
.).
Nähfu(3druck
regulieren
Oar
Nlthfultdruck
malt
dem
zu
verarbeitenden
Material
sngepaltt
warden.
Dickers
oder
härtere
Stoffe
erlordem
eirren
stArkeren
Druck
ats
leich
tare
Stoffe.
Schraubenhülse
V
nach
rechts
tire-
hen
Druck
wird
starker,
nach
links
drehen
—
Druck
wird
scfiwltcher.
Nähful3
hochstellen
Der
NShfuI3
kann
anlweder
ml
dam auf
der
ROck
seite
des
Maschinankopfas
bafindlichen
Hand
hebet
hochgestellt,
oder
durch
Beltitlgen
des
Kniehabels
angehoban
warden.
(Gilt
such
für
die
obera
Walze
bel
Ijkl.
-905/.
.).
Regulacion
de
Ia
presion
del
prensatelas
La
preston
del
prensatelas
tendrá
qua
adaptarae
en
cada
caso
al
material
qua
Se
cosa.
Para
mate
dales
gruesos
habrá
qua
elegir
más
presiOn
que
para
materlales
ligeros.
Girando
el
tomillo
V
hada
Ia
derecha,
Ia
presiOn
aumanta,
y
vicaveraa.
Elevaciôn
del
pie
prensatelas
El
pie
prensatelas
puade
elavarse
madiante
a
palanca
manual
colocada
defrtis
dais
cabeza
de
a
maquina,
o
bieri
accionando
Ia
palanca
tie
rodi
ha.
(Válido
también
para
el
rodillo
superior
en
ha
Subc.
-905/.
.).
Funktionen
der
Tretplatten
0
=
Ruhestellung
1
=
Nlthen
bis
zur
max.
Stichzahl
2
=
Bet
Maschinen
mit:
-913/52
Nadel
posittoniert
in
Koch-
bzw.
Tiefstahlung.”
3+1
=
Bel
Maschinen
mit:
-911/01
RUckwltrtsntihen,
bzw.
Verriageln
•
Nur
501
MonuNnon
mft
Stopmolon
ISI&Iung
Nrd
KppuN&t0r
wablbo,t.
Functions
of
pedals
o
=
Rest
position
1
=
Sawing
up
to
max.
speed
2
=
On
machines
with:
-913/52
Needle
aithar
irt
“up”
or
“down”
position”
3+1
=
On
machines
with:
-911)01
Sawing
backwards
oi
backtacking.
•
On
,noublnon
015
Slop
rnol
only
tSlson
ponllionponu50o
by
Ir,gglo
swiluhI
19
Fig.
17
Fig.
lb

Cleaning
Clesn
the
sewing
hook
and
the
parts
in
its
vicinity
each
day.
To
do
this,
switch
off
the
machine,
take
off
the
needle
plate
and
remove
the
dust
In
the
hook
area
with
a
soft
brush. Never
use
metal
objects
for
removing
tightly
packed
lint.
For
a
thorough
cleaning
or
for
removing
thread
jamming
in
the
hook
raceway,
proceed
as
follows:
Take
out
screw
a
and
remove
the
hook
gib.
Fonet
ions
des
pedales
0
Position
do
repos
=
Couture
jusqu’à
Ia
vitesso
maximale.
2
=
Sur
machines
avec:
-913/52:
posltionnement
haut
ou
baa
de
l’sguiIle.
3
eti
=
Sur
machines
avec:
-911/01:
couture
en
arrière
ou
points
d’arrêt.
•
Uqoe5
w,Ie
nveInesavocnetsursIop
lseievson
pr
InWm,Leur
S
bsuIe).
Funciones
de
los
pedales
0
PosiciOn
tie
reposo.
1
=
Costura
hssta
Is
velocidad
maxima.
2
En
máquinas
con
-913/52:
posicionado
superior
o
inferior
de
Ia
aguja
3y1
=
Enmaquirtascon
-911/01:
Costurs
en
retroceso
y
rematado.
-
soy
on
maquins
ren
nwn,st
{EIOndo
yponidOn
roooneo&.tomptorbononnle).
Relnlgen
Greiter
und
Greiferraum
titglich
reinigen.
Hiorzu
Maschine
susschaften,
Sticfiplstte
abnehmen
und
don
im
Greiferrsum
sitzenden
Nithstaub
mit
elnem
Pinsef
ontfemen.
Auf
keinen
Fall
Metal
gegenstitnde
zum
Lösen
von
festsitzendem
Schmutz
vorwenden.
Zur
gr(indlichen
Reinigung
oder
bei
evtl.
Faden
etrtschlsg,
Greiferwiefolgt
demontieren:
Schrau
be
a
herausschrauben
und
Grail
erbügel
abneh
men.
Limpieza
de
Ia
máquina
El
garfio
y
su
zone
doberán
limpiarse
diariamente.
Pars
sIlo,
dosconecte
Is
mãquina,
quite
Ia
placa
tie
aguja
y
retire
con
un
pincol
los
restos
y
polvo
tie
costura
acumulados
en
Is
zone
del
garfio.
Pars
Ia
limpieza
no
utilice
nunca
objotos
tie
metal.
Cuando
se
quiere
hacer
una
limpieza
a
fondo,
o
en
caso
do
qua
so
enclave
aIgLn
hilo
en
ol
garflo,
desmonte
éato
de
Ia
torma
siguiente:
saque
ol
tomillo
e
y
quito
el
arco
del
garito.
1
Nettoyage
La
crochet
etson
logement
sont
it
nettoyer
cheque
jour.
Mottro
Ia
machine
hors
circuit.
Enlover
lea
bourres
cia
lii
it
‘aide
dun
pirtceau.
No
jamais
ulilisor
d’objet
metallique.
Pour
le
nettoyage
it
fond
du
crochet,
retirer
levis
e
at
enlever
I’archet
de
crochot.
21

Schraube
B
(Fig.
20)
läsen,
an
Grill
G
Oberstich
breile
von
etwa
1,5
mm
oinstellen
(‘
Raupen
breite)
und
Schraube
B
wiederfestdrehen.
Such
lagenhebel
H
in
Stellungt
bringan,
An
Stichsleller
mutter
S
(Fig.
15>
Stichlänge
VOfl
Ca.
0,5mm
(=
1
Teitstrich)
einstellen.
Knoptlochlänge
out
Nahgul
markieren
und
Knopf
loch
nach
folgendem
Schema
ntihen
(FIg.
21>:
o
Nähen
der
ersten
Knoptlochraupe
his
an
Mar
kianing
und
Nadel
rechts
der
Raupe
im
Stoff
stecken
lassen.
O
Nähfull
anhebon,
NShgut
urn
180°
rochtsher
urn
drehen
unct
Full
wieder
senken.
Einon
NShstich
nach
links
euslühren.
o
Grill
G
out
4
mm
statIon,
4
-
6
Riegolaliche
aShen;
den
Sued
dabei
etwsS
einhalton,
damit
der
Riegel
nicht
zu
lang
wird.
O
Grill
G
wlederaut
1,5mm
stellon
und
die
zweite
Ftaupe
nShen
bis
co.
1
mm
vor
Schlull.
O
Grill
G
erneut
aut
4
mm
stellen
und
SchiuB
riegel
nahen
his
beide
Raupen
(ibordeckt
sind.
Stolf
dabei
wieder
etwas
einhalten.
o
Grill
G
und
Stichstollermutter
Saul
“0”
statIon
und
3
-
4
Heflsliche
nhhen.
O
Nadel
In
Hochstellung
bringen,
Nllhtult
anhe
ben,
Niihgut
nach
hintem
herausnehmen
urid
NShfSden
abschnoiden.
Gas
Knopfloch
(zweckmallig
mit
einom
Ploiltren
ner)
zwischen
don
Reopen
autschneiden.
Durch
MitfUhren
elnes
Einlauffadens
wird
des
Knopiloch
etwas
plastischer
gestaltet.
Sewing
buttonholes
Loosen
screw
B
(Fig.
20),
turn
knob
G
to
a
stitch
(or
buttonhole
seam)
width
of
abt.
1.5
mm,
and
tighten
screw
8.
Move
needle
position
lever
H
to
position
I.
Turn
teed
regulator
thumb
nut
S
(Fig.
15>
to
a
stitch
length
of
abt.
0.5mm
(“'
1
gradua
tion
mark).
Mark
the
length
of
the
buttonhole
on
the
fabric
and
sew
the
buttonhole
as
follows
(Fig.
21):
o
Sew
the
first
buttonhole
seam
up
to
the
mark,
leaving
the
needle
in
the
fabric
on
the
right
side
of
its
throw.
o
Raise
the
presser
foot,
turn
the
fabric
dodewise
through
180°
end
lower
the
presser
fool
again.
Let
the
needle
take
one
stitch
to
the
left.
O
Turn
knob
Gto
4mm,
and
sow4to6bsrtacking
stitches,
slightly
closing
together
the
button
hole
end
to
reduce
the
length
of
the
bartack.
o
Again
turn
knob
Gto
1.5mm
and
sew
the
second
buttonhole
seam,
stopping
sbt.
1
mm
from
its
end.
o
Turn
knob
G
104mm
again
and
sew
the
second
bartsck,
closing
together
the
tabric
so
that
both
sesm
ends
are
properly
covered.
o
Turn
both
knob
G
and
thumb
nutS
to
“0’
and
make
3
to
4
tying
stitches.
0
Raise
needle
and
sewing
foot,
remove
the
work
by
pulling
it
toward
the
rear,
and
trim
the
threads.
Cut
the
buttonhole
open
between
the
seams
(pre
ferably
using
a
seam
ripper
for
that
purpose),
If
you
preter
a
more
prominent
buttonhole,
insert
a
tiller
thread
in
the
buttonhole
seam.
Couture
de
boutonnières
Dessorrer
Ia
via
B
(fig.
20),
régler
one
jetée
d’ai
guille
do
1,5
mm
any.
au
moyen
do
bouton
G
(=‘
targour
do
lèvres)
at
resserrer
Ia
via
B.
Placer
Is
levier
H
du
deport
de
laigoilla
en
position
I.
A
l’écrou
regIs-point
S
(fig.
15),
regler
on
point
de
0,5
mm
any.
do
tong
(=
1
crsn
de
graduation>.
Marquer
Is
longusur
de
boutonniere
sur
Ia
pièce
at
coudre
celle-ci
comma
suit
(fig.
21):
a
Coudre
Ia
premiere
lèvre
jusqu’au
repère
et
laissor
l’aiguille
en
jetèe
droite
dana
l’Ctotfe.
9
Lever
le
pied
presseur,
toumer
Ia
pièce
de
180°
vera
Ia
droite
et
abaisser
S
nouveau
Ia
pied.
Faire
un
point
vera
Is
gauche.
9
Régler
le
boulon
G
sur
4
at
coudre
456
points
d’arrét
en
relenant
quetque
p00
Is
pièce
pour
qua
l’arrèt
ne
devienne
pas
trop
long.
o
Ramener
Ia
boston
G
sur
1,5
mm
at
coudre
Ia
seconds
lèvre
jusqu’ã
1,5mm
environ
du
bord
avant
dela
boutonniere.
o
Placer
a
nouveau
le
boulon
G
sur
4
at
coudre
l’arrèt
avant
jusqu’S
ce
que
les
daux
lèvres
soient
recouvertus.
Ce
taisant,
retenir
S
nou
veau
modérément
tétoffe.
o
Regler
le
boston
G
et
lécrou
S
sur
.‘O”
et
coudre
3
ou
4
points
de
nonage.
O
Amener
l’slguille
en
position
superieure,
role-
var
Ia
pied,
sorlir
Ia
pièce
vera
l’ardère
et
coo
per
lea
Ills
S
coudre.
Ouvrir
Ia
boutonniere
de
preference
so
Découvit.
L’inserfion
dun
SI
de
passe
dane
las
lSvres
per
met
daugmenter
le
relief
de
Ia
boutonniere.
Costura
do
ojales
Al
loje
at
tornillo
B
(fig.
20),
ajuste
en
al
botân
Gun
ancho
de
zigzag
do
1,5mm
(=
ancho
del
lablo
del
ojal)
y
apriete
cia
nuevo
ol
lornillo
B.
Ponga
laps
Ian
pars
posiciân
do
puntada
H
aol.
Girando
Ia
tuerca
S
(fig.
15).
ajuste
on
fargo
do
puntsda
do
0,5mm
aprox.
(=
1
rays
divisonia).
Marque
Ia
lar
gura
del
ojal
en
Ia
lola
y
hsga
el
ojal
dais
siguiento
forma
(fig.
21):
o
Cosa
el
primer
ohio
det
ojal
hasta
Ia
marco
y
deja
Ia
aguja
ala
cteracha
clavada
en
Ia
lola.
O
Levanto
el
prensatelas,
gire
a
tela
180°
hacla
Is
derecha
y
baje
el
prensatolss.
Haga
una
puntada
hacie
Is
izquierda.
o
Coloque
el
botSn
G
en4mm,
y
haga
do
4a6
pontadas
de
presitla
retenienclo
un
poco
Ia
piozs
do
costura
pars
qua
Ia
presilta
no
resulte
demasiado
larga.
o
Vuelva
a
poner
et
botOn
G
en
1.5
mm
y
ol
segundo
labio
del
ojal
hasta
Ilegar
a
I
mm
sprox.
del
final.
O
Vuelva
a
poner
el
botön
G
on
4
mm
y
cosa
Is
presltla
final
hasta
quo
ambos
labios
del
o)aI
quedon
recubiertos.
Tamblén
aqul
habrS
quo
raloner
on
poco
Ia
plaza
do
costura.
o
Pongs
el
botSn
G
y
Ia
tuerca
Spare
ol
lsrgo
rIo
punlads
en
“0”
y
haga
do
3
a
4
puntadas
do
remote.
o
Elove
Ia
aguja
y
el
prensatelss,
retire
Is
plaza
do
costura
hacia
atrSs
y
corte
los
bibs.
Abra
el
ojal
con
el
cortador
do
ojalas.
Insertando
on
hito
do
alma,
adquiere
el
ojal
mSs
relieve
y
plasticidad.
Knopf
loch
nähen
fl.21
23

Ntitrfuit
durda
Knopflochfult
mit
Glmpenfuhrung
ersetzen
und
Lineal
anschrauben
(Fig.
22).
Vorm
Hochstelten
der
Stoffdriickerstange
Lineal
irnmer
durch
Rochtsdreher,
ausschwenken,
Oberfadenspannung
stark
und
Unterfadenspan
flung
schwach
einstelten.
lJberstlchbreite
auf
2
-
3
mm
steilen
und
Stichlitnge
möglichst
klein
wählen.
FOhrungslineal
so
einstellen,
dalI
die
Nadel
die
Ftihrungshilfe
nicht
streift.
Gimpenfaden
Ca.
5cm
durch
die
Bohrung
rn
Full
ziehen
und
nach
hinten
tegen.
Knopfloch
aus
schneiden
unit
das
Arbeitastück
mit
dam
Knopt
lochauge
zur
Nitheriri,
unter
den
Full
logeri.
Am
Ende
der
Umrrithung
NithiuB
anheben
urid
Arbeitsstück
etwas
nach
hintan
ziehen.
Ftiden
auf
4
cm
abschneiden,
nach
union
durch
des
Knopf
loch
zieheri
unit
zusammendrehen.
Uberstich
auf
Ca.
4mm
staten
und
Fitden
Uberstechen.
Arbaita
attick
urn
90°
drehen
unit
Faden
mit
Ca.
1,5
mm
Oberatich
verriegein.
FBden
dictfl
am
Riegel
absclineiden.
Sewing
eyelet-end
or
gimp
buttonholes
(Part
Nos,
of
foot
91-041
420-05,
and
of
edge
guide:
91
-041
427-91)
Replace
the
presser
toot
by
the
buttonhole
foot
with
gimp
guide
and
screw
on
the
edge
guide
(Fig.
22).
Before
your
raise
the
presser
bar,
make
sure
you
swing
the
edge
guide
out
of
action
by
turning
it
to
the
right.
Increase
the
needle
thread
tenalon
and
reduce
the
bobbin
thread
tension.
Set
the
stitch
width
at
2-3
mm,
and
regulate
the
stitch
length
so
that
the
stitches
are
packed
closely
together.
Adjust
the
edge
guide
so
that
the
needle
will
not
hit
the
guide
sleeve.
Pull
ebt.
5
cm
of
gimp
thread
through
the
hole
in
the
fool
and
lay
it
toward
the
back,
Cut
Out
the
buttonhole
and
place
the
fabric
under
the
foot
so
that
the
eyelet-end
of
the
buttonhole
faces
toward
you.
Aftersowing,
raise
the
buttonhole
foot
and
pull
the
workplace
backwards
a
little.
Trim
the
threads,
leaving
ends
abt.
4
cm
long.
Pull
the
threads
through
the
buttonhole
to
the
wrong
side
and
twist
them
together.
Turn
the
stitch
width
control
to
4
end
stitch
the
thread
ends
down.
Turn
the
work-
piece
through
90°
and
bartack
the
threads
with
stitches
1.5mm
wide.
Cut
the
threads
off
close
to
the
bartack.
Couture
de
boutonnlères
a
ceillet
ou
a
til
de
passe
(Pied
n°
91-041
420-05,
guide
n°
91-041
427-91)
Remplacar
to
pied
normal
par
Ia
pied
it
bouton
niitres
avec
guide-cords
etvisserle
guide
(fig.
22).
Avant
de
relever
Ia
barTe
presse-tissu,
toujours
escamoter
Is
guide
per
rotation
it
droite.
Rent
orcer
a
tension
supitrieure
at
ritduire
Is
ten
sion
inférleure.
Régier
Ia
jetho
daiguille
sur
2
ou
3mm
at
choisir
une
tongueur
do
point
ausi
petite
quo
possible.
Ritgier
Ia
guide
prair
qua
raiguilie
n’en
frBio
pea
Ia
come
do
guidage.
‘firer
Is
fit
do
passe
do
5
cm
environ
par
ie
trou
clans
le
pied
at
le
coucher
en
arriitre,
Ditcouper
Ia
boutonniere
et
piecer
Ia
pièce
sons
te
pied,
fcailiet
toumit
vera
is
mitcanicienne.
Contoumer
Ia
boutonniere,
relever
le
pied
at
firer
Is
pièce
queique
peu
en
arrière,
Couper
lee
fits
sur
4
cm,
ies
faire
passer
it
lenvers,
par
is
bouton
nièra,
at
las
nouer.
Régier
Is
jetéa
d’aiguiile
cur
4
at
surpiguor
los
fits.
Toumer
ia
pièce
do
90°
et
brider
las
Ills
par
une
jetée
daiguilie
do
1,5
mm
environ.
Couper
los
fits
au
ras
de
lerrét.
Costura
de
ojales
sastre
y
de
cordoncillo
(Pie,
N°
do
pedido
91-041
420-05;
guts
91-041
427-91)
Sustituya
el
pie
prensatetas
normal
porei
pie
pare
ojales
con
guia
para
cOrdoncitlo
y
aiomille
Ia
gula
(11g.
22).
Antea
do
eievar
Ia
barra
del
prensetelas,
retire
siempre
Ia
giiia
giritrrdola
hacia
Ia
derecha.
Ajuste
Ia
tension
del
hilo
superior
mits
fuorte
do
to
normal
y
Ia
del
hilo
inferior
mita
fioja.
Ponge
et
ancho
do
zigzag
de
2
a
3mm
y
ehia
una
iongitud
de
puntada
muy
pequeha.
Ajuste
Ia
guta
do
forms
quo
is
aguja
no
roce
at
casquillo
do
diche
gula.
inIroduzca
at
cordoncillo
unos
5cm
porel
egujero
del
piay
itchaio
hacia
atrits.
Crate
el
ojai
ycoloque
Ia
piezsde
costuredebajo
del
pie,
do
forms
quo
at
010
dat
ojat
señaie
hecia
Ia
operarle.
Al
final
dots
costura
eteve
at
pie
para
ojales
y
tire
do
Ia
pieze
un
poco
hacia
atlas.
Corto
los
hilos,
dejando
un
cabo
de
unos
4
cm,
y
tire
do
ellos
tiscia
abajo
por
al
ojal.
Prasilie
los
hiios
con
un
sneho
do
zigzag
de
4mm
apr05.
Gire
Ia
plaza
do
costura
90°
y
remato
os
hilos
con
un
ancho
do
zigzag
do
1,5
mm.
sprox.
Corte
ioa
hiios
a
rae
do
is
prosilla.
25
Augen-
oder
Gimpenknopf
loch
nähen
(FoB
Best,-Nr.
91-041
420-05,
Lineal
91-041
427-91)

Cording
(Subcl.
-45/.
-915/..)
needle
bar
91
-064
652-91
needle
bar
91-064
653-01
+
needle
holder
91-063
148-91
foot
91-051
277-93
Ba
6.0,
cover
plate
91-041
844-25
Replace
the
presser
tool
by
the
cording
fool
(Fig.
23).
Slip
prong
a
of
the
cording
slide
into
hole
b,
open
the
bad
slide
a
little,
push
the
resilient
prongs
C
arid
d
over
the
edge
of
the
needle
plate,
and
close
the
bed
slide
again.
‘I
Nodi
syOem
438
01<
Nei0o
oyoiwi
130
B
Confection
des
nervures
(ss.-cl.
-45/.
-915/..)
Barre
aiguillea
91-064
652-91
barre
a
aiguilles
91-064
653-01
4
pince-aiguille
91-063
14891*,
pied
91-051
277-938
x
6,0,
plaquette
91-041
844-25
IRemplacor
Ia
pied
presseur
perle
pled
S
nervures
(fig.
23).
Inlroduire
Ia
patte
a
de
applique
dans
le
perçago
b.
Ouvrir
quelquo
peu
Ia
plaque
S
gus
siSre
ella
ralerrner
en
passant
sur
lea
oreilles
C
et
d
de
‘applique
ainsi
maintenue.
Hepousaer
Ia
plaque
S
glissière.
SysIki’w
d&gutle
438
OK
“I
systoo,o
dlgiiIio
1308
Adjusting
the
neeale
gauge
(Subcl.
-915/..)
The
needle
gauge
can
be
varied
from
2
to
3,
4.5
or
6
mm,
depending
on
the
machine
version.
Subct.
-915/05
Turn
screw
T
counter-clockwise
to
increase
the
needle
gauge,
or
clockwise,
to
decrease
it.
Subcl.
-915/02
On
this
machine
version
the
needles
are
indivi
dually
adjustable.
To
do
this,
loosen
the
screws
at
the
beck
of
the
needle
holder
jaws
and
adjust
each
jaw,
as
appropriate.
Then
tighten
the
screws
again.
Ecartement
des
aiguilles
(se-ct.
-915/..)
Suivarit
le
modSle
de
machine,
recartement
des
aiguiltes
eat
rSglable
entre
2
et
3,
4,5
ou
6
mm
au
maximum.
Sous-classe
-915/05:
Per
rotation
S
gauche
de
levis
T,
l’bcartement
des
aiguilles
augmente;
par
rotation
S
droite,
ii
di
minue.
Sous-classe
-915/02:
Sur
ce
rnodSle,
lea
aiguiltes
sont
rAglables
indivi
duellement.
Desserrer
lea
vis
Sla
face
arriSre
des
mSchoires
pince-aiguille.
ajuster
los
machoires
et
resaerrer
lea
vis.
Biesennähen
UkI.
-45/.
.
-915/..)
Nadelstange
91-064
65291l,
Nadelstange
91-064653-01
+
Nadelhalter9l-063
148-91>,
Full
91-051
277-93Bx6,0,
Uberdeckplatte
91-041
844-25
Nhhfult
durch
Biesenfult
ersetzen
(Fig.
23).
Oberdeckstichplattchen
mit
Befesligungslasche
a
In
Bohrung
b
elnh8ngen,
Grundplettenschieber
etwes
zurUckziehen
und
die
lederenden
Enden
c
und
d
Uber
die
Stichplattenkenle
drOcken.
Grundplattenschieber
beischieben.
‘)Ndioyieoi
4341<1<
Ndo8yOom
1308
26
Costuras
de
nervaduras
(Subc.
-45/.
-91Sf..)
Berrade
eguja
91-064
652-91,
Berra
de
aguja
N°
91-064
653-01
+
Portaagujas
N°
91-063
148-91
Pie
N
91
-051
277-93
B
x
6,0;
Plaquita
N°
91-041
844-25.
Sustituya
el
pie
prensatelas
normal
por
el
pie
pare
nervaduras
(fig.
23).
Coloque
Ia
plequits
do
a
torme
siguiente
enganche
Ia
oreja
do
tljaciOn
a
en
et
agujero
b,
haga
retrocedor
un
poco
Ia
corcedera
de
laplace
base
y
presione
los
selientea
elSsticos
C
y
d
sobre
el
canto
de
laplace
do
eguja.
Empuje
hacie
donlro
a
corredere
do
Ia
placa
base.
Sioiow
de
moles
438
OK
5i0OO1
dgojeo
1305
Nadelabstand
einsteIen
(UkI.
-915/..)
Je
nach
MaschinenausfShrung
kann
olri
Nadel
abstand
von
2
bis
max.
3
bzw.
4,5
odor
6mm
em
geslelti
werden.
UkI.
-915/05:
Durch
Linksdrehen
der
Schraube
T
wird
der
Na
dolabstand
groltor,
durch
ftechtsdrehan
kloiner.
UkI.
-915/02:
Bol
iSeser
Austuhmng
sind
die
Nadein
einzeln
vorstellbar.
Die
auf
der
Riicksoite
der
Nadolhal
torbackon
sitzendon
Schrauben
Ibsen
und
Beckon
einzeln
vorsohieben.
Schrauben
wieder
anzielien.
Ajuste
de
Ia
distancia
entre
agujas
(Subc.
-915/..)
Segiin
el
tipo
do
mSquina,
puede
ajustarso
una
distancia
entro
agujas
do
2
a
3,4,56
6
mm
como
mSximo.
Subc.’
-915/05:
Girando
at
tomillo
thecia
Ia
izquierda,
Ia
distancia
mitre
agujas
sorS
mayor,
y
vicevorsa.
Subc.
-915/02:
En
este
tipo,
as
agujas
so
pueden
ajustar
mdi
vidualmenlo.
Aflojo
los
Iomittos
quo
so
en
cuentran
delrSs
do
las
manidlbulas
porleagu
jas
y
desplScelas
mndividualmento.
27

Button
sewing
(Part
No.
of
foot
91-041
047-05)
Setting:
Stitch
length
“0°
and
right
or
left
needle
position.
Place
the
button
under
the
toot
and
adjust
the
stitch
width
so
that
the
needle
is
centered
In
the
right
and
left
holes
of
the
button
when
It
descends
on
its
throw.
To
tie
off
the
seam,
turn
the
stitch
width
control
to
“0”
and
sew
a
few
tying
stitches.
H
5060
Pose
de
boutons
(Pied
n°
91-041
047-05)
Reglage:
Longueur
du
point
0.
Position
de
I’aigullle:
A
gauche
ou
it
droile.
Poser
le
bouton
sous
le
pied
01
régler
Ia
jetite
d’aiguille
do
aorta
que
celle-ci
pique
exactement
eu
centre
desirous
gauche
at
droit
dens
Ia
bouton.
Après
Is
fixation
du
bouton,
coudre
quelques
points
sur
place
après
ritglage
de
Ia
jetite
cur
‘.0”.
Quilting
(Part
No.
of
straight-stitch
toot:
91-026
242-93,
part
No.
of
zigzag
foot
91-041
296-93)
Sew
the
first
seam
with
great
care.
Then
set
the
quilting
gauge
to
the
desired
distance
between
seems
and
guide
the
material
while
sewing
the
next
seam
so
that
the
gauge
finger
follows
the
preceding
seam.
Ouatinage
(Pied
n’.
91-026
242-93
pour
point
droil,
pied
n°
91-041
296-93
pour
point
Zigzag>
Coudre
soigneusement
Ia
1’”
couture.
llégler
t’ittrier
du
guide-espaceur
sur
l’écartoment
vouf
U
ties
coutures
at
s’orienter
cur
cette
couture
pour
réaliser
Ia
couture
suivante.
Knopf
annähen
(Full
Best.-Nr.
91-041
047-05)
Einstellung:
Stichlitnge
o0o
und
Stichlage
oiinkso
oder
“rechis”.
Knopt
unter
den
Full
legen
urid
Oberstich
so
sin
stat
len,
daB
die
Nadel
jewells
genau
in
die
Mine
des
linken
und
rechlen
Loches
sticht.
Zum
Sichem
tier
Naht,
Oberstich
auf
‘.0°
stellen
und
einige
Sticha
auf
der
Stelle
machen.
28
Costura
de
botones
(Pie,
N”
tie
pedido
91-041
047-05)
Ajuste:
Largo
tie
puntada:
0.
PoaiciSn
tie
Ia
aguja:
‘.izquierdao
0
oderecha”.
Cotoque
el
botén
debajo
del
pie
prensafelas
y
ajuste
el
ancho
de
zigzag
do
forma
quo
Ia
aguja
se
dave
exactamente
en
el
centro
decade
egujero.
Pars
esegurar
a
coslura,
ponga
el
ancho
de
zig
zag
en
o0.y
haga
unas
puntadas
de
rernate.
Wattierung
absteppen
Full
llest.-Nr.
91-026242-93
für
Geradslich,
Full
Best.-Nr.
91-041
296-93
für
Zickzackstich)
Die
1.
Nato
sorgfallig
nithen.
BOgef
des
Lineals
act
den
gewünschlen
Nahtabstand
einstellen
und
beim
Nithen
an
der
vorhergehenden
NahI
enl
Ianggleiten
lessen.
Acolchados
(Pie,
N”
do
pedido
91-026
242-93,
para
punto
redo;
Pie,
N”
do
pedido
91-041
296-93,
para
punto
zigzag)
La
primers
costura
hay
que
hscerla
cuidadosa
monte.
A
continuación
se
alusta
Ia
guts
a
Ia
dis
tancia
deseada
entre
las
costuras
y
so
posiciona
at
material
do
tal
torma,
Que
Ia
guts
discurra
sIam
pro
a
0
lergo
tie
Ia
costura
anterior.
29
Fls.
25

I
Fig.
27
Fr
4543
Universal-Roilpikier-
und
Staffier
apparat
(Besl-Nr.
91-744700
91)
Die
Pfaff
138
kann
bei
Verwendung
dieseg
Apparates,
der
aristelle
des
Ntlhfu8es
ange
schraubt
wird,
auch
sum
Pikiareri
eingesetzt
werden.
Das
Lineal
(1,)
1st
austauschbar.
Für
dünrie
Stoffe
wird
das
dickere,
für
dicke
Stofle
das
dünnere
Lineal
eingesetzi.
Das
Wechseln
geschieht
durch
elnfaches
Her
ausziehen
bzw.
Aufsteciren,
Eirrstellung:
Grölite
Obersfichbreite
and
Such
Iringe
ca.
3mm.
Mittels
des
Hebels
c
den
Apparat
so
ausrichten,
dalI
die
Naclel
gleichmtlllig
nach
beiden
Seiten
eirrsticht.
Achtung.
Maschine
our
bei
herabgelassener
Stotidrdckerstange
in
Be
Wegurig
selzenl
Für
dtirrne
Stoffe,
die
Nadetanschltlge
fund
g
mit
dam
Schrauberrzjaher
so
einstellen,
dali
die
Nadel
ganz
ieicht
abgelenkt
wild.
Arbeltswelse:
Urngelegle
Stoffkante
bairn
Nh-
hen
an
der
linken
Kante
entlanggleiten
lassen
(Fig.
28).
Am
Ende
der
Naht,
Nadel
rechts
in
des
RoBhasr
einstechen
lessen,
Stoftdrückerstange
etwss
anheben
mid
Arbeitsstbck
urn
180°
drehen.
Die
umbuggte
Stoffkante
bairn
Nhhen
nun
an
der
rechten
Kante
des
Lineals
entlanggleiten
Isssen
(Fig.
29).
Roll
padding
and
blindstitching
foot
(Pad-No.
91
744
700-91)
Fitted
with
this
foot
instead
of
the
normal
presser
toot,
the
Ptaff
138
can
also
be
employed
for
pad
ding
and
blindstitching
operations.
Guide
(b)
is
exchangeable.
For
thin
fabrics
a
wide
guide,
and
for
thicker
fabrics
a
narrowguide
is
used.
To
change
the
guide,
simply
pullout
the
old
guide
and
Insert
the
new
one.
Setting:
Maximum
stitch
width
and
stitch
length
abt.
3mm,
Adjust
the
position
of
the
blindslitching
foot
by
means
of
lever
can
that
the
needle
throw
is
exactly
halved
by
the
center
line
of
the
toot.
Never
run
the
machine
unless
the
presser
bar
has
been
lowered.
For
sewing
thin
fabrics
adjust
bight
limiting
screws
and
g
with
the
aid
of
a
screwdriver
so
that
the
needle
will
be
slightty
deflected.
Operation:
During
sewing
guide
the
folded
fabric
edge
along
the
left
edge
ol
the
guide
(Fig.
28).
At
the
end
of
the
seam,
let
the
needle
stitch
into
the
horsehair
lining,
raise
the
presser
bar
a
little
and
turn
the
workplace
through
180°.
Now
guide
the
folded
fabric
edge
along
the
right
edge
of
the
guide
(Fig.
29).
Pied
universel
pour
piqUre
roulante
et
glaçage
(n°
91-744700-911
Equipée
de
ce
pied
a
Is
place
du
pied
presseur
normal,
Ia
Plaff
138
convient
rigalement
pour
coudre
Cu
point
inaisibla.
Le
guide
b
eat
richan
geable:
ii
s’emboite
enire
lea
tourcheg
dii
piad.
Utiliser
Ia
guide
tin
pour
las
tissus
epais
ella
guide
ripais
pour
las
tissus
fins.
Re
9
lage:
Largeur
maximale
et
Iongueur
du
point
3
mm
env.
A
l’aide
du
levier
c,
gunner
Ia
pied
de
manière
que
l’aiguille
pique
régulierement
de
part
et
d’autre.
Na
pas
omettre
d’abaisser
Ia
bane
presse—tissu
avant
de
commencer
a
coudre.
Pour
lea
tissus
fins,
rêgler
las
balées
tel
g
h
l’aide
dun
tournevis
de
maniftre
que
I’aiguille
soil
ricarttle
lrigerement.
Mode
opératoire:
Salon
fig.
28,
gilder
a
cassure
du
tissu
contre
le
bard
gauche
a
du
guide.
Ala
tin
de
Ia
couture,
laisser
l’aiguille
a
droite
dans
le
arm,
lever
legigrement
Ia
barre
presse-tissu
at
burner
l’ouvrage
de
180°.
Maintenant,
laisser
glisser
ta
cassure
du
tissu
Ia
long
du
bord
droll
d
du
guide
(fig.
29).
Aparato
universal
para
picar
y
coser
a
puntada
invisible
(N°
de
pedido
91-744
700-91)
Con
este
aparato,
que
se
colons
y
atornilla
en
hugar
dab
pie
prensatelaa,
a
Pfaff
138
puede
alit
zarse
tambin
pars
picado
enrollado.
La
gala
It,)
as
intercambiable.
La
guia
más
gruesa
an
emplea
para
grineros
del
gados
y
Ia
guia
más
delgada
pars
géneros
de
mayor
grosor.
El
cambio
de
Ia
gala
es
may
técil,
pues
basta
con
sacarla
o
meterla
an
el
muelle
de
presión.
Auste:
ponga
el
anaho
máximo
de
zigzag
y
un
largo
de
puntada
de
3
mm
aprox.
Accionando
Ia
patanea
C,
posicione
at
aparato
de
forma
qua
Ia
aguja
penetre
guardando
Ia
misma
dislancia
a
ambos
lados.
Atenciriri:
Ia
maquina
solamente
deberé
ponerse
en
marcha
con
Ia
barra
del
pren
satetas
bajada.
En
el
caso
de
géneros
delgados,
ajusle
con
at
destornilladorlos
topes
fy
g
de
torma
qua
Ia
agujs
sea
oprimida
ligeramente
hacra
dentro.
Durante
Ia
coshura,
el
borde
doblado
de
a
plaza
deberé
conducirge
contra
el
canto
isquierdo
ne
Ia
guia
(8g.
28).
At
final
de
Ia
costura
deja
Ia
aguja
clavada
por
Ia
parte
derecha
en
Ia
entretela,
Ia
vanle
an
poco
Ia
barra
del
prensalelas
y
gire
Ia
plaza
de
costura
180°.
A
continuación,
el
borde
dobtado
da
Ia
plaza
Se
conduce
contra
el
canto
derecho
de
Ia
gala
(fig.
29).
31

Gberdeckstichplatte
Best-Nr.
91-041
251
-25
zum
Stopten
und
Slicken
1.
Sleppfull
abschrauben.
2.
Oberdeck-Slichplatte
einhängerr
(Fig.
30)
em
schwenken
und
mit
dem
Gwndplattenschieber
festhalten
(Fig.
31).
3.
Stoffdrückerhebel
herunterlasseri.
4.
Stopf-
oder
Slickarbeit
unter
die
Nadel
bringen.
Stopfen:
Schadhafte
Stalle
zuerst
in
Lfingsrichtung
mit
Fitden
Oberspannen
mid
dann
mit
kleirrsten
Stichen
in
Querrichtung
Oborstechen.
Sticken:
Das
Monogramm-Stickerr
erfordert
etwas
Ubung,
bis
man
aid,
des
gleichrnitllige
Schieben
rn
Rhythmus
tier
Nadelbewegung
angeeignet
hat.
Zweckmittlig
Slickrahrnen
verwenden
(FIg.
32).
32
Cover
plate
(Part
No.
91
-041
251-25)
For
darning
and
enrbroidenng.
1,
Remove
the
presser
foot.
2.
Slip
the
prong
of
the
cover
plate
into
the
hole
of
the
needle
plate
(Fig.
30),
turn
it
over
and
secure
it
iii
position
with
the
bed
slide
(Fig.
31).
3.
Lower
the
presser
bar
lifter.
4.
Place
the
workpiece
under
the
needle.
Darning
Stitch
over
the
damaged
spot
from
one
side
to
the
other,
then
turn
the
material
through
90°
and
dam
at
right
angles
with
very
short
stitches.
Embroidering
Monogram
embroidery
requires
a
little
practice
until
you
have
learned
to
move
the
material
evenly
in
rhythm
with
the
needle
motion.
For
best
results,
use
an
embroidery
hoop
(Fig.
32).
Plaque
de
recouvrement
de
Ia
plaque
‘à
aiguille
N°
91-041
251-25,
pour
repriser
at
broder
1.
Dflvisser
to
pied
presseur.
2.
Mettre
en
place
Is
plaque
tie
recouvremenl
(fig.
30)
at
Ia
bloquer
par
a
glisaière
tie
plaleau
(fig.
31).
3.
Abaisser
to
levier
du
pied
presseur.
4.
Amener
l’ouvrage
repriser
ou
a
broder
sous
laiguille.
Reprtsage:
Commencer
par
tendro
des
Ills
dans
le
sans
de
a
longueur
sur
I’endroit
a
repriser;
ensuite,
coudre
de
trés
petite
points
dane
Ia
sans
do
a
largour.
Brodage:
La
brodage
do
morrogrammes
demsnde
quelque
exercice
(usqu’a
ce
quon
so
soit
habitué
eu
tie-
placement
regulmer
du
cadre,
au
rythme
du
mou
vemerit
do
taiguilte.
Lemploi
dun
cadre
it
broder
eat
recommandit
(fig.
32).
Plaquita
para
puntada
de
recubrimiento
N°
do
pedido
91-041
251-25
pars
zurcir
y
bordar
I.
Destomille
y
quite
el
pie
prensalelas.
2.
Enganche
Ia
plaquita
(fig.
30),
presiónels
sobre
laplace
do
agula
y
asegrrela
con
Ia
corredora
do
Ia
place
baao
(fig.
31).
3.
Baja
Ia
palanca
aizaprensatelas.
4.
Coloque
a
piezs
quo
se
ha
do
bordor
o
zurcir
doba(o do
Ia
aguja.
Zuroldos:
Primeromente
extiends
los
hilos
en
sentido
longi
tudinal
sabre
Ia
pane
dansds
y
a
continuoción,
con
pequerras
puntadas
err
sentido
transversal.
Bordados:
El
bordado
de
monogramas
requiero
un
poco
de
practice
hasta
qua
Ia
piezs
so
vaya
moviendo
uni
formemente
con
respeclo
ol
movimiento
do
Ia
aguja
(as
decir,
cuando
Ia
aguja
salga
de
Ia
piers).
Se
recomienda
utilizarun
baslidor
(1mg.
32).
33
Flg.30
1114775
Frg
31
1114776

Schrägband-Einfal3apparat
..lApparat:
Best.-Nr.
91-041
894-23,
Full:
Best.-Nr.
91-041
895-04)
Apparat
mit
der
Schraube
A
aut
der
Gnundplatte
testschrauben.
Dazugehoiigen
Full,
nach
Enttemen
des
norma
en
Nithtulles
anschrauben.
Baridanfang
spitz
zuschneiden
cod
Band
durch
die
BandfUhnung
schieben
bis
es
am
Auslaut
hervortittl.
Aid
gluiuhinäl3igs
Umschlagen
des
Bandes
achten
und
Band
bia
unter
den
Nithtull
ziehen.
ArbeitsstOck
mit
der
Kanlo
in
die
FUhrung
am
abgewickolton
Ausisuf
des
Apparales
schie
ben.
Einstellung:
Schraube
A
lösen
und
Apparat
so
lostsetzen,
daJ3
die
Naht
auf
Ober-
cod
Unter
seite
im
gteichori
Abstand
zur
Bandkante
verläuft.
Schraube
A
wieder
testziehen.
Bias
binder
(Part
No.
ot
attachment:
91-041
894-23,
part
No.
of
foot:
91-041
895-04)
Secure
the
bias
binder
to
the
bodplato
with
screw
A,
snd
replace
the
normal
presser
toot
by
the
special
presser
root
to
be
used
with
the
binder.
Cut
the
end
of
the
tape
to
a
long
point
and
push
the
tape
through
the
binder
unlit
it
emerges
in
the
exit.
Make
sure
the
binding
is
bIded
evenly
and
pull
it
through
the
attachment
until
its
end
is
posi
tioned
under
the
presser
loot.
Insert
the
edge
to
be
bound
in
the
slot
of
the
binder.
Setting:
Loosen
screw
A
and
adjust
the
binder
so
that
tim
stitching
margin
is
the
same
on
the
top
and
bottom
ot
the
binding.
Tighten
screw
A
again.
Bordeur
au
biais
(Appareil
n
91-041
894-23,
Pied
n
91-041
895-04)
Fixer
lappareit
it
laldo
de
a
vis
A
sur
lo
plateau
fondamental.
Remplacer
lo
pied
normal
par
Ia
pied
bordeur.
Couper
‘extrémitit
du
biais
en
pointe
pour
pouvoir
Jo
taire
passer
plus
I
acilemnnl
par
to
bordeur.
Veil
ler
au
rempliage
régutier
dii
biaix
nIle
tirer
jusque
sous
In
pied
bordeur.
Engager
Jo
bord
it
border
it
bond
clans
Ia
goulotle
coudito
do
lappareil.
Réglage:
Desserrer
Ia
vis
A
01
régter
tappareil
Jusquit
ce
quo,
it
lenvers
01
it
lendroil,
a
cou
ture
paraisso
it
distances
itgalos
du
bord.
Rex
serrer
Ia
vis
A.
Aparato
ribeteador
para
cintas
al
sesgo
(Apsrato:
N°
do
podido
91-041
594-23:
Pie:
Mde
pedido
91-041
895-04)
Fije
el
sparato
en
Ia
placa
base
medianle
el
honiillo
A.
Atomille
ol
pie
especial,
quo
reomplaza
al
pie
normal.
Corto
en
punlael
comienzo
do
Ia
cinta,
lntroduzca
Is
cinta
en
Ia
guia
y
empUjela
hasta
quo
asorno
pm
Ia
salida.
Vaya
doblando
Ia
cinta
unitormo
manley
Ilitvela
hasta
debajo
del
pie
prensatelas.
lntroduzca
el
canlo
do
Ia
pieza
de
005tura
en
Ia
tormlnación
angular
del
aparato.
Ajuste:
atloje
el
tornillo
A
y
posicione
el
oparato
do
forms
quo
Ia
costura,
tanto
on
a
cars
como
en
el
rosits,
so
halle
exactamonte
ala
misma
distan
cia
del
borde
de
Ia
cinta.
Apriole
de
nuovo
el
tomillo
A.
Riemenschutz
oberhaib
der
Tischplatte
Schulz
wie
tolgt
montieron:
Riemenschulz
1
autsotzon
urid
mit
den
Schrau
ben
2
tixioren.
Sctiutz
so
ausrictiton,
doll
dor
Riemoneinlauf
sicher
abgeachirmt
wird.
Schrau
ben
2
testziehon.
Belt
guard
above
the
tabletop
The
bolt
guard
is
titled
as
follows:
Place
belt
guard
1
on
the
table
and
secure
it
in
position
with
screws
2.
Adjust
it
so
that
it
reliably
covers
the
point
of
bolt
entry.
Tighten
screws
2
securely.
Garde-courrole
supérleur
Monter
lo
garde-courroio
on
procédant
comme
suit
Monler
to
garde-courroio
1
ella
tixer
it
raido
dos
vis
2,
Alignar
los
plaques
do
manlitro
quo
le
point
dattaquo
do
Ia
courrolo
soil
couvort
avec
certitude.
Sorror
los
via
2.
Guardacorreas
superior
Monte
ol
guardacorreas
do
Ia
torma
siguiente:
Coloquo
el
guardacorroas
1
y
asegOrolo
con
los
tomillos
2.
Posiciona
el
guardacorreas
do
torma
quo
Ia
corroa
quade
bion
protegids.
Apriote
los
tomillos
2.
35
Achtung:
Maschinon
mit
Motorantrieb
nb
ohne
Riomenschutz
in
Betrieb
setzon.
Dangert
Never
run
a
power-driven
machine
unless
the
belt
guard
has
been
properly
fitted.
Attention:
No
jamais
mettro
en
marcho
les
machines
it
commando
par
moteur
sans
le
gardo-courroie
en
place.
Atenclón:
No
pongs
nunca
to
mitquina
en
martha
xiii
haber
colocado
antos
ol
guarda
corroas.
La página se está cargando ...

Manque
do
points:
1°
Enfilage
incorrect
2°
Fausse
aiguille
3°
Aiguttle
ptacée
do
travers
4°
Aiguille
Imp
fine
pour
to
ill
5°
Aiguille
trop
grosse
pour
le
fit
6°
Aiguilte
courbite
7°
AlguilIe
placito
hop
haut
ou
trop
has
8°
Espacementtropgrand
entre
alguitle
etpolnte
do
crochet
(0,1
mm.)
9°
Trop
grande
ou
trop
petite
remontite
do
Iatguille
pour
Ia
formation
de
a
boucle
10°
Matiitres
trop
apprittites
ou
collantes
11°
Fit
trop
tordu.
Casse
de
fit:
1°
Cas
susmenhionnés
2°
Tension
des
fits
trop
forte
3°
Fits
noueux
4°
Fit
deposit
devenu
cassant
5°
RI
do
mauvaise
qualité
6°
Prise
de
fit
dana
a
courslitro
du
crochet
7°
Trou
data
plaque
it
aiguitle
rugueux
8°
Fit
tombit
do
Ia
hobine
et
entortillé
autour
do
Ia
broche
it
bobine
9°
Ressort
conlrôleur
do
fIt
ditréglé
10°
Aiguille
dpointée.
Casse
d’aiguf
Ito:
1°Aiguilte
courhite
price
par
Ia
pointe
du
crochet
2°
Fit
frop
gros
pour
Ualguitte
3°
Crochet
derégfit
par
suite
dune
piise
do
fit
4°
Tension
superioure
trop
torte
5°
Malières
trop
dures
faisant
ditvier
raiguilte
6°
Aiguiflo
ditvio
sur
es
matières
tirites
ou
poussites
ala
main
7°
Entratnemerrt
encore
acid
quand
t’aiguitte
touche
I’ouvrage
8°
Crochet
trop
pres
do
I’aig
utile
9°
Aiguilte
6-op
fine
pour
rouvrage
10°
Fit
entomillé
autour
de
Ia
brocho
it
bobino.
Entrainement
défectueux:
1°
Griffo
se
trouve
trop
has
2°
Denture
do
a
grille
trop
fine
pour
rouvrage
30
Forme
de
a
grille
impropre
pour
touvrage
4°
Pression
trop
faibto
do
pied
presseur
50
Dents
do
grille
encrassées
60
Dents
do
grille
itmoussées
Fallos
y
sus
causas
Puntadaa
saltadas
a
cause
do:
1
Enhebrado
I
also
2.
Sistema
do
agujas
falso
3.
Aguja
mat
cotocada
4.
Aguja
may
delgads
en
relaciôn
at
trio
5.
Aguja
muy
gruesa
en
relaciOn
at
hilo
6.
Agujadoblada
7.
La
aguja
ha
sido
colocads
muy
attso
may
baja
8.
La
distancia
entre
Ia
punts
del
garfio
yfa
aguja
es
demasiado
grande
(0,1
mm)
9.
Formaciôn
de
fazada
demasiado
grande
ode
masiado
poqueda
10.
Msferiet
do
costura
pegaj
coo
do
macho
apresto.
11.
Hilo
demasiado
retorcido.
Rotura
del
hilo
5
csusa
do:
1.
Los
motivos
moncionsdos
arrteriormonto
2,
Tension
demasiado
fuerte
3.
Hitosnudosos
4.
Hhlo
atmacenado
demasiado
tiempo
yen
sitio
may
seco
5.
Mats
catidad
del
hilo
6.
Hilo
sprisionado
en
Ia
corredera
del
gariio
7.
Agujoro
do
Ia
placa
do
aguja
danado
per
Ia
aguja
8.
Hito
enrodado
en
et
Garrote
0
en
of
porta
carretes
9.
Muetleroguladordel
hito
desplazado
do
su
sub
10.
Aguja
despuntada
o
dartads
Rotura
de
Ia
aguja
a
causa
do:
1.
Aguja
doblada,
onganchada
por
Is
punts
dot
garfio
2.
Hilo
demasiado
grueso
para
Ia
aguja
3.
Gartiodesplazadodesusitio,
poraprisionarse
machoc
hilos
4.
TensiOn
dot
bib
superior
domasiado
fuerte
5.
La
aguja
es
desviada
en
los
sitios
duros
dat
material
de
costura
6.
Aguja
doblada
por
empujar
0
tirar
dot
materiar
7.
Trsnsporta
no
terminado
at
penetrar
Ia
aguja
8.
Gartio
demasiado
pegado
ala
aguja
9.
Aguja
demasiado
delgada
on
relaciOn
at
ma
terial
10.
Hito
enredado
on
Ia
espiga
del
portacarrotes
Transporte
defectuoso
a
Gauss
do:
1.
Transportadormuybajo
2.
Dientes
del
transportador
muy
tlnos
pars
el
material
3.
Forms
dot
transportador
inapropiada
pars
el
trabajo
4.
Price
presion
del
prensatef
as
5.
Diontosdoltransportsdorllenosde
polvo
6.
Puntas
do
los
dientes
muy
schatadas
Causes
de
derangement
Wearing
parts
-6/21
x
4,5
91-54]
522—131:0
L
Pièces
d’usure
/
-6/21
x
6,0
91-lIt
ttt-13[
I
l-’iezas
uo
uesaoto
-34/01
61-flit
713—53111
111701
VerscheiI3teile
/
91-11355-91
61-013168-91
11-17436-15
il-iS
167-15
41-013101-S
51-826961-5414]
91-025889-0403]
85-040
032-04
[8]tuil
oD
01-528694-01
si-nit
st-os
01940401-941:0111711
IFI
w
91-188488-41
91-188441-41
91-36676-61
-51-8811t19-t5
91
715
81-36713-19
J
0-36844-80
-
2
81-36279-45
91-36670-15
__________
91-697134-89
1___
91-3636-01
01-36
099-51
[j]=
Ausfütsuoç
anebee
[07]]
Oucersrk18rbxole
bel
eestelung
eosoben
°
IndloOo
001844
1040010
reao
071900
wOO
an
004e0
o
7°réiIn
verwafl
1040400,0440
dOmIlie
I
a
oow,ooedo
=
10414000044
lp0
Indlqoeno
44
lIe
55mg
0000
pnoikton
39
38
La página se está cargando ...
Transcripción de documentos
Zur besonderen Beachtung Important notes Urn Stdrungen oder Schtidan zu vernieiden, sind nachstehende Punide unbedingt zu beachteri. To avoid trouble or damage ills absolutely neces sary to observe the following instiuctions: • Bøfpr ‘bu put the machine into operation for the first time clean it fhoroughly, remove all dust which has accumulated on it in transit and oil it well (see pages 4 + 5). • Check to make sure the line vottage agrees with the voltage indicated on the motor rating plate, If It does not, be sure not to plug ri the machine. • The balance wheel should always rotate to ward you. If it does not, exchange the wires on the motor. • During the first two weeks of operation run the machine atu, of its top speed only. • Vor der orslen lnbetriebnahmo Maschine griindlich situbem und anschlieltend OIen (siefle Seite4 ± 5). • Kontrollieren, ob die Netzspannung mit dec auf dern Motor-Leistungsschild angegebenen Spannung iibereinstimmt. Eel Abweichung, Maschine auf ketnen Fall in Betrieb $etzen. • Del laufender Maschine moB sich das Handrad andem zur Bedienungsperson hun drehen falls Motor umklemmen lassen. 3/4 • In den ersten 2 Wochen, Maschine nur mit ihrer Hdchslgeschwindigkeit lauten lassen. — Conseils importants Observaciones Importantes Observer rigoureusement es recommandations suivarites pour évifer tous derangements et de térioratlons. • Un nettoyage at huilage soignewc do Ia ma chine s’imposent, avant Ia premiere mise en service, salon los prescriptions (pages 4 at 5). Con el fin do evitar fallos y averlas, deberán tenerse muy en cuenta los siguienfes purtlos: • Antas do poner Ia máquina en marcha por pri mere vez, hágase una limpieza y engrase general do Ia misma (vitanse págs. 4 y 5). • S’assurer qua Ia tension do sectaur concorde avec Ia tension indiquea sur Ia plaque signs létique du moleur. En cas de divergence, ne pas mettra Ia machine en marche. • La volant de Ia machine devra toumer, vu d’en haul vera Ia mécanicienne. Sinon, inverser Ia polatité. • Compruebo si Ia tensiOn de Ia red coincide con Iatenaión indicada en Ia plaquita do ospecifica ciones del motor. En caso contrario, no ponga en marcha Ia máquina de ninguna manera. • Al ponor Ia máquine on marcha, asegOrase do qua el volante giro hacia Ia operaria. En caso contrarlo, daberân conmuterse los polos del motor. • Durante las2primerassemanas, Ia mitquinano 4 do so velocidad / 3 deberá macchar max qua a maxima. • Utificense Onicamente agujas del sistema indicado (V. pág. 7). • Limpia Ia maquina con regularidad (v. p4g. 21). • Use the specified needle system only (see page 7). • Clean the machine regularly (see page 21). semaines, n’utili • Pendant las deux premieres 3/4 do as vitessa maxi oar Ia machine qu’aux male. • Nutilisar que lea aiguilles du système prescrif (voir page 7). • Nettoyer regulièrement Ia machine (page 21). Sicherheits-Hinwelse Safety instructions Recommandations de securité Normas de seguridad • Die Maschine dad nur ihrer Bostimmung gemtttt verwendot warden. Beim Umbau in andere AusfLihrungen sind sIlo gUlligen Schulzbestim mungen zu berticksichtigen. • Din Betrieb tier Maschine ohne die vom Werk engobrachten Schutzoinrichtungen ist nicht erlaubt. • Das Elnochallen und Betreiben dec Maschine dart nor durch die entsprechend unterwiesene Bedienpersori erfolgon. • Beim Wechseln von Ntihwerlczeugen, wie z.B. Nadel, Ntihful3, Stichplatte, Stoffschieber und Spule beim Einfitdeln, beim Vertassen des Arbeitsplatzes und bei Wartungaarbeiten, ist die Maschine durch Betittigen des Haupt schalfers odor durch Herausziohen des Netsstockers vom Nets zu trennen. horeech betbtitoo Kepplungsowto,on st dot ste. Bat • The machine must Only be used for the purpose it was designed for. In case of conversion into another version all valid safety instructions have to be considered. • Do not operate the machine without the safety devices It is equipped with. • The machine musI only be switched on and operalad by persons who have been instructed accordingly. • When eschanging gauge parts (e.g. needle, presser toot, needle plate, feed dog, bobbin). threading the machine or leaving it, arid when making maintenance work, the machine must be disconnected either by actuating the master switch or by removing the mains plug. • N’utiliser Ia machine quo pour las travaux aux quels ella est dostinéa. En cas tie transtorma lion en one autre version, respecter toutes los prescriptions do sécurlté vslables. • No utilico Ia máquina m4s qua pare los traba(os pars los qua esté deslinada. Al transtormatla en otrotipo, ténganae an cuontatodaa las normas de seguridad vigontes. • No asta permitido usar Ia máquina sin los dis positivos do prolacciOn montadoa en f4brica. • Nur das vorgescitriebene Nadelsystem wendon (siehe Seile 7). • Maschine regolmtiflig reinigen (siehe Seile 21). BlOnd dna Motom nbZuwarleo. • Bei Wartungs- und Reparaturarbeiten an pnou matiachen Einrichtungen ist die Maschine vom pneumatiachen Vorsorgungsnelz zu Ironnen. Aunoahwen sind our bat Justrorurh&ten 005 Funktioosprd k,ngoudurhentuprechonduntorwlesnneFodrkrhhn ordduul. • Arbeiten an dec elektrischen Ausrustung ditrfen nut durch Elektrolachkrtifle odor entsprechend unterwiesene Personen durcligeKihrt werden. Athettan at actor Sponorrrg slehwdoc Thtlen tart CloneS. tungorngnd. DIN nannhen con rotbnutgondlnwoirthnogsngemaa honlvelly.oetnwtod ototob motors watt For the In cane or motor to stand still. • When carrying out maintenance- or repair work on pneumatic devices the machine must be disconnected fmm the pneumatic supply source. The only onrnepbnnns perodttod ore odiusnnents end parlor ,nernoechooinn made by competont ponsonool. • Work on the electrical equipment of ttre machine must only be carried out by electricians or other persons who have boon instructed accordingly. Apanthorn the permIssIble deviations according to DIN 57105, ansI voe 0105, work on One pets and eqndproent In not per ,sltlod. • N pas utillser Ia machine saris las dispoattits do sécurlté. • Saute I’opératrice instrulte on consequence devra mettre Ia machine en circuit at coudre. • Avantle chartgementd’organas de couture tels quo l’aiguille. le pied presseur, Ia plaque a at guilte, Is grlffe ella canette, avant I’entllago, avant de quitter Ia machine SI avant len travaux d’entrellon. Ia machine ost a mettre hors circuit ti I’interrupteur general ou par enlèvemont de Ia fiche secteur, • La máquina sOlo debor4 sor conectada y mane jada per a persona instruida al respacto. • Al cambiar Organos tie costura (agu(a, prensa telas, placa tie agu(a, fransportador, canilla etc.), to misrno quo al enhebrar, at abandonar el puesto de costura y al hacer traba(os de mantenimiento, Ia máquina deberé desconac tarse eléctricamente con et interruptur general o retirando el enchute do Ia red. Pour Ins motevnrs-trwrsorottesrs troloedoyjas. aatodm totem dot,wteor. En rnotores tin norbraguo oceonedos enaodnloamente bay quo aspetor etUO SO pare at flOriSt. • Pour los travaux d’ontretien etde reparation au système pnaumatique, couper Ia machine du rAsoau pneumatiquo. • Al afecluar trabajos tie roparaciOn y manteni miento, habr4 quo desconectar Ia máquina do la red de alimentaciOn noumática. Scole000ccyltoss entwines: rdglagen ot contrides par do per 000eotcompelant. • Las travaux sux équipements électriques sont 4 confier un électricten ou 4 du personnel competent. les moose eon pièces at disposels soon tension no semI yes n&rds, Saul es nooepboos Solon to norma OtN 57 105 as VDE slob. Odin Se adrnilen oncopolonen coat canada niosteon rontncdou efactuaclos pot personal enpecratneodo. • Los traba(os en el equipo oléctrico deberán sor realizados por electrlcistas cornpelonles o por personal instruido al caso. Noootdperrndhdo roabmartrabaiosen preresydinponlhoosque esttin bole Iewtbn, salvo en Ins eucepolones do Ia 00000 otNanls5ovOEstob. 57 305 hew. VDE 0155, COnt onloobt. 3 07811 07810 F,g.2 Cilen Bel neuen Maschinon ate blanken Tails mit sau harem Lappen abwischon. Anschliellend an ails roto markierten Cistollen (in Fig. 1 his 3 durch Pfeile gekennzoichnot) etwas Petroleum goben und Maschine hal hochgestetltem Nithfu8, oboe Faden und Spulenkapsel, kurz tauten assert. Danach alle tilstetlen mit etwas Pfaff Nähma schlnenôI Nr. 280-1-120144 odor siturefreiem /s bei 50°C 2 CII mit airier Viskosititt von 15,0 mrn 3 bei 15°C ver und einer Dichte von 0,865 glcrn sorgen. Das blon 2 mat wSchenttich, bei indu striellem Einsatz taglich sowie hal extremen Be dirigungen (zO. viol Ntihstaub, hoho Drehzahi usw.) 2 mat titgtich wiederholen. Kapsellaufbahn. Grailor und Kopfteilo besonders berUcksichtigen. Die Kegelritdor einmat Im Jahr mit Natronseiten tett(Tropfpunkt 150°C) Pfatf-Sest.-Nr. 280-1-120 243 dunn eintetten. Oiling Before you put a new machine into operation, wipe all bright metal parts with a clean rag. Apply a few drops of kerosene to all oiling points marked red on the machine (end by arrows in Figs. 1103> and run the machine briefly with needle thread and bobbin case removed and the presser foot raised. Then apply a few drops ot Ptaff sewing machine oil No. 280-1-120144 or an acid-free oil /s at 50°C and a den 2 with a viscosity 0115.0 mm sity of 0.865 g/cmi at 15°C to all oiling points. Oil the machine twice a week, including especially the bobbin case raceway in the sewing hook and the machine head parts. When the machine is employed in sewing factories, oil it once a day, under extreme conditions (e.g. large amount of lint or high speed) even twice a day. Apply a thin film of sods soap grease with a drip ping point of 150°C (Ptaff No. 280-1-120 243> to the bevel gears, once a year. Engrase Huilage Sur lea machines neuvos, nettoyer toules los parties non pointes avec Un lorchon propre. Puis, verser quelques gouttes do pétrole stir toua lea points do graissage marques de peinture rouge (fig. 1 a 3, fléches). Faire burner to mécanisme quelque lamps sans fit ni boSe a canette, it pied presseur levé. Puia, graisser bus lea points indiquès ci-dessos evec do Ihuite Pfaff, ret. 280-1-120144 ou do l’huile exernpte d’aclde dune viscoaité do 15,0 mm°/sec a so°c et d’une densité do 0,865 g/cm° a 15°C. Huller normale mont deux tots par semaine, une tots par Jour en cas d’utiiiaation induatrielle 01 deux lois par jour a des conditions d’emploi extremes (p. ex. beaucoup do bourres, vitesses étevéos, etc.), en particufierlscoursière du crochet, le crochet et lea pièces do beta. Une tots par an, enduireles pignons dune légère couche do graisso so savon do soude (temperalure de auutoment 150°C), tél. Pfaff 280-1-120 243. En el caso de máquines nuevas, limpie todas las piezas pulidas. A continuaciôn eche un poco do potróleo en todos los puntos do engrase marca dos con -roto” (indicados con Ilechas en las figs. 1 a3) y, con el pie prensatolas levantado, sin hilo y sin cápaula de Ia canulta, ponga Ia mAquina on marcha duranle un corto tiempo. Soguidamente provea todos lox punlos do engrase con on poco do acelte Plaff para máqulnaa do coser, N’ 2801-120144, 6 do eceite oxento do ácidos con una /s a 50°C y una clonsidod 2 viscosidad do 15,0 mm do 0,865 9/cm° a 15°C. Ropita este engrese dos veces a Ia semana; ci se usa como máquina in dustrial, uris vex at dia yen condiciones extremes (p. ej. mucho polvo do costura, etevada volocidad, etc.), 2 vecea at dis, sin olvidarso do a pisla do Ia corredera del garlio y do las piezas de Ia cabeza. Engrase los engranajes cOnicos una vex at año con uris capa fina do grosa sOdica (punto de go tao 150°C), N° do pedido Pfatf 280-1-120 243. 5 Inserting the needle Nadel- und Garndicke Aiguille et fil Mit der Pfaff 138 in Ausfuhnurrg A kSnnen teine, in AusfUhnung B mittlere Malerialieri verarboilet werden. Nadel- und Gamdicke richion sich dabei nach dem zu vemithenden Material. Die nachslehenden Angaben sollen als Anhalls punkte dienen. La PlaIt 138 en modéle A Iravaille les matières fInes; is models B convient pour les matières moyennes. La grosseur de l’aiguille at dii fit sont tonction des mallAres. La tableau ci-dessous ne donne qua des valeurs approximatives. Use needles of the specified system only, as indi cated below: Hilos y agujas Needle and thread sizes In model A the Pfafl 138 is used for sewing light weight materials, in model B for medium-weight materials. Needle size and thread weight depend on the material to be sewn. Select the proper needle and thread sizes from the chart below: El tipo de maquirra A asIa ideado para generos ligaroa yeT B pare semuligeros. El grosor del hilo y da a aguja depends del ma terial qua se coss. El cuadro slguienfe ofrece al gunos puntos de referenda pare Ia corrects alec don de Ta aguja y del hllo respadto vi tipo de máquina. Subdass Needle system -6/21; -6/21-915102; -34/01; -45/01-915/02;-45/02-915102; -66/01 438 -6/21-915105; -45/01-915/05; -45/02915/05 1308 -275/01-277/01 134 EtC KK Switch off the machine. Loosen needle set screw A. Insert the needle with its long groove facing toward you and push it up into the needle holder as far as it will go. Tighten the needle set screw. Mise en place de l’aiguille N’ufiliaer que des aiguilles du système preacrit: . R7187 F. 4 a c . .9Be • E-eot 0 5 , B are 2 rfl0•OO 0000. <l oars’srtt o5 5500 ZZCIE) .9 5 -0 0 E ao,c.2r 5lO..,< s,ar.tt tI=Sar uicd7uflO >>-=__ S at car o 5St c (oc0uc0 60 100—80 140 200—150 70 70—60 120 180—120 Système d’aiguille DangerI Do not operate without finger guardl -6/21; -6/21-915/02; -34/01; -45/01-915/02;-45/02-915102; -66/01 -6/21-915/05; -45/01-915/05; -45/02-915105 Attention: Sans protège-doigts, risque d’accidenti -275/01;-277/01 MansIOn: No rosa sin saisadedos. lffellgro de accidental MaItre Is machine hors circuit. Desserrer Ia via de fIxation A cia laiguille. Intro duire laiguille jusquit Ia butée clans le pince sigullie, Is rainure longue loumée Vera ravant. Rebloquer levis de fixation de laiguulle. 0 z-° Sous-classe Achtung: Shine Flngerschutz Verlefzungsgefahrl 438 1(1< 1308 134 EtC A 80 B 90 100 Colocación de Ia aguja 100 60—50 80 50—40 70 40—30 120—100 100—80 80—60 70 60 Nadel einsetzen Use excluaivsrnente agujas del sistema indicado: Nur Nadaln des vorgeschriebenen Systems var wenden: Subclase Sisteme deaguaja -6/21; -6/21-915/02; -34/01; -45/01-915/02;-45/02-915102; -66/01 438 1(1< -6/21-915/05; -45/01-915/05; -45/02-915/05 1308 -275/01 ;-277/01 134 EtC Unterfdasse -6/21; -6/21-91 5/02; -34/01; -45/01-915/02;-45/02-915102 -66/01 -6/21-915/05; -45/01-915/05; -45/02-915/05 Nadalsystam -275/01-277/01 134 BK * Nadeldicke in hundertstel mm Needle size in hundredths of mm * * Grossaur de l’aiguilla an canlièmes da mm Groaor de Ia aguja en Vim da mm 1308 ausschaltan. Nadelbefastigungsschraube A lSsen. Nadel, mit dec langan Nadeirille nach vorn, his zum Ansciilag in den Nadelhalter ainsetzen. Nadelbefestigungs schraube feslziehen. Maachine * 438 KK Dasconecte a maquina. Atloje el tomillo A pare fijaciOn de Ia agujs. Intro duzca Ia aguja haste el tops anal portaagujas, de fcrms qua su ranura larga mire hacia el frente. Finalemante, apriele at lornillo pare fijación cia Is aguja. Devanado del hilo inferior Bobinage du fil de canette Winding the bobbin Unterfaden aufspulen . Sputa aut Spindel 5, Gamrotte auf Stift 1 stecken Fadan dutch Ose 2, rn Uhrzeigersinn zwischen ale dieSpannungsscheiben3führenundeinigeM rn Uhrzeigerainn auf die Sputa wicketn, Spuler e dutch Dnjcl< aut den Hebet 6 einschalten. Getoilt Sputa schaltet setbsttatig ab. Schraube 7 nach rechb drehari Spule wird mehr, nach links dreflen Sputa wird weniger geftlltt. Ungtetchrntit3igas Aufaputen, nach Lhsen der Schraube 4, dutch Var schieben des SpannungsIrtigers ragutieren. Fig. S zeigt die Anordnung dat Spulereinrlchtung bet Maschinen mit Motorantrieb, Fig. 6 bet Maschinen mit Treteiririchtung. Place a bobbin on spindle 5 and a spool of thread on pin 1 Pass the thread through eyelet 2, clockwise around and between tension discs 3, arid kwindat&tumsofthreadonthebobbininacloc wise direction. Startthe bobbin winder by puahing in lever 6. The bobbIn winder stops automatically when the bobbin is full. Turn screw 7 clockwise for more thread, or counter-clockwise for less the thread, If the thread piles up on one side of bobbin, loosen screw 4 and adjust the position of the tension bracket sideways. The thread tension is regulated by turning nut 8. The arrangement of the bobbin winder on powerdriven machines is illustrated In Fig. 5, that of foot-driven machines in Fig. 6. Placer Ia canette sur laxe 5 eta bobine de Ill sot Ia broche 1. Passerle fit part’miltet 2, dana Ia sans des aiguittes dune moritre entre las disques de tension 3 puis, anrouler Ia fit de quolques tours, dans le aena des aiguilles dune montre, sot Ia canette. Embrayer te dévidoir par pression sur Is levier 6. A canette pleine, Ia dévidoir se débraye autornatiquement. Parvissagede Is vis 7: canetle mieux remplie; par dévtssage de cage vis: canaSa moths remplie. La bobinage irrégutier se règle, après desserrage data via 4, pare déptacement du support de tension. Regler Ia pretension ‘0 t’aide de l’Ocrou B. La fig. 5 montre a disposition du dOvtdoir sur las machines ti moteur at Ia fig. 6 celte sot las machines S pédalier. lntroduzca Ia canilla en at husillo 5’ el Carrete en Ia espiga 1. Pase el hito pot et sgujero 2 y a continuaciOn en el sentido de las agulas del retoj, pot antre ba ptatiltos tensores 3 y arrolte, tam bién en at mismo sentido, unas vueltas de hilo en Ia canilta. Ponga at devanador an marcha pre sionando Ia patanca 6. La canitta lena Ce descorrects por at aota. Girandoel tomitto7 hacia a derecha, Ia canitla se Ilana más. y viceversa. Si Ia canilla Se Ilena irre gularrnanle, aflojeeltomltlo4ycorra tateralmente at soporte del lensahitos, Regule Ia tension del hilo mediante Ia tuerca 8. La fig. 5 muestra a disposiciOn del dispositivo devanador en mOquinas con accionamienlo a motor y Ia fig. 6, para et caso do rnOquinas accio nadas a pedal. S .1’ Threading and inserting the bobbin case Threading the needle Switch off the machine. Insert the bobbin into the bobbin case so that it turns in the direction of the arrow when the thread is pulled (Fig. 7). Draw the thread into slot 1 end pull it under the tension spring until it emerges at tip 2. SwItch off the machine. Turn the balance wheel to bring the take-up lever to its highest point. Lift the bobbin case latch and insert the bobbin case with the bobbin into the sewing hook. Close the latch and press against the bobbin case lightly until you hear it snap into place. Lead the thread through thread guide 1, then, as shown in Fig. 8, through guide 2, around wire 3, from the right between tensions discs 4, around guide disc 5, over thread check spring 6 and in sert in hook 7. /2 :9 I Afterwards lead the thread from the right through the hole of thread lever 8, wires 9, 10 and II and thread the needle from front to back; pull about 6 or 7cm of thread through the needle eye. :, Enfilage et mise en place de Ia bofte a canette FO. 8 Il 161756 Enfilage du fil supérieur Mettre Ia machine hors circuit. Placer Ia canette gamin dens Ia boite a canette de manière que le lii as déroule dans le sans indiqué par Ia flèche (fig. 7), enfilerle lii par Ia tents I • sous Ia tanguette 2 du ressort el engager Ia canette a fond. MaItre a machine hors circuit. Par rotation du volant, placer Is levier releveur de I ii au point haut. Lever le loquet de Is bolts a canette at placer cello-cl avec Ia cariette dana le crochet. Coucher le loquel at veiller a l’ernboilage perceptible de Ia boite a canelle. Enfiter lo lit, venant de Ia bobine, parts broche 1, puis, salon fig. 8, par le guide-fil 2. sous létrie- 3, de Ia droite ontre lea disques de tension 4, autour du disque 5, cur Is reason contrôleur 6, sous le crochet 7. Ensuite, anther he releveur 8 de Ia droile, passer Ia III par es guide-fit 9, bet 11. Enfiler laiguille do lavant en laissant dépasser any, 7cm de III. Oberfaden einfädeln Spulenkapsel einfädeln und einsetzen Spule so in die Spulenkapsel einsetzen, dalI eta sich bel Fadenabzug in Plellflchtung dreht (siehe Fig. 7) dabel den Faden in Schlitz 1 elnhflngen und unter die Federzunge 2 ziehen. Faden sotl Ca. 5 cr0 herausragen. Maschinie ausechallen. Am Handrad drehen bie Fadenhebel in höchster Stellung steht. Spulen kapsetklappe anheben und Kapsel mit Spule in den Greifenelnsetzen. KIappe umiegen und Ieicht nachdrlIcken bis die Kapsel httrbar einrastet. ColocaclOn y enhebrado de Ia cápsula de Ia canilla Coloque Is canitls en Ia cápsula de forma qua at tirar del hilo. Ia carlitla gire en el sentido de Ia flecha (V. fig. 7), y enganche al mierno tiempo el hito en Ia ranura I hasta que aparezca per detrás de Ia Iengueta etáatica 2. Deaconecle Ia maquina. Dire elvolanlehastaque a palanca tirahilos quede en su posiclôn superior. Levante Is bisagrita de Ia cépsula y coloque eats ta (unto con Ia canilla en el garflo. Suelte Ia bisagri a y presione ligeramente basis que Ia cépsul encaje perceptiblernente. Macchine ausschatten. Den von der Gamrolle kommenden Faden durch den Fadenfithrungsstift I fédetn, denach wie in Fig. 8 gezeigt durch die Ftthrung 2, urn den Biigel 3, von rechts zwischen die Spannungsscheiben urn die FUhrungsscheibe 5, iiber die Fadenan zugsfeder 6 fUhreri und in den Haken 7 einhtin geri. Anschlie8end tien Faderi von rechts durch die Bobbing lm Fadenhebel 8, die Biigel 9, 10 und 11 ftthren und die Nadel von vome each hlnten sin fridein. Das Fadenende etwa 6-7cm durchziehen. Enhebrado del hilo superior Desconecle Ia mAquina. Pace el bib desde el carrels pot el guiahilos 1 y, como se mueslra en Ia fIg. 8, ports guia 2, alrede dor del muello 3, desde Ia derecha por afire los platitlos tenaores 4, alrededor del discos, por endma del muello recuperador 6y, enganchandolo en el gancho 7. páselo deeds Ia derecha pot el agujero dot tirahilos 8, pot las gulas 9, 10 y 11 y, deeds el frente, pot el 0(0 de Ia aguja. Baja un cabo de bib do unios 657cm. 11 Tension Drawing up the bobbin thread Regulate both tensions so that the needle and bobbin threads interlock In the center of the matehal and the stitches are tightly set (Fig. 10) Switch off the machine. Hold the end of the needle thread and turn the balance wheel in its normal direction of rotation until the bobbin thread comes up through the needle hole ins loop. Upper tension too loose or tower tension too tight (Ag. 11). Draw the bobbin thread out of the needle hole and lay both threads back under the presser toot. Upper tension too tight or lower tension too loose (Ag. 12). A iA I 3 3 - 3 - Ag.12 Remonter le fil inférleur Tension des fils Rrigler las tensions de manitire qua Ins deux fits ne torment pas de boucles else nouont au milieu de t’ouvrage (fig. 10). Mettre Ia machine hors circuit. Tenir Ia tit superieur at burner le volant dans Ia sans normal jusqu’ti lapparition clans Ia trou dai guille du fit inférieur eous forme de boucle, Tension du fit supérleur frop talbie ou tension du fit infériour trop forte (fig. 11). Tiror Ia fIt complètement du trou daiguille de Ia plaque et coucher lea flis daiguille at de crochet vera l’arrière. Tension du fit supérieur trop forte ou tension du fit infitneurtrop faible (fig. 12). Achtung: Ohna Fingerschutz Verletzungsgetahrl Dangert Do not operate without tnger guard Attention: Sans protège-doigts, nsque daccident! Atenctôn: No cosa otn salvadedos. iPetigro de accidental Fadenspannung Tension de los hilos Ober- und Untertsdenspannung so aufeinander abstimmen, daB die beiden Ftiden gut einge zogen sind und die Verschlingung in der Mine des Nahgutes erfolgt (Fig 10). La tensiOn del hlto superior e Inferior debe cci ordinarae de forma qua ambos hitos queden bien asentados y qua at entrelazado tenga tugar dentro del material (Fig. 10). Unterfaden heraufholen ExtracciOn del hilo inferior Macchine ausachalten. Desconecte Ia méqulna Obertaden festhalten und am Handrad in Dreh richtung drehen, bis der Unterfaden ats Schlinge mis dam Stichloch kommt. Sujete at fib superior y gire el volante en sentido normal haste qua aparezca at hilo inferior en forms de lazada por at agu)ero de Ia place de aguja Oberfadenspannung zu schwach outer Unterfadanspannung zu stark (Fig. 11). TensiOn del hito superior demasiado ftoja o ten sian del fib interior demasiado fuerte (Fig. 11). Saque ahora Ia punts del hito interior y cotoqueto haute atrás por debajo del pie pmensatelas. Obertadenspannung zu stark oder Unterfadertspannvng zu schwach (Fig. 12). TensiOn del hito superior demasiado fuerte o ten siOn dot hilo interior demaslado tioja (FIg 12). Unterfadert aus dam Stichloch herausziehen und zusammen mit dam Obertaden nach hinten uniter den Stepptutf legen. 13 Regulating the stitch length Turn thumb nut S clockwise for shorter stitches, or counter-clockwise for longer stitches. The numbers on the scale indicate the approximate stitch length in millimeters. Reverse sewing Push feed regutator lever S up as far as it wilt go and hold in there. The reverse sthches are as tong as the ones set for forward sewing. Fts. 13 R16175b Fig.14 R 9787 Reglage de Ia long ueur du point Oberfadenspannung regulieren Unterfadenspannung regulieren Oberfadenspannung nur bei herabgelassener StoftdrUckerstange regulieren. Durch Drehen der Prindelmutlerl bzw. 2nach rechts(+”)wirddie Durch Drehert der Schlitzschrauba nach rechls (±“) wird die Spannung starker, nach links (fl—”) Par vissage data poignée S. le point deviant plus court par dévissage de celia poignee, Ia point deviant plus tong. Léchelte graduée indiquo Ia tongueur approxima live du point on mm. achwticher. Spannung starker, nach links (,,—“) schwticher. Couture en inarche arrière Flelever Ia poignée S jusqu’à Ia bulée ella main tenir dens cotta position. La longueur du point en marche arrière correspond a celIa du point en marche avant. Regulating the needle thread tension Always lower the presser bar before you regulate the needle thread tension. To increase the ten sion, turn knurled nut I or 2 clockwise, to de crease the tension, turn It counter-clockwise. Regulating the bobbin thread tension Turn the regulating screw clockwise for a tighter tension, or counter-clockwise for a weaker ten sion. Ajuste del largo de puntada Réglage de a tension du fil superieur Avant de regler Ins tensions. sbaisser lv pied presseur. Par rotation des rlcrous I at 2 vers Ia droile, Ia tension des Ills augmente; ella diminue par rotation vera Is gauche, Reglage de Ia tension du fil inférieur Stichlange einstellen Par rotation dv Ia via vers Is drolle (+), Ia tension du lii augmente; ella diminue par rotation vera Ia gauche (--). Durch Drahen der Stichstellerrnutter S nach rechts wird die Stichllinge kleiner, nach links grotter. Die Skate gibt die ungeféhre Stichltinge in mm an. Regulacion de Ia tension del hilo superior La regulacion de Ia tensiOn del hilo superior solamente debarA efectuarse cuando Ia barra del prensatelas esté bajada. Girando las tuercas mo letoadas 1 y 2 hacia Ia derecha, a tensiOn au macta, y viceversa. Girando Ia tuerca del regulador de puntada S hacia Ia derecha, el argo dv puntada disminuye, y viceversa. La ascala Indica at largo de puntada aproximado en mm. Costura en retroceso Rückwärtsnähen Regulacion de Ia tensián del hilo inferior Girando at tornillo hacia Ia derecha, Ia tension aumenta, y viceversa. Stichstallermulter S bis sum Anschtag nach oben dnicken und festhatfen. Der RFickwãrtsstich entsprlcht dabel der einge. stetlten Stichlange des Vorwärtsstiches. Levante at regulador de puntada S hasta at lope y sujételo. La puntada en retroceso tiene Ia misma largura qua Ia puntada ajustada para Ia costura en avarice. IS I— J. —+ 4- ZD cD c D ,Il Stichiage einstellen Mit dam Hebel H wird die Stichlage aingesteift. Stichiage links Hebel H in Stellung: I II = Stichlaga mute Ill = Stichiage rechts. Em Wechsel der Stichiage kann wahrend des NTihens ertolgen. Bei stilistehender Maschine dart em Wechsel der Stichlaga cur bet hochste hender Nadel vorgenomrnen warden. Zickzackstich (Oberstich) einstellen Mittels des Grilles G wird die Breite desZickzack stiches eingestetlt. Wird Tier Grill G so gedreht, dali der Zeiger Z 0 zeigt, nitht die Maschine Geradstich. auf Oberstichbreite tixieren Schrsube B festziehen. Grill 0 Tirehen, so dali Zeiger 2 in Schiebor S ainrastet. Schraube B lösen und Oberstich mittels Gruff 0 einstellen. Schraube B wieder artziehen. Die Ijberstichbreite ist nun tixiert, so dali such nach einem Oberstich brelte-Wechseh beim Zurückstellen die exakt gleiche Brelte errelchtwird. Deport de l’aigullle Lever H serves to Set the needle position. Its three Le deport de l’aiguille se ritgle a aide du levier H. A levier H en position = Aigullle it gauche II = Aiguulle au milieu Ill = Aiguille it droite. L’aiguille peut itlre ditportèe pendant Ia couture. A machine srrêtite, relever l’aigullle avant de pro ceder it son deport. Regulating the stitch width The stitch width is regulated by turning knob G. When knob 0 is turned so that pointer Z points at 0, the machine sews straight stitches. Locking the stitch width slide in position lighten screw B. Turn knob 0 so that pointer Z snaps in place in slideS. Loosen screw B and turn knob 0 to the desired stitch width. Again tighten screw Bto lock the stitch width slide. When knob G is turned back after a change in stitch width, the original setting will thus be restored exactly. cE . Setting the needle position positions are as follows: left needle position central needle position II Ill = Tight needle position The needle position can be changed during sew ing. However, when the machine is not in operation, always raise the needle belore you change the needle positron. cID Réglage du point zigzag La targaur du point se régle it l’aide du boston 0. A index 2 Tie Ia poignee G stir ‘O”, Is machine coud au point droit. Ajuste de Ia posición de Ia aguja La poslciOn do Ia sgujs se sjusta colocando Ia patance H en Isa rnuescas siguientes: = posiclón izquierds Tie Is agujs II = posiclOn centro de Ia aguja Ill = posiciOn derecha Tie Ia aguja El canibio de poaición de Ia agujs puede rash zarse tambiitn durante Ia costura. Estsndo Is mitqulna parada, el carnbio de posidon do ha aguja deberit hacerse soismente con ha aguja en su posicion superior. Ajuste del ancho de zigzag Se etectoa girando at botén 0. Si el indicador Z so hatha completamente a Ia derecha. en 0. a mitquina coae en punto recilo. Fixation de Ia largeur du point Bloqueo del ancho de zigzag Serrerlavis B.Toumerhe bouton Gjusqu’ace que le talon Tie h’indes Z s’engage dens te cran Tie Ia coulisse S. Desserrer Is via B, ritglerhe point voulu Apnete et tomllto B. Gire el bated G de forms qua el irrdicadorZ encaje ants muesca do Ia corredera S. Afloje el tornillo B y ajuste at ancho Tie zigzag mediante el botén G. Apriete de nuavo eI tar nitlo B. El ancho Tie zigzag quads asl bloqueado, do forma que,incluso al cambiar de ancho Tie zig zag,se consigue exactamente el mismo ancho si girar hacia atrits at baton 0. 17 it ‘aide de a poignée 0. Resserrer Ia via B, Si maintenant, apres couture en tine jetite d’aiguille dill érente, on ramitne he bouton G dana Ia position préalable, Is machine coud it nouveau exacte ment it Ia largeur Tie point ritglite auparavant. Regulating the pressure on the material The presser foot pressure must be adapted to the material being sewn. Heavy and stiff materials require a stronger pressure, while light and thin materials are sewn with a weaker presser foot pressure. Turn regulaling screw V clockwise for a stronger pressure, or counter-clockwise for a weaker pres sure. Raising the presser foot The presser foot can be raised by means of the hand lever at the back of the machine head or by operating the knee lever. (This also applies to the top roller of subcl. -905/. .). Pression du pied presseur La preasion du pied presseur dolt être adaptée aux matières mises en ceuvre. Las matières épaisses ou dures exigent une pression plus forte que las matières lêgeres. Rotation tie Ia doullle V a tiroite, pression plus forte; rotation tie Ia doulila V a gauche, pression plus faible. Fig. 17 Fig. lb Relevage du pied presseur II est possible de relever le pled pressour tant ti l’aide du levier releveur ala face arrièra tie Ia tête de machine qua tie a genouillltre. (Cad eat vala ble aussi pour le rouleau supérleur en ss-d. -905/. Nähfu(3druck regulieren Oar Nlthfultdruck malt dem zu verarbeitenden Material sngepaltt warden. Dickers oder härtere Stoffe erlordem eirren stArkeren Druck ats leich tare Stoffe. Schraubenhülse V nach rechts tireDruck wird starker, nach links drehen hen Druck wird scfiwltcher. — Nähful3 hochstellen Der NShfuI3 kann anlweder ml dam auf der ROck seite des Maschinankopfas bafindlichen Hand hebet hochgestellt, oder durch Beltitlgen des Kniehabels angehoban warden. (Gilt such für die obera Walze bel Ijkl. -905/. .). .). Regulacion de Ia presion del prensatelas La preston del prensatelas tendrá qua adaptarae en cada caso al material qua Se cosa. Para mate dales gruesos habrá qua elegir más presiOn que para materlales ligeros. Girando el tomillo V hada Ia derecha, Ia presiOn aumanta, y vicaveraa. Funktionen der Tretplatten 0 1 2 = = = Elevaciôn del pie prensatelas El pie prensatelas puade elavarse madiante a palanca manual colocada defrtis dais cabeza de a maquina, o bieri accionando Ia palanca tie rodi ha. (Válido también para el rodillo superior en ha Subc. -905/. .). Functions of pedals Ruhestellung o = Rest position Nlthen bis zur max. Stichzahl Bet Maschinen mit: 1 = Sawing up to max. speed 2 = -913/52 Nadel posittoniert in Koch- bzw. position” Tiefstahlung.” 3+1 Bel Maschinen mit: -911/01 RUckwltrtsntihen, bzw. Verriageln = • Nur 501 MonuNnon mft Stopmolon ISI&Iung Nrd KppuN&t0r wablbo,t. On machines with: -913/52 Needle aithar irt “up” or “down” 3+1 = On machines with: -911)01 Sawing backwards oi backtacking. • On ,noublnon 015 Slop rnol only tSlson ponllionponu50o by Ir,gglo swiluhI 19 Cleaning y Clesn the sewing hook and the parts in its vicinit each day. To do this, switch off the machine, take the off the needle plate and remove the dust In hook area with a soft brush. Never use metal objects for removing tightly packed lint. For a thorough cleaning or for removing thread s: jamming in the hook raceway, proceed as follow Take out screw a and remove the hook gib. 1 Nettoyage La crochet etson logement sont it nettoyer cheque lea jour. Mottro Ia machine hors circuit. Enlover bourres cia lii it ‘aide dun pirtceau. No jamais ulilisor d’objet metallique. Pour le nettoyage it fond du crochet, retirer levis e at enlever I’archet de crochot. Fonetions des pedales 0 = 2 = Funciones de los pedales Position do repos Couture jusqu’à Ia vitesso maximale. 0 Sur machines avec: -913/52: posltionnement haut ou baa de l’sguiIle. 2 3 eti = Sur machines avec: -911/01: couture en arrière ou points d’arrêt. • Uqoe5 w,Ie nveInesavocnetsursIop lseievson pr InWm,Leur S bsuIe). 1 PosiciOn tie reposo. = Costura hssta Is velocidad maxima. En máquinas con -913/52: posicionado superior o inferior de Ia aguja 3y1 = Enmaquirtascon -911/01: Costurs en retroceso y rematado. soy on maquins ren nwn,st nonnle). - {EIOndo yponidOn roooneo&.tomptorbo Relnlgen n. Greiter und Greiferraum titglich reinige Hiorzu und Maschine susschaften, Sticfiplstte abnehmen mit don im Greiferrsum sitzenden Nithstaub elnem Pinsef ontfemen. Auf keinen Fall Metal gegenstitnde zum Lösen von festsitzendem Schmutz vorwenden. Zur gr(indlichen Reinigung oder bei evtl. Faden etrtschlsg, Greiferwiefolgt demontieren: Schrau be a herausschrauben und Grailerbügel abneh men. Limpieza de Ia máquina El garfio y su zone doberán limpiarse diariamente. Pars sIlo, dosconecte Is mãquina, quite Ia placa tie aguja y retire con un pincol los restos y polvo tie costura acumulados en Is zone del garfio. Pars Ia limpieza no utilice nunca objotos tie metal. Cuando se quiere hacer una limpieza a fondo, o en caso do qua so enclave aIgLn hilo en ol garflo, ol desmonte éato de Ia torma siguiente: saque tomillo e y quito el arco del garito. 21 role- O O Amener l’slguille en position superieure, et coo Nadel In Hochstellung bringen, Nllhtult anhe ben, Niihgut nach hintem herausnehmen urid NShfSden abschnoiden. var Ia pied, sorlir Ia pièce vera l’ardère per lea Ills S coudre. Ouvrir Ia boutonniere de preference so Découvit. L’inserfion dun SI de passe dane las lSvres per met daugmenter le relief de Ia boutonniere. Gas Knopfloch (zweckmallig mit einom Ploiltren ner) zwischen don Reopen autschneiden. Durch MitfUhren elnes Einlauffadens wird des Knopiloch etwas plastischer gestaltet. Costura do ojales Sewing buttonholes Knopf loch nähen Schraube B (Fig. 20) läsen, an Grill G Oberstich breile von etwa 1,5 mm oinstellen (‘ Raupen breite) und Schraube B wiederfestdrehen. Such lagenhebel H in Stellungt bringan, An Stichsleller mutter S (Fig. 15> Stichlänge VOfl Ca. 0,5mm (= 1 Teitstrich) einstellen. Knoptlochlänge out Nahgul markieren und Knopfloch nach folgendem Schema ntihen (FIg. 21>: o O Loosen screw B (Fig. 20), turn knob G to a stitch (or buttonhole seam) width of abt. 1.5 mm, and tighten screw 8. Move needle position lever H to position I. Turn teed regulator thumb nut S (Fig. 15> to a stitch length of abt. 0.5mm (“' 1 gradua tion mark). Mark the length of the buttonhole on the fabric and sew the buttonhole as follows (Fig. 21): Sew the first buttonhole seam up to the mark, leaving the needle in the fabric on the right side of its throw. o o Raise the presser foot, turn the fabric dodewise through 180° end lower the presser fool again. Let the needle take one stitch to the left. O Turn knob Gto 4mm, and sow4to6bsrtacking stitches, slightly closing together the button hole end to reduce the length of the bartack. fl.21 Couture de boutonnières Dessorrer Ia via B (fig. 20), régler one jetée d’ai guille do 1,5 mm any. au moyen do bouton G (=‘ targour do lèvres) at resserrer Ia via B. Placer Is levier H du deport de laigoilla en position I. A l’écrou regIs-point S (fig. 15), regler on point de 0,5 mm any. do tong (= 1 crsn de graduation>. Marquer Is longusur de boutonniere sur Ia pièce at coudre celle-ci comma suit (fig. 21): a Coudre Ia premiere lèvre jusqu’au repère et laissor l’aiguille en jetèe droite dana l’Ctotfe. Nähen der ersten Knoptlochraupe his an Mar kianing und Nadel rechts der Raupe im Stoff stecken lassen. Gto 1.5mm and sew the second o Again turn knob seam, stopping sbt. 1 mm from its 180° 9 Lever le pied presseur, toumer Ia pièce Iade pied. Nähfull anhebon, NShgut urn 180° rochtsher urn drehen unct Full wieder senken. Einon NShstich nach links euslühren. G 104mm again and sew the second o Turn knobclosing together the tabric so that both points 9 Régler le boulon G sur 4 at coudreIs456 pièce pour G and thumb nutS to “0’ and o Turn bothto knob 4 tying stitches. o 4 mm statIon, 4 6 Riegolaliche o Grill G out Sued dabei etwsS einhalton, damit buttonhole end. bartsck, sesm ends are properly covered. - aShen; den der Riegel nicht zu lang wird. O Grill G wlederaut 1,5mm stellon und die zweite Ftaupe nShen bis co. 1 mm vor Schlull. O Grill G erneut aut 4 mm stellen und SchiuB riegel nahen his beide Raupen (ibordeckt sind. Stolf dabei wieder etwas einhalten. Stichstollermutter Saul “0” statIon o Grill G undHeflsliche nhhen. und 3 4 - vera Ia droite et abaisser S nouveau Faire un point vera Is gauche. make 3 Raise needle and sewing foot, remove the work by pulling it toward the rear, and trim the threads. o Cut the buttonhole open between the seams (pre ferably using a seam ripper for that purpose), If you preter a more prominent buttonhole, insert a tiller thread in the buttonhole seam. o 0 d’arrét en relenant quetque p00 qua l’arrèt ne devienne pas trop long. Ramener Ia boston G sur 1,5 mm at coudre Ia seconds lèvre jusqu’ã 1,5mm environ du bord avant dela boutonniere. Placer a nouveau le boulon G sur 4 at coudre l’arrèt avant jusqu’S ce que les daux lèvres soient recouvertus. Ce taisant, retenir S nou veau modérément tétoffe. Regler le boston G et lécrou S sur .‘O” et coudre 3 ou 4 points de nonage. Al loje at tornillo B (fig. 20), ajuste en al botân Gun ancho de zigzag do 1,5mm (= ancho del lablo del ojal) y apriete cia nuevo ol lornillo B. Ponga laps Ian pars posiciân do puntada H aol. Girando Ia tuerca S (fig. 15). ajuste on fargo do puntsda do 0,5mm aprox. (= 1 rays divisonia). Marque Ia lar gura del ojal en Ia lola y hsga el ojal dais siguiento forma (fig. 21): det ojal hasta Ia marco y o Cosa el primeralaohio cteracha clavada en Ia lola. deja Ia aguja a tela 180° hacla Is derecha y baje el prensatolss. Haga una puntada hacie Is izquierda. Coloque el botSn G en4mm, y haga do 4a6 pontadas de presitla retenienclo un poco Ia piozs do costura pars qua Ia presilta no resulte demasiado larga. O Levanto el prensatelas, gire o et botOn G en 1.5 mm y o Vuelva a poner labio del ojal hasta Ilegar a I mm ol segundo sprox. del final. a poner el botön G on 4 mm y cosa Is presltla final hasta quo ambos labios del o)aI quedon recubiertos. Tamblén aqul habrS quo raloner on poco Ia plaza do costura. O Vuelva Ia tuerca Spare ol lsrgo rIo o Pongs el enbotSn G yhaga do 3 a 4 puntadas do punlads remote. “0” y y el prensatelss, retire Is plaza o Elove Ia aguja hacia atrSs y corte los bibs. do costura Abra el ojal con el cortador do ojalas. Insertando on hito do alma, adquiere el ojal mSs relieve y plasticidad. 23 Sewing eyelet-end or gimp buttonholes (Part Nos, of foot 91-041 420-05, and of edge guide: 91 -041 427-91) Augen- oder Gimpenknopfloch nähen Replace the presser toot by the buttonhole foot with gimp guide and screw on the edge guide (Fig. (FoB Best,-Nr. 91-041 420-05, 22). Lineal 91-041 427-91) Before your raise the presser bar, make sure you swing the edge guide out of action by turning it to the right. Ntitrfuit durda Knopflochfult mit Glmpenfuhrung ersetzen und Lineal anschrauben (Fig. 22). Vorm Hochstelten der Stoffdriickerstange Lineal irnmer durch Rochtsdreher, ausschwenken, Oberfadenspannung stark und Unterfadenspan flung schwach einstelten. lJberstlchbreite auf 2 3 mm steilen und Stichlitnge möglichst klein wählen. FOhrungslineal so einstellen, dalI die Nadel die Ftihrungshilfe nicht streift. - Gimpenfaden Ca. 5cm durch die Bohrung rn Full ziehen und nach hinten tegen. Knopfloch aus schneiden unit das Arbeitastück mit dam Knopt lochauge zur Nitheriri, unter den Full logeri. Am Ende der Umrrithung NithiuB anheben urid Arbeitsstück etwas nach hintan ziehen. Ftiden auf 4 cm abschneiden, nach union durch des Knopf loch zieheri unit zusammendrehen. Uberstich auf Ca. 4mm staten und Fitden Uberstechen. Arbaita attick urn 90° drehen unit Faden mit Ca. 1,5 mm Oberatich verriegein. FBden dictfl am Riegel absclineiden. Increase the needle thread tenalon and reduce the bobbin thread tension. Set the stitch width at 2-3 mm, and regulate the stitch length so that the stitches are packed closely together. Adjust the edge guide so that the needle will not hit the guide sleeve. Pull ebt. 5 cm of gimp thread through the hole in the fool and lay it toward the back, Cut Out the buttonhole and place the fabric under the foot so that the eyelet-end of the buttonhole faces toward you. Aftersowing, raise the buttonhole foot and pull the workplace backwards a little. Trim the threads, leaving ends abt. 4 cm long. Pull the threads through the buttonhole to the wrong side and twist them together. Turn the stitch width control to 4 end stitch the thread ends down. Turn the workpiece through 90° and bartack the threads with stitches 1.5mm wide. Cut the threads off close to the bartack. Couture de boutonnlères a til de passe a ceillet ou (Pied n° 91-041 420-05, guide n° 91-041 427-91) Remplacar to pied normal par Ia pied it bouton niitres avec guide-cords etvisserle guide (fig. 22). Avant de relever Ia barTe presse-tissu, toujours escamoter Is guide per rotation it droite. Rentorcer a tension supitrieure at ritduire Is ten sion inférleure. Régier Ia jetho daiguille sur 2 ou 3mm at choisir une tongueur do point ausi petite quo possible. Ritgier Ia guide prair qua raiguilie n’en frBio pea Ia come do guidage. ‘firer Is fit do passe do 5 cm environ par ie trou clans le pied at le coucher en arriitre, Ditcouper Ia boutonniere et piecer Ia pièce sons te pied, fcailiet toumit vera is mitcanicienne. Costura de ojales sastre y de cordoncillo (Pie, N° do pedido 91-041 420-05; guts 91-041 427-91) Sustituya el pie prensatetas normal porei pie pare ojales con guia para cOrdoncitlo y aiomille Ia gula (11g. 22). Antea do eievar Ia barra del prensetelas, retire siempre Ia giiia giritrrdola hacia Ia derecha. Ajuste Ia tension del hilo superior mits fuorte do to normal y Ia del hilo inferior mita fioja. Ponge et ancho do zigzag de 2 a 3mm y ehia una iongitud de puntada muy pequeha. Ajuste Ia guta do forms quo is aguja no roce at casquillo do diche gula. inIroduzca at cordoncillo unos 5cm porel egujero del piay itchaio hacia atrits. Crate el ojai ycoloque Ia piezsde costuredebajo del pie, do forms quo at Contoumer Ia boutonniere, relever le pied at firer Is pièce queique peu en arrière, Couper lee fits sur 4 cm, ies faire passer it lenvers, par is bouton nièra, at las nouer. Régier Is jetéa d’aiguiile cur 4 at surpiguor los fits. Toumer ia pièce do 90° et brider las Ills par une jetée daiguilie do 1,5 mm environ. 010 dat ojat señaie hecia Ia operarle. Al final dots costura eteve at pie para ojales y tire do Ia pieze un poco hacia atlas. Corto los hilos, dejando un cabo de unos 4 cm, y tire do ellos tiscia abajo por al ojal. Prasilie los hiios con un sneho do zigzag de 4mm apr05. Gire Ia plaza do costura 90° y remato os hilos con un ancho do zigzag do 1,5 mm. sprox. Couper los fits au ras de lerrét. Corte ioa hiios a rae do is prosilla. 25 Adjusting the neeale gauge Cording (Subcl. -915/..) The needle gauge can be varied from 2 to 3, 4.5 or 6 mm, depending on the machine version. (Subcl. -45/. -915/..) needle bar 91 -064 652-91 needle bar 91-064 653-01 + needle holder 91-063 148-91 foot 91-051 277-93 Ba 6.0, cover plate 91-041 844-25 Subct. -915/05 Turn screw T counter-clockwise to increase the needle gauge, or clockwise, to decrease it. Subcl. -915/02 On this machine version the needles are indivi dually adjustable. To do this, loosen the screws at the beck of the needle holder jaws and adjust each jaw, as appropriate. Then tighten the screws again. Replace the presser tool by the cording fool (Fig. 23). Slip prong a of the cording slide into hole b, open the bad slide a little, push the resilient prongs C arid d over the edge of the needle plate, and close the bed slide again. ‘I Nodi syOem 438 01< Nei0o oyoiwi 130 B Confection des nervures Ecartement des aiguilles (ss.-cl. -45/. -915/..) Barre aiguillea 91-064 652-91 barre a aiguilles 91-064 653-01 pince-aiguille 91-063 14891*, pied 91-051 277-938 x 6,0, plaquette 91-041 844-25 (se-ct. -915/..) Suivarit le modSle de machine, recartement des aiguiltes eat rSglable entre 2 et 3, 4,5 ou 6 mm au maximum. 4 Sous-classe -915/05: Per rotation S gauche de levis T, l’bcartement des aiguilles augmente; par rotation S droite, ii di minue. IRemplacor Ia pied presseur perle pled S nervures (fig. 23). Inlroduire Ia patte a de applique dans le perçago b. Ouvrir quelquo peu Ia plaque S gus siSre ella ralerrner en passant sur lea oreilles C et d de ‘applique ainsi maintenue. Hepousaer Ia plaque S glissière. “I Sous-classe -915/02: Sur ce rnodSle, lea aiguiltes sont rAglables indivi duellement. Desserrer lea vis Sla face arriSre des mSchoires pince-aiguille. ajuster los machoires et resaerrer lea vis. SysIki’w d&gutle 438 OK systoo,o dlgiiIio 1308 Costuras de nervaduras Biesennähen UkI. -45/. -915/..) (Subc. -45/. -91Sf..) Nadelabstand einsteIen . Nadelstange 91-064 65291l, Nadelstange 91-064653-01 + Nadelhalter9l-063 148-91>, Full 91-051 277-93Bx6,0, Uberdeckplatte 91-041 844-25 Nhhfult durch Biesenfult ersetzen (Fig. 23). Oberdeckstichplattchen mit Befesligungslasche a In Bohrung b elnh8ngen, Grundplettenschieber etwes zurUckziehen und die lederenden Enden c und d Uber die Stichplattenkenle drOcken. Grundplattenschieber beischieben. ‘)Ndioyieoi 4341<1< Ndo8yOom 1308 26 Berrade eguja 91-064 652-91, Berra de aguja N° 91-064 653-01 + Portaagujas N° 91-063 148-91 Pie N 91 -051 277-93 B x 6,0; Plaquita N° 91-041 844-25. Sustituya el pie prensatelas normal por el pie pare nervaduras (fig. 23). Coloque Ia plequits do a torme siguiente enganche Ia oreja do tljaciOn a en et agujero b, haga retrocedor un poco Ia corcedera de laplace base y presione los selientea elSsticos C y d sobre el canto de laplace do eguja. Empuje hacie donlro a corredere do Ia placa base. Sioiow de moles 438 OK 5i0OO1 dgojeo 1305 (UkI. -915/..) Je nach MaschinenausfShrung kann olri Nadel abstand von 2 bis max. 3 bzw. 4,5 odor 6mm em geslelti werden. UkI. -915/05: Durch Linksdrehen der Schraube T wird der Na dolabstand groltor, durch ftechtsdrehan kloiner. UkI. -915/02: Bol iSeser Austuhmng sind die Nadein einzeln vorstellbar. Die auf der Riicksoite der Nadolhal torbackon sitzendon Schrauben Ibsen und Beckon einzeln vorsohieben. Schrauben wieder anzielien. Ajuste de Ia distancia entre agujas (Subc. -915/..) Segiin el tipo do mSquina, puede ajustarso una distancia entro agujas do 2 a 3,4,56 6 mm como mSximo. Subc.’ -915/05: Girando at tomillo thecia Ia izquierda, Ia distancia mitre agujas sorS mayor, y vicevorsa. Subc. -915/02: En este tipo, as agujas so pueden ajustar mdi vidualmenlo. Aflojo los Iomittos quo so en cuentran delrSs do las manidlbulas porleagu jas y desplScelas mndividualmento. 27 Quilting Button sewing (Part No. of straight-stitch toot: 91-026 242-93, part No. of zigzag foot 91-041 296-93) Sew the first seam with great care. Then set the quilting gauge to the desired distance between seems and guide the material while sewing the next seam so that the gauge finger follows the (Part No. of foot 91-041 047-05) Setting: Stitch length “0° and right or left needle position. Place the button under the toot and adjust the stitch width so that the needle is centered In the right and left holes of the button when It descends on its throw. To tie off the seam, turn the stitch width control to “0” and sew a few tying stitches. Fls. 25 H 5060 preceding seam. Ouatinage Pose de boutons (Pied n’. 91-026 242-93 pour point droil, pied n° 91-041 296-93 pour point Zigzag> Coudre soigneusement Ia 1’” couture. llégler t’ittrier du guide-espaceur sur l’écartoment vouf U ties coutures at s’orienter cur cette couture pour réaliser Ia couture suivante. (Pied n° 91-041 047-05) Reglage: Longueur du point 0. Position de I’aigullle: A gauche ou it droile. Poser le bouton sous le pied 01 régler Ia jetite d’aiguille do aorta que celle-ci pique exactement eu centre desirous gauche at droit dens Ia bouton. Après Is fixation du bouton, coudre quelques points sur place après ritglage de Ia jetite cur ‘.0”. Knopf annähen Costura de botones (Full Best.-Nr. 91-041 047-05) (Pie, N” tie pedido 91-041 047-05) Einstellung: Stichlitnge o0o und Stichlage oiinkso oder “rechis”. Knopt unter den Full legen urid Oberstich so sin stat len, daB die Nadel jewells genau in die Mine des linken und rechlen Loches sticht. Zum Sichem tier Naht, Oberstich auf ‘.0° stellen und einige Sticha auf der Stelle machen. Ajuste: Largo tie puntada: 0. PoaiciSn tie Ia aguja: ‘.izquierdao 0 oderecha”. 28 Cotoque el botén debajo del pie prensafelas y ajuste el ancho de zigzag do forma quo Ia aguja se dave exactamente en el centro decade egujero. Pars esegurar a coslura, ponga el ancho de zig zag en o0.y haga unas puntadas de rernate. Acolchados Wattierung absteppen Full llest.-Nr. 91-026242-93 für Geradslich, Full Best.-Nr. 91-041 296-93 für Zickzackstich) Die 1. Nato sorgfallig nithen. BOgef des Lineals act den gewünschlen Nahtabstand einstellen und beim Nithen an der vorhergehenden NahI enl Ianggleiten lessen. (Pie, N” do pedido 91-026 242-93, para punto redo; Pie, N” do pedido 91-041 296-93, para punto zigzag) La primers costura hay que hscerla cuidadosa monte. A continuación se alusta Ia guts a Ia dis tancia deseada entre las costuras y so posiciona at material do tal torma, Que Ia guts discurra sIam pro a 0 lergo tie Ia costura anterior. 29 Fig. 27 I Fr 4543 Pied universel pour piqUre roulante Universal-Roilpikier- und Staffier Roll padding and blindstitching foot apparat (Besl-Nr. 91-744700 91) (Pad-No. 91 744 700-91) Die Pfaff 138 kann bei Verwendung dieseg Apparates, der aristelle des Ntlhfu8es ange schraubt wird, auch sum Pikiareri eingesetzt werden. Das Lineal (1,) 1st austauschbar. Für dünrie Stoffe wird das dickere, für dicke Stofle das dünnere Lineal eingesetzi. Fitted with this foot instead of the normal presser toot, the Ptaff 138 can also be employed for pad ding and blindstitching operations. Guide (b) is exchangeable. For thin fabrics a wide guide, and for thicker fabrics a narrowguide is used. Das Wechseln geschieht durch elnfaches Her ausziehen bzw. Aufsteciren, Eirrstellung: Grölite Obersfichbreite and Such Iringe ca. 3mm. Mittels des Hebels c den Apparat so ausrichten, dalI die Naclel gleichmtlllig nach beiden Seiten eirrsticht. Achtung. Maschine our bei herabgelassener Stotidrdckerstange in Be Wegurig selzenl Für dtirrne Stoffe, die Nadetanschltlge fund g mit dam Schrauberrzjaher so einstellen, dali die Nadel ganz ieicht abgelenkt wild. Arbeltswelse: Urngelegle Stoffkante bairn Nhhen an der linken Kante entlanggleiten lassen (Fig. 28). Am Ende der Naht, Nadel rechts in des RoBhasr einstechen lessen, Stoftdrückerstange etwss anheben mid Arbeitsstbck urn 180° drehen. Die umbuggte Stoffkante bairn Nhhen nun an der rechten Kante des Lineals entlanggleiten Isssen (Fig. 29). To change the guide, simply pullout the old guide and Insert the new one. Setting: Maximum stitch width and stitch length abt. 3mm, Adjust the position of the blindslitching foot by means of lever can that the needle throw is exactly halved by the center line of the toot. Never run the machine unless the presser bar has been lowered. For sewing thin fabrics adjust bight limiting screws and g with the aid of a screwdriver so that the needle will be slightty deflected. Operation: During sewing guide the folded fabric edge along the left edge ol the guide (Fig. 28). At the end of the seam, let the needle stitch into the horsehair lining, raise the presser bar a little and turn the workplace through 180°. Now guide the folded fabric edge along the right edge of the guide (Fig. 29). et glaçage (n° 91-744700-911 r Equipée de ce pied a Is place du pied presseu pour normal, Ia Plaff 138 convient rigalement coudre Cu point inaisibla. Le guide b eat richan dii piad. geable: ii s’emboite enire lea tourcheg ella guide epais tissus las pour tin guide r Ia Utilise ripais pour las tissus fins. age: Largeur maximale et Iongueur du point Re l 9 Ia pied de 3 mm env. A l’aide du levier c, gunner part manière que l’aiguille pique régulierement de Ia bane et d’autre. Na pas omettre d’abaisser . presse—tissu avant de commencer a coudre Pour lea tissus fins, rêgler las balées tel g h l’aide lle soil dun tournevis de maniftre que I’aigui ricarttle lrigerement. Mode opératoire: Salon fig. 28, gilder a cassure tin du tissu contre le bard gauche a du guide. Ala le arm, de Ia couture, laisser l’aiguille a droite dans lever legigrement Ia barre presse-tissu at burner ta l’ouvrage de 180°. Maintenant, laisser glisser cassure du tissu Ia long du bord droll d du guide (fig. 29). Aparato universal para picar y coser a puntada invisible (N° de pedido 91-744 700-91) la Con este aparato, que se colons y atornil en hugar dab pie prensatelaa, a Pfaff 138 puede alit zarse tambin pars picado enrollado. La gala It,) as intercambiable. s del La guia más gruesa an emplea para grinero gados y Ia guia más delgada pars géneros de mayor grosor. El cambio de Ia gala es may técil, pues basta con sacarla o meterla an el muelle de presión. Auste: ponga el anaho máximo de zigzag y un largo de puntada de 3 mm aprox. Accionando Ia Ia patanea C, posicione at aparato de forma qua ia a aguja penetre guardando Ia misma dislanc nte ambos lados. Atenciriri: Ia maquina solame deberé ponerse en marcha con Ia barra del pren os, satetas bajada. En el caso de géneros delgad ajusle con at destornilladorlos topes fy g de torma qua Ia agujs sea oprimida ligeramente hacra dentro. Durante Ia coshura, el borde doblado de a plaza ne Ia deberé conducirge contra el canto isquierdo guia (8g. 28). At final de Ia costura deja Ia aguja la, Ia clavada por Ia parte derecha en Ia entrete Ia vanle an poco Ia barra del prensalelas y gire plaza de costura 180°. A continuación, el borde dobtado da Ia plaza Se conduce contra el canto derecho de Ia gala (fig. 29). 31 Flg.30 1114775 Frg 31 1114776 plaque Plaque de recouvrement de Ia ‘à aiguille Gberdeckstichplatte Best-Nr. 91-041 251 -25 zum Stopten und Slicken 1. Sleppfull abschrauben. em 2. Oberdeck-Slichplatte einhängerr (Fig. 30) r schwenken und mit dem Gwndplattenschiebe festhalten (Fig. 31). 3. Stoffdrückerhebel herunterlasseri. n. 4. Stopf- oder Slickarbeit unter die Nadel bringe Stopfen: g mit Schadhafte Stalle zuerst in Lfingsrichtun ten Fitden Oberspannen mid dann mit kleirrs Stichen in Querrichtung Oborstechen. Sticken: , Das Monogramm-Stickerr erfordert etwas Ubung rn bis man aid, des gleichrnitllige Schieben hat. Rhythmus tier Nadelbewegung angeeignet Zweckmittlig Slickrahrnen verwenden (FIg. 32). 32 Cover plate (Part No. 91 -041 251-25) For darning and enrbroidenng. 1, Remove the presser foot. 2. Slip the prong of the cover plate into the hole of the needle plate (Fig. 30), turn it over and secure it iii position with the bed slide (Fig. 31). 3. Lower the presser bar lifter. 4. Place the workpiece under the needle. Darning Stitch over the damaged spot from one side to the other, then turn the material through 90° and dam at right angles with very short stitches. Embroidering Monogram embroidery requires a little practice until you have learned to move the material evenly in rhythm with the needle motion. For best results, use an embroidery hoop (Fig. 32). broder N° 91-041 251-25, pour repriser at r. presseu pied to ser 1. Dflvis recouvremenl 2. Mettre en place Is plaque tie plaleau (fig. 30) at Ia bloquer par a glisaière tie (fig. 31). r. 3. Abaisser to levier du pied presseu broder sous ou r reprise ge 4. Amener l’ouvra laiguille. a Reprtsage: le sans de a Commencer par tendro des Ills dans , coudre longueur sur I’endroit repriser; ensuite a largour. de trés petite points dane Ia sans do a Brodage: de quelque La brodage do morrogrammes demsn habitué eu exercice (usqu’a ce quon so soit rythme du mou placement regulmer du cadre, au cadre it broder vemerit do taiguilte. Lemploi dun eat recommandit (fig. 32). tie- Plaquita para puntada de recubrimiento zurcir y bordar N° do pedido 91-041 251-25 pars lelas. I. Destomille y quite el pie prensa presiónels sobre 2. Enganche Ia plaquita (fig. 30), Ia corredora laplace do agula y asegrrela con do Ia place baao (fig. 31). s. 3. Baja Ia palanca aizaprensatela bordor o zurcir 4. Coloque a piezs quo se ha do doba(o do Ia aguja. Zuroldos: sentido longi Primeromente extiends los hilos en continuoción, tudinal sabre Ia pane dansds y a transversal. con pequerras puntadas err sentido Bordados: o un poco de El bordado de monogramas requier moviendo uni practice hasta qua Ia piezs so vaya iento do Ia formemente con respeclo ol movim salga de Ia aguja (as decir, cuando Ia aguja r (1mg. 32). piers). Se recomienda utilizarun baslido 33 Belt guard above the tabletop Bias binder belt guard The bolt guard is titled as follows: Place screws 1 on the table and secure it in position with of bolt 2. Adjust it so that it reliably covers the point entry. Tighten screws 2 securely. (Part No. ot attachment: 91-041 894-23, part No. of foot: 91-041 895-04) Secure the bias binder to the bodplato with screw A, snd replace the normal presser toot by the special presser root to be used with the binder. Cut the end of the tape to a long point and push the tape through the binder unlit it emerges in the exit. Make sure the binding is bIded evenly and pull it through the attachment until its end is posi tioned under the presser loot. Insert the edge to be bound in the slot of the binder. Setting: Loosen screw A and adjust the binder so that tim stitching margin is the same on the top and bottom ot the binding. Tighten screw A again. Bordeur au biais (Appareil n 91-041 894-23, Pied n 91-041 895-04) Fixer lappareit it laldo de a vis A sur lo plateau fondamental. Remplacer lo pied normal par Ia pied bordeur. Couper ‘extrémitit du biais en pointe pour pouvoir Jo taire passer plus I acilemnnl par to bordeur. Veil ler au rempliage régutier dii biaix nIle tirer jusque sous In pied bordeur. Engager Jo bord it border it bond clans Ia goulotle coudito do lappareil. Réglage: Desserrer Ia vis A 01 régter tappareil Jusquit ce quo, it lenvers 01 it lendroil, a cou ture paraisso it distances itgalos du bord. Rex serrer Ia vis A. Schrägband-Einfal3apparat ..lApparat: Best.-Nr. 91-041 894-23, Full: Best.-Nr. 91-041 895-04) Apparat mit der Schraube A aut der Gnundplatte testschrauben. Dazugehoiigen Full, nach Enttemen des norma en Nithtulles anschrauben. Baridanfang spitz zuschneiden cod Band durch t die BandfUhnung schieben bis es am Auslau hervortittl. Aid gluiuhinäl3igs Umschlagen des Bandes achten und Band bia unter den Nithtull ziehen. ArbeitsstOck mit der Kanlo in die FUhrung am abgewickolton Ausisuf des Apparales schie ben. Einstellung: Schraube A lösen und Apparat so lostsetzen, daJ3 die Naht auf Ober- cod Unter seite im gteichori Abstand zur Bandkante verläuft. Schraube A wieder testziehen. Aparato ribeteador para cintas al sesgo (Apsrato: N° do podido 91-041 594-23: Pie: Mde pedido 91-041 895-04) Fije el sparato en Ia placa base medianle el honiillo A. Atomille ol pie especial, quo reomplaza al pie normal. zca Corto en punlael comienzo do Ia cinta, lntrodu Is cinta en Ia guia y empUjela hasta quo asorno o pm Ia salida. Vaya doblando Ia cinta unitorm telas. manley Ilitvela hasta debajo del pie prensa Ia lntroduzca el canlo do Ia pieza de 005tura en tormlnación angular del aparato. Ajuste: atloje el tornillo A y posicione el oparato en do forms quo Ia costura, tanto on a cars como el rosits, so halle exactamonte ala misma distan cia del borde de Ia cinta. Apriole de nuovo el tomillo A. Garde-courrole supérleur nb Achtung: Maschinon mit Motorantrieb ohne Riomenschutz in Betrieb setzon. e Dangert Never run a power-driven machin unless the belt guard has been properly fitted. les Attention: No jamais mettro en marcho le machines it commando par moteur sans place. en gardo-courroie na en Atenclón: No pongs nunca to mitqui martha xiii haber colocado antos ol guarda corroas. Riemenschutz oberhaib der Tischplatte Schulz wie tolgt montieron: Schrau Riemenschulz 1 autsotzon urid mit den iton, doll dor ben 2 tixioren. Sctiutz so ausrict Schrau Riemoneinlauf sicher abgeachirmt wird. ben 2 testziehon. Monter lo garde-courroio on procédant comme it raido suit Monler to garde-courroio 1 ella tixer ro quo le dos vis 2, Alignar los plaques do manlit t avec point dattaquo do Ia courrolo soil couvor certitude. Sorror los via 2. Guardacorreas superior siguiente: Monte ol guardacorreas do Ia torma los Coloquo el guardacorroas 1 y asegOrolo con torma tomillos 2. Posiciona el guardacorreas do e los quo Ia corroa quade bion protegids. Apriot tomillos 2. 35 Pièces d’usure -6/21 x 6,0 VerscheiI3teile / Wearing parts Causes de derangement Fallos y sus causas -6/21 x 4,5 Manque do points: 1° Enfilage incorrect 2° Fausse aiguille 3° Aiguttle ptacée do travers 4° Aiguille Imp fine pour to ill 5° Aiguille trop grosse pour le fit 6° Aiguilte courbite 7° AlguilIe placito hop haut ou trop has 8° Espacementtropgrand entre alguitle etpolnte do crochet (0,1 mm.) 9° Trop grande ou trop petite remontite do Iatguille pour Ia formation de a boucle 10° Matiitres trop apprittites ou collantes 11° Fit trop tordu. Casse de fit: 1° Cas susmenhionnés 2° Tension des fits trop forte 3° Fits noueux 4° Fit deposit devenu cassant 5° RI do mauvaise qualité 6° Prise de fit dana a courslitro du crochet 7° Trou data plaque it aiguitle rugueux 8° Fit tombit do Ia hobine et entortillé autour do Ia broche it bobine 9° Ressort conlrôleur do fIt ditréglé 10° Aiguille dpointée. Puntadaa saltadas a cause do: 1 Enhebrado I also 2. Sistema do agujas falso 3. Aguja mat cotocada 4. Aguja may delgads en relaciôn at trio 5. Aguja muy gruesa en relaciOn at hilo 6. Agujadoblada 7. La aguja ha sido colocads muy attso may baja 8. La distancia entre Ia punts del garfio yfa aguja es demasiado grande (0,1 mm) 9. Formaciôn de fazada demasiado grande ode masiado poqueda 10. Msferiet do costura pegaj coo do macho apresto. 11. Hilo demasiado retorcido. I L 61-013168-91 61-flit 713—53111 111701 91-lIt ttt-13[ 91-54] 522—131:0 91-11355-91 l-’iezas uo uesaoto -34/01 / 85-040 032-04 [8]tuil 91-025889-0403] 51-826961-5414] oD Rotura del hilo 5 csusa do: 1. Los motivos moncionsdos arrteriormonto 2, Tension demasiado fuerte 3. Hitosnudosos 4. Hhlo atmacenado demasiado tiempo yen sitio may seco 5. Mats catidad del hilo 6. Hilo sprisionado en Ia corredera del gariio 7. Agujoro do Ia placa do aguja danado per Ia aguja 8. Hito enrodado en et Garrote 0 en of porta carretes 9. Muetleroguladordel hito desplazado do su sub 10. Aguja despuntada o dartads 11-17436-15 il-iS 167-15 01940401-941:0111711 si-nit st-os 01-528694-01 IFI w 41-013101-S 91-188488-41 91-188441-41 Casse d’aiguf Ito: 1°Aiguilte courhite price par Ia pointe du crochet 2° Fit frop gros pour Ualguitte 3° Crochet derégfit par suite dune piise do fit 4° Tension superioure trop torte 5° Malières trop dures faisant ditvier raiguilte 6° Aiguiflo ditvio sur es matières tirites ou poussites ala main 7° Entratnemerrt encore acid quand t’aiguitte touche I’ouvrage 8° Crochet trop pres do I’aig utile 9° Aiguilte 6-op fine pour rouvrage 10° Fit entomillé autour de Ia brocho it bobino. Entrainement défectueux: 1° Griffo se trouve trop has 2° Denture do a grille trop fine pour rouvrage 30 Forme de a grille impropre pour touvrage 4° Pression trop faibto do pied presseur 50 Dents do grille encrassées 60 Dents do grille itmoussées 38 Rotura de Ia aguja a causa do: 1. Aguja doblada, onganchada por Is punts dot garfio 2. Hilo demasiado grueso para Ia aguja 3. Gartiodesplazadodesusitio, poraprisionarse machoc hilos 4. TensiOn dot bib superior domasiado fuerte 5. La aguja es desviada en los sitios duros dat material de costura 6. Aguja doblada por empujar 0 tirar dot materiar 7. Trsnsporta no terminado at penetrar Ia aguja 8. Gartio demasiado pegado ala aguja 9. Aguja demasiado delgada on relaciOn at ma terial 10. Hito enredado on Ia espiga del portacarrotes Transporte defectuoso a Gauss do: 1. Transportadormuybajo 2. Dientes del transportador muy tlnos pars el material 3. Forms dot transportador inapropiada pars el trabajo 4. Price presion del prensatefas 5. Diontosdoltransportsdorllenosde polvo 6. Puntas do los dientes muy schatadas -51-8811t19-t5 91-36676-61 91 715 81-36713-19 - 91-36670-15 2 J 0-36844-80 81-36279-45 91-697134-89 1___ 01-36 099-51 91-3636-01 [j]= Ausfütsuoç anebee ° o = IndloOo 001844 7°réiIn verwafl 10414000044 lp0 [07]] Oucersrk18rbxole bel eestelung eosoben 1040010 reao 071900 wOO an 1040400,0440 Indlqoeno 44 004e0 dOmIlie I a oow,ooedo lIe 55mg 0000 pnoikton 39-
 1
1
-
 2
2
-
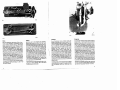 3
3
-
 4
4
-
 5
5
-
 6
6
-
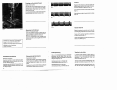 7
7
-
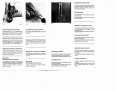 8
8
-
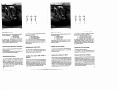 9
9
-
 10
10
-
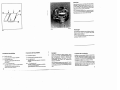 11
11
-
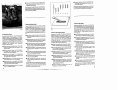 12
12
-
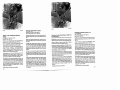 13
13
-
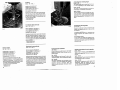 14
14
-
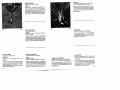 15
15
-
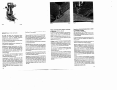 16
16
-
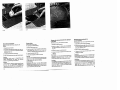 17
17
-
 18
18
-
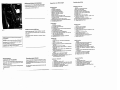 19
19
-
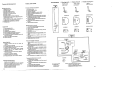 20
20
-
 21
21


Pfaff 138 El manual del propietario
- Categoría
- Máquinas de coser
- Tipo
- El manual del propietario
- Este manual también es adecuado para
En otros idiomas
- français: Pfaff 138 Le manuel du propriétaire
- English: Pfaff 138 Owner's manual
- Deutsch: Pfaff 138 Bedienungsanleitung
Documentos relacionados
-
Pfaff 938 Manual de usuario
-
-
-
-
-
-
-
-