Schumacher DieHard DH154 Lithium Ion Tactical Jump Starter Light El manual del propietario
- Categoría
- Cargadores de batería de coche
- Tipo
- El manual del propietario

0099002165-00
Owner’s Manual / Manual del Propietario
Lithium Ion
Tactical Jump Starter Light
Luz táctica de arrancador
de emergencia de ion litio
CAUTION:
Read and follow all safety
rules and operating
instructions before every
use of this product.
SAVE THESE INSTRUCTIONS.
ATENCIÓN:
Lea y siga todas las reglas
de seguridad e instrucciones
de uso antes de cada uso
de este producto.
GUARDE ESTAS INSTRUCCIONES.
Model
DH154

If product is purchased at a Sears, Kmart, Sears Auto Center
or Sears Hometown retailer:
DIEHARD
LIMITED WARRANTY
FOR ONE YEAR from the date of sale, this product is warranted against
defects in material or workmanship when it is operated and maintained
according to all supplied instructions.
WITH PROOF OF SALE a defective product will be replaced free of charge.
For warranty coverage details to obtain free replacement, visit the web page:
www.diehard.com/warranty-information
This warranty does not cover the charging cable, carrying string and
accessory bag, which are expendable parts that can wear out from normal
use within the warranty period.
This warranty gives you specic legal rights, and you may also have other
rights which vary from state to state.
Transform SR Brands Management LLC, Hoffman Estates, IL 60179
If product is purchased from other than a Sears, Kmart,
Sears Auto Center or Sears Hometown retailer:
DIEHARD
LIMITED WARRANTY
FOR ONE YEAR from the date of sale, this product is warranted against
defects in material or workmanship when it is operated and maintained
according to all supplied instructions.
WITH PROOF OF SALE, a defective product will receive free warranty service.
The DieHard brand name is used under license. Direct all claims for
warranty service to: Schumacher Electric Corporation, 1-800-621-5485,
www.batterychargers.com
This warranty does not cover the charging cable, carrying string and
accessory bag, which are expendable parts that can wear out from normal
use within the warranty period.
This warranty gives you specic legal rights, and you may also have other
rights which vary from state to state.
Schumacher Electric Corporation, Mount Prospect, IL 60056
DieHard and the DieHard logo are registered trademarks of KCD IP, LLC
and/or Transform SR Brands LLC and are used under license by Schumacher
Electric Corporation. All Rights Reserved.

Si el producto se compra en una tienda Sears, Kmart, Sears Auto Center
o Sears Hometown:
GARANTÍA LIMITADA DIEHARD
DURANTE UN AÑO desde la fecha de venta, este producto está
garantizado contra defectos de materiales o mano de obra cuando se
opera y mantiene de acuerdo a las instrucciones provistas.
CON EL COMPROBANTE DE VENTA, un producto defectuoso será
reemplazado sin cargo.
Para obtener detalles sobre la cobertura de la garantía para obtener un
reemplazo gratuito, visite la página web: www.diehard.com/warranty-information
Esta garantía no cubre el cable de carga, el cordel para llevar, ni la bolsa
de accesorios, que son piezas desechables que pueden desgastarse por el
uso normal dentro del período de garantía.
Esta garantía le otorga derechos legales especícos, así como otros
derechos, que varían de estado a estado.
Transform SR Brands Management LLC, Hoffman Estates, IL 60179
Si el producto se compra en un minorista que no sea Sears, Kmart,
Sears Auto Center o Sears Hometown:
GARANTÍA LIMITADA DIEHARD
DURANTE UN AÑO desde la fecha de venta, este producto está garan-
tizado contra defectos de materiales o mano de obra cuando se opera y
mantiene de acuerdo a las instrucciones provistas.
CON EL COMPROBANTE DE VENTA, un producto defectuoso recibirá un
servicio de garantía gratuito.
La marca DieHard se usa bajo licencia. Dirija todas las reclamaciones de
servicio de garantía a: Schumacher Electric Corporation, 1-800-621-5485,
www.batterychargers.com
Esta garantía no cubre el cable de carga, el cordel para llevar, ni la bolsa
de accesorios, que son piezas desechables que pueden desgastarse por el
uso normal dentro del período de garantía.
Esta garantía le otorga derechos legales especícos, así como otros
derechos, que varían de estado a estado.
Schumacher Electric Corporation, Mount Prospect, IL 60056
DieHard y el logotipo de DieHard son marcas registradas de KCD IP, LLC
y / o Transform SR Brands LLC y se utilizan bajo licencia de Schumacher
Electric Corporation. Todos los derechos reservados.

• 4 •
1. IMPORTANT SAFETY INSTRUCTIONS
SAVE THESE INSTRUCTIONS.
WARNING! RISK OF ELECTRIC SHOCK OR FIRE.
1.1 SAVE THESE INSTRUCTIONS – This manual contains important
safety and operating instructions.
1.2 Read, understand and follow all instructions, cautions and warnings
listed in this manual. Failure to follow all instructions and abide by all
cautions and warnings could result in personal injury, injury to others
and property damage.
1.3 This jump starter is not intended for use by children. Persons with
reduced physical, sensory or mental capabilities, or lack of experience
and knowledge, must be given supervision or instruction concerning the
use of the product by a person responsible for their safety.
1.4 Children should be supervised to ensure they do not play with the unit.
1.5 DO NOT put ngers or hands into any of the unit’s outlets.
1.6 DO NOT expose the unit to rain or snow.
1.7 The appliance is to be used only with the provided power supply.
1.8 Use only recommended attachments. Use of an attachment not
recommended or sold by the manufacturer may result in a risk of re,
electric shock or injury to persons or damage to property.
1.9 DO NOT operate the unit with damaged cables or clamps.
1.10 DO NOT operate the unit if it has received a sharp blow, been dropped
or otherwise damaged in any way; take it to a qualied service person.
WARNING! RISK OF EXPLOSIVE GASES.
1.11 WORKING IN THE VICINITY OF A LEAD-ACID BATTERY IS
DANGEROUS. BATTERIES GENERATE EXPLOSIVE GASES
DURING NORMAL OPERATION. IT IS IMPORTANT THAT YOU
FOLLOW THESE INSTRUCTIONS EACH TIME YOU USE THE UNIT.
1.12 To reduce the risk of a battery explosion, follow these instructions and
those published by the battery manufacturer and the manufacturer of
any equipment you intend to use in the vicinity of the battery. Review
the cautionary markings on these products and on the engine.
1.13 DO NOT set the unit on ammable materials, such as carpeting,
upholstery, paper, cardboard, etc.
1.14 NEVER place the unit directly above battery being jumped.
1.15 DO NOT use the unit to jump start a vehicle while charging the
internal battery.
1.16 IMPORTANT! CHARGE THE UNIT IMMEDIATELY AFTER PURCHASE,
AFTER EACH USE, AND AT LEAST EVERY 3 MONTHS.
1.17 DO NOT turn on the unit while it is being charged.
1.18 DO NOT handle or move the unit while it is being charged.
1.19 DO NOT look directly into the light or shine the light directly into the
eyes of any person or animal.
1.20 DO NOT leave the battery in a discharged state.
1.21 DO NOT use the unit with a charger which has a damaged cord or
plug; replace the cord or plug immediately.

• 5 •
2. PERSONAL SAFETY PRECAUTIONS
WARNING! RISK OF EXPLOSIVE GASES.
A SPARK NEAR THE BATTERY MAY CAUSE A BATTERY EXPLOSION.
TO REDUCE THE RISK OF A SPARK NEAR THE BATTERY:
2.1 NEVER smoke or allow a spark or ame in the vicinity of a battery or engine.
2.2 Remove personal metal items such as rings, bracelets, necklaces and
watches when working with a lead-acid battery. A lead-acid battery
can produce a short-circuit current high enough to weld a ring to
metal, causing a severe burn.
2.3 Be extra cautious, to reduce the risk of dropping a metal tool onto the
battery. It might spark or short-circuit the battery or other electrical
part that may cause an explosion.
2.4 Do not permit the internal battery of the unit to freeze. Never charge a
frozen battery.
2.5 To prevent sparking, NEVER allow clamps to touch together or
contact the same piece of metal.
2.6 Consider having someone nearby to come to your aid when you work
near a lead-acid battery.
2.7 Have plenty of fresh water, soap and baking soda nearby for use, in
case battery acid contacts your eyes, skin, or clothing.
2.8 Wear complete eye and body protection, including safety goggles and
protective clothing. Avoid touching your eyes while working near the battery.
2.9 If battery acid contacts your skin or clothing, immediately wash
the area with soap and water. If acid enters your eye, immediately
ood the eye with cold running water for at least 10 minutes and get
medical attention right away.
2.10 If battery acid is accidentally swallowed, drink milk, the whites of eggs
or water. DO NOT induce vomiting. Seek medical attention immediately.
2.11 Neutralize any acid spills thoroughly with baking soda before attempting
to clean up.
WARNING! TO REDUCE THE RISK OF BURNS OR FIRE,
FOLLOW THESE SAFETY PRECAUTIONS:
2.12 DO NOT disassemble the unit; take it to a qualied service person
when service or repair is required. Incorrect reassembly may result in a
risk of re or electric shock.
2.13 DO NOT crush, puncture, short external contacts or dispose of in re or water.
2.14 DO NOT expose to temperatures above 140°F (60°C) or below
-
4˚F (
-
20˚ C).
2.15 Recycle or dispose of the used battery as required by local regulations.
2.16 If the electrolyte in the cells gets on your skin, wash thoroughly with
soap and water. If it gets into your eyes, rinse thoroughly with cool
water and seek immediate medical attention.
2.17 This product contains a lithium ion battery. In case of re, you may
use water, a foam extinguisher, Halon, CO
2
, ABC dry chemical, powdered
graphite, copper powder or soda (sodium carbonate) to extinguish the re.
Once the re is extinguished, douse the product with water, an aqueous-
based extinguishing agent, or other nonalcoholic liquids to cool the product
and prevent the battery from re-igniting. NEVER attempt to pick up or
move a hot, smoking, or burning product, as you may be injured.

• 6 •
3. PREPARING TO USE THE UNIT
WARNING! RISK OF CONTACT WITH BATTERY ACID.
BATTERY ACID IS A HIGHLY CORROSIVE SULFURIC ACID.
3.1 Make sure the area around the battery is well ventilated while the unit
is in use.
3.2 Clean the battery terminals before using the jump starter. During
cleaning, keep airborne corrosion from coming into contact with your
eyes, nose and mouth. Use baking soda and water to neutralize the
battery acid and help eliminate airborne corrosion. Do not touch your
eyes, nose or mouth.
3.3 Determine the voltage of the battery by referring to the vehicle
owner’s manual and make sure that the output voltage is 12V.
3.4 Make sure that the unit’s cable clamps make tight connections.
4. FOLLOW THESE STEPS WHEN CONNECTING TO A BATTERY
WARNING! A SPARK NEAR THE BATTERY MAY CAUSE A
BATTERY EXPLOSION. TO REDUCE THE RISK OF A SPARK
NEAR THE BATTERY:
4.1 Plug the clamps into the unit, and then attach the output cables to
the battery and chassis as indicated below. Never allow the output
clamps to touch each other.
4.2 Position the DC cables to reduce the risk of damage by the hood,
door and moving or hot engine parts. NOTE: If it is necessary to
close the hood during the jump starting process, ensure that the hood
does not touch the metal part of the battery clips or cut the insulation
of the cables.
4.3 Stay clear of fan blades, belts, pulleys and other parts that can cause injury.
4.4 Check the polarity of the battery posts. The POSITIVE (POS, P, +)
battery post usually has a larger diameter than the NEGATIVE
(NEG, N, -) post.
4.5 Determine which post of the battery is grounded (connected) to the
chassis. If the negative post is grounded to the chassis (as in most
vehicles), see step 4.6. If the positive post is grounded to the chassis,
see step 4.7.
4.6 For a negative-grounded vehicle, connect the POSITIVE (RED) clamp
from the jump starter to the POSITIVE (POS, P, +) ungrounded post
of the battery. Connect the NEGATIVE (BLACK) clamp to the vehicle
chassis or engine block away from the battery. Do not connect the
clamp to the carburetor, fuel lines or sheet-metal body parts. Connect
to a heavy gauge metal part of the frame or engine block.
4.7 For a positive-grounded vehicle, connect the NEGATIVE (BLACK)
clamp from the jump starter to the NEGATIVE (NEG, N, -) ungrounded
post of the battery. Connect the POSITIVE (RED) clamp to the vehicle
chassis or engine block away from the battery. Do not connect the
clamp to the carburetor, fuel lines or sheet-metal body parts. Connect
to a heavy gauge metal part of the frame or engine block.
4.8 When nished using the jump starter, remove the clamp from the
vehicle chassis and then remove the clamp from the battery terminal.
Disconnect the clamp cable from the unit.

• 7 •
5. SET UP INSTRUCTIONS
5.1 Remove any cord wraps and uncoil the charging cable.
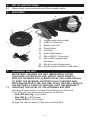
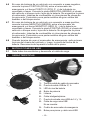
6. FEATURES
5
4
6
1. Jumper cable output socket
2. USB 2.1A output port
3. Battery level LED
4. Power button
5. Flashlight
6. Smart cable/clamps
7. Micro USB 5V, 1A input port
8. Micro-USB charging cable
Not shown:
9. String for tactical jump starter
10. Bag for clamps and Micro-USB cable
2
3
7
1
8
7. CHARGING THE UNIT
IMPORTANT! CHARGE THE UNIT IMMEDIATELY AFTER
PURCHASE, AFTER EACH USE, AND AT LEAST EVERY 3
MONTHS, OR WHEN THE CHARGE LEVEL FALLS BELOW 50%,
TO KEEP THE INTERNAL BATTERY FULLY CHARGED AND
PROLONG BATTERY LIFE. FAILURE TO DO THIS WILL REDUCE
THE BATTERY’S CAPACITY AND MAY VOID THE WARRANTY.
7.1 CHECKING THE LEVEL OF THE INTERNAL BATTERY
Press the Power button to check the battery level of the unit.
The LEDs will indicate the battery level, as follows:
• Red LED ashing: ≤ 5% power
• Red LED lit: ≤ 50% power
• Green LED lit: > 50% power
Charge the internal battery if the level is below 50%.

• 8 •
7.2 CHARGING THE INTERNAL BATTERY
NOTE: Use a 1A USB charger (not included) to recharge the jump
starter. Using a charger with less than 1A will increase charge time.
1. When charging the internal battery, work in a well ventilated area and do not
restrict the ventilation in any way.
2. Connect the micro USB end of the charging cable to the micro USB port
on the end of the unit. Insert the USB end of the cable into the USB port
on your charger.
3. Plug your charger into a live power source.
4. The LED will indicate the charge level, as follows:
• Red LED ashing: ≤ 50% power
• Green LED ashing: > 50% power
• Green LED lit: 100% power
5. Charging may take 6.5-15.5 hours, depending on the battery level
and model type.
6. Recharge the unit after use, and at least every 3 months.
8. OPERATING INSTRUCTIONS
8.1 JUMP STARTING A VEHICLE ENGINE
NOTE: Use only the provided jump cable.
IMPORTANT: Do not use the jump starter while charging its internal battery.
IMPORTANT: Using the jump starter without a battery installed in the
vehicle will damage the vehicle’s electrical system.
NOTE: The internal battery must have a charge if at least 50% to
jump start a vehicle.
1. Turn the ignition OFF.
2. Lay the DC cables away from any fan blades, belts, pulleys and other
moving parts. Make sure all of the vehicle’s electrical devices are turned off.
3. Plug the battery clamp smart cable into the jump starter’s output socket.
The green LED on the smart cable should ash.
4. For a negative-grounded vehicle, connect the POSITIVE (RED) clamp
from the jump starter to the POSITIVE (POS, P, +) ungrounded post
of the battery. Connect the NEGATIVE (BLACK) clamp to the vehicle
chassis or engine block away from the battery. Do not connect the
clamp to the carburetor, fuel lines or sheet-metal body parts. Connect
to a heavy gauge metal part of the frame or engine block.
5. For a positive-grounded vehicle, connect the NEGATIVE (BLACK)
clamp from the jump starter to the NEGATIVE (NEG, N, -) ungrounded
post of the battery. Connect the POSITIVE (RED) clamp to the vehicle
chassis or engine block away from the battery. Do not connect the
clamp to the carburetor, fuel lines or sheet-metal body parts. Connect to
a heavy gauge metal part of the frame or engine block.
6. The smart cable will detect the voltage of the vehicle and jump starter,
and will make a clicking sound. The green LED on the smart cable
should light.
7. Turn the key to the ACC position.

• 9 •
8. When the green LED is solid, the unit is ready to jump start the vehicle.
NOTE: If the vehicle battery is extremely discharged, the initial current
draw from the jump starter may activate short circuit protection in the
smart cable. Disconnect and reconnect the smart cable to reset.
9. After a proper connection has been made, crank the engine. If the engine
does not start within 5-8 seconds, stop cranking and wait at least 2
minutes before attempting to start the vehicle again.
NOTE: If the car does not crank a second time, check the smart cable to
see if the green LED is lit. If the green LED ashes or the red LED lights,
refer to the information on the back of the smart cable.
NOTE: Cold weather may affect the performance of the jump starter’s
lithium battery. If you hear only a click and the engine does not turn
over, try the following:
With the jump starter connected to the car battery and the green
LED illuminated on the smart cable, turn on all lights and electrical
accessories for one minute. This draws current from the jump starter
and warms the battery. Now try to crank the engine. If it does not turn
over, repeat the procedure. Extremely cold weather may require two or
three battery warmings before the engine will start.
IMPORTANT: DO NOT attempt to jump start your vehicle more
than three consecutive times. If the vehicle will not start after three
attempts, consult a service technician.
10. After the engine starts, disconnect the black clamp (-) and the red
clamp (+), in that order, and then unplug the battery clamp cable from
the jump starter socket.
11. Recharge the unit as soon as possible after each use.
8.2 USING THE FLASHLIGHT
1. Press and hold the Power button to turn on the light.
2. Press lightly on the Power button to cycle through the following modes:
• Steady glow
• Flash in strobe mode
• Flash for an SOS signal
• OFF
3. When nished using the ashlight, press the Power button until the
light turns off.
4. Recharge the unit as soon as possible after each use.
8.3 CHARGING A MOBILE DEVICE
The USB port provides up to 2.1A at 5V DC.
1. Connect a mobile device cable to the USB port.
2. Charging should begin automatically.
3. Charging time will vary, based on the mobile device’s battery size.
4. When nished using the USB port, disconnect the charging cable from
your mobile device and then disconnect the charging cable from the unit.
5. Recharge the unit as soon as possible after each use.

• 10 •
9. MAINTENANCE INSTRUCTIONS
9.1 After use and before performing maintenance, unplug and disconnect the unit.
9.2 Use a dry cloth to wipe any dirt or oil from the smart cable, charging
cable and case.
9.3 Ensure that all of the unit’s components are in place and in good
working condition.
9.4 Servicing does not require opening the unit, as there are no user-
serviceable parts.
9.5 Any servicing should be performed by qualied service personnel.
10. STORAGE INSTRUCTIONS
10.1 Store inside, in a cool, dry place.
10.2 Take care to avoid/prevent damage to the smart cable, charging cable and
unit. Failure to do so could result in personal injury or property damage.
10.3 Charge the unit’s internal battery immediately after purchase, after
every use and every 3 months.
10.4 All batteries are affected by temperature. The ideal storage
temperature is at 70°F (21 ˚C). The internal battery will gradually self-
discharge (lose power) over time, especially in warm environments.
Leaving the battery in a discharged state may result in permanent
battery damage. To ensure satisfactory performance and avoid
permanent damage, charge the internal battery every 3 months.
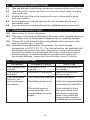
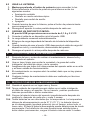
11. TROUBLESHOOTING
PROBLEM POSSIBLE CAUSE SOLUTION
The unit does not
operate.
The battery is not
charged.
Recharge the battery to
full charge.
The unit will not
recharge.
No power at receptacle. Make sure the power
source is live.
The jump starter
turns on, but
won’t jump start
my vehicle.
The connections are poor.
The battery power is low.
The vehicle requires
more power than can
be supplied by the jump
starter.
Check connections.
Verify the charge level of the
jump starter is at least 50%.
Do not attempt to jump
start your vehicle more
than three consecutive
times. If the vehicle still
does not start, consult a
qualied service technician.

• 11 •
Smart Cable LED and Alarm Behavior
BEHAVIOR REASON
Green LED ashing Ready to connect the smart cable to
the jump starter, and ready to connect
the clamps to the vehicle.
Green LED solid
(with clicking sound)
Detecting the condition of the vehicle
and jump starter.
Green LED solid Ready to jump start the vehicle. After
jump start, disconnect the clamps.
Red LED lit (no alarm) Voltage is too high or too low for
starting a vehicle.
Red LED lit; long buzzer alarm The connection is reversed.
Short circuit protection.
Overload protection.
NOTE: Disconnect and reconnect the smart cable to reset.
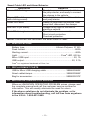
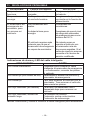
12. SPECIFICATIONS
Battery type ................................................ Lithium Polymer, 37 Wh
Peak current ............................................................................. 800A
Starting current .........................................................................400A
Light ...................................................................Cree
®
LED, 600 lm
Micro USB input .....................................................................5V, 1A
USB output .......................................................................... 5V, 2.1A
Cree
®
is a registered trademark of Cree, Inc.
13. REPLACEMENT PARTS
USB to Micro USB charging cable .................................3899003982Z
Smart cable/clamps ........................................................3899003986Z
Bag for accessories ........................................................5899000037Z
14. BEFORE RETURNING FOR REPAIRS
When an UNKNOWN OPERATING PROBLEM arises, please read
the complete manual and call the customer service number for
information. This will usually eliminate the need for return.
If the above solutions do not eliminate the problem, or for
information about troubleshooting, call toll-free from anywhere
in the U.S.A.: 1-800-621-5485.

• 12 •
1. INSTRUCCIONES IMPORTANTES DE SEGURIDAD
CONSERVE ESTAS INSTRUCCIONES.
¡ADVERTENCIA! RIESGO DE INCENDIO O DESCARGA ELÉCTRICA.
1.1 CONSERVE ESTAS INSTRUCCIONES – Este manual contiene
importantes instrucciones de funcionamiento y seguridad.
1.2 Lea, comprenda y siga todas las instrucciones, precauciones y
advertencias explicadas en este manual. El incumplimiento de estas
instrucciones, precauciones y advertencias puede causar lesiones a
propios y ajenos y daños materiales.
1.3 Este arrancador de emergencia no está pensado para que lo usen
niños. Las personas con capacidades físicas, sensoriales o mentales
mermadas o sin experiencia o sin conocimientos, deben recibir
instrucciones sobre el uso del producto o que ser supervisadas por
alguien que se haga responsable de su seguridad.
1.4 Los niños deben ser supervisados para asegurarse de que no
jueguen con el aparato.
1.5 NO meta los dedos ni las manos en las salidas del producto.
1.6 NO exponga el aparato a la lluvia ni a la nieve.
1.7 El aparato solo debe usarse con la fuente de alimentación suministrada.
1.8 Use únicamente los accesorios recomendados. El uso de un
accesorio no recomendado o vendido por el fabricante puede
conllevar riesgos de incendio, descarga eléctrica, lesiones personales
o daños materiales.
1.9 NO utilice el aparato con cables o pinzas dañadas.
1.10 NO ponga en marcha el aparato si este ha recibido algún golpe
fuerte, se ha caído o ha sufrido algún otro daño; llévelo a un técnico
de servicio cualicado.
¡ADVERTENCIA! RIESGO DE GASES EXPLOSIVOS.
1.11 TRABAJAR CERCA DE UNA BATERÍA DE PLOMO ES PELIGROSO.
LAS BATERÍAS GENERAN GASES EXPLOSIVOS DURANTE SU
FUNCIONAMIENTO NORMAL. ES IMPORTANTE SEGUIR ESTAS
INSTRUCCIONES CADA VEZ QUE SE UTILICE EL APARATO.
1.12 Para reducir el riesgo de que explote una batería, siga estas
instrucciones y las publicadas por el fabricante de la batería y por el
fabricante del equipo que vaya a usar cerca de la misma. Revise las
indicaciones de precaución que haya en estos productos y en el motor.
1.13 NO ponga en aparato sobre materiales inamables, como moquetas,
tapicerías, papel, cartón, etc.
1.14 NUNCA coloque el aparato directamente encima de la batería que se
esté arrancando.
1.15 NO utilice el aparato para arrancar un vehículo si se está cargando la
batería interna.
1.16 ¡IMPORTANTE! CARGUE EL APARATO INMEDIATAMENTE
DESPUÉS DE COMPRARLO, DESPUÉS DE CADA USO Y AL
MENOS CADA 3 MESES.
1.17 NO apague el aparato mientras se esté cargando.
1.18 NO manipule ni mueva el aparato mientras se esté cargando.

• 13 •
1.19 NO mire directamente a la luz ni la dirija directamente a los ojos de
una persona o de un animal.
1.20 NO deje la batería descargada.
1.21 NO use el aparato con un cargador que tenga el cable o el enchufe
dañado, cambie el cable o el enchufe inmediatamente.
2. PRECAUCIONES PERSONALES DE SEGURIDAD
¡ADVERTENCIA! RIESGO DE GASES EXPLOSIVOS.
UNA CHISPA CERCA DE LA BATERÍA PUEDE HACER QUE ESTA
EXPLOTE. PARA REDUCIR EL RIESGO DE CHISPAS CERCA
DE LA BATERÍA:
2.1 NUNCA fume ni permita chispas o llamas en las cercanías de una
batería o motor.
2.2 Cuando trabaje con una batería de plomo, quítese todos los objetos
personales de metal, como anillos, pulseras, colgantes y relojes. Una
batería de plomo puede producir una corriente de cortocircuito lo
bastante intensa como para soldar un anillo al metal, lo que causaría
graves quemaduras.
2.3 Extreme la precaución para evitar el riesgo de que caigan herramientas
metálicas en la batería. Podrían causar chispas o un cortocircuito en la
batería u otro componente eléctrico y acabar provocando una explosión.
2.4 No deje que se hiele la batería interna del aparato. Nunca cargue una
batería helada.
2.5 Para evitar chispas, NUNCA deje que las pinzas se toquen ni contacten
con la misma pieza de metal.
2.6 Plantéese tener a alguien cerca para que le ayude al trabajar cerca de
una batería de plomo.
2.7 Tenga cerca jabón, bicarbonato de sosa y abundante agua dulce para
usar por si acaso le cayera ácido de la batería en la piel, ropa u ojos.
2.8 Use protección que le cubra todo el cuerpo y los ojos, incluidas gafas
de seguridad y ropa de protección. No se toque los ojos cuando esté
trabajando cerca de la batería.
2.9 Si le cae ácido de la batería en la piel o la ropa, lávese la zona
inmediatamente con agua y jabón. Si le cae ácido en los ojos, láveselos
enseguida con agua corriente fría durante al menos 10 minutos y busque
atención médica de inmediato.
2.10 Si por accidente traga ácido de la batería, tome leche, agua o claras de
huevo. NO se provoque el vómito. Busque atención médica de inmediato.
2.11 Neutralice convenientemente los derrames de ácido con bicarbonato de
sosa antes de intentar limpiarlos.
¡ADVERTENCIA! PARA REDUCIR EL RIESGO DE QUEMADURAS
O INCENDIO, SIGA ESTAS PRECAUCIONES DE SEGURIDAD:
2.12 NO desarme el aparato; llévelo a un técnico de servicio cualicado
cuando precise un servicio de reparación o de mantenimiento. Si
el equipo se vuelve a montar de forma incorrecta, hay riesgo de
incendio o de descarga eléctrica.
2.13 NO aplaste, pinche ni corte los contactos externos ni la arroje al
fuego o al agua.
2.14 NO lo exponga a temperaturas por encima de 60 ˚C (140 ˚F) ni por
debajo de -20 ˚C (-4 ˚F).

• 14 •
2.15 Recicle o tire la batería usada conforme a la normativa local.
2.16 Si el electrolito le salpica la piel, lávese con abundante agua y jabón.
Si le entra en los ojos, lávese con abundante agua fría y consulte a
un médico inmediatamente.
2.17 Este producto contiene una batería Li-Ion. En caso de incendio,
se puede usar agua, extintor de espuma, halón, CO
2
, polvo químico
seco ABC y polvo de grato, de cobre o de carbonato de sodio para
extinguirlo. Una vez extinguido el incendio, rociar el producto con agua,
un agente extintor acuoso o cualquier líquido no alcohólico para enfriar el
producto e impedir que vuelva a inamarse. No intente NUNCA quitar o
mover un producto caliente, humeante o en llamas, podría herirse.
3. PREPARATIVOS ANTES DE USAR EL APARATO
¡ADVERTENCIA!
RIESGO DE CONTACTO CON ÁCIDO DE BATERÍA. EL ÁCIDO DE
LA BATERÍA ES ÁCIDO SULFÚRICO SUMAMENTE CORROSIVO.
3.1 Asegúrese de que la zona en torno a la batería esté bien ventilada
mientras se utilice el aparato.
3.2 Limpie los bornes de la batería antes de usarla con el arrancador de
emergencia. Durante la limpieza, evite que la corrosión en el aire le
entre en los ojos, la nariz o la boca. Use bicarbonato de sosa y agua
para neutralizar el ácido de la batería y ayudar a eliminar la corrosión
en el aire. No se toque los ojos, la boca ni la nariz.
3.3 Determine la tensión de la batería; para ello, consulte el manual del
vehículo y asegúrese de que la tensión de salida sea de 12 V.
3.4 Cerciórese de que las pinzas de cable del aparato hagan buena conexión.
4. PASOS A SEGUIR AL CONECTAR A UNA BATERÍA
¡ADVERTENCIA! UNA CHISPA CERCA DE LA BATERÍA PUEDE
HACER QUE ESTA EXPLOTE. PARA REDUCIR EL RIESGO DE
CHISPAS CERCA DE LA BATERÍA:
4.1 Conecte las pinzas al aparato y luego enganche los cables de salida
a la batería y al chasis como se indica a continuación. Nunca permita
que las pinzas de salida se toquen entre sí.
4.2 Coloque los cables de CC de modo que haya menos riesgo de daños
producidos por el capó, alguna puerta o componentes móviles o
calientes del motor. NOTA: Si hubiera que cerrar el capó durante
el proceso de arranque con pinzas de batería, asegúrese de que el
capó no toque la parte metálica de las pinzas ni que el aislamiento de
los cables esté cortado.
4.3 No se acerque a aspas de ventiladores, correas, poleas ni otras
piezas que pudieran causar lesiones.
4.4 Compruebe la polaridad de los bornes de la batería. El borne
POSITIVO (POS, P, +) de la batería suele ser de mayor diámetro que
el borne NEGATIVO (NEG, N, -).
4.5 Determine qué borne de la batería está puesto a masa (conectado
al chasis). Si el borne negativo está conectado al chasis (como en la
mayoría de vehículos), consulte el paso 4.6. Si el borne positivo está
conectado al chasis, consulte el paso 4.7.

• 15 •
4.6 En caso de tratarse de un vehículo con conexión a masa negativa,
conecte la pinza POSITIVA (ROJA) entre el arrancador de
emergencia y el borne POSITIVO (POS, P, +) de la batería no
conectado a masa. Conecte la pinza NEGATIVA (NEGRA) al chasis
del vehículo o bloque motor, lejos de la batería. No enganche la pinza
al carburador, tuberías de combustible ni otras piezas de chapa de
la carrocería. Conéctela a una parte metálica de gran calibre del
bastidor o del bloque motor.
4.7 En caso de tratarse de un vehículo con conexión a masa positiva,
conecte la pinza NEGATIVA (NEGRA) entre el arrancador de
emergencia y el borne NEGATIVO (NEG, N, -) de la batería no
conectado a masa. Conecte la pinza POSITIVA (ROJA) al chasis del
vehículo o bloque motor, lejos de la batería. No enganche la pinza
al carburador, tuberías de combustible ni otras piezas de chapa de
la carrocería. Conéctela a una parte metálica de gran calibre del
bastidor o del bloque motor.
4.8 Cuando termine de usar el arrancador de emergencia, quite primero
la pinza del chasis del vehículo y, luego, la pinza del borne de la
batería. Desconecte del aparato el cable de la pinza.
5. INSTRUCCIONES DE USO
5.1 Quite todos los envoltorios y desenrolle el cable de carga.
6. CARACTERÍSTICAS
5
4
6
1. Toma de salida de cable de arrancador
2. Puerto de salida USB de 2,1 A
3. LED de nivel de batería
4. Botón de potencia
5. Linterna
6. Cable inteligente/pinzas
7. Puerto de entrada microUSB de 5 V y 1 A
8. Cable de carga microUSB
No se muestra:
9. Cordón de arrancador de emergencia
10. Bolsa para pinzas y cable microUSB
2
3
7
1
8

• 16 •
7. CARGAR EL APARATO
¡IMPORTANTE! CARGUE EL APARATO INMEDIATAMENTE
DESPUÉS DE COMPRARLO, DESPUÉS DE CADA USO Y AL
MENOS CADA 3 MESES. O CUANDO EL NIVEL DE CARGA BAJE
DEL 50 % PARA MANENER LA BATERÍA INTERNA CARGADA AL
MÁXIMO Y PROLONGAR LA VIDA ÚTIL DE LA MISMA.
De no hacerlo, se reducirá la capacidad de la batería y puede que se
anule la garantía.
7.1 COMPROBAR EL NIVEL DE LA BATERÍA INTERNA
Pulse el botón de potencia para comprobar el nivel de batería del aparato.
Los LED indicarán el nivel de la batería de la siguiente manera:
• LED rojo intermitente: ≤ 5 % de potencia
• LED rojo iluminado: ≤ 50 % de potencia
• LED verde iluminado: > 50 % de potencia
Cargue la batería interna si el nivel por debajo del 50 %.
7.2 CARGAR LA BATERÍA INTERNA
NOTA: Use un cargador USB de 1 A (no incluido) para recargar el
arrancador de emergencia. Si utiliza un cargador de menos de 1 A, el
tiempo de carga será mayor.
1. Al cargar la batería interna, hágalo en una zona bien ventilada y no
obstruya la ventilación en modo alguno.
2. Conecte el extremo microUSB del cable de carga al puerto microUSB
del aparato. Introduzca el cable USB en el puerto USB del cargador.
3. Conecte el cargador a la alimentación eléctrica.
4. Los LED indicarán el nivel de carga de la siguiente manera:
• LED rojo intermitente: ≤ 50 % de potencia
• LED verde intermitente: > 50 % de potencia
• LED verde iluminado: 100 % de potencia
5. La carga puede durar unas 6,5-15,5 horas, según el nivel de la batería
y del tipo de modelo.
6. Recargue el aparato trabajo después de cada uso y al menos cada 3 meses.
8. INSTRUCCIONES DE FUNCIONAMIENTO
8.1 ARRANCAR EL MOTOR DE UN VEHÍCULO
NOTA: Use solamente el cable de puente proporcionado.
IMPORTANTE: No utilice el arrancador de emergencia si se está
cargando su batería interna.
IMPORTANTE: Si se utiliza el arrancador de emergencia sin una batería
instalada en el vehículo, se dañará el sistema eléctrico del vehículo.
NOTA: La batería interna debe tener una carga de al menos el 50 %
para arrancar un vehículo.
1. Apague el contacto (OFF).
2. Aparte los cables de CC de aspas de ventiladores, correas, poleas y
otras piezas móviles. Cerciórese de que todos los dispositivos eléctricos
del vehículo estén apagados.
3. Conecte el cable inteligente de la pinza de batería a la toma de salida
del arrancador de emergencia. El LED verde del cable inteligente
debería parpadear.

• 17 •
4. En caso de tratarse de un vehículo con conexión a masa negativa,
conecte la pinza POSITIVA (ROJA) entre el arrancador de emergencia
y el borne POSITIVO (POS, P, +) de la batería no conectado a masa.
Conecte la pinza NEGATIVA (NEGRA) al chasis del vehículo o bloque
motor, lejos de la batería. No enganche la pinza al carburador, tuberías
de combustible ni otras piezas de chapa de la carrocería. Conéctela a
una parte metálica de gran calibre del bastidor o del bloque motor.
5. En caso de tratarse de un vehículo con conexión a masa positiva,
conecte la pinza NEGATIVA (NEGRA) entre el arrancador de emergencia
y el borne NEGATIVO (NEG, N, -) de la batería no conectado a masa.
Conecte la pinza POSITIVA (ROJA) al chasis del vehículo o bloque
motor, lejos de la batería. No enganche la pinza al carburador, tuberías
de combustible ni otras piezas de chapa de la carrocería. Conéctela a
una parte metálica de gran calibre del bastidor o del bloque motor.
6. El cable inteligente detectará la tensión del vehículo y del arrancador de
emergencia y hará un sonido de clic. El LED verde del cable inteligente
debería encenderse.
7. Ponga la llave de contacto en la posición de accesorios (ACC).
8. Cuando el LED verde luce de forma ja, es que el aparato está listo
para arrancar el vehículo.
NOTA: Si la batería del vehículo está muy descargado, puede que el
consumo de corriente inicial del arrancador de emergencia active la
protección contra cortocircuitos del cable inteligente. Desconecte y
vuelva a conectar el cable inteligente para restablecerlo.
9. Una vez que la conexión sea buena, ponga en marcha el motor. Si el
motor no arranca en 5-8 segundos, interrumpa la puesta en marcha y
espere al menos 2 minutos antes de volver a intentar arrancar el vehículo.
NOTA: Si el coche sigue sin ponerse en marcha la segunda vez,
compruebe el cable inteligente para ver si el LED verde se ilumina. Si el
LED verde parpadea o se enciende el LED rojo, consulte la información
en la parte trasera del cable inteligente.
NOTA: El clima frío puede afectar al rendimiento de la batería de litio
del arrancador de emergencia. Si oye un clic y el motor no va, intente
lo siguiente:
Con el arrancador de emergencia conectado a la batería del coche y
el LED verde iluminado en el cable inteligente, encienda durante un
minuto todas las luces y accesorios eléctricos. Esto consumirá corriente
del arrancador de emergencia y calentará la batería. Pruebe entonces a
poner en marcha el motor. Si no el motor no va, repita el procedimiento.
Si el clima es sumamente frío, harán falta dos o tres calentamientos de
la batería hasta que arranque el motor.
IMPORTANTE: NO intente poner en marcha el vehículo con el
arrancador más de tres veces seguidas. Si el vehículo no arranca al
cabo de esas tres veces, consulte a un técnico de servicio.
10. Una vez en marcha el motor, retire la pinza negra (-) y la pinza roja (+),
en ese orden, y luego desconecte el cable de pinza de la batería de la
toma del arrancador de emergencia.
11. Recargue el aparato lo antes posible después de cada uso.

• 18 •
8.2 USAR LA LINTERNA
1. Mantenga pulsado el botón de potencia para encender la luz.
2. Pulse levemente el botón de potencia para alternar entre los
siguientes modos:
• Iluminación estable
• Destello en modo estroboscópico
• Destello para señal de auxilio
• Apagado
3. Cuando termine de usar la linterna, pulse el botón de potencia hasta
que se apague la luz.
4. Recargue el aparato lo antes posible después de cada uso.
8.3 CARGAR UN DISPOSITIVO MÓVIL
El puerto USB proporciona una corriente de 2,1 A y 5 V CC.
1. Conecte el cable de un dispositivo móvil al puerto USB.
2. La carga debería comenzar automáticamente.
3. El tiempo de carga dependerá del tamaño de la batería del dispositivo
móvil.
4. Cuando termine de usar el puerto USB, desconecte el cable de carga del
dispositivo móvil y, a continuación, desconéctelo del aparato.
5. Recargue el aparato lo antes posible después de cada uso.
9. INSTRUCCIONES DE MANTENIMIENTO
9.1 Después del uso y antes de realizar el mantenimiento, desenchufe y
desconecte el aparato.
9.2 Use un trapo limpio para quitar la suciedad y la grasa del cable
inteligente, del cable de carga y de la carcasa.
9.3 Asegúrese de que todos los componentes del aparato estén en su sitio
y en buen estado de funcionamiento.
9.4 El mantenimiento no requiere abrir la unidad, dado que no hay piezas
que cambiar.
9.5 Cualquier trabajo de mantenimiento debe ser realizado por técnicos
cualicados.
10. INSTRUCCIONES DE ALMACENAMIENTO
10.1 Guarde el aparato en un lugar seco y fresco.
10.2 Tenga cuidado de impedir/prevenir daños en el cable inteligente,
el cable de carga y el aparato. De no hacerlo, podrían producirse
lesiones personales o daños materiales.
10.3 Cargue la batería interna del aparato inmediatamente después de
comprarlo, después de cada uso y cada 3 meses.
10.4 Todas baterías se ven afectadas por la temperatura. La temperatura
idónea de almacenamiento es de 21˚C (70 ˚F). La batería interna
se irá descargando (perderá potencia) con el tiempo, sobre todo, si
hace calor. Si deja la batería descargada puede deteriorarse de modo
permanente. Para disfrutar de unas prestaciones satisfactorias y
evitar daños permanentes, cargue la batería interna cada 3 meses.

• 19 •
11. RESOLUCIÓN DE PROBLEMAS
PROBLEMA CAUSA PROBABLE SOLUCIÓN
El aparato no
funciona.
La batería no está
cargada.
Cargue completamente
la batería.
El aparato no se
recarga.
No hay alimentación en
el enchufe hembra.
Asegúrese de que haya
corriente en la fuente de
alimentación.
El arrancador de
emergencia se
enciende, pero
no arranca mi
vehículo.
Las conexiones son
malas.
La batería tiene poca
energía.
El vehículo requiere más
potencia que la que el
arrancador de emergencia
es capaz de suministrar.
Compruebe las
conexiones.
Asegúrese de que el nivel
de carga del arrancador
de emergencia sea como
mínimo del 50 %.
No intente poner en
marcha el vehículo con
el arrancador más de
tres veces seguidas. Si el
vehículo sigue sin arrancar,
consulte a un técnico de
servicio cualicado.
Indicaciones de alarma y LED del cable inteligente
INDICACIONES RAZÓN
LED verde intermitente. Preparado para conectar el cable
inteligente al arrancador de emergencia
y, a continuación, conectar las pinzas
al vehículo.
LED verde jo (con sonido de clic). Detectando el estado del vehículo y
arrancador de emergencia.
LED verde jo. Listo para arrancar el vehículo con el
arrancador. Tras arrancar el vehículo,
desconecte las pinzas.
LED rojo iluminado (sin alarma) La tensión es demasiado alta o
demasiado baja para arrancar un
vehículo.
LED rojo iluminado; alarma de
avisador larga
La conexión se invierte.
Protección contra cortocircuitos.
Protección de sobrecarga.
NOTA: Desconecte y vuelva a conectar el cable inteligente para restablecerlo.

• 20 •
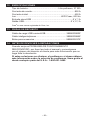
12. ESPECIFICACIONES
Tipo de batería ...............................................Litio-polímero, 37 Wh
Corriente de cresta ..................................................................800 A
Corriente inicial .......................................................................400 A
Luz .....................................................................LED Cree
®
, 600 lm
Entrada microUSB ...............................................................5 V, 1 A
Salida USB ........................................................................5 V, 2,1 A
Cree
®
es una marca registrada de Cree, Inc.
13. PIEZAS DE REPUESTO
Cable de carga USB a microUSB ..................................3899003982Z
Cable inteligente/pinzas .................................................3899003986Z
Bolsa para accesorios ....................................................5899000037Z
14. ANTES DE DEVOLVER A REPARACIONES
Cuando surja un PROBLEMA DE FUNCIONAMIENTO
DESCONOCIDO, por favor lea todo el manual y comuníquese
con el número de atención al cliente para más información que no
haga falta la devolución.
Si estas soluciones no eliminan el problema o si desea obtener
más información sobre la solución de problemas, llame gratis al
desde cualquier parte del U.S.A.: 1-800-621-5485.
-
 1
1
-
 2
2
-
 3
3
-
 4
4
-
 5
5
-
 6
6
-
 7
7
-
 8
8
-
 9
9
-
 10
10
-
 11
11
-
 12
12
-
 13
13
-
 14
14
-
 15
15
-
 16
16
-
 17
17
-
 18
18
-
 19
19
-
 20
20


Schumacher DieHard DH154 Lithium Ion Tactical Jump Starter Light El manual del propietario
- Categoría
- Cargadores de batería de coche
- Tipo
- El manual del propietario
en otros idiomas
Artículos relacionados
-
Schumacher Electric SC1280 El manual del propietario
-
-
-
-
-
-
Schumacher 71326 DieHard 6V/12V Battery Charger/Engine Starter El manual del propietario
-
-
-