
Soap Dispenser Installation Instructions
Tools Required: Pliers
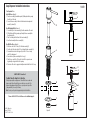
Install The Base Figure #1
1. Pass base assembly (A) and rubber gasket (B) through sink hole opening
from the top of the sink.
2. Secure the base assembly to the sink from the under side using metal
washer (C) and nut (D).
Use With Included Bottle Figure #2
1. Screw bottle (E) in to base assembly (A) from the underside of the sink.
2. Fi
ll the attached bottle by pouring soap through the base assembly into
the attached bottle.
3. Push 7 in. tubing into the bottom of the head assembly (F).
4. Insert head assembly into base assembly (A).
Use With 4 Foot Hose Figure #3
1. Attach one end of the 4 ft. hose (G) to the head assembly (F).
2. From the top of the sink, run the 4 ft. hose through the base assembly (A).
3. From under the sink, sl
ide the stopper (H) onto the 4 ft. hose, leaving
about 12 in. hanging out.
4. Unscrew the cap from an existing bottle of soap (J).
5. Push the loose end of the 4 ft. hose into the bottle of soap and secure
by pushing the stopper into the bottle opening.
6. If desired, cut the hose to appropriate length and reinstall into the bottle of soap.
©2016 Danco, Inc.
Irving, TX 75062
10037, 10038, 10039
HELPFUL HINT - Please Read!
Please call 800-523-5135 or visit Danco.com for additional support.
Figure #1
Figure #2
Figure #3
F
A
G
B
C
D
E
J
H
A
F
F
A
10039
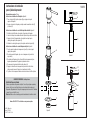
You Must Prime The Pump Prior To Intial Use
Start by depressing the soap dispenser 5 times. Wait a few seconds and
depress again 5 times. Repeat this process until soap comes out of the
dispenser (depending on length of the hose, you may need to repeat the
“pump and wait” process up to 20 times).
Note: You only need to prime the pump during the initial installation.

©2016 Danco, Inc.
Irving, TX 75062
10037, 10038, 10039
10039
Instrucciones de instalación
para el jabón dispensador
Herramientas necesarias: Pinzas
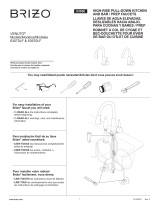
Instrucciones de Instalación el Recipiente Figura #1
1. Pase el recipiente (A) y la junta de goma (B) por el agujero de la parte
superior del fregadero.
2. Asegure el recipiente al fregadero por debajo usando la arandela de metal (C)
y la tuerca (D).
Instrucciones de Instalación con la Botella que Viene Incluida Figura #2
1. Atornille la botella (E) dentro del recipiente (A) por debajo del fregadero.
2. Llene la botella que viene incluida vertiendo el jabón del recipiente hacia la botella.
3. Empuje el tubo de 7 pulgadas dentro del recipiente hasta que toque la
cabeza (parte superior) del recipiente (F).
4. Introduzca la cabeza (parte superior) del recipiente dentro del recipiente (A).
Instrucciones de Instalación con una Manguera de 4 pies Figura #3
1. Conecte una de las puntas de la manguera de 4 pies (G) a la cabeza (parte
superior) del recipiente.
2. Desde la mesada del fregadero, deje correr la manguera de 4 pies hasta el
recipiente (A).
3. Desde abajo del fregadero, deslice el tapón (H) hacia la manguera de 4 pies,
dejando aproximadamente 12 pulgadas colgando hacia fuera.
4. Desenrosque la tapa de
una botella de jabón existente (J).
5. Empuje el extremo libre de la manguera de 4 pies dentro de la botella de
jabón y asegúrelo usando el tapón sobre la apertura de la botella.
6. Si prefiere corte la manguera al tamaño deseado e instale en la botella de jabon.
INDIRECTA PROVECHOSA - Leído por favor
Usted Debe Preparar la Bomba
Comience presionando el dispensador de jabón 5 veces. Espere algunos segundos y
presione otras 5 veces más. Repita este proceso hasta que el jabón salga por el
dispensador. (Dependiendo de lo largo de la mangera puede ser necesario el "bombear
y esperar" proceso hasta 20 veces).
Atención: Usted necesita solamente preparar la bomba durante la instalación inicial.
Llame al 800-523-5135 o visite danco.com para mas ayuda.
Figura #1
Figura #2
Figura #3
F
A
G
B
C
D
E
J
H
A
F
F
A
-
 1
1
-
 2
2


DANCO 10039B Guía de instalación
- Tipo
- Guía de instalación
- Este manual también es adecuado para
en otros idiomas
- English: DANCO 10039B Installation guide
Artículos relacionados
Otros documentos
-
 Brizo 63970LF-SS Guía de instalación
-
Delta 9992-DST Guía de instalación
-
Glacier Bay 67536-0508D2 Guía de instalación
-
-
Delta Faucet 9158-SW-DST Guía de instalación
-
-
-
-
Delta 9178-AR-DST Guía de instalación
