Progress Lighting P8531-01 Guía de instalación
- Tipo
- Guía de instalación

MAINE
VT
NH
MASS
NEW YORK
PENNSYLVANIA
OHIO
IND
ILLINOIS
KENTUCKY
VIRGINIA
NORTH CAROLINATENNESSEE
WEST
VIRGINIA
SOUTH
CAROLINA
GEORGIAALABAMA
MISS
FLORIDA
LOUISIANA
ARKANSAS
OKLAHOMA
MISSOURI
TEXAS
KANSAS
NEW MEXICO
MEXICO
ARIZONA
CALIFORNIA
NEVADA UTAH COLORADO
NEBRASKA
WYOMING
IDAHO
OREGON
SOUTH DAKOTA
IOWA
WISCONSIN
MICHIGAN
MINN
NORTH DAKOTA
MONTANA
WASHINGTON
RHODE ISLAND
CONNECTICUT
NEW JERSEY
MARYLAND
DELAWARE
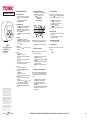
ASTRONOMIC LATITUDE ZONES
ZONES DE LATITUDE
ZONAS ASTRONOMICAS (LATITUDES)
SUSA
CUSA
NUSA
ALAS
HAWI
PROGRAMMING INSTRUCTIONS
457Z
A DIVISION OF NSi INDUSTRIES, LLC
PLEASE READ ALL INSTRUCTIONS FIRST
ONE YEAR LIMITED WARRANTY: If this product
fails because of a manufacturing defect within
one year after purchase, we will, at our option,
either repair or replace it at no charge. Our
warranty does not cover damage caused by
accident, abuse or misuse. We assume no
further liability with respect to the sale or use
of this product. THIS WARRANTY IS IN LIEU
OF ALL OTHER WARRANTIES, EXPRESSED OR
IMPLIED, INCLUDING THE WARRANTY OF
MERCHANTABILITY. We make no warranty with
respect to the fitness of any goods for the users
particular application. This warranty gives you
specific legal rights, and you also may have other
rights which vary from state to state.
It is our intent to provide accurate and current
specification information. However, in the interest
of product improvement, TORK may alter the
specifications or constructional details without
prior notice.
SET
MODE
ENTER
R
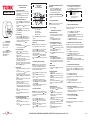
1.0 INSTALLATION INSTRUCTION
• Plug the timer into a 120VAC receptacle. If you charge battery
overnight, the unit can be removed and programmed without
AC power.
• Press the R (RESET) button by using an insulated tool.
• Press the ENTER to start the timer.
2.0 SET TIME AND DATE (CALD)
• Press the MODE button two times to display “CALD” flashing.
• Press the ENTER button to start current time setting mode.
• Using buttons change year, then press SET button.
• Continue to using and SET button to enter current month,
date, hour, minutes, and seconds.
• Press the ENTER button to save the current time setting and return
to clock mode.
3.0 SET SCHEDULE
• Press the MODE button to display “PROG” flashing.
• Press the ENTER button to display “PROG 1 ON”. This is the first
of 20 ON/OFF pairs. For first ON program, press SET. To go to other
programs, press .
3.1 SELECT DAYS
• All days are flashing. Use to choose a different set of days,
then press SET.
3.2 SET ON
• Use to choose:
a) “TIME” for a program with user set times
b) “SNUP” for a timer calculated sunrise time that will change daily
throughout the year.
c) “SNST” for a timer calculated sunset time that will change daily
throughout the year.
• Then press SET. If “TIME” selected: Use buttons to change
hour, then press SET button. Repeat for minutes.
3.3 SET OFF
• “PROG 1 OFF” is flashing on display. Press SET.
• All days are flashing. Use to choose a different set of
days, then press SET.
• Use to choose:
a) “TIME” for a program with user set times,
b) “SNUP” for a timer calculated sunrise time that will change daily
throughout the year.
c) “SNST” for a timer calculated sunset time that will change daily
throughout the year.
• Then press SET. If “TIME” selected: Use buttons to change
hour, then press SET button. Repeat for minutes. Press SET.
• Repeat steps for a total 20 ON and 20 OFF time settings.
• Press the ENTER button to finish programming set and return to
clock mode.
4.0 OPTIONAL SUNSET/SUNRISE TIME ZONES
• Press the MODE button three times to display “ZONE” flashing.
• Press the ENTER button to start Zone setting mode.
• Use the keys to display the correct zone.
---
NOTE: NUSA (Default) = North USA, CUSA = Center USA, SUSA = South
USA, ALAS = Alaska&Northern Canada, HAWI = Hawaii&Puerto Rico.
----
• Press the ENTER button to save the setting and return to clock
mode.
5.0 OPTIONAL SUNSET/SUNRISE OFFSET
---
NOTE: This mode displays calculated sunset/sunrise. You can change to
turn ON/OFF earlier or later with this mode.
---
• Press the MODE button four times to display “SUN± ” flashing.
• Press the ENTER button to start offset mode .
• Screen displays today’s SNUP (sun up) time flashing. Use or
to change default time.
• Press SET and screen displays today’s SNST (sunset) time flashing.
Use to change default time.
• Press ENTER to complete the setting and back to normal clock
mode.
6.0 OPTIONAL CHANGE DAYLIGHT SAVINGS TIME (DST)
---
NOTE: Skip this step for default daylight savings dates. Follow instructions
below only if you need to remove or change. MANU (Manual Mode) – no
DST change by timer. NEW mode - change dates to something other than
default dates.
----
• Press the MODE button five times to display “DST” flashing.
• Press the ENTER button to choose daylight savings times.
• Use the to choose daylight savings options.
a) The display shows “INIT”. For timer to follow current U.S. DST
dates, press ENTER.
b) The display shows “MANU”. For no DST adjustment, press ENTER.
c) The display shows “NEW”. For modified DST dates, consult
technical support phone line.
7.0 COUNTDOWN TIME SETTING
---
NOTE: Countdown mode will postpone the manual off for a preset period.
As an example, press button to turn off lights and timer will wait five
minutes before load is shut down. This will give you time to exit the room.
---
• Press the MODE button to display “PROG” flashing.
• Press the ENTER button to display “PROG 1 ON”.
• Press the once to bring the Countdown time setting.
• Press SET for the Countdown (dL) screen.
• Press to choose length of time.
• Press ENTER to complete the setting and back to normal clock
mode.
8.0 RANDOM ON/OFF TIME
• Pressed key SET & simultaneously to set the Random function.
Display shows “RND”.
• To Cancel Random function simply repeat above procedure. The
“RND” sign will disappear from display.
9.0 OVERRIDE BUTTON FUNCTIONS ( )
• Press one time to turn timer ON or OFF.
10.0 ACTIVATE COUNTDOWN
---
NOTE: To activate Countdown step 7 must be completed and the timer in
the ON position.
---
• Press
RATINGS
• 120V 15A, 1800W General Purpose
• 120V 15A, 1800W Resistive
• 120V, 960W Tungsten
• 120V 1/3 HP, TV-5
LI-846
FOR TECHNICAL SUPPORT: SOUTIEN TECHNIQUE : PARA COMUNICARSE CON EL SERVICIO TÉCNICO: [email protected] 877.230.7874

SET
MODE
ENTER
R
A DIVISION OF NSi INDUSTRIES, LLC
CARACTÉRISTIQUES
• 120 V c.a. 15A, 1800W usage général
• 120 V c.a., 15 A, 1800 W résistif
• 120 V c.a., 960 W tungstène
• 120 V c.a., 1/3 H.P., TV-5
CLASIFICACIONES
• 120 VCA 15 A, 1800 VATIOS para uso general
• 120 VCA 15 A, 1800 VATIOS resistivo
• 120 VCA, 960 VATIOS tungsteno
• 120 VCA 1/3 HP, TV-5
LI-846
FOR TECHNICAL SUPPORT: SOUTIEN TECHNIQUE : PARA COMUNICARSE CON EL SERVICIO TÉCNICO: [email protected] 877.230.7874
MAINE
VT
NH
MASS
NEW YORK
PENNSYLVANIA
OHIO
IND
ILLINOIS
KENTUCKY
VIRGINIA
NORTH CAROLINATENNESSEE
WEST
VIRGINIA
SOUTH
CAROLINA
GEORGIAALABAMA
MISS
FLORIDA
LOUISIANA
ARKANSAS
OKLAHOMA
MISSOURI
TEXAS
KANSAS
NEW MEXICO
MEXICO
ARIZONA
CALIFORNIA
NEVADA UTAH COLORADO
NEBRASKA
WYOMING
IDAHO
OREGON
SOUTH DAKOTA
IOWA
WISCONSIN
MICHIGAN
MINN
NORTH DAKOTA
MONTANA
WASHINGTON
RHODE ISLAND
CONNECTICUT
NEW JERSEY
MARYLAND
DELAWARE
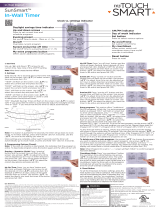
ASTRONOMIC LATITUDE ZONES
ZONES DE LATITUDE
ZONAS ASTRONOMICAS (LATITUDES)
SUSA
CUSA
NUSA
ALAS
HAWI
VEUILLEZ LIRE TOUTES LES INSTRUCTIONS
AVANT D’UTILISER CE PRODUIT
1.0 INSTRUCTIONS POUR L’INSTALLATION
• Branchez la minuterie sur une prise de 120 V c.a. Si vous chargez
la pile pendant la nuit, vous pourrez retirer l’unité et la programmer
sans alimentation en c.a.
• Appuyez sur la touche R (réinitialisation) à l’aide d’un outil isolé.
• Appuyez sur la touche ENTER (entrée) pour lancer la minuterie.
2.0 RÉGLAGE DE L’HEURE ET DE LA DATE (CALD)
• Appuyez sur la touche MODE deux fois et « CALD » clignotera à l’écran.
• Appuyez sur la touche ENTER pour lancer le mode de réglage de l’heure
actuelle.
• Réglez l’année à l’aide des touches , puis appuyez sur la touche
SET (régler).
• Entrez le mois, la date, l’heure, les minutes et les secondes à l’aide des
touches et SET.
• Appuyez sur la touche ENTER pour sauvegarder le réglage de l’heure et
retourner au mode horloge.
3.0 RÉGLAGE DE L’HORAIRE
• Appuyez sur la touche MODE et « PROG » clignotera à l’écran.
• Appuyez sur la touche ENTER et « PROG 1 ON » clignotera à l’écran.
Il s’agit du premier des 20 cycles de mise en marche et d’arrêt. Pour
régler la première mise en marche, appuyez sur SET. Pour passer aux
autres programmes, appuyez sur les touches .
3.1 SÉLECTION DES JOURS
• Tous les jours clignotent. Utilisez les touches pour sélectionner les
jours désirés, puis appuyez sur la touche SET.
3.2 RÉGLAGE DE LA MISE EN MARCHE
• Utilisez les touches pour sélectionner l’une des options
suivantes :
a) « TIME » (heure), pour un programme réglé en fonction d’heures
déterminées par l’utilisateur
b) « SNUP », pour une mise en marche à l’heure du lever du soleil (cette
heure s’ajuste chaque jour en fonction de la date)
c) « SNST », pour une mise en marche à l’heure du coucher du soleil (cette
heure s’ajuste chaque jour en fonction de la date)
• Appuyez ensuite sur la touche SET. Si vous avez sélectionné l’option TIME :
Utilisez les touches pour régler l’heure, puis appuyez sur la touche
SET. Faites de même pour régler les minutes.
3.3 RÉGLAGE DE L’ARRÊT
• « PROG 1 OFF » (arrêt du programme 1) clignote à l’écran. Appuyez sur la
touche SET.
• Tous les jours clignotent. Utilisez les touches pour sélectionner les
jours désirés, puis appuyez sur la touche SET.
• Utilisez les touches pour sélectionner l’une des options suivantes :
a) « TIME », pour un programme réglé en fonction d’heures déterminées par
l’utilisateur
b) « SNUP », pour un arrêt à l’heure du lever du soleil (cette heure s’ajuste
chaque jour en fonction de la date)
c) « SNST », pour un arrêt à l’heure du coucher du soleil (cette heure
s’ajuste chaque jour en fonction de la date)
• Appuyez ensuite sur la touche SET. Si vous avez sélectionné l’option
TIME : Utilisez les touches pour régler l’heure, puis appuyez sur la
touche SET. Faites de même pour régler les minutes. Appuyez sur la touche
SET.
• Répétez ces étapes pour programmer jusqu’à 20 cycles de mise en
marche et d’arrêt.
• Appuyez sur la touche ENTER pour terminer le réglage et retourner
au mode horloge.
4.0 RÉGLAGE FACULTATIF DU LEVER DU SOLEIL ET DU COUCHER
DU SOLEIL EN FONCTION DU FUSEAU HORAIRE
• Appuyez sur la touche MODE trois fois et « ZONE » (fuseau horaire)
clignotera à l’écran.
• Appuyez sur la touche ENTER pour lancer le mode de réglage du
fuseau horaire.
• Utilisez les touches pour sélectionner le fuseau horaire approprié.
---
REMARQUE : NUSA (par défaut) = Nord des États-Unis
CUSA = Centre des États-Unis
SUSA = Sud des États-Unis
ALAS = Alaska et Nord du Canada
HAWI = Hawaï et Porto Rico
----
• Appuyez sur la touche ENTER pour sauvegarder le réglage et retourner au
mode horloge.
5.0 RÉGLAGE FACULTATIF DU DÉCALAGE DU LEVER ET DU
COUCHER DU SOLEIL
---
REMARQUE : Ce mode affiche l’heure prévue du coucher et du lever du soleil.
Ce mode vous permet de modifier l’heure de mise en marche et d’arrêt.
---
• Appuyez sur la touche MODE quatre fois et « SUN± » clignotera à l’écran.
• Appuyez sur la touche ENTER pour lancer le mode de décalage.
• L’heure du lever du soleil (SNUP) clignote à l’écran. Utilisez les touches et
pour modifier l’heure par défaut.
• Appuyez sur la touche SET et l’heure du coucher du soleil (SNST) clignotera
à l’écran. Utilisez les touches pour modifier l’heure par défaut.
• Appuyez sur la touche ENTER pour terminer le réglage et retourner au mode
horloge.
6.0 MODIFICATION FACULTATIVE DE L’HEURE AVANCÉE
---
REMARQUE : Passez cette étape pour conserver les paramètres par défaut
pour l’heure avancée. Suivez uniquement les instructions ci-dessous pour
désactiver ou modifier cette fonction. MANU (mode manuel) – la minuterie
ne passera pas automatiquement à l’heure avancée. Mode NEW (nouveau) –
permet de modifier les dates déterminées par défaut.
----
• Appuyez sur la touche MODE cinq fois et « DST » (heure avancée) clignotera
à l’écran.
• Appuyez sur la touche ENTER pour sélectionner l’heure avancée.
• Utilisez les touches pour choisir parmi les options d’heure
avancée.
a) L’écran affichera « INIT ». Pour que la minuterie suive les dates
américaines de passage à l’heure avancée, appuyez sur la touche ENTER.
b) L’écran affichera « MANU ». Pour désactiver le passage à l’heure avancée,
appuyez sur la touche ENTER.
c) L’écran affichera « NEW ». Pour les dates modifiées de passage à l’heure
avancée, appelez la ligne de soutien technique.
7.0 RÉGLAGE DU COMPTE À REBOURS
---
REMARQUE : Le mode à compte à rebours retardera l’arrêt manuel selon une
période prédéterminée. Par exemple, appuyez sur la touche pour éteindre
les lumières, et l’arrêt s’effectuera cinq minutes plus tard. Vous aurez ainsi le
temps de quitter la pièce.
---
• Appuyez sur la touche MODE et « PROG » clignotera à l’écran.
• Appuyez sur la touche ENTER et « PROG 1 ON » clignotera à l’écran.
• Appuyez sur la touche une fois pour passer en mode de réglage du
compte à rebours.
• Appuyez sur la touche SET pour afficher l’écran du compte à rebours (dL).
• Utilisez les touches pour régler la durée.
• Appuyez sur la touche ENTER pour terminer le réglage et retourner au mode
horloge.
8.0 RÉGLAGE DES HEURES DE MISE EN MARCHE ET D’ARRÊT EN
MODE ALÉATOIRE
• Appuyez sur les touches SET et simultanément pour régler
la fonction aléatoire. L’écran affichera « RND » (aléatoire).
• Pour désactiver la fonction aléatoire, répétez simplement l’étape
précédente. Le symbole « RND » disparaîtra de l’écran.
9.0 FONCTIONS DE LA TOUCHE D’INTERRUPTION MANUELLE « »
• Appuyez une fois sur la touche pour mettre en marche ou arrêter la
minuterie.
10.0 ACTIVATION DU COMPTE À REBOURS
---
REMARQUE : Pour que vous puissiez activer le compte à rebours, l’étape 7
doit avoir été complétée et la minuterie doit être en marche.
---
• Appuyez sur la touche .
-– -– -–
EMPIECE POR LEER TODAS LAS INSTRUCCIONES
1.0. INSTRUCCIONES DE INSTALACIÓN
• Conecte el temporizador en un tomacorriente de 120 VCA. Si carga la
batería toda la noche, la unidad puede retirarse y programarse sin
alimentación de CA.
• Presione el botón R con una herramienta con aislamiento.
• Presione el botón ENTER para iniciar el temporizador.
2.0. CONFIGURACIÓN DEL TIEMPO Y LA FECHA (CALD)
• Presione el botón MODE dos veces para que “CALD” parpadee.
• Presione el botón ENTER para iniciar el modo de configuración de la
hora actual.
• Use los botones para cambiar el año y presione el botón SET.
• Siga usando y el botón SET para ingresar el día,
mes, hora, minutos y segundos actuales.
• Presione el botón ENTER para grabar la configuración de la hora actual
y volver al modo reloj.
3.0. CONFIGURACIÓN DEL HORARIO
• Presione el botón MODE para que “PROG” parpadee.
• Presione el botón ENTER para mostrar “PROG 1 ON”. Éste es el
primero de los 20 pares de encendido/apagado. Para el programa del
primer encendido, presione SET. Para ir a los otros programas, presione
.
3.1. SELECCIÓN DE LOS DÍAS
• Todos los días parpadean. Use para escoger diferentes días y
presione SET.
3.2. CONFIGURACIÓN DEL ENCENDIDO
• Use para escoger:
a) “TIME” para un programa con horas configuradas por el usuario.
b) “SNUP” para un amanecer calculado por el temporizador que cambia
a diario durante el año.
c) “SNST” para un anochecer calculado por el temporizador que cambia
a diario durante el año.
• Luego presione SET. Si selecciona “TIME”: Use los botones para
cambiar la hora y presione el botón SET. Repita el procedimiento para
los minutos.
3.3. CONFIGURACIÓN DEL APAGADO
• “PROG 1 OFF” parpadea en la pantalla. Presione SET.
• Todos los días parpadean. Use para escoger diferentes días y
presione SET.
• Use para escoger:
a) “TIME” para un programa con horas configuradas por el usuario.
b) “SNUP” para un amanecer calculado por el temporizador que
cambia a diario durante el año.
c) “SNST” para un anochecer calculado por el temporizador que cambia
a diario durante el año.
• Luego presione SET. Si selecciona “TIME”: Use los botones para
cambiar la hora y presione el botón SET. Repita el procedimiento para
los minutos. Presione SET.
• Repita los pasos para configurar 20 horas de encendido y 20 horas de
apagado.
• Presione el botón ENTER para terminar la configuración de la
programación y volver al modo reloj.
PROGRAMMING INSTRUCTIONS
457Z
4.0. ZONAS HORARIAS DE ANOCHECER/AMANECER OPCIONALES
• Presione el botón MODE tres veces para que “ZONE” parpadee.
• Presione el botón ENTER para iniciar el modo de configuración de la zona.
• Use las teclas para mostrar la zona correcta.
NOTA: NUSA (predeterminado) = El norte de USA
CUSA = El centro de USA
SUSA = El sur de USA
ALAS = Alaska y el norte de Canadá
HAWI = Hawai y Puerto Rico
• Presione el botón ENTER para grabar la configuración y volver al modo reloj.
5.0. CAMBIO DE ANOCHECER/AMANECER OPCIONAL
---
NOTA: Este modo muestra el anochecer/amanecer calculados. Puede cambiarlo y encenderlo o
apagarlo antes o después con este modo.
---
• Presione el botón MODE cuatro veces para que “SUN± ” parpadee.
• Presione el botón ENTER para iniciar el modo de cambio.
• La pantalla muestra la hora de SNUP de hoy (amanecer) parpadeando. Use o
para cambiar la hora predeterminada.
• Presione SET y la pantalla muestra la hora de SNST de hoy (anochecer) parpadeando.
Use para cambiar la hora predeterminada.
• Presione ENTER para completar la configuración y volver al modo reloj normal.
6.0. CAMBIO DEL MODO DE HORARIO DE VERANO (DST) OPCIONAL
---
NOTA: Omita este paso si desea considerar las fechas del horario de verano predeterminadas.
Siga las instrucciones a continuación si necesita eliminarlas o cambiarlas. MANU (modo manual):
no hay cambio al DST en el temporizador. Modo NEW: cambio de las fechas a fechas diferentes
a las predeterminadas.
----
• Presione el botón MODE cinco veces para que “DST” parpadee.
• Presione el botón ENTER para escoger las fechas del horario de verano.
• Use para escoger las opciones del horario de verano.
a) La pantalla muestra “INIT”. Para que el temporizador respete las fechas actuales del DST
para EE.UU., presione ENTER.
b) La pantalla muestra “MANU”. Si no desea cambiar el DST, presione ENTER.
c) La pantalla muestra “NEW”. Para fechas del DST modificadas, consulte la línea telefónica de
asistencia técnica.
7.0. CONFIGURACIÓN DE LA HORA DE CUENTA REGRESIVA
---
NOTA: El modo de cuenta regresiva pospondrá el apagado automático durante un periodo
preconfigurado. Como ejemplo, presione el botón para apagar las luces y el temporizador
esperará cinco minutos antes de cortar la alimentación. De esta forma tendrá tiempo para salir
de la habitación.
---
• Presione el botón MODE para que “PROG” parpadee.
• Presione el botón ENTER para mostrar “PROG 1 ON”.
• Presione la tecla una vez para ver en la pantalla la configuración de la hora de cuenta
regresiva.
• Presione SET para ver la pantalla de cuenta regresiva (dL).
• Presione para escoger la duración del tiempo.
• Presione ENTER para completar la configuración y volver al modo reloj normal.
8.0. HORA ALEATORIA DE ENCENDIDO Y APAGADO
• Presione la tecla SET y de forma simultánea para configurar la función de aleatorio.
La pantalla muestra “RND”.
• Para anular la función de aleatorio basta con repetir el procedimiento antes mencionado.
El símbolo “RND” desaparecerá de la pantalla.
9.0. FUNCIONES DEL BOTÓN DE ANULACIÓN ( )
• Presione una vez para encender o apagar el temporizador.
10.0. ACTIVACIÓN DE LA CUENTA REGRESIVA
---
NOTA: Para activar la cuenta regresiva, se debe completar el paso 7 y el temporizador debe
estar en la posición de encendido.
---
• Presione .
4.0
4.0
-
 1
1
-
 2
2


Progress Lighting P8531-01 Guía de instalación
- Tipo
- Guía de instalación
en otros idiomas
Otros documentos
-
Defiant 49808 Manual de usuario
-
Tork EW103B Manual de usuario
-
Woods 50015 Manual de usuario
-
 myTouchSmart 33861-T1 Manual de usuario
-
Sylvania SA 170 User Instructions
-
-
Intermatic SS8C Programming Manual
-
-
Intermatic EJ600 Series Installation And User Instructions Manual
-
