El ATEN VE812R es un receptor HDMI que se conecta al transmisor VE812T para extender señales HDMI hasta 100 metros a través de un solo cable Cat 5e/6/6a. Soporta resoluciones de hasta 1080p y además transmite señales de infrarrojos para controlar dispositivos remotos. El VE812R es ideal para aplicaciones en las que se necesita extender señales HDMI a largas distancias, como en aulas, salas de conferencias y sistemas de señalización digital.
El ATEN VE812R es un receptor HDMI que se conecta al transmisor VE812T para extender señales HDMI hasta 100 metros a través de un solo cable Cat 5e/6/6a. Soporta resoluciones de hasta 1080p y además transmite señales de infrarrojos para controlar dispositivos remotos. El VE812R es ideal para aplicaciones en las que se necesita extender señales HDMI a largas distancias, como en aulas, salas de conferencias y sistemas de señalización digital.

Transcripción de documentos
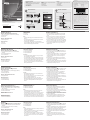
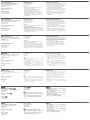
Package Contents Important Notice VE812 1 VE812T HDMI Over Single Cat 5 Transmitter 1 VE812R HDMI Over Single Cat 5 Receiver 2 Power Adapters 1 Mounting Kit 1 User Instructions VE812R 1 VE812R HDMI Over Single Cat 5 Receiver 1 Power Adapter 1 Mounting Kit 1 User Instructions VE812T 1 VE812T HDMI Over Single Cat 5 Transmitter 1 Power Adapter 1 Mounting Kit 1 User Instructions Considering environmental protection, ATEN does not provide a fully printed user manual for this product. If the information contained in the Quick Start Guide is not enough for you to configure and operate your product, please visit our website www.aten.com, and download the full user manual. Online Registration http://eservice.aten.com North America: 1-888-999-ATEN Ext: 4988 Technical Phone Support International: 886-2-86926959 United Kingdom: 44-8-4481-58923 The following contains information that relates to China: A B Hardware Review VE812T Front View & Rear View 3 Hardware Installation Receiver VE812T Top View 3 HDMI Display ATEN VanCryst™ VE812 HDMI Over Single Cat 5 Extender Quick Start Guide 1 FEDERAL COMMUNICATIONS COMMISSION INTERFERENCE STATEMENT: This equipment has been tested and found to comply with the limits for a Class A digital device, pursuant to Part 15 of the FCC Rules. These limits are designed to provide reasonable protection against harmful interference when the equipment is operated in a commercial environment. This equipment generates, uses, and can radiate radio frequency energy and, if not installed and used in accordance with the instruction manual, may cause harmful interference to radio communications. Operation of this equipment in a residential area is likely to cause harmful interference in which case the user will be required to correct the interference at his own expense. FCC Caution: Any changes or modifications not expressly approved by the party responsible for compliance could void the user's authority to operate this equipment. CE Warning: This is a class A product. In a domestic environment this product may cause radio interference in which case the user may be required to take adequate measures. Suggestion: Shielded twisted pair (STP) cables must be used with the unit to ensure compliance with FCC & CE standards. VE812R (Front) 2 VE812R Front View & Rear View EMC Information 3 4 VE812R (Rear) 5 6 VE812R Top View © Copyright 2016 ATEN® International Co., Ltd. 1 ATEN and the ATEN logo are trademarks of ATEN International Co., Ltd. All rights reserved. Transmitter 2 This device complies with Part 15 of the FCC Rules. Operation is subject to the following two conditions:(1) this device mat not cause harmful interference, and(2) this device must accept any interference received, including interference that may cause undesired operation. 4 VE812T (Rear) All other trademarks are the property of their respective owners. VE812T / VE812R Side View This product is RoHS compliant. Part No. PAPE-1223-A22G 2 이 기기는 업무용(A급) 전자파적합기기로서 판매자 또는 사용자는 이 점을 주의하시기 바라며, 가정외의 지역에서 사용하는 것을 목적으로 합니다. VE812T (Front) Printing Date: 02/2016 HDMI Source Device 1 4 7 8 9 All information, documentation, firmware, software utilities, and specifications contained in this package are subject to change without prior notification by the manufacturer. Please visit our website http:// www.aten.com/download/?cid=dds for the most up-to-date versions. VE812 HDMI Over Single Cat 5 Extender Quick Start Guide Hardware Review A VE812T / VE812R Front View & Rear View 1. HDMI In Port (VE812T) / HDMI Out Port (VE812R) 2. Remote I/O Port 3. Power Jack VE812T / VE812R Side View 4. Grounding Terminal VE812T Top View 5. Link LED 6. Power LED VE812R Top View 7. HDMI OUT LED 8. Link LED 9. Power LED Note: • The Power LED lights green to indicate that the device is power on. • The Link LED lights green to indicate that the connection via Cat 5 cable is established. • The HDMI OUT LED lights green to indicate that the content is displayed with HDCP. It flashes green to indicate that the content is displayed without HDCP. Hardware Installation B 1. Connect the HDMI IN Port on the VE812T to the HDMI OUT port on your video source device using an HDMI cable. 2. Connect one end of the RJ-45 cable to the Remote I/O Port on the VE812T. Then connect the other end of the RJ-45 cable to the Remote I/O Port on the VE812R. 3. Connect the HDMI OUT port on the VE812R to the HDMI IN port on your video display device using an HDMI cable. 4. Connect the VE812T/VE812R to power outlets using the provided power adapters. Power on your source and display devices. Système d'extension par câble de catégorie 5 simple HDMI VE812 – Guide de démarrage rapide Description de l’appareil A VE812T / VE812R Vue avant / Vue arrière 1. Port d'entrée HDMI (VE812T) / Port de sortie HDMI (VE812R) 2. Port d’entrée/sortie de ligne 3. Prise d’alimentation VE812T / VE812R Vue latérale 4. Prise de terre VE812T Vue supérieure 5. Voyant de liaison (Link) 6. Voyant d’alimentation www.aten.com VE812R Vue supérieure Installation du matériel Remarque : • Le voyant d’alimentation s’allume en verre pour indiquer que le périphérique est alimenté. • Le voyant de liaison s’allume en vert pour indiquer que la connexion par le biais du câble de catégorie 5 est établie. • Le voyant de sortie HDMI s’allume en verre pour indiquer que le contenu est affiché avec la protection HDCP. Il clignote en verre pour indiquer que le contenu est affiché sans la protection HDCP. 1. Connectez le port d’entrée HDMI du module VE812T au port de sortie HDMI de votre périphérique vidéo source à l’aide d’un câble HDMI. 2. Connectez une extrémité du câble RJ-45 au port de sortie de ligne du module VE812T. Ensuite, connectez l’autre extrémité du câble RJ-45 au port d’entrée de ligne du module VE812R. 3. Connectez le port de sortie HDMI du module VE812R au port d’entrée HDMI de votre périphérique d’affichage vidéo à l’aide d’un câble HDMI. 4. Branchez les modules VE812T/VE812R sur des prises de courant à l’aide des adaptateurs secteur fournis. Allumez les périphériques d'affichage et source. 7. Voyant de sortie HDMI 8. Voyant de liaison (Link) 9. Voyant d’alimentation B VE812 HDMI-Verlängerung über ein einzelnes Kat. 5-Kabel Kurzanleitung Hardwareübersicht A VE812T / VE812R Vorderseitige Ansicht / Rückseitige Ansicht 1. HDMI-Eingang (VE812T) / HDMI-Ausgang (VE812R) 2. Line-In-/Out-Buchse 3. Stromeingangsbuchse VE812T / VE812R Seitliche Ansicht 4. Erdungsanschluss VE812T Draufsicht 5. Verbindungsanzeige 6. LED-Betriebsanzeige www.aten.com VE812R Draufsicht Hardware installieren Hinweis : • Die Betriebsanzeige leuchtet grün, wenn das Gerät mit dem Stromnetz verbunden ist. • Die Link-Anzeige leuchtet grün, wenn die Verbindung über das Kat. 5-Kabel hergestellt wurde. • Die Anzeige HDMI Out leuchtet grün, wenn das zu übertragende Bild HDCP-Signale enthält. Sie blinkt grün, wenn das zu übertragende Bild keine HDCP-Signale enthält. 1. Verbinden Sie den Eingang HDMI IN am VE812T mit dem HDMI-Ausgang Ihrer Bildsignalquelle. Verwenden Sie dazu ein passendes HDMI-Kabel. 2. Verbinden Sie das eine Ende eines RJ-45-Kabels mit der Buchse LINE OUT am VE812T. Verbinden Sie anschließend das andere Ende eines RJ-45-Kabels mit der Buchse LINE IN am VE812R. 3. Verbinden Sie den Ausgang HDMI OUT am VE812R mit dem HDMI-Eingang Ihres Anzeigegerätes. Verwenden Sie dazu ein passendes HDMI-Kabel. 4. Verbinden Sie den VE812T/VE812R über die mitgelieferten Netzteile mit dem Stromnetz. Schalten Sie die Signalquelle und die Anzeigegeräte ein. 7. LED-Anzeige des HDMI-Ausgangs 8. Verbindungsanzeige 9. LED-Betriebsanzeige B VE812 Alargador HDMI sobre un único cable de Cat. 5 Guía rápida Presentación del hardware A VE812T / VE812R Vista frontal / Vista posterior 1. Puerto de entrada HDMI (VE812T) / Puerto de salida HDMI (VE812R) 2. Entrada y salida de línea Line IN / OUT 3. Entrada de alimentación VE812T / VE812R Vista lateral 4. Toma de tierra VE812T Vista superior 5. Indicador de enlace (Link) 6. Indicador de alimentación www.aten.com VE812R Vista superior Instalar el hardware Nota: • El indicador de alimentación se ilumina de color verde cuando el dispositivo recibe corriente eléctrica. • El indicador LED Link se ilumina de color verde cuando la conexión a través del cable de Cat. 5 se ha establecido. • El indicador HDMI Out se ilumina de color verde cuando el contenido lleva una señal HDCP. El indicador parpadea de color verde cuando el contenido no lleva una señal HDCP. 1. Conecte el puerto HDMI IN del VE812T a la salida de señal HDMI de su dispositivo fuente de señal gráfica. Para ello, emplee un cable HDMI. 2. Conecte un extremo del cable de RJ-45 al puerto LINE OUT del VE812T. Luego conecte el otro extremo del cable de RJ-45 al puerto LINE IN del VE812R. 3. Conecte el puerto HDMI OUT del VE812R a la entrada de señal HDMI de su dispositivo de visualización. Para ello, emplee un cable HDMI. 4. Enchufe el VE812T/VE812R a la red eléctrica. Para ello, emplee los adaptadores de alimentación incluidos. Encienda los dispositivos de visualización y fuente. 7. Indicador LED de salida HDMI 8. Indicador de enlace (Link) 9. Indicador de alimentación B Estensore HDMI Over Single Cat 5 VE812 – Guida rapida Hardware A VE812T / VE812R Vista anteriore / Vista posteriore 1. Porta d’ingresso HDMI (VE812T)/Porta d’uscita HDMI (VE812R) 2. Porta d’ingresso/d'uscita di linea (Line IN/OUT) 3. Presa d’alimentazione VE812T / VE812R Vista laterale 4. Terminale di messa a terra VE812T Vista dall’alto 5. LED di collegamento 6. LED d’alimentazione www.aten.com VE812R Vista dall’alto Installazione dell’hardware Nota: • Il LED d’alimentazione si illumina in verde per indicare che il dispositivo è alimentato. • Il LED di collegamento si illumina in verde per indicare che la connessione via cavo Cat 5 è stabilita. • Il LED dell’uscita HDMI si illumina in verde per indicare che il contenuto viene visualizzato con HDCP. Lampeggia in verde per indicare che il contenuto viene visualizzato senza HDCP. 1. Collegare la porta d’ingresso HDMI del VE812T alla porta di uscita HDMI del dispositivo video sorgente tramite un cavo HDMI. 2. Collegare un’estremità del cavo RJ-45 alla porta d’uscita di linea del VE812T. Collegare l’altra estremità del cavo RJ-45 alla porta d’ingresso di linea del VE812R. 3. Collegare la porta d’uscita HDMI del VE812T/VE812R alla porta d’ingresso HDMI del dispositivo video tramite un cavo HDMI. 4. Collegare il VE812T/VE812R a una presa di alimentazione di rete per mezzo degli alimentatori in dotazione. Accendere il dispositivo sorgente e quello di visualizzazione. 7. LED dell’uscita HDMI 8. LED di collegamento 9. LED d’alimentazione B-
 1
1
-
 2
2


ATEN VE812T Guía de inicio rápido
- Tipo
- Guía de inicio rápido
El ATEN VE812R es un receptor HDMI que se conecta al transmisor VE812T para extender señales HDMI hasta 100 metros a través de un solo cable Cat 5e/6/6a. Soporta resoluciones de hasta 1080p y además transmite señales de infrarrojos para controlar dispositivos remotos. El VE812R es ideal para aplicaciones en las que se necesita extender señales HDMI a largas distancias, como en aulas, salas de conferencias y sistemas de señalización digital.
en otros idiomas
- français: ATEN VE812T Guide de démarrage rapide
- italiano: ATEN VE812T Guida Rapida
- English: ATEN VE812T Quick start guide
- Deutsch: ATEN VE812T Schnellstartanleitung
- русский: ATEN VE812T Инструкция по началу работы
- português: ATEN VE812T Guia rápido
- 日本語: ATEN VE812T クイックスタートガイド
Artículos relacionados
-
ATEN VanCryst VE812 Guía de inicio rápido
-
ATEN VE814T Guía de inicio rápido
-
ATEN VE3912T Guía de inicio rápido
-
-
-
-
ATEN VE2812AEUT Guía de inicio rápido
-
-
ATEN VE2812AUST Guía de inicio rápido
-
ATEN VS1814T Guía de inicio rápido