Aspes AJI104500ED El manual del propietario
- Categoría
- Lavaplatos
- Tipo
- El manual del propietario

Lavavajillas
Manual de Instrucciones
PARTE I: Versión Genérica
AJI104500ED
Por favor, lea este manual con cuidado antes de utilizar
el lavavajillas
Guarde este manual para consultas futuras.

INFORMACIÓN DE SEGURIDAD
CONTENIDO
DESCRIPCIÓN DEL PRODUCTO
USANDO SU LAVAVAJILLAS
Cargar la sal en el descalcificador
Consejos
MANTENIMIENTO Y LIMPIEZA Cuidados
externos
Cuidados internos
Cuidado del lavavajillas
INSTRUCCIONES DE INSTALACIÓN
Conexión eléctrica
Abastecimiento de agua y drenaje
Conexión de las mangueras de drenaje
Coloque el dispositivo
Instalación libre
Instalación incorporada (para el modelo de
encastre)
CONSEJOS PARA SOLUCIONAR PROBLEMAS
CARGANDO LAS CESTAS DE ACUERDO CON
NOTA:
Revisar la sección de Sugerencias para la resolución de problemas le
ayudará a resolver algunos problemas comunes por usted mismo.
Si no puede resolver los problemas usted mismo, solicite ayuda de un
técnico profesional.
El fabricante, siguiendo una política de constante desarrollo y actualización
del producto, puede realizar modificaciones sin previo aviso.
Si está perdido o desactualizado, puede recibir un nuevo manual de usuario
del fabricante o vendedor responsable.
3
8
9
9
11
13
13
13
16
17
17
18
19
20
20
26
30
21
29 Disponibilidad de Piezas de Repuestos

INFORMACIÓN DE SEGURIDAD
ADVERTENCIA
Cuando use su lavavajillas, siga las precauciones
que se detallan a continuación:
3
Este dispositivo está destinado a ser utilizado
en aplicaciones domésticas y similares.
-
Este aparato puede ser utilizado por niños a partir de 8
años y personas con capacidades físicas, sensoriales o
mentales reducidas o sin experiencia y conocimiento si
se les ha supervisado o instruido sobre el uso del
artefacto de una manera segura y entienden los peligros.
Los niños no deben jugar con el aparato. La limpieza y el
mantenimiento por parte del usuario no deben ser
realizados por niños sin supervisión. (Para EN60335-1)
Este aparato no debe ser utilizado por
personas (incluyendo niños) con capacidades físicas,
sensoriales o mentales reducidas, o falta de experiencia
y conocimiento, a menos que hayan sido supervisadas o
instruidas sobre el uso del aparato por una persona
responsable de su seguridad. (Para IEC60335-1)

¡El material de embalaje podría ser peligroso para los niños!
Este aparato es solo para uso doméstico en interiores.
Para protegerse contra el riesgo de descarga eléctrica, no
sumerja la unidad, el cable o el enchufe en agua u otro líquido.
Desconecte antes de limpiar y realizar tareas de mantenimiento
en el aparato.
Use un paño suave humedecido con jabón suave y luego use
un paño seco para limpiarlo nuevamente.
Instrucciones de toma de tierra
Este aparato debe estar conectado a tierra. En caso de un
mal funcionamiento o avería, la conexión a tierra reducirá
el riesgo de una descarga eléctrica al proporcionar una
ruta de menor resistencia de la corriente eléctrica. Este
electrodoméstico está equipado con un enchufe de
conductor de puesta a tierra.
El enchufe debe enchufarse a una toma de corriente
apropiada que esté instalada y conectada a tierra de
acuerdo con todos los códigos y ordenanzas locales.
La conexión incorrecta del conductor de puesta a tierra del
equipo puede provocar el riesgo de una descarga eléctrica.
Consulte con un electricista o representante de servicio
calificado si tiene dudas sobre si el artefacto está
correctamente conectado a tierra.
4

No modifique el enchufe provisto con el aparato; Si
no encaja en la toma de corriente.
Haga que un electricista calificado instale una toma
de corriente adecuada.
No abuse, ni se siente, ni se pare sobre la puerta o
la rejilla del lavavajillas.
No opere su lavavajillas a menos que todos los
paneles estén colocados correctamente.
Abra la puerta con mucho cuidado. Si el lavavajillas
está funcionando, existe el riesgo de que salga agua.
No coloque objetos pesados ni se pare en la puerta
cuando esté abierta.
El aparato podría volcarse hacia adelante.
Al cargar artículos para lavar:
1) Ubique los objetos con filo para que no dañen
el sello de la puerta;
2) Advertencia: los cuchillos y otros utensilios
con punta afilada deben cargarse en la cesta con
sus puntas hacia abajo o colocados en posición
horizontal.
Algunos detergentes para lavavajillas son
fuertemente alcalinos. Pueden ser extremadamente
peligrosos si se ingieren. Evite el contacto con la
piel y los ojos y mantenga a los niños alejados del
lavavajillas cuando la puerta esté abierta.
Verifique que el polvo del detergente esté vacío
después de completar el ciclo de lavado.
5

6
No lave artículos de plástico a menos que estén
marcados como "aptos para lavavajillas" o su
equivalente.
Para artículos de plástico no marcados, verifique las
recomendaciones del fabricante.
Use solo detergentes y agentes de enjuague
recomendados para su uso en un lavavajillas.
Nunca use jabón, detergente para la ropa o detergente
para el lavado de manos en su lavavajillas.
La puerta no debe dejarse abierta, ya que esto podría
aumentar el riesgo de mal-función.
Si el cable de alimentación está dañado, debe ser
reemplazado por el fabricante o su agente de servicio o
una persona calificada para evitar un peligro.
Durante la instalación, la fuente de alimentación no
debe doblarse o aplanarse de forma excesiva o
peligrosa.
No altere los controles.
El electrodoméstico debe estar conectado a la válvula
principal de agua con nuevos juegos de mangueras.
Los viejos sets no deben ser reutilizados.
Para ahorrar energía, en el modo de espera, el aparato
se apagará automáticamente mientras no haya ninguna
operación en minutos.
15

Eliminación de residuos
Para desechar el paquete y el
electrodoméstico por favor vaya a un centro
de reciclaje. Por lo tanto, corte el cable de
alimentación y hacer que el dispositivo de
cierre de la puerta quede inutilizable.
Los envases de cartón se fabrican con papel
reciclado y deben desecharse en la recolección de
papel usado para reciclar.
Al asegurarse de que este producto se elimine
correctamente, ayudará a evitar posibles
consecuencias negativas para el medio ambiente y
la salud humana, que de lo contrario podrían ser
causadas por el manejo inapropiado de este
producto.
Para obtener información más detallada sobre el
reciclaje de este producto, comuníquese con la
oficina local de su ciudad y su servicio de
eliminación de desechos domésticos.
ELIMINACIÓN: No deseche este producto como
desecho municipal sin clasificar. La recolección de
tales desechos por separado para un tratamiento
especial es necesaria.
7

DESCRIPCIÓN DEL PRODUCTO
Para obtener el mejor rendimiento de su lavavajillas, lea todas las
instrucciones de funcionamiento antes de usarlo por primera vez.
Dispensador
Contenedor de
sal
Brazo de pulverización inferior
Conjunto de filtro
Tubería
interna
IMPORTANTE:
8
Las imágenes son solo de referencia, algunos modelos pueden ser
diferentes
tercera bandeja cesta inferior
Brazo de
cesta superior
zona para copas
Brazo superior aspersor

USANDO SU LAVAVAJILLAS
Antes de usar su lavavajillas:
Dentro Fuera
1. Configure el descalcificador de agua
2. Cargue la sal en el descalcificador
3. Cargue la canasta
4. Llene el dispensador
Cargar la sal en el descalcificador
¡Solo use sal específicamente diseñada para el uso de lavavajillas!
Cualquier otro tipo de sal no específicamente diseñada para el uso de
lavavajillas, especialmente la sal de mesa, dañará el ablandador de agua.
En caso de daños causados por el uso de sal inadecuada, el fabricante no
da ninguna garantía ni se responsabiliza por los daños causados.
Solo rellene con sal antes de ejecutar un ciclo.
Esto evitará que los granos de sal o agua salada que se haya derramado
permanezcan en el fondo de la máquina por un período de tiempo que
pueda causar corrosión.
ADVERTENCIA
9
Si su modelo no tiene ningún ablandador de agua, puede omitir esta
sección. Siempre use sal para uso en el lavavajillas.
El contenedor de sal se encuentra debajo de la cesta inferior y debe
llenarse como se explica a continuación:
NOTA:
Consulte la sección 1 "Descalcificador de agua" de la PARTE 1. Consulte la sección 1
"Descalcificador de agua" de la PARTE : : Versión especial, Versión especial, si necesita
configurar el ablandador de agua. Si necesita configurar el ablandador de agua, consulte

10
1. Retire la cesta inferior y desatornille la tapa del depósito.
2. Coloque el extremo del embudo (suministrado) en el orificio y vierta
aproximadamente 1,5 kg de sal de lavavajillas.
3. Llene el contenedor de sal hasta su límite máximo con agua. Es normal que salga
una pequeña cantidad de agua del contenedor de sal.
4. Después de llenar el recipiente, vuelva a atornillar la tapa.
5. La luz de advertencia de sal dejará de estar después de que el contenedor de sal se
haya llenado con sal.
6. Inmediatamente después de llenar la sal en el contenedor de sal, se debe iniciar un
programa de lavado (sugerimos usar un programa corto). De lo contrario, el sistema de
filtro, la bomba u otras partes importantes de la máquina pueden dañarse con agua
salada. Esto está fuera de garantía.
NOTE:
El contenedor de sal solo debe rellenarse cuando la luz de advertencia de sal
en el panel de control se enciende.
Dependiendo de qué tan bien se disuelva la sal, la luz de advertencia de sal
aún puede estar encendida aunque el contenedor de sal esté lleno.
Si no hay luz de advertencia de sal en el panel de control (para algunos
modelos), puede estimar cuándo se debe llenar la sal en el suavizador por
los ciclos que ha funcionado el lavavajillas.
Si la sal se ha derramado, ejecuta un prelavado o un programa rápido para
eliminarla.
Siga los pasos a continuación para agregar sal lavavajillas:

4
1 2 Retire la canasta superior.
3Vuelva a colocar la canasta superior
en los rodillos superiores o inferiores.
Posición baja
Saca la canasta superior.
posición alta
Empuje la canasta superior.
Ajustar la bandeja superior
Tipo 1:
La altura de la canasta superior se puede ajustar fácilmente para acomodar
platos más altos en la canasta superior o inferior.
Para ajustar la altura del estante superior, siga estos pasos:
Consejos
1Para elevar la parrilla a la posición
superior, levante la parrilla hasta que
ambos lados estén a la misma altura.
El estante se asegurará en su lugar.
2To lower the rack, push down on the
handle and release.
Tipo 2:
11

Plegando los estantes de las tazas
Para dejar espacio para los artículos más altos, suba la rejilla de la taza hacia
arriba. También puede quitarlo cuando no se requiera su uso.
12
Plegar los estantes
Los picos se usan para sostener platos y un plato. Se pueden bajar para hacer
más espacio para artículos grandes.
elevar hacia arriba doblar hacia atrás

LIMPIEZA Y MANTENIMIENTO
Cuidados externos
La puerta y el sello de la puerta
Limpie los sellos de la puerta regularmente con un paño suave y húmedo para
eliminar los depósitos de alimentos.Cuando se carga el lavavajillas, los residuos de
comida y bebida pueden gotear en los lados de la puerta del lavavajillas. Estas
superficies están fuera del gabinete de lavado y no se accede por el agua desde
los brazos de rociado. Cualquier depósito debe limpiarse antes de que se cierre la
puerta.
Panel de control
El panel de control debe limpiarse SOLAMENTE con un paño suave y húmedo.
Para evitar la penetración de agua en la cerradura de la puerta y los
componentes eléctricos, no use un limpiador en aerosol de ningún tipo.
Nunca use limpiadores abrasivos o estropajos en las superficies
externas porque pueden rayar el acabado. Algunas toallas de papel
también pueden rayar o dejar marcas en la superficie.
ADVERTENCIA
Cuidados internos
Sistema de filtros
NOTA:
Las imágenes son solo para referencia, diferentes modelos del sistema de
filtrado y los brazos rociadores pueden ser diferentes.
13
El sistema de filtrado en la base del gabinete de lavado contiene residuos gruesos
durante el ciclo de lavado, incluyendo materiales extraños tales como palillos de
dientes o fragmentos. los residuos gruesos acumulados podrían resultar que se
obstruyen los filtros. Inspeccione regularmente la condición de los filtros, retire
cuidosamente los materiales extraños y limpie con agua las piezas del sistema de
filtrado si es necesario. Siga los siguientes pasos para limpiar el filtro.

1 2
Sostenga el filtro grueso y gírelo
en sentido antihorario para
desbloquear el filtro. Levante el
filtro hacia arriba y fuera del
lavavajillas.
El filtro fino se puede sacar de la
parte inferior del conjunto del filtro. El
filtro grueso se puede separar del
filtro principal apretando suavemente
las pestañas en la parte superior y
tirando de él.
3 4
Los restos de alimentos más grandes
se pueden limpiar enjuagando el filtro
con agua corriente.
Para una limpieza más completa, use
un cepillo de limpieza suave.
Vuelva a armar los filtros en el
orden inverso al del desmontaje,
vuelva a colocar el inserto del filtro
y gírelo en el sentido de las agujas
del reloj hasta la flecha de cierre.
No apriete demasiado los filtros. Vuelva a colocar los filtros en secuencia de forma
segura, de lo contrario podría entrar suciedad gruesa en el sistema y causar un
bloqueo.
NUNCA use el lavavajillas sin filtros en su lugar. El reemplazo incorrecto del filtro
puede reducir el nivel de rendimiento del electrodoméstico y dañar los platos y
utensilios.
ADVERTENCIA
Filtro
principal
Filtro grueso
Filtro fino
14
Abrir

Lave los brazos en agua jabonosa
y tibia y use un cepillo suave para
limpiar los chorros. Reemplácelos
después de enjuagarlos
completamente.
Brazos pulverizadores
Es necesario limpiar los brazos de rociado regularmente para productos químicos
de agua dura que obstruirán los chorros y los cojinetes del brazo rociador.
Para limpiar los brazos rociadores, siga las instrucciones a continuación:
2
3
Para quitar el brazo rociador
inferior, saque el brazo rociador
hacia arriba.
15
1Para quitar el brazo rociador superior,
sostenga la tuerca en el centro de la
rueda y gire el brazo rociador en el
sentido contrario a las agujas del reloj
para quitarlo.

Cuidados para el lavavajillas
Precaución de helada
tome medidas de protección contra heladas en el lavavajillas en invierno. Todos
los ciclos posteriores al lavado operan de la siguiente manera:
1. Corte la corriente eléctrica al lavavajillas en la fuente de suministro.
2. Cierre el suministro de agua y desconecte el tubo de entrada de agua de la
válvula de agua.
3. Drene el agua de la tubería de entrada y la válvula de agua. (Usa una sartén
para juntar el agua)
4. Vuelva a conectar el tubo de entrada de agua a la válvula de agua.
5. Retire el filtro en el fondo de la bañera y use una esponja para absorber el agua
en el sumidero.
Después de cada lavado
Después de cada lavado, cierre el suministro de agua al aparato y deje la puerta
ligeramente abierta para que la humedad y los olores no queden atrapados en el
interior.
Retire el enchufe
Antes de limpiar o realizar tareas de mantenimiento, siempre quite el enchufe del
zócalo.
Sin disolventes ni limpieza abrasiva
Para limpiar el exterior y las piezas de goma del lavavajillas, no use disolventes ni
productos de limpieza abrasivos. Solo use un paño con agua tibia y jabón.
Para eliminar manchas o manchas de la superficie del interior, use un paño
humedecido con agua y un poco de vinagre o un producto de limpieza hecho
específicamente para lavavajillas.
Cuando no está en uso durante mucho tiempo
Se recomienda que ejecute un ciclo de lavado con el lavavajillas vacío y luego retire
el enchufe de la toma, apague el suministro de agua y deje la puerta del aparato
ligeramente abierta. Esto ayudará a que los sellos de la puerta duren más y evite
que se formen olores dentro del artefacto.
Mover el aparato
Si el electrodoméstico debe moverse, intente mantenerlo en posición vertical. Si es
absolutamente necesario, puede colocarse de espaldas.
16

INSTRUCCIONES DE INSTALACIÓN
Asegúrese de que exista una correcta conexión a tierra antes del uso
ADVERTENCIA
Por seguridad personal:
No use un cable de extensión o un enchufe
adaptador con este electrodoméstico.
Bajo ninguna circunstancia, corte o retire la
conexión a tierra del cable de alimentación.
La instalación de las tuberías y equipos eléctricos debe ser realizada por profesionales.
Acerca de la conexión de alimentación
Atención
ADVERTENCIA
Peligro de Choque Eléctrico
Desconecte la energía eléctrica
antes de instalar el lavavajillas.
De lo contrario, podría producirse la
muerte o una descarga eléctrica.
17
Requisitos eléctricos
Consulte la etiqueta de clasificación para conocer el voltaje nominal y conecte el lavavajillas a
la fuente de alimentación adecuada. Utilice el fusible 10A / 13A / 16A requerido, fusible de
retardo o disyuntor recomendado y proporcione un circuito separado que sirva solo a este
electrodoméstico.
Conexión eléctrica
Asegúrese de que el voltaje y la frecuencia de la corriente correspondan a los de la placa de
características. Solo inserte el enchufe en una toma de corriente que esté conectada a tierra
correctamente. Si la toma eléctrica a la que debe conectarse el aparato no es apropiada para
el enchufe, reemplace el enchufe, en lugar de usar un adaptador o similar, ya que podrían
causar sobrecalentamiento y quemaduras.

Abastecimiento de agua y drenaje
Conexión de agua fría
Conecte la manguera de suministro de
agua fría a un conector roscado de 3/4
(pulgadas) y asegúrese de que esté
bien sujeta en su lugar.
Si las tuberías de agua son nuevas o
no se han utilizado durante un período
prolongado de tiempo, deje correr el
agua para asegurarse de que el agua
esté limpia. Esta precaución es
necesaria para evitar el riesgo de que la
entrada de agua se bloquee y dañe el
aparato.
manguera de
suministro de
seguridad
manguera de
suministro ordinario
Acerca de la manguera de suministro de seguridad
La manguera de suministro de seguridad consiste en las paredes dobles. El
sistema de la manguera garantiza su intervención bloqueando el flujo de agua en
caso de que se rompa la manguera de suministro y cuando el espacio de aire
entre la manguera de suministro y la manguera corrugada exterior esté lleno de
agua.
Cómo conectar la manguera de suministro de seguridad
1. Tire de las mangueras de suministro de seguridad completamente fuera del
compartimiento de almacenamiento ubicado en la parte posterior del lavavajillas.
2. Ajuste los tornillos de la manguera de suministro de seguridad al grifo con
rosca de 3/4 pulg.
3. Encienda completamente el agua antes de encender el lavavajillas.
ADVERTENCIA
Una manguera que se conecta al fregadero puede explotar si está instalada
en la misma línea de agua que el lavavajillas. Si su fregadero tiene uno, se
recomienda desconectar la manguera y tapar el orificio.
Cómo desconectar la manguera de suministro de seguridad
1. Apaga el agua.
2. Desenrosque la manguera de suministro de seguridad del grifo.
18

Conexión de las mangueras de drenaje
Fije con seguridad la manguera de drenaje en la posición A o en la posición B
B
A
MAX 1000mm
Encimera
Manguera
de drenaje
Inserta la manguera de drenaje en un tubo de drenaje con un diámetro mínimo de
4 cm o déjalo entrar al fregadero, asegurándote de evitar doblarlo o engarzarlo.
La altura del tubo de drenaje debe ser inferior a 1000 mm. El extremo libre de la
manguera no debe sumergirse en agua para evitar el retroceso del mismo.
Cómo drenar el exceso de agua de las mangueras
Si el fregadero está 1000 más alto desde el suelo, el exceso de agua en las
mangueras no se puede drenar directamente en el fregadero. Será necesario
drenar el exceso de agua de las mangueras en un recipiente o recipiente
adecuado que se mantenga afuera y más bajo que el fregadero.
Salida de agua
Conecte la manguera de drenaje de agua. La manguera de drenaje debe estar
correctamente instalada para evitar fugas de agua. Asegúrese de que la
manguera de drenaje de agua no esté doblada ni aplastada.
Manguera de extensión
Si necesita una extensión de manguera de drenaje, asegúrese de usar una
manguera de drenaje similar.
No debe superar los 4 metros; de lo contrario, el efecto de limpieza del lavavajillas
podría ser reducido
Conexión de sifón
La conexión de desechos debe estar a una altura inferior a 100 cm (máximo)
desde el fondo del plato. La manguera de drenaje de agua debe ser fija.
19
Parte posterior del lavavajillas
Entrada de agua
Tubo de desagüe
Cable de red

Coloque el dispositivo
Coloque el aparato en la ubicación deseada. La parte posterior debe descansar
contra la pared detrás de ella y los lados, a lo largo de los gabinetes o paredes
adyacentes. El lavavajillas está equipado con un suministro de agua y
mangueras de drenaje que se pueden colocar a la derecha o a la izquierda para
facilitar la instalación.
20
Paso 1. Seleccionar la mejor ubicación para el lavavajillas
La posición de instalación del lavavajillas debe estar cerca de las mangueras de entrada y
drenaje existentes y del cable de alimentación.
Ilustraciones de las dimensiones del mueble y la posición de instalación del lavavajillas.La
posición de instalación del lavavajillas debe estar cerca de las mangueras de entrada y drenaje
existentes y del cable de alimentación.
Ilustraciones de las dimensiones del mueble y la posición de instalación del lavavajillas.
1. Menos de 5 mm entre la parte superior del lavavajillas y el gabinete y la puerta
exterior alineada al mueble.
90 ° 90 °
580mm580mm
820mm820mm
100100
600 mm(for 60cm model)
450 mm(for 45cm model)
8080
Instalación incorporada (para el modelo integrado)

Paso 2. Dimensiones e instalación del panel estético
2. Si el lavavajillas está atascado en la esquina del
la puerta. GabineteLavavajillas
puerta del
lavavajillas
of 50mm
NOTA:
Dependiendo de dónde se encuentre su toma de corriente, es posible que
tenga que hacer un agujero en el lado opuesto del armario.
21
El panel de madera estético podría procesarse de acuerdo con el panel de
madera estético podría ser procesado de acuerdo con los dibujos de
instalación. Dibujos de instalación.
A
pegamento
pegamento
Modelo semi integrado
El pasador mágico A y el pasador mágico B se dislocan, el pasador mágico A en
el panel de madera estético y el pasador mágico afieltrado B de la puerta
exterior del lavavajillas (consulte la figura A). Después de colocar el panel, fije el
panel a la puerta exterior mediante tornillos y pernos (consulte la figura B).
B
2. Aprieta los cuatro tornillos largos
1.Tome los cuatro tornillos cortos
, debe haber algo de espacio cuando se abra
mueble

Paso 3. Ajuste de tensión del resorte de la puerta
1. Los resortes de la puerta se ajustan en la
fábrica a la tensión adecuada para la puerta
exterior. Si tiene instalado un panel de
madera estético, deberá ajustar la tensión
del resorte de la puerta. Gire el tornillo de
ajuste para mover el ajustador y tensar o
relajar el cable de acero.
2. La tensión del resorte de la puerta es
correcta cuando la puerta permanece
horizontal en la posición completamente
abierta, pero se eleva hasta el final con un
ligero movimiento de un dedo.
B
2. Aprieta los cuatro tornillos largos
A1.Tome los cuatro tornillos cortos
Modelo totalmente integrado
Instale el gancho en el panel de madera estético y coloque el gancho en la
ranura de la puerta exterior del lavavajillas (vea la figura A). Después de colocar
el panel, fije el panel a la puerta exterior mediante tornillos y pernos (consulte la
figura B).
22

Paso 4. Pasos de instalación del lavaplatos
1. Fije la banda de condensación debajo de la superficie de trabajo del armario.
Asegúrese de que la banda de condensación esté alineada con el borde de la
superficie de trabajo. (Paso 2)
2. Conecte la manguera de entrada al suministro de agua fría.
3. Conecte la manguera de drenaje.
4. Conecte el cable de alimentación.
5. Coloque el lavavajillas en su lugar. (Etapa 4)
6. Nivele el lavavajillas. La comida trasera se puede ajustar desde la parte frontal
del lavavajillas girando el tornillo Philips en el medio de la base del lavavajillas con
un tornillo Philips. Para ajustar las patas delanteras, use un destornillador plano y
gire las patas delanteras hasta que el lavavajillas esté nivelado. (Paso 5 al paso 6)
7. Instale la puerta del mueble en la puerta exterior del lavavajillas. (Paso 7 al paso
10)
8. Ajuste la tensión de los resortes de las puertas con una llave Allen que gira en el
sentido de las agujas del reloj para apretar los resortes izquierdo y derecho de la
puerta. De lo contrario, podría dañar su lavavajillas. (Paso 11)
9. El lavavajillas debe estar asegurado en su lugar. Hay dos maneras de hacer esto:
A. Superficie de trabajo normal: coloque el gancho de instalación en la ranura del
plano lateral y fíjelo a la superficie de trabajo con los tornillos para madera.
B. Parte superior de trabajo de mármol o granito: Fije el lado con Tornillo.
A
B
23
Consulte los pasos de instalación especificados en la instalación.

UP
DOWN
Nivel de verificación
desde el frente hacia atras
Nivel de verificación
un lado a otro
Paso 5. Nivelación del lavavajillas
El lavaplatos debe estar nivelado para el correcto funcionamiento del estante para
platos y el rendimiento del lavado.
Coloque un nivel de burbuja en la puerta y en el riel dentro de la bañera como
se muestra para verificar que el lavavajillas esté nivelado.
Nivele el lavavajillas ajustando las tres patas niveladoras individualmente.
Cuando nivele el lavavajillas, preste atención para no dejar que el lavavajillas se
vuelque.
1.
2.
3.
NOTA:
La altura máxima de ajuste de los pies es de 50 mm.
24

25
CONSEJOS PARA SOLUCIONAR
PROBLEMAS
Antes de llamar al servicio técnico
Revisar los cuadros en las páginas siguientes puede evitarle llamar para obtener servicio.
Problema Causa posible Qué hacer?
El lavavajillas no
se inicia
Fusible quemado, o
cortocircuito
Reemplace el fusible o reinicie el
disyuntor. Retire cualquier otro
electrodoméstico que comparta el mismo
circuito con el lavavajillas.
La fuente de
alimentación no
está encendida.
Asegúrese de que el lavavajillas esté
encendido y que la puerta esté bien
cerrada. Asegúrese de que el cable de
alimentación esté enchufado correctamente
en la toma de corriente.
Verifique que el suministro de agua
esté conectado correctamente y que el
agua esté encendida.
La puerta del lavavajillas
no está bien cerrada.
Asegúrese de cerrar la puerta
correctamente y engancharla.
Agua no
bombeada desde
el lavavajillas
Manguera de drenaje
retorcida o atrapada.
Filtro obstruido
Fregadero de
cocina atascado.
Verifique la manguera de drenaje.
Compruebe el filtro grueso.
Verifique el fregadero de la cocina para
asegurarse de que esté drenando bien.
Si el problema es que el fregadero de la
cocina no está drenando, es posible que
necesite un plomero en lugar de un
técnico para lavaplatos.
Pompas de jabón Detergente incorrecto
La presión del agua
es baja
Use solo el detergente especial para
lavavajillas para evitar espuma. Si esto
ocurre, abra el lavavajillas y permita que
la espuma se evapore. Agregue 1 galón
de agua fría al fondo del lavavajillas.
Cierre la puerta del lavavajillas, luego
seleccione cualquier ciclo. Inicialmente, el
lavavajillas drenará el agua. Abra la
puerta después de que la etapa de
drenaje esté completa y verifique si la
espuma ha desaparecido. Repita si es
necesario.

26
Ayuda de enjuague
derramada.
Limpie siempre los derrames de
abrillantador inmediatamente.
Interior manchado Se puede haber
usado detergente
con colorante.
Asegúrese de que el detergente no
tenga colorante.
Película blanca en
la superficie interior
Minerales de agua
dura
Para limpiar el interior, use una
esponja húmeda con detergente para
lavavajillas y use guantes de goma.
Nunca use ningún otro limpiador que
no sea detergente para lavavajillas,
de lo contrario, puede causar espuma
o espuma.
Hay manchas de
óxido en los
cubiertos
Los artículos afectados
no son resistentes a la
corrosión.
No se ejecutó un
programa después de
agregar la sal de
lavavajillas. Los
rastros de sal han
entrado en el ciclo de
lavado.
Siempre ejecute un programa de
lavado sin vajilla después de
agregar sal. No seleccione la
función Turbo (si está presente).
La tapa está
suelta.
Verifique que la tapa del
descalcificador esté segura.
Problema Causa posible Qué hacer?
Evite lavar artículos que no sean
resistentes a la corrosión en el
lavavajillas.
Ruido de algo
golpeando en el
lavavajillas
Un brazo rociador está
golpeando contra un
artículo en una cesta
Interrumpa el programa y
reorganice los elementos que
obstruyen el brazo rociador.
Ruido en el
lavavajillas
Los artículos de vajilla
están sueltos en el
lavavajillas.
Interrumpa el programa y
reorganice los elementos de
la vajilla.
Ruido de algo
golpeando en
las tuberías de
agua
Esto puede ser causado
por la instalación en el
sitio o por la sección
transversal de la tubería.
Esto no tiene influencia en la
función del lavavajillas. En
caso de duda, contacte a un
plomero calificado.
Los platos no
están limpios
Los platos no se
cargaron correctamente.
Vea las notas en "Carga y
descarga de su lavavajillas".
El programa no fue lo
suficientemente eficaz.
Seleccione un programa más intensivo.

27
No se dispensó
suficiente detergente.
Use más detergente o
cambie su detergente.
Los artículos están
bloqueando el
movimiento de los
brazos rociadores.
Reorganice los elementos para que
la pulverización pueda girar
libremente.
La combinación del filtro
no está limpio o no está
correctamente colocado en
la base del gabinete de
lavado. Esto puede causar
que los chorros del brazo
rociador se bloqueen.
Limpie y / o ajuste el filtro
correctamente. Limpie los
chorros del brazo rociador.
Nubosidad en
cristalería.
Combinación de
agua blanda y
demasiado
detergente.
Use menos detergente si tiene
agua blanda y seleccione un
ciclo más corto para lavar el
material de vidrio y limpiarlo.
Problema Causa posible Qué hacer?
Aparecen manchas
blancas en platos y
vasos.
Agregue más detergente.
Marcas negras o
grises en los platos
Utensilios de aluminio
se han frotado contra
los platos
Use un limpiador abrasivo
suave para eliminar esas
marcas.
El área de agua dura
puede causar
depósitos de cal.
Carga incorrecta Cargue el lavavajillas como se
sugiere en las instrucciones.
Los platos se
eliminan
demasiado pronto
No vacíe su lavavajillas
inmediatamente después del lavado.
Abra la puerta ligeramente para que
salga el vapor. Saque los platos hasta
que la temperatura interior sea segura
para tocar. Descargue primero la
cesta inferior para evitar que caiga
agua de la cesta superior.
El detergente se dejó
en el dispensador
Los platos bloquean el
dispensador de detergente
Recargar los platos adecuadamente
Los platos no
están limpios
Los platos no
están limpios

Problema
El programa
equivocado ha sido
seleccionado.
Con un programa corto, la
temperatura de lavado es menor,
disminuyendo el rendimiento de
limpieza. Elija un programa con un
largo tiempo de lavado.
Uso de cubiertos
con un
recubrimiento de
baja calidad.
El drenaje de agua es más difícil con
estos artículos. Cubiertos o platos de
este tipo no son adecuados para lavar
en el lavavajillas.
Posible causa Qué hacer?
28
Los platos no
están limpios
ADVERTENCIA
La reparación por sí mismo o la reparación no profesional posiblemente
causarán riesgos graves a la seguridad del usuario del aparato y afectará
la garantía.
Disponibilidad de Piezas de Repuestos
Siete años después del lanzamiento de última unidad del modelo en mercado:
Motor, bomba de circulación y drenaje, calentadores y elementos de calefacción,
incluyendo bombas de calefacción (las de separado o las adjuntadas), tuberías y
equipos relacionados que incluyen todas las mangueras, válvulas, filtros y topes
de agua, piezas estructurales e interiores relacionadas con ensamblajes de puerta
(las de separado o las adjuntadas), tablero de circuito impreso, pantallas electrónicas,
interruptores de presión, termostatos y sensores, software y firmware incluyendo
software de reinicio.
Diez años después del lanzamiento de última unidad del modelo en mercado:
Bisagra y sellos de puerta, otros sellos, brazos rociadores, rejillas interiores y
periféricos de plástico como cestas y tapas.

29
1. cesta superior:
CARGANDO CESTOS DE
ACUERDO CON
2. Cesta inferior:
EN60436:
Cargar el lavavajillas a su máxima capacidad contribuirá al ahorro de energía y agua.
33
33
44
55
55
22
33
33
22
11
11
66
66
7788
99
1212
1313
66
6666
1010 991111
1
2
3
4
5
Artículo
Number
6
7
8
9
10
11
12
13
Artículo
Number
Platos
Platos de postre
Platos llanos
Platos hondos
Platos de postres de melamina
Cuencas de melamina
Fuente oval
Ollas
Tazas
Cuencos
Vasos
Cuencas de cristal
Cuencas de postre

30
13
26
4
4
457
8
1
2
3
4
5
6
7
8
Cuchara de sopa
Tenedor
Cochillo
Cuchara de café
Cuchara de postre
Cuchara de servir
Tenedor de servir
Cuchara de salsa
Número
Información para pruebas de
comparabilidad según EN 60436
Capacidad: 10 ajustes de posición
Posición superior de la cesta: posición
inferior Programa: ECO Configuración
del abrillantador:
suavizante: H3
Max
3. Tercera bandeja:
Artículo
5
1
4
77
33
88
66
22
33
4

Guarde este manual para consultas futuras.
Lea este manual cuidadosamente
antes de usar el lavavajillas y
Lavavajillas
Manual de Instrucciones
PARTE II: Versión Especial
AJI104500ED

CONTENIDOS
CÓDIGOS DE ERROR
PROGRAMACIÓN DEL LAVAVAJILLAS
Cuadro del Ciclo de Lavado
Inicio de un ciclo de lavado
Cambio de programa a medio ciclo
¿Olvidó agregar un plato?
USO DEL LAVAVAJILLAS
Panel de control
Ablandador de agua
Preparación y carga de los platos
Función del abrillantador y el detergente
Llenado del contenedor de abrillantador
Llenado del dispensador de detergente
4
4
6
12
7
10
11
13
13
14
14
15
INFORMACIÓN TÉCNICA
17
16
AVISO:
Si no puede resolver el problema solo, pida ayuda a un técnico
profesional.
El fabricante, siguiendo las políticas de constante desarrollo y actualización del
producto, puede hacer modificaciones sin previo aviso.
Si se pierde o está desactualizado, puede recibir de su fabricante o vendedor
responsable un nuevo manual de usuario.

5
GUÍA RÁPIDA PARA USUARIOS
2 3 Carga de las cestas
4Llenado del dispensador
3
1Instalación del lavavajillas
Lea en el manual de Instrucciones el contenido correspondiente al método
de funcionamiento detallado.
(Revise la sección 5 “INSTRUCCIONES DE INSTALACIÓN”
de la PARTE I: Versión genérica.)
Remoción de residuos más grandes
en la cubertería.
Exterior
Interior
Selección de un programa y
funcionamiento del lavavajillas

4
USO DEL LAVAVAJILLAS
Panel de control
Operación (Botón)
Potencia
Demora
Programa
Presione este botón para encender el lavavajillas, la pantalla se
ilumina.
1
4
2
3
Seleccione el programa de lavado adecuado y se encenderá el
indicador correspondiente.
Pulse este botón para configurar las horas de demora para el
lavado. Puede demorar el inicio del lavado hasta 24 horas. Si
pulsa una vez este botón demora el inicio del lavado una hora.
Para pequeñas cargas puede utilizar solamente el cesto superior
o inferior para ahorrar energía. Cada vez que pulsa el botón Half
Load, se alterna entre la cesta superior y la inferior solamente.
2
1 7 34 6
Media
carga
5

5
5
6
Pantalla Para mostrar el tiempo restante, tiempo de demora,
código de error, etc.
7
Abrillantador
Sal
Indicador
de
programa
Indicador
de
advertencia
ECO
Este es el programa normal adecuado para cargas
normalmente sucias, como por ejemplo recipientes,
platos, vasos y cacerolas ligeramente sucias.
Vidrio
Para cubertería y vasos ligeramente sucios.
90 minutos
Para cargas normalmente sucias que necesitan un lavado
rápido.
Rápido
Un lavado más breve para una carga ligeramente
sucia que no necesita secado.
Remojo
Para enjuagar la vajilla que planea lavar más
tarde ese día.
Si el indicador “ ” está encendido, significa que el nivel de
abrillantador es bajo y debe volver a llenarse.
Si el indicador “ ” está encendido, significa que el nivel de
sal en el lavavajillas es bajo y debe volver a llenarse.
Intensivo
Los elementos muy sucios incluyen cacerolas y
sartenes. Con comida seca.
Universal
Para utensilios habituales, como ollas, platos, vasos y
sartenes ligeramente sucias
Pantalla

Ablandador de agua
El ablandador de agua debe configurarse manualmente con el selector de dureza
de agua.
Cuantos más minerales contenga, más dura será el agua.
El ablandador debe regularse según la dureza del agua en su área.
Su Servicio de Aguas local le puede aconsejar sobre la dureza de la misma
en su área.
Ajuste del consumo de sal
según su entorno local, éstas cambiarán en la siguiente secuencia:
H1->H2->H3->H4->H5->H6;
Siga los pasos a continuación para ajustar el consumo de sal.
6
El ablandador de agua está diseñado para remover minerales y sales de la misma,
los que tendrían un efecto adverso o en detrimento en el funcionamiento del
electrodoméstico.
El lavavajillas permite ajustar la cantidad de sal consumida según la dureza del agua
usada. Tiene la finalidad de optimizar y personalizar el nivel de consumo de agua.
1. Encienda el electrodoméstico;
2. Pulse el botón Program por más de 5 segundos para iniciar el modelo de
configuración del ablandador de agua dentro de 60 segundos después de que el
electrodoméstico fuera encendido;
3. Pulse el botón Program para seleccionar la configuración adecuada
4. Pulse el botón On/Off para finalizar el modelo de configuración.
DUREZA DEL AGUA
Nivel de
ablandador de
agua
de sal
(gramo/ciclo)
Alemán
°dH
Francés
°fH
Británico
°Clarke Mmol/l
0 - 5 0 - 9 0 - 6 0 - 0,94 H1 0
6 - 11 10 - 20 7 - 14 1,0 - 2,0 H2 9
12 - 17 21 - 30 15 - 21 2,1 - 3,0 H3 12
18 - 22 31 - 40 22 - 28 3,1 - 4,0 H4 20
23 - 34 41 - 60 29 - 42 4,1 - 6,0 H5 30
35 - 55 61 - 98 43 - 69 6,1 - 9,8 H6 60
1°dH=1,25 °Clarke=1,78 °fH=0,178mmol/l
Consumo
10
5
3
2
1
Aparecer regeneración
en secuencia de cada
X programas
Sin regeneración
Ajuste de fábrica: H3
1) Cada ciclo con operación de regeneración adicionalmente consumirá 2,0
litros de agua, el consumo de energía incrementa en 0,02kWh y el programa
se extenderá en 4 minutos.

Si su modelo no posee ablandador de agua, puede omitir esta sección.
Ablandador de agua
Preparación y carga de los platos
Considere comprar utensilios que estén identificados como aptos para
lavavajillas.
Para elementos especiales, seleccionar un programa con la temperatura
más baja posible.
Cubertería con mangos de madera, de asta, de porcelana o de nácar
Artículos de plástico que no son resistentes al calor
Cubertería antigua con piezas pegadas que no son resistentes a la temperatura
Artículos de menaje revestidos o vajilla
Artículos de peltre o cobre
Copas de cristal
Los artículos de acero están supeditados a la oxidación
Bandejas de madera
Los elementos hechos de fibras sintéticas
Algunos tipos de copas pueden perder brillo después de muchos lavados
Las partes de plata y aluminio tienen la tendencia a decolorarse durante el lavado
Los patrones vidriados pueden desvanecerse si se lavan con frecuencia
Para lavar los siguientes cubiertos/platos
No son convenientes
Son de conveniencia limitada
7
Revise la sección 3 “Carga de sal en el ablandador” de la PARTE I:
Versión genérica, si su lavavajillas carece de sal.
AVISO:
La dureza del agua varía de lugar en lugar. Si en el lavavajillas se usa agua
dura, se formarán depósitos en la vajilla y utensilios.
Este electrodoméstico está equipado con un suavizante especial que utiliza
un contenedor de sal especialmente diseñado para eliminar cal y minerales
del agua.
Para evitar daños, no saque las copas y cubiertos del lavavajillas hasta
que el programa terminó.

Los elementos como tazas, copas, ollas/sartenes, etc. deben mirar hacia abajo.
Todos los utensilios deben estar apilados de forma segura para no caerse.
Los platos y los cubiertos no deben estar unos dentro de otros, o cubriéndolos.
Para evitar daños, las copas no se deben tocar una con otras.
¡Los cuchillos largos colocados hacia arriba son un peligro potencial!
Para evitar que el agua gotee desde la cesta superior a la inferior,
recomendamos vaciar la cesta inferior. primero, seguido por la cesta superior.
Retire la vajilla
8
Recomendaciones para cargar el lavavajillas
Para un mejor desempeño del lavavajillas, siga esta guía de carga.
Coloque los objetos en el lavavajillas de la siguiente manera:
Quite las grandes cantidades de restos de comida. Ablande los remanentes de
comida quemada de las cacerolas. No es necesario que enjuague los platos en
agua corriente.
(Las características y apariencia de las cestas y canastas de cubertería
pueden variar según el modelo.)
Los elementos curvos o con recovecos deben cargarse de manera inclinada para
que el agua se deslice.
Ubique todos los utensilios de manera que los brazos de aspersión puedan
rotar libremente durante el lavado.
Cargue las piezas huecas tales como tazas, copas, sartenes, etc. con la
abertura hacia abajo para que no acumule agua en su contenedor o en la base
profunda.
La cesta superior está diseñada para contener la vajilla más delicada y liviana,
como por ejemplo copas y tazas de café y té.
Los cubiertos largos y/o filosos como por ejemplo los cuchillos de trinchar se
deben colocar horizontalmente en la cesta superior.
Por favor, no sobrecargue el lavavajillas. Esto es importante para lograr un buen
resultado y para un consumo de energía razonable.
AVISO:
Los elementos muy pequeños no deben lavarse en el lavavajillas ya que podrían
caerse fácilmente de la cesta.
ADVERTENCIA
¡Los elementos se van a calentar! Para evitar daños, no saque
del lavavajillas copas y cubiertos hasta 15 minutos después
que el programa terminó.

9
Carga de la cesta superior
La cesta superior esta diseñada para contener la vajilla
más delicada y liviana, como por ejemplo copas, tazas
de café y té y platillos así como también platos,
pequeños cuencos y cacerolas poco profundas (siempre
y cuando no estén demasiado sucias). Ubique los platos
y batería de cocina de manera tal que el aspersor de
agua no los mueva.
Carga de la cesta inferior
Sugerimos que ubique los elementos más grandes y más
difíciles de limpiar en la cesta inferior: como por ejemplo
ollas, sartenes, tapas, fuentes y cuencos, como vemos en
la siguiente figura. Es preferible ubicar las fuentes y tapas
a los lados del canasto para evitar que bloquee la rotación
del brazo de aspersión.
El diámetro máximo aconsejado para los platos en frente
del dispensador de detergente es de 19 cm, para no
dificultar su apertura.
Carga en el cesto de cubertería
Los cubiertos se deben colocar en la rejilla especial para ellos, separados de todo lo
demás y en la posición apropiada. Asegúrese que los utensilios no se mezclen ya
que podrían provocar un mal desempeño.
ADVERTENCIA
No permita que ningún elemento
sobrepase la base.
¡Cargue siempre los utensilios
filosos con el filo hacia abajo!
Para un mejor efecto de lavado, cargue las cestas como indican las
opciones de carga estándar en la última sección de la PARTE I:
Versión genérica

ADVERTENCIA
Esto podría dañar el electrodoméstico.
Función del abrillantador y el detergente
Función del detergente
ADVERTENCIA
Uso adecuado del detergente
10
El abrillantador se libera durante el enjuague final para evitar que el agua forme gotas
sobre la vajilla, las que pueden dejar manchas o rayas. También mejora el secado al
permitir que el agua resbale de los platos. El lavavajillas está diseñado para que use
abrillantador líquido.
Solo utilice una marca de abrillantador para lavavajillas. Nunca llene el
dispensador del lavavajillas con otra substancia (p. ej. Producto de limpieza
de lavavajilla, detergente líquido).
Los ingredientes químicos que componen el detergente son necesarios para remover,
triturar y dispensar toda la suciedad del lavavajillas. La mayoría de los detergentes de
calidad comercial son adecuados para este propósito.
Use solamente el detergente especialmente hecho para usar en lavavajillas.
Guarde el detergente en un lugar fresco y seco.
No coloque detergente en polvo en el dispensador hasta que esté listo para
lavar los platos.
¡El detergente para lavavajillas es corrosivo! Mantenga el
detergente para lavavajillas fuera del alcance de los niños.
Cuándo rellenar el abrillantador
La regularidad en la necesidad de rellenar el dispensador depende de cuán a menudo
se lava la vajilla y del ajuste de uso del abrillantador.
El indicador Nivel Bajo Abrillantador ( ) se encenderá cuando se necesite más
abrillantador.
No llene demasiado el dispensador de abrillantador.

11
Llenado del contenedor de abrillantador
1.
2.
3.
4.
Ajuste del depósito para el abrillantador
Para lograr un mejor rendimiento en el secado con menos abrillantador, el lavavajillas
se ha diseñado para que el usuario ajuste su consumo. Siga los pasos a continuación.
Encienda el electrodoméstico.
Dentro de los 60 segundos después del paso 1, presione el botón Start/Pause por
más de 5 segundos, y luego presione el botón Delay “+” para ingresar el modelo de
ajuste, el indicador del abrillantador parpadea a una frecuencia de 1Hz.
Presione el botón Start/Pause para seleccionar el ajuste apropiado de acuerdo con
sus hábitos de uso, los ajustes cambiarán siguiendo la secuencia:
D1->D2->D3->D4->D5->D1.
Cuanto mayor sea el número, más abrillantador usa el lavavajillas.
Al dejar de usar por 5 segundos o al presionar el botón Power se sale del modelo
de ajuste, el ajuste se completa.
3
1
2
Remueva la tapa del tanque de
abrillantador levantando la manija.
Vierta el abrillantador en el dispensa-
dor, tenga cuidado de no rebalse.
Cierre la puerta después.

12
A
B
Llenado del dispensador de detergente
1.
2.
2
1Por favor, escoja una forma para
abrir de acuerdo con la situación real.
Agregue detergente en la cavidad
más grande (A) para el ciclo de
lavado principal. Para un mejor
resultado de limpieza, especialmente
si tiene artículos muy sucios, vierta
una pequeña cantidad de
detergente en la puerta. El
detergente adicional se activará
durante la fase de pre-lavado.
3Cierre la tapa deslizándola al
frente y luego presiónela.
B
AVISO:
Tenga en cuenta que, dependiendo de la suciedad del agua, la configuración
puede ser diferente.
Observe las recomendaciones del fabricante en el paquete de detergente.
Abra la tapa deslizando el
dispositivo de cierre.
Abra la tapa presionando el
botón de cierre.
AA
1
2
Deslice a la derecha
Presione

13
PROGRAMACIÓN DEL LAVAVAJILLAS
Cuadro del Ciclo de Lavado
( ) Significa: necesita colocar abrillantador en el dispensador.
Enjuague
Enjuague
Secado
Lavado(45°C)
Secado
Prelavado
Enjuague
Secado
120 0,783 13,1
(1/2 pieza)
175
235 0,755 9,0
Pro-
grama
Energía
(kWh)
Agua
(L)
Descripción del
Ciclo
Detergente
Pre/Principal
Tiempo de
funciona-
miento
(min)
Abrillan-
tador
1,012 13,1
205 1,378 15,3
El cuadro siguiente muestra los mejores programas para los niveles de residuos de
comida y cuanto detergente se necesita. También muestra diversa información
sobre los programas.
Intensivo
Vidrio
Lavado (65)
Pre-lavado (50)
Enjuague (60)
Pre-lavado (45°C)
Lavado (55 )
Enjuague
Enjuague (65)
Secado
Enjuague
Enjuague (60)
Lavado (50)
Enjuague (65)
(*EN 60436)
Universal
(1/2 pieza)
4/14g
(1/2 pieza)
4/14g
18g
4/14g
Prelavado
30 0,539
15
Enjuague
Secado
90 1,093 10,2
(1 pieza)
12g
90 minutos
Rápido
Remojado
Lavado (60)
Enjuague (65)
Lavado
Enjuague (45)
18g
10,0
3,6
Lavado (50)
0,02

14
Inicio de un ciclo de lavado
1. Extraiga la cesta inferior y superior, cargue la vajilla y vuelva a introducirlos.
Se recomienda cargar la cesta inferior primero y luego la superior.
2. Vierta el detergente.
3. Inserte el enchufe en el tomacorriente. Se hace referencia a la provisión de energía
en la última página “Ficha del producto”. Asegúrese de que el suministro de agua
esté abierto a presión máxima.
4. Abra la puerta, presione el botón de encendido.
5. Seleccione un programa, la luz indicadora se encenderá. Luego cierre la
puerta, el lavavajillas iniciará su ciclo.
NOTA:
ECO (*EN60436): El programa ECO es aplicable para limpiar la vajilla sólida, que
para este uso, es el programa más eficiente en materia del consumo combinado
de energía y agua, y se lo utiliza para evaluar el performance con legislación de
diseño ecológico de EU.
1. El pre-enjuague de los artículos de vajilla causará un consumo aumentado
de agua y energía, y no se lo recomienda.
2. Lavar la vajilla en el lavaplatos doméstico normalmente consumirá energía
y agua menores en la fase de uso que el lavado con mano si utiliza el lavaplatos
doméstico de acuerdo con las instrucciones.
1. Abra ligeramente la puerta para detener el lavavajillas, después de que el brazo
de aspersión deje de funcionar, puede abrir la puerta completamente.
2. Presione el botón Program más de tres segundos y la máquina quedará en
estado de espera.
3. Puede cambiar el programa a la configuración de ciclo deseado.
3 segundos
Cambio de programa a medio ciclo
El ciclo de lavado puede cambiarse solo si estuvo funcionando por un tiempo, de otro
modo, ya se puede haber liberado el detergente y el lavavajillas puede haber drenado
el agua de lavado. Si este es el caso, el lavavajillas necesita volver a configurarse y
tiene que volver a llenar el dispensador de detergente. Para configurar el lavavajillas,
siga las siguientes instrucciones:
Ahorro de Energía
ECO

15
¿Olvidó agregar un plato?
La vajilla olvidada se puede agregar en cualquier momento antes de que se abra el
dispensador de detergente. Si este es el caso, siga las Instrucciones a continuación:
1. Abra ligeramente la puerta para detener el lavado.
2. Después que los brazos de aspersión dejan de trabajar, puede abrir la
puerta completamente.
3. Agregue la vajilla que se ha olvidado.
4. Cierre la puerta.
5. El lavavajillas comenzará a funcionar nuevamente.
ADVERTENCIA
Es peligroso abrir la puerta a
mitad del ciclo ya que podría
quemarse con vapor caliente.

16
CÓDIGOS DE ERROR
Si hay algún malfuncionamiento, el lavavajillas mostrará códigos de error para
identificarlos:
Códigos Significados Posibles Causas
Mayor tiempo de
entrada.
Desbordamiento.
Malfuncionamiento de elemento de
calentamiento.
Algún elemento de lavavajillas
tiene pérdidas.
E1
E3
E4
No alcanza la
temperatura requerida.
Los grifos no están abiertos, el ingreso
de agua es limitado o la presión del agua
es demasiado baja.
Ed
Falle en la orientacion
de la valvula de distribución Circuito abierto o rotura de
la valvula de distribución.
ADVERTENCIA
¤Si se produce un desbordamiento, cerrar el suministro principal de agua y
llame al servicio de mantenimiento.
¤Si hay agua en la fuente de la base por rebalsar o alguna pérdida de agua,
ésta debe extraerse antes de reiniciar el lavavajillas.
Si hay una falla, el lavavajillas mostrará un código de error. La
tabla muestra posibles códigos de error y sus causas.
¤siguiente

17
815mm
448mm
550 mm (con la puerta cerrada)
1150 mm (con la puerta abierta 90°)
W
D1
Alt
D2
INFORMACIÓN TÉCNICA
Altura (Alt.)
Anchura (Anch.)
Profundidad (Pro.1)
Profundidad (Pro.2)

18
Proveedor:
Modelo:
Ficha de producto:
Parametro Parameter
dimensiones en cm
EEI ( )
Índice de rendimiento de limpieza (a)
Consumo de energía en kWh
[por ciclo], basado en el
programa eco usando llenado
de agua fría. El consumo de
energía real dependerá de
cómo se utilice el aparato.
Duración del programa (a) (h: min)
Emisiones de ruido acústico
aéreo (a) (dB (A) re 1 pW)
modo apagado (w)
Inicio diferido (W) (si corresponde)
Duración mínima de la garantía ofrecida por el proveedor (b):
Capacidad nominal (a) (ps)
aclase de eficiencia energética
Índice de rendimiento de secado (a)
Consumo de agua en litros
[por ciclo], basado en el
programa eco. El consumo
real de agua dependerá de
cómo se utilice el aparato y
de la dureza del agua.
tipo
Airborne acoustical noise
emission class ( )
Modo de espera (W)
networked standby (W)
(si corresponde)
a
Informacion adicional
(a) para el programa eco.
(b) los cambios en estos elementos no se considerarán relevantes a los efectos del párrafo 4 del
Artículo 4 del Reglamento (UE) 2017/1369.
(c) si la base de datos de productos genera automáticamente el contenido definitivo de esta
celda, el proveedor no deberá ingresar estos datos.
(1)Reglamento (UE) 2019/2022 de la Comisión, de 1 de octubre de 2019, por el que se establecen
requisitos de diseño ecológico para lavavajillas domésticos de conformidad con la Directiva 2009/125 / CE
del Parlamento Europeo y del Consejo que modifica el Reglamento (CE) No. 1275/2008 de la Comisión y
deroga la Comisión. Reglamento (UE) No. 1016/2010 (véase la página 267 de este Diario Oficial).
(EN60436)
Valor Value
alto
ancho
profundo
N/A
N/A
E ( )
c
C ( )
c
9
0 49,
1 00,
'JDIBEFQSPEVDUP
10
0,755
3:55
47
Independiente
ASPES
55,9
AJI104500ED
9,0
1,065
1,125
36 meses
Enlace web al sitio web del proveedor, donde se encuentra la información del punto 6 del anexo
II del Reglamento (UE) 2019/2022 de la Comisión (1)(b): https://eprel.ec.europa.eu
82
45
55
Dirección de Proveedor: SVAN TRADING S.L.C/ Ciudad de Cartagena, 20.Paterna (46988). SPAIN.
(EN60436)

PART Ⅰ: Generic Version
Please read this manual carefully
before using the dishwasher and
Keep this manual for future reference.
AJI104500ED

NOTE:
Reviewing the section on will help you solve some
common problems by yourself.
If you cannot solve the problems by yourself, please ask for help from a
professional technician.
The manufacturer, following a policy of constant development and updating of
the product, may make modifications without giving prior notice.
If lost or out-of-date, you can receive a new user manual from the manufacturer
or responsible vendor.
Troubleshooting Tips
SAFETY INFORMATION
3
CONTENTS
PRODUCT OVERVIEW
8
USING YOUR DISHWASHER
Loading The Salt Into The Softener
Basket Loading Tips
9
9
11
MAINTENANCE AND CLEANING
External Care
Internal Care
Caring For The Dishwasher
13
13
13
16
INSTALLATION INSTRUCTION
Power Connection
Water Supply And Drain
Connection Of Drain Hoses
Built-In Installation (for the integrated model)
Positioning The Appliance
17
17
18
19
20
TROUBLESHOOTING TIPS
25
LOADING THE BASKETS
29
20
28 Availability Of Spare Parts

SAFETY INFORMATION
WARNING
When using your dishwasher, follow the
precautions listed below:
Installation and repair can only be carried out by a
qualified technician
This appliance is intended to be used in household
and similar applications.
3
This appliance can be used by children aged from 8
years and above and persons with reduced physical,
sensory or mental capabilities or lack of experience
and knowledge if they have been given supervision or
instruction concerning use of the appliance in a safe
way and understand the hazards involved.
Children shall not play with the appliance. Cleaning
and user maintenance shall not be done by children
without supervision. (For EN60335-1)
This appliance is not intended for use by persons
(including children) with reduced physical, sensory or
mental capabilities, or lack of experience and
knowledge, unless they have been given supervision
or instruction concerning use of the appliance by a
person responsible for their safety. (For IEC60335-1)

Packaging material could be dangerous for children!
This appliance is for indoor household use only.
To protect against the risk of electrical shock, do not
immerse the unit, cord or plug in water or other liquid.
Please unplug before cleaning and maintenance the
appliance .
Children should be supervised to ensure that they do
not play with the appliance.
Use a soft cloth moisten with mild soap,
and then use a dry cloth to wipe it again.
If the supply cord is damaged, it must be replaced by
the manufacturer or its service agent or a similarly
qualified person in order to avoid a hazard.
Earthing Instructions
4
This appliance must be earthed. In the event of a
malfunction or breakdown, earthing will reduce the
risk of an electric shock by providing a path of least
resistance of electric current. This appliance is
equipped with an earthing conductor plug.
The plug must be plugged into an appropriate
outlet that is installed and earthed in accordance
with all local codes and ordinances.
Improper connection of the equipment-earthing
conductor can result in the risk of an electric shock.
Check with a qualified electrician or service
representative if you are in doubt whether the
appliance is properly grounded.

Do not modify the plug provided with the appliance
if it does not fit the outlet.
Have a proper outlet installed by a qualified
electrician.
Do not abuse, sit on, or stand on the door or dish
rack of the dishwasher.
Do not operate your dishwasher unless all enclosure
panels are properly in place.
Open the door very carefully if the dishwasher is
operating, there is a risk of water squirting out.
Do not place any heavy objects on or stand on the
door when it is open. The appliance could tip
forward.
When loading items to be washed:
1) Locate sharp items so that they are not likely to
damage the door seal;
2) Warning: Knives and other utensils with sharp
points must be loaded in the basket with their
points facing down or placed in a horizontal
position.
Some dishwasher detergents are strongly alkaline.
They can be extremely dangerous if swallowed.
Avoid contact with the skin and eyes and keep
children away from the dishwasher when the door
is open.
Check that there are no detergent residues after
completion of the wash cycle.
Do not wash plastic items unless they are marked
“dishwasher safe” or the equivalent.
5

6
For unmarked plastic items not so marked, check the
manufacturer's recommendations.
Use only detergent and rinse agents recommended for
use in an automatic dishwasher.
Never use soap, laundry detergent, or hand washing
detergent in your dishwasher.
The door should not be left open, since this could
increase the risk of tripping.
During installation, the power supply must not be
excessively or dangerously bent or flattened.
Do not tamper with controls.
The appliance needs to be connected to the main
water valve using new hose sets. Old sets should not be
reused.
To save energy, in stand by mode, the appliance will
switch of automatically after 15 minutes without any
user interaction.
The maximum number of place settings to be washed
is 10.
The maximum permissible inlet water pressure is 1MPa.
The minimum permissible inlet water pressure is
0.04MPa.

Disposal
For disposing of package and the
appliance please go to a recycling center.
Therefore cut off the power supply cable
and make the door closing device
unusable.
Cardboard packaging is manufactured from recycled
paper and should be disposed in the waste paper
collection for recycling.
By ensuring this product is disposed of correctly, you
will help prevent potential negative consequences
for the environment and human health, which could
otherwise be caused by inappropriate waste
handling of this product.
For more detailed information about recycling of this
product, please contact your local city office and
your household waste disposal service.
DISPOSAL: Do not dispose this product as
unsorted municipal waste. Collection of such
waste separately for special treatment is
necessary.
7

PRODUCT OVERVIEW
To get the best performance from your dishwasher, read all operating instructions
before using it for the first time.
Top spray arm
Dispenser
Salt container Filter assembly
Lower spray arm
Inner pipe
IMPORTANT:
8
Pictures are only for reference, different models may be different.
NOTE:
Cutlery rack Lower basket
Upper basket
Cup rack
Upper spray arm

Loading The Salt Into The Softener
Only use salt specifically designed for dishwashers use!
Every other type of salt not specifically designed for dishwasher use,
especially table salt, will damage the water softener. In case of damages
caused by the use of unsuitable salt the manufacturer does not give any
warranty nor is liable for any damages caused.
Only fill with salt before running a cycle.
This will prevent any grains of salt or salty water, which may have been
spilled, remaining on the bottom of the machine for any period of time,
which may cause corrosion.
WARNING
Always use salt intended for dishwasher use.
The salt container is located beneath the lower basket and should be filled as
explained in the following:
Please check the section 1 “Water Softener” of PART Ⅱ: Special Version,
If you need to set the water softener .
Please check the section 1 “Water Softener” of PART Ⅱ: Special Version,
If you need to set the water softener .
9
If your model does not have any water softener, you may skip this section.
NOTE:
USING YOUR DISHWASHER
Before using your dishwasher :
Inside Outside
1. Set the water softener
2. Loading the salt Into the softener
3. Loading the basket
4. Fill the dispenserdetergent

10
1. Remove the lower basket and unscrew the reservoir cap.
2. Place the end of the funnel (if supplied) into the hole and pour in about 1.5 kg of
dishwasher salt.
3. Fill the salt container to its maximum limit with water, It is normal for a small
amount of water to come out of the salt container.
4. After filling the container, screw back the cap tightly.
5. The salt warning light will after the salt container has been filled with salt.
6. Immediately after filling the salt into the salt container, a washing program should
be started (We suggest to use a short program). Otherwise the filter system, pump
or other important parts of the machine may be damaged by salty water. This is
out of warranty.
turn off
NOTE:
The salt container must only be refilled when the salt warning light ( ) in the
control panel comes on. Depending on how well the salt dissolves, the salt
warning light may still be on even though the salt container is filled.
If there is no salt warning light in the control panel (for some ), you can
estimate when to fill the salt into the softener by the cycles that the dishwasher
has run.
If salt has spilled, run a soak or quick program to remove it.
models
Please follow the steps below for adding dishwasher salt:

11
Adjusting the upper basket
The height of the upper basket can be easily adjusted to accommodate taller dishes
in either the upper or lower basket.
To adjust the height of the upper rack, follow these steps:
4
1Pull out the upper basket. 2Remove the upper basket.
3Re-attach the upper basket to upper
or lower rollers.
Push in the upper basket.
lower position
upper position
Type 1:
Basket TipsLoading

12
Folding back the cup shelves
To make room for taller items in the upper basket, raise the cup rack upwards.
You can then lean the tall glasses against it. You can also remove it when it is not
required for use.
Folding back the rack shelves
The spikes of the lower basket are used for holding plates and a platter.
They can be lowered to make more room for large items.
raise upwards fold backwards
1To raise the
the upper basket at the center of
each side until the basket locks into
place in the upper position. It is not
necessary to lift the adjuster handle.
upper basket just lift ,2To lower the lift the
adjust handles on each side to
release the basket and lower it to
the lower position.
upper basket,
Type 2:

13
MAINTENANCE AND CLEANING
External Care
The door and the door seal
Clean the door seals regularly with a soft damp cloth to remove food deposits.
When the dishwasher is being loaded, food and drink residues may drip onto the
sides of the dishwasher door. These surfaces are outside the wash cabinet and are not
accessed by water from the spray arms. Any deposits should be wiped off before the
door is closed.
The control panel
If cleaning is required, the control panel should be wiped with a soft damp cloth only.
To avoid penetration of water into the door lock and electrical components,
do not use a spray cleaner of any kind.
Never use abrasive cleaners or scouring pads on the outer surfaces because
they may scratch the finish. Some paper towels may also scratch or leave
marks on the surface.
WARNING
Internal Care
Filtering system
NOTE:
Pictures are only for reference, different models of the filtering system and spray
arms may be different.
The filtering system in the base of the wash cabinet retains coarse debris from the
washing cycle, including foreign objects such as tooth picks or shards. The collected
coarse debris may cause the filters to clog. Check the condition of the filters regularly,
carefully remove foreign objects and clean the parts of the filtering system if necessary
with water. Follow the steps below to clean the filter.

1 2
Hold the coarse filter and rotate it
anticlockwise to unlock the filter.
Lift the filter upwards and out of
the dishwasher.
The fine filter can be pulled off the
bottom of the filter assembly.
The coarse filter can be detached
from the main filter by gently
squeezing the tabs at the top and
pulling it away.
3 4
Larger food remnants can be
cleaned by rinsing the filter under
running water.
For a more thorough clean, use a
soft cleaning brush.
Reassemble the filters in the reverse
order of the disassembly, replace the
filter insert, and rotate clockwise to
the close arrow.
Do not over tighten the filters. Put the filters back in sequence securely,
otherwise coarse debris could get into the system and cause a blockage.
Never use the dishwasher without filters in place. Improper replacement of
the filter may reduce the performance level of the appliance and damage
dishes and utensils.
WARNING
Main filter Main filter
Coarse filterCoarse filter
Fine filter
14
OpenOpen

15
Spray arms
Wash the arms in soapy and warm
water and use a soft brush to clean
the jets.
It is necessary to clean the spray arms regularly for hard water chemicals will clog the
spray arm jets and bearings.
To clean the spray arms, follow the instructions below:
2
3
To remove the lower spray arm, pull
out the spray arm upward.
1To remove the upper spray arm,
hold the nut in the center still and
rotate the spray arm counterclockwise
to remove it.

16
Caring For The Dishwasher
Frost precaution
Please take frost protection measures on the dishwasher in winter. Every time after
washing cycles, please operate as follows:
1. Cut off the electrical power to the dishwasher at the supply source.
2. Turn off the water supply and disconnect the water inlet pipe from the water valve.
3. Drain the water from the inlet pipe and water valve. (Use a pan to gather the water)
4. Reconnect the water inlet pipe to the water valve.
5. Remove the filter at the bottom of the tub and use a sponge to soak up water in
the sump.
After every wash
After every wash, turn off the water supply to the appliance and leave the door slightly
open so that moisture and odors are not trapped inside.for a while
Remove the plug
Before cleaning or performing maintenance, always remove the plug from the socket.
No solvents or abrasive cleaning
To clean the exterior and rubber parts of the dishwasher, do not use solvents or
abrasive cleaning products. Only use a cloth with warm soapy water.
To remove spots or stains from the surface of the interior, use a cloth dampened with
water an a little vinegar, or a cleaning product made specifically for dishwashers.
When not in use for a long time
It is recommend that you run a wash cycle with the dishwasher empty and then remove
the plug from the socket, turn off the water supply and leave the door of the
appliance slightly open. This will help the door seals to last longer and prevent odors
from forming within the appliance.
Moving the appliance
If the appliance must be moved, try to keep it in the vertical position. If absolutely
necessary, it can be positioned on its back.
Seals
One of the factors that cause odours to form in the dishwasher is food that remains
trapped in the seals. Periodic cleaning with a damp sponge will prevent this from
occurring.

17
INSTALLATION INSTRUCTION
Ensure the voltage and frequency of the power being corresponds to those on the
rating plate. Only insert the plug into an electrical socket which is earthed properly. If
the electrical socket to which the appliance must be connected is not appropriate for
the plug, replace the socket, rather than using a adaptors or the like as they could
cause overheating and burns.
Electrical requirements
Electrical connection
Ensure that proper earthing exists before use
About Power Connection
WARNING
For personal safety:
Do not use an extension cord or an adapter
plug with this appliance.
Do not, under any circumstances, cut or remove
the earthing connection from the power cord.
The installation of the pipes and electrical equipments should be done by professionals.
Attention
WARNING
Electrical Shock Hazard
Disconnect electrical power before
installing dishwasher.
Failure to do so could result in death or
electrical shock.
Please look at the rating label to know the rating voltage and connect the dishwasher
to the appropriate power supply. Use the required fuse 10A/13A/16A, time delay fuse
or circuit breaker recommended and provide separate circuit serving only this appliance.

Water Supply And Drain
Cold water connection
Connect the cold water supply hose to
a threaded 3/4(inch) connector and
make sure that it is fastened tightly in
place.
If the water pipes are new or have not
been used for an extended period of
time, let the water run to make sure
that the water is clear. This precaution
is needed to avoid the risk of the
water inlet to be blocked and damage
the appliance.
safety supply hose
ordinary supply hose
About the safety supply hose
The safety supply hose consists of the double walls. The system guarantees its
intervention by blocking the flow of water in case of the supply hose breaking and
when the air space between the supply hose itself and the outer corrugated hose is
full of water.
How to connect the safety supply hose
1. Pull safety supply hoses out from storage compartment located at
rear of dishwasher.
2. the screws of the safety supply hose to the faucet with thread 3/4inch.
3. Turn water fully on before starting the dishwasher.
the
Tighten
the
WARNING
A hose that attaches to can burst if it is installed on the same water
line as the dishwasher. If your sink has one, it is recommended that the
hose be disconnected and the hole plugged.
a tap
How to disconnect the safety supply hose
1. Turn off the water.
2. Unscrew the safety supply hose from the faucet.
18

Connection Of Drain Hoses
Please securely fix the drain hose in either position A or position B
B
A
MAX 1000 mm
Counter
Drain hose
Insert the drain hose into a drain pipe with a minimum diameter of 4 cm, or let it run
into the sink, making sure to avoid bending or crimping it. The height of drain pipe
must be less than 1000 mm. The free end of the hose must not be immersed in water
to avoid the back flow of it.
Extension hose
Water outlet
How to drain excess water from hoses
Syphon connection
If the connection to the drain pipe is positioned higher than 1000 mm, excess water
may remain in the drain hose. the hose It will be necessary to drain excess water from
into a bowl or suitable container that is held outside and lower than the sink.
Connect the water drain hose. The drain hose must be correctly fitted to avoid water
leaks. Ensure that the water drain hose is not kinked or squashed.
The waste connection must be at a height less than (maximum) from the
bottom of the .
1000 mm
dishwasher
If you need a drain hose extension, make sure to use a similar drain hose.
It must not be longer than 4 meters, otherwise the cleaning effect of the dishwasher
could be reduced.
19
Back of dishwasher
Water Inlet
Drain Pipe
Mains Cable
40 mm
Drain Pipe

20
Positioning The Appliance
Position the appliance in the desired location. The back should rest against the wall
behind it, and the sides, along the adjacent cabinets or walls. The dishwasher is
equipped with water supply and drain hoses that can be positioned either to the right
or the left sides to facilitate proper installation.
Built-In Installation (for the integrated model)
Step 1. Selecting the best location for the dishwasher
The installation position of dishwasher should be near the existing inlet and drain
and power .
Illustrations of cabinet dimensions and installation position of the dishwasher.
1. Less than 5 mm between the top of dishwasher and cabinet and the outer door
aligned to cabinet.
the
hose socket
90 ° 90 °
580mm580mm
820mm820mm
100100
Electrical, drain
and water supply
line connection
Electrical, drain
and water supply
line connection
Space between cabinet
bottom and floor
Space between cabinet
bottom and floor
600 mm (for 600 m model)
450 mm (for 450 mm model)
m
8080

Step 2. Aesthetic panel's dimensions and installation
2. If dishwasher is at the corner of the cabinet,
there should be some space when the door is opened.
installed
CabinetDishwasher
Door of
dishwasher
Minimum space
of 50 mm
NOTE:
Depending on where your electrical outlet is, you may need to cut a hole in the
opposite cabinet side.
21
Follow the specific installation instruction for attaching the
aesthetical door panel.
Follow the specific installation instruction for attaching the
aesthetical door panel.
A
Velcro stripe
Velcro stripe
Seperate velcro stripe A and velcro stripe B and attach velcro stripe A on the inner side
of the aesthetic panel. Attach the felted velcro stripe B on the outer door of dishwasher
(see figure A). After positioning of the panel, fix the panel onto the outer door by
screws and bolts (See figure B) .
Semi-integrated model
B
2.Pin up the four long screws
1.Take away the four short screws

Step 3. Tension adjustment of the door spring
1. The door springs are set at the factory to
the proper tension for the outer door. If
aesthetic panel are installed, you
will have to adjust the door spring tension.
Rotate the adjusting screw to drive the
adjustor to strain or relax the steel cable.
2. Door spring tension is correct when the
door remains horizontal in the fully opened
position, yet rises to a close with the slight
lift of a finger.
Install the hook on the aesthetic panel and put the hook into the slot of the outer
door of dishwasher (see figure A). After positioning of the panel, fix the panel onto
the outer door by screws and bolts (See figure B).
B
2.Pin up the four long screws
A1.Take away the four short screws
Fully-integrated model
22

Step 4. Dishwasher installation steps
1. Affix the condensation strip under the work surface of cabinet. Please ensure the
condensation strip is flush with edge of work surface. (Step 2)
2. Connect the inlet hose to the cold water supply.
3. Connect the drain hose.
4. Connect the power cord.
5. Place the dishwasher into
6. Level the dishwasher. The rear foot can be adjusted from the front of the
dishwasher by turning the Philips screw in the middle of the base of dishwasher
use Philips screw . To adjust the front feet, use a flat screw driver and turn
the front feet until the dishwasher is level. (Step 5 to Step 6)
7. Install the furniture door to the outer door of the dishwasher. (Step 7 to Step 10)
8. Adjust the tension of the door springs by using turning in a
clockwise motion to tighten the left and right door springs. Failure to do this could
cause damage to your dishwasher. (Step 11)
9. The dishwasher must be secured in place. There are two ways to do this:
A. Normal work surface: Put the installation hook into the slot of the side plane
and secure it to the work surface with
B. Marble or granite work top: Fix the side with .
the cabinet.
a driver
a Philips screw driver
the screws.
screws
A
B
23
Please refer to the specific installation steps in the installation
drawings.
Please refer to the installation steps in the installation
drawings.
specific

UP
DOWN
Check level
front to back
Check level
side to side
Step 5. Levelling the dishwasher
Dishwasher must be level for proper dish rack operation and wash performance.
Place a spirit level on door and rack track inside the tub as shown to check that the
dishwasher is level.
Level the dishwasher by adjusting the three levelling individually.
When level the dishwasher, please pay attention not to let the dishwasher tip over.
feet
1.
2.
3.
The maximum adjustment height of the feet is 50 mm.
NOTE:
24

25
TROUBLESHOOTING TIPS
Before Calling For Service
Reviewing the charts on the following pages may save you from calling for service.
Problem Possible Causes What To Do
Dishwasher doesn't
start
Fuse blown, or the
circuit break tripped.
Replace fuse or reset circuit breaker.
Remove any other appliances sharing
the same circuit with the dishwasher.
Power supply is not
turned on.
Make sure the dishwasher is turned
on and the door is closed securely.
Make sure the power cord is
properly plugged into the wall socket.
Check that the water supply is
connected properly and the water
is turned on.
Door of dishwasher
not properly closed.
Make sure to close the door
properly and latch it.
Water not pumped
form dishwasher
Twisted or trapped
drain hose.
Filter clogged.
Kitchen sink clogged.
Check the drain hose.
Check .the filter system
Check the kitchen sink to make sure
it is draining well. If the problem is
the kitchen sink that is not draining ,
you may need a plumber rather than
a serviceman for dishwashers.
Foam in the tub Wrong detergent.
Water pressure is low
Use only the special dishwasher
detergent to avoid suds. If this occurs,
open the dishwasher and let suds
evaporate. Add 1 of cold water
to the bottom of the dishwasher.
Close the dishwasher door, then select
any cycle. Initially, the dishwasher will
drain out the water. Open the door
after draining stage is complete and
check if the suds have disappeared.
Repeat if necessary.
liter

26
Spilled .rinse aid Always wipe up spills
immediately.
rinse aid
Stained tub interior Detergent with
colourant may
have been used.
Make sure that the detergent has no
colourant.
White film on
inside surface
Hard water minerals. To clean the interior, use
with dishwasher detergent
and wear rubber gloves. Never use
any other cleaner than dishwasher
detergent otherwise, it may cause
foaming or suds.
the damp
soft cloth
There are rust
stains on cutlery
The affected items
are not corrosion
resistant.
A program
was not run after
dishwasher salt was
added. Traces of
salt have gotten
into the wash cycle.
Always run a wash program
without any crockery after adding
salt. Do not select the Turbo function
(if present), after adding dishwasher
salt.
The lid of the softer
is loose.
Check the softener lid is secure.
Problem Possible Causes What To Do
Avoid washing items that are not
corrosion resistant in the dishwasher.
Knocking noise in
the dishwasher
A spray arm is knocking
against an item in a
basket
Interrupt the program and
rearrange the items which are
obstructing the spray arm.
Rattling noise in
the dishwasher
Items of crockery
are loose in the
dishwasher.
Interrupt the program and
rearrange the items of crockery.
Knocking noise in
the water pipes
This may be caused
by on-site installation
or the cross-section
of the piping.
This has no influence on the
dishwasher function. If in doubt,
contact a qualified plumber.
The dishes
are not clean
The dishes were not
loaded correctly.
See PART Ⅱ “Preparing And Loading
Dishes”.
The program was
not powerful enough.
Select a more intensive program.

27
Not enough detergent
was dispensed.
Use more detergent, or change
your detergent.
Items are blocking
the movement of
the spray arms.
Rearrange the items so that the spray
can rotate freely.
The filter combination
is not clean or is not
correctly fitted in the
base of wash cabinet.
This may cause the spray
arm jets to get blocked.
Clean and/or fit the filter correctly.
Clean the spray arm jets.
Cloudiness on
glassware.
Combination of soft
water and too much
detergent.
Use less detergent if you have soft
water and select a shorter cycle to
wash the glassware and to get
them clean.
Problem Possible Causes What To Do
The dishes
are not clean.
White spots
appear on dishes
and glasses.
Check water softener settings or fill
status of salt container.
Black or grey
marks on dishes
Aluminium utensils
have rubbed against
dishes
Use a mild abrasive cleaner to
eliminate those marks.
Hard water area
can cause limescale
deposits.
Improper loading Use gloves if detergent residue can
be found on dishes to avoid skin
irritations.
Dishes are removed
too soon
Do not empty your dishwasher
immediately after washing. Open
the door slightly so that the steam
can come out. Take out the dishes
until the inside temperature is safe
to touch. Unload the lower basket
first to prevent the dropping water
from the upper basket.
Detergent left in
dispenser
Dishes block
detergent dispenser
Re-loading the dishes properly.
The dishes aren't
drying

Problem
Wrong program has
been selected.
With a short program, the
washing temperature is lower,
decreasing cleaning performance.
Choose a program with a long
washing time.
Use of cutlery with a
low-quality coating.
Water drainage is more difficult with
these items. Cutlery or dishes of this
type are not suitable for washing in
the dishwasher.
Possible Causes What To Do
28
The dishes aren't
drying
Seven years after placing the last unit of the model on the market:
Motor, circulation and drain pump, heaters and heating elements, including
heat pumps (separately or bundled), piping and related equipment including
all hoses, valves, filters and aqua stops, structural and interior parts related to
door assemblies (separately or bundled), printed circuit boards, electronic
displays, pressure switches, thermostats and sensors, software and firmware
including reset software.
Ten years after placing the last unit of the model on the market:
Door hinge and seals, other seals, spray arms, drain filters, interior racks and
plastic peripherals such as baskets and lids.
Availability Of Spare Parts
WARNING
Self-repair or non-professional repair may cause serious risks to the safety
of the user of the appliance and impact warranty.

1.Upper basket:
2.Lower basket:
LOADING THE BASKETS
ACCORDING TO EN60436:
29
1
2
3
4
5
Cups
Mugs
Glasses
Glass bowl
Dessert bowls
Item
Number
6
7
8
9
10
11
12
13
Saucers
Dessert plates
Dinner plates
Soup plates
Melamine dessert plates
Melamine bowl
Oval platter
Small pot
Item
Number
66
66
7788
99
1212
1313
66
6666
1010 991111
33
33
44
55
55
22
33
33
22
11
11
Loading the dishwasher to its full capacity will contribute to energy and water savings.

Information for comparability
tests in accordance with EN60436
Capacity: 10 place settings
Position of the upper basket: lower position
Program: ECO
Rinse aid setting: Max
Softener setting: H3
30
1 32 6444 5 7 8
1
2
3
4
5
6
7
8
Soup spoons
Forks
Knives
Tea spoons
Dessert spoons
Serving spoons
Serving fork
Gravy ladle
Item
Number
5
7
1
4
3
8
6
2
3
7
3
8
6
2
3
4
3.Cutlery rack:

PART Ⅱ: Special Version
Please read this manual carefully
before using the dishwasher and
Keep this manual for future reference.
AJI104500ED

CONTENTS
ERROR CODES
NOTE:
If you cannot solve the problems by yourself, please ask for help from a
professional technician.
The manufacturer, following a policy of constant development and updating of
the product, may make modifications without giving prior notice.
If lost or out-of-date, you can receive a new user manual from the manufacturer
or responsible vendor.
USING YOUR DISHWASHER
Control Panel
Water Softener
Preparing And Loading Dishes
Function Of The Rinse Aid And Detergent
Filling The Rinse Aid Reservoir
Filling The Detergent Dispenser
4
4
6
12
7
10
11
13
13
17
17
18
TECHNICAL INFORMATION
20
19
17
PROGRAM SELECTION
Wash Cycle Table
Changing The Program Mid-cycle
Forget To Add A Dish?
Saving Energy
Starting A Program

5
QUICK USER GUIDE
Please read the corresponding content the instruction manual for detailed
operating method.
in
2Remove larger residue from dishes.
Avoid pre-rinsing.
3Load the baskets.
4Fill the dispenser with detergent and
rinse aid.
Select a suitable program and
start the dishwasher.
Inside Outside
3
1Install the dishwasher
(Please check the section 5 “INSTALLATION INSTRUCTION ”
of PART Ⅰ: Generic Version.)

44
USING YOUR DISHWASHER
Control Panel
2
1 7 34 6
Operation (Button)
Power
Delay
Program
Press this button to turn on your dishwasher.
Press this button to set the delayed hours for washing. You can
delay the start of washing up to 24 hours. One press on this
button delays the start of washing by one hour.
Select the appropriate washing program, the selected program
indicator will be lit.
Intensive
For heaviest soiled crockery, and normally soiled pots, pans,
dishes etc. With dried-on food.
Universal
For normally soiled loads, such as pots, plates, glasses and
lightly soiled pans.
1
3
4
2
Display
5Program
indicator
Half-load
When you have about or less than half of full place settings
dishware to wash, you can choose this function to save energy
and water.
(It can be used programs except rapid and soak)
5

5
Water Faucet
If the “ ” indicator is lit, it means the dishwasher is low
on dishwasher salt and needs to be refilled.
Rapid
A shorter wash for lightly soiled loads that do not
need drying.
90 min
For normally soiled loads that need quick wash.
Rinse Aid
If the “ ” indicator is lit, it means the dishwasher is low
on dishwasher rinse aid and requires a refill.
5
6Warning
indicator
Program
indicator
Screen
7
To show the remining time and delay time,
error codes etc.
program
ECO
This is standard program, it is suitable to clean normally
soiled tableware and it is the most efficient program in
terms of its combined energy and water consumption for
that type of tableware.
Soak
To rinse dishes that you plan to wash later that day.
Glass
For lightly soiled crockery and glass.

6
Water Softener
The water softener must be set manually, using the water hardness dial.
The water softener is designed to remove minerals and salts from the water, which
would have a detrimental or adverse effect on the operation of the appliance.
The more minerals there are, the harder your water is.
The softener should be adjusted according to the hardness of the water in your area.
Your local Water Authority can advise you on the hardness of the water in your area.
Adjusting salt consumption
The dishwasher is designed to allow for adjustment in the amount of salt consumed
based on the hardness of the water used. This is intended to optimise and customise
the level of salt consumption.
1. the door, on the appliance;
2. Program
3. Press the to select the proper set according to your local
environment, the will change in the following sequence:
H1->H2->H3->H4->H5->H6;
4. Press the Power button to end the .
Open
button
button
switch
Within 60 seconds after the appliance was switched on press the
for more than 5 seconds to enter the water softener setting mode.
Program again
setting
setting mode
Please follow the steps below for adjustment in salt consumption.
dH=1.25 Clarke=1.78 fH=0.178mmol/l
°°
°
1
The setting: H3factory
0 - 5
6 - 11
12 - 17
18 - 22
23 - 34
35 - 55
German
dH
German
dH
0 - 9
10 - 20
21 - 30
31 - 40
41 - 60
61 - 98
0 - 6
7 - 14
15 - 21
22 - 28
29 - 42
43 - 69
0 - 0.94
1.0 - 2.0
2.1 - 3.0
3.1 - 4.0
4.1 - 6.0
6.1 - 9.8
French
fH
French
fH Mmol/lMmol/l
British
Clarke
British
Clarke
WATER HARDNESS Salt consumption
(gram/cycle)
Salt consumption
(gram/cycle)
H1
H2
H3
H4
H5
H6
0
9
12
20
30
60
Regeneration occurs
every X program
sequence 1)
No regeneration
10
5
3
2
1
Water softner
level
1) Every cycle with a regeneration operation consumes additional 2.0 litres of
water, the energy consumption increases by 0.02 kWh and the program
extents by 4 minutes.

NOTE:
If your model does not have any water softener, you may skip this section.
Water Softener
The hardness of the water varies from place to place. If hard water is used in the
dishwasher, deposits will form on the dishes and utensils.
The appliance is equipped with a special softener that uses a salt container
specifically designed to eliminate lime and minerals from the water.
Preparing And Loading Dishes
Consider buying utensils which are identified as dishwasher-proof.
For particular items, select a program with the lowest possible temperature.
To prevent damage, do not take glass and cutlery out of the dishwasher
immediately after the program has ended.
Cutlery with wooden, horn china or mother-of-pearl handles
Plastic items that are not heat resistant
Older cutlery with glued parts that are not temperature resistant
Bonded cutlery items or dishes
Pewter or cooper items
Crystal glass
Steel items subject to rusting
Wooden platters
Items made from synthetic fibres
Some types of glasses can become dull after a large number of washes
Silver and aluminum parts have a tendency to discolor during washing
Glazed patterns may fade if machine washed frequently
For washing the following cutlery/dishes
Are not suitable
Are of limited suitability
7
Please check the section 3 “Loading The Salt Into The Softener”
of PART Generic Version, If your dishwasher lacks salt.Ⅰ:
Please check the section 3 “Loading The Salt Into The Softener”
of PART Ⅰ: Generic Version, If your dishwasher lacks salt.

8
Items such as cups, glasses, pots, pans, etc. face downwards.
Curved items, or ones with recesses, should be loaded aslant so that water can run
off.
All utensils are stacked securely and can not tip over.
All utensils are placed in the way that the spray arms can rotate freely during
washing.
Load hollow items such as cups, glasses, pans etc. With the opening facing
downwards so that water cannot collect in the container or a deep base.
Dishes and items of cutlery must not lie inside one another, or cover each other.
To avoid damage, glasses should not touch one another.
The upper basket is designed to hold more delicate and lighter dishware such as
glasses, coffee and tea cups.
Long bladed knives stored in an upright position are a potential hazard!
Long and sharp items of cutlery such as carving knives must be positioned
horizontally in the upper basket.
Please do not overload your dishwasher. This is important for good results and for
reasonable consumption of energy.
must
NOTE:
Very small items should not be washed in the dishwasher as they could easily fall
out of the basket.
To prevent water dripping from the upper basket into the lower basket, we
recommend that you empty the lower basket first, followed by the upper basket.
Removing the dishes
WARNING
Items will be hot! To prevent damage, do not take glass and
cutlery out of the dishwasher for around 15 minutes after the
program has ended.
Recommendations for loading the dishwasher
Scrape off any large amounts of leftover food. Soften remnants of burnt food in
pans. It is not necessary to rinse the dishes under running water.
For best performance of the dishwasher, follow these loading guidelines.
(Features and appearance of baskets and cutlery baskets may vary from
your model.)
Place objects in the dishwasher in following way:the

Loading the upper basket
The upper basket is designed to hold more delicate and
lighter dishware such as glasses, coffee and tea cups and
saucers, as well as plates, small bowls and shallow pans
(as long as they are not too dirty). Position the dishes
and cookware so that they will not get moved by the
spray of water.
Loading the lower basket
We suggest that you place large and difficult to clean
items into the lower basket: such as pots, pans, lids,
serving dishes and bowls, as shown in the figure below. It
is preferable to place serving dishes and lids on the side
of the racks in order to avoid blocking the rotation of the
top spray arm.
The maximum diameter advised for plates in front of the
detergent dispenser is of 19 cm, this not to hamper the
opening of it.
WARNING
Do not let any item extend through
the bottom.
Always load sharp utensils with the
sharp point down!
Loading the cutlery basket
9
For the best washing effect, please load the baskets refer to standard
loading options on last section of PART Generic VersionⅠ:
For the best washing effect, please load the baskets refer to standard
loading options on last section of PART Ⅰ: Generic Version
Cutlery should be placed in the cutlery basket separate from each other in the
appropriate positions. Avoid nesting of the cutlery to prevent insufficient cleaning
performance.

10
The rinse aid is released during the final rinse to prevent water from forming droplets
on your dishes, which can leave spots and streaks. It also improves drying by allowing
water to off the dishes. Your dishwasher is designed to use liquid rinse aids. run
WARNING
Only use branded rinse aid for dishwasher. Never fill the rinse aid dispenser
with any other substances (e.g. Dishwasher cleaning agent, liquid detergent).
This would damage the appliance.
Function Of The Rinse Aid And Detergent
Function of detergent
The chemical ingredients that compose the detergent are necessary to remove, crush and
dispense all dirt out of the dishwasher. Most of the commercial quality detergents are
suitable for this purpose.
WARNING
Proper Use of Detergent
Use only detergent specifically made for dishwashers use. Keep your detergent
fresh and dry.
.
Do not fill detergent into the dispenser until you are ready to start the
dishwasher
Dishwasher detergent is corrosive! Keep dishwasher
detergent out of the reach of children.
When to refill the rinse aid
The regularity of the dispenser needing to be refilled depends on how often dishes are
washed and the rinse aid setting used.
The Low Rinse Aid indicator ( ) will be lit when more rinse aid is needed.
Do not overfill the rinse aid dispenser.

11
Adjusting the rinse aid reservoir
To achieve a better drying performance with limited rinse aid, the dishwasher is
designed to adjust the consumption by user. Follow the below steps.
1.
2. Program
and then press the Delay button to enter the set model,
the rinse aid indication blinks as 1Hz frequency.
3. to select the proper set according to your using habits,
will change in the following sequence: D1->D2->D3->D4->D5->D1.
The higher the number, the more rinse aid the dishwasher uses.
4. Without operation in 5 seconds or press the Power button to complete the setup
and exit the setting mode.
Open the door, switch on the appliance.
Within 60 seconds after the appliance was switched on press the button
for more than 5 seconds,
Press the Program button again
the setting
Filling The Rinse Aid Reservoir
3Close the cap after all.
1
2
Remove the rinse reservoir cap by
lifting up the handle .
Pour the rinse aid into the dispenser,
being careful not to overfill.

12
2
1Please choose an open way according
to the actual situation.
1. Open the cap by sliding the release
catch.
2. Open the cap by pressing down the
release latch.
Add detergent into the larger cavity
(A) for main wash.
For better cleaning result, especially if
you have very dirt items, pour a small
amount of detergent onto the door.
The additional detergent will activate
during the pre-wash phase.
3Close the flap by sliding it to the
front and then pressing it down.
AA
Sliding it to the right
Press down
1
2
BB
Filling The Detergent Dispenser
NOTE:
Please observe the manufacturer's recommendations on the detergent packaging.

Wash Cycle Table
13
The table below shows which programs are best for the levels of food residue
on them and how much detergent is needed. It also show various information about
the programs. Consumption values and program duration are only indicative except
for ECO program.
( ) indicates that the program uses rinse aid in the last rinse.
Program Running
Time(min)
Energy
(kWh)
Water
(L)
Description
Of Cycle
Rinse
Aid
Detergent
Pre/Main Wash
(*EN60436)
235
90
0.755
1.093
9.0
10.2
Pre-wash(50℃)
Wash(65℃)
Rinse
Rinse
Rinse(65℃)
Drying
Wash(45℃)
Rinse
Rinse(60℃)
Drying
Wash(60℃)
Rinse
Rinse(65℃)
Drying
Intensive
90 min
18g
(1 or 2 tabs)
4/14g
(1 tab)
18g
120 0.783 13.1
Pre-wash
Wash(50℃)
Rinse
Rinse(65℃)
Drying
Glass (1 or 2 tabs)
4/14g
30 0.539 10.0
Wash(50℃)
Rinse
Rinse(45℃)
12g
Rapid
175 1.012 13.1
Pre-wash(45℃)
Wash(55℃)
Rinse
Rinse(65℃)
Drying
Universal (1 or 2 tabs)
4/14g
15 0.02 3.6
Prewash
Soak
205 1.378 15.3

:
for this use, it is the most efficient program in terms of its combined
energy and water consumption, and it is used to assess compliance
with the EU ecodesign legislation.
The ECO program is suitable to clean normally soiled tableware, that
NOTE:
(*EN60436)
ECO
14

3 sec
Starting A program
1. Draw out the lower and upper basket, load the dishes and push them back.
It is commended to load the lower basket first, then the upper one.
2. Pour in the detergent.
3. Insert the plug into the socket. The power supply refer to last page ”Product fiche”.
Make sure that the water supply is turned on to full pressure.
4. Open the door, Press the Power button.
5. Choose a program, the response light will turn on. Then close the door, the
dishwasher will start its cycle.
Changing The Program Mid-cycle
A program can only be changed if it has been running only for a short period of
time, otherwise the detergent may have already been released or the wash water
with detergent has already been drained. If this is the case, the dishwasher needs to
be reset and the detergent dispenser must be refilled.
stopped
program selection mode
To reset the dishwasher,
follow the instructions below:
1. Open the door a little to stop the dishwasher, after the spray arm
working, you can open the door completely.
2. Press any Program button more than three seconds the machine will be in
.
3. You can change the program to the desired cycle setting.
15
ECO
Saving Energy
1. Pre-rinsing of tableware items leads to increased water and energy consumption
and is not recommended.
2. Washing tableware in a household dishwasher usually consumes less energy and
water in the use phase than hand dishwashing when the household dishwasher is
used according to the instructions.

Forget To Add A Dish?
A forgotten dish can be added any time before the detergent dispenser opens. If
this is the case, follow the instructions below:
1.
2.
3. Add the forgotten dishes.
4. Close the door.
5. The dishwasher will start running again.
Open the door a little to stop the washing.
After the spray arms working, you can open the door completely.stopped
WARNING
It is dangerous to open the door
mid-cycle, as hot steam may
scald you.
16

WARNING
17
ERROR CODES
If there is a malfunction the dishwasher will display an error code. The following table
shows possible error codes and their causes.
Meanings
Longer inlet time.
Overflow.
Possible Causes
Some element of dishwasher leaks .
Faucets is not opened, or water intake is
restricted,or water pressure is too low.
Codes
E1
E4
Not reaching required
temperature.
Malfunction of heating element.
E3
Open circuit or break wiring for
the communication
Failure of communication
between main
with display
circuit board
circuit board.
Ed
If there is an error code that cannot be solved, please request professional
assistance.

TECHNICAL INFORMATION
WW
D1
D1
H
H
18
D2D2
Height (H)
Width (W)
Depth (D1)
Depth (D2)
815mm
448mm
550mm (with the door closed)
1150mm (with the door opened 90 )

Product information sheet (EN60436)
Supplier's name or trade mark:
Supplier's address ( ):
Model identifier:
General product parameters:
b
Minimum duration of the guarantee offered by the supplier ( ):
b
Additional information:
Weblink to the supplier’s website, where the information in point 6 of Annex II to
Commission Regulation (EU) 2019/2022 ( ) ( ) is found:
( ) for the eco program.
( ) changes to these items shall not be considered relevant for the purposes of paragraph 4 of
Article 4 of Regulation (EU) 2017/1369.
( ) if the product database automatically generates the definitive content of this cell the supplier
shall not enter these data.
a
b
c
1 b
( ) Commission Regulation (EU) 2019/2022 of 1 October 2019 laying down eco design requirements
for household dishwashers pursuant to Directive 2009/125/EC of the European Parliament and of
the Council amending Commission Regulation (EC) No 1275/2008 and repealing Commission
Regulation (EU) No 1016/2010 (see page 267 of this Official Journal).
1
AJI104500ED
ASPES
SVAN TRADING S.L.C/ Ciudad de Cartagena, 20.Paterna (46988). SPAIN.
19
Parameter Value Parameter Value
Height
Width
Depth
82
45
55
Dimensions in cm
EEI ( )
Cleaning performance index ( )
Energy consumption in kWh
[per cycle], based on the eco
program using cold
water fill. Actual energy
consumption will depend on
how the appliance is used.
Program duration ( ) (h:min)
Airborne acoustical noise
emissions ( ) (dB(A) re 1 pW)
Off-mode (W)
Delay start (W) (if applicable)
Rated capacity ( ) (ps)
a
a
a
a
a
Energy efficiency class ( )
Drying performance index ( )
Water consumption in litres
[per cycle], based on the eco
program. Actual water con-
sumption will depend on how
the appliance is used and on
the hardness of the water.
Type
Airborne acoustical noise
emission class ( )
Standby mode (W)
Networked standby (W)
(if applicable)
a
a
a
1,065
9,0
Fully intergrated
N/A
N/A
E ( )
c
C ( )
c
55,9
1,125
0,755
3:55
47
0,49
1,00
10
https://eprel.ec.europa.eu
36 months

-
 1
1
-
 2
2
-
 3
3
-
 4
4
-
 5
5
-
 6
6
-
 7
7
-
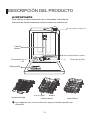 8
8
-
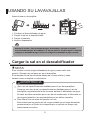 9
9
-
 10
10
-
 11
11
-
 12
12
-
 13
13
-
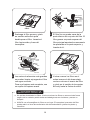 14
14
-
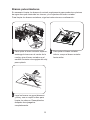 15
15
-
 16
16
-
 17
17
-
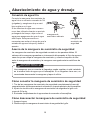 18
18
-
 19
19
-
 20
20
-
 21
21
-
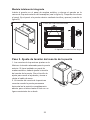 22
22
-
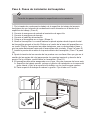 23
23
-
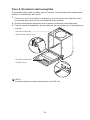 24
24
-
 25
25
-
 26
26
-
 27
27
-
 28
28
-
 29
29
-
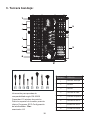 30
30
-
 31
31
-
 32
32
-
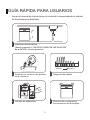 33
33
-
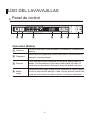 34
34
-
 35
35
-
 36
36
-
 37
37
-
 38
38
-
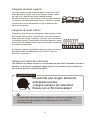 39
39
-
 40
40
-
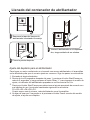 41
41
-
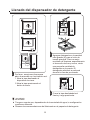 42
42
-
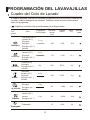 43
43
-
 44
44
-
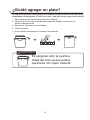 45
45
-
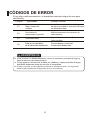 46
46
-
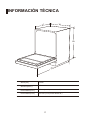 47
47
-
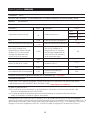 48
48
-
 49
49
-
 50
50
-
 51
51
-
 52
52
-
 53
53
-
 54
54
-
 55
55
-
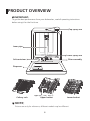 56
56
-
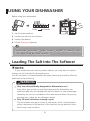 57
57
-
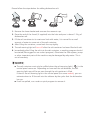 58
58
-
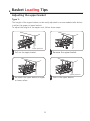 59
59
-
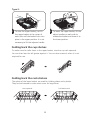 60
60
-
 61
61
-
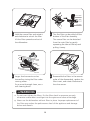 62
62
-
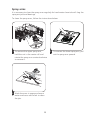 63
63
-
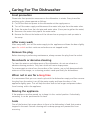 64
64
-
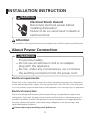 65
65
-
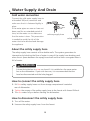 66
66
-
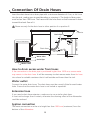 67
67
-
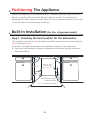 68
68
-
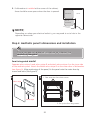 69
69
-
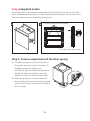 70
70
-
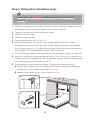 71
71
-
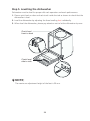 72
72
-
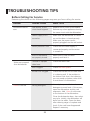 73
73
-
 74
74
-
 75
75
-
 76
76
-
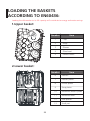 77
77
-
 78
78
-
 79
79
-
 80
80
-
 81
81
-
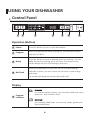 82
82
-
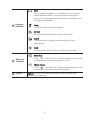 83
83
-
 84
84
-
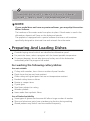 85
85
-
 86
86
-
 87
87
-
 88
88
-
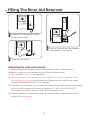 89
89
-
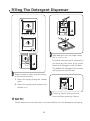 90
90
-
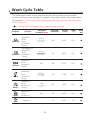 91
91
-
 92
92
-
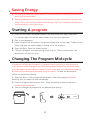 93
93
-
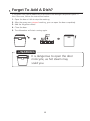 94
94
-
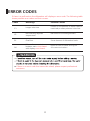 95
95
-
 96
96
-
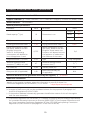 97
97
-
 98
98


Aspes AJI104500ED El manual del propietario
- Categoría
- Lavaplatos
- Tipo
- El manual del propietario
En otros idiomas
- English: Aspes AJI104500ED Owner's manual
Documentos relacionados
Otros documentos
-
Infiniton DIW-3724IXH El manual del propietario
-
-
-
-
-
-