Yamaha YRS-1100 El manual del propietario
- Categoría
- Receptor
- Tipo
- El manual del propietario

Printed in Indonesia WV87380-1
Surround sound TV stand
OWNER’S MANUAL
MANUAL DE INSTRUCCIONES

CAUTION: READ THIS BEFORE OPERATING YOUR UNIT.
1 To assure the finest performance, please read this manual
carefully. Keep it in a safe place for future reference.
2 Install this unit in a well ventilated, cool, dry, clean place –
away from direct sunlight, heat sources, vibration, dust,
moisture, and/or cold. For proper ventilation, allow the
following minimum clearances.
Rear: 5 cm (2 in)
Sides: 5 cm (2 in)
3 Locate this unit away from other electrical appliances,
motors, or transformers to avoid humming sounds.
4 Do not expose this unit to sudden temperature changes from
cold to hot, and do not locate this unit in an environment with
high humidity (i.e. a room with a humidifier) to prevent
condensation inside this unit, which may cause an electrical
shock, fire, damage to this unit, and/or personal injury.
5 Avoid installing this unit where foreign object may fall onto
this unit and/or this unit may be exposed to liquid dripping or
splashing. On the top of this unit, do not place:
– Other components, as they may cause damage and/or
discoloration on the surface of this unit.
– Burning objects (i.e. candles), as they may cause fire,
damage to this unit, and/or personal injury.
– Containers with liquid in them, as they may fall and
liquid may cause electrical shock to the user and/or
damage to this unit.
6 Do not cover this unit with a newspaper, tablecloth, curtain,
etc. in order not to obstruct heat radiation. If the temperature
inside this unit rises, it may cause fire, damage to this unit,
and/or personal injury.
7 Do not plug in this unit to a wall outlet until all connections
are complete.
8 Do not operate this unit upside-down. It may overheat,
possibly causing damage.
9 Do not use force on switches, knobs and/or cords.
10 When disconnecting the power cable from the wall outlet,
grasp the plug; do not pull the cable.
11 Do not clean this unit with chemical solvents; this might
damage the finish. Use a clean, dry cloth.
12 Only voltage specified on this unit must be used. Using this
unit with a higher voltage than specified is dangerous and
may cause fire, damage to this unit, and/or personal injury.
Yamaha will not be held responsible for any damage resulting
from use of this unit with a voltage other than specified.
13 To prevent damage by lightning, keep the power cable
disconnected from a wall outlet or this unit during a lightning
storm.
14 Do not attempt to modify or fix this unit. Contact qualified
Yamaha service personnel when any service is needed. The
cabinet should never be opened for any reasons.
15 When not planning to use this unit for long periods of time
(i.e. vacation), disconnect the AC power plug from the wall
outlet.
16 Be sure to read the “TROUBLESHOOTING” section on
common operating errors before concluding that this unit is
faulty.
17 Before moving this unit, press p to set this unit to the
standby mode, and disconnect the AC power plug from the
wall outlet.
18 Install this unit near the AC outlet and where the AC power
plug can be reached easily.
19 The batteries shall not be exposed to excessive heat such as
sunshine, fire or the like. When you dispose of batteries,
follow your regional regulations.
20 Excessive sound pressure from earphones and headphones
can cause hearing loss.
This unit is not disconnected from the AC power source as long as
it is connected to the wall outlet, even if this unit itself is turned off
by p. This state is called the standby mode. In this state, this unit
is designed to consume a very small quantity of power.
WARNING
TO REDUCE THE RISK OF FIRE OR ELECTRIC SHOCK, DO
NOT EXPOSE THIS UNIT TO RAIN OR MOISTURE.
CAUTION
Danger of explosion if battery is incorrectly replaced. Replace
only with the same or equivalent type.
CAUTION
Use of controls or adjustments or performance of procedures other
than those specified herein may result in hazardous radiation
exposure.
Notes
• This unit’s speakers use magnets. Do not place items that are
sensitive to magnetism, such as CRT-type TVs, clocks, credit
cards, floppy disks, etc., on top of the rack.
• When the unit is positioned close to a CRT-type TV, picture or
sound distortion may occur. In this case, move the TV away from
the unit.
i En

1 En
■ Notes on remote controls and batteries
• Do not spill water or other liquids on the remote control.
• Do not drop the remote control.
• Do not leave or store the remote control in the following places:
– places of high humidity, such as near a bath
– places of high temperatures, such as near a heater or a
stove
– places of extremely low temperatures
– dusty places
• Do not expose the remote control sensor of this unit to direct
sunlight or lighting such as inverted fluorescent lamps.
• If the batteries grow old, the effective operation range of the remote
control decreases considerably. If this happens, replace the batteries
with two new ones as soon as possible.
• Change all of the batteries if you notice the following conditions:
the operation range of the remote control decreases or the
transmission indicator does not light up or becomes dim.
• Do not use old batteries together with new ones.
• Do not use different types of batteries (such as alkaline and
manganese batteries) together. Read the packaging carefully as
these different types of batteries may have the same shape and color.
• Exhausted batteries may leak. If the batteries have leaked, dispose
of them immediately. Avoid touching the leaked material or letting it
come into contact with clothing, etc. Clean the battery compartment
thoroughly before installing new batteries.
• Do not throw away batteries with general house waste. Dispose of
them correctly in accordance with your local regulations.

2 En
What you can do with this unit
To enjoy TV
To enjoy Blu-ray
movies
To enjoy games
Checking supplied accessories (p. 4)
Installation (p. 5)
Preparing the remote control (p. 7)
Connecting your TV and Blu-ray disc player (p. 8)
Operating the unit by TV’s remote control (p. 18)
When enjoying STB program
such as on satellite/CATV tuner
(p. 9)
Connecting a game
console (p. 9)
Playing back a TV, Blu-ray disc player, and game console (p. 20)
PREPARATION
CONNECTION/
INITIAL SETTINGS
PLAYBACK
Setting the best possible sound automatically (p. 11)
HDMI link (HDMI control)
function
p. 18
Cinema DSP function
p. 22
IntelliBeam function
p. 11
Headphone surround function
p. 26
UniVolume
p. 21
Playing back iPod/iPhone
p. 29

3 En
PREPARATION
CONNECTION/
INITIAL SETTINGS PLAYBACK SETTINGS
TROUBLESHOOTING
ABOUT THIS UNIT English
Contents
PREPARATION
Getting started ....................................................... 4
Supplied accessories .................................................... 4
CONNECTION/INITIAL SETTINGS
Installation..............................................................5
Remote control preparation........................................... 7
Connections........................................................... 8
TV and Blu-ray disc player connection.......................... 8
Game console or tuner connection ............................... 9
Initial settings.......................................................10
Selecting language for menu display .......................... 10
Auto setup for appropriate surround effects
(IntelliBeam)........................................................... 11
Operating the unit by TV’s remote control................... 18
PLAYBACK
Playback features ................................................20
Basic operation for playback....................................... 20
Enjoying sound with your preference.......................... 21
Switching stereo/surround sound....................................... 21
Playing back digitally compressed formats (MP3, WMA, etc.)
with enriched sound (Compressed Music Enhancer)......... 21
Automatic volume level adjustment (UniVolume)............... 21
Volume balance adjustment...............................................21
Enjoying realistic surround sound (CINEMA DSP).............22
Changing the audio output method for surround playback........23
Surround decoder setting................................................... 25
Using useful features .................................................. 26
Listening with headphones................................................. 26
Sleep timer/auto power down function ...............................27
Settings for each input source (Option menu)....................27
Playing back iPod/iPhone ........................................... 29
When using Yamaha Universal Dock for iPod (optional
YDS-12, etc.) ....................................................................29
When using Wireless System for iPod (optional YID-W10).......29
Playing back Bluetooth components........................... 30
Pairing ................................................................................ 30
Connecting ......................................................................... 31
SETTINGS
Setup menu...........................................................32
Setting procedure........................................................32
Setup menu list............................................................33
Manual setup...............................................................34
Setting parameters ........................................................... 34
Beam adjustment.............................................................. 35
Image location .................................................................. 36
Tone control ................................................................36
Tone control...................................................................... 36
Subwoofer settings ........................................................... 36
Audio delay control ........................................................... 36
Dynamic range control...................................................... 37
Volume level of each channel with test tones ................... 37
Sound out setting ........................................................37
Sound beam output configuration ..................................... 37
Input assignment.........................................................38
Input assignment .............................................................. 38
Input rename..................................................................... 39
HDMI setup....................................................................... 39
DISPLAY MENU ............................................................... 40
Advanced setup ...................................................41
TROUBLESHOOTING
Troubleshooting...................................................42
ABOUT THIS UNIT
Controls and functions........................................46
Glossary................................................................49
Specifications.......................................................51
Using the supplied demonstration DVD.............53
Index......................................................................54
About this manual
• In this manual, operations that can be performed using either the front panel buttons or the remote control are explained using the
remote control.
•
y indicates a tip for your operation.
• Notes contain important information and operating instructions.
• This manual is produced prior to production. Design and specifications are subject to change in part as a result of improvements,
etc. In case of differences between the manual and the product, the product has priority.
• The alphabet mark (such as ) indicates the remote control key(s) indicated on the figure on the left page.

4 En
PREPARATION
Getting started
Before assembly and connecting, make sure you have received all of the following items.
1)
Supplied accessories
Remote control Battery (× 2)
(AA, R6, UM-3)
Optical cable
(1.5 m (4.9 ft))
Video pin cable
(for displaying menu
and iPod video)
(1.5 m (4.9 ft))
Install Manual
Owner’s Manual
(this manual)
Main unit
IntelliBeam microphone
(× 1) (6 m (19.7 ft))
Cardboard microphone
stand (× 1)
Quick Reference Guide
Digital audio pin cable
(1.5 m (4.9 ft))
Demonstration DVD
(☞p. 53)
Assembly is required before using this unit. Make sure all of the following items are included in the package, as they are all
necessary to complete assembly. Refer to the Install Manual for installation.
• Main unit • Rear panels (left and right)
• Shelf • Support posts
• Bottom panel • Center rear panel
• Glass top panel • Brackets
• Pins • Small screws M4 × 10 mm
• Large screws M5 × 30 mm • Washers
• Fasteners
According to the connection, the supplied cables may not be needed.
1) y

5 En
CONNECTION/INITIAL SETTINGS
PREPARATION PLAYBACK SETTINGS
TROUBLESHOOTING
ABOUT THIS UNIT English
CONNECTION/
INITIAL SETTINGS
Installation
Place the unit in the appropriate position after assembly. Refer to the supplied Install Manual for assembly. This section describes a
suitable installation location to install this unit. Refer to “Notes on installation” below and place the unit correctly in the safe place.
This unit creates surround sound by reflecting projected sound beams off the walls of your listening room. The surround sound effects
produced by this unit may not be sufficient when this unit is installed in the following locations.
• Rooms with walls inadequate for reflecting sound beams
• Rooms with acoustically absorbent walls
• Rooms with measurements outside the following range: W (3 to 7 m (10 to 23 ft)) × H (2 to 3.5 m (7 to 11.5 ft)) × D (3 to 7 m (10 to
23 ft))
• Rooms with less than 1.8 m (6 ft) from the listening position to this unit
• Rooms where objects such as furniture are likely to obstruct the path of sound beams
• Rooms where the listening position is close to the walls
• Rooms where the listening position is not in front of this unit
■ My Surround
In the room such as above, you can enjoy rich surround effects by My Surround (☞p. 24).
Before installing this unit
Notes on installation
• Install your TV in accordance with the manufacturer’s instructions to prevent it from toppling over.
• This unit’s speakers use magnets. Do not place items that are sensitive to magnetism, such as clocks, credit cards, floppy disks, etc., on top of the
rack.
• When the unit is positioned close to a CRT-type TV, picture or sound distortion may occur.
Caution: Handling the tempered glass
The top glass panel is constructed of glass that has been tempered for strength and safety. In addition, a safety film has been applied to the tempered
glass to offer additional protection against injuries that may be caused by shattering glass. However, if you handle the glass inappropriately, the glass
might break and glass fragments might fly, causing injuries. Be sure to follow the precautions listed below:
• Do not allow any strong impacts to the glass (for example, do not allow thrown objects to strike the glass).
• Do not allow sharp objects to contact the glass.
• If the tempered glass has been scratched, it might break unexpectedly. If you see scratches, replace the glass immediately.
• Do not remove the glass caution sticker.
Maximum
load
50kg
15kg
30kg
Interior slide sheet
An interior slide sheet is attached to the
bottom of the unit, allowing you to
move the unit into position easily. To
prevent damage to the floor, clean the
floor of dust and rubbish before moving
the unit.
YRS-1100
• Install this unit in the center of the left and right walls.
• Listening position (such as sofa, etc.) should be located at the
front of the unit.
• The distance between listening position and the unit should be
more than 1.8 m (6 ft).
YRS-1100

Installation
6 En
This unit outputs sound beam as shown in the illustrations below. Install this unit where there are no obstacles such as furniture
obstructing the path of sound beams. Otherwise, the desired surround sound effects may not be achieved.
You may install this unit in parallel with the wall or in the corner.
■ Installation examples
Parallel installation
Install this unit as close to the exact center of the wall as possible.
Ideal installation condition
Install this unit as close to the exact front of your normal listening position as possible.
The distance between listening position and the unit should be more than 1.8 m (6 ft).
Installing this unit
Parallel installation
Install this unit in the exact center of the wall when it is measured
from the left and right corners
Corner installation
Install this unit in the corner at a 40° to 50° angle from the
adjacent walls.
An object, such as furniture
40° to 50°
Parallel installation
(with 5Beam)
Corner installation
(with Stereo+3Beam)

Installation
7 En
PREPARATION PLAYBACK SETTINGS
TROUBLESHOOTING
ABOUT THIS UNIT English
CONNECTION/
INITIAL SETTINGS
Installing in a non-square room
Install this unit so that the sound beams can be reflected off the walls.
Before installing batteries or using the remote control, make sure that you read precautions on the remote control and batteries in
“CAUTION: READ THIS BEFORE OPERATING YOUR UNIT.”
Remote control preparation
Installing the batteries
Battery × 2
(AA, R6, UM-3)
Press U
Remove the transparent sheet before using.
Operation range
Within 6 m (20 ft)

8 En
Connections
For the cable connection, follow the orders below.
TV and Blu-ray disc player connection
1
HDMI cable
(optional)
Input the digital audio/
video signals of the Blu-
ray disc player to this
unit.
2
HDMI cable
(optional)
The digital video of the
Blu-ray disc is reflected
on TV.
3
Optical cable
(supplied)
Play back digital sounds
of TV on this unit.
4
Video pin cable
(supplied)
To display the YRS-
1100’s setup menus on
the TV.
• Do not connect the power cable until all connections are completed.
• Do not use excessive force when inserting the cable plug. Doing so may damage the cable plug and/or terminal.
123
INPUT1
INPUT2
HDMI INPUT
OPTICAL
OUTPUT
VIDEO
AUDIORL
HDMI
OUTPUT
To AC wall outlet
Blu-ray disc player
1. Remove the cap
2. Check the direction of
the plug
TV
Video signals
Audio signals
1
2
3
(Example)
1)
4
2)
Audio return channel (ARC) supported TV
• Connect HDMI cable to audio return channel supported terminal (the
terminal with “ARC” indicated) on TV. In this case, you do not need
to connect optical cable.
• Activate the HDMI control function of this unit (☞p. 39).
What is audio return channel (ARC)?
A function transmits digital audio signal output from TV to this unit
through a HDMI cable. By this function, a digital audio pin cable to
connect TV and this unit is not needed.
Depending on the setting, HDMI for video signal and optical digital
audio, coaxial digital audio or analog audio for audio signal can be
selected. Refer to “Input assignment (☞p. 38)”.
1) y
2) y

Connections
9 En
PREPARATION PLAYBACK SETTINGS
TROUBLESHOOTING
ABOUT THIS UNIT English
CONNECTION/
INITIAL SETTINGS
Game console or tuner connection
Additional external device (example) Connecting cable
1 HDMI supported game console
HDMI cable (optional)
2 Satellite/cable TV (HDMI supported)
HDMI cable (optional)
3 Satellite/cable TV (HDMI not supported)
Digital audio pin cable (supplied)
4)
4 HDMI not supported game console
Analog audio stereo pin cable (optional)
4)
HDMI
OUTPUT
HDMI
OUTPUT
ANALOG
OUTPUT
COAXIAL
OUTPUT
VIDEO
INPUT
VIDEO
OUTPUT
VIDEO
OUTPUT
VIDEO
INPUT
Video signals
Audio signals
TV
1 2 3 4
3)
(Example)
4)
To AC wall outlet
(Example)
4)
(Example)
(Example)
The additional devices having an optical digital output jack, connect to
the optical digital input jack of this unit with an optical cable.
To connect a game console or tuner to TV, you need extra video pin
cables (optional).
3) y 4) y

10 En
Initial settings
Selecting language for menu
display
1
Turn the unit and your TV on.
2
Switch TV’s input to “VIDEO INPUT 1
(example)”.
Check whether the initial screen is displayed.
1)
3
Press and hold SETUP key until the
“LANGUAGE SETUP” menu appears on
your TV.
4
Press U / V key to select the desired
language and then press ENTER key.
Selectable item: ENGLISH, DEUTSCH, FRANÇAIS,
ESPAÑOL, ITALIANO, NEDERLANDS, РУССКИЙ,
SVENSKA
Initial setting: English
YRS-
1100
Push [SETUP] to
begin SETUP MENU.
(example)
[ ]/[ ]:Sel [ENTER]:Return
3)LANGUAGE SETUP
When the screen is not displayed
Confirm the case followings.
– The input jack of your TV and the video output jack of the unit are
connected.
– The input of your TV is set to “VIDEO INPUT 1 (example)”.
1) y

11 En
Initial settings
PREPARATION PLAYBACK SETTINGS
TROUBLESHOOTING
ABOUT THIS UNIT English
CONNECTION/
INITIAL SETTINGS
This unit creates a sound field by reflecting sound beams on the
walls of your listening room and by broadening the cohesion of
all the channels. Just as you would arrange the speaker position of
other audio systems, you need to set the beam angle to enjoy the
best possible sound from this unit.
This unit employs the beam optimization and sound optimization
features with the aid of the supplied IntelliBeam microphone, allowing
you to avoid troublesome listening-based setup and achieving highly
accurate sound adjustments that best match your listening
environment. We call these two features “IntelliBeam” generically.
Beam optimization:
This feature optimizes the beam angle so that the parameter best
matches your listening environment.
Sound optimization:
This feature optimizes the beam delay, volume, and quality so
that the parameters best match your listening environment.
This unit performs these two automatic optimizations with the aid
of the supplied IntelliBeam microphone.
2)
Follow the procedure below to connect the IntelliBeam
microphone to this unit and place it in a proper location.
Auto setup for appropriate
surround effects (IntelliBeam)
Installing the IntelliBeam microphone
1
Place the IntelliBeam microphone on a flat
level surface at your normal listening position.
Use the supplied cardboard microphone stand or a tripod
to place the IntelliBeam microphone at the same height as
your ears would be when you are seated.
■ Assembling the supplied cardboard
microphone stand
• The AUTO SETUP procedure may not be run successfully if this
unit is installed in one of the rooms described in “Installing this
unit” on page 6. In such cases, run MANUAL SETUP (☞p. 14) to
manually adjust the corresponding parameters.
• Do not connect the IntelliBeam microphone to an extension cable
as doing so may result in an inaccurate sound optimization.
• After you have completed the AUTO SETUP procedure, be sure
to disconnect the IntelliBeam microphone.
• The IntelliBeam microphone is sensitive to heat.
– Keep the IntelliBeam microphone away from direct sunlight.
– Do not place the IntelliBeam microphone on top of this unit.
Note
1 2 3
54
Remove
Fit in
Run
through
Place
horizontally
Fit in
Make sure that there are no obstacles between the
IntelliBeam microphone and the walls in your listening
room as these objects obstruct the path of sound beams.
However, any objects that are in contact with the walls
will be regarded as a protruding part of the walls.
2
Check if a supplied video pin cable is
connected and headphones are not
connected.
IntelliBeam microphone Upper limit
Within 1 m (3.3 ft)
Center height of this
unit
Cardboard microphone
stand
Within 1 m (3.3 ft)
Listening
position
1.8 m (6.0 ft)
or more
Lower limit
Center line
IntelliBeam
microphone
Cardboard microphone stand
• “BEAM+SOUND OPTIMIZE” screen appears automatically when
the IntelliBeam microphone is connected. “BEAM OPTIMIZE
ONLY” or “SOUND OPTIMIZE ONLY” can be selected separately
in setup menu (☞p. 14).
• Data set automatically can be saved in the system memory (☞p. 16).
You can save the several data depending on listening room and you
can change the setting conveniently.
2) y

Initial settings
12 En
Using AUTO SETUP (IntelliBeam)
1
Turn the unit and your TV on.
2
Switch TV’s input to “VIDEO INPUT 1
(example)”.
3
Connect the supplied IntelliBeam
microphone to the INTELLIBEAM MIC jack.
The jack is on the underside of the main unit.
• It is normal for loud test tones to be output during the AUTO
SETUP procedure. Make sure that there are no children around
in the listening room while the AUTO SETUP procedure is in
progress.
• Make sure that your listening room is as quiet as possible. For
accurate measurement, turn off air conditioner or other devices
that make noises.
• If there are curtains in your listening room, we recommend
following the procedure below.
1 Open the curtains to improve sound reflection.
2 Run “BEAM OPTIMIZE ONLY”.
3 Close the curtains.
4 Run “SOUND OPTIMIZE ONLY”.
Note
IntelliBeam microphone
When pressing RETURN key displays the setup menu
Press SETUP key repeatedly and display the menu screen again, then
select: “AUTO SETUP” “BEAM+SOUND OPTIMIZE”.
When the screen is not displayed
Confirm the case below.
– The input jack of your TV and the video output jack of the unit are
connected.
– The input of your TV is set to “VIDEO INPUT 1 (example)”.
“BEAM+SOUND OPTIMIZE” is selected automatically. When you
perform “BEAM OPTIMIZE ONLY” or “SOUND OPTIMIZE ONLY”
only, refer to “AUTO SETUP via setup menu (☞p. 14)”.
• Wait outside the room during the AUTO SETUP procedure.
• The AUTO SETUP procedure takes about 3 minutes.
• To cancel the AUTO SETUP procedure after it is started, press
RETURN key.
1) y 2) y
3) y

13 En
Initial settings
PREPARATION PLAYBACK SETTINGS
TROUBLESHOOTING
ABOUT THIS UNIT English
CONNECTION/
INITIAL SETTINGS
The screen below is displayed after connecting
IntelliBeam microphone to the unit.
1) 2)
4
Press ENTER key to start the AUTO
SETUP procedure and then leave the room
within 10 seconds.
3)
The setup screen automatically changes during the AUTO
SETUP procedure.
If AUTO SETUP procedure is complete, this unit rings
the chimes.
4)
AUTO SETUP
(PREPARATION & CHECK)
Please connect the MIC.
Please place the MIC at least
1.8m/6ft away from SoundPro-
jector. The MIC should be set
at ear level when seated.
Measurement takes about 3min.
After [ENTER] is pressed,
please leave the room.
[ENTER]:Start [RETURN]:Cancel
The best setting may not be done if you are in the room. Prepare to
leave the room in 10 seconds after pressing ENTER in step 4.
Note
MEASUREMENT COMPLETE.
BEAM MODE :5Beam/Plus2
SUBWOOFER :Yes
[ENTER]:Save set-up.
[RETURN]:Do
not save
set-up.
XXXXXXXXSHOW RESULTXXXXXXXXXX
Will begin in 10 sec.
Please leave the room.
---------
AUTO SETUP START
[RETURN]:Cancel
(After 3 min.)
5
Press ENTER key to confirm the
results.
5)
The measurement result is saved.
6
Remove the IntelliBeam microphone.
Initial screen appears.
6)
Keep the IntelliBeam microphone in a safe place.
The measurement results are stored in the internal
memory of this unit until you run the AUTO SETUP
procedure again or configure the settings manually.
You can save the several measurement result using
memory setting function (☞p. 16).
AUTO SETUP COMPLETE
Please remove the MIC
from Sound Projector
and the listening position.
• If an error occurs, an error buzzer sounds and an error message is
displayed. For details on error messages, see “Error messages for
AUTO SETUP” (☞p. 15).
• If “ENVIRONMENT CHECK:Failure” is displayed, refer to “Error
messages for AUTO SETUP” (☞p. 15), press RETURN key, and
then run the AUTO SETUP procedure again.
• Depending on the environment of your listening room, the beam
angles of front right and left and surround left and right may be set to
the same value even if “BEAM MODE :5 Beam” is displayed as a
result.
If you do not want to reflect the results, press RETURN key.
When AUTO SETUP is performed from SETUP MENU, menu selection
screen of SETUP MENU appears.
4) y 5) y
6) y

Initial settings
14 En
■ AUTO SETUP via setup menu
1
Place the IntelliBeam microphone and
press SETUP key.
2
Press U / V to select “AUTO SETUP”
and then press ENTER key.
3
Press U / V to select one of the items
below and then press ENTER key.
Select Item:
“BEAM+SOUND OPTIMIZE” (Beam optimization
and sound optimization)
It is recommended that you should select this optimization
feature, if you make settings for the first time.
This menu takes about three minutes.
“BEAM OPTIMIZE ONLY”(Beam optimization
only)
Use to optimize the beam angle so that the parameter best
matches your listening environment.
This menu takes about one minute.
“SOUND OPTIMIZE ONLY”(Sound optimization
only)
Use to optimize the beam delay, volume, and quality so
that the parameters best match your listening environment.
You must optimize the beam angle with “BEAM
OPTIMIZE ONLY” before starting “SOUND OPTIMIZE
ONLY”. It is recommended that you should select this
optimization feature in the following cases:
• If you have opened or closed the curtains in your
listening room before using this unit
• If you have manually set the beam angle.
This menu takes about two minutes.
4
Connect the IntelliBeam microphone to
this unit after “AUTO SETUP
(PREPARATION & CHECK)” screen is
displayed.
For the details on installing and connecting IntelliBeam
microphone, refer to “Installing the IntelliBeam
microphone (☞p. 11)”.
5
Perform the step 4, 5 and 6 of “Using
AUTO SETUP (IntelliBeam) (☞p. 13)”.
6
After setup is completed, remove the
IntelliBeam microphone.
The best setting may not be done if you are in the room. Prepare to
leave the room in 10 seconds after pressing ENTER in step 4.
Note

15 En
Initial settings
PREPARATION PLAYBACK SETTINGS
TROUBLESHOOTING
ABOUT THIS UNIT English
CONNECTION/
INITIAL SETTINGS
■ Error messages for AUTO SETUP
If an error message is displayed on your TV, check the error
message list to solve the problem and then follow the procedure
below.
[ERROR E-1]: Press ENTER key to run the AUTO SETUP
procedure again. Or press Z key to continue the
measurement.
[ERROR E-7]: Press key to turn this unit to standby
mode, then run AUTO SETUP procedure again after turning this
unit on.
Other errors: Press RETURN key to cancel the operation
and then run the AUTO SETUP procedure again.
If the problem is difficult to be solved, configure the settings
manually in “SETUP MENU” (☞p. 32).
ERROR E-1: Please test in quieter environment.
Cause Remedy
There is too much unwanted
noise in your listening room.
Make sure that your listening
room is as quiet as possible. You
may want to choose certain hours
during the day when there is not
much noise coming from outside.
ERROR E-2: No MIC detected. Please check MIC
connection and re-try.
Cause Remedy
The IntelliBeam microphone is
not connected to this unit or
disconnected during the AUTO
SETUP procedure.
Connect the IntelliBeam
microphone to this unit firmly.
ERROR E-3: Unexpected control is detected. Please
re-try.
Cause Remedy
Some other operations were
performed on this unit while the
AUTO SETUP procedure was in
progress.
Do not perform any other
operations while the AUTO
SETUP procedure is in progress.
ERROR E-4: Please check MIC position. MIC should
be set in front of the Sound Projector and re-try.
Cause Remedy
The IntelliBeam microphone is
not placed in front of this unit.
Make sure that the IntelliBeam
microphone is installed in front
of this unit.
ERROR E-5: Please check MIC position. MIC should
be set above 1.8m/6.0ft and re-try.
Cause Remedy
The IntelliBeam microphone is
not placed in the right distance
from this unit.
Make sure that the IntelliBeam
microphone is installed more
than 1.8 m (6.0 ft) from the front
of this unit and within 1 m (3.3
ft) from the center height of this
unit.
ERROR E-6: Volume level is lower than expected.
Please check MIC position/connection and re-try.
Cause Remedy
The IntelliBeam microphone
cannot collect the sound
produced by this unit because the
sound output level is too low.
Make sure that the IntelliBeam
microphone is firmly connected
to this unit and placed in a proper
location. If the problem persists,
contact the nearest
authorized Yamaha service
center for assistance.
ERROR E-7: Unexpected error happened. Please
turn off and re-try.
Cause Remedy
An internal system error
occurred.
Press key to turn this unit
to standby mode, then run AUTO
SETUP procedure again after
turning this unit on.
ERROR E-8: Headphones are connected. Please
unplug the headphones and re-try.
Cause Remedy
A headphone is connected. Disconnect the headphone and
re-try.

Initial settings
16 En
You can save the current beam and sound settings in the system
memory of this unit. It is handy to save certain settings according
to the varying conditions of your listening environment. For
example, if there are curtains in the path of sound beams, the
effectiveness of the sound beams will vary depending on whether
the curtains are open or closed.
■ Saving settings
Saving several measurement results
(Memory setting function)
1
Press SETUP key.
2
Select “MEMORY” and press ENTER
key.
3
Press U / V key to select “SAVE”
and then press ENTER key.
4
Press U / V key to select the desired
memory number and then press ENTER
key.
1)
Selectable item: Memory 1, Memory 2, Memory 3
“Memory 1 Save Now ?” is displayed when the memory
number is selected.
5
Press ENTER key.
“Memory 1 Saving…” is displayed and the setting is
saved.
If there are curtains in your listening room, we recommend
following the procedure below.
1. While the curtains are open, run “BEAM+SOUND
OPTIMIZE” (☞p. 14) and then save the settings to
“Memory 1”.
2. While the curtains are closed, run “SOUND OPTIMIZE
ONLY” (☞p. 14) and then save the settings to
“Memory 2”.
• If system settings are already stored in the selected memory number,
this unit overwrites the old settings.
• Memory function cannot be set when “MEMORY PROTECT” is set
to “ON” in ADVANCED SETUP (☞p. 41).
1) y

17 En
Initial settings
PREPARATION PLAYBACK SETTINGS
TROUBLESHOOTING
ABOUT THIS UNIT English
CONNECTION/
INITIAL SETTINGS
■ Loading settings
1
Press SETUP key.
2
Select “MEMORY” and press ENTER
key.
3
Press U / V key to select “LOAD”
and press ENTER key.
4
Press U / V key to select the
memory number to be loaded and then
press ENTER key.
Selectable item: Memory 1, Memory 2, Memory 3
“Memory 1 Load Now ?” is displayed when the memory
number is selected.
5
Press ENTER key.
“Memory 1 Loading…” is displayed and the setting is
loaded.

Initial settings
18 En
You can use the TV remote control to operate this unit if your TV
supports the HDMI control function (ex. REGZA Link) and is
connected to this unit’s HDMI OUT (ARC) jack.
1)
Operating the unit by TV’s remote
control
What is the HDMI control function?
Remote control of TV (Example)
Power on/off
Controls the volume
Selects a component to
reproduce sounds (this
unit or TV)
Switches input
This unit automatically
selects the input according to
the input source setting on the
TV. Switching input on TV
menu (ex. selecting Blu-ray
disc player on TV menu) also
changes input of this unit.
• Even if your TV supports the HDMI control function, some functions
may not be available. For details, refer to the manual supplied with
your TV.
• If you use HDMI to connect this unit to a device such as a Blu-ray
disc player that supports HDMI control, you can control that device
using the HDMI control function.
• We suggest that you use products (TV, Blu-ray disc/DVD player, etc.)
from the same manufacturer.
1) y

19 En
Initial settings
PREPARATION PLAYBACK SETTINGS
TROUBLESHOOTING
ABOUT THIS UNIT English
CONNECTION/
INITIAL SETTINGS
When the connected components and jacks are changed, reset this
unit with following procedures.
Setting the HDMI control function
1
Turn on all components connected to this
unit with HDMI.
2
Check all components connected with
HDMI and enable the HDMI control
function on each component.
For this unit, set “HDMI CONTROL” to “ON” (☞p. 39).
2)
For external components, refer to the manual supplied
with each component.
3)
3
Turn off the TV and then turn on it again.
Registering HDMI components to TV
4)
1
Select this unit as the input source of the
TV.
2
Turn on the HDMI control function
supported component (example: Blu-ray
disc player) connected to this unit.
3
Select the input source of this unit to Blu-
ray disc player and check whether the
image in the player is correctly displayed
or not.
When connecting Blu-ray disc player with HDMI 1 jack,
press input selector key once to show the following
diagram.
HDMI1
Input source name
4
Check if the HDMI control function works
(turn on this unit or adjust the volume level
using the remote control of the TV).
If the HDMI control function is not working
Check the following:
– The TV is connected to the HDMI OUT (ARC) jack of this
unit.
– “HDMI CONTROL” (☞p. 39) is set to “ON” in setup
menu.
– The HDMI control function is enabled on the TV. (Also
check the relative settings such as power interlock function
or speaker priority.)
The HDMI control function is not working even checking the
above,
– Turn off this unit and the TV, and then turn them back on
again.
– Unplug the power cables of the TV and this unit, and plug
them in again.
– After selecting INPUT1, INPUT2, INPUT3 or DOCK,
change the input of TV and the one of this unit to the same
input.
Changing the connection method and
connected components
1
Turn off the HDMI control function of the
TV and player, turn off all connected
devices, and change the connections.
2
Perform the step 1 to 3 of “Setting the
HDMI control function”.
• The default setting is “OFF”.
When “HDMI CONTROL” is set to “ON” in setup menu,
– Even you press key, the power does not completely turned
off and the signal outputs from the HDMI IN jack to HDMI OUT
(ARC) jack.
– Before pressing key, select desired input sources connected
to HDMI IN (1 to 3).
– According to the TV, the TV operation such as changing the
channel may change the setting of surround modes of this unit.
The example of TV settings
• From a setup menu on your TV, select “Link setting” “HDMI
control setting” (example), then set a setting such as “HDMI control
function” to “ON” (example).
• Setting such as “Speaker priority” should be set to “AV amplifier”.
For some HDMI components, you only need to set the HDMI control
function. Registering HDMI components to TV is not required in this
case.
2) y 3) y
4) y

20 En
PLAYBACK
Playback features
Basic operation for playback
1
Press key to turn on this unit.
2
Turn on components (TV, Blu-ray disc
player, game console, etc.) connected to
this unit.
3
Select a component you want to listen to
by pressing the input selector key ( , ,
) corresponding to the connection of
external components.
For example, when playing back a Blu-ray disc player
connected to HDMI IN 1 jack, select HDMI1 by pressing
input selector key as shown below.
4
Play back component selected in step 3.
5
Press VOLUME +/- key to adjust the
volume.
1)
2) 3)
Press SUBWOOFER +/- key to adjust
the subwoofer.
4)
6
Select surround mode or stereo mode and
set your sound preferences. (☞p. 21)
HDMI1
Input source name
Press key to turn this unit to standby mode.
When audio is output from both TV speaker and this unit, mute the TV
sound.
To mute the sound
Press MUTE key. While the mute function is activated, the VOL
indicator on the front panel display flashes. To resume the volume, press
MUTE key again or press VOLUME +/- key.
When sound input to HDMI IN is output from the TV, the volume level
does not change even if you press VOLUME +/- key or MUTE
key.
• The subwoofer volume in this unit can be adjusted separately from the
volume.
• Lowering the subwoofer volume is recommended at night.
1) y
2) y
3) Note
4)
y

21 En
Playback features
PREPARATION
CONNECTION/
INITIAL SETTINGS SETTINGS
TROUBLESHOOTING
ABOUT THIS UNIT EnglishPLAYBACK
When playback is in stereo sound.
When playback is in surround sound.
Play back digitally compressed format such as MP3 and WMA
emphasizing bass and treble extended dynamically.
While watching the TV, compensate the excessive volume differences
to make it easier to hear during the following cases.
• When switching the channel
• When a TV program changed to commercial
• When one program is finished and another program started
Use this feature to adjust the volume balance for each channel
during playback.
7)
Enjoying sound with your preference
Switching stereo/surround sound
Press STEREO key to switch to stereo
mode.
Press SURROUND key to switch to surround
mode.
Playing back digitally compressed formats
(MP3, WMA, etc.) with enriched sound
(Compressed Music Enhancer)
Press ENHANCER key to turn the function
on/off.
5)
Automatic volume level adjustment
(UniVolume)
Press UNIVOLUME key to turn the function
on/off.
6)
Volume balance adjustment
1
Press CH LEVEL key.
2
Press U/ V key to select adjustable
channel from the followings.
Left Lv: Front left
Right Lv: Front right
CenterLv: Center
Sur.L Lv: Surround left
Sur.R Lv: Surround right
SWFR Lv: Subwoofer
3
Press Y/Z key to adjust the volume.
8)
Adjustable range: -10.0 dB to +10.0 dB
4
Press CH LEVEL key to exit from the
menu.
When My Surround is selected:
CenterLv: Center
SurLR Lv: Surround left and right
SWFR Lv: Subwoofer
• The default setting is “On” for DOCK input, and “Off” for other
inputs.
• Compressed Music Enhancer does not work when the source is
following digital audio signal,
– Dolby TrueHD, DTS-HD Master Audio, etc.
– Signal that sampling rate is more than 48 kHz.
• The default setting is “Off”.
• To set the UniVolume to “Off”, press UNIVOLUME key.
• We recommend turning off the UniVolume function during playback
of music.
Refer to “Volume level of each channel with test tones (☞p. 37)” when
adjusting the test sound.
Example of volume balance
• If you have problems hearing words: Select CenterLv (center) to
increase the level.
• When the sound does not seem like surround sound: Select Sur.L Lv
(surround left) and Sur.R Lv (surround right) to increase the level.
• The volume of subwoofer also can be adjusted by using
SUBWOOFER +/- key.
5) y
6) y
7) y
8) y

Playback features
22 En
Playback surround sounds using Yamaha’s exclusive CINEMA
DSP.
1)
CINEMA DSP
This unit is equipped with a Yamaha CINEMA DSP (digital sound field
processing) chip containing several sound field programs used to
enhance your playback experience. Most of the CINEMA DSP programs
are precise digital recreations of actual acoustic environments of famous
concert halls, music venues, and movie theaters.
The CINEMA DSP programs are not available in the following
conditions.
• HD audio signals are being played back on a Blu-ray disc.
• Audio signals with sampling frequency of higher than 96 kHz are
being played back.
• When using My Surround function (☞p. 23).
• When playing back in stereo mode.
This unit automatically memorizes the settings assigned to each input
source. When you select another input, the unit automatically recalls the
last settings for the selected input.
1) y
2) y
3) y
Enjoying realistic surround sound (CINEMA
DSP)
1
Press SURROUND key to switch to
surround mode.
2
Press the desired CINEMA DSP key
repeatedly.
2) 3)
The CINEMA DSP category name appears in the front
panel display and the CINEMA DSP indicator (☞p. 47)
lights up.
MOVIE
Sci-Fi
This program clearly reproduces dialogs and special sound
effects of the latest science fiction films and lets you feel a
broad and expansive cinematic space.
Adventure
This program reproduces the thrilling environment of the
latest action films and lets you feel the dynamic and
excitement of fast-moving scenes.
Spectacle
This program reproduces the wide and grand environment and
lets you have added impressions on spectacular scenes with
strong visual impacts.

23 En
Playback features
PREPARATION
CONNECTION/
INITIAL SETTINGS SETTINGS
TROUBLESHOOTING
ABOUT THIS UNIT EnglishPLAYBACK
You can set the number of beam output channels and audio
output method.
MUSIC
Music Video
This program produces a vibrant environment and lets you
feel as if you are at an actual jazz or rock concert.
Concert Hall
This program creates a rich surround effect of a large round
concert hall with a great deal of presence, emphasizing the
extension of sounds, and lets you feel as if you are seated
close to the center of the stage.
Jazz Club
This program recreates the acoustic environment of “The
Bottom Line”, a famous jazz club in New York once and lets
you feel as if you are seated right in front of the stage.
ENTERTAINMENT
Sports
This program reproduces the energetic environment of live
sports broadcasting, converging a commentator’s voice on the
center and broadening the overall atmosphere of the stadium,
and lets you feel as if you are seated at an actual stadium or a
ball park.
Talk Show
This program reproduces excitement of live talk shows. It
enhances the ambience of gaiety while keeping the
conversations at a comfortable volume.
Drama
This program stables reverberations that match a wide range
of movie genres from serious dramas to musicals and
comedies, and offers an optimum 3D feeling, reproducing
effects tones and background music softly but cubically
around clear words.
Game
This program is suitable for role-playing and adventure
games. It utilizes the sound field effects for movies to
represent the depth and spatial feeling of the field during play,
while offering movie-like surround effects in the movie
scenes in the game.
Mch Stereo
This program downmixes multi-channel source to 2 channels
and then outputs the sound from all speakers and produces
stereo sounds in wide range. It is ideal for background music
at parties, etc.
OFF (DSP Off)
Sur.Decorder (surround decorder)
This program plays back surround sound without CINEMA
DISP sound field effect.
Changing the audio output method for
surround playback
1
Press SETUP key.
2
Use U / V key and ENTER key to
select “Sound Setup”.
3
Use U / V key and ENTER key to
select “Sound Out”.
4
Use U / V key and ENTER key to
select “Ch Out”.
5
Press Y/Z key to select the number of
output channels.
Selectable item: 5.1ch, 7.1ch, Auto ch*
4)
6
Press V key to select “Sur.”
7
Press Y/Z key to select the desired
audio output method.
5)
Selectable item:
(When 5.1ch is selected) 5Beam, St+3Beam,
3Beam, My Sur.
(When 7.1ch is selected) 5Beam+2, St+3Beam2,
3Beam, My Sur.
8
To exit the menu, press SETUP key.
Continued to the next page.
• The default settings are marked with “*”.
• When “Auto ch”(automatic) is set.
When the input signal is 2ch/5ch 5.1ch output
When the input signal is 6.1/7.1ch 7.1ch output
“Headphone” is displayed when headphones are connected, and the
setting is cannot be changed.
4) y 5) y

Playback features
24 En
■ Selectable item for “Sur. (surround)”
Beam modes for “5.1ch” Beam modes for “7.1ch”
For enjoying
surround sound
effects on the movie,
etc. to the fullest
5 Beam (5 Beam)
Outputs sound beams
from the front right and
left, center, and surround
right and left channels.
5Beam+2 (5Beam Plus2)
Outputs sound beams
from the front right and
left, center, and surround
back right and left
channels. Surround right
and left channel sources
are mixed into the front
right and left and
surround back right and
left channels.
For watching live
recordings on a
Blue-ray disc
St+3Beam (Stereo+3Beam)
Outputs normal sound from the front right and left
channels and sound beams from the center and
surround right and left channels.
St+3Beam2 (St+3Beam Plus2)
Outputs normal sound from the front right and left
channels and sound beams from the center and
surround back right and left channels. Surround
right and left channel sounds are output by using
front right and left channel sound and surround
back right and left sound beams.
For enjoying movies
with the whole
family, or when the
listening position is
close to the backside
of the wall.
3 Beam (3 Beam)
Outputs sound beams from the front right and left and center channels.
Other channel sources are mixed into the front right and left channels.
For small listening
area or when
surround sound
effects are
insubstantial due to
the listening room
conditions.
My Sur. (My Surround)
For the full effect of My Surround, your listening position must face toward the front of this unit.
Even surround sound effects are insubstantial with other setting, you can enjoy sound with surround
effects.

Playback features
25 En
PREPARATION
CONNECTION/
INITIAL SETTINGS SETTINGS
TROUBLESHOOTING
ABOUT THIS UNIT EnglishPLAYBACK
When this unit plays back 2-channel or 5.1-channel sources in
surround mode, surround decoder enables them playback for 7.1-
channel.
1)
You can enjoy a variety of surround sound effects by
switching the decoder.
2)
Available decoders and recommended sources
2ch 5ch
2ch 7ch
Surround decoder setting
Select and set “Sur.Dec.Mode” in the option
menu.
Refer to “Configuring settings for each input source (Option
menu)” on page 27 for the operation of option menu.
Decoder
Recommended
source
Pro Logic (Dolby Pro
Logic)
– All sources
PLII (Dolby Pro Logic
II)
Movie
Music
Game
Movies
Music
Games
Neo:6 (DTS Neo:6) Cinema
Music
Movies
Music
Decoder
Recommended
source
PLIIx (Dolby Pro Logic
IIx)
Movie
Music
Game
Movies
Music
Games
Neo:6 (DTS Neo:6) Cinema
Music
Movies
Music
About the surround decoder Playing back 5.1-channel
sources
When “Ch Out” (channel output) is set to “7.1ch”, this unit decodes 5.1-
channel sources and then playback them in up to 7.1-channel surround
(☞p. 23). One of the following decoders is automatically selected
depending on the input signals.
• The decoders are available only when surround playback is selected.
• Available decoders vary depending on the “Ch Out” setting (☞p. 24).
• During stereo playback (☞p. 21) or using My Surround function
(☞p. 23), surround decoder is invalid.
1) y
5.1ch input source Decoder
PCM, Dolby Digital, Dolby Digital
EX, Dolby TrueHD, Dolby Digital
Plus
Dolby Pro Logic IIx Movie/
Music
DTS Digital, DTS-ES matrix, DTS-
HD Master Audio, DTS-HD High
Resolution Audio
DTS-ES matrix
DTS-ES discrete DTS-ES discrete
2) y

Playback features
26 En
• The headphone volume, tone control, and LFE level can be set
separately with speaker setting.
• If too much bass is heard while playing back 5.1 or 7.1 channels
containing LFE channel (0.1ch), it may be improved by decreasing
the LFE level. (☞p. 36)
1) y
Using useful features
Listening with headphones
Insert a headphone plug to the PHONES jack
(☞p. 46) of this unit.
1)
The surround sound using headphones
With newly-developed 7.1 ch headphone surround
technology, you can enjoy surround and stereo sound using
headphones same as speaker. (☞p. 21) When using
headphones, changing CINEMA DSP (☞p. 22) is also
available.

27 En
Playback features
PREPARATION
CONNECTION/
INITIAL SETTINGS SETTINGS
TROUBLESHOOTING
ABOUT THIS UNIT EnglishPLAYBACK
Use this feature to automatically set this unit to the standby mode
after a specified period of time.
■ Auto power down function
3)
When AutoPowerDown is set, the unit is turned to standby mode
automatically after 10 minutes from the selected input source is
turned off or in standby mode. This function is useful to prevent
you from forgetting to turn off the unit.
Set according to each input (TV/HDMI1-3/INPUT1-3/DOCK).
Available menu items vary depending on the selected input.
Option menu items
The following menu items are provided for each input.
The option menu items are listed below. These settings are
applied to the currently selected input source. The default settings
are marked with “*”.
■ Adjusting input level of each jack
(Volume Trim)
Adjust the input level for each jack to compensate for variations
in volume between different input devices.
Adjustable range: -6.0 dB to 0.0 dB* to +6.0 dB
■ Switching the audio signal to play back
(Decoder Mode)
Use to select digital audio signals for playback.
Selectable item: Auto*, DTS
Auto: This unit automatically selects the audio signal for
playback. Normally select this mode.
DTS: This unit plays back only DTS signal.
■ Setting the surround decoder (Sur. Dec.
Mode)
Refer to “Enjoying sound with your preference” (☞p. 21) for
details.
Sleep timer/auto power down function
Press SLEEP key repeatedly.
Switching the time it takes to switch to standby mode. The
SLEEP indicator (☞p. 47) flashes in the front panel display.
The SLEEP indicator in the front panel display lights up and the
sleep timer is set.
2)
Selectable item: Sleep 120 min., Sleep 90 min., Sleep
60 min., Sleep 30 min., AutoPowerDown, Off
Settings for each input source (Option menu)
1
Press input key ( , , , ) to select
the input you want to change the setting.
2
Press OPTION key.
The option menu is displayed on the front panel display.
3
Select the items by pressing U/ V
key, then press ENTER key.
4
Change setting value by pressing Y/Z
key.
5
To exit the option menu, press OPTION
key.
; Volume Trim
Input source Menu items
HDMI1-3 Volume Trim, Decoder Mode, Sur. Dec. Mode,
Signal Info
TV
INPUT1-3
DOCK
Volume Trim, Sur. Dec. Mode, Connect,
Disconnect, Pairing, Interlock
4)
• The sleep timer setting is canceled if this unit is set to the standby
mode or “Off” is selected.
• When AutoPowerDown is set, SLEEP indicator does not light up
while the input source component is turned on.
• If the unit is operated during the 10 minutes before entering standby
mode, the unit does not enter standby mode until 10 minutes after the
latest operation.
• AutoPowerDown cannot be selected when:
– analog (INPUT3) or DOCK is selected.
– TV or HDMI1-3 is selected and HDMI control function is on.
For details on Interlock, refer to “Playing back iPod/iPhone (☞p. 29)”.
For details on Connect, Disconnect and Pairing, refer to “Playing back
Bluetooth components (☞p. 30)”.
2) y
3) y
4) y

Playback features
28 En
■ Displaying the input signal information
(Signal Info)
Press U/ V key to change the following information.
Format Digital audio format
Channel The number of channels included in input signal
(front/surround/LFE (low frequency sound
effects))
Display example: [3/2/0.1] Front 3ch,
Surround 2ch, LFE for input signal
1)
Sampling Sampling frequency for digital input signal
Bitrate Bitrate per second of input signal
HDMI In HDMI video signal resolution
HDMI Message When error occurs with HDMI (displayed only
when error is occurred.)
If the input signal includes channels that cannot be displayed in the
format shown in the display example, the total number of channels will
be displayed, as in “5.1ch”.
1) y

29 En
Playback features
PREPARATION
CONNECTION/
INITIAL SETTINGS SETTINGS
TROUBLESHOOTING
ABOUT THIS UNIT EnglishPLAYBACK
You can play music stored in iPod/iPhone connected to Yamaha
Universal Dock for iPod (optional YDS-12, etc.) or Wireless
System for iPod/iPhone (optional YID-W10).
After setting the iPod/iPhone to the dock, you can use the remote
control of this unit for playback operations. You can also display
iPod/iPhone video on the TV.
: Controls iPod’s menu.
: Controls click wheel.
iPod/iPhone supported by Universal Dock for iPod
(YDS-12/YDS-11/YDS-10):
(As of September 2010)
• iPod touch, iPod mini, iPod (4th and 5th generations), iPod
Classic, iPod nano, iPhone, iPhone 3G, iPhone 3GS
• iPhones are not compatible with YDS-11/YDS-10.
After connecting the receiver to this unit and setting the iPod/
iPhone to the transmitter, you can use the connected iPod/iPhone
as a remote control while playing back music.
iPod/iPhone supported by Wireless System for iPod
(YID-W10):
(As of September 2010)
iPod touch, iPod (5th generation), iPod Classic, iPod nano,
iPhone, iPhone 3G, iPhone 3GS
■ Link with this unit (Interlock mode)
7)
When using YID-W10, You can use functions following for iPod/
iPhone when “Interlock” is set to “On” in option menu (☞p. 27).
• When playback starts on iPod/iPhone, this unit is turned on and
DOCK (iPod) is selected as source automatically.
• This unit turns to standby mode automatically when the
playback is stopped or after a while iPod/iPhone is removed
from the transmitter.
Playing back iPod/iPhone
1
Insert the iPod/iPhone into the Yamaha
Universal Dock for iPod or Wireless
System for iPod/iPhone connected to the
DOCK terminal.
2)
Place it as far as possible from this unit to avoid the noise.
2
Playback iPod/iPhone by selecting dock
input by pressing DOCK key.
4)
To VIDEO INPUT of TV
3)
(only when YDS-12/YDS-11/
YDS-10 is used)
YDS-12, etc.
When using Yamaha Universal Dock for iPod
(optional YDS-12, etc.)
When using Wireless System for iPod
(optional YID-W10)
5)
6)
• Connect when this unit is in standby mode.
• For details on how to connect and set up the YDS-12 and YID-W10,
refer to manuals supplied with them.
When using YDS-12, YDS-11, or YDS-10 with the video pin cable
(supplied) to connect the VIDEO OUT jack of this unit to the VIDEO
INPUT jack of the TV, you can display iPod/iPhone video on the TV.
• Some features may not be available depending on the model or the
software version of your iPod/iPhone.
• For details about the messages displayed on the front panel display of
connected iPod/iPhone, refer to “iPod/iPhone (☞p. 44)” in
“Troubleshooting”.
• Be sure to set the volume to minimum before docking or removing
your iPod/iPhone.
This unit charges the battery of an iPod/iPhone stationed in the Yamaha
Universal Dock for iPod connected to the DOCK terminal even when
this unit is in standby mode. “Charging” appears in the front panel
display.
• When YID-W10 is connected, and the “Interlock” is set to “On”, it
charges even in standby mode.
• To set the playback volume higher than the maximum volume of the
iPod/iPhone, use this unit’s remote control to control the volume.
This function works with ring tone and sound of application. When the
iPhone is set to silent mode, this unit does not turn on with the ring tone.
2) y
3) y
4) Note
5) y
6) y
7) y

Playback features
30 En
Play back music stored in the Bluetooth components (portable audio
players, Bluetooth-enabled computers, etc.) connected to the
Bluetooth Wireless Audio Receiver (optional YBA-10).
Playing back Bluetooth components
Pairing
About “Pairing”
It is the operation of registering a component for
communications. Pairing must be performed before using a
Bluetooth component with the Yamaha Bluetooth Wireless
Audio Receiver connected to the system for the first time, or if
the registered pairing data has been deleted.
To ensure security, a time limit of 8 minutes is set for the pairing
operation. Please read and fully understand all the instructions
before starting.

31 En
Playback features
PREPARATION
CONNECTION/
INITIAL SETTINGS SETTINGS
TROUBLESHOOTING
ABOUT THIS UNIT EnglishPLAYBACK
1
As described in step 1 (☞p. 29) of “Playing
back iPod/iPhone”, connect the Bluetooth
Wireless Audio Receiver (optional YBA-10)
to DOCK terminal.
1)
2
Press DOCK key to set the input to
DOCK.
3
Turn on the Bluetooth component you
want to pair with, and then enter pairing
state.
2)
4
Press OPTION key.
Option menu for DOCK input appears in the display.
5
Select “Pairing” by pressing U/ V
key and press ENTER key.
3)
“Searching...” appears on the display when the Bluetooth
connection is initiated.
6
Check that the Bluetooth components
recognize the Bluetooth Wireless Audio
Receiver.
If the Bluetooth component detects the Yamaha Bluetooth
wireless audio receiver, the audio receiver name (“YBA-10
YAMAHA”, for example) appears in the device list of the
Bluetooth component.
7
Select the Bluetooth Wireless Audio
Receiver from the component list of the
Bluetooth components and input “0000”
for password of the Bluetooth.
Connecting
1
Press DOCK key to set the input to
DOCK.
2
Press OPTION key.
3
Select “Connect” and press ENTER
key.
5)
4
To disconnect the Bluetooth Wireless
Audio Receiver from the Bluetooth
component, press OPTION key again to
display option menu, select “Disconnect”,
and press ENTER key.
4)
For details, refer to the manual supplied with YBA-10.
Refer to the manual of your Bluetooth component for details.
To cancel pairing, press RETURN key.
When establishing the Bluetooth connection from this unit, it is only
possible to connect to the most recently connected Bluetooth component.
• For details of messages, refer to “Bluetooth (☞p. 45)” in
“Troubleshooting”.
• If you want to establish a connection with a Bluetooth other than the
one most recently connected, initiate the connection from that
Bluetooth component. Refer to the manual of your Bluetooth
component for details.
1) y
2) y
3) y
4) y
5) y

32 En
SETTINGS
Setup menu
Before performing following procedures, check if this unit and
TV are connected with the video pin cable (supplied) and switch
TV input to “VIDEO INPUT 1 (example)”.
Setting procedure
1
Press SETUP key to enter the setup
menu.
1)
2
Select menu by pressing U/ V key
and press ENTER key.
Repeat these step to display desired menu.
3
Change setting value of each menu by
pressing Y/Z key.
2)
4
Press SETUP key again to exit the
setup menu.
Press RETURN key to return to the previous menu.
MEMORY
AUTO SETUP
MANUAL SETUP
INPUT MENU
DISPLAY MENU
[ ]/[ ]:Up/Down
[ENTER]:Enter
SET MENU
SOUND SETUP
1)SETTING PARAMETERS
2)BEAM ADJUSTMENT
3)IMAGE LOCATION
[ ]/[ ]:Up/Down
[ENTER]:Enter
MANUAL SETUP
Press and hold SETUP key to display “LANGUAGE SETUP” menu
(☞p. 40).
The default settings are marked with “*”.
1) Note
2)
y

33 En
Setup menu
PREPARATION
CONNECTION/
INITIAL SETTINGS PLAYBACK SETTINGS
TROUBLESHOOTING
ABOUT THIS UNIT English
Setup menu list
Category Menu Sub menu Features Page
MEMORY LOAD Memory 1, Memory 2,
Memory 3
Loads the beam and sound settings saved in the
memory.
☞p. 17
SAVE Memory 1, Memory 2,
Memory 3
Saves the current beam and sound settings to the
memory.
☞p. 16
AUTO SETUP BEAM+SOUND
OPTIMIZE
AUTO SETUP Optimizes the beam and sound settings automatically.
☞p. 14
BEAM OPTIMIZE
ONLY
Optimizes the beam settings automatically.
☞p. 14
SOUND OPTIMIZE
ONLY
Optimizes the sound settings automatically.
☞p. 14
MANUAL SETUP SETTING
PARAMETERS
INSTALLED POSITION,
listening room settings,
distance settings
Adjusts the listening room and listening position
settings. ☞p. 34
BEAM
ADJUSTMENT
HORIZONTAL ANGLE,
BEAM TRAVEL
LENGTH, FOCAL
LENGTH (Front L, Front
R, Center, Surround L,
Surround R)
Adjusts the various sound beam settings.
☞p. 35
IMAGE
LOCATION
LEFT, RIGHT Adjusts the sound position of the front right and left
channels.
☞p. 36
SOUND SETUP TONE CONTROL TREBLE, BASS Adjusts the output level of high-frequency or
low-frequency sound.
☞p. 36
SUBWOOFER LFE LEVEL Configures the subwoofer settings. ☞p. 36
AUDIO DELAY AUTO LIP SYNC Adjusts delay in output timing between video signals
and audio signals.
☞p. 36
TV, HDMI1-3,
INPUT1, INPUT2,
INPUT3
Adjusts output timing of audio signals manually.
☞p. 36
Dynamic Range
Control
Adaptive DRC, Dolby/
DTS DRC
Adjusts the dynamic range.
☞p. 37
CHANNEL LEVEL Front L, Front R, Center,
Surround L, Surround R,
Subwoofer
Adjusts the volume of each channel.
☞p. 37
SOUND OUT CHANNEL OUT Configures the sound beam output settings. ☞p. 37
SURROUND Configures the surround audio signal output settings. ☞p. 37
INPUT MENU INPUT
ASSIGNMENT
OPTICAL1, OPTICAL2,
COAXIAL, ANALOG
Assigns jacks according to the component to be used.
☞p. 38
AUDIO SELECT
(HDMI1, HDMI2,
HDMI3)
Configures the sound output from HDMI jack
☞p. 38
INPUT RENAME TV, INPUT1, INPUT2,
INPUT3, HDMI1,
HDMI2, HDMI3
R
enames the displayed input source.
☞p. 39
HDMI SETUP HDMI CONTROL,
SUPPORT AUDIO
Configures the HDMI settings.
☞p. 39
DISPLAY MENU F. DISPLAY SETUP STANDARD DIMMER,
AUTO DIMMER
Configures the front panel display settings.
☞p. 40
OSD SETUP OSD SHIFT, OSD BACK
COLOR
Configures the OSD settings.
☞p. 40
LANGUAGE
SETUP
ENGLISH, DEUTSCH,
FRANÇAIS, ESPAÑOL,
ITALIANO,
NEDERLANDS,
РУССКИЙ, SVENSKA
Changes the language used in the OSD.
☞p. 40
UNIT SETUP METERS, FEET Changes the display unit of measurement. ☞p. 40

Setup menu
34 En
Use this menu to manually adjust the parameters related to the
sound beam output. To fine-adjust parameters configured by
AUTO SETUP, use “BEAM ADJUSTMENT” and “IMAGE
LOCATION”.
MANUAL SETUP SETTING PARAMETERS
Use to set the position of this unit in your listening room and the
distance of this unit from the listening position.
1)
2)
Manual setup
Setting parameters
1
In “SETTING PARAMETERS 1/3”,
configure “INSTALLED POSITION”.
Select the installed position of this unit.
3)
Selectable item: FLAT TO WALL* (parallel to
wall), ANGLE TO WALL OR CORNER (angle to
wall or corner)
2
In “SETTING PARAMETERS 2/3”,
configure the listening room settings.
Specify the length and width of the listening room.
Control range: 2.0 m to 12.0 m (6.5 ft to 40.0 ft)
When this unit is installed
parallel to wall, specify the
width of the listening room
and the distance between this
unit and rear wall.
FLAT TO WALL ANGLE TO WALL OR
CORNER
When this unit is installed at
the corner of the room,
specify the width of length
of the listening room.
3
In “SETTING PARAMETERS 3/3”,
configure the distance settings.
Specify the distance between the listening position and
this unit. When this unit is installed parallel to wall, you
also need to specify the distance between the listening
position and left wall.
Control range (from this unit): 1.8 m to 9.0 m
(6.0 ft to 30.0 ft)
Control range (from left wall): 0.6 m to 11.4 m
(2.0 ft to 38.0 ft)
1.8 to 9.0 m
(6.0 to 30.0 ft)
FLAT TO WALL
0.6 to 11.4 m
(2.0 to 38.0 ft)
If you make adjustments in “SETTING PARAMETERS”, the “BEAM
ADJUSTMENT” parameters are automatically adjusted.
If you make adjustments in “SETTING PARAMETERS”, the beam
optimization settings made in the AUTO SETUP procedure will be lost.
If you change this setting, “Surround mode” setting changes
automatically (☞p. 23).
1) y
2) y
3) y

35 En
Setup menu
PREPARATION
CONNECTION/
INITIAL SETTINGS PLAYBACK SETTINGS
TROUBLESHOOTING
ABOUT THIS UNIT English
MANUAL SETUP BEAM ADJUSTMENT
Use to manually adjust the various sound beam settings.
4)
Beam adjustment
1
Configure “HORIZONTAL ANGLE”.
Adjust the horizontal angle of sound beams for each
channel using test tones.
Adjust toward L (left) to move the direction of the output
to the left and adjust toward R (right) to move it to the
right.
Control range: L90° to R90°
2
Configure “BEAM TRAVEL LENGTH”.
5)
Adjust the distance that sound beams travel after being
output and reflected off the wall until they arrive at the
listening position so that all sounds can arrive at the
listening position at the same time.
Control range: 0.3 m to 24.0 m (1.0 ft to 80.0 ft)
The length of each arrow
indicates the beam travel
length.
( – ) ( + )
( + ) ( – )
3
Configure “FOCAL LENGTH”.
6)
Adjust the distance from the front of this unit to the focal
point of output for each channel to achieve an expansive
feeling for each channel. Adjust toward - (minus) to move
the focus outward (widen the sweet spot) and adjust
toward + (plus) to move the focus toward the normal
position (narrow the sweet spot).
We recommend that you use the initial setting
(-0.5 m or -1.5 ft) for “Center”.
Sub menu: Front L, Front R, Surround L, Surround
R
Control range: -1.0 m to +13.0 m (-3.5 ft to +43.5 ft)
Sub menu: Center
Control range: -1.0 m to -0.5 m* to +13.0 m (-3.5 ft
to -1.5 ft* to +43.5 ft)
Focal length
Focal point
Sweet spot
Front left channel Center channel
Example
• The “BEAM ADJUSTMENT” parameters are automatically adjusted
(except “Center” in “FOCAL LENGTH”) if you run the AUTO
SETUP (☞p. 12) or if you configure “SETTING PARAMETERS”
(☞p. 34).
• Depending on the surround mode settings (☞p. 23), some channel
positions may not be available for selection. In this case, “- -” is
displayed.
Configure this setting only when you have adjusted “HORIZONTAL
ANGLE”.
The width of the sweet spot becomes slightly wider than the width of this
unit if you run the AUTO SETUP (☞p. 12) or if you configure
“SETTING PARAMETERS” (☞p. 34).
4) y 5) Note
6)
y

Setup menu
36 En
MANUAL SETUP IMAGE LOCATION
Use to adjust the direction from which the front left and right
channel sound is heard so that each sound can be heard closer to
the center channel.
Use this feature to redirect audio signals if the sound coming
from the front left and right channels seems unnatural.
You can adjust this parameter only when “5BeamPlus2”, “5
Beam” or “3 Beam” is selected in “Surround mode” (☞p. 23).
Select “ON” to configure the sound direction.
Selectable item: OFF*, ON
SOUND SETUP TONE CONTROL
Use to adjust the output level of high/low-frequency sound.
Sub menu: TREBLE (High tone), BASS (Low tone)
Adjustable range: -10.0 dB to 0.0 dB* to +10.0 dB
SOUND SETUP SUBWOOFER
Sub menu: LFE LEVEL
Adjust the volume of Dolby Digital and DTS signals included in
the LFE (low frequency sound effects).
2)
Adjustable range: -20.0 dB to 0.0 dB*
SOUND SETUP AUDIO DELAY
Flat panel display TV images sometimes lag behind the sound.
You can use this function to delay the sound output to
synchronize it with the video image.
Sub menu: AUTO LIP SYNC
Select how to automatically adjust the audio output delay.
Selectable item: ON*, OFF
“ON”: The audio output delay is automatically adjusted. This
item is available when a TV that supports the automatic lipsync is
connected to the HDMI OUT (ARC) jack of this unit.
“OFF”: Select “OFF” if the TV connected to the HDMI OUT
(ARC) jack of this unit does not support the automatic lipsync or
you want to disable the automatic lipsync. The delay time for
each input can be adjusted manually by following items.
Sub menu: TV
Adjust the audio output delay applied to signals input from the
TV jacks.
Adjustable range: 0 ms* to 300 ms
Image location
1
Adjust the image location for the front left
channel (LEFT).
The higher the percentage, the louder the output from the
center.
Control range: 0%* to 95%
2
Adjust the image location for the front
right channel (RIGHT).
The higher the percentage, the louder the output from the
center.
Control range: 0%* to 95%
Without adjustment With the front left
channel adjusted
Without adjustment With the front right
channel adjusted
Tone control
Tone control
Subwoofer settings
Audio delay control
To adjust the volume of each channel, see “CHANNEL LEVEL”
(☞p. 37)
What is LFE?
“LFE” refers to low frequency effects included in the digital audio.
Digital signals such as Dolby Digital and DTS include a dedicated line
for LFE.
1) y 2) y

37 En
Setup menu
PREPARATION
CONNECTION/
INITIAL SETTINGS PLAYBACK SETTINGS
TROUBLESHOOTING
ABOUT THIS UNIT English
Sub menu: HDMI1-3
Manually adjust the audio output delay applied to signals input
from the HDMI IN jacks. This setting is effective only when
“AUTO LIP SYNC” is set to “OFF”.
Adjustable range: 0 ms to 30 ms* to 300 ms
Sub menu: INPUT1/INPUT2/INPUT3
Adjust the audio output delay applied to signals input from the
INPUT1/INPUT2/INPUT3 jacks.
Adjustable range: 0 ms to 30 ms* to 300 ms
SOUND SETUP Dynamic Range Control
Use to adjust the dynamic range compression. Dynamic range is
the difference between the smallest sound that can be heard above
the noise of the equipment and the biggest sound that can be
heard without distortion.
Sub menu: Adaptive DRC
3)
Select whether to automatically adjust the dynamic range in
conjunction with the volume level. When this function is set to
“ON”, the dynamic range is adjusted as follows.
When the volume level is low:
Narrow the dynamic range. Loud sound is played back softer, and
soft sound which is hard to be listened to is played back louder.
When the volume level is high:
Widen the dynamic range. From soft sound to loud sound, source
sound is played back without adjusting volume.
Selectable item: ON*, OFF
“ON”: Adjust dynamic range automatically.
4)
“OFF”: The dynamic range is not adjusted automatically.
Sub menu: Dolby/DTS DRC
Select the amount of dynamic range applied when this unit is
decoding Dolby Digital and DTS signals.
Selectable items: Min/Auto, Standard, Max*
Max: Outputs sound without adjusting the dynamic range of the
input signals.
5)
Standard: The dynamic range recommended for regular home
use.
Min/Auto:
(Minimum) Adjust the dynamic range for low volume or a quiet
environment, such as at night, for playing back bitstream signals
except for Dolby TrueHD signals.
(Auto) Adjust the dynamic range based on information from the
input signal when playing back Dolby TrueHD signal.
SOUND SETUP CHANNEL LEVEL
Use to adjust the volume of each channel with test tones.
6)
Sub menu:
Front L, Front R, Center, Surround L, Surround R,
Subwoofer
Adjustable range: -10.0 dB to +10.0 dB
SOUND SETUP SOUND OUT
Sub menu: CHANNEL OUT, SURROUND
Use to configure the number of output channels (5.1ch/7.1ch/
Auto) or audio output method. For details, see “Changing the
audio output method for surround playback” (☞p. 23).
Dynamic range control
On
On
Output level
Output level
Off
Off
Input level Input level
Volume : low Volume : high
Volume level of each channel with test tones
Sound out setting
Sound beam output configuration
• When set to “ON”, “Dolby/DTS DRC” is automatically set to “Max”.
• This setting is not available when the UniVolume is set to “ON”.
This makes the sound easier to hear when listening at low volume at
night, for example.
“Adaptive DRC” is automatically set to “OFF” when the settings other
than “Max” is selected.
When using My Surround function, Center, Surround L/R, Subwoofer
can be selected.
3) y
4) y
5) y
6) y

Setup menu
38 En
INPUT MENU INPUT ASSIGNMENT
1)
Use to change the key assignments of input jacks on this unit. The
sound of the input select is decided according to key assign set to
each jacks.
2)
Selectable item:
Selectable item: TV, INPUT1, INPUT2, INPUT3, HDMI1,
HDMI2, HDMI3
AUDIO SELECT (Audio select of HDMI input)
Switch the HDMI sound signal to Off when you want to playback
the video from HDMI IN jack and sound from AUDIO INPUT
jack.
3)
Sub menu: HDMI1, HDMI2, HDMI3
Selectable item: OFF, ON*
Input assignment
Input assignment
Sub menu
Default setting
Audio input jack
OPTICAL1 TV
DIGITAL (OPTICAL)
TV
OPTICAL2 INPUT1
DIGITAL (OPTICAL)1
COAXIAL INPUT2
DIGITAL (COAXIAL)2
ANALOG INPUT3
AUDIO INPUT 3
Set corresponding HDMI IN to “OFF” in audio input setting to HDMI IN
jack of “INPUT ASSIGNMENT” when selecting HDMI IN.
The selectable item for other digital sound input jack already selected
will not be displayed.
Example: When connecting this unit and PC
1 Connect DVI output jack of the PC and HDMI IN 3 using DVI
HDMI converter cable.
2 Connect a sound output jack of the PC and AUDIO INPUT 3 jack
(ANALOG).
3 Set “ANALOG” of “INPUT ASSIGNMENT” to “HDMI3”
4 Set “HDMI3” of “AUDIO SELECT (INPUT ASSIGNMENT)” to
“OFF”.
1) y
2) y
3) y

39 En
Setup menu
PREPARATION
CONNECTION/
INITIAL SETTINGS PLAYBACK SETTINGS
TROUBLESHOOTING
ABOUT THIS UNIT English
INPUT MENU INPUT RENAME
Use to change the name of the input source displayed when the
input source is selected. Select a name from templates, or enter an
original name.
■ Selecting a name from templates
■ Entering an original name
Menu: HDMI SETUP
Use to configure the settings related to HDMI signals and HDMI
control function.
■ HDMI control
Sub menu: HDMI CONTROL
Use this function to link this unit and an HDMI control-
compatible TV via HDMI. For details, see “Operating the unit by
TV’s remote control (☞p. 18)”.
Selectable item: OFF*, ON
“OFF”: Disable the control function. The standby power
consumption of this unit decreases.
“ON”: Enable the control function.
■ Audio playback component
Sub menu: SUPPORT AUDIO
Use to select a component to play back HDMI audio signals. This
setting is effective when “HDMI CONTROL” is set to “OFF”.
5)
Selectable item: YRS-1100*, OTHER
“YRS-1100”: Play back the input sound signal.
“OTHER”: Play back the equipment connected to HDMI OUT
(ARC) jack.
Input rename
1
Press U / V key to select the input
source to be renamed.
2
Press Y/Z key to select a input source
name.
Selectable item: Blu-ray, DVD, DVR, CATV,
Satelite, Game
3
To exit the menu, press RETURN key.
1
Press U / V key to select the input
source to be renamed.
2
Press ENTER key.
“T” appears above the new name display to indicate the
position to be entered.
3
Press Y/Z key to place the _
(underscore) under the space or the
character you want to edit.
4
Press U / V key to select the desired
character.
4)
5
Repeat steps 3 and 4 to edit other
characters.
6
To complete the setting, press ENTER
key.
7
To exit from the menu, press RETURN
key.
HDMI setup
A to Z, 0 to 9, a to z, and symbols (!, ?, <, >, etc.) are available for input.
HDMI video signals input to one of the HDMI IN jacks of this unit are
always output from the HDMI OUT (ARC) jack of this unit.
4) y
5) y

Setup menu
40 En
■ Front panel display setup
DISPLAY MENU F.DISPLAY SETUP
Use to adjust the brightness and display settings of the front panel
display.
Sub menu: STANDARD DIMMER
Use to adjust the brightness of the front panel display when you
operate this unit. The front panel display dims as the number
becomes small.
Selectable item: -2, -1, OFF* (brightest)
Sub menu: AUTO DIMMER
Use to adjust the brightness of the front panel display at normal
time (unit/remote control without operation) based on setting
value of the “STANDARD DIMMER”. The front panel display
dims as the number becomes small.
Selectable item: DISPLAY OFF (hide), -3, -2, -1, OFF*
(brightest)
■ OSD setup
DISPLAY MENU OSD SETUP
Use to adjust the display position and select the background color
of the OSD.
Sub menu: OSD SHIFT
Use to adjust the vertical position of the OSD. Adjust toward the -
(minus) direction to raise the position of the OSD, and adjust
toward the + (plus) direction to lower it.
Selectable item: -5 to ±0* to +5
Sub menu: OSD BACK COLOR
Use to select the background color of the OSD.
Selectable item: Blue*, Gray, Black, Purple, Red
■ Language setup
1)
DISPLAY MENU LANGUAGE SETUP
Use to select the language used in the OSD.
Selectable item: ENGLISH* (English), DEUTSCH
(German), FRANÇAIS (French), ESPAÑOL (Spanish),
ITALIANO (Italian), NEDERLANDS (Dutch), РУССКИЙ
(Russian), SVENSKA (Swedish)
■ Unit Setup
DISPLAY MENU UNIT SETUP
Use to change the display unit of measurement.
Selectable item: METERS, FEET
For Canada model, “FEET” is default setting.
For other models, “METERS” is default setting.
• Select METERS to enter distances in meters.
• Select FEET to enter distances in feet.
DISPLAY MENU
Press and hold SETUP key to display the menu directly.
1) y

41 En
PREPARATION
CONNECTION/
INITIAL SETTINGS PLAYBACK SETTINGS
TROUBLESHOOTING
ABOUT THIS UNIT English
Advanced setup
1
Press key to turn this unit to
standby mode.
2
While holding down INPUT key on the front
panel, press key on the remote
control to turn on the power.
“ADVANCED SETUP” appears in the front panel
display.
3
Release INPUT key on the front panel.
4
Press U/ V to select the desired
menu on the front panel display and then
press ENTER key.
1)
5
Change setting by pressing Y/Z key.
2)
6
Press key to set this unit to the
standby mode.
The new setting will be reflected when you turn on the
unit by pressing key.
Menu Description Selectable item/ Adjustable range
TURN ON VOLUME Sets volume level at power-on. Off* (Not set), 01 to 99, MAX (Maximum)
MAX VOLUME SET Sets maximum volume. 01 to 99, MAX* (Maximum)
PANEL INP. KEY Enables/disables the INPUT key on the front panel. P.INPUT: ON* (Enabled), P.INPUT:OFF (Disabled)
F.PANEL. KEY Enables/disables the keys on the front panel. P.INPUT: ON* (Enabled), P.INPUT:OFF (Disabled)
R.INPUT POWER Enables/disables power-on by remote control input
keys when the unit is in standby mode.
R.INPUT PW: OFF* (Disables power-on),
R.INPUT PW: ON (Enables power-on)
AC ON STANDBY Sets whether or not this unit returns to its previous
state when AC power is restored after a temporary
power loss.
AC STANDBY: OFF* (Restores the state before
power was lost),
AC STANDBY: ON (Enters standby mode)
MEMORY PROTECT Prohibits saving of the settings by using the memory
setting function (☞p. 16).
PROTECT:OFF* (Protect is not performed),
PROTECT:ON (Protect is performed)
DEMO MODE Demonstrates sound beam.
3)
BEAM DEMO:OFF* (Normal playback),
BEAM DEMO:ON (Demo mode)
FACTORY PRESET Resets all settings to their default values, except
settings in ADVANCED SETUP.
PRST:CANCEL* (Reset is not performed),
PRST: RESET (Reset is performed)
To return to the previous menu, press RETURN key.
The default settings are marked with “*”.
This unit outputs sound beam down-mixed to 1 channel moving
horizontally to right and left. By this function, you can feel how sound
beam is output from this unit.
“Demo” appears in the front panel display while setting demo mode.
Start/stop moving horizontally
Press Off key.
Auto Demo On: Sound beam automatically moves horizontally to right
and left
Auto Demo Off: The direction of sound beam is fixed
Adjust the angle of sound beam manually
Press SURROUND/ STEREO key in the state of “Auto Demo
Off”
1) y
2) y
3) y

42 En
TROUBLESHOOTING
Troubleshooting
Refer to the chart below when this unit does not function properly. If the problem you are experiencing is not listed below or if the
instruction below does not help, set this unit to the standby mode, disconnect the AC power supply cable, and contact the nearest
authorized Yamaha dealer or service center.
Troubleshooting
General
Problem Cause Remedy
See
page
This unit does not
operate properly.
The internal microcomputer has been
frozen by an external electric shock (such
as lightning or excessive static electricity)
or by a power supply with low voltage.
Set this unit to the standby mode, disconnect the
AC power supply cable, plug it back in after 30
seconds, and use it normally.
–
This unit fails to turn on
when key is pressed,
or enters the standby
mode soon after the
power has been turned
on.
The AC power supply cable is not firmly
connected to the AC wall outlet.
Connect the AC power supply cable firmly to the
AC wall outlet.
8
This unit has been exposed to a strong
external electric shock (such as lightning
and strong static electricity).
Set this unit to the standby mode, disconnect the
AC power supply cable, plug it back in after 30
seconds, and use it normally.
–
This unit suddenly
enters the standby
mode.
The internal temperature becomes too high
and the overheat protection circuitry has
been activated.
Wait for about one hour for this unit to cool down
and turn it back on. –
The sleep timer has turned the unit off. Turn on the power and play back the source again. 27
The power has shut down after wireless
was disconnected for a while during
“Interlock” is set to “On” using YID-W10.
Resume wireless connection or detect audio of
iPod/iPhone and turn on the unit. –
No sound.
Incorrect input or output cable connections. Connect them with an HDMI connection or a
digital connection.
8, 9
No appropriate input source has been
selected.
Select an appropriate input source with INPUT key
or input selector keys.
20
The volume is turned down. Turn up the volume. 20
The sound is muted. Press MUTE or VOLUME +/- key to resume audio
output and adjust the volume level.
20
There is input signal cannot be played back
by this unit.
Play a source whose signals can be reproduced by
this unit. Change the system settings of the source
component.
–
“SUPPORT AUDIO” is set to “OTHER”. Set to “YRS-1100”. 39
“HDMI CONTROL” is set to “OFF”. When connecting ARC (Audio Return Channel)
supported TV and this unit using HDMI cable only,
set “HDMI CONTROL” to “ON”.
39
Connect coaxial digital input jack and TV’s audio
output jack using a digital audio pin cable.
9
Headphones are connected to this unit.
The sound of effect
channel for cable
broadcasting may
become noise.
The source has a surround effect. Do not put surround effect by this unit.
–
No sound or too small
sound from a specific
channel.
The output level of the channel is muted. Raise the output level of the channel. 21, 37
The beam setting is inappropriate. Adjust the beam setting. 23
You play back the source in the stereo
mode.
Start surround playback.
22
Some audio output methods do not output
sound beams for certain channels.
Adjust the beam setting.
23

Troubleshooting
43 En
PREPARATION
CONNECTION/
INITIAL SETTINGS PLAYBACK SETTINGS ABOUT THIS UNIT English
TROUBLESHOOTING
Surround sound effects
are insubstantial.
When connecting this unit with playback
component and TV digitally, the output
setting of the playback component and TV
is not valid.
Refer to the manual supplied with your component
and check the setting.
–
The listening room is not a regular shape,
or the unit or listening position is not at the
center of the right and left wall of the
listening room.
Relocate the unit or listening position.
6, 34
There is no wall in the path of the sound
beam.
Try placing a flat object, such as a board, in the path
of the sound beam.
–
When My Surround is selected, listening
position is not in front of the unit.
Listen in front of this unit.
24
No sound from the
internal subwoofer.
The source does not contain low bass
signals.
The level of subwoofer is low. Increase the subwoofer level with SUBWOOFER +
key.
20
The image is not
displayed on TV screen.
HDMI cable is not securely connected. Connect them with an HDMI connection or a
digital connection.
8, 9
Menu screen of this unit
is not displayed.
VIDEO OUTPUT jacks of this unit and TV
are not connected.
Connect the jacks with video pin cable (supplied).
8
The input switch of TV is not set correctly. Switch the input source for your TV. –
A digital or high-
frequency equipment
produces noises.
The unit may be placed close to digital
equipment or high-frequency equipment.
Leave these equipments from the unit.
–
The system settings
change automatically.
When “HDMI CONTROL” is set to “ON”,
operations of the TV (for example,
changing channels, etc.) may change the
system settings, such as the surround mode.
Set “HDMI CONTROL” to “OFF” or set the
system again by using its remote control.
39
The HDMI control
function does not work
properly.
“HDMI CONTROL” is set to “OFF”. Set “HDMI CONTROL” to “ON”. 39
The HDMI control function is disabled on
your TV.
Refer to the manual supplied with your TV and
check the setting.
–
The number of the connected HDMI
components is over the limit.
Disconnect some of the HDMI components.
–
The automatic lipsync
is not effective even
“AUTO LIP SYNC” is set
to “ON”.
The TV does not support the automatic
lipsync.
Set “AUTO LIP SYNC” to “OFF” and then
manually adjust the audio output delay.
36
“Not Available” appears
on the front panel
display after key
operation.
The key is unable to function in the current
condition.
Remote control
Problem Cause Remedy
See
page
The remote control
does not work and/or
function properly.
Wrong distance or angle. The remote control functions within a maximum
range of 6 m (20 ft) and no more than 30 degrees
off-axis from the front panel.
7
Direct sunlight or lighting (from an inverter
type of fluorescent lamp, etc.) is striking
the remote control sensor of this unit.
Reposition this unit.
–
The batteries are weak. Replace all batteries. 7
Problem Cause Remedy
See
page

Troubleshooting
44 En
If the problem occur other than the following message displayed on the display, check the connection of your iPod/iPhone.
iPod/iPhone
Note
Message Features Remedy
See
page
Connect error
iPod/iPhone has a problem with
communication.
Turn off the power of this unit and reconnect
Yamaha Universal Dock for iPod again.
29
Reset iPod/iPhone to a Yamaha Universal Dock for
iPod.
29
Low Battery
The battery of iPod/iPhone is running low.
Unknown iPod
The iPod/iPhone being used is not
supported by this unit.
Connect supported iPod to this unit.
29
Connected
iPod/iPhone is correctly connected to the
Yamaha Universal Dock for iPod.
iPod/iPhone is correctly set to Yamaha
Wireless Transmitter and connected to this
unit wirelessly.
Disconnected
iPod/iPhone is removed from Yamaha
Universal Dock for iPod.
The wireless connection of this unit and
iPod/iPhone is disconnected.
Unable to play
For some reason, iPod/iPhone cannot be
played back.
Check whether the music stored in iPod/iPhone is
playable or not.
–
Charging
Your iPod/iPhone is charging.

Troubleshooting
45 En
PREPARATION
CONNECTION/
INITIAL SETTINGS PLAYBACK SETTINGS ABOUT THIS UNIT English
TROUBLESHOOTING
If the problem occur other than the following message displayed on the display, check the connection of your Bluetooth component.
y Resetting this unit
When the unit freezes, the problem may solve by resetting the unit.
To reset the unit, press key of this unit for more than 10 seconds.
Bluetooth
Note
Message Features Remedy
See
page
Searching...
The Yamaha Bluetooth Wireless Audio
Receiver (such as YBA-10, optional) and
the Bluetooth component are in the process
of the pairing.
The Yamaha Bluetooth Wireless Audio
Receiver (such as YBA-10, optional) and
the Bluetooth component are in the process
of establishing the connection.
Completed
The pairing is completed.
Canceled
The pairing is canceled.
Not Available
The Yamaha Bluetooth Wireless Audio
Receiver (such as YBA-10, optional) and
the Bluetooth component are in the process
of the pairing.
Connected
The connection between the Yamaha
Bluetooth Wireless Audio Receiver (such
as YBA-10, optional) and the Bluetooth
component is established.
Disconnected
The Bluetooth component is disconnected
from the Yamaha Bluetooth Wireless
Audio Receiver (such as YBA-10,
optional).
Not found
The unit cannot find the Bluetooth
component while performing the pairing or
trying to connect to the Bluetooth
component.
(When pairing)
– The pairing should be performed for this unit and
the Bluetooth component at the same time. Make
sure that the Bluetooth component is also a
pairing mode.
(When Connected)
– Make sure that the power of the Bluetooth
component is on.
– Check if the distance between the Yamaha
Bluetooth Wireless Audio Receiver and the
Bluetooth component is in 10 meters.
–
– The Bluetooth component and this unit have not
been performed pairing. Pairing the stations
again.
30

46 En
ABOUT THIS UNIT
Controls and functions
1 INTELLIBEAM MIC jack
Connect the supplied IntelliBeam microphone for AUTO SETUP
(☞p. 11).
2 Front panel display
Shows information about the operational status of this unit.
(☞p. 47)
3 PHONES jack
For connecting headphones. (☞p. 26)
4 Remote control sensor
Receives infrared signals from the remote control. (☞p. 48)
5 SURROUND STATUS indicator
Lights up according to the input signal.
6 VOLUME +/- key
Controls the volume of the unit. (☞p. 20)
7 INPUT key
Selects playback component. (☞p. 9)
8 key
Turns on the unit or set it to the standby mode.
9 System indicator
Lights up to show the system condition.
Controls and functions
Front panel
8
9
2
7
1
3
5
46
YRS-1100
Displayed
color
Input signal
Blue Following surround audio signal formats:
Dolby TrueHD, Dolby Digital Plus, DTS-HD
Master Audio, DTS-HD High Resolution, Multi-
channel Linear PCM
Orange Surround audio signal other than above
Off Audio signal other than above or no signal
Light Power
HDMI
CONTROL
(☞p. 39)
Interlock
Mode
(☞p. 29)
Green On – –
Red Standby On Off
Standby Off On
Off Standby Off Off
In the standby mode, this unit consumes a small amount of
power in order to receive infrared signals from the remote
control or to search for HDMI signals.
Note

Controls and functions
47 En
PREPARATION
CONNECTION/
INITIAL SETTINGS PLAYBACK SETTINGS
TROUBLESHOOTING
ABOUT THIS UNIT English
1 Power cable
For connecting to an AC wall outlet. (☞p. 8)
2 HDMI OUT (ARC) jack
For connecting HDMI compatible TV and external components.
(☞p. 8)
3 HDMI IN jack
For connecting HDMI compatible Blu-ray disc player, tuner and
game console. (☞p. 8, 9)
4 OPTICAL digital input (TV) jack
For connecting optical cable to the TV. (☞p. 8)
5 OPTICAL digital input 1 jack
For connecting optical cable to the external components. (☞p. 9)
6 COAXIAL digital input 2 jack
For connecting digital audio pin cable to the external
components. (☞p. 9)
7 AUDIO INPUT 3 jack
For connecting analog cable to the external components. (☞p. 9)
8 DOCK terminal
For connecting optional Yamaha Universal Dock for iPod,
Wireless System for iPod/iPhone, and Bluetooth Wireless Audio
Receiver. (☞p. 29, 30)
9 VIDEO OUT jack
For connecting video input jack of TV to play back video in iPod/
iPhone. (☞p. 8)
1 HDMI indicator
Lights up when HDMI signal is input.
2 SLEEP indicator
Lights up when the sleep timer is set. (☞p. 27)
3 CINEMA DSP indicator
Lights up when a sound field program is selected (☞p. 22).
4 VOL indicator
Indicates the current volume level. (☞p. 20)
5 Multi information display
Displays information in alpha-numeric values.
Displays playback components and current sound output when
power is on.
Rear panel
4 5 6 7
1
2
8 93
YRS-1100
Front panel display
12
5
34

Controls and functions
48 En
CINEMA DSP program keys
Select the CINEMA DSP programs (☞p. 22).
SURROUND key
Switches to surround playback. (☞p. 22)
STEREO key
Switches to stereo playback. (☞p. 21)
Input selector keys
Select playback component. (☞p. 20)
INFO key
Switches the information display on the front panel as follows.
• Input/Output: Input name/surround mode
• DSP Program: Sound field program of CINEMA DSP (only
when using CINEMA DSP)
• Audio Decoder: Sound signal decoder currently selected
SETUP key
Displays the setup menu. (☞p. 32)
MENU (U) key, ENTER key,
(Y) key, (Z) key, (V) key
• Change the setting. (☞p. 32)
• Operate iPod.
DOCK key
Selects iPod/iPhone or Bluetooth component. (☞p. 29, 30)
RETURN key
Returns to the previous menu screen.
SUBWOOFER (+/-) key
Adjusts the volume balance of subwoofer.
SLEEP key
Sets the sleep timer. (☞p. 27)
key
Turns on the unit or set it to the standby mode. (☞p. 20)
UNIVOLUME key
Turns UniVolume mode to on/off. (☞p. 21)
ENHANCER key
Turns Compressed Music Enhancer to on/off. (☞p. 21)
OPTION key
Displays option menu for each input source. (☞p. 27)
S/T key
Operate iPod wheel. (☞p. 29).
VOLUME (+/-) key
Controls the volume of the unit. (☞p. 20)
MUTE key
Mute/resume the sound. (☞p. 20)
CH LEVEL key
Adjusts the volume balance during playback. (☞p. 21)
Remote control
Infrared signal transmitter

49 En
PREPARATION
CONNECTION/
INITIAL SETTINGS PLAYBACK SETTINGS
TROUBLESHOOTING
ABOUT THIS UNIT English
Glossary
Ordinarily, two front speakers, a center speaker, two surround
speakers, and a subwoofer are necessary for enjoying 5.1 channel
surround sound.
■ 7.1 channel surround playback
This unit creates surround sound by reflecting projected sound
beams off the walls of your listening room.
The number of sampling (process for digitalizing analog signals)
per second. In principle, the higher the sampling rate, the wider
the frequency range that can be played back, and the higher the
quantized bit rate, the finer the sound that can be reproduced.
A channel is an audio type that has been divided based on range
and other characteristics.
Ex. 7.1 channel
• Front speakers, Left (1ch), Right (1ch)
• Center speaker (1ch)
• Surround speakers, Left (1ch), Right (1ch)
• Surround back speakers, Left (1ch), Right (1ch)
• Subwoofer (1ch × 0.1* = 0.1ch)
* In contrast to a full 1-channel band, a component designed to
enhance low frequency sound for added effect.
Digital surround sound system which is developed by Dolby
Laboratories provides completely independent multi-channel
audio. With 3 front channels (left, center, and right) and 2
surround stereo channels, Dolby Digital provides five full-range
audio channels. By using 2 channel stereo for the surround
speakers, more accurate moving sound effects and surround
sound environment are possible than with Dolby Surround.
Dolby Digital Plus is an advanced audio technology developed
for high-definition programming and media including HD
broadcasts, and Blu-ray Disc. Selected as an optional audio
standard for Blu-ray Disc, this technology delivers multichannel
sound with discrete channel output. Supporting bitrates up to 6.0
Mbps, Dolby Digital Plus can carry up to 7.1 discreet audio
channels simultaneously. Supported by HDMI and designed for
the optical disc players and AV receivers/amplifiers of the future,
Dolby Digital Plus also remains fully compatible with the
existing multichannel audio systems that incorporate Dolby
Digital.
Glossary
Digital Sound Projector
Typical 5.1 channel
speaker system
Front speakers
Subwoofer
Surround
speaker
Center
speaker
The sound image of the system
Sampling frequency
Channel (ch)
Dolby Digital
Dolby Digital Plus

Glossary
50 En
Dolby Pro Logic IIx is a new technology enabling discrete
multichannel playback from 2-channel or multi-channel sources.
There are three modes available: “Music mode” for music
sources, “Movie mode” for movie sources (for 2-channel sources
only) and “Game mode” for game sources.
Dolby TrueHD is an advanced lossless audio technology
developed for high-definition disc-based media including Blu-ray
Disc. Selected as an optional audio standard for Blu-ray Disc, this
technology delivers sound that is bit-for-bit identical to the studio
master, offering a high-definition home theater experience.
Supporting bitrates up to 18.0 Mbps, Dolby TrueHD can carry up
to 8 discrete channels of 24-bit/96 kHz audio simultaneously.
Dolby TrueHD also remains fully compatible with the existing
multichannel audio systems and retains the metadata capability of
Dolby Digital, allowing dialog normalization and dynamic range
control.
Deep Color is a type of video signal that can be transmitted by the
HDMI jacks of this unit. Deep Color refers to the use of various
color depths in displays, up from the 24-bit depths in previous
versions of the HDMI specification. This extra bit depth allows
HDTVs and other displays go from millions of colors to billions
of colors and eliminate on-screen color banding for smooth tonal
transitions and subtle gradations between colors. The increased
contrast ratio can represent many times more shades of gray
between black and white. Also Deep Color increases the number
of available colors within the boundaries defined by the RGB or
YCbCr color space.
Digital surround sound system developed by DTS, Inc., which
provides 5.1 channel audio. With an abundance of audio data, it is
able to provide authentic-sounding effects.
DTS-HD High Resolution Audio is a high resolution audio
technology developed for high-definition disc-based media
including Blu-ray Disc. Selected as an optional audio standard for
Blu-ray Disc, this technology delivers sound that is virtually
indistinguishable from the original, offering a high-definition
home theater experience. Supporting bitrates up to 6.0 Mbps for
Blu-ray Disc, DTS-HD High Resolution Audio can carry up to
7.1 discrete channels of 24-bit/96 kHz audio simultaneously.
The lossless high quality audio format created for next generation
optical disc such as Blu-lay Disc. It is selected as an audio
standard for Blu-ray Disc. Supporting bitrates up to 24.5 Mbps
for Blu-ray Disc, DTS-HD High Master Audio can carry up to 7.1
discrete channels of 24-bit/96 kHz audio simultaneously.
HDMI (High-Definition Multimedia Interface) is the first
industry supported, uncompressed, all-digital audio/video
interface. When used in combination with HDCP (High-
bandwidth Digital Content Protection), HDMI provides a secure
audio/video interface that meets the security requirements of
content providers and system operators.
Linear PCM is a signal format under which an analog audio
signal is digitized, recorded, and transmitted without using any
compression. This is used as a method of recording CDs and
DVD audio. The PCM system uses a technique for sampling the
size of the analog signal per very small unit of time. Standing for
pulse code modulation, the analog signal is encoded as pulses and
then modulated for recording.
x.v.Color is a type of video signal that can be transmitted by the
HDMI jacks of this unit. It is a more extensive color space than
sRGB, and allows the expression of colors that could not be
expressed before. While remaining compatible with the color
gamut of sRGB standards, “x.v.Color” expands the color space
and can thus produce more vivid, natural images. It is particularly
effective for still pictures and computer graphics.
Dolby Pro Logic IIx
Dolby TrueHD
Deep Color
DTS
DTS-HD High Resolution Audio
DTS-HD Master Audio
HDMI
PCM (Pulse Code Modulation)
x.v.Color

51 En
PREPARATION
CONNECTION/
INITIAL SETTINGS PLAYBACK SETTINGS
TROUBLESHOOTING
ABOUT THIS UNIT English
Specifications
Amplifier section
• Rated Output Power
Front L/R (1 kHz, 1% THD, 6 Ω) ....................................... 45 W + 45 W
Small dia. speaker (1 kHz, 1% THD, 4 Ω).................................... 27.2 W
Subwoofer (100 Hz, 1% THD, 3 Ω) ................................................ 90 W
• Maximum Output Power
Front L/R (1 kHz, 10% THD, 6 Ω) .....................................50 W + 50 W
Small dia. speaker (1 kHz, 10% THD, 4 Ω)..................................... 32 W
Subwoofer (100 Hz, 10% THD, 3 Ω) ............................................ 100 W
Speaker section
• Small dia. speaker...................2.8 cm (1-1/8 in) magnetic shielding cone
• Front speaker
.......................6 × 10 cm (2-3/8 × 3-7/8 in) non-magnetic shielding cone
• Subwoofer ........................13 cm (5-1/8 in) non-magnetic shielding cone
Input Jack
• Audio Input
Optical .......................................................................... 2 (TV, INPUT 1)
Coaxial...................................................................................1 (INPUT 2)
Analog ........................................................................... 1 pair (INPUT 3)
• HDMI Input............................................................... 3 (HDMI IN 1 to 3)
Output Jacks
• HDMI Output.......................................................................................... 1
• Video Output (Composite video, 1.0 Vp-p)............................................1
[Canada, and Korea models]...........................................................NTSC
[Other models] ...................................................................................PAL
• Headphone
Headphone Output Power (1 kHz, 460 mV input, 16 Ω) ............ 220 mV
General
• Power Supply
[Canada model] .............................................................AC 120 V, 60 Hz
[Europe, U.K., Korea and Asia models] ...........AC 220-240 V, 50/60 Hz
• Power Consumption......................................................................... 42 W
• Standby Power Consumption
(HDMI Control on) ......................................................... Less than 5.0 W
(HDMI Control off).........................................................Less than 0.5 W
• Frequency Response........................................................35 Hz to 20 kHz
• Dimensions (W × H × D)
YRS-1100.............................................................. 1200 × 500 × 445 mm
(47-1/4 × 19-3/4 × 17-5/8 in)
• Weight
YRS-1100....................................................................46.5 kg (102.5 lbs)
* Specifications are subject to change without notice.
The “ “ logo and “IntelliBeam” are trademarks of Yamaha
Corporation.
The “ “ logo and “Cinema DSP” are registered trademarks of
Yamaha Corporation.
Manufactured under license from Cambridge Mechatronics Ltd.
Worldwide patents applied for.
The “ “ logo and “Digital Sound Projector™” are trademarks of
Cambridge Mechatronics Ltd.
Manufactured under license from Dolby Laboratories. “Dolby”, “Pro
Logic” and the double-D symbol are trademarks of Dolby Laboratories.
Manufactured under license under U.S. Patent #’s: 5,451,942; 5,956,674;
5,974,380; 5,978,762; 6,226,616; 6,487,535; 7,212,872; 7,333,929;
7,392,195; 7,272,567 & other U.S. and worldwide patents issued &
pending. DTS, DTS-HD and the Symbol are registered trademarks, &
DTS-HD Master Audio, and the DTS logos are trademarks of DTS, Inc.
Product includes software. © DTS, Inc. All Rights Reserved.
iPod, iPhone
“iPod” is a trademark of Apple Inc., registered in the U.S. and other
countries.
“iPhone” is a trademark of Apple Inc.
Bluetooth
Bluetooth is a registered trademark of Bluetooth SIG and is used by
Yamaha in accordance with a license agreement.
“HDMI,” the “HDMI” logo and “High-Definition Multimedia Interface”
are trademarks, or registered trademarks of HDMI Licensing LLC.
“x.v.Color” is a trademark of Sony Corporation.
“UniVolume” is a trademark of Yamaha Corporation.
Specifications

Specifications
52 En
■ Receivable audio signals
y
• Refer to the supplied instruction manuals of the input source component, and set the component appropriately.
• When CPPM copy-protected DVD-Audio is played back, video and audio signals may not be output depending on the type of the DVD player.
• This unit is not compatible with HDCP-incompatible HDMI or DVI components. Refer to the supplied instruction manuals of HDMI or DVI
components for HDCP compatibility.
• To decode audio bitstream signals on this unit, set the input source component appropriately so that the component outputs the bitstream audio signals
directly (does not decode the bitstream signals on the component). Refer to the supplied instruction manuals for details.
■ Repeatable video signals
1)
– This unit is compatible with the video signals of the following resolutions:
• 480i/60 Hz
• 576i/50 Hz
• 480p/60 Hz
• 576p/50 Hz
–Deep Color
– x.v.Color
– 3D video signal
• 720p/60 Hz, 50 Hz
• 1080i/60 Hz, 50 Hz
• 1080p/60 Hz, 50 Hz, 24 Hz
Available signal information
HDMI signal compatibility
Audio signal types Audio signal formats Compatible media
2ch Linear PCM 2ch, 32-192 kHz, 16/20/24 bit CD, DVD-Video, DVD-Audio, etc.
Multi-ch Linear PCM 8ch, 32-192 kHz, 16/20/24 bit DVD-Audio, Blu-ray disc, HD DVD, etc.
Bitstream (SD Audio) Dolby Digital, Dolby Digital EX, DTS, DTS-
ES
DVD-Video, etc.
Bitstream (HD Audio) Dolby TrueHD, Dolby Digital Plus, DTS-HD
Master Audio, DTS-HD High Resolution
Audio
Blu-ray disc, HD DVD
Digital audio signal (optical/coaxial)
Audio signal types Audio signal formats Compatible media
2ch Linear PCM 2ch, 32-96 kHz, 16/20/24 bit CD, DVD-Video, DVD-Audio, etc.
Bitstream Dolby Digital, Dolby Digital EX, DTS, DTS-
ES
DVD-Video, etc.
The compatible video signal is changed depending on the connected TV.
1) y

53 En
PREPARATION
CONNECTION/
INITIAL SETTINGS PLAYBACK SETTINGS
TROUBLESHOOTING
ABOUT THIS UNIT English
Using the supplied demonstration DVD
By playing back the supplied demonstration DVD, you can check the digital signals being input properly from the Blu-ray disc player
through the digital connection (HDMI, optical, or coaxial) and experience this unit’s multi-channel surround sound.
If “Dolby D” does not appear in the front panel display in step 6,
check the followings.
Is the Blu-ray disc player connected to this unit using a
digital cable?
You need to connect these components with digital cables
(HDMI cable, optical cable, or coaxial cable) to playback 5.1-
channel contents such as Dolby Digital.
Is an input source selected correctly on this unit?
Check that which input jack of this unit the Blu-ray disc player is
connected to. Then check whether the name of input source
displayed in the front panel display of this unit is the same as that
of the input jack used.
If you connect the Blu-ray disc player to the HDMI IN 1 jack, when you
select HDMI 1 as the input source, “HDMI 1” should be displayed.
Is digital audio output set correctly on the Blu-ray disc
player?
HDMI connection: Set the digital audio output setting to “Auto”
or “Bitstream”.
Digital audio connection: Enable “Dolby Digital/DTS” or
“Bitstream”.
Refer to the owner’s manual supplied with the Blu-ray disc player for the
settings.
Playing back the demonstration DVD
1
Select input sources both on this unit and
your TV so that audio signal of DVD is
input to this unit and video signal is input
to your TV.
HDMI connection: On your TV, select this unit as the
input source. On this unit, select the Blu-ray disc player as
the input source.
Audio/Video connection: Select the Blu-ray disc player as
the input source on both of your TV and this unit.
2
Load the demonstration DVD.
3
Select “Rain and Thunder” from the DVD
menu.
Display the DVD menu screen by using the remote
control of the Blu-ray disc player and then playback “Rain
and Thunder”.
4
Press OPTION key on the remote control
to display the option menu.
5
Press U/V key to select “Signal Info”, and
then press ENTER key.
6
Check that “Dolby D” appears in the front
panel display.
If the “Dolby D” does not appear, the digital audio signal
of the demonstration DVD is not input to this unit. Check
the connections and settings of the Blu-ray disc player.
7
Press V key and check that “3/2/0.1”
appears in the front panel display.
8
Experience the Dolby Digital 5.1ch
surround sound.
The sound of rain and buzzing of cicadas are heard from
all around the listening position.
Dolby D
3/2/0.1
“Dolby D” does not appear when the Blu-ray disc player is not
playing back the demonstration DVD and the DVD menu screen is
displayed.
Note
Enjoy the surround sound in surround playback mode (☞p. 21).
y
If “Dolby D” does not appear
y
y

54 En
Index
Numerics
2ch ................................................................................ 25
2-channel ...................................................................... 25
3 Beam (3 Beam).......................................................... 24
5 Beam (5 Beam).......................................................... 24
5.1ch .............................................................. 23, 24, 25
5Beam+2 (5Beam Plus2).............................................. 24
7.1ch ...................................................................... 23, 24
A
Adaptive DRC .............................................................. 37
Advanced setup ............................................................ 41
Analog audio stereo pin cable ......................................... 9
Angle to wall or corner................................................. 34
ARC................................................................................. 8
Audio output method.................................................... 23
Audio select of HDMI input......................................... 38
AUTO LIP SYNC ........................................................ 36
Auto power down function........................................... 27
AUTO SETUP.............................................................. 15
AutoPowerDown.......................................................... 27
B
BEAM ADJUSTMENT ............................................... 35
Beam optimization ....................................................... 11
BEAM OPTIMIZE ONLY........................................... 14
BEAM TRAVEL LENGTH......................................... 35
BEAM+SOUND OPTIMIZE....................................... 14
Before installing this unit ................................................ 5
Bluetooth components.................................................. 30
Bluetooth Wireless Audio Receiver............................. 30
Blu-ray disc player ....................................................... 20
C
Cardboard microphone stand........................................ 11
Ch Out .......................................................................... 23
Channel (ch) ................................................................. 49
Channel output ............................................................. 25
CINEMA DSP.............................................................. 22
CINEMA DSP indicator............................................... 47
Compressed Music Enhancer ....................................... 21
D
Decoder Mode .............................................................. 27
Deep Color.................................................................... 50
Digital audio pin cable..................................................... 9
Digital Sound Projector................................................ 49
Dolby Digital................................................................ 49
Dolby Digital Plus ........................................................ 49
Dolby Pro Logic IIx...................................................... 50
Dolby TrueHD ...................................................... 21, 50
DTS....................................................................... 27, 50
DTS-HD High Resolution ............................................ 46
DTS-HD High Resolution Audio ................................. 50
DTS-HD Master Audio......................................... 21, 50
Dynamic range control.................................................. 37
E
Entertainment................................................................ 23
Error buzzer sounds...................................................... 13
Error message ............................................................... 13
F
F.DISPLAY SETUP..................................................... 40
FOCAL LENGTH ........................................................ 35
Front panel.................................................................... 46
Front panel display ....................................................... 47
G
Game console................................................................ 20
H
HD audio signals........................................................... 22
HDMI............................................................................ 50
HDMI cable .................................................................... 8
HDMI control ............................................................... 39
HDMI control function................................................. 18
Headphone ............................................................ 23, 26
HORIZONTAL ANGLE.............................................. 35
I
IMAGE LOCATION.................................................... 36
INPUT ASSIGNMENT................................................ 38
INPUT RENAME......................................................... 39
INTELLIBEAM MIC jack ........................................... 46
IntelliBeam microphone ............................................... 11
Interior slide sheet........................................................... 5
Interlock........................................................................ 29
iPhone ........................................................................... 29
iPod............................................................................... 29
L
LANGUAGE SETUP................................................... 40
LFE ....................................................................... 26, 36

Index
55 En
PREPARATION
CONNECTION/
INITIAL SETTINGS PLAYBACK SETTINGS
TROUBLESHOOTING
ABOUT THIS UNIT English
M
MEMORY .................................................................... 16
Movie............................................................................ 22
MP3............................................................................... 21
Music ............................................................................ 23
My Sur. (My Surround) ................................................ 24
O
Optical cable ............................................................... 8, 9
Option menu ................................................................. 27
OSD SETUP ................................................................. 40
P
Pairing........................................................................... 30
Parallel to wall .............................................................. 34
PCM (Pulse Code Modulation) .................................... 50
PHONES jack ............................................................... 46
Power cable.............................................................. 8, 47
R
Rear panel ..................................................................... 47
Registering HDMI components to TV ......................... 19
Remote control.............................................................. 48
Remote control sensor .................................................. 46
S
Sampling frequency.............................................. 22, 49
Sampling rate................................................................ 21
Satellite/cable TV ........................................................... 9
SETTING PARAMETERS .......................................... 34
Signal Info .................................................................... 28
SLEEP indicator ................................................... 27, 47
Sleep timer.................................................................... 27
Sound optimization....................................................... 11
SOUND OPTIMIZE ONLY......................................... 14
Sound Out..................................................................... 23
Sound out setting .......................................................... 37
St+3Beam (Stereo+3Beam).......................................... 24
St+3Beam2 (St+3Beam Plus2)..................................... 24
STATUS indicator........................................................ 46
Stereo mode .................................................................. 21
Subwoofer............................................................. 20, 21
Subwoofer settings........................................................ 36
SUPPORT AUDIO....................................................... 39
Sur................................................................................. 23
Sur. Dec. Mode............................................................. 27
Surround decoder.......................................................... 25
Surround mode.............................................................. 21
Surround sound ............................................................ 22
Sweet spot .................................................................... 35
System indicator........................................................... 46
T
Tempered glass ............................................................... 5
Test tones ..................................................................... 37
Tone control ................................................................. 36
TV ................................................................................ 20
U
UNIT SETUP............................................................... 40
UniVolume................................................................... 21
V
Video pin cable ............................................................... 8
VOL indicator ....................................................... 20, 47
Volume......................................................................... 20
Volume balance............................................................ 21
Volume Trim................................................................ 27
W
Wireless System........................................................... 29
WMA ........................................................................... 21
X
x.v.Color....................................................................... 50
Y
YBA-10........................................................................ 31
YDS-12 ........................................................................ 29
YID-W10 ..................................................................... 29

i Es
PRECAUCIÓN: LEA LAS INDICACIONES SIGUIENTES ANTES DE UTILIZAR ESTE APARATO
1 Para asegurar el mejor rendimiento de este aparato, lea
atentamente este manual. Y luego guárdelo en un lugar
seguro para poder consultarlo en el futuro en caso de ser
necesario.
2 Instale esta unidad en un lugar bien ventilado, fresco, seco y
limpio, alejado de la luz directa del sol, fuentes de calor,
vibración, polvo, humedad y/o frío. Para una adecuada
ventilación, permita que el equipo tenga el siguiente espacio
libre mínimo:
Atrás: 5 cm
A los lados: 5 cm
3 Coloque este aparato lejos de otros aparatos eléctricos,
motores o transformadores, para evitar así los ruidos de
zumbido.
4 No exponga este aparato a cambios bruscos de temperaturas,
del frío al calor, ni lo coloque en lugares muy húmedos (una
habitación con deshumidificador, por ejemplo), para impedir
así que se forme condensación en su interior, lo que podría
causar una descarga eléctrica, un incendio, daños en el
aparato y/o lesiones a las personas.
5 Evite instalar este aparato en un lugar donde puedan caerle
encima objetos extraños y/o donde quede expuesto al goteo o
a la salpicadura de líquidos. Encima de este aparato no ponga:
– Otros componentes, porque pueden causar daños y/o
decoloración en la superficie de este aparato.
– Objetos con fuego (velas, por ejemplo), porque
pueden causar un incendio, daños en el aparato y/o
lesiones a las personas.
– Recipientes con líquidos, porque pueden caerse y
derramar el líquido, causando descargas eléctricas al
usuario y/o dañando el aparato.
6 No tape este aparato con un periódico, mantel, cortina, etc.
para no impedir el escape del calor. Si aumenta la
temperatura en el interior del aparato, esto puede causar un
incendio, daños en el aparato y/o lesiones a las personas.
7 No enchufe este aparato a una toma de corriente hasta
después de haber terminado todas las conexiones.
8 No ponga el aparato al revés. Podría recalentarse y
posiblemente causar daños.
9 No utilice una fuerza excesiva con los conmutadores, los
controles y/o los cables.
10 Cuando desconecte el cable de alimentación de la toma de
corriente, sujete la clavija y tire de ella; no tire del propio
cable.
11 No limpie este aparato con disolventes químicos porque
podría estropear el acabado. Utilice un paño limpio y seco
para limpiar el aparato.
12 Utilice solamente la tensión especificada en este aparato.
Utilizar el aparato con una tensión superior a la especificada
resulta peligroso y puede producir un incendio, daños en el
aparato y/o lesiones a las personas. Yamaha no se hará
responsable de ningún daño debido al uso de este aparato con
una tensión diferente de la especificada.
13 Para impedir daños debidos a relámpagos, desconecte el
cable de alimentación de la toma de corriente durante una
tormenta eléctrica.
14 No intente modificar ni arreglar este aparato. Póngase en
contacto con el personal de servicio Yamaha cualificado
cuando necesite realizar alguna reparación. La caja no deberá
abrirse nunca por ninguna razón.
15 Cuando no piense utilizar este aparato durante mucho tiempo
(cuando se ausente de casa por vacaciones, por ejemplo)
desconecte el cable de alimentación de la toma de corriente.
16 Asegúrese de leer la sección “RESOLUCIÓN DE
PROBLEMAS” antes de dar por concluido que su aparato
está averiado.
17 Antes de trasladar este aparato, pulse p para ponerlo en el
modo de espera, y luego desconecte el cable de alimentación
de CA de la toma de corriente.
18 Instale este aparato cerca de la toma de CA y donde se pueda
alcanzar fácilmente la clavija de alimentación.
19 Las baterías no deberán exponerse a un calor excesivo como,
por ejemplo, el que producen los rayos del sol, el fuego y
similares. Cuando deseche las baterías, por favor cumpla las
regulaciones de su región.
20 La presión acústica excesiva de los auriculares puede causar
pérdida auditiva.
Este aparato no se desconecta de la fuente de alimentación de CA
si está conectada a una toma de corriente, aunque la propia aparato
esté apagada con p. A este estado se le llama modo de espera. En
este estado, este aparato ha sido diseñada para que consuma un
cantidad de corriente muy pequeña.
ADVERTENCIA
PARA REDUCIR EL RIESGO DE INCENDIO O DESCARGA
ELÉCTRICA, NO EXPONGA ESTE APARATO A LA LLUVIA
NI A LA HUMEDAD.
PRECAUCIÓN
Peligro de explosión si la pila se sustituye incorrectamente.
Sustitúyala por otra del mismo tipo o de un tipo equivalente.
PRECAUCIÓN
El uso de los controles, los ajustes o los procedimientos que no se
especifican enste manual pueden causar una exposición peligrosa a
la radiación.
Notas
• Los altavoces de esta unidad utilizan imanes. No coloque
elementos sensibles al magnetismo, como televisores tipo CRT,
relojes, tarjetas de crédito, disquetes, etc., encima de la
estantería.
• Cuando la unidad se coloca cerca de un televisor tipo CRT,
pueden producirse distorsiones de imagen o sonido. En ese caso,
aleje el televisor de la unidad.

1 Es
■ Observaciones sobre los mandos a
distancia y las pilas
• No derrame agua u otros líquidos en el mando a distancia.
• No deje caer el mando a distancia.
• No deje ni guarde el mando a distancia en uno de las siguientes
lugares:
– lugares de humedad alta como, por ejemplo, cerca de un
baño
– lugares con temperaturas elevadas, por ejemplo, cerca de
una calefacción o estufa
– lugares con temperaturas demasiado bajas
– lugares polvorientos
• No exponga el sensor del mando a distancia de esta unidad a la luz
solar directa ni a iluminación de focos fluorescentes invertidos.
• Si las pilas se agotan, el alcance operativo eficaz del mando a
distancia se reduce considerablemente. Si esto sucediese, cambie las
pilas por dos nuevas tan pronto como sea posible.
• Cambie todas las pilas si observa alguna de las siguientes
condiciones: el alcance operativo del mando a distancia se reduce o
el indicador de transmisión no se ilumina o lo hace tenuemente.
• No utilice pilas viejas y nuevas juntas.
• No utilice juntas pilas de tipos diferentes (alcalinas de manganeso,
por ejemplo). Lea atentamente las instrucciones de la caja ya que
hay distintos tipos de pilas con la misma forma y color.
• Las pilas gastadas pueden tener derrames. Si se produce algún
derrame en las pilas, deséchelas inmediatamente. Evite tocar el
líquido derramado o que entre en contacto con la ropa, etc. Ante de
instalar pilas nuevas, limpie bien el compartimento de las pilas.
• No arroje las pilas al cubo de la basura. Deséchelas de acuerdo con
la normativa local aplicables.

2 Es
Qué puede hacer con esta unidad
Ver la televisión
Ver películas
Blu-ray
Jugar a videojuegos
Comprobación de accesorios suministrados (p. 4)
Instalación (p. 5)
Preparación del mando a distancia (p. 7)
Conexión de su TV y del reproductor de discos Blu-ray (p. 8)
Funcionamiento de la unidad con el mando a distancia del televisor (p. 18)
Si se reciben programas STB
de un sintonizador CATV/satélite
(p. 9)
Conexión de una
videoconsola (p. 9)
Televisión, reproductor de discos Blu-ray y videoconsola (p. 20)
PREPARACIÓN
CONEXIÓN/
AJUSTES INICIALES
REPRODUCCIÓN
Ajuste automático del mejor sonido posible (p. 11)
Función HDMI (control HDMI)
p. 18
Función Cinema DSP
p. 22
Función IntelliBeam
p. 11
Función de sonido envolvente
de auriculares
p. 26
UniVolume
p. 21
Reproducción de iPod/iPhone
p. 29

3 Es
PREPARACIÓN
CONEXIÓN/
AJUSTES INICIALES REPRODUCCIÓN AJUSTES
RESOLUCIÓN DE
PROBLEMAS
SOBRE ESTA
UNIDAD
Español
Índice general
PREPARACIÓN
Primeros pasos......................................................4
Accesorios suministrados ............................................. 4
CONEXIÓN/AJUSTES INICIALES
Instalación.............................................................. 5
Preparación del mando a distancia............................... 7
Conexiones ............................................................ 8
Conexión del TV y del reproductor de discos Blu-ray... 8
Conexión como videoconsola o sintonizador................ 9
Ajustes iniciales................................................... 10
Selección del idioma del menú ................................... 10
Configuración automática para obtener el efecto
surround adecuado (IntelliBeam)............................ 11
Funcionamiento de la unidad con el mando a distancia
del televisor................................................................. 18
REPRODUCCIÓN
Funciones de reproducción................................ 20
Funcionamiento básico de reproducción .................... 20
Experiencia de sonido según sus preferencias........... 21
Selección del sonido estéreo/surround .............................. 21
Reproducción de formatos comprimidos digitalmente (MP3,
WMA, etc.) con sonido enriquecido (Compressed Music
Enhancer)........................................................................... 21
Ajuste automático del nivel del volumen (UniVolume) .......21
Ajuste del balance del volumen.......................................... 21
Reproducción de sonido surround más real (CINEMA DSP)....22
Cambio del método de salida de audio para la reproducción
surround........................................................................................23
Descodificador de surround ...............................................25
Uso de funciones de utilidad....................................... 26
Escucha con altavoces.......................................................26
Función de temporizador para dormir/apagado automático ...27
Ajustes para cada fuente de entrada (menú de opciones)......27
Reproducción de iPod/iPhone..................................... 29
Si se utiliza una base universal Yamaha iPod (YDS-12
opcional, etc.)....................................................................29
Si se utiliza un sistema inalámbrico para iPod (YID-W10
opcional)........................................................................................29
Reproducción de componentes Bluetooth .................. 30
Emparejado........................................................................ 30
Conexión ............................................................................ 31
AJUSTES
Menú de configuración........................................32
Procedimiento de ajuste..............................................32
Lista del menú de configuración..................................33
Configuración manual .................................................34
Ajuste de parámetros........................................................ 34
Ajuste del haz ................................................................... 35
Localización de imagen ....................................................36
Control del tono...........................................................36
Control del tono ................................................................ 36
Ajustes del subwoofer....................................................... 36
Control de retardo de audio .............................................. 36
Control de gama dinámica ................................................ 37
Nivel del volumen de cada canal con tonos de prueba.....37
Ajustes de salida de sonido.........................................37
Configuración de la salida del haz sonoro ........................ 37
Asignación de entradas...............................................38
Asignación de entradas .................................................... 38
Renombrado de entradas ................................................. 39
Configuración HDMI ......................................................... 39
MENU VISUALIZACIÓN...................................................40
Configuración avanzada......................................41
RESOLUCIÓN DE PROBLEMAS
Resolución de problemas ...................................42
SOBRE ESTA UNIDAD
Controles y funciones .........................................46
Glosario.................................................................49
Especificaciones ..................................................51
Utilización del DVD de demostración
suministrado.........................................................53
Índice.....................................................................54
Notas sobre este manual
• En este manual, las operaciones que se pueden realizar utilizando los botones del panel delantero o el mando a distancia se explican
utilizando el mando a distancia.
•
y indica un consejo para su utilización.
• Las notas contienen información importante sobre las instrucciones y el funcionamiento.
• Este manual se ha elaborado antes de la producción del dispositivo. El diseño y las especificaciones están sujetos a cambios
parciales, como resultado de las mejoras realizadas, etc. En el caso de que existan diferencias entre el manual y el producto, el
producto tiene prioridad.
• La marca alfabética ( ) indica las teclas del mando a distancia indicadas en la figura de la página izquierda.

4 Es
PREPARACIÓN
Primeros pasos
Antes de realizar el montaje y las conexiones, asegúrese de que no falta nada de lo siguiente.
1)
Accesorios suministrados
Mando a
distancia
Pilas (× 2)
(AA, R6, UM-3)
Cable óptico
(1,5 m)
Cable de vídeo con
clavijas
(para ver vídeos de
iPod y el menú)
(1,5 m)
Manual de
instalación
Manual de instrucciones
(este manual)
Unidad principal
Micrófono IntelliBeam (× 1)
(6 m)
Soporte de cartón para
micrófono (× 1)
Guía de referencia rápida
Cable de audio digital
con clavijas (1,5 m)
DVD de demostración
(☞p. 53)
Para poder utilizar esta unidad es preciso montarla primero. Asegúrese de que todo lo siguiente se incluye en el paquete, ya que lo
necesitará para poder realizar el montaje. Consulte el Manual de instalación para obtener más instrucciones.
• Unidad principal • Paneles traseros (izquierdo y derecho)
• Estante • Postes de soporte
• Panel inferior • Panel trasero central
• Panel superior de vidrio • Arandelas
• Pasadores • Tornillos pequeños M4 × 10 mm
• Tornillos grandes M5 × 30 mm • Juntas
• Fijadores
En función de la conexión, no todos los cables suministrados serán necesarios.
1) y

5 Es
CONEXIÓN/AJUSTES INICIALES
PREPARACIÓN REPRODUCCIÓN AJUSTES
RESOLUCIÓN DE
PROBLEMAS
SOBRE ESTA
UNIDAD
Español
CONEXIÓN/
AJUSTES INICIALES
Instalación
Coloque la unidad en una posición adecuada tras haberla montado. Consulte el Manual de instalación suministrado para obtener
instrucciones sobre el montaje. Este apartado explica el mejor lugar para instalar esta unidad. Consulte la siguiente sección
“Observaciones sobre la instalación” para colocar la unidad correctamente en un lugar seguro.
Esta unidad crea un sonido surround reflejando los haces de sonido proyectados en las paredes de la habitación. Los efectos de sonido
surround generados por esta unidad a veces no son suficientes si está instalada en los sitios que indicamos a continuación:
• Habitaciones con paredes que no permiten reflejar los haces de sonido.
• Habitaciones que absorben el sonido.
• Habitaciones con dimensiones distintas de las que especificamos a continuación: ancho (3 - 7 m) × altura (2 - 3,5 m) × profundidad
(3 - 7 m).
• Habitaciones con una distancia inferior a 1,8 m entre la posición de escucha y la unidad.
• Habitaciones con objetos como muebles suelen obstruir el recorrido de los haces de sonido.
• Habitaciones donde la posición de escucha está cerca de las paredes.
• Habitaciones donde la posición de escucha no está frente a la unidad.
■ Mi Trasero
En una habitación como la mostrada más arriba, puede disfrutar de un increíble efecto surround con Mi Trasero (☞p. 24).
Antes de instalar esta unidad
Observaciones sobre la instalación
• Instale el TV según las instrucciones del fabricante para evitar que se vuelque.
• Los altavoces de la unidad tienen imanes. No coloque objetos sensibles al magnetismo, como relojes, tarjetas de crédito, disquetes, etc., encima
del estante.
• Si la unidad se coloca cerca de un TV de tipo CRT, es posible que se produzcan distorsiones de sonido o de imagen.
Precaución: manipulación del vidrio templado
El panel superior de vidrio está fabricado con vidrio templado para obtener mayor resistencia y seguridad. Además, se ha aplicado una película de
seguridad al vidrio templado para proporcionar aún más protección y evitar daños si se rompe el vidrio. Sin embargo, si se manipula el vidrio de forma
incorrecta, corre el riesgo de que se rompa y salgan pedazos disparados que podrían provocar daños. Es muy importante seguir las siguientes
precauciones:
• No permita que ningún objeto golpee el vidrio con fuerza (no deje, por ejemplo, que nadie tire un objeto para que choque con el vidrio).
• No permita que objetos punzantes entren en contacto con el vidrio.
• Un vidrio templado arañado puede romperse en cualquier momento. Si ve arañazos, cambie el vidrio inmediatamente.
• No retire la pegatina de precaución del vidrio.
Carga
máxima
50 kg
15 kg
30 kg
Lámina deslizante interior
En la parte inferior de la unidad encontrará una lámina
deslizante interior para que pueda mover la unidad en
su posición con facilidad. Para evitar daños en el
suelo, límpielo de polvo o suciedad antes de mover la
unidad.
YRS-1100
• Instale esta unidad en una posición simétrica entre las dos
paredes.
• La posición de escucha (como el sofá) debe quedar delante de la
unidad.
• La distancia entre la posición de escucha y la unidad debe ser
superior a los 1,8 m.
YRS-1100

Instalación
6 Es
Esta unidad emite haces de sonido de la forma indicada en la ilustración siguiente. Instale la unidad en un sitio sin obstáculos, como
muebles, que puedan obstruir la circulación de los haces de sonido. De lo contrario, quizás no consiga el efecto de sonido surround
deseado.
Puede instalar la unidad en paralelo a la pared o en una esquina.
■ Ejemplos de instalación
Instalación en paralelo
Instale esta unidad tan cerca del centro exacto de la pared como sea posible.
Condiciones ideales de instalación
Instale esta unidad tan cerca de la parte delantera exacta de su posición de escucha normal como sea posible.
La distancia entre la posición de escucha y la unidad debe ser superior a los 1,8 m.
Instalación de esta unidad
Instalación en paralelo
Instale la unidad en el centro exacto de la pared, medido desde las
esquinas derecha e izquierda.
Instalación en la esquina
Instale la unidad en una esquina, a un ángulo de entre 40° y 50°
de las paredes circundantes.
Un objeto como, por ejemplo,
un mueble
40° - 50°
Instalación en paralelo
(con 5Haces)
Instalación en una esquina
(con Estéreo+3Haces)

Instalación
7 Es
PREPARACIÓN REPRODUCCIÓN AJUSTES
RESOLUCIÓN DE
PROBLEMAS
SOBRE ESTA
UNIDAD
Español
CONEXIÓN/
AJUSTES INICIALES
Instalación en una habitación no cuadrada
Instale esta unidad para que los haces de sonido puedan ser reflejados por las paredes.
Antes de introducir las pilas o de usar el mando a distancia, no se olvide de leer las precauciones sobre el mando a distancia y las pilas
que aparecen en “PRECAUCIÓN: LEA LAS INDICACIONES SIGUIENTES ANTES DE UTILIZAR ESTE APARATO”
Preparación del mando a distancia
Instalación de las pilas
Pilas × 2
(AA, R6, UM-3)
Pulse U
Retire la hoja transparente antes de usarlo.
Alcance operativo
Menos de 6 m

8 Es
Conexiones
Para conectar los cables, siga este orden:
Conexión del TV y del reproductor de discos Blu-ray
1
Cable HDMI
(opcional)
Introduzca las señales de
audio/vídeo del
reproductor de discos
Blu-ray a esta unidad.
2
Cable HDMI
(opcional)
El vídeo digital del disco
Blu-ray se ve en el TV.
3
Cable óptico
(suministrado)
Reproduzca sonido
digital de TV en esta
unidad.
4
Cable de vídeo
con clavijas
(suministrado)
Para ver los menús de
configuración de YRS-
1100 en el televisor.
• No conecte el cable de alimentación hasta que se hayan realizado todas las conexiones.
• No emplee demasiada fuerza al insertar el conector del cable. De lo contrario, podría dañar el conector del cable y/o el terminal.
123
INPUT1
INPUT2
HDMI INPUT
OPTICAL
OUTPUT
VIDEO
AUDIORL
HDMI
OUTPUT
A la toma de CA
Reproductor de discos
Blu-ray
1. Quite la protección
2. Verifique la dirección de
la toma
TV
Señales de vídeo
Señales de audio
1
2
3
(Ejemplo)
1)
4
2)
TV compatible con la función ARC (Canal de retorno de
audio)
• Conecte el cable HDMI al terminal compatible con canal de retorno
de audio (el terminal indicado con “ARC”) en el TV. En este caso, no
es necesario conectar el cable óptico.
• Active la función de control HDMI de esta unidad (☞p. 39).
¿Qué es el canal de retorno de audio (ARC)?
Una función transmite la señal de salida de audio digital del TV a esta
unidad mediante un cable HDMI. Con esta función, no es necesario
disponer de cable de audio digital con clavijas para conectar el TV.
En función de los ajustes, es posible seleccionar HDMI para señal de
vídeo y audio digital óptico, audio digital coaxial o audio analógico para
señal de audio. Consulte “Asignación de entradas (☞p. 38)”.
1) y
2) y

Conexiones
9 Es
PREPARACIÓN REPRODUCCIÓN AJUSTES
RESOLUCIÓN DE
PROBLEMAS
SOBRE ESTA
UNIDAD
Español
CONEXIÓN/
AJUSTES INICIALES
Conexión como videoconsola o sintonizador
Dispositivo externo adicional (ejemplo) Cable de conexión
1 Videoconsola compatible con HDMI
Cable HDMI (opcional)
2 TV satélite/cable (compatible con HDMI)
Cable HDMI (opcional)
3 TV satélite/cable (no compatible con HDMI)
Cable de audio digital con clavijas
(suministrado)
4)
4 Videoconsola no compatible con HDMI
Cable de audio analógico estéreo con clavijas
(opcional)
4)
HDMI
OUTPUT
HDMI
OUTPUT
ANALOG
OUTPUT
COAXIAL
OUTPUT
VIDEO
INPUT
VIDEO
OUTPUT
VIDEO
OUTPUT
VIDEO
INPUT
Señales de vídeo
Señales de audio
TV
1 2 3 4
3)
(Ejemplo)
4)
A la toma de CA
(Ejemplo)
4)
(Ejemplo)
(Ejemplo)
Al conectar otros dispositivos con terminal de salida digital óptica,
conéctelos al terminal de entrada digital óptica de esta unidad mediante
un cable óptico.
Para conectar una videoconsola o un sintonizador al TV necesitará cables
de vídeo de clavijas adicionales (opcional).
3) y 4) y

10 Es
Ajustes iniciales
Selección del idioma del menú
1
Encienda la unidad y el televisor.
2
Seleccione “VIDEO INPUT 1 (ejemplo)”
como entrada de televisor.
Compruebe que aparezca la pantalla inicial.
1)
3
Mantenga pulsada la tecla SETUP hasta
que aparezca el menú “LANGUAGE
SETUP” en el televisor.
4
Pulse la tecla U / V para seleccionar
el idioma deseado y, a continuación, pulse
la tecla ENTER.
Opciones: ENGLISH, DEUTSCH, FRANÇAIS, ESPAÑOL,
ITALIANO, NEDERLANDS, РУССКИЙ y SVENSKA
Ajuste inicial: ENGLISH
YRS-
1100
Push [SETUP] to
begin SETUP MENU.
(ejemplo)
[ ]/[ ]:Sel [ENTER]:Return
3)LANGUAGE SETUP
Cuando no aparece la pantalla
Realice las siguientes comprobaciones.
– El terminal de entrada del televisor y el terminal de salida de vídeo
de la unidad deben estar conectados.
– El televisor tiene seleccionado “VIDEO INPUT 1 (ejemplo)”
como modo de entrada.
1) y

11 Es
Ajustes iniciales
PREPARACIÓN REPRODUCCIÓN AJUSTES
RESOLUCIÓN DE
PROBLEMAS
SOBRE ESTA
UNIDAD
Español
CONEXIÓN/
AJUSTES INICIALES
Esta unidad crea un campo sonoro reflejando los haces de sonido en las paredes
de la habitación de escucha y ampliando la cohesión entre todos los canales. Al
igual que con la disposición de otros sistemas de audio, usted necesita ajustar el
ángulo del haz para disfrutar del mejor sonido posible procedente de esta unidad.
Esta unidad aplica las funciones de optimización de haz y optimización
de sonido con la ayuda del micrófono IntelliBeam suministrado, lo que
sustituye las complicadas configuraciones basadas en la comprobación
de la recepción del sonido y garantiza unos ajustes precisos, que se
adapten perfectamente al entorno de instalación. Nos referimos
genéricamente a estas dos funciones con el término “IntelliBeam”.
Optimización de haz:
Esta función sirve para optimizar el ángulo del haz, para que el
parámetro se adapte de la mejor forma posible al entorno.
Optimización del sonido:
Esta función sirve para optimizar el retardo, el volumen y la
calidad del haz, para que los parámetros se adapten de la mejor
forma posible al entorno.
Para llevar a cabos estas dos optimizaciones automáticas, la
unidad utiliza el micrófono IntelliBeam suministrado.
2)
Siga el procedimiento siguiente para conectar el micrófono
IntelliBeam con esta unidad y colocarlo en un lugar apropiado.
Configuración automática para obtener el
efecto surround adecuado (IntelliBeam)
Instalación del micrófono IntelliBeam
1
Coloque el micrófono IntelliBeam en una superficie
plana en su posición normal de escucha.
Utilice el soporte de cartón para micrófono o un trípode
para colocar el micrófono IntelliBeam a una altura igual a
la de sus oídos cuando está sentado.
■ Ensamblaje del soporte de cartón para
micrófono suministrado
• No garantizamos un funcionamiento correcto del proceso de
CONFIG. AUTOMATICA si la unidad se instala en habitaciones
del tipo descrito en “Instalación de esta unidad” en la página 6. En
estos casos, utilice CONFIG. MANUAL (☞p. 14) para ajustar
manualmente los parámetros correspondientes.
• No conecte el micrófono IntelliBeam a un alargador, puesto que
puede influir negativamente en la optimización del sonido.
• Asegúrese de desconectar el micrófono IntelliBeam después de
completar el procedimiento CONFIG. AUTOMATICA.
• El micrófono IntelliBeam es sensible al calor.
– Mantenga el micrófono IntelliBeam alejado de la luz solar directa.
– No ponga el micrófono IntelliBeam encima de esta unidad.
Nota
1 2 3
54
Retirar
Encaja
r
Cruce
Colocar en
horizontal
Encajar
Asegúrese de que no hay obstáculos entre el micrófono
IntelliBeam y las paredes de la habitación de escucha,
puesto que pueden obstruir la circulación de los haces de
sonido. Sin embargo, si hay objetos en contacto con las
paredes, el micrófono interpretará que forman parte de
ellas.
2
Compruebe si el cable de vídeo con
clavijas está conectado y los auriculares
están desconectados.
Micrófono IntelliBeam Límite superior
Menos de 1 m
Altura central de
esta unidad
Soporte de cartón para
micrófono
Menos de 1 m
Posición de
escucha
1,8 m o más
Límite inferior
Línea central
Micrófono
IntelliBeam
Soporte de cartón para micrófono
• Aparecerá automáticamente la pantalla “OPTIMIZAR
HAZ+SONIDO” al conectar el micrófono IntelliBeam. Podrá
seleccionar las opciones “OPTIMIZAR SOLO HAZ” u
“OPTIMIZAR SOLO SONIDO” por separado en el menú de
configuración (☞p. 14).
• Los datos configurados pueden guardarse automáticamente en la
memoria del sistema (☞p. 16). Además, tiene la opción de guardar
datos distintos para cada habitación de escucha y elegir en cada caso
el más apropiado.
2) y

Ajustes iniciales
12 Es
Utilización de CONFIG. AUTOMATICA
(IntelliBeam)
1
Encienda la unidad y el televisor.
2
Seleccione “VIDEO INPUT 1 (ejemplo)”
como entrada de televisor.
3
Conecte el micrófono IntelliBeam
suministrado al terminal INTELLIBEAM
MIC.
El terminal se encuentra en la parte inferior de la unidad
principal.
• Es normal que se emitan tonos de prueba de elevado volumen
durante el procedimiento de CONFIG. AUTOMATICA.
Asegúrese de que no hay niños alrededor de la sala de escucha
cuando se esté realizando el procedimiento de CONFIG.
AUTOMATICA.
• Asegúrese de que la habitación de escucha esté tan silenciosa
como sea posible. Para obtener una medición precisa, apague el
aire acondicionado u otros dispositivos que produzcan ruidos.
• Si hay cortinas en su habitación de escucha, le recomendamos
que siga el procedimiento inferior.
1 Abra las cortinas para mejorar el reflejo del sonido.
2 Ejecute “OPTIMIZAR SOLO HAZ”.
3 Cierre las cortinas.
4 Ejecute “OPTIMIZAR SOLO SONIDO”.
Nota
Micrófono IntelliBeam
Al pulsar la tecla RETURN, aparece el menú de
configuración.
Pulse la tecla SETUP varias veces y volverá a aparecer la pantalla del
menú. A continuación, seleccione “CONFIG. AUTOMATICA”
“OPTIMIZAR HAZ+SONIDO”.
Cuando no aparece la pantalla
Realice las siguientes comprobaciones.
– El terminal de entrada del televisor y el terminal de salida de vídeo
de la unidad deben estar conectados.
– El televisor tiene seleccionado “VIDEO INPUT 1 (ejemplo)”
como modo de entrada.
La opción “OPTIMIZAR HAZ+SONIDO” se selecciona
automáticamente. Si prefiere utilizar “OPTIMIZAR SOLO HAZ” u
“OPTIMIZAR SOLO SONIDO”, consulte “CONFIG. AUTOMATICA
desde el menú de configuración (☞p. 14)”.
• Espere fuera de la habitación mientras se realiza el procedimiento de
CONFIG. AUTOMATICA.
• El procedimiento de CONFIG. AUTOMATICA dura unos 3 minutos.
• Para cancelar el procedimiento de CONFIG. AUTOMATICA una vez
que haya empezado, pulse la tecla RETURN.
1) y 2) y
3) y

13 Es
Ajustes iniciales
PREPARACIÓN REPRODUCCIÓN AJUSTES
RESOLUCIÓN DE
PROBLEMAS
SOBRE ESTA
UNIDAD
Español
CONEXIÓN/
AJUSTES INICIALES
Aparece la pantalla siguiente después de conectar el micrófono
IntelliBeam a la unidad.
1) 2)
4
Pulse la tecla ENTER para iniciar el
procedimiento de CONFIG. AUTOMATICA
y, a continuación, salga de la habitación
antes de que pasen 10 segundos.
3)
La pantalla de configuración cambia automáticamente durante
el procedimiento de CONFIG. AUTOMATICA.
Esta unidad hará sonar las campanillas cuando termine el
procedimiento CONFIG. AUTOMATICA.
4)
CONFIG. AUTOMATICA
(PREPARACION Y COMPROBACION)
Por favor conectar MIC.
Posicionar MIC por lo menos a
1.8m del proyector de sonido.
El MIC debe posicionarse
a la altura del oido sentado.
Medidas duraran aprox. 3 min.
Pulse [ENTER] y salga de sala
[ENTER] :Comenzar
[RETURN]:Cancelar
No se obtendrá el mejor ajuste si permanece en la habitación.
Prepárese para salir de la habitación antes de que pasen 10 segundos
después de pulsar ENTER en el paso 4.
Nota
MEDIDA COMPLETA.
MODO HAZ : 5Haces/Plus2
SUBWOOFER: SÍ
[ENTER]:Salvar Config.
[RETURN]:No Salvar Config.
MOSTRAR RESULTADO
COMIENZO CONFIG. AUTOMATICA
COMENZARÁ EN 10 S.
Por favor salga de la sala.
----------
[RETURN]:Cancelar
(A los 3 min.)
5
Pulse la tecla ENTER para confirmar los
resultados.
5)
Se guardará el resultado de la medición.
6
Retire el micrófono IntelliBeam.
Aparecerá la pantalla inicial.
6)
Guarde el micrófono IntelliBeam en un lugar seguro.
Los resultados de la medición se guardan en la memoria
interna de esta unidad hasta que ejecute de nuevo el
procedimiento CONFIG. AUTOMATICA o configure
manualmente los ajustes.
Tiene la opción de guardar distintas mediciones con la
función de memoria (☞p. 16).
CONFIG. AUTOMATICA COMPLETA
Por favor quitar MIC
del proyectordesonido.
• Si se produce un error, se reproducirá un sonido de error (pitido) y
aparecerá un mensaje de error. Para obtener más información sobre
los mensajes de error, consulte “Mensajes de error de CONFIG.
AUTOMATICA” (☞p. 15).
• Si aparece “COMPROBACION ENTORNO:Fallo”, consulte
“Mensajes de error de CONFIG. AUTOMATICA” (☞p. 15), pulse la
tecla RETURN y vuelva a iniciar el procedimiento CONFIG.
AUTOMATICA.
• Dependiendo de las condiciones de la habitación de escucha, se podrá
utilizar el mismo valor en los ángulos de los haces de los altavoces
delanteros derecho e izquierdo y de los altavoces surround derecho e
izquierdo aunque aparezca como resultado “MODO HAZ :5 Haces”.
Si no desea reflejar los resultados, pulse la tecla RETURN.
Al realizar la CONFIG. AUTOMATICA desde MENU
CONFIGURACIÓN, aparecerá la pantalla de selección del menú de
MENU CONFIGURACIÓN.
4) y 5) y
6) y

Ajustes iniciales
14 Es
■ CONFIG. AUTOMATICA desde el menú de
configuración
1
Coloque el micrófono IntelliBeam y pulse
la tecla SETUP.
2
Pulse U / V para seleccionar
“CONFIG. AUTOMATICA” y, a
continuación, pulse la tecla ENTER.
3
Pulse U / V para seleccionar uno de
los elementos siguientes y pulse la tecla
ENTER.
Opciones:
“OPTIMIZAR HAZ+SONIDO” (Optimización de haz
y optimización de sonido)
Se recomienda seleccionar esta opción de optimización si
realiza la configuración por primera vez.
Este menú tarda unos tres minutos.
“OPTIMIZAR SOLO HAZ”(Optimización solo del
haz)
Se usa para optimizar el ángulo del haz, para que el
parámetro se adapte de la mejor forma a su ambiente de
escucha.
Este menú tarda un minuto aproximadamente.
“OPTIMIZAR SOLO SONIDO”(Optimización solo
del sonido)
Se usa para optimizar el ángulo, retardo, volumen y calidad
del haz para los parámetros se adapten lo mejor posible a su
entorno. Debe optimizar el ángulo del haz con
“OPTIMIZAR SOLO HAZ” antes de iniciar
“OPTIMIZAR SOLO SONIDO”. Se recomienda
seleccionar esta función de optimización en los siguientes
casos:
• Si ha abierto o cerrado las cortinas de su sala de escucha
antes de utilizar esta unidad.
• Si ha ajustado manualmente el ángulo del haz.
Este menú tarda unos dos minutos.
4
Conecte el micrófono IntelliBeam a la
unidad una vez que haya aparecido la
pantalla “CONFIG. AUTOMATICA
(PREPARACION Y COMPROBACION)”.
Para obtener más información sobre la instalación y la
conexión del micrófono IntelliBeam, consulte “Instalación
del micrófono IntelliBeam (☞p. 11)”.
5
Realice los pasos 4, 5 y 6 de “Utilización
de CONFIG. AUTOMATICA (IntelliBeam)
(☞p. 13)”.
6
Una vez que haya terminado la
configuración, desconecte el micrófono
IntelliBeam.
No se obtendrá el mejor ajuste si permanece en la habitación.
Prepárese para salir de la habitación antes de que pasen 10 segundos
después de pulsar ENTER en el paso 4.
Nota

15 Es
Ajustes iniciales
PREPARACIÓN REPRODUCCIÓN AJUSTES
RESOLUCIÓN DE
PROBLEMAS
SOBRE ESTA
UNIDAD
Español
CONEXIÓN/
AJUSTES INICIALES
■ Mensajes de error de CONFIG.
AUTOMATICA
Si se muestra un mensaje de error en su televisor, revise la lista de
mensajes de error para resolver el problema y siga el
procedimiento siguiente.
[ERROR E-1]: pulse la tecla ENTER para repetir el
procedimiento de CONFIG. AUTOMATICA. Otra opción es
pulsar la tecla Z para seguir con la medición.
[ERROR E-7]: pulse la tecla para poner la unidad en el
modo de espera. A continuación, repita el procedimiento
CONFIG. AUTOMATICA tras encender de nuevo la unidad.
Otros errores: pulse la tecla RETURN para cancelar la
operación y, después, repita el procedimiento CONFIG.
AUTOMATICA.
Si es difícil resolver el problema, configure manualmente los
ajustes desde “MENU CONFIGURACIÓN” (☞p. 32).
ERROR E-1: Pruebe en entorno tranquilo.
Causa Remedio
Hay demasiado ruido no deseado
en su habitación de escucha.
Asegúrese de que la habitación
de escucha esté tan silenciosa
como sea posible. Puede que
quiera elegir ciertas horas del día
cuando no hay mucho ruido
procedente del exterior.
ERROR E-2: MIC no detectado. Por favor, comprobar
conectar MIC y volver a intentar.
Causa Remedio
El micrófono IntelliBeam no está
conectado a esta unidad o se
desconectó durante el
procedimiento CONFIG.
AUTOMATICA.
Conecte bien el micrófono
IntelliBeam a esta unidad.
ERROR E-3: Detectado control inesperado. Por
favor, inténtelo nuevo.
Causa Remedio
Se han realizado otras
operaciones mientras se llevaba a
cabo el procedimiento CONFIG.
AUTOMATICA.
No efectúe ninguna otra
operación mientras esté en
marcha el procedimiento
CONFIG. AUTOMATICA.
ERROR E-4: Por favor,comprobar MIC. Posicionar
MICenfrente del proyector de sonido. y volver a
intentar.
Causa Remedio
El micrófono IntelliBeam no está
enfrente de esta unidad.
Compruebe que el micrófono
IntelliBeam está instalado
enfrente de esta unidad.
ERROR E-5: Por favor, comprobar MIC. El MIC debe
de estar a 1.8m mínimo y volver a intentar.
Causa Remedio
El micrófono IntelliBeam no está
colocado a una distancia
apropiada de esta unidad.
Compruebe que el micrófono
IntelliBeam está instalado a más
de 1,8 m de la parte delantera de
esta unidad y a menos de 1 m de
la altura central de esta unidad.
ERROR E-6: Volumen demasiado bajo. Comprobar
posición/conex MIC y volver a intentar.
Causa Remedio
El micrófono IntelliBeam no
puede captar el sonido producido
por esta unidad porque el nivel de
salida del sonido es demasiado
bajo.
Asegúrese de que el micrófono
IntelliBeam esté firmemente
conectado con esta unidad y
ubicado en un lugar apropiado. Si
el problema persiste, póngase en
contacto con el centro de
asistencia autorizado de Yamaha
más cercano.
ERROR E-7: Error inesperado. Por favor, apague y
volver a intentar.
Causa Remedio
Se ha producido un error en el
interior del sistema.
Pulse la tecla para poner
la unidad en el modo de espera. A
continuación, repita el
procedimiento CONFIG.
AUTOMATICA tras encender de
nuevo la unidad.
ERROR E-8: Auriculares están conectados. Por
favor, desconecte los auriculares y volver a intentar.
Causa Remedio
Hay unos auriculares conectados. Desconecte los auriculares y
vuelva a intentarlo.

Ajustes iniciales
16 Es
Puede almacenar los ajustes actuales de haz y sonido en la
memoria del sistema de esta unidad. Resulta útil guardar ciertos
ajustes según las condiciones cambiantes de su habitación de
escucha. Por ejemplo, si hay cortinas en el camino de los haces
sonoros, la efectividad de los mismos cambiará dependiendo de si
las cortinas están abiertas o cerradas.
■ Para guardar los ajustes
Almacenamiento de varios resultados de
medición (función de memoria)
1
Pulse la tecla SETUP.
2
Seleccione “MEMORIA” y pulse la tecla
ENTER.
3
Pulse la tecla U / V para seleccionar
“SALVAR” y, a continuación, pulse la tecla
ENTER.
4
Pulse la tecla U / V para seleccionar
el número de memoria deseado y, a
continuación, pulse la tecla ENTER.
1)
Opciones: Memoria 1, Memoria 2 y Memoria 3
Aparecerá “Memoria 1 ¿Salvar Ahora?” al seleccionar el
número de memoria.
5
Pulse la tecla ENTER.
Aparecerá “Memoria 1 Salvando...” y se guardará el
ajuste.
Si hay cortinas en su habitación de escucha, le
recomendamos que siga el procedimiento inferior.
1. Con las cortinas abiertas, ejecute “OPTIMIZAR
HAZ+SONIDO” (☞p. 14) y, a continuación, guarde los
ajustes en “Memoria 1”.
2. Con las cortinas cerradas, ejecute “OPTIMIZAR SOLO
SONIDO” (☞p. 14) y, a continuación, guarde los
ajustes en “Memoria 2”.
• Si ya hay ajustes del sistema guardados en el número de memoria
seleccionado, esta unidad sobrescribirá esos ajustes.
• La función de memoria no se puede utilizar cuando “MEMORY
PROTECT” está en la posición “ON” en ADVANCED SETUP
(☞p. 41).
1) y

17 Es
Ajustes iniciales
PREPARACIÓN REPRODUCCIÓN AJUSTES
RESOLUCIÓN DE
PROBLEMAS
SOBRE ESTA
UNIDAD
Español
CONEXIÓN/
AJUSTES INICIALES
■ Carga de los ajustes
1
Pulse la tecla SETUP.
2
Seleccione “MEMORIA” y pulse la tecla
ENTER.
3
Pulse la tecla U / V para seleccionar
“CARGAR” y, a continuación, pulse la
tecla ENTER.
4
Pulse la tecla U / V para seleccionar
el número de memoria que desea cargar y,
a continuación, pulse la tecla ENTER.
Opciones: Memoria 1, Memoria 2 y Memoria 3
Aparecerá “Memoria 1 ¿Cargar Ahora?” al seleccionar el
número de memoria.
5
Pulse la tecla ENTER.
Aparecerá “Memoria 1 Cargando...” y se cargará el
ajuste.

Ajustes iniciales
18 Es
Puede utilizar el mando a distancia del TV para operar esta
unidad si el TV es compatible con la función de control HDMI
(por ejemplo, REGZA Link) y si está conectada al terminal
HDMI OUT (ARC) de esta unidad.
1)
Funcionamiento de la unidad con
el mando a distancia del televisor
¿Qué es la función de control HDMI?
Mando a distancia del TV (Ejemplo)
Encendido/Apagado
Controla el volumen
Selecciona un
componente para
reproducir el sonido
(esta unidad o TV)
Cambia la entrada
Esta unidad selecciona
automáticamente la entrada
en función del ajuste de
fuente de entrada del TV. Al
cambiar de entrada en el
menú TV (por ej.
seleccionando el reproductor
de discos Blu-ray en el menú
TV) también cambia la
entrada de esta unidad.
• Incluso si el TV es compatible con la función de control HDMI,
algunas funciones no estarán disponibles. Consulte los detalles en el
manual suministrado con su TV.
• Si utiliza un cable HDMI para conectar esta unidad a un dispositivo
como un reproductor de discos Blu-ray compatible con control
HDMI, podrá controlar dicho dispositivo mediante la función de
control HDMI.
• Le recomendamos que utilice productos (TV, reproductor de discos
Blu-ray/DVD, etc.) del mismo fabricante.
1) y

19 Es
Ajustes iniciales
PREPARACIÓN REPRODUCCIÓN AJUSTES
RESOLUCIÓN DE
PROBLEMAS
SOBRE ESTA
UNIDAD
Español
CONEXIÓN/
AJUSTES INICIALES
Cuando se cambian los componentes conectados o los terminales,
se debe restaurar la unidad con los siguientes procedimientos.
Ajuste de la función de control HDMI
1
Encienda todos los componentes con esta
unidad mediante HDMI.
2
Compruebe todos los componentes
conectados con HDMI y active la función
de control HDMI en cada componente.
En esta unidad, ponga “CONTROL HDMI” en “ON”
(☞p. 39).
2)
Para los componentes externos, consulte el manual
suministrado con cada uno de ellos.
3)
3
Apague el TV y enciéndalo de nuevo.
Registro de los componentes HDMI en el
televisor
4)
1
Seleccione esta unidad como fuente de
entrada del TV.
2
Encienda el componente compatible con
la función de control HDMI (ejemplo:
reproductor de discos Blu-ray) conectado
a esta unidad.
3
Seleccione la fuente de entrada de esta
unidad como reproductor de discos
Blu-ray y compruebe si el reproductor se
visualiza correctamente o no.
Si conecta el reproductor de discos Blu-ray con el
terminal HDMI 1, pulse la tecla de selección de entrada
una vez para ver el siguiente diagrama.
HDMI1
Nombre de la fuente de entrada
4
Compruebe si la función de control HDMI
funciona (active esta unidad ajuste el nivel
de volumen mediante el mando a distancia
del TV).
Si la función de control HDMI no funciona
Compruebe lo siguiente:
– El televisor está conectado al terminal HDMI OUT (ARC)
de esta unidad.
– “CONTROL HDMI” (☞p. 39) está en “ON” en el menú de
configuración.
– La función de control HDMI está habilitada en el TV.
(Verifique también los ajustes relacionados, como la
función de enclavamiento de la alimentación o prioridad de
altavoces.)
La función de control HDMI no funciona incluso tras
comprobar lo anterior.
– Apague la unidad y el TV, y vuelva a encenderlos.
– Desconecte los cables de alimentación del TV y de esta
unidad y vuelva a conectarlos.
– Tras seleccionar INPUT1, INPUT2, INPUT3 o DOCK,
cambie la entrada del TV y la de esta unidad para que sean
la misma.
Cambio del método de conexión y los
componentes conectados
1
Desactive la función de control HDMI del
TV y del reproductor, apague todos los
dispositivos conectados y cambie las
conexiones.
2
Realice los pasos 1-3 de “Ajuste de la
función de control HDMI”.
• El ajuste predeterminado es “OFF”.
Cuando “CONTROL HDMI” se encuentra en la posición “ON”
en el menú de configuración:
– Aunque pulse la tecla , la unidad no se apaga por completo y
emite la señal del terminal HDMI IN en el terminal HDMI OUT (ARC).
– Antes de pulsar la tecla , seleccione las fuentes de entrada
que desee conectadas a HDMI IN (1-3).
– En función del TV, operaciones como cambiar de canal pueden
cambiar los ajustes de los modos de sonido envolvente de esta unidad.
Ejemplo de ajustes del TV
• Desde el menú de configuración del televisor, seleccione “Ajustes de
Link” “Ajuste del control HDMI” (ejemplo) y, después, ajuste la
“Función de control HDMI” en “ON” (ejemplos).
• Se debe ajustar también la “Prioridad de altavoces” como
“Amplificador AV”.
En algunos componentes HDMI sólo es necesario ajustar la función de control
HDMI. En ese caso, no es necesario registrar componentes HDMI en el TV.
2) y 3) y
4) y

20 Es
REPRODUCCIÓN
Funciones de reproducción
Funcionamiento básico de
reproducción
1
Pulse la tecla para encender esta
unidad.
2
Encienda los componentes (televisor,
reproductor de discos Blu-ray, consola de
videojuegos, etc.) conectados a esta unidad.
3
Seleccione un componente que quiera
escuchar pulsando la tecla de selección de
entrada ( , , ) correspondiente a la
conexión de componentes externos.
Por ejemplo, cuando se utiliza un reproductor de discos
Blu-ray conectado a un terminal HDMI IN 1 para
seleccionar HDMI1 se debe pulsar la tecla de selección de
entrada tal como se indica a continuación.
4
Reproduzca el componente seleccionado
en el paso 3.
5
Pulse la tecla VOLUME +/- para ajustar
el volumen.
1)
2) 3)
Pulse la tecla SUBWOOFER +/- para
ajustar el subwoofer.
4)
6
Seleccione el modo de sonido envolvente
o estéreo y configure sus preferencias de
sonido. (☞p. 21)
HDMI1
Nombre de la fuente de entrada
Pulse la tecla para poner la unidad en modo
de espera.
Si se emite audio desde los altavoces del TV y desde la unidad, se
silencia el sonido del TV.
Para silenciar el sonido
Pulse la tecla MUTE. Mientras esté activada la función de silencio, el
indicador VOL parpadeará en el panel delantero. Para reanudar el
volumen, vuelva a pulsar MUTE o pulse la tecla VOLUME +/- .
Cuando el sonido de entrada HDMI IN sale del TV, el nivel del volumen
no cambia incluso al pulsar VOLUME +/- o MUTE.
• El volumen del subwoofer de esta unidad puede ajustarse de forma
independiente del volumen.
• Se recomienda bajar el volumen del subwoofer por la noche.
1) y
2) y
3) Nota
4)
y

21 Es
Funciones de reproducción
PREPARACIÓN
CONEXIÓN/
AJUSTES INICIALES AJUSTES
RESOLUCIÓN DE
PROBLEMAS
SOBRE ESTA
UNIDAD
EspañolREPRODUCCIÓN
Con la reproducción en sonido estéreo
Con la reproducción en sonido surround
Puede reproducir formatos comprimidos digitalmente como MP3 o
WMA y realzar los graves y los agudos dinámicamente.
Mientras ve la televisión, puede compensar las diferencias excesivas de
volumen entre canales para facilitar la audición en los siguientes casos.
• Cuando se cambia de canal
• Cuando hay publicidad en la televisión
• Cuando termina un programa y empieza otro
Utilice esta función para ajustar el balance del volumen en cada
canal durante la reproducción.
7)
Experiencia de sonido según sus
preferencias
Selección del sonido estéreo/surround
Pulse la tecla STEREO para acceder al
modo estéreo.
Pulse la tecla SURROUND para acceder al
modo surround
Reproducción de formatos comprimidos
digitalmente (MP3, WMA, etc.) con sonido
enriquecido (Compressed Music Enhancer)
Pulse la tecla ENHANCER para activar o
desactivar la función.
5)
Ajuste automático del nivel del volumen
(UniVolume)
Pulse la tecla UNIVOLUME para activar o
desactivar la función.
6)
Ajuste del balance del volumen
1
Pulse la tecla CH LEVEL.
2
Pulse la tecla U/ V para seleccionar
canales ajustables entre las opciones
siguientes.
Left Lv: frontal izquierdo
Right Lv: frontal derecho
CenterLv: central
Sur.L Lv: surround izquierdo
Sur.R Lv: surround derecho
SWFR Lv: subwoofer
3
Pulse la tecla Y/Z para ajustar el
volumen.
8)
Margen ajustable: de -10,0 dB a +10,0 dB
4
Pulse la tecla CH LEVEL para salir del
menú.
Con Mi Trasero seleccionado:
CenterLv: central
SurLR Lv: surround izquierdo y derecho
SWFR Lv: subwoofer
• La configuración predeterminada es “On” para la entrada DOCK y
“Off” para el resto de entradas.
• La tecnología Compressed Music Enhancer no funciona si la fuente es
una señal de audio digital,
– Dolby TrueHD, DTS-HD Master Audio, etc.
– Si la velocidad de muestreo de la señal es inferior a 48 KHz.
• El ajuste predeterminado es “Off”.
• Para ajustar UniVolume en “Off”, pulse la tecla UNIVOLUME.
• Le recomendamos que desactive la función UniVolume durante la
reproducción de música.
Consulte “Nivel del volumen de cada canal con tonos de prueba
(☞p. 37)” cuando lleve a cabo la prueba de sonido.
Ejemplo de balance del volumen
• Si tiene problemas para oír palabras: seleccione CenterLv (central)
para aumentar el nivel.
• Si el sonido no parece sonido surround: seleccione Sur.L Lv
(surround izquierdo) y Sur.R Lv (surround derecho) para subir el
nivel.
• El volumen del subwoofer también se puede ajustar con la tecla
SUBWOOFER +/-.
5) y
6) y
7) y
8) y

Funciones de reproducción
22 Es
Reproduzca sonido surround con el exclusivo sistema CINEMA
DSP de Yamaha.
1)
CINEMA DSP
También va equipada con un chip Yamaha CINEMA DSP (procesamiento
digital de campos sonoros), que contiene varios programas de campo
sonoro que se emplean para realzar la experiencia de la reproducción. La
mayoría de los programas CINEMA DSP son recreaciones digitales
exactas de ambientes acústicos auténticos de famosas salas de conciertos,
cines y otros lugares que acogen conciertos musicales.
Los programas CINEMA DSP no están disponibles en las siguientes
condiciones:
• Reproducción de señales de audio de alta definición de un disco
Blu-ray.
• Reproducción de señales de audio con una frecuencia de muestreo de
más de 96 kHz.
• Uso de la función Mi Trasero (☞p. 23).
• Reproducción en modo estéreo.
Esta unidad memoriza automáticamente la configuración asignada a cada
fuente de entrada. Al seleccionar otra entrada, la unidad activa
automáticamente la última configuración de la entrada seleccionada.
1) y
2) y
3) y
Reproducción de sonido surround más real
(CINEMA DSP)
1
Pulse la tecla SURROUND para acceder
al modo surround
2
Pulse la tecla CINEMA DSP deseada
varias veces.
2) 3)
El nombre de la categoría CINEMA DSP aparecerá en el
visor del panel delantero y se iluminará el indicador
CINEMA DSP (☞p. 47).
MOVIE
Sci-Fi
Este programa reproduce claramente los diálogos y los efectos
de sonido especiales de las últimas películas de ciencia
ficción, y le permite sentir un espacio cinematográfico amplio
y expansivo.
Adventure
Este programa reproduce el emocionante ambiente de las
últimas películas de acción, y le permite sentir el dinamismo y
la excitación de las escenas de movimientos rápidos.
Spectacle
Este programa reproduce un ambiente amplio y elegante, y le
permite tener la impresión añadida de escenas espectaculares
con un fuerte impacto visual.

23 Es
Funciones de reproducción
PREPARACIÓN
CONEXIÓN/
AJUSTES INICIALES AJUSTES
RESOLUCIÓN DE
PROBLEMAS
SOBRE ESTA
UNIDAD
EspañolREPRODUCCIÓN
Puede establecer el número de canales de salida de haces y el
método de salida del audio.
MUSIC
Music Video
Este programa produce una atmósfera vibrante, y le permite
sentirse como si estuviera en un auténtico concierto de jazz o
de rock.
Concert Hall
Este programa crea el rico efecto surround de una sala de
conciertos grande y redonda, con mucho efecto de presencia
que enfatiza la extensión de los sonidos, y permite que se
sienta como si estuviera sentado cerca del centro del
escenario.
Jazz Club
Este programa reproduce el ambiente acústico de “The
Bottom Line”, un famoso club de jazz de Nueva York, y le
permite sentirse como si estuviera sentado justo delante del
escenario.
ENTERTAINMENT
Sports
Este programa reproduce la fuerza de las retransmisiones
deportivas en directo, dirigiendo la voz del comentarista hacia
el centro y ampliando la atmósfera general del estadio. Le
permite sentirse como si estuviera sentado en el estadio.
Talk Show
Este programa reproduce la excitación de los programas de
entrevistas y debate en directo. Realza el ambiente de alegría
mientras mantiene las conversaciones en un nivel cómodo.
Drama
Este programa proporciona reverberaciones estables que se
adaptan a una amplia gama de géneros cinematográficos,
desde los dramáticos a los musicales y las comedias, y ofrece
una sensación tridimensional óptima que reproduce los tonos
de efectos y la música de fondo con suavidad pero de formas
cúbica alrededor de diálogos claros.
Game
Este programa es el ideal para los juegos de aventuras y de rol.
Emplea los efectos de campo sonoro para las películas para
representar durante el juego la profundidad y la sensación
espacial del campo durante el juego, y al mismo tiempo ofrece
efectos surround similares a los de las películas en las escenas
de película del juego.
Mch Stereo
Este programa reduce las fuentes multicanal a 2 canales y, a
continuación, da salida al sonido por todos los altavoces y
produce una amplia gama de sonidos estéreo. Ideal para
música de fondo en fiestas, etc.
OFF (DSP Off)
Sur.Decorder (surround decorder)
Este programa reproduce el sonido surround sin el efecto de
campo sonoro CINEMA DISP.
Cambio del método de salida de audio para
la reproducción surround
1
Pulse la tecla SETUP.
2
Utilice la tecla U / V y la tecla
ENTER para seleccionar “Sound Setup”.
3
Utilice la tecla U / V y la tecla
ENTER para seleccionar “Sound Out”.
4
Utilice la tecla U / V y la tecla
ENTER para seleccionar “Ch Out”.
5
Pulse Y/Z para seleccionar el número
de canales de salida.
Opciones: 5.1ch, 7.1ch, Auto ch*
4)
6
Pulse la tecla V para seleccionar “Sur.”
7
Pulse la tecla Y/Z para seleccionar el
método de salida de audio deseado.
5)
Opciones:
(Con 5.1ch seleccionado) 5Beam, St+3Beam,
3Beam y My Sur.
(Con 7.1ch seleccionado) 5Beam+2, St+3Beam2,
3Beam y My Sur.
8
Para salir del menú, pulse la tecla
SETUP.
Continúa en la página siguiente.
• Los ajustes predeterminados aparecen marcados con “*”.
• Cuando la opción “Auto ch”(automático) está seleccionada.
Cuando la señal de entrada es 2ch/5ch salida 5.1ch
Cuando la señal de entrada es 6.1/7.1ch salida 7.1ch
Aparece “Auricular” cuando los auriculares están conectados y no se
puede modificar el ajuste.
4) y 5) y

Funciones de reproducción
24 Es
■ Opciones de “Sur. (surround)”
Modos de haz de “5.1ch” Modos de haz de “7.1ch”
Para disfrutar del
efecto de sonido
surround de una
película u otros
contenidos al
máximo
5 Beam (5 Haces)
Emite haces sonoros
desde los canales
delanteros izquierdo y
derecho, central y de
sonido surround
izquierdo y derecho.
5Beam+2 (5Haces Plus2)
Emite los haces sonoros
desde los canales
delanteros derecho e
izquierdo, central y
surround traseros
derecho e izquierdo. Las
fuentes de los canales
surround derecho e
izquierdo se mezclan en
los canales delanteros
derecho e izquierdo y
surround traseros
derecho e izquierdo.
Para ver grabaciones
en directo grabadas
en un disco Blu-ray
St+3Beam (Estéreo+3Haces)
Da salida a sonido normal desde los canales
delanteros izquierdo y derecho, y a haces sonoros
desde los canales central y surround izquierdo y
derecho.
St+3Beam2 (Est+3Haces+2)
Da salida al sonido normal desde los canales
delanteros derecho e izquierdo, y a los haces
sonoros desde los canales central y surround
traseros derecho e izquierdo. Se da salida a los
sonidos de los canales surround derecho e izquierdo
utilizando el sonido de los canales delanteros
derecho e izquierdo y los haces sonoros surround
traseros derecho e izquierdo.
Para disfrutar viendo
películas con toda la
familia o cuando la
posición de escucha
está cerca de la parte
trasera de la pared.
3 Beam (3 Haces)
Da salida a los haces sonoros desde los canales delanteros derecho, izquierdo y central.
Las demás fuentes de canales se mezclan en los canales delanteros derecho e izquierdo.
Para una zona de
escucha reducida o
cuando el efecto de
sonido surround sea
poco perceptible
debido a las
condiciones de la
habitación.
My Sur. (Mi Trasero)
Para disfrutar al máximo de Mi Trasero, la posición de escucha debe estar encarada a la parte delantera
de esta unidad.
Aunque el efecto de sonido surround sea poco perceptible con otros ajustes, con este podrá disfrutar
del efecto surround.

Funciones de reproducción
25 Es
PREPARACIÓN
CONEXIÓN/
AJUSTES INICIALES AJUSTES
RESOLUCIÓN DE
PROBLEMAS
SOBRE ESTA
UNIDAD
EspañolREPRODUCCIÓN
Cuando esta unidad reproduce fuentes de 2 o 5.1 canales en el
modo surround, el descodificador de surround permite
reproducirlos en 7.1 canales.
1)
Puede disfrutar de una gran
variedad de efectos de sonido surround activando el
descodificador.
2)
Descodificadores disponibles y fuentes recomendadas
2 canales 5 canales
2 canales 7 canales
Descodificador de surround
Seleccione “Sur.Dec.Mode” en el menú de
opciones.
Consulte “Configuración de los ajustes para cada fuente de
entrada (menú de opciones)” en la página 27 para obtener más
información sobre el menú de opciones.
Descodificador
Fuente
recomendada
Pro Logic (Dolby Pro
Logic)
– Todas las fuentes
PLII (Dolby Pro Logic
II)
Movie
Music
Game
Películas
Música
Juegos
Neo:6 (DTS Neo:6) Cinema
Music
Películas
Música
Descodificador
Fuente
recomendada
PLIIx (Dolby Pro Logic
IIx)
Movie
Music
Game
Películas
Música
Juegos
Neo:6 (DTS Neo:6) Cinema
Music
Películas
Música
Reproducción de fuentes con 5.1 canales con el
descodificador de surround
Cuando la opción “Ch Out” (salida de canal) está ajustada en “7.1ch”,
esta unidad descodifica las fuentes de 5.1 canales y, después, las
reproduce en sonido surround de 7.1 canales (☞p. 23). Uno de los
siguientes descodificadores se selecciona automáticamente dependiendo
de las señales de entrada.
• Los descodificadores solo están disponibles al seleccionar la
reproducción surround.
• Los descodificadores disponibles varían en función del ajuste “Ch
Out” (☞p. 24).
• Con la reproducción estéreo (☞p. 21) y la función Mi Trasero
(☞p. 23), no puede utilizarse el descodificador de surround.
1) y
Fuente de entrada de 5.1
canales
Descodificador
PCM, Dolby Digital, Dolby Digital
EX, Dolby TrueHD, Dolby Digital
Plus
Dolby Pro Logic IIx Movie/
Music
DTS Digital, DTS-ES matrix, DTS-
HD Master Audio, DTS-HD High
Resolution Audio
DTS-ES matrix
DTS-ES discrete DTS-ES discrete
2) y

Funciones de reproducción
26 Es
• El volumen de los auriculares, el control del tono y el nivel de LFE se
pueden ajustar independientemente del ajuste del altavoz.
• Si se escuchan demasiados graves al reproducir canales 5.1 o 7.1 con
canal LFE (0.1 canales), se puede mejorar reduciendo el nivel de LFE.
(☞p. 36)
1) y
Uso de funciones de utilidad
Escucha con altavoces
Inserte el terminal de auriculares en la entrada
PHONES (☞p. 46) de esta unidad.
1)
Sonido envolvente con auriculares
Gracias a la tecnología de sonido envolvente 7.1 para
altavoces de reciente implantación, podrá disfrutar del
sonido envolvente y estéreo de los altavoces directamente
en sus auriculares (☞p. 21). Con los auriculares, también
puede seleccionarse CINEMA DSP (☞p. 22).

27 Es
Funciones de reproducción
PREPARACIÓN
CONEXIÓN/
AJUSTES INICIALES AJUSTES
RESOLUCIÓN DE
PROBLEMAS
SOBRE ESTA
UNIDAD
EspañolREPRODUCCIÓN
Utilice esta función para poner automáticamente esta unidad en el
modo de espera después de un determinado período de tiempo.
■ Función de apagado automático
3)
Si está ajustado AutoPowerDown, la unidad pasa
automáticamente al modo de espera 10 minutos después de que la
fuente de entrada seleccionada se apague o pase a modo de
espera. Esta función resulta útil para evitar olvidar apagar la
unidad.
Realice los ajustes según cada entrada (TV/HDMI1-3/INPUT1-3/
DOCK). Los elementos disponibles del menú varían en función
de la entrada seleccionada.
Elementos del menú de opciones
Para cada entrada se proporcionan los siguientes elementos del
menú.
A continuación encontrará los elementos del menú de opciones.
Estos ajustes se aplican a la fuente de entrada seleccionada en ese
momento. Los ajustes predeterminados aparecen marcados con
“*”.
■ Ajuste del nivel de entrada en cada
terminal (Volume Trim)
Ajuste el nivel de entrada de cada terminal para compensar las
variaciones de volumen entre los distintos dispositivos de
entrada.
Margen ajustable: de -6,0 dB a 0,0 dB* a +6,0 dB
■ Cambio de la señal de audio a
reproducción (Decoder Mode)
Seleccione las señales de audio digital para la reproducción.
Opciones seleccionables: Auto*, DTS
Auto: esta unidad selecciona automáticamente la señal de audio
para su reproducción. Lo habitual es seleccionar este modo.
DTS: esta unidad reproduce únicamente señal DTS.
■ Configuración del descodificador de
surround (Sur. Dec. Mode)
Consulte “Experiencia de sonido según sus preferencias”
(☞p. 21) para obtener más información.
Función de temporizador para dormir/
apagado automático
Pulse la tecla SLEEP varias veces.
Para cambiar la hora hay que acceder al modo de espera. El
indicador SLEEP (☞p. 47) parpadeará en la pantalla del panel
delantero.
El indicador SLEEP de la pantalla del panel delantero se ilumina
y se ajusta el temporizador para dormir.
2)
Opciones seleccionables: Sleep 120 min., Sleep 90 min.,
Sleep 60 min., Sleep 30 min., AutoPowerDown, Off
Ajustes para cada fuente de entrada (menú
de opciones)
1
Pulse la tecla de entrada ( , , , )
para seleccionar la entrada para la que
quiera cambiar los ajustes.
2
Pulse la tecla OPTION.
El menú de opciones aparece en el visor del panel
delantero.
3
Seleccione las opciones pulsando la tecla
U/ V y, después, la tecla ENTER.
4
Cambie el valor del ajuste pulsando la
tecla Y/Z.
5
Para salir del menú de opciones, pulse la
tecla OPTION.
; Volume Trim
Fuente de
entrada
Elementos del menú
HDMI1-3 Volume Trim, Decoder Mode, Sur. Dec. Mode,
Signal Info
TV
INPUT1-3
DOCK
Volume Trim, Sur. Dec. Mode, Connect,
Disconnect, Pairing, Interlock
4)
• El ajuste del temporizador para dormir se cancela si la unidad pasa al
modo de espera o si selecciona “Off”.
• Con la opción AutoPowerDown activada, el indicador SLEEP no se
ilumina mientras el componente de la fuente de entrada está activado.
• Si la unidad se utiliza durante los 10 minutos anteriores a entrar en el
modo de espera, ésta no pasa al modo de espera hasta que transcurran
otros 10 minutos desde la última operación.
• No se puede seleccionar AutoPowerDown si:
– Está seleccionado (INPUT3) analógico o DOCK.
– Está seleccionado TV o HDMI1-3 y la función de control HDMI
está activada.
Para obtener más información sobre Interlock, consulte “Reproducción
de iPod/iPhone (☞p. 29)”. Para obtener más información sobre la
conexión, la desconexión o el emparejado, consulte “Reproducción de
componentes Bluetooth (☞p. 30)”.
2) y
3) y
4) y

Funciones de reproducción
28 Es
■ Visualización de información sobre las
señales de entrada (Signal Info)
Pulse la tecla U/ V para cambiar la siguiente
información.
Format Formato de audio digital
Channel El número de canales incluidos en la señal de
entrada (frontal/surround/LFE (efectos de sonido
en frecuencias bajas))
Ejemplo de visualización: [3/2/0.1] 3 c
delantero, 2 c surround, LFE para señal de
entrada
1)
Sampling Frecuencia de muestreo para señal de entrada
digital
Bitrate Velocidad de bits por segundo de señal de
entrada
HDMI In Resolución de señal de vídeo HDMI
HDMI Message Si se produce un error HDMI (sólo aparece
cuando se produce un error).
Si la señal de entrada incluye canales que no pueden visualizarse en el
formato mostrado en el ejemplo de visualización, se visualizará el
número total de canales, como en “5.1ch”.
1) y

29 Es
Funciones de reproducción
PREPARACIÓN
CONEXIÓN/
AJUSTES INICIALES AJUSTES
RESOLUCIÓN DE
PROBLEMAS
SOBRE ESTA
UNIDAD
EspañolREPRODUCCIÓN
Puede reproducir música guardada en un iPod/iPhone conectado
a una base universal para iPod de Yamaha (YDS-12 opcional,
etc.) o un sistema inalámbrico para iPod/iPhone (YID-W10
opcional).
Una vez ajustado el iPod/iPhone en la base, puede utilizar el
mando a distancia de esta unidad para reproducir el contenido.
También puede ver vídeo de iPod/iPhone en el TV.
: controla el menú del iPod.
: controla la rueda de selección.
El iPod/iPhone compatible con la base universal iPod
(modelos YDS-12/YDS-11/YDS-10):
(A septiembre de 2010)
• iPod touch, iPod mini, iPod (4ª y 5ª generación), iPod Classic,
iPod nano, iPhone, iPhone 3G, iPhone 3GS
• el iPhone no es compatible con los modelos YDS-11/YDS-10.
Tras conectar el receptor a esta unidad y ajustar el iPod/iPhone al
transmisor, puede usar el iPod/iPhone conectado como mando a
distancia para reproducir música.
El iPod/iPhone es compatible con el sistema
inalámbrico para iPod (YID-W10):
(A septiembre de 2010)
iPod touch, iPod (5ª generación), iPod Classic, iPod nano,
iPhone, iPhone 3G, iPhone 3GS
■ Enlace con esta unidad (modo Interlock)
7)
Si utiliza el modelo YID-W10, podrá usar funciones para iPod/
iPhone con “Interlock” ajustado en “On” en el menú de opciones
(☞p. 27).
• Cuando se inicia la reproducción con iPod/iPhone, esta unidad
se enciende y se selecciona DOCK (iPod) automáticamente
como fuente.
• Esta unidad pasa automáticamente al modo de espera si se
detiene la reproducción o transcurridos unos momentos tras la
extracción del iPod/iPhone del transmisor.
Reproducción de iPod/iPhone
1
Inserte el iPod/iPhone en la base universal
Yamaha iPod o en el sistema inalámbrico
para iPod/iPhone conectado al terminal
DOCK.
2)
Colóquelo tan lejos de la unidad como sea posible para
evitar interferencias.
2
Reproduzca el iPod/iPhone seleccionando
la entrada de la base pulsando la tecla
DOCK.
4)
A VIDEO INPUT del TV
3)
(sólo si se utiliza el modelo
YDS-12/YDS-11/YDS-10)
YDS-12, etc.
Si se utiliza una base universal Yamaha
iPod (YDS-12 opcional, etc.)
Si se utiliza un sistema inalámbrico para
iPod (YID-W10 opcional)
5)
6)
• Se debe conectar con la unidad en modo de espera.
• Para obtener información sobre la conexión y la configuración de los
modelos YDS-12 y YID-W10, consulte los manuales suministrados.
Si utiliza los modelos YDS-12, YDS-11 o YDS-10 con el cable de vídeo
con clavijas (suministrado) para conectar el terminal VIDEO OUT de
esta unidad al terminal VIDEO INPUT del TV, podrá ver vídeo de iPod/
iPhone en el TV.
• Algunas funciones podrían no estar disponibles, en función del
modelo o la versión de software de su iPod/iPhone.
• Para obtener más información sobre los mensajes que aparecen en el
visor del panel delantero del iPod/iPhone conectado, consulte “iPod/
iPhone (☞p. 44)” en “Resolución de problemas”.
• Asegúrese de ajustar el volumen al mínimo antes de colocar o extraer
el iPod/iPhone.
Esta unidad carga la batería de un iPod/iPhone colocado sobre la base
universal Yamaha iPod conectada al terminal DOCK incluso si la unidad
se encuentra en modo de espera. “Charging” aparece en el visor del panel
delantero.
• Si está conectado el modelo YID-W10 y la función “Interlock” se
ajusta en “On”, se carga incluso en modo de espera.
• Para ajustar el volumen de reproducción por encima del volumen
máximo permitido por el iPod/iPhone, utilice el mando a distancia de
la unidad para controlar el volumen.
Esta función se puede usar con tonos de llamada y sonido de
aplicaciones. Si el iPhone está en modo de silencio, la unidad no se
enciende con el tono de llamada.
2) y
3) y
4) Nota
5) y
6) y
7) y

Funciones de reproducción
30 Es
Es posible reproducir música guardada en componentes Bluetooth
(reproductores de audio portátiles, ordenadores con Bluetooth, etc.)
conectados al receptor de audio inalámbrico Bluetooth (YBA-10
opcional).
Reproducción de componentes
Bluetooth
Emparejado
Acerca del “emparejado”
Es la operación por la cual se registra un componente para
comunicaciones. El emparejado deberá realizarse antes de
utilizar un componente Bluetooth con el receptor de audio
inalámbrico Yamaha Bluetooth conectado al sistema por primera
vez, o si se han eliminado los datos de emparejado registrados.
Para garantizar la seguridad, el límite de tiempo de la operación
de emparejado es de 8 minutos. Lea y asegúrese de comprender
todas las instrucciones antes de empezar.

31 Es
Funciones de reproducción
PREPARACIÓN
CONEXIÓN/
AJUSTES INICIALES AJUSTES
RESOLUCIÓN DE
PROBLEMAS
SOBRE ESTA
UNIDAD
EspañolREPRODUCCIÓN
1
Tal como se describe en el paso 1 (☞p. 29)
de “Reproducción de iPod/iPhone”,
conecte el receptor de audio inalámbrico
Bluetooth (YBA-10 opcional) al terminal
DOCK.
1)
2
Pulse la tecla DOCK para ajustar la
entrada en DOCK.
3
Encienda el componente Bluetooth con el
que desea realizar el emparejado y, a
continuación, acceda al estado de
emparejado.
2)
4
Pulse la tecla OPTION.
Aparecerá el menú de opciones para la entrada DOCK en
el visor.
5
Seleccione “Pairing” pulsando la tecla
U/ V y pulse la tecla ENTER.
3)
“Searching...” aparecerá en el visor cuando se inicie la
conexión Bluetooth.
6
Compruebe que los componentes
Bluetooth reconocen el receptor de audio
inalámbrico Bluetooth.
Si el componente Bluetooth detecta el receptor de audio
inalámbrico Bluetooth de Yamaha, en la lista de
componentes del componente Bluetooth, aparecerá el
nombre del receptor de audio (“YBA-10 YAMAHA”, por
ejemplo).
7
Seleccione el receptor de audio
inalámbrico Bluetooth en la lista de
componentes Bluetooth e introduzca
“0000” como contraseña de Bluetooth.
Conexión
1
Pulse la tecla DOCK para ajustar la
entrada en DOCK.
2
Pulse la tecla OPTION.
3
Seleccione “Connect” y pulse la tecla
ENTER.
5)
4
Para desconectar el receptor de audio
inalámbrico Bluetooth del componente
Bluetooth, pulse OPTION de nuevo para
que aparezca el menú de opciones,
seleccione “Disconnect” y pulse la tecla
ENTER.
4)
Consulte los detalles en el manual suministrado con el modelo YBA-10.
Para conocer más detalles, consulte el manual del componente Bluetooth.
Para cancelar el proceso de emparejado, pulse RETURN.
Cuando se establece la conexión Bluetooth en esta unidad, sólo se
pueden conectar los componentes Bluetooth conectados más
recientemente.
• Para obtener más información sobre los mensajes, consulte
“Bluetooth (☞p. 45)” en “Resolución de problemas”.
• Si desea establecer una conexión con un componente Bluetooth que
no es el último dispositivo con el que se ha establecido conexión,
inicie la conexión desde dicho componente Bluetooth. Para conocer
más detalles, consulte el manual del componente Bluetooth.
1) y
2) y
3) y
4) y
5) y

32 Es
AJUSTES
Menú de configuración
Antes de realizar los siguientes pasos, compruebe que esta unidad
y el televisor están conectados con el cable de vídeo con clavijas
(suministrado) y active la entrada del televisor “VIDEO INPUT 1
(ejemplo)”.
Procedimiento de ajuste
1
Pulse la tecla SETUP para acceder al
menú de configuración.
1)
2
Seleccione el menú pulsando la tecla
U/ V y pulse la tecla ENTER.
Repita este paso para acceder al menú deseado.
3
Cambie el valor de ajuste de cada menú
pulsando la tecla Y/Z.
2)
4
Pulse la tecla SETUP de nuevo para
salir del menú de configuración.
Pulse la tecla RETURN para volver al menú anterior.
MEMORIA
CONFIG. AUTOMATICA
CONFIG. MANUAL
CONFIG. SONIDO
MENU ENTRADAS
MENU VISUALIZACIÓN
[ ]/[ ]:Subir/Bajar
[ENTER]:Enter
MENU CONFIGURACIÓN
1)AJUSTE PARAMETROS
2)AJUSTE HAZ
3)LOCALIZACIÓN IMAGEN
CONFIG. MANUAL
[ ]/[ ]:Subir/Bajar
[ENTER]:Enter
Mantenga pulsada la tecla SETUP para acceder al menú “CONFIG.
IDIOMA” (☞p. 40).
Los ajustes predeterminados aparecen marcados con “*”.
1) Nota
2)
y

33 Es
Menú de configuración
PREPARACIÓN
CONEXIÓN/
AJUSTES INICIALES REPRODUCCIÓN AJUSTES
RESOLUCIÓN DE
PROBLEMAS
SOBRE ESTA
UNIDAD
Español
Lista del menú de configuración
Categoría Menú Menú secundario Características Página
MEMORIA CARGAR Memoria 1, Memoria 2 y
Memoria 3
Carga los ajustes de haz y sonido almacenadas en la
memoria.
☞p. 17
SALVAR Memoria 1, Memoria 2 y
Memoria 3
Guarda en la memoria los ajustes actuales de haz y
sonido.
☞p. 16
CONFIG.
AUTOMATICA
OPTIMIZAR
HAZ+SONIDO
CONFIG.
AUTOMATICA
Optimiza automáticamente los ajustes de haz y sonido.
☞p. 14
OPTIMIZAR SOLO
HAZ
Optimiza automáticamente los ajustes de haz.
☞p. 14
OPTIMIZAR SOLO
SONIDO
Optimiza automáticamente los ajustes de sonido.
☞p. 14
CONFIG.
MANUAL
AJUSTE
PARAMETROS
POSICIÓN
INSTALADA, ajustes de
la habitación de escucha,
ajustes de distancia
Ajusta las configuraciones de la habitación y de la
posición de escucha.
☞p. 34
AJUSTE HAZ ANGULO
HORIZONTAL,
DISTANCIA
RECORRIDA HAZ,
DISTANCIA FOCAL
(Frontal Izq, Frontal Der,
Central, Trasero Izq,
Trasero Der)
Hace diversos ajustes de haces sonoros.
☞p. 35
LOCALIZACIÓN
IMAGEN
IZQUIERDO,
DERECHO
Ajusta la posición del sonido de los canales delanteros
derecho e izquierdo.
☞p. 36
CONFIG. SONIDO CONTROL DE
TONO
AGUDOS, GRAVES Ajusta el nivel de salida del sonido de alta o -baja
frecuencia.
☞p. 36
SUBWOOFER NIVEL LFE Configura los ajustes del subwoofer. ☞p. 36
RETARDO AUDIO AUTO LIP SYNC Ajusta el retardo de la sincronización de salida entre
las señales de vídeo y de audio.
☞p. 36
TV, HDMI1-3,
INPUT1, INPUT2,
INPUT3
Ajusta el tiempo de salida de las señales de audio
manualmente. ☞p. 36
Control Rango
Dinámico
Adaptive DRC, Dolby/
DTS DRC
Ajusta la gama dinámica.
☞p. 37
NIVEL CANAL Frontal Izq, Frontal Der,
Central, Trasero Izq,
Trasero Der, Subwoofer
Ajusta el volumen de cada canal.
☞p. 37
SALIDA SONIDO SALIDA CANAL Ajusta la configuración de la salida de haces sonoros. ☞p. 37
TRASERO Ajusta la configuración de la salida de señales de
sonido surround.
☞p.
37
MENU ENTRADAS ASIGNACIÓN
ENTRADAS
OPTICA1, OPTICA2,
COAXIAL,
ANALOGICO
Asigna terminales según el componente que se vaya a
utilizar. ☞p. 38
SELECCIONAR AUDIO
(HDMI1, HDMI2,
HDMI3)
Configura la salida de sonido desde la toma HDMI.
☞p. 38
RENOMBRADO
ENTRADAS
TV, INPUT1, INPUT2,
INPUT3, HDMI1,
HDMI2, HDMI3
Cambia el nombre de la fuente de entrada visualizada.
☞p. 39
CONFIG. HDMI CONTROL HDMI,
MANEJO AUDIO
Configura los ajustes HDMI.
☞p. 39
MENU
VISUALIZACIÓN
AJUSTE
ATENUACIÓN
ATENUACIÓN
STANDARD,
ATENUACIÓN
AUTOMATICA
Realiza los ajustes para el visualizador del panel
delantero.
☞p. 40
AJUSTE OSD DESPLAZAR OSD,
COLOR DE FONDO
OSD
Configura los ajustes de la visualización en pantalla
(OSD). ☞p. 40
CONFIG. IDIOMA ENGLISH, DEUTSCH,
FRANÇAIS, ESPAÑOL,
ITALIANO,
NEDERLANDS,
РУССКИЙ, SVENSKA
Cambia el idioma que se emplea en la OSD.
☞p. 40
AJUSTE
UNIDADES
METROS, PIES Cambia la unidad de medición de la visualización.
☞p. 40

Menú de configuración
34 Es
Utilice este menú para ajustar manualmente los parámetros
relacionados con la salida del haz sonoro. Para realizar el ajuste
fino de los parámetros ajustados mediante CONFIG.
AUTOMATICA, emplee “AJUSTE HAZ” y “LOCALIZACIÓN
IMAGEN”.
CONFIG. MANUAL AJUSTE PARAMETROS
Se utiliza para establecer la posición de esta unidad en su
habitación de escucha y la distancia desde la posición de escucha
hasta esta unidad.
1)
2)
Configuración manual
Ajuste de parámetros
1
En “AJUSTE PARAMETROS 1/3”,
configure “POSICIÓN INSTALADA”.
Selecciona la posición de instalación de esta unidad.
3)
Opciones seleccionables: PARALELO A
PARED* (en paralelo a la pared), ANGULO A
PARED O ESQUINA (ángulo a la pared o
esquina)
2
En “AJUSTE PARAMETROS 2/3”,
configure los ajustes de la sala de
escucha.
Especifique la longitud y anchura de la sala de escucha.
Margen de control: de 2,0 m a 12,0 m
Cuando la unidad está
instalada en paralelo a la
pared, especifique la anchura
de la sala de escucha y la
distancia entre la unidad y la
pared posterior.
PARALELO A PARED ANGULO A PARED O
ESQUINA
Cuando la unidad está
instalada en un rincón de la
sala, especifique la anchura
de la longitud de la sala de
escucha.
3
En “AJUSTE PARAMETROS 3/3”,
configure los ajustes de distancias.
Especifique la distancia entre la posición de escucha y
esta unidad. Cuando la unidad está instalada en paralelo a
la pared, necesita especificar la distancia entre la posición
de escucha y la pared izquierda.
Margen de control (desde esta unidad): de 1,8 m
a 9,0 m
Margen de control (desde la pared izquierda): de
0,6 m a 11,4 m
De 1,8 a 9,0 m
PARALELO A PARED
De 0,6 a 11,4 m
Si efectúa ajustes en “AJUSTE PARAMETROS”, los parámetros
“AJUSTE HAZ” se ajustan automáticamente.
Si realiza ajustes en “AJUSTE PARAMETROS”, se perderán los ajustes
de optimización del haz efectuados en el procedimiento CONFIG.
AUTOMATICA.
Si modifica esta opción, la configuración de “Modo surround” cambia
automáticamente (☞p. 23).
1) y
2) y
3) y

35 Es
Menú de configuración
PREPARACIÓN
CONEXIÓN/
AJUSTES INICIALES REPRODUCCIÓN AJUSTES
RESOLUCIÓN DE
PROBLEMAS
SOBRE ESTA
UNIDAD
Español
CONFIG. MANUAL AJUSTE HAZ
Se utiliza para ajustar manualmente varios ajustes de haces
sonoros.
4)
Ajuste del haz
1
Configure “ANGULO HORIZONTAL”.
Ajusta el ángulo horizontal de los haces sonoros para cada
canal utilizando tonos de prueba.
Ajuste hacia L (izquierda) para mover la dirección de la
salida a la izquierda, y hacia R (derecha) para moverla a
la derecha.
Margen de control: de L90° a R90°
2
Configure “DISTANCIA RECORRIDA HAZ”.
5)
Ajusta la distancia que se desplazan los haces sonoros
desde que salen y se reflejan en la pared hasta que llegan
a la posición de escucha de forma que todos los sonidos
lleguen a la posición de escucha al mismo tiempo.
Margen de control: de 0,3 m a 24,0 m
La longitud de cada flecha
indica la distancia recorrida
por el haz.
( – ) ( + )
( + ) ( – )
3
Configure “DISTANCIA FOCAL”.
6)
Ajusta la distancia de la parte delantera de esta unidad hasta
el punto focal de salida para cada canal para lograr una
sensación expansiva de cada canal. Ajuste hacia - (menos)
para mover el enfoque hacia afuera (ampliar el punto
óptimo) y ajuste hacia + (más) para mover el enfoque hacia
la posición normal (estrechar el punto óptimo).
Le recomendamos que emplee el ajuste inicial
(-0,5 m o -1,5 pies) para “Central”.
Menú secundario: Frontal Izq, Frontal Der, Trasero
Izq, Trasero Der
Margen de control: de -1,0 m a +13,0 m
Menú secundario: Central
Margen de control: de -1,0 m a -0,5 m* a +13,0 m
Distancia focal
Punto focal
Punto
óptimo
Canal delantero
izquierdo
Canal central
Ejemplo
• Los parámetros de “AJUSTE HAZ” se ajustan automáticamente
(excepto “Central” en “DISTANCIA FOCAL”) si ejecuta CONFIG.
AUTOMATICA (☞p. 12) o si configura “AJUSTE PARAMETROS”
(☞p. 34).
• Dependiendo de los ajustes del modo surround (☞p. 23), algunas
posiciones de canales pueden no estar disponibles para la selección.
En tal caso se visualiza “– –”.
Efectúe este ajuste únicamente cuando haya ajustado “ANGULO
HORIZONTAL”.
La anchura del punto óptimo se hace ligeramente más amplia que la
anchura de esta unidad si ejecuta CONFIG. AUTOMATICA (☞p. 12) o
si configura “AJUSTE PARAMETROS” (☞p. 34).
4) y 5) Nota
6)
y

Menú de configuración
36 Es
CONFIG. MANUAL LOCALIZACIÓN IMAGEN
Se usa para ajustar la dirección desde la que se oye el sonido de
los canales delanteros izquierdo y derecho, para que cada canal
pueda ser oído próximo al canal central.
Emplee esta función para redirigir las señales de audio si el
sonido que llega desde los canales delanteros izquierdo y derecho
no parece natural.
Únicamente puede ajustar este parámetro cuando en “Modo
surround” (☞p. 23) está seleccionado “5Haces Plus2”, “5 Haces”
o “3 Haces”.
Seleccione “ON” para configurar la dirección del sonido.
Opciones seleccionables: OFF*, ON
CONFIG. SONIDO CONTROL DE TONO
Utilice esta opción para ajustar el nivel de salida del sonido de
alta o baja frecuencia.
Menú secundario: AGUDOS (Tonos altos), GRAVES
(Tonos bajos)
Margen ajustable: de -10,0 dB a 0,0 dB* a +10,0 dB
CONFIG. SONIDO SUBWOOFER
Menú secundario: NIVEL LFE
Ajusta el volumen de Dolby Digital y las señales DTS incluidas en
LFE (efectos de sonido en frecuencias bajas).
2)
Margen ajustable: de -20,0 dB a 0,0 dB*
CONFIG. SONIDO RETARDO AUDIO
Las imágenes de TV con pantalla plana a veces generan desfases
con el sonido. Puede utilizar esta función para retrasar la salida de
sonido, y sincronizarlo así con la imagen de vídeo.
Menú secundario: AUTO LIP SYNC
Seleccione si hay que ajustar automáticamente el retardo de la
salida de audio.
Opciones seleccionables: ON*, OFF
“ON”: El retardo de la salida de audio se ajusta automáticamente.
Esta opción está disponible cuando un TV compatible con la
sincronización de voz automática está conectado en el terminal
HDMI OUT (ARC) de esta unidad.
“OFF”: Seleccione “OFF” si el televisor conectado en el terminal
HDMI OUT (ARC) de esta unidad no es compatible con la
sincronización de voz automática o si quiere desactivar la
sincronización de voz automática. El tiempo de retardo de cada
entrada se puede ajustar manualmente con las siguientes
opciones.
Menú secundario: TV
Ajusta el retardo de la salida de audio que se aplica a las señales
que entran desde los terminales TV.
Margen ajustable: de 0 ms* a 300 ms
Localización de imagen
1
Ajusta la ubicación de la imagen para el
canal delantero izquierdo (IZQUIERDO).
Cuanto más alto es el porcentaje, más alta es la salida
desde el centro.
Margen de control: de 0%* a 95%
2
Ajusta la ubicación de la imagen para el
canal delantero derecho (DERECHO).
Cuanto más alto es el porcentaje, más alta es la salida
desde el centro.
Margen de control: de 0%* a 95%
Sin ajuste Con el canal delantero
izquierdo ajustado
Sin ajuste Con el canal delantero
derecho ajustado
Control del tono
Control del tono
Ajustes del subwoofer
Control de retardo de audio
Para ajustar el volumen de cada canal, vea “NIVEL CANAL” (☞p. 37). ¿Qué es LFE?
“LFE” hace referencia a los efectos de baja frecuencia incluidos en el
audio digital. Las señales digitales como Dolby Digital y DTS incluyen
una línea dedicada a LFE.
1) y 2) y

37 Es
Menú de configuración
PREPARACIÓN
CONEXIÓN/
AJUSTES INICIALES REPRODUCCIÓN AJUSTES
RESOLUCIÓN DE
PROBLEMAS
SOBRE ESTA
UNIDAD
Español
Menú secundario: HDMI1-3
Ajusta manualmente el retardo de la salida de audio que se aplica
a las señales que entran desde los terminales HDMI IN. Este
ajuste sólo es efectivo cuando “AUTO LIP SYNC” está en
“OFF”.
Margen ajustable: de 0 ms a 30 ms* a 300 ms
Menú secundario: INPUT1/INPUT2/INPUT3
Ajusta el retardo de la salida de audio que se aplica a las señales
que entran desde los terminales INPUT1/INPUT2/INPUT3.
Margen ajustable: de 0 ms a 30 ms* a 300 ms
CONFIG. SONIDO Control Rango Dinámico
Utilícelo para ajustar la compresión de la gama dinámica. La
gama dinámica es la diferencia entre el sonido más pequeño que
puede oírse por encima del ruido del equipo y el sonido más alto
que puede oírse sin distorsión.
Menú secundario: Adaptive DRC
3)
Seleccione si hay que ajustar automáticamente la gama dinámica
en conjunción con el nivel del sonido. Cuando esta función se
ajusta en “ON”, la gama dinámica se ajusta de la siguiente
manera.
Cuando el nivel del volumen es bajo:
Estrecha la gama dinámica. El sonido elevado se reproduce más
suave, y el sonido blando que es difícil de escuchar se reproduce a
más volumen.
Cuando el nivel del volumen es alto:
Amplía la gama dinámica. Del sonido suave al sonido potente, la
fuente sonora se reproduce sin ajustar el volumen.
Opciones seleccionables: ON*, OFF
“ON”: ajusta automáticamente la gama dinámica.
4)
“OFF”: la gama dinámica no se ajusta dinámicamente.
Menú secundario: Dolby/DTS DRC
Seleccione la cantidad de gama dinámica que se aplica cuando
esta unidad está descodificando señales Dolby Digital y DTS.
Opciones seleccionables: Mín/Auto, Estándar, Máx*
Máx: emite sonido sin ajustar la gama dinámica de las señales de
entrada.
5)
Estándar: gama dinámica recomendad para uso doméstico
habitual.
Mín/Auto:
(Mínimo) Ajusta la gama dinámica para un entorno de volumen
bajo o silencioso, como en visionados nocturnos o para
reproducir señales de flujos de bits salvo señales Dolby TrueHD.
(Automático) Ajusta la gama dinámica a partir de la información
obtenida de la señal cuando se reproducen señales Dolby
TrueHD.
CONFIG. SONIDO NIVEL CANAL
Utilícelo para ajustar el volumen de cada canal con tonos de
prueba.
6)
Menú secundario:
Frontal Izq, Frontal Der, Central, Trasero Izq, Trasero
Der, Subwoofer
Margen ajustable: de -10,0 dB a +10,0 dB
CONFIG. SONIDO SALIDA SONIDO
Menú secundario: SALIDA CANAL, TRASERO
Utilizado para configurar el número de canales de salida (5.1ch/
7.1ch/Auto) o el método de salida del audio. Para obtener más
información, consulte “Cambio del método de salida de audio
para la reproducción surround” (☞p. 23).
Control de gama dinámica
Activar
Activar
Nivel de salida
Nivel de salida
Desactivar
Desactivar
Nivel de entrada Nivel de entrada
Volumen: bajo Volumen: alto
Nivel del volumen de cada canal con tonos
de prueba
Ajustes de salida de sonido
Configuración de la salida del haz sonoro
• Si está ajustada en “ON”, “Dolby/DTS DRC” se ajusta
automáticamente en “Máx”.
• Este ajuste no está disponible cuando UniVolume se ajusta en “ON”.
Esto hace que el sonido se escuche más fácilmente si el volumen es bajo,
por ejemplo, por la noche.
“Adaptive DRC” se pone automáticamente en “OFF” cuando se ha
seleccionado un ajuste que no es “Máx”.
Al utilizar la función Mi Trasero, es posible seleccionar Central, Trasero
Izq/Der, Subwoofer.
3) y
4) y
5) y
6) y

Menú de configuración
38 Es
MENU ENTRADAS ASIGNACIÓN ENTRADAS
1)
Utilícelo para cambiar las asignaciones claves de los terminales
de entrada de esta unidad. El sonido de la entrada seleccionada se
decide según la asignación de los terminales.
2)
Opciones:
Opciones seleccionables: TV, INPUT1, INPUT2, INPUT3,
HDMI1, HDMI2, HDMI3
SELECCIONAR AUDIO (Selección de audio de entrada
HDMI)
Cambie la señal de sonido HDMI a Off si quiere reproducir el
vídeo del terminal HDMI IN y el sonido del terminal AUDIO
INPUT.
3)
Menú secundario: HDMI1, HDMI2, HDMI3
Opciones seleccionables: OFF, ON*
Asignación de entradas
Asignación de entradas
Menú secundario
Ajuste
predeterminado
Terminal de entrada de
audio
OPTICA1 TV
DIGITAL (OPTICAL)
TV
OPTICA2 INPUT1
DIGITAL (OPTICAL) 1
COAXIAL INPUT2
DIGITAL (COAXIAL) 2
ANALOGICO INPUT3
AUDIO INPUT 3
Ajuste la entrada HDMI IN correspondiente a “OFF” del ajuste de
entrada de audio a la toma HDMI IN de “ASIGNACIÓN ENTRADAS”
al seleccionar HDMI IN.
La opción seleccionable para otros terminales de entrada de sonido
digital ya seleccionados no aparecerá.
Ejemplo: Cuando se conecta la unidad y un PC
1 Conecte el terminal de salida DVI del PC y HDMI IN 3 con un cable
adaptador DVI HDMI.
2 Conecte un terminal de salida de audio del PC y el terminal AUDIO
INPUT 3 (ANALOGICO).
3 Defina “ANALOGICO” de “ASIGNACIÓN ENTRADAS” a
“HDMI3”.
4 Defina “HDMI3” de “SELECCIONAR AUDIO (ASIGNACIÓN
ENTRADAS)” en “OFF”.
1) y
2) y
3) y

39 Es
Menú de configuración
PREPARACIÓN
CONEXIÓN/
AJUSTES INICIALES REPRODUCCIÓN AJUSTES
RESOLUCIÓN DE
PROBLEMAS
SOBRE ESTA
UNIDAD
Español
MENU ENTRADAS RENOMBRADO ENTRADAS
Utilícelo para cambiar el nombre de la fuente de entrada que se
visualiza cuando se selecciona la fuente de entrada. Seleccione
uno de los nombres de las plantillas o introduzca un nombre
original.
■ Selección de un nombres de las plantillas
■ Introducción de un nombre original
Menú: CONFIG. HDMI
Utilícelo para configurar los ajustes relacionados con las señales
HDMI y con la función de control HDMI.
■ Control HDMI
Menú secundario: CONTROL HDMI
Use esta función para enlazar esta unidad y un TV compatible
con control HDMI a través de HDMI. Para obtener más
información, consulte “Funcionamiento de la unidad con el
mando a distancia del televisor (☞p. 18)”.
Opciones seleccionables: OFF*, ON
“OFF”: desactiva la función de control. Disminuye el consumo de
corriente de esta unidad en el modo de espera.
“ON”: activa la función de control.
■ Componente de reproducción de audio
Menú secundario: MANEJO AUDIO
Utilícelo para seleccionar el componente que va reproducir
señales de audio HDMI. Este ajuste únicamente tiene efecto si
“CONTROL HDMI” está en “OFF”.
5)
Opciones seleccionables: YRS-1100*, OTRO
“YRS-1100”: reproduce la señal de sonido de entrada.
“OTRO”: reproduce el equipo conectado al terminal HDMI OUT
(ARC).
Renombrado de entradas
1
Pulse la tecla U/ V para seleccionar
la fuente de entrada cuyo nombre se va a
cambiar.
2
Pulse la tecla Y/Z para seleccionar un
nombre de fuente de entrada.
Opciones seleccionables: Blu-ray, DVD, DVR,
CATV, Satelite, Game
3
Para salir del menú, pulse la tecla
RETURN.
1
Pulse la tecla U/ V para seleccionar
la fuente de entrada cuyo nombre se va a
cambiar.
2
Pulse la tecla ENTER.
“T” se visualiza encima del nuevo nombre para indicar la
posición que se va a introducir.
3
Pulse la tecla Y/Z para poner _
(subrayado) debajo del espacio o carácter
que desea editar.
4
Pulse la tecla U / V para seleccionar
el carácter que desee.
4)
5
Repita los pasos 3 y 4 para editar otros
caracteres.
6
Para terminar el ajuste, pulse la tecla
ENTER.
7
Para salir del menú, pulse la tecla
RETURN.
Configuración HDMI
Es posible introducir las letras de la A a la Z, los números de 0 a 9, y las
letras de la a a la z y símbolos (!, ?, <, >, etc.).
Las señales de vídeo HDMI que entran por uno de los terminales HDMI
IN de esta unidad siempre salen por el terminal HDMI OUT (ARC).
4) y
5) y

Menú de configuración
40 Es
■ Configuración del visor del panel delantero
MENU VISUALIZACIÓN AJUSTE ATENUACIÓN
Se usa para ajustar el brillo y la visualización del visualizador del
panel delantero.
Menú secundario: ATENUACIÓN STANDARD
Utilícelo para ajustar el brillo del visor del panel delantero
cuando manipula esta unidad. El visor del panel delantero se
atenúa cuando el número es más pequeño.
Opciones seleccionables: -2, -1, OFF* (más brillante)
Menú secundario: ATENUACIÓN AUTOMATICA
Utilícelo para ajustar el brillo del visor del panel delantero en
funcionamiento normal (unidad/mando a distancia sin usar)
basándose en el valor de ajuste de “ATENUACIÓN
STANDARD”. El visor del panel delantero se atenúa cuando el
número es más pequeño.
Opciones seleccionables: VISUALIZACIÓN OFF (ocultar),
-3, -2, -1, OFF* (más brillante)
■ Configuración de OSD
MENU VISUALIZACIÓN AJUSTE OSD
Se usa para ajustar la posición de visualización y seleccionar el
color de fondo de la OSD.
Menú secundario: DESPLAZAR OSD
Se utiliza para ajustar la posición vertical de la OSD. Ajuste hacia
la dirección - (menos) para subir la posición de la OSD, y ajuste
hacia la dirección + (más) para bajarla.
Opciones seleccionables: de -5 a ±0* a +5
Menú secundario: COLOR DE FONDO OSD
Utilícelo para seleccionar el color de fondo de la OSD.
Opciones seleccionables: Azul*, Gris, Negro, Púrpura, Rojo
■ Configuración de idioma
1)
MENU VISUALIZACIÓN CONFIG. IDIOMA
Utilizado para cambiar el idioma que se emplea en la OSD.
Opciones seleccionables: ENGLISH* (inglés),
DEUTSCH (alemán), FRANÇAIS (francés), ESPAÑOL,
ITALIANO (italiano), NEDERLANDS (neerlandés),
РУССКИЙ (ruso), SVENSKA (sueco)
■ Ajuste de unidades
MENU VISUALIZACIÓN AJUSTE UNIDADES
Use esta opción para cambiar la unidad de medida de la visualización.
Opciones seleccionables: METROS, PIES
Para el modelo de Canadá, la opción predeterminada es “PIES”.
Para los demás modelos, la opción predeterminada es
“METROS”.
• Seleccione METROS para introducir las distancias en metros.
• Seleccione PIES para introducir las distancias en pies.
MENU VISUALIZACIÓN
Mantenga pulsada la tecla SETUP para ver el menú directamente.
1) y

41 Es
PREPARACIÓN
CONEXIÓN/
AJUSTES INICIALES REPRODUCCIÓN AJUSTES
RESOLUCIÓN DE
PROBLEMAS
SOBRE ESTA
UNIDAD
Español
Configuración avanzada
1
Pulse la tecla para poner la unidad
en modo de espera.
2
Sin soltar la tecla INPUT en el panel
delantero, pulse la tecla en el mando
a distancia para encender la unidad.
“ADVANCED SETUP” aparecerá en la pantalla del
panel delantero.
3
Suelte la tecla INPUT del panel delantero.
4
Pulse U/ V para seleccionar el menú
que desee en el visor del panel delantero y
seguidamente pulse la tecla ENTER.
1)
5
Cambie el ajuste pulsando la tecla
Y
/
Z
.
2)
6
Pulse la tecla para poner la unidad
en modo de espera.
El nuevo ajuste se reflejará la próxima vez que encienda
esta unidad pulsando la tecla .
Menú Descripción
Opciones seleccionables/Margen
ajustable
TURN ON VOLUME Ajusta el nivel del volumen al encenderse la unidad. De Off* (Sin ajustar), 01 a 99, MAX (Máximo)
MAX VOLUME SET Ajusta el volumen máximo. De 01 a 99, MAX* (Máximo)
PANEL INP. KEY Activa/desactiva la tecla INPUT del panel delantero. P.INPUT: ON* (Activada), P.INPUT:OFF
(Desactivada)
F.PANEL. KEY Activa/desactiva las teclas del panel delantero. P.INPUT: ON* (Activada), P.INPUT:OFF
(Desactivada)
R.INPUT POWER Activa/desactiva el encendido de la unidad con las
teclas de entrada del mando a distancia si la unidad se
encuentra en modo de espera.
R.INPUT PW: OFF* (Desactiva el encendido),
R.INPUT PW: ON (Activa el encendido)
AC ON STANDBY Establece si la unidad vuelve o no a su estado
anterior cuando se restaura la alimentación de CA
tras una interrupción temporal de la corriente.
AC STANDBY: OFF* (Se restaura el estado anterior
a la interrupción),
AC STANDBY: ON (Entra en modo de espera)
MEMORY PROTECT Impide guardar los ajustes utilizando la función de
memoria (☞p. 16).
PROTECT:OFF* (No se lleva a cabo ninguna
protección),
PROTECT:ON (Se lleva a cabo la protección)
DEMO MODE Emite una prueba del haz sonoro.
3)
BEAM DEMO:OFF* (Reproducción normal),
BEAM DEMO:ON (Modo demostración)
FACTORY PRESET Restaura todos los ajustes a sus valores
predeterminados, salvo los de ADVANCED SETUP.
PRST:CANCEL* (No se lleva a cabo ninguna
restauración),
PRST: RESET (Se lleva a cabo la restauración)
Para volver al menú anterior, pulse la tecla RETURN.
Los ajustes predeterminados aparecen marcados con “*”.
Esta unidad emite un haz sonoro con mezcla descendente en un canal,
con movimiento horizontal a derecha e izquierda. Con esta función, es
posible comprobar cómo se emite el haz sonoro desde la unidad.
Aparece “Demo” en el visualizador del panel delantero al configurar el
modo demostración.
Iniciar/detener movimiento horizontal
Pulse la tecla Desactivar.
Auto Demo On: el haz sonoro se mueve automáticamente en sentido
horizontal a izquierda y derecha.
Auto Demo Off: la dirección del haz sonoro es fija.
Ajuste manual del ángulo del haz sonoro
Pulse la tecla SURROUND/ STEREO en el estade “Auto Demo
Off
”
1) y
2) y
3) y

42 Es
RESOLUCIÓN DE PROBLEMAS
Resolución de problemas
Consulte la tabla de abajo cuando esta unidad no funcione correctamente. Si el problema que usted tiene no está en la lista de abajo o las
instrucciones de abajo no sirven de ayuda, ponga esta unidad en el modo de espera, desconecte el cable de alimentación de CA y
póngase en contacto con el centro de servicio o concesionario Yamaha autorizado.
Resolución de problemas
General
Problema Causa Remedio
Vea la
página
Esta unidad no
funciona
correctamente.
El microprocesador interno ha sido dañado
por una descarga eléctrica externa (rayo o
electricidad estática excesiva) o por una
alimentación de baja tensión.
Ponga esta unidad en el modo de espera, desconecte
el cable de alimentación, vuelva a conectarlo
después de 30 segundos y utilice normalmente la
unidad.
–
Esta unidad no se
enciende cuando se
pulsa o se entra en el
modo de espera poco
después de conectarse
la alimentación.
El cable de alimentación de CA no está
firmemente conectado a la toma de CA de
la pared.
Conecte firmemente el cable de alimentación de
CA a la toma de CA de la pared. 8
Esta unidad ha sido expuesta a una
descarga eléctrica externa intensa (rayo o
electricidad estática intensa).
Ponga esta unidad en el modo de espera, desconecte
el cable de alimentación, vuelva a conectarlo
después de 30 segundos y utilice normalmente la
unidad.
–
Esta unidad se pone
repentinamente en el
modo de espera.
La temperatura interna aumenta demasiado
y se activa el circuito protector contra
recalentamiento.
Espere una hora aproximadamente a que se enfríe la
unidad y vuelva a encenderla. –
El temporizador para dormir ha apagado la
unidad.
Conecte la alimentación y reproduzca de nuevo la
fuente.
27
Se ha apagado la corriente tras desconectar
el sistema inalámbrico temporalmente con
la función “Interlock” ajustada en “On” con
el modelo YID-W10.
Restablezca la conexión inalámbrica o detecte el
audio de iPod/iPhone y encienda la unidad.
–
No hay sonido.
Conexiones de los cables de entrada o
salida mal hechas.
Conéctelos con una conexión HDMI o digital.
8, 9
No se ha seleccionado una fuente de
entrada apropiada.
Seleccione una fuente de entrada apropiada con la
tecla INPUT o las teclas de selección de entrada.
20
El volumen está bajo. Suba el volumen. 20
El sonido está silenciado. Pulse la tecla MUTE o VOLUME +/- para reanudar
la salida de audio y ajustar el nivel del volumen.
20
Hay una señal de entrada que no se puede
reproducir en esta unidad.
Reproduzca una fuente cuyas señales pueda
reproducir esta unidad. Cambie los ajustes del
sistema del componente fuente.
–
“MANEJO AUDIO” está en la posición
“OTRO”.
Ajuste en “YRS-1100”.
39
“CONTROL HDMI” está en la posición
“OFF”.
Cuando se conecta un TV compatible con ARC
(canales de retorno de audio) y esta unidad utiliza
únicamente un cable HDMI, ajuste “CONTROL
HDMI” en “ON”.
39
El terminal de entrada digital coaxial y el terminal
de salida de audio del TV se conectan con un cable
de audio digital con clavijas.
9
Hay unos auriculares conectados a la
unidad.
El sonido del canal de
efectos para programas
por cable puede
convertirse en ruido.
La fuente tiene efecto envolvente. No emita efectos de sonido envolvente en esta
unidad.
–
Sin sonido o sonido
demasiado bajo desde
un canal en particular.
El nivel de salida del canal está silenciado. Suba el nivel de salida del canal. 21, 37
La configuración del haz es inapropiada. Ajuste la configuración del haz. 23
Reproduce la fuente en el modo estéreo. Inicie la reproducción surround. 22
Algunos métodos de salida de audio no dan
salida a haces sonoros por determinados
canales.
Ajuste la configuración del haz.
23

Resolución de problemas
43 Es
PREPARACIÓN
CONEXIÓN/
AJUSTES INICIALES REPRODUCCIÓN AJUSTES
SOBRE ESTA
UNIDAD
Español
RESOLUCIÓN DE
PROBLEMAS
Los efectos del sonido
surround no son
consistentes.
Cuando se conecta esta unidad digitalmente
con componentes de reproducción y TV, el
ajuste de salida del componente de
reproducción y del TV deja de ser válido.
Consulte el manual que se proporciona con su
componente y revise la configuración.
–
La habitación de escucha tiene una forma
irregular o la unidad o la persona no está en
una posición simétrica entre las dos paredes
de la habitación.
Mueva la unidad o cambie la posición de escucha.
6, 34
No hay pared en el camino del haz sonoro. Ponga un objeto plano, como un tablero, en el
camino del haz sonoro.
–
Si Mi Trasero está seleccionado, la posición
de escucha no está frente a la unidad.
Escuche desde delante de la unidad.
24
No hay sonido del
altavoz de subgraves
interno.
La fuente no contiene señales de graves
bajos.
El nivel del subwoofer es bajo. Aumente el nivel del subwoofer con la tecla
SUBWOOFER +.
20
La imagen no se ve en la
pantalla del TV.
El cable HDMI no está bien conectado. Conéctelos con una conexión HDMI o digital.
8, 9
La pantalla del menú de
esta unidad no aparece.
Las tomas VIDEO OUTPUT de esta unidad
y el televisor no están conectadas.
Conecte las tomas con un cable de vídeo con
clavijas (suministrado).
8
El interruptor de entrada del TV no se
encuentra en la posición correcta.
Cambie la fuente de entrada para su TV.
–
Un dispositivo digital o
de alta frecuencia
genera ruido.
Puede que la unidad esté colocada cerca de
un dispositivo digital o un dispositivo de
alta frecuencia.
Aleje estos equipos de la unidad.
–
La configuración del
sistema se cambia
automáticamente.
Si “CONTROL HDMI” está en la posición
“ON”, las funciones del TV (por ejemplo,
cambiar de canal, etc.) tal vez modifiquen
ciertos ajustes de configuración del sistema,
como el modo envolvente.
Ajuste “CONTROL HDMI” en “OFF” o vuelva a
configurar el sistema con el mando a distancia.
39
La función de control
HDMI no funciona
adecuadamente.
“CONTROL HDMI” está en la posición
“OFF”.
Ajuste “CONTROL HDMI” en “ON”.
39
La función de control HDMI está
desactivada en su televisor.
Consulte el manual que se proporciona con su TV y
revise la configuración.
–
El número de los dispositivos HDMI
conectados ha superado el límite.
Desconecte algunos de los dispositivos HDMI.
–
La sincronización de
voz automática no tiene
efecto incluso cuando
“AUTO LIP SYNC” está
en “ON”.
El televisor no es compatible con la
sincronización de voz automática.
Ponga “AUTO LIP SYNC” en “OFF” y ajuste
después manualmente el retardo de la salida de
audio.
36
“Not Available” aparece
en el visor del panel
delantero tras utilizar
las teclas.
La tecla no puede funcionar en el estado
actual.
Mando a distancia
Problema Causa Remedio
Vea la
página
El mando a distancia no
funciona o funciona
mal.
Distancia o ángulo equivocados. El mando a distancia funciona dentro de una
distancia de 6 m y sin exceder un ángulo de
30 grados a partir del eje central del panel
delantero.
7
La luz solar directa o de otras luces
(lámpara fluorescente tipo inversor, etc.)
cae directamente sobre el sensor de mando
a distancia de esta unidad.
Cambie la posición de esta unidad.
–
Las pilas están casi agotadas. Cambie todas las pilas. 7
Problema Causa Remedio
Vea la
página

Resolución de problemas
44 Es
Si se produce el problema y aparece un mensaje distinto en el visor, compruebe la conexión del iPod/iPhone.
iPod/iPhone
Nota
Mensaje Características Remedio
Vea la
página
Connect error
El iPod/iPhone tiene un problema de
comunicación.
Apague la unidad y vuelva a conectar la base
universal Yamaha iPod.
29
Restaure el iPod/iPhone en una base universal
Yamaha iPod.
29
Low Battery
Queda poca batería en el iPod/iPhone.
Unknown iPod
El iPod/iPhone que se está utilizando no es
compatible con esta unidad.
Conecte un iPod compatible a la unidad.
29
Connected
El iPod/iPhone está conectado
correctamente en la base universal Yamaha
iPod.
El iPod/iPhone está correctamente ajustado
en el transmisor inalámbrico Yamaha y
conectado a la unidad inalámbricamente.
Disconnected
El iPod/iPhone se ha quitado de la base
universal Yamaha iPod.
La conexión inalámbrica de esta unidad y el
iPod/iPhone está desconectada.
Unable to play
Por algún motivo, no es posible reproducir
con su iPod/iPhone.
Compruebe si la música almacenada en el iPod/
iPhone es reproducible o no.
–
Charging
Su iPod/iPhone se está cargando.

Resolución de problemas
45 Es
PREPARACIÓN
CONEXIÓN/
AJUSTES INICIALES REPRODUCCIÓN AJUSTES
SOBRE ESTA
UNIDAD
Español
RESOLUCIÓN DE
PROBLEMAS
Si se produce el problema y aparece un mensaje distinto en el visor, compruebe la conexión del componente Bluetooth.
y Restauración de la unidad
Si la unidad se bloquea, el problema se puede solucionar restaurándola.
Para restaurar la unidad, pulse la tecla de la unidad durante más de 10 segundos.
Bluetooth
Nota
Mensaje Características Remedio
Vea la
página
Searching...
El receptor de audio inalámbrico Yamaha
Bluetooth (como, por ejemplo, un YBA-10,
opcional) y el componente Bluetooth se
encuentran en proceso de emparejado.
El receptor de audio inalámbrico Yamaha
Bluetooth (como, por ejemplo, un YBA-10,
opcional) y el componente Bluetooth se
encuentran en proceso de establecimiento
de conexión.
Completed
El emparejado ha finalizado.
Canceled
Se ha cancelado el emparejado.
Not Available
El receptor de audio inalámbrico Yamaha
Bluetooth (como, por ejemplo, un YBA-10,
opcional) y el componente Bluetooth se
encuentran en proceso de emparejado.
Connected
La conexión entre el receptor de audio
inalámbrico Yamaha Bluetooth (como, por
ejemplo, un YBA-10, opcional) y el
componente Bluetooth se ha establecido.
Disconnected
El componente Bluetooth está
desconectado del receptor de audio
inalámbrico Yamaha Bluetooth (como un
YBA-10, opcional).
Not found
La unidad no puede encontrar el
componente Bluetooth mientras se realiza
el emparejado o se intenta conectar al
dispositivo Bluetooth.
(Durante el emparejado)
– El emparejado debe realizarse entre la unidad y
el componente Bluetooth al mismo tiempo.
Asegúrese de que el componente Bluetooth se
encuentra también en modo de emparejado.
(Conectados)
– Asegúrese de que el componente Bluetooth está
encendido.
– Compruebe si la distancia entre el receptor de
audio inalámbrico Yamaha y el componente
Bluetooth es inferior a 10 metros.
–
– El componente Bluetooth y la unidad no se han
emparejado. Vuelva a emparejar las emisoras.
30

46 Es
SOBRE ESTA UNIDAD
Controles y funciones
1 Terminal INTELLIBEAM MIC
Conecte el micrófono IntelliBeam que se suministra para
CONFIG. AUTOMATICA (☞p. 11).
2 Visor del panel delantero
Muestra información del estado de funcionamiento de esta
unidad. (☞p. 47)
3 Terminal PHONES
Para conectar auriculares. (☞p. 26)
4 Sensor del mando a distancia
Recibe señales de infrarrojos del mando a distancia. (☞p. 48)
5 Indicador SURROUND STATUS
Se ilumina según la señal de entrada.
6 Tecla VOLUME +/-
Controla el volumen de la unidad. (☞p. 20)
7 Tecla INPUT
Selecciona el componente de reproducción. (☞p. 9)
8 Tecla
Enciende o pone esta unidad en el modo de espera.
9 Indicador del sistema
Se enciende para mostrar el estado del sistema.
Controles y funciones
Panel delantero
8
9
2
7
1
3
5
46
YRS-1100
Color
mostrado
Señal de entrada
Azul Los siguientes formatos de audio envolvente:
Dolby TrueHD, Dolby Digital Plus, DTS-HD
Master Audio, DTS-HD High Resolution, PCM
lineal multicanal
Naranja Señales de audio envolvente distintas a las
anteriores
Desactivar Señales de audio distintas a las anteriores o sin
señal
Indicador
Encendido
CONTROL
HDMI
(☞p. 39)
Modo de
Interlock
(☞p. 29)
Verde Activado – –
Rojo En espera Activar Desactivar
En espera Desactivar Activar
Desactivar
En espera Desactivar Desactivar
En el modo de espera, esta unidad consume un poco de
energía para recibir señales infrarrojas del mando a
distancia o para buscar señales HDMI.
Nota

Controles y funciones
47 Es
PREPARACIÓN
CONEXIÓN/
AJUSTES INICIALES REPRODUCCIÓN AJUSTES
RESOLUCIÓN DE
PROBLEMAS
SOBRE ESTA
UNIDAD
Español
1 Cable de alimentación
Para conexión a una toma de pared de CA. (☞p. 8)
2 Terminal HDMI OUT (ARC)
Para conectar TV compatible con HDMI y componentes
externos. (☞p. 8)
3 Terminal HDMI IN
Para conectar reproductor de discos Blu-ray compatible con
HDMI, sintonizado y videoconsola. (☞p. 8, 9)
4 Terminal de entrada digital OPTICAL (TV)
Para conectar el cable óptico al TV. (☞p. 8)
5 Terminal 1 de entrada digital OPTICAL
Para conectar el cable óptico a los componentes externos. (☞p. 9)
6 Terminal 2 de entrada digital COAXIAL
Para conectar el cable de audio digital con clavijas a los
componentes externos. (☞p. 9)
7 Terminal AUDIO INPUT 3
Para conectar el cable analógico a los componentes externos.
(☞p. 9)
8 Terminal DOCK
Para conectar la base universal Yamaha iPod opcional, el sistema
inalámbrico para iPod/iPhone o el receptor de audio inalámbrico
Bluetooth. (☞p. 29, 30)
9 Terminal VIDEO OUT
Para conectar el terminal de entrada de vídeo del TV y reproducir
vídeo en iPod/iPhone. (☞p. 8)
1 Indicador HDMI
Se ilumina si se recibe señal HDMI.
2 Indicador SLEEP
Se enciende cuando está activado el temporizador para dormir.
(☞p. 27)
3 Indicador CINEMA DSP
Se enciende cuando se selecciona un programa de campo acústico
(☞p. 22).
4 Indicador VOL
Indica el nivel de volumen actual. (☞p. 20)
5 Pantalla de información múltiple
Muestra información con valores alfanuméricos.
Muestra los componentes de reproducción y la salida de sonido
actual si la unidad está encendida.
Panel trasero
4 5 6 7
1
2
8 93
YRS-1100
Visor del panel delantero
12
5
34

Controles y funciones
48 Es
Teclas de los programas CINEMA DSP
Selecciona los programas CINEMA DSP (☞p. 22).
Tecla SURROUND
Cambia a la reproducción de sonido envolvente. (☞p. 22)
Tecla STEREO
Cambia a la reproducción estéreo. (☞p. 21)
Teclas de selección de entrada
Selecciona el componente de reproducción. (☞p. 20)
Tecla INFO
Cambia la visualización de la información del panel delantero del
modo siguiente.
• Entrada/Salida: nombre de entrada/modo de sonido envolvente
• Programa DSP: programa de campo acústico de CINEMA
DSP (únicamente si se utiliza CINEMA DSP)
• Descodificador de audio: descodificador de señales de audio
seleccionado actualmente
Tecla SETUP
Muestra el menú de configuración. (☞p. 32)
Tecla MENU (U), tecla ENTER,
tecla (Y), tecla (Z), tecla (V)
• Cambia la configuración. (☞p. 32)
• Opera el iPod.
Tecla DOCK
Selecciona el iPod/iPhone o el componente Bluetooth. (☞p. 29,
30)
Tecla RETURN
Vuelve a la pantalla anterior del menú.
Tecla SUBWOOFER (+/-)
Ajusta el balance de volumen del subwoofer.
Tecla SLEEP
Ajusta el temporizador para dormir. (☞p. 27)
Tecla
Enciende o pone esta unidad en el modo de espera. (☞p. 20)
Tecla UNIVOLUME
Activa y desactiva el modo UniVolume. (☞p. 21)
Tecla ENHANCER
Activa o desactiva la tecnología Compressed Music Enhancer.
(☞p. 21)
Tecla OPTION
Muestra el menú de opciones para cada fuente de entrada.
(☞p. 27)
Tecla S/T
Opera la rueda de selección del iPod. (☞p. 29)
Tecla VOLUME (+/-)
Controla el volumen de la unidad. (☞p. 20)
Tecla MUTE
Permite silenciar el sonido o reanudar la reproducción. (☞p. 20)
Tecla CH LEVEL
Ajuste del balance de volumen durante la reproducción (☞p. 21)
Mando a distancia
Transmisor de señales de infrarrojos

49 Es
PREPARACIÓN
CONEXIÓN/
AJUSTES INICIALES REPRODUCCIÓN AJUSTES
RESOLUCIÓN DE
PROBLEMAS
SOBRE ESTA
UNIDAD
Español
Glosario
Generalmente, se necesitan dos altavoces frontales, un altavoz
central, dos altavoces envolventes y un subwoofer para disfrutar
de un sonido envolvente de 5.1 canales.
■ Reproducción surround de 7.1 canales
Esta unidad crea un sonido surround reflejando los haces de
sonido proyectados en las paredes de la habitación.
Número de muestreo (proceso para digitalización de señales
analógicas) por segundo. En principio, cuanto mayor sea la tasa
de muestreo, más amplio será el intervalo de frecuencia que
puede reproducirse, y cuanto mayor sea la tasa de bits cuantizada,
mejor será el sonido que pueda reproducirse.
Un canal consiste en un tipo de audio que se ha dividido según el
alcance y otras características.
Ej. 7.1 canales
• Altavoces delanteros, Izquierdo (1 c), Derecho (1 c)
• Altavoz central (1 c)
• Altavoces envolventes, Izquierdo (1 c), Derecho (1 c)
• Altavoces envolventes traseros, Izquierdo (1 c), Derecho (1 c)
• Subwoofer (1c × 0,1* = 0,1 c)
* En contraposición a una banda de un solo canal completo, un
dispositivo diseñado para mejorar el sonido de baja frecuencia
y conseguir así un efecto adicional.
Sistema de sonido envolvente digital desarrollado por Dolby
Laboratories que proporciona audio multicanal totalmente
independiente. Con tres canales delanteros (izquierdo, central y
derecho) y 2 canales estéreo envolventes, Dolby Digital
proporciona cinco canales de audio de alcance completo.
Mediante la utilización de estéreo de dos canales para los
altavoces envolventes, es posible conseguir un efecto de
movimiento de sonido y de entorno de sonido envolvente que con
el Dolby Surround.
Dolby Digital Plus es una avanzada tecnología de audio
desarrollada para programación de medios que incluyen
emisiones de HD y Blu-ray Disc. Seleccionada como una norma
de audio opcional para Blu-ray Disc, esta tecnología proporciona
un sonido multicanal con salida de canales discretos. Soportando
velocidades de bits de hasta 6,0 Mbps, Dolby Digital Plus puede
transportar simultáneamente hasta 7.1 canales de audio discretos.
Compatible con HDMI y diseñado para los reproductores de
discos ópticos y los receptores/amplificadores de AV del futuro,
Dolby Digital Plus sigue siendo totalmente compatible con los
sistemas de audio multicanal existentes que incorporan Dolby
Digital.
Glosario
Digital Sound Projector
Sistema de altavoces de
5.1 canales habitual
Altavoces frontales
Subwoofer
Altavoz
de sonido
envolvente
Altavoz
central
La imagen de sonido del sistema
Frecuencia de muestreo
Canal (c)
Dolby Digital
Dolby Digital Plus

Glosario
50 Es
Dolby Pro Logic IIx es una nueva tecnología que permite realizar
reproducciones multicanal discretas de fuentes multicanal o de
2 canales. Existen tres modos posibles: “Modo Music” para
fuentes de música, “Modo Movie” para fuentes de películas (sólo
para fuentes de 2 canales) y “Modo Game” para fuentes de
juegos.
Dolby TrueHD es una avanzada tecnología de audio sin pérdida
desarrollada para medios de alta definición basados en discos
incluyendo Blu-ray Disc. Seleccionada como una norma de audio
opcional para Blu-ray Disc, esta tecnología proporciona un
sonido que es bit a bit idéntico al original, ofreciendo una
experiencia de cine en casa de alta definición. Soportando
velocidades de bits de hasta 18,0 Mbps, Dolby TrueHD puede
transportar simultáneamente hasta 8 canales discretos de audio de
24 bits/96 kHz. Dolby TrueHD sigue siendo totalmente
compatible con los sistemas de audio multicanal existentes y
conserva la capacidad de metadatos de Dolby Digital,
permitiendo la normalización de los diálogos y el control de la
gama dinámica.
Deep Color es un tipo de señal de vídeo que se puede transmitir
en los terminales HDMI de esta unidad. Deep Color se refiere al
uso de diversas profundidades de color en las pantallas, desde las
profundidades de 24 bits de anteriores versiones de las
especificaciones HDMI. Esta profundidad extra en bits permite a
las pantallas HDTV y a otras ir de millones de colores a miles de
millones de colores y a eliminar el banding para conseguir
transiciones tonales suaves y sutiles gradaciones entre colores. El
aumento en la proporción del contraste puede representar muchas
veces más sombras de gris entre el negro y el blanco. Asimismo,
Deep Color aumenta el número de colores disponibles dentro de
los límites definidos por el espacio de color RGB o YCbCr.
Sistema de sonido envolvente digital desarrollado por DTS, Inc.,
que proporciona audio de 5.1 canales. Cuenta con gran cantidad
de datos de audio, y es capaz de proporcionar auténticos efectos
de sonido.
DTS-HD High Resolution Audio es una tecnología de audio de
alta resolución desarrollada para medios de alta definición
basados en discos incluyendo Blu-ray Disc. Seleccionada como
una norma de audio opcional para Blu-ray Disc, esta tecnología
proporciona un sonido que es prácticamente indistinguible del
original, ofreciendo una experiencia de cine en casa de alta
definición. DTS-HD High Resolution Audio soporta velocidades
de bits de hasta 6,0 Mbps para Blu-ray Disc y puede transportar
simultáneamente hasta 7.1 canales discretos de audio de 24 bits/
96 kHz.
El formato de audio de alta calidad sin pérdidas creado para
discos ópticos de última generación como los Blu-ray Disc. Se ha
seleccionado como norma e audio para Blu-ray Disc. Soporta
velocidades de bits de hasta 24,5 Mbps para Blu-ray Disc, DTS-
HD High Master Audio puede transportar simultáneamente hasta
7.1 canales discretos de audio de 24 bits/96 kHz.
HDMI (High-Definition Multimedia Interface) es la primera
interfaz de audio/vídeo completamente digital y sin compresión
que tiene el apoyo del sector. Cuando se usa en combinación con
HDCP (High-bandwidth Digital Content Protection), HDMI
proporciona una interfaz de audio/vídeo segura que cumple con
los requisitos de seguridad de los proveedores de contenido y
operadores de sistemas.
PCM lineal es un formato de señal bajo el cual una señal de audio
analógico se digitaliza, se graba y se transmite sin utilizar
ninguna compresión. Esto se utiliza como un método de
grabación de CDs y DVD audio. El sistema PCM utiliza una
técnica para muestrear el tamaño de la señal analógica por
unidades de tiempo muy pequeñas. Significando modulación por
codificación de impulsos, la señal analógica se codifica como
impulsos y luego se modula para la grabación.
x.v.Color es un tipo de vídeo que se puede transmitir con los
terminales HDMI de esta unidad. Es un espacio cromático más
extenso que sRGB y permite la expresión de colores que no se
podían expresar con anterioridad. Aunque sigue siendo
compatible con la gama de color de los estándares sRGB,
“x.v.Color” amplía el espacio de color y, por lo tanto, produce
imágenes más vívidas y naturales. Es especialmente eficaz para
imágenes fijas y gráficos de ordenador.
Dolby Pro Logic IIx
Dolby TrueHD
Deep Color
DTS
DTS-HD High Resolution Audio
DTS-HD Master Audio
HDMI
PCM (Pulse Code Modulation)
x.v.Color

51 Es
PREPARACIÓN
CONEXIÓN/
AJUSTES INICIALES REPRODUCCIÓN AJUSTES
RESOLUCIÓN DE
PROBLEMAS
SOBRE ESTA
UNIDAD
Español
Especificaciones
Sección del amplificador
• Potencia de salida nominal
Delantero I/D (1 kHz, 1% THD, 6 Ω)................................. 45 W + 45 W
Altavoces de diámetro pequeño (1 kHz, 1% THD, 4 Ω) .............. 27,2 W
Subwoofer (100 Hz, 1% THD, 3 Ω) ................................................ 90 W
• Potencia de salida máxima
Delantero I/D (1 kHz, 10% THD, 6 Ω)...............................50 W + 50 W
Altavoces de diámetro pequeño (1 kHz, 10% THD, 4 Ω) ............... 32 W
Subwoofer (100 Hz, 10% THD, 3 Ω) ............................................ 100 W
Sección del altavoz
• Altavoces de diámetro pequeño
................................................... Cono de 2,8 cm con blindaje magnético
• Altavoz delantero ............ Cono con blindaje no magnético de 6 × 10 cm
• Subwoofer ............................. Cono con blindaje no magnético de 13 cm
Terminal de entrada
• Entrada de audio
Óptica ........................................................................... 2 (TV, INPUT 1)
Coaxial...................................................................................1 (INPUT 2)
Analógica........................................................................ 1 par (INPUT 3)
• Entrada HDMI.............................................................3 (HDMI IN 1 a 3)
Terminales de salida
• Salida HDMI........................................................................................... 1
• Salida de vídeo (Vídeo compuesto, 1,0 Vp-p) ........................................ 1
[Modelos para Canadá y Corea]......................................................NTSC
[Otros modelos]..................................................................................PAL
• Auricular
Potencia de salida de auriculares (1 kHz, entrada 460 mV, 16 Ω)
...................................................................................................... 220 mV
General
• Alimentación
[Modelo de Canadá]......................................................120 V CA, 60 Hz
[Modelos de Europa, Reino Unido, Corea y Asia]
...........................................................................220-240 V CA, 50/60 Hz
• Consumo de energía......................................................................... 42 W
• Consumo en espera
(Control HDMI activado)................................................Menos de 5,0 W
(Control HDMI desactivado) ..........................................Menos de 0,5 W
• Respuesta de frecuencia............................................. De 35 Hz a 20 kHz
• Dimensiones (An × Al × Prof)
YRS-1100............................................................. 1.200 × 500 × 445 mm
• Peso
YRS-1100...................................................................................... 46,5 kg
* Las especificaciones están sujetas a cambios sin previo aviso.
El logotipo “ ” e “IntelliBeam” son marcas comerciales de
Yamaha Corporation.
El logotipo “ ” y “Cinema DSP” son marcas registradas de
Yamaha Corporation.
Fabricado bajo licencia de Cambridge Mechatronics Ltd. Solicitud de
patentes en todo el mundo.
El logotipo “ ” y “Digital Sound Projector™” son marcas comerciales
de Cambridge Mechatronics Ltd.
Fabricado con licencia de Dolby Laboratories. “Dolby”, “Pro Logic” y el
símbolo de la doble D son marcas comerciales de Dolby Laboratories.
Fabricado bajo licencia en la patente norteamericana N.º: 5,451,942;
5,956,674; 5,974,380; 5,978,762; 6,226,616; 6,487,535; 7,212,872;
7,333,929; 7,392,195; 7,272,567 y otras patentes estadounidenses y
mundiales emitidas y pendientes. DTS, DTS-HD y su símbolo son marcas
comerciales registradas y DTS-HD Master Audio y los logotipos de DTS
son marcas comerciales de DTS, Inc. Product e incluyen software. © DTS,
Inc. Todos los derechos reservados.
iPod, iPhone
“iPod” es una marca comercial de Apple Inc. registrada en Estados Unidos
y en otros países.
“iPhone” es una marca comercial de Apple Inc.
Bluetooth
Bluetooth es una marca registrada de Bluetooth SIG y es utilizada por
Yamaha de acuerdo con un contrato de licencia.
“HDMI”, el logotipo de “HDMI” y “High-Definition Multimedia
Interface” son marcas comerciales o marcas comerciales registradas de
HDMI Licensing LLC.
“x.v.Color” es una marca comercial de Sony Corporation.
“UniVolume” es una marca comercial de Yamaha Corporation.
Especificaciones

Especificaciones
52 Es
■ Señales de audio que se pueden recibir
y
• Consulte los manuales de instrucciones del dispositivo de origen de la entrada y ajuste el dispositivo adecuadamente.
• Cuando se reproduzca un DVD-Audio con protección contra copias CCPM, las señales de vídeo y audio puede que no salgan, según el tipo de
reproductor de DVD.
• Esta unidad no es compatible con dispositivos HDMI o DVI no compatibles con HDCP. Consulte los manuales de instrucciones suministrados con los
componentes HDMI o DVI para comprobar la compatibilidad con HDCP.
• Para decodificar las señales de bitstream de datos en esta unidad, ajuste correctamente el dispositivo de entrada, de forma que el dispositivo pueda
reproducir directamente las señales de audio de bitstream (no decodifica las señales bitstream en el dispositivo). Para conocer más detalles, consulte los
manuales de instrucciones suministrados.
■ Señales de vídeo repetibles
1)
– Esta unidad es compatible con señales de vídeo de las siguientes resoluciones:
• 480i/60 Hz
• 576i/50 Hz
• 480p/60 Hz
• 576p/50 Hz
–Deep Color
– x.v.Color
– Señal de vídeo 3D
• 720p/60 Hz, 50 Hz
• 1080i/60 Hz, 50 Hz
• 1080p/60 Hz, 50 Hz, 24 Hz
Información de la señal disponible
Compatibilidad de la señal HDMI
Tipos de señal de audio Formatos de señal de audio Medios compatibles
Linear PCM de 2 c 2 c, 32-192 kHz, 16/20/24 bits CD, DVD-Vídeo, DVD-Audio, etc.
Linear PCM multicanal 8 c, 32-192 kHz, 16/20/24 bits DVD-Audio, disco Blu-ray, HD DVD, etc.
Bitstream (SD Audio) Dolby Digital, Dolby Digital EX, DTS, DTS-
ES
DVD-Vídeo, etc.
Bitstream (HD Audio) Dolby TrueHD, Dolby Digital Plus, DTS-HD
Master Audio, DTS-HD High Resolution
Audio
Disco Blu-ray, HD DVD
Señal de audio digital (óptica/coaxial)
Tipos de señal de audio Formatos de señal de audio Medios compatibles
Linear PCM de 2 c 2 c, 32-96 kHz, 16/20/24 bits CD, DVD-Vídeo, DVD-Audio, etc.
Bitstream Dolby Digital, Dolby Digital EX, DTS, DTS-
ES
DVD-Vídeo, etc.
La señal de vídeo compatible cambia en función del televisor conectado.
1) y

53 Es
PREPARACIÓN
CONEXIÓN/
AJUSTES INICIALES REPRODUCCIÓN AJUSTES
RESOLUCIÓN DE
PROBLEMAS
SOBRE ESTA
UNIDAD
Español
Utilización del DVD de demostración suministrado
Reproduciendo el DVD de demostración que se proporciona, puede comprobar si las señales digitales del reproductor de discos Blu-ray
están entrando bien por la conexión digital (HDMI, óptica o coaxial) y disfrutar del sonido surround multicanal de la unidad.
Si “Dolby D” no aparece en el visualizador del panel delantero en
el paso 6, realice las siguientes comprobaciones.
¿Está el reproductor de discos Blu-ray conectado con
esta unidad vía un cable digital?
Necesita conectar estos componentes mediante cables digitales
(cable HDMI, cable óptico o cable coaxial) para reproducir
contenidos en 5.1 canales tales como Dolby Digital.
¿Está correctamente seleccionada la fuente de entrada
en esta unidad?
Compruebe en qué terminal de entrada de la unidad está
conectado el reproductor de discos Blu-ray. Compruebe entonces
que el nombre de la fuente de entrada que se visualiza en el visor
del panel delantero de la unidad es la misma que la del terminal
de entrada que se está utilizando.
Si el reproductor de discos Blu-ray está conectado en el terminal HDMI IN
1, cuando seleccione HDMI 1 como la fuente de entrada, se debería
visualizar “HDMI 1”.
¿Está la salida de audio digital correctamente
configurada en el reproductor de discos Blu-ray?
Conexión HDMI: Ponga la salida de audio digital en “Auto” o
“Bitstream”.
Conexión de audio digital: Habilite “Dolby Digital/DTS” o
“Bitstream”.
Consulte las configuraciones en el manual del usuario que se proporciona
con el reproductor de discos Blu-ray.
Reproducción del DVD de demostración
1
Seleccione fuentes de entrada en esta
unidad y en su televisor para que la señal
de audio del DVD entre esta unidad y la
señal de vídeo en su televisor.
Conexión HDMI: en su televisor, seleccione esta unidad
como la fuente de entrada. En esta unidad, seleccione el
reproductor de discos Blu-ray como la fuente de entrada.
Conexión de audio/vídeo: seleccione el reproductor de discos Blu-
ray como la fuente de entrada en su televisor y en esta unidad.
2
Cargue el DVD de demostración.
3
Seleccione “Rain and Thunder” en el menú
del DVD.
Visualice la pantalla del menú del DVD utilizando el
mando a distancia del reproductor de discos Blu-ray y, a
continuación, reproduzca “Rain and Thunder”.
4
Pulse la tecla OPTION en el mando a
distancia para mostrar el menú de opciones.
5
Pulse la tecla U/V para seleccionar “Signal
Info” y, seguidamente, pulse la tecla ENTER.
6
Compruebe que aparezca “Dolby D” en el
visualizador del panel delantero.
Si el indicador “Dolby D” no se enciende, la señal de
audio digital del DVD de demostración no está entrando
en la unidad. Revise las conexiones y la configuración del
reproductor de discos Blu-ray.
7
Pulse la tecla V y compruebe que aparece
“3/2/0.1” en el visualizador del panel
delantero.
8
Disfrute del sonido surround Dolby Digital
en 5.1 canales.
El sonido de la lluvia y el zumbido de las cigarras se escucha
desde todas las partes alrededor de la posición de escucha.
Dolby D
3/2/0.1
“Dolby D” no aparece cuando el reproductor de discos Blu-ray no
está reproduciendo el DVD de demostración y se visualiza la
pantalla del menú del DVD.
Nota
Disfrute del sonido surround en el modo de reproducción surround
(☞p. 21).
y
Si “Dolby D” no aparece
y
y

54 Es
Índice
Numerics
2 canales ....................................................................... 25
3 Beam (3 Haces) ......................................................... 24
5 Beam (5 Haces) ......................................................... 24
5.1ch .............................................................. 23, 24, 25
5Beam+2 (5Haces Plus2)............................................. 24
7.1ch ...................................................................... 23, 24
A
Adaptive DRC .............................................................. 37
AJUSTE ATENUACIÓN ............................................ 40
AJUSTE HAZ .............................................................. 35
AJUSTE OSD............................................................... 40
AJUSTE PARAMETROS............................................ 34
AJUSTE UNIDADES .................................................. 40
Ajustes de salida de sonido........................................... 37
Ajustes del subwoofer .................................................. 36
Ángulo a la pared o esquina ......................................... 34
ANGULO HORIZONTAL .......................................... 35
Antes de instalar esta unidad........................................... 5
ARC................................................................................. 8
ASIGNACIÓN ENTRADAS....................................... 38
Auricular................................................................ 23, 26
AUTO LIP SYNC ........................................................ 36
AutoPowerDown.......................................................... 27
B
Balance del volumen .................................................... 21
C
Cable de alimentación ............................................. 8, 47
Cable de audio analógico estéreo con clavijas ................ 9
Cable de audio digital con clavijas.................................. 9
Cable de vídeo con clavijas............................................. 8
Cable HDMI.................................................................... 8
Cable óptico................................................................ 8, 9
Canal (c) ....................................................................... 49
Ch Out .......................................................................... 23
CINEMA DSP.............................................................. 22
Componentes Bluetooth ............................................... 30
Compressed Music Enhancer ....................................... 21
CONFIG. AUTOMATICA .......................................... 15
CONFIG. IDIOMA ...................................................... 40
Configuración avanzada............................................... 41
Consola de videojuegos................................................ 20
Control de gama dinámica............................................ 37
Control del tono............................................................ 36
Control HDMI .............................................................. 39
D
Decoder Mode............................................................... 27
Deep Color.................................................................... 50
Descodificador de surround.......................................... 25
Digital Sound Projector ................................................ 49
DISTANCIA FOCAL................................................... 35
DISTANCIA RECORRIDA HAZ................................ 35
Dolby Digital ................................................................ 49
Dolby Digital Plus ........................................................ 49
Dolby Pro Logic IIx...................................................... 50
Dolby TrueHD ...................................................... 21, 50
DTS....................................................................... 27, 50
DTS-HD High Resolution ............................................ 46
DTS-HD High Resolution Audio ................................. 50
DTS-HD Master Audio......................................... 21, 50
E
Emparejado................................................................... 30
En paralelo a la pared.................................................... 34
Entertainment................................................................ 23
F
Frecuencia de muestreo ........................................ 22, 49
Función de apagado automático ................................... 27
Función de control HDMI............................................. 18
H
HDMI............................................................................ 50
I
Indicador CINEMA DSP.............................................. 47
Indicador del sistema .................................................... 46
Indicador SLEEP .................................................. 27, 47
Indicador STATUS....................................................... 46
Indicador VOL...................................................... 20, 47
Interlock........................................................................ 29
iPhone ........................................................................... 29
iPod............................................................................... 29
L
Lámina deslizante interior .............................................. 5
LFE ....................................................................... 26, 36
LOCALIZACIÓN IMAGEN........................................ 36

Índice
55 Es
PREPARACIÓN
CONEXIÓN/
AJUSTES INICIALES REPRODUCCIÓN AJUSTES
RESOLUCIÓN DE
PROBLEMAS
SOBRE ESTA
UNIDAD
Español
M
Mando a distancia......................................................... 48
MANEJO AUDIO ........................................................ 39
MEMORIA................................................................... 16
Mensaje de error ........................................................... 13
Menú de opciones......................................................... 27
Método de salida del audio........................................... 23
Mi Sur. .......................................................................... 24
Micrófono IntelliBeam ................................................. 11
Modo estéreo ................................................................ 21
Modo surround.............................................................. 21
Movie............................................................................ 22
MP3............................................................................... 21
Música........................................................................... 23
My Sur. (Mi Trasero).................................................... 24
O
Optimización de haz ..................................................... 11
Optimización del sonido............................................... 11
OPTIMIZAR HAZ+SONIDO...................................... 14
OPTIMIZAR SOLO HAZ............................................ 14
OPTIMIZAR SOLO SONIDO..................................... 14
P
Panel delantero.............................................................. 46
Panel trasero.................................................................. 47
PCM (Pulse Code Modulation) .................................... 50
Punto óptimo................................................................. 35
R
Receptor de audio inalámbrico Bluetooth .................... 30
Registro de los componentes HDMI en el televisor ..... 19
RENOMBRADO ENTRADAS.................................... 39
Reproductor de discos Blu-ray ..................................... 20
S
Salida de canal .............................................................. 25
Selección de audio de entrada HDMI........................... 38
Señales de audio de alta de definición.......................... 22
Sensor del mando a distancia........................................ 46
Signal Info .................................................................... 28
Sistema inalámbrico...................................................... 29
Sonido de error ............................................................. 13
Sonido surround............................................................ 22
Soporte de cartón para micrófono................................. 11
Sound Out..................................................................... 23
St+3Beam (Estéreo+3Haces)........................................ 24
St+3Beam2 (Est+3Haces+2) ........................................ 24
Subwoofer ............................................................. 20, 21
Sur. ............................................................................... 23
Sur. Dec. Mode ............................................................ 27
T
Temporizador para dormir ........................................... 27
Terminal INTELLIBEAM MIC................................... 46
Terminal PHONES ...................................................... 46
Tonos de prueba........................................................... 37
TV ................................................................................ 20
TV satélite/cable ............................................................. 9
U
UniVolume................................................................... 21
V
Velocidad de muestreo................................................. 21
Vidrio templado .............................................................. 5
Visor del panel delantero ............................................. 47
Volume Trim................................................................ 27
Volumen....................................................................... 20
W
WMA ........................................................................... 21
X
x.v.Color....................................................................... 50
Y
YBA-10........................................................................ 31
YDS-12 ........................................................................ 29
YID-W10 ..................................................................... 29


Printed in Indonesia WV87380-1
Surround sound TV stand
OWNER’S MANUAL
MANUAL DE INSTRUCCIONES
-
 1
1
-
 2
2
-
 3
3
-
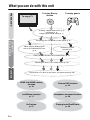 4
4
-
 5
5
-
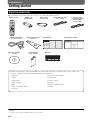 6
6
-
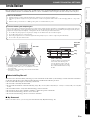 7
7
-
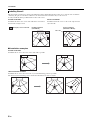 8
8
-
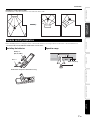 9
9
-
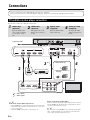 10
10
-
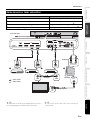 11
11
-
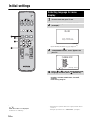 12
12
-
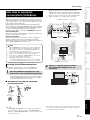 13
13
-
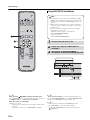 14
14
-
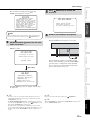 15
15
-
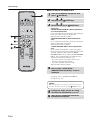 16
16
-
 17
17
-
 18
18
-
 19
19
-
 20
20
-
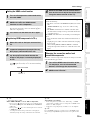 21
21
-
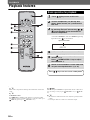 22
22
-
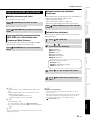 23
23
-
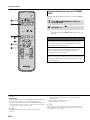 24
24
-
 25
25
-
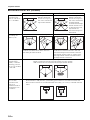 26
26
-
 27
27
-
 28
28
-
 29
29
-
 30
30
-
 31
31
-
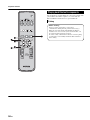 32
32
-
 33
33
-
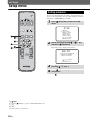 34
34
-
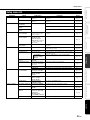 35
35
-
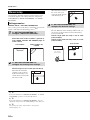 36
36
-
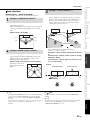 37
37
-
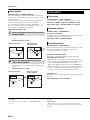 38
38
-
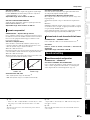 39
39
-
 40
40
-
 41
41
-
 42
42
-
 43
43
-
 44
44
-
 45
45
-
 46
46
-
 47
47
-
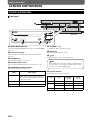 48
48
-
 49
49
-
 50
50
-
 51
51
-
 52
52
-
 53
53
-
 54
54
-
 55
55
-
 56
56
-
 57
57
-
 58
58
-
 59
59
-
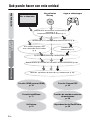 60
60
-
 61
61
-
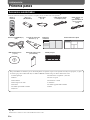 62
62
-
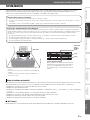 63
63
-
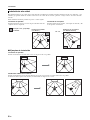 64
64
-
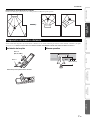 65
65
-
 66
66
-
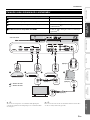 67
67
-
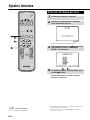 68
68
-
 69
69
-
 70
70
-
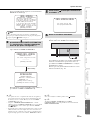 71
71
-
 72
72
-
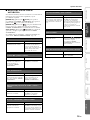 73
73
-
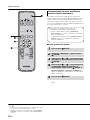 74
74
-
 75
75
-
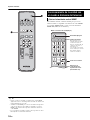 76
76
-
 77
77
-
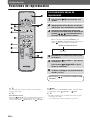 78
78
-
 79
79
-
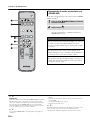 80
80
-
 81
81
-
 82
82
-
 83
83
-
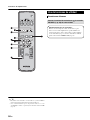 84
84
-
 85
85
-
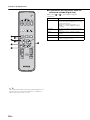 86
86
-
 87
87
-
 88
88
-
 89
89
-
 90
90
-
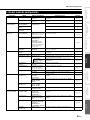 91
91
-
 92
92
-
 93
93
-
 94
94
-
 95
95
-
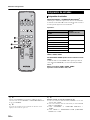 96
96
-
 97
97
-
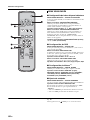 98
98
-
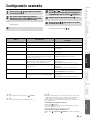 99
99
-
 100
100
-
 101
101
-
 102
102
-
 103
103
-
 104
104
-
 105
105
-
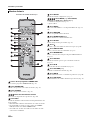 106
106
-
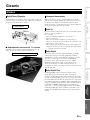 107
107
-
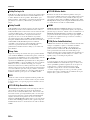 108
108
-
 109
109
-
 110
110
-
 111
111
-
 112
112
-
 113
113
-
 114
114
-
 115
115
-
 116
116


Yamaha YRS-1100 El manual del propietario
- Categoría
- Receptor
- Tipo
- El manual del propietario
En otros idiomas
- English: Yamaha YRS-1100 Owner's manual
Documentos relacionados
-
Yamaha YRS-700 El manual del propietario
-
Yamaha YSP-2500 El manual del propietario
-
-
Yamaha Digital Sound Projector YSP-3000 El manual del propietario
-
Yamaha YSP-4000 El manual del propietario
-
Yamaha YSP-2700 El manual del propietario
-
-
-
Yamaha YSP-5100 Manual de usuario
-