Bresser Thermo-hygrometer black 4 measurement results El manual del propietario
- Categoría
- Medición
- Tipo
- El manual del propietario
Este manual también es adecuado para

Art.No. 9070200
THERMO-/HYGROMETER
Bedienungsanleitung
Operating instructions
Instrucciones de uso
DE
EN
ES

2
DE
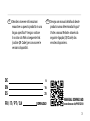
Besuchen Sie unsere Website über
den folgenden QR Code oder Weblink
um weitere Informationen zu diesem
Produkt oder die verfügbaren Über-
setzungen dieser Anleitung zu nden.
EN
Visit our website via the following QR
Code or web link to nd further infor-
mation on this product or the available
translations of these instructions.
FR
Si vous souhaitez obtenir plus
d’informations concernant ce produit
ou rechercher ce mode d’emploi en
d’autres langues, rendez-vous sur
notre site Internet en utilisant le code
QR ou le lien correspondant.
ES
Visite nuestra página de Internet
utilizando el siguiente código QR
o el enlace web, para buscar más
información sobre este producto o
versiones disponibles del presente
manual de instrucciones en
diferentes idiomas.
CA
Visiteu el nostre lloc web mitjançant
el següent codi QR o l’enllaç web
per obtenir més informació sobre
aquest producte o per consultar les
traduccions disponibles d’aquest
manual d’instruccions.

3
IT
Desidera ricevere informazioni
esaustive su questo prodotto in una
lingua specica? Venga a visitare
il nostro sito Web al seguente link
(codice QR Code) per conoscere le
versioni disponibili.
PT
Deseja um manual detalhado deste
produto numa determinada língua?
Visite a nossa Website através da
seguinte ligação (QR Code) das
versões disponíveis.
MANUAL DOWNLOAD:
www.bresser.de/P9070200
DE 6
EN 16
ES 25
FR / IT / PT / CA DOWNLOAD

4
AAA / LR03
AAA / LR03
AAA / LR03
Service: www.bresser.de/weather
Station
B
Sensor
D
Wait 5s
C
5 sec
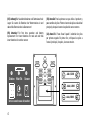
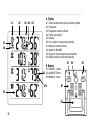
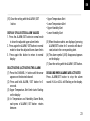
(DE) Achtung! Bei Neuinbetriebnahme und Batteriewechsel:
Legen Sie zuerst die Batterien der Wetterstation ein und
danach die Batterien des Außensensors!
(EN) Attention! For rst time operation and battery
replacement: First insert batteries for main unit and then
insert batteries for outdoor sensor.
(ES) Atención! Para la primera vez que utilice el producto y
para cambios de pilas: Primero insertar las pilas en la unidad
principal y después insertar las pilas del sensor externo.
(CA) Atenció! A l‘hora d‘usar l‘aparell i substituir les piles
per primera vegada: En primer lloc, col·loqueu les piles a
l‘estació principal i, després, al sensor exterior.

5
1
2
3
4
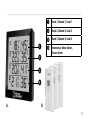
A.
B.
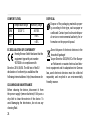
1
Kanal 1, Channel 1, Canal 1
2
Kanal 2, Channel 2, Canal 2
3
Kanal 3, Channel 3, Canal 3
4
Innensensor, Indoor Sensor,
Sensor interior

6
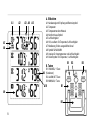
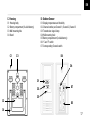
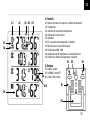
A. Bildschirm
A1: Kanalanzeige mit Empfang und Batteriesymbol
A2: Temperatur
A3: Temperaturtendenz Hinweis
A4: Komfortniveau Symbol
A5: Luftfeuchtigkeit
A6: Hi-/Low-Alarm für Temperatur/Luftfeuchtigkeit
A7: Markierung für den ausgewählten Kanal
A8: Symbol für MAX/MIN
A9: Anzeige für Innentemperatur und Luftfeuchtigkeit
A10: Alarmsymbol für Temperatur / Luftfeuchtigkeit
A1 A2 A3 A4 A5
A7
A8
A10
A9
B. Tasten
B1: CHANNEL/ + Taste
(Kanaltaste)
B2: ALARM/ SET Taste
B3: MIN/MAX/ - Taste
B1
B2
B2B1
B3
A6

DE
7
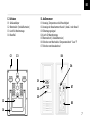
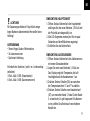
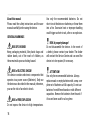
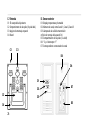
C. Gehäuse
C1: Gehäusekörper
C2: Batteriefach (3x AAA Batterien)
C3: Loch für Wandmontage
C4: Standfuß
D. Außensensor
D1: Anzeige, Temperatur und Luftfeuchtigkeit
D2: Anzeige der Kanalnummer: Kanal 1, Kanal 2 oder Kanal 3
D3: Übertragungssignal
D4: Loch für Wandmontage
D5: Batteriefach (2 X AAA Batterien)
D6: Schalter zum Wechsel der Temperatureinheit °C auf °F
D7: Schalter zum Kanalwechsel
C2
C1 C3
C4
D1
D2
D3
D4
D6
D7
D5

8
ALLGEMEINE WARNHINWEISE
ERSTICKUNGSGEFAHR!
Verpackungsmaterialien (Plastiktüten, Gummi-
bänder, etc.) von Kindern fernhalten! Es besteht
ERSTICKUNGSGEFAHR!
GEFAHR EINES STROMSCHLAGS!
Dieses Gerät beinhaltet Elektronikteile, die über
eine Stromquelle (Batterien) betrieben werden.
Die Nutzung darf nur, wie in der Anleitung be-
schrieben, erfolgen, andernfalls besteht GEFAHR
eines STROMSCHLAGS!
BRAND-/EXPLOSIONSGEFAHR!
Setzen Sie das Gerät keinen hohen Temperaturen
aus. Benutzen Sie nur die empfohlenen Batterien.
Gerät und Batterien nicht kurzschließen oder ins
Feuer werfen! Durch übermäßige Hitze und un-
sachgemäße Handhabung können Kurzschlüsse,
Brände und sogar Explosionen ausgelöst werden!
GEFAHR von Sachschäden!
Bauen Sie das Gerät nicht auseinander! Wenden
Sie sich im Falle eines Defekts an Ihren Fachhänd-
ler. Er nimmt mit dem Service-Center Kontakt auf
und kann das Gerät ggf. zwecks Reparatur einschi-
cken.
ACHTUNG!
Benutzen Sie nur die empfohlenen Batterien.
Ersetzen Sie schwache oder verbrauchte Bat-
terien immer durch einen komplett neuen Satz
Batterien mit voller Kapazität. Verwenden Sie
keine Batterien unterschiedlicher Marken, Typen
oder unterschiedlich hoher Kapazität. Entfernen
Sie Batterien aus dem Gerät, wenn es längere
Zeit nicht benutzt wird!

DE
9
ACHTUNG!
Für Spannungsschäden in Folge falsch einge-
legter Batterien übernimmt der Hersteller keine
Haftung!
LIEFERUMFANG
• Temeo Hygro Quadro Wetterstation
• 3x Aussensensoren
• Quickstart-Anleitung
Erforderliche Batterien (nicht im Lieferumfang
enthalten):
3 Stck. AAA / LR03 (Hauptstation)
6 Stck. AAA / LR03 (Aussensensoren)
EINRICHTUNG HAUPTEINHEIT
1. Öffnen Sie das Batteriefach der Haupteinheit
und legen Sie drei neue Batterien 1,5V AAA mit
der Polarität, wie dargestellt, ein.
2. Alle LCD-Segmente werden jetzt für ein paar
Sekunden auf dem Bildschirm angezeigt.
3. Schließen Sie das Batteriefach.
EINRICHTUNG AUSSENSENSOR
1. Öffnen Sie das Batteriefach des Außensensors
mit einem Schraubendreher.
2. Legen Sie zwei neue Batterien 1,5 AAA ein.
Das Display zeigt die Temperatur, die Luft-
feuchtigkeit und die Kanalnummer 1 an.
3. Drücken Sie den Schalter (D6) um zwischen
der Temperatureinheit °C und °F zu wählen.
4. Drücken Sie den Schalter zum Kanalwechsel
(D7), um zwischen Kanal 1, Kanal 2 oder Kanal
3 zu wechseln. Es gibt insgesamt 3 Außensen-
soren, stellen Sie alle drei auf verschiedene
Kanäle ein.

10
HAUPTEINHEIT
1. Die Messungen der eingerichteten Außensen-
soren werden an die Haupteinheit übertragen
und das Empfangssymbol (A1) erscheint.
2. Wenn der Empfang erfolgreich ist, wird
auf dem Bildschirm die Temperatur und
Luftfeuchtigkeit, der Temperaturtrend Hinweis
(A3) und das Komfortniveau Symbol (A4) des
ausgewählten Außensensors angezeigt.
3. Kurz danach verschwindet das Empfangssymbol.
4. Auf dem Bildschirm werden im Abschnitt 4 die
Messwerte des Innensensors angezeigt.
5. Wenn die Werte nicht von einem Kanal emp-
fangen werden, erscheint “-” auf dem Display.
Überprüfen Sie die Batterien und versuchen
Sie es erneut. Prüfen Sie ob Störquellen
vorliegen.
6. Sie können die erneute Initialisierung
(Funkempfang) manuell starten (Drücken und
halten Sie die CHANNEL/+ Taste).
7. Tastenfunktion:
(1) CHANNEL / + Taste (Kanaltaste)
A. Drücken Sie diese Taste um unterschiedliche
Anzeigeabschnitte auszuwählen.
B. Im Einstellungsmodus bewirkt das drücken
der Taste: HOCH.
C. Drücken und halten Sie die Taste, um den
erneuten Funkempfang zu erzwingen.
[1] Drücken Sie die CHANNEL / + Taste, bis
der Pfeil (A7) auf dem gewünschten Kanal
erscheint. Kanal 1, 2, 3, oder IN um einen
Funkempfang für alle Outdoor-Sensoren
gleichzeitig zu erzwingen.
[2] Drücken und halten Sie diese Taste für 3
Sekunden, um Signale von dem gewünschten
Außensensor zu suchen.
[3] Das Empfangssymbol (A1) erscheint.
[4] Die Haupteinheit wird jetzt die Messungen
scannen.

DE
11
[5] Wenn der Empfang erfolgreich ist, zeigt die
Anzeige die Temperatur und Luftfeuchtigkeit
des gewünschten Außensensors, den
Temperaturtrend Hinweis (A3) und das
Komfortniveau Symbol (A4) des ausgewählten
Außensensors angezeigt.
[6] Kurz danach verschwindet das Empfangssym-
bol.
(2) MIN/MAX / - Taste
A. Im Normalbetrieb, drücken und halten Sie die
Taste länger als 3 Sekunden um zwischen °C
und °F zu wechseln.
B. Wenn Sie die Taste drücken, erscheint MAX
auf dem Bildschirm.
C. Die Maximalwerte seit dem letzten Zurückset-
zen werden jetzt angezeigt.
D. Drücken und halten Sie die MIN / MAX-
Taste, um die Maximalwerte des aktuell
ausgewählten Kanals zu löschen.
E. Drücken Sie diese Taste erneut.
F. MIN erscheint auf dem Bildschirm
G. Die Minimalwerte seit dem letzten Zurückset-
zen werden jetzt angezeigt.
H. Drücken und halten Sie die MIN / MAX-
Taste, um die Minimalwerte des aktuell
ausgewählten Kanals zu löschen.
I. Drücken Sie die MIN / MAX-Taste erneut um
auf die aktuellen Werte zurückzukehren.
HINWEIS: Drücken und halten Sie die MIN/MAX /-
Taste oder CHANNEL / + Taste um die Funktion
zu beschleunigen.
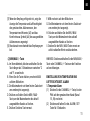
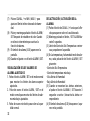
EINSTELLUNG VON TEMPERATUR UND
LUFTFEUCHTIGKEIT ALARM
1. Temperatur Alarm
(1) Drücken Sie die CHANNEL / + Taste, bis der
Pfeil auf dem gewünschten Kanal (Kanal
1-3, IN) erscheint.
(2) Drücken und halten Sie die ALARM / SET-
Taste für 3 Sekunden.

12
(3) HI AL und die Temperatur Obergrenze (CH
1-3: 70 ° C - Standard, IN: 60 ° C) beginnt auf
dem Bildschirm an zu blinken.
(4) Drücken Sie die CHANNEL / + oder MIN /
MAX / - Taste, um die gewünschte Tempera-
tur Obergrenze einzustellen.
HINWEIS: Drücken und halten Sie die Taste um
die Funktion zu beschleunigen.
(5) Drücken und halten Sie die ALARM / SET-
Taste, wenn Sie den gewünschten Wert
eingestellt haben, während der Wert noch am
Blinken ist, um den Alarm zu aktivieren.
(6) Das Alarmsymbol (A10) erscheint auf dem
Bildschirm.
(7) Speichern Sie die Einstellung mit der ALARM
/ SET Taste.
(8) LO AL und die Temperatur Untergrenze (CH
1-3: -50°C - Standard, IN: -9.9°C) beginnt auf
dem Bildschirm an zu blinken.
(9) Drücken Sie die CHANNEL / + oder MIN /
MAX / - Taste, um die gewünschte Tempera-
tur Untergrenze einzustellen.
(10) Drücken und halten Sie die ALARM / SET-
Taste, wenn Sie den gewünschten Wert
eingestellt haben, während der Wert noch am
Blinken ist, um den Alarm zu aktivieren.
(11) Das Alarmsymbol (A10) erscheint auf dem
Bildschirm.
(12) Speichern Sie die Einstellung mit der ALARM
/ SET-Taste.
2. Luftfeuchtigkeit Alarm
(1) HI AL und die Luftfeuchtigkeit Obergrenze
(CH 1-3: 95% - Standard, IN 95%) beginnt auf
dem Bildschirm an zu blinken. (Kanal 1-3,
IN)
(2) Drücken Sie die CHANNEL / + oder MIN
/ MAX / - Taste, um die gewünschte Luft-
feuchtigkeit Obergrenze einzustellen.
(3) Drücken und halten Sie die ALARM / SET-

DE
13
Taste, wenn Sie den gewünschten Wert
eingestellt haben, während der Wert noch
am Blinken ist, um den Alarm zu aktivieren.
(4) Das Alarmsymbol (A10) erscheint auf dem
Bildschirm.
(5) Speichern Sie die Einstellung mit der ALARM
/ SET-Taste.
(6) LO AL und die Luftfeuchtigkeit Untergrenze
(CH 1-3: 20% - Standard, IN: 20%) beginnt
auf dem Bildschirm an zu blinken.
(7) Drücken Sie die CHANNEL / + oder MIN
/ MAX / - Taste, um die gewünschte Luft-
feuchtigkeit Untergrenze einzustellen.
(8) Drücken und halten Sie die ALARM / SET-
Taste, wenn Sie den gewünschten Wert
eingestellt haben, während der Wert noch
am Blinken ist, um den Alarm zu aktivieren.
(9) Das Alarmsymbol (A10) erscheint auf dem
Bildschirm.
(10) Speichern Sie die Einstellung mit der ALARM
/ SET-Taste.
ANZEIGE DER EINGESTELLTEN ALARMWERTE
1. Drücken Sie die ALARM / SET-Taste im Normal-
betrieb, um die eingestellten Alarmobergren-
zen zu zeigen.
2. Drücken Sie erneut die ALARM / SET-Taste
im Normalbetrieb, um die eingestellten Alar-
muntergrenzen zu zeigen.
3. Drücken Sie erneut auf diese Taste, um zur nor-
malen Anzeige zurückzukehren.
ALARM AKTIVIEREN / DEAKTIVIEREN
(1) Drücken Sie die CHANNEL / + Taste, bis der
Pfeil auf dem gewünschten Kanal erscheint.
(2) Drücken und halten Sie die ALARM / SET-Taste
für 3 Sekunden.
(3) Die obere Temperaturalarm Grenze beginnt
auf dem Display an zu blinken
(4) Im Temperatur- und Luftfeuchtigkeitsalarm-
modus, wird bei jedem drücken der ALARM /
SET-Taste rotiert zwischen:

14
• Temperatur Alarm Obergrenze
• Temperaturalarm Untergrenze
• Luftfeuchtigkeit Alarm Obergrenze
• Luftfeuchtigkeit Alarm Untergrenze
(5) Wenn die oben genannten Warnungen an-
gezeigt werden, drücken Sie die ALARM /
SET-Taste für 3 Sekunden um die gewünschte
Benachrichtigung zu aktivieren oder deaktiv-
ieren.
(6) Das Alarmsymbol (A10) erscheint oder ver-
schwindet jetzt auf dem Bildschirm.
(7) Speichern Sie die Einstellung mit der ALARM /
SET-Taste.
DEAKTIVIEREN, WENN EIN ALARM
AKTIV IST
Drücken Sie die ALARM / SET Taste, um den
Alarm Ton zu stoppen. HI AL oder LO AL blinkt
weiterhin auf dem Bildschirm.
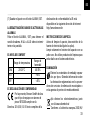
KOMFORTNIVEAU
Temperatur Bereich
Luftfeuchtigkeit
Bereich
COM 20-28 °C 40-70%
WET >65%
DRY <45%
EG-KONFORMITÄTSERKLÄRUNG
Hiermit erklärt Bresser GmbH, dass der
Funkanlagentyp mit Artikelnummer:
9070200 der Richtlinie 2014/53/EU ent-
spricht. Der vollständige Text der EU-Konformi-
tätserklärung ist unter der folgenden Internetad-
resse verfügbar: http://www.bresser.de

DE
15
REINIGUNG UND WARTUNG
Trennen Sie das Gerät vor der Reinigung von der
Stromquelle (Batterien entfernen)!
Reinigen Sie das Gerät nur äußerlich mit einem
trockenen Tuch. Benutzen Sie keine Reinigungs-
üssigkeit, um Schäden an der Elektronik zu ver-
meiden.
ENTSORGUNG
Entsorgen Sie die Verpackungsmaterialien
sortenrein. Informationen zur ordnungsge-
mäßen Entsorgung erhalten Sie beim kom-
munalen Entsorgungsdienstleister oder
Umweltamt.
Werfen Sie Elektrogeräte nicht in den Hausmüll!
Gemäß der Europäischen Richtlinie 2002/96/
EG über Elektro- und Elektronik-Altgeräte und
deren Umsetzung in nationales Recht müssen
verbrauchte Elektrogeräte getrennt gesammelt
und einer umweltgerechten Wiederverwertung
zugeführt werden.

16
A. Display
A1: Channel number with reception and battery symbol
A2: Temperature
A3: Temperature tendency indicator
A4: Comfort level symbol
A5: Humidity
A6: Hi-/Low-Alarm for temperature /humidity
A7: Marking for selected channel
A8: Symbol for MAX/MIN
A9: Display for internal temperature and humidity
A10: Alarm symbol for temperature/humidity
A1 A2 A3 A4 A5
A7
A8
A10
A9
B. Buttons
B1: CHANNEL/ + button
B2: ALARM/ SET button
B3: MIN/MAX/ - button
B1
B2
B2B1
B3
A6

EN
17
C. Housing
C1: Housing body
C2: Battery compartment (3x AAA battery)
C3: Wall mounting hole
C4: Stand
D. Outdoor Sensor
D1: Display, temperature and humidity
D2: Channel number, as Channel 1, Channel 2, Channel 3
D3: Transmission signal lamp
D4: Wall mounting hole
D5: Battery compartment (2x AAA battery)
D6: °C and °F switch
D7: Corresponding Channel switch
C2
C1 C3
C4
D1
D2
D3
D4
D6
D7
D5

18
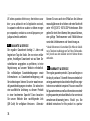
About this manual
Please read the safety instructions and the user
manual carefully before using the device.
GENERAL WARNINGS
RISK OF CHOKING!
Keep packaging material, like plastic bags and
rubber bands, out of the reach of children, as
these materials pose a choking hazard.
RISK of ELECTRIC SHOCK!
This device contains electronic components that
operate via a power source (Batteries). Only use
the device as described in the manual; otherwise,
you run the risk of an electric shock.
RISK of FIRE/EXPLOSION!
Do not expose the device to high temperatures.
Use only the recommended batteries. Do not
short-circuit the device or batteries, or throw them
into a re. Excessive heat or improper handling
could trigger a short-circuit, a re or an explosion.
RISK of property damage!
Do not disassemble the device. In the event of
a defect, please contact your dealer. The dealer
will contact the Service Centre and can send the
device in to be repaired, if necessary.
ATTENTION!
Use only the recommended batteries. Always
replace weak or empty batteries with a new, com-
plete set of batteries at full capacity. Do not use
batteries from different brands or with different
capacities. Remove the batteries from the unit if
it has not been used for a long time.

EN
19
ATTENTION!
The manufacturer is not liable for damage
related to improperly installed batteries!
SCOPE OF DELIVERY
Main unit (A), Remote sensor (B), Instruction
manual
Required batteries (not included with purchase):
3x AAA / LR03 (1.5V) for Main Unit
6x AAA / LR03 (1.5V) for Outdoor Sensors
INSTALLATION OF MAIN UNIT
1. Open the battery compartment of the main
unit and insert three new batteries 1,5V AAA,
polarity as illustrated.
2. ALL LCD segments will be displayed for about
a few seconds.
3. Close the battery compartment.
INSTALLATION OF OUTDOOR SENSOR
1. Open the battery compartment of the
outdoor sensor with a screwdriver.
2. Insert two new batteries 1,5 AAA, the display
shows the temperature and humidity and the
Channel number 1.
3. Press the °C and °F switch (D6) to select
temperature unit.
4. Use the Channel switch (D7) to change
between Channel 1, Channel 2 or Channel 3.
There are a total of 3 outdoor sensors, set all
3 to different channels.
MAIN UNIT
1. The measurements of the installed outdoor
sensors will be transmitted to the main unit
and the radio-controlled reception symbol (A1)
appears.
2. If the reception is successful, the display will
show temperature and humidity of the respec-
tive outdoor sensor, the temperature trend

20
symbol (A3) and the symbol of the comfort
level (A4).
3. Then the radio-controlled reception symbol
disappears.
4. In the display section 4, the measured values
of the internal sensor (Indoor) will appear.
5. If the values are not received from a channel,
‘--’ appears on the display, check the batteries
and try it again. Check if there is any source of
interference.
6. You can start the initialization manually.
7. Button function:
(1) CHANNEL / + button
A. Press it to select different display sections.
B. In setting mode, press it equals to UP.
C. Press and hold to enforce radio controlled
reception.
[1] press the CHANNEL/+ button until the
arrow (A7) appears on the desired channel.
Channel 1, 2 or 3, or IN for enforce a radio
controlled reception for all outdoor sensors
simultaneously.
[2] press and hold this button for 3 seconds to
search for signals from the desired outdoor
sensor.
[3] the radio-controlled reception symbol (A1)
appears.
[4] the basic station will scan the measurements.
[5] If the reception is successful, the display will
show temperature and humidity of the desired
outdoor sensor, the temperature trend symbol
(A3) and the symbol of the comfort level (A4).
[6] Then the radio-controlled reception symbol dis-
appears.
(2) MIN/MAX / - button
A. In normal mode, press and hold it more than 3
seconds to switch °C and °F.
B. Press this button, MAX appears on the display.

EN
21
C. On the display appear the maximum values
since the last reset.
D. Press and hold the MIN/MAX- button to delete
the maximum values of the currently selected
channel.
E. Press this button again
F. MIN appears on the display
G. On the display appear the minimum values
since the last reset.
H. Press and hold the MIN/MAX- button to delete
the minimum values of the currently selected
channel.
I. Press again to go back to the display of the
present values.
NOTE: press and hold the MIN/MAX /- or
CHANNEL / + button for a fast running.
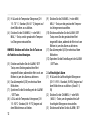
SETTING OF THE ALARM FOR THE
TEMPERATURE AND HUMIDITY
1. Temperature alarm
(1) press the CHANNEL /+ button until the
arrow appears on the desired channel
(channel 1-3, IN)
(2) Press and hold ALARM / SET button for 3
seconds.
(3) HI AL and upper temperature limit (CH 1-3:
70°C - default, IN: 60°C) starts ashing on
the display.
(4) Press the CHANNEL /+ or MIN/MAX /- but-
ton to adjust the desired upper temperature
limit.
NOTE: press and hold the MIN/MAX /- or
CHANNEL / + button for a fast running.
(5) press and hold the ALARM / SET button
after setting the value when still ashing to
activate the alarm function.
(6) The alarm symbol (A10) appears on the
display

22
(7) Save the setting with the ALARM / SET
button
(8) LO AL and lower temperature limit (CH 1-3:
-50°C【- default, IN: -9.9°C) starts ashing on
the display.
(9) Press the CHANNEL / + or MIN/MAX /- but-
ton to adjust the desired lower temperature
limit.
(10) Press and hold the ALARM / SET button
after setting the value when still ashing to
activate the alarm function.
(11) The alarm symbol (A10) appears on the
display.
(12) Save the setting with the ALARM / SET
button.
2. Humidity alarm
(1) HI AL and upper humidity limit (CH 1-3:
95% - default, IN 95% ) starts ashing on the
display (channel 1-3, IN)
(2) Press the CHANNEL / + or MIN/MAX/-
button to adjust the desired upper humidity
limit
(3) press and hold the ALARM / SET button
after setting the value when still ashing to
activate the alarm function
(4) The alarm symbol (A10) appears on the
display
(5) Save the setting with the ALARM / SET
button
(6) LO AL and lower humidity limit (CH 1-3: 20%
- default, IN: 20%) starts ashing on the
display.
(7) Press the CHANNEL / + or MIN/MAX /-
button to adjust the desired lower humidity
limit.
(8) Press and hold the ALARM / SET button
after setting the value when still ashing to
activate the alarm function.
(9) The alarm symbol (A10) appears on the
display.

EN
23
(10) Save the setting with the ALARM / SET
button.
DISPLAY OF ADJUSTED ALARM VALUES
1. Press the ALARM /SET button in normal mode
to show the adjusted upper alarm limits
2. Press again the ALARM / SET button in normal
mode to show the adjusted lower alarm limits
3. Press again this button to return to normal
display
DEACTIVATING /ACTIVATING THE ALARM
(1) Press the CHANNEL / + button until the arrow
appears on the desired channel.
(2) Press and hold ALARM / SET button for 3
seconds.
(3) Upper Temperature Alert limit starts ashing
on the display
(4) In Temperature and Humidity Alarm Mode,
each press of ALARM / SET button rotates
between:
• Upper Temperature Alert
• Lower Temperature Alert
• Upper Humidity Alert
• Lower Humidity Alert
(5) When the above alerts are displayed, pressing
ALARM/SET button for 3 seconds will deacti-
vate/activate the corresponding alert.
(6) The alarm symbol (A10) disappears/appears
on the display.
(7) Save the setting with the ALARM / SET button.
DISABLING WHEN ALARMS ARE ACTIVATED
Press ALARM/SET button to stop the alarm
sound. HI AL or LO AL still ashing on the display.

24
COMFORT LEVEL
Temperature range Humidity range
COM 20-28 °C 40-70%
WET >65%
DRY <45%
EC DECLARATION OF CONFORMITY
Hereby, Bresser GmbH declares that the
equipment type with part number:
9070200 is in compliance with
Directive: 2014/30/EU. The full text of the EU
declaration of conformity is available at the
following internet address: http://www.bresser.de
CLEANING AND MAINTENANCE
Before cleaning the device, disconnect it from
the power supply (remove batteries)! Only use a
dry cloth to clean the exterior of the device. To
avoid damaging the electronics, do not use any
cleaning uid.
DISPOSAL
Dispose of the packaging materials proper-
ly, according to their type, such as paper or
cardboard. Contact your local waste-dispos-
al service or environmental authority for in-
formation on the proper disposal.
Do not dispose of electronic devices in the
household garbage!
As per Directive 2002/96/EC of the Europe-
an Parliament on waste electrical and elec-
tronic equipment and its adaptation into German
law, used electronic devices must be collected
separately and recycled in an environmentally
friendly manner.

ES
25
A. Pantalla
A1: Número de canal con recepción y símbolo de la batería
A2: Temperatura
A3: indicador de tendencia de temperatura
A4: símbolo de nivel de confort
A5: Humedad
A6: Hi / Low-alarma de temperatura / humedad
A7: Marcado para el canal seleccionado
A8: Símbolo para MAX / MIN
A9: visualización de la temperatura y la humedad interna
A10: Símbolo de alarma de temperatura / humedad
A1 A2 A3 A4 A5
A7
A8
A10
A9
B. Botones
B1: CANAL / botón +
B2: ALARMA / botón SET
B3: / MAX / MIN - botón
B1
B2
B2B1
B3
A6

26
C. Vivienda
C1: El cuerpo del alojamiento
C2: Compartimento de las pilas (3x pila AAA)
C3: Agujero de montaje en pared
C4: Stand
D. Sensor exterior
D1: Display, temperatura y humedad
D2: Número de canal, como Canal 1, Canal 2, Canal 3
D3: Lámpara de la señal de transmisión
orificio de montaje de la pared: D4
D5: Compartimiento de las pilas (2 x AAA)
D6: ° C y el interruptor ° F
D7: Correspondiente conmutador de canal
C2
C1 C3
C4
D1
D2
D3
D4
D6
D7
D5

ES
27
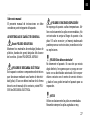
Sobre este manual
El presente manual de instrucciones se debe
considerar parte integrante del aparato.
ADVERTENCIAS DE CARÁCTER GENERAL
Existe PELIGRO DE ASFIXIA!
Mantener los materiales de embalaje (bolsas de
plástico, bandas de goma) alejadas del alcance
de los niños. ¡Existe PELIGRO DE ASFIXIA!
¡PELIGRO DE DESCARGA ELÉCTRICA!
Este aparato contiene componentes electrónicos
que funcionan mediante una fuente de electrici-
dad (pilas). El uso se deberá realizar de la forma
descrita en el manual; de lo contrario, existe PELI-
GRO de DESCARGA ELÉCTRICA.
¡PELIGRO DE INCENDIO/EXPLOSIÓN!
No exponga el aparato a altas temperaturas. Uti-
lice exclusivamente las pilas recomendadas. ¡No
cortocircuitar ni arrojar al fuego el aparato o las
pilas! El calor excesivo y el manejo inadecuado
pueden provocar cortocircuitos, incendios e inclu-
so explosiones.
¡PELIGRO de daños materiales!
No desmonte el aparato. En caso de que exista
algún defecto, le rogamos que se ponga en con-
tacto con su distribuidor autorizado. Este se pon-
drá en contacto con el centro de servicio técnico
y, dado el caso, podrá enviarle el aparato para su
reparación.
¡NOTA!
Utilice exclusivamente las pilas recomendadas.
Recambie siempre las pilas agotadas o muy

28
usadas por un juego completo de pilas nuevas
con plena capacidad. No utilice pilas de marcas
o modelos distintos ni de distinto nivel de capa-
cidad. ¡Hay que retirar las pilas del aparato si no
se va a usar durante un periodo prolongado!
¡NOTA!
El fabricante no se hace responsable de los
daños por tensión como consecuencia de pilas
mal colocadas.
VOLUMEN DE SUMINISTRO
• Unidad principal
• el sensor remoto
• Manual de instrucciones
Se requieren baterías (no incluidas con la
compra):
3x AAA / LR03 (1,5 V) para la unidad principal
6x AAA / LR03 (1,5 V) para el sensor exterior
INSTALACIÓN DE LA UNIDAD PRINCIPAL
1. Abra el compartimiento de la batería de la un-
idad principal e insertar tres nuevas baterías
AAA de 1,5 V, la polaridad como se ilustra.
2. todos los segmentos LCD se mostrará durante
unos pocos segundos.
3. Cierre el compartimiento de la batería.
LA INSTALACIÓN DEL SENSOR EXTERIOR
1. Abra el compartimiento de la batería del
sensor al aire libre con un destornillador.
2. Inserte dos pilas AAA de 1,5 nuevos, la pan-
talla muestra la temperatura y la humedad y el
número de canal. 1
3. Pulse el interruptor ° C y ° F (D6) para selec-
cionar la unidad de temperatura.
4. Utilizar el botón selector de canales (D7) para
cambiar entre el Canal 1, Canal 2 o Canal 3.
Hay un total de 3 juego de sensores al aire
libre, los 3 a los diferentes canales.

ES
29
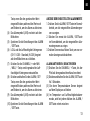
UNIDAD PRINCIPAL
1. Las mediciones del sensor exterior instalado
serán Mitted trans a la unidad principal y el
símbolo de la recepción de radio-controlado
(A1) Aparece.
2. Si la recepción es exitosa, la pantalla mostrará
la temperatura y la humedad del sensor
exterior respectivamente, el símbolo tendencia
de la temperatura (A3) y el símbolo del nivel
de comodidad (A4).
3. A continuación, el símbolo de recepción de
radio-controlado desaparece.
4. En la sección de visualización 4, los valores
medidos del sensor interno (interior) aparecerá.
5. Si los valores no son recibidos desde un
canal, ‘-’ aparece en la pantalla, compruebe las
baterías y vuelva a intentarlo. Compruebe si
hay alguna fuente de interferencia.
6. Puede comenzar la inicialización manual-
mente.
7. Botón de función:
(1) CANAL botón / +
A. Pulse para seleccionar las diferentes secciones
de visualización.
B. En el modo de ajuste, pulse es igual a la UP.
C. Mantenga presionado para hacer cumplir la re-
cepción de radio control.
[1] Presione el botón de CANAL / + hasta que la e-
cha (A7) Aparece en el canal deseado. Canal 1,
2 ó 3, o IN para hacer cumplir una recepción de
radio control para todos los sensores exteriores
simultáneamente.
[2] Mantenga pulsado este botón durante 3 segun-
dos para buscar señales del sensor exterior
deseado.
[3] El símbolo de recepción de radio-controlado
(A1) Aparece.
[4] La estación de base explorará las mediciones.
[5] Si la recepción es exitosa, la pantalla mostrará
la temperatura y la humedad del sensor exterior

30
deseado, el símbolo tendencia de la temperatura
(A3) y el símbolo del nivel de comodidad (A4).
[6] A continuación, el símbolo de recepción de ra-
dio-controlado desaparece.
(2) MIN / MAX / - botón
A. En el modo normal, pulse y mantenga pulsado
más de 3 segundos para cambiar ° C y ° F.
B. Pulse este botón, MAX Aparece en la pantalla.
C. En el display aparecen los valores máximos
desde el restablecimiento de la carga.
D. Mantenga oprimida la tecla MIN / MAX para
eliminar los valores máximos del canal selec-
cionado en ese momento.
E. Pulse este botón de nuevo
F. MIN aparece en la pantalla
G. En la pantalla aparecen los valores mínimos
desde el restablecimiento de la carga.
H. Pulse y mantenga pulsado el botón MIN / MAX
para eliminar los valores mínimos del canal
seleccionado en ese momento.
I. Pulse de nuevo para volver a la visualización de
los valores presentes.
IMPORTANTE:
@Pulse y mantenga el MIN / MAX / - o el botón de
CANAL / + para un casi corriendo.
AJUSTE DE LA ALARMA DE LA
TEMPERATURA Y LA HUMEDAD
1. Temperatura de alarma
(1) Pulse el botón de CANAL / + hasta que la
echa que aparece sobre el canal deseado
(canal 1-3, IN)
(2) Mantenga pulsado el botón / SET ALARM
durante 3 segundos.
(3) HI AL y límite superior de temperatura (CH
1-3: 70 ° C - por defecto, IN: 60 ° C) comienza
a parpadear en la pantalla.
(4) Pulse el CANAL / + o MIN / MAX / - para
ajustar el límite superior de temperatura
deseado.

ES
31
@Pulse y mantenga el MIN / MAX / - o el
botón de CANAL / + para un casi corriendo.
(5) Pulse y mantenga pulsado el botón ALARM
/ SET después de establecer el valor Cuando
en silencio intermitente para activar la
función de alarma.
(6) El símbolo de alarma (A10) aparece en la
pantalla
(7) Guardar el ajuste con el botón ALARM /
SET
(8) LO AL y el límite inferior de temperatura
(CH 1-3: -50 ° C - por defecto, IN: -9.9 ° C)
comienza a parpadear en la pantalla.
(9) Pulse el CANAL / + o MIN / MAX / - para
ajustar el límite inferior de temperatura
deseado.
(10) Pulse y mantenga pulsado el botón ALARM /
SET después de establecer el valor Cuando
en silencio intermitente para activar la
función de alarma.
(11) El símbolo de alarma (A10) aparece en la
pantalla.
(12) Guardar el ajuste con el botón ALARM / SET.
2. Humedad de alarma
(1) HI AL y el límite superior de humedad (CH
1-3: 95% - por defecto, en el 95%) comienza
a parpadear en la pantalla (canal 1-3, IN)
(2) Pulse el CANAL / + o MIN / MAX / - para
ajustar el límite superior de humedad desea-
do
(3) mantenga pulsado el botón ALARM / SET
después de establecer el valor Cuando en
silencio intermitente para activar la función
de alarma
(4) El símbolo de alarma (A10) aparece en la
pantalla
(5) Guardar el ajuste con el botón ALARM / SET
(6) LO AL y menor límite de humedad (CH 1-3:
20% - por defecto, IN: 20%) comienza a
parpadear en la pantalla.

32
(7) Pulse el CANAL / + o MIN / MAX / - para
ajustar el límite inferior deseado de hume-
dad.
(8) Pulse y mantenga pulsado el botón ALARM /
SET después de establecer el valor Cuando
en silencio intermitente para activar la
función de alarma.
(9) El símbolo de alarma (A10) aparece en la
pantalla.
(10) Guardar el ajuste con el botón ALARM / SET.
VISUALIZACIÓN DE LOS VALORES DE
ALARMA AJUSTADOS
1. Pulse el botón ALARM / SET en el modo normal
para mostrar los límites de alarma superior
ajustados.
2. Pulse de nuevo el botón ALARM / SET en el
modo normal para mostrar los límites de alar-
ma más bajos ajustados.
3. Pulse de nuevo este botón para volver a la pan-
talla normal.
DESACTIVACIÓN / ACTIVACIÓN DE LA
ALARMA
(1) Pulse el botón de CANAL / + hasta que la e-
cha que aparece sobre el canal deseado.
(2) Mantenga pulsado el botón / SET ALARM du-
rante 3 segundos.
(3) Límite de Alerta de Alta Temperatura comien-
za a parpadear en la pantalla
(4) En La temperatura y la humedad modo de alar-
ma, cada pulsación del botón ALARM / SET
gira entre:
- Alerta de Alta Temperatura
- Alerta de temperatura más baja
- Alta Alerta de Humedad
- Bajo Alerta de Humedad
(5) Cuando se muestran las alertas anteriores,
al pulsar el botón ALARMA / SET durante 3
segundos se active / desactive la alerta cor-
respondiente.
(6) El símbolo de alarma (A10) desaparece / apa-
rece en la pantalla.

ES
33
(7) Guardar el ajuste con el botón ALARM / SET.
LA DESACTIVACIÓN CUANDO SE ACTIVAN LAS
ALARMAS
Pulse el botón ALARMA / SET para detener el
sonido de alarma. HI AL o AL LO silencio intermi-
tente en la pantalla.
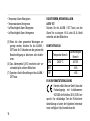
EL NIVEL DE CONFORT
Rango de temperatura
Rango de
humedad
COM 20-28 °C 40-70%
WET >65%
DRY <45%
EC DECLARACIÓN DE CONFORMIDAD
Por la presente, Bresser GmbH declara
que el tipo de equipo con número de
pieza: 9070200 cumple con la
Directiva: 2014/30 / EU. El texto completo de la
declaración de conformidad de la UE está
disponible en la siguiente dirección de Internet:
http://www.bresser.de
INSTRUCCIONES DE LIMPIEZA
Antes de limpiar el aparato, desconéctelo de la
fuente de electricidad (quite las pilas).
Limpie solamente el exterior del aparato con un
paño seco. No utilice productos de limpieza para
evitar daños en el sistema electrónico.
ELIMINACIÓN
Elimine los materiales de embalaje separa-
dos por tipos. Obtendrá información sobre
la eliminación reglamentaria en los provee-
dores de servicios de eliminación municipales o
en la agencia de protección medioambiental.
¡No elimine los electrodomésticos junto
con la basura doméstica!
Conforme a la directiva europea 2002/96/

34
UE sobre aparatos eléctricos y electrónicos usa-
dos y a su aplicación en la legislación nacional,
los aparatos eléctricos usados se deben recoger
por separado y conducir a un reciclaje que no per-
judique al medio ambiente.
DE
GARANTIE & SERVICE
Die reguläre Garantiezeit beträgt 2 Jahre und
beginnt am Tag des Kaufs. Um von einer verlän-
gerten, freiwilligen Garantiezeit wie auf dem Ge-
schenkkarton angegeben zu protieren, ist eine
Registrierung auf unserer Website erforderlich.
Die vollständigen Garantiebedingungen sowie
Informationen zu Garantiezeitverlängerung und
Serviceleistungen können Sie unter www.bresser.
de/garantiebedingungen einsehen. Sie wünschen
eine ausführliche Anleitung zu diesem Produkt
in einer bestimmten Sprache? Dann besuchen
Sie unsere Website über nachfolgenden Link
(QR Code) für verfügbare Versionen. Alternativ
können Sie uns auch eine E-Mail an die Adresse
manuals@bresser.de schicken oder eine Nachricht
unter +49 (0) 2872 - 8074-220* hinterlassen. Bitte
geben Sie stets Ihren Namen, Ihre genaue Adresse,
eine gültige Telefonnummer und E-Mail-Adresse
sowie die Artikelnummer und -bezeichnung an.
*Lokale Rufnummer in Deutschland (Die Höhe der Gebüh-
ren je Telefonat ist abhängig vom Tarif Ihres Telefonanbie-
ters); Anrufe aus dem Ausland sind mit höheren Kosten
verbunden.
EN
WARRANTY & SERVICE
The regular guarantee period is 2 years and begins on
the day of purchase. To benet from an extended vol-
untary guarantee period as stated on the gift box, regis-
tration on our website is required. You can consult the
full guarantee terms as well as information on extend-
ing the guarantee period and details of our services at
www.bresser.de/warranty_terms. Would you like
detailed instructions for this product in a particu-

GARANTIE/WARRANTY
35
lar language? Then visit our website via the link
below (QR code) for available versions. Alterna-
tively you can also send an email to manuals@
bresser.de or leave a message on +49 (0) 28 72 –
80 74-220*. Please always state your name, precise
address, a valid phone number and email address, as
well as the article number and name.
*Number charged at local rates in Germany (the amount you
will be charged per phone call will depend on the tariff of your
phone provider); calls from abroad will involve higher costs.
ES
GARANTÍA Y SERVICIO
El período regular de garantía es dos anos iniciándo-
se en el día de la compra. Para beneciarse de un
período de garantía más largo y voluntario tal y como
se indica en la caja de regalo es necesario registrarse
en nuestra página web. Las condiciones de garantía
completas así como informaciones relativas a la am-
pliación de la garantía y los servicios pueden encon-
trarse en www.bresser.de/warranty_terms. ¿Desearía
recibir unas instrucciones de uso completas sobre
este producto en un idioma determinado? Entonces
visite nuestra página web utilizando el siguiente en-
lace (código QR) para ver las versiones disponibles.
DOWNLOAD: www.bresser.de/P9070200

Manual_9070200_Thermo-Hygrometer_de-en-es_NATGEO_v042018a
Bresser GmbH
Gutenbergstr. 2
DE-46414 Rhede
www.bresser.de · info@bresser.de
Irrtümer und technische Änderungen vorbehalten.
Errors and technical changes reserved.
© 2018 National Geographic Partners LLC.
All rights reserved. NATIONAL GEOGRAPHIC and
Yellow Border Design are trademarks of the
National Geographic Society, used under license.
Visit our website: www.nationalgeographic.com
-
 1
1
-
 2
2
-
 3
3
-
 4
4
-
 5
5
-
 6
6
-
 7
7
-
 8
8
-
 9
9
-
 10
10
-
 11
11
-
 12
12
-
 13
13
-
 14
14
-
 15
15
-
 16
16
-
 17
17
-
 18
18
-
 19
19
-
 20
20
-
 21
21
-
 22
22
-
 23
23
-
 24
24
-
 25
25
-
 26
26
-
 27
27
-
 28
28
-
 29
29
-
 30
30
-
 31
31
-
 32
32
-
 33
33
-
 34
34
-
 35
35
-
 36
36


Bresser Thermo-hygrometer black 4 measurement results El manual del propietario
- Categoría
- Medición
- Tipo
- El manual del propietario
- Este manual también es adecuado para
en otros idiomas
Artículos relacionados
Otros documentos
-
TFA Wireless Thermo-Hygrometer with 3 Transmitters KLIMA-MONITOR Manual de usuario
-
Auriol z31092 Operation and Safety Notes
-
-
-
TFA Dostmann Wireless Weather Station MONDO Manual de usuario
-
-
-
-
Lexibook METEOCLOCK PURE SM1670 Manual de usuario