Zanussi ZDLN6531 Manual de usuario
- Categoría
- Lavaplatos
- Tipo
- Manual de usuario


VISIT OUR WEBSITE TO:
Get usage advice, brochures, trouble shooter, service and repair information:
www.zanussi.com/support
SAFETY INFORMATION
Before the installation and use of the appliance, carefully read the
supplied instructions. The manufacturer is not responsible for any
injuries or damage that are the result of incorrect installation or
usage. Always keep the instructions in a safe and accessible
location for future reference.
CHILDREN AND VULNERABLE PEOPLE SAFETY
• This appliance can be used by children aged from 8 years and
above and persons with reduced physical, sensory or mental
capabilities or lack of experience and knowledge if they have
been given supervision or instruction concerning the use of the
appliance in a safe way and understand the hazards involved.
• Children between 3 and 8 years of age and persons with very
extensive and complex disabilities shall be kept away from the
appliance unless continuously supervised.
• Children of less than 3 years of age should be kept away from
the appliance unless continuously supervised.
• Do not let children play with the appliance.
• Keep detergents away from children.
• Keep children and pets away from the appliance when the door
is open.
• Children shall not carry out cleaning and user maintenance of
the appliance without supervision.
GENERAL SAFETY
• This appliance is intended to be used in household and similar
applications such as:
– farm houses; staff kitchen areas in shops, offices and other
working environments;
– by clients in hotels, motels, bed & breakfast and other
residential type environments.
2

• Do not change the specification of this appliance.
• The operating water pressure (minimum and maximum) must be
between 0.5 (0.05) / 8 (0.8) bar (MPa)
• Follow the maximum number of 13 place settings.
• If the supply cord is damaged, it must be replaced by the
manufacturer, its Authorised Service Centre or similarly
qualified persons in order to avoid a hazard.
• Put the cutlery in the cutlery basket with the sharp ends
pointing down or put them in the cutlery drawer in a horizontal
position with the sharp edges down.
• Do not leave the appliance with the open door unattended to
avoid stepping accidentally onto it.
• Before any maintenance operation, deactivate the appliance
and disconnect the mains plug from the socket.
• Do not use high pressure water sprays and/or steam to clean
the appliance.
• If the appliance has ventilation openings in the base, they must
not be covered e.g. by a carpet.
• The appliance is to be connected to the water mains using the
new supplied hose-sets. Old hose sets must not be reused.
SAFETY INSTRUCTIONS
INSTALLATION
WARNING! Only a qualified person
must install this appliance.
• Remove all the packaging.
• Do not install or use a damaged appliance.
• Do not use the appliance before installing it in
the built-in structure due to safety manner.
• Follow the installation instructions supplied with
the appliance.
• Always take care when moving the appliance as
it is heavy. Always use safety gloves and
enclosed footwear.
• Do not install or use the appliance where the
temperature is less than 0 °C.
• Install the appliance in a safe and suitable place
that meets installation requirements.
www.youtube.com/electrolux
www.youtube.com/aeg
How to install your 60 cm
Dishwasher Sliding Hinge
ELECTRICAL CONNECTION
WARNING! Risk of fire and electric
shock.
• The appliance must be earthed.
• Make sure that the parameters on the rating
plate are compatible with the electrical ratings
of the mains power supply.
• Always use a correctly installed shockproof
socket.
• Do not use multi-plug adapters and extension
cables.
• Make sure not to cause damage to the mains
plug and to the mains cable. Should the mains
3

cable need to be replaced, this must be carried
out by our Authorised Service Centre.
• Connect the mains plug to the mains socket
only at the end of the installation. Make sure that
there is access to the mains plug after the
installation.
• Do not pull the mains cable to disconnect the
appliance. Always pull the mains plug.
• This appliance is fitted with a 13 A mains plug. If
it is necessary to change the mains plug fuse,
use only a 13 A ASTA (BS 1362) fuse (UK and
Ireland only).
WATER CONNECTION
• Do not cause damage to the water hoses.
• Before connection to new pipes, pipes not used
for a long time, where repair work has been
carried out or new devices fitted (water meters,
etc.), let the water flow until it is clean and clear.
• Ensure that there are no visible water leaks
during and after the first use of the appliance.
• The water inlet hose has a safety valve and a
sheath with an inner mains cable.
WARNING! Dangerous voltage.
• If the water inlet hose is damaged, immediately
close the water tap and disconnect the mains
plug from the mains socket. Contact the
Authorised Service Centre to replace the water
inlet hose.
USE
• Do not put flammable products or items that are
wet with flammable products in, near or on the
appliance.
• Dishwasher detergents are dangerous. Follow
the safety instructions on the detergent
packaging.
• Do not drink and play with the water in the
appliance.
• Do not remove the dishes from the appliance
until the programme is complete. Some
detergent may remain on the dishes.
• Do not store items or apply pressure on the
open door of the appliance.
• The appliance can release hot steam if you open
the door while a programme operates.
SERVICE
• To repair the appliance contact the Authorised
Service Centre. Use original spare parts only.
• Please note that self-repair or non-professional
repair can have safety consequences and might
void the guarantee.
• The following spare parts will be available for 7
years after the model has been discontinued:
motor, circulation and drain pump, heaters and
heating elements, including heat pumps, piping
and related equipment including hoses, valves,
filters and aquastops, structural and interior
parts related to door assemblies, printed circuit
boards, electronic displays, pressure switches,
thermostats and sensors, software and firmware
including reset software. Please note that some
of these spare parts are only available to
professional repairers, and that not all spare
parts are relevant for all models.
• The following spare parts will be available for 10
years after the model has been discontinued:
door hinge and seals, other seals, spray arms,
drain filters, interior racks and plastic peripherals
such as baskets and lids.
DISPOSAL
WARNING! Risk of injury or
suffocation.
• Disconnect the appliance from the mains
supply.
• Cut off the mains cable and discard it.
• Remove the door catch to prevent children and
pets to get closed in the appliance.
4

PRODUCT DESCRIPTION
The graphics below is just a general
product overview. For more detailed
information, refer to other chapters
and/or documents provided with the
appliance.
4
3
7
9
8
10
56
11
1
2
1
Upper spray arm
2
Lower spray arm
3
Filters
4
Rating plate
5
Salt container
6
Air vent
7
Rinse aid dispenser
8
Detergent dispenser
9
Cutlery basket
10
Lower basket
11
Upper basket
BEAM-ON-FLOOR
The Beam-on-Floor is a light that is displayed on
the floor below the appliance door.
• When the programme starts, a red light comes
on and stays on for the duration of the
programme.
• When the programme is completed, a green
light comes on.
• When the appliance has a malfunction, the red
light flashes.
The Beam-on-Floor is off when the
appliance is deactivated.
When AirDry is activated during the
drying phase, the projection on the
floor may not be completely visible. To
see if the cycle has ended, check the
control panel.
5

CONTROL PANEL
1 2 3 4 5 6
1
On/Off button/Reset button
2
Delay start button
3
Display
4
Programme buttons
5
Option buttons
6
AUTO programme button
DISPLAY
A AB
A. Indicators
B. Time indicator
INDICATORS
Indicator Description
Rinse aid indicator. It is on when the rinse aid dispenser needs refilling. Refer to
"Before first use".
Salt indicator. It is on when the salt container needs refilling. Refer to "Before first
use".
Machine Care indicator. It is on when the appliance needs internal cleaning with the
Machine Care programme. Refer to "Care and cleaning".
Drying phase indicator. It is on when a programme with the drying phase is selec-
ted. It flashes when the drying phase operates. Refer to "Programme selection".
6

PROGRAMME SELECTION
PROGRAMMES
CA B D E
A. • 30 min is the shortest programme suitable
for washing a load with fresh and light soil.
• Pre-rinse is a programme for rinsing off
food remains from the dishes. It prevents
odours forming in the appliance. Do not use
detergent with this programme.
B. 60 min is a programme suitable for washing a
load with fresh and lightly dried-on soil.
C. 90 min is a programme suitable for washing
and drying normally soiled items.
D. 160 min is a programme suitable for washing
and drying heavily soiled items.
E. ECO is the longest programme offering the
most efficient use of energy and water
consumption for crockery and cutlery with
normal soil. This is the standard programme for
test institutes.
1)
OPTIONS
You can adjust the programme selection to your
needs by activating options.
Extra Power
This option improves the washing results of the
selected programme. It increases the wash
temperature and duration.
Glass Care
This option provides special care for a delicate
load. It prevents rapid changes in the wash
temperature of the selected programme and
reduces it to 45 °C. This protects glassware in
particular from damaging.
AUTO
This program automatically adjusts the wash cycle
to the type of load.
The appliance senses the degree of soil and the
amount of dishes in the baskets. It adjusts the
temperature and quantity of water as well as the
wash duration.
PROGRAMMES OVERVIEW
Programme Type of load Degree of soil Programme phases Options
30 min • Crockery
• Cutlery
• Fresh • Wash 50 °C
• Intermediate rinse
• Final rinse 45 °C
• AirDry
• Extra Power
• Glass Care
Pre-rinse • All types of
loads
• All degrees
of soil
• Prewash Options are not ap-
plicable to this pro-
gramme.
60 min • Crockery
• Cutlery
• Fresh
• Lightly
dried-on
• Wash 60 °C
• Intermediate rinse
• Final rinse 50 °C
• AirDry
• Extra Power
• Glass Care
1) This programme is used to assess compliance with the Ecodesign Comission Regulation (EU)
2019/2022.
7

Programme Type of load Degree of soil Programme phases Options
90 min • Crockery
• Cutlery
• Pots
• Pans
• Normal
• Lightly
dried-on
• Wash 60 °C
• Intermediate rinse
• Final rinse 55 °C
• Drying
• AirDry
• Extra Power
• Glass Care
160 min • Crockery
• Cutlery
• Pots
• Pans
• Normal to
heavy
• Dried-on
• Prewash
• Wash 60 °C
• Intermediate rinse
• Final rinse 60 °C
• Drying
• AirDry
• Extra Power
• Glass Care
ECO • Crockery
• Cutlery
• Pots
• Pans
• Normal
• Lightly
dried-on
• Prewash
• Wash 50 °C
• Intermediate rinse
• Final rinse 60 °C
• Drying
• AirDry
• Extra Power
• Glass Care
AUTO • Crockery
• Cutlery
• Pots
• Pans
The pro-
gramme ad-
justs to all de-
grees of soil.
• Prewash
• Wash 50 - 60 °C
• Intermediate rinse
• Final rinse 55 °C
• Drying
• AirDry
Options are not ap-
plicable to this pro-
gramme.
Machine
Care
• No load The pro-
gramme
cleans the ap-
pliance interi-
or.
Refer to "Care
and clean-
ing".
• Wash 65 °C
• Intermediate rinse
• Final rinse
• AirDry
Options are not ap-
plicable to this pro-
gramme.
Consumption values
Programme
1)
Water (l) Energy (kWh) Duration (min)
30 min 9.4 -11.4 0.57 - 0.69 30
Pre-rinse 3.7 - 4.5 0.02 - 0.05 15
60 min 9.3 - 11.4 0.82 - 0.94 60
90 min 9.1 - 11.1 1.01 - 1.13 90
160 min 9.2 - 11.2 0.96 - 1.08 160
ECO 9.9
0.821
2)
/0.835
3) 240
AUTO 8.2 - 11.2 0.67 - 1.08 120 - 170
8

Programme
1)
Water (l) Energy (kWh) Duration (min)
Machine Care 8.4 - 10.2 0.60 - 0.71 60
1) The pressure and the temperature of the water, the variations of the mains supply, the options and the
quantity of dishes can change the values.
2) In accordance with the 1016/2010 regulation
3) In accordance with the 2019/2022 regulation
Information for test institutes
To receive the necessary information for conducting
performance tests (e.g. according to EN60436),
send an email to:
In your request please include the product number
code (PNC) found on the rating plate.
For any other questions regarding your dishwasher
please refer to the service book provided with your
appliance.
BASIC SETTINGS
You can configure the appliance by changing basic
settings according to your needs.
Number Settings Values
Description
1)
1 Water hardness From level 1L to
level 10L
Adjust the level of the water softener according
to the water hardness in your area.
Factory setting: 5L.
2 Rinse aid empty
notification
1d (on)
0d (off)
Activate or deactivate the rinse aid indicator.
Factory setting: 1d.
3 End sound 1b (on)
0b (off)
Activate or deactivate the acoustic signal for the
end of a programme.
Factory setting: 0b.
4 Auto door open 1o (on)
0o (off)
Activate or deactivate the AirDry.
Factory setting: 1o.
5 Key tones 1F (on)
0F (off)
Activate or deactivate the sound of the buttons
when pressed.
Factory setting: 1F.
6 Latest pro-
gramme selec-
tion
1H (on)
0H (off)
Enable or disable the automatic selection of the
most recently used programme and options.
Factory setting: 0H.
1) For more details, refer to the information provided in this chapter.
You can change the basic settings in setting mode.
Instructions on how to configure the appliance are
provided further in this chapter.
When the appliance is in setting mode, the display
shows a digit and a letter. For each setting, a
dedicated letter is displayed. The dedicated letters
are indicated in the table.
9

The order of the basic settings presented in the
table is also the order of the settings in setting
mode.
THE WATER SOFTENER
The water softener removes minerals from the water
supply, which would have a negative effect on the
washing results and on the appliance.
The higher the content of these minerals, the harder
your water is. Water hardness is measured in
equivalent scales.
The water softener should be adjusted according to
the hardness of the water in your area. Your local
water authority can advise you on the hardness of
the water in your area. It is important to set the right
level of the water softener to assure good washing
results.
Water hardness
German degrees
(°dH)
French degrees
(°fH)
mmol/l
Clarke de-
grees
Water softener level
47 - 50 84 - 90 8.4 - 9.0 58 - 63 10
43 - 46 76 - 83 7.6 - 8.3 53 - 57 9
37 - 42 65 - 75 6.5 - 7.5 46 - 52 8
29 - 36 51 - 64 5.1 - 6.4 36 - 45 7
23 - 28 40 - 50 4.0 - 5.0 28 - 35 6
19 - 22 33 - 39 3.3 - 3.9 23 - 27
5
1)
15 - 18 26 - 32 2.6 - 3.2 18 - 22 4
11 - 14 19 - 25 1.9 - 2.5 13 - 17 3
4 - 10 7 - 18 0.7 - 1.8 5 - 12 2
<4 <7 <0.7 < 5
1
2)
1) Factory setting.
2) Do not use salt at this level.
Regardless of the type of detergent used, set
the proper water hardness level to keep the
salt refill indicator active.
Multi-tabs containing salt are not
effective enough to soften hard water.
Regeneration process
For the correct water softener operation, the resin
of the softener device needs to be regenerated
regularly. This process is automatic and is the part
of the normal dishwasher operation.
When the prescribed quantity of water (see values
in the table) has been used since the previous
regeneration process, a new regeneration process
will be initiated between the final rinse and the
programme end.
Water softener level Amount of water (l)
1 250
2 100
3 62
4 47
5 25
6 17
7 10
8 5
10

Water softener level Amount of water (l)
9 3
10 3
In case of the high water softener setting, it may
occur also in the middle of the programme, before
the rinse (twice during a programme). Regeneration
initiation has no impact on the cycle duration,
unless it occurs in the middle of a programme or at
the end of a programme with a short drying phase.
In that cases, the regeneration prolongs the total
duration of a programme by additional 5 minutes.
Subsequently, the rinsing of the water softener that
lasts 5 minutes may begin in the same cycle or at
the beginning of the next programme. This activity
increases the total water consumption of a
programme by additional 4 litres and the total
energy consumption of a programme by additional
2 Wh. The rinsing of the softener ends with a
complete drain.
Each performed softener rinse (possible more than
one in the same cycle) may prolong the programme
duration by another 5 minutes when it occurs at any
point at the beginning or in the middle of a
programme.
All the consumption values mentioned
in this section are determined in
accordance with the currently
applicable standard in laboratory
conditions with water hardness
2.5mmol/L according to the
2019/2022 regulation (water softener:
level 3).
The pressure and the temperature of
water as well as the variations of the
mains supply can change the values.
THE RINSE AID EMPTY NOTIFICATION
The rinse aid helps to dry the dishes without
streaks and stains. It is automatically released
during the hot rinse phase.
When the rinse aid chamber is empty, the rinse aid
indicator is turned on notifying to refill rinse aid. If
the drying results are satisfactory while using multi-
tablets only, it is possible to deactivate the
notification for refilling rinse aid. However, for best
drying performance, always use rinse aid.
If standard detergent or multi-tablets without rinse
aid are used, activate the notification to keep the
rinse aid refill indicator active.
END SOUND
You can activate an acoustic signal that sounds
when the programme is completed.
Acoustic signals sound also when a
malfunction of the appliance occurs. It
is not possible to deactivate these
signals.
AIRDRY
AirDry improves the drying results. The appliance
door opens automatically during the drying phase
and remains ajar.
AirDry is automatically activated with all
programmes other than Pre-rinse.
CAUTION! Do not try to close the
appliance door within 2 minutes after
automatic opening. This can cause
damage to the appliance.
CAUTION! If children have access to
the appliance, we advise to deactivate
AirDry. The automatic opening of the
door may pose a danger.
When AirDry opens the door, Beam-
on-Floor might not be completely
visible. To see if the programme is
complete, look at the control panel.
KEY TONES
The buttons on the control panel make a click
sound when you press them. You can deactivate
this sound.
LATEST PROGRAMME SELECTION
You can set the automatic selection of the most
recently used programme and options.
The latest programme that was completed before
the appliance deactivation is saved. It is then
11

selected automatically after you activate the
appliance.
When the latest programme selection is disabled,
the default programme is ECO.
SETTING MODE
How to enter setting mode
You can enter setting mode before starting a
programme. You cannot enter setting mode while
the programme is running.
To enter setting mode, press and hold
simultaneously 30 min and ECO for about 3
seconds.
• The lights related to 60 min, 90 min and
160 min are on.
• The display shows the current value of the
first available setting.
How to navigate in setting mode
You can navigate in setting mode using programme
buttons.
CA B
A. Previous button
B. OK button
C. Next button
Use Previous and Next to switch between the
basic settings and to change their value.
Use OK to enter the selected setting and to
confirm changing its value.
How to change a setting
Make sure the appliance is in setting mode.
1. Use Previous or Next to select the desired
setting.
The display shows the current setting value (a digit
and the dedicated letter).
2. Press OK to enter the setting.
The current setting value flashes.
3. Press Previous or Next to change the value.
4. Press OK to confirm the setting.
• The new setting is saved.
• The appliance returns to the basic settings
list.
5. Press and hold simultaneously 30 min and
ECO for about 3 seconds to exit setting mode.
The appliance returns to the programme selection.
The saved settings remain valid until you change
them again.
BEFORE FIRST USE
1. Make sure that the current level of the
water softener agrees with the hardness
of the water supply. If not, adjust the level
of the water softener.
2. Fill the salt container.
3. Fill the rinse aid dispenser.
4. Open the water tap.
5. Start the programme 30 min to remove any
residuals from the manufacturing process. Do
not use detergent and do not put dishes in the
baskets.
After starting the programme, the appliance
recharges the resin in the water softener for up to 5
minutes. The washing phase starts only after this
procedure is complete. The procedure is repeated
periodically.
THE SALT CONTAINER
CAUTION! Use rough salt designed
for dishwashers only. Fine salt
increases the risk of corrosion.
The salt is used to recharge the resin in the water
softener and to assure good washing results in
daily use.
How to fill the salt container
1. Turn the cap of the salt container
counterclockwise and remove it.
2. Put 1 litre of water in the salt container (only for
the first time).
3. Fill the salt container with 1 kg of salt (until it is
full).
12

4. Carefully shake the funnel by its handle to get
the last granules inside.
5. Remove the salt around the opening of the salt
container.
6. Turn the cap of the salt container clockwise to
close the salt container.
CAUTION! Water and salt can come
out of the salt container when you fill
it. After you fill the salt container,
immediately start a programme to
prevent corrosion.
HOW TO FILL THE RINSE AID DISPENSER
M
A
X
1
2
3
4
+
-
A B
D
C
CAUTION! Only use rinse aid
designed specifically for dishwashers.
1. Press the release button (D) to open the lid
(C).
2. Pour the rinse aid in the dispenser (A) until the
liquid reaches the fill level 'max'.
3. Remove the spilled rinse aid with an absorbent
cloth to prevent excessive foam formation.
4. Close the lid. Make sure that the release button
locks into position.
You can turn the selector of the
released quantity (B) between position
1 (lowest quantity) and position 4 or 6
(highest quantity).
DAILY USE
1. Open the water tap.
2. Press and hold until the appliance is
activated.
3. Fill the salt container if it is empty.
4. Fill the rinse aid dispenser if it is empty.
5. Load the baskets.
6. Add the detergent.
7. Select and start a programme.
8. Close the water tap when the programme is
complete.
USING THE DETERGENT
B
C
A
1. Press the release button (B) to open the lid (C).
2. Put the detergent, in powder or tablets, in the
compartment (A).
13

3. If the programme has a prewash phase, put a
small quantity of detergent on the inner part of
the appliance door.
4. Close the lid. Make sure that the release button
locks into position.
HOW TO SELECT AND START A
PROGRAMME
1. Press the button dedicated to the programme
you want to set.
• The light related to the button is on.
• The display shows the programme duration.
2. Activate applicable options if desired.
3. Close the appliance door to start the
programme.
HOW TO SELECT AND START THE
PROGRAMME PRE-RINSE
1. To select Pre-rinse, press and hold 30 min for
3 seconds.
• The light related to the button is on.
• The display shows the programme duration.
Options are not applicable to this
programme.
2. Close the appliance door to start the
programme.
HOW TO ACTIVATE OPTIONS
1. Select a programme.
2. Press the button dedicated to the option you
want to activate.
• The light related to the button is on.
• The display shows the updated programme
duration.
By default, options must be activated
every time before you start a
programme.
If the latest programme selection is
enabled, the saved options are
activated automatically along with the
programme.
It is not possible to activate or
deactivate options while a programme
is running.
Not all options are compatible with
each other.
Activating options often increases the
water and energy consumption as well
as the programme duration.
HOW TO SELECT AND START THE
PROGRAMME AUTO
1. Press AUTO.
• The light related to the button is on.
• The display shows the programme duration.
Options are not applicable to this
programme.
2. Close the appliance door to start the
programme.
The appliance senses the type of load and adjusts
a suitable wash cycle. During the cycle, the sensors
operate several times and the initial programme
duration can decrease.
HOW TO DELAY THE START OF A
PROGRAMME
1. Select a programme.
2. Press repeatedly until the display shows
the desired delay time (from 1 to 24 hours).
The light related to the button is on.
3. Close the appliance door to start the
countdown.
During the countdown, it is not possible to change
the delay time and the programme selection.
When the countdown is complete, the programme
starts.
HOW TO CANCEL THE DELAY START WHILE
THE COUNTDOWN OPERATES
Press and hold for about 3 seconds.
The appliance returns to the programme selection.
If you cancel the delay start, you have
to select the programme again.
HOW TO CANCEL A RUNNING
PROGRAMME
Press and hold for about 3 seconds.
The appliance returns to the programme selection.
Make sure that there is detergent in
the detergent dispenser before you
start a new programme.
OPENING THE DOOR WHILE THE
APPLIANCE OPERATES
Opening the door while a programme is running
stops the appliance. It may affect the energy
consumption and the programme duration. After
closing the door, the appliance continues from the
point of interruption.
14

If the door is opened for more than 30
seconds during the drying phase, the
running programme ends. It does not
happen if the door is opened by AirDry
function.
THE AUTO OFF FUNCTION
This function saves energy by switching the
appliance off when it is not operating.
The function comes into operation automatically:
• When the programme is completed.
• After 5 minutes if a programme was not started.
END OF THE PROGRAMME
When the programme is complete, the display
shows 0:00.
The Auto Off function switches the appliance off
automatically.
All buttons are inactive except for the on/off button.
HINTS AND TIPS
GENERAL
Follow the hints below to ensure optimal cleaning
and drying results in daily use and to protect the
environment.
• Washing dishes in the dishwasher as instructed
in the user manual usually consumes less water
and energy than washing dishes by hand.
• Load the dishwasher to its full capacity to save
water and energy. For best cleaning results,
arrange items in the baskets as instructed in the
user manual and do not overload the baskets.
• Do not pre-rinse dishes by hand. It increases
the water and energy consumption. When
needed, select a programme with a prewash
phase.
• Remove larger residues of food from the dishes
and empty cups and glasses before putting
them inside the appliance.
• Soak or slightly scour cookware with firmly
cooked-on or baked-on food before washing it
in the appliance.
• Make sure that items in the baskets do not
touch or cover each other. Only then can the
water completely reach and wash the dishes.
• You can use dishwasher detergent, rinse aid
and salt separately or you can use the multi-
tablets (e.g. ''All in 1''). Follow the instructions
on the packaging.
• Select a programme according to the type of
load and the degree of soil. ECO offers the
most efficient use of water and energy
consumption.
• To prevent limescale buildup inside the
appliance:
– Refill the salt container whenever
necessary.
– Use the recommended dosage of the
detergent and rinse aid.
– Make sure that the current level of the water
softener agrees with the hardness of the
water supply.
– Follow the instructions in the chapter "Care
and cleaning".
USING SALT, RINSE AID AND DETERGENT
• Only use salt, rinse aid and detergent designed
for dishwasher. Other products can cause
damage to the appliance.
• In areas with hard and very hard water, we
recommend to use basic dishwasher detergent
(powder, gel, tablets containing no additional
agents), rinse aid and salt separately for optimal
cleaning and drying results.
• Detergent tablets do not fully dissolve with short
programmes. To prevent detergent residues on
the tableware, we recommend that you use
tablets with long programmes.
• Always use the correct quantity of detergent.
Insufficient dosage of detergent can result in
poor cleaning results and hard-water filming or
spotting on the items. Using too much detergent
with soft or softened water results in detergent
residues on the dishes. Adjust the amount of
detergent based on the water hardness. Refer
to the instructions on the detergent packaging.
• Always use the correct quantity of rinse aid.
Insufficient dosage of rinse aid decreases the
drying results. Using too much rinse aid results
in bluish layers on the items.
• Make sure that the water softener level is
correct. If the level is too high, the increased
quantity of salt in the water might result in rust
on cutlery.
WHAT TO DO IF YOU WANT TO STOP USING
MULTI-TABLETS
Before you start using separately detergent, salt
and rinse aid, complete the following steps:
1. Set the highest level of the water softener.
2. Make sure that the salt and rinse aid containers
are full.
3. Start the 30 min programme. Do not add
detergent and do not put dishes in the baskets.
15

4. When the programme is completed, adjust the
water softener according to the water hardness
in your area.
5. Adjust the released quantity of rinse aid.
BEFORE STARTING A PROGRAMME
Before you start the selected programme, make
sure that:
• The filters are clean and correctly installed.
• The cap of the salt container is tight.
• The spray arms are not clogged.
• There is enough salt and rinse aid (unless you
use multi-tablets).
• The arrangement of the items in the baskets is
correct.
• The programme is suitable to the type of load
and the degree of soil.
• The correct quantity of detergent is used.
LOADING THE BASKETS
• Always use the whole space of the baskets.
• Use the appliance to wash dishwasher-safe
items only.
• Do not wash in the appliance items made of
wood, horn, aluminium, pewter and copper as
they could crack, warp, get discoloured or
pitted.
• Do not wash in the appliance items that can
absorb water (sponges, household cloths).
• Put hollow items (cups, glasses and pans) with
the opening facing downwards.
• Make sure that glasses do not touch each other.
• Put light items in the upper basket. Make sure
that the items do not move freely.
• Put cutlery and small items in the cutlery basket.
• Make sure that the spray arms can move freely
before you start a programme.
UNLOADING THE BASKETS
1. Let the tableware cool down before you
remove it from the appliance. Hot items can be
easily damaged.
2. First remove items from the lower basket, then
from the upper basket.
After the programme is completed,
water can still remain on the inside
surfaces of the appliance.
CARE AND CLEANING
WARNING! Before any maintenance
other than running the programme
Machine Care, deactivate the
appliance and disconnect the mains
plug from the main socket.
Dirty filters and clogged spray arms
negatively affect the washing results.
Check these elements regularly and, if
necessary, clean them.
MACHINE CARE
Machine Care is a programme designed to clean
the appliance interior with optimal results. It
removes limescale and grease buildup.
When the appliance senses the need for cleaning,
the indicator is on. Start the Machine Care
programme to clean the appliance interior.
How to start the Machine Care programme
Before starting the Machine Care
programme, clean the filters and spray
arms.
1. Use a descaler or a cleaning product designed
specifically for dishwashers. Follow the
instructions on the packaging. Do not put
dishes in the baskets.
2. Press and hold simultaneously Extra Power
and AUTO for about 3 seconds.
The indicators and Extra Power flash. The
display shows the programme duration.
3. Close the appliance door to start the
programme.
When the programme is complete, the indicator
is off.
INTERNAL CLEANING
• Carefully clean the appliance, including the
rubber gasket of the door, with a soft damp
cloth.
• Do not use abrasive products, abrasive cleaning
pads, sharp tools, strong chemicals, scourer or
solvents.
• To maintain the performance of your appliance,
use a cleaning product designed specifically for
dishwashers at least once every two months.
Carefully follow the instructions on the
packaging of the product.
• For optimal cleaning results, start the Machine
Care programme.
16

REMOVAL OF FOREIGN OBJECTS
Check the filters and the sump after each use of the
dishwasher. Foreign objects (e.g. pieces of glass,
plastic, bones or toothpicks, etc) decrease the
cleaning performance and can cause damage to
the drain pump.
1. Disassemble the filters system as instructed in
this chapter.
2. Remove any foreign objects by hand.
CAUTION! If unable to remove the
objects, contact an Authorised
Service Centre.
3. Reassemble the filters as instructed in this
chapter.
EXTERNAL CLEANING
• Clean the appliance with a moist soft cloth.
• Only use neutral detergents.
• Do not use abrasive products, abrasive cleaning
pads or solvents.
CLEANING THE FILTERS
The filter system is made of 3 parts.
C
B
A
1. Turn the filter (B) counterclockwise and remove
it.
2. Remove the filter (C) out of filter (B).
3. Remove the flat filter (A).
4. Wash the filters.
5. Make sure that there are no residues of food or
soil in or around the edge of the sump.
6. Put back in place the flat filter (A). Make sure
that it is correctly positioned under the 2
guides.
7. Reassemble the filters (B) and (C).
17

8. Put back the filter (B) in the flat filter (A). Turn it
clockwise until it locks.
CAUTION! An incorrect position of
the filters can cause bad washing
results and damage to the appliance.
CLEANING THE LOWER SPRAY ARM
We recommend to clean the lower spray arm
regularly to prevent soil from clogging the holes.
Clogged holes can cause unsatisfactory washing
results.
1. To remove the lower spray arm, pull it upwards.
2. Wash the spray arm under running water. Use
a thin pointed tool, e.g. a toothpick, to remove
particles of soil from the holes.
3. To install the spray arm back, press it
downwards.
TROUBLESHOOTING
WARNING! Improper repair of the
appliance may pose a danger to the
safety of the user. Any repairs must be
performed by qualified personnel.
The majority of problems that may occur can
be solved without the need to contact an
Authorised Service Centre.
Refer to the below table for information on possible
problems.
With some problems, the display shows an alarm
code.
18

Problem and alarm code Possible cause and solution
You cannot activate the appli-
ance.
• Make sure that the mains plug is connected to the mains sock-
et.
• Make sure that there is no damaged fuse in the fuse box.
The programme does not start. • Make sure that the appliance door is closed.
• If the delay start is set, cancel the setting or wait for the end of
the countdown.
• The appliance recharges the resin inside the water softener.
The duration of the procedure is approximately 5 minutes.
The appliance does not fill with
water.
The display shows i10 or i11.
• Make sure that the water tap is open.
• Make sure that the pressure of the water supply is not too low.
For this information, contact your local water authority.
• Make sure that the water tap is not clogged.
• Make sure that the filter in the inlet hose is not clogged.
• Make sure that the inlet hose has no kinks or bends.
The appliance does not drain
the water.
The display shows i20.
• Make sure that the sink spigot is not clogged.
• Make sure that the interior filter system is not clogged.
• Make sure that the drain hose has no kinks or bends.
The anti-flood device is on.
The display shows i30.
• Close the water tap.
• Make sure that the appliance is correctly installed.
• Make sure the baskets are loaded as instructed in the user
manual.
Malfunction of the water level
detection sensor.
The display shows i41 - i44.
• Make sure that the filters are clean.
• Switch the appliance off and on.
Malfunction of the wash pump
or the drain pump.
The display shows i51 - i59 or
i5A - i5F.
• Switch the appliance off and on.
The temperature of the water
inside the appliance is too high
or malfunction of the tempera-
ture sensor occurred.
The display shows i61 or i69.
• Make sure that the temperature of the inlet water does not ex-
ceed 60°C.
• Switch the appliance off and on.
Technical malfunction of the
appliance.
The display shows iC0 or iC3.
• Switch the appliance off and on.
The level of water inside the
appliance is too high.
The display shows iF1.
• Switch the appliance off and on.
• Make sure that the filters are clean.
• Make sure that the outlet hose is installed at the right height
above the floor. Refer to the installation instructions.
The appliance stops and starts
more times during operation.
• It is normal. It provides optimal cleaning results and energy sav-
ings.
The programme lasts too long. • If the delay start option is set, cancel the delay setting or wait
for the end of the countdown.
• Activating options can increase the programme duration.
19

Problem and alarm code Possible cause and solution
The remaining time in the dis-
play increases and skips nearly
to the end of the programme
duration.
• This is not a defect. The appliance is working correctly.
Small leak from the appliance
door.
• The appliance is not levelled. Loosen or tighten the adjustable
feet (if applicable).
• The appliance door is not centred on the tub. Adjust the rear
foot (if applicable).
The appliance door is difficult
to close.
• The appliance is not levelled. Loosen or tighten the adjustable
feet (if applicable).
• Parts of the tableware are protruding from the baskets.
Rattling or knocking sounds
from the inside of the appli-
ance.
• The tableware is not properly arranged in the baskets. Refer to
basket loading leaflet.
• Make sure that the spray arms can rotate freely.
The appliance trips the circuit-
beaker.
• The amperage is insufficient to supply simultaneously all the ap-
pliances in use. Check the socket amperage and the capacity
of the meter or turn off one of the appliances in use.
• Internal electrical fault of the appliance. Contact an Authorised
Service Centre.
Once you have checked the appliance, deactivate
and activate the appliance. If the problem occurs
again, contact an Authorised Service Centre.
For alarm codes not described in the table, contact
an Authorised Service Centre.
WARNING! We do not recommend
using the appliance until the problem
has been completely fixed. Unplug the
appliance and do not plug it in again
until you are certain that it operates
correctly.
THE PRODUCT NUMBER CODE (PNC)
If you contact an Authorised Service Centre, you
need to provide the product number code of your
appliance.
The PNC can be found on the rating plate on the
appliance door. You can also check the PNC on the
control panel.
Before checking the PNC, make sure the appliance
is in the programme selection.
1. Press and hold simultaneously Glass Care
and AUTO for about 3 seconds.
The display shows the PNC of your appliance.
2. To exit the PNC presentation, press and hold
simultaneously Glass Care and AUTO for
about 3 seconds.
The appliance returns to the programme selection.
20

THE WASHING AND DRYING RESULTS ARE NOT SATISFACTORY
Problem Possible cause and solution
Poor washing results. • Refer to "Daily use", "Hints and tips" and the basket load-
ing leaflet.
• Use more intensive washing programme.
• Activate the Extra Power option to improve the washing re-
sults of a selected programme.
• Clean spray arm jets and filter. Refer to "Care and Clean-
ing".
Poor drying results. • Tableware was left for too long inside the closed appliance.
Activate AirDry to set the automatic opening of the door and
to improve the drying performance.
• There is no rinse aid or the dosage of rinse aid is not suffi-
cient. Fill the rinse aid dispenser or set the level of rinse aid
to a higher level.
• The quality of the rinse aid can be the cause.
• We recommend to use rinse aid always, even in combination
with multi-tablets.
• Plastic items may need to be towel dried.
• The programme does not have the drying phase. Refer to
"Programmes overview".
There are whitish streaks or blu-
ish layers on glasses and dishes.
• The released quantity of rinse aid is too high. Adjust the rinse
aid level to a lower level.
• The quantity of detergent is too high.
There are stains and dry water
drops on glasses and dishes.
• The released quantity of rinse aid is not sufficient. Adjust the
rinse aid level to a higher level.
• The quality of the rinse aid can be the cause.
The interior of the appliance is
wet.
• This is not a defect of the appliance. Humid air condensates
on the appliance walls.
Unusual foam during washing. • Use the detergent designed specifically for dishwashers.
• There is a leak in the rinse aid dispenser. Contact an Author-
ised Service Centre.
Traces of rust on cutlery. • There is too much salt in the water used for washing. Refer to
"The water softener".
• Silver and stainless steel cutlery were placed together. Do
not put silver and stainless steel items close together.
There are residues of detergent
in the dispenser at the end of the
programme.
• The detergent tablet was stuck in the dispenser and therefore
was not completely washed away by water.
• Water cannot wash away the detergent from the dispenser.
Make sure that the spray arms are not blocked or clogged.
• Make sure that items in the baskets do not impede the lid of
the detergent dispenser from opening.
Odours inside the appliance. • Refer to "Internal cleaning".
• Start the Machine Care programme with a descaler or a
cleaning product designed for dishwashers.
21

Problem Possible cause and solution
Limescale deposits on the table-
ware, on the tub and on the in-
side of the door.
• The level of salt is low, check the refill indicator.
• The cap of the salt container is loose.
• Your tap water is hard. Refer to "The water softener".
• Use salt and set regeneration of the water softener even
when multi-functional tablets are used. Refer to "The water
softener".
• Start the Machine Care programme with a descaler designed
for dishwashers.
• If limescale deposits still remain, clean the appliance with ap-
pliance cleaners which are particularly suitable for this pur-
pose.
• Try a different detergent.
• Contact the detergent manufacturer.
Dull, discoloured or chipped ta-
bleware.
• Make sure that only dishwasher-safe items are washed in the
appliance.
• Load and unload the basket carefully. Refer to the basket
loading leaflet.
• Place delicate items in the upper basket.
• Activate the Glass Care option to ensure special care for
glassware and delicate items.
Refer to "Before first use", "Daily
use", or "Hints and tips" for other
possible causes.
TECHNICAL INFORMATION
Dimensions Width / height / depth (mm) 596 / 818 - 898 / 550
Electrical connection
1) Voltage (V) 220 - 240
Frequency (Hz) 50
Water supply pressure Min. / max. bar (MPa) 0.5 (0.05) / 8 (0.8)
Water supply
Cold water or hot water
2) max 60 °C
Capacity Place settings 13
Power consumption Left-on mode (W) 5.0
Off-mode (W) 0.50
1) Refer to the rating plate for other values.
2) If the hot water comes from alternative source of energy (e.g. solar panels), use the hot water supply to
decrease energy consumption.
LINK TO THE EU EPREL DATABASE
The QR code on the energy label supplied with the
appliance provides a web link to the registration of
this appliance in the EU EPREL database. Keep
the energy label for reference together with the
user manual and all other documents provided with
this appliance.
It is possible to find information related to the
performance of the product in the EU EPREL
database using the link https://eprel.ec.europa.eu
22

and the model name and product number that you
can find on the rating plate of the appliance. Refer
to the chapter "Product description".
For more detailed information about the energy
label, visit www.theenergylabel.eu.
ENVIRONMENTAL CONCERNS
Recycle materials with the symbol . Put the
packaging in relevant containers to recycle it. Help
protect the environment and human health by
recycling waste of electrical and electronic
appliances. Do not dispose of appliances marked
with the symbol with the household waste.
Return the product to your local recycling facility or
contact your municipal office.
23

VISITE NUESTRO SITIO WEB PARA:
Obtener consejos, folletos, soluciones a problemas e información de servicio y reparación:
www.zanussi.com/support
INFORMACIÓN SOBRE SEGURIDAD
Antes de instalar y utilizar el aparato, lea atentamente las
instrucciones facilitadas. El fabricante no se hace responsable de
lesiones o daños producidos como resultado de una instalación o
un uso incorrectos. Conserve siempre estas instrucciones en
lugar seguro y accesible para futuras consultas.
SEGURIDAD DE NIÑOS Y PERSONAS
VULNERABLES
• Este aparato puede ser utilizado por niños de 8 años en
adelante y personas cuyas capacidades físicas, sensoriales o
mentales estén disminuidas o que carezcan de la experiencia y
conocimientos suficientes para manejarlo, siempre que cuenten
con las instrucciones o la supervisión sobre el uso del
electrodoméstico de forma segura y comprendan los riesgos.
• Es necesario mantener alejados del aparato a los niños entre 3
y 8 años, así como a las personas con minusvalías importantes
y complejas, salvo que estén bajo supervisión continua.
• Es necesario mantener alejados del aparato a los niños de
menos de 3 años salvo que estén bajo supervisión continua.
• No deje que los niños jueguen con el aparato.
• Mantenga los detergentes fuera del alcance de los niños.
• Mantenga a los niños y mascotas alejados del aparato cuando
la puerta se encuentre abierta.
• La limpieza y mantenimiento de usuario del aparato no podrán
ser realizados por niños sin supervisión.
SEGURIDAD GENERAL
• Este aparato está concebido para utilizarse en aplicaciones
domésticas y similares, tales como:
– granjas; áreas de cocina para el personal en tiendas, oficinas
y otros entornos de trabajo;
24

– por clientes en hoteles, moteles, pensiones y otros entornos
de tipo residencial.
• No cambie las especificaciones de este aparato.
• La presión de agua de funcionamiento (mínima y máxima) debe
estar entre 0.5 (0.05) / 8 (0.8) bares (MPa)
• Siga el máximo número de ajustes de 13 cubiertos.
• Si el cable eléctrico sufre algún daño, el fabricante, su servicio
técnico autorizado o un profesional cualificado tendrán que
cambiarlo para evitar riesgos.
• Coloque los cubiertos en el cesto para cubiertos con el filo
hacia abajo o colóquelos en la bandeja de cubiertos en
posición horizontal con el filo hacia abajo.
• No deje el aparato con la puerta abierta para evitar tropezar
accidentalmente con ella.
• Antes de proceder con cualquier operación de mantenimiento,
apague el aparato y desconecte el enchufe de la red.
• No utilice pulverizadores de agua a alta presión ni vapor para
limpiar el aparato.
• Si el aparato tiene orificios de ventilación en la base, no deben
cubrirse, por ejemplo con una alfombra.
• El aparato debe conectarse a la toma de agua utilizando los
nuevos juegos de tubos suministrados. No se deben reutilizar
los juegos de tubos antiguos.
INSTRUCCIONES DE SEGURIDAD
INSTALACIÓN
ADVERTENCIA! Sólo un técnico
cualificado puede instalar el aparato.
• Retire todo el embalaje.
• No instale ni utilice un aparato dañado.
• No utilice el aparato antes de instalarlo en la
estructura empotrada por motivos de seguridad.
• Siga las instrucciones de instalación
suministradas con el aparato.
• Tenga cuidado al mover el aparato, porque es
pesado. Utilice siempre guantes de protección y
calzado cerrado.
• No instale ni utilice el aparato en lugares con
temperaturas inferiores a 0 ºC.
• Instale el aparato en un lugar seguro y
adecuado que cumpla los requisitos de
instalación.
www.youtube.com/electrolux
www.youtube.com/aeg
How to install your 60 cm
Dishwasher Sliding Hinge
CONEXIÓN ELÉCTRICA
ADVERTENCIA! Riesgo de incendios
y descargas eléctricas.
• El aparato debe conectarse a tierra.
25

• Asegúrese de que los parámetros de la placa
de características son compatibles con los
valores eléctricos del suministro eléctrico.
• Utilice siempre una toma con aislamiento de
conexión a tierra correctamente instalada.
• No utilice adaptadores de enchufes múltiples ni
cables prolongadores.
• Asegúrese de no provocar daños en el enchufe
ni en el cable de red. Si es necesario cambiar el
cable de alimentación del aparato, debe hacerlo
el centro de servicio técnico autorizado.
• Conecte el enchufe a la toma de corriente
únicamente cuando haya terminado la
instalación. Asegúrese de tener acceso al
enchufe del suministro de red una vez finalizada
la instalación.
• No desconecte el aparato tirando del cable de
conexión a la red. Tire siempre del enchufe.
• Este aparato se suministra con un enchufe de
13 A. Si fuera necesario cambiar el fusible del
enchufe, use exclusivamente un fusible ASTA
(BS 1362) de 13 A (solo para RU e Irlanda).
CONEXIÓN DE AGUA
• No provoque daños en los tubos de agua.
• Antes de conectar a nuevas tuberías o tuberías
que no se hayan usado durante mucho tiempo,
o donde se hayan realizado trabajos o se hayan
conectado dispositivos nuevos (contadores de
agua, por ejemplo), deje correr el agua hasta
que esté limpia.
• Asegúrese de que no haya fugas de agua
visibles durante y después del primer uso del
aparato.
• La manguera de entrada de agua tiene una
válvula de seguridad y un revestimiento con un
cable interno de conexión a la red.
ADVERTENCIA! Voltaje peligroso.
• Si la manguera de entrada de agua está
dañada, cierre la llave de agua y quite
inmediatamente el enchufe de la toma de
corriente. Póngase en contacto con el centro
servicio técnico autorizado para cambiar la
manguera de entrada de agua.
USO DEL APARATO
• No coloque productos inflamables ni objetos
mojados con productos inflamables dentro,
cerca o encima del aparato.
• Los detergentes para lavavajillas son peligrosos.
Siga las instrucciones de seguridad del envase
de detergente.
• No beba agua procedente del aparato ni juegue
con ella.
• No retire la vajilla del aparato hasta que finalice
el programa. Puede quedar algo de detergente
en los platos.
• No guarde los artículos ni ejerza presión sobre
la puerta abierta del aparato.
• El aparato puede liberar vapor caliente si abre la
puerta durante un programa.
ASISTENCIA
• Para reparar el aparato, póngase en contacto
con el centro de servicio autorizado. Utilice
solamente piezas de recambio originales.
• Tenga en cuenta que la autorreparación o la
reparación no profesional puede tener
consecuencias de seguridad y podría anular la
garantía.
• Las siguientes piezas de repuesto estarán
disponibles durante 7 años después de que el
modelo se haya retirado: motor, bomba de
circulación y desagüe, calentadores y
elementos de calentamiento, incluidas las
bombas de calor, tuberías y equipos
relacionados, incluidas las mangueras, válvulas,
filtros y aquastops, piezas estructurales e
interiores relacionadas con los conjuntos de
puertas, placas de circuitos impresos, pantallas
electrónicas, presostatos, termostatos y
sensores, software y firmware, incluido el
software de restablecimiento. Tenga en cuenta
que algunas de estas piezas de recambio solo
están disponibles para los reparadores
profesionales, y que no todas las piezas de
recambio son relevantes para todos los
modelos.
• Las siguientes piezas de repuesto estarán
disponibles durante 10 años después de que el
modelo se haya retirado: bisagras y juntas de
puertas, otras juntas, brazos aspersores, filtros
de desagüe, rejillas interiores y periféricos de
plástico como cestas y tapas.
DESECHO
ADVERTENCIA! Existe riesgo de
lesiones o asfixia.
• Desconecte el aparato de la red.
• Corte el cable de conexión a la red y deséchelo.
26

• Retire el pestillo de la puerta para evitar que los
niños y las mascotas queden encerrados en el
aparato.
DESCRIPCIÓN DEL PRODUCTO
Los siguientes gráficos son sólo una
descripción general del producto. Para
obtener información más detallada,
consulte otros capítulos y/o
documentos suministrados con el
aparato.
4
3
7
9
8
10
56
11
1
2
1
Brazo aspersor intermedio
2
Brazo aspersor inferior
3
Filtros
4
Placa de características
5
Depósito de sal
6
Salida de aire
7
Dosificador de abrillantador
8
Tapa del dosificador de
9
Cesto para cubiertos
10
Cesto inferior
11
Cesto superior
BEAM-ON-FLOOR
Beam-on-Floor es una luz que aparece en el suelo
bajo la puerta del aparato.
• Cuando empieza el programa, la luz roja se
enciende y permanece encendida la duración
del programa.
• Cuando termina el programa, se enciende una
luz verde.
• Cuando el aparato presenta una avería, la luz
roja parpadea.
Beam-on-Floor desaparece cuando se
desactiva el aparato.
27

Cuando AirDry está activado durante
la fase de secado, es posible que la
proyección en el suelo no esté visible
completamente. Para ver si el ciclo ha
terminado, consulte el panel de
control.
PANEL DE CONTROL
1 2 3 4 5 6
1
Botón de encendido/apagado / Botón de
reinicio
2
Botón de inicio diferido
3
Pantalla
4
Botones de programa
5
Teclas de opciones
6
Botón de programa AUTO
PANTALLA
A AB
A. Indicadores
B. Indicador de tiempo
INDICADORES
Indicador Descripción
Indicador de abrillantador. Se enciende cuando hay que rellenar el dosificador de
abrillantador. Consulte "Antes del primer uso".
Indicador de sal. Se enciende cuando hay que rellenar el depósito de sal. Consulte
"Antes del primer uso".
Indicador Machine Care. Se enciende cuando el aparato necesita una limpieza in-
terna con el programa Machine Care. Consulte "Mantenimiento y limpieza".
28

Indicador Descripción
Indicador de la fase de secado. Se activa cuando se selecciona un programa con la
fase de secado. Parpadea durante la fase de secado. Consulte "Selección de
programas".
SELECCIÓN DE PROGRAMAS
PROGRAMAS
CA B D E
A. • 30 min es el programa más corto adecuado
para lavar una carga con suciedad fresca y
ligera.
• Preaclarado es un programa para enjuagar
los restos de comida de los platos. Evita la
formación de olores en el aparato. No
utilice detergente con este programa.
B. 60 min es un programa más adecuado para
lavar una carga con suciedad fresca y ligera.
C. 90 min es un programa adecuado para lavar y
secar los artículos con suciedad normal.
D. 160 min es un programa adecuado para lavar y
secar los artículos muy sucios.
E. ECO es el programa más largo que ofrece el
uso más eficaz del agua y consumo de energía
para vajillas y cubiertos con suciedad normal.
Este es el programa estándar para institutos de
pruebas.
1)
OPCIONES
Puede ajustar la selección de programas a sus
necesidades activando opciones.
Extra Power
Esta opción mejora los resultados de lavado del
programa seleccionado. Aumenta la temperatura y
la duración del lavado.
Glass Care
Esta opción proporciona un cuidado especial para
una carga delicada. Evita cambios rápidos en la
temperatura de lavado del programa seleccionado
y la reduce a 45 °C. Esto protege a la cristalería en
particular de los daños.
AUTO
Este programa ajusta automáticamente el ciclo de
lavado al tipo de carga.
El aparato detecta el tipo de suciedad y la cantidad
de platos que hay en los cestos. Ajusta la
temperatura y la cantidad del agua además de la
duración del programa.
RESUMEN DE LOS PROGRAMAS
Programa Tipo de carga
Grado de sucie-
dad
Fases del programa Opciones
30 min • Vajilla
• Cubiertos
• Fresco • Lavado a 50 °C
• Aclarado intermedio
• Aclarado final a
45 °C
• AirDry
• Extra Power
• Glass Care
1) Este programa se utiliza para evaluar el cumplimiento del Reglamento de la Comisión sobre ecodiseño
(UE) 2019/2022.
29

Programa Tipo de carga
Grado de sucie-
dad
Fases del programa Opciones
Preaclara-
do
• Todo tipo
de cargas
• Todos los
grados de
suciedad
• Prelavado Las opciones no se
aplican a este pro-
grama.
60 min • Vajilla
• Cubiertos
• Fresco
• Ligeramen-
te seco
• Lavado a 60 °C
• Aclarado intermedio
• Aclarado final a
50 °C
• AirDry
• Extra Power
• Glass Care
90 min • Vajilla
• Cubiertos
• Ollas
• Sartenes
• Normal
• Ligeramen-
te seco
• Lavado a 60 °C
• Aclarado intermedio
• Aclarado final a
55 °C
• Desecar
• AirDry
• Extra Power
• Glass Care
160 min • Vajilla
• Cubiertos
• Ollas
• Sartenes
• De normal
a intensa
• Seco
• Prelavado
• Lavado a 60 °C
• Aclarado intermedio
• Aclarado final a
60 °C
• Desecar
• AirDry
• Extra Power
• Glass Care
ECO • Vajilla
• Cubiertos
• Ollas
• Sartenes
• Normal
• Ligeramen-
te seco
• Prelavado
• Lavado a 50 °C
• Aclarado intermedio
• Aclarado final a
60 °C
• Desecar
• AirDry
• Extra Power
• Glass Care
AUTO • Vajilla
• Cubiertos
• Ollas
• Sartenes
El programa
se ajusta a to-
dos los niveles
de suciedad.
• Prelavado
• Lavado a 50 - 60 °C
• Aclarado intermedio
• Aclarado final a
55 °C
• Desecar
• AirDry
Las opciones no se
aplican a este pro-
grama.
Machine
Care
• Sin carga El programa
limpia el inte-
rior del apara-
to.
Consulte
"Manteni-
miento y lim-
pieza".
• Lavado a 65 °C
• Aclarado intermedio
• Aclarado final
• AirDry
Las opciones no se
aplican a este pro-
grama.
30

Valores de consumo
Programa
1)
Agua (l) Energía (kWh) Duración (min)
30 min 9.4 -11.4 0.57 - 0.69 30
Preaclarado 3.7 - 4.5 0.02 - 0.05 15
60 min 9.3 - 11.4 0.82 - 0.94 60
90 min 9.1 - 11.1 1.01 - 1.13 90
160 min 9.2 - 11.2 0.96 - 1.08 160
ECO 9.9
0.821
2)
/0.835
3) 240
AUTO 8.2 - 11.2 0.67 - 1.08 120 - 170
Machine Care 8.4 - 10.2 0.60 - 0.71 60
1) La presión y temperatura del agua, las variaciones del suministro de energía, las opciones y la cantidad
de platos pueden alterar los valores.
2) De acuerdo con el reglamento 1016/2010
3) De acuerdo con el reglamento 2019/2022
Información para los institutos de pruebas
Para recibir toda la información necesaria para
efectuar pruebas de rendimiento (p.ej., según
EN60436), envíe un correo electrónico a:
En su solicitud, incluya el código de número de
producto (PNC) que se encuentra en la placa de
características.
Para cualquier otra pregunta relacionada con su
lavavajillas, consulte el manual de servicio
suministrado con el aparato.
AJUSTES BÁSICOS
Puede configurar el dispositivo cambiando la
configuración básica de acuerdo con sus
necesidades.
Número Ajustes Valores
Descripción
1)
1 Dureza agua Del nivel 1L al
nivel 10L
Ajustar el nivel del descalcificador de agua se-
gún la dureza del agua de su zona.
Ajuste de fábrica: 5L.
2 Notificación del
abrillantador
1d (activar)
0d (desactivar)
Activar o desactivar la notificación del abrillan-
tador.
Ajuste de fábrica: 1d.
3 Sonido de fin 1b (activar)
0b (desactivar)
Activar o desactivar la señal acústica de fin de
programa.
Ajuste de fábrica: 0b.
31

Número Ajustes Valores
Descripción
1)
4 Apertura auto-
mática de la
puerta
1o (activar)
0o (desactivar)
Activar o desactivar AirDry.
Ajuste de fábrica: 1o.
5 Tonos de boto-
nes
1F (activar)
0F (desactivar)
Activar o desactivar el sonido de los botones
cuando se pulsan.
Ajuste de fábrica: 1F.
6 Última selección
de programa
1H (activar)
0H (desactivar)
Activar o desactivar la selección automática del
programa y las opciones utilizadas más recien-
temente.
Ajuste de fábrica: 0H.
1) Para más detalles, consulte la información proporcionada en este capítulo.
Puede cambiar los ajustes básicos en el modo de
ajuste. Las instrucciones sobre cómo configurar el
aparato se encuentran más adelante en este
capítulo.
Cuando el aparato está en modo de ajuste, la
pantalla muestra un dígito y una letra. Para cada
ajuste, se muestra una letra dedicada. Las letras
dedicadas se indican en la tabla.
El orden de los ajustes básicos presentados en la
tabla es también el de los ajustes del modo de
ajuste.
DESCALCIFICADOR DE AGUA
El descalcificador elimina minerales del suministro
de agua que podrían afectar negativamente al
resultado de lavado y al funcionamiento del
aparato.
Cuanto mayor sea el contenido de dichos
minerales, más dura será el agua. La dureza del
agua se mide en escalas equivalentes.
El descalcificador de agua debe ajustarse en
función de la dureza que presente el agua de su
zona. La empresa local de suministro de agua
puede indicarle el grado de dureza de la misma. Es
muy importante ajustar el nivel de descalcificador
para obtener un buen resultado de lavado.
Dureza agua
Grados alemanes
(°dH)
Grados franceses
(°fH)
mmol/l Grados Clarke
Nivel del descalcifica-
dor del agua
47 - 50 84 - 90 8.4 - 9.0 58 - 63 10
43 - 46 76 - 83 7.6 - 8.3 53 - 57 9
37 - 42 65 - 75 6.5 - 7.5 46 - 52 8
29 - 36 51 - 64 5.1 - 6.4 36 - 45 7
23 - 28 40 - 50 4.0 - 5.0 28 - 35 6
19 - 22 33 - 39 3.3 - 3.9 23 - 27
5
1)
15 - 18 26 - 32 2.6 - 3.2 18 - 22 4
11 - 14 19 - 25 1.9 - 2.5 13 - 17 3
4 - 10 7 - 18 0.7 - 1.8 5 - 12 2
32

Grados alemanes
(°dH)
Grados franceses
(°fH)
mmol/l Grados Clarke
Nivel del descalcifica-
dor del agua
<4 <7 <0.7 < 5
1
2)
1) Ajuste de fábrica.
2) No utilice sal en este nivel.
Independientemente del tipo de detergente
que utilice, ajuste el nivel de dureza de agua
adecuado para mantener activo el indicador
de rellenado de sal.
Las tabletas múltiples que contienen
sal no son suficientemente efectivas
para ablandar el agua dura.
Proceso de regeneración
Para el correcto funcionamiento del descalcificador
de agua, la resina del dispositivo debe regenerarse
regularmente. Este proceso es automático y forma
parte del funcionamiento normal del lavavajillas.
Cuando la cantidad de agua prescrita (véanse los
valores del cuadro) se ha utilizado desde el
proceso de regeneración anterior, se iniciará un
nuevo proceso de regeneración entre el aclarado
final y el final del programa.
Nivel del descalcifica-
dor del agua
Cantidad de agua (l)
1 250
2 100
3 62
4 47
5 25
6 17
7 10
8 5
9 3
10 3
En el caso del ajuste alto del descalcificador de
agua, puede ocurrir también en la mitad del
programa, antes del enjuague (dos veces durante
un programa). El inicio de la regeneración no tiene
ningún impacto en la duración del ciclo, a menos
que ocurra a mitad de un programa o al final de un
programa con una breve fase de secado. En ese
caso, la regeneración prolonga la duración total de
un programa en 5 minutos adicionales.
Posteriormente, el enjuague del descalcificador de
agua que dura 5 minutos puede comenzar en el
mismo ciclo o al principio del siguiente programa.
Esta actividad aumenta el consumo total de agua
de un programa en 4 litros adicionales y el
consumo total de energía de un programa en 2 Wh
adicionales. El aclarado del descalcificador termina
con un drenaje completo.
Cada aclarado del descalcificador realizado (es
posible que haya más de uno en el mismo ciclo)
puede prolongar la duración del programa en otros
5 minutos cuando se produzca en cualquier punto
del comienzo o en la mitad de un programa.
Todos los valores de consumo
mencionados en esta sección se
determinan de conformidad con la
norma actualmente aplicable en
condiciones de laboratorio con una
dureza del agua de 2,5 mmol/l según
la normativa 2019/2022
(descalcificador de agua: nivel 3).
La presión y la temperatura del agua,
así como las variaciones de la red de
suministro pueden cambiar los valores.
LA NOTIFICACIÓN DE ABRILLANTADOR
VACÍO
El abrillantador permite que la vajilla se seque sin
rayas ni franjas. Se libera automáticamente durante
la fase de aclarado con agua caliente.
Cuando el depósito de abrillantador está vacío, el
indicador se enciende para solicitar que se rellene.
Si el resultado de secado es satisfactorio usando
solo tabletas múltiples, puede desactivar el aviso
para rellenar el abrillantador. Sin embargo, para
obtener el mejor secado, utilice siempre
abrillantador.
Si utiliza detergente normal o tabletas múltiples sin
abrillantador, active la notificación para mantener
activo el indicador de rellenado de abrillantador.
33

SONIDO DE FIN
Puede activar una señal acústica que suena al
finalizar el programa.
Las señales acústicas suenan también
cuando se produce un fallo del
aparato. No es posible desactivar
estas señales.
AIRDRY
AirDry mejora el resultado de secado. La puerta del
aparato se abre automáticamente durante la fase
de secado y permanece entreabierta.
AirDry se activa automáticamente con todos los
programas excepto Preaclarado.
PRECAUCIÓN! No intente cerrar la
puerta del aparato durante 2 minutos
después de la apertura automática. El
aparato podría dañarse.
PRECAUCIÓN! Si los niños tienen
acceso al aparato, se aconseja
desactivar AirDry. La apertura
automática de la puerta puede
suponer un peligro.
Cuando AirDry abre la puerta, Beam-
on-Floor puede no ser totalmente
visible. Para ver si el programa ha
terminado, consulte el panel de
mandos.
TONOS DE BOTONES
Los botones del panel de mandos emiten un sonido
clic al presionarlos. Puede desactivar este sonido.
ÚLTIMA SELECCIÓN DE PROGRAMA
Puede activar la selección automática del programa
y las opciones utilizadas más recientemente.
El último programa que se completó antes de la
desactivación del aparato se guarda. A
continuación, se selecciona automáticamente
después de activar el aparato.
Cuando la última selección de programa está
desactivada, el programa por defecto es ECO.
MODALIDAD DE AJUSTE
Cómo acceder al modo de ajuste
Puede entrar en el modo de ajuste antes de iniciar
un programa. No puede entrar en el modo de ajuste
mientras se realiza un programa.
Para acceder al modo de ajuste, pulse y mantenga
pulsado 30 min y ECO unos 3 segundos.
• Las luces relacionadas con 60 min, 90
min y 160 min están encendidas.
• La pantalla muestra el valor actual del
primer ajuste disponible.
Cómo navegar en el modo de ajuste
Puede navegar por el modo de configuración
utilizando los botones de programa.
CA B
A. Botón Anterior
B. Botón ACEPTAR
C. Botón Siguiente
Utilice Anterior y Siguiente para cambiar entre
los ajustes básicos y para modificar su valor.
Utilice ACEPTAR para introducir el ajuste
seleccionado y confirmar el cambio de valor.
Cómo cambiar un ajuste
Asegúrese de que el aparato se encuentra en
modo de ajuste.
1. Utilice Anterior o Siguiente para seleccionar
el ajuste deseado.
La pantalla muestra el valor de ajuste actual (un
dígito y la letra correspondiente).
2. Pulse ACEPTAR para introducir el ajuste.
El valor de ajuste actual parpadea.
3. Pulse Anterior o Siguiente para cambiar el
valor.
4. Pulse ACEPTAR para confirmar el ajuste.
• El nuevo ajuste se guarda.
34

• El aparato vuelve a la lista de ajustes
básica.
5. Mantenga pulsados simultáneamente 30 min y
ECO durante al menos 3 segundos para salir
del modo.
El aparato vuelve a la selección de programa.
Los ajustes guardados son válidos hasta que los
vuelva a cambiar.
ANTES DEL PRIMER USO
1. Asegúrese de que el nivel actual del
descalcificador coincide con la dureza de
su suministro de agua. De lo contrario,
ajuste el nivel del descalcificador de
agua.
2. Llene el depósito de sal.
3. Llene el dosificador de abrillantador.
4. Abra la llave de paso.
5. Inicie el programa 30 min para eliminar los
residuos del proceso de fabricación. No utilice
detergente ni cargue platos en los cestos.
Después de iniciar el programa, el aparato recarga
la resina del descalcificador durante hasta 5
minutos. La fase de lavado empieza solo después
de que termine este proceso. El proceso se repite
periódicamente.
EL DEPÓSITO DE SAL
PRECAUCIÓN! Utilice solo sal
gruesa diseñada para lavavajillas. La
sal fina aumenta el riesgo de
corrosión.
La sal se utiliza para recargar la resina del
descalcificador y asegurar un buen resultado de
lavado en el uso diario.
Llenado del depósito de sal
1. Gire la tapa del depósito de sal hacia la
izquierda y retírela.
2. Vierta 1 litro de agua en el depósito de sal
(solo la primera vez).
3. Llene el depósito de sal con 1 kg de sal (hasta
que esté lleno).
4. Agite cuidadosamente el embudo por el asa
para hacer que entren los últimos granos.
5. Elimine los restos de sal que puedan haber
quedado en la entrada del depósito.
6. Gire la tapa del depósito de sal hacia la
derecha para cerrar el depósito de sal.
PRECAUCIÓN! El agua y la sal
pueden salirse del depósito de sal
cuando lo llena. Después de llenar el
depósito de sal, inicie inmediatamente
un programa para evitar la corrosión.
CÓMO LLENAR EL DOSIFICADOR DE
ABRILLANTADOR
M
A
X
1
2
3
4
+
-
A B
D
C
PRECAUCIÓN! Utilice
exclusivamente abrillantador diseñado
específicamente para lavavajillas.
1. Pulse la tecla de apertura (D) para abrir la tapa
(C).
2. Vierta el abrillantador en el dosificador (A)
hasta que el líquido alcance el nivel 'max'.
3. Limpie las salpicaduras de abrillantador con un
paño absorbente para evitar que se forme
demasiada espuma.
35

4. Cierre la tapa. Asegúrese de que la tecla de
apertura se encaja en su sitio.
Puede girar el selector de la cantidad
(B) entre la posición 1 (menor
cantidad) y la posición 4 o 6 (mayor
cantidad).
USO DIARIO
1. Abra la llave de paso.
2. Pulse y mantenga pulsado hasta que se
active el aparato.
3. Llene el depósito de sal si está vacío.
4. Llene el dosificador de abrillantador si está
vacío.
5. Cargue los cestos.
6. Añada el detergente.
7. Seleccione e inicie un programa.
8. Cierre la llave del agua cuando termine el
programa.
USO DEL DETERGENTE
B
C
A
1. Pulse la tecla de apertura (B) para abrir la tapa
(C).
2. Coloque el detergente en polvo o pastilla en el
compartimento (A).
3. Si el programa tiene una fase de prelavado,
inserte una pequeña cantidad de detergente en
la parte interior de la puerta del aparato.
4. Cierre la tapa. Asegúrese de que la tecla de
apertura se encaja en su sitio.
CÓMO SELECCIONAR E INICIAR UN
PROGRAMA
1. Pulse el botón del programa que desee ajustar.
• La luz correspondiente al botón está
encendida.
• En la pantalla se muestra la duración del
programa.
2. Seleccione las opciones aplicables que desee.
3. Cierre la puerta del aparato para iniciar el
programa.
CÓMO SELECCIONAR E INICIAR EL
PROGRAMA PREACLARADO
1. Para seleccionar Preaclarado, pulse y
mantenga pulsado 30 min 3 segundos.
• La luz correspondiente al botón está
encendida.
• En la pantalla se muestra la duración del
programa.
Las opciones no se aplican a este
programa.
2. Cierre la puerta del aparato para iniciar el
programa.
CÓMO ACTIVAR LAS OPCIONES
1. Seleccione un programa.
2. Pulse el botón correspondiente a la opción que
desea activar.
• La luz correspondiente al botón está
encendida.
• La pantalla muestra la duración del
programa actualizada.
De forma predeterminada, cada vez
que inicie un programa debe activar
las opciones.
Si la última selección de programa
está activada, las opciones guardadas
se activan automáticamente junto con
el programa.
No es posible activar ni desactivar
opciones con el programa en marcha.
No todas las opciones son
compatibles entre sí.
La activación de opciones suele
afectar al consumo de agua y energía
y a la duración del programa.
CÓMO SELECCIONAR E INICIAR EL
PROGRAMA AUTO
1. Pulse AUTO.
36

• La luz correspondiente al botón está
encendida.
• En la pantalla se muestra la duración del
programa.
Las opciones no se aplican a este
programa.
2. Cierre la puerta del aparato para iniciar el
programa.
El aparato detecta el tipo de carga y ajusta un ciclo
de lavado adecuado. Durante el ciclo, los sensores
funcionan varias veces y la duración del programa
inicial puede disminuir.
CÓMO RETRASAR EL INICIO DE UN
PROGRAMA
1. Seleccione un programa.
2. Pulse repetidamente hasta que la pantalla
muestre el tiempo de retardo que desee (entre
1 y 24 horas).
La luz correspondiente al botón está encendida.
3. Cierre la puerta del aparato para iniciar la
cuenta atrás.
Durante la cuenta atrás, no es posible cambiar el
retardo ni la selección de programa.
El programa se pone en marcha cuando termina la
cuenta atrás.
CANCELACIÓN DEL INICIO DIFERIDO
MIENTRAS ESTÁ EN CURSO LA CUENTA
ATRÁS
Pulse y mantenga pulsado durante 3 segundos.
El aparato vuelve a la selección de programa.
Si cancela el inicio diferido, debe
volver a seleccionar el programa.
CÓMO CANCELAR UN PROGRAMA EN
MARCHA
Pulse y mantenga pulsado durante 3 segundos.
El aparato vuelve a la selección de programa.
Compruebe que hay detergente en el
dosificador antes de iniciar un nuevo
programa.
APERTURA DE LA PUERTA MIENTRAS ESTÁ
FUNCIONANDO EL APARATO
Si abre la puerta mientras se realiza un programa,
el aparato se detiene. Puede afectar al consumo de
energía y a la duración del programa. Cuando
cierre la puerta, el aparato continuará a partir del
punto de interrupción.
Si la puerta se abre más de 30
segundos durante la fase de secado,
el programa en funcionamiento se
termina. Esto no sucede si la puerta se
abre mediante la función AirDry.
LA FUNCIÓN AUTO OFF
Esta función ahorra energía al apagar el aparato
cuando no está en funcionamiento.
La función se pone en marcha automáticamente:
• Cuando el programa ha finalizado.
• Tras 5 minutos si el programa no se ha iniciado.
FIN DEL PROGRAMA
Cuando haya finalizado el programa de lavado, la
pantalla mostrará 0:00.
La función Auto Off apaga el aparato
automáticamente.
Se apagan todos los botones salvo el de
encendido / apagado.
CONSEJOS
GENERAL
Siga estos consejos para obtener un resultado de
limpieza de secado óptimo en el uso diario y
proteger el medio ambiente.
• Lavar los platos en el lavavajillas como se indica
en el manual de instrucciones suele consumir
menos agua y energía que lavar los platos a
mano.
• Cargue el lavavajillas a su máxima capacidad
para ahorrar agua y energía. Para obtener los
mejores resultados de limpieza, coloque los
artículos en las cestas como se indica en el
manual de usuario y no sobrecargue los cestos.
• No enjuague los platos a mano. Aumenta el
consumo de agua y energía. Cuando sea
necesario, seleccione un programa con fase de
prelavado.
• Quite los residuos más grandes de comida de
los platos y vacíe las tazas y vasos antes de
ponerlos dentro del aparato.
37

• Remoje o frote ligeramente los utensilios de
cocina con restos de comida cocinada u
horneada pegada antes de lavarlos en el
aparato.
• Asegúrese de que los objetos de los cestos no
se tocan entre sí ni se cubren unos a otros. Solo
entonces el agua puede llegar a todos los
platos y lavarlos completamente.
• Puede utilizar detergente para lavavajillas,
abrillantador y sal por separado o pastillas
múltiples (p. ej. "Todo en 1"). Siga las
instrucciones que aparecen en el paquete.
• Seleccione un programa según el tipo de carga
y el grado de suelo. ECO ofrece el uso más
eficiente del consumo de agua y energía.
• Para prevenir la acumulación de cal dentro del
aparato:
– Rellene el depósito de sal siempre que sea
necesario.
– Use la dosis recomendada de detergente y
abrillantador.
– Asegúrese de que el nivel actual del
descalcificador coincide con la dureza de
su suministro de agua.
– Siga las instrucciones del capítulo
"Mantenimiento y limpieza".
UTILIZACIÓN DE SAL, ABRILLANTADOR Y
DETERGENTE
• Utilice únicamente sal, abrillantador y
detergente diseñados para lavavajillas. El
aparato podría dañarse con otros productos.
• En las zonas con agua dura y muy dura, se
recomienda usar solo detergente para
lavavajillas (polvo, gel, pastillas que no
contengan agentes adicionales), abrillantador y
sal por separado para unos resultados de
limpieza y secado óptimos.
• Las pastillas de detergente no se disuelven
completamente con programas cortos. Para
evitar restos de detergente en la vajilla, se
recomienda usar pastillas de detergente con los
programas largos.
• Utilice siempre la cantidad correcta de
detergente. Una dosis insuficiente de
detergente puede dar lugar a resultados de
limpieza deficientes y a películas o manchas de
agua dura en los artículos. El uso de demasiado
detergente con agua blanda o descalificada
produce residuos de detergente en los platos.
Ajuste la cantidad de detergente en función de
la dureza del agua. Consulte las instrucciones
del envase del detergente.
• Use siempre la cantidad correcta de
abrillantador. Una dosis insuficiente de
abrillantador disminuye los resultados del
secado. Usar demasiado abrillantador produce
capas azuladas.
• Asegúrese de que el nivel del descalcificador
de agua es correcto. Si el nivel es demasiado
alto, el aumento de la cantidad de sal en el agua
podría oxidar los cubiertos.
QUÉ HACER SI DESEA DEJAR DE USAR
PASTILLAS DE DETERGENTE
Antes de volver a utilizar por separado detergente,
sal y abrillantador, realice estos pasos:
1. Ajuste el nivel más alto del descalcificador.
2. Asegúrese de llenar el depósito de sal y el
dosificador de abrillantador.
3. Inicie el programa 30 min. No añada
detergente ni cargue platos en los cestos.
4. Cuando termine el programa, ajuste el
descalcificador según la dureza del agua de su
zona.
5. Ajuste la cantidad de abrillantador.
ANTES DEL INICIO DE UN PROGRAMA
Antes de iniciar el programa seleccionado,
asegúrese de que:
• Los filtros están limpios y bien instalados.
• La tapa del depósito de sal está apretada.
• Los brazos aspersores no están obstruidos.
• Hay abrillantador y sal suficientes (a menos que
utilice pastillas múltiples).
• La disposición de los objetos en los cestos es
correcta.
• El programa es adecuado para el tipo de carga
y el grado de suciedad.
• Se utiliza la cantidad correcta de detergente.
CARGA DE LOS CESTOS
• Aproveche siempre todo el espacio de los
cestos.
• Utilice el electrodoméstico exclusivamente para
lavar utensilios aptos para lavavajillas.
• No lave en el aparato artículos de madera,
cuerno, aluminio, peltre y cobre, ya que podrían
agrietarse, deformarse, decolorarse o picarse.
• No lave en el aparato objetos que puedan
absorber agua (esponjas, paños de limpieza,
etc.).
• Coloque los objetos huecos (por ejemplo, tazas,
vasos, cazuelas) con las aberturas boca abajo.
• Asegúrese de que los vasos no chocan entre sí.
• Coloque los objetos ligeros en el cesto
superior. Asegúrese de que los objetos no se
mueven.
• Coloque los cubiertos y los objetos pequeños
en el cesto de cubiertos.
• Antes de iniciar un programa, compruebe que
los brazos aspersores giran sin obstrucción.
38

DESCARGA DE LOS CESTOS
1. Deje enfriar la vajilla y cristalería antes de
retirarla del aparato Los artículos calientes son
sensibles a los golpes.
2. Vacíe primero el cesto inferior y a continuación
el superior.
Después de terminar el programa,
todavía puede quedar agua en las
superficies interiores del aparato.
MANTENIMIENTO Y LIMPIEZA
ADVERTENCIA! Antes de proceder
con cualquier mantenimiento que no
sea realizar el programa Machine
Care, apague el aparato y desconecte
el enchufe de la red.
Los filtros sucios y los brazos
aspersores obstruidos afectan
negativamente a la calidad del lavado.
Revise estos elementos
periódicamente y, si es necesario,
límpielos.
MACHINE CARE
Machine Care es un programa diseñado para
limpiar el interior del aparato con resultados
óptimos. Elimina la acumulación de cal y grasa.
Cuando el aparato detecta que es necesario
limpiarlo, se enciende el indicador . Inicie el
programa Machine Care para limpiar el interior del
aparato.
Cómo iniciar el programa Machine Care
Antes de iniciar el programa Machine
Care, limpie los filtros y brazos
aspersores.
1. Utilice un descalcificador o producto de
limpieza diseñado específicamente para
lavavajillas. Siga las instrucciones que
aparecen en el paquete. No introduzca platos
en los cestos.
2. Mantenga pulsados simultáneamente Extra
Power y AUTO durante unos 3 segundos.
Los indicadores y Extra Power parpadean. En la
pantalla se muestra la duración del programa.
3. Cierre la puerta del aparato para iniciar el
programa.
Cuando finaliza el programa, el indicador está
apagado.
LIMPIEZA DEL INTERIOR
• Limpie cuidadosamente el aparato, incluida la
junta de goma de la puerta, con un paño
húmedo.
• No utilice productos abrasivos, estropajos
abrasivos o duros, utensilios afilados, productos
químicos agresivos ni disolventes.
• Para mantener el funcionamiento óptimo del
aparato, utilice un producto específico de
limpieza para lavavajillas al menos cada dos
meses. Siga atentamente las instrucciones del
envase del producto.
• Para obtener unos resultados de limpieza
óptimos, inicie el programa Machine Care.
ELIMINACIÓN DE OBJETOS EXTRAÑOS
Revisa los filtros y el sumidero después de cada
uso del lavavajillas. Los objetos extraños (por
ejemplo, trozos de vidrio, plástico, huesos o palillos
de dientes, etc.) disminuyen el rendimiento de la
limpieza y pueden causar daños a la bomba de
desagüe.
1. Desmonte el sistema de filtros como se indica
en este capítulo.
2. Retire cualquier objeto extraño con la mano.
PRECAUCIÓN! Si no puede
retirar los objetos, póngase en
contacto con un Centro de
servicio técnico.
3. Vuelva a montar los filtros como se indica en
este capítulo.
LIMPIEZA DEL EXTERIOR
• Limpie el aparato con un paño suave
humedecido.
• Utilice solo detergentes neutros.
• No utilice productos abrasivos, estropajos duros
ni disolventes.
LIMPIEZA DE LOS FILTROS
El sistema de filtro está hecho de 3 piezas.
39

C
B
A
1. Gire el filtro (B) hacia la izquierda y extráigalo.
2. Extraiga el filtro (C) del filtro (B).
3. Retire el filtro plano (A).
4. Lave los filtros.
5.
Asegúrese de que no haya restos de comida ni
suciedad alrededor del borde del sumidero.
6. Vuelva a colocar el filtro plano (A). Asegúrese
de que esté bien colocado bajo las 2 guías.
7. Vuelva a montar los filtros (B) y (C).
8. Vuelva a colocar el filtro (B) en el filtro plano
(A). Gírelo hacia la derecha hasta que encaje.
PRECAUCIÓN! Una posición
incorrecta de los filtros puede dañar el
aparato y provocar resultados de
lavado no satisfactorios.
40

LIMPIEZA DEL BRAZO ASPERSOR
INFERIOR
Recomendamos limpiar periódicamente el brazo
aspersor inferior para que la suciedad no obstruya
los orificios.
Si los orificios están taponados, la calidad del
lavado puede deteriorarse.
1. Para quitar el brazo aspersor inferior, tire de él
hacia arriba.
2. Lávelo con agua corriente. Retire las partículas
de suciedad de los orificios mediante un objeto
afilado, como un palillo.
3. Para instalar el brazo aspersor inferior,
presiónelo hacia abajo.
SOLUCIÓN DE PROBLEMAS
ADVERTENCIA! Una reparación
inadecuada del aparato puede
suponer un riesgo para la seguridad
del usuario. Todas las reparaciones
debe llevarlas a cabo personal
cualificado.
La mayoría de los problemas que pueden
surgir se resuelven sin necesidad de ponerse
en contacto con el Centro de servicio
técnico.
Si tiene alguna duda, consulte la tabla siguiente.
Algunos fallos de funcionamiento se indican en la
pantalla con un código de alarma.
41

Problema y código de alarma Causa y soluciones posibles
No se puede encender el apa-
rato.
• Asegúrese de que el enchufe esté conectado a la toma de co-
rriente.
• Asegúrese de que no hay ningún fusible dañado en la caja de
fusibles.
El programa no se pone en
marcha.
• Asegúrese de que la puerta del aparato esté cerrada.
• Si se ha ajustado el inicio diferido, cancele el ajuste o espere
hasta el final de la cuenta atrás.
• El aparato recarga la resina dentro del descalcificador de agua.
La duración total del proceso es de aproximadamente 5 minu-
tos.
El aparato no carga agua.
La pantalla muestra i10 o i11.
• Compruebe que el grifo esté abierto.
• Asegúrese de que la presión del agua no sea demasiado baja.
Solicite información a la compañía local de suministro de agua.
• Compruebe que el grifo no esté obstruido.
• Asegúrese de que el filtro de la manguera de entrada no está
obstruido.
• Asegúrese de que la manguera de entrada no esté doblada ni
retorcida.
El aparato no desagua.
La pantalla muestra i20.
• Compruebe que el desagüe no esté obstruido.
• Compruebe que el filtro de desagüe no está obstruido.
• Asegúrese de que el tubo de desagüe no esté doblado ni re-
torcido.
El dispositivo contra inunda-
ción se ha puesto en marcha.
La pantalla muestra i30.
• Cierre la llave de paso.
• Asegúrese de que el aparato está instalado correctamente.
• Asegúrese de que los cestos se cargan según las instruccio-
nes del manual de usuario.
Fallo de funcionamiento del
sensor de detección del nivel
de agua.
La pantalla muestra i41 - i44.
• Asegúrese de que los filtros están limpios.
• Apague y encienda el aparato.
Fallo de funcionamiento de la
bomba de lavado o de la bom-
ba de desagüe.
La pantalla muestra i51 - i59 o
i5A - i5F.
• Apague y encienda el aparato.
La temperatura del agua den-
tro del aparato es demasiado
alta o se ha producido un fallo
de funcionamiento del sensor
de temperatura.
La pantalla muestra i61 o i69.
• Asegúrese de que la temperatura del agua de entrada no exce-
da los 60°C.
• Apague y encienda el aparato.
Fallo técnico del aparato.
La pantalla muestra iC0 o iC3.
• Apague y encienda el aparato.
42

Problema y código de alarma Causa y soluciones posibles
El nivel de agua dentro del
aparato es demasiado alto.
La pantalla muestra iF1.
• Apague y encienda el aparato.
• Asegúrese de que los filtros están limpios.
• Asegúrese de que la manguera de salida esté instalada a la al-
tura correcta sobre el suelo. Consulte las instrucciones de ins-
talación.
El aparato se detiene y se po-
ne en marcha más veces du-
rante el funcionamiento.
• Esto es correcto. Proporciona resultados de limpieza óptimos y
ahorra energía.
El programa dura demasiado. • Si se ha ajustado la opción de inicio diferido, cancele dicho
ajuste o espere hasta el final de la cuenta atrás.
• Activar opciones puede pueden aumentar la duración del pro-
grama.
En la pantalla aumenta el tiem-
po restante y llega casi hasta
el fin de la duración del pro-
grama.
• No se trata de un defecto. El aparato funciona correctamente.
Pequeña fuga en la puerta del
aparato.
• El aparato no está nivelado. Afloje o apriete las patas ajustables
(en su caso).
• La puerta del aparato no está centrada en la cuba. Ajuste la pa-
ta trasera (en su caso).
Cuesta cerrar la puerta del
aparato.
• El aparato no está nivelado. Afloje o apriete las patas ajustables
(en su caso).
• Hay partes de la vajilla que sobresalen de los cestos.
Sonidos de traqueteo o golpe-
teo dentro del aparato.
• La vajilla no está colocada correctamente en los cestos. Con-
sulte el folleto sobre carga del cesto.
• Asegúrese de que los brazos aspersores pueden rotar libre-
mente.
El aparato dispara el disyuntor. • No hay amperaje suficiente para todos los aparatos que están
en funcionamiento. Compruebe el amperaje de la caja de en-
chufe y la capacidad del medidor o apague alguno de los apa-
ratos que esté usando.
• Fallo eléctrico interno del aparato. Póngase en contacto con un
servicio técnico autorizado.
Una vez comprobado el aparato, desactive y
actívelo. Si el problema se vuelve a producir,
póngase en contacto con un Centro de servicio
técnico.
Para los códigos de alarma no descritos en la tabla,
póngase en contacto con un Centro de servicio
técnico.
ADVERTENCIA! No recomendamos
usar el aparato hasta que el problema
se haya solucionado por completo.
Desenchufe el aparato y no lo vuelva a
conectar hasta que esté seguro de
que funciona correctamente.
EL CÓDIGO DEL NÚMERO DE PRODUCTO
(PNC)
Si se pone en contacto con un centro de servicio
autorizado, debe proporcionar el código del
número de producto de su aparato.
El PNC está en la placa de características, en la
puerta del aparato. También puede consultar el
PNC en el panel de mandos.
Antes de consultar el PNC, asegúrese de que el
aparato está en modo de selección de programa.
1. Mantenga pulsados simultáneamente Glass
Care y AUTO durante unos 3 segundos.
La pantalla muestra el PNC de su aparato.
43

2. Para salir de la presentación del PNC,
mantenga pulsados simultáneamente Glass
Care y AUTO unos 3 segundos.
El aparato vuelve a la selección de programa.
LOS RESULTADOS DEL LAVADO Y EL SECADO NO SON SATISFACTORIOS
Problema Causa y soluciones posibles
Mal resultado de lavado. • Consulte "Uso diario", "Consejos" y el folleto sobre cómo
cargar el cesto.
• Utilice un programa de lavado más intenso.
• Active la opción Extra Power para mejorar el resultado de la-
vado del programa seleccionado.
• Limpie las boquillas del brazo aspersor y el filtro. Consulte
"Mantenimiento y limpieza".
Malos resultados de secado. • Se ha dejado la vajilla demasiado tiempo dentro del aparato
cerrado. Active AirDry para ajustar la apertura automática de
la puerta y mejorar el rendimiento de secado.
• No hay abrillantador o la dosificación del abrillantador es in-
suficiente. Llene el dosificador de abrillantador o ajuste el ni-
vel de abrillantador a un nivel superior.
• La calidad del abrillantador podría ser la causa.
• Recomendamos que siempre utilice abrillantador, incluso en
combinación con tabletas múltiples.
• Los objetos de plástico deben secarse con un paño.
• El programa no tiene la fase de secado. Consulte “Resu-
men de los programas”.
Hay rayas o películas azuladas
en vasos y platos.
• La dosificación del abrillantador es demasiado alta. Ajuste
más bajo el nivel de abrillantador.
• La cantidad de detergente es demasiada.
Hay manchas y gotas de agua en
vajilla y cristalería.
• La dosificación del abrillantador es insuficiente. Ajuste más
alto el nivel de abrillantador.
• La calidad del abrillantador podría ser la causa.
El interior del aparato está moja-
do.
• No se trata de un defecto del aparato. Se condensa aire hú-
medo en las paredes del aparato.
Espuma inusual durante el lava-
do.
• Utilice exclusivamente detergente diseñado específicamente
para lavavajillas.
• Hay una fuga en el dosificador de abrillantador. Póngase en
contacto con un servicio técnico autorizado.
Rastros de óxido en los cubier-
tos.
• Hay demasiada sal en el agua de lavado. Consulte "El des-
calcificador de agua".
• Se han mezclado cubiertos de plata y acero inoxidable. No
ponga juntos los cubiertos de plata y acero inoxidable.
Quedan restos de detergente en
el dosificador al final del progra-
ma.
• La pastilla de detergente se ha quedado pegada en el dosifi-
cador y no se ha disuelto totalmente en el agua.
• El agua no puede disolver el detergente que hay en el dosifi-
cador. Compruebe que los brazos aspersores no estén blo-
queados o atascados.
• Asegúrese de que los objetos de los cestos no impiden que
se abra la tapa del dosificador de detergente.
44

Problema Causa y soluciones posibles
Olores en el interior del aparato. • Consulte "Limpieza interna".
• Inicie el programa Machine Care con un descalcificador o
producto de limpieza diseñado para lavavajillas.
Depósitos calcáreos en la vajilla,
la cuba y el interior de la puerta.
• El nivel de sal es bajo, consulte el indicador de rellenado.
• La tapa del depósito de sal está suelta.
• El agua del grifo es dura. Consulte "El descalcificador de
agua".
• Utilice agua y ajuste la regeneración del descalcificador de
agua aunque use tabletas multifunción. Consulte "El descal-
cificador de agua".
• Inicie el programa Machine Care con un descalcificador dise-
ñado para lavavajillas.
• Si sigue habiendo depósitos de cal, utilice limpiadores para
aparatos domésticos, que son especialmente apropiados pa-
ra este fin.
• Pruebe con otro detergente.
• Contacte con el fabricante del detergente.
Vajilla mate, descolorida o agrie-
tada.
• Asegúrese de lavar en el aparato únicamente objetos aptos
para lavavajillas.
• Cargue y descargue con cuidado el cesto. Consulte el folleto
sobre carga del cesto.
• Coloque los objetos delicados en el cesto superior.
• Active la opción Glass Care para asegurar un cuidado espe-
cial de la cristalería y objetos delicados.
Consulte otras posibles causas en
"Antes del primer uso", "Uso
diario" o "Consejos".
INFORMACIÓN TÉCNICA
Medidas Ancho / alto / fondo (mm) 596 / 818 - 898 / 550
Conexión eléctrica
1) Voltaje (V) 220 - 240
Frecuencia (Hz) 50
Presión del suministro de agua Mín. / máx. bares (MPa) 0.5 (0.05) / 8 (0.8)
Suministro de agua
Agua fría o caliente
2) máx. 60 °C
Capacidad Cubiertos 13
Consumo de potencia Modo encendido (W) 5.0
Modo apagado (W) 0.50
1) Consulte los demás valores en la placa de características.
2) Si el agua caliente procede de una fuente de energía alternativa (por ejemplo, paneles solares), utilice la
toma de agua caliente para reducir el consumo de energía.
45

ENLACE A LA BASE DE DATOS EPREL DE LA
UE
El código QR de la etiqueta energética
suministrada con el aparato proporciona un enlace
web para el registro de este aparato en la base de
datos de EU EPREL. Guarde la etiqueta de energía
como referencia junto con el manual de usuario y
todos los demás documentos que se proporcionan
con este aparato.
Es posible encontrar información relacionada con el
rendimiento del producto en la base de datos
EPREL de la UE utilizando el enlace https://
eprel.ec.europa.eu y el nombre del modelo y el
número de producto que se encuentra en la placa
de características del aparato. Consulte el capítulo
"Descripción del producto".
Para obtener información más detallada sobre la
etiqueta energética, visite www.theenergylabel.eu.
ASPECTOS MEDIOAMBIENTALES
Recicle los materiales con el símbolo . Coloque
el material de embalaje en los contenedores
adecuados para su reciclaje. Ayude a proteger el
medio ambiente y la salud pública, así como a
reciclar residuos de aparatos eléctricos y
electrónicos. No deseche los aparatos marcados
con el símbolo junto con los residuos
domésticos. Lleve el producto a su centro de
reciclaje local o póngase en contacto con su
oficina municipal.
46
*


WWW.ZANUSSI.COM/SHOP
156939021-A-292020
-
 1
1
-
 2
2
-
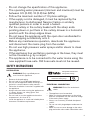 3
3
-
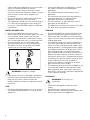 4
4
-
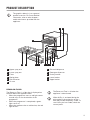 5
5
-
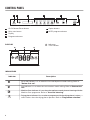 6
6
-
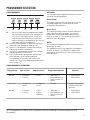 7
7
-
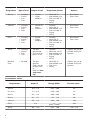 8
8
-
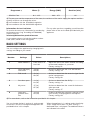 9
9
-
 10
10
-
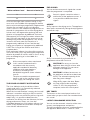 11
11
-
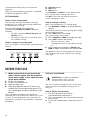 12
12
-
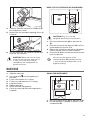 13
13
-
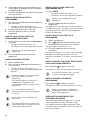 14
14
-
 15
15
-
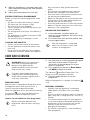 16
16
-
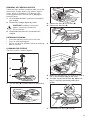 17
17
-
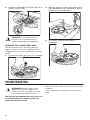 18
18
-
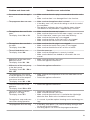 19
19
-
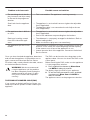 20
20
-
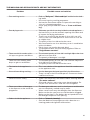 21
21
-
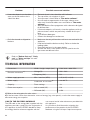 22
22
-
 23
23
-
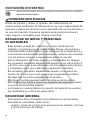 24
24
-
 25
25
-
 26
26
-
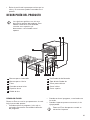 27
27
-
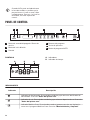 28
28
-
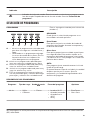 29
29
-
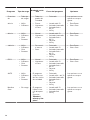 30
30
-
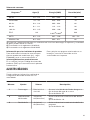 31
31
-
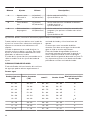 32
32
-
 33
33
-
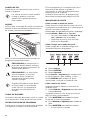 34
34
-
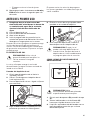 35
35
-
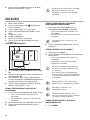 36
36
-
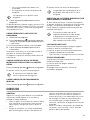 37
37
-
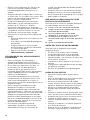 38
38
-
 39
39
-
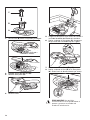 40
40
-
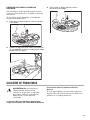 41
41
-
 42
42
-
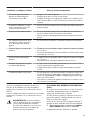 43
43
-
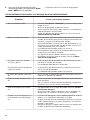 44
44
-
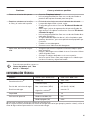 45
45
-
 46
46
-
 47
47
-
 48
48


Zanussi ZDLN6531 Manual de usuario
- Categoría
- Lavaplatos
- Tipo
- Manual de usuario
en otros idiomas
- English: Zanussi ZDLN6531 User manual
Artículos relacionados
Otros documentos
-
 Küppersbusch GSV4500 Manual de usuario
-
AEG FFB52600ZW Manual de usuario
-
AEG FFB53600ZM Manual de usuario
-
AEG F66722VI0P Manual de usuario
-
Electrolux ESI5525LAX Manual de usuario
-
-
-
Infiniton LPL-306 El manual del propietario
-
AEG FFB74707PM Manual de usuario
-
