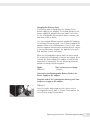
Minebea Intec YRB06Z External Rechargeable Battery Pack El manual del propietario
- Tipo
- El manual del propietario

Operating Instructions | Betriebsanleitung | Mode d’ emploi |
Instrucciones de manejo
Minebea Intec YRB06Z
External Rechargeable Battery Pack | Externe Akkus | Accumulateurs externes
rechargeable | Equipo externo de baterías recargables
98627-000-01
98627-000-01

2 Operating Instructions | Bedienungsanleitung Operating Instructions | Bedienungsanleitung 3
English – page 3
Deutsch – Seite 10
Français – page 17
Español – página 24

2 Operating Instructions | Bedienungsanleitung Operating Instructions | Bedienungsanleitung 3
Startup . . . . . . . . . . . . . . . . . . . . . . . . . . . . . . . . . . . 4
Connecting the Balance/Scale to
the Rechargeable Battery Pack . . . . . . . . . . . . . . . . . . 4
Battery Power Indicator (LED)
YRB 06 Z . . . . . . . . . . . . . . . . . . . . . . . . . . . . . . . . . 4
Charging the Battery Pack . . . . . . . . . . . . . . . . . . . . . 5
Connecting the Rechargeable
Battery Pack to the Power Supply or AC Adapter. . . . . 5
Operation . . . . . . . . . . . . . . . . . . . . . . . . . . . . . . . . . 6
Service Life of the Rechargeable Lead Batteries. . . . . . 6
Warranty . . . . . . . . . . . . . . . . . . . . . . . . . . . . . . . . . . 6
Turning the Operating Voltage
for the Balance/Scale On and Off . . . . . . . . . . . . . . . . 7
Automatic Shutoff. . . . . . . . . . . . . . . . . . . . . . . . . . . 7
Care and Maintenance . . . . . . . . . . . . . . . . . . . . . . . 8
Cleaning . . . . . . . . . . . . . . . . . . . . . . . . . . . . . . . . . . 8
Recycling/Disposing of the Rechargeable Batteries
Installed in the Pack . . . . . . . . . . . . . . . . . . . . . . . . . 8
Specifications . . . . . . . . . . . . . . . . . . . . . . . . . . . . . . 9
3
Contents

4 Operating Instructions | Bedienungsanleitung Operating Instructions | Bedienungsanleitung 5
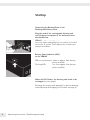
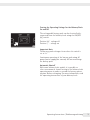
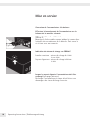
Startup
Connecting the Balance/Scale to the
Rechargeable Battery Pack
Plug the cord of the rechargeable battery pack
into the power receptacle of the balance/scale as
described below.
YRB 01 Z, YRB 02 Z, YRB 05 Z:
Insert the plug of the cord into the jack on the bal-
ance/scale as shown
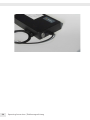
YRB06Z:
Insert the right-angle plug into the socket on the bal-
ance/scale as shown. Then tighten the slotted screw
using a screwdriver.
Battery Power Indicator (LED)
on the YRB06Z
LED on continuously: 100% to approx. 20% battery
power available
Flashing LED: less than approx. 20% battery
power available
When the LED flashes, the battery pack needs to be
recharged (see next page).
Recharge the battery pack promptly to prevent damage
caused by deep discharging (see footnote on page 6).
4
Startup
Connecting the Balance/Scale to the
Rechargeable Battery Pack
Plug the cord of the rechargeable battery pack
into the power receptacle of the balance/scale as
described below.
YRB 01 Z, YRB 02 Z, YRB 05 Z:
Insert the plug of the cord into the jack on the bal-
ance/scale as shown
YRB06Z:
Insert the right-angle plug into the socket on the bal-
ance/scale as shown. Then tighten the slotted screw
using a screwdriver.
Battery Power Indicator (LED)
on the YRB06Z
LED on continuously: 100% to approx. 20% battery
power available
Flashing LED: less than approx. 20% battery
power available
When the LED flashes, the battery pack needs to be
recharged (see next page).
Recharge the battery pack promptly to prevent damage
caused by deep discharging (see footnote on page 6).
4

4 Operating Instructions | Bedienungsanleitung Operating Instructions | Bedienungsanleitung 5
Charging the Battery Pack
The battery pack is charged by the balance/scale’s
power supply or AC adapter. If the plug design on the
power supply/AC adapter does not match the socket
on the rechargeable battery pack, please contact your
Sartorius office or dealer.
Use only original Sartorius power supplies/AC adapters
to recharge the battery pack. Use of power supplies/AC
adapters from other manufacturers, even if these units
have an approval identification marking from a nation-
al testing laboratory, requires the approval of a quali-
fied Sartorius service technician.
When the rechargeable battery pack has been stored
for a relatively long period, it may be discharged. After
startup, the power supply/AC adapter should remain
connected to line power for the following minimum
periods to charge the battery pack:
Model Time necessary to recharge
YRB 06 Z 15 hours
Connecting the Rechargeable Battery Pack to the
Power Supply or AC adapter
Plug the cord of the rechargeable battery pack into
the power supply or AC adapter.
YRB 06 Z:
Insert the right-angle plug into the socket on the
rechargeable battery pack as shown. Then tighten the
slotted screw using a screwdriver.
Charging the Battery Pack
The battery pack is charged by the balance/scale’s
power supply or AC adapter. If the plug design on the
power supply/AC adapter does not match the socket
on the rechargeable battery pack, please contact your
Sartorius office or dealer.
Use only original Sartorius power supplies/AC adapters
to recharge the battery pack. Use of power supplies/AC
adapters from other manufacturers, even if these units
have an approval identification marking from a nation-
al testing laboratory, requires the approval of a quali-
fied Sartorius service technician.
When the rechargeable battery pack has been stored
for a relatively long period, it may be discharged. After
startup, the power supply/AC adapter should remain
connected to line power for the following minimum
periods to charge the battery pack:
Model Time necessary to recharge
YRB 01 Z 5 hours
YRB 02 Z,
YRB 04 Z
YRB 05 Z, YRB 06 Z 15 hours
Connecting the Rechargeable Battery Pack to the
Power Supply or AC adapter
Plug the cord of the rechargeable battery pack into
the power supply or AC adapter.
YRB 01 Z, YRB 02 Z and YRB 05 Z:
Insert the plug into the jack on the rechargeable battery
pack as shown.
YRB 04 Z and YRB 06 Z:
Insert the right-angle plug into the socket on the
rechargeable battery pack as shown. Then tighten the
slotted screw using a screwdriver.
5
Minebea

6 Operating Instructions | Bedienungsanleitung Operating Instructions | Bedienungsanleitung 7
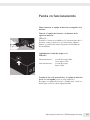
Operation
The rechargeable battery pack may not be
used in hazardous areas/locations.
Service Life of the Rechargeable Lead
Batteries
The rechargeable lead batteries installed in
the pack have a service life of approx. 200
charge cycles (when the batteries are 100%
discharged). Recharge the batteries
promptly to prevent damage caused by
deep discharging.1)
When a battery remains undercharged for
a long time, a deep discharge occurs in
which the cell voltage goes below a specific
threshold value.
In this case, the chemical reactions that
have occurred are reversible only to a
certain degree.
As a result, the original capacity can
no longer be regained by recharging the
battery several times. Therefore, damage
to the battery is irreversible.
To find the maximum hours of operation
for the battery pack, refer to the section
entitled “Specifications” in the operating
instructions of the balance or scale you are
using. Be sure that you recharge the bat-
tery pack once you have reached this time
limit.
1) Deep discharge = the withdrawal of
all available electrical energy before the
battery is recharged
Warranty
The rechargeable batteries installed
in the pack are not covered by the
warranty.
6

6 Operating Instructions | Bedienungsanleitung Operating Instructions | Bedienungsanleitung 7
Turning the Operating Voltage for the Balance/Scale
On and Off
The rechargeable battery pack can be electrically dis-
connected from the balance/scale using the ON/OFF
(0/|) switch.
Position “0”: voltage off
Position “|”: voltage on
Important Note
The battery pack recharges faster when the switch is
set to “0.”
Continuous operation of the battery pack using AC
power (mains supply/line current) will not overcharge
the battery pack.
Automatic Shutoff
With some balance/scale models, it is possible to
select an automatic shutoff setting in the balance/scale
operating menu in order to extend the battery operat-
ing time before recharging. For more information, read
the operating instructions of your balance/scale.
7

8 Operating Instructions | Bedienungsanleitung Operating Instructions | Bedienungsanleitung 9
Care and Maintenance
Cleaning
Before cleaning the rechargeable battery pack, please
disconnect it from the power supply/AC adapter.
Please do not use any aggressive cleaning agents
(solvents or similar agents). Instead use a cloth which
has been wet with a mild detergent to clean the
rechargeable battery pack.
Make sure that no liquid enters the rechargeable bat-
tery pack. After cleaning, wipe down the rechargeable
battery pack with a soft, dry piece of cloth.
Disposing of Used Batteries
The battery pack contains environmentally toxic
substances (lead) and, therefore, cannot be disposed of
with standard household waste. Return used or defec-
tive battery packs to your Sartorius dealer or dispose of
them in accordance with the national environmental
regulations in your country (i.e., recycling).
8

8 Operating Instructions | Bedienungsanleitung Operating Instructions | Bedienungsanleitung 9
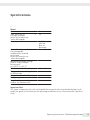
Specifications
Model YRB 01 Z YRB 02 Z YRB 04 Z
YRB 05 Z YRB 06 Z
Power requirements V 12 12 12
Time necessary to h 5 15 15
recharge (average)
(when the batteries are
100% discharged)
Capacity 1.3 Ah at 6.5 Ah at 6.5 Ah at
65 mA 325 mA 325 mA
Rate of Rate of Rate of
discharge discharge discharge
Service life of 200 charge/discharge cycles
the rechargeable
lead batteries installed
in the pack
(when the batteries are
100% discharged)
Maximum allowable storage 12 months
time of a fully charged
battery pack
(at +20°C to +25°C)
Allowable relative humidity % 25 to 85 25 to 85 25 to 85
Moisture class according F, non-condensing
to DIN 40 040
Dimensions (W ×D ×
H) mm 206×110×40 322×161×50 322×161×50
Weight, approx. kg 1 3.4 3.4
Length of the connecting m 1.5 1.5 1
cord to the balance/scale
Important Note
The hours of operation for each rechargeable battery pack with the particular balance/scale
model are given in the balance/scale operating instructions in the section entitled “Specifica-
tions.”
9
Specifications
Model YRB 01 Z YRB 02 Z YRB 04 Z
YRB 05 Z YRB 06 Z
Power requirements V 12 12 12
Time necessary to h 5 15 15
recharge (average)
(when the batteries are
100% discharged)
Capacity 1.3 Ah at 6.5 Ah at 6.5 Ah at
65 mA 325 mA 325 mA
Rate of Rate of Rate of
discharge discharge discharge
Service life of 200 charge/discharge cycles
the rechargeable
lead batteries installed
in the pack
(when the batteries are
100% discharged)
Maximum allowable storage 12 months
time of a fully charged
battery pack
(at +20°C to +25°C)
Allowable relative humidity % 25 to 85 25 to 85 25 to 85
Moisture class according F, non-condensing
to DIN 40 040
Dimensions (W ×D ×H) mm 206×110×40 322×161×50 322×161×50
Weight, approx. kg 1 3.4 3.4
Length of the connecting m 1.5 1.5 1
cord to the balance/scale
Important Note
The hours of operation for each rechargeable battery pack with the particular balance/scale
model are given in the balance/scale operating instructions in the section entitled “Specifica-
tions.”
9
Specifications
Model YRB 01 Z YRB 02 Z YRB 04 Z
YRB 05 Z YRB 06 Z
Power requirements V 12 12 12
Time necessary to h 5 15 15
recharge (average)
(when the batteries are
100% discharged)
Capacity 1.3 Ah at 6.5 Ah at 6.5 Ah at
65 mA 325 mA 325 mA
Rate of Rate of Rate of
discharge discharge discharge
Service life of 200 charge/discharge cycles
the rechargeable
lead batteries installed
in the pack
(when the batteries are
100% discharged)
Maximum allowable storage 12 months
time of a fully charged
battery pack
(at +20°C to +25°C)
Allowable relative humidity % 25 to 85 25 to 85 25 to 85
Moisture class according F, non-condensing
to DIN 40 040
Dimensions (W ×D ×H) mm 206×110×40 322×161×50 322
×161×50
Weight, approx. kg 1 3.4 3.4
Length of the connecting m 1.5 1.5 1
cord to the balance/scale
Important Note
The hours of operation for each rechargeable battery pack with the particular balance/scale
model are given in the balance/scale operating instructions in the section entitled “Specifica-
tions.”
9

10 Operating Instructions | Bedienungsanleitung Operating Instructions | Bedienungsanleitung 11
Inhalt
Inbetriebnahme . . . . . . . . . . . . . . . . . . . . . . . . . . . 11
Anschluß Waage-Akku. . . . . . . . . . . . . . . . . . . . . . . 11
Anzeige des Ladezustands bei
YRB 06 Z . . . . . . . . . . . . . . . . . . . . . . . . . . . . . . . . 11
Laden des Akkus . . . . . . . . . . . . . . . . . . . . . . . . . . . 12
Anschluß Akku-Netzgerät . . . . . . . . . . . . . . . . . . . . 12
Betreiben des Akkus . . . . . . . . . . . . . . . . . . . . . . . . 13
Lebensdauer der Bleiakkus . . . . . . . . . . . . . . . . . . . . 13
Garantie . . . . . . . . . . . . . . . . . . . . . . . . . . . . . . . . . 13
Betriebsspannung zur Waage ein- und ausschalten. . 14
Automatische Abschaltung. . . . . . . . . . . . . . . . . . . . 14
Pflege und Wartung . . . . . . . . . . . . . . . . . . . . . . . . 15
Reinigung . . . . . . . . . . . . . . . . . . . . . . . . . . . . . . . . 15
Entsorgen der eingesetzten Akkus . . . . . . . . . . . . . . 15
Technische Daten . . . . . . . . . . . . . . . . . . . . . . . . . . 16
10

10 Operating Instructions | Bedienungsanleitung Operating Instructions | Bedienungsanleitung 11
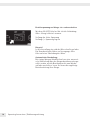
Inbetriebnahme
Anschluss Waage-Akku
Stellen Sie den Betriebsspannungsanschluss an
der Waage her.
YRB 01 Z, YRB 02 Z und YRB 05 Z:
Den Stecker der Anschlussleitung wie abgebildet in die
Anschlußbuchse der Waage einsetzen.
YRB 06 Z:
Setzen Sie den Winkelstecker wie abgebildet in
die Anschlussbuchse der Waage ein.
Drehen Sie dann die Schlitzschraube mit einem Schrau-
bendreher fest.
Anzeige des Ladezustands bei
YRB 06 Z
Dauerlicht: Ladezustand 100%
bis ca. 20%
Blinkende Anzeige: Ladezustand kleiner
ca. 20%
Bei blinkender Anzeige ist der Akku zu laden
(siehe nächste Seite).
Laden Sie den Akku rechtzeitig, um
Schäden durch Tiefentladung zu vermeiden!
11

12 Operating Instructions | Bedienungsanleitung Operating Instructions | Bedienungsanleitung 13
Laden des Akkus
Das Laden erfolgt über das Netzgerät der Waage. Sollte
die Steckerausführung des Netzgerätes nicht mit der
Buchse des Akkus übereinstimmen, so verständigen Sie
bitte Ihren Lieferanten.
Verwenden Sie zum Laden nur Originalnetzgeräte.
Die Verwendung anderer Fabrikate, auch mit den Zulas-
sungszeichen einer Prüfanstalt, bedarf der Zustimmung
eines Fachmannes.
Nach längerer Lagerung kann der Akku entladen sein.
Nach der Inbetriebnahme sollte das Netzgerät zum Auf-
laden des Akkus mindestens folgende Zeit an der
Stromversorgung angeschlossen bleiben:
Modell Ladezeit
YRB 06 Z 15 Stunden
Anschluss Akku-Netzgerät
Stellen Sie den Stromanschluß am Akku her.
YRB 06 Z:
Setzen Sie den Winkelstecker wie abgebildet in die
Anschlussbuchse des Akkus ein. Drehen Sie dann die
Schlitzschraube mit einem Schraubendreher fest.
12

12 Operating Instructions | Bedienungsanleitung Operating Instructions | Bedienungsanleitung 13
Der Akku darf nicht in explosionsgefährde-
tem Bereich eingesetzt werden.
Lebensdauer der Bleiakkus
Die Lebensdauer der eingesetzten Bleiakkus
beträgt ca. 200 Ladezyklen (bezogen auf
jeweils 100% Entladung). Laden Sie den
Akku rechtzeitig, um Schäden durch Tief-
entladung zu vermeiden!
Bei einer permanenten Entladung tritt eine
Tiefentladung ein, bei der die Zellenspan-
nung unter einen bestimmten Schwellen-
wert gelangt. Die chemischen Vorgänge
sind nur bedingt umkehrbar. Mit mehreren
Ladevorgängen ist die Beschädigung nicht
mehr rückgängig zu machen.
Die ursprüngliche Kapazität kann nicht
wieder erreicht werden.
Die einzuhaltende Betriebsdauer finden Sie
in der Betriebsanleitung Ihrer Waage in
Kapitel »Technische Daten«.
Garantie
Die eingesetzten Akkus sind von der
Garantie ausgeschlossen.
13
Betreiben des Akkus

14 Operating Instructions | Bedienungsanleitung Operating Instructions | Bedienungsanleitung 15
Betriebsspannung zur Waage ein- und ausschalten
Mit dem ON-/OFF-Schalter läßt sich die Verbindung
Akku - Waage elektrisch trennen.
Stellung »0«: Keine Spannung
Stellung »|«: Spannung liegt an
Hinweis!
In Schalterstellung »0« wird der Akku schneller geladen.
Ein Dauerbetrieb des Akkus am Versorgungs-Netz
führt zu keiner Überladung des Akkus.
Automatische Abschaltung
Bei einigen Waagen-Modellreihen kann eine automati-
sche Abschaltung über das Waagenbetriebsmenü ange-
wählt werden, um die Betriebsdauer bis zum Wieder-
aufladen zu erhöhen. Lesen Sie hierzu die zugehörige
Betriebsanleitung Ihrer Waage.
14

14 Operating Instructions | Bedienungsanleitung Operating Instructions | Bedienungsanleitung 15
Pflege und Wartung
Reinigung
Vor Reinigung des Gerätes trennen Sie den Stroman-
schluß bitte vom Netzgerät.
Benutzen Sie bitte keine aggressiven Reinigungsmittel
(Lösungsmittel o.ä.), sondern ein mit leichter Seifenlau-
ge angefeuchtetes Tuch.
Achten Sie darauf, daß keine Flüssigkeit in das Gerät
eindringt und reiben Sie mit einem trockenen, weichen
Tuch nach.
Entsorgung
Die Batterie enthält umweltschädliche Stoffe (Blei)
und darf somit nicht in den normalen Müll entsorgt
werden. Verbrauchte oder defekte Batterie-Packs
an den Lieferanen zurücksenden oder gemäß den
nationalen Umweltbestimmungen entsorgen
(Recycling).
15

16 Operating Instructions | Bedienungsanleitung Operating Instructions | Bedienungsanleitung 17
Technische Daten
Modell
YRB 01 Z YRB 02 Z YRB 06 Z
Netzspannung
V 12 12 12
Ladezeit, typisch
h5 15 15
(bezogen auf jeweils
100% Entladung)
Kapazität 1,3 Ah bei 6,5 Ah bei 6,5 Ah bei
65 mA 325 mA 325 mA
Entladestrom Entladestrom Entladestrom
Lebensdauer der eingesetzten 200 Lade-/Entladezyklen
Blei-Akkus (bezogen auf
jeweils 100% Entladung)
max. zulässige Lagerzeit 12 Monate
eines vollständig geladenen
Akkus(bei +20 bis +25 °C)
zulässige relative
Luftfeuchtigkeit
% 25 bis 85 25 bis 85 25 bis 85
Feuchteklasse nach
F, nicht kondensierend
DIN 40040
Abmessungen (B +T +
H) mm 206 +110 +40 322 +161+50 322 +161+50
Gewicht, ca.
kg 1 3,4 3,4
Länge der Anschlussschnur
zur Waage
m 1,5 1,5 1
Hinweis!
Die Betriebsdauer des jeweiligen Akkus zum zugehörigen Waagenmodell finden
Sie in der Betriebsanleitung Ihrer Waage im Kapitel »Technische Daten«.
16
Technische Daten
Modell YRB 01 Z YRB 02 Z YRB 06 Z
Netzspannung V 12 12 12
Ladezeit, typisch h5 15 15
(bezogen auf jeweils
100% Entladung)
Kapazität 1,3 Ah bei 6,5 Ah bei 6,5 Ah bei
65 mA 325 mA 325 mA
Entladestrom Entladestrom Entladestrom
Lebensdauer der eingesetzten 200 Lade-/Entladezyklen
Blei-Akkus (bezogen auf
jeweils 100% Entladung)
max. zulässige Lagerzeit 12 Monate
eines vollständig geladenen
Akkus(bei +20 bis +25 °C)
zulässige relative
Luftfeuchtigkeit % 25 bis 85 25 bis 85 25 bis 85
Feuchteklasse nach F, nicht kondensierend
DIN 40040
Abmessungen (B +T +H) mm 206 +110 +40 322 +161+50 322 +161+50
Gewicht, ca. kg 1 3,4 3,4
Länge der Anschlussschnur
zur Waage m 1,5 1,5 1
Hinweis!
Die Betriebsdauer des jeweiligen Akkus zum zugehörigen Waagenmodell finden
Sie in der Betriebsanleitung Ihrer Waage im Kapitel »Technische Daten«.
16
Technische Daten
Modell YRB 01 Z YRB 02 Z YRB 0
6 Z
Netzspannung V 12 12
12
Ladezeit, typisch h5 15
15
(bezogen auf jeweils
100% Entladung)
Kapazität 1,3 Ah bei 6,5 Ah bei 6,5 Ah bei
65 mA 325 mA 325 mA
Entladestrom Entladestrom Entladestrom
Lebensdauer der eingesetzten 200 Lade-/Entladezyklen
Blei-Akkus (bezogen auf
jeweils 100% Entladung)
max. zulässige Lagerzeit 12 Monate
eines vollständig geladenen
Akkus(bei +20 bis +25 °C)
zulässige relative
Luftfeuchtigkeit % 25 bis 85 25 bis 85 25 bis 85
Feuchteklasse nach F, nicht kondensierend
DIN 40040
Abmessungen (B +T +H) mm 206 +110 +40 322 +161+50 322
+161+50
Gewicht, ca. kg 1 3,4
3,4
Länge der Anschlussschnur
zur Waage m 1,5 1,5
1
Hinweis!
Die Betriebsdauer des jeweiligen Akkus zum zugehörigen Waagenmodell finden
Sie in der Betriebsanleitung Ihrer Waage im Kapitel »Technische Daten«.
16

16 Operating Instructions | Bedienungsanleitung Operating Instructions | Bedienungsanleitung 17
Sommaire
Mise en service . . . . . . . . . . . . . . . . . . . . . . . . . . . . 18
Connexion de l’accumulateur à la balance . . . . . . . . 18
Indicateur du niveau de charge sur
YRB et 06 Z . . . . . . . . . . . . . . . . . . . . . . . . . . . . . . 18
Chargement de l’accumulateur. . . . . . . . . . . . . . . . . 19
Connexion de l’accumulateur au bloc
d’alimentation . . . . . . . . . . . . . . . . . . . . . . . . . . . . . 19
Fonctionnement de l’accumulateur . . . . . . . . . . . . 20
Longévité des batteries au plomb . . . . . . . . . . . . . . . 20
Garantie . . . . . . . . . . . . . . . . . . . . . . . . . . . . . . . . . 20
Mise en service et arrêt de la balance . . . . . . . . . . . . 21
Arrêt automatique . . . . . . . . . . . . . . . . . . . . . . . . . . 21
Entretien et maintenance. . . . . . . . . . . . . . . . . . . . 22
Nettoyage . . . . . . . . . . . . . . . . . . . . . . . . . . . . . . . . 22
Recyclage des batteries utilisées . . . . . . . . . . . . . . . . 22
Caractéristiques techniques . . . . . . . . . . . . . . . . . . 23
17

18 Operating Instructions | Bedienungsanleitung Operating Instructions | Bedienungsanleitung 19
Mise en service
Connexion de l’accumulateur à la balance
Effectuez le branchement de l’accumulateur sur la
balance de la manière suivante.
YRB 01 Z, YRB 02 Z et YRB 05 Z :
Branchez la prise du cordon d’alimentation comme
indiqué sur la figure ci-contre dans la douille de raccor-
dement de la balance.
YRB 06 Z :
Branchez la fiche coudée comme indiqué ci-contre dans
la douille de raccordement de la balance. Puis serrez la
vis à fente avec un tournevis.
Indication du niveau de charge sur YRB06Z
Lumière continue : niveau de charge de 100%
à env. 20%
Voyant clignotant : niveau de charge inférieur
à 20%
Losque le voyant clignote l’accumulateur doit être
rechargé (voir page suivante).
Rechargez l’accumulateur à temps afin d’éviter tous
dommages dus à une décharge excessive.
18

18 Operating Instructions | Bedienungsanleitung Operating Instructions | Bedienungsanleitung 19
Chargement de l’accumulateur
La charge s’effectue par le bloc d’alimentation de la
balance. Si la prise du bloc d’alimentation ne corres-
pond pas à la douille de l’accumulateur, veuillez en
avertir votre fournisseur.
Pour charger l’accumulateur, n’utilisez que des blocs
d’alimentation d’origine Sartorius. L’utilisation d’autres
produits exige l’approbation d’un spécialiste reconnu
par Sartorius, même si le bloc a été agréé par un centre
national d’essai.
Après un stockage relativement long, il se peut que
l’accumulateur soit déchargé. Après la mise en service,
laissez le bloc d’alimentation branché au secteur pen-
dant un certain temps pour charger l’accumulateur.
Le temps de charge minimum dépend du modèle :
Modèle Temps de charge
YRB 06 Z 15 heures
Connexion de l’accumulateur au bloc d’alimentation
Effectuez le raccordement électrique à
l’accumulateur.
YRB 06 Z :
Branchez la fiche coudée comme indiqué ci-contre
dans la douille de raccordement de l’accumulateur.
Puis serrez la vis à fente avec un tournevis.
19
Minebea

20 Operating Instructions | Bedienungsanleitung Operating Instructions | Bedienungsanleitung 21
L’accumulateur ne doit pas être utilisé dans
un domaine à risques d’explosions.
Longévité des batteries au plomb
La longévité des batteries au plomb utili-
sées dans le boîtier accu est d’environ 200
cycles de chargement (dans le cas d’un
déchargement à 100%).
Chargez l’accumulateur en temps voulu
afin d’éviter tous dommages dus à une
décharge excessive!
Une décharge permanente peut entraîner
une décharge totale qui se traduit par une
baisse de la tension d’élément en deçà
d’une valeur seuil spécifique. Les réactions
chimiques qui se produisent dans ce cas ne
sont réversibles que jusqu’à un certain
degré. La capacité originale ne peut plus
être totalement récupérée en rechargeant
plusieurs fois l’accumulateur ; le dommage
causé est en conséquence irréversible.
La durée de fonctionnement à respecter est
indiquée dans le mode d’emploi de votre
balance au chapitre «Caractéristiques tech-
niques».
Garantie
Les batteries au plomb utilisées ne font
pas partie de la garantie.
20
Fonctionnement de l’accumulateur

20 Operating Instructions | Bedienungsanleitung Operating Instructions | Bedienungsanleitung 21
Mise en service et arrêt de la balance
L’accumulateur rechargeable peut être déconnecté
électriquement de la balance à l’aide de l’interrupteur
ON/OFF (0/| = marche/arrêt).
Position «0» : pas de tension
Position «|» : tension
Important !
Lorsque l’interrupteur est en position «0», l’accumula-
teur se charge plus rapidement.
Une connexion permanente de l’accumulateur à la
tension d’alimentation ne provoque pas de surcharge
de l’accumulateur.
Arrêt automatique
Sur certains modèles de balances vous pouvez sélec-
tionner un arrêt automatique par le menu d’exploita-
tion de la balance pour augmenter la durée de fonc-
tionnement jusqu’à la recharge. Veuillez lire à ce sujet
le mode d’emploi de votre balance.
21

22 Operating Instructions | Bedienungsanleitung Operating Instructions | Bedienungsanleitung 23
Entretien et maintenance
Nettoyage
Avant de nettoyer l’appareil, veuillez le débrancher du
bloc d’alimentation.
N’utilisez pas de produits de nettoyage agressifs (déter-
gents ou produits similaires) mais un chiffon humecté
d’eau savonneuse.
Veillez à ce que le liquide ne pénètre pas dans l’appareil
et essuyez avec un chiffon doux et sec.
Recyclage
L’accumulateur contient des substances polluantes
(plomb) et ne doit pas être jeté dans les déchets
normaux. Retourner les accumulateurs usagés ou
défectueux aux fournisseurs ou les éliminer conformé-
ment aux dispositions nationales concernant l’environ-
nemment (recyclage).
22

22 Operating Instructions | Bedienungsanleitung Operating Instructions | Bedienungsanleitung 23
Caractéristiques techniques
Modèle
YRB 01 Z YRB 02 Z YRB 06 Z
Tension du secteur V 12
12 12
Temps de charge, typique h 5
15 15
(dans le cas d’un
déchargement à 100%)
Capacité 1,3 Ah avec 6,5 Ah avec 6,5 Ah avec
65 mA 325 mA 325 mA
de courant de courant de courant
de décharge de décharge de décharge
Durée de vie des batteries
200 cycles de chargement
au plomb utilisées
/déchargement
(dans le cas d’un
déchargement à 100%)
Temps de stockage max. 12 mois
autorisé d’un accumulateur
complètement chargé
(à une température de
+20 à +25 °C)
Humidité relative de % 25 à 85 25 à 85 25 à 85
l’air autorisée
Classe d’humidité F, sans condensation
selon DIN 40 040
Dimensions (L ×P ×H) mm 206×110×
40 322×161×50 322×161×50
Poids, env. kg 1
3,4 3,4
Longueur du cordon m 1,5
1,5 1
d’alimentation jusqu’à
la balance
Important!
La durée de fonctionnement de l’accumulateur pour le modèle de balance correspondant est
indiquée dans le mode d’emploi de votre balance au chapitre «Caractéristiques techniques».
23
Caractéristiques techniques
Modèle YRB 01 Z YRB 02 Z YRB 04 Z
YRB 05 Z YRB 06 Z
Tension du secteur V 12 12 12
Temps de charge, typique h 5 15 15
(dans le cas d’un
déchargement à 100%)
Capacité 1,3 Ah avec 6,5 Ah avec 6,5 Ah avec
65 mA 325 mA 325 mA
de courant de courant de courant
de décharge de décharge de décharge
Durée de vie des batteries 200 cycles de chargement/déchargement
au plomb utilisées
(dans le cas d’un
déchargement à 100%)
Temps de stockage max. 12 mois
autorisé d’un accumulateur
complètement chargé
(à une température de
+20 à +25 °C)
Humidité relative de % 25 à 85 25 à 85 25 à 85
l’air autorisée
Classe d’humidité F, sans condensation
selon DIN 40 040
Dimensions (L ×P ×H) mm 206×110×40 322×161×50 322×161×50
Poids, env. kg 1 3,4 3,4
Longueur du cordon m 1,5 1,5 1
d’alimentation jusqu’à
la balance
Important!
La durée de fonctionnement de l’accumulateur pour le modèle de balance correspondant est
indiquée dans le mode d’emploi de votre balance au chapitre «Caractéristiques techniques».
23
Caractéristiques techniques
Modèle YRB 01 Z YRB 02 Z YRB 0
6 Z
Tension du secteur V 12 12
12
Temps de charge, typique h 5 15
15
(dans le cas d’un
déchargement à 100%)
Capacité 1,3 Ah avec 6,5 Ah avec 6,5 Ah avec
65 mA 325 mA 325 mA
de courant de courant de courant
de décharge de décharge de décharge
Durée de vie des batteries
200 cycles de chargement
au plomb utilisées
/déchargement
(dans le cas d’un
déchargement à 100%)
Temps de stockage max. 12 mois
autorisé d’un accumulateur
complètement chargé
(à une température de
+20 à +25 °C)
Humidité relative de % 25 à 85 25 à 85 25 à 85
l’air autorisée
Classe d’humidité F, sans condensation
selon DIN 40 040
Dimensions (L ×P ×H) mm 206×110×40 322×161×50 322
×161×50
Poids, env. kg 1 3,4
3,4
Longueur du cordon m 1,5 1,5
1
d’alimentation jusqu’à
la balance
Important!
La durée de fonctionnement de l’accumulateur pour le modèle de balance correspondant est
indiquée dans le mode d’emploi de votre balance au chapitre «Caractéristiques techniques».
23

24 Operating Instructions | Bedienungsanleitung Operating Instructions | Bedienungsanleitung 25

24 Operating Instructions | Bedienungsanleitung Operating Instructions | Bedienungsanleitung 25
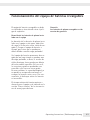
Puesta en funcionamiento
Cómo conectar el equipo de baterías recargables a la
balanza
Conecte el equipo de baterías a la balanza de la
siguiente manera:
YRB 01 Z, YRB 02 Z e YRB 05 Z:
Enchufe el conector del cable de conexión en el toma-
corriente de la balanza, como se muestra en la ilustra-
ción adjunta.
YRB 06 Z:
Enchufe el conector acodado en el tomacorriente de la
balanza, como se muestra en la ilustración adjunta.
Apriete el tornillo de ranura fijamente utilizando un
destornillador.
Indicador del estado de carga en el
YRB 06 Z
Luz permanente: estado de carga 100%
hasta aprox. 20%
Luz intermitente: estado de carga
bajo el 20%
Cuando la luz está intermitente, el equipo de baterías
ha de ser recargado (véase la pág. siguiente).
Recargue el equipo de baterías a tiempo para evitar los
daños que causa una descarga profunda.
25

26 Operating Instructions | Bedienungsanleitung Operating Instructions | Bedienungsanleitung 27
Cómo cargar el equipo de baterías
El equipo de baterías se carga por medio de la unidad
de alimentación o del adaptador de CA de la balanza. Si
el diseño del enchufe de la unidad de alimentación no
corresponde al diseño del tomacorriente del equipo de
baterías recargables, notifique a su suministrador o a su
oficina Sartorius.
Para cargar el equipo de baterías utilice solamente uni-
dades de alimentación originales. La utilización de uni-
dades de alimentación de otros fabricantes requiere la
autorización de un técnico especialista, aun si éstas tie-
nen una marca de aprobación otorgada por algún insti-
tuto de control.
Si el equipo de baterías recargables ha estado almace-
nado durante mucho tiempo, es posible que se encuen-
tre descargado. Después de la puesta en funcionamien-
to, la unidad de alimentación utilizada para la carga del
equipo de baterías debe conectarse a la corriente eléc-
trica por lo menos durante:
Modelo Tiempo de carga
YRB 06 Z 15 horas
Cómo conectar el equipo de baterías recargables a la
unidad de alimentación
Conecte el equipo de baterías con la unidad de ali-
mentación de la siguiente manera:
YRB 06 Z:
Enchufe el conector acodado de la unidad de alimenta-
ción en el tomacorriente del equipo de baterías recarga-
bles, como se muestra en la ilustración. Apriete el torni-
llo de ranura fijamente utilizando un destornillador.
26

26 Operating Instructions | Bedienungsanleitung Operating Instructions | Bedienungsanleitung 27
El equipo de baterías recargables no debe
ser utilizado en áreas donde exista el peli-
gro de explosión.
Duración de las baterías de plomo insta-
ladas en el equipo
La duración de las baterías de plomo insta-
ladas en el equipo es de aprox. 200 ciclos
de carga (si las baterías están 100% descar-
gadas). ¡Cargue el equipo de baterías a
tiempo, para evitar que se produzcan
daños debido a una descarga profunda!
Si el equipo de baterías permanece descar-
gado por un largo tiempo se produce una
descarga profunda, es decir, la tensión de
célula disminuye hasta quedar por debajo
del valor umbral específico. En este caso,
las reacciones químicas producidas son
reversibles sólo hasta un cierto grado.
En otras palabras, la capacidad original ya
no puede ser recuperada totalmente al
recargar las baterías varias veces. Por con-
secuencia, el daño que sufren las baterías
es irreversible.
El tiempo máximo de funcionamiento a
observar para el equipo está indicado en la
sección “Datos técnicos” de las instruccio-
nes de manejo para balanza.
Garantía
Las baterías de plomo recargables están
exentas de garantía.
27
Funcionamiento del equipo de baterías recargables

28 Operating Instructions | Bedienungsanleitung Operating Instructions | Bedienungsanleitung 29
Cómo conectar o desconectar la tensión de alimenta-
ción para la balanza
Con el interruptor ON/OFF se puede desconectar eléc-
tricamente la balanza del equipo de baterías.
Posición “0”: No hay tensión
Posición “|”: Hay tensión
¡Nota importante!
En la posición “0” del interruptor, el equipo de baterías
se carga más rápidamente.
Una conexión continua del equipo de baterías
a la tensión de red no produce una sobrecarga
de las baterías.
Desconexión automática
Para algunas series de modelos de balanzas se puede
seleccionar el modo de desconexión automática
mediante el menú de funcionamiento de la balanza,
con el fin de alargar el tiempo de duración de las bate-
rías hasta la próxima carga. Para más detalles al respec-
to, vea las instrucciones de instalación y manejo de la
balanza respectiva.
28

28 Operating Instructions | Bedienungsanleitung Operating Instructions | Bedienungsanleitung 29
Cuidado y mantenimiento
Limpieza
Antes de empezar con la limpieza, desconecte el equipo
de baterías recargables de la unidad de alimentación.
No utilice detergentes agresivos (p. ej. disolventes), sino
un paño humedecido en agua jabonosa. Ponga aten-
ción en que no penetre ningún líquido en el interior del
aparato y, luego, pase un paño seco y suave por todas
las superficies.
Eliminación de desechos
Las baterias constan de materiales nocivos (plomo) y,
por lo tanto, no deben eliminarse como basura normal.
Equipos de baterías en desuso o defectuosos han de
remitirse al proveedor, o bien, han de eleminarse de
acuerdo a la normativa nacional para el medio ambien-
te (reciclaje).
29

30 Operating Instructions | Bedienungsanleitung Operating Instructions | Bedienungsanleitung 31
Datos técnicos
Modelo YRB 01 Z YRB 02 Z YRB 04 Z
YRB 05 Z YRB 06 Z
Tensión de red V 12 12 12
Tiempo de carga, típico h 5 15 15
(si las baterías están
100% descargadas)
Capacidad 1,3 Ah con 6,5 Ah con 6,5 Ah con
65 mA 325 mA 325 mA
tensión de tensión de tensión de
descarga descarga descarga
Duración de 200 ciclos de carga y de descarga
baterías de plomo
instaladas en el equipo
(si las baterías están
100% descargadas)
Tiempo de almacenamiento 12 meses
máx. permitido para un equipo
de baterías cargado
totalmente (a una
temperatura de
+20 hasta +25 °C)
Humedad del aire % 25 hasta 85
relativa permitida
Clase de protección contra F, no condensa
la humedad
según DIN 40 040
Dimensiones mm 206×110×40 322×161×50 322×161×50
(anch. ×prof. ×alt.)
Peso, aprox. kg 1 3,4 3,4
Longitud del cable de m 1,5 1,5 1
conexión a la balanza
¡Nota importante!
En las instrucciones de instalación y de manejo de su balanza – sección
“Datos Técnicos” – encontrará los datos acerca del tiempo de funcionamiento del equipo de
baterías recargables respectivo para su modelo de balanza.
30
Datos técnicos
Modelo
YRB 01 Z YRB 02 Z YRB 06 Z
Tensión de red
V 12 12 12
Tiempo de carga, típico h 5 15 15
(si las baterías están
100% descargadas)
Capacidad 1,3 Ah con 6,5 Ah con 6,5 Ah con
65 mA 325 mA 325 mA
tensión de tensión de tensión de
descarga descarga descarga
Duración de
200 ciclos de carga y
baterías de plomo
de descarga
instaladas en el equipo
(si las baterías están
100% descargadas)
Tiempo de almacenamiento 12 meses
máx. permitido para un equipo
de baterías cargado
totalmente (a una
temperatura de
+20 hasta +25 °C)
Humedad del aire % 25 hasta 85
relativa permitida
Clase de protección contra F, no condensa
la humedad
según DIN 40 040
Dimensiones mm 206×110×40 322×161×50 322×161×50
(anch. ×prof. ×alt.)
Peso, aprox.
kg 1 3,4 3,4
Longitud del cable de m 1,5 1,5 1
conexión a la balanza
¡Nota importante!
En las instrucciones de instalación y de manejo de su balanza – sección
“Datos Técnicos” – encontrará los datos acerca del tiempo de funcionamiento del equipo de
baterías recargables respectivo para su modelo de balanza.
30
Datos técnicos
Modelo YRB 01 Z YRB 02 Z YRB 0
6 Z
Tensión de red V 12 12
12
Tiempo de carga, típico h 5 15
15
(si las baterías están
100% descargadas)
Capacidad 1,3 Ah con 6,5 Ah con 6,5 Ah con
65 mA 325 mA 325 mA
tensión de tensión de tensión de
descarga descarga descarga
Duración de
200 ciclos de carga y
baterías de plomo de descarga
instaladas en el equipo
(si las baterías están
100% descargadas)
Tiempo de almacenamiento 12 meses
máx. permitido para un equipo
de baterías cargado
totalmente (a una
temperatura de
+20 hasta +25 °C)
Humedad del aire % 25 hasta 85
relativa permitida
Clase de protección contra F, no condensa
la humedad
según DIN 40 040
Dimensiones mm 206×110×40 322×161×50 322
×161×50
(anch. ×prof. ×alt.)
Peso, aprox. kg 1 3,4
3,4
Longitud del cable de m 1,5 1,5
1
conexión a la balanza
¡Nota importante!
En las instrucciones de instalación y de manejo de su balanza – sección
“Datos Técnicos” – encontrará los datos acerca del tiempo de funcionamiento del equipo de
baterías recargables respectivo para su modelo de balanza.
30

30 Operating Instructions | Bedienungsanleitung Operating Instructions | Bedienungsanleitung 31

Minebea Intec Bovenden GmbH & Co. KG
Leinetal 2
37120 Bovenden, Germany
Phone +49.551.309.83.0
Fax +49.551.309.83.190
www.minebea-intec.com
Copyright by Minebea Intec, Bovenden,
Germany.
No part of this publication may be reprinted
or translated in any form or by any means
without prior written permission from Minebea
Intec. All rights reserved.
The status of the information, specifications
and illustrations in this manual is indicated by
the date given below. Minebea Intec reserves
the right to make changes to the technology,
features, specifications, and design
oftheequipment without notice.
Date: December 2018
Printed in Germany on paper that has been
bleached without any use of chlorine.
MS · KT
Publication No.: WYR8000-n18123
-
 1
1
-
 2
2
-
 3
3
-
 4
4
-
 5
5
-
 6
6
-
 7
7
-
 8
8
-
 9
9
-
 10
10
-
 11
11
-
 12
12
-
 13
13
-
 14
14
-
 15
15
-
 16
16
-
 17
17
-
 18
18
-
 19
19
-
 20
20
-
 21
21
-
 22
22
-
 23
23
-
 24
24
-
 25
25
-
 26
26
-
 27
27
-
 28
28
-
 29
29
-
 30
30
-
 31
31
-
 32
32


Minebea Intec YRB06Z External Rechargeable Battery Pack El manual del propietario
- Tipo
- El manual del propietario
En otros idiomas
Documentos relacionados


Otros documentos
-
Yamaha YSP-2500 El manual del propietario
-
-
Yamaha SRT-1000 El manual del propietario
-
-
Yamaha YSP-2700 El manual del propietario
-
-
-