Sony XR-CA360X Manual de usuario
- Categoría
- Receptores de medios de coche
- Tipo
- Manual de usuario
Este manual también es adecuado para

Actual total number: Sony XR-CA360X/CA360 (GB,ES,CT) 3-246-852-22(1)
2003 Sony Corporation
XR-CA360X
XR-CA360
3-246-852-22 (1)
Operating Instructions
Manual de instrucciones
GB
ES
CT
For installation and connections, see the supplied installation/connections
manual.
Para obtener información sobre la instalación y las conexiones, consulte el manual
de instalación/conexiones suministrado.
FM/AM Cassette Car
Stereo
AUTOESTEREO PARA
CASETE

2
Precautions
•If your car was parked in direct sunlight
resulting in a considerable rise in
temperature inside the car, allow the unit to
cool off before operating it.
•If no power is being supplied to the unit,
check the connections first. If everything is in
order, check the fuse.
•If no sound comes from the speakers of a
2-speaker system, set the fader control to the
centre position.
•When a tape is played back for a long period,
the cassette may become warm because of
the built-in power amplifier. However, this is
not a sign of malfunction.
If you have any questions or problems
concerning your unit that are not covered in
this manual, please consult your nearest Sony
dealer.
To maintain high quality sound
If you have drink holders near your audio
equipment, be careful not to splash juice or
other soft drinks onto the car audio. Sugary
residues on this unit or cassette tapes may
contaminate the playback heads, reduce the
sound quality, or prevent sound reproduction
altogether.
Cassette cleaning kits cannot remove sugar
from the tape heads.
Welcome !
Thank you for purchasing this Sony Cassette
Player.
In addition to the cassette playback and radio
operations, you can expand your system by
connecting an optional CD/MD unit*
1
.
When you operate this unit or a connected
optional CD unit with the CD TEXT function,
the CD TEXT information will appear in the
display when you play a CD TEXT disc*
2
.
*
1
You can connect a CD changer, an MD changer,
a CD player, or an MD player.
*
2
A CD TEXT disc is an audio CD that includes
information such as the disc name, artist name,
and track names.
This information is recorded on the disc.

3
Notes on Cassettes
Cassette care
•Do not touch the tape surface of a cassette, as
any dirt or dust will contaminate the heads.
•Keep cassettes away from equipment with
built-in magnets such as speakers and
amplifiers, as erasure or distortion on the
recorded tape could occur.
•Do not expose cassettes to direct sunlight,
extremely cold temperatures, or moisture.
•Slack in the tape may cause the tape to be
caught in the machine. Before you insert the
tape, use a pencil or similar object to turn the
reel and take up any slack.
•Distorted cassettes and loose labels can cause
problems when inserting or ejecting tapes.
Remove or replace loose labels.
•The sound may become distorted while
playing the cassette. The cassette player head
should be cleaned after each 50 hours of use.
Slack
Cassettes longer than 90 minutes
The use of cassettes longer than 90 minutes is
not recommended except for long continuous
play. The tape used for these cassettes is very
thin and tends to stretch easily. Frequent
playing and stopping of these tapes may cause
them to become entangled in the cassette deck
mechanism.

4
Table of Contents
This Unit Only
With Optional Equipment
Location of controls ................................................. 5
Getting Started
Resetting the unit ................................................ 6
Detaching the front panel .................................. 6
Setting the clock .................................................. 7
Cassette Player
Listening to a tape ............................................... 7
Radio reception during fast-forwarding or
rewinding of a tape
— Automatic Tuner Activation (ATA) ....... 8
Radio
Storing stations automatically
— Best Tuning Memory (BTM) ................... 8
Storing only the desired stations ...................... 9
Receiving the stored stations ............................. 9
Other Functions
Adjusting the balance and fader ..................... 10
Attenuating the sound ..................................... 10
Changing the sound and display settings ..... 10
Setting the equalizer
— EQ3............................................................ 11
CD/MD Unit
Playing a CD or MD ......................................... 12
Playing tracks repeatedly
— Repeat Play .............................................. 13
Playing tracks in random order
— Shuffle Play .............................................. 13
Additional Information
Maintenance....................................................... 14
Removing the unit ............................................ 15
Specifications ..................................................... 16
Troubleshooting guide ..................................... 17

5
Location of controls
XR-CA360X/CA360
SOURCE
MODE
SEL
RELEASE
EQ3
DSPL
ATT
DISC
REP
SHUF
ATA
123456
BTM
OFFSENS
SEEK
DIR
Refer to the pages listed for details.
1 SOURCE (Radio/CD/MD) button
8, 9, 11, 12
2 MODE button
During radio reception:
Band select 8, 9
During CD/MD playback:
CD/MD unit select 12
3 Volume +/– button 7, 10, 11
4 Z (eject) button 7, 8, 9, 12
5 Display window
6 m/M (fast winding)/DIR (tape
transport direction change) buttons 7, 8
7 SEEK button
Seek 9
Automatic Music Sensor 13
Manual search 13
8 DSPL (display mode change) button
7, 12
9 EQ3 button 11
0 RELEASE (front panel release) button
6, 14
qa SEL (select) button 7, 10, 11, 12
qs RESET button (located on the front side
of the unit behind the front panel) 6
qd ATT (attenuate) button 10
qf Number buttons 10, 12
During radio reception:
Preset number select 9
During CD/MD playback:
(1) DISC – 13
(2) DISC + 13
(3) REP 13
(4) SHUF 13
qg Frequency select switch
(located on the bottom of the unit)
See “Frequency select switch” in the
Installation/Connections manual.
qh BTM/ATA button 8
qj SENS button 9
qk OFF button* 6
* Warning when installing in a car
without ACC (accessory) position on
the ignition key switch
Be sure to press (OFF) on the unit for 2
seconds to turn off the clock display after
turning off the engine.
When you press (OFF) momentarily, the
clock display does not turn off and this
causes battery wear.

66
Attaching the front panel
Attach part A of the front panel to part B of
the unit as illustrated and push the left side
into position until it clicks.
Notes
• Be sure not to attach the front panel upside
down.
• Do not press the front panel too hard against the
unit when attaching it.
• Do not press too hard or put excessive pressure
on the display window of the front panel.
• Do not expose the front panel to direct sunlight
or heat sources such as hot air ducts, and do not
leave it in a humid place. Never leave it on the
dashboard of a car parked in direct sunlight or
where there may be a considerable rise in
temperature.
Caution alarm
If you turn the car ignition off without
removing the front panel, the caution alarm
will beep for a few seconds.
If you connect an optional power amplifier and
do not use the built-in amplifier, the beep
sound will be deactivated.
Getting Started
Resetting the unit
Before operating the unit for the first time, or
after replacing the car battery or changing the
connections, you must reset the unit.
Remove the front panel and press the RESET
button with a pointed object, such as a
ballpoint pen.
Note
Pressing the RESET button will erase the clock
setting and some memorised functions.
Detaching the front panel
You can detach the front panel of this unit to
protect the unit from being stolen.
1 Press (OFF).
2 Press (RELEASE), then slide the front
panel a little to the left, and pull it off
towards you.
Notes
• Be sure not to drop the panel when detaching it
from the unit.
• If you detach the panel while the unit is still
turned on, the power will turn off automatically
to prevent the speakers from being damaged.
• When carrying the front panel with you, use the
supplied front panel case.
RESET button
(OFF)
(RELEASE)
A
B

77
Cassette Player
Listening to a tape
Insert a cassette.
Playback starts automatically.
The side facing up is played.
The side facing down is played.
Tip
To change the tape‘s playback direction, press m
and M.
To stop playback and eject the
cassette
Press Z.
Fast-winding the tape
During playback, press m or M.
* The indicator will flash while fast-winding the
tape.
To start playback during fast-forwarding or
rewinding, press the other fast-winding button
partially until the locked button is released.
Setting the clock
The clock uses a 12-hour digital indication.
Example: To set the clock to 10:08
1 Press (DSPL) for 2 seconds.
The hour indication flashes.
1 Press either side of the volume button
to set the hour.
2 Press (SEL).
The minute indication flashes.
3 Press either side of the volume button
to set the minute.
2 Press (DSPL).
The clock starts.
After the clock setting is complete, the
display returns to normal play mode.
To rewind
m
M
Direction
indicator*
FWD
REV
To advance
M
m
to go forward
to go back
to go forward
to go back

88
Radio
Storing stations
automatically
— Best Tuning Memory (BTM)
The unit selects the stations with the strongest
signals and stores them in the order of their
frequencies. You can store up to 6 stations on
each band (FM1, FM2, FM3, AM1, and AM2).
Caution
When tuning in stations while driving, use
Best Tuning Memory to prevent accidents.
1 Press (SOURCE) repeatedly to select the
radio.
In case of tape playback, press Z to eject the
tape.
Each time you press (SOURCE), the source
changes as follows:
Radio t CD* t MD*
* If the corresponding optional equipment is
not connected, this item will not appear.
2 Press (MODE) repeatedly to select the
band.
Each time you press (MODE), the band
changes as follows:
FM1 t FM2 t FM3 t AM1 t AM2
3 Press (BTM) (ATA) for 2 seconds.
The unit stores stations in the order of their
frequencies on the number buttons.
A beep sounds when the setting is stored.
Notes
• The unit does not store stations with weak
signals. If only a few stations can be received,
some number buttons will retain their former
setting.
• When a number is indicated in the display, the
unit starts storing stations from the one currently
displayed.
Radio reception during
fast-forwarding or
rewinding of a tape
— Automatic Tuner Activation (ATA)
When fast-forwarding or rewinding with the
m or M button, the radio will turn on
automatically.
During playback, press (BTM) (ATA)
repeatedly until “ATA-ON” in the display
appears.
ATA-ON y ATA-OFF
ATA mode starts.
To return to normal play mode, select “ATA-
OFF.”

99
Storing only the desired
stations
You can preset up to 18 FM stations (6 each for
FM1, 2, and 3) and up to 12 AM stations (6
each for AM1 and 2) in the order of your
choice.
1 Press (SOURCE) repeatedly to select the
radio.
In case of tape playback, press Z to eject the
tape.
2 Press (MODE) repeatedly to select the
band.
3 Press either side of (SEEK) to tune in the
station that you want to store on the
number button.
4 Press the desired number button ((1) to
(6)) until “MEM” appears.
The number button indication appears in
the display.
Note
If you try to store another station on the same
number button, the previously stored station will
be erased.
Receiving the stored
stations
1 Press (SOURCE) repeatedly to select the
radio.
In case of tape playback, press Z to eject the
tape.
2 Press (MODE) repeatedly to select the
band.
3 Press the number button ((1) to (6)) on
which the desired station is stored.
If you cannot tune in a preset
station
— Automatic tuning/Local Seek Mode
Automatic tuning:
Press either side of (SEEK) to search for
the station.
Scanning stops when the unit receives a
station. Press either side of (SEEK)
repeatedly until the desired station is
received.
Local Seek Mode:
If the automatic tuning stops too
frequently, press (SENS) repeatedly until
“LOCAL-ON” appears.
“LCL” indicator is displayed.
Only the stations with relatively strong
signals will be tuned in.
Tip
If you know the frequency of the station you want
to listen to, press either side of (SEEK) until the
desired frequency appears (manual tuning).
If FM stereo reception is poor
— Monaural Mode
During radio reception, press (SENS)
repeatedly until “MONO-ON” appears.
“MONO” indicator is displayed.
The sound improves, but becomes
monaural (“ST” disappears).
To return to normal radio reception mode,
select “MONO-OFF.”

10
Changing the sound and
display settings
The following items can be set:
•A.SCRL (Auto Scroll)* (page 12).
•M.DSPL (Motion Display)
– the demonstration mode which appears
when the tape is ejected and no source is
selected (e.g., tuner is turned off).
•BEEP – to turn the beep sound on or off.
1 Press (SEL) and the desired preset
number button simultaneously.
(SEL) + (3): A.SCRL*
(SEL) + (4): M.DSPL
(SEL) + (6): BEEP
* When no CD or MD is playing, this item will
not appear.
2 Press (SEL) and the preset number
button repeatedly to select the desired
setting (Example: ON or OFF).
Other Functions
Adjusting the balance and
fader
You can adjust the balance and fader.
1 Press (SEL) repeatedly until “BAL” or
“FAD” appears.
Each time you press (SEL), the item
changes as follows:
LOW* t MID* t HIGH* t
BAL (left-right) t FAD (front-rear)
* When EQ3 is activated (page 11).
2 Press either side of the volume button to
adjust the selected item.
Adjust within 3 seconds after selecting the
item.
Attenuating the sound
Press (ATT).
After “ATT-ON” momentarily flashes, the
“ATT” indication appears in the display.
To restore the previous volume level, press
(ATT) again.
“ATT-OFF” flashes momentarily.

11
Setting the equalizer
— EQ3
You can select an equalizer curve for 7 music
types (XPLOD, VOCAL, CLUB, JAZZ, NEW
AGE, ROCK, CUSTOM, and OFF (equalizer
OFF)).
You can store a different equalizer setting for
each source.
Selecting the equalizer curve
1 Press (SOURCE) to select a source (Radio,
CD or MD) or insert a cassette.
2 Press (EQ3) repeatedly to select the
desired equalizer curve.
Each time you press (EQ3), the item
changes.
To cancel the equalizing effect, select
“OFF.”
Adjusting the equalizer curve
You can store and adjust the equalizer settings
for different tone ranges.
1 Press (SOURCE) to select a source (Radio,
CD or MD) or insert a cassette.
2 Press (EQ3) repeatedly to select the
desired equalizer curve.
3 Adjusting the equalizer curve.
1 Press (SEL) repeatedly to select the
desired tone range.
Each time you press (SEL), the tone
range changes.
LOW t MID t HI (t BAL t FAD)
2 Press either side of the volume button
repeatedly to adjust to the desired
volume level.
The volume level is adjustable by 1 dB
steps from –10 dB to +10 dB.
3 Repeat step 1 and 2 to adjust the
equalizer curve.
To restore the factory-set equalizer
curve, press (SEL) for 2 seconds.
After 3 seconds, the display returns to
normal play mode.
Note
When EQ3 is set to “OFF,” you cannot adjust the
equalizer settings.

12
Automatically scrolling a display
item
— Auto Scroll
If the disc name, artist name, or track name on
a CD TEXT disc or MD exceeds 8 characters
and the Auto Scroll function is on, information
automatically scrolls across the display as
follows:
• The disc name appears when the disc has
changed (if the disc name is selected).
• The track name appears when the track has
changed (if the track name is selected).
If you press (DSPL) to change the display
item, the disc or track name of the CD TEXT or
MD disc is scrolled automatically whether you
set the function ON or OFF.
During playback, press (SEL) and (3) to
select “A.SCRL-ON.”
To cancel Auto Scroll, select “A.SCRL-OFF.”
Note
For some discs with very many characters, the
following cases may happen:
— Some of the characters are not displayed.
— Auto Scroll does not work.
With Optional Equipment
CD/MD Unit
This unit can control external CD/MD units.
If you connect an optional CD unit with the
CD TEXT function, the CD TEXT information
will appear in the display when you play a CD
TEXT disc.
Playing a CD or MD
1 Press (SOURCE) repeatedly to select CD
or MD.
In case of tape playback, press Z to eject the
tape.
2 Press (MODE) until the desired unit
appears.
CD/MD playback starts.
When a CD/MD unit is connected, all the
tracks play from the beginning.
Tip
With the optional MG Memory Stick System-up
Player MGS-X1 connected to this unit, press
(SOURCE) to select “MD,” then press (MODE) to
select the unit number of the MD (MD1 or MD2,
etc.).
Changing the display item
Each time you press (DSPL) during CD, CD
TEXT, or MD playback, the item changes as
follows:
Elapsed playback time t
Disc name*
1
/Artist name*
2
t Track name*
3
t
Clock
*
1
If you have not labelled the disc or if there is no
disc name prerecorded on the MD, “NO NAME”
appears in the display.
*
2
If you play a CD TEXT disc, the artist name
appears in the display after the disc name. (Only
for CD TEXT discs with the artist name.)
*
3
If the track name of a CD TEXT disc or MD is not
prerecorded, “NO NAME” appears in the
display.

13
GB
Locating a specific track
— Automatic Music Sensor (AMS)
During playback, press either side of
(SEEK) momentarily for each track you
want to skip.
Locating a specific point in a track
— Manual Search
During playback, press and hold either
side of (SEEK). Release when you have
found the desired point.
Switching to other discs
During playback, press (1) (DISC –) or
(2) (DISC +) button.
The desired disc in the current unit begins
playback.
(1) (DISC –): For preceding discs
(2) (DISC +): For succeeding discs
To locate succeeding tracks
To locate preceding tracks
To search forward
To search backward
Disc number
Track number
SEEK
SEEK
Playing tracks repeatedly
— Repeat Play
You can select:
•REP-TRACK – to repeat a track.
•REP-DISC – to repeat a disc.
During playback, press (3) (REP)
repeatedly until the desired setting
appears.
REP-TRACK t REP-DISC t REP-OFF
Repeat Play starts.
To return to normal play mode, select “REP-
OFF.”
Playing tracks in random
order — Shuffle Play
You can select:
•SHUF-DISC – to play the tracks on the
current disc in random order.
•SHUF-CHGR – to play the tracks in the
current unit in random order.
•SHUF-ALL* – to play all the tracks in all the
units in random order.
During playback, press (4) (SHUF)
repeatedly until the desired setting
appears.
SHUF-DISC t SHUF-CHGR t SHUF-ALL* t
SHUF-OFF
Shuffle Play starts.
* “SHUF-ALL” is only available when you
connect two or more optional CD/MD units.
To return to normal play mode, select “SHUF-
OFF.”

14
Fuse (10 A)
Additional
Information
Maintenance
Fuse replacement
When replacing the fuse, be sure to use one
matching the amperage rating stated on the
original fuse. If the fuse blows, check the
power connection and replace the fuse. If the
fuse blows again after replacement, there may
be an internal malfunction. In such a case,
consult your nearest Sony dealer.
Warning
Never use a fuse with an amperage rating
exceeding the one supplied with the unit as
this could damage the unit.
Cleaning the connectors
The unit may not function properly if the
connectors between the unit and the front
panel are not clean. In order to prevent this,
open the front panel by pressing (RELEASE),
then detach it and clean the connectors with a
cotton swab dipped in alcohol. Do not apply
too much force. Otherwise, the connectors may
be damaged.
Main unit
Back of the front panel
Notes
• For safety, turn off the engine before cleaning
the connectors and remove the key from the
ignition switch.
• Never touch the connectors directly with your
fingers or any metal device.

15
Face the hook
inwards.
Removing the unit
1 Remove the protection collar.
1 Detach the front panel (page 6).
2 Engage the release keys together
with the protection collar.
3 Pull out the release keys to remove
the protection collar.
2 Remove the unit.
1 Insert both release keys together until
they click.
2 Pull the release keys to unseat the
unit.
3 Slide the unit out of the mounting.
Orient the release
key correctly.

16
Specifications
Cassette player section
Tape track 4-track 2-channel stereo
Wow and flutter 0.13 % (WRMS)
Frequency response 30 – 15,000 Hz
Signal-to-noise ratio 55 dB
Tuner section
FM
Tuning range FM tuning interval:
50 kHz/200 kHz
switchable
87.5 – 108.0 MHz
(at 50 kHz step)
87.5 – 107.9 MHz
(at 200 kHz step)
Aerial terminal External aerial connector
Intermediate frequency 10.7 MHz/450 kHz
Usable sensitivity 9 dBf
Selectivity 75 dB at 400 kHz
Signal-to-noise ratio 67 dB (stereo),
69 dB (mono)
Harmonic distortion at 1 kHz
0.5 % (stereo),
0.3 % (mono)
Separation 35 dB at 1 kHz
Frequency response 30 – 15,000 Hz
AM
Tuning range AM tuning interval:
9 kHz/10 kHz switchable
531 – 1,602 kHz
(at 9 kHz step)
530 – 1,710 kHz
(at 10 kHz step)
Aerial terminal External aerial connector
Intermediate frequency 10.7 MHz/450 kHz
Sensitivity 30 µV
Power amplifier section
Outputs Speaker outputs
(sure seal connectors)
Speaker impedance 4 – 8 ohms
Maximum power output 45 W × 4 (at 4 ohms)
General
Outputs Audio output
Power aerial relay control
lead
Power amplifier control
lead
Inputs BUS control input terminal
BUS audio input terminal
Tone controls Low:
±10 dB at 60 Hz (Xplod)
Mid:
±10 dB at 1 kHz (Xplod)
High:
±10 dB at 10 kHz (Xplod)
Power requirements 12 V DC car battery
(negative earth)
Dimensions Approx. 178 × 50 × 178 mm
(w/h/d)
Mounting dimensions Approx. 182 × 53 × 161 mm
(w/h/d)
Mass Approx. 1.2 kg
Supplied accessories Parts for installation and
connections (1 set)
Front panel case (1)
Optional accessories BUS cable (supplied with
an RCA pin cord)
RC-61 (1 m), RC-62 (2 m)
Optional equipment CD changer (10 discs)
CDX-656X
CD changer (6 discs)
CDX-T69X
MD changer (6 discs)
MDX-66XLP
MG-MS System-up player
MGS-X1
DVD changer
DVX-100S
Source selector
XA-C30
AUX-IN Selector
XA-300
Design and specifications are subject to change
without notice.

17
Actual total number: Sony XR-CA360X/CA360 (GB,ES,CT) 3-246-852-22(1)
Troubleshooting guide
The following checklist will help you remedy the problems you may encounter with your unit.
Before going through the checklist below, check the connections and operating procedures.
General
Tape playback
Problem
The sound is distorted.
Cause/Solution
The tape head is contaminated.
t Clean the head with a commercially available dry-type
cleaning cassette.
Radio reception
Problem
Preset tuning is not possible.
Automatic tuning is not
possible.
The stations cannot be
received.
The sound is hampered by
noises.
The “ST” indication flashes.
Cause/Solution
• Store the correct frequency in the memory.
• The broadcast signal is too weak.
•The broadcast signal is too weak.
t Use manual tuning.
•The local seek mode is set to ON.
t Set the local seek mode to OFF (page 9).
Connect an power aerial control lead (blue) or accessory power
supply lead (red) to the power supply lead of a car’s aerial
booster. (When your car has built-in FM/AM aerial in the
rear/side glass only.)
•Tune in the frequency accurately.
•The broadcast signal is too weak.
t Set to monaural mode (page 9).
Problem
No sound.
The contents of the memory
have been erased.
Indications do not appear
in the display.
Cause/Solution
•Cancel the ATT function (page 10).
• Set the fader control to the centre position for 2-speaker
systems.
• Adjust the volume with (+).
• The power cord or battery has been disconnected.
• The RESET button was pressed.
t Store again into the memory.
• Remove the front panel and clean the connectors. See
“Cleaning the connectors” (page 14) for details.
• The clock display disappears if you press (OFF) for 2
seconds.
t Press (OFF) again for 2 seconds to display the clock.
Problem
The sound skips.
Cause/Solution
A dirty or defective disc.
CD/MD playback

18
Error displays (when an optional CD/MD unit is connected)
The following indications will flash for about 5 seconds, and an alarm sound will be heard.
*
1
When an error occurs during playback of a CD or MD, the disc number of the CD or MD does not appear
in the display.
*
2
The disc number of the disc causing the error appears in the display.
If the above-mentioned solutions do not help improve the situation, consult your nearest Sony
dealer.
Solution
Insert the disc magazine in the CD/
MD unit.
Insert discs in the CD/MD unit.
Clean or insert the CD correctly.
Insert another MD.
Insert another CD/MD.
Play an MD with tracks recorded on
it.
Press the RESET button of the unit.
Close the lid or insert the MDs
properly.
Wait until the temperature goes
down below 50°C.
Display
NO MAG
NO DISC
ERROR
BLANK
RESET
NOT READY
HI TEMP
Cause
The disc magazine is not inserted in
the CD/MD unit.
No disc is inserted in the CD/MD unit.
A CD is dirty or inserted upside
down.*
2
An MD does not play because of some
problem.*
2
A CD/MD cannot play because of
some problem.
No tracks have been recorded on an
MD.*
2
The CD/MD unit cannot be operated
because of some problem.
The lid of the MD unit is open or MDs
are not inserted properly.
The ambient temperature is more than
50°C.
*
1
*
1

19

2
Gracias por adquirir este reproductor de
cassettes Sony.
Además de las operaciones de reproducción de
cassettes y de la radio, es posible ampliar el
sistema mediante la conexión de una unidad*
1
de CD/MD opcional.
Cuando emplee esta unidad o una unidad de
CD opcional conectada con la función CD
TEXT, la información CD TEXT aparecerá en el
visor al reproducir discos CD TEXT*
2
.
*
1
Es posible conectar un cambiador de CD, un
cambiador de MD, un reproductor de CD o un
reproductor de MD.
*
2
Un disco CD TEXT es un CD de audio que
contiene información, como el título del disco,
el nombre del cantante y los títulos de los
temas.
Esta información está registrada en el disco.
¡Bienvenido!
Precauciones
•Si aparca el automóvil bajo la luz solar
directa y se produce un considerable
aumento de temperatura en su interior, deje
que la unidad se enfríe antes de utilizarla.
•Si la unidad no recibe alimentación,
compruebe las conexiones en primer lugar. Si
todo está en orden, examine el fusible.
•Si los altavoces no emiten ningún sonido en
un sistema de 2 altavoces, ajuste el control de
equilibrio en la posición central.
•Si reproduce la cinta durante mucho tiempo,
el cassette puede calentarse debido al
amplificador de potencia incorporado. No
obstante, esto es normal.
Si desea realizar alguna consulta o solucionar
algún problema referentes a la unidad que no
se mencionen en este manual, póngase en
contacto con el proveedor Sony más próximo.
Para mantener una alta calidad de
sonido
Si existen soportes para bebidas cerca del
equipo de audio, tenga cuidado de que no
salpiquen zumos u otros refrescos sobre el
mismo, ya que la existencia de residuos
azucarados en la unidad o en las cintas de
cassette pueden ensuciar los cabezales de
reproducción, reducir la calidad del sonido o
impedir la reproducción del sonido.
Los kits de limpieza para cassettes no eliminan
las sustancias azucaradas de los cabezales de
cinta.

3
Notas sobre los cassettes
Cuidados de los cassettes
•No toque la superficie de la cinta del cassette,
ya que la suciedad o el polvo ensucian los
cabezales.
•Mantenga los cassettes alejados de equipos
provistos de imanes incorporados, como
altavoces y amplificadores, ya que el sonido
de la cinta grabada podría borrarse o
distorsionarse.
•No exponga los cassettes a la luz solar
directa, a temperaturas extremadamente frías
ni a la humedad.
•La existencia de holguras en la cinta puede
provocar que ésta se enrede en el mecanismo.
Antes de insertarla, utilice un lápiz o un
objeto similar para girar la bobina y eliminar
holguras.
•Los cassettes deformados y las etiquetas mal
adheridas pueden causar problemas al
insertar o expulsar las cintas. Retire o adhiera
con firmeza las etiquetas.
•Es posible que el sonido se distorsione
mientras se reproduce el cassette. El cabezal
del reproductor de cassettes debe limpiarse
después de 50 horas de uso.
Holgura
Cassettes de duración superior a 90 minutos
No se recomienda el uso de cassettes de
duración superior a 90 minutos excepto para
reproducciones largas y continuas. La cinta
utilizada en estos cassettes es muy fina y
tiende a estirarse con facilidad. Las
operaciones frecuentes de reproducción y
parada de estas cintas pueden hacer que éstas
se enreden en el mecanismo de la platina de
cassettes.

4
Índice
Sólo esta unidad Equipo opcional
Localización de los controles ................................. 5
Procedimientos iniciales
Restauración de la unidad ................................. 6
Extracción del panel frontal ............................... 6
Ajuste del reloj ..................................................... 7
Reproductor de cassettes
Escucha de cintas ................................................ 7
Recepción de la radio durante el avance rápido
o el rebobinado de la cinta
— Activación automática del sintonizador
(ATA) ............................................................... 8
Radio
Memorización automática de emisoras
— Memorización de la mejor sintonía
(BTM) ............................................................... 8
Memorización de las emisoras deseadas ......... 9
Recepción de las emisoras memorizadas ........ 9
Otras funciones
Ajuste del balance y el equilibrio.................... 10
Atenuación del sonido ..................................... 10
Cambio de los ajustes de sonido y
visualización ................................................. 10
Ajuste del ecualizador
— EQ3............................................................. 11
Unidad de CD/MD
Reproducción de discos compactos (CD) o de
minidiscos (MD) .......................................... 12
Reproducción repetida de temas
— Reproducción repetida ........................... 13
Reproducción de temas en orden aleatorio
— Reproducción aleatoria .......................... 13
Información complementaria
Mantenimiento .................................................. 14
Extracción de la unidad ................................... 15
Especificaciones ................................................. 16
Guía de solución de problemas....................... 17

5
Localización de los controles
Consulte las páginas enumeradas para obtener más información.
1 Botón SOURCE (Radio/CD/MD)
8, 9, 11, 12
2 Botón MODE
Durante la recepción de radio:
Selección de banda 8, 9
Durante la reproducción de CD/MD:
Selección de unidad de CD/MD 12
3 Botón de volumen +/– 7, 10, 11
4 Botón Z (expulsión) 7, 8, 9, 12
5 Visor
6 Botones m/M (bobinado rápido)/DIR
(cambio del sentido de transporte de la
cinta) 7, 8
7 Botón SEEK
Búsqueda 9
Sensor de música automático 13
Búsqueda manual 13
8 Botón DSPL (cambio del modo de
indicación) 7, 12
9 Botón EQ3 11
q; Botón RELEASE (liberación del panel
frontal) 6, 14
qa Botón SEL (selección) 7, 10, 11, 12
qs
Botón RESET (situado en el lado frontal de
la unidad,
detrás del
panel frontal) 6
qd Botón ATT (atenuación) 10
qf Botones numéricos 10, 12
Durante la recepción de la radio:
Selección de números de
memorización 9
Durante la reproducción de CD/MD:
(1) DISC – 13
(2) DISC + 13
(3) REP 13
(4) SHUF 13
qg Selector de frecuencia
(situado en la parte inferior de la unidad)
Consulte “Selector de frecuencia” del
manual de instalación/conexiones.
qh Botón BTM/ATA 8
qj Botón SENS 9
qk Botón OFF* 6
*Advertencia sobre la instalación en
un automóvil que no disponga de
posición ACC (accesorios) en el
interruptor de la llave de encendido
Después de apagar el motor, asegúrese de
presionar (OFF) en la unidad durante
2 segundos para desactivar la indicación
del reloj.
Si presiona (OFF) momentáneamente, la
indicación del reloj no se desactivará y esto
causará el desgaste de la batería.
XR-CA360X/CA360
SOURCE
MODE
SEL
RELEASE
EQ3
DSPL
ATT
DISC
REP
SHUF
ATA
123456
BTM
OFFSENS
SEEK
DIR

6
Inserción del panel frontal
Fije la parte A del panel a la parte B de la
unidad como se muestra en la ilustración y
presione sobre el lado izquierdo del panel
hasta que oiga un chasquido.
Notas
• Asegúrese de no fijar el panel frontal al revés.
• No ejerza excesiva presión sobre el panel frontal
al fijarlo a la unidad.
• No ejerza demasiada presión sobre el visor del
panel frontal.
• No exponga el panel frontal a la luz solar directa
ni a fuentes térmicas, como conductos de aire
caliente, ni lo deje en un lugar húmedo. No lo
deje nunca sobre el salpicadero de un automóvil
aparcado bajo la luz solar directa ni en ningún
otro lugar donde pueda producirse un aumento
considerable de la temperatura.
Alarma de precaución
Si apaga el motor del automóvil sin haber
extraído el panel frontal, la alarma de
precaución emitirá pitidos durante unos
segundos.
Si conecta un amplificador opcional de
potencia y no utiliza el incorporado, los pitidos
se desactivarán.
Procedimientos
iniciales
Restauración de la unidad
Antes de utilizar la unidad por primera vez, o
después de sustituir la batería del automóvil o
de cambiar las conexiones, debe restaurar
dicha unidad.
Extraiga el panel frontal y presione el botón
RESET con un objeto puntiagudo, como un
bolígrafo.
Nota
Al presionar RESET, se borra el ajuste del reloj y
algunas funciones memorizadas.
Extracción del panel
frontal
Es posible extraer el panel frontal de esta
unidad con el fin de evitar su robo.
1 Presione (OFF).
2 Presione (RELEASE), deslice el panel
frontal ligeramente hacia la izquierda y
tire de él hacia fuera.
Notas
• Tenga cuidado de que el panel no se caiga
cuando lo extraiga de la unidad.
• Si extrae el panel mientras la unidad está
encendida, la alimentación se desactivará
automáticamente para evitar que los altavoces se
dañen.
• Cuando lleve consigo el panel frontal, guárdelo
en el estuche suministrado.
(OFF)
(RELEASE)
A
B
Botón RESET

7
Reproductor de
cassettes
Escucha de cintas
Inserte un cassette.
La reproducción se iniciará de forma
automática.
Se reproduce la cara orientada hacia arriba.
Se reproduce la cara orientada hacia abajo.
Consejo
Para cambiar el sentido de reproducción de la
cinta, presione m y M.
Para detener la reproducción y
expulsar el cassette
Presione Z.
Bobinado rápido de la cinta
Durante la reproducción, presione
m o M.
* El indicador parpadeará durante el bobinado
rápido de la cinta.
Para iniciar la reproducción durante el avance
rápido o el rebobinado, presione el otro botón
de bobinado rápido parcialmente hasta que se
libere el botón bloqueado.
Ajuste del reloj
El reloj dispone de una indicación digital de
12 horas.
Ejemplo: Para ajustar el reloj a las 10:08
1 Presione (DSPL) durante 2 segundos.
La indicación de hora parpadea.
1 Presione cualquier lado del botón de
volumen para ajustar la hora.
2 Presione (SEL).
La indicación de minutos parpadea.
3 Presione cualquier lado del botón de
volumen para ajustar los minutos.
2 Presione (DSPL).
El reloj se pone en funcionamiento.
Al finalizar el ajuste del reloj, la pantalla
vuelve al modo de reproducción normal.
para avanzar
para retroceder
para avanzar
para retroceder
Indicador de
sentido*
Para avanzar
Para
rebobinar
FWD
REV
m
M
M
m

8
Recepción de la radio
durante el avance rápido
o el rebobinado de la cinta
— Activación automática del sintonizador
(ATA)
Cuando realice el avance rápido o el
rebobinado con el botón m o M, la radio se
encenderá automáticamente.
Durante la reproducción, presione (BTM)
(ATA) varias veces hasta que ”ATA-ON“
aparezca en el visor.
ATA-ON y ATA-OFF
Se inicia el modo ATA.
Para regresar al modo de reproducción
normal, seleccione “ATA-OFF”.
Radio
Memorización automática
de emisoras
— Memorización de la mejor sintonía (BTM)
Esta unidad selecciona las emisoras de señal
más intensa y las memoriza por orden de
frecuencia. Es posible memorizar hasta 6
emisoras de cada banda (FM1, FM2, FM3, AM1
y AM2).
Precaución
Para sintonizar emisoras durante la
conducción, utilice la función de
memorización de la mejor sintonía para evitar
accidentes.
1 Presione (SOURCE) varias veces para
seleccionar la radio.
Al reproducir una cinta, presione Z para
expulsar la cinta.
Cada vez que presione (SOURCE), la fuente
cambiará de la siguiente forma:
Radio t CD* t MD*
* Si el equipo opcional correspondiente no está
conectado, el elemento no aparecerá.
2 Presione (MODE) varias veces para
seleccionar la banda.
Cada vez que presione (MODE), la banda
cambiará de la siguiente forma:
FM1 t FM2 t FM3 t AM1 t AM2
3 Presione (BTM) (ATA) durante
2 segundos.
La unidad memoriza las emisoras en los
botones numéricos por orden de frecuencia.
La unidad emite un pitido cuando el ajuste
se memoriza.
Notas
• La unidad no memoriza emisoras de señales
débiles. Si se reciben pocas emisoras, algunos
botones numéricos conservarán su ajuste
anterior.
• Si el visor muestra algún número, la unidad
memorizará las emisoras a partir del número
mostrado en el visor.

9
Memorización de las
emisoras deseadas
Es posible memorizar hasta 18 emisoras de FM
(6 para cada una: FM1, 2 y 3) y hasta 12
emisoras de AM (6 para cada una: AM1 y 2),
en el orden que prefiera.
1 Presione (SOURCE) varias veces para
seleccionar la radio.
Al reproducir una cinta, presione Z para
expulsar la cinta.
2 Presione (MODE) varias veces para
seleccionar la banda.
3 Presione cualquier lado de (SEEK) para
sintonizar la emisora que desee
memorizar en el botón numérico.
4 Presione botón numérico que desee (de
(1) a (6)) hasta que aparezca “MEM”.
En el visor aparecerá la indicación del
botón numérico.
Nota
Si memoriza otra emisora en el mismo botón
numérico, la emisora previamente memorizada se
borrará.
Recepción de las emisoras
memorizadas
1 Presione (SOURCE) varias veces para
seleccionar la radio.
Al reproducir una cinta, presione Z para
expulsar la cinta.
2 Presione (MODE) varias veces para
seleccionar la banda.
3 Presione el botón numérico (de (1) a
(6)) en el que esté memorizada la
emisora que desee.
Si no puede sintonizar una emisora
programada
— Modo de sintonización automática/
Búsqueda local
Sintonización automática:
Presione cualquier lado de (SEEK) para
buscar la emisora.
La exploración se detiene cuando la unidad
recibe una emisora. Presione cualquier lado
de (SEEK) varias veces hasta recibir la
emisora deseada.
Modo de búsqueda local:
Si la sintonización automática se detiene
con demasiada frecuencia, presione
(SENS) varias veces hasta que aparezca
“LOCAL-ON”.
Se muestra el indicador “LCL”.
Sólo se sintonizarán las emisoras de señal
relativamente intensa.
Consejo
Si sabe cuál es la frecuencia de la emisora que
desea escuchar, presione cualquier lado de
(SEEK) hasta que aparezca la frecuencia deseada
(sintonización manual).
Si la recepción de FM en estéreo es
de mala calidad — Modo monofónico
Durante la recepción de la radio,
presione (SENS) varias veces hasta que
aparezca “MONO-ON”.
Se muestra el indicador “MONO”.
El sonido mejorará, aunque será
monofónico (“ST“ desaparece).
Para regresar al modo de recepción de radio
normal, seleccione “MONO-OFF”.

10
Cambio de los ajustes de
sonido y visualización
Es posible ajustar los siguientes elementos:
•A.SCRL (Desplazamiento automático)*
(página 12).
•M.DSPL (Desplazamiento de indicaciones)
– el modo de demostración que aparece
cuando la cinta se expulsa y no hay ninguna
fuente seleccionada (por ejemplo, el
sintonizador está apagado).
•BEEP – que permite activar o desactivar los
pitidos.
1 Presione (SEL) y el botón numérico
programado que desee
simultáneamente.
(SEL) + (3): A.SCRL*
(SEL) + (4): M.DSPL
(SEL) + (6): BEEP
* Cuando no se está reproduiendo ningún CD o
MD,este elemento no aparece.
2 Presione (SEL) y el botón numérico
programado para seleccionar el ajuste
deseado (Ejemplo: ON u OFF).
Otras funciones
Ajuste del balance y el
equilibrio
Es posible ajustar el balance y el equilibrio.
1 Presione (SEL) varias veces hasta que
aparezca “BAL” o “FAD”.
Cada vez que presiona (SEL), los
elementos cambian de la siguiente forma:
LOW* t MID* t HIGH* t
BAL (izquierdo y derecho) t
FAD (delantero y trasero)
* Si está activado EQ3 (página 11).
2 Ajuste el elemento seleccionado
presionando cualquier lado del botón de
volumen.
Realice el ajuste antes de que transcurran
3 segundos después de seleccionar el
elemento.
Atenuación del sonido
Presione (ATT).
Después de que “ATT-ON” parpadee
momentáneamente, la indicación “ATT”
aparece en el visor.
Para restaurar el nivel de volumen anterior,
vuelva a presionar (ATT).
“ATT-OFF” parpadea momentáneamente.

11
Ajuste del ecualizador
— EQ3
Es posible seleccionar una curva de
ecualizador para 7 tipos de música distintos
(XPLOD, VOCAL, CLUB, JAZZ, NEW AGE,
ROCK, CUSTOM y OFF (ecualizador
apagado)).
Puede almacenar un ajuste diferente del
ecualizador para cada fuente.
Selección de la curva de ecualizador
1 Presione (SOURCE) para seleccionar una
fuente (Radio, CD o MD) o bien inserte
un cassette.
2 Presione (EQ3) varias veces para
seleccionar la curva de ecualizador
deseada.
Cada vez que presione (EQ3), el elemento
cambiará.
Para cancelar el efecto de ecualización,
seleccione “OFF”.
Ajuste de la curva de ecualizador
Puede almacenar y definir los ajustes del
ecualizador para distintos rangos tonales.
1 Presione (SOURCE) para seleccionar una
fuente (Radio, CD o MD) o bien inserte
un cassette.
2 Presione (EQ3) varias veces para
seleccionar la curva de ecualizador
deseada.
3 Ajuste de la curva de ecualizador.
1 Presione (SEL) varias veces para
seleccionar el rango de tonos
deseado.
Cada vez que presione (SEL), el rango
de tonos cambiará.
LOW t MID t HI (t BAL t FAD)
2 Presione cualquier lado del botón de
volumen varias veces para ajustar el
nivel de volumen deseado.
El nivel de volumen puede ajustarse en
intervalos de 1 dB entre –10 dB y +10 dB.
3 Repita los pasos 1 y 2 para ajustar la
curva de ecualizador.
Para restaurar la curva de ecualizador
ajustada en fábrica, presione (SEL)
durante 2 segundos.
Transcurridos 3 segundos, la pantalla
vuelve al modo de reproducción
normal.
Nota
Si ajusta EQ3 en “OFF”, no podrá ajustar los
valores del ecualizador.

12
Equipo opcional
Unidad de CD/MD
Esta unidad puede controlar unidades de CD/
MD externas.
Si conecta una unidad opcional de CD con la
función CD TEXT, la información CD TEXT
aparecerá en el visor al reproducir discos CD
TEXT.
Reproducción de discos
compactos (CD) o de
minidiscos (MD)
1 Presione (SOURCE) varias veces para
seleccionar CD o MD.
Al reproducir una cinta, presione Z para
expulsar la cinta.
2 Presione (MODE) hasta que aparezca la
unidad que desee.
Se inicia la reproducción de CD/MD.
Si una unidad de CD/MD se encuentra
conectada, todos los temas se reproducen
desde el principio.
Consejo
Una vez conectado el reproductor opcional de
sistema de "MG Memory Stick" MGS-X1 a la
unidad, presione el botón (SOURCE) para
seleccionar "MD" y, a continuación, el botón
(MODE) para seleccionar el número de la unidad
de MD (MD1 o MD2, etc.).
Cambio de los elementos del visor
Cada vez que presione (DSPL) durante la
reproducción de CD, CD TEXT o MD, el
elemento cambiará de la siguiente forma:
Tiempo de reproducción transcurrido t
Título del disco*
1
/Nombre del cantante*
2
t
Título del tema*
3
t Reloj
*
1
Si no ha asignado título al disco o en el MD no
se ha registrado ningún título de disco
previamente, el visor mostrará “NO NAME”.
*
2
Si reproduce un disco CD TEXT, el nombre del
cantante aparecerá en el visor después del título
del disco. (Sólo para discos CD TEXT con nombre
del cantante).
*
3
Si el título del tema de un disco CD TEXT o de
un MD no se ha registrado previamente, el visor
mostrará “NO NAME”.
Desplazamiento automático de un
elemento del visor
— Desplazamiento automático
Si el título del disco, el nombre del artista o el
título del tema de un disco CD TEXT o MD es
superior a 8 caracteres y la función de
desplazamiento automático está activada, la
información se desplaza por el visor
automáticamente como se indica a
continuación:
• El título del disco aparece al cambiar éste (si se
ha seleccionado el título de disco).
• El título del tema aparece al cambiar éste (si se
ha seleccionado el título de tema).
Si presiona (DSPL) para cambiar el elemento
del visor, el título del disco o del tema del CD
TEXT o del disco MD se desplaza
automáticamente, tanto si pulsa ON como si
pulsa OFF.
Durante la reproducción, presione (SEL)
y (3) para seleccionar “A.SCRL-ON”.
Para cancelar el desplazamiento automático,
seleccione “A.SCRL-OFF”.
Nota
En algunos discos con un gran número de
caracteres, puede ocurrir lo siguiente:
— Algunos de los caracteres no se muestran.
— La función de desplazamiento automático no
funciona.

13
Localización de un tema específico
— Sensor de música automático (AMS)
Durante la reproducción, presione
cualquier lado de (SEEK)
momentáneamente por cada tema que
desee omitir.
Localización de un punto específico
de un tema — Búsqueda manual
Durante la reproducción, mantenga
presionado cualquier lado de (SEEK).
Deje de presionarlo cuando encuentre el
punto que desee.
Conmutación a otros discos
Durante la reproducción, presione el
botón (1) (DISC –) o (2) (DISC +).
Se inicia la reproducción del disco que se
encuentra en la unidad actual.
(1) (DISC –): Para discos anteriores
(2) (DISC +): Para discos posteriores
Para buscar hacia
delante
Número del disco
Número del tema
Para localizar
temas anteriores
Para localizar
temas posteriores
Para buscar hacia
atrás
SEEK
SEEK
Reproducción repetida de
temas — Reproducción repetida
Es posible seleccionar:
•REP-TRACK – para repetir un tema.
•REP-DISC – para repetir un disco.
Durante la reproducción, presione (3)
(REP) varias veces hasta que aparezca el
ajuste deseado.
REP-TRACK t REP-DISC t REP-OFF
Se inicia la reproducción repetida.
Para regresar al modo normal, seleccione
“REP-OFF”.
Reproducción de temas en
orden aleatorio
— Reproducción aleatoria
Es posible seleccionar:
•SHUF-DISC – para reproducir los temas del
disco actual en orden aleatorio.
•SHUF-CHGR – para reproducir los temas de
la unidad actual en orden aleatorio.
•SHUF-ALL* – para reproducir todos los
temas de todas las unidades en orden
aleatorio.
Durante la reproducción, presione (4)
(SHUF) varias veces hasta que aparezca
el ajuste deseado.
SHUF-DISC t SHUF-CHGR t SHUF-ALL* t
SHUF-OFF
Se inicia la reproducción en orden aleatorio.
* “SHUF-ALL” sólo se encuentra disponible si
conecta dos o más unidades de CDIMD
opcionales.
Para regresar al modo normal, seleccione
“SHUF-OFF”.

14
Información
complementaria
Mantenimiento
Sustitución del fusible
Al sustiuir el fusible, asegúrese de utilizar uno
que coincida con el amperaje indicado en el
fusible original. Si el fusible salta, compruebe
la conexión de alimentación y sustitúyalo. Si
después de sustituirlo vuelve a saltar, es
posible que exista un funcionamiento interno
defectuoso. En tal caso, póngase en contacto
con el proveedor Sony más próximo.
Advertencia
No utilice nunca un fusible con un amperaje
superior al del suministrado con la unidad, ya
que ésta podría dañarse.
Fusible (10 A)
Limpieza de los conectores
Es posible que la unidad no funcione
correctamente si los conectores de la unidad y
del panel frontal no están limpios. Para evitar
que ocurra esto, abra el panel fontal
presionando (RELEASE) y, a continuación,
extráigalo y limpie los conectores con un
bastoncillo de algodón humedecido en alcohol.
No aplique demasiada fuerza. De otro modo,
podrían dañarse los conectores.
Notas
• Como medida de seguridad, antes de limpiar los
conectores, apague el motor y extraiga la llave
del interruptor de encendido.
• No toque nunca los conectores directamente con
los dedos o con un dispositivo metálico.
Unidad principal
Parte posterior del panel frontal

15
Extracción de la unidad
1 Extraiga el marco de protección.
1 Extraiga el panel frontal (página 6).
2 Fije las llaves de liberación con el
marco de protección.
3 Tire de las llaves de liberación para
extraer el marco de protección.
2 Extraiga la unidad.
1 Inserte las dos llaves de liberación a la
vez hasta que oiga un “clic”.
2 Tire de las llaves de liberación para
extraer la unidad.
3 Deslice la unidad para extraerla del
emplazamiento.
Oriente la llave de
liberación en la
dirección correcta.
El gancho debe
encontrarse en la
parte interior.

16
Especificaciones
Sección del reproductor de
cassettes
Pista de cinta 4 pistas, 2 canales, estéreo
Fluctuación y trémolo 0,13 % (WRMS)
Respuesta de frecuencia 30 – 15 000 Hz
Relación señal-ruido 55 dB
Sección del sintonizador
FM
Gama de sintonía Intervalo de sintonía de
FM:
50 kHz/200 kHz
conmutable
87,5 – 108,0 MHz
(intervalo de 50 kHz)
87,5 – 107,9 MHz
(intervalo de 200 kHz)
Terminal de antena Conector para antena
exterior
Frecuencia intermedia 10,7 MHz/450 kHz
Sensibilidad útil 9 dBf
Selectividad 75 dB a 400 kHz
Relación señal-ruido 67 dB (estéreo),
69 dB (monofónico)
Distorsión armónica a 1 kHz
0,5 % (estéreo),
0,3 % (monofónico)
Separación entre canales 35 dB a 1 kHz
Respuesta en frecuencia 30 – 15 000 Hz
AM
Gama de sintonía Intervalo de sintonía de
AM:
9 kHz/10 kHz
conmutable
531 – 1 602 kHz
(intervalo de 9 kHz)
530 – 1 710 kHz
(intervalo de 10 kHz)
Terminal de antena Conector para antena
exterior
Frecuencia intermedia 10,7 MHz/450 kHz
Sensibilidad 30 µV
Sección del amplificador de
potencia
Salidas Salidas de altavoz
(conectores de sellado
seguro)
Impedancia de altavoz 4 – 8 Ω
Salida máxima de potencia
45 W × 4 (a 4 Ω)
Generales
Salidas Salida de audio
Cable de control de relé de
antena motorizada
Cable de control de
amplificador de potencia
Entradas Terminal de entrada de
control BUS
Terminal de entrada de
audio BUS
Controles de tono Graves:
±10 dB a 60 Hz (Xplod)
Medios:
±10 dB a 1 kHz (Xplod)
Agudos:
±10 dB a 10 kHz (Xplod)
Requisitos de alimentación
Batería de automóvil de
cc 12 V (toma a tierra
negativa)
Dimensiones Aprox. 178 × 50 × 178 mm
(an/al/prf)
Dimensiones de montaje Aprox. 182 × 53 × 161 mm
(an/al/prf)
Masa Aprox. 1,2 kg
Accesorios suministrados
Componentes para
instalación y conexiones
(1 juego)
Estuche para el panel
frontal (1)
Accesorios opcionales Cable BUS (suministrado
con un cable de pines
RCA)
RC-61 (1 m), RC-62 (2 m)
Equipo opcional
Cambiador de CD (10 discos)
CDX-656X
Cambiador de CD (6 discos)
CDX-T69X
Cambiador de MD (6 discos)
MDX-66XLP
Reproductor de sistema
MG-MS
MGS-X1
Cambiador de DVD
DVX-100S
Selector de fuente
XA-C30
Selector AUX-IN
XA-300
Diseño y especificaciones sujetos a cambios sin
previo aviso.

17
Actual total number: Sony XR-CA360X/CA360 (GB,ES,CT) 3-246-852-22(1)
Guía de solución de problemas
La siguiente lista de comprobaciones resulta útil para solucionar los problemas que puedan
producirse al utilizar la unidad.
Antes de consultar la lista que aparece a continuación, compruebe los procedimientos de conexión
y funcionamiento.
Generales
Problema
Ausencia de sonido.
Se ha borrado el contenido de
la memoria.
El visor no muestra
indicaciones.
Causa/Solución
•Cancele la función ATT (página 10).
•Ajuste el control de equilibrio en la posición central para
sistemas de 2 altavoces.
•Ajuste el volumen con (+).
•Ha desconectado el cable de alimentación o la batería.
•Ha presionado el botón RESET.
t Vuelva a realizar el almacenamiento en la memoria.
•Retire el panel frontal y limpie los conectores. Para obtener
más información, consulte el apartado “Limpieza de los
conectores” (página 14).
•La indicación del reloj desaparece si presiona (OFF) durante
2 segundos.
t Presione (OFF) de nuevo durante 2 segundos para
visualizar el reloj.
Problema
El sonido se distorsiona.
Causa/Solución
El cabezal de cinta está sucio.
t Limpie el cabezal con un cassette de limpieza de tipo seco
disponible en el mercado.
Reproducción de cintas
Recepción de radio
Causa/Solución
•Memorice la frecuencia correcta.
•La emisión es demasiado débil.
•La emisión es demasiado débil.
t Utilice la sintonización manual.
•El modo de búsqueda local está ajustado en ON.
t Ajústelo en OFF (página 9).
Conecte un cable de control de antena motorizada (azul) o un
cable de fuente de alimentación auxiliar (rojo) al cable de
fuente de alimentación del amplificador de antena del
automóvil. (Sólo si el automóvil incorpora una antena de
recepción de FM/AM en el cristal posterior/lateral.)
•Sintonice la frecuencia con precisión.
•La emisión es demasiado débil.
t Ajuste el modo en monofónico (página 9).
Problema
No es posible realizar la
sintonización programada.
No es posible realizar la
sintonización automática.
No es posible recibir las
emisoras.
Los ruidos obstaculizan el
sonido.
La indicación “ST” parpadea.
Reproducción de CD/MD
Problema
El sonido se recibe entrecortado.
Causa/Solución
Disco sucio o defectuoso.

18
Indicaciones de error (con una unidad opcional de CD/MD conectada)
Las siguientes indicaciones parpadean durante unos 5 segundos y se emite una alarma.
Solución
Inserte el cargador de discos en
la unidad de CD/MD.
Inserte los discos en la unidad
de CD/MD.
Limpie el CD o insértelo
correctamente.
Inserte otro MD.
Inserte otro CD/MD.
Reproduzca un MD con temas
grabados.
Presione el botón RESET de la
unidad.
Cierre la tapa o inserte los
minidiscos correctamente.
Espere hasta que la temperatura
descienda por debajo de 50°C.
Indicación
NO MAG
NO DISC
ERROR
BLANK
RESET
NOT READY
HI TEMP
Causa
No ha insertado el cargador de
discos en la unidad de CD/MD.
No ha insertado ningún disco en la
unidad de CD/MD.
El CD está sucio o se ha insertado
al revés.*
2
No es posible reproducir un MD
debido a algún problema.*
2
No es posible reproducir un CD/
MD debido a algún problema.
No ha grabado ningún tema en el
MD.*
2
No es posible emplear la unidad de
CD/MD debido a algún problema.
La tapa de la unidad de MD está
abierta o los minidiscos no se han
insertado correctamente.
La temperatura ambiente es
superior a 50°C.
*
1
*
1
*
1
Cuando se produce algún error durante la reproducción de un CD o MD, el número del CD o del MD no
aparece en el visor.
*
2
El visor mostrará el número del disco que causa el error.
Si el problema no se soluciona con las sugerencias anteriormente enumeradas, póngase en contacto
con el proveedor Sony más próximo.

19

2
•
•
•
•
*
1
*
2
*
1
*
2

3
•
•
•
•
•
•


5
1
2
3 +/–
4 Z
5
6 m M
7
8
9
0
qa
qs
qd
XR-CA360X/CA360
SOURCE
MODE
SEL
RELEASE
EQ3
DSPL
ATT
DISC
REP
SHUF
ATA
123456
BTM
OFFSENS
SEEK
DIR
qf
(1) –
(2)
(3)
(4)
qg
qh
qj
qk *
*
(OFF)
(OFF)

6
1 (OFF)
2 (RELEASE)
•
•
•
(OFF)
A
B
A
B
•
•
•
•
(RELEASE)

7
1 (DSPL)
1
2 (SEL)
3
2 (DSPL)
m M
Z
m M
*
*
m
M
M
m

8
m M
(BTM)
y
1 (SOURCE)
Z
(SOURCE)
t * t *
*
2 (MODE)
(MODE)
t t t t
3 (BTM)
•
•

9
1 (SOURCE)
Z
2 (MODE)
3 (SEEK)
4 (1) (6)
1 (SOURCE)
Z
2 (MODE)
3 (1)
(6)
(SEEK)
(SEEK)
(SENS)
(SEEK)
(SENS)

10
• *
•
–
• –
1 (SEL)
(SEL) (3) *
(SEL) (4)
(SEL) (6)
*
2 (SEL)
1 (SEL)
(SEL)
* t * t * t
t
*
2
(ATT)
(ATT)

11
1 (SOURCE)
2 (EQ3)
(EQ3)
1 (SOURCE)
2 (EQ3)
3
1 (SEL)
(SEL)
t t t t
2
–
3 1 2
(SEL)

12
•
•
(DSPL)
(SEL) (3)
1 (SOURCE)
Z
2 (MODE)
(SOURCE)
(MODE)
(DSPL)
t *
1
*
2
t
*
3
t
*
1
*
2
*
3

13
• –
• –
(3)
t t
• –
• –
• * –
(4)
t t * t
*
SEEK
(SEEK)
(SEEK)
(1) – (2)
(1) –
(2)
SEEK

14
(RELEASE)
•
•

15
1
1
2
3
2
1
2
3

16
–
–
–
–
–
–
µ
–

17
Actual total number: Sony XR-CA360X/CA360 (GB,ES,CT) 3-246-852-22(1)
•
•
• (+)
•
•
t
•
• (OFF)
t (OFF)
•
•
•
t
•
t
•
•
t
t

18
NO MAG
NO DISC
ERROR
BLANK
RESET
NOT READY
HI TEMP
*
*
*
*
1
*
1
*
*

19

Sony Corporation Printed in Malaysia
Transcripción de documentos
3-246-852-22 (1) FM/AM Cassette Car Stereo AUTOESTEREO PARA CASETE Operating Instructions GB Manual de instrucciones ES CT For installation and connections, see the supplied installation/connections manual. Para obtener información sobre la instalación y las conexiones, consulte el manual de instalación/conexiones suministrado. XR-CA360X XR-CA360 2003 Sony Corporation Actual total number: Sony XR-CA360X/CA360 (GB,ES,CT) 3-246-852-22(1) Welcome ! Precautions Thank you for purchasing this Sony Cassette Player. •If your car was parked in direct sunlight resulting in a considerable rise in temperature inside the car, allow the unit to cool off before operating it. •If no power is being supplied to the unit, check the connections first. If everything is in order, check the fuse. •If no sound comes from the speakers of a 2-speaker system, set the fader control to the centre position. •When a tape is played back for a long period, the cassette may become warm because of the built-in power amplifier. However, this is not a sign of malfunction. In addition to the cassette playback and radio operations, you can expand your system by connecting an optional CD/MD unit*1. When you operate this unit or a connected optional CD unit with the CD TEXT function, the CD TEXT information will appear in the display when you play a CD TEXT disc*2. *1 You can connect a CD changer, an MD changer, a CD player, or an MD player. *2 A CD TEXT disc is an audio CD that includes information such as the disc name, artist name, and track names. This information is recorded on the disc. If you have any questions or problems concerning your unit that are not covered in this manual, please consult your nearest Sony dealer. To maintain high quality sound If you have drink holders near your audio equipment, be careful not to splash juice or other soft drinks onto the car audio. Sugary residues on this unit or cassette tapes may contaminate the playback heads, reduce the sound quality, or prevent sound reproduction altogether. Cassette cleaning kits cannot remove sugar from the tape heads. 2 Notes on Cassettes Cassette care •Do not touch the tape surface of a cassette, as any dirt or dust will contaminate the heads. •Keep cassettes away from equipment with built-in magnets such as speakers and amplifiers, as erasure or distortion on the recorded tape could occur. •Do not expose cassettes to direct sunlight, extremely cold temperatures, or moisture. •Slack in the tape may cause the tape to be caught in the machine. Before you insert the tape, use a pencil or similar object to turn the reel and take up any slack. Cassettes longer than 90 minutes The use of cassettes longer than 90 minutes is not recommended except for long continuous play. The tape used for these cassettes is very thin and tends to stretch easily. Frequent playing and stopping of these tapes may cause them to become entangled in the cassette deck mechanism. Slack •Distorted cassettes and loose labels can cause problems when inserting or ejecting tapes. Remove or replace loose labels. •The sound may become distorted while playing the cassette. The cassette player head should be cleaned after each 50 hours of use. 3 Table of Contents With Optional Equipment This Unit Only Location of controls ................................................. 5 Getting Started Resetting the unit ................................................ 6 Detaching the front panel .................................. 6 Setting the clock .................................................. 7 CD/MD Unit Playing a CD or MD ......................................... 12 Playing tracks repeatedly — Repeat Play .............................................. 13 Playing tracks in random order — Shuffle Play .............................................. 13 Cassette Player Listening to a tape ............................................... 7 Radio reception during fast-forwarding or rewinding of a tape — Automatic Tuner Activation (ATA) ....... 8 Radio Storing stations automatically — Best Tuning Memory (BTM) ................... 8 Storing only the desired stations ...................... 9 Receiving the stored stations ............................. 9 Other Functions Adjusting the balance and fader ..................... Attenuating the sound ..................................... Changing the sound and display settings ..... Setting the equalizer — EQ3 ............................................................ 4 Additional Information 10 10 10 11 Maintenance ....................................................... Removing the unit ............................................ Specifications ..................................................... Troubleshooting guide ..................................... 14 15 16 17 Location of controls DIR SOURCE EQ3 SEEK MODE DSPL DISC RELEASE SEL ATT 1 2 REP SHUF 3 4 ATA 5 6 BTM SENS OFF XR-CA360X/CA360 Refer to the pages listed for details. 1 SOURCE (Radio/CD/MD) button 8, 9, 11, 12 2 MODE button During radio reception: Band select 8, 9 During CD/MD playback: CD/MD unit select 12 3 Volume +/– button 7, 10, 11 4 Z (eject) button 7, 8, 9, 12 5 Display window 6 m/M (fast winding)/DIR (tape transport direction change) buttons 7, 8 7 SEEK button Seek 9 Automatic Music Sensor 13 Manual search 13 8 DSPL (display mode change) button 7, 12 9 EQ3 button 11 0 RELEASE (front panel release) button 6, 14 qa SEL (select) button 7, 10, 11, 12 qs RESET button (located on the front side of the unit behind the front panel) 6 qf Number buttons 10, 12 During radio reception: Preset number select 9 During CD/MD playback: (1) DISC – 13 (2) DISC + 13 (3) REP 13 (4) SHUF 13 qg Frequency select switch (located on the bottom of the unit) See “Frequency select switch” in the Installation/Connections manual. qh BTM/ATA button 8 qj SENS button 9 qk OFF button* 6 * Warning when installing in a car without ACC (accessory) position on the ignition key switch Be sure to press (OFF) on the unit for 2 seconds to turn off the clock display after turning off the engine. When you press (OFF) momentarily, the clock display does not turn off and this causes battery wear. qd ATT (attenuate) button 10 5 Attaching the front panel Getting Started Attach part A of the front panel to part B of the unit as illustrated and push the left side into position until it clicks. Resetting the unit Before operating the unit for the first time, or after replacing the car battery or changing the connections, you must reset the unit. Remove the front panel and press the RESET button with a pointed object, such as a ballpoint pen. RESET button Note Pressing the RESET button will erase the clock setting and some memorised functions. Detaching the front panel You can detach the front panel of this unit to protect the unit from being stolen. 1 Press (OFF). 2 Press (RELEASE), then slide the front panel a little to the left, and pull it off towards you. (OFF) (RELEASE) Notes • Be sure not to drop the panel when detaching it from the unit. • If you detach the panel while the unit is still turned on, the power will turn off automatically to prevent the speakers from being damaged. • When carrying the front panel with you, use the supplied front panel case. 6 A B Notes • Be sure not to attach the front panel upside down. • Do not press the front panel too hard against the unit when attaching it. • Do not press too hard or put excessive pressure on the display window of the front panel. • Do not expose the front panel to direct sunlight or heat sources such as hot air ducts, and do not leave it in a humid place. Never leave it on the dashboard of a car parked in direct sunlight or where there may be a considerable rise in temperature. Caution alarm If you turn the car ignition off without removing the front panel, the caution alarm will beep for a few seconds. If you connect an optional power amplifier and do not use the built-in amplifier, the beep sound will be deactivated. Setting the clock The clock uses a 12-hour digital indication. Cassette Player Example: To set the clock to 10:08 1 Press (DSPL) for 2 seconds. The hour indication flashes. Listening to a tape Insert a cassette. Playback starts automatically. 1 Press either side of the volume button to set the hour. to go forward The side facing up is played. to go back The side facing down is played. 2 Press (SEL). The minute indication flashes. 3 Press either side of the volume button to set the minute. to go forward Tip To change the tape‘s playback direction, press m and M. To stop playback and eject the cassette Press Z. Fast-winding the tape to go back 2 Press (DSPL). The clock starts. After the clock setting is complete, the display returns to normal play mode. During playback, press m or M. Direction indicator* To advance To rewind FWD M m REV m M * The indicator will flash while fast-winding the tape. To start playback during fast-forwarding or rewinding, press the other fast-winding button partially until the locked button is released. 7 Radio reception during fast-forwarding or rewinding of a tape — Automatic Tuner Activation (ATA) When fast-forwarding or rewinding with the m or M button, the radio will turn on automatically. During playback, press (BTM) (ATA) repeatedly until “ATA-ON” in the display appears. ATA-ON y ATA-OFF ATA mode starts. To return to normal play mode, select “ATAOFF.” Radio Storing stations automatically — Best Tuning Memory (BTM) The unit selects the stations with the strongest signals and stores them in the order of their frequencies. You can store up to 6 stations on each band (FM1, FM2, FM3, AM1, and AM2). Caution When tuning in stations while driving, use Best Tuning Memory to prevent accidents. 1 Press (SOURCE) repeatedly to select the radio. In case of tape playback, press Z to eject the tape. Each time you press (SOURCE), the source changes as follows: Radio t CD* t MD* * If the corresponding optional equipment is not connected, this item will not appear. 2 Press (MODE) repeatedly to select the band. Each time you press (MODE), the band changes as follows: FM1 t FM2 t FM3 t AM1 t AM2 3 Press (BTM) (ATA) for 2 seconds. The unit stores stations in the order of their frequencies on the number buttons. A beep sounds when the setting is stored. Notes • The unit does not store stations with weak signals. If only a few stations can be received, some number buttons will retain their former setting. • When a number is indicated in the display, the unit starts storing stations from the one currently displayed. 8 Storing only the desired stations You can preset up to 18 FM stations (6 each for FM1, 2, and 3) and up to 12 AM stations (6 each for AM1 and 2) in the order of your choice. 1 Press (SOURCE) repeatedly to select the radio. In case of tape playback, press Z to eject the tape. 2 Press (MODE) repeatedly to select the band. 3 Press either side of (SEEK) to tune in the station that you want to store on the number button. 4 Press the desired number button ((1) to (6)) until “MEM” appears. The number button indication appears in the display. Note If you try to store another station on the same number button, the previously stored station will be erased. If you cannot tune in a preset station — Automatic tuning/Local Seek Mode Automatic tuning: Press either side of (SEEK) to search for the station. Scanning stops when the unit receives a station. Press either side of (SEEK) repeatedly until the desired station is received. Local Seek Mode: If the automatic tuning stops too frequently, press (SENS) repeatedly until “LOCAL-ON” appears. “LCL” indicator is displayed. Only the stations with relatively strong signals will be tuned in. Tip If you know the frequency of the station you want to listen to, press either side of (SEEK) until the desired frequency appears (manual tuning). If FM stereo reception is poor — Monaural Mode During radio reception, press (SENS) repeatedly until “MONO-ON” appears. Receiving the stored stations “MONO” indicator is displayed. 1 Press (SOURCE) repeatedly to select the radio. In case of tape playback, press Z to eject the tape. 2 Press (MODE) repeatedly to select the band. 3 Press the number button ((1) to (6)) on which the desired station is stored. The sound improves, but becomes monaural (“ST” disappears). To return to normal radio reception mode, select “MONO-OFF.” 9 Other Functions Changing the sound and display settings You can adjust the balance and fader. The following items can be set: •A.SCRL (Auto Scroll)* (page 12). •M.DSPL (Motion Display) – the demonstration mode which appears when the tape is ejected and no source is selected (e.g., tuner is turned off). •BEEP – to turn the beep sound on or off. 1 1 Adjusting the balance and fader Press (SEL) repeatedly until “BAL” or “FAD” appears. Each time you press (SEL), the item changes as follows: (SEL) + (3): A.SCRL* (SEL) + (4): M.DSPL (SEL) + (6): BEEP LOW* t MID* t HIGH* t BAL (left-right) t FAD (front-rear) * When no CD or MD is playing, this item will not appear. * When EQ3 is activated (page 11). 2 Press either side of the volume button to adjust the selected item. Adjust within 3 seconds after selecting the item. Attenuating the sound Press (ATT). After “ATT-ON” momentarily flashes, the “ATT” indication appears in the display. To restore the previous volume level, press (ATT) again. “ATT-OFF” flashes momentarily. 10 Press (SEL) and the desired preset number button simultaneously. 2 Press (SEL) and the preset number button repeatedly to select the desired setting (Example: ON or OFF). Setting the equalizer — EQ3 You can select an equalizer curve for 7 music types (XPLOD, VOCAL, CLUB, JAZZ, NEW AGE, ROCK, CUSTOM, and OFF (equalizer OFF)). You can store a different equalizer setting for each source. Selecting the equalizer curve 1 Press (SOURCE) to select a source (Radio, CD or MD) or insert a cassette. 2 Press (EQ3) repeatedly to select the desired equalizer curve. Each time you press (EQ3), the item changes. Adjusting the equalizer curve You can store and adjust the equalizer settings for different tone ranges. 1 Press (SOURCE) to select a source (Radio, CD or MD) or insert a cassette. 2 Press (EQ3) repeatedly to select the desired equalizer curve. 3 Adjusting the equalizer curve. 1 Press (SEL) repeatedly to select the desired tone range. Each time you press (SEL), the tone range changes. LOW t MID t HI (t BAL t FAD) To cancel the equalizing effect, select “OFF.” 2 Press either side of the volume button repeatedly to adjust to the desired volume level. The volume level is adjustable by 1 dB steps from –10 dB to +10 dB. 3 Repeat step 1 and 2 to adjust the equalizer curve. To restore the factory-set equalizer curve, press (SEL) for 2 seconds. After 3 seconds, the display returns to normal play mode. Note When EQ3 is set to “OFF,” you cannot adjust the equalizer settings. 11 With Optional Equipment CD/MD Unit This unit can control external CD/MD units. If you connect an optional CD unit with the CD TEXT function, the CD TEXT information will appear in the display when you play a CD TEXT disc. Playing a CD or MD 1 2 Press (SOURCE) repeatedly to select CD or MD. In case of tape playback, press Z to eject the tape. Press (MODE) until the desired unit appears. CD/MD playback starts. When a CD/MD unit is connected, all the tracks play from the beginning. Tip With the optional MG Memory Stick System-up Player MGS-X1 connected to this unit, press (SOURCE) to select “MD,” then press (MODE) to select the unit number of the MD (MD1 or MD2, etc.). Changing the display item Each time you press (DSPL) during CD, CD TEXT, or MD playback, the item changes as follows: Elapsed playback time t Disc name*1/Artist name*2 t Track name*3 t Clock *1 If you have not labelled the disc or if there is no disc name prerecorded on the MD, “NO NAME” appears in the display. *2 If you play a CD TEXT disc, the artist name appears in the display after the disc name. (Only for CD TEXT discs with the artist name.) *3 If the track name of a CD TEXT disc or MD is not prerecorded, “NO NAME” appears in the display. 12 Automatically scrolling a display item — Auto Scroll If the disc name, artist name, or track name on a CD TEXT disc or MD exceeds 8 characters and the Auto Scroll function is on, information automatically scrolls across the display as follows: • The disc name appears when the disc has changed (if the disc name is selected). • The track name appears when the track has changed (if the track name is selected). If you press (DSPL) to change the display item, the disc or track name of the CD TEXT or MD disc is scrolled automatically whether you set the function ON or OFF. During playback, press (SEL) and (3) to select “A.SCRL-ON.” To cancel Auto Scroll, select “A.SCRL-OFF.” Note For some discs with very many characters, the following cases may happen: — Some of the characters are not displayed. — Auto Scroll does not work. Locating a specific track — Automatic Music Sensor (AMS) During playback, press either side of (SEEK) momentarily for each track you want to skip. To locate succeeding tracks SEEK To locate preceding tracks Locating a specific point in a track — Manual Search During playback, press and hold either side of (SEEK). Release when you have found the desired point. Playing tracks repeatedly — Repeat Play You can select: • REP-TRACK – to repeat a track. • REP-DISC – to repeat a disc. During playback, press (3) (REP) repeatedly until the desired setting appears. REP-TRACK t REP-DISC t REP-OFF Repeat Play starts. To return to normal play mode, select “REPOFF.” To search forward SEEK To search backward Switching to other discs During playback, press (1) (DISC –) or (2) (DISC +) button. The desired disc in the current unit begins playback. (1) (DISC –): For preceding discs (2) (DISC +): For succeeding discs Disc number Track number Playing tracks in random order — Shuffle Play GB You can select: • SHUF-DISC – to play the tracks on the current disc in random order. • SHUF-CHGR – to play the tracks in the current unit in random order. • SHUF-ALL* – to play all the tracks in all the units in random order. During playback, press (4) (SHUF) repeatedly until the desired setting appears. SHUF-DISC t SHUF-CHGR t SHUF-ALL* t SHUF-OFF Shuffle Play starts. * “SHUF-ALL” is only available when you connect two or more optional CD/MD units. To return to normal play mode, select “SHUFOFF.” 13 Additional Information Cleaning the connectors The unit may not function properly if the connectors between the unit and the front panel are not clean. In order to prevent this, open the front panel by pressing (RELEASE), then detach it and clean the connectors with a cotton swab dipped in alcohol. Do not apply too much force. Otherwise, the connectors may be damaged. Maintenance Fuse replacement When replacing the fuse, be sure to use one matching the amperage rating stated on the original fuse. If the fuse blows, check the power connection and replace the fuse. If the fuse blows again after replacement, there may be an internal malfunction. In such a case, consult your nearest Sony dealer. Fuse (10 A) Warning Never use a fuse with an amperage rating exceeding the one supplied with the unit as this could damage the unit. 14 Main unit Back of the front panel Notes • For safety, turn off the engine before cleaning the connectors and remove the key from the ignition switch. • Never touch the connectors directly with your fingers or any metal device. Removing the unit 1 Remove the protection collar. 1 Detach the front panel (page 6). 2 Engage the release keys together with the protection collar. Orient the release key correctly. 3 Pull out the release keys to remove the protection collar. 2 Remove the unit. 1 Insert both release keys together until they click. Face the hook inwards. 2 Pull the release keys to unseat the unit. 3 Slide the unit out of the mounting. 15 Specifications Cassette player section Tape track Wow and flutter Frequency response Signal-to-noise ratio 4-track 2-channel stereo 0.13 % (WRMS) 30 – 15,000 Hz 55 dB General Outputs Inputs Tuner section Tone controls FM Tuning range FM tuning interval: 50 kHz/200 kHz switchable 87.5 – 108.0 MHz (at 50 kHz step) 87.5 – 107.9 MHz (at 200 kHz step) Aerial terminal External aerial connector Intermediate frequency 10.7 MHz/450 kHz Usable sensitivity 9 dBf Selectivity 75 dB at 400 kHz Signal-to-noise ratio 67 dB (stereo), 69 dB (mono) Harmonic distortion at 1 kHz 0.5 % (stereo), 0.3 % (mono) Separation 35 dB at 1 kHz Frequency response 30 – 15,000 Hz AM Tuning range Aerial terminal Intermediate frequency Sensitivity AM tuning interval: 9 kHz/10 kHz switchable 531 – 1,602 kHz (at 9 kHz step) 530 – 1,710 kHz (at 10 kHz step) External aerial connector 10.7 MHz/450 kHz 30 µV Power amplifier section Speaker outputs (sure seal connectors) Speaker impedance 4 – 8 ohms Maximum power output 45 W × 4 (at 4 ohms) Power requirements Dimensions Mounting dimensions Mass Supplied accessories Optional accessories Optional equipment Audio output Power aerial relay control lead Power amplifier control lead BUS control input terminal BUS audio input terminal Low: ±10 dB at 60 Hz (Xplod) Mid: ±10 dB at 1 kHz (Xplod) High: ±10 dB at 10 kHz (Xplod) 12 V DC car battery (negative earth) Approx. 178 × 50 × 178 mm (w/h/d) Approx. 182 × 53 × 161 mm (w/h/d) Approx. 1.2 kg Parts for installation and connections (1 set) Front panel case (1) BUS cable (supplied with an RCA pin cord) RC-61 (1 m), RC-62 (2 m) CD changer (10 discs) CDX-656X CD changer (6 discs) CDX-T69X MD changer (6 discs) MDX-66XLP MG-MS System-up player MGS-X1 DVD changer DVX-100S Source selector XA-C30 AUX-IN Selector XA-300 Outputs 16 Design and specifications are subject to change without notice. Troubleshooting guide The following checklist will help you remedy the problems you may encounter with your unit. Before going through the checklist below, check the connections and operating procedures. General Problem Cause/Solution No sound. •Cancel the ATT function (page 10). • Set the fader control to the centre position for 2-speaker systems. • Adjust the volume with (+). The contents of the memory have been erased. • The power cord or battery has been disconnected. • The RESET button was pressed. t Store again into the memory. Indications do not appear in the display. • Remove the front panel and clean the connectors. See “Cleaning the connectors” (page 14) for details. • The clock display disappears if you press (OFF) for 2 seconds. t Press (OFF) again for 2 seconds to display the clock. Tape playback Problem Cause/Solution The sound is distorted. The tape head is contaminated. t Clean the head with a commercially available dry-type cleaning cassette. Radio reception Problem Cause/Solution Preset tuning is not possible. • Store the correct frequency in the memory. • The broadcast signal is too weak. Automatic tuning is not possible. •The broadcast signal is too weak. t Use manual tuning. •The local seek mode is set to ON. t Set the local seek mode to OFF (page 9). The stations cannot be received. The sound is hampered by noises. Connect an power aerial control lead (blue) or accessory power supply lead (red) to the power supply lead of a car’s aerial booster. (When your car has built-in FM/AM aerial in the rear/side glass only.) The “ST” indication flashes. •Tune in the frequency accurately. •The broadcast signal is too weak. t Set to monaural mode (page 9). CD/MD playback Problem Cause/Solution The sound skips. A dirty or defective disc. 17 Actual total number: Sony XR-CA360X/CA360 (GB,ES,CT) 3-246-852-22(1) Error displays (when an optional CD/MD unit is connected) The following indications will flash for about 5 seconds, and an alarm sound will be heard. Display NO MAG NO DISC Cause Solution The disc magazine is not inserted in the CD/MD unit. Insert the disc magazine in the CD/ MD unit. No disc is inserted in the CD/MD unit. Insert discs in the CD/MD unit. A CD is dirty or inserted upside down.*2 Clean or insert the CD correctly. *1 An MD does not play because of some Insert another MD. problem.*2 ERROR A CD/MD cannot play because of some problem. Insert another CD/MD. BLANK * No tracks have been recorded on an MD.*2 Play an MD with tracks recorded on it. RESET The CD/MD unit cannot be operated because of some problem. Press the RESET button of the unit. 1 The lid of the MD unit is open or MDs Close the lid or insert the MDs properly. NOT READY are not inserted properly. ambient temperature is more than HI TEMP The 50°C. Wait until the temperature goes down below 50°C. *1 When an error occurs during playback of a CD or MD, the disc number of the CD or MD does not appear in the display. *2 The disc number of the disc causing the error appears in the display. If the above-mentioned solutions do not help improve the situation, consult your nearest Sony dealer. 18 19 ¡Bienvenido! Precauciones Gracias por adquirir este reproductor de cassettes Sony. •Si aparca el automóvil bajo la luz solar directa y se produce un considerable aumento de temperatura en su interior, deje que la unidad se enfríe antes de utilizarla. •Si la unidad no recibe alimentación, compruebe las conexiones en primer lugar. Si todo está en orden, examine el fusible. •Si los altavoces no emiten ningún sonido en un sistema de 2 altavoces, ajuste el control de equilibrio en la posición central. •Si reproduce la cinta durante mucho tiempo, el cassette puede calentarse debido al amplificador de potencia incorporado. No obstante, esto es normal. Además de las operaciones de reproducción de cassettes y de la radio, es posible ampliar el sistema mediante la conexión de una unidad*1 de CD/MD opcional. Cuando emplee esta unidad o una unidad de CD opcional conectada con la función CD TEXT, la información CD TEXT aparecerá en el visor al reproducir discos CD TEXT*2. *1 Es posible conectar un cambiador de CD, un cambiador de MD, un reproductor de CD o un reproductor de MD. *2 Un disco CD TEXT es un CD de audio que contiene información, como el título del disco, el nombre del cantante y los títulos de los temas. Esta información está registrada en el disco. Si desea realizar alguna consulta o solucionar algún problema referentes a la unidad que no se mencionen en este manual, póngase en contacto con el proveedor Sony más próximo. Para mantener una alta calidad de sonido Si existen soportes para bebidas cerca del equipo de audio, tenga cuidado de que no salpiquen zumos u otros refrescos sobre el mismo, ya que la existencia de residuos azucarados en la unidad o en las cintas de cassette pueden ensuciar los cabezales de reproducción, reducir la calidad del sonido o impedir la reproducción del sonido. Los kits de limpieza para cassettes no eliminan las sustancias azucaradas de los cabezales de cinta. 2 Notas sobre los cassettes Cuidados de los cassettes •No toque la superficie de la cinta del cassette, ya que la suciedad o el polvo ensucian los cabezales. •Mantenga los cassettes alejados de equipos provistos de imanes incorporados, como altavoces y amplificadores, ya que el sonido de la cinta grabada podría borrarse o distorsionarse. •No exponga los cassettes a la luz solar directa, a temperaturas extremadamente frías ni a la humedad. •La existencia de holguras en la cinta puede provocar que ésta se enrede en el mecanismo. Antes de insertarla, utilice un lápiz o un objeto similar para girar la bobina y eliminar holguras. Cassettes de duración superior a 90 minutos No se recomienda el uso de cassettes de duración superior a 90 minutos excepto para reproducciones largas y continuas. La cinta utilizada en estos cassettes es muy fina y tiende a estirarse con facilidad. Las operaciones frecuentes de reproducción y parada de estas cintas pueden hacer que éstas se enreden en el mecanismo de la platina de cassettes. Holgura •Los cassettes deformados y las etiquetas mal adheridas pueden causar problemas al insertar o expulsar las cintas. Retire o adhiera con firmeza las etiquetas. •Es posible que el sonido se distorsione mientras se reproduce el cassette. El cabezal del reproductor de cassettes debe limpiarse después de 50 horas de uso. 3 Índice Sólo esta unidad Localización de los controles ................................. 5 Procedimientos iniciales Restauración de la unidad ................................. 6 Extracción del panel frontal ............................... 6 Ajuste del reloj ..................................................... 7 Equipo opcional Unidad de CD/MD Reproducción de discos compactos (CD) o de minidiscos (MD) .......................................... 12 Reproducción repetida de temas — Reproducción repetida ........................... 13 Reproducción de temas en orden aleatorio — Reproducción aleatoria .......................... 13 Reproductor de cassettes Escucha de cintas ................................................ 7 Recepción de la radio durante el avance rápido o el rebobinado de la cinta — Activación automática del sintonizador (ATA) ............................................................... 8 Radio Memorización automática de emisoras — Memorización de la mejor sintonía (BTM) ............................................................... 8 Memorización de las emisoras deseadas ......... 9 Recepción de las emisoras memorizadas ........ 9 Otras funciones Ajuste del balance y el equilibrio .................... 10 Atenuación del sonido ..................................... 10 Cambio de los ajustes de sonido y visualización ................................................. 10 Ajuste del ecualizador — EQ3 ............................................................. 11 4 Información complementaria Mantenimiento .................................................. Extracción de la unidad ................................... Especificaciones ................................................. Guía de solución de problemas ....................... 14 15 16 17 Localización de los controles DIR SOURCE EQ3 SEEK MODE DSPL DISC RELEASE SEL ATT 1 2 REP SHUF 3 4 ATA 5 6 BTM SENS OFF XR-CA360X/CA360 Consulte las páginas enumeradas para obtener más información. 1 Botón SOURCE (Radio/CD/MD) 8, 9, 11, 12 2 Botón MODE Durante la recepción de radio: Selección de banda 8, 9 Durante la reproducción de CD/MD: Selección de unidad de CD/MD 12 3 Botón de volumen +/– 7, 10, 11 4 Botón Z (expulsión) 7, 8, 9, 12 5 Visor 6 Botones m/M (bobinado rápido)/DIR (cambio del sentido de transporte de la cinta) 7, 8 7 Botón SEEK Búsqueda 9 Sensor de música automático 13 Búsqueda manual 13 8 Botón DSPL (cambio del modo de indicación) 7, 12 9 Botón EQ3 11 q; Botón RELEASE (liberación del panel frontal) 6, 14 qa Botón SEL (selección) 7, 10, 11, 12 qs Botón RESET (situado en el lado frontal de la unidad, detrás del panel frontal) 6 qd Botón ATT (atenuación) 10 qf Botones numéricos 10, 12 Durante la recepción de la radio: Selección de números de memorización 9 Durante la reproducción de CD/MD: (1) DISC – 13 (2) DISC + 13 (3) REP 13 (4) SHUF 13 qg Selector de frecuencia (situado en la parte inferior de la unidad) Consulte “Selector de frecuencia” del manual de instalación/conexiones. qh Botón BTM/ATA 8 qj Botón SENS 9 qk Botón OFF* 6 * Advertencia sobre la instalación en un automóvil que no disponga de posición ACC (accesorios) en el interruptor de la llave de encendido Después de apagar el motor, asegúrese de presionar (OFF) en la unidad durante 2 segundos para desactivar la indicación del reloj. Si presiona (OFF) momentáneamente, la indicación del reloj no se desactivará y esto causará el desgaste de la batería. 5 Procedimientos iniciales Inserción del panel frontal Fije la parte A del panel a la parte B de la unidad como se muestra en la ilustración y presione sobre el lado izquierdo del panel hasta que oiga un chasquido. Restauración de la unidad Antes de utilizar la unidad por primera vez, o después de sustituir la batería del automóvil o de cambiar las conexiones, debe restaurar dicha unidad. Extraiga el panel frontal y presione el botón RESET con un objeto puntiagudo, como un bolígrafo. Botón RESET Nota Al presionar RESET, se borra el ajuste del reloj y algunas funciones memorizadas. Extracción del panel frontal Es posible extraer el panel frontal de esta unidad con el fin de evitar su robo. 1 Presione (OFF). 2 Presione (RELEASE), deslice el panel frontal ligeramente hacia la izquierda y tire de él hacia fuera. (OFF) (RELEASE) Notas • Tenga cuidado de que el panel no se caiga cuando lo extraiga de la unidad. • Si extrae el panel mientras la unidad está encendida, la alimentación se desactivará automáticamente para evitar que los altavoces se dañen. • Cuando lleve consigo el panel frontal, guárdelo en el estuche suministrado. 6 A B Notas • Asegúrese de no fijar el panel frontal al revés. • No ejerza excesiva presión sobre el panel frontal al fijarlo a la unidad. • No ejerza demasiada presión sobre el visor del panel frontal. • No exponga el panel frontal a la luz solar directa ni a fuentes térmicas, como conductos de aire caliente, ni lo deje en un lugar húmedo. No lo deje nunca sobre el salpicadero de un automóvil aparcado bajo la luz solar directa ni en ningún otro lugar donde pueda producirse un aumento considerable de la temperatura. Alarma de precaución Si apaga el motor del automóvil sin haber extraído el panel frontal, la alarma de precaución emitirá pitidos durante unos segundos. Si conecta un amplificador opcional de potencia y no utiliza el incorporado, los pitidos se desactivarán. Ajuste del reloj El reloj dispone de una indicación digital de 12 horas. Ejemplo: Para ajustar el reloj a las 10:08 1 Presione (DSPL) durante 2 segundos. La indicación de hora parpadea. Reproductor de cassettes Escucha de cintas Inserte un cassette. La reproducción se iniciará de forma automática. 1 Presione cualquier lado del botón de volumen para ajustar la hora. para avanzar Se reproduce la cara orientada hacia arriba. para retroceder Se reproduce la cara orientada hacia abajo. 2 Presione (SEL). La indicación de minutos parpadea. 3 Presione cualquier lado del botón de volumen para ajustar los minutos. Consejo Para cambiar el sentido de reproducción de la cinta, presione m y M. Para detener la reproducción y expulsar el cassette para avanzar Presione Z. Bobinado rápido de la cinta para retroceder 2 Durante la reproducción, presione m o M. Indicador de sentido* Presione (DSPL). FWD REV El reloj se pone en funcionamiento. Al finalizar el ajuste del reloj, la pantalla vuelve al modo de reproducción normal. Para avanzar Para rebobinar M m m M * El indicador parpadeará durante el bobinado rápido de la cinta. Para iniciar la reproducción durante el avance rápido o el rebobinado, presione el otro botón de bobinado rápido parcialmente hasta que se libere el botón bloqueado. 7 Recepción de la radio durante el avance rápido o el rebobinado de la cinta — Activación automática del sintonizador (ATA) Cuando realice el avance rápido o el rebobinado con el botón m o M, la radio se encenderá automáticamente. Durante la reproducción, presione (BTM) (ATA) varias veces hasta que ”ATA-ON“ aparezca en el visor. ATA-ON y ATA-OFF Se inicia el modo ATA. Para regresar al modo de reproducción normal, seleccione “ATA-OFF”. Radio Memorización automática de emisoras — Memorización de la mejor sintonía (BTM) Esta unidad selecciona las emisoras de señal más intensa y las memoriza por orden de frecuencia. Es posible memorizar hasta 6 emisoras de cada banda (FM1, FM2, FM3, AM1 y AM2). Precaución Para sintonizar emisoras durante la conducción, utilice la función de memorización de la mejor sintonía para evitar accidentes. 1 Presione (SOURCE) varias veces para seleccionar la radio. Al reproducir una cinta, presione Z para expulsar la cinta. Cada vez que presione (SOURCE), la fuente cambiará de la siguiente forma: Radio t CD* t MD* * Si el equipo opcional correspondiente no está conectado, el elemento no aparecerá. 2 Presione (MODE) varias veces para seleccionar la banda. Cada vez que presione (MODE), la banda cambiará de la siguiente forma: FM1 t FM2 t FM3 t AM1 t AM2 3 Presione (BTM) (ATA) durante 2 segundos. La unidad memoriza las emisoras en los botones numéricos por orden de frecuencia. La unidad emite un pitido cuando el ajuste se memoriza. Notas • La unidad no memoriza emisoras de señales débiles. Si se reciben pocas emisoras, algunos botones numéricos conservarán su ajuste anterior. • Si el visor muestra algún número, la unidad memorizará las emisoras a partir del número mostrado en el visor. 8 Memorización de las emisoras deseadas Es posible memorizar hasta 18 emisoras de FM (6 para cada una: FM1, 2 y 3) y hasta 12 emisoras de AM (6 para cada una: AM1 y 2), en el orden que prefiera. 1 Presione (SOURCE) varias veces para seleccionar la radio. Al reproducir una cinta, presione Z para expulsar la cinta. 2 Presione (MODE) varias veces para seleccionar la banda. 3 Presione cualquier lado de (SEEK) para sintonizar la emisora que desee memorizar en el botón numérico. 4 Presione botón numérico que desee (de (1) a (6)) hasta que aparezca “MEM”. En el visor aparecerá la indicación del botón numérico. Nota Si memoriza otra emisora en el mismo botón numérico, la emisora previamente memorizada se borrará. Recepción de las emisoras memorizadas 1 Presione (SOURCE) varias veces para seleccionar la radio. Al reproducir una cinta, presione Z para expulsar la cinta. 2 Presione (MODE) varias veces para seleccionar la banda. 3 Presione el botón numérico (de (1) a (6)) en el que esté memorizada la emisora que desee. Si no puede sintonizar una emisora programada — Modo de sintonización automática/ Búsqueda local Sintonización automática: Presione cualquier lado de (SEEK) para buscar la emisora. La exploración se detiene cuando la unidad recibe una emisora. Presione cualquier lado de (SEEK) varias veces hasta recibir la emisora deseada. Modo de búsqueda local: Si la sintonización automática se detiene con demasiada frecuencia, presione (SENS) varias veces hasta que aparezca “LOCAL-ON”. Se muestra el indicador “LCL”. Sólo se sintonizarán las emisoras de señal relativamente intensa. Consejo Si sabe cuál es la frecuencia de la emisora que desea escuchar, presione cualquier lado de (SEEK) hasta que aparezca la frecuencia deseada (sintonización manual). Si la recepción de FM en estéreo es de mala calidad — Modo monofónico Durante la recepción de la radio, presione (SENS) varias veces hasta que aparezca “MONO-ON”. Se muestra el indicador “MONO”. El sonido mejorará, aunque será monofónico (“ST“ desaparece). Para regresar al modo de recepción de radio normal, seleccione “MONO-OFF”. 9 Otras funciones Ajuste del balance y el equilibrio Es posible ajustar el balance y el equilibrio. 1 Presione (SEL) varias veces hasta que aparezca “BAL” o “FAD”. Cada vez que presiona (SEL), los elementos cambian de la siguiente forma: Cambio de los ajustes de sonido y visualización Es posible ajustar los siguientes elementos: •A.SCRL (Desplazamiento automático)* (página 12). •M.DSPL (Desplazamiento de indicaciones) – el modo de demostración que aparece cuando la cinta se expulsa y no hay ninguna fuente seleccionada (por ejemplo, el sintonizador está apagado). •BEEP – que permite activar o desactivar los pitidos. 1 LOW* t MID* t HIGH* t BAL (izquierdo y derecho) t FAD (delantero y trasero) (SEL) + (3): A.SCRL* (SEL) + (4): M.DSPL (SEL) + (6): BEEP * Si está activado EQ3 (página 11). 2 Ajuste el elemento seleccionado presionando cualquier lado del botón de volumen. Realice el ajuste antes de que transcurran 3 segundos después de seleccionar el elemento. Atenuación del sonido Presione (ATT). Después de que “ATT-ON” parpadee momentáneamente, la indicación “ATT” aparece en el visor. Para restaurar el nivel de volumen anterior, vuelva a presionar (ATT). “ATT-OFF” parpadea momentáneamente. 10 Presione (SEL) y el botón numérico programado que desee simultáneamente. * Cuando no se está reproduiendo ningún CD o MD,este elemento no aparece. 2 Presione (SEL) y el botón numérico programado para seleccionar el ajuste deseado (Ejemplo: ON u OFF). Ajuste del ecualizador — EQ3 Es posible seleccionar una curva de ecualizador para 7 tipos de música distintos (XPLOD, VOCAL, CLUB, JAZZ, NEW AGE, ROCK, CUSTOM y OFF (ecualizador apagado)). Puede almacenar un ajuste diferente del ecualizador para cada fuente. Selección de la curva de ecualizador 1 Presione (SOURCE) para seleccionar una fuente (Radio, CD o MD) o bien inserte un cassette. 2 Presione (EQ3) varias veces para seleccionar la curva de ecualizador deseada. Cada vez que presione (EQ3), el elemento cambiará. Para cancelar el efecto de ecualización, seleccione “OFF”. Ajuste de la curva de ecualizador Puede almacenar y definir los ajustes del ecualizador para distintos rangos tonales. 1 Presione (SOURCE) para seleccionar una fuente (Radio, CD o MD) o bien inserte un cassette. 2 Presione (EQ3) varias veces para seleccionar la curva de ecualizador deseada. 3 Ajuste de la curva de ecualizador. 1 Presione (SEL) varias veces para seleccionar el rango de tonos deseado. Cada vez que presione (SEL), el rango de tonos cambiará. LOW t MID t HI (t BAL t FAD) 2 Presione cualquier lado del botón de volumen varias veces para ajustar el nivel de volumen deseado. El nivel de volumen puede ajustarse en intervalos de 1 dB entre –10 dB y +10 dB. 3 Repita los pasos 1 y 2 para ajustar la curva de ecualizador. Para restaurar la curva de ecualizador ajustada en fábrica, presione (SEL) durante 2 segundos. Transcurridos 3 segundos, la pantalla vuelve al modo de reproducción normal. Nota Si ajusta EQ3 en “OFF”, no podrá ajustar los valores del ecualizador. 11 Equipo opcional Unidad de CD/MD Esta unidad puede controlar unidades de CD/ MD externas. Si conecta una unidad opcional de CD con la función CD TEXT, la información CD TEXT aparecerá en el visor al reproducir discos CD TEXT. Reproducción de discos compactos (CD) o de minidiscos (MD) 1 2 Presione (SOURCE) varias veces para seleccionar CD o MD. Al reproducir una cinta, presione Z para expulsar la cinta. Presione (MODE) hasta que aparezca la unidad que desee. Se inicia la reproducción de CD/MD. Si una unidad de CD/MD se encuentra conectada, todos los temas se reproducen desde el principio. Consejo Una vez conectado el reproductor opcional de sistema de "MG Memory Stick" MGS-X1 a la unidad, presione el botón (SOURCE) para seleccionar "MD" y, a continuación, el botón (MODE) para seleccionar el número de la unidad de MD (MD1 o MD2, etc.). Cambio de los elementos del visor Cada vez que presione (DSPL) durante la reproducción de CD, CD TEXT o MD, el elemento cambiará de la siguiente forma: Tiempo de reproducción transcurrido t Título del disco*1/Nombre del cantante*2 t Título del tema*3 t Reloj *1 Si no ha asignado título al disco o en el MD no se ha registrado ningún título de disco previamente, el visor mostrará “NO NAME”. *2 Si reproduce un disco CD TEXT, el nombre del cantante aparecerá en el visor después del título del disco. (Sólo para discos CD TEXT con nombre del cantante). *3 Si el título del tema de un disco CD TEXT o de un MD no se ha registrado previamente, el visor mostrará “NO NAME”. 12 Desplazamiento automático de un elemento del visor — Desplazamiento automático Si el título del disco, el nombre del artista o el título del tema de un disco CD TEXT o MD es superior a 8 caracteres y la función de desplazamiento automático está activada, la información se desplaza por el visor automáticamente como se indica a continuación: • El título del disco aparece al cambiar éste (si se ha seleccionado el título de disco). • El título del tema aparece al cambiar éste (si se ha seleccionado el título de tema). Si presiona (DSPL) para cambiar el elemento del visor, el título del disco o del tema del CD TEXT o del disco MD se desplaza automáticamente, tanto si pulsa ON como si pulsa OFF. Durante la reproducción, presione (SEL) y (3) para seleccionar “A.SCRL-ON”. Para cancelar el desplazamiento automático, seleccione “A.SCRL-OFF”. Nota En algunos discos con un gran número de caracteres, puede ocurrir lo siguiente: — Algunos de los caracteres no se muestran. — La función de desplazamiento automático no funciona. Localización de un tema específico — Sensor de música automático (AMS) Durante la reproducción, presione cualquier lado de (SEEK) momentáneamente por cada tema que desee omitir. Para localizar temas posteriores SEEK Para localizar temas anteriores Localización de un punto específico de un tema — Búsqueda manual Durante la reproducción, mantenga presionado cualquier lado de (SEEK). Deje de presionarlo cuando encuentre el punto que desee. Para buscar hacia delante SEEK Para buscar hacia atrás Conmutación a otros discos Durante la reproducción, presione el botón (1) (DISC –) o (2) (DISC +). Se inicia la reproducción del disco que se encuentra en la unidad actual. (1) (DISC –): Para discos anteriores (2) (DISC +): Para discos posteriores Número del disco Reproducción repetida de temas — Reproducción repetida Es posible seleccionar: • REP-TRACK – para repetir un tema. • REP-DISC – para repetir un disco. Durante la reproducción, presione (3) (REP) varias veces hasta que aparezca el ajuste deseado. REP-TRACK t REP-DISC t REP-OFF Se inicia la reproducción repetida. Para regresar al modo normal, seleccione “REP-OFF”. Reproducción de temas en orden aleatorio — Reproducción aleatoria Es posible seleccionar: • SHUF-DISC – para reproducir los temas del disco actual en orden aleatorio. • SHUF-CHGR – para reproducir los temas de la unidad actual en orden aleatorio. • SHUF-ALL* – para reproducir todos los temas de todas las unidades en orden aleatorio. Durante la reproducción, presione (4) (SHUF) varias veces hasta que aparezca el ajuste deseado. SHUF-DISC t SHUF-CHGR t SHUF-ALL* t SHUF-OFF Número del tema Se inicia la reproducción en orden aleatorio. * “SHUF-ALL” sólo se encuentra disponible si conecta dos o más unidades de CDIMD opcionales. Para regresar al modo normal, seleccione “SHUF-OFF”. 13 Información complementaria Mantenimiento Sustitución del fusible Al sustiuir el fusible, asegúrese de utilizar uno que coincida con el amperaje indicado en el fusible original. Si el fusible salta, compruebe la conexión de alimentación y sustitúyalo. Si después de sustituirlo vuelve a saltar, es posible que exista un funcionamiento interno defectuoso. En tal caso, póngase en contacto con el proveedor Sony más próximo. Limpieza de los conectores Es posible que la unidad no funcione correctamente si los conectores de la unidad y del panel frontal no están limpios. Para evitar que ocurra esto, abra el panel fontal presionando (RELEASE) y, a continuación, extráigalo y limpie los conectores con un bastoncillo de algodón humedecido en alcohol. No aplique demasiada fuerza. De otro modo, podrían dañarse los conectores. Unidad principal Fusible (10 A) Parte posterior del panel frontal Advertencia No utilice nunca un fusible con un amperaje superior al del suministrado con la unidad, ya que ésta podría dañarse. 14 Notas • Como medida de seguridad, antes de limpiar los conectores, apague el motor y extraiga la llave del interruptor de encendido. • No toque nunca los conectores directamente con los dedos o con un dispositivo metálico. Extracción de la unidad 1 Extraiga el marco de protección. 1 Extraiga el panel frontal (página 6). 2 Fije las llaves de liberación con el marco de protección. Oriente la llave de liberación en la dirección correcta. 3 Tire de las llaves de liberación para extraer el marco de protección. 2 Extraiga la unidad. 1 Inserte las dos llaves de liberación a la vez hasta que oiga un “clic”. El gancho debe encontrarse en la parte interior. 2 Tire de las llaves de liberación para extraer la unidad. 3 Deslice la unidad para extraerla del emplazamiento. 15 Especificaciones Sección del reproductor de cassettes Pista de cinta Fluctuación y trémolo Respuesta de frecuencia Relación señal-ruido 4 pistas, 2 canales, estéreo 0,13 % (WRMS) 30 – 15 000 Hz 55 dB Sección del sintonizador FM Gama de sintonía Intervalo de sintonía de FM: 50 kHz/200 kHz conmutable 87,5 – 108,0 MHz (intervalo de 50 kHz) 87,5 – 107,9 MHz (intervalo de 200 kHz) Terminal de antena Conector para antena exterior Frecuencia intermedia 10,7 MHz/450 kHz Sensibilidad útil 9 dBf Selectividad 75 dB a 400 kHz Relación señal-ruido 67 dB (estéreo), 69 dB (monofónico) Distorsión armónica a 1 kHz 0,5 % (estéreo), 0,3 % (monofónico) Separación entre canales 35 dB a 1 kHz Respuesta en frecuencia 30 – 15 000 Hz AM Gama de sintonía Terminal de antena Frecuencia intermedia Sensibilidad Intervalo de sintonía de AM: 9 kHz/10 kHz conmutable 531 – 1 602 kHz (intervalo de 9 kHz) 530 – 1 710 kHz (intervalo de 10 kHz) Conector para antena exterior 10,7 MHz/450 kHz 30 µV Sección del amplificador de potencia Salidas Salidas de altavoz (conectores de sellado seguro) Impedancia de altavoz 4–8Ω Salida máxima de potencia 45 W × 4 (a 4 Ω) 16 Generales Salidas Salida de audio Cable de control de relé de antena motorizada Cable de control de amplificador de potencia Entradas Terminal de entrada de control BUS Terminal de entrada de audio BUS Controles de tono Graves: ±10 dB a 60 Hz (Xplod) Medios: ±10 dB a 1 kHz (Xplod) Agudos: ±10 dB a 10 kHz (Xplod) Requisitos de alimentación Batería de automóvil de cc 12 V (toma a tierra negativa) Dimensiones Aprox. 178 × 50 × 178 mm (an/al/prf) Dimensiones de montaje Aprox. 182 × 53 × 161 mm (an/al/prf) Masa Aprox. 1,2 kg Accesorios suministrados Componentes para instalación y conexiones (1 juego) Estuche para el panel frontal (1) Accesorios opcionales Cable BUS (suministrado con un cable de pines RCA) RC-61 (1 m), RC-62 (2 m) Cambiador de CD (10 discos) Equipo opcional CDX-656X Cambiador de CD (6 discos) CDX-T69X Cambiador de MD (6 discos) MDX-66XLP Reproductor de sistema MG-MS MGS-X1 Cambiador de DVD DVX-100S Selector de fuente XA-C30 Selector AUX-IN XA-300 Diseño y especificaciones sujetos a cambios sin previo aviso. Guía de solución de problemas La siguiente lista de comprobaciones resulta útil para solucionar los problemas que puedan producirse al utilizar la unidad. Antes de consultar la lista que aparece a continuación, compruebe los procedimientos de conexión y funcionamiento. Generales Problema Causa/Solución Ausencia de sonido. • Cancele la función ATT (página 10). • Ajuste el control de equilibrio en la posición central para sistemas de 2 altavoces. • Ajuste el volumen con (+). Se ha borrado el contenido de la memoria. • Ha desconectado el cable de alimentación o la batería. • Ha presionado el botón RESET. t Vuelva a realizar el almacenamiento en la memoria. El visor no muestra indicaciones. • Retire el panel frontal y limpie los conectores. Para obtener más información, consulte el apartado “Limpieza de los conectores” (página 14). • La indicación del reloj desaparece si presiona (OFF) durante 2 segundos. t Presione (OFF) de nuevo durante 2 segundos para visualizar el reloj. Reproducción de cintas Problema Causa/Solución El sonido se distorsiona. El cabezal de cinta está sucio. t Limpie el cabezal con un cassette de limpieza de tipo seco disponible en el mercado. Recepción de radio Problema Causa/Solución No es posible realizar la sintonización programada. •Memorice la frecuencia correcta. •La emisión es demasiado débil. No es posible realizar la sintonización automática. •La emisión es demasiado débil. t Utilice la sintonización manual. •El modo de búsqueda local está ajustado en ON. t Ajústelo en OFF (página 9). No es posible recibir las emisoras. Los ruidos obstaculizan el sonido. Conecte un cable de control de antena motorizada (azul) o un cable de fuente de alimentación auxiliar (rojo) al cable de fuente de alimentación del amplificador de antena del automóvil. (Sólo si el automóvil incorpora una antena de recepción de FM/AM en el cristal posterior/lateral.) La indicación “ST” parpadea. •Sintonice la frecuencia con precisión. •La emisión es demasiado débil. t Ajuste el modo en monofónico (página 9). Reproducción de CD/MD Problema Causa/Solución El sonido se recibe entrecortado. Disco sucio o defectuoso. Actual total number: 17 Sony XR-CA360X/CA360 (GB,ES,CT) 3-246-852-22(1) Indicaciones de error (con una unidad opcional de CD/MD conectada) Las siguientes indicaciones parpadean durante unos 5 segundos y se emite una alarma. Indicación NO MAG NO DISC *1 ERROR BLANK *1 RESET NOT READY HI TEMP Causa Solución No ha insertado el cargador de discos en la unidad de CD/MD. Inserte el cargador de discos en la unidad de CD/MD. No ha insertado ningún disco en la unidad de CD/MD. Inserte los discos en la unidad de CD/MD. El CD está sucio o se ha insertado al revés.*2 Limpie el CD o insértelo correctamente. No es posible reproducir un MD debido a algún problema.*2 Inserte otro MD. No es posible reproducir un CD/ MD debido a algún problema. Inserte otro CD/MD. No ha grabado ningún tema en el MD.*2 Reproduzca un MD con temas grabados. No es posible emplear la unidad de CD/MD debido a algún problema. Presione el botón RESET de la unidad. La tapa de la unidad de MD está abierta o los minidiscos no se han insertado correctamente. Cierre la tapa o inserte los minidiscos correctamente. La temperatura ambiente es superior a 50°C. Espere hasta que la temperatura descienda por debajo de 50°C. *1 Cuando se produce algún error durante la reproducción de un CD o MD, el número del CD o del MD no aparece en el visor. *2 El visor mostrará el número del disco que causa el error. Si el problema no se soluciona con las sugerencias anteriormente enumeradas, póngase en contacto con el proveedor Sony más próximo. 18 19 鳴謝惠顧! 感謝您惠購 Sony 牌卡式放音機。 除了播放卡式磁帶和收音機之外,您還可連 接選購件 CD/MD 裝置*1 以擴大系統。 當您操作本機或連接一台選購的帶 CD TEXT 功能的 CD 裝置,并播放 CD TEXT 唱碟*2時,該 CD TEXT 資訊將出現在顯示屏上。 *1 可連接一臺 CD 換碟機、一臺 MD 換碟機、一臺 CD 唱 機或一臺 MD 唱機。 *2 CD TEXT 唱碟是一種音頻 CD,包含了諸如唱碟名 稱,演唱者和曲目名稱之類的資訊。 這些資訊記錄在唱碟上。 使用前須注意 • 若您的車停放在陽光直射的地方,導致車內升 溫過高,則應使本機冷卻後再使用。 • 若本機沒有電源供給,請先檢查連接狀況。若 一切正常,則請檢查保險絲。 • 若 2 路揚聲器系統中的揚聲器不發聲,請將音 量控制器置於中間位置。 • 長時間播放磁帶時,磁帶可能因內裝功率放大 器而發熱。請放心,這並非故障。 若您有什麼疑問,或您的機器有什麼問題, 而本說明書沒有提及,請向您附近的 Sony 經銷 商諮詢。 要維持高音質時 在音響設備附近若裝有飲料架,則須特別注 意別在此汽車音響設備上濺上果汁或其它飲料。 在機器或磁帶上的糖份殘餘物,將弄髒放音磁頭 而降低音質或妨礙聲音再現。 卡式磁帶清潔工具是不能去除磁頭上的糖分 的。 2 卡式磁帶須知 磁帶的保護 • 請勿觸摸磁帶的表面,因為任何髒物或灰塵會 沾污磁頭。 • 使磁帶遠離內含磁性物質的設備,若揚聲器、 放大器等,以防止磁帶上所錄製的資訊被消除 或失真。 • 請勿將磁帶暴露於陽光直射、極低溫度或潮濕 的環境下。 • 鬆弛了的磁帶,可能會纏住走帶機構。因此, 在裝磁帶前,請用鉛筆或類似的工具穿入磁帶 的轉軸中旋緊鬆弛了的磁帶。 長度超過 90 分鐘的磁帶 除非需要長時間連續放音,否則不建議使用 長度超過 90 分鐘的磁帶。這類磁帶所使用的磁 帶條非常薄,很容易伸長變形。頻繁地操作播放 及停止磁帶,可能使磁帶糾纏住卡帶座裡的機 構。 磁帶鬆弛 的部分 • 翹曲的磁帶和鬆開的標籤都可能在磁帶插入或 退出時發生問題。 請除去或更換鬆開的標籤。 • 播放卡帶時,聲音可能會失真。每使用過 50 個 小時,卡式放音機的磁頭便須加以清潔。 3 目錄 與選購的裝置一起使用時 僅使用本機時 控制鍵的位置 ............................. 5 準備工作 重調本機 ............................... 6 拆卸前面板 ............................. 6 設定時鐘 ............................... 7 CD/MD 裝置 播放 CD 或 MD ......................... 12 反覆播放曲目 — 反覆放音功能 .................... 13 以任意順序播放曲目 — 任意順序放音功能 ................ 13 卡式放音機 收聽磁帶放音 ........................... 7 錄音帶快速前進或倒退時收聽收音機 — ATA(自動調諧啟動) .............. 8 收音機 自動儲存電台 — 最佳調諧記憶功能(BTM) .......... 8 僅儲存想要的電台 ....................... 9 收聽所儲存的電台 ....................... 9 附加資訊 其它功能 調節平衡和音量控制器 .................. 減弱音量 .............................. 改變音響和顯示設定 .................... 設定均衡器 - EQ3 ............................. 4 10 10 10 11 保養 .................................. 取出裝置 .............................. 規格 .................................. 故障排除指南 .......................... 14 15 16 17 控制鍵的位置 DIR SOURCE EQ3 SEEK MODE DSPL DISC RELEASE SEL ATT 1 2 REP SHUF 3 4 ATA 5 6 BTM SENS OFF XR-CA360X/CA360 詳細說明,請參見有關頁面。 1 SOURCE(收音機 8, 9, 11, 12 CD MD)鍵 3 音量 +/– 鍵 7, 10, 11 7, 8, 9, 12 5 顯示屏 6 m/M(快繞)/DIR(磁帶走帶方向變 化)鍵 7, 8 7 SEEK 鍵 CD/MD 放音中: (1) DISC – 13 (2) DISC + 13 (3) REP 13 (4) SHUF 13 qg 頻率選擇開關(位於本機底部) 參照安裝 連接說明書裡的“頻率選擇開 關”。 qh BTM/ATA 鍵 8 qj SENS 鍵 9 尋找 9 自動音樂傳感器 13 手動尋找 13 8 DSPL(顯示模式變換)鍵 9 EQ3 鍵 10, 12 收音機接收廣播中: 預設號碼選擇 9 2 MODE 鍵 收音機接收時: 波段選擇 8, 9 CD/MD 放音中: CD/MD 裝置選擇 12 4 Z(排出)鍵 qf 號碼鍵 qk OFF 鍵* 6 7, 12 11 0 RELEASE(前面板釋放)鍵 6, 14 qa SEL(選擇)鍵 7, 10, 11, 12 * 警告:當把本機安裝在點火器鑰匙開關不具有 補助位置的汽車中 關閉發動機後,必須按住裝置上的 (OFF) 鍵 2 秒 鐘,才能關閉時鐘顯示。 當您只按下 (OFF) 鍵短暫片刻,時鐘顯示將 不能關閉,並且將消耗電池。 qs RESET 鍵(位於本機正面的前面板內)6 qd ATT(減弱音量)鍵 10 5 安裝前面板 如圖所示將前面板的 A 部分裝到機器上的 B 部分,然後將左邊推入至卡住為止。 準備工作 重調本機 在第一次使用本機前,或更換汽車電池或改 變連接後,必須使本機復原。 用帶尖頭的物體,如圓珠筆,取出前面板和 按下 RESET 鍵。 RESET 鍵 註 按 RESET 鍵將消除時鐘設定和某些已記憶的功能。 註 • 切勿顛倒安裝前面板。 • 安裝前面板時,切勿用過大勁按入本機。 • 切勿用力按壓前面板的顯示屏或對其施加過大的壓 力。 • 切勿將前面板放在可直接照射到陽光的地方或熱气管 等熱源附近,也不要將它放在潮濕的地方。千万不要 將它放在停泊在陽光直射下的或溫度會升到很高的汽 車儀錶板上。 報警 拆卸前面板 您可拆卸本機前面板,以防止本機被盜。 1 按下 (OFF) 鍵。 2 按下 (RELEASE) 鍵,然後將前面板略向左邊 滑動並朝著自己的方向拉下來。 (OFF) (RELEASE) 註 • 從本機拆下前面板時,切勿讓它掉下。 • 您如果在機器仍開著電源時拆下前面板,電源將會自 動地關掉以防揚聲器受損。 • 隨身攜帶前面板移動時,請使用附帶的前面板盒子。 6 A B 若在不拆下前面板的情況下關閉汽車點火裝 置,便將發出幾秒鐘的嘟嘟警報聲。 如果您不用內置的放大器而連接選購的功率 放大器,則聽不到警報聲。 設定時鐘 時鐘採用 12 小時數字顯示。 卡式放音機 例如:將時鐘設定為 10 : 08 1 按住 (DSPL) 鍵 2 秒鐘。 點鐘顯示閃爍。 收聽磁帶放音 插入磁帶。 即自動開始播放。 1 按下音量鍵的一側以設定小時。 向前 朝上的面正在播放中。 向后 朝下的面正在播放中。 2 按下 (SEL) 鍵。 要領 要改變走帶方向,請按 m 及 M 鍵。 分鐘顯示閃爍。 3 按下音量鍵的一側以設定分鐘。 向前 要停止播放及排出磁帶 請按下 Z 鍵。 快繞磁帶 播放中,按下 m 或 M 鍵。 向后 2 按下 (DSPL) 鍵。 方向指示燈* 要前進時 要倒退時 FWD M m REV m M * 快繞磁帶中, 指示燈將閃爍。 要在快進或重繞時開始播放,請按下另一快 繞鍵直至被鎖定的按鍵跳上來。 時鐘啟動。 時鐘設定完畢之後,顯示即返回正常播放模 式。 7 錄音帶快速前進或倒退時 收聽收音機 收音機 — ATA(自動調諧啟動) 當用 m 或 M 鍵快進或後退時,收音機 將自動打開。 自動儲存電台 — 最佳調諧記憶功能(BTM) 在播放中,反覆按下 (BTM)(ATA)鍵,直至 在屏幕上出現“ATA-ON”。 ATA-ON y ATA-OFF 本機篩選信號最強的電台,並按照它們的頻 率順序進行儲存。您可以在每一波段上(FM1, FM2,FM3,AM1 和 AM2)最多存儲 6 個電台。 注意 駕車中調諧電臺時,務請使用最佳調諧記憶 功能,以防發生事故。 ATA 模式啟動。 要返回正常播放模式時,則選擇“ATA-OFF”。 1 反覆按 (SOURCE) 鍵選擇收音機。 在磁帶播放情況下,按下 Z 鍵,退出磁帶。 每次按下 (SOURCE) 鍵,聲源即作如下變 化: 收音機 t CD* t MD* * 如果沒連接相應的選購設備,將不出現該項目。 2 反覆按下 (MODE) 鍵,選擇波段。 每次按下 (MODE) 鍵,波段變化如下: FM1 t FM2 t FM3 t AM1 t AM2 3 按住 (BTM)(ATA)鍵 2 秒鐘。 本機按照電臺的頻率順序將電台存儲在數字鍵 上。 存入了設定時,將響起“嘟嘟”聲。 註 • 本機不能夠存儲信號微弱的電臺。若僅接收到少數幾 個電臺,則某些數字鍵仍將保留其以前的設定。 • 當顯示屏上已顯示一個數字時,本機即將從現在顯示 的數字按順序開始存儲電臺。 8 僅儲存想要的電台 能按照您選擇的順序預約最多 18 個 FM 電 臺 (FM1,2 和 3 各 6 個) 和 12 個 AM 電臺 (AM1 和 2 各 6 個)。 1 反覆按 (SOURCE) 鍵選擇收音機。 在磁帶播放情況下,按下 Z 鍵,退出磁帶。 2 反覆按下 (MODE) 鍵,選擇波段。 3 按下 (SEEK) 鍵的一側,調入您想要存儲在 數字鍵上的電臺。 4 按下所要的數字鍵((1) 至 (6)),至顯示 “MEM”。 數字鍵指示即出現在顯示屏上。 若您不能調入預約電臺時 — 自動調諧/本地尋找模式 自動調諧: 按下 (SEEK) 鍵的一側以搜索電臺(自動調 諧)。 當本機接收到電臺時,掃描即停止。按下 (SEEK) 鍵的一側,至接收到所要的電臺。 本地尋找模式: 註 若您試圖在已存儲有電臺的數字鍵上存儲另一個電臺, 則以前存入的電臺將被新電臺所取代。 若自動調諧停止過于頻繁,請反覆按下 (SENS) 鍵直至“LOCAL-ON”出現。 “LCL”指示顯示。 僅信號相對較強的電臺才會被調入。 要領 若您知道想要收聽的電臺頻率,請按下 (SEEK) 鍵的 一側,至顯示所要的頻率(手動調諧)。 若 FM 立體聲的收音狀況不良 — 單聲道模式 收聽所儲存的電台 1 反覆按 (SOURCE) 鍵選擇收音機。 在磁帶播放情況下,按下 Z 鍵,退出磁帶。 2 反覆按下 (MODE) 鍵,選擇波段。 3 按下存儲有所要電臺的數字按鈕((1) 至 (6))。 收音机接收廣播中,反覆按下鍵 (SENS) 直 至“MONO-ON”出現。 “MONO”指示顯示。 聲音狀況得到改善,但變成單聲道(“ST”顯 示消失)。 要回到普通模式時,選擇“MONO-OFF”即可。 9 其它功能 調節平衡和音量控制器 改變音響和顯示設定 您可設定: • A.SCRL(自動滾動)*(第 12 頁)。 • M.DSPL(移動顯示) – 在磁帶被退出,且未選擇任何音源時出現的演 示模式。(例如:調諧器被關閉。) • BEEP – 打開或關閉“嘟嘟”警告聲功能。 您可以調節平衡和音量控制器。 1 1 (SEL) + (3): A.SCRL* (SEL) + (4): M.DSPL (SEL) + (6): BEEP LOW* t MID* t HIGH* t BAL(左-右)t FAD(前-後) * 當 CD 或 MD 不在播放時,此項目將不顯示。 * 當啟動了 EQ3(第 11 頁)。 2 按音量鍵的任何一側調節所選擇的項目。 選擇了項目之後,須在 3 秒內進行調節。 減弱音量 按下 (ATT) 鍵。 在“ATT-ON”閃爍片刻后,“ATT”指示出現 在顯示屏上。 若要恢復原先的音量水平,再按下 (ATT) 一次。 “ATT-OFF”顯示片刻。 10 同時按 (SEL) 按鈕和所要的預設數字鍵。 反覆按 (SEL) 鍵,直至出現“BAL”或 “FAD”。 每次按下 (SEL) 鍵,項目顯示變化如下: 2 反覆按 (SEL) 和預設數字鍵選擇想要的設定 (例如:ON 或 OFF)。 設定均衡器 選擇均衡曲線 您可以儲存並調節音調範圍和音量電平的均 衡設定。 - EQ3 1 您可選擇七種音樂類型(XPLOD,VOCAL, CLUB,JAZZ,NEW AGE,ROCK,CUSTOM 和 OFF (均衡器 OFF))的均衡曲線。 您可以為每個音源存儲不同的均衡器設定。 按 (SOURCE) 鍵選擇音源(收音機,CD 或 MD),或插入錄音帶。 2 反覆按 (EQ3) 鍵選擇想要的均衡曲線。 3 調節均衡曲線 1 反覆按 (SEL) 鍵選擇想要的音調範圍。 每按一次 (SEL) 鍵,音調範圍將發生改 變。 選擇均衡曲線 1 按 (SOURCE) 鍵選擇音源(收音機,CD 或 MD),或插入錄音帶。 2 反覆按 (EQ3) 鍵選擇想要的均衡曲線。 每按一次 (EQ3) 鍵,顯示項目便改變。 LOW t MID t HI(t BAL t FAD) 2 反覆按音量鍵的任何一側調節至想要的音 量電平。 音量電平以 1 dB 遞增,從 –10 dB 至 +10 dB 進行調節。 要取消均衡效果選擇“OFF”。 3 重複步驟 1 和步驟 2 調節均衡曲線。 如要復原至出廠設定的均衡曲線,請按住 (SEL) 鍵 2 秒鐘。 3 秒鍾後,顯示幕返回正常播放模式。 註 當 EQ3 設定在“OFF”時,則無法調節均衡器設 定。 11 與選購的裝置一起使用時 CD/MD 裝置 本機能控制外接 CD/MD 裝置。 若連接一臺選購的帶 CD TEXT 功能的 CD 裝 置,當播放 CD TEXT 唱碟時,該 CD TEXT 資訊 將出現在顯示屏上。 播放 CD 或 MD 1 2 反覆按下 (SOURCE) 鍵,選擇 CD 或 MD。 在磁帶播放情況下,按下 Z 鍵,退出磁帶。 按下 (MODE) 鍵,至顯示所要的裝置。 CD/MD 即開始播放。 當連接好 CD/MD 裝置時,所有曲目都將從 頭開始播放。 提示 當選購件 MG Memory Stick System-up Player MGSX1 連接在本機上,按 (SOURCE) 鍵選擇“MD”,然後 按 (MODE) 鍵選擇 MD 的編號(MD1 或 MD2 等等)。 改變所顯示的項目 在播放 CD、CD TEXT 或 MD 時,每次按下 (DSPL) 鍵,項目即作如下變化: 已放音時間 t 唱碟名稱*1 作者名*2 t 曲名*3 t 時鐘 *1 若未標記唱碟或 MD 上未預先錄製唱碟名稱,顯示屏 上出現“NO NAME”。 *2 若播放 CD TEXT 唱碟,作者名在唱碟名稱(僅限於 有作者名的 CD TEXT 唱碟)之後出現於顯示屏上。 *3 若 CD TEXT 唱碟或 MD 的曲目名稱未預先錄製,顯示 屏上出現“NO NAME”。 12 自動滾動顯示項目 — 自動滾動功能 若 MD 或 CD TEXT 唱碟上的唱碟名稱、作者 名或曲目名稱超過 8 個字符,並且自動滾動功 能已被打開時,它們將自動滾動顯示如下: • 當唱碟已被更換時(若該唱碟名稱已被選定),顯示 唱碟名稱。 • 當曲目已經改變時(若該曲目名稱已被選定),顯示 曲目名稱。 若您按下 (DSPL) 鍵改變顯示項目,不論將 功能設定在 ON 或 OFF,CD TEXT 或 MD 的唱碟 名稱或曲目名稱將自動滾動。 在播放過程中按 (SEL) 和 (3) 選擇 “A.SCRL-ON”。 要解除自動滾動時,選擇“A.SCRL-OFF”即 可。 註 對帶有很多字符的唱碟,可能會有下列情況: —有些字符不顯示。 —自動滾動不起作用。 尋找指定的曲目 — 自動音樂傳感器(AMS) 播放中,對想要跳越的每首曲目,按下 (SEEK) 鍵的一側片刻。 反覆播放曲目 — 反覆放音功能 您可以選擇: •REP-TRACK – 反覆播放一首曲目。 •REP-DISC – 反覆播放一張唱碟。 尋找接下的曲目時 播放中,反覆按下 (3)(REP)鍵,至顯示 所要的設定。 SEEK 尋找前面的曲目時 尋找曲目中的指定位置 — 手動尋找功能 播放中,按住 (SEEK) 鍵的一側。當找到所 要的指定位置時即鬆開該鍵。 往前尋找時 SEEK REP-TRACK t REP-DISC t REP-OFF 反覆播放開始。 要返回正常播放模式時,則選擇“REPOFF”。 以任意順序播放曲目 — 任意順序放音功能 往後尋找時 轉換至其它唱碟 在播放中,按下 (1)(DISC–)鍵或 (2) (DISC+)鍵。 當前裝置中的所要唱碟開始播放。 (1)(DISC–): 之前唱碟 (2)(DISC+): 之后唱碟 您可以選擇: •SHUF-DISC – 以任意順序播放現在唱碟上的曲 目。 •SHUF-CHGR – 以任意順序播放現在裝置中的曲 目。 •SHUF-ALL* – 以任意順序播放所有的裝置中的所 有的曲目。 播放中,反覆按下 (4)(SHUF)鍵,至顯示 所要的設定。 盤號 SHUF-DISC t SHUF-CHGR t SHUF-ALL* t SHUF-OFF 曲號 即開始任意順序播放曲目。 * “SHUF-ALL”僅當您連接二台或二台以上選購的 CD/MD 裝置時有效。 要返回正常播放模式時,則選擇“SHUFOFF”。 13 清潔連接器 若本機與前板之間的連接器不乾淨,則本機 可能不能正常工作。為防止這種情況發生,請按 下 (RELEASE) 鍵,打開前面板,然後拆卸前面 板,用蘸有酒精的棉棒清潔連接器。切勿用力過 大。否則,連接器可能會被損壞。 附加資訊 保養 更換保險絲 更換保險絲時,必須確保所使用的保險絲與 原保險絲的安培數相配。若保險絲燒斷,請檢查 電源連接並再更換保險絲。若保險絲更換後又被 燒斷,則可能是內部故障。在這種情況下,請洽 詢附近的 Sony 經銷商。 主機 前面板的背部 保險絲(10 A) 警告 切勿使用額定安培數超過本機附帶保險絲安 培數的保險絲,否則會損壞本機。 14 註 • 為了安全起見,在清潔連接器之前,應關閉發動機並 從點火開關上取出鑰匙。 • 千万不要用手指直接觸摸連接器或任何金屬裝置。 取出裝置 1 拆下保護環。 1 2 卸下前面板(第 6 頁)。 將開鎖鑰匙與保護環嚙合。 正確確定開鎖 鑰匙的方向。 3 2 拉出開鎖鑰匙以拆下保護環。 取出裝置。 1 將兩把開鎖鑰匙一起插入,直至聽到喀 嗒聲。 鉤子面朝內。 2 拉出開鎖鑰匙,使裝置脫離原位。 3 將本機從安裝位置滑出。 15 規格 卡式放音機部分 磁帶徑跡 抖晃率 頻率響應 信噪比 一般規格 4 徑跡 2 聲道立體聲 0.13 %(WRMS) 30 – 15,000 Hz 55 dB 輸出 輸入 音調控制 調諧器部分 FM 調諧範圍 天線端子 中頻 可用靈敏度 選擇度 信噪比 諧波失真,1 kHz 時 分離度 頻率響應 FM 調諧間隔 : 50 kHz/200 kHz 可轉換 87.5 – 108.0 MHz (50 kHz 步進時) 87.5 – 107.9 MHz (200 kHz 步進時) 外接天線連接器 10.7 MHz/450 kHz 9 dBf 75 dB(400 kHz 時) 67 dB(立體聲), 69 dB(單耳聲) 0.5 %(立體聲), 0.3 %(單耳聲) 35 dB(1 kHz 時) 30 – 15,000 Hz AM 調諧範圍 天線端子 中頻 靈敏度 AM 調諧間隔 : 9 kHz/10 kHz 可轉換 531 – 1,602 kHz (9 kHz 步進時) 530 – 1,710 kHz (10 kHz 步進時) 外接天線連接器 10.7 MHz/450 kHz 30 µV 功率放大器部分 輸出 揚聲器阻抗 最大功率輸出 16 揚聲器輸出 (可靠密封連接器) 4 –8 Ω 45 W×4(4 Ω時) 電源 尺寸 安裝尺寸 質量 提供的附件 選購附件 選購裝置 線路輸出 電動天線繼電控制導線 功率放大器控制導線 BUS 控制輸入端子 BUS 音頻輸入端子 低音: 60 Hz 時 ± 10 dB(Xplod) 中音: 1 kHz 時 ± 10 dB(Xplod) 高音: 10 kHz 時 ± 10 dB(Xplod) 12 V DC 汽車電池 (負接地) 約 178×50×178 mm (寬 高 深) 約 182×53×161 mm (寬 高 深) 約 1.2 kg 安裝和連接用部件(一套) 前面板盒(1) BUS 電纜 (附帶一根 RCA 管腳導線) RC-61(1 m), RC-62(2 m) CD 換碟機(10 碟式) CDX-656X CD 換碟機(6 碟式) CDX-T69X MD 換碟機(6 碟式) MDX-66XLP MG-MS System-up player MGS-X1 DVD 換碟機 DVX-100S 聲源選擇器 XA-C30 AUX-IN 選擇器 XA-300 設計和規格若有變更,恕不另行通知。 故障排除指南 下列檢查表有助於解決您使用本機時可能遇到的問題。 在使用下面的檢查表之前,請檢查連接和操作步驟是否正確。 概述 故障 原因 解決方法 無聲。 •取消 ATT 功能(第 10 頁)。 •將 2 路揚聲器系統的音量控制器設定在中心位置。 •用 (+) 調節音量。 存儲功能內容被消除。 •電源線或電池已被斷開。 •RESET 鍵被按下了。 t 再將設定存入記憶功能。 顯示屏上不出現指示。 •拆卸前板,並且清潔連接器。 詳細情況,請參見“清潔連接器”(第 14 頁)。 •如果您按住 (OFF) 按鈕持續 2 秒鐘,時鐘顯示將消失。 t 再次按住 (OFF) 按鈕持續 2 秒鐘可使時鐘重新顯示。 磁帶放音 故障 原因 放音失真。 磁頭受污染了。 t 請用市售的乾式清潔磁頭用卡帶清洗磁頭。 解決方法 廣播收音 故障 原因 解決方法 無法預約調諧。 •將正確的頻率存儲在記憶功能內。 •廣播信號太弱。 無法自動調諧。 •廣播信號太弱。 t 使用手動調諧。 •本地搜尋模式設定在“ON”。 t 將本地搜尋模式設定在“OFF”(第 9 頁)。 無法接收電台。 聲音有噪音。 請連接電動天線控制導線(藍色)或補助電源導線(紅色)至汽 車天線昇壓器的電源導線。(當您的汽車僅在側窗上有內置 FM/AM 天線時。) “ST”指示閃爍。 •精確地調諧電臺頻率。 •廣播信號太弱。 t 設定至單聲道模式(第 9 頁)。 CD/MD 放音 故障 原因 解決方法 跳音。 塵埃污染或唱碟變形。 17 Actual total number: Sony XR-CA360X/CA360 (GB,ES,CT) 3-246-852-22(1) 錯誤顯示(當連接一臺選購件 CD/MD 裝置時) 下述指示將閃爍 5 秒鐘左右,隨之將聽到警告聲。 顯示 原因 解決方法 唱碟盒未裝入 CD/MD 裝置。 將裝有唱碟的唱碟盒裝入 CD/MD 裝置 。 CD/MD 裝置中未裝入唱碟。 將唱碟裝入 CD/MD 裝置。 CD 髒了或 CD 裝反了。*2 將 CD 擦拭乾淨或正確地裝入 CD。 因某些原因 MD 不能放音。*2 裝入另一張 MD。 因某些原因 CD/MD 不能放音。 裝入另一張 CD/MD。 BLANK * MD 上沒錄曲目。*2 播放錄有曲目的 MD。 RESET 因某些原因 CD/MD 裝置不能操作。 按裝置的 RESET 鍵。 NOT READY MD 裝置的蓋子被打開或 MD 未被正確 地裝入。 關上蓋子或正確地裝入 MD。 HI TEMP 環境溫度超過 50℃。 等待溫度下降到 50℃ 以下。 NO MAG NO DISC ERROR * 1 1 *1 在 CD 或 MD 播放時出現錯誤,顯示屏上就不會顯示 CD 或 MD 的唱碟號。 *2 在顯示屏上顯示造成錯誤的唱碟號。 若上述解決方法無助於改善狀況,即請洽詢附近的 Sony 經銷商。 18 19 Sony Corporation Printed in Malaysia-
 1
1
-
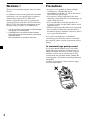 2
2
-
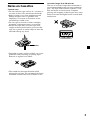 3
3
-
 4
4
-
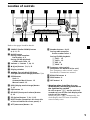 5
5
-
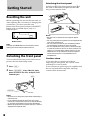 6
6
-
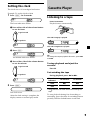 7
7
-
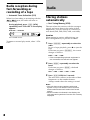 8
8
-
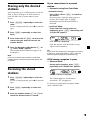 9
9
-
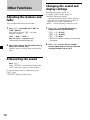 10
10
-
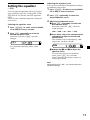 11
11
-
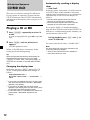 12
12
-
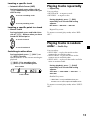 13
13
-
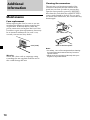 14
14
-
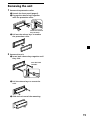 15
15
-
 16
16
-
 17
17
-
 18
18
-
 19
19
-
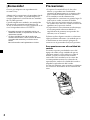 20
20
-
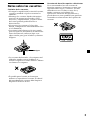 21
21
-
 22
22
-
 23
23
-
 24
24
-
 25
25
-
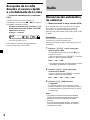 26
26
-
 27
27
-
 28
28
-
 29
29
-
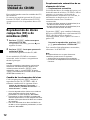 30
30
-
 31
31
-
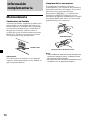 32
32
-
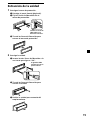 33
33
-
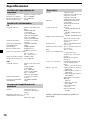 34
34
-
 35
35
-
 36
36
-
 37
37
-
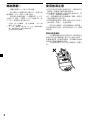 38
38
-
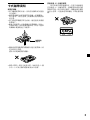 39
39
-
 40
40
-
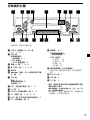 41
41
-
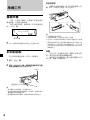 42
42
-
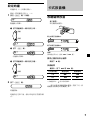 43
43
-
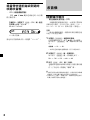 44
44
-
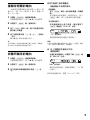 45
45
-
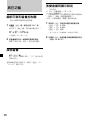 46
46
-
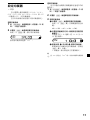 47
47
-
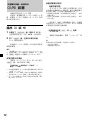 48
48
-
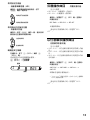 49
49
-
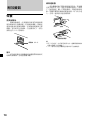 50
50
-
 51
51
-
 52
52
-
 53
53
-
 54
54
-
 55
55
-
 56
56


Sony XR-CA360X Manual de usuario
- Categoría
- Receptores de medios de coche
- Tipo
- Manual de usuario
- Este manual también es adecuado para
en otros idiomas
- English: Sony XR-CA360X User manual