La página se está cargando...

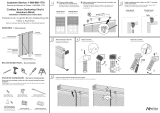
Recommended Tools | Recomendadas:
Ensure that your package contains all of the contents needed for proper installation.
Asegúrese de que su paquete contenga todos los elementos necesarios para realizar
una correcta instalación.
Cordless Faux Wood Blind
Installation & Maintenance Instructions
Persianas de imitación de madera sin cordón
Instrucciones de Instalación y Mantenimiento
Customer Service: 1-800-666-1779
Servicio de Atención al Cliente: 1-800-666-1779
Overview | Visión General:
Hold Down Bracket
(Optional)
Soporte de Sujeción
(Opcional)
Headrail Endcap
Cabecera del Riel Superior
Bottom Rail
Riel Inferior
Wand
Vara
Endcap
Cabecera
Headrail
Riel Superior
Valance
Cenefa
Check the Components | Revise los Componentes:
Choose a blind position:
Inside Mount or Outside Mount.
Escoja la posicion de su persiana:
Montaje Interior o Montaje Exterior.
Dismount your blind.
Desmontar la persiana.
1
Attach valance clips.
Ajuste los sujetadores de cenefa.
3
Mount your blind.
Coloque la persiana.
5
Insert wand stem into the headrail as shown below.
Inserta la vástago de la vara en el riel principal tal como se muestra.
6
Attach endcaps to the rails.
Colocar las tapas a los
extremos de los rieles.
4
Install mounting brackets. Always use TWO 1 1/4”
mounting screws per bracket.
Instale los soportes de montaje. Siempre utilizar
DOS 1 ¼” tornillos por cada soporte de montaje.
2
Mark bracket position. Brackets should not interfere with
the tilt mechanism.
Marque la posicion de los soportes. Los soportes de
montaje no deben interferir con el mecanismo de
inclinación.
Montaje Interior
Inside Mount
Montaje Exterior
Outside Mount
Montaje Interior
Inside Mount
Montaje Exterior
Outside Mount
Attach valance (Attach valance return -for Outside Mount only).
Coloque la cenefa (Coloque el lado superior de la cenefa - sólo para
montaje exterior).
7
Click!
Click!
A B
Space Evenly
Colócalos a una distancia uniforme
Valance
Cenefa
Valance Return Clip
Sujetador del Lado
Superior de la Cenefa
Valance Return
Lado Superior
de la Cenefa
Hold Down bracket
with screw (Optional)
Soporte de sujeción
con tornillo (Opcional)
Mounting Screw
Tornillo de
Montaje
Mounting Bracket
Soporte de Montaje
Bottom Rail Endcap
Cabecera del
Riel Inferior
Headrail Endcap
Cabecera del
Riel Superior
Valance Clip
Sujetador de
Cenefa
Wand & Wand Stem
Vara & Vástago de la vara

Nien Window Fashions
®
products are 5 year warranted to be free
from defects in materials or workmanship as long as the original
purchaser owns the blind/shade(s).
To obtain warranty service contact the dealer with whom the
product was purchased for warranty assistance, contact Nien
Window Fashions
®
Customer Service at 1-800-666-1779 or visit
http://www.nienmade.com/contactus.aspx
This warranty does not cover the following:
1) Any damage caused by unauthorized repairs, improper installa-
tion, cleaning, maintenance. 2) Normal wear and tear. 3) Acci-
dents, alterations, misuse, abuse to the product, act of God. 4)
Exposure to elements, excessive humidity, fading, discoloration over
time. 5) Shipping charges, any removal and reinstallation cost.
NIEN WINDOW FASHIONS
®
5 YEAR WARRANTY INFO
Los porductos Nien Window Fashions
®
están garantizados por 5 años
contra defectos materiales o de fabricación mientras el comprador
original conserve las persianas/visillos. Para servicio relacionado con
la garantía contacta al distribudor donde adquiriste el producto,
contacta al Servicio al Cliente de Nien Window Fashions
®
por el
1-800-666-1779 o visite:
http://www.nienmade.com/contactus.aspx
Esta garantia no cubre lo siguiente:
1) Cualquier daño causado por reparaciones no autorizadas,
limpieza, mantenimiento, instalación incorrectas. 2) Desgaste
normal. 3) Accidentes, modificaciones, uso inapropiado, abuso del
producto, danños por razones de fuerza mayor. 4) Exposición a los
elementos, humedad excesiva, pérdida del lustre, decoloración
con el paso del tiempo. 5) Cargos de envío, cualquier costo por
retiro o reinstalación.
NIEN WINDOW FASHIONS
®
GARANTÍA LIMITADA DE 5 AÑOS
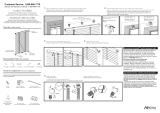
Twist ladders end and insert into
bottom rail holes and replace buttons.
Retuerce el extremo de las escalerillas,
inserta en los orificios del riel inferior y
reemplaza los botones.
f:
N300yyy
Trim the horizontal ladder cords.
Recorta los cordones horizon-
tales de a escalerilla.
c:
Lower the blind and rotate the slats to open
position (no angle). Mark desired length.
Baje la persiana y gira las tablillas a una
posición abierta (no ángulo). Marque la
longitud deseada.
a:
Shortening your blind (If necessary).
Cómo acortar tus persianas (Si es necesario).
9
Operate your blind:
a. Lift the bottom rail up or pull the bottom rail down.
b. Adjust the slats angle: turn the wand until the slats are at the desired position.
Opere su persiana:
a. Levantar el riel inferior o jalarlo hacia abajo.
b. Ajustar el ángulo de las tablillas: girar la vara hasta dejar las tablillas en la
posición deseada.
8
Install hold down bracket.
Instale el soporte de sujeción.
Optional
Montaje Interior
Inside Mount
Montaje Exterior
Outside Mount
Cleaning Instructions:
Keep your blind looking its best by periodically
wiping it with a soft cloth, feather duster, dusting
mitt, or the round brush attachment from a
vacuum cleaner. Do not use solvents or abrasive
solutions to clean the blind. This will cause
damage to the blind.
Instrucciones de Limpieza:
Para un mejor cuidado de su persiana, limpiar
periodicamente con un paño, plumero, o un
cepillo redondo adjunto a la aspiradora. No use
soluciones solventes o abrasivas para limpiar la
persiana ya que puede dañarla.
A Note Regarding Color:
The natural variations of color, grain, and texture in
this product may vary. We are not able to guaran-
tee exact matches on subsequent orders. Returns
can not be authorized due to these normal varia-
tions.
Nota Referiente al Color:
Las variedades de color, marcas de maderas, y
texturas son pueden variar. Nosotros no podemos
garantizar el color exacto en ordenes subsequen-
tas. Nosostros no podemos darle credito para sus
persianasdado a estas razones de naturaleza.
Remove all bottom rail buttons.
Remueva todos los botones del riel inferior.
CAUTION: Do not untie the bottom rail buttons from the cords.
PRECAUCIÓN: No separar los botones del riel inferior de los
cordones.
d:
e:
Lift bottom rail to the retained horizontal cords. Cut off excess
outer vertical cords (leave approximately 2" (5cm) below the
bottom rail). Do not cut the center lift cord.
Levante el riel inferior a los cables horizontales retenidos. Corte
el exceso de los cordones verticales que se ubican al exterior
(deje aproximadamente 2" (5cm) debajo del riel inferior). No
corte el cable de elevación central.
NOTE: If the blind hangs unevenly,
repeat the steps to raise and lower the
blind all the way up/down evenly with
both hands.
NOTA: Si la persiana se cuelga de
manera desigual, con ambas manos
repita los pasos para subir y bajar la
persiana completamente hacia
arriba/abajo de manera uniforme.
Carefully cut all slats through the route hole below the marked length.
Discard unwanted slats.
Con cuidado corte todas las tablilla a travez de orificio guía debajo de la
altura marcada. Tire las tablillas no deseadas.
CAUTION: Do not cut cords.
PRECAUCIÓN: No cortes los cordones.
b:
/