Hampton Bay 10793478411832 Guía de instalación
- Tipo
- Guía de instalación

Pencil|Lápiz Screwdriver|Destornillador
Ladder|Escalera
Drill|Taladro Level|Nivel
Ensure that your package contains all of the contents needed for proper installation.
Asegúrese de que su paquete contenga todos los elementos necesarios para realizar
una correcta instalación.
Cordless Vinyl Blind
Installation & Maintenance Instructions
Please take a moment to review the following installation guide.
Properly installed, your new blind will provide you with years of beauty.
Persianas de vinilo sin cordón
Instrucciones de Instalación y Mantenimiento
Dedique un poco de su tiempo a repasar la siguiente guía de instalación.
Si la persiana está instalada correctamente, podrá disfrutar de su belleza durante años.
Customer Service: 1-800-666-1779
Servicio de Atención al Cliente: 1-800-666-1779
Overview | Visión General:
Recommended Tools | Recomendadas:
Check the components | Revise los Componentes:
Nien Window Fashions
®
products are warranted to be free from
defects in materials or workmanship as long as the original
purchaser owns the blind/shade(s). To obtain warranty service
contact the dealer with whom the product was purchased for
warranty assistance, contact Nien Window Fashions
®
Customer
Service at
1-800-666-1779 or visit
http://www.nienmade.com/contactus.aspx
This warranty does not cover the following:
1) Any damage caused by unauthorized repairs, improper
installation, cleaning, maintenance. 2) Normal wear and tear.
3) Accidents, alterations, misuse, abuse to the product, act of
God. 4) Exposure to elements, excessive humidity, fading,
discoloration over time. 5) Shipping charges, any removal and
reinstallation cost.
NIEN WINDOW FASHIONS
®
LIMITED WARRANTY INFO
NIEN WINDOW FASHIONS
®
GARANTÍA LIMITADA DE POR VIDA
Los porductos Nien Window Fashions
®
están garantizados contra defectos
materiales o de fabricación mientras el comprador original conserve las
persianas/visillos. Para servicio relacionado con la garantía contacta al
distribudor donde adquiriste el producto, contacta al Servicio al Cliente de
Nien Window Fashions
®
por el 1-800-666-1779 o Esta garantía no cubre lo
siguiente:
1) Cualquier daño causado por reparaciones no autorizadas, limpieza,
mantenimiento, instalación incorrectas. 2) Desgaste normal. 3) Accidentes,
modificaciones, uso inapropiado, abuso del producto, danños por razones
de fuerza mayor. 4) Exposición a los elementos, humedad excesiva,
pérdida del lustre, decoloración con el paso del tiempo. 5) Cargos de envío,
cualquier costo por retiro o reinstalación.
Hold Down Bracket
Soporte de Sujeción
Bottom Rail
Riel Inferior
Wand
Vara
Endcap
Cabecera
Headrail
Riel Superior
Hold Down Bracket
(Optional)
Soporte de Sujeción
(Opcional)
Screw
Tornillo
Mounting Bracket
Soporte de Montaje
Headrail Endcap
Cabecera del Riel Superior
Bottom Rail Endcap
Cabecera del Riel Inferior
Wand & Wand Stem
Vara & Vástago de la vara
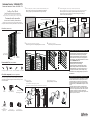
Choose a blind position (1-Inside mount, 2-Outside mount)and mark bracket position
Elija la posicion y ubicacion de su persiana(1-Montaje Interior, 2-Montaje
Exterior,) y marque la posicion donde colocara los soportes de montaje
1:
Remove the white tape from the
mounting bracket
Retire la cinta blanca del
soporte
Install mounting brackets (Choose an option: Inside mount, Outside mount)
Make sure the bracket does not obstruct the cordlock, drum support and cord tilter inside the headrail
Instale los soportes de montaje (Escoja la opción: Montaje Interior, Montaje Exterior)
Asegurese de que el soporte no obstruya la cerradura de cuerda, soporte de tambor, y el
volteador de cuerda dentro del riel superior
2:
Space Evenly
Colócalos a una distancia uniforme
Outside Mount
Montaje Exterior
Inside Mount
Montaje Interior
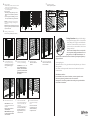
Insert wand stem into the headrail as shown below.
Inserta la vástago de la vara en el riel principal tal como se muestra
3:
Click !
Attach end caps to the rails.
Colocar las tapas a los extremos de los rieles.
4:
Mount your blind
Coloque la persiana.
Remove the Blind (If necessary)
Quitar la persiana (Si es necesario)
Lower the blind a few inches using the pull cords.
Push the back of the headrail upward with your thumb until it snaps into place.
5:
Latch
Click !

N300659
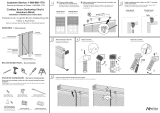
Operate your blind:
a. Hold the handle(s) located at the bottom rail. Lift the
bottom rail up or pull the bottom rail down.
b. Adjust the slats angle: turn the wand until the slats
are at the desired position.
Opere su persiana:
a. Sostener la(s) manija(s) ubicada(s) en el riel
inferior. Levantar el riel inferior o jalarlo hacia
abajo.
b. Ajustar el ángulo de las tablillas: girar la vara
hasta dejar las tablillas en la posición deseada.
NOTE: If your blind hangs un-evenly, repeat the
steps, ensuring you are lifting or lowering from two
sides evenly.
NOTA: Si la persiana queda desnivela-da, repetir
los pasos asegurando que los dos lados se levantan
o bajan al mismo nivel.
6:
Install hold down bracket
Instale el soporte de sujeción
7:
Inside Mount
Montaje Interior
Outside Mount
Montaje Exterior
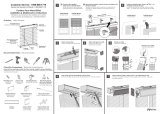
Shortening your blind (If necessary)
Cómo acortar tus persianas (Si es necesario)
8:
Lower the blind and rotate the
slats to open position (no angle).
Abaissez le store et ouvrez les
lattes complètement (angle
droit).
a:
Carefully cut the slats through the
route hole to your desired height.
CAUTION: Do not cut cords.
Corta cuidadosamente las
tablillas, a través del orificio
guía, hasta la altura deseada.
PRECAUCIÓN: No cortes
los cordones.
b:
Discard unwanted slats.
Desechas las tabillas no
deseadas
c:
Trim the horizontal ladder cords
Recorta los cordones horizon-
tales de a escalerilla
d:
Remove all bottom rail buttons
CAUTION: Do not untie
the bottom rail buttons from
the cords.
Enlevez tous les boutons
du rail inférieur.
PRECACIÓN: No separar
los botones del riel inferior
de los cordones.
e:
Lift bottom rail beneath ladder
location nearest the desired length
and cut off excess ladders. (Leave
approximately
1” (2.5 cm) below the bottom rail).
Levanta el riel inferior debajo
del escalón más cercano a la
longitud deseada y corta los
escalones sobrantes.
f:
Twist ladders end and insert into
bottom rail holes and replace
buttons.
Retuerce el extremo de las
escalerillas, inserta en los
orificios del riel inferior y
reemplaza los botones.
g:
A note regarding color:
The natural variations of color, grain and texture in this product may vary. We are not
able to guarantee
exact matches on subsequent orders. Returns can not be authorized due to these
normal variations.
Nota Referiente al Color:
Las variedades de color, marcas de maderas y texturas son pueden variar.
Nosotros no podemos garantizar el color exacto en ordenes
subsequentas. Nosostros no podemos darle credito para sus persianasdado a
estas razones de naturaleza.
Cleaning Instructions: Keep your blind looking it’s
best by periodically wiping it with a soft cloth, feather
duster, dusting mitt or using the round brush attach-
ment from a vacuum cleaner. Do not use solvents or
abrasive solutions to clean the blind. This will cause
damage to the blind.
Instrucciones de Limpieza: Para un mejor cuida-
do de su persiana, limpiar periodicamente con un
paño, plumero, o un cepillo redondo adjunto a la
aspiradora. No use soluciones solventes o abrasivas para limpiar la persiana ya
que puede dañarla.
-
 1
1
-
 2
2


Hampton Bay 10793478411832 Guía de instalación
- Tipo
- Guía de instalación
en otros idiomas
Artículos relacionados
Otros documentos
-
Home Decorators Collection 10793478184491 Guía de instalación
-
-
-
Home Decorators Collection 10793478397815 Guía de instalación
-
 Designer's Touch 10793478523467 Manual de usuario
-
Home Decorators Collection 10793478861422 Guía de instalación
-
 Designer's Touch 10793478410965 Guía de instalación
-
-
Home Decorators Collection 10793478330324 Guía de instalación
-
Home Decorators Collection 10793478653232 Guía de instalación

