
Contact Schön at (800) 880-8164 or visit www.schonsimplymodern.com. Copyright ©2015, World Imports Decorative Plumbing. All rights reserved.
PAGE 1
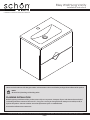
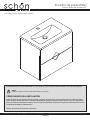
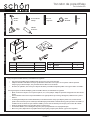
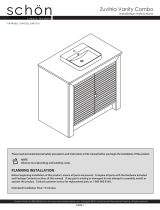
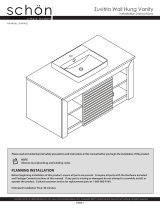
Esley Wall Hung Vanity
Installation Instructions
FOR MODELS: EYGWVT2420, EYGRVT2420, EYGBVT2420
TOOLS REQUIRED
Please read and understand all safety precautions and instructions in this manual before you begin the installation of this product.
NOTE
Observe local plumbing and building codes.
PLANNING INSTALLATION
Before beginning installation of this product, ensure all parts are present. Compare all parts with the Hardware Included
and Package Contents sections of this manual. If any part is missing or damaged, do not attempt to assemble, install, or
operate the product. Contact customer service for replacement parts at 1-800-880-8164.
Estimated Installation Time: 30 minutes

PAGE 2
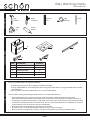
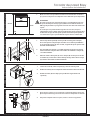
PART DESCRIPTION QUANTITY
A Vanity 1
B 1
C 1
A
Top
Mounting bracket
PACKAGE CONTENTS
Anchor
7
D
CARE & CLEANING
Screw
E
7
Silicone
sealant
Clean
rag
Esley Wall Hung Vanity
Pre-Installation
To protect your bath furniture, we suggest the following:
□ Avoid placing your furniture in direct sunlight, as sunlight causes fading.
Clean up spills immediately. Use a blotting rather than a wiping action. Water left over a long period of time will cause white
spots in the nish.
Alcohol, perfume, after-shave and medications can cause severe nish damage.
□
□
For best results in cleaning and polishing your bath furniture, we recommend the following:
□
□
Dust frequently with a clean, soft, dry, lint-free cloth. Clean the surface by rubbing in the direction of the grain.
Polish your furniture approximately every six months with a product that contains detergents, emulsiers and mineral oil.
The detergents clean dirt from the furniture; the emulsiers give it body to clean and last longer; the mineral oil is left behind
as a barrier for dirt and moisture that can harm the nish. There is no grit to harm the nish, no wax build-up, and no silicone
to raise the sheen and act as a barrier for touch-ups and renishing.
Clean the outside surface with mild soap, warm water, and a soft cloth.
On stubborn stains, use a powdered detergent and damp sponge or nylon scouring pad.
Never use abrasive scouring powders, cleansers, or pads because they will scratch, damage, and dull the surface.
□
□
□
□
B
D
E
C
Phillips
screwdriver
Carpenter’s
level
TOOLS REQUIRED
Tape
measure
Claw
hammer
Pencil

Contact Schön at (800) 880-8164 or visit www.schonsimplymodern.com. Copyright ©2015, World Imports Decorative Plumbing. All rights reserved.
PAGE 3
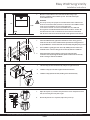
1: PREPARING THE WALL
1.
FLOOR
35"
31-3/4"
Esley Wall Hung Vanity
Installation Instructions
Measure a vertical distance of 31-3/4" from the oor using a tape
measure, and mark on the wall with a pencil. This will be the height
of the wall bracket (C).
2: INSTALLING THE BRACKET
1.
2.
3.
Place the wall bracket (C) against the wall at this location. Using a pencil,
mark seven locations on the wall that match up with the mounting bracket’s
(C) pre-drilled holes. Ensure the marks are horizontally straight by using a level.
Use a hammer to gently punch an anchor (D) halfway into the wall at each
marked location. Finish screwing in the anchors (D) with the screwdriver.
Align the bracket (C) holes with the anchors (D) against the wall.
insert the screws (E) through the bracket (C) holes and into the anchors (D).
Finish screwing in with the screwdriver.
WARNING
The vanity is heavy. Two people are recommended for safe installation. The
metal secure mount bracket (C) must be screwed into at least TWO 2 x 4 wall
studs and secured within 4" of each end of the bracket.
In the event 2 x 4 studs cannot be located within this area, additional
bracing must be installed behind the nished wall as follows. Position the
board between two studs so that the front surface of the bracket is ush
with the front of the studs. The nished wall is then applied over the board.
X
X
X
X
X
X
X
3: HANGING THE VANITY
Lift the vanity (A) above the bracket (C) and place it against the wall.
Slide the vanity (A) to the left or right to the desired location.
Slide the vanity (A) down the wall, hooking it onto the bracket (C).
1.
2.
3.
C
D
E
A
C
4: ADJUSTING THE LEVELS
1
2
2
1
Adjust the top bolt (1) to tilt the vanity from front to back. Adjust the bottom
bolt (2) for leveling the vanity left or right.
After all adjustments are completed, replace the plastic cap.
1.
2.

5: PREPARING TO INSTALL THE TOP
6: ADHERING THE TOP
PAGE 4
Esley Wall Hung Vanity
Installation Instructions
CAUTION
Two people are needed to safely lift the top and accurately position it
onto the vanity.
Align the top (B) with the vanity (A).
Slowly lower the top (B) onto the vanity (A).
Wipe away any excess silicone that may have seeped out.
1.
2.
3.
Wipe o the top edges of the vanity (A) that will be in contact with the
top (B) using a clean rag.
Apply a layer of silicone along all of the top edges.
1.
2.
A
A
B

PÁGINA 6
Tocador de pared Esley
PARA LOS MODELOS: EYGWVT2420, EYGRVT2420, EYGBVT2420
Instrucciones de instalación
TOOLS REQUIRED
Lee cuidadosamente en este manual todas las instrucciones y precauciones antes de comenzar a instalar este producto.
NOTA
Cumple con todas las normas locales de plomería y construcción.
CÓMO PLANIFICAR LA INSTALACIÓN
Antes de comenzar la instalación de este producto, asegúrate de que todas las piezas estén presentes. Verica que estén
todas las piezas cotejándolas con las secciones Contenido del Paquete y Herrajes Incluidos de este manual. Si alguna pieza
falta o está dañada, no intentes ensamblar, instalar u operar el producto. Para piezas de repuesto, comunícate con servicio
al cliente por el teléfono 1-800-880-8164.
Tiempo aproximado de instalación: 30 minutos
Comunícate con Schön por el teléfono (800) 880-8164 o visita www.schonsimplymodern.com. Copyright ©2015, World Imports Decorative Plumbing. Todos los derechos reservados.

PÁGINA 7
Sellador
de silicona
Paño
limpio
Tocador de pared Esley
Destornillador
Phillips
Nivel de
carpintero
HERRAMIENTAS NECESARIAS
Cinta
de medir
CONTENIDO DEL PAQUETE
Para proteger tus muebles de baño, recomendamos lo siguiente:
□ Evita poner tus muebles bajo la luz directa del sol, pues esta ocasiona decoloración.
Limpia los derrames al momento. Es mejor que absorbas los derrames con un paño seco sin pasarlo sobre la supercie.
Si dejas agua por mucho tiempo, esto producirá manchas blancas en el acabado.
El alcohol, los perfumes, las lociones para después de afeitar y las medicinas líquidas pueden causar graves daños al acabado.
□
□
Para lograr mejores resultados al limpiar y pulir tus muebles de baño, recomendamos lo siguiente:
□
□
□
□
□
□
Martillo
de uña
Lápiz
CUIDADO Y LIMPIEZA
Quita con frecuencia el polvo con un paño sin pelusas, seco, suave y limpio. Limpia la supercie restregando en la dirección de
la veta.
Pule tus muebles cada seis meses aproximadamente con algún producto que contenga detergentes, emulsionantes y aceite
mineral.
Los detergentes limpian la suciedad del mueble; los emulsionantes dan cuerpo para limpiar y durar más; el aceite mineral
queda como una barrera para la suciedad y la humedad que puedan dañar el acabado. No hay polvo para dañar el acabado, ni
acumulación de cera ni silicona para aumentar el brillo y actuar como una barrera para retoques y renovación del acabado.
Limpia la supercie exterior con agua tibia, jabón y un paño suave.
Para manchas difíciles, usa un detergente en polvo y una esponja húmeda o una esponjilla de nylon.
Nunca uses polvos, limpiadores o esponjillas abrasivos para pulir, porque rayarán, dañarán y opacarán la supercie
PIEZA DESCRIPCIÓN CANTIDAD
A Tocador 1
B 1
C 1
Cubierta
Soporte de montaje
PIEZA DESCRIPCIÓN CANTIDAD
D 7
E 7
Anclaje
Tornillo
Pre-instalación
A
B
D
E
C

PÁGINA 8
1: CÓMO PREPARAR LA PARED
1.
PISO
88.9cm
80.6cm
Mide con la cinta correspondiente una distancia vertical de 80.6 cm desde el
piso y marca en la pared con un lápiz. Esta será la altura del soporte de pared (C).
2: CÓMO INSTALAR EL SOPORTE
1.
2.
3.
Coloca el soporte de pared (C) contra la pared en este lugar. Con un lápiz,
marca siete puntos en la pared que coincidan con los oricios pretaladrados
en el soporte de montaje (C). Con un nivel, asegúrate de que los puntos estén
alineados horizontalmente
Usa un martillo para insertar con cuidado, dentro de la pared, un anclaje (D)
hasta la mitad en cada punto marcado. Termina de atornillar los anclajes (D)
con el destornillador.
Alinea los oricios del soporte (C) con los anclajes (D) contra la pared. Inserta
los tornillos (E) a través de los oricios del soporte (C) y dentro de los anclajes
(D). Termina de atornillar con el destornillador
ADVERTENCIA
El tocador es pesado. Para una instalación segura, se recomiendan dos personas.
El soporte de metal para montaje seguro (C) debe estar atornillado al menos en
DOS vigas de pared de 2 x 4 y asegurado a menos de 10.2 cm de cada extremo del
soporte.
En caso de que no se puedan localizar vigas de 2 x 4 en esa área, el soporte
adicional debe colocarse detrás de la pared acabada de la manera siguiente. Ubica
la tabla entre dos vigas de modo que la supercie frontal del soporte quede al ras
con el frente de las vigas. La pared terminada se aplica entonces sobre la tabla
X
X
X
X
X
X
X
3: CÓMO COLGAR EL TOCADOR
Levanta el tocador (A) sobre el soporte (C) y colócalo contra la pared.
Desliza el tocador (A) hacia la izquierda o la derecha hasta la ubicación deseada.
Desliza el tocador (A) hacia abajo por la pared hasta engancharlo en el
soporte (C).
1.
2.
3.
C
D
E
A
C
Tocador de pared Esley
Instrucciones de instalación
Comunícate con Schön por el teléfono (800) 880-8164 o visita www.schonsimplymodern.com. Copyright ©2015, World Imports Decorative Plumbing. Todos los derechos reservados.
4: CÓMO AJUSTAR LOS NIVELES
1
2
2
1
Ajusta el perno superior (1) para inclinar el tocador desde el frente hacia atrás.
Ajusta el perno inferior (2) para nivelar el tocador hacia la izquierda o la derecha.
Después de completar todos los ajustes, vuelve a colocar la tapa plástica
1.
2.

5: CÓMO PREPARARSE PARA INSTALAR LA CUBIERTA
6: CÓMO ADHERIR LA CUBIERTA
PÁGINA 9
PRECAUCIÓN
Se necesitan dos personas para cargar la cubierta de forma segura y
colocarla adecuadamente sobre el tocador.
Alinea la cubierta (B) con el tocador (A).
Baja la cubierta (B) lentamente hacia el tocador (A).
Elimina cualquier exceso de silicona que pueda haberse ltrado.
1.
2.
3.
Pasa un paño limpio por los bordes superiores del tocador (A) que estarán en
contacto con la cubierta (B).
Aplica una capa de silicona a lo largo de todos los bordes superiores.
1.
2.
A
A
B
Tocador de pared Esley
Instrucciones de instalación
-
 1
1
-
 2
2
-
 3
3
-
 4
4
-
 5
5
-
 6
6
-
 7
7
-
 8
8


Schon EYGBVT2420 Instrucciones de operación
- Tipo
- Instrucciones de operación
- Este manual también es adecuado para
en otros idiomas
Artículos relacionados
Otros documentos
-
Home Decorators Collection BF90212 Instrucciones de operación
-
-
Belle Foret PKBM3030 Guía de instalación
-
-
-
-
-
-