El Sony WM-FX888 es un radiocasete portátil con funciones avanzadas para una experiencia de audio excepcional. Con su diseño compacto y liviano, puedes llevarlo a todas partes y disfrutar de tu música favorita en cualquier momento. Reproduce cintas en ambos lados, lo que te permite escuchar tus álbumes completos sin interrupciones.
Además, cuenta con función de repetición para que puedas escuchar tus canciones favoritas una y otra vez. También puedes avanzar o retroceder rápidamente a través de las pistas para encontrar la que deseas. El radiocasete también tiene una función de búsqueda automática de música (AMS) que encuentra y reproduce automáticamente las canciones en la cinta.


Transcripción de documentos
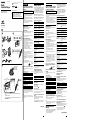
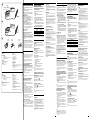
3-238-360-32(2) Printed using VOC (Volatile Organic Compound)-free vegetable oil based ink. English Español WARNING Radio Cassette Player “WALKMAN” is a trademark of Sony Corporation. Radiocasete Portátil Operating Instructions Manual de instrucciones POR FAVOR LEA DETALLADAMENTE ESTE MANUAL DE INSTRUCCIONES ANTES DE CONECTAR Y OPERAR ESTE EQUIPO. RECUERDE QUE UN MAL USO DE SU APARATO PODRIA ANULAR LA GARANTIA. WM-FX888 Playing a Tape D To prevent fire or shock hazard, do not expose the unit to rain or moisture. Do not install the appliance in a confined space, such as a bookcase or built-in cabinet. • To prevent fire, do not cover the ventilation of the apparatus with newspapers, tablecloths, curtains, etc. And don't place lighted candles on the apparatus. • To prevent fire or shock hazard, do not place objects filled with liquids, such as vases, on the apparatus. • Certain countries may regulate disposal of the battery used to power this product. Please consult with your local authority. A Y•x for 2 seconds or more during playback Stop playback Y•x once during playback Prepare a dry battery (not supplied) or the rechargeable battery (supplied). Repeat the current track (Repeat Single Track function) Y•x twice during playback To stop a single repeat, press Y•x once. Dry Battery Operation on the main unit Rechargeable Battery B 1 Insert the supplied rechargeable battery (NC6WM) into the rechargeable battery compartment with correct polarity. 2 Connect the supplied AC power adaptor to the charging stand, plug in the AC power adaptor to the house current (mains). 3 Place the main unit on the charging stand. The CHARGE lamp will light up. Full charging takes about 10 hours. You can charge the battery about 300 times. Note • Do not use the unit while charging. Remove the unit from the charging stand when using it. – If you operate the unit while charging, the battery will not be charged. – If you operate the unit while charging, it may cause malfunction. – Do not place the unit on the charging stand without the rechargeable battery. Otherwise, it may cause malfunction. CHARGE Note on the AC power adaptor Use only the supplied AC power adaptor. Do not use any other AC power adaptor. Polarity of the plug D When to replace/charge the battery FWD (forward) side Cara frontal (FWD) C Replace or charge the battery when “e” flashes in the display. REV (reverse) side Cara posterior (REV) Battery life (Approx. hours) (JEITA*) Sony alkaline LR6 (SG)** REW (AMS) Plug in firmly. Enchúfelo firmemente. Y•REPEAT** i HOLD VOL HOLD FF REW Y•x** MENU VOL* SET x * There is a tactile dot beside VOL on the main unit to show the direction to turn up the volume. ** The button has a tactile dot. * Tape playback 36 Radio reception 32 Rechargeable battery (NC-6WM) FF (AMS) En la unidad principal existe un punto táctil junto a VOL que muestra la dirección para subir el volumen. ** El botón tiene un punto táctil. Operation on the remote control Switch playback to the other side Note • For maximum performance we recommend that you use a Sony alkaline battery. B When adjusting the volume on the remote control Set the VOL control on the main unit to around 6. Press A Attach the supplied battery case, and then insert one R6 (size AA) battery with correct polarity. C When adjusting the volume on the main unit Set the VOL control on the remote control at maximum. To Preparations Sony Corporation ©2001 1 Insert a cassette and if the HOLD function is on, slide the HOLD switch in the opposite direction of the arrow to unlock the controls. 2 Press Y(play)•x(stop) on the remote control and adjust the volume with VOL. (On the main unit, press Y•REPEAT.) Tape playback 10 Radio reception 10 Press Switch playback to the other side Y•REPEAT during playback Stop playback x (stop) Repeat the current track (Repeat Single Track function) Y•REPEAT for 2 seconds or more during playback To stop a single repeat, press it again. Other tape operations Press Fast forward* FF Rewind* REW Play the next track/ succeeding 9 tracks from the beginning (AMS**) FF once/repeatedly during playback Play the current track/previous 8 tracks from the beginning (AMS**) REW once/repeatedly during playback Play the other side from the beginning (Skip Reverse function) FF for 2 seconds or more during stop Play the same side from the beginning (Rewind Auto Play function) REW for 2 seconds or more during stop * If Y•x on the remote control is pressed during fast forward or rewind, the Walkman switches to playback. **Automatic Music Sensor Adjusting playback modes To select playback direction mode Press MENU repeatedly to set the cursor in the display to MODE. Then press SET to select the desired mode. No sitúe el aparato en un espacio cerrado, como una estantería o un armario empotrado. • Para evitar el riesgo de incendio, no cubra el sistema de ventilación del aparato con periódicos, manteles, cortinas, etc. ni coloque velas encendidas sobre el aparato. • Para evitar el riesgo de incendio o electrocución, no coloque sobre el aparato objetos que contengan líquidos como, por ejemplo, un jarrón. • Es posible que en ciertos países se regule el desecho de la pila que se utiliza para alimentar este producto. Consulte con las autoridades locales. Preparativos Prepare una pila seca (no suministrada) o la pila recargable (suministrada). 2 Pulse Y(reproducción)•x(parada) en el mando a distancia y ajuste el volumen con VOL. (En la unidad principal, pulse Y•REPEAT.) Al ajustar el volumen en la unidad principal Ajuste el control VOL del mando a distancia al máximo. Al ajustar el volumen en el mando a distancia Ajuste el control VOL en la unidad principal a 6 aproximadamente. Operación en el mando a distancia Para Pulse Reproducir la otra cara Y•x durante 2 segundos o más durante la reproducción Detener la reproducción Y•x una vez durante la reproducción Repetir la canción actual (función de repetición de una sola canción) Y•x dos veces durante la reproducción Para detener la reproducción de una sola canción, pulse una vez Y•x. Operación en la unidad principal Para Pulse Adjunte el compartimento de la pila y, a continuación, inserte una pila R6 (tamaño AA) con la polaridad correcta. Reproducir la otra cara Y•REPEAT durante la reproducción Detener la reproducción x (parar) Nota • Para un máximo rendimiento le recomendamos que utilice una pila alcalina Sony. Repetir la canción actual (función de repetición de una sola canción) Y•REPEAT durante 2 segundos o más durante la reproducción Para detener la reproducción de una sola canción, vuelva a pulsar este botón. A Pila recargable B 1 Inserte la pila recargable suministrada (NC-6WM) en su compartimento correspondiente con la polaridad correcta. 2 Conecte el adaptador de corriente alterna suministrado al soporte de carga y el adaptador de CA a la electricidad (toma de corriente). 3 Coloque la unidad principal sobre el soporte de carga. Se encenderá la lámpara CHARGE. La carga completa dura unas 10 horas. Puede cargar la pila aproximadamente 300 veces. Nota • No utilice la unidad mientras se está cargando. Cuando utilice la unidad, extráigala del soporte de carga. – Si utiliza la unidad mientras se está cargando, la pila no se cargará. – Si utiliza la unidad mientras se está cargando, pueden producirse fallos en el funcionamiento. – No coloque la unidad en el soporte de carga sin la pila recargable. De lo contrario, pueden producirse fallos en el funcionamiento. Nota sobre el adaptador de alimentación de CA Utilice únicamente el adaptador de alimentación de CA suministrado. No utilice ningún otro adaptador de alimentación de CA. Polaridad de la clavija Cuándo se debe reemplazar/cargar la pila C Reemplace o cargue la pila cuando “e” parpadea en la pantalla. To play Select Duración de la pila (número aproximado de horas) both sides repeatedly s Pila alcalina de Sony LR6 (SG)** both sides once from the FWD side d Reproducción de cintas 36 Recepción de radio 32 To skip a long space between tracks (BL SKIP* function) Sony alkaline LR6 (SG)** and Rechargeable NC-6WM Para evitar incendios o descargas eléctricas, no exponga la unidad a la lluvia ni a la humedad. Pila seca To To ADVERTENCIA (JEITA*) Pila recargable (NC-6WM) Otras operaciones de la cinta Para Pulse Hacer que la cinta FF avance rápidamente* Rebobinar* la cinta REW Reproducir la FF una vez/repetidamente siguiente canción/las durante la reproducción 9 canciones siguientes desde el principio (AMS**) Reproducir la canción REW una vez/repetidamente actual/las 8 canciones durante la reproducción anteriores desde el principio (AMS**) FF durante 2 segundos o más Reproducir la otra con el modo STOP activado cara desde el comienzo (Función de inversión con salto) Reproducir la misma REW durante 2 segundos o más con el modo STOP cara desde el comienzo (función de activado reproducción automática después del rebobinado) * Si se pulsa Y•x en el mando a distancia durante el rebobinado o el avance rápido, el Walkman cambia a modo de reproducción. **Sensor automático de canciones Ajuste de los modos de reproducción Para seleccionar el modo de dirección de la reproducción Pulse MENU repetidamente para ajustar el cursor de la pantalla en MODE. A continuación, pulse SET para seleccionar el modo deseado. Para reproducir Seleccione ambas caras repetidamente s ambas caras una vez desde la cara FWD d On the main unit: 1 Press MENU repeatedly to set the cursor in the display to BL SKIP. 2 Press SET to show “ ”. Reproducción de cintas * Measured value by the standard of JEITA (Japan Electronics and Information Technology Industries Association). (Using a Sony HF series cassette tape) **When using a Sony LR6 (SG) “STAMINA” alkaline dry battery (produced in Japan). On the remote control: 1 Press MODE repeatedly to show “BL SKIP”. Pila alcalina de Sony LR6 (SG)** y Pila recargable NC-6WM Para saltarse un espacio grande entre canciones (función BL SKIP*) Reproducción de cintas 45 * The tape is fast-forwarded to the next track if there is a blank space longer than 12 seconds. Recepción de radio 42 En la unidad principal: 1 Pulse repetidamente MENU para ajustar el cursor de la pantalla en BL SKIP. 2 Pulse SET para mostrar “ ”. Note • The battery life may be shorter depending on the operating condition, the surrounding temperature and battery type. To play a tape recorded with Dolby* B NR system * Valores medidos por el estándar de JEITA (Japan Electronics and Information Technology Industries Association). (Utilizando una cinta de casete de la serie Sony HF) **Al utilizar una pila seca alcalina Sony LR6 (SG) “STAMINA” (fabricada en Japón). Tape playback 45 Radio reception 42 Press MENU repeatedly to set the cursor in the display to ; NR (Dolby noise reduction). Then press SET to show “ ”. * Manufactured under license from Dolby Laboratories. “Dolby”and the double-D symbol are trademarks of Dolby Laboratories. (turn over) Recepción de radio 10 10 Nota • La duración de la pila puede acortarse dependiendo de las condiciones de funcionamiento, la temperatura ambiental y el tipo de pila. Reproducción de una cinta D 1 Inserte un casete y, si la función HOLD está activada, deslice el interruptor HOLD en la dirección contraria a la fecha para desbloquear los controles. En el mando a distancia: 1 Pulse MODE repetidamente para mostrar “BL SKIP”. * La cinta avanza rápidamente a la siguiente canción si hay un espacio en blanco mayor de 12 segundos. Para reproducir una cinta grabada con sistema Dolby* B NR Pulse repetidamente MENU para ajustar el cursor de la pantalla en ; NR (Reducción de ruidos Dolby). A continuación, pulse SET para mostrar “ ”. * Fabricado bajo licencia de Dolby Laboratories. “Dolby” y el símbolo de doble D son marcas registradas de Dolby Laboratories. (gire la página) English E Listening to the Radio E TUNE/PRESET + TUNE/PRESET – BAND• RADIO ON RADIO OFF + – MENU SET RADIO ON/ BAND•OFF ENTER F HOLD 1 Press BAND•RADIO ON to turn on the radio. 2 Press BAND•RADIO ON repeatedly to select AM, FM1, or FM2. 3 Press MENU on the main unit repeatedly and set “__” ( the cursor) in the display to TUNE MODE. 4 For manual tuning 1 Press SET to choose MANUAL. 2 Press TUNE/PRESET + or – repeatedly to tune in to the desired station. Hold down TUNE/PRESET + or – for a few seconds to scan for stations. For preset tuning 1 Press SET to choose PRESET. 2 Press TUNE/PRESET + or – repeatedly to recall the desired preset station. To use preset tuning, preset stations first (see “Presetting Radio Stations”). MODE MENU G Terminals Terminales Terminals Terminales Terminals Terminales Frequency range FM: 87.5 - 108 MHz 76.0 - 90.0 MHz (Japan) AM: 530 - 1 710 kHz (North, Central, and South America) 531 - 1 602 kHz (other countries) 531 - 1 710 kHz (Japan) Power requirements 1.5 V Rechargeable battery One R6 (size AA) battery Dimensions (w/h/d) Approx. 108.4 × 77.7 × 23.0 mm (43⁄8 × 31⁄8 × 29⁄32 inches) Mass Approx. 160 g (5.7 oz) Supplied accessories • AC power adaptor (1) • Battery case (1) • Stereo headphones or earphones with remote control (1) • Charging stand (1) • Rechargeable battery (NC-6WM, 1.2 V, 600 mAh, Ni-Cd) (1) • Rechargeable battery carrying case (1) • Carrying pouch (1) Tape section Frequency response (Dolby NR off) Playback: 40 - 15 000 Hz Output Headphones (i) jack Load impedance 8 - 300 Ω Design and specifications are subject to change without notice. Especificaciones Radio Gama de frecuencias FM: 87,5 - 108 MHz 76,0 - 90,0 MHz (Japón) AM: 530 - 1 710 kHz (Norteamérica, Sudamérica y América Central) 531 - 1 602 kHz (otros países) 531 - 1 710 kHz (Japón) Cinta Frecuencia de respuesta (Dolby NR apagado) Reproducción: 40 - 15 000 Hz Salida Clavija de auriculares (i) Impedancia de carga 8 - 300 Ω General Requisitos de alimentación 1,5 V Pila recargable Una pila R6 (tamaño AA) Dimensiones (a/a/p) Aproximadamente 108,4 × 77,7 × 23,0 mm Masa Aprox. 160 g Accesorios suministrados • Adaptador de alimentación de CA (1) • Compartimento de pila (1) • Auriculares de casco o auriculares estéreo con mando a distancia (1) • Soporte de carga (1) • Pila recargable (NC-6WM, 1,2 V, 600 mAh, Ni-Cd) (1) • Estuche de transporte para la pila recargable (1) • Bolsa de transporte (1) El diseño y las especificaciones están sujetos a cambios sin previo aviso. • Do not drop the unit or give a shock to the unit, or it may cause a malfunction. • Do not leave the unit in a location near heat sources, or in a place subject to direct sunlight, excessive dust or sand, moisture, rain, mechanical shock, or in a car with its windows closed. • The LCD display may become hard to see or slow down when using the unit at high temperatures (above 40˚C/104°F) or at low temperatures (below 0˚C/32°F). At room temperature, the display will return to its normal operating condition. • Do not use cassettes longer than 90 minutes except for long continuous playback. • If the unit has not been used for long period of time, set it in the playback mode and warm it up for a few minutes before you start using again. On the remote control Use the supplied remote control only with this unit. AM(kHz) On headphones/earphones 531 - 1 602 Road safety To improve the broadcast reception JPn 76 - 90 531 - 1 710 • For AM: Reorient the unit itself. • For FM: Extend the remote control cord (antenna). If the reception is still not good, press MENU repeatedly to set the cursor in the display to FM MODE. Then press SET to choose from “MONO” (monaural), “LOCAL” or none (stereo) for best reception. USA 87.5 - 108 530 - 1 710 Do not use headphones/earphones while driving, cycling, or operating any motorized vehicle. It may create a traffic hazard and is illegal in some areas. It can also be potentially dangerous to play your headphones/earphones at high volume while walking, especially at pedestrian crossings. You should exercise extreme caution or discontinue use in potentially hazardous situations. To operate from the remote control E General Area indication and frequency range On handling 87.5 - 108 Presetting Radio Stations Radio section 1 Press BAND•RADIO ON to turn on the radio. 2 Press ENTER. The frequency digits will flash in the display. 3 Press and hold BAND•RADIO ON until “Eur”,“JPn”, or “USA” flashes. 4 Press BAND•RADIO ON repeatedly to select “Eur”, “JPn”, or “USA” and press ENTER. 5 Tune in to and store stations as necessary following the procedure of “Listening to the Radio” and “Presetting Radio Stations”. Eur Press RADIO OFF. To turn on the radio, press RADIO ON/BAND•OFF for more than one second (while the tape is in stop mode only). To select the band, press RADIO ON/BAND•OFF for more than one second while the radio is on. To tune in or recall a preset station, press + or –. To turn off the radio, press RADIO ON/BAND•OFF. Specifications (Excluding European, Saudi Arabian, and Chinese model) • Do not charge a dry battery. • Do not carry the dry or rechargeable batteries with coins or other metallic objects. It can generate heat if the positive and negative terminals of the batteries are accidentally contacted by a metallic object. • When you do not use the Walkman for a long time, remove the battery to avoid any damage caused by battery leakage and subsequent corrosion. Frequency range FM (MHz) HOLD SET Receiving Stations Outside Your Country Area* To turn off the radio SOUND Español On batteries You can store radio stations into the unit’s memory. You can preset up to 32 stations —12 each for FM1 and FM2 and 8 for AM (for the JPn area*, up to 16 stations — 8 each for FM and AM). * See “Receiving Stations Outside Your Country (Excluding European, Saudi Arabian, and Chinese model)”. Tuning in to and Storing Radio Stations Automatically (Auto-Memory Scanning function) 1 Press BAND•RADIO ON to turn on the radio. 2 Press BAND•RADIO ON repeatedly to select AM, FM1, or FM2. 3 Press ENTER until “A” appears in the display. The Walkman starts searching and storing stations. Then the preset number appears. Note • Do not remove the power sources until all the stations are stored. Storing Radio Stations Manually (Manual-Memory function) You can preset the stations in any order. 1 Press BAND•RADIO ON to turn on the radio. 2 Press BAND•RADIO ON repeatedly to select AM, FM1, or FM2. 3 Press ENTER. The frequency digits will flash in the display. 4 Press TUNE/PRESET + or – repeatedly to tune in to the desired station and press ENTER. The preset number will flash in the display. 5 Press TUNE/PRESET + or – repeatedly to select the desired preset number and press ENTER. The station is preset to the number of your choice. Notes • If you cannot complete step 4 or 5 while the indications are flashing, repeat from step 3. • If you preset a new station to the same preset number, the previously stored station will be erased. To cancel the stored station Follow the procedure above and in step 4, instead of tuning in to a station, press and hold TUNE/PRESET + or – until “– – – –” is displayed. Press ENTER while “– – – –” is flashing. The preset number will flash in the display. Press TUNE/PRESET + or – repeatedly to select the preset number you want to cancel and press ENTER. * Eur : European and other countries JPn : Japan USA : USA, Canada, and Central and South America Preventing hearing damage Using Other Functions F Do not use headphones/earphones at high volume. Hearing experts advise against continuous, loud and extended play. If you experience a ringing in your ears, reduce volume or discontinue use. Locking the Controls — HOLD Function Caring for others Slide the HOLD switch in the direction of the arrow to lock the controls of the Walkman or the remote control. Emphasizing Sound On the main unit: 1 Press MENU repeatedly to set the cursor in the display to SOUND. 2 Press SET repeatedly to select the sound emphasis of your choice. On the remote control: 1 Press SOUND repeatedly. With each press, the indications change. The indications change as follows: RV : Sound Revitalizer. Emphasizes treble sound. MB : Mega Bass. Emphasizes bass sound (moderate effect). GRV : Groove. Emphasizes bass sound (strong effect). no message : normal (no effect). Note • If the sound is distorted with the mode “GRV”, turn down the volume of the main unit or select other modes. Protecting Your Hearing — AVLS (Automatic Volume Limiter System) On the main unit: Press MENU repeatedly in the playback, stop or radio mode to set the cursor to AVLS in the display . Then press SET to show “ ”. On the remote control: Hold down MODE until “AVLS” appears in the display. To cancel the AVLS function Press SET so that “ ” disappears from the display on the main unit. On the remote control, hold down MODE again until “AVLS” disappears.. Note • The AVLS setting will be canceled when you replace the battery. Precautions On charging • Remove the AC power adaptor from the wall outlet as soon as possible after the rechargeable battery has been charged. Overcharging may damage the rechargeable battery. • The charging stand and the rechargeable battery may become warm during charging, but this is not a problem. • Do not tear off the film on the rechargeable battery. • Use only the supplied charging stand to charge the supplied rechargeable battery. • Be sure not to short-circuit the battery. When you carry it with you, use the supplied carrying case. If you are not using the case, do not carry the battery with other metallic objects such as keys, rings in your pocket. • If the rechargeable battery is new or has not been used for a long time, it may not be charged completely until you use it several times. Keep the volume to a moderate level. This will allow you to hear outside sounds and to be considerate to the people around you. On maintenance To clean the tape head and path Use the cleaning cassette CHK-1W/C-1KW (not supplied) every 10 hours of use. Use only the recommended cleaning cassette. To clean the exterior Use a soft cloth slightly moistened in water. Do not use alcohol, benzine or thinner. Clean the headphones/earphones and remote control plugs periodically with a cotton swab or a soft cloth as illustrated. Clean the terminals periodically with a cotton swab or soft cloth as illustrated. G Escuchar la radio E 1 Pulse BAND•RADIO ON para encender la radio. 2 Pulse repetidamente BAND•RADIO ON para seleccionar AM, FM1 o FM2. 3 Pulse repetidamente MENU en la unidad principal y ajuste “__” (el cursor) de la pantalla en TUNE MODE. 4 Para una sintonización manual 1 Pulse SET para elegir MANUAL. 2 Pulse repetidamente TUNE/PRESET + o – para sintonizar la emisora deseada. Mantenga pulsado TUNE/PRESET + o – durante unos segundos para buscar emisoras. Para sintonizar emisoras memorizadas 1 Pulse SET para elegir PRESET. 2 Pulse repetidamente TUNE/PRESET + o – para recuperar la emisora memorizada deseada. Para sintonizar emisoras memorizadas, ajuste primero las emisoras (consulte, “Memorización de emisoras de radio”). Para apagar la radio Pulse RADIO OFF. Para mejorar la recepción de la emisión • Para AM: Vuelva a orientar la unidad entera. • Para FM: Extienda el cable del mando a distancia (antena). Si la recepción sigue siendo deficiente, pulse repetidamente MENU para ajustar el cursor de la pantalla en FM MODE. A continuación, pulse SET para elegir entre “MONO” (monofónico), “LOCAL” o ninguno (estéreo) para una mejor recepción. Para operar desde el mando a distancia Para encender la radio, pulse RADIO ON/ BAND•OFF durante más de un segundo (sólo mientras la cinta se encuentra en el modo STOP). Para seleccionar la banda, pulse RADIO ON/ BAND•OFF durante más de un segundo mientras la radio está encendida. Para sintonizar o recuperar una emisora memorizada, pulse + o –. Para apagar la radio, pulse RADIO ON/BAND• OFF. Memorización de emisoras de radio E Puede almacenar emisoras de radio en la memoria de la unidad. Puede memorizar hasta 32 emisoras, 12 para FM1 y FM2 respectivamente y 8 para AM (en el área de Japón*, se pueden memorizar hasta 16 emisoras, 8 para FM y otras 8 para AM). * Consulte “Recepción de emisoras fuera del país (No se incluyen los modelos, europeos, chinos ni los de Arabia Saudí)”. Sintonización y almacenamiento automático de emisoras de radio (Función de exploración automática de memoria) 1 Pulse BAND•RADIO ON para encender la radio. 2 Pulse repetidamente BAND•RADIO ON para seleccionar AM, FM1 o FM2. 3 Pulse ENTER hasta que aparezca “A” en la pantalla. El Walkman comienza a buscar y almacenar emisoras. A continuación, aparece el número preestablecido. Nota • No retire las fuentes de alimentación hasta que estén almacenadas todas las estaciones. Almacenamiento manual de estaciones de radio (Función de memoria manual) Puede memorizar las emisoras en cualquier orden. 1 Pulse BAND•RADIO ON para encender la radio. 2 Pulse repetidamente BAND•RADIO ON para seleccionar AM, FM1 o FM2. 3 Pulse ENTER. Los dígitos de frecuencia parpadearán en la pantalla. 4 Pulse repetidamente TUNE/PRESET + o – para sintonizar la emisora deseada y pulse ENTER. El número de presintonías parpadeará en la pantalla. 5 Pulse repetidamente TUNE/PRESET + o – para seleccionar el número de presintonía deseado y pulse ENTER. La emisora se memoriza en el número que haya elegido. Notas • Si no puede realizar los pasos 4 ó 5 mientras están parpadeando las indicaciones, repita todos los pasos desde el paso 3. • Si memoriza una nueva emisora en el mismo número preestablecido, se borrará la emisora almacenada previamente. Para cancelar la emisora almacenada Siga el procedimiento anterior y en el paso 4, en vez de sintonizar una emisora, mantenga pulsado TUNE/PRESET + o – hasta que aparezca “- - - -”. Pulse ENTER mientas “- - - -” parpadea. El número de emisoras memorizadas parpadeará en pantalla. Pulse repetidamente TUNE/PRESET + o – para seleccionar el número de presintonía que desea cancelar y pulse ENTER. Recepción de emisoras fuera del país (No se incluyen los modelos, europeos, chinos ni los de Arabia Saudí) 1 Pulse BAND•RADIO ON para encender la radio. 2 Pulse ENTER. Los dígitos de frecuencia parpadearán en la pantalla. 3 Mantenga pulsado BAND•RADIO ON hasta que parpadee “Eur”,”JPn” o “USA”. 4 Pulse repetidamente BAND•RADIO ON para seleccionar “Eur”, “JPn” o “USA” y pulse ENTER. 5 Sintonice y almacene estaciones siguiendo el procedimiento de “Escuchar la radio” y “Memorización de emisoras de radio”. Precauciones Carga • Desconecte el adaptador de alimentación de CA de la toma mural lo antes posible una vez cargada la pila recargable. La sobrecarga puede dañar la pila recargable. • El soporte de carga y la pila recargable pueden calentarse durante la carga, pero no implica ningún problema. • No retire el plástico de la pila recargable. • Utilice solamente el soporte de carga suministrado para cargar la pila recargable suministrada. • Tenga cuidado de no cortocircuitar la pila. Cuando la lleve consigo, utilice el estuche de transporte suministrado. Si no utiliza el estuche de transporte, no deje que la pila entre en contacto con otros objetos metálicos que se encuentren en su bolsillo, como llaveros. • Si la pila es nueva o no se ha utilizado durante mucho tiempo, es posible que no se cargue completamente hasta que la utilice varias veces. Pilas • No cargue una pila seca. • No transporte las pilas secas o recargables junto a monedas u otros objetos metálicos. Puede generar calor si las terminales positiva y negativa de las pilas entran en contacto accidentalmente con un objeto de metal. • Cuando no utilice el Walkman durante mucho tiempo, retire la pila para evitar cualquier daño causado por fugas y su consecuente corrosión. Manejo Eur 87,5 - 108 531 - 1 602 JPn 76 - 90 531 - 1 710 • No deje caer la unidad ni la golpee, puesto que podría provocar un mal funcionamiento. • No deje la unidad cerca de fuentes térmicas, ni en un lugar sometido a la luz solar directa, a polvo excesivo, a arena, a la humedad, a la lluvia, a golpes, ni en el interior de un automóvil con las ventanillas cerradas. • El visor de cristal líquido puede ser difícil de ver o puede que funcione con lentitud cuando utilice la unidad a altas temperaturas (más de 40ºC) o a bajas temperaturas (menos de 0ºC). A temperatura ambiente, el visor volverá a las condiciones normales de funcionamiento. • No utilice casetes de más de 90 minutos excepto para la reproducción larga y continua. • Si no ha utilizado la unidad durante mucho tiempo, póngala en el modo de reproducción para que se caliente durante algunos minutos antes de empezar a usarla de nuevo. USA 87,5 - 108 530 - 1 710 Mando a distancia Indicación de área y gama de frecuencias Área* Gama de frecuencias FM (MHz) AM(kHz) * Eur :Europa y otros países JPn :Japón USA :EE.UU., Canadá, Sudamérica y América Central Utilice el mando a distancia suministrado solamente con esta unidad. Auriculares con casco/auriculares Seguridad en la carretera Utilización de otras funciones F Bloqueo de los controles — Función HOLD Deslice el interruptor HOLD en la dirección de la flecha para bloquear los controles del Walkman o del mando a distancia. Potenciar el sonido No utilice los auriculares con casco/auriculares cuando conduzca, vaya en bicicleta, o maneje cualquier vehículo motorizado. Esto podría suponer un peligro para el tráfico, y es ilegal en ciertas zonas. También puede resultar potencialmente peligroso escuchar a través de los auriculares a gran volumen mientras camine, especialmente en pasos cebra. En situaciones potencialmente peligrosas, deberá tener mucho cuidado o dejar de utilizar los auriculares. Cuidado de sus oídos Evite utilizar los auriculares a gran volumen. Los especialistas del sistema auditivo desaconsejan la escucha prolongada a gran nivel. Si experimenta un silbido en sus oídos, reduzca el volumen o deje de escuchar a través de los auriculares. En la unidad principal: 1 Pulse repetidamente MENU para ajustar el cursor de la pantalla en SOUND. 2 Pulse repetidamente SET para seleccionar la potencia de sonido deseada. Respeto a los demás En el mando a distancia: 1 Pulse repetidamente SOUND. Cada vez que pulse, cambiarán las indicaciones. Para limpiar el cabezal y la trayectoria de la cinta Las indicaciones cambian del modo siguiente: RV : Revitalizador de sonido. Enfatiza los sonidos agudos. MB : Mega Bass. Enfatiza los sonidos graves (efecto moderado). GRV : Groove. Enfatiza los sonidos graves (efecto fuerte). sin mensaje : normal (sin efecto). Nota • Si el sonido se distorsiona con el modo “GRV”, baje el volumen de la unidad principal o seleccione otros modos. Protección de los oídos — AVLS (Sistema de limitación automática del volumen) En la unidad principal: Pulse repetidamente MENU en los modos de reproducción, parada o radio para ajustar el cursor en AVLS en la pantalla. A continuación, pulse SET para mostrar “ ”. En el mando a distancia: Mantenga pulsado MODE hasta que aparezca “AVLS” en pantalla. Para cancelar la función AVLS Pulse SET para que desaparezca “ ” de la pantalla de la unidad principal. En el mando a distancia, mantenga pulsado de nuevo MODE hasta que desaparezca “AVLS”. Nota • El ajuste AVLS se cancelará cuando reemplace la pila. Mantenga el volumen a un nivel moderado. Esto le permitirá escuchar los sonidos del exterior y respetar a quienes se encuentren a su alrededor. Mantenimiento Utilice un casete limpiador CHK-1W/C-1KW (no suministrado) cada 10 horas de utilización. Utilice solamente el casete limpiador recomendado. Para limpiar el exterior Utilice un paño suave ligeramente humedecido con agua. No use alcohol, bencina, ni disolvente. Limpie periódicamente las clavijas de los auriculares y del mando a distancia con un paño de algodón o bayeta suave, tal y como se muestra en la ilustración. Limpie periódicamente los terminales con un paño de algodón o bayeta suave, tal y como se muestra en la ilustración. G-
 1
1
-
 2
2


El Sony WM-FX888 es un radiocasete portátil con funciones avanzadas para una experiencia de audio excepcional. Con su diseño compacto y liviano, puedes llevarlo a todas partes y disfrutar de tu música favorita en cualquier momento. Reproduce cintas en ambos lados, lo que te permite escuchar tus álbumes completos sin interrupciones.
Además, cuenta con función de repetición para que puedas escuchar tus canciones favoritas una y otra vez. También puedes avanzar o retroceder rápidamente a través de las pistas para encontrar la que deseas. El radiocasete también tiene una función de búsqueda automática de música (AMS) que encuentra y reproduce automáticamente las canciones en la cinta.
en otros idiomas
- English: Sony WM-FX888 Operating instructions
Artículos relacionados
-
Sony Walkman WM-EX670 Manual de usuario
-
Sony WM-EX650 El manual del propietario
-
-
-
-
-
-
-
-