Sony CKA-NWS630 El manual del propietario
- Categoría
- Juguetes
- Tipo
- El manual del propietario
El Sony CKA-NWS630 te permite usar tu reproductor de música WALKMAN de forma más cómoda y segura mientras haces ejercicio o realizas otras actividades. Con su funda protectora y correa ajustable, el CKA-NWS630 te permite llevar tu WALKMAN en el brazo, brindándote fácil acceso a los controles y la pantalla. La correa es elástica y se adapta a una amplia gama de tamaños de brazo, garantizando un ajuste cómodo y seguro. Además, el CKA-NWS630 también se puede usar como soporte horizontal, lo que te permite colocar tu WALKMAN en una superficie plana para reproducir música o ver videos.
El Sony CKA-NWS630 te permite usar tu reproductor de música WALKMAN de forma más cómoda y segura mientras haces ejercicio o realizas otras actividades. Con su funda protectora y correa ajustable, el CKA-NWS630 te permite llevar tu WALKMAN en el brazo, brindándote fácil acceso a los controles y la pantalla. La correa es elástica y se adapta a una amplia gama de tamaños de brazo, garantizando un ajuste cómodo y seguro. Además, el CKA-NWS630 también se puede usar como soporte horizontal, lo que te permite colocar tu WALKMAN en una superficie plana para reproducir música o ver videos.

Transcripción de documentos
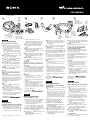
CKA-NWS630 4-113-925-11(1) stopper arrêt tope Zapfen fermo belt hole orifice du brassard orificio de la correa Gurtloch foro del cinturino Operating Instructions How to use the case and belt 1 Adjust the length of the belt (Figure ). 3 4 5 Remove the belt stopper from stopper (), put the belt on your arm, and determine the position of stopper to fit the belt stopper hole. Remove the belt from your arm, remove stopper from the belt completely (), and fix it into the belt hole at the confirmed position (). Insert your WALKMAN into the case from the display part (Figure -). Clip the case containing the WALKMAN onto the belt (Figure -,). It is possible to clip it on after putting the belt on your arm. Put the belt on your arm (Figure ), fix stopper , and pull it into the narrow section of the belt stopper hole (Figure -). If both stoppers ( and ) are removed, set the belt as in Figure . Hint The case can be clipped not only on a belt. How to use as the horizontal stand (Figure ) Open the clip (), press the button () and place the swing arm between the slots (). You can change the angle of the WALKMAN by changing the position of the swing arm. When stowing the swing arm, place the swing arm back into the clip until it snaps into position (). Notes The belt is stretchable, but take care not to stretch it too much. Do not make it too tight on your arm. When washing, place into a washing net. Detach the case when you use any product which requires use of an attachment supplied with your WALKMAN. When removing the case from the belt on your arm, do not pull strongly as the case may catch on a hole in the belt. “WALKMAN” and are registered trademarks of Sony Corporation. Français buckle agrafe hebilla Schnalle fibbia Retirez le brassard du bras, retirez complètement l’arrêt du brassard () et fixez-le dans l’orifice du brassard à la position que vous venez de vérifier (). 2 Insérez votre WALKMAN dans l’étui en introduisant l’écran vers le haut (Figure -). 3 Clipsez sur le brassard l’étui renfermant le WALKMAN (Figure -,). Il est possible de le clipser après avoir mis le brassard autour du bras. 4 Mettez le brassard autour du bras (Figure ), fixez l’arrêt et tirez-le dans la partie étroite de l’orifice de l’arrêt du brassard (Figure -). 5 Si les deux arrêts ( et ) sont retirés, réglez le brassard de la manière illustrée à la Figure . Conseil L’étui ne peut être clipsé que sur un brassard. Utilisation comme support horizontal (Figure ) Ouvrez le clip (), appuyez sur la touche () et placez le bras pivotant entre les rainures (). Vous pouvez modifier l’angle du WALKMAN en agissant sur la position du bras pivotant. Lorsque vous rangez le bras pivotant, rabattezle dans le clip jusqu’à ce qu’il émette un déclic (). Remarques Le brassard est extensible, mais veillez à ne pas trop tirer dessus. Ne le serrez pas trop fort autour du bras. Pour le laver, placez le brassard dans un filet de lavage. Détachez l’étui lorsque vous employez un produit qui exige l’utilisation d’un accessoire fourni avec votre WALKMAN. Lorsque vous retirez l’étui du brassard alors que vous le portez toujours au bras, ne tirez pas trop fort, car il risque de s’accrocher à un des orifices du brassard. 1 Réglez la longueur du brassard (Figure ). Printed in China 2 3 Quite el tope de la correa del tope (), colóquese la correa en el brazo y fije la posición del tope para que coincida con el orificio del tope de la correa. Quítese la correa del brazo, quite el tope de la correa () y fíjelo en el orificio de la correa en la posición correspondiente (). Introduzca el WALKMAN en la funda por la parte de la pantalla (Figura -). Fije la funda con el WALKMAN en la correa (Figura -,). También puede fijarla tras colocarse la correa en el brazo. back side dos detrás Rückseite lato posteriore 5 Tipp Die Schutzhülle lässt sich mit dem Clip nicht nur am Gurt, sondern auch anderswo befestigen. ), fije el tope y deslícelo hacia la parte estrecha del orificio del tope de la correa (figura -). Si se han quitado los dos topes ( y ), fije la correa tal como ilustra la figura . Sugerencia La correa no es la única forma de fijar la funda. haben, stellen Sie die Länge des Gurts wie in Abbildung erläutert ein. So können Sie das Gerät horizontal aufstellen (Abbildung ) Abra la pinza (), pulse el botón () y coloque el brazo basculante entre las ranuras (). Para cambiar el ángulo del WALKMAN, basta con cambiar la posición del brazo basculante. Para guardar el brazo basculante, vuelva a colocarlo en la pinza hasta que quede fijado en su posición (). Öffnen Sie den Clip (), drücken Sie auf den Knopf () und setzen Sie den beweglichen Arm in einen Schlitz ein (). Sie können den Winkel des WALKMAN ändern, indem Sie die Position des beweglichen Arms verändern. Zum Verstauen des beweglichen Arms stecken Sie ihn wieder zurück in den Clip, so dass er einrastet (). Uso como soporte horizontal (figura ) Notas Hinweise La correa es elástica, pero tenga cuidado de no estirarla en exceso. No se la coloque demasiado ceñida en el brazo. Para lavarla, hágalo en una bolsa de lavado. Extraiga la funda cuando utilice cualquier producto que requiera el uso de una fijación suministrado con tu WALKMAN. Al quitar la funda de la correa, no tire demasiado fuerte, ya que la funda podría engancharse con alguno de los orificios de la correa. Der Gurt lässt sich dehnen, aber achten Sie darauf, ihn nicht zu stark zu dehnen. Legen Sie den Gurt nicht zu eng um den Arm. Legen Sie den Gurt zum Waschen in ein Wäschenetz. Nehmen Sie die Schutzhülle ab, wenn Sie andere Produkte, wie z. B. das mitgelieferte Zubehör des WALKMAN, anschließen wollen. Wenn Sie die Schutzhülle vom Gurt am Arm abnehmen, ziehen Sie nicht zu stark daran, da die Schutzhülle möglicherweise in einem Gurtloch feststeckt. “WALKMAN” y son marcas comerciales registradas de Sony Corporation. „WALKMAN“ und sind eingetragene Markenzeichen der Sony Corporation. Deutsch Italiano Bedienungsanleitung Istruzioni per l’uso So verwenden Sie die Schutzhülle und den Gurt 1 Regolare la lunghezza del cinturino (Figura 1 Stellen Sie die Länge des Gurts ein (Abbildung Español 1 Ajuste la longitud de la correa (Figura ). front side face avant delante Vorderseite lato anteriore 5 Wenn Sie beide Zapfen ( und ) entfernt Manual de Instrucciones Uso de la funda y la correa button touche botón Knopf 4 Colóquese la correa en el brazo (figura « WALKMAN » et sont des marques déposées de Sony Corporation. Comment utiliser l’étui et le brassard Retirez l’arrêt du brassard au niveau de l’arrêt (), placez le brassard autour du bras et déterminez la position de l’arrêt par rapport à l’orifice de l’arrêt du brassard. swing arm bras pivotant brazo basculante Beweglicher Arm Mode d’emploi ©2008 Sony Corporation belt stopper arrêt du brassard tope de la correa Zapfenverschluss fermo del cinturino English 2 2 3 4 ). Lösen Sie den Zapfenverschluss vom Zapfen (), legen Sie den Gurt um den Arm und legen Sie das Gurtloch fest, von dem aus der Zapfen in das Zapfenverschlussloch passt. Nehmen Sie den Gurt vom Arm ab, entfernen Sie den Zapfen ganz aus dem Gurt () und setzen Sie ihn in das festgelegte Gurtloch ein (). Setzen Sie den WALKMAN mit dem Display nach oben weisend in die Schutzhülle ein (Abbildung -). Befestigen Sie die Schutzhülle mit dem WALKMAN darin mit dem Clip am Gurt (Abbildung -,). Dies ist auch möglich, wenn Sie den Gurt bereits um den Arm gelegt haben. Legen Sie den Gurt um den Arm (Abbildung ), setzen Sie den Zapfenverschluss auf den Zapfen und ziehen Sie diesen in den schmalen Teil des Zapfenverschlussloches (Abbildung -). Utilizzo della custodia e del cinturino 2 3 4 5 ). Rimuovere il fermo del cinturino dal fermo (), applicare il cinturino sul braccio e stabilire la posizione del fermo per regolare il foro del fermo del cinturino. Rimuovere il cinturino dal braccio e il fermo dal cinturino (), quindi fissarlo nel relativo foro nella posizione confermata (). Inserire il WALKMAN nella custodia dalla parte del display (Figura -). Agganciare la custodia contenente il WALKMAN sul cinturino (Figura ,). È possibile agganciarla solo dopo aver sistemato il cinturino sul braccio. Posizionare il cinturino sul braccio (Figura ), fissare il fermo , quindi tirarlo verso la parte stretta del foro del fermo del cinturino (Figura -). Se entrambi i fermi ( e ) vengono tolti, fissare il cinturino come indicato nella Figura . Suggerimento La custodia può essere agganciata anche ad altri supporti oltre che al cinturino.-
 1
1
-
 2
2


Sony CKA-NWS630 El manual del propietario
- Categoría
- Juguetes
- Tipo
- El manual del propietario
El Sony CKA-NWS630 te permite usar tu reproductor de música WALKMAN de forma más cómoda y segura mientras haces ejercicio o realizas otras actividades. Con su funda protectora y correa ajustable, el CKA-NWS630 te permite llevar tu WALKMAN en el brazo, brindándote fácil acceso a los controles y la pantalla. La correa es elástica y se adapta a una amplia gama de tamaños de brazo, garantizando un ajuste cómodo y seguro. Además, el CKA-NWS630 también se puede usar como soporte horizontal, lo que te permite colocar tu WALKMAN en una superficie plana para reproducir música o ver videos.
en otros idiomas
- français: Sony CKA-NWS630 Le manuel du propriétaire
- italiano: Sony CKA-NWS630 Manuale del proprietario
- English: Sony CKA-NWS630 Owner's manual
- Deutsch: Sony CKA-NWS630 Bedienungsanleitung
- Nederlands: Sony CKA-NWS630 de handleiding
- português: Sony CKA-NWS630 Manual do proprietário
- dansk: Sony CKA-NWS630 Brugervejledning
- svenska: Sony CKA-NWS630 Bruksanvisning
- suomi: Sony CKA-NWS630 Omistajan opas
Artículos relacionados
-
Sony CKL-NWS630 El manual del propietario
-
Sony CKA-NWU50 El manual del propietario
-
-
-
Sony CKM-NWS630 El manual del propietario
-
-
-
-
-