

2
ENGLISH
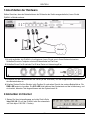
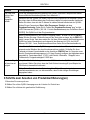
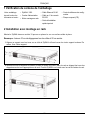
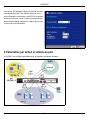
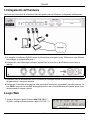
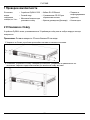
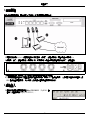
1 Checking the Package Contents
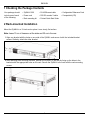
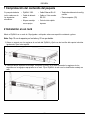
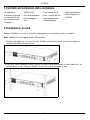
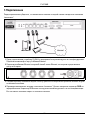
2 Rack-mounted Installation
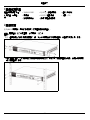
Mount the ZyWALL in a 19-inch rack or place it on a sturdy, flat surface.
Note: Leave 10 cm of clearance at the sides and 20 cm in the rear.
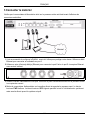
1 Align one bracket with the holes on one side of the ZyWALL and secure it with the included bracket
screws. Similarly, attach the other bracket.
2 After attaching both mounting brackets, position the ZyWALL in the rack by lining up the holes in the
brackets with the appropriate holes on the rack. Secure the ZyWALL to the rack with the rack-mounting
screws.
Your package should
include one of each
of the following:
• ZyWALL 1050
•Power cord
• Rack-mounting kit
• RJ-45 Ethernet cable
• RS-232 console Y-cable
• Printed Quick Start Guide
• Configuration Reference Card
• Compact disk (CD)

ENGLISH
3
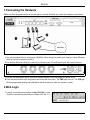
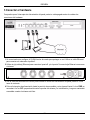
3 Connecting the Hardware
Make sure that the power switch on the rear panel is turned off before you make the hardware connections.
1 It is recommended that you configure the ZyWALL before using it to protect your network. Use an Ethernet
cable to connect a computer to port 1.
2 Use another Ethernet cable(s) to connect port 2 and/or port 3 to an Ethernet jack with Internet access.
3 Use the included power cord to connect the power socket on the rear panel to a power outlet.
4 Push the power switch to the on position and look at the front panel. The PWR light turns on. The SYS light
blinks during system testing and initialization and then stays on when the system is ready.
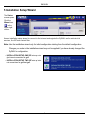
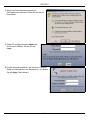
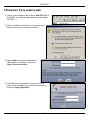
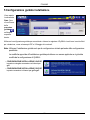
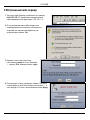
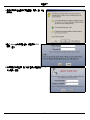
4 Web Login
1 Launch your web browser and go to http://192.168.1.1 (the
ZyWALL automatically redirects you to https://192.168.1.1).

ENGLISH
4
2 Click Yes to proceed if you get a security alert or
certificate screen.
3 Enter admin as the user name and 1234 as
the password. Click Login.
4 It is strongly recommended that you change the
password. Type and retype a new password, and click
Apply.

ENGLISH
5
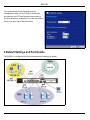
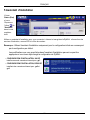
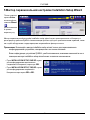
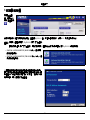
5 Installation Setup Wizard
Use an installation setup wizard to connect to the Internet and register the ZyWALL and/or activate trial
services, like IDP and content filter.
Note: Use the installation wizard only for initial configuration starting from the default configuration.
Changes you make in the installation wizard may not be applied if you have already changed the
ZyWALL’s configuration.
The Status
screen opens.
Click the
Wizard icon
in the
upper right
corner.
• INSTALLATION SETUP, ONE ISP sets up a sin-
gle Internet connection for ge2.
• INSTALLATION SETUP, TWO ISP sets up Inter-
net connections for ge2 and ge3.

ENGLISH
6
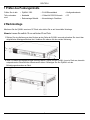
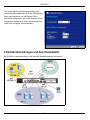
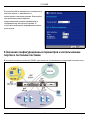
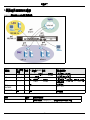
6 Default Settings and Port Details
The ZyWALL is configured for the following network topology by default.
The wizard screens vary depending on the
encapsulation type you use. Refer to information
provided by your ISP and the web help screens to
know what to enter in each field. You can leave fields
blank if you don’t have that information.

ENGLISH
7
Note: The USB ports, extension card slots, and hard disk slot are reserved for future use.
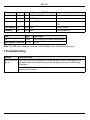
7 Troubleshooting
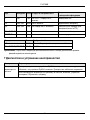
Port Interface Zone IP Address and DHCP Settings Suggested Use With Default Settings
1 ge1 LAN 192.168.1.1, DHCP server enabled Protected LAN
2, 3 ge2, ge3 WAN DHCP clients Connections to the Internet
4, 5 ge4, ge5 DMZ None, DHCP server disabled Public servers (such as web, e-mail and
FTP)
DIAL BACKUP aux None None Auxiliary modem
CONSOLE N/A None None Local management
Label Type Cable to Use
1~5 RJ-45 8-wire Category 5e or above Ethernet cable
DIAL BACKUP, CONSOLE RS-232 RS-232
Problem Corrective Action
None of the LEDs
turn on.
Make sure that you have the power cord connected to the ZyWALL and plugged in to an
appropriate power source. Make sure you have the ZyWALL turned on. Check all cable
connections.
If the LEDs still do not turn on, you may have a hardware problem. In this case, you should
contact your local vendor.

ENGLISH
8
8 Procedure to View a Product’s Certification(s)
1 Go to www.zyxel.com.
2 Select your product from the drop-down list box on the ZyXEL home page to go to that product's page.
3 Select the certification you wish to view from this page.
Cannot access
the ZyWALL from
the LAN.
Check the cable connection between the ZyWALL and your computer or switch. Refer to
section 3 for details.
Ping the ZyWALL from a LAN computer. Make sure your computer’s Ethernet card is
installed and functioning properly. Also make sure that its IP address is in the same subnet as
the ZyWALL’s.
In the computer, click Start, (All) Programs, Accessories and then Command Prompt. In
the Command Prompt window, type "ping" followed by the ZyWALL’s LAN IP address
(192.168.1.1 is the default) and then press [ENTER]. The ZyWALL should reply.
If you’ve forgotten the ZyWALL’s password, use the RESET button. Press the button in for
about 5 seconds (or until the PWR LED starts to blink), then release it. It returns the ZyWALL
to the factory defaults (password is 1234, LAN IP address 192.168.1.1 etc.; see your User’s
Guide for details).
If you’ve forgotten the ZyWALL’s IP address, you can use the commands through the
console port to check it. Connect your computer to the CONSOLE port using a console
cable. Your computer should have a terminal emulation communications program (such as
HyperTerminal) set to VT100 terminal emulation, no parity, 8 data bits, 1 stop bit, no flow
control and 115200 bps port speed.
Cannot access
the Internet.
Check the ZyWALL’s connection to the Ethernet jack with Internet access. Make sure the
Internet gateway device (such as a DSL modem) is working properly.
Check ge2’s status in the Status screen. Use the installation setup wizard again and make
sure that you enter the correct settings.
Problem Corrective Action

9
DEUTSCH
1 Prüfen des Packungsinhalts
2 Rackmontage
Montieren Sie die ZyWALL an einem 19"-Rack oder stellen Sie es auf eine stabile Unterlage.
Hinweis: Lassen Sie seitlich 10 cm und hinten 20 cm Platz.
1 Richten Sie eine Halterung an den Löchern an der Seite der ZyWALL aus und schrauben Sie sie mit den
mitgelieferten Montageschrauben fest. Verfahren Sie ebenso mit der zweiten Halterung.
2 Wenn Sie beide Montagehalterungen befestigt haben, richten Sie die ZyWALL im so im Rack aus, dass die
entsprechenden Schraublöcher übereinander stehen. Befestigen Sie den ZyWALL mit den
Befestigungsschrauben am Rack.
Prüfen Sie ob alle
Teile vorhanden
sind:
• ZyWALL 1050
• Netzkabel
• Rackmontage-Zubehör
• RJ-45-Ethernetkabel
• Y-Kabel für RS-232-Konsole
• Kurzanleitung in Druckform
• Konfigurationskarte
•CD

DEUTSCH
10
3 Anschließen der Hardware
Stellen Sie sicher, dass der Netzschalter an der Rückseite des Geräts ausgeschaltet ist, bevor Sie die
ZyWALL in Betrieb nehmen.
1 Es wird empfohlen, die ZyWALL zu konfigurieren, bevor Sie sie zum in Ihrem Netzwerk einsetzen.
Schließen Sie einen Computer mit einem Ethernetkabel an Port 1 an.
2 Schließen Sie an Port 2 und/oder Port 3 Ihren Router mit Internetzugriff an.
3 Schliessen Sie den Netzanschluss des Geräts (an der Rückseite) mit dem mitgelieferten Netzkabel an
eine Netzsteckdose an.
4 Schalten Sie den Ein/Aus-Schalter in die Position On und sehen Sie sich das vordere Bedienfeld an. Die
PWR-LED beginnt zu leuchten. Die SYS-LED blinkt während des Systemtests und der Initialisierung, und
sie leuchtet, wenn der Test abgeschlossen und das System bereit ist.
4 Anmelden im Internet
1 Starten Sie Ihren Internetbrowser und rufen Sie die Seite
http://192.168.1.1 auf (der ZyWALL leitet Sie automatisch
zur Seite https://192.168.1.1 weiter).

DEUTSCH
11
2 Wenn eine Sicherheitswarnung oder ein
Zertifikatsfenster erscheint, klicken Sie auf Ja, um
fortzufahren.
3 Geben Sie als Benutzername admin und
als Kennwort 1234 ein. Klicken Sie auf
Login.
4 Es wird dringend empfohlen, das Kennwort zu ändern.
Geben Sie zweimal das neue Kennwort ein, und klicken
Sie auf Apply (Übernehmen).

DEUTSCH
12
5 Installationsassistent
Stellen Sie mit dem Installationsassistenten eine Verbindung zum Internet her und registrieren Sie den
ZyWALL und/oder aktivieren Sie Testdienste wie IDP und Inhaltsfilter.
Hinweis: Verwenden Sie den Setup-Assistenten beginnend mit der Standardkonfiguration nur für die
Erstkonfiguration.
Änderungen, die Sie mit dem Installationsassistenten vornehmen, werden nicht übernommen,
wenn Sie bereits die Konfiguration des ZyWALL geändert haben.
Das Fenster
Status
(Status) wird
angezeigt.
Klicken Sie in
der rechten
oberen Ecke
auf das
Assistent-
Symbol .
•Mit INSTALLATION SETUP, ONE ISP wird eine
einzelne Internetverbindung für ge2 eingerichtet.
•Mit INSTALLATION SETUP, TWO ISP wird eine
Internetverbindung für ge2 und ge3 eingerichtet.

DEUTSCH
13
6 Standardeinstellungen und Anschlussdetails
Der ZyWALL ist standardmäßig für die folgende Netzwekrtopologie konfiguriert.
Das zweite Fenster des Assistenten hängt vom
verwendeten Encapsulation ab. In den Handbüchern
Ihres Internetprovider und auf dessen Online-
Hilfeseiten erfahren Sie, was in die einzelnen Felder
eingegeben werden muss. Wenn Ihnen bestimmte
Daten nicht vorliegen, Internetprovider.

DEUTSCH
14
Hinweis: Die USB-Anschlüsse, Erweiterungskartensteckplätze und der Festplattenschacht werden für
die spätere Benutzung reserviert.
7 Problembeseitigung
Anschluss anschluss Zone
IP-Adressse und DHCP-
Einstellungen
Empfohlene Verwendung mit
Standardeinstellungen
1 ge1 LAN 192.168.1.1, DHCP-Server aktiviert Geschütztes LAN
2, 3 ge2, ge3 WAN DHCP-Clients Verbindungen zum Internet
4, 5 ge4, ge5 DMZ Keine, DHCP-Server deaktiviert Öffentliche Server (z. B. Internet, E-
Mail und FTP)
DIAL BACKUP aux Keine Keine Hilfsmodem
KONSOLE n. V. Keine Keine Lokale Verwaltung
Bezeichnung Typ Zu verwendendes Kabel
1 - 5 RJ-45 8-poliges Ethernetkabel der Cat 5e oder höher
DIAL BACKUP, KONSOLE RS-232 RS-232
Problem Lösungsmöglichkeit
Es leuchtet keine
der LED-
Anzeigen.
Prüfen Sie die Stromversorgung der ZyWALL. Stellen Sie sicher, dass der ZyWALL
eingeschaltet ist.
Wenn die LED-Anzeigen auch dann nicht leuchten, besteht möglicherweise ein Problem mit
der Hardware. In diesem Fall sollten Sie sich an Ihren Händler wenden.

DEUTSCH
15
8 Schritte zum Ansehen von Produktzertifizierung(en)
1 Besuchen Sie www.zyxel.com.
2 Wählen Sie auf der ZyXEL-Homepage aus der Liste der Ihr Produkt aus.
3 Wählen Sie auf dieser die gewünschte Zertifizierung.
Vom LAN kann
nicht auf den
ZyWALL
zugegriffen
werden.
Prüfen Sie die Kabelverbindung zwischen der ZyWALL und Ihrem Computer oder Switch.
Eine ausführliche Beschreibung finden Sie in Abschnitt 3.
Versuchen Sie den ZyWALL mit einem Ping vom LAN-Computer aus zu erreichen. Stellen
Sie sicher, dass die Ethernetkarte des Computers installiert ist und einwandfrei funktioniert.
Stellen Sie sicher, dass sich die IP-Adresse im selben Subnetz befindet wie der ZyWALL.
Klicken Sie am Computer auf Start, (Alle) Programme, Zubehör und dann
Eingabeaufforderung. Geben Sie im Fenster der Eingabeaufforderung "ping" und die
LAN IP-Adresse des ZyWALL (192.168.1.1 ist die Standardadresse) ein, und drücken Sie auf
[ENTER]. Die ZyWALL muß den Ping beantworten.
Wenn Sie das Kennwort für den ZyWALL vergessen haben, drücken Sie auf die RESET-
Taste. Drücken Sie etwa 5 Sekunden lang auf die Taste (oder so lange, bis die PWR-LED
blinkt). Lassen Sie die Taste dann wieder los. Auf diese Weise werden alle Einstellungen des
ZyWALL auf seine Standardwerte zurückgesetzt (das Kennwort ist 1234, die LAN-IP-
Adresse 192.168.1.1 usw.; Detailinformationen hierzu finden Sie im Benutzerhandbuch).
Wenn Sie die IP-Adresse des ZyWALL vergessen haben, können Sie sie mit den
entsprechenden Befehlen über den Konsolenanschluss ermitteln. Schließen Sie Ihren
Computer mit einem Konsolenkabel an den Anschluss CONSOLE an. Ihr Computer muss
über ein Terminalemulationsprogramm (z. B. HyperTerminal) verfügen, das folgendermassen
eingestellt ist: Terminalemulation VT100, keine Parität, 8 Datenbits, 1 Stoppbit, keine
Flusskontrolle, Portgeschwindigkeit 115200 bps.
Es ist kein Zugriff
auf das Internet
möglich.
Überprüfen Sie die Verbndung zwischen dem WAN Interface der ZyWALL und Ihrem Router
zum Internet. Stellen Sie sicher, dass das Gerät für den Internetzugriff (zum Beispiel ein
DSL-Modem) einwandfrei funktioniert.
Prüfen Sie im Statusfenster den Status des ge2. Führen Sie noch einmal den
Installationsassistenten aus, um sicherzustellen, dass Sie die richtigen Einstellungen
eingegeben haben.
Problem Lösungsmöglichkeit

16
ESPAÑOL
1 Comprobación del contenido del paquete
2 Instalación en un rack
Monte el ZyWALL en un rack de 19 pulgadas o colóquelo sobre una superficie resistente y plana.
Nota: Deje 10 cm de espacio por los lados y 20 cm por detrás.
1 Alinee un soporte con los agujeros de un lado del ZyWALL y fíjelo con los tornillos del soporte incluidos.
Igualmente, fije el otro soporte.
2 Tras fijar ambos soportes de montaje, coloque el ZyWALL en el rack alineando los agujeros de los
soportes con los agujeros apropiados en el rack. Fije el ZyWALL al rack con los tornillos de montaje en
rack.
Su paquete debería
incluir cada uno de
los siguientes
elementos:
• ZyWALL 1050
• Cable de aliment-
ación
• Kit para montaje
en un equipo
• Cable Ethernet RJ-45
• Cable en Y de consola
RS-232
• Guía de inicio rápido
impresa
• Tarjeta de referencia de config-
uración
• Disco compacto (CD)

ESPAÑOL
17
3 Conectar el hardware
Compruebe que el interruptor de alimentación del panel posterior esté apagado antes de realizar las
conexiones del hardware.
1 Se recomienda que configure el ZyWALL antes de usarlo para proteger su red. Utilice un cable Ethernet
para conectar un ordenador al puerto 1.
2 Utilice otro(s) cable(s) Ethernet para conectar el puerto 2 y/o el puerto 3 a una clavija Ethernet con acceso
a Internet.
3 Use el cable de alimentación incluido para conectar el zócalo de alimentación del panel posterior a una
toma de corriente.
4 Pulse el interruptor de alimentación hasta la posición de encendido y mire al panel frontal. La luz PWR se
encenderá. La luz SYS parpadeará durante la prueba del sistema y la inicialización y luego se mantendrá
encendida cuando el sistema esté listo.

ESPAÑOL
18
4 Acceso a la Web
1 Abra su navegador y vaya a http://192.168.1.1 (el ZyWALL
le llevará automáticamente a https://192.168.1.1).
2 Haga clic en Sí para continuar si se ha abierto una
pantalla de alerta de seguridad o certificado.
3 Escriba admin como nombre de usuario y
1234 como contraseña. Haga clic en Login
(Entrar).
4 Se recomienda que cambie la contraseña. Escriba y
vuelva a escribir la nueva contraseña y haga clic en
Apply (Aplicar).

ESPAÑOL
19
5 Asistente para la instalación
Utilice un asistente para la instalación para conectarse a Internet y registrar el ZyWALL y/o activar los
servicios de prueba, como IDP y el filtro de contenidos.
Nota: Utilice el asistente para la instalación sólo para la configuración inicial comenzando desde la
configuración predeterminada.
Los cambios realizados con el asistente para la instalación puede que no se apliquen si ya ha
cambiado la configuración del ZyWALL.
Aparecerá la
pantalla
Status
(Estado).
Haga clic en
el icono del
Asistente
en la esquina
superior
derecha.
• INSTALLATION SETUP, ONE ISP configura una
única conexión a Internet para ge2.
• INSTALLATION SETUP, TWO ISP configura con-
exiones a Internet para ge2 y ge3.

ESPAÑOL
20
6 Configuración predeterminada y detalles de los puertos
El ZyWALL está configurado para la siguiente topología de red por defecto.
Las pantallas del asistente varían según el tipo de
encapsulación usado. Consulte la información
facilitada por su ISP y las pantallas de ayuda web
para saber qué escribir en cada campo. Deje un
campo en blanco si no tiene esa información.

ESPAÑOL
21
Nota: Los puertos USB, ranuras de extensión para tarjeta y la ranura para disco duro están reservadas
para su uso en el futuro.
7 Solución de problemas
Puerto Interfaz Zona
Configuración de dirección IP y
DHCP
Se aconseja utilizar la configuración
predeterminada
1 ge1 LAN 192.168.1.1, servidor DHCP
activado
LAN protegida
2, 3 ge2, ge3 WAN Clientes DHCP Conexiones a Internet
4, 5 ge4, ge5 DMZ Ninguna, servidor DHCP
desactivado
Servidores públicos (como web, correo
electrónico y FTP)
DIAL BACKUP
(APOYO DE
MARCADO)
aux Ning
uno
Ninguno Módem auxiliar
CONSOLA N/A Ning
uno
Ninguno Administración local
Etiqueta
Type
(Tipo)
Cable a usar
1~5 RJ-45 Cable Ethernet de 8 hilos de categoría 5e o superior
DIAL BACKUP, CONSOLA RS-232 RS-232
Problema Solución
Ninguno de los
LEDs se
enciende.
Asegúrese de haber conectado el cable de alimentación al ZyWALL y si lo ha enchufado en
una fuente de alimentación apropiada. Compruebe si el ZyWALL está encendido.
Compruebe todas las conexiones de los cables.
Si los LEDs todavía no se encienden, puede que tenga un problema de hardware. En este
caso, debería contactar con su vendedor local.

ESPAÑOL
22
8 Procedimiento para ver la(s) certificación(es) del producto
1 Vaya a www.zyxel.com.
2 Seleccione su producto de la lista desplegable en la página inicial de ZyXEL para ir a la página de ese
producto.
3 Seleccione el certificado que desee visualizar en esta página.
No se puede
acceder al
ZyWALL desde la
LAN.
Compruebe la conexión de cables entre el ZyWALL y su ordenador o switch. Consulte la
sección 3 para más detalles.
Realice un ping al ZyWALL desde un ordenador en la LAN. Compruebe que la tarjeta
Ethernet de su ordenador esté instalada y funcione correctamente. Asegúrese también que
su dirección IP sea de la misma subred que el ZyWALL.
En el ordenador, haga clic en Inicio, (Todos los) programas, Accesorios y luego en
Símbolo del sistema. En la ventana del Símbolo del sistema, escriba "ping" seguido por la
dirección IP LAN del ZyWALL (192.168.1.1 es la predeterminada) y pulse [ENTRAR]. El
ZyWALL debería responder.
Si ha olvidado la contraseña del ZyWALL, utilice el botón RESET . Mantenga pulsado el
botón durante unos 5 segundos (o hasta que el LED PWR comience a parpadear), a
continuación suéltelo. Esto devolverá al ZyWALL la configuración predeterminada de fábrica
(la contraseña es 1234, dirección IP LAN 192.168.1.1 etc.; vea la Guía del usuario para más
detalles).
Si ha olvidado la dirección IP del ZyWALL, puede usar los comandos a través del puerto
consola para comprobarlo. Conecte su ordenador al puerto CONSOLE (Consola) usando
un cable de consola. Su ordenador debería tener un programa de comunicaciones de
emulación de terminales (como HyperTerminal) ajustado a la emulación del terminal VT100,
sin paridad, 8 bits de datos, 1 bit de parada, sin flujo de control y una velocidad de puerto de
115200 bps.
No puedo acceder
a Internet.
Compruebe la conexión del ZyWALL a la clavija Ethernet con acceso a Internet. Compruebe
si el dispositivo de puerta de enlace de Internet (como un módem DSL) funciona
correctamente.
Compruebe el estado de ge2 en la pantalla Status (Estado). Utilice el asistente para la
instalación de nuevo y asegúrese de introducir la configuración correcta.
Problema Solución

23
FRANÇAIS
1 Vérification du contenu de l'emballage
2 Installation avec montage en rack
Montez le ZyWALL dans un rack de 19 pouces ou placez-le sur une surface solide et plane.
Remarque : Laissez 10 cm de dégagement sur les côtés et 20 cm au dos.
1 Alignez un support avec les trous sur un côté du ZyWALL et fixez-le avec les vis du support incluses. De
même, fixez l'autre support.
2 Après avoir fixé les supports de fixation, mettez en place le ZyWALL dans le rack en alignant les trous des
supports avec les trous appropriés sur le rack. Fixez le ZyWALL sur le rack avec les vis de fixation du rack.
Votre emballage
devrait inclure les
éléments suivants :
• ZyWALL 1050
• Cordon d'alimentation
• Kit de montage en rack
• Câble Ethernet RJ-45
• Câble en Y de console
RS-232
• Guide d'installation
rapide imprimé
• Carte de référence de config-
uration
• Disque compact (CD)

FRANÇAIS
24
3 Connecter le matériel
Vérifiez que le commutateur d'alimentation situé sur le panneau arrière est éteint avant d'effectuer les
connexions matérielles.
1 Il est recommandé de configurer leZyWALL avant de l'utiliser pour protéger votre réseau. Utilisez un câble
Ethernet pour connecter un ordinateur au port 1.
2 Utilisez un autre (d'autres) câble(s) Ethernet pour connecter le port 2 et/ou le port 3 à une prise Ethernet
avec accès à Internet.
3 Utilisez le cordon d'alimentation inclus pour connecter la prise d'alimentation située sur le panneau arrière
à une prise de courant.
4 Mettez le commutateur d'alimentation sur la position allumé et regardez le panneau avant. Le témoin
lumineux PWR s'allume. Le témoin lumineux SYS clignote pendant le test et l'initialisation du système et
reste ensuite allumé quand le système est prêt.

FRANÇAIS
25
4 Ouverture d'une session web
1 Lancez votre navigateur web et allez à http://192.168.1.1
(le ZyWALL vous redirige automatiquement vers https://
192.168.1.1).
2 Cliquez sur Oui pour continuer si vous recevez une
alerte de sécurité ou un écran de certificat.
3 Entrez admin comme nom d'utilisateur et
1234 comme mot de passe. Cliquez sur
Login (Ouvrir une session).
4 Il est fortement recommandé de changer le mot de
passe Tapez et retapez un nouveau mot de passe, et
cliquez sur Apply (Appliquer).

FRANÇAIS
26
5 Assistant d'installation
Utilisez un assistant d'installation pour vous connecter à Internet et enregistrez leZyWALL et/ou activez les
services d'évaluation, comme IDP et le filtre de contenu.
Remarque : Utilisez l'assistant d'installation uniquement pour la configuration initiale en commençant
par la configuration par défaut.
Les modifications que vous avez faites dans l'assistant d'installation peuvent ne pas être
appliquées si vous avez déjà changé la configuration de ZyWALL .
L'écran
Status (Etat)
s'ouvre.
Cliquez sur
l'icône de
l'Assistant
dans le coin
supérieur
droit.
• CONFIGURATION D'INSTALLATION, UN ISP
installe une seule connexion Internet pour ge2.
• CONFIGURATION D'INSTALLATION, DEUX ISP
installent des connexions Internet pour ge2 et
ge3.

FRANÇAIS
27
6 Paramètres par défaut et détails du port
Le ZyWALL est configuré par défaut pour la topologie de réseau suivante.
Les écrans de l'assistant varient en fonction du type
d'encapsulation que vous utilisez. Reportez-vous
aux informations fournies par votre ISP et les écrans
d'aide du web pour savoir ce que vous devez entrer
dans chaque champ. Laissez un champ vide si vous
n'avez pas cette information.

FRANÇAIS
28
Remarque : Les ports USB, les logements de carte d'extension, et le logement de disque dur sont
réservés à une utilisation ultérieure.
7 Dépannage
Port Interface Zone Adresse IP et paramètres DHCP
Utilisation suggérée avec les
paramètres par défaut
1 ge1 LAN 192.168.1.1, serveur DHCP activé LAN protégé
2, 3 ge2, ge3 WAN Clients DHCP Connexions à Internet
4, 5 ge4, ge5 DMZ Aucun, serveur DHCP désactivé Serveurs publics (tels que web, e-
mail et FTP)
DIAL BACKUP
(SAUVEGARDE DE
NUMÉROTATION)
aux Aucun Aucun Modem auxiliaire
CONSOLE N/D Aucun Aucun Gestion locale
Etiquette Type Câble à utiliser
1~5 RJ-45 Câble Ethernet de catégorie 5e à 8 fils ou supérieur
DIAL BACKUP
(SAUVEGARDE DE
NUMÉROTATION),
CONSOLE (CONSOLE)
RS-232 RS-232
Problème Action corrective
Aucune LED ne
s'allume.
Vérifiez que votre cordon d'alimentation est connecté au ZyWALL et branché dans une prise
de courant appropriée. Vérifiez que le ZyWALL est allumé. Vérifiez toutes les connexions
câblées.
Si les LED ne s'allument toujours pas, cela signifie que vous avez peut-être un problème
matériel. Dans ce cas-là, vous devez contacter votre vendeur local.

FRANÇAIS
29
8 Procédure pour afficher la (les) certification(s) d'un produit
1 Allez à www.zyxel.com.
2 Sélectionnez votre produit dans la liste déroulante dans la page d'accueil du ZyXEL pour aller à la page de
ce produit.
3 Sélectionnez la certification que vous désirez consulter dans cette page.
Impossible
d'accéder au
ZyWALL à partir
du LAN.
Vérifiez la connexion câblée entre leZyWALL et votre ordinateur ou commutateur. Reportez-
vous à la section 3 pour les détails.
Exécutez la commande Ping sur le ZyWALL à partir d'un ordinateur du LAN. Vérifiez que la
carte Ethernet de votre ordinateur est installée et fonctionne correctement. Vérifiez aussi que
son adresse IP se trouve dans le même sous-réseau que celle duZyWALL.
Sur l'ordinateur, cliquez sur Start (Démarrer), (All) Programmes ((Tous) Programmes),
Accessories (Accessoires) et ensuite sur Command Prompt (Invite de commandes).
Dans la fenêtre Command Prompt (Invite de Commandes), tapez "ping" suivi de l'adresse
IP LAN du ZyWALL (192.168.1.1 est l'adresse par défaut) et appuyez ensuite sur [ENTER]
(ENTRÉE). Le ZyWALL devrait répondre.
Si vous avez oublié le mot de passe du ZyWALL, utilisez le bouton RESET
(RÉINITIALISER). Appuyez sur le bouton pendant environ 5 secondes (jusqu'à ce que la
LED PWR commence à clignoter), puis relâchez-le. Il rétablit le ZyWALL aux valeurs par
défaut d'usine (le mot de passe est 1234, l'adresse IP LAN 192.168.1.1 etc.; voir votre Guide
de l'utilisateur pour les détails).
Si vous avez oublié l'adresse IP du ZyWALL, vous pouvez utiliser les commandes à travers
le port de la console pour le vérifier. Connectez votre ordinateur au port CONSOLE à l'aide
d'un câble de console. Votre ordinateur doit avoir un programme de communication
d'émulation de terminal (tel qu'HyperTerminal) paramétré sur l'émulation de terminal VT100,
pas de parité, 8 bits de données, 1 bit de stop, pas de contrôle de flux et une vitesse de port
de 115200 bps.
Impossible
d'accéder à
Internet.
Vérifiez la connexion ZyWALLdu à la prise Ethernet avec l'accès Internet. Vérifiez que le
périphérique de passerelle Internet (tel qu'un modem DSL) fonctionne correctement.
Vérifiez l'état de ge2 dans l'écran Status (Etat). Utiliser à nouveau l'assistant d'installation et
vérifiez que vous avez entré les paramètres corrects.
Problème Action corrective

30
ITALIANO
1 Controllo del contenuto della confezione
2 Installazione su rack
Montare lo ZyWALL in un rack da 19 pollici o appoggiarlo su una superficie piana e non stabile.
Nota: Lasciare 10 cm di spazio ai lati e 20 cm dietro.
1 Allineare una staffa con i fori su un lato dello ZyWALL, quindi fissarlo con le viti fornite in dotazione.
Fissare l'altra staffa allo stesso modo.
2 Dopo aver fissato entrambe le staffe, inserire lo ZyWALL nel rack allineando i fori delle staffe con i fori
corrispondenti sul rack. Fissare lo ZyWALL al rack con le viti di montaggio su rack.
La confezione
dovrebbe comprende
un esemplare di tutti
gli elementi elencati
di seguito:
• ZyWALL 1050
• Cavo di alimentazione
• Kit di montaggio su
rack
• Cavo Ethernet RJ-45
• Cavo Y console RS-232
• Copia stampata della
Guida introduttiva
• Scheda di riferimento
della configurazione
• CD-ROM

ITALIANO
31
3 Collegamento dell'hardware
Verificare che l'interruttore di accensione dietro sia spento prima di effettuare i collegamenti dell'hardware.
1 Si consiglia di configurare ZyWALL prima di utilizzarlo per proteggere la rete. Utilizzare un cavo Ethernet
per collegare un computer alla porta 1.
2 Utilizzare altri cavi Ethernet per collegare la porta 2 e/o la porta 3 a un jack Ethernet con accesso a
Internet.
3 Utilizzare il cavo di alimentazione fornito a corredo per collegare la presa di alimentazione (situata dietro
all'apparecchio) a una presa elettrica.
4 Posizionare l'interruttore di accensione sulla posizione di accensione e guardare il pannello anteriore. La
luce PWR si accende. La luce SYS lampeggia durante il test e l'inizializzazione del sistema, quindi resta
accesa quando il sistema è pronto.
4 Login Web
1 Avviare il browser e aprire l'indirizzo http://192.168.1.1
(ZyWALL redirige automaticamente a https://192.168.1.1).

ITALIANO
32
2 Fare clic su Sì per procedere se viene visualizzato
un avvisto di protezione o una schermata per il
certificato.
3 Immettere admin come nome utente e 1234
come password. Fare clic su Login.
4 È vivamente consigliato cambiare la password. Digitare
e ridigitare una nuova password, quindi fare clic su
Applica.

ITALIANO
33
5 Configurazione guidata installazione
Utilizzare la configurazione guidata per connettersi a Internet e registrare il ZyWALL e/o attivare i servizi offerti
per valutazione, come ad esempio IDP e il filtraggio dei contenuti.
Nota: Utilizzare l'installazione guidata solo per la configurazione iniziale partendo dalla configurazione
predefinita.
Le modifiche apportate all'installazione guidata potrebbero non essere applicate se è già stata
modificata la configurazione di ZyWALL.
Viene aperta
la schermata
Stato. Fare
clic sull'icona
della
procedura
guidata
nell'angolo
superiore
destro.
• CONFIGURAZIONE INSTALLAZIONE, UNO ISP
imposta una singola connessione a Internet per
ge2.
• CONFIGURAZIONE INSTALLAZIONE, DUE ISP
imposta connessioni a Internet per ge2 e ge3.

ITALIANO
34
6 Impostazioni predefinite e dettagli delle porte
ZyWALL è configurato per la seguente topologia di rete per impostazione predefinita.
Le schermata della procedura guidata variano a
seconda del tipo di incapsulamento utilizzato.
Vedere le informazioni fornite dall'ISP e le schermate
della guida online per sapere cosa immettere in
ciascun campo. Lasciare un campo vuoto se non si
possiedono queste informazioni.

ITALIANO
35
Nota: Le porte USB, gli slot delle schede di espansione e lo slot del disco rigido sono riservate per uso
futuro.
7 Risoluzione dei problemi
Porta Interfaccia Zona Indirizzo IP e impostazioni DHCP
Uso suggerito con impostazioni
predefinite
1 ge1 LAN 192.168.1.1, server DHCP abilitato LAN protetta
2, 3 ge2, ge3 WAN Client DHCP Connessioni a Internet
4, 5 ge4, ge5 DMZ Nessuno, server DHCP disabilitato Server pubblici (quali ad esempio
Web, e-mail e FTP)
COMPOSIZIO
NE DI
BACKUP
aux Ness
uno
Nessuno Modem ausiliario
CONSOLE N/a Ness
uno
Nessuno Gestione locale
Etichetta Tipo Cavo da utilizzare
1~5 RJ-45 Categoria 5e a 8 fili o cavo Ethernet precedente
COMPOSIZIONE DI
BACKUP, CONSOLE
RS-232 RS-232
Problema Azione correttiva
Nessuno dei LED
è acceso.
Assicurarsi di aver collegato il cavo di alimentazione a ZyWALL e a una sorgente di
alimentazione appropriata. Assicurarsi che ZyWALL sia acceso. Controllare tutti i
collegamenti dei cavi.
Se i LED continuano a non accendersi, potrebbe esserci un guasto hardware. In questo
caso, è opportuno rivolgersi al rivenditore locale.

ITALIANO
36
8 Procedura per visualizzare le certificazioni di un prodotto
1 Aprire la pagina www.zyxel.com.
2 Selezionare il prodotto dall'elenco di riepilogo a discesa nella Home Page di ZyXEL per passare alla
pagina del prodotto in questione.
3 Selezionare da questa pagina la certificazione che si desidera visualizzare.
Impossibile
accedere a
ZyWALL dalla
LAN.
Controllare il collegamento dei cavi tra ZyWALL e il computer o lo switch. Vedere la sezione
3 per i dettagli.
Eseguire il ping di ZyWALL da un computer della LAN. Verificare che la scheda Ethernet del
computer sia installata e correttamente funzionante. Verificare inoltre che il suo indirizzo IP
sia nella stessa subnet di ZyWALL.
Nel computer, fare clic su Start, (Tutti i) Programmi, Accessori e quindi Prompt dei
comandi. Nella finestra Prompt dei comandi, digitare "ping" seguito dall'indirizzo IP LAN di
ZyWALL (192.168.1.1 è l'indirizzo predefinito) e quindi premere [Invio]. ZyWALL dovrebbe
rispondere.
Se si è dimenticata la password di ZyWALL, utilizzare il pulsante RESET. Premere il pulsante
per circa 5 secondi (oppure finché il LED PWR non inizia a lampeggiare), quindi rilasciarlo.
Questa operazione riporta ZyWALL ai valori predefiniti (la password è 1234, l'indirizzo IP
LAN è 192.168.1.1, e così via; vedere la Guida dell'utente per i dettagli).
Se si è dimenticato l'indirizzo IP di ZyWALL, è possibile utilizzare i comandi tramite la porta
console per conoscerlo. Collegare il computer alla porta CONSOLE utilizzando un cavo
console. Il computer dovrebbe disporre di un programma di comunicazione di emulazione
terminale (come ad esempio HyperTerminal); impostare l'emulazione di terminale VT100,
nessuna parità, 8 bit di dati, 1 bit di stop, nessun controllo di flusso e velocità della porta pari
a 115200 bps.
Impossibile
accedere a
Internet.
Controllare il collegamento di ZyWALL al jack Ethernet con accesso a Internet. Assicurarsi
che il dispositivo gateway verso Internet (quale ad esempio un modem DSL) funzioni
correttamente.
Controllare lo stato di ge2 nella schermata Stato. Utilizzare nuovamente la configurazione
guidata dell'installazione e verificare di aver immesso le impostazioni corrette
Problema Azione correttiva

37
РУССКИЙ
1 Проверка комплектности
2 Установка в стойку
Устройство ZyWALL может устанавливаться в 19-дюймовую стойку или на любую твердую плоскую
поверхность.
Примечание. Оставьте зазоры по 10 см по бокам и 20 см сзади.
1 Закрепите по бокам устройства кронштейны винтами из комплекта поставки.
2 Установите устройство в стойку в выбранную позицию и, убедившись в правильности его
положения, закрепите предназначенными для монтажа в стойку винтами.
В комплект
входят
следующие
позиции, по 1 шт.:
• Устройство ZyWALL 1050
• Сетевой шнур
• Монтажный комплект для
установки в стойку
• Кабель RJ-45 Ethernet
•Y-разветвитель RS-232 для
подключения консоли
• Краткое руководство (брошюра)
• Памятка по
конфигурированию
(карточка)
• Компакт-диск

РУССКИЙ
38
3 Подключение
Перед подключением убедитесь, что выключатель питания на задней панели находится в положении
“выключено”.
1 Перед подключением устройства ZyWALL к защищаемой сети рекомендуется его сконфигурировать.
Подключите компьютер к порту 1 кабелем Ethernet.
2 Подключите кабелями Ethernet к портам 2 и/или 3 линии Ethernet, по которым осуществляется
доступ в Интернет.
3 Соедините розетку питания на задней стенке устройства с электрической розеткой сетевым шнуром
из комплекта поставки.
4 Переведите выключатель питания в положение “включено”. Должен загореться индикатор PWR на
передней панели. Индикатор SYS мигает по ходу выполнения внутреннего теста и инициализации.
Его постоянное свечение говорит о готовности системы.

РУССКИЙ
39
4 Встроенный web-сервер
1 Запустите web-браузер и перейдите на страницу
http://192.168.1.1 (произойдет автоматическое
перенаправление на адрес https://192.168.1.1).
2 В случае вывода каких-либо запросов на
подтверждение потенциально небезопасных
операций или приема сертификатов для
продолжения нажмите Yes.
3 Введите в поле User name имя
пользователя admin и в поле Password
— пароль 1234. Нажмите кнопку Login.
4 Рекомендуется сразу же сменить пароль. Наберите
новый пароль в поле New Password и еще раз
— в
поле Retype to Confirm; затем нажмите кнопку Apply.

РУССКИЙ
40
5 Мастер первоначальной настройки Installation Setup Wizard
Мастер первоначальной настройки installation setup wizard служит для подключения к Интернету и
регистрации устройства ZyWALL и/или активации пробного доступа к дополнительным сервисам, таким
как служба обнаружения и предотвращения вторжений или фильтр контента.
Примечание. Используйте мастер installation setup wizard только для первоначального
конфигурирования устройства, находящегося в состоянии поставки.
Если конфигурация устройства ZyWALL уже была изменена, внесение изменений в нее с
помощью мастера installation setup wizard может оказаться невозможным.
После открытия
экрана Status
воспользуйтесь
значком Wizard
,
расположенным
в правом
верхнем углу.
• Пункт INSTALLATION SETUP, ONE ISP служит
для конфигурирования единственного
соединения с Интернетом, через порт GE2.
• Пункт INSTALLATION SETUP, TWO ISP служит
для конфигурирования соединений с
Интернетом через порты GE2 и GE3.

РУССКИЙ
41
6 Значения конфигурационных параметров и использование
портов в состоянии поставки
В состоянии поставки устройство ZyWALL рассчитано на использование в следующей топологии сети.
В процессе работы мастера могут появляться те
или иные экраны, в зависимости от
используемого типа инкапсуляции. Используйте
для заполнения полей сведения,
предоставленные интернет-провайдером и
содержащиеся в web-системе справки. В
отсутствие необходимой информации оставьте
поле пустым.

РУССКИЙ
42
Примечание. Порты USB, гнезда для дополнительных плат и гнездо для жесткого диска в
данной модели не используются.
7 Диагностика и устранение неисправностей
Порт интерфейс Зона IP-адрес и настройки DHCP
Предполагаемое использование
в заводской конфигурации
1 GE1 LAN 192.168.1.1, сервер DHCP
включен
Защищенная ЛВС
2, 3 GE2, GE3 WAN DHCP-клиенты Подключения к Интернету
4, 5 GE4, GE5 DMZ Нет, сервер DHCP выключен Общедоступные серверы (web,
электронной почты и FTP)
DIAL BACKUP aux Нет Нет Вспомогательный модем
CONSOLE Нет Нет Нет Локальное управление
Маркировка Тип Требуемый кабель
1~5 RJ-45 Ethernet, 8-проводной, категории не ниже 5e
DIAL BACKUP, CONSOLE RS-232 RS-232
Неисправность Меры по устранению
Светодиодные
индикаторы не
светятся.
Проверьте, подключено ли устройство ZyWALL к электросети сетевым шнуром.
Убедитесь, что устройство ZyWALL включено. Проверьте все кабельные соединения.
Если светодиодные индикаторы по-прежнему не светятся, возможно, устройство
неисправно. Обратитесь к продавцу.

РУССКИЙ
43
8 Просмотр информации о соответствии продукта нормативным
требованиям
1 Перейдите на сайт ZyXEL по адресу www.zyxel.ru.
2 Выберите свой продукт из раскрывающегося списка для перехода к странице продукта.
3 Просмотрите информацию о соответствии нормативным требованиям.
Нет доступа к
устройству
ZyWALL со
стороны ЛВС.
Проверьте кабельное соединение между устройством ZyWALL и компьютером или
коммутатором. См. раздел 3.
Направьте устройству ZyWALL ping-запрос с одного из компьютеров ЛВС. Убедитесь в
правильности установки и функционирования Ethernet-адаптера на этом компьютере.
Проверьте также, принадлежат ли IP-адреса используемого компьютера и устройства
ZyWALL одной подсети.
На компьютере: пройдите по цепочке меню Start, (All) Programs, Accessories,
Command Prompt [Пуск, (Все) Программы, Стандартные, Командная строка]. В
окне интерфейса командной строки наберите команду "ping", затем через пробел IP-
адрес устройства ZyWALL в ЛВС (по умолчанию 192.168.1.1) и нажмите [ENTER]. От
ZyWALL должен прийти ответ.
При утере пароля устройства ZyWALL нажмите и удерживайте в течение примерно 5
секунд (или пока не начнет мигать светодиодный индикатор PWR) кнопку RESET.
Конфигурационные параметры устройства будут возвращены к заводским установкам
(пароль 1234, IP-адрес со стороны ЛВС 192.168.1.1 и т.д.; см. Руководство
пользователя).
Выяснить IP-адрес устройства ZyWALL можно с консоли локального управления.
Подключите компьютер к порту CONSOLE кабелем для подключения консоли.
Воспользуйтесь любой программой эмуляции терминала (например, HyperTerminal) в
режиме терминала VT100 с 8 битами данных, без четности, с 1 стоповым битом, без
протокола управления, скорость порта 115200.
Нет доступа в
Интернет.
Проверьте подключение устройства ZyWALL к линии Ethernet, по которой
осуществляется доступ в Интернет. Проверьте правильность функционирования
интернет-шлюза (например, DSL-модема).
Проверьте состояние порта GE2 на экране Status. Снова запустите мастер installation
setup wizard и проверьте, все ли параметры заданы верно.
Неисправность Меры по устранению

44
繁體中文
1 檢查包裝內容
2 機架安裝
將 ZyWALL 安裝在 19 英吋的機架內或將它放置在穩定的平面上。
注意:兩側留下十公分的空間,後方則為二十公分。
1 將一個具有螺絲孔的托架靠在開關的一側,然後以包裝內附的托架螺釘固定。以相同方式接上另一托架。
2 接上兩個托架後,將托架的螺絲孔對齊機架對應的螺絲孔,以此方式將開關裝置在機架內。利用機架安裝螺
釘將開關固定於機架。
產品包裝內應該包含
下列物品,每項各一
件:
• ZyWALL 1050
• 電源線
• 機架安裝套件
• RJ-45 乙太網路連接線
• RS-232 Y 型設定線
• 快速入門指南印刷本
• 組態參考卡片
• 光碟 (CD)

繁體中文
45
3 連接硬體
在您進行硬體連接前,要先確認後方面板上的電源開關為關閉狀態。
1 建議您在使用 ZyWALL 保護網路前先完成設定。使用乙太網路連接線將電腦連結至連接埠 1。
2 使用另一條乙太網路連接線將連接埠 2 及 / 或連接埠 3 連結至具有網路連線功能的乙太網路插孔。
3 使用包裝內附的電源線將後方面板上的電源插槽連結至電源插座。
4 將電源開關推向啟動的位置並注意前方面板的動靜。電源 PWR 指示燈亮起。系統測試及啟動的過程中系統
SYS 指示燈會跟著閃爍,然後等到系統準備妥當時則維持亮起的狀態。
4 網路登入
1 啟動您的網路瀏覽器並前往 http://192.168.1.1 (ZyWALL 會
自動將您重新導向 https://192.168.1.1)。

繁體中文
46
2 假使您遇到安全性警示或憑證畫面,點擊 " 是 " 以繼
續進行。
3 輸入 admin 作為使用者名稱,而密碼為 1234
點擊 " 登入 "。
4 強烈建議您更換密碼。輸入新的密碼後再重新輸入一次,
然後點擊 " 套用 "。

繁體中文
47
5 安裝設定精靈
利用安裝設定精靈來連接網際網路,並註冊 ZyWALL 且 / 或啟動試用服務,像是 IDP 及內容過濾功能。
注意:安裝精靈僅適用於 ZyWALL 處於初始組態。
假使您已經改變了初始組態,則您在安裝精靈中所作的變動或許不被 ZyWALL 實際套用。
打開狀態畫
面。點擊右上
角的精靈圖示
。
• INSTALLATION SETUP, ONE ISP為ge2設定單一
網際網路連線。
• INSTALLATION SETUP, TWO ISP為ge2與ge3設
定網際網路連線。
精靈畫面依照使用的網際網路連線種類而有所差異。
請參考您的網路服務提供者提供的相關資訊及線上輔
助畫面以了解各項欄位應該輸入的內容。如果您沒有
那項資訊,則將該欄位保留空白。

繁體中文
48
6 預設值及連接埠的細節
ZyWALL 預設值為以下的網路拓璞結構。
連接埠
乙太網路
界面
區域 IP 位址及 DHCP 設定 預設值適用於
1 ge1 LAN
192.168.1.1, 已啟動 DHCP 伺服器 受到保護的區域網路
2, 3 ge2, ge3 WAN
DHCP 使用者 通往網際網路的連結
4, 5 ge4, ge5 DMZ
無,已關閉 DHCP 伺服器 公用伺服器 (例如網路、電子郵件及檔
案傳輸協定)
DIAL
BACKUP
aux None
無 輔助數據機
CONSOLE
無
None
無 本地管理
標籤 種類 使用的連接線
1~5 RJ-45
8 股金屬線的 Category 5e 乙太網路連接線或更高的規格

繁體中文
49
注意:保留 USB 連接埠、擴充卡插槽及硬碟插槽供將來使用。
7 疑難排解
8 檢視產品的認證
1 前往 www.zyxel.com。
2 在 ZyXEL 首頁的下拉式清單方塊中選擇您所購買的產品以前往產品的相關網頁。
3 由此網頁選擇您想要檢視的認證。
DIAL BACKUP, CONSOLE RS-232 RS-232
問題 修正動作
LED 指示燈全部不
亮。
確認電源線已經接上 ZyWALL 並且插入適當的電源插座。確認您已經啟動 ZyWALL 電源。檢
查所有連接線的連結狀況。
假使 LED 指示燈仍然不亮,或許是硬體方面的問題。如果發生這種情形,您應該連絡當地的
經銷商。
區域網路端連接
ZyWALL。
檢查 ZyWALL 與您電腦 ( 或 switch) 間的線路連接狀況。請參考第 3 章以了解細節。
由區域網路的電腦向 ZyWALL 發出 Ping 指令。確認您電腦的乙太網路卡安裝正確並運作正
常。另外還要確認它的 IP 位址與 ZyWALL 的 IP 位址位在同一子網路內。
在電腦中點擊開始,功能表中,(所有)程式 " 裡 " 附屬應用程式 " 的 " 命令提示字元 "。在
命令提示字元視窗中輸入 "ping",後面緊接著 ZyWALL 的區域網路 IP 位址 (預設值為
192.168.1.1)然後按下 [ENTER]。ZyWALL 應該會回應。
假使您忘記 ZyWALL 的密碼,請使用重置按鈕。按下按鈕等待約十秒鐘 (或直到電源 PWR
LED 指示燈開始閃爍)再放開按鈕。ZyWALL 會回復成出廠預設值 (密碼為 1234、區域網
路 IP 位址為 192.168.1.1 等,請參考您的使用指南以了解細節)。
假使您忘記 ZyWALL IP 的位址,也能夠使用指令透過設定埠去檢視。利用設定線將您的電腦
連上設定埠。您的電腦應該將終端模擬連線程式 (例如 HyperTerminal)設定為 VT100 終端
模擬模式、無同位位元、8 個資料位元、1 個停止位元、無流量控制而且連接埠傳輸速率為每
秒 115200 位元。
無法連接網際網
路。
檢查 ZyWALL 與具有網路連線功能之乙太網路插孔間的連結狀況。確認網路閘道裝置 (例如
DSL 數據機)運作正常。
在狀態畫面中檢查 ge2 的狀態。再次使用安裝設定精靈,並確認輸入了正確的設定內容。
標籤 種類 使用的連接線
-
 1
1
-
 2
2
-
 3
3
-
 4
4
-
 5
5
-
 6
6
-
 7
7
-
 8
8
-
 9
9
-
 10
10
-
 11
11
-
 12
12
-
 13
13
-
 14
14
-
 15
15
-
 16
16
-
 17
17
-
 18
18
-
 19
19
-
 20
20
-
 21
21
-
 22
22
-
 23
23
-
 24
24
-
 25
25
-
 26
26
-
 27
27
-
 28
28
-
 29
29
-
 30
30
-
 31
31
-
 32
32
-
 33
33
-
 34
34
-
 35
35
-
 36
36
-
 37
37
-
 38
38
-
 39
39
-
 40
40
-
 41
41
-
 42
42
-
 43
43
-
 44
44
-
 45
45
-
 46
46
-
 47
47
-
 48
48
-
 49
49


ZyXEL Communications ZyWALL 1050 Manual de usuario
- Tipo
- Manual de usuario
- Este manual también es adecuado para
en otros idiomas
Artículos relacionados
-
 ZyXEL Communications ZyWALL USG-1000 Manual de usuario
-
 ZyXEL Communications ZYWALL USG 300 El manual del propietario
-
 ZyXEL Communications ZYWALL 70 UTM El manual del propietario
-
 ZyXEL Communications Network Card 5 Manual de usuario
-
 ZyXEL Communications ZYWALL P1 Manual de usuario
-
 ZyXEL Communications Network Card 70 Manual de usuario
-
 ZyXEL Communications ZYWALL USG 200 El manual del propietario
-
 ZyXEL Communications 70 Manual de usuario
-
 ZyXEL Communications ZyWALL SSL 10 Manual de usuario
-
 ZyXEL Communications ZyWALL 2 Plus Guía de inicio rápido


