
RJ760MD Drum Kit with MIDI
User’s Guide
Please read this user’s guide first before operating the unit and save it for
future reference.
Congratulations on your purchase of this Roll-up Drum kit. To get the most from your purchase, please take a few minutes to
read these instructions.
1. Safety instructions
• This product should not be exposed to water by dripping or splashing and no objects filled with liquids, such as vases,
should be placed near to the product. Do not place the unit on a wet surface.
• Do not expose the product to temperatures above 35°C and keep it out of direct sunlight.
• This product has no user-serviceable parts. Do not attempt to repair this product yourself. Only qualified service
personnel should perform servicing.
• Do not subject the plastic part of the product to harsh impacts. Do not drop the product as this may result in damage.
• Disconnect the product from the power source before cleaning. Never handle the USB cable with wet hands as this could
cause electric shock. Unplug the product when it will be unused for long periods of time.
• This product is designed for indoor use only.
•
If the USB cable or power adapter needs to be replaced, ensure that the replacement complies with the manufacturer’s
specifications.
2. Preparation for use
Unpack the drum kit carefully. We recommend that you save the box and packing materials in case you wish to store the
drum kit. Before setting up the unit, verify that the following accessories are present:
CONTENTS:
• 1 x RJ760MD Drum kit with MIDI
• 2 x Pedals
• 2 x Drum sticks
• 1 x USB Power adapter
• 1 x USB Power/Data cable
• 1 x 3.5mm AUX input cable
• 1 x Windows software CD
• 1 x Printed user guide
3. Power source
Unwind the USB power cable to its full length; connect one end to the USB/DC 5V input on the rear of the drum kit.
Connect the other end to the USB power adapter. Plug in the USB power adapter to a 110V power socket and switch on.
Alternatively, the drum kit can be powered from a computer USB port using the USB power cable supplied.
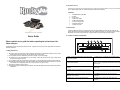
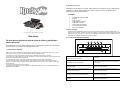
4. Location of controls and indicators
1 - VOL- : Press to reduce the output volume. There are 9
volume levels available.
7 – RHY: Press to cycle between the 9 available rhythms.
2 – VOL+: Press to increase the output volume. There are
9 volume levels available.
8 – START/STOP: Press to start playback of the selected
rhythm. Press to stop playback of the rhythm or demo song
that is playing.
3 – STYLE: Press to cycle between the 7 drum kit sounds
available.
9 – T-: Press to lower the tempo of the selected rhythm or
demo song.
4 – DEMO: Press to cycle between the 12 demo songs
available.
10 – T+: Press to raise the tempo of the selected rhythm or
demo song.
5 – REC: Press to start the record function. A maximum of
336 beats can be recorded.
11- POWER: Power indicator LED, lights red when
switched on.
6 – PLAY: Press to play back the recorded beats. 12 – REC: Record indicator LED, lights green when
recording.

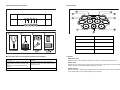
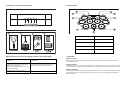
5. Rear panel switches and connections
Make connections to the rear of the drum kit as follows before switching on:
6. Drum pad layout
7. Operation
Switching the unit on
Slide the on/off switch at the rear of the drum kit to the left to switch on. The power indicator LED will light up red.
Volume control
Press the VOL-/VOL+ buttons to adjust the volume of the drum sounds, demo songs and rhythms. There are 9 Volume
settings available plus an off setting. The default setting at power up is level 6.
Drum kit selection
Press the STYLE button to cycle through the 7 different drum kit sounds. Hit the drums to test out the sounds available
until you find the one that you like. The default setting at power up is STYLE 1.
1 – Power On/Off Switch. Used to switch the drum
kit on or off.
4 – Connect Headphones, Earphones or to amplified
speakers.
2 – Power adapter connection. Use the USB power
adapter supplied or power from a computer USB
port.
NOTE: Also used for MIDI connection to host
computer
5 – Auxiliary input for iPod, iPhone, Smartphone or
MP3 player. Use the 3.5mm cable supplied to connect
the external device.
3 - Pedals for Bass Drum and Hi-hat.
1
–
Snare
6
–
Crash cymbal
2 – Open/Close Hi-hat 7 – Ride cymbal
3
–
Crash cymbal
8
–
Low floor tom
4 – High tom 9 - Bass drum
5 – Low-mid tom

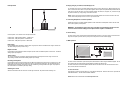
Pedal operation
Press the pedals 1 and 2 for Bass drum and Open/Close Hi-hat
Hi-hat function – Without Pedal plugged in – OPEN Hi-Hat
Hi-hat function – With pedal pressed – CLOSED Hi-hat
Hi-hat function – With pedal not pressed – OPEN Hi-hat
Demo songs
Press the DEMO button repeatedly to select the demo song required. There are 12 different demo songs to choose from.
The default setting at power up is Demo song 1.
Rhythm selection
Press the RHY button repeatedly to select the rhythm required. There are 9 different rhythms to choose from. The default
setting at power up is Rhythm 1.
Tempo control
The T+ and T- buttons can be pressed to adjust the playback tempo of the rhythms and demo songs. There are 16
Tempo settings available and the default setting at power up is setting 9.
Recording and Playback
Press the REC button to enter the recording mode; the REC LED will light green. Play the drums normally and up to 336
beats will be recorded. Press the PLAY button at any time to play back the recorded beats. The recorded beats cannot
be deleted except by switching off the power but can be overwritten by pressing the REC button again. The playback of
the recorded beats is not affected by the tempo setting.
Switching the unit off
Slide the on/off switch at the rear of the drum kit to the right to switch off. The power indicator LED will go out.
8. Playing along to your iPhone, iPod, MP3 player etc.
You can listen to the sound of a connected external audio device such as an iPhone, iPod or MP3 player through your
drum kit. Connect one end of the 3.5 mm jack cable supplied to the AUX input socket (labelled MP3) located at the rear
of the drum kit, and the other end to your audio equipment (iPhone, iPod, MP3, PC, CD player, etc.). This feature is great
for practice and allows you to play along to a favourite music track.
NOTE: Use the volume control of the connected device to adjust the playback volume of the music track. The music
volume cannot be adjusted by the VOL- and VOL+ keys of the drum kit.
9. Connecting headphones or external speakers
Headphone, Earphones or external amplified speakers can be connected to the Headphone socket on the rear of the
drum kit; this is great for private practice.
WARNING !: The headphone output can be very loud. When using headphones please lower the
volume to minimum before striking the drum pads and then adjust to a suitable level.
10. Power Saving
The drum kit has a power save function that will be activated after a period of 1 minute. In power save mode the drum kit
keys will not respond to presses; strike any drum pad to wake up the drum kit and continue playing.
11. MIDI operation
The drum kit can be connected to a personal computer, either Windows or MAC using the USB cable supplied. The drum
kit is supplied with a CD containing demonstration MIDI drum software for Windows only.
The drum kit hardware is however compatible with both Windows and MAC and can be used with software such as
Sonar, Cubase, Nuendo and Ezdrummer.
To install the software:
Insert the Demo CD into the computer CD drive – Using Windows file explorer - Browse to the CD drive - Open the folder
‘USB MIDI DRUM KIT’ – Run the software installer ‘USBDrum’.
NOTE: Software can be downloaded from www.rockjammusic.com

Once installed please connect the drum kit to the computer with the USB cable and wait a few seconds for the hardware
to install before running the Drum Kit software from the ‘USB Drum’ shortcut that will have been created on the Windows
desktop.
12. Troubleshooting and Support
If a problem occurs please check the following table before returning the unit. If the problem cannot be solved with the
following information then please return the item to the store where it was purchased from.
Problem Remedy
Power
The power LED does not light
- Make sure the power adapter USB cable is connected properly at both ends.
- Make sure the switch at the rear of the drum kit is set to on.
- Make sure that the power outlet is switched on.
Abnormal sound
Drum sounds are heard when the
pedals are plugged and unplugged
- This is not a fault.
- To avoid the issue please insert the pedals before switching on.
No sound
In normal use
When using headphones
- Make sure the volume has not been set to minimum (Off position).
- Make sure that the headphones are plugged in fully and that the volume is not set to
minimum (Off position).
iPod/iPhone/Smartphone/MP3
playback
The volume of the music cannot be
adjusted with the VOL- and VOL+
buttons
- This is not a fault.
- Adjust the volume on the audio device.
Unresponsive
The drum kit buttons do not respond
to presses
- This is not a fault.
- The drum kit has entered power save mode. Strike one of the drum pads to resume
playing.
13. Product Specifications
DC Power: DC 5V @ 1000 mA from USB Power adapter
Dimensions: 47.2(L) x 29.5 (W) x 6.2 (H) cm
Functions:
9 Drum pads, 7 Drum styles, 9 Rhythms, 12 Demo songs, Record (336
Beat), MIDI out, AUX input, Audio output
Weight: 880 g
Material: Silicone
FCC Compliance Statement
FCC Class B Part 15
This device complies with Part 15 of the Federal Communications Commission (FCC) Rules.
Operation is subject to the following two conditions:
This device may not cause harmful interference.
This device must accept any interference received, including interference that may cause
undesired operation.
CAUTION:
Changes or modifications to this unit not expressly approved by the party responsible for compliance could void the user’s
authority to operate this equipment.
This equipment has been tested and found to comply with the limits for a Class B digital device, pursuant to Part 15 of the
FCC Rules. These limits are designed to provide reasonable protection against harmful interference in a residential
installation. This equipment generates, uses, and can radiate radio frequency energy and, if not installed and used in
accordance with the manufacturer’s instructions, may cause interference harmful to radio communications.
There is no guarantee, however, that interference will not occur in a particular installation. If this equipment does cause
harmful interference to radio or television reception, which can be determined by turning the equipment off and on, the user
is encouraged to try to correct the interference by one or more of the following measures:
Reorient or relocate the receiving antenna.
Increase the separation between the equipment and receiver.
Connect the equipment to an outlet on a circuit different from that to which the receiver is connected.
Consult the dealer or an experienced radio or TV technician for help.
RockJam is a registered trademark of:
PDT Ltd., Unit 4B, Greengate Industrial Estate, White Moss View,
Middleton, Manchester, M24 1UN, United Kingdom
iPod and iPhone are trademarks of Apple Inc. registered in the U.S. and other countries.
MAC is a registered trademark of Apple Inc.

Kit de batería RJ760MD con MIDI
Guía de uso
Por favor lea esta guía de uso antes de operar la unidad, y guárdela para
futuras referencias
Enhorabuena por la compra del Kit de Batería Roll-up. Para obtener el máximo de su adquisición,
por favor tómese unos minutos para leer estas instrucciones
1. Instrucciones de seguridad
•Este producto no debe ser expuesto al agua por goteo o salpicaduras de agua ni a objetos con líquido, como un jarrón,
deben colocarse cerca al producto. No coloque la unidad sobre una superficie húmeda.
• No exponga el producto a temperaturas superiores a 35°C y manténgalo fuera de la luz solar directa.
• Este producto no contiene piezas que puedan ser reparables por el usuario. No intente reparar este producto usted mismo.
Sólo personal de servicio calificado podrá hacerlo.
• No exponga la parte plástica a golpes duros. No deje caer el producto ya que podría provocarle daños.
• Desconecte el producto de la fuente de alimentación antes de limpiarlo. Nunca toque el cable USB con las manos
mojadas, ya que podría recibir una descarga eléctrica. Desconecte el producto cuando no vaya a utilizarlo durante largos
períodos de tiempo.
• Este producto está diseñado para uso en interiores.
• Si el cable USB o adaptador de corriente necesitara ser reemplazado, asegúrese de que la sustitución cumpla con las
especificaciones del fabricante.
2. Preparación para el uso
Desembale el kit de batería con cuidado. Recomendamos que guarde la caja y los materiales de
embalaje por si desea guardar el kit batería. Antes de montar la unidad, compruebe que los
siguientes accesorios están presentes:
CONTENIDOS:
• 1 x RJ760MD Kit de batería con MIDI
• 2 x Pedales
• 2 x Palos de batería
• 1 x USB Adaptador de corriente
• 1 x USB Cable de corriente
• 1 x 3.5mm Cable AUX de entrada
• 1x CD con Software para Windows
• 1 x Guía de usuario impresa
3. Fuente de energía
Desenrolle el cable de alimentación USB en toda su longitud; conecte un extremo a la entrada USB/DC de 5V en la
parte posterior de la batería Conecte el otro extremo al adaptador de corriente USB. Enchufe el adaptador de corriente
USB a una toma de corriente de 110 V y encienda. Como alternativa, el kit de batería puede ser alimentado desde un
puerto USB de un ordenador mediante el cable USB suministrado.
4. Locación de los controles e indicadores
1 - VOL- : Presione para reducir el volumen de salida. Hay
9 niveles de volumen disponibles
.
7 – RHY: Presione para elegir cualquiera de los 9 ritmos
disponibles.
2 – VOL+: Presione para aumentar el volumen de salida.
Hay 9 niveles de volumen disponibles
.
8 – START/STOP: Presione este botón para empezar o
detener la reproducción de la canción o el sonido demo
seleccionado.
3 – STYLE: Presione para variar entre los 7 sonidos de
batería disponibles
9 – T-: Presione para disminuir el tempo del ritmo o la
canción demo seleccionados.
4 – DEMO: Presione para operar cualquiera de las 12
canciones demo disponibles
10 – T+: Presione para aumentar el tempo del ritmo o la
canción demo seleccionados.
5 – REC: Presione para iniciar la función de grabado.
Pueden grabarse hasta un máximo de 336 ritmos
11- POWER: LED indicador de encendido, que se vuelve
rojo cuando está encendido.
6 – PLAY: Presione play back para reproducir los ritmos
grabados
12 – REC: LED indicador de grabación, que se vuelve
verde cuando está grabando.

5. Interruptores y conexiones del panel posterior
Haga las conexiones en el reverse del kit antes de encenderlo, como se indica debajo:
6. Panel de la batería
7. Operatividad
Encender la unidad
Deslice el interruptor on/off en la parte trasera de la batería a hacia la izquierda para encenderla. El LED indicador de
encendido se tornará rojo.
.
Control de volumen
Pulse las teclas VOL- / VOL + para ajustar el volumen de los sonidos de percusión, canciones demo y ritmos. Hay 9 niveles
de volumen disponibles, además de un ajuste de desactivación. La configuración por defecto en el encendido es el nivel 6.
Selección de sonidos
Pulse el botón STYLE para elegir en la configuración de la batería alguno de los 7 sonidos diferentes. Golpee los tambores
para poner prueba los sonidos disponibles hasta que encuentre el que más le guste. La configuración por defecto en el
encendido es STYLE 1.
1 Interruptor On/off. Se utiliza para encender o
apagar el kit
4 – Conector para auriculares o parlantes
amplificadores
2 – Conexión para adaptador de energía. Use el
adaptador de energía incluido o cargue desde el
puerto USB de una computadora
NOTA: También lo puede usar para la conexión
MIDI con la computadora
5 – Entrada Auxiliar para iPod, iPhone, Smartphone o
reproductores de MP3. Utilice el cable incluido de 3.5
mm para conectar esos dispositivos externos
3 - Pedales para Hi-hat de bajos y baterías.
1
–
Redoblante
6
–
Platillo
2 – Abrir/Cerrar Hi-hat 7 – Platillo conductor
3
–
Platillo
8
–
Tom bajo
4 – Tom alto 9 – Bajo de batería
5 – Tom bajo-medio

Operación del pedal
Presione los pedales 1 y 2 para operar el Bajo y Abrir/Cerrar el Hi-hat
Función Hi-hat – Sin el Pedal conectado- ABRE el Hi-hat
Función Hi-hat – Presionando el Pedal –Hi-hat CERRADO
Función Hi-hat – Sin el Pedal presionado – ABRE Hi-hat
Canciones Demo
Presione el botón DEMO varias veces para seleccionar la canción deseada. Hay 12 canciones demo diferentes para elegir.
La configuración por defecto en el encendido es la canción demo 1.
Selección de ritmo
Pulse el botón RHY varias veces para seleccionar el ritmo requerido. Hay 9 ritmos diferentes para elegir. La configuración
por defecto al encender el dispositivo es Ritmo 1.
Control de Tempo
Los botones T + y T- pueden ser presionados para ajustar el Tempo en la reproducción de los ritmos y canciones demo. Hay
16 ajustes de Tempo disponibles, y la configuración por defecto al encender el dispositivo está fijada en 9.
Grabación y reproducción
Pulse el botón REC para entrar en el modo de grabación; el LED REC se iluminará de color verde. Toque la batería con
normalidad y se registrarán hasta 336 ritmos. Presione el botón PLAY en cualquier momento para reproducir los ritmos
registrados. Estos no se pueden eliminar excepto desconectando la energía, pero se pueden sobrescribir pulsando de
nuevo el botón REC. La reproducción de los ritmos registrados no se va afectada por el ajuste de tempo.
Desconexión del equipo
Deslice el interruptor on/off en la parte trasera de la batería a hacia la derecha para apagarla. El LED indicador de
encendido se apagará.
8. Reproduzca desde su iPhone, iPod, Reproductor MP3, etc.
Usted puede escuchar el sonido desde un dispositivo externo conectado como iPhone, iPod, Reproductor MP3 a través
de su kit de batería. Conecte una de las puntas del cable incluido de 3.5 mm a la entrada AUX (etiquetada MP3)
localizada en el dorso del kit de batería, y la otra en su equipo de audio iPhone, iPod, Reproductor MP3, Reproductor de
CD, etc.). Esta característica es perfecta para practicar con sus canciones favoritas.
NOTA: Modifique el volumen de la canción reproducida desde el dispositivo conectado, ya que este no puede ser
ajustado en las teclas VOL- y VOL+ del kit de batería.
9. Conectar auriculares o altavoces externos
La batería no tiene ningún altavoz interno de modo que auriculares, audífonos o altavoces externos deben conectarse para
escuchar los sonidos de batería. Estos artefactos pueden conectarse a la toma de auriculares en la parte posterior de la
batería; esto es ideal para la práctica privada.
¡ADVERTENCIA!:
La salida de auriculares puede ser muy ruidosa. Al utilizar los auriculares, por favor baje el volumen al mínimo
antes de golpear los parches de percusión y luego ajuste a un nivel adecuado
10. Ahorro de energía
La batería tiene una función de ahorro de energía que se activará después de un período de 1 minuto. En el modo de ahorro
de energía las claves del juego de batería no responderán a las prensas; golpee cualquier parte del teclado de la batería
para activarla y seguir tocando.
11. Operación MIDI
La batería se puede conectar a un ordenador personal, ya sea Windows o Mac mediante el cable USB suministrado. La
batería se suministra con un CD que contiene el software de demostración MIDI tambor para Windows solamente.
El hardware del kit de batería es sin embargo compatible con Windows y Mac y se puede utilizar con softwares como Sonar,
Cubase, Nuendo y EZdrummer.
Para instalar el software:
Inserte el CD demo en la unidad de CD del computador. Usando el Explorador de archivos de Windows - Vaya a la unidad
de CD - Abrir la carpeta USB MIDI Drum Kit'- Ejecutar el instalador de software ' USBDrum’.

Una vez instalado conecte el kit de batería al ordenador con el cable USB y espere unos segundos para que el hardware se
instale antes de ejecutar el acceso directo al software del kit de batería de desde ' USB Drum', que se habrá creado en el
escritorio de Windows.
12. Solución de problemas y soporte
Si se produce algún problema, por favor diríjase a la siguiente tabla antes de devolver la unidad. Si el problema no se
puede resolver con la siguiente información, por favor devuelva el artículo a la tienda donde lo compró.
Problema Solución
Energía
La luz LED no se enciende
- Asegúrese de que el cable USB esté conectado a ambos lados.
- Asegúrese de que el interruptor en el dorso del equipo se encuentra en
modo On.
- Asegúrese de que la Fuente de energía esté en modo on
Sonido anormal
Se escuchan sonidos de la batería
cuando los pedales están igualmente
conectados o desconectados
- Esto no es un error
-Para evitar esta situación por favor inserte los pedales antes de encender
Sin sonido
En uso normal
Cuando se usan los auriculares
- Asegúrese de que los auriculares están conectados correctamente y que
el volumen no esté en el mínimo (posición off)
-Asegúrese de que los auriculares fueron conectados correctamente y que
el volumen no esté en el mínimo (posición off)
iPod/iPhone/Smartphone/Reproductor
de MP3
El volumen de la música no puede ser
ajustado con los botones VOL- y VOL+
- Esto no es un error
- Ajuste el volumen en el dispositivo de audio.
Sin respuesta
Los botones del kit de batería no
responden cuando se los presiona
- Esto no es un error
-El kit de batería se encuentra en modo de ahorro de energía. Golpee
cualquier parte del teclado de la batería para activarla y seguir tocando.
13. Especificaciones del producto
Energía DC: DC 5V @ 1000 mA de puerto USB
Dimensiones: 47.2(L) x 29.5 (A) x 6.2 (A) cm
Funciones:
9 pads de batería, 7 estilos de batería, 9 ritmos, 12 canciones demo,
grabación (336 beats), salida MIDI, entrada AUX, Salida de Audio.
Peso: 880g
Material: Silicona
Cumplimiento de la FCC
FCC Clase B Parte 15
Este dispositivo cumple con la sección 15 de la Comisión Federal de Comunicaciones (FCC).
La operación está sujeta a las dos condiciones siguientes:
Este dispositivo no puede causar interferencias perjudiciales.
Este dispositivo debe aceptar cualquier interferencia recibida, incluidas las interferencias que
puedan provocar un funcionamiento no deseado.
ADVERTENCIA:
Los cambios o modificaciones a esta unidad no aprobados expresamente por la parte responsable del cumplimiento podrían
anular la autoridad del usuario para utilizar este equipo.
Este equipo ha sido probado y cumple con los límites para un dispositivo digital de Clase B, según la Parte 15 de las normas
de la FCC. Estos límites están diseñados para proporcionar una protección razonable frente a interferencias perjudiciales en
una instalación residencial. Este equipo genera, utiliza y puede irradiar energía de radiofrecuencia, y si no se instala y utiliza
de acuerdo con las instrucciones del fabricante, puede causar interferencias perjudiciales en las radiocomunicaciones.
No hay garantía, sin embargo, de que no se produzcan interferencias en una instalación específica. Si este equipo causa
interferencias perjudiciales en la recepción de radio o televisión, lo cual puede determinarse apagándolo y encendiéndolo,
se recomienda al usuario que intente corregir la interferencia mediante una o más de las siguientes medidas:
Reorientar o reubicar la antena receptora.
Aumentar la separación entre el equipo y el receptor.
Conectar el equipo a una toma de un circuito distinto de aquel al que está conectado el receptor.
Consulte al distribuidor o a un experimentado técnico de radio o televisión para obtener ayuda.
RockJam es una marca registrada de:
PDT Ltd., Unit 4B, Greengate Industrial Estate, White Moss View,
Middleton, Manchester, M24 1UN, United Kingdom
iPod y iPhone son marcas registradas de Apple Inc. registradas en los EE.UU. y otros países.
MAC es una marca registrada de Apple Inc.
-
 1
1
-
 2
2
-
 3
3
-
 4
4
-
 5
5
-
 6
6
-
 7
7
-
 8
8


en otros idiomas
- English: RockJam RJ760MD User manual
Otros documentos
-
Behringer XD80USB Guía de inicio rápido
-
-
Casio WK-200 Manual de usuario
-
Yamaha DD-75 El manual del propietario
-
-
-
Yamaha PSR-A3000 El manual del propietario
-
Kawai AnyTime ATX2-p El manual del propietario
-
Yamaha DD-65 Manual de usuario