Note 1: Ornamental Capitals
When installing a round
Fiberglass column with an
ornamental capital, subtract
the cut at bead (“T”) dimen-
sion (distance from top of
ornament to top of neck
mould) an add the height of
the ornamental capital, this
can lengthen or shorten the
height of the column. You can
find the cut at bead (“T”)
dimension in the products
brochure.
Note 2: Required Loading
Ensure concentric loading of
the column. 100% of bottom
must contact substrate and
75% of top must contact sofit.
Note 3: Hand Rail
When attaching hand rails or
corner irons to round or square
fiberglass columns, holes must
be pre-drilled.
Note 4: Cap and Base
Light sanding may be needed
for correct fitting of base.
Note 5: Do not install columns
below grade or fill with
concrete.
Note 6: If used in free standing
applications, structural posts
may be used.
PAINT TIPS:
• Make sure all surfaces are
clean. Prime with a bonding
primer.
• Follow paint manufacturer’s
instructions for priming and
finishing of fiberglass com-
posite column and
polyurethane cap and base.
• Do not paint using dark col-
ors (dark colors are consid-
ered any color that falls
within the L values of 56 to
0). L is a measure of the
lightness of an object, and
ranges from 0 (
black) t
o 100
(white).
XL 1028
FRONT
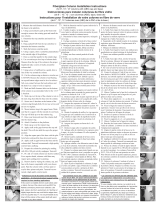
Installing neck moulding to Square Fiberglass Columns
5. Put assembly in place and plumb. Make sure
load is centered over column shaft and evenly
distributed around the bearing surface.
3. Slip base over top of column shaft and
allow to slide to base of shaft. Slip cap over
shaft and allow to rest on neck mould. Some
sanding may be required.
2. Use an abrasive saw (masonry or carbide
tip blade). Fine trim t
op a
nd bottom with rasp
to ensure flat surface contact.
9. Mark location for supplied neck moulding.
Measure and cut neck moulding to a 45°
angle. Apply construction adhesive* and put
neck mould in place.
10. Pre-drill holes through neck mould into
column. Screw neck mould in place or pre-drill
and use finish nails.
6. Mark and drill holes in floor and column shaft
for corner/ angle brackets (not included).
(Co
lumn i
nstallation kit available #17040)
4. Apply construction adhesive* to top and bot-
tom surfaces of column.
7. Apply construction adhesive* to top of cap,
press against structure, and screw or nail into
place.
11. Set screws or nails and use caulk to cover
holes.
8. Apply construction adhesive* to bottom of
base and nail or screw to floor.
1. Measure opening
in four places: front,
back, left and right of
colum
n (
see draw-
ing). Mark column
accordingly. If column
is too long, shorten
length from bottom.
*Use a non-acetone based exterior grade construction adhesive.
WARRANTY IS VOID IF INSTALLATION INSTRUCTIONS ARE NOT FOLLOWED
Round or Square Fiberglass (FRP)
Installation Instructions
INSTALLATION TIPS
79921 SQ fiberglass install pics_19071 HBG 2/21/17 11:53 AM Page 1
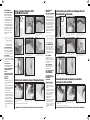
Instrucciones para Instalar Las Columnas Fibra de
Vidrio Redondos o Cuadrados
FRENTE
5. Aplome la columna. Asegurese que la
carga este distribuida y centrada uniforme-
mente alrededor de la superficie portante.
3. Inserte la Base desde la parte superior y
déjela deslizar hasta el piso. Haga lo mismo
con el Capital y deslícelo hasta el collar. Lijar
un poco podría ser necesario.
2. Use una sierra abrasiva (para manposte-
ria o de hoja de Carburo) para emparejar la
parte superior e inferior y
asegurar u
n buen
contacto con la superficie.
6. Marque y perfore agujeros en piso y colum-
na para la instalación de la platina (no inclui-
da) – (Juego de instalación disponible
#17040)
4. Aplique el pegamento a la superficie superi-
or e inferior de la columna.
7. Aplique el pegamento a la parte superior del
Capital prescionando hacia arriba. Asegure con
tornillos o clavos.
8. Aplique el pegamento a la parte i
nferior d
e
la Base. Asegure con tornillos o clavos.
1. Mida la apertura
en cuatro puntos:
Adelante, atrás,
derecha e izquierda
- Ver ilustración - Y
márquelos en la
columna. Sí la
columna es muy
larga acortela cor-
tando en la parte
inferior.
Instalación del anillo decorativo en columnas
cuadradas de Fibra de Vidrio
9. Marque el lugar donde se instalará el
anillo decorativo. Mida y corte en ángulo de
45 grados. Aplique pegamento.
10. Perfore agujeros de paso atravéz del
anillo hasta alcanzar la columna. Atornille el
anillo decorativo o use clavos para terminado
fino.
11. Aplique macilla para cubrir los tornillos o
los clavos.
* Use pegamento para exteriores que no contenga Acetona.
LA GARANTIA SE PIERDE DE NO SEGUIRSE LAS INSTRUCCIONES DE INSTALACIÓN.
NOTA 2: CARGA REQUERIDO
Asegurese de tener una carga
concéntrica en la columna.
100% de la parte inferior nece-
sita tener contacto directo con el
sustrato y 75% de la parte
superior debe hacer contacto
con la viga.
NOTA 3: PASAMANOS
Cuando deba asegurar un
pasamanos o soportes a colum-
nas cuadradas o redondas de
Fibra de Vidrio, se deben hacer
agujero
s g
uia.
NOTA 4: CAPITAL Y BASE
Lijada superficial puede ser
requerida para lograr un posi-
cionamiento correcto.
NOTA 5: NO INSTALE COLUMNA
DEBAJO DE GRADO O DE
RELLENO CON HORMIGÓN.
NOTA 6: SI SE UTILIZA EN
APLICACIONES DE PIÉ, PUEDEN
UTILIZARSE POSTES
ESTRUCTURALES.
CONSEJOS DE PINTAR:
• Asegúrese de que todas las
superficies estén limpias.
Primero con una imprimación
de unión.
• Siga las instrucciones del fa
b-
r
icante para el aplicado de la
capa base y la capa final de
pintura en las columnas de
Fibra de Vidrio y en las
molduras fabricadas en
Polyuretano.
• No utilize colores oscuros (col-
ores oscuros son aquellos
clasificados con el valor L
entre 50 y 0) L es la medida
de brillantez de un objeto, y
oscila entre 0 (negro) y 100
(blanco).
CONCEJOS PARA LA
INSTALACIÓN
NOTA 1: CAPITALES ORNAMENTALES
Cuando instale una columna
redonda de Fibra de Vidrio con
Capital ornamental dedusca la
medida corte en la cuenta (“T”)
(Distancia desde la parte supe-
rior del ornamento hasta la
parte superior del anillo decora-
tivo) y añada la altura del
Capital, esto puede alargar o
acortar la altura total de la
columna. Ud puede encontrar la
medida corte en la cuenta (
“T”)
en nuestro catalogo.
79921 SQ fiberglass install pics_19071 HBG 2/21/17 11:53 AM Page 2

Square Fiberglass Column Installation Instructions
1. Determine the position of the column shaft by dropping a plumb line from
the center of the beam to the floor. Mark this point on the floor with an “X”.
This mark is where you will center the column shaft so that the top of the
shaft will align with the center of the beam. On the bottom of the beam
and on the floor surface, measure a distance out from these center points
in 4 directions, that is half the width of the column shaft, and mark those
distances. Use a carpenter’s square to draw the outline of the column shaft
through these marks. When you install the column shaft, you will align the
column to these marks.
2. Measure the overall height. Raise the beam slightly with brace for easy
installation of the column.
3. Lay column on saw horses, and trim column shaft to length. Column shaft
can be trimmed from the top or bottom since the shaft is non-tapered. Cut
with a circular saw with an abrasive masonry blade or fine tooth carbide
blade. Finish both the top and bottom of the shaft with a rasp or sander to
ensure an even load distribution around the bearing surfaces.
4. Slide the neck mould over top of shaft to the desired location (do this before
sliding capital over the shaft). Fasten neck mould to shaft using construction
adhesive and countersink non-corrosive screws. Slide cap over top of column
shaft. Let capital slide down to rest on the neck mould temporarily until
shaft is correctly positioned. Caulk between neck mould and shaft and fill
countersunk screw holes with caulk or exterior filler.
5. Slide base onto column shaft from bottom. Use masking tape or shims to
temporarily hold base approximately 12” up from shaft bottom.
6. Place column in a vertical position with beam load centered over column
shaft with an even distribution around the bearing surfaces. Be sure to align
the perimeter of the column shaft with the marks you made in Step 1. You
can use a 4’ or longer level to verify column shaft is plumb.
7. Remove brace to allow load to bear on column shaft.
8. Take small L-brackets included in the cap and base kit, and on opposites
sides of the columns shaft, attach 2 of them to the beam, and 2 of them to
the floor surface. The vertical legs of the L-brackets should touch the face of
the column shaft. Use the holes in the vertical leg of the L-bracket as guides
to pre-drill the attachment screw holes into the column shaft. BE SURE TO
PRE-DRILL HOLES. Be careful to not over tighten screws.
9. POLYURETHANE Cap and Base: Slide cap up to soffit and attach to soffit
using non-corrosive screws. Attach base to floor and bottom of shaft using
non-corrosive screws or appropriate fasteners. Countersink holes so screw
heads will recess into the cap and base material. Fill holes with exterior
“Bondo” or filler. SYNTHETIC INJECTION MOLDED (SIM) Cap and Base: Attach
using non-corrosive screws in the holes pre-molded in the cap and base. Fill
holes with “Bondo” or filler.
10. Caulk between cap and soffit, the cap and shaft and the base and shaft for a
finished appearance.
A. SPECIAL NOTES AND EXCEPTIONS:
• Be certain the load is evenly distributed over the load bearing surface of the
shaft. The column should be loaded concentrically with 100% contact on the
bottom with the substrate and 75% at the top with the soffit.
• PermaLite
®
columns are not intended to be split.
• Split columns are non-load bearing.
• If building code requires uplift connection, contact your distributor or dealer
for recommendations.
• Do not paint using dark colors (dark colors are considered any color that falls
within the L values of 56 to 0). L is a measure of the lightness of an object,
and ranges from 0 (black) to 100 (white).
• Spray painting is not recommended. Paint should always be applied with a brush.
• 2nd floor balconies should NOT be attached directly to the side of any Square
Fiberglass Column.
• Water should not be allowed to collect inside Fiberglass Columns. Flashing
may be required to channel water away from the inside of the column. A
drainage hole can be drilled in the bottom of the shaft and plinth if necessary.
• Columns should never be pressure washed or sprayed with water prior to
installation.
• Columns are not designed to be set into masonry.
• Concrete should never be used to fill Fiberglass Columns. This will void the
warranty.
• Do not install columns below grade. This will void the warranty.
B. FINISHING AND PAINTING INSTRUCTIONS:
1. Make sure all surfaces are clean prior to painting. Use mineral spirits if oil or
alkyd products are used. Warm soapy water should be used if acrylic products
are utilized. Synthetic cap and base: A non-oil based cleaner should be used
to clean the cap/base.
2. Alkyd or oil base primer and paint are recommended. Acrylic products can be
used, but additional sanding is required. Synthetic cap and base: Use a good
high-quality exterior paint. At least one coat of bonding primer and two coats
of final paint should be used. Suggested primer for Synthetic Injection Molded
(SIM) cap and base XIM Primer 400 White, or any bonding primer made for
use on fiberglass or plastics.
3. Use a good, high-quality exterior paint. At least one coat of bondinh primer
and two coats of a final paint should be used.
4. Follow paint manufacturer’s instructions concerning use within temperature
ranges for best results. Do not use paint or solvents containing acetone.
C. LIGHTWEIGHT SQUARE RECESSED PANEL COLUMNS - ATTACHING TOP
AND BOTTOM PANEL INSERT KITS & PANEL DIVIDER KITS PRIOR TO COLUMN
INSTALLATION:
1. Before installation, apply the panel insert pieces to the top and bottom of
each side of the column shaft (Field trimming shaft to desired length prior to
attaching insert pieces). Each column will include (4) top panel insert pieces
and (4) bottom panel insert pieces. The pieces can be attached to the shaft
using a construction adhesive and non-corrosive screws (screws must be
countersunk and filled with a fiberglass body filler, such as “Bondo”).
2. If using panel divider pieces to achieve a two-panel or three-panel design
column, attach in the same manner as the panel insert pieces. First measure
and determine the placement of each of the panel divider pieces and attach to
each side of the column shaft using a construction adhesive and countersunk
non-corrosive screws.
3. Fill the seams where the panel insert pieces and panel divider pieces meet the
shaft and the countersunk screw holes with a fiberglass body filler, such as
“Bondo”.
LIGHTWEIGHT SQUARE RECESSED PANEL COLUMNS – INSTALLATION
INSTRUCTIONS:
4. Follow “Square Fiberglass Column Installation Instructions” Steps 1-10 &
“Finishing and Painting Instructions” Steps 1-4.
© 2017 HB&G Building Products, Inc.
-
 1
1
-
 2
2


en otros idiomas
- English: HB&G 120999 Operating instructions