Panasonic NN-C980B El manual del propietario
- Categoría
- Microondas
- Tipo
- El manual del propietario
Este manual también es adecuado para

Panasonic
Operating Instructions
Microwave/Convection Oven
Model NN-C980B/NN-C980W
Before operating this oven, please read these instructions completely.
Antes de operar este producto, lea este instructivo en su totalidad.
La referencia rapida en espa_ol puede ser encontrada en la p_ginas 25-42
(Spanish quick reference can be found on pages 25-42.)
For assistance, please call : 1-800-211-PANA(7262)
or send e-mail to : consumerproductsOpanasonic, corn

Thank you for purchasing the Panasonic Microwave/Convection Oven.
Let's Start to Use Your Oven!--page 11.
PRECAUTIONS
TO AVOID POSSIBLE EXPOSURE
TO EXCESSIVE MICROWAVE ENERGY
(a) Do not attempt to operate this oven with the door open since open-door operation can
result in harmful exposure to microwave energy. It is important not to defeat or tamper
with the safety interlocks. Under normal conditions, the oven will not operate with the
door open.
(b) Do not place any object between the oven front face and the door, or allow soil or
cleaner residue to accumulate on sealing surfaces.
(c) Do not operate the oven if it is damaged. It is particularly important that the oven door
close properly and that there is no damage to the :
(1) door (bent)
(2) hinges and latches (broken or loosened)
(3) door seals and sealing surfaces.
(d) The oven should not be adjusted or repaired by anyone except properly qualified service
personnel.
EXAMINE YOUR OVEN
Unpack oven, remove all packing material.
Examine the oven for any damage such as dents, broken door latches or cracks in the door.
Check that none of the accessories are missing, by following the list below.
[] Roller Ring
Place the Roller Ring
correctly on the oven floor.
[] Oven Rack
Oven Rack should be used
0 for Bake and Broil cooking.
[] Ceramic Tray
Place the Ceramic Tray
exactly on Roller Ring.
[]
Operating
Instructions
Alway use Roller Ring and
Ceramic Tray in proper [] Cookbook
position.
Notify dealer immediately if oven is damaged. DO NOT install if oven is damaged.
The serial number of this product may be found on
the right side of the oven door opening. You
should note the model number and the serial
number of this oven in the space provided and
retain this book as a permanent record of your
purchase for future reference.
Model No.
Serial No.
Date of Purchase
© Copyrighted by Matsushita Electric Industrial Co., Ltd. 2000.
2

CONTENTS
Before Operation
IMPORTANT SAFETY INSTRUCTIONS ............................................... 4
Installation and GROUNDING INSTRUCTIONS ........................................ 5
Practical Hints ................................................................. 6-7
Feature Diagram ................................................................. 8
Cooking Modes : Heating Source .................................................... 8
Control Panel ................................................................... 9
Operation & Hints
To Use Function ................................................................ 10
Let's Start to Use Your Oven! ..................................................... 11
To Set Clock ................................................................... 11
To Defrost Micro Power and Time Setting ........................................... 12
Using Turbo Defrost Pad ............................................... 17
To Reheat Micro Power and Time Setting ........................................... 12
Using Sensor Reheat Pad ........................................... 18-19
To Cook Micro Power and Time Setting ........................................... 12
on Bake ........................................................... 13
on Broil ............................................................ 14
on Combination ...................................................... 15
Using Popcorn Pad ................................................... 16
Using Sensor Cooking .............................................. 18-19
Using Convection Cooking (Weight Cook by Combination) ...................... 20
Using Convection Cooking (Auto Cook by Bake) ............................. 21
Using Quick Min Pad .................................................. 12
To Use Keep Warm Pad .......................................................... 16
To Use Timer Function ........................................................... 22
Quick Guide to Operation ........................................................ 43
Maintenance
Before Requesting Service ........................................................ 23
Care of Your Microwave Oven ...................................................... 24
Technical Specifications .......................................................... 44
Referencia Rapida
INSTRUCCIONES DE SEGRIDAD .................................................. 25
INSTRUCCIONES DE INSTALACION ................................................ 26
SUGERENCIAS UTILES ......................................................... 27
GUiA PARA COCINAR Y UTENSILIOS ............................................... 28
Diagrama de Caracterfsticas ....................................................... 29
Modos de Coccion .............................................................. 29
Panel de Controles .............................................................. 30
Funciones ..................................................................... 31
Para Ajustar el Reloj ............................................................. 32
Recalentamiento/Descongelaci6n/Cocci6n con selecci6n de Potencia y Tiempo ................ 32
Hornear ...................................................................... 33
Parrilla ....................................................................... 34
Combination ................................................................... 35
Descongelacion Turbo ............................................................ 36
Sensor de Recalentamiento Autom_.tico .............................................. 36
Sensor de coccion Automatica ................................................... 37-38
Cocci6n AutomAtica por Peso (Combinacion) .......................................... 39
Horneado Automatica ............................................................ 39
Pulsadores de Palomitas de Mafz .................................................. 40
Funci6n Rapido en Minutes ....................................................... 40
Temporizador (Timer) ............................................................ 41
Cuidados de Su Homo de Microondas ............................................... 42
Antes de Acudir a Servicio ........................................................ 42
Especificaciones Tecnicas ........................................................ 44
3
1

IMPORTANT SAFETY INSTRUCTIONS
Your microwave oven is a cooking device and you
should use as much care as you use with a stove or
any other cooking device. When using this electric
appliance, basic safety precautions should be
followed, including the following:
WARNING--To reduce the risk of burns, electric
shock, fire, injury to persons or exposure to
excessive microwave energy:
1. Read all instructions before using the appliance.
2. Read and follow "PRECAUTIONSTO AVOID
POSSIBLE EXPOSURE TO EXCESSIVE
MICROWAVE ENERGY," found on page 2.
3. This appliance must be grounded. Connect only
to a properly grounded outlet. See "Grounding
Instructions" found on page 5.
4. Install or locate this appliance only in
accordance with the provided installation
instructions found on page 5.
5. Do not cover or block any openings on this
appliance.
6. Do not store or use this appliance outdoors. Do
not use this product near water--for example,
near a kitchen sink, in a wet basement, or near a
swimming pool, and the like.
7. Use this appliance only for its intended use as
described in this manual. Do not use corrosive
chemicals or vapors in this appliance. This type
of oven is specifically designed to heat, or cook
food. It is not designed for industrial or laboratory
use.
8. When cleaning surfaces of door and oven that
come together on closing the door, use only
mild, non-abrasive soaps or detergents applied
with a sponge or soft cloth.
9. As with any appliance, close supervision is
necessary when used by children.
10. Do not operate this appliance if it has a
damaged corcl or plug, if it is not working
properly, or if it has been damaged or dropped.
11. Do not immerse cord or plug in water.
12. Keep cord away from heated surfaces.
13. Do not let cord hang over edge of table or
counter.
14. This appliance should be serviced only by
qualified service personnel. Contact the nearest
authorized service facility for examination, repair
or adjustment.
15. Some products such as whole eggs and sealed
containers (for example, closed glass jars) may
explode and should not be heated in this oven.
16. To reduce the risk of fire in the oven cavity:
(a) Do not overcook food. Carefully attend
appliance if paper, plastic, or other
combustible materials are placed inside the
oven to facilitate cooking.
(b) Remove wire twist-ties from paper or plastic
bags before placing bag in oven.
(c) It materials inside the oven should ignite,
keep oven door closed, turn oven off, and
disconnect the power cord, or shut off power
at the fuse or circuit breaker panel.
(d) De not use the cavity for storage purposes.
Do not leave paper products, cooking
utensils, or food in the cavity when not in
use.
17. To avoid the possible risk of a burn, the
appliance must not be used in areas such as
island-type countertops where the rear surfaces
would be exposed to user contact and the
appliance must be placed more than 3 feet
(85 cm) above the floor.
General Use
1. DO NOT tamper with or make any adjustments
or repairs to the door, control panel housing,
safety interlock switches or any other part of the
oven.
DO NOT remove outer panel from oven. Repairs
should only be done by qualified service person.
2. DO NOT use the microwave function when the
oven is empty. The microwave energy will reflect
continuously throughout the oven, if food or
water is not present to absorb energy. This could
damage the oven and result in the danger of a
fire.
3. DO NOT use this oven to heat chemicals or
other non-food products. DO NOT clean this
oven with any product that is labeled as
containing corrosive chemicals. The heating of
corrosive chemicals in this oven can cause
radiation leaks.
4. DO NOT dry clothes, newspapers or other
materials in the oven. They may catch on fire.
5. DO NOT use recycled paper products unless
the paper product is labeled as safe for
microwave oven use. Recycled paper products
may contain impurities which may cause sparks
and/or fires when used.
6. DO NOT use newspapers or paper bags for
cooking. Fire can result.
7. DO NOT hit or strike the control panel. Damage
to the controls may occur. Fire can result.
8. DO NOT store flammable materials next to, on
top of, or in the oven. These could be fire
hazards.
9. POT HOLDERS may be needed when handling
dishes. Heat is transferred from the hot food to
the cooking container and from the cooking
container to Glass Tray. Glass Tray can be very
hot after removing cooking container from oven.
10. Before using the BAKE, COMBINATION or
BROIL functions for the first time, operate the
oven without food on BROIL for 20 minutes. This
will allow the oil that is used for rust protection
to be burned off.
11. Door and exterior will get hot during BAKE,
COMBINATION and BROIL. Please handle door
carefully.
12. Use extreme caution when removing oven
accessories or cooking containers from oven or
disposing of hot grease.
SAVE THESE INSTRUCTIONS

Installation & GROUNDING INSTRUCTIONS
Placement of Your Oven
1. Oven must be placed on a flat, stable surface.
For proper operation, the oven must have
sufficient air flow. Allow 3" ( 8 cm ) of space on
both sides of the oven and 6" ( 15 cm ) of space
on top of the oven.
a. DO NOT block air vents. If they are blocked
during operation, the oven may overheat. If
the oven overheats, a thermal safety device
will turn the oven off. The oven will remain
inoperable until it has cooled.
b. DO NOT place the oven near a hot, damp
surface such as a gas or electric range, or
dishwasher.
c. DO NOT operate the oven when room
humidity is too high.
2. This oven was manufactured for household use
only.
3. This oven may be built into a wall cabinet, if
desired, by using the proper trim kit, which may
be purchased from a local dealer.
Follow all installation instructions packed with
kit.
Grounding Instructions
This appliance must be grounded. In the event of an
electrical short circuit, grounding reduces the risk of
electric shock by providing an escape wire for the
electric current. This appliance is equipped with a
cord having a grounding wire with a grounding plug.
The plug must be plugged into an outlet that is
properly installed and grounded.
WARNING--Improper use of the grounding plug
can result in a risk of electric shock.
Consult a qualified electrician or service person if
the grounding instructions are not completely
understood, or if it is uncertain whether the
appliance is properly grounded or not.
If it is necessary to use an extension cord, use only
a three wire extension cord that has a three-blade
grounding plug, and a three-slot receptacle that will
accept the plug on the appliance. The marked rating
of the extension cord should be equal to, or greater
than, the electrical rating of the appliance.
Power Supply
1. A short power-supply cord is provided to reduce
the risks resulting from becoming entangled in
or tripping over a longer cord.
2. Longer cord sets or extension cords are
available and may be used if care is exercised in
their use.
3. If a long cord or extension cord is used, (1) the
marked electrical rating of the cord set or
extension cord should be at least as great as
the electrical rating of the appliance, (2) the
extension cord must be a grounding-type 3-wire
cord, and (3) the longer cord should be
arranged so that it will not drape over the
countertop or tabletop where it can be pulled on
by children or tripped over accidentally.
Wiring Requirements
1. The oven must be on a SEPARATE CIRCUIT.
No other appliance should share the circuit with
the microwave oven. If it does, the branch circuit
fuse may blow or the circuit breaker may trip, or
the food may cook slower than recommended in
this manual.
2. The VOLTAGE used must be the same as
specified on this microwave oven (120 V). Using
a higher voltage is dangerous and may result in
a fire or other accident causing oven damage.
Using a lower voltage will cause slow cooking.
Panasonic is NOT responsible for damage
resulting from the use of the oven with other
than specified voltage.
3. The oven must be plugged into at least a 20
AMP, 120 VOLT, 60 Hz GROUNDED OUTLET.
Where a standard two-prong outlet is
encountered, it is the personal responsibility and
obligation of the consumer
to have it replaced with
©11a properly grounded
three-prong outlet.
4. A TEMPORARY CONNECTION with a two-
prong adapter may be made where LOCAL
CODES PERMIT it. Unless the cover screw is
grounded through the house wiring, attaching
the adapter grounding plate
to the cover screw wil! not
ground the oven. If there is _ _
any doubt that the cover " _j'_ ._Y
screw is grounded, have it
checked by an electrician.
Radio Interference
1. Operation of the microwave oven may cause
interference to your radio, TV or similar
equipment.
2. When there is interference, it may be reduced or
eliminated by taking the following measures:
a. Clean door and sealing surfaces of the oven
(See Care of Your Microwave Oven found on
page 24 )
b. Place the radio, TV, etc. away from the
microwave oven as far as possible.
c. Use a properly installed antenna to obtain
stronger signal reception.
Fan Motor Operation
After using the oven, the fan rotate to cook the
electric components. This is perfectly normal, and
you can take out the food from the oven while the
fan operates.
5

Practical Hints
Follow These Safety Precautions When Cooking in Your Oven
1) HOME CANNING / DRYING FOODS / SMALL
QUANTITIES OF FOODS
• Do not use your
combination oven for
home canning or the
heating of any closed
jar. Pressure will build
up and the jar may
explode, In addition, the
combination oven
cannot maintain the
food at the proper
canning temperature. Improperly canned food
may spoil and be dangerous to consume.
• Small quantities of food or foods with low
moisture content can dry out, burn on catch on
fire. If a fire occurs, turn oven off and leave oven
door closed. Disconnect the power cord or shut
off power at the fuse or circuit breaker panel.
• Do not dry meats, herbs, fruits or vegetables in
your oven.
IMPORTANT
Proper cooking depends on time set and
weight of food. If you use a smaller portion
than recommended and cook at the time for
the recommended portion, fire can result.
If a fire occurs, turn oven off and leave oven
door closed. Disconnect the power cord or
shut off power at the fuse or circuit breaker
panel.
2) POPCORN
Popcorn must be popped in a microwave oven
corn popper. Microwave popcorn which pops in its
own package is also available. Fellow popcorn
manufacturers' directions and use a brand
suitable for the wattage of your combination oven.
Never leave oven unattended when popping
popcorn.
CAUTION:
When using pre-packaged microwave
popcorn, follow recommended package
instructions.
Check package weight before using the
popcorn pad. Set the oven for the weight of
the popcorn package. (see page 16)
If these instructions are not followed, the
popcorn may not pop adequately or may
ignite and cause a fire.
3) DEEP FAT FRYING
• Do not attempt to deep fat fry in your microwave
oven. Oil can be heated beyond ideal
temperatures very quickly in a microwave oven.
Temperatures can climb high enough for the
cooking oils to reach their respective flash points
and burst into flames.
Thebubbleheatedoil may _ _'/_
and spatter _/_
causing possible
damage to the oven
and perhaps resulting
in burns. Additionally,
microwave-safe utensils
may not be able to
withstand the temperature of the hot oil, and
could result in the utensil shattering if it contains
even a slight imperfection, scratch or chip.
4)
EGGS
Do not heat eggs in
their shell in a
microwave oven.
Pressure will build
up and the eggs will
explode.
5) FOODS WITH NONPOROUS SKINS
• Potatoes, apples,
egg yolks, whole
squash and
sausages are
examples of foods
with nonporous
skins. This type of
food must be
pierced before
/
cooking, to prevent their bursting.
6)
LIQUIDS
Heated liquids can erupt if not mixed with air. Do
not heat liquids in your microwave oven without
first stirring.
6

Practical Hints
7) CERAMICTRAY / COOKING UTENSILS / FOIL
• Cooking utensils get hot during cooking. Use
potholders when removing utensils and Glass
Tray from the oven or when removing lids or
plastic wrap covers from cooking utensils to
avoid burns.
• Ceramic Tray will get hot during cooking. It
should be allowed to cool before handling or
before paper products, such as paper plates,
napkins or microwave popcorn bags, are placed
in the oven for microwave cooking.
• During cooking, heat is transferred from the hot
food to the cooking utensil and from the utensil
to Ceramic Tray. Ceramic Tray can be very hot
after removing cooking utensils from oven.
• When using foil, skewers, warming rack or
utensils made of metal in the oven, allow at least
1-inch (2.5 cm) of space between metal material
and interior oven walls. If arcing occurs
(sparking) remove metal material (skewers etc.)
and/or transfer to a non-metallic container.
• Dishes with metallic trim should not be used
during Microwave or Combination cooking,
arcing may occur,
8) PAPER TOWELS / CLOTHS
• Do not use paper
towels or cloths
which contain a
synthetic fiber
woven into them.
The synthetic fiber
may cause the towel
to ignite.
• Do not use paper
bags or recycled
paper products in
the microwave oven.
9) BROWNING DISHES / OVEN COOKING BAGS
• Microwave browning dishes or grills are
designed for microwave cooking only. Preheating
times vary depending on the size of the
browning dish and food being cooked. Always
follow instructions provided by the browning dish
or grill manufacturer. Do not preheat browning
dish more than 8 minutes.
• If an oven cooking bag is used for microwave
cooking, prepare according to package
directions. Do not use wire twist-tie to close bag.
Instead use nylon tie, a piece of cotton string or
a strip cut from the open end of the bag. Make
six 1/2-inch slits by closure. Place oven cooking
bag in a dish slightly larger than the food being
cooked.
10) THERMOMETERS
• Do not use a conventional meat thermometer for
Microwave or Combination cooking. Arcing may
occur. Do not use a microwave meat
thermometer for Combination cooking or Bake. It
may melt.
11)BABY FORMULA / FOOD
• Do not heat baby formula or food in the
microwave oven. The glass jar or surface of the
food may appear warm while the interior can
burn the infant's mouth and esophagus.
12)REHEATING PASTRY PRODUCTS
• When reheating pastry products, check
temperatures of any fillings before eating. Some
foods have fillings which heat faster and can be
extremely hot while the surface remains warm to
the touch (ex. Jelly Donuts).
13)GENERAL OVEN USAGE GUIDELINES / OVEN
DOOR
• Do not use the oven for any reason other than
the preparation of food.
• Do not leave oven unattended while in use.
• The oven door and the interior walls will get hot
during Combination, Bake and Broil cooking.
7

Feature Diagram
Ceramic Tray
1. Do not operate the oven without the Roller Ring and Ceramic Tray in place.
2. Only use Ceramic Tray specifically designed for this oven. Do not substitute any other Ceramic Tray.
3. If Ceramic Tray is hot, allow to cool before cleaning or placing in water.
4. Do not cook directly on Ceramic Tray unless otherwise indicated. Always place food in a microwave-safe
dish, or on a rack set in a microwave-safe dish.
5. Ceramic Tray can rotate in either direction.
6. if food or utensil on Ceramic Tray touches the oven walls, causing the tray to stop moving, the tray will
automatically rotate in the opposite direction. This is normal.
Door Safety Lock System External air vents
Door Safety Lock System
See-through Oven
Window
Roller Ring
1. Roller Ring and oven floor
should be cleaned
frequently to prevent
excessive noise.
2. Roller Ring must always be
used together with
Ceramic Tray for cooking.
Panel:
Covered with a
removeable
protective film to
prevent scratches
during shipping,
Small bubbles may
appear under this
film. When this
happens, remove film
carefully. (Hint - apply
i masking or clear
tape to an exposed
External air vents / corner and pull
gently to remove).
Identification Plate _ Door Release Button
The oven model number Press to open the door.
and serial number are Opening the door during cooking will stop the
recorded here. cooking process without cancelling the
program. Cooking resumes as soon as the
door is closed and Start Pad is pressed. The
oven light will stay on or turn on whenever the
door is opened. It is quite safe to open the door
at any time during a cooking program and
there is no risk of microwave exposure.
Cooking Modes: Heating Source
The diagram below shows examples of the accessories.
Use of these accessories may vary depending on the recipe/dish used. Further information can be found in
the Cookbook.
Microwave
• 4,- " " o'_o"
Microwave ,<
Bake Broil
Heater
Combination

Control Panel
Menu Action Screen
BROtL BAKE COMB
MICRO MLN SEC
Inverter Turbo Defrost Pad
Popcorn Pad
Microwave Power Select Pad --
Bake Pad
Auto Cook by Bake
Sensor Cooking by
Microwave
Sensor Cooking by __
Combination
Keep Warm Pad
(5 menus)
Serving / Weight Pad
Quick Min Pad
Timer Pad
Function Pad
Stop/Reset Pad
Before cooking: One tap clears
your instructions
During cooking: One tap
temporarily stops the cooking
process. Another tap cancels all
your instructions and time of day
appears in Menu Action Screen
Display.
Sensor Cooking --
@ 4
wTimer
2 3
5 6
98
0
i
Clock i
--t.,o.,.e.eOI!.,a.]--
Sensor Reheat Pad
- Broil Pad
-- Combination Pad
Weight Cook by Combination
-- More ! Less Pads
Number Pads
•Clock Pad
-- Start Pad
One tap allows oven to begm
functioning. If door is opened
or STOP/RESET Pad is tapped
once during oven operation,
START Pad must again be
pressed to restart oven
Prompters:
When a pad is pressed, a beep sound is heard and the corresponding letter or word(s) appear and scroll
across the Menu Action Screen Display. If a pad =spressed and no beep is heard, the unit does not or
cannot accept the instruction. AS each pad ts pressed the corresponding word(s) scroll across the screen
Words wtll automattcally appear to prompt user to perform the next step It ts not necessary to wait for the
words to appear before pressing pads for the next step. A two beep sound _sheard between stages. At the
end of any complete program, the oven will beep five times.
9

To Use Function
The unique function feature of your PANASONIC microwave oven allows you to set the non-cooking features
of your ovens such as CHILD LOCK, WORD SPEED, LANGUAGE CHOICE (ENGLISH, SPANISH OR
FRENCH), plus many more. See below. The initial settings are in bold.
_D.-2
i
i
I
---_- 3
_5
I
i
LANGUAGE CHOICE
The oven has English, French and Spanish displays. The default setting is English.
1.ENGLISH ---)Display appears in English.
2.FRANCAIS -)Display appears in French.
3.ESPANOL --)Display appears in Spanish.
Lb/kg CHOICE
The oven has both imperial and metric weight measurements. The oven displays the weight
in imperial measurements.
l.Lb °F-) Weight can be set in Ib/oz and oven temperature can be set in °F
2.kg °C--> Weight can be set in kg/g and oven temperature can be set in °C
WORD SPEED
The word scrolling speed can be accelerated or slowed down.
1.QUICK -)Words scroll quickly.
2.MEDIUM -)Scrolling speed returns to initial setting.
3.SLOW -)Words scroll slowly.
MENU ACTION ON/OFF
MENU ACTION SCREEN helps you program your oven by prompting you with the next step.
When you become familiar with your oven, the Prompting Guide can be turned off.
1.ON --)Prompting Guide will appear.
2.OFF -)Prompting Guide will not appear.
CHILD LOCK ON/OFF
The Child Safety Lock feature prevents children from using the oven.
1.ON -)Child Lock has been set and operation is impossible.
2.OFF ->Child Lock has been cancelled.
BEEP ON/OFF
If you wish to have the oven operate without beeping, this feature can be turned off.
1.ON -)Beep sound will be heard.
2.OFF -)Beep sound will not be heard.
REMINDER BEEP ON/OFF
A reminder beep reminds you to remove the food from the oven after cooking is complete.
The oven beeps every few seconds.
1.ON ---)Reminder beep activated.
2.OFF --)Reminder beep deactivated.
--_-8
DAYLIGHT SAVING ON/OFF
1.ON -)Time of day will advance one hour.
2.OFF -)Time of day return to original setting.
CLOCK ON/OFF
Clock display can be turned off.
1,ON -)Time of Day display will appear in the Menu Action Screen Display.
2.OFF ---)Time of Day display will not appear in the Menu Action Screen Display.
Time of day will remain in memory even when the display is off.
_l=,,-0
J
DEMO MODE ON/OFF
Demo mode is designed for retail store display. In this mode, the oven can be demonstrated
without turning the oven on.
1.ON -)Demo mode is activated.
2.OFF -)Demo mode is deactivated.
10

Let's Start to Use Your Oven!
Panasoldc
Bake
Pie
-- SenSor Cooking --
1 2 3
4 5 6
7 8 9
Timer O Clock
Start
1 Plug In
Plug into a properly grounded electrical outlet.
"WELCOME TO PANASONIC REFER TO
OPERATING INSTRUCTIONS BEFORE USE"
appears in the Menu Action Sereen Display.
(This will immediately cease
when any pad is pressed.)
©!!
Press
Open the door and place the food on Ceramic
Tray in the oven. Then close the door.
Select Power Level
e.g.P10 power- Press once
(Continue pressing for other power levels
-- page 12)
4 Set Cooking Time
[ e.g. 1 minute 30 seconds ]
Press
_- The time in the Menu Action Sereen Display
will count down.
To Set Clock
Press.
Enter time of day.(e.g.11:25)
Using Number Pad.
NOTE
1. You can use the oven without setting the clock.
2. There is no a.m. or p.m. settings. Clock is a 12 hour display.
3. To reset the time of day, repeat steps above.
4. The clock will retain time setting only when plugged into power source.
11

Micro Power and Time Setting
Use of Accessory:
Ceramic Tray
5 o
7 8 9
____I
Ttmer 0 Clock
1
Select Power Level
Press
once
twice
3 times
4 times
5 times
6 times
7 times
8 times
9 times
10 times
Power Level
P10 (HIGH)
P9
P8
P7 (MEDIUM-HIGH)
P6 (MEDIUM)
P5
P4
P3 (MEDIUM-LOW)
P2
P1 (LOW)
For P10 Power, you can start from step 2.
__ Set Cooking Time
(P10 --) up to 30 minutes
Others .--)up to 99 minutes and 99 seconds.)
Cooking will starts. The time in the Menu
Action Screen Display will begin to count
down.
To recall the selected power level, press Micro
Power pad.
For 2 or 3 stage cooking,
Repeat above steps 1 and 2 before pressing Start
Pad.
To Use Quick Min Pad
This feature helps you in programming your oven without pressing the Number Pads and allows you to add
extra cooking time easily.
To Set Cooking Time:
.-c=-l
Set cooking time [up to Press.
10 taps/minutes). ,=-Cooking will start
on P10 power.
TO Add Extra Cooking Time:
NOTE:
1. You can use other power levels or other cooking
modes, select the desired power level or cooking
mode before setting the cooking time.
2. After setting the time by Quick Min Pad, You
cannot use the Number Pads, and vice versa.
Press to add extra cooking time [up to 10
taps) during cooking.
_'Cooking time changes to include extra time and
continues to count down in the Menu Action
Screen Display.
NOTE:
You can add cooking time for all features with power
and time settings.
12

UseofAccessory:
OvenRack& CeramicTray
Panasoldc
-- ConVection Cooking --
-- Sensor Cooking --
1 213
4 56
7 8 9
Timel O Clock
Start
To Cook on Bake
Bake temperature automatically counts-up in 25°F
(10"C) increments from 200"F to 450"F (from
100°C to 230°C). Place Oven Rack on Ceramic
Tray before preheating.
1 Select Oven
Temperature
by pressing Bake Pad.
2 Press
3
_- Preheating will start.
For recipes that do not require preheating,
eliminate step 2.
NOTE: During preheating "P" appears in the
Menu Action Screen Display. Please do not
open door.
When preheating is completed, oven will beep
three times and "P END" will appear in the Menu
Action Screen Display.
Place the Food
Carefully
in an oven-safe dish on Oven Rack.
4 Set Baking Time
Using Number Pads. (up to 9 hours 99 minutes)
I e.g. 30 minutes I
5 Press
.w- Cooking starts. The cooking time in the Menu
Action Screen Display begins to count down.
To recall the selected oven temperature, press
Bake Pad.
NOTE:
1. If oven door is not opened after preheating, oven will maintain the selected temperature for 30 minutes.
After 30 minutes, oven will shut off automatically and beep five times.
2. When selected cooking time is less than one hour, time counts down second by second.
3. When selected cooking time is more than one hour, time counts down minute by minute until 1 hour
remains. The timer will then count down second by second.
13

To Cook on Broil
Use of Accessory:
Oven Rack & Ceramic Tray
Most broil items require preheating the oven, Place Oven
Rack on Ceramic Tray.
Follow these steps.
1 Press Broil Pad
Panasonic
-- Convection COOking --
-- Sensor COOking --
@@
1 2 3
4 5 6
7 8 9
Timer 0 Clock
2 Press
_Preheating will start.
For recipes that do not require preheating,
eliminate step 2.
NOTE: During preheating "P" appears in the
Menu Action Screen Display. Do not open door
during preheating.
When preheating is completed, oven will beep
three times and "P END" will appear in the Menu
Action Screen Display.
3 Place the Food
On spatter shield on broiler pan and carefully
place on the Oven Rack. You can purchase most
broiler pans from your local stores.
4
Set Broiling Time
using Number Pads.
(up to 99 minutes and 99 seconds)
[ e.g. 35 minutes I
5 Press
,w-The cooking time in the Menu Action Screen
Display begins to count down.
NOTE:
1. If oven door is not opened after preheating, oven will maintain the temperature for 30 minutes.
After 30 minutes, oven will shut off automatically and beep five times.
14

To Cook on Combination
Use of Accessory:
Ceramic Tray
Bake
-- Sensor Cooking --
@@
1 2 3
4 5 6
7 8 9
7-truer O Clock
Start
There are 4 combination settings. These settings are
automatic, there is no need to set oven temperature or
microwave power level. Some combination recipes
require preheating. For instructions, follow steps 1 and 2
of the "To Cook on Bake" selection.
1 Place the Food
Open the door and place the food in appropriated
sized dish on Ceramic Tray in the oven. Then
close the door.
2 Select the Setting
Combination 1, 2, 3, or 4 can be selected.
Oven Temperature Micro-
wave
1 275"F (130"C)
2 300"F (150"C) 30 %
)ower
3 325"F (160"C)
4 375°F (190°C)
Food
Beef (Well)
Lamb (Well)
Beef (Rare, Med)
Lamb (Med)
Pork
Chicken or Duck
3 Set Cooking Time
using Number Pads (up to 9 hours 99 minutes).
l e.g. 20 minutes ]
4 Press
r Cooking starts. The cooking time in Menu
Action Screen Display begins to count down.
NOTE:
1. When selected cooking time is less than one hour, the time counts down second by second.
2. When selected cooking time is more than one hour, the time counts down minute by minute until only
1 hour remains. The timer will then count down second by second.
3. Use microwaveable and heat-safe dishes.
4. DO NOT use plastic wrap or wax paper.
5. Use parchment paper or lid when covering food.
15

To Use Popcorn Pad
Use of Accessory:
Ceramic Tray !
...... J
J
@@
@@
4 5 6
7 8 9
1 Press Popcorn Pad
J
to select the weight of prepackaged microwave
popcorn.
press Weiqht
F once 3.5 oz. (99 g)
twice 3.0 oz. (90 g)
L 3 times 1.75 oz. (50 g)
2 Press Start
,e- Cooking time appears in the Menu Action
Screen Display and begins to count down.
NOTES:
1. Use prepackaged room temperature microwave
popcorn. Read manufacturers' instructions.
2. Place the bag in oven on Ceramic Tray according
to manufacturers' directions.
3. Pop only one bag at a time.
4. When popping multiple bags one right after the
other, the cooking times may vary slightly.
This does not affect the popcorn results.
5. After popping, open the bag carefully, popcorn
and steam are extremely hot.
6. Do not reheat unpopped kernels or reuse bag.
7. Never leave oven unattended when popping
popcorn.
CAUTION: tf pre-packaged popcorn is of a different
weight than the recommended weight, do not use
the popcorn setting, or inadequate popping or a fire
may occur. Follow the manufacturers' instructions.
To Use Keep Warm Pad
This feature helps you to keep a certain selection of foods warm for 30 minutes after cooking. (Pie, Gravy,
Stew, Casserole or Mushed Potatoes)
Select Category.
Select Serving/Weight.
Press Start.
Keep Warm time appears in the Menu
Action Screen Display and begins to
count down from 30 minutes.
At the end of cooking, five beeps sound
and "ENJOY YOUR MEAl" appears in
the Menu Action Screen Display.
16

Using Inverter Turbo Defrost Pad
Use of Accessory:
Ceramic Tray
Panasonic
This feature allows you to defrost meat, poultry and
seafood by using the weight on the package.
1 Place the Food
Open the food and place the food in appropriated
sized dish on Ceramic Tray in the oven. Then
close the door.
-- Convection Cooking --
-- Sensor Cooking --
1 2 3
4 5 6
_ 7 8 9
Timer O Clock
Start
2 Press
Set Weight
Weight must be programmed in pounds and
tenths of a pound (not ounces).
[e.g. 2.6 Ibs (1.2 kg) ! If you wish to use
I_ the g / kg, see
page 10
"Function".
Press
_" Defrosting time appears in the Menu Action
Screen Display and begins to count down.
Conversion Chart:
Follow this chart to convert ounces or hundredths
of a pound into tenths as a pound. If a piece of
meat weighs 1.95 pounds or 1 pound 14 ounces,
program 1.9 pounds.
Ounces
0 .96 - .05
1-2 .06 -. 15
3-4 .16 - .25
5 .26 - .35
6-7 .36 - .45
8 .46 - .55
9-10 .56 - .65
11-12 .66 - .75
13 .76 - .85
14-15 .86 - .95
Hundredths of Tenths of
a Pound a Pound
0.0
0.1
0.2
0,3
0.4
0.5
0.6
0.7
0.8
0.9
NOTE:
1. The shape and size of food wil! determine the maximum weight the oven can accommodate.The
recommended maximum weight of meat is 4 Ibs (1.8 kg); poultry, 6 Ibs (2.7 kg); and seafood, 3 Ibs
(1.4 kg).
2. The oven beeps once during the defrosting cycle to signal that the food needs to be turned or rearranged,
To prevent overdefrosting, thin areas or edges can be shielded with strips of aluminum foil.
3. For best results, the minimum recommended weight is 0,5 pound.
4. Stand time or power level may be programmed after Inverter Turbo Defrost
17

To Use Sensor Reheat/Sensor Cooking
Use of Accessory:
This feature allows you to reheat/cook most of your
favourite foods without having to select reheating/cooking
times and power levels.The oven does it all automatically.
Ceramic Tray
I
Panasonic
......I
-- Convection COOking --
@@
@@
-- Sensor Cooking --
1 2 3
4 5 6
7 8 9
Timer O Clock
1 Select Category
The Potatoes/Vegetables, Rice/Pasta and
Casserole Pads each have 2 - 4 categories.
See next page.
More / Less Pads:
Preferences for food aloneness vary with each
individual. After having used Sensor Reheat /
Sensor Cooking a few times, you may decide
you would prefer your food cooked to a
programs can be adjusted to cook food for a
longer or shorter time.
Press More/Less Pad before pressing Start.
1 tap = More cooking
2 taps = Less cooking
3 taps = original cooking
2 Press
;_ Cooking will start.
After the burst of steam is detected by the
SENSOR, the remaining cooking time appears in
the Menu Action Screen Display and begins to
count down.
For best results by Sensor, follow these recommendations.
BEFORE Reheating / cooking:
1. The room temperature surrounding the oven
should be below 95°F(35°C)
2. Food weight should be between 4 oz (120 g)and
24 oz (680 g).
3. Ceramic Tray and outside of container should be
dry.
4. Cover foods loosely but completely, with plastic
wrap or place foods in a casserole dish with a
proper fitting lid.
5. All foods should be taken from their normal
storage place.
DURING Reheating / Cooking:
While "AUTO" is displayed in the Menu Action
Screen Display, DO NOT open door longer than 1
minute. This causes inaccurate cooking results.
Once the timer begins to count down, the oven door
may, be opened to stir, turn, shield or add foods.
AFTER Reheating / Cooking:
All foods should have a covered stand time.
18

To Use Sensor Reheat/Sensor Cooking
DO NOT:
1. Reheat bread and pastry products. Use manual power and time.
2. Reheat raw or uncooked food.
3. Use if oven cavity is warm.
4. Use for beverages.
5. Use for frozen foods.
Food
Plate of Food
Meat, Poultry
Casseroles
Side dishes
Soups, Sauces,
Gravies
i Starting Temp.
Refrig.
Refrig.
Refrig.
Refrig.
or Room
Refrig.
;ENSOR COOK - HINTS:
CATEGORY
@ 1 x Potatoes
i
2 x Fresh
Vegetables
3 x Canned
Vegetables
4 x Frozen
Vegetables
1 x White Rice
2 x Brown Rice
3 x Pasta
1 x Casserole 1
2 x Casserole 2
Weight Number
per of
Serving Servings
12-16 oz 1
4-6 oz 1-4
8 oz 1-2
4-6 oz 1-4
6-8 oz 1-2
WEIGHT RANGE
1 - 4 potatoes
6-8oz
(170 - 230 g)
each
1/2- 2 Ib
(230 - 900 g)
weight before
peeling, trimming
etc.
15 oz
can size
10 - 28 oz
(28O- 80O g)
Rice--Boiling water
1½ cup---1 cup
1 cup---2 cups
11/2 cups-- 3 cups
2 cups---31_ cups
Casseroles - Add 2 to 4 tablespoons of liquid;
cover with lid or plastic wrap. Stir when time
appears in the Menu Action Screen Display.
Canned foods - Empty contents into casserole
dish or serving bowl; cover dish with lid or plastic
wrap. After reheating, release plastic wrap and
stand.
Plate of food - Arrange food on plate; top with
butter, gravy, etc. After reheating, release plastic
wrap and stand.
INSTRUCTIONS
Pierce several
times and place
on a microwave
safe dish.
Add water.
Empty contents
into microwave-
safe serving
bowl.
Add 2 tbsp of
water. Do not
cook with butter
or sauce.
Place rice with
hot water in a
microwave-safe
casserole dish..
COVER
NO
Lid or plastic
wrap
Lid or plastic
wrap
Lid or plastic
wrap
!Follow
manufacturers'
direction.
AFTER SEEP
Turn over.
Stir or
rearrange, if
_ossible.
Stir or
rearrange.
Stir or
rearrange.
Stir, if possible.
2 - 8 oz Place pasta with Lid or plastic Stir
hot water in a wrap occasionally
microwave-safe
casserole dish.
Use appropriate Lid. Stir
amount of liquid, occasionally
NOTE: if Sensor Reheat/Cook is programmed while the oven cavity is still hot from heater, "HOT" appears in
the Menu Action Screen Display the fan starts running to cool the cavity. If the cavity is too hot, the Sensor
will not work properly. After the cavity has cooled, the "HOT" message will disappear and revert to colon or
time of day.
Sensor Cooking is successful with the foods and recipes found in the Cookbook and marked with the Symbol
I_. Because of the vast differences in food composition, recipes and charts without the Symbol [] Should be
prepared in your microwave oven using the Power and Time setting.
19

Using Convection Cooking (Weightcookbycombination)
Use of Accessory:
Ceramic Tray ]
This feature allows you to Roast Beef, Pork or Whole
Chicken by setting the weight.
Place food on a microwave roasting rack set in a
microwave- and heat-safe dish.
_r=so.,o 1 Place the Food
Open the door and place the food in dish on
Ceramic Tray in the oven. Then close the door.
I\\
2 Select Category
This pad is subdivided into 4 categories;
Chicken Pieces, Whole Chicken,
Beef-medium and Pork.
3 Set Weight
1 2 3
/
4 5 6
e.g. 2.0 Ib/kg _ _
If you wish to adjust the roasting time,
press More / Less pads (See page 18).
7 8 9
j 4 Press
Timer 0 Clock .i-
,,r Cooking starts. The cooking time in the Menu
Action Screen Display begins to count down.
NOTE:
1. These settings are cooked by Auto Combination (Bake and Microwave).
2. When the weight has been selected, the cooking time will be automatically determined.
3. Roasts weighing above or below the recommended weights should be cooked using the Manual
Combination.
Auto Combination
CATEGORY
Chicken Pieces
Whole Chicken
Beef - medium
Pork
WEIGHT RANGE
max. 2 Ib (1 kg)
max. 6 Ib (3 ..k.g__
max. 4 Ib (2 kg)
max. 4 Ib (2 kg)
INSTRUCTIONS
Place skin-side down.
Place breast-side down.
Place fat- side down.
Ptace fat-side sown. Pork must
reach 170°F(77°C) before serving.
AFTER BFF
Turn over
Turn over
Turn over
Turn over
2O

Using Convection Cooking (Auto cookbyBake)
Use of Accessory:
J
Oven Rack & Ceramic Tray
This feature allows you to bake cake or pie without
having to select oven temperature and baking time.
Place Oven Rack on Ceramic Tray.
-- Con_ction Cooking --
-- Sensor Cooking --
1 2 3
4 5 6
7 8 9
Timer O Clock
1
Place the Food
Open the door and place the food in dish on Oven
Rack on Ceramic Tray. Then close the door.
!
IS/
2 Select Category
Cake Pad is divided into 2 categories. The Pie
Pad is divided into 3 categories (see below).
If you wish to adjust the baking time, press
More / Less Pads (See page 18).
3 Press
,e- Cooking starts. The cooking time in the Menu
Action Screen Display begins to count down.
NOTE:
1. These settings are cooked by Bake.
2. There is no need to preheat.
3. Metal cookware may be used. Position the dish to be cooked on Oven Rack on Ceramic Tray
CATEGORYPAD PRESS
once
twice
once
twice
3 times
Cake recipes that conventionally bake in less than 35 minutes
Cake
Cake recipes that conventionally bake in 45 minutes to 60 minutes.
Double-crust pies with fresh fruit fillings.
Pie Double-crust pies that are frozen (weight should not be more than 2 Ib 5 oz).
Double-crust pies with pre-cooked or canned pie fillings.
• Will not bake chocolate fudge, brownies or fruit cake recipes.
• 0o not use frozen pie crust.
• Place frozen pies on a small cookie sheet.
21

To Use Timer Function
DIJ*4|NSION •
@Z 3Z
I@
@7Zl,
CED
This feature allows you to program a Standing Time after
cooking _scompleted and to program the oven as a
minute timer and/or to program delay start.
To Use as a Kitchen Timer
Press Timer
2 Set Desired .
Amount of Time
using number pads
(up to 99 mmutes and 99 seconds)
3 Press
,m-Time will count down without oven
operating.
To Set Stand Time
Set Desired
Cooking
Program
B
e g. H_gh 10 mm Press.
(See page 12)
To Set Delay Start
Set desired
amount of stand
time.
Press
Cooking wdl start
After cooking, stand
ttme will count down
w_thout oven operating
_ _ SetDesired
-- _ Cooking
Program
Press Set desired amount e g. High 10 mln Press
of delayed time. (See page 12) After completed
delayed t=me,
cooking will start.
NOTE:
1. When the first/second stage has fintshed, a two beep s_gnal =sheard After all the stages have been
completed, the oven wdl beep five ttmes.
2 If oven door is opened during the Stand Time or Kitchen Ttmer, the time =nthe Menu Action Screen
Display will continue to count down
3. Delay Start cannot be programmed before any Auto Control Function
Thts is to prevent the starting temperature of the food from nsmg before defrosting or cooking begins
4. T_mer can be set up to 99 mmutes and 99 seconds
22

Before Requesting Service
F- ALL THESE THINGS ARE NORMAL:
The oven causes interference Some radio and TV interference might occur when you cook with the
with my TV. microwave oven. This interference is similar to the interference caused
by small appliances such as mixers, vacuums, hair dryer, etc. It does
not indicate a problem with your oven.
The oven lights dim. When cooking with a power other than P10 - P3, the oven must cycle
to obtain the lower power levels. The oven light wilt dim and clicking
noises can be heard when the oven cycles.
Steam accumulates on the During cooking, steam and warm air are given off from the food. Most
oven door and warm air comes of the steam and warm air are removed from the oven by the air which
from the oven vents, circulates in the oven cavity. However, some steam will condense on
cooler surfaces such as the oven door. This is normal.
I accidentally ran my Running the oven empty for a short time will not damage the oven.
microwave oven without any However, we do not recommend this to be done.
food in it.
There are humming and These noises occur as the oven automatically switches from microwave
clicking noises from my oven power to Convection, to create the Combination setting. This is
when I cook by Combination. normal.
The oven has an odor and It is essential that your oven is wiped out regularly particularly after
generates smoke when using cooking. Any fat and grease that builds up on the roof and walls of the
the Bake, Combination and oven will begin to smoke if not cleaned.
_Broil function.
PROBLEM
Oven will not turn on.
Oven will not start cooking.
POSSIBLE CAUSE
_-e-_en is not plugged in
securely.
Circuit breaker or fuse is tripped Reset circuit breaker or replace
or blown, fuse.
There is a problem with the Plug another appliance into the
outlet, outlet to check if the outlet is
working.
• The door is not closed Close the oven door securely.
completely.
Start pad was not pressed after Press Start pad.
programming.
Another program has already Press Stop/Reset pad to cancel
been entered into the oven. the previous program and
program again.
The program has not been Program again according to the
entered correctly. Operating Instructions.
Stop/Reset pad has been Program oven again.
pressed accidentally.
J
j L REMEDY
Remove plug from outlet, wait 10
seconds and re-insert.
The words "DEMO MODE"
appear on the screen.
When the oven is turning on,
there is noise coming from
Ceramic Tray.
I Oven is set at Demo Mode.*
See page10 (To use Function)
to turn off Demo Mode.
I Roller Ring and oven bottom are Clean these parts according to
dirty. Care of Your Oven (see next
page).
* DEMO MODE is designed for retail store display.
Cooking and other functions will not operate during Demo Mode.
If it seems there is a problem with the oven, contact an authorized Service Centre.
23

Care of Your Microwave Oven
BEFORE CLEANING:
Unplug at socket of the oven. If impossible, leave
oven door open to prevent oven from accidentally
turning on.
AFTER CLEANING:
Be sure to replace Roller Ring and Ceramic Tray
in the proper position and press Stop/Reset Pad
to clear the Menu Action Screen Display.
Inside of the oven:
Wipe with a damp cloth. Non
caustic oven cleaners may be
used if the oven gets very dirty.
The use of harsh detergent or
abrasive cleaners is not
recommended.
NOTE:
Do not use oven cleaners on
the top of the oven. \
\
Ceramic Tray:
Remove and wash in warm
sudsy water or in a dishwasher.
If grease accumulates, clean
with a non-abrasive nylon mesh
scouring pad and non caustic
oven cleaners.
Outside oven surfaces:
Clean with a damp cloth. To
prevent damage to the
operating parts inside the oven,
water should net be allowed to
seep into ventilation openings.
Control Panel:
If the control panel becomes wet,
clean with a soft, dry cloth. Do not
use harsh detergents or abrasive
cleaners on the control panel.
Oven Door:
Wipe with a soft cloth when steam accumulates
inside or around the outside of the oven door. This
may occur when the oven is operated under high
humidity conditions and in no way indicates a
malfunction of the unit or microwave leakage.
Roller Ring and oven cavity floor:
Wipe the bottom surface of the oven with mild
detergent water or window cleaner and dry. Roller
Ring may be washed in mild sudsy water or
dishwasher. These areas should be kept clean to
avoid excessive noise.
After Bake/Broil/Combination cooking, the oven should be cleaned with a soft cloth squeezed in soapy
water. If the oven is not cleaned occasionally to eliminate this grease, it can accumulate and cause the oven
to SMOKE during use. To avoid smoking, run the oven without food on BROIL for 20 minutes.
24

INSTRUCCIONES DE SEGRIDAD
Cuando se usan aparatos electricos, se deben seguir
precauciones basicas de seguridad, incluyendo Ins
siguientes:
PRECAUClON - Para reducir el riesgo de
quemaduras, descarga et_ctrica, incendio, beridas a
personas o exposicion excesiva a energia de
microondas:
1. Lea todas las instrucciones antes de usar el
aparato.
2. Lea y siga las "PRECAUCIONES PARA EVlTAR
POSlBLE EXPOSICION EXCESlVA A ENERGIA
DE MICROONDAS" especificas, que se
encuentran en la parte posterior de la cubierta
frontal.
3. Este aparato debe ser conectado a tierra.
Conecte solamente a la toma electrica
debidamente conectada a tierra. Vea las
"INSTRUCClONES PARA CONEXlON A TIERRA"
que se encuentran en la pagina 26.
4. Instale o ubique este aparato solamente de
acuerdo con 1as instrucciones de instalaci6n que
se encuentran en la pa.gina 26.
5. No cubra ni tape ninguna de las rendijas de este
aparato.
6. No almacene o use este aparato en exteriores.
No use este aparato cerca del agua - por
ejemplo, cerca del fregadero de la cocina, en
uRn base mojada, o cerca de uRn alberca, y
similares.
7. Use este aparato solo para los fines para los
que rue hecho, tal como se describen en este
manual. No use qufmicos o vapores corrosivos
en este aparato. Este tipo de norno esta
especfficamente disefiado para calentar o
cocinar alimentos. No fue disehado para uso
industrial o de laboratorio.
8. Cuando limpie Ins superficies de la puerta y el
homo que vienen juntas al cerrar la puerta, use
solamente jabones no abrasivos o detergentes
suaves aplicados con una esponja o con tela
suave.
9. Como con cualquier aparato electrico, es
necesaria la supervisi6n de un adulto cuando
sea usado por niflos.
10. No use este aparato si tiene daflados el cordon o
la clavija, si no esta trabajando adecuadamente,
o si ha sido dafiado o se ha dejado caer.
11. No sumergir en agua el cable o la clavija.
12. Mantenga el cordon lejos de superficies
calientes.
13. No deje el cordon colgando en el borde de la
mesa o mostrador.
14. Este aparato debe recibir mantenimiento solo de
personal calificado. Contacte Ins instalaciones de
servicio autorizadas mas cercanas para revisi6n,
reparaci6n o ajuste.
15. Algunos prodectos, tales come los huevos
completos y contenedores sellados - per
ejemplo frascos de vidrio cerrados - pueden
explotar y no deben ser calentados en este
horno.
16 Para reducir el riesgo de incendil en la cavidad
del homo:
(a) No sobrecocine los alimentos. Preste
atenci6n cuidadosamente al aparato. El
papel, plastico u otros materiales
combustibles son colocados dentro del horno
para facilitar la cocci6n pero si no se utilizan
adecuadamente esto puede producir
incendio en su homo.
(b)Quite los sujetadores de alambre de las
bolsas de papel o plastico antes de colocar
la bolsa en el horno.
(c) Si los materiales dentro del homo se
incendiaran, mantenga cerrada la puerta del
horno, pongalo en posicion de apagado, y
deconecte la energia electrica, o corte et
suministro electrico en la caja de fusibles o
en el panel de control.
(d) No use la cavidad con propositos de
almacenaje. No deje productos de papel,
utensilios de cocina o alimentos en la
cavidad cuando no este en uso.
17. Para evitar el posible riesgo de quemadura, el
aparato no debe ser usado en areas tales como
mostradores tipo isla en los que las supeficies
posteriores estarian expuestas al contacto del
useario y el aparato debe ser colocado ma.s de
85 cm arriba el suelo.
Uso General
1. No altere I haga ninf0n ajuste o reparaci6n a la
puerta, al alojamiento del pavel de control,
interruptores entrecruzados de seguridad o a
cualquier otra parte del homo. NO quite el panel
exterior det horno. Las reparaciones deben ser
hechas solamente por persomal de servicio
calificado.
2. NO opere el horno vacio. La energfa de
microondas se reflejara continuamente a traves
del homo si los alimentos o agua no estan
presentes para absorber energia. Esto ruede
dafiar el homo y resultar en peligro de incendio.
3. NO use este horno para calentar productos
qufmicos u otros productos no alimenticios. NO
limpie este homo con cualquier producto
etiquetado con conteniendo quimico corrosivos.
El calentamiento de quimicos corrosivos en este
horno puede causer fugas de tadiacion.
4. NO seque telas, periodicos u otros materiales en
el homo. Pueden incendiarse.
5. NO use productos de papel reciclado, ya que
pueden contener impurezas que pueden causar
chispas y/o incendios cuando se usen.
6. NO use periodicos o bolsas de papel para
cocinar. Puede resultar un incendio.
7. NO pegue, NO golpee el panel de cantrol.
Pueden causarse dafios a los controles. Puede
resultar un incendio.
8. SOPORTES PARA LO CALIENTE pueden ser
necesarios cuando cocine. El calor se transfiere
de los alimentos calientes a los contenedores
para cocinar y de los contenedores a la Bandeja
de Ceramica. La Bandeja de CerAmica puede
estar muy caliente despues de sacar los
contenedores para cocinar del homo.
9. NO almacene materiales flamables cerca, arriba,
o dentro del homo. Pueden ser riesgos de
incendio.
25

INSTRUCCIONES DE INSTALACION
Examine Su Horno
Desempaque el houno, quite todo el material de
empaque y examine quese horno no tenga ningl_n
daSo, tales come abolladuras, seguros de la puerta
rotes o resquebrajaduras en la puerta. Notifique
inmediatamente a su distribuidor si el horno est&
da_ado.
Ubicacien del Horno
1. El homo debe ser celocado en una superficie
plana y estable. Para su operacien apropiada, el
horno debe tener suficiente corriente de aire.
Deje 10 cm de espacio de ambos lades del
hornoy 15 cm de espacio en la parte superior
del houno.
a. NO tape lae ventilas de aire. Si est&n
tapadas durante su operacien, el horno
puede sobrecalentarse. Si se sobrecalienta,
un dispositivo termico de seguridad apagar_l
el horno. El horno no operar_l hasta que se
haya enfriado.
b. NO coloque el horno cerca de una superficie
humeda caliente, tal come un registro de gas
o el_ctrico.
c. NO opere el borne cuando la humedad del
cuarto sea muy alta.
2. Este homo ha side fabricado para use en el
hogar solamente.
3. Este hornos ee pueden instalar dentro de algun
estante mural, se desea. Para hacerlo puede
contactarse con algen Servicio Autorizado de
Panasonic Vea la pag. 44 para especificaciones
tecnicas.
Instrucciones para Conexien d Tierra
Este aparato debe ser conectado a tierra. En el
case de un corto circuito, la conexion a tierra reduce
el riesgo de una descarga electrica propercionando
una I_nea de escape para la corriente electrica. Este
aparato esta equipado con un cable y clavija para
conexion a tierra. La clavija debe ser conectada en
un receptor que este instalado adecuadamente y
conectade a tierra.
PRECAUCION - El use inapropiado de la clavija
para conexien a tierra puede resultar en riesgo de
descarga electrica.
Consulte un electricista o a personal de servicio
calificados, si las instrucciones para conectar a
tierra no son completamente compredidas o si
existe duda de que el aparato esta correctamente
conectado a tierra. Si es necesario usar un cable de
extensien, use sol_,mente cable de extensien de tres
hilos que tenga una clavija de tres entradas para
conectar a tierra, y un receptor de tree ranutas que
acepte la clavija del aparato. El calibre marcado en
el cable de extension debe ser igual o mayor al
calibre el_ctrico del aparato.
Suministro Electrico
1. Se provee un cable de suministro el_ctrico corto
para reducir los riesgos resultantes de enredarse
o tropesarse con un cable m_.s largo.
2. Juegos de cable m&s largos o extensiones estdn
diaponibles y pueden utilizarse si se usan con
cuidado.
3. Si se usa un cable mas largo o extensien, (1) el
calibre el_ctrico marcado en el juego de corden
o extensien debe ser al menos tan grande come
el calibre el@ctrico del aparato, (2) el cable de
extensien debe ser de tres hilos del tipo de
conexien a tierra, y (3) el corden mds largo debe
ser arreglado de tal forma que no caiga sobre la
cubierta del mostrador o de la mesa deride
pueda ser jalado per ni_fos o tropesarse
accidentalmente.
Circuitos
Los hornos de microondas Panasonic deben ser
operados en circuitos separados de otros aparatos.
No hacer esto puede causar que la caja de fucibles
se daSe y/o que los alimentos se cocinen rods
lentamente.
No coloque fusibles en el tablero de un valor mas
alto del especificado.
Interferencia de Radio
1. La operacien de su homo de microondas puede
causar interferencia en su radio, TV o equipo
similar.
2. Cuando hay interferencia, se puede reducir o
eliminar tomando las siguientes medidas:
a. Limpie la puerta y las superficies selladoras
del homo. (Vea Cuidados de Su Horno de
Microondas que se encuentran en la pagina
42)
b. Ponga el radio, TV, etc. Io m&s lejos posible
del homo de microondas.
c. Use una antena instalada adecuadamente
para ebtener una recepcien de seSal m&s
fuerte.
PRECAUCIONS PARA EVITAR
POSIBLE EXPOSICION EXCESIVA A ENERGIA DE MICROONDAS
(a) No intente hacer funcionar este horno con la puerta abierta ya que esto puede resultar peligroso. Es
importante no anular o bloquear los mecanismos de seguridad.
(b) No coloque ningun objeto entre el panel frontal del hornoy la puerta, ni permita que se acumule basura
o resibuos de limpiadores en las superficies de sellado.
(c) No haga funcionar el horno si esta da£_ado, es importante que la puerta del horno abra y cierre
apropiadamente:
(1) la puerta (combada)
(2) bisagras y seguro de la puerta (rotes o sueltos)
(3) sellos de las puertas y superficies de sellado.
(d) El homo no debera ser ajustado o reparedo per ninguna peersona, excepto el personal de servicio
debidamente calificado.
26

SUGERENCIAS UTILES
Siga Estas Precauciones de Seguridad Cuando Cocine en Su Horno
1) ENLATADO CASERO/ALIMENTOS •
DESHIDRATADOS/PEQUEI_IAS
CANTIDADES DE ALIMENTOS
• No use su horno para el enlatado casero o para
calentar cualquier fiasco cerrado. La predi6n
aumentara y el frasco puede explotar. Su homo no
puede mantener los alimentos a la temperatura 6)
apropiada de enlatado. •
• PequeSas cantidades de alimento o alimentos con
bajo contenido de humeded se pueden secar,
quernar o incendiarse.
• No seque alimentos, hierbas, frutas o vegetales en
su horno.
La cocci6n adecuada depende del tiempo
designado y del peso de los alimentos. Si use una
porcion menor de la recomendada y cocina por el
tiempo para la porcion recomendada, puede
resulatar un incendio. Si ocurre un incendio, ponga
el homo en posici6n de apagado y mantengalo
cerrado. Desconecte la energia eldctrica o
desconecte la caja de fusibles o el panel de control.
2) PALOMITAS DE MAiZ
Las palomitas de ma_z deben prepararse en un
recipiente para palomitas de maiz adecuado para
homo de microondas. Palornilas de maiz para horno
de m croondas que se preparan en su prop o paquete
rarnbien est&n desponibles. Siga las instrucciones del
fabricante de palomitas de mafz y use una marca
adecuada para la potencia de su homo de
microondas. Nunca deje desatendido el homo cuando
prepare palomitas de mafz.
PRECAUCION
Cuando use palomitas de maiz para microondas
previamente empacado siga las instrucciones
recomendadas en el paquete. Revise el peso del
paquete antes de user la tecla de palomitas de
maiz. Prepare el horno para el peso del paquete
de palomitas de maiz (yea p&gina 40). Si no se
siguen estas instrucciones, las palomitas de maiz
pueden no reventar adecuadamente o pueden
encenderse y causar un incendio.
3) FREIR CON MUCHA GRASA
• No trate de freir con mucha grasa en su homo de
microondas. Cocinar aceites puede estallar en
llamas y puede causar daSo al homo y quiza acabar
en quemaduras. Los utensillos de microondas
pueden no ser utiles para soportar la temperatura
del aceite caliente, y podrian romperse.
4) HUEVOS
• No caliente huevos en su cascaron en el homo
de microondas. La presion subira y el huevo
expletara
Use papas trescas para hornear y cocinelas hasta
que esteR listas. Cooinar demasiado causa
deshidrataci6n y puede producir un incendio.
Use los pesos recomendados o puede ocurriri un
incendio.
LIQUIDOS
Los liquidos calientes pueden hacer erupcion si no
se rnezclan con el aire. No caliente liquidos en su
homo de microondas sin agitarios antes.
7) BANDEJA DE CER_.MICAJUTENSILIOS DE
COCINA/PAPEL ALUMINIO
• Los utensillos para cocinar se calientan durante la
Cocci6R. en microondas. Use soportes para Io
caliente, cuando saque los utensillos del horno o
cuando quite tapas o cubiertas de envoltura de
plastico de los utensiflos de cocina, para evitar
quemaduras.
• La bandeja de CerAmica se calentar& durante la
coccion Debe permitirse que se enfrie antes de
manejarla o antes de colocar productos de papel,
tales como plates de papel o bolsas de palomitas de
maiz para microondas, para cocinar.
• Cuando se use papel aluminio, brochetas, rejillas
para calentar o utensilios hechos de metal en el
homo, deje por Io menos 2,5 cm de espacio entre el
material de metal y las paredes interiores del horno.
Si arquea (chispea) quite el material de metal
(brochetas etc.) y/o cambielo a un contenedor no
met&lice.
• Prates con adornos metalicos no deberan ser
usados, ya que puede producirse arco electrico.
8) TOALLAS DE PAPEL/TELAS
• No use toallas de papel o telas que contengan
fibras sinteticas en su tejido. La fibra sintetica puecle
causar que la toalla se incendie.
• No use belsas de papel o productos de papel
reciclado en el homo de microondas.
9) BANDEJA DORADORA/BOLSAS PARA
COCINAR EN HORNO
• Las bandeja doradora o asados don dese_ados
para cocinar en microondas solamente. Siempre
siga las instrucciones dadas por el fabricante.
No precaliente la bandeja doradora mas de 8
minutos.
• Si se usa una bolsa para cocinar para el
Microondas, prepare de acuerdo alas instrucciones
del paquete. No use sujetadores de alambre para
cerrar la bolsa.
10) TERM(_METROS
• No use term6metros convencionales para
alimentos en su homo. Puede producir arco.
5) ALIMENTOS CON PIELES NO POROSAS
• Papas, manzanas, yemas de huevo, calabazas
completas y salchichas son ejemplos de
alimentos con pieles no porosas. Estos ripos de
alimentos deben ser perforados antes de cocinarlos
en Microondas para evitar que estallen.
11) GU|A DE USO GENERAL DEL
HORNO/PUERTA DEL HORNO
• No use el horno por cualquier razoR que no sea la
preparaci6n de alimentos.
• No deje sin atenci6n el horno mientras este en uso.
27

GU|A PARA COCINAR Y UTENSILIOS
ARTICULO
Papel Aluminio
Platillos Dorados
Bolsas de Papel de
Estraza
Servicio de Mesa
para la Cena
Especial pare
solamente
Poliester Desechable
Platos de Carton
Caja de Comida
Rgipida con
Agarradera de Metal
Bandeja para Comida
Congelada
Metal
Especial para
Microondas
Frescos de Cristal
Cristaleria y Cer&mica
para Homo Resistente
AI Calor solamente
Sujetadores Met_llicos
Torcidos
Bolsa para Cocinar en
el Homo
Plates de Papel y
Servilletas
Toallas de Papel y
Servulletas
Pl_tstico
Especial para
Microondas solamente
Bateria de Cocina y
Platos de
Almacenamiento
Envoltura Plastica
MICROONDAS
Si, pare
Protecci6n
DORAR
Si
No
No No
Si Reviser"
Si
No
Si
Si
Si
Si
Revisar*
No
Si
Revisar*
No
Si
COMENTARIOS
PequeiSas partes de aluminio pueden ser moldeadas alrededor de
partes delgadas de comida o aMes pare prevenir que se cocinen
demasiado. Se puede producir el arco si el aluminio esta muy
cercano alas paredes del homo o si se usa demasiado.
Los plarillos dorados estan disef_ados para cocinar en microondas
solamente. Revise la informaci6n de platillos dora(los para ver las
instrucciones y el cuadro de calor. No precaliente por mas de 8
minutos.
Puede causar un incendio en el homo.
Revise las instrucciones del fabricante pare el uso y cuidado pare ve
la canveniencia de calentamiento por microondas. Algunos servicios
de mesa puedan indecar en la parte trasera de los plates "aesistente
a Homo de Microondas".
Algunos alimentos congelados se empacan en estos plaros. Pueden
ser comprados en tiendas de abarrotes.
Puede causar arco.
Cenas congeladas pueden ser calentadas en bandejas de aluminio,
si la bandeja tiene una attura menor a 2 cm. Coloque la bandeja de
aluminio en el centro del homo. Deje al menos un espacio de 2,5 cm
entre la bandeja de aluminio y las paredes del homo. Caliente
solamente 1 bandeja de aluminio en el houno carla vez. Pare
contenedores de mas de 2 cm de profundidad, sacar los alimentos y
colocarlos en un contenedor de tama5o similar especiales para
microondas.
Quite la tapa. Caliente los alimentos solo hasta que esten tibios. La
mayoria de los frascos de cristal no son resistentes al calor.
Ideales pare cocinar y dorar en mieroondas.
No No Pueden causar arco que podria ocasionar un incendio en el horno.
No
No
Si No
SI
Si
Siga las instrucciones del fabricante. Cierre la bolsa con los
sujetadores de nylon que se proporcionan, con una tire cortada del
final de la bolsa, o con un pedazo de cuerda de algodon. No Io cierre
con sujetadores meta.licos torcidos. Haga seis cortes de 1,5 cm per e
cierre.
Use para entibiar alimentos cocinados, y para cocinar alimentos que
requieran corto tiempo de coccion, tales como satchichas Francfort.
Use para entibiar pollos y sandwiches por microondas.
Deberan estar etiquetados "Adecuados para calentar por
Si Revisar* microondas".
Revise las instrucciones del fabricante para los usos recomendados.
i Algunos platos plasticos espeeialies para microondas no son
adecuados para cocinar alinectos con altos contenidos de grasa.
Si No Use para cubrir alimentos durante la cocci6n para retener la
humedad.
Popote, Mimbre Madera Si No Use solemente para recalentar pot corto tiempo.
Tazas de Unicel Si No
Termometros
Especial para
Microondas solamente
Convencional
Papel Encerado
si No
No No
Si No
Rejilla de Alambre Si
i No
Use para que los alimentos Ileguen ala temperatura ideal para
servur. El unicel se derretira si los alimentos alcanzan una
temperatura alta.
Use solamente termometros pare came y dulce especiales para
microondas.
Uselo como cubierta para prevenirsalpicaduras y para retenerla
humedad. J
Use solo elaccesorio de rejillda se alambreincluido con este modelo
de homo.
PARA PROBAR UN CONTENEDOR PARA EL USO SEGURO DEL HORNO DE MICROONDAS: Mida una taza de agua y
viertala en el contenedor que se va e prober y pongalo en el homo de microondas, caliente un minuto en temperatura
ALTA. Si el contenedor es especial para homo demicroondas, permanecera confortablemente frio y el agua debera estar
caliente. Si el contenedor esta caliente, ha absorbido alfuna energia de microondas y no deber_l set usado. Esta prueba no
puede ser hecha en contenedores deplastico. *Revise las instracciones del fabricante, debe soportar calor haste 190"C.
28

Diagrama de Caracteristicas
Bandeja de Ceramica: --_
1. No opere el horno sin el Anillo Rodante y la Bandeja de Ceramica en su lugar. /
2. Use solamente la Bandela de Cer&mica especificamente deseRada para este homo.No la substituya por I
ninguna otra bandeja de ceramica. I
3. Si la Bandeja de Ceramica esta caliente, permita que se enfrie antes de limpiarla o ponerla en agua. --
4. NO cocine directamente en la Bandeja de Ceramica. Siempre ponga los alimentos en platos especiales
para microondas, o en juegos de rejillas dentro de platos especiales para microondas.
5. Si los alimentos o utensilios sobre la Bandeja de Ceramica tocan las paredes del homo, causando que
se detenga el movimiento de la bandeja, la bandeja rotara, automaticamente en sentido opuesto.
Esto es normal.
6. La Bandeja de Cerg.mica puede rotar en cualquier direccion.
Sistema de seguridad la
puerta
Ventana del horno
Ventilas Externas
i
Placa de identificacion
Ventilas Externas
Anillo Rodante:
1. El Anillo Rodente y el piso del homo deben ser
limpiados frecuentemente para prevenir suciedad
excesiva.
2. El Anillo Rodante debe ser usado siempre junto
con la Bandeja de Ceramica para cocinar.
-_'_-_ _,_____:_,ci"_-_:-_-_:'_-_Rejilla de Alambre
Sistema de seguridad la
puerta
/
7
/
i
/Controles
(ver la
siguiente hoja)
Oprima para abrir la puerta:
Abrir la puerta mientras se est,_ cocinando detendra
el proceso de coccion sin cancelar el programa. Se
reanudar& la cocci6n tan pronto como la puerta se
cierre y se optima el pulsador para Encender. la luz
del homo permanecer;_ encendida o se enceclera
cada vez que la puerta sea abierta.
Modos de Coccibn
Microondas Hornear
i" _° " ° . -!÷÷
Parrilla
Combinacion
Microondas <_ Cuarzo
29

Panel de Controles
Ventanilla indicadora
Durante la operacion de
microondas/calentador, la indicacion
rota en el lado izquierdo de la
pantalla.
Pulsador de Descongelacibn Turbo-
Pulsador para palomitas
MICRO MIN SEC
Pulsador de potencia
Pulsador de funci6n "Hornear"---
Horneado Automdtico
Sensor de coccibn per
Microondae
Sensor de cocci6n per
Combinaci6n
Mantener Caliente
Pulsador para porcions / peso--
Pulsador de Rztpido en Minutos --
Pulsador de tiempo de espera
Pulsador Funciones
Pulsador PausaJReempezar
Antes de Cocinar: Un toque debilita
sus instrucciones.
Durante la Coccibn: Un toque
detiene temporalmente el proceso de
cocci6n. Otro toque cancela todas
sus instrucciones y la hora del dia
aparece en la pantalla.
• Sensor C_
1 2 3
4 5 6
7 8 9
Timer 0 Clock
_Stop/ResetJ[ Start
-- Pulsador de Recalentamiento
por Sensor
-- Pulsador de funci6n "Parrilla"
-- Pulsador de funci6n
"Combinaci6n"
Cocci6n per peso por
Combinaci6n
-- Pulsador de mds/menos
t Pulsadores numdricos
-- Pulsador de reloj
Pulsador Para Encender
Un toque permite al homo
empezar su funci6n.
Si la puerta esta abierta o el
pulsador para
Pausa/Reempezar se oprime
una vez durante la operacibn
del homo, el pulsador para
encender debe oprimirse otra
vez pera reanudar el trabajo del
homo.
Apontador:
Cuando se presionan las teclas, se escucha un sonido de aviso y la letra o palabra(s) correspondientes
aparecen y giran per la pantalla. Si se opdme una tecoa y no se escucha el aviso, la unided no ha
aceptado o no puede aceptar las instrucciones. Las palabras aparecer&n automaticamente para sugerir al
useario que realice el siguiente paso. No es mecesario esperar que las palabras aparezcan antes de
oprimir las _vclas para el siguiente paso. Dos sonidos de aviso se escuchan entre las etapas. AI final de
cada programa complete, el horno emitir& cinco sonidos de aviso.
30

Funciones
Los pulsadores le permiten escoger el sistema en cada caracterfstica.
[
L--m,-0
ELECCION DE IDIOMA
La pantalla de el homo viene en ingles, frances y espafiol. La pantalla aparece en ingles
cuando usted conecta el horno.
1.ENGLISH ->La pantalla aparece en ingles.
2.FRAN_AIS ->La pantalla aparece en frances.
3.ESPANOL ->La pantalla aparece en espaflol.
ELECCION DE Lb/kg
El horno tiene medidas de peso metricas e imperiales. El horno estar& en la medida de
peso imperial cuando Io conecte.
l.Lb °F .-)El peso puede ser puesto en Ib/oz.
2.kg °C ->El peso puede ser puesto en kg/g.
VELOCIDAD DE PALABRA
La velocidad de las palabras en la pantalla puedo sorrer mas rapido o mas lento.
1.RAPIDO ->Las palabras correr_.n ra.pido.
2.MEDIO ->Las palabras correr_.n a su velocidad inicial.
3.DESPACIO ->Las palabras correran lento.
ACCION DEL MENIal ENOENDIDO/APAGADO (ON/OFF)
La accien del men6 en pantalla le ayuda arogramar el horno indicando el si guiente paso a
fomar por anticipado. Cuando ustedes se familarize con su horno, este puede ser apagado.
1.ON (ENCENDIDO) -->La guia aparecera.
2.OFF (APAGADO) ->La guia desaparecer&.
SEGURO PARA NII_IOS ENCENDIDO/APAGADO (ON/OFF)
El horno tiene la caracteristica de seguro para nifios para preven_r su uso por nifios.
1.ON (ENCENDIDO) ->->Elseguro ha sido puesto y ninguna operacion sera aceptada.
2.OFF (APAGADO) ->El seguro ha sido cancelado.
SONIDO "BEEP" ENCENDIDO/APAGADO (ON/OFF)
Si ustedes desea que el homo opere sin sonido "beep", puede ser eliminado.
1.ON (ENCENDIDO) --)El sonido "beep" se escuchara..
2.OFF (APAGADO) -->El sonido "beep" no se escuchara..
SONIDO "BEEP" DE RECORDATORIO ENCENDIDO/APAGADO (ON/OFF)
Esta sonido "beep" es para recordar le que retire el alimento despues de que se ha
completado la coccion.
1.ON (ENOENDIDO) -->El sonido "beep" de recordatorio trabajara,.
2.OFF (APAGADO) ->El sonido "beep" de recordatorio no trabajara.
HORA DE VERANO
1.ON (ENCENDIDO) -)Automaticamente ajusta el reloj una hora hacia adelante.
2.OFF (APAGADO) ->Retrasa el reloj a su hora original.
RELOJ ENCENDIDO/APAGADO
El reloj puede apagarse.
1.ON (ENCENDIDO) .--)El reloj reaparecera.
2.OFF (APAGADO) ->EI reloj desa parecera.
La hora del dia no se perder_, si el reloj desaparece de la pantalla.
MODE DE DEMOSTRACION ENCENDIDO/APAGADO
El modo de demostraci6n esta disefiado para su exhibicien en tienda. En esta modo, el
horno puede ser demostrado sin poder o potencia.
1.ON (ENCENDIDO) ->El homo estara en modo de demonstracien.
2.OFF (APAGADO) -)El horno no estara en modo de demostraci6n.
31

Para Ajustar el Reloj
Ejem.: Para flJar 11:25
1.
2
3
Clock
[]
e Presione elpulsador
CLOCK
•rLos dos puntos
parpadear&n.
• Ft)e la hora correcta del
d{a
• Pres_one el pulsador
CLOCK
_'Los dos puntos dejar_.n
de parpadear La hora
estd ingresada y ublcada
en la ventanllla
mdtcadora.
NOTA:
1.Puede usar el homo sm poner a tiempo el reloj
2 No ex_ste lormato A.M. o PM El reloj es de
12 horas.
3.Para volver a porter la hora del dfa, repita los
pasos descntos arrtba.
4.El reloj mantendr& la hora del dia en tanto el
homo est_ conectado al summtstro de
electrtcJdad.
Recalentamientoi
C Descongelaci6rd
occi6n con selecci6n
de Potencia y Tiempo
Ejem.: Nlvel de potencla MEDIO por
5 m|nutos
1.
2
4 veces
• Selecctone el ntvel de
potencta..
• Seleccione el ttempo de
COCCi6n
(P10 .--)hasta 30 mmutos
los otros '-.) hasta 99 mmutos
y 99 sequndos)
3 • Preslone el pulsador
START
Bandeja de Cerdm=ca
NOTA:
1 AI selecctonar el nivel de potencia P10 en la
pnmera etapa, no es necesar_o pres_onar el
pulsador MICRO POWER. Simplemente fije el
ttempo de coccl6n preslonando los pulsadores
numericos y START
2 Para coccibn en 2 o 3 etapas, repet_r los pasos
arrtba citados, antes de apretar el pulsador
START
3 Pulsador MICRO POWER
Pulse Nivel de Potencia
1 vez
2 veces
3 veces
4 veces
5 veces
6 veces
7 veces
8 veces
9 veces
10 veces
P10 (ALTO)
P9
P8
P7 (MEDIO-ALTO)
P6 (MEDIO)
P5
P4
P3 (MEDIO-BAJO)
P2
P1 (BAJO)
32

Hornear
Esta caracteristica le ofrece una selecci6n de temperatura de herneado desde 100°C hasta 230°C en
incrementos de 10°C (o desde 200°F hasta 450°F en incrementos de 25°F).
Ejem.: Para Hornear un pastel
(a 150°C per 30 minutes)
1. • Presione'hasta que se
muestre la temperatura
100°C a 230°C (200°F a
450°F).
3.
4.
• Presione el pulsador
START.
*"P" (Precalienta) aparece.
NO ABRIR LA PUERTA.
• Cuando se precalienta el homo
se escuchan tres beep yen el
visor se muestra "P END"
(Precalentado finalizado).
Ponga los alimentos en el
horno.
• Fije el tiempo de cocci6n
(hasta 9 horas y 99 minutes).
5. • Presione el pulsador
START.
NOTA:
1.
Rejilla de Alambre
Bandeja de Ceramica
Si la puerta del horno no se abre despu_s del
precalentamiento el homo mantendra la
tempe.ratura seleccionada per 30 minutes,
despues se enfriara automaticamente.
2. Cuando el tiempo de coccion selsccionado es
menor a una hera, el reloj retrocedera segundo a
segundo.
3. Cuando el tiempo de cocci6n seleccionado es
superior a una hera el reloj retroceder& minute
per minute hasta que quede una hera, entonces
retrocedera, segundo per segundo.
4. Para recetas que no requieren precalentamiento,
elimine el paso 2.
Ejemplos de Horneando:
Temperatura
100"C (200°F)
110"C (225°F)
120°C (250°F)
130°C (275°F)
140 °C
150°C (300°F)
160°C (325°F)
170°C
180"C (350°F)
190°C (375°F)
200°C (400°F)
210°C
220°C (425°F)
230"C (450°F)
Ejemplos de alimentos
Mantener a temperatura ideal los Alimentos
Merengue
Tostar, coco, calabaza, semilla
Caramelo, barra, pastel de Fruta
Suffle, cacerola, cocinar, habas
Pastel en caja, ternera, came, aves, vegetales
Levadura de pan, pan rapido, galletas
Levadura de pan, molletes, pastel de queso
Base para tartaleta
Bisquet
Torta de Frutas
33

Parrilla
Ejem.: Para Asar un Polio por 35 minutos
1._ • Presione el pulsador BROIL.
3
4
• Presione el puisador
START.
*"P" (Precalienta) aparece.
NO ABRIR LA PUERTA.
• Cuando se precalienta el
horno se escuchan tres beep
y la indicaci6n "P END"
(Precalentado finalizado)
aparece. Ponga los alimentos
en el horno.
• Fije el tiempo de cocci6n
(hasta 99minutos y 99
segundos).
, 5 _ ' •Presione el pulsador
START.
Rejilla de Alambre
Bandeja de Ceramica
NOTA:
1. Si la puerta del horno no se abre despu_s del
precalentamiento el horno mantendrd la
temperatura seleccionada pot 30 rninutos,
despues se enfriara automdticamente.
2. Para recetas que no requieren precalentamiento,
elimine el paso 2.
Carta de Tiempo para Parrilla:
CARNE
TIEMPO DE
COCClON
CARNE
Hamburguesa (1 cm ancho, 110 g)
2 tierna 8
2 medio 10
2 bien cocido 13
Filete Mignon
3 cm ancho (200 g)
Tierna 14
Medio 17
4 cm ancho (250 g)
Tierna 17
Medio 20
Bistec
aprox. 2.5 cm ancho, 300 g
Tierna 11
Medio 14
Bien cociclo 19
aprox. 2 cm ancho, 420 g
Tierna 16
Medio 23
Bien cocido 28
a 9
a12
a14
a16
a19
a19
a 22
a 13
a 18
a 21
a 20
a 25
a 3O
CARNE/AVES
PUERCO
Chuletas
2 chuletas aprox. 1,2 cm ancho, 120 g
2 chuletas aprox. 2,5 cm ancho, 120 g
2 Salchichas
Jambn rebanado
(aprox. 1,2 cm ancho, 320 g)
Salchichas italianas, aprox. 100 g
CORDERO
Chuletas, costillas
(aprox. 2 cm ancho, 100 g)
2 medio
2 bien cocido
POLLO
Piezas (680 g a 1 kg)
Pechuga partida (340 a 570 g)
Piernas (340 a 570 g)
Muslos (450 a 570 g)
Alas (340 a 450 g)
GALLINA EN PARTES (450 a 570 g)
TIEMPO DE
COCClON
11 a 13
22 a 24
5 a 7
7
9 al0
9 a12
14 a 16
33 a 36
24 a 26
21 a 24
20 a 24
20 a 22
20 a 22
34

Combinaci6n
Ejem.: Para cocinar res asada en un termino
medio (Cmbinacion 2 por 20 minutos)
1 • Seleccione la fijaci6n
deseada.
2x
_ • Fije el tiempo de cocci6n
(hasta 9 horas y 99 minutos).
• Presione el pulsador START.
3.
Bandeja de Cer_mica
NOTA:
1. Cuando el tiempo de coccion seleccionado es
menor a una hora, el reloj retrocedera, segundo
a segundo.
2. Cuando el tiempo de ciccion seleccionado es
superior a una hora, el reloj retrocedera minuto
por minuto hasta que quede una hora, entonces
retroceder_, segundo por segundo.
1
2
3
4
Hornear Micro°
ondas
130°C
(275°F)
150"C
(300"F)
160"C
(325°F)
190°C
(375=F)
3O%
Alimentos
Came (bien cocida)
Cordero (bien cocido)
Came (casi cruda/
termino medio),
Cordeo (termino medio)
Puerco
Polio, Pato
Carta de Tiempo para Parrilla:
L TEMPERATURA
CARNE FIJACION TIEMPO DE COCCION I
DESPUES DE COCINAR
ASADO DE TERNERA
Costilla sin hueso
muy tierno
medio cocido
bien cocido
Pierna, Chamberete
(alta calidad)
muy tierno
medio cocido
bien cocido
Lomo de ternera
muy tierno
medio cocido
ASADO O PUERCO
con hueso
sin hueso
2 chuletas de puerco
COClDO
enlatado
espaldilla
pierna
ASADOS DE CORDERO
con hueso - medio cocido
sin hueso - medio cocido
2 chuletas de cordero
COMBINACION 2
COMBINACION 2
COMBINAClON 1
COMBINAClON 2
COMBINACION 2
COMBINACION 1
COMBINACION 2
COMBINACION 2
COMBINACION 3
COMBINACION 3
COMBINACION 3
16a 18min/500g
18 a 20 rain / 500 g
25 a 27 rain / 500 g
10a 14min/500g
13a 15 min / 500 g
20a22 min/500g
13 a 17 rain / 500 g
18 a 20 rain / 500 g
55°C (130°F)
65°C (150°F)
70_C (160°F)
55°C (130"F)
65°C (150°F)
70°C (160°F)
55"C (130°F)
65"C (150°F)
21 a 23 min / 500 g 77°C (170°F)
17 a 19 min / 500 g 77°C (170°F)
14 a 19 min total
COMBINACION 1 13 a 15 min / 500 g 60°C (140°F)
COMBINACION 1 14 a 16 min / 500 g 60°C (140°F)
COMBINACION 1 14 a 16 min / 500 g 60°C (140°F)
COMBINACION 2 13 a 15 min / 500 g 65"C (150°F)
COMBINACION 2 17 a 19 min / 500 g 65°C (150°F)
COMBINACION 3 8 a 10 min total I .......
35

Descongelaci6n Turbo
Ejem.: Para Descongelar 1,5 kg de came
1. • Presione el pulsador
Descongelacion Turbo.
2. I_ • Fije el peso.
L-_
3 • Presione el pulsador START.
{_ *El tiempo de descongelado
aparece en la pantalla y
empieza a disminuir.
Bandeja de Cer&mica
NOTA:
1. La ferma y el tamafio de los alimentos
determinar& el peso m_lximo para carnes de
1,8 kg (4 Ib), aves 2,7 kg (6 Ib) y pescados y
mariscos 1,4 kg (3 Ib).
2. El homo emite un sonido de aviso una vez
durante el ciclo de descongelado para sefialar
que los alimentos necesita ser volteados o
vueltos a arreglar. Para evitar un.
descongelamiento excesivo, las areas delgadas
o las esquinas pueden ser protegidas con tiras
de papel aluminio.
3. Para mejores resultados, el peso minimo
recomendado es 220 g (0,5 Ib).
4. El tiempo de inicio o el nivel de potencia pueden
ser programados despu_s del Auto
Descongelamiento.
Recalentamiento Automdtico
1. • Presione el pulsador de
SENSOR REHEAT.
• Presione el pulsador de
START.
2.
(s,.oI
Bandeja de Cer&mica
Para obtener mejores resultados de! Sensor de
Recalentamiento, siga estas recomendaciones:
1, Todos los alimentos deben ser cocidos
previamente y deben ester a temperatura o
temperatura de refrigerador.
2. Los alimentos que pesen menos de 100 g y m&s
de 700 g se deben recalentar solo per tiempo y
potencia.
3. Siga las indicaciones que le da la funci6n sensor
de cocinado.
NO HACER:
1. Recalentar pan y productos de pasteleria. Use el
tiempo y potencia manual.
2. Recalentar alimentos crudos o sin cocer.
3. Usar ta funci6n de recalentamiento si el interior
del homo est_l caliente.
4. Usar la funci6n de recalentamiento para bebidas.
5. Usar la funcion de recalentamiento para
alimentos cengelados.
36

Sensor de Coccibn Autombtica
I. Ej.
2.
• Seleccione la categoria
deseada (ver siguiente pagina).
• Presione el Pulsador MORE /
LESS (M#.s / Menos) si usted
Io desea.
• Presione el pulsador de
START,
El sistema de SENSOR AUTOMATICO ("AUTO
SENSOR") Trabaja detectando el vapor acumulado
que despiden los alimentos en la cavidad del horno.
Usted podra cocinar y recalentar muchos de sus
alimentos favoritos sin tener que seleccionar
temperaturas y niveles de potencia.
Bandeja de Cer&mica
Para mejores resultados por sensor, verifique Io
siguiente !
ANTES de cocinar/recalentar:
1. La temperatura ambiente que rodea al homo
debe ser menor de 95°F (35°C).
2. El peso de los alimentos no debera set menor
a 4 onzas (100 g. aprox).
3. El plato giratorio de cristal y el contenedor que
se va a utilizar deben estar secos.
4. Cubra los alimentos por completa con papel
pt_.stico procurando que este no quede muy
adherido, o bien, colocarlo en una cacerola con
tapa.
Control de grado de cocci_n mas / menos
(more / less):
Las preferencias en el grado de cocci6n de los
alimentos varian en cada individuo, con este
pulsador Usted podra, decidir que tipo de grado de
cocci6n que prefiere en sus alimentos.
Usando este pulsador el Sensor autom#,tico puede
ser ajustado para cocinar el alimento por mas o
menos tiempo. Si usted esta satisfecho con los
resultados de coccion del programa "auto sensor",
no necesitara, usar el control m_,s/menos.
Presione funci6n m_.s/menos antes de presionar
funcfon START.
DURANTE la cocci6n/recalentado:
Mientras la palabra "AUTO" se muestre en la
ventanitla indicadora, no clebera abrirse la puerta
del herno por mas de 1 minuto, esto causaria
resultados inadecuados en la cocci6n.
El tiempo restante de coccion aparecera
inmediatamente en la ventanilla indeicadora y
comenzara a conter en forma descendente. El
horno puede ser abierto durante este tiempo
restante para voltear, batir o a5adir ingredientes.
DESPUI_S de la coccion/recalentado:
Todos los alimentos deben estar cubiertos durante
un tiempo de 3 a 5 minutos.
NOTA:
Si el sensor de cocci6n es programado mientras la
cavidad del horno est,, caliente a causa de haber
utitizado el cuarzo, la palabra "HOT" (caliente)
aparecera en su ventanilla indicadora y un
ventilador comenzara, a funcionar para enfriar la
cavidad del horno. Si la cavidad del horbo esta
demasiado caliente el sensor de coccion no
funcionara adecuadamente hasta haberse enfriado
la cavidad, la palabra "HOT" desaparecer& y la
cocclon inlclara.
37

Sensor de Coccibn Automdtica
Sensor de cocci6n - Sugerencias:
CATEGORIA PESO INSTRUCCIONES CUBRIR DESPUES DEL
SONIDO
,_ 1 x , Papas 1 - 4 papas Prefore la cglscara NO De la vuelta.
170 - 230 g varias veces y
(6 - 8 oz.) coloque en un molde
cada una a prueba de
microondas.
2x
Vegetales 230 - 900 g Agregue agua. Tapa 0 Revuelva 0
frescos (1/2- 2 lb.) cubierta de reacomode, si es
pese antes de pldstieo, posible.
pelar, rebanar,
etc.
3x
Vegetales 15 oz Vacie el contenido Tapa 0 Revuelva 0
enlatados tama5 de la en un molde a cubierta de reacomode.
lata prueba de pl&stico.
microondas.
4 x Vegetales 280 - 800 g Agregue 2 Tapa 0 Revuelva 0
congelados (10 - 28 oz.) cucharadas soperas cubierta de reacomode.
de agua. No cocine pl_stico.
con mantequilla o
salsa.
Arroz Sign Ins Revuelva, si es
Blanco instrucciones posible.
del fabricante.
_lx
2x
Arroz
Integral
Arroz -- Agua
hirviendo
1/2taza--1 taza
1 taza--2 tazas
11/2 tazas--
3 tazas
2 tazas--
31/2 tazas
Ponga el arroz en
agua caliente en uno
olin a prueba de
microondas.
3 x Pasta 2 - 8 oz Ponga la pasta en Tapa 0 Revuelva
agua caliente en uno cubierta de ocasionalmente.
olin a prueba de plastico.
microondas.
Plato al homo Use la cantidad Tapa Revuelva
1 apropiada de agua. ocasionalmente.
Plato al horno
2
NOTA:
Si el Sensor de Recalentamiento/Cocci6n es programado mientras la cauidad del horno nun esta caliente,
"HOT" ("CALIENTE") aparece en el display de ment] en pantana y el ventilador se activa para anfriar la
cavidad. Si la cavidad est_ muy caliente, el Sensor no trabajara adecuadamente. Despues que la cavidad se
ha enfriado, el mensaje "HOT" ("CALIENTE") desaparecera, y sera reemplacado por dos puntos o la horn del
din.
El Sensor de Coccion es exitoso con los aliments y Ins recetas encontrados en el recetario y marcados con el
simbolo _1. Debido a varias diferencias en la composicion de los alimentos, Ins recetas sin el simbolo []
deberar ser preparadas en su homo de microondas usando pregramacion manual de pctencia y tiempo.
38

Coccibn Automdtica por Peso (Combinacibn)
Esta caracteristica le permite el rostizar res, puerco o pollos enteros ajust_indose a su peso.
Ejem.: Para cocinar 2,0 kg de Polio entero
1El • Seleccione la categoria
deseada.
2. _ • Fije el peso.
:__ • Presione el Pulsador
MORE/LESS (Mas/Menos) si
usted desea (ver p. 37).
4. • Presione el pulsador START.
•El tiempo de cocci6n
en la pantalla
aparece Y
empieza a disminuir.
Bamdeja de Ceramica
NOTA:
1. Estos ajustes son para coccion per combinacion
(horneado y microondas).
2. Cuando el peso ha side declarado, el tiempo de
coccion sera ajustado automa.ticamente.
3. Las piezas que esten per arriba o per debajo de
las pesos recomendados deber;&n set cocidos
per combinacion manual.
CATEGORIA
PIEZAS DE POLLO
POLLO ENTERO
RES TERMINO MEDIO
CERDO
PESO
max. 1 kg (2 lb.'
max. 3 kg (6 lb.
max. 2 kg (4 lb.
max. 2 kg (4 lb.)
INSTRUCCIONES
Coloque la piel hacia abajo.
Coleque la pechuga boca abajo.
Coloque el lade graso hacia abajo.
Coloque el lade graso hacia abajo.
El puerco debe alcanzar los 77°C
(170°F) antes de servirse.
DESPUI_S DE SONIDO
Dele vuelta.
Dele vuelta.
Dele vuelta.
Dele vuelta.
Horneado Autombtica
Esta novedad le permite hornear un pastel o pay sin tener que seleccionar temperatura y tiempo de horneado.
Ejem.: Para hornear un pastel amarillo Rejilla de Alambre
1Ej. • Seleccione la categoria
deseada.
2. • Presione el Pulsador
_! MORE/LESS (Ma,s/Menos) si
usted desea (ver p. 37).
3. • Predione el puldasor START.
•El tiempo de coccion
aparece en la pantalla y
empieza a disminuir.
Bandeja de CerAmica
NOTA:
1. Estos ajustes son para coccion per horneado
2. No hay nececidad de precalentar.
3. Pueden usarse moldes metalicos. Cotoque el
molde a ser utilizado sobre la Pejilla de
Alambre, colocada sobre la Bandeja de
CerAmica.
PASTELES 1 para recetas que generalmente estan listas en menos de 35 minutes.
PASTELES 2 para recetas que generalmente estan listas en m_.s de 45 minutes.
I PASTEL FRESCO para pays de doble corteza que contienen relleno de fruta fresca.
PASTEL CONGELADO para pays de deble corteza que estan congelados.
PASTEL PRE-COCIDO para pays de doble corteza que contienen relleno prececides o enlatados, j
• No hornee chocolate fundido, panques o pasteles de frutas.
• No use certeza de pay congelada.
• Coloque pays congelados en un pequeho mantel.
39

Pulsadores de.
Pal0mitas de Mazz
Ejem.: Para recalentar 99 g (3,5 oz.)de palomitas
de maiz en bolsas especlales para
mlcroondas.
Funci6n R.apido en
Minuzbs
Esta caracte rfstica le permite ajustar el tiempo de
cocci6n f_icilmente en vez de uear el pulsador
numerico o agregar tiempo de coccion extra.
1. _ • Seleccione el peso que se
indeca en la bolsa de
palomitas.
2. _ •Presione el pulsador
START.
NOTA:
1.Utilize palomitas de mafz preempacado que esten
a temperatura ambiente. Lea las instrucciones del
fabricante.
2.Ponga la bolsa en el interior del horne de acuerdo
con las instrucciones del fabricante.
3.Haga s61o 1 bolsa a ia vez.
4.Despu_s, permita que el contenido de la bolsa se
enfrie per unos cuantos minutos antes de abrir.
Abra la bolsa cuidadosamente lejos de su cara
porque las palomitas y su vapor est_n muy
calientes.
5.No recaliente las palomitas que no se hicieron y
no recaliente una bolsa usada.
6.No descuide el horno cuando haga palomitas de
mafz.
PRECAUCION: Si las palomitas preempacadas son
de un peso diferente al recomendado, no utilize
estos tiempos preprogramados ya que una cocci6n
inadecuada o un incendio pueden ocurrir. Siga las
instrucciones del fabricante.
Mantener Caliente
Esta funci6n le ayuda a mantener caliente una
selecci6n de alimentos durante 30 minutos despues
de su coccibn.
Ejem.: Para mantener callente 2 tazas de salsa
de came.
NOTA:
• Presione dos veces.
"CALDA ESPESO
PRESIONE PORCIONES/
PESO" aparece en La
Ventana de Visualizaci6n.
• Verificar el porcion en la
Ventana de Visualizaci6n.
• Presione.
El tiempo de Mantener
Caliente aparece en la
Ventana de Visualizacion y
inicia la cuenta a atrds a
partir desde 30 minutos.
AI final de la Mantener Caliente, se escuchan cinco
zumbidos. En la Ventan de Visualizaci6n aparece
"DISFRUTE DE SUS ALIMENTOS".
Para seleccionar el tiempo de coccion:
Ejem.: Nivel de potencla HIGH (Alta) por 1
mlnuto.
1,
2.
,i
Qu_k
Min
• Seleccione el tiempo de
cocci6n (hasta 10 min).
• Presione el pulsador
START.
NOTA:
1.Se puede usar otro nivel de potencia u otro modo
de cocci6n, seleccionelos antes de ajuster el
tiempo.
2.Despu(_s de haber ajuetado el tiempo por medio
del pulsador Quick Min no podr_ usar los
pulsadores num_ricos o viceversa.
Para Agregar Tiempo Extra:
1.
• Oprima para agregar
tiempo de cocci6n
(hasta 10 minutos) dutante
el cocinado.
*El tiempo de cocinado
cambia para incluir el
tiempo extra y continea
la cuenta regreseva en
la pantalla.
NOTA:
Usted puede ahadir tiempo de cocci6n para todos
los platillos con las funciones de poder y tiempo.
4O

Temporizador (Timer)
Para usar como temporizador en la
cocina:
Para programar un comienzo tardio:
Ejem.: Para contar 5 minutos
]2.
3.
E Start ]
• Presione el pulsador TIMER.
• Indique la cantidacl de tiempo
(hasta 99 minutos y 99
segundos)
• Predione el pulsador START.
*El tiempo de comenzar#, a
contar en forma descendente
sin que el homo este
funcionando.
Para fijar un tiempo de espera o
tiempo oe reposo:
Ejem.: Despudss de la coccion dejar reposar
el alimento durante 5 minutos
1, Ej.
Y
• Indique el programa de coccion
deseado (ver p. 32 para
instrucciones).
2. _ • Presione el pulsador TIMER.
3 []
4.
• Indique la cantidad de tiempo
(hasta 99 minutos y 99
segundos).
• Predione el pulsador START.
*Despues de la coccion el
tiempo de reposo empezara.
a contar en forma
descendente
sin que el horno este
funcionando.
Ejem.: Para empezar a cocinar 5 minutos
despues
1.
2.
3. Ej.
[]
Y
4.
-- =_oneel pulsador TIMER.
• Indique la cantidad de tiempo
que tardara, en empezar el
programa (hasta 99 minutos y
99 segundos).
• Seoeccione el programa de
cocci6n (ver p.32 para
instrucciones).
• Presione el pulsador START.
*Cuando el tiempo demorado
comience la cuenta regresiva
y este haya finaIizado, la
cocclon iRiclara.
NOTAS :
1. Si la puerta del houno es abierta durantee el
tiempo de espera o cuando se usa como
temporizador, el tiempo que se indica en la
ventanilla continuara, contando en forma
regresiva.
2. El comienzo tardfo no puede ser programado
antes de ninguna funci6n automAtica.
Esto es para prevenir que el inicio de
la temperatura de los alimentos se incremete
antes del desoingelamiento o inicio de la cocci6n.
Un cambio en el inicio de la temperatura podria
causar resultados inadecuados.
41

Cuidados de Su Horno de Microondas
ANTES DE LIMPIAR: Apague el homo y
desconecte el cable de alimentacion para prevenir
un encendido accidental.
Plato giratorio de cristal: Remueva el plaro de
cristal cuando este frio y lave con agua tibia y
jabonosa o en su lavadora de plates.
Interior del horno: Limpie su homo con un patio
hL_medo. Puede utilizar un detergente suave si el
homo esua muy sucio. El use de limpiadores
abrasives no es recomendable.
Puerta del homo: Si el vapor se acumula en el
interior o alrededor de la puerta de homo, limpie
con un patio suave.
Esto puede suceder cuando el homo se poera en
condiciones demasiado humedas y no indica real
funcionamiento de la unidad.
El anillo giratorio: Limpie el soporte del plato
giratorio que se encuentra en el homo con agua
jabonosa. El anille giraterio deba ser limpiado con
agua jabonosa o en su lavadora de plates. Estas
partes deben estar limpias para evitar un excesivo
ruido.
DESPUES DE LIMPIAR: Este seguro de colocar el
anillo giratorio y el plato de cristal en la posicion
correcta y presione Srop/Reset para limpiar la
ventanilla indicadora.
Pamel de controles: Limpie su panel con un patio
suave, no use detergentes fuertes ni abrasives.
Antes de Acudir a Servicio
f Todas estas cosas son normales:
Mi horno de microondas En algunos radios y televisores puede ocurrir interferencia cuando usted
causa interferencia con mi cocine con su houno de microondas, Esta interferencia es similar a la
televisor, interferencia causada per pequefios aparatos electricos come batidoras,
aspiradoras,secadoras de aire, esto no indica ningun problema.
La luz del homo se atent3a. Cuando se esta cocinando con una temperatura diferente a temperatura
alta (P10 - P3) el homo tiene que recorrer un ciclo para ebtener niveles
de potencia mas bajos. La luz del homo se aten0a y podra oir ruidos de
"click" cuando el homo realiza su ciclo.
Se acumula vapor en la Durante la coccion los atimentos despiden vapor. La mayoria de este
puerta del homo y aire vapor es removido per el aire que circula en la cavidad del houno, sin
caliente sale de las rejillas embargo, algo de vapor se condensara en las superficies frias tales come
de ventilaci6n, la puerta del horno. Esto es normal.
Accidentalmente encendio Operar el homo vacio per un corto tiempo no datiara el horno, sin
su homo de microondas sin embargo, no Io recomendamos.
ningL_n alimento dentro.
J
PROBLEMA SOLUCION
.... =
El homo no enciende.
POSIBLE CAUSA
"-Esta el homo conectado en
forma segura?
Remueve la clavija de contacto
de la toma de corriente. Espere
10 seg. Vuelva a conectar.
El circuito general de luz o el Encienda de nuevo su circuito
fusible estan fuera de servicio o general de luz (brake) o
tienen atg0n problema interne, reemplace el fusible.
Hay un problema con la toma de Conecte otro aparato electrico
corriente, para verificar su toma de
corriente.
I La puerta del homo no est#. bien Cierre la puerta firmemente.
cerrada.
Otro programa se encuentra Presione STOP/RESET
t
registrado en su borne. (pausaJreem) para cancelar el
programa anterior y programe i
dde nuevo. !
El homo he acepta mi
programa.
Si al parecer el problema se encuentra en su houno, consulte al centro de
servicio ma,s cercano.
42

Feature
To Set Clock
(see page 11)
To Use Function
(see page 10)
Quick Guide to Operation
]
How to Operate
v v
To Use Micro Power
and Time Setting
(see page 12)
3To Cook on Bake
(see page 13)
To Cook on Broil
(see page 14)
To Cook on Combination
(see page 15)
To Use
Popcorn pad
(see page 16)
To Use
Keep Warm pad
(see page 16)
To use
Turbo Defrost pad
(see page 17)
TO Use Sensor Reheat /
Sensor Cooking
(see page 18, 19)
Select oven temperature.
Select the setting.
@ c=n
Select Serving We=ght.
Press to select category. Press to select quantity.
I
'@ c=n
_ r=-iv
y
v
_ r-=-?
v
v
To Use convection cooking
Weight cook
(see page 20)
To Use convection cooking
Auto Cook pads
(by Bake) (see page 21)
To Use
Quick Min pad
(see page 12)
To Use as
a Kitchen Timer
(see page 22)
To Set
Stand Time
(see page 22)
To Set
Delay Start
(see page 22)
v v
e.g.
v
v
program
F_ _'_ _ Set desiredcooking
-- _ _. .
program.
43
1

Technical Specifications
Power Consumptton
Microwave
Heater
Output:
Microwave
Heater
Outside D_mens_ons:
Oven Cawty D_menstons
Operating Frequency.
Butlt-m Trim Ktt"
Uncrated Weight:
* IEC 705-88 Test procedure
12.8 Amps, 1,500 W
12 5 Amps, 1,500 W
1100 W*
1,400 W
1413/16" x 237/8" x 195/16"
376 mm (H) x 606 mm (W) x 491 mm (D)
91/2" x 161/4 '' x 18_3/16"
242 mm (H) x 412 mm (W) x 426 mm (D)
2,450 MHz
NN-TK909W (NN-C980W) / NN-TK909 (NN-C980B)
Approx. 46 Ibs (21 kg)
Specthcattons are subject to change wtthout nottce.
As for the voltage requtrement, the production year and month, country and senal number, please
refer to the tdentificatton plate on the m_crowave oven
ESPECIFICACIONES TI CNICAS
Potencla de Consumo:
M_cro-ondas,
Calor Emttido;
Potencta de Salida
M_croondas,
Calor Emtttdo;
Dlmensiones Extenores.
(Alto x Ancho x rondo)
Dimenstones Cavldad del Homo:
(Alto x Ancho x rondo)
Frecuencla.
Operact6n
Peso sin Embalaje:
12,8 Amps, 1500 W
12,5 Amps, 1500W
1100 W*
1400 W
376 mmx 606 mm x 49! mm
1413/16"x 237/8" x 19s/16"
242 mm x 412 mm x 426 mm
91/2" x 161/4" x 1613/16"
2450 MHz
NN-TK909W (per NN-C980W)/NN-TK909 (por NN-C980B)
Aprox 21 kg (46 Ibs)
lEG 705-88 Procedtmtento de Prueba
Las especfficac_ones estan sujetas a camblos stn
prevto avtso.
Panasonic Consumer Electronics
Company, Division of Matsushita
Electric Corporation of America
One Panasomc Way,
Secaucus, New Jersey 07094
Panasonic Sales Company,
Division of Matsushita Electric of
Puerto Rico, Inc. ("PSC")
Ave 65 de Infanteda, Km 9 5
San Gabriel Industnal Park,
Carolina, Puerto Rtco 00985
A00034X01AP
F0400-0
Pnnted TnUSA
-
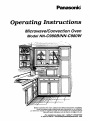 1
1
-
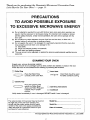 2
2
-
 3
3
-
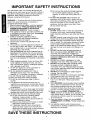 4
4
-
 5
5
-
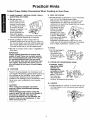 6
6
-
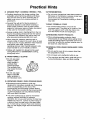 7
7
-
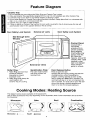 8
8
-
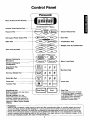 9
9
-
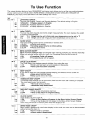 10
10
-
 11
11
-
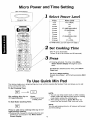 12
12
-
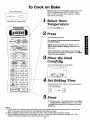 13
13
-
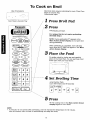 14
14
-
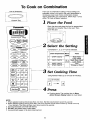 15
15
-
 16
16
-
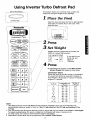 17
17
-
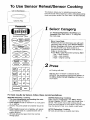 18
18
-
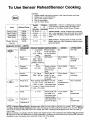 19
19
-
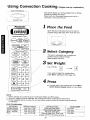 20
20
-
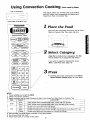 21
21
-
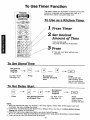 22
22
-
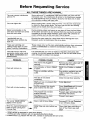 23
23
-
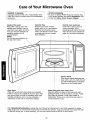 24
24
-
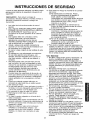 25
25
-
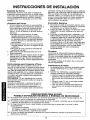 26
26
-
 27
27
-
 28
28
-
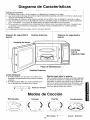 29
29
-
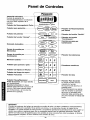 30
30
-
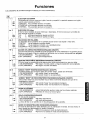 31
31
-
 32
32
-
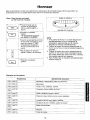 33
33
-
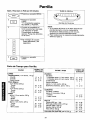 34
34
-
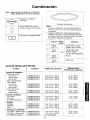 35
35
-
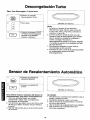 36
36
-
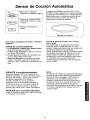 37
37
-
 38
38
-
 39
39
-
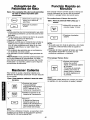 40
40
-
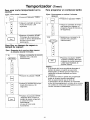 41
41
-
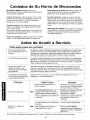 42
42
-
 43
43
-
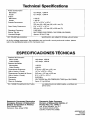 44
44


Panasonic NN-C980B El manual del propietario
- Categoría
- Microondas
- Tipo
- El manual del propietario
- Este manual también es adecuado para
en otros idiomas
- English: Panasonic NN-C980B Owner's manual
Artículos relacionados
Otros documentos
-
Bosch HMB8020/01 El manual del propietario
-
Gaggenau BM281730/01 El manual del propietario
-
 Cafe CSB9120SJSS El manual del propietario
-
 Advantium ZSC1201 El manual del propietario
-
 Cafe CEB515P4NWM El manual del propietario
-
Haier HMC1085SESS Manual de usuario
-
Magic Chef MCD992R Manual de usuario
-
-
Merrychef eikon e5 Instrucciones de operación
-


