
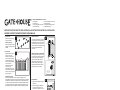
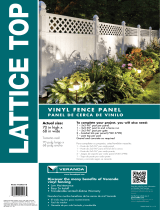
Panel
Panel
Post
Poste
X
Y
Y
Y
Y
2
5
READ INSTRUCTIONS PRIOR TO INSTALLATION/LEA LAS INSTRUCCIONES ANTES DE LA INSTALACIÓN
Ubicación de los postes
Mida el ancho del panel de la cerca (X) y añada ½ pulgada (12,70 cm),
correspondientes a los soportes. Luego mida el ancho del poste (Y) y añada esta
medida al ancho total del panel y el soporte. Esta es la medida del centro para
la ubicación de los hoyos para los postes. Es altamente recomendable que cave
varios hoyos para instalar 3 o 4 secciones de cerca al mismo tiempo, con el fi n
de asegurarse de que los hoyos para los postes están correctamente ubicados.
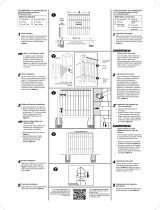
Rail Bracket Location
From the ground up measure 2 inches up
on post, mark pilot holes and install lower
bracket. Measure 31.5 inches from the top
of the lower bracket, mark and install top
bracket. Follow these measurements when
installing the Decorative Bracket Kit
(not shown).
Ubicación de los soportes del travesaño
Mida 2 pulgadas (5,08 cm) desde el suelo
en el poste, marque orifi cios guía e instale
el soporte inferior. Mida 31.5 pulgadas
(80,01 cm) desde la parte superior del
soporte inferior, marque orifi cios guía
e instale el soporte superior. Tenga en
cuenta estas medidas cuando instale el
soporte decorativo (no se muestra).
Panel Installation
a) Set panel into the brackets on the fi rst
pre-set post.
b) Place the next post (with brackets) in
the hole on the opposite end of the
panel without any concrete in the hole.
c) Ensure posts are fl ush against panel.
Secure all screws into the panel in the
center bracket slots.
d) Level and plumb post.
e) Level panel horizontally.
f) Add concrete according to
manufacturer's instructions.
g) Repeat install process for other panels.
h) Follow the panel installation instructions
when using Decorative Bracket Kit.
Instalación del panel
a) Ubique el panel en los soportes del
primer poste preinstalado.
b) Ubique el poste siguiente (con los
soportes) en el hoyo del extremo
opuesto del panel, que no tiene
concreto.
c) Asegúrese de que todos los postes
están al ras del panel. Ajuste todos
los tornillos del panel en el centro de
las ranuras del soporte.
d) Nivele y aplome el poste.
e) Nivele el panel horizontalmente.
f) Rellene con concreto de acuerdo con
las instrucciones del fabricante.
g) Repita el procedimiento de instalación
para los demás paneles.
h) Siga las instrucciones para la
instalación del panel cuando utilice
el soporte decorativo.
Panel/Panel
Posts/Postes
Post Tops/Remates para poste
Brackets/Soportes
Vinyl Cement/Cemento para vinilo
Concrete/Concreto
Pea Gravel/Gravilla tipo guisante
Gate Kit/Kit de puerta
Materials Needed/Materiales necesarios
ASSEMBLY INSTRUCTIONS/INSTRUCCIONES DE ENSAMBLAJE
1
1.
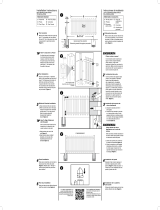
Fence Location
Mark the fence location using
string and line stakes.
Ubicación de la cerca
Marque la ubicación de la cerca
utilizando una cuerda y estacas
alineadas.
2.
Post Location
Measure the width of the fence
panel (X) plus ½ inch for
brackets. Then measure the
width of the post (Y) and add
the measurement to the total
width of the panel and bracket.
This is the on-center
measurement for post hole
location. It is highly
recommended to dig enough
holes to install 3 to 4 sections of
fence at a time to ensure proper
post hole placement.
4.
5.
31.5
4
A
B
Top Rail
Travesaño superior
Lower Horizontal Rail
Travesaño horizontal
inferior
Use all screw holes
Utilice todos los orifi cios
para tornillos
2 in
31.5 in
3
X+½ in+Y
X+½ in+Y
X+½ in+Y
General post hole location
Ubicación general de los hoyos para postes
24 in
12 in
6 in
Post
Poste
X
Y
Y
Y
Y
Instalación del poste
a) Cave los hoyos para los postes de 12 pulgadas
(30,48 cm) de diámetro y 30 pulgadas (76,20 cm)
de profundidad.
b) Añada 6 pulgadas (15,24 cm) de gravilla para
el drenaje del poste.
c) Si la línea de penetración de la helada es mayor
a 30 pulgadas (76,20 cm), Cave un hoyo de la
profundidad adecuada. Añada 6 pulgadas de
gravilla para el drenaje del poste. Añada concreto
hasta que quede una profundidad de 24 pulgadas.
d) Inserte el poste en el centro del hoyo.
e) Nivele el poste y verifi que que esté a plomo.
f) Rellene el espacio restante del primer hoyo con concreto de acuerdo con las
instrucciones del fabricante.
g) Controle nuevamente que esté nivelado y a plomo. Siempre deje 2 pulgadas
(5,08 cm) de separación del suelo debajo del panel.
h) Añada concreto al siguiente hoyo para poste luego de instalar el panel.
3.
Post Installation
a) Dig post hole 12 inches in
diameter and 30 inches deep.
b) Add 6 inches of gravel for
post drainage.
c) If frost line exceeds 30
inches, dig hole to the
appropriate depth. Add 6
inches of gravel for post
drainage. Add concrete
until a depth of 24 inches
remains.
d) Insert post in center of
post hole.
e) Level and plumb post.
f) Fill remainder of fi rst hole
with concrete according to
manufacturer’s instructions.
g) Recheck level and plumb. Always allow 2 inches of ground clearance under panel.
h) Add concrete to next post hole after panel is installed.
3c
Frost Line
Línea de
penetración
de la helada
penetración
de la helada
penetración
Concrete footer
Concreto
elemento de
anclaje
12 in
6 in
24 in
-
 1
1

en otros idiomas
- English: Freedom 73013029 Installation guide
Artículos relacionados
Otros documentos
-
 Veranda 73011310 Instrucciones de operación
-
 Veranda 73012194 Instrucciones de operación
-
Veranda 73045697 Instrucciones de operación
-
 Veranda 73014216 Instrucciones de operación
-
 Veranda 73010700 Guía de instalación
-
 Veranda 73010699 Guía de instalación
-
 Veranda 73003150 Guía de instalación
-
Barrette Outdoor Living 73024592 Guía de instalación


