
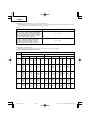
Charger
Cargador
UC 18YGH
Handling instructions
Instrucciones de manejo
Read through carefully and understand these instructions before use.
Leer cuidadosamente y comprender estas instrucciones antes del uso.
2008.10.29, 09:56Page 1

1
2
3
4
5
6
7
8
9
0
1
1
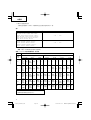
EB1412S
EB1414S
EB1414
EB14B
EB1424
EB1426H
EB1430H
EB1430X
EB1433X
BCH1420
EB1212S
EB1214S
EB1214L
EB1220BL
EB1230HL
EB1230X
EB1233X
EB12S
FEB12S
EB12B
EB1224
EB1226HL
EB1230H
BCH1220
EB912S
EB9S
EB914S
EB914
FEB9S
EB9B
EB924
EB926H
EB930H
EB933X
EB712S
EB7S
EB714S
FEB7S
EB7B
EB1812S
EB18B
EB1820
EB1830H
EB1814SL
EB1820L
EB1824L
EB1826HL
EB1830HL
EB1830X
EB1833X
BCH1820
2008.10.29, 09:56Page 2

2
English Español
Rechargeable battery Batería recargable
(EB712S, EB7S, EB714S, (EB712S, EB7S, EB714S, (EB712S, EB7S, EB714S,
FEB7S, EB7B) FEB7S, EB7B) FEB7S, EB7B)
Rechargeable battery Batería recargable
(EB912S, EB9S, EB914S, EB914, (EB912S, EB9S, EB914S, EB914, (EB912S, EB9S, EB914S,
FEB9S, EB9B, EB924, EB926H, FEB9S, EB9B, EB924, EB926H, EB914, FEB9S, EB9B, EB924,
EB930H, EB933X) EB930H, EB933X) EB926H, EB930H, EB933X)
Rechargeable battery Batería recargable
(EB12S, FEB12S, EB12B, EB1224, (EB12S, FEB12S, EB12B, EB1224, (EB12S, FEB12S, EB12B, EB1224,
EB1226HL, EB1230H, BCH1220) EB1226HL, EB1230H, BCH1220) EB1226HL, EB1230H, BCH1220)
Rechargeable battery Batería recargable
(EB1212S, EB1214S, EB1214L, (EB1212S, EB1214S, EB1214L, (EB1212S, EB1214S, EB1214L,
EB1220BL, EB1230HL, EB1230X, EB1220BL, EB1230HL, EB1230X, EB1220BL, EB1230HL, EB1230X,
EB1233X) EB1233X) EB1233X)
Rechargeable battery Batería recargable
(EB1412S, EB1414S, EB1414, (EB1412S, EB1414S, EB1414, (EB1412S, EB1414S, EB1414,
EB14B, EB1424, EB1426H, EB14B, EB1424, EB1426H, EB14B, EB1424, EB1426H,
EB1430H, EB1430X, EB1433X, EB1430H, EB1430X, EB1433X, EB1430H, EB1430X, EB1433X,
BCH1420) BCH1420) BCH1420)
Rechargeable battery Batería recargable
(EB1812S, EB18B, EB1820, (EB1812S, EB18B, EB1820, (EB1812S, EB18B, EB1820,
EB1830H) EB1830H) EB1830H)
Rechargeable battery Batería recargable
(EB1814SL, EB1820L, EB1824L, (EB1814SL, EB1820L, EB1824L, (EB1814SL, EB1820L, EB1824L,
EB1826HL, EB1830HL, EB1830X, EB1826HL, EB1830HL, EB1830X, EB1826HL, EB1830HL, EB1830X,
EB1833X, BCH1820) EB1833X, BCH1820) EB1833X, BCH1820)
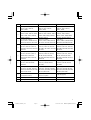
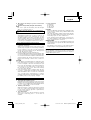
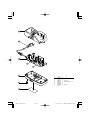
Hole for connecting the Agujero para conectar la
rechargeable battery bateria recargable
Pilot lamp Lámpara piloto
Name plate Placa de características
1
2
3
4
5
6
7
8
9
0
2008.10.29, 09:58Page 2

English
3
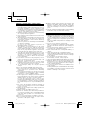
GENERAL OPERATIONAL PRECAUTIONS
1. This appliance is not intended for use by persons
(including children) with reduced physical, sensory
or mental capabilities, or lack of experience and
knowledge, unless they have been given supervision
or instruction concerning use of the appliance by
a person responsible for their safety.
2. Children should be supervised to ensure that they
do not play with the appliance.
3. Keep work area clean. Cluttered areas and benches
invite accidents.
4. Avoid dangerous environment. Don’t expose power
tools and charger to rain. Don’t use power tools
and charger in damp or wet locations. And keep
work area well lit.
Never use power tools and charger near flammable
or explosive materials.
Do not use tool and charger in presence of
flammable liquids or gases.
5. The appliance is not intended for use by young
children or infirm persons without supervision.
Young children should be supervised to ensure that
they do not play with the appliance. All visitors
should be kept safe distance from work area.
6. Store idle tools and charger. When not in use, tools
and charger should be stored in dry, high or locked-
up place — out of reach or children. Store tools
and charger in a place in which the temperature
is less than 40°C.
7. Don’t abuse cord. Never carry charger by cord or
yank it to disconnect from receptacle. Keep cord
from heat, oil and sharp edges.
8. When the charger is not in use or when being
maintained and inspected, disconnect the power
cord of the charger from the receptacle.
9. To avoid danger, always use only the specified
charger.
10. Use only genuine HITACHI replacement parts.
11. Do not use power tools and charger for applications
other than those specified in the Handling
Instructions.
12. To avoid personal injury, use only the accessories
or attachment recommended in these handling
instructions or in the HITACHI catalog.
13. If the supply cord is damaged, it must be replaced
by the manufacture or its service agent or a similarly
qualified person in order to avoid a hazard.
Let only the authorized service center do the
repairing. The Manufacture will not be responsible
for any damages or injuries caused by repair by
the unauthorized persons or by mishandling of the
tool.
14. To ensure the designed operational integrity of
power tools and charger, do not remove installed
covers or screws.
15. Always use the charger at the voltage specified on
the nameplate.
16. Always charge the battery before use.
17. Never use a battery other than that specified. Do
not connect a usual dry cell, a rechargeable battery
other than that specified or a car battery to the
power tool.
18. Do not use a transformer containing a booster.
19. Do not charge the battery from an engine electric
generator or DC power supply.
20. Always charge indoors. Because the charger and
battery heat slightly during charging, charge the
battery in a place not exposed to direct sunlight;
where the humidity is low and the ventilation is
good.
21. Use the exploded assembly drawing on this handling
instructions only for authorized servicing.
PRECAUTIONS FOR CHARGER
1. Always charge the battery at an ambient temperature
of 0–40°C. A temperature of less than 0°C will result
in over charging which is dangerous. The battery
cannot be charged at a temperature greater than
40°C.
The most suitable temperature for charging is that
of 20–25°C.
2. Do not use the charger continuously.
When one charging is completed, leave the charger
for about 15 minutes before the next charging of
battery.
3. Do not allow foreign matter to enter the hole for
connecting the rechargeable battery.
4. Never disassemble the rechargeable battery or
charger.
5. Never short-circuit the rechargeable battery.
Short-circuiting the battery will cause a great electric
current and overheat. It results in burn or damage
to the battery.
6. Do not dispose of the battery in fire.
If the battery is burnt, it may explode.
7. Using an exhausted battery will damage the charger.
8. Bring the battery to the shop from which it was
purchased as soon as the post-charging battery life
becomes too short for practical use. Do not dispose
of the exhausted battery.
9. Do not insert objects into the air ventilation slots
of the charger.
Inserting metal objects or flammable into the charger
air ventilation slots will result in an electrical shock
hazard or damage to the charger.
2008.10.29, 09:58Page 3

English
4
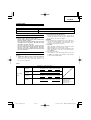
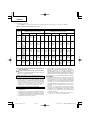
Charging time Approx. 30 – 70 minutes
Charging voltage 7.2 – 18 V
Weight 0.35 kg
SPECIFICATION
CHARGER
APPLICATION
For charging the HITACHI BATTERY
䡬 EB712S, EB7S, EB714S, FEB7S, EB7B,
EB912S, EB9S, EB914S, EB914, FEB9S, EB9B, EB924,
EB926H, EB930H, EB933X,
EB1212S, EB12S, EB1214S, EB1214L, FEB12S, EB12B,
EB1220BL, EB1224, EB1226HL, EB1230H, BCH1220,
EB1230HL, EB1230X, EB1233X
EB1412S, EB1414S, EB1414, EB14B, EB1424,
EB1426H, EB1430H, EB1430X, EB1433X, BCH1420,
EB1812S, EB1814SL, EB18B EB1820, EB1820L,
EB1824L, EB1826HL, EB1830H, EB1830HL, EB1830X,
EB1833X, BCH1820
2. Insert the battery into the charger
Firmly insert the battery into the charger till it
contacts the bottom of the charger and checking
the polarities as shown in Fig. 1.
CAUTION:
䡬 If the batteries are inserted in the reverse direction,
not only recharging will become impossible, but it
may also cause problems in the charger such as
a deformed recharging terminal.
3. Charging
When inserting a battery in the charger, the pilot
lamp will light up continuously in red.
When the battery becomes fully recharged, the pilot
lamp will blink in red (At 1-second intervals).
(See Table 1)
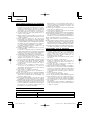
(1) Pilot lamp indication
The indications of the pilot lamp will be as shown
in Table 1, according to the condition of the charger
or the rechargeable battery.
CHARGING
Before using the power tool, charge the battery as
follows.
1. Connect the charger’s power cord to the receptacle
When connecting the plug of the charger to a
receptacle, the pilot lamp will blink in red
(At 1-second intervals).
Table 1
Indications of the pilot lamp
Before Blinks Lights for 0.5 seconds. Does not light
charging for 0.5 seconds. (off for 0.5 seconds)
Lights Lights continuously
Blinks Lights for 0.5 seconds. Does not light
for 0.5 seconds. (off for 0.5 seconds)
Blinks Lights for 1 second. Does not light
for 0.5 seconds. (off for 0.5 seconds)
Overheat
standby
While
charging
Charging
complete
Battery overheated.
Unable to charge.
(Charging will
commence when
battery cools)
Pilot lamp
(red)
2008.10.29, 09:58Page 4

English
5
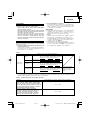
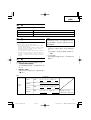
Table 2
(3) Regarding recharging time
Table 3 shows the recharging time required according to the type of battery.
Battery capacity (Ah)
Battery
Ni-Cd BATTERY Ni-MH BATTERY
Voltage
(V) 1.2–1.4 Ah 2.0 Ah 2.4 Ah 2.0 Ah 2.6 Ah 3.0 Ah 3.3 Ah
EB712S
EB7S
EB7B
7.2V
EB714S 30min.
(6 cells)
50min. –––––––– ––––––––– –––– –––– ––––––––– ––––––––– ––––– –––– –––––––––– ––––––––– ––––––––– ––– –––––
FEB7S
(6 cells)
EB912S
EB914S
9.6V
EB9S
30min.
EB9B
50min.
EB924
55min. –––– –––– –––––––––
EB926H
60min.
EB930H
70min.
EB933X
70min.
EB914 (8 cells) (8 cells) (8 cells) (8 cells) (8 cells)
FEB9S
(8 cells)
EB12S
EB1212S
EB12B
EB1230H
12V
EB1214S
30min.
EB1220BL
50min.
EB1224
55min.
BCH1220
50min.
EB1226HL
60min.
EB1230HL
70min.
EB1233X
70min.–
EB1214L
(10 cells)
(10 cells) (10 cells) (10 cells) EB1230X (10 cells)
FEB12S (10 cells)
(10 cells)
EB1412S
14.4V
EB1414S
30min.
EB14B
50min.
EB1424
55min.
BCH1420
50min.
EB1426H
60min.
EB1430H
70min.
EB1433X
70min.
EB1414 (12 cells) (12 cells) (12 cells) (12 cells)
EB1430X
(12 cells)
(12 cells)
(12 cells)
EB1812S
EB18B EB1830H
18V
EB1814SL
30min.
EB1820L
50min.
EB1824L
55min.
BCH1820
50min.
EB1826HL
60min.
EB1830HL
70min.
EB1833X
70min.
(15 cells)
EB1820 (15 cells) (15 cells) (15 cells) EB1830X (15 cells)
(15 cells) (15 cells)
Rechargeable batteries Temperatures at which the battery can be recharged
EB712S, EB7S, EB714S, FEB7S, EB7B, EB912S,
EB9S, EB914S, EB914, FEB9S, EB9B, EB924,
EB1212S, EB12S, EB1214S, EB1214L, FEB12S,
–5°C — 55°C
EB12B, EB1220BL, EB1224, EB1412S, EB1414S,
EB1414, EB14B, EB1424, EB1812S, EB1814SL,
EB18B EB1820, EB1820L, EB1824L
EB926H, EB930H, EB933X, EB1226HL,
EB1230H, EB1230HL, EB1230X, EB1233X,
EB1426H, EB1430H, EB1430X, EB1433X, –5°C — 50°C
EB1826HL, EB1830H, EB1830HL, EB1830X,
EB1833X, BCH1220, BCH1420, BCH1820
Table 3 Recharging time (approx. min.) at 20°C
NOTE: The recharging time may vary according to the ambient temperature.
(2) Regarding the temperature of the rechargeable battery.
The temperatures for rechargeable batteries are as shown in the table below, and batteries that have become
hot should be cooled for a while before being recharged.
2008.10.29, 09:58Page 5

English
6
4. Disconnect the charger’s power cord from the
receptacle.
5. Hold the charger firmly and pull out the battery.
NOTE
Be sure to pull out the battery from the charger
after use, and then keep it.
Regarding electric discharge in case of new batteries,
etc.
As the internal chemical substance of new batteries
and batteries that have not been used for an
extended period is not activated, the electric
discharge might be low when using them the first
and second time. This is a temporary phenomenon,
and normal time required for recharging will be
restored by recharging the batteries 2-3 times.
How to make the batteries perform longer.
(1) Recharge the batteries before they become
completely exhausted.
When you feel that the power of the tool becomes
weaker, stop using the tool and recharge its battery.
If you continue to use the tool and exhaust the
electric current, the battery may be damaged and
its life will become shorter.
(2) Avoid recharging at high temperatures.
A rechargeable battery will be hot immediately after
use. If such a battery is recharged immediately after
use, its internal chemical substance will deteriorate,
and the battery life will be shortened. Leave the
battery and recharge it after it has cooled for a
while.
CAUTION
䡬 If the battery is charged while it is heated because
it has been left for a long time in a location subject
to direct sunlight or because the battery has just
been used, the pilot lamp of the charger lights for
1 second, does not light for 0.5 seconds (off for
0.5 seconds). In such a case, first let the battery
cool, then start charging.
䡬 Since the built-in micro computer takes about 3
seconds to confirm that the battery being charged
with UC18YGH is taken out, wait for a minimum
of 3 seconds before reinserting it to continue
charging. If the battery is reinserted within 3 seconds,
the battery may not be properly charged.
MAINTENANCE AND INSPECTION
1. Inspecting the mounting screws:
Regularly inspect all mounting screws and ensure
that they are properly tightened. Should any of the
screws be loose, retighten them immediately. Failure
to do so could result in serious hazard.
2. Cleaning of the charger
When the charger is stained, wipe with a soft dry
cloth or a cloth moistened with soapy water. Do
not use chloric solvents, gasoline or paint thinner,
for they melt plastics.
3. Store idle charger
When not in use, the charger should be stored in
dry, high or locked-up place — out of reach of
children.
4. Service parts list
A: Item No.
B: Code No.
C: No. Used
D: Remarks
CAUTION
Repair, modification and inspection of Hitachi Power
Tools must be carried out by a Hitachi Authorized
Service Center.
This Parts List will be helpful if presented with the
tool to the Hitachi Authorized Service Center when
requesting repair or other maintenance.
In the operation and maintenance of power tools,
the safety regulations and standards prescribed in
each country must be observed.
MODIFICATIONS
Hitachi Power Tools are constantly being improved
and modified to incorporate the latest technological
advancements.
Accordingly, some parts (i.e. code numbers and/or
design) may be changed without prior notice.
NOTE
Due to HITACHI’s continuing program of research and
development, the specifications herein are subject to
change without prior notice.
2008.10.29, 09:58Page 6

Español
7
PRECAUCIONES GENERALES DE OPERACION
1. Este aparato no debe ser utilizado por personas
(incluidos niños) cuya capacidad física, sensorial o
mental sea reducida, ni por personas con falta de
experiencia y conocimiento, salvo que una persona
responsable de su seguridad los supervise o les
haya dado instrucciones sobre el uso del aparato.
2. Se debe vigilar a los niños para garantizar que no
juegan con el aparato.
3. Mantener limpia el área de trabajo, los puestos de
trabajo y bancos desordenados predisponen a que
ocurran accidentes.
4. Evitar ambientes peligrosos. No exponer las
herramientas ni los cargadores a la lluvia. No utilizar
las herramientas ni los cargadores en lugares húmedos
o mojados. Mantener el área de trabajo bien iluminada.
No utilizar nunca las herramientas ni los cargadores
cerca de materiales inflamables o explosivos.
No utilizar la herramienta ni el cargador cerca de
líquidos inflamables o gases.
5. El aparato no debe ser utilizado por niños o personas
con discapacidad.
Los menores no deberán jugar con el aparato y por
lo tanto, deberá mantenerse siempre bajo supervisión.
Asimismo, las personas ajenas deben mantenerse
a una distancia prudente del área de trabajo.
6. Guardar bien las herramientas y cargadores que no
se usan. Elegir para ello un lugar seco, alto, cerrado
y que no esté al alcance de los niños.
Guardar las herramientas y los cargadores en un
lugar con una buena temperatura, menor de los 40°C.
7. No abusar del cable. Nunca transladar el cargador
por el cable, ni desenchufar de un tirón. Mantener
el cable alejado de sitios calientes, del aceite o
piedras filosas.
8. Cuando no se usa el cargador o cuando se le hace
el servicio de mantenimiento e inspección,
desenchufar del tomacorriente de CA el cable de
alimentación del cargador.
9. Usar siempre el cargador especificado.
Nunca usar otro cargador que lo especificado, es
para evitar riesgos.
10. Usar sólo piezas de repuesto originales HITACHI.
11. No utilizar herramientas ni el cargador para otras
aplicaciones que difieran de las especificadas en el
manual de instrucciones.
12. El uso de cualquier recambio o accesorio que no venga
recomendado en el manual de instrucciones o catálogo
HITACHI puede suponer el deterioro de la máquina.
13. Cuando el cable de alimentación esté dañado, deberá
sustituirlo el fabricante o su agente de servicio o una
persona similarmente calificada, para evitar peligros.
La reparación de cualquier máquina debe ser
facilitada por un servicio autorizado.
El fabricante no es responsable de ningun daño o
deterioro causado por la reparación que una persona
no autorizada hubiese realizado, ni tampoco del
maltrato de la máquina.
14. Usar siempre el cargador a la tensión especificada
en la placa de identificación.
15. Usar siempre el cargador a la tensión especificada
en la placa de identificación.
16. Cargar siempre la batería antes de usar la herramienta.
17. No utilizar otra batería que no sea la especificada.
No conectar pilas secas, baterías de automóviles o
baterías que no sean las especificadas a la herramienta.
18. No usar transformador con reforzador.
19. No cargar la batería con generador eléctrico ni con
DC.
20. Hacer siempre la carga en interiores. Como el cargador
y la bateía se calientan un poco durante la carga, ésta
hay que hacerla en un sitio no expuest a la luz solar
directa, que tenga poca humedad y esté bien ventilado.
21. El despiece presentado en el manual de instrucciones
sólo debe ser utilizado por un servicio autorizado.
PRECAUCIONES PARA EL CARGADOR
1. Siempre cargar la batería a una temperatura
comprendida entre 0 a 40°C. Una temperatura
inferior a 0°C causa una sobrecarga, lo que es
peligroso. No puede cargarse la batería a una
temperatura mayor de 40°C.
La temperatura más apropiada para cargar es la de
20 a 25°C.
2. No usar el cargador continuamente.
Cuando se completa la carga, dejar descansar el
cargador por 15 minutos antes de proseguir con
la carga siguiente.
3. No dejar que entre suciedad por el orificio de
conexión de la batería recargable.
4. Nunca desarmar la batería recargable ni el cargador.
5. Nunca poner en cortocircuito la batería recargable.
Al poner en cortocircuito la batería puede producir
una corriente eléctrica y enorme y por consecuencia
un recalentamiento, pudiendo quemar o deteriorar
la batería.
6. No tirar la batería al fuego.
Si se quema la batería puede explotar.
7. El uso de una batería descargada dañará el cargador.
8. Llevar la batería al sitio de compra original en el
caso de que la duración de la batería recargable
sea reducida al usarse. No tirar la batería descargada.
9. No insertar objetos en las ranuras de ventilación
del cargador.
La inserción de objetos metálicos o inflamables en
dichas ranuras puede provocar descargas eléctricas
o dañar el cargador.
Tiempo de carga Aprox. 30 – 70 minutos
Tensión de carga 7,2 – 18 V
Peso 0,35 kg
ESPECIFICACIONES
CARGADOR
2008.10.29, 09:59Page 7

Español
8
APLICACION
Para carga de batería Hitachi.
䡬 EB712S, EB7S, EB714S, FEB7S, EB7B,
EB912S, EB9S, EB914S, EB914, FEB9S, EB9B, EB924,
EB926H, EB930H, EB933X,
EB1212S, EB12S, EB1214S, EB1214L, FEB12S, EB12B,
EB1220BL, EB1224, EB1226HL, EB1230HL, BCH1220,
EB1230HL, EB1230X, EB1233X
EB1412S, EB1414S, EB1414, EB14B, EB1424,
EB1426H, EB1430H, EB1430X, EB1433X, BCH1420,
EB1812S, EB1814SL, EB18B EB1820, EB1820L,
EB1824L, EB1826HL, EB1830H, EB1830HL, EB1830X,
EB1833X, BCH1820
CARGA
Antes de usar la herramienta eléctrica, cargar la batería
del modo siguiente:
1. Enchufe el cable de alimentación del cargador a un
tomacorriente de CA.
Cuando haya conectado el enchufe del cargador a
una toma de la red, el piloto parpadeará en rojo
(A intervalos de 1 segundo).
2. Inserte la batería en el cargador
Inserte firmemente la batería en el cargador hasta
que entre en contacto con la parte inferior del
mismo, después de comprobar la polaridad como
se muestra en las Fig 1.
PRECAUCION:
䡬 Si inserta las baterías al revés, no sólo será imposible
cargarlas, sino que también es posible que se
produzcan problemas en el cargador, como la
deformación de los terminales de carga.
3. Carga
Cuando inserte una batería en el cargador, el piloto
permanecerá continuamente encendido en rojo.
Cuando la batería se haya cargado completamente,
el piloto parpadeará en rojo (A intervalos de 1
segundo). (Vea las Tabla 1)
(1) Indicaciones de la lámpara indicadora
Las indicaciones de la lámpara indicadora serán tal
y como se muestran en la Tabla 1, de acuerdo con
la condición del cargador o de la batería.
(2) Temperatura de las baterías
La temperatura de las baterías se muestra en la tabla siguiente, y las baterías que se hayan calentado deberán
dejarse enfriar durante cierto tiempo antes de cargarlas.
Tabla 1
Indicaciones de la lámpara indicadora
Antes de la Parpadeo Se encenderá durante 0,5 segundos.
carga No se encenderá durante 0,5 segundos.
(Apagada durante 0,5 segundos)
Illuminación Iluminación permanente
Parpadeo Se encenderá durante 0,5 segundos.
No se encenderá durante 0,5 segundos.
(Apagada durante 0,5 segundos)
Parpadeo Se encenderá durante 1 segundo.
No se encenderá durante 0,5 segundos.
(Apagada durante 0,5 segundos)
Espera por
recalentamiento
Lámpara
piloto (rojo)
Durante la
carga
Carga
completa
Batería recalentada.
No puede cargarse (la
carga comenzará
cuando la batería se
enfríe).
Tabla 2 Carga de las baterías que se hayan calentado
Baterías Temperatura con la que podrá cargarse la batería
EB712S, EB7S, EB714S, FEB7S, EB7B, EB912S,
EB9S, EB914S, EB914, FEB9S, EB9B, EB924,
EB1212S, EB12S, EB1214S, EB1214L, FEB12S,
–5°C — 55°C
EB12B, EB1220BL, EB1224, EB1412S, EB1414S,
EB1414, EB14B, EB1424, EB1812S, EB1814SL,
EB18B EB1820, EB1820L, EB1824L
EB926H, EB930H, EB933X, EB1226HL,
EB1230H, EB1230HL, EB1230X, EB1233X,
EB1426H, EB1430H, EB1430X, EB1433X, –5°C — 50°C
EB1826HL, EB1830H, EB1830HL, EB1830X,
EB1833X, BCH1220, BCH1420, BCH1820
2008.10.29, 09:59Page 8

Español
9
Tabla 3 Tiempo de recarga (min. aprox.) a 20°C
NOTA: El tiempo de recarga puede variar de acuerdo con la temperatura ambiental.
(3) Tiempo de recarga
En la Tabla 3 se muestra el tiempo de recarga requerido de acuerdo con el tipo de batería.
4. Desenchufe el cable de alimentación del cargador del
tomacorriente de CA.
5. Sostenga el cargador firmemente y saque la batería.
NOTA
Asegúrese de extraer la batería del cargador después
del uso, y guárdela después.
Descarga eléctrica en caso de baterías nuevas, etc.
Como la substancia química interna de las baterías
nuevas o las que no se hayan utilizado durante
mucho tiempo no está activada, la descarga eléctrica
puede ser inferior cuando se utilicen por primera
y segunda vez. Este fenómeno es temporal, y el
tiempo normal requerido para la recarga se
restablecerá recargando las baterías 2-3 veces.
Forma de hacer que las baterías duren más
(1) Recarque las baterías antes de que se hayan agotado
completamente.
Si siente que la potencia de la herramienta eléctrica
se debilita, deje de utilizarla y recargue su batería.
Si continuase utilizando la herramienta hasta agotar
la capacidad de la batería, ésta podría dañarse y
su duración útil podría acortarse.
(2) Evite realizar la recarga a altas temperaturas
Una batería se calentará inmediatamente después de
haberla utilizado. Si recargase tal batería
inmediatamente después de haberla utilizado, su
substancia química interna se deterioraría, y la duración
útil de la batería se acortaría. Deje la batería y recárguela
después de que se haya enfriado durante cierto tiempo.
PRECAUCION
䡬 Si carga la batería mientras esté caliente por haber
estado mucho tiempo en un lugar sometido a la
luz solar directa, o por haber acabado de utilizarla,
la lámpara de piloto del cargador parpadea durante
1 segundo y no se enciende durante 0,5 segundos
(apagada durante 0,5 segundos). En tales casos,
deje primero que se enfríe la batería e inicie luego
la carga.
䡬 Como el microprocesador incorporado tarda 3
segundos en confirmar que la batería que estaba
cargándose con el UC18YGH se ha estraído, espere
3 segundos como mínimo antes de reinsertarla para
continuar cargando.
Si reinserta la batería antes de 3 segundos, es
posible que no se carge adecuadamente.
Capacidad de la batería (Ah)
Tensión de
BATERÍA de Ni-Cd (níquel-cadmio) BATERÍA de Ni-Cd (níquel-cadmio)
la batería
(V) 1,2–1,4 Ah 2,0 Ah 2,4 Ah 2,0 Ah 2,6 Ah 3,0 Ah 3,3 Ah
EB712S
EB7S
EB7B
7,2V
EB714S 30min.
(6 celdas)
50min. –––––––– ––––––––– –––– –––– ––––––––– ––––––––– ––––– –––– –––––––––– ––––––––– ––––––––– ––– –––––
FEB7S
(6 celdas)
EB912S
EB914S
9,6V
EB9S
30min.
EB9B
50min.
EB924
55min. –––– –––– –––––––––
EB926H
60min.
EB930H
70min.
EB933X
70min.
EB914 (8 celdas) (8 celdas) (8 celdas) (8 celdas) (8 celdas)
FEB9S
(8 celdas)
EB12S
EB1212S
EB12B
EB1230H
12V
EB1214S
30min.
EB1220BL
50min.
EB1224
55min.
BCH1220
50min.
EB1226HL
60min.
EB1230HL
70min.
EB1233X
70min.–
EB1214L
(10 celdas)
(10 celdas) (10 celdas) (10 celdas) EB1230X (10 celdas)
FEB12S (10 celdas)
(10 celdas)
EB1412S
14,4V
EB1414S
30min.
EB14B
50min.
EB1424
55min.
BCH1420
50min.
EB1426H
60min.
EB1430H
70min.
EB1433X
70min.
EB1414 (12 celdas) (12 celdas) (12 celdas) (12 celdas)
EB1430X
(12 celdas)
(12 celdas)
(12 celdas)
EB1812S
EB18B EB1830H
18V
EB1814SL
30min.
EB1820L
50min.
EB1824L
55min.
BCH1820
50min.
EB1826HL
60min.
EB1830HL
70min.
EB1833X
70min.
(15 celdas)
EB1820 (15 celdas) (15 celdas) (15 celdas) EB1830X (15 celdas)
(15 celdas) (15 celdas)
2008.10.29, 09:59Page 9

Español
10
MANTENIMIENTO E INSPECCION
1. Inspeccionar los tornillos de montaje:
Regularmente inspeccionar todos los tornillos de
montaje y asequrarse de que estén apretados
firmemente. Si cualquier tornillo estuviese suelto,
volver a apretarlo inmediatamente. El no hacer esto
provocaría un riesgo serio.
2. Limpieza del cargador
Cuando el cargador esté sucio, limpiarlo con un
paño suave y seco o con un paño mojado en agua
jabonosa. No utilizar disolventes clóricos, gasolina
o disolventes para pinturas ya que éstos funden los
materiales plásticos.
3. Almcenamiento del cargador sin usar
Cuando no use el cargador, guardarlo en un lugar
seco, alto o cerrado, fuera del alcance de los niños.
4. Lista de repuestos
A: N°. ítem
B: N°. código
C: N°. usado
D: Observaciones
PRECAUCION
La reparación, modificación e inspección de las
herramientas eléctricas Hitachi deben ser realizadas
por un Centro de Servicio Autorizado de Hitachi.
Esta lista de repuestos será de utilidad si es
presentada junto con la herramienta al Centro de
Servicio Autorizado de Hitachi, para solicitar la
reparación o cualquier otro tipo de mantenimiento.
En el manejo y el mantenimiento de las herramientas
eléctricas, se deberán observar las normas y
reglamentos vigentes en cada país.
MODIFICACIONES
Hitachi Power Tools introduce constantemente
mejoras y modificaciones para incorporar los últimos
avances tecnológicos.
Por consiguiente, algunas partes (por ejemplo,
números de códigos y/o diseño) pueden ser
modificadas sin previo aviso.
OBSERVACION
Debido al programa continuo de investigación y
desarrollo de HITACHI estas especificaciones están
sujetas a cambio sin previo aviso.
2008.10.29, 09:59Page 10

11
2008.10.29, 10:00Page 11

12
䡬
2008.10.29, 10:00Page 12

13
°
(Ah)
Ni-Cd Ni-MH
(V) 1.2–1.4 Ah 2.0 Ah 2.4 Ah 2.0 Ah 2.6 Ah 3.0 Ah 3.3 Ah
EB712S
EB7S
EB7B
7.2V
EB714S 30
(6 )
50 –––––––– ––––––––– –––– –––– ––––––––– ––––––––– ––––– –––– –––––– –––– ––––––––– ––––––––– ––– –––––
FEB7S
(6 )
EB912S
EB914S
9.6V
EB9S
30
EB9B
50
EB924
55
–––– –––– –––––––––
EB926H
60
EB930H
70
EB933X
70
EB914
(8 ) (8 ) (8 ) (8 ) (8 )
FEB9S
(8 )
EB12S
EB1212S
EB12B
EB1230H
12V
EB1214S
30
EB1220BL
50
EB1224
55
BCH1220
50
EB1226HL
60
EB1230HL
70
EB1233X
70 –
EB1214L
(10 )
(10 ) (10 ) (10 )
EB1230X
(10 )
FEB12S
(10 )
(10 )
EB1412S
14.4V
EB1414S
30
EB14B
50
EB1424
55
BCH1420
50
EB1426H
60
EB1430H
70
EB1433X
70
EB1414
(12 ) (12 ) (12 ) (12 )
EB1430X
(12 )
(12 )
(12 )
EB1812S
EB18B EB1830H
18V
EB1814SL
30
EB1820L
50
EB1824L
55
BCH1820
50
EB1826HL
60
EB1830HL
70
EB1833X
70
(15 )
EB1820
(15 ) (15 ) (15 )
EB1830X
(15 )
(15 ) (15 )
2008.10.29, 10:00Page 13

14
䡬
䡬
2008.10.29, 10:00Page 14

15
ABCD
1 330-734 1
2———————1
3 329-857 1 3.15A
4 330-737 1 230V-240V “3, 5”
5 326-285 4
6 329-635 1
7 326-358 3 D3× 18
8———————1
2008.10.29, 10:15Page 15

16
2008.10.29, 10:15Page 16

17
2008.10.29, 10:15Page 17

18
2008.10.29, 10:15Page 18

Hitachi Koki Co.
,
Ltd.
810
Code No. C99177231 G
Printed in China
2008.10.29, 10:15Page 19
Transcripción de documentos
Charger Cargador 日立牌充電器 UC 18YGH Handling instructions Instrucciones de manejo 使用說明書 Read through carefully and understand these instructions before use. Leer cuidadosamente y comprender estas instrucciones antes del uso. 使用前務請詳加閱讀 001CoverF̲UC10SFL̲ChT Page 1 2008.10.29, 09:56 Adobe PageMaker 6.5J/PPC 1 EB712S EB7S EB714S FEB7S EB7B 1 EB912S EB9S EB914S EB914 FEB9S EB9B EB924 EB926H EB930H EB933X 2 EB12S FEB12S EB12B EB1224 EB1226HL EB1230H BCH1220 3 EB1212S EB1214S EB1214L EB1220BL EB1230HL EB1230X EB1233X 4 EB1412S EB1414S EB1414 EB14B EB1424 EB1426H EB1430H EB1430X EB1433X BCH1420 5 EB1812S EB18B EB1820 EB1830H 6 EB1814SL EB1820L EB1824L EB1826HL EB1830HL EB1830X EB1833X BCH1820 7 8 9 0 1 001CoverF̲UC10SFL̲ChT Page 2 2008.10.29, 09:56 Adobe PageMaker 6.5J/PPC English 1 2 3 4 中國語 Español Rechargeable battery 充電式電池 Batería recargable (EB712S, EB7S, EB714S, (EB712S, EB7S, EB714S, (EB712S, EB7S, EB714S, FEB7S, EB7B) FEB7S, EB7B) FEB7S, EB7B) Rechargeable battery Batería recargable 充電式電池 (EB912S, EB9S, EB914S, EB914, (EB912S, EB9S, EB914S, EB914, (EB912S, EB9S, EB914S, FEB9S, EB9B, EB924, EB926H, FEB9S, EB9B, EB924, EB926H, EB914, FEB9S, EB9B, EB924, EB930H, EB933X) EB930H, EB933X) EB926H, EB930H, EB933X) Rechargeable battery Batería recargable 充電式電池 (EB12S, FEB12S, EB12B, EB1224, (EB12S, FEB12S, EB12B, EB1224, (EB12S, FEB12S, EB12B, EB1224, EB1226HL, EB1230H, BCH1220) EB1226HL, EB1230H, BCH1220) EB1226HL, EB1230H, BCH1220) Rechargeable battery Batería recargable 充電式電池 (EB1212S, EB1214S, EB1214L, (EB1212S, EB1214S, EB1214L, (EB1212S, EB1214S, EB1214L, EB1220BL, EB1230HL, EB1230X, EB1220BL, EB1230HL, EB1230X, EB1220BL, EB1230HL, EB1230X, 5 6 7 EB1233X) EB1233X) EB1233X) Rechargeable battery Batería recargable 充電式電池 (EB1412S, EB1414S, EB1414, (EB1412S, EB1414S, EB1414, (EB1412S, EB1414S, EB1414, EB14B, EB1424, EB1426H, EB14B, EB1424, EB1426H, EB14B, EB1424, EB1426H, EB1430H, EB1430X, EB1433X, EB1430H, EB1430X, EB1433X, EB1430H, EB1430X, EB1433X, BCH1420) BCH1420) BCH1420) Rechargeable battery Batería recargable 充電式電池 (EB1812S, EB18B, EB1820, (EB1812S, EB18B, EB1820, (EB1812S, EB18B, EB1820, EB1830H) EB1830H) EB1830H) Rechargeable battery Batería recargable 充電式電池 (EB1814SL, EB1820L, EB1824L, (EB1814SL, EB1820L, EB1824L, (EB1814SL, EB1820L, EB1824L, EB1826HL, EB1830HL, EB1830X, EB1826HL, EB1830HL, EB1830X, EB1826HL, EB1830HL, EB1830X, EB1833X, BCH1820) EB1833X, BCH1820) EB1833X, BCH1820) 8 Hole for connecting the rechargeable battery Agujero para conectar la bateria recargable 充電式電池連接孔 9 Pilot lamp Lámpara piloto 指示燈 0 Name plate Placa de características 銘牌 2 00Table̲UC10SFL̲ChT Page 2 2008.10.29, 09:58 Adobe PageMaker 6.5J/PPC English GENERAL OPERATIONAL PRECAUTIONS 1. This appliance is not intended for use by persons (including children) with reduced physical, sensory or mental capabilities, or lack of experience and knowledge, unless they have been given supervision or instruction concerning use of the appliance by a person responsible for their safety. 2. Children should be supervised to ensure that they do not play with the appliance. 3. Keep work area clean. Cluttered areas and benches invite accidents. 4. Avoid dangerous environment. Don’t expose power tools and charger to rain. Don’t use power tools and charger in damp or wet locations. And keep work area well lit. Never use power tools and charger near flammable or explosive materials. Do not use tool and charger in presence of flammable liquids or gases. 5. The appliance is not intended for use by young children or infirm persons without supervision. Young children should be supervised to ensure that they do not play with the appliance. All visitors should be kept safe distance from work area. 6. Store idle tools and charger. When not in use, tools and charger should be stored in dry, high or lockedup place — out of reach or children. Store tools and charger in a place in which the temperature is less than 40°C. 7. Don’t abuse cord. Never carry charger by cord or yank it to disconnect from receptacle. Keep cord from heat, oil and sharp edges. 8. When the charger is not in use or when being maintained and inspected, disconnect the power cord of the charger from the receptacle. 9. To avoid danger, always use only the specified charger. 10. Use only genuine HITACHI replacement parts. 11. Do not use power tools and charger for applications other than those specified in the Handling Instructions. 12. To avoid personal injury, use only the accessories or attachment recommended in these handling instructions or in the HITACHI catalog. 13. If the supply cord is damaged, it must be replaced by the manufacture or its service agent or a similarly qualified person in order to avoid a hazard. Let only the authorized service center do the repairing. The Manufacture will not be responsible for any damages or injuries caused by repair by the unauthorized persons or by mishandling of the tool. 14. To ensure the designed operational integrity of power tools and charger, do not remove installed covers or screws. 15. Always use the charger at the voltage specified on the nameplate. 16. Always charge the battery before use. 17. Never use a battery other than that specified. Do not connect a usual dry cell, a rechargeable battery other than that specified or a car battery to the power tool. 18. Do not use a transformer containing a booster. 19. Do not charge the battery from an engine electric generator or DC power supply. 20. Always charge indoors. Because the charger and battery heat slightly during charging, charge the battery in a place not exposed to direct sunlight; where the humidity is low and the ventilation is good. 21. Use the exploded assembly drawing on this handling instructions only for authorized servicing. PRECAUTIONS FOR CHARGER 1. Always charge the battery at an ambient temperature of 0–40°C. A temperature of less than 0°C will result in over charging which is dangerous. The battery cannot be charged at a temperature greater than 40°C. The most suitable temperature for charging is that of 20–25°C. 2. Do not use the charger continuously. When one charging is completed, leave the charger for about 15 minutes before the next charging of battery. 3. Do not allow foreign matter to enter the hole for connecting the rechargeable battery. 4. Never disassemble the rechargeable battery or charger. 5. Never short-circuit the rechargeable battery. Short-circuiting the battery will cause a great electric current and overheat. It results in burn or damage to the battery. 6. Do not dispose of the battery in fire. If the battery is burnt, it may explode. 7. Using an exhausted battery will damage the charger. 8. Bring the battery to the shop from which it was purchased as soon as the post-charging battery life becomes too short for practical use. Do not dispose of the exhausted battery. 9. Do not insert objects into the air ventilation slots of the charger. Inserting metal objects or flammable into the charger air ventilation slots will result in an electrical shock hazard or damage to the charger. 3 01Eng̲UC10SFL̲ChT Page 3 2008.10.29, 09:58 Adobe PageMaker 6.5J/PPC English SPECIFICATION CHARGER Charging time Approx. 30 – 70 minutes Charging voltage 7.2 – 18 V Weight 0.35 kg APPLICATION For charging the HITACHI BATTERY 䡬 EB712S, EB7S, EB714S, FEB7S, EB7B, EB912S, EB9S, EB914S, EB914, FEB9S, EB9B, EB924, EB926H, EB930H, EB933X, EB1212S, EB12S, EB1214S, EB1214L, FEB12S, EB12B, EB1220BL, EB1224, EB1226HL, EB1230H, BCH1220, EB1230HL, EB1230X, EB1233X EB1412S, EB1414S, EB1414, EB14B, EB1424, EB1426H, EB1430H, EB1430X, EB1433X, BCH1420, EB1812S, EB1814SL, EB18B EB1820, EB1820L, EB1824L, EB1826HL, EB1830H, EB1830HL, EB1830X, EB1833X, BCH1820 CHARGING Before using the power tool, charge the battery as follows. 1. Connect the charger’s power cord to the receptacle When connecting the plug of the charger to a receptacle, the pilot lamp will blink in red (At 1-second intervals). 2. Insert the battery into the charger Firmly insert the battery into the charger till it contacts the bottom of the charger and checking the polarities as shown in Fig. 1. CAUTION: 䡬 If the batteries are inserted in the reverse direction, not only recharging will become impossible, but it may also cause problems in the charger such as a deformed recharging terminal. 3. Charging When inserting a battery in the charger, the pilot lamp will light up continuously in red. When the battery becomes fully recharged, the pilot lamp will blink in red (At 1-second intervals). (See Table 1) (1) Pilot lamp indication The indications of the pilot lamp will be as shown in Table 1, according to the condition of the charger or the rechargeable battery. Table 1 Indications of the pilot lamp Pilot lamp (red) Before charging Blinks Lights for 0.5 seconds. Does not light for 0.5 seconds. (off for 0.5 seconds) While charging Lights Lights continuously Charging complete Blinks Lights for 0.5 seconds. Does not light for 0.5 seconds. (off for 0.5 seconds) Overheat standby Blinks Lights for 1 second. Does not light for 0.5 seconds. (off for 0.5 seconds) Battery overheated. Unable to charge. (Charging will commence when battery cools) 4 01Eng̲UC10SFL̲ChT Page 4 2008.10.29, 09:58 Adobe PageMaker 6.5J/PPC English (2) Regarding the temperature of the rechargeable battery. The temperatures for rechargeable batteries are as shown in the table below, and batteries that have become hot should be cooled for a while before being recharged. Table 2 Rechargeable batteries Temperatures at which the battery can be recharged EB712S, EB7S, EB714S, FEB7S, EB7B, EB912S, EB9S, EB914S, EB914, FEB9S, EB9B, EB924, EB1212S, EB12S, EB1214S, EB1214L, FEB12S, EB12B, EB1220BL, EB1224, EB1412S, EB1414S, EB1414, EB14B, EB1424, EB1812S, EB1814SL, EB18B EB1820, EB1820L, EB1824L –5°C — 55°C EB926H, EB930H, EB933X, EB1226HL, EB1230H, EB1230HL, EB1230X, EB1233X, EB1426H, EB1430H, EB1430X, EB1433X, EB1826HL, EB1830H, EB1830HL, EB1830X, EB1833X, BCH1220, BCH1420, BCH1820 –5°C — 50°C (3) Regarding recharging time Table 3 shows the recharging time required according to the type of battery. Table 3 Recharging time (approx. min.) at 20°C Battery capacity (Ah) Battery Voltage (V) 7.2V 9.6V 12V 14.4V 18V Ni-Cd BATTERY 1.2–1.4 Ah EB712S EB7S EB714S FEB7S (6 cells) EB912S EB914S EB9S EB914 FEB9S (8 cells) EB12S EB1212S EB1214S EB1214L FEB12S (10 cells) EB1412S EB1414S EB1414 (12 cells) Ni-MH BATTERY 2.0 Ah 2.4 Ah 2.0 Ah 2.6 Ah 30min. EB7B (6 cells) 50min. –––––––– ––––––––– –––– –––– ––––––––– ––––––––– 30min. EB9B (8 cells) 50min. EB924 (8 cells) 55min. –––– –––– ––––––––– 30min. EB12B EB1220BL 50min. (10 cells) EB1224 55min. (10 cells) 30min. EB14B 50min. (12 cells) EB1812S EB1814SL 30min. (15 cells) EB18B EB1820L 50min. EB1820 (15 cells) ––––––––– 3.0 Ah 3.3 Ah –––––––––– ––––––––– ––––––––– –––––––– EB926H 60min. (8 cells) EB930H (8 cells) 70min. EB933X 70min. (8 cells) BCH1220 50min. (10 cells) EB1226HL 60min. (10 cells) EB1230H EB1230HL 70min. EB1230X (10 cells) EB1233X 70min.– (10 cells) EB1424 55min. (12 cells) BCH1420 50min. (12 cells) EB1426H 60min. (12 cells) EB1430H EB1430X 70min. (12 cells) EB1433X 70min. (12 cells) EB1824L 55min. (15 cells) BCH1820 50min. (15 cells) EB1826HL 60min. (15 cells) EB1830H EB1830HL 70min. EB1830X (15 cells) EB1833X 70min. (15 cells) NOTE: The recharging time may vary according to the ambient temperature. 5 01Eng̲UC10SFL̲ChT Page 5 2008.10.29, 09:58 Adobe PageMaker 6.5J/PPC English 4. Disconnect the charger’s power cord from the receptacle. 5. Hold the charger firmly and pull out the battery. NOTE Be sure to pull out the battery from the charger after use, and then keep it. Regarding electric discharge in case of new batteries, etc. As the internal chemical substance of new batteries and batteries that have not been used for an extended period is not activated, the electric discharge might be low when using them the first and second time. This is a temporary phenomenon, and normal time required for recharging will be restored by recharging the batteries 2-3 times. How to make the batteries perform longer. (1) Recharge the batteries before they become completely exhausted. When you feel that the power of the tool becomes weaker, stop using the tool and recharge its battery. If you continue to use the tool and exhaust the electric current, the battery may be damaged and its life will become shorter. (2) Avoid recharging at high temperatures. A rechargeable battery will be hot immediately after use. If such a battery is recharged immediately after use, its internal chemical substance will deteriorate, and the battery life will be shortened. Leave the battery and recharge it after it has cooled for a while. CAUTION 䡬 If the battery is charged while it is heated because it has been left for a long time in a location subject to direct sunlight or because the battery has just been used, the pilot lamp of the charger lights for 1 second, does not light for 0.5 seconds (off for 0.5 seconds). In such a case, first let the battery cool, then start charging. 䡬 Since the built-in micro computer takes about 3 seconds to confirm that the battery being charged with UC18YGH is taken out, wait for a minimum of 3 seconds before reinserting it to continue charging. If the battery is reinserted within 3 seconds, the battery may not be properly charged. 4. Service parts list A: Item No. B: Code No. C: No. Used D: Remarks CAUTION Repair, modification and inspection of Hitachi Power Tools must be carried out by a Hitachi Authorized Service Center. This Parts List will be helpful if presented with the tool to the Hitachi Authorized Service Center when requesting repair or other maintenance. In the operation and maintenance of power tools, the safety regulations and standards prescribed in each country must be observed. MODIFICATIONS Hitachi Power Tools are constantly being improved and modified to incorporate the latest technological advancements. Accordingly, some parts (i.e. code numbers and/or design) may be changed without prior notice. NOTE Due to HITACHI’s continuing program of research and development, the specifications herein are subject to change without prior notice. MAINTENANCE AND INSPECTION 1. Inspecting the mounting screws: Regularly inspect all mounting screws and ensure that they are properly tightened. Should any of the screws be loose, retighten them immediately. Failure to do so could result in serious hazard. 2. Cleaning of the charger When the charger is stained, wipe with a soft dry cloth or a cloth moistened with soapy water. Do not use chloric solvents, gasoline or paint thinner, for they melt plastics. 3. Store idle charger When not in use, the charger should be stored in dry, high or locked-up place — out of reach of children. 6 01Eng̲UC10SFL̲ChT Page 6 2008.10.29, 09:58 Adobe PageMaker 6.5J/PPC Español PRECAUCIONES GENERALES DE OPERACION 1. Este aparato no debe ser utilizado por personas (incluidos niños) cuya capacidad física, sensorial o mental sea reducida, ni por personas con falta de experiencia y conocimiento, salvo que una persona responsable de su seguridad los supervise o les haya dado instrucciones sobre el uso del aparato. 2. Se debe vigilar a los niños para garantizar que no juegan con el aparato. 3. Mantener limpia el área de trabajo, los puestos de trabajo y bancos desordenados predisponen a que ocurran accidentes. 4. Evitar ambientes peligrosos. No exponer las herramientas ni los cargadores a la lluvia. No utilizar las herramientas ni los cargadores en lugares húmedos o mojados. Mantener el área de trabajo bien iluminada. No utilizar nunca las herramientas ni los cargadores cerca de materiales inflamables o explosivos. No utilizar la herramienta ni el cargador cerca de líquidos inflamables o gases. 5. El aparato no debe ser utilizado por niños o personas con discapacidad. Los menores no deberán jugar con el aparato y por lo tanto, deberá mantenerse siempre bajo supervisión. Asimismo, las personas ajenas deben mantenerse a una distancia prudente del área de trabajo. 6. Guardar bien las herramientas y cargadores que no se usan. Elegir para ello un lugar seco, alto, cerrado y que no esté al alcance de los niños. Guardar las herramientas y los cargadores en un lugar con una buena temperatura, menor de los 40°C. 7. No abusar del cable. Nunca transladar el cargador por el cable, ni desenchufar de un tirón. Mantener el cable alejado de sitios calientes, del aceite o piedras filosas. 8. Cuando no se usa el cargador o cuando se le hace el servicio de mantenimiento e inspección, desenchufar del tomacorriente de CA el cable de alimentación del cargador. 9. Usar siempre el cargador especificado. Nunca usar otro cargador que lo especificado, es para evitar riesgos. 10. Usar sólo piezas de repuesto originales HITACHI. 11. No utilizar herramientas ni el cargador para otras aplicaciones que difieran de las especificadas en el manual de instrucciones. 12. El uso de cualquier recambio o accesorio que no venga recomendado en el manual de instrucciones o catálogo HITACHI puede suponer el deterioro de la máquina. 13. Cuando el cable de alimentación esté dañado, deberá sustituirlo el fabricante o su agente de servicio o una persona similarmente calificada, para evitar peligros. La reparación de cualquier máquina debe ser facilitada por un servicio autorizado. El fabricante no es responsable de ningun daño o deterioro causado por la reparación que una persona no autorizada hubiese realizado, ni tampoco del maltrato de la máquina. 14. Usar siempre el cargador a la tensión especificada en la placa de identificación. 15. Usar siempre el cargador a la tensión especificada en la placa de identificación. 16. Cargar siempre la batería antes de usar la herramienta. 17. No utilizar otra batería que no sea la especificada. No conectar pilas secas, baterías de automóviles o baterías que no sean las especificadas a la herramienta. 18. No usar transformador con reforzador. 19. No cargar la batería con generador eléctrico ni con DC. 20. Hacer siempre la carga en interiores. Como el cargador y la bateía se calientan un poco durante la carga, ésta hay que hacerla en un sitio no expuest a la luz solar directa, que tenga poca humedad y esté bien ventilado. 21. El despiece presentado en el manual de instrucciones sólo debe ser utilizado por un servicio autorizado. PRECAUCIONES PARA EL CARGADOR 1. Siempre cargar la batería a una temperatura comprendida entre 0 a 40°C. Una temperatura inferior a 0°C causa una sobrecarga, lo que es peligroso. No puede cargarse la batería a una temperatura mayor de 40°C. La temperatura más apropiada para cargar es la de 20 a 25°C. 2. No usar el cargador continuamente. Cuando se completa la carga, dejar descansar el cargador por 15 minutos antes de proseguir con la carga siguiente. 3. No dejar que entre suciedad por el orificio de conexión de la batería recargable. 4. Nunca desarmar la batería recargable ni el cargador. 5. Nunca poner en cortocircuito la batería recargable. Al poner en cortocircuito la batería puede producir una corriente eléctrica y enorme y por consecuencia un recalentamiento, pudiendo quemar o deteriorar la batería. 6. No tirar la batería al fuego. Si se quema la batería puede explotar. 7. El uso de una batería descargada dañará el cargador. 8. Llevar la batería al sitio de compra original en el caso de que la duración de la batería recargable sea reducida al usarse. No tirar la batería descargada. 9. No insertar objetos en las ranuras de ventilación del cargador. La inserción de objetos metálicos o inflamables en dichas ranuras puede provocar descargas eléctricas o dañar el cargador. ESPECIFICACIONES CARGADOR Tiempo de carga Aprox. 30 – 70 minutos Tensión de carga 7,2 – 18 V Peso 0,35 kg 7 02Spa̲UC10SFL̲ChT Page 7 2008.10.29, 09:59 Adobe PageMaker 6.5J/PPC Español APLICACION Para carga de batería Hitachi. 䡬 EB712S, EB7S, EB714S, FEB7S, EB7B, EB912S, EB9S, EB914S, EB914, FEB9S, EB9B, EB924, EB926H, EB930H, EB933X, EB1212S, EB12S, EB1214S, EB1214L, FEB12S, EB12B, EB1220BL, EB1224, EB1226HL, EB1230HL, BCH1220, EB1230HL, EB1230X, EB1233X EB1412S, EB1414S, EB1414, EB14B, EB1424, EB1426H, EB1430H, EB1430X, EB1433X, BCH1420, EB1812S, EB1814SL, EB18B EB1820, EB1820L, EB1824L, EB1826HL, EB1830H, EB1830HL, EB1830X, EB1833X, BCH1820 CARGA Antes de usar la herramienta eléctrica, cargar la batería del modo siguiente: 1. Enchufe el cable de alimentación del cargador a un tomacorriente de CA. Cuando haya conectado el enchufe del cargador a una toma de la red, el piloto parpadeará en rojo (A intervalos de 1 segundo). 2. Inserte la batería en el cargador Inserte firmemente la batería en el cargador hasta que entre en contacto con la parte inferior del mismo, después de comprobar la polaridad como se muestra en las Fig 1. PRECAUCION: 䡬 Si inserta las baterías al revés, no sólo será imposible cargarlas, sino que también es posible que se produzcan problemas en el cargador, como la deformación de los terminales de carga. 3. Carga Cuando inserte una batería en el cargador, el piloto permanecerá continuamente encendido en rojo. Cuando la batería se haya cargado completamente, el piloto parpadeará en rojo (A intervalos de 1 segundo). (Vea las Tabla 1) (1) Indicaciones de la lámpara indicadora Las indicaciones de la lámpara indicadora serán tal y como se muestran en la Tabla 1, de acuerdo con la condición del cargador o de la batería. Tabla 1 Indicaciones de la lámpara indicadora Lámpara piloto (rojo) Antes de la carga Parpadeo Durante la carga Carga completa Illuminación Parpadeo Parpadeo Espera por recalentamiento Se encenderá durante 0,5 segundos. No se encenderá durante 0,5 segundos. (Apagada durante 0,5 segundos) Iluminación permanente Se encenderá durante 0,5 segundos. No se encenderá durante 0,5 segundos. (Apagada durante 0,5 segundos) Batería recalentada. Se encenderá durante 1 segundo. No se encenderá durante 0,5 segundos. No puede cargarse (la carga comenzará (Apagada durante 0,5 segundos) cuando la batería se enfríe). (2) Temperatura de las baterías La temperatura de las baterías se muestra en la tabla siguiente, y las baterías que se hayan calentado deberán dejarse enfriar durante cierto tiempo antes de cargarlas. Tabla 2 Carga de las baterías que se hayan calentado Baterías Temperatura con la que podrá cargarse la batería EB712S, EB7S, EB714S, FEB7S, EB7B, EB912S, EB9S, EB914S, EB914, FEB9S, EB9B, EB924, EB1212S, EB12S, EB1214S, EB1214L, FEB12S, EB12B, EB1220BL, EB1224, EB1412S, EB1414S, EB1414, EB14B, EB1424, EB1812S, EB1814SL, EB18B EB1820, EB1820L, EB1824L –5°C — 55°C EB926H, EB930H, EB933X, EB1226HL, EB1230H, EB1230HL, EB1230X, EB1233X, EB1426H, EB1430H, EB1430X, EB1433X, EB1826HL, EB1830H, EB1830HL, EB1830X, EB1833X, BCH1220, BCH1420, BCH1820 –5°C — 50°C 8 02Spa̲UC10SFL̲ChT Page 8 2008.10.29, 09:59 Adobe PageMaker 6.5J/PPC Español (3) Tiempo de recarga En la Tabla 3 se muestra el tiempo de recarga requerido de acuerdo con el tipo de batería. Tabla 3 Tiempo de recarga (min. aprox.) a 20°C Capacidad de la batería (Ah) Tensión de la batería (V) 7,2V 9,6V 12V 14,4V 18V BATERÍA de Ni-Cd (níquel-cadmio) 1,2–1,4 Ah EB712S EB7S EB714S FEB7S (6 celdas) EB912S EB914S EB9S EB914 FEB9S (8 celdas) EB12S EB1212S EB1214S EB1214L FEB12S (10 celdas) EB1412S EB1414S EB1414 (12 celdas) 2,0 Ah BATERÍA de Ni-Cd (níquel-cadmio) 2,4 Ah 2,0 Ah 2,6 Ah 3,0 Ah 3,3 Ah 30min. EB7B 50min. (6 celdas) –––––––– ––––––––– –––– –––– ––––––––– ––––––––– 30min. EB9B 50min. (8 celdas) EB924 55min. (8 celdas) –––– –––– ––––––––– EB926H 60min. (8 celdas) EB930H 70min. (8 celdas) EB933X 70min. (8 celdas) 30min. EB12B EB1220BL 50min. (10 celdas) EB1224 55min. (10 celdas) BCH1220 50min. (10 celdas) EB1226HL 60min. (10 celdas) EB1230H EB1230HL 70min. EB1230X (10 celdas) EB1233X 70min.– (10 celdas) 30min. EB14B 50min. (12 celdas) EB1424 55min. (12 celdas) BCH1420 50min. (12 celdas) EB1426H 60min. (12 celdas) EB1430H EB1430X 70min. (12 celdas) EB1433X 70min. (12 celdas) EB1812S EB1814SL 30min. (15 celdas) EB18B EB1820L 50min. EB1820 (15 celdas) EB1824L 55min. (15 celdas) BCH1820 50min. (15 celdas) EB1826HL 60min. (15 celdas) EB1830H EB1830HL 70min. EB1830X (15 celdas) EB1833X 70min. (15 celdas) ––––––––– –––––––––– ––––––––– ––––––––– –––––––– NOTA: El tiempo de recarga puede variar de acuerdo con la temperatura ambiental. 4. Desenchufe el cable de alimentación del cargador del tomacorriente de CA. 5. Sostenga el cargador firmemente y saque la batería. NOTA Asegúrese de extraer la batería del cargador después del uso, y guárdela después. Descarga eléctrica en caso de baterías nuevas, etc. Como la substancia química interna de las baterías nuevas o las que no se hayan utilizado durante mucho tiempo no está activada, la descarga eléctrica puede ser inferior cuando se utilicen por primera y segunda vez. Este fenómeno es temporal, y el tiempo normal requerido para la recarga se restablecerá recargando las baterías 2-3 veces. Forma de hacer que las baterías duren más (1) Recarque las baterías antes de que se hayan agotado completamente. Si siente que la potencia de la herramienta eléctrica se debilita, deje de utilizarla y recargue su batería. Si continuase utilizando la herramienta hasta agotar la capacidad de la batería, ésta podría dañarse y su duración útil podría acortarse. (2) Evite realizar la recarga a altas temperaturas Una batería se calentará inmediatamente después de haberla utilizado. Si recargase tal batería inmediatamente después de haberla utilizado, su substancia química interna se deterioraría, y la duración útil de la batería se acortaría. Deje la batería y recárguela después de que se haya enfriado durante cierto tiempo. PRECAUCION 䡬 Si carga la batería mientras esté caliente por haber estado mucho tiempo en un lugar sometido a la luz solar directa, o por haber acabado de utilizarla, la lámpara de piloto del cargador parpadea durante 1 segundo y no se enciende durante 0,5 segundos (apagada durante 0,5 segundos). En tales casos, deje primero que se enfríe la batería e inicie luego la carga. 䡬 Como el microprocesador incorporado tarda 3 segundos en confirmar que la batería que estaba cargándose con el UC18YGH se ha estraído, espere 3 segundos como mínimo antes de reinsertarla para continuar cargando. Si reinserta la batería antes de 3 segundos, es posible que no se carge adecuadamente. 9 02Spa̲UC10SFL̲ChT Page 9 2008.10.29, 09:59 Adobe PageMaker 6.5J/PPC Español MANTENIMIENTO E INSPECCION 1. Inspeccionar los tornillos de montaje: Regularmente inspeccionar todos los tornillos de montaje y asequrarse de que estén apretados firmemente. Si cualquier tornillo estuviese suelto, volver a apretarlo inmediatamente. El no hacer esto provocaría un riesgo serio. 2. Limpieza del cargador Cuando el cargador esté sucio, limpiarlo con un paño suave y seco o con un paño mojado en agua jabonosa. No utilizar disolventes clóricos, gasolina o disolventes para pinturas ya que éstos funden los materiales plásticos. 3. Almcenamiento del cargador sin usar Cuando no use el cargador, guardarlo en un lugar seco, alto o cerrado, fuera del alcance de los niños. 4. Lista de repuestos A: N°. ítem B: N°. código C: N°. usado D: Observaciones PRECAUCION La reparación, modificación e inspección de las herramientas eléctricas Hitachi deben ser realizadas por un Centro de Servicio Autorizado de Hitachi. Esta lista de repuestos será de utilidad si es presentada junto con la herramienta al Centro de Servicio Autorizado de Hitachi, para solicitar la reparación o cualquier otro tipo de mantenimiento. En el manejo y el mantenimiento de las herramientas eléctricas, se deberán observar las normas y reglamentos vigentes en cada país. MODIFICACIONES Hitachi Power Tools introduce constantemente mejoras y modificaciones para incorporar los últimos avances tecnológicos. Por consiguiente, algunas partes (por ejemplo, números de códigos y/o diseño) pueden ser modificadas sin previo aviso. OBSERVACION Debido al programa continuo de investigación y desarrollo de HITACHI estas especificaciones están sujetas a cambio sin previo aviso. 10 02Spa̲UC10SFL̲ChT Page 10 2008.10.29, 09:59 Adobe PageMaker 6.5J/PPC 中國語 作業上的一般注意事項 1. 本裝置除非在有安全負責人員監督,或提供裝置 使用相關指示的情況下,否則不可由體能、觸感 能力或精神狀況欠佳,或欠缺經驗及知識的人員 (包含孩童)使用。 2. 應監督避免孩童接觸與使用此裝置。 3. 工作場所應打掃乾淨﹐清理妥當。雜亂無章將導 致事故。 4. 避免危險的環境﹐請勿讓電動工具與充電器淋到 雨﹐不可在潮濕地方使用電動工具和充電器﹐工 作地點要保持明亮。 請勿在易燃或爆炸性物質附近使用電動工具和充 電器。 不可在存放易燃液體或氣體的地方使用電動工具 和充電器。 5. 小孩和體弱人士切勿在無監督的情況下使用此電 動工具。必須監督小孩以確保其不會玩耍此電動 工具。所有訪客均須與作業區保持安全距離。 6. 電動工具與充電器要先關掉開關再收藏。 不用時﹐要存放於小孩拿不到的乾燥的高處或用 鎖匙鎖上。請勿存放於溫度高於40℃的地方。 7. 塞繩不可濫用。充電器切勿拿著塞繩搬動或從插 座中拔出。不可讓塞繩受熱、沾油或碰到銳利的 菱角。 8. 充電器不用時或維修檢查時,務請將充電器的插 頭從插座中拔出。 9. 請勿使用未經指定的充電器以免發生危險。 10. 只能使用日立指定的更換零件。 11. 不得使用電動工具和充電器去進行規定以外的其 它作業。 12. 為了防止人體受傷﹐只能使用本說明書或日立牌 產品目錄中所指定的附件。 13. 如果電源線破損,必須由廠商或其代理商或類似 的專業人士更換,以免發生危險。 維修請僅委託經授權的維修中心進行。對於因非 經授權人士的修理或錯誤操作所導致的任何損壞 或傷害,廠商概不負責。 14. 為了保證設計的完整性﹐電動工具和充電器的蓋 罩和螺釘類不可隨便拆除。 15. 務請在銘牌上規定的電壓下使用充電器。 16. 使用前務請充電。 17. 請勿使用未經指定的電池。請勿將未經指定的普 通乾電池、充電式電池或汽車蓄電池連接於電動 工具上。 18. 請勿使用帶增壓器的變壓器。 19. 請勿用引擎發電機或直流電源裝置對電池進行充 電。 20. 務請在室內進行充電。充電時﹐充電器和電池會 稍微變熱﹐因此﹐不要在直射陽光處充電﹐而應 在濕度低、通風好的陰涼處進行充電。 21. 進行授權服務時﹐請使用本說明書中的組裝分解 圖。 充電器使用上的注意事項 1. 電池充電時,周圍溫度務必為0∼40℃。溫度低於 0℃會導致充電過度,非常危險。電池不能在高於 4 0 ℃的溫度下充電。最適合充電的溫度是2 0 ∼ 25℃之間。 2. 請勿持續使用本充電器。 一次充電完成后,請將充電器擱置 15 分鐘以上, 然后再進行下一次充電。 3. 勿讓雜質進入充電式電池連結口內。 4. 切勿拆卸充電式電池與充電器。 5. 切勿使充電式電池短路。 使電池短路將會造成很大的電流和過熱﹐從而燒 壞電池。 6. 請勿將電池丟入火中。 電池受熱將會爆炸。 7. 請勿使用耗竭了的電池﹐否則會損壞充電器。 8. 充電後電池壽命太短不夠使用時﹐請盡快將電池 送往經銷店。請勿將用過的電池亂丟。 9. 請勿將異物插入充電器的通風口。 若將金屬異物或易燃物插入通風口的話﹐將會引 起觸電事故或使充電器受損。 11 03ChT̲UC10SFL̲ChT Page 11 2008.10.29, 10:00 Adobe PageMaker 6.5J/PPC 中國語 規 格 充電器 充電時間 約30 - 70分鍾 充電電壓 7.2 V - 18 V 重量 0.35 kg 用 途 為日立電池充電。 䡬 EB712S,EB7S,EB714S,FEB7S,EB7B, EB912S,EB9S,EB914S,EB914,FEB9S,EB9B,EB924, EB926H,EB930H,EB933X, EB1212S,EB12S,EB1214S,EB1214L,FEB12S,EB12B, EB1220BL,EB1224,EB1226HL,EB1230H,BCH1220, EB1230HL,EB1230X,EB1233X EB1412S,EB1414S,EB1414,EB14B,EB1424,EB1426H, EB1430H,EB1430X,EB1433X,BCH1420,EB1812S, EB1814SL,EB18B,EB1820,EB1820L ,EB1824L, EB1826HL, EB1830H,EB1830HL,EB1830X,EB1833X, BCH1820 充 電 注意 如果將電池的方向插反,非但不能進行充電,而且 會造成熔絲爆斷,或者造成充電器內部故障,如充 電線端變形等。 3. 充電 將電池插入充電器充電時,指示燈將持續亮紅 燈。 電池充足電後,指示燈呈紅色閃爍(間隔為1秒) (見表1)。 (1) 指示燈的狀態 根據充電器和充電電池的狀況,指示燈的指示如 表1所示。 使用電動工具之前,按下述方式將電池進行充電。 1. 將充電器的電線連接到插座上 將充電器插頭接到插座時,指示燈將閃紅燈(間 隔一秒)。 2. 將電池插入充電器 將電池用力插入充電器至底部,並檢查極性是否 如圖 1所示。 表 1 指示燈的狀態 充電前 充電期間 指示燈 (紅色) 充電完成 過熱待機 閃爍 亮0.5秒,不亮0.5秒。(熄滅0.5秒) 亮 持續發亮 閃爍 亮0.5秒,不亮0.5秒。(熄滅0.5秒) 閃爍 亮1秒,不亮0.5秒。(熄滅0.5秒) 電池過熱。無法充電 (電池冷卻時,將開始充電) 12 03ChT̲UC10SFL̲ChT Page 12 2008.10.29, 10:00 Adobe PageMaker 6.5J/PPC 中國語 (2) 關於充電電池的溫度 充電電池的溫度如下表所示,變熱的電池在充電前應該先冷卻一會。 表2 充電電池 可以對電池進行充電的溫度 EB712S,EB7S,EB714S,FEB7S,EB7B,EB912S, EB9S,EB914S,EB914,FEB9S,EB9B,EB924, EB1212S,EB12S,EB1214S,EB1214L,FEB12S, EB12B,EB1220BL,EB1224,EB1412S,EB1414S, EB1414,EB14B,EB1424,EB1812S,EB1814SL, EB18B,EB1820,EB1820L,EB1824L —5 ℃ — 55 ℃ EB926H,EB930H,EB933X,EB1226HL, EB1230H,EB1230HL,EB1230X,EB1233X, EB1426H,EB1430H,EB1430X,EB1433X, EB1826HL,EB1830H,EB1830HL,EB1830X, EB1833X,BCH1220,BCH1420,BCH1820 —5 ℃ — 55 ℃ (3) 關於再充電時間 表格 3 顯示不同類型電池所需的充電時間。 表格 3 在 20°C 時的再充電時間(約分鐘) 電池容量 (Ah) 電池 電壓 (V) 7.2V 9.6V 12V 14.4V 18V Ni-Cd 電池 1.2–1.4 Ah EB712S EB7S EB714S FEB7S (6 節電池) EB912S EB914S EB9S EB914 FEB9S (8 節電池) EB12S EB1212S EB1214S EB1214L FEB12S (10 節電池) EB1412S EB1414S EB1414 (12 節電池) Ni-MH 電池 2.0 Ah 2.4 Ah 2.0 Ah 2.6 Ah 3.0 Ah 3.3 Ah 30分鍾 EB7B 50分鍾 (6 節電池) –––––––– ––––––––– –––– –––– ––––––––– ––––––––– 30分鍾 EB9B 50分鍾 (8 節電池) EB924 55分鍾 (8 節電池) –––– –––– ––––––––– EB926H 60分鍾 (8 節電池) EB930H 70分鍾 (8 節電池) EB933X 70分鍾 (8 節電池) 30分鍾 EB12B EB1220BL 50分鍾 (10 節電池) EB1224 55分鍾 (10 節電池) BCH1220 50分鍾 (10 節電池) EB1226HL 60分鍾 (10 節電池) EB1230H EB1230HL 70分鍾 EB1230X (10 節電池) EB1233X 70分鍾– (10 節電池) 30分鍾 EB14B 50分鍾 (12 節電池) EB1424 55分鍾 (12 節電池) BCH1420 50分鍾 (12 節電池) EB1426H 60分鍾 (12 節電池) EB1430H EB1430X 70分鍾 (12 節電池) EB1433X 70分鍾 (12 節電池) EB1812S EB1814SL 30分鍾 (15 節電池) EB18B EB1820L 50分鍾 EB1820 (15 節電池) EB1824L 55分鍾 (15 節電池) BCH1820 50分鍾 (15 節電池) EB1826HL 60分鍾 (15 節電池) EB1830H EB1830HL 70分鍾 EB1830X (15 節電池) EB1833X 70分鍾 (15 節電池) ––––––––– –––––––––– ––––––––– ––––––––– –––––––– 註: 充電時間會依環境溫度而有不同。 13 03ChT̲UC10SFL̲ChT Page 13 2008.10.29, 10:00 Adobe PageMaker 6.5J/PPC 中國語 3. 將充電器電源線從交流電插座中拔出 4. 抓住充電器,將電池拉出 註 充電後,先將電池從充電器中取出,然後妥善保 存。 關於使用新電池等情況下的放電。 由於新電池和未經長期使用電池的內部化學物質 沒有活性,在前一兩次使用時放電量會較低。這 只是暫時現象,通過2至3次充電後,將會恢復 充電所需正常時間。 怎樣讓電池使用時間更長。 (1) 在電池電量完全耗盡之前給電池充電。 在感覺工具的動力變弱時,停止使用工具並為電 池充電。 如果繼續使用工具消耗電流,可能會造成對電池 的損壞,並且電池使用壽命也會縮短。 (2) 避免在高溫下充電。 充電電池在剛使用後會發熱。如果在電池剛使用 後為電池充電,電池的內部化學物質的性能會下 降,電池使用壽命會縮短。請先將電池放置一 會,待其冷卻後再進行充電。 注意 䡬 電池經長時間日光直射或剛使用過後會變熱, 若在電池受熱情況下進行充電,則充電器的指 示燈將會亮1秒而非0.5秒(熄滅0.5秒)。在此 情況下,請先讓電池冷卻後再進行充電。 䡬 由於UC18YGH內置微電腦需要大約3秒的時間來 確認進行充電的電池已經被取出,請等待至少 3秒後再將電池重新插入繼續進行充電。如果電 池在3秒之內重新插入,則電池可能會不能正確 充電。 維 護 和 檢 查 1. 檢查安裝螺釘 要經常檢查安裝螺釘是否緊固妥善。若發現螺釘 鬆了﹐應立即重新扭緊﹐否則會導致嚴重的事 故。 2. 清理充電器 充電器沾污時﹐用乾軟布或沾肥皂水的布擦拭。 切勿使用氯溶液、汽油或稀釋劑﹐以免塑膠部份 溶化。 3. 存放不使用的充電器 不使用時,應將充電器存放在小孩不可及的高而 乾燥處或上鎖處。 4. 維修部件目錄 A:項目號碼 B:代碼號碼 C:所使用號碼 D:備註 注意 日立電動工具的修理、維護和檢查必須由日立所認 可的維修中心進行。 當尋求修理或其他維護時,將本部件目錄與工具一 起提交給日立所認可的維修中心會對您有所幫助。 在操作和維護電動工具中,必須遵守各國的安全規 則和標准規定。 改進 日立電動工具隨時都在進行改進以適應最新的技術 進步。 因此,有些部件(如,代碼號碼和 或設計)可能 未預先通知而進行改進。 註 為求改進,本所冊所載規格可能不預先通告而徑予 更改。 14 03ChT̲UC10SFL̲ChT Page 14 2008.10.29, 10:00 Adobe PageMaker 6.5J/PPC A B C 1 2 3 4 5 6 7 8 330-734 — — — — — — — 329-857 330-737 326-285 329-635 326-358 — — — — — — — 1 1 1 1 4 1 3 1 D 3.15A 230V-240V “3, 5” D3×18 15 04Back̲UC10SFL̲ChT Page 15 2008.10.29, 10:15 Adobe PageMaker 6.5J/PPC 16 04Back̲UC10SFL̲ChT Page 16 2008.10.29, 10:15 Adobe PageMaker 6.5J/PPC 17 04Back̲UC10SFL̲ChT Page 17 2008.10.29, 10:15 Adobe PageMaker 6.5J/PPC 18 04Back̲UC10SFL̲ChT Page 18 2008.10.29, 10:15 Adobe PageMaker 6.5J/PPC Hitachi Koki Co., Ltd. 810 Code No. C99177231 G Printed in China 04Back̲UC10SFL̲ChT Page 19 2008.10.29, 10:15 Adobe PageMaker 6.5J/PPC-
 1
1
-
 2
2
-
 3
3
-
 4
4
-
 5
5
-
 6
6
-
 7
7
-
 8
8
-
 9
9
-
 10
10
-
 11
11
-
 12
12
-
 13
13
-
 14
14
-
 15
15
-
 16
16
-
 17
17
-
 18
18
-
 19
19
-
 20
20


Hikoki UC 18YGH Manual de usuario
- Tipo
- Manual de usuario
- Este manual también es adecuado para
en otros idiomas
- English: Hikoki UC 18YGH User manual
Artículos relacionados
-
Hikoki UC 18YGL2 El manual del propietario
-
Hitachi UC14SF Manual de usuario
-
-
Infocus UC 14YFA Manual de usuario
-
Hikoki ET18DM Manual de usuario
-
-
-
-
-
Hitachi DS18DVB El manual del propietario
Otros documentos
-
-
-
Hitachi UC 18YRL El manual del propietario
-
-
-
-
Hitachi Koki UC 24Yjuc24yj Handling Instructions Manual
-