Sony VCT-1170RM Manual de usuario
- Categoría
- Accesorios para cámaras
- Tipo
- Manual de usuario

WARNING
This equipment has been tested
and found to comply with the
limits for a Class B digital device,
pursuant to Part 15 of the FCC
Rules. These limits are designed
to provide reasonable protection
against harmful interference in a
residential installation. This
equipment generates, uses, and
can radiate radio frequency
energy and, if not installed and
used in accordance with the
instructions, may cause harmful
interference to radio
communications. However, there
is no guarantee that interference
will not occur in a particular
installation. If this equipment
does cause harmful interference to
radio or television reception,
which can be determined by
turning the equipment off and on,
the user is encouraged to try to
correct the interference by one or
more of the following measures:
– Reorient or relocate the
receiving antenna.
– Increase the separation between
the equipment and receiver.
– Connect the equipment into an
outlet on a circuit different from
that to which the receiver is
connected.
– Consult the dealer or an
experienced radio/TV
technician for help.
You are cautioned that any
changes or modifications not
expressly approved in this manual
could void your authority to
operate this equipment.
Features
The VCT-1170RM is a tripod for
video camera recorders and
features:
•A Remote Commander built in
the pan/tilt handle which
allows you to operate
(zooming, recording or photo
recording) the video camera
recorder with a remote
control jack. You can use the
Remote Commander on the
pan/tilt handle with an
ordinary grip (down position)
or a reverse grip (up position).
•A ball-level for quick and easy
level adjustment.
•Smooth panning/tilting with
the oil-cylinder pan/tilt
handle.
•A built-in counterbalance
mechanism to prevent the
tripod from toppling over.
Caution
•After recording, slide the
recording standby switch of
the pan/tilt handle to LOCK. If
you leave it on STANDBY, the
battery will wear down.
•Make sure that you hold on to
the video camera recorder
when removing it. The camera
mounting shoe automatically
comes off the tripod when you
unlock the camera mounting
shoe lock lever, so the video
camera may fall, if you are not
holding it.
•After using the tripod, remove
the video camera recorder,
close the legs and replace the
pan handle to the original
position. Never carry the
tripod with the video camera
recorder attached.
Cleaning
Clean the tripod with a soft
cloth lightly moistened with a
mild detergent solution. After
using the tripod at a location
subject to sea breezes, be sure to
wipe it clean with a dry cloth.
Identifying the Parts
A
1 Remote plug holder
Insert the remote plug when
not in use.
2 Remote control cord
3 Pan/tilt handle lock screw
4 Camera mounting screw
5 Pin
6 Camera mounting shoe
7 Tilt lock knob
8 Pan lock knob
9 Ball-level lock knob
10 Level
11 Tripod head
12 Camera mounting shoe lock
lever
13 Stay
14 Ferrule (with a spike)
15 Leg holder
16 Recording standby switch
17 START/STOP button (front)
18 ZOOM lever (front)
19 PHOTO mode button (front)
20 PHOTO mode button
(bottom)
21 START/STOP button
(bottom)
22 ZOOM lever (rear)
23 FRONT/REAR switch
24 Pan/tilt handle
25 Leg length adjustment lock
lever
Using the Tripod
B Setting the Tripod
1 Remove the leg holder.
2 Spread the legs until the
tripod becomes stable.
3 Unlock the leg length
adjustment lock levers.
4 Adjust the length of the legs.
5 Lock the leg length
adjustment lock levers.
C Mounting the Video
Camera Recorder
Install the battery pack and
insert a cassette in the video
camera recorder before
mounting it on the tripod.
1 Turn the camera mounting
shoe lock lever to the left to
remove the camera
mounting shoe.
2 Align the pin and the
camera mounting screw
with the holes on the bottom
of the video camera
recorder, and tighten the
screw firmly.
3 Insert the camera mounting
shoe with the video camera
recorder attached into the
tripod head until clicks.
Then, turn the camera
mounting shoe lock lever to
the right to make sure that it
is locked.
4 To make the camera level:
1 Unlock the ball-level
lock knob.
2 Adjust the angle of the
tripod head so that the
bubble in the level
moves inside the red
ring.
3 Lock the ball-level lock
knob.
Caractéristiques
Le VCT-1170RM est un trépied
pour caméscopes intégrant les
fonctions suivantes :
•Une télécommande intégrée
dans la poignée de
panoramique/inclinaison qui
vous permet de commander le
caméscope (zoom,
enregistrement ou
enregistrement photo) via une
prise de commande à distance
. Vous pouvez utiliser une
télécommande sur la poignée
de panoramique/inclinaison
avec une poignée ordinaire
(position basse) ou une
poignée inversée (position
haute).
•Un niveau à bulle pour une
mise à niveau simple et rapide.
•Des mouvements de
panoramique/inclinaison tout
en douceur grâce à une
poignée de panoramique/
inclinaison à cylindre
hydraulique.
•Le mécanisme de contrepoids
intégré empêche le trépied de
basculer.
Attention
•Après la prise de vue, ramenez
le commutateur de veille
d’enregistrement de la poignée
de panoramique/inclinaison
sur la position LOCK. Si vous
le laissez sur STANDBY, la pile
va s’épuiser inutilement.
•Veillez à maintenir le
caméscope lorsque vous
l’enlevez du trépied. Le sabot
de montage du caméscope
s’enlève automatiquement du
trépied lorsque vous
déverrouillez le levier de
blocage du sabot de montage
et le caméscope risque donc de
tomber si vous ne le maintenez
pas.
•Après avoir utilisé le trépied,
retirez le caméscope, repliez les
pieds et repositionnez la
poignée de panoramique dans
sa position originale. Ne
transportez jamais le trépied
alors que le caméscope se
trouve toujours fixé dessus.
Nettoyage
Nettoyez le trépied avec un
chiffon doux légèrement imbibé
d’une solution de détergent non
agressif. Après avoir utilisé le
trépied dans un endroit exposé
aux vents marins, frottez-le avec
un chiffon sec.
Identification des
composantes
A
1 Support de fiche de
télécommande
Introduisez la fiche de
télécommande lorsque vous
ne l’utilisez pas.
2 Cordon de télécommande
3 Vis de blocage de poignée
de panoramique/inclinaison
4 Vis de montage du
caméscope
5 Ergot de positionnement
6 Sabot de montage du
caméscope
7 Molette de verrouillage
d’inclinaison
8 Molette de verrouillage de
panoramique
9 Molette de verrouillage du
niveau à bulle
10 Niveau
11 Tête du trépiedd
12 Levier de verrouillage du
sabot de montage du
caméscope
13 Support
14 Ferrure (avec goujon)
15 Support de pied
16 Commutateur de veille
d’enregistrement
17 Bouton START/STOP
(avant)
18 Levier ZOOM (avant)
19 Button de mode PHOTO
(avant)
20 Button de mode PHOTO
(bas)
21 Bouton START/STOP (bas)
22 Levier ZOOM (arrière)
23 Commutateur AVANT/
ARRIERE
24 Poignée de panoramique/
inclinaison
25 Levier de verrouillage de
réglage de longueur de pied
Utilisation du
trépied
B Réglage du trépied
1 Enlevez le support de pied.
2 Déployez les pieds jusqu’à
ce que le trépied soit stable.
3 Déverrouillez les leviers de
réglage de la longueur des
pieds.
4 Ajustez la longueur des
pieds.
5 Verrouillez les leviers de
réglage de la longueur des
pieds.
C Montage du
caméscope
Installez la batterie et insérez
une cassette dans le caméscope
avant de l’installer sur le
trépied.
1 Tournez le levier de
verrouillage du sabot de
montage du caméscope vers
la gauche pour déposer le
sabot de montage du
caméscope.
2 Alignez la broche et la vis de
montage de la caméra sur
les orifices situés dans le
fond du caméscope et serrez
fermement la vis.
3 Introduisez le sabot de
montage du caméscope avec
le caméscope dans la tête du
trépied jusqu’à ce qu’il
s’encliquette. Tournez
ensuite le levier de
verrouillage du sabot de
montage du caméscope vers
la droite pour le verrouiller.
4 Pour mettre le caméscope de
niveau:
1 Déverrouillez la molette
de verrouillage du
niveau à bulle.
2 Ajustez l’angle de la tête
du trépied de façon à ce
que la bulle du niveau se
place au centre du cercle
rouge.
3 Verrouillez la molette de
verrouillage du niveau à
bulle.
Funciones
La unidad VCT-1170RM es un
trípode para videocámaras e
incluye lo siguiente:
•Mando a distancia en la
palanca de panoramización/
inclinación que permite
emplear la función de zoom,
de grabación de la
videocámara o de grabación
fotográfica con una toma de
mando a distancia
. Es
posible utilizar el mando a
distancia en la palanca de
panoramización/inclinación
con un fijador normal
(posición hacia abajo) o un
fijador inverso (posición hacia
arriba).
•Nivelador de bola para
realizar ajustes de nivel de
forma rápida y sencilla.
•Panoramización/inclinación
uniforme mediante la palanca
de panoramización/
inclinación con cilindro de
aceite.
•Mecanismo de contrapeso
incorporado para evitar que el
trípode se tambalee.
Precaución
•Tras la grabación, deslice el
interruptor de modo de espera
de grabación de la palanca de
panoramización/inclinación a
la posición LOCK. Si lo deja en
STANDBY, la pila se agotará.
•Asegúrese de sujetar la
videocámara al extraerla. El
soporte de montaje de la
cámara se desprende
automáticamente del trípode
al desbloquear la palanca de
bloqueo de dicho soporte, por
lo que la videocámara puede
caerse si no la sujeta.
•Tras utilizar el trípode, retire la
videocámara, cierre las patas
del trípode y vuelva a colocar
la palanca de
panoramización/inclinación
en la posición original. No
transporte nunca el trípode
con la videocámara acoplada.
Limpieza
Utilice un paño ligeramente
humedecido en una solución
detergente suave. Después de
utilizar el trípode en un lugar
expuesto a la brisa marina,
utilice un paño seco para su
limpieza.
Identificación de los
componentes
A
1 Portaenchufe del mando a
distancia
Inserte el enchufe del mando
a distancia cuando no lo
utilice.
2 Cable del mando a distancia
3 Tornillo de bloqueo de la
palanca de
panoramización/inclinación
4 Tornillo de montaje de la
videocámara
5 Patilla
6 Soporte de montaje de la
videocámara
7 Rueda de bloqueo de
inclinación
8 Rueda de bloqueo de
panoramización
9 Rueda de bloqueo del
nivelador de bola
10 Nivel
11 Cabeza del trípode
12 Palanca de bloqueo del
soporte de montaje de la
videocámara
13 Fijador
14 Férula (con una punta)
15 Fijador de patas
16 Interruptor del modo de
espera de grabación
17 Botón START/STOP
(frontal)
18 Palanca ZOOM (frontal)
19 Botón de modo PHOTO
(frontal)
20 Botón de modo PHOTO
(parte inferior)
21 Botón START/STOP (parte
inferior)
22 Palanca ZOOM (parte
trasera)
23 Interruptor FRONT/REAR
24 Palanca de panoramización/
inclinación
25 Palanca de bloqueo del
ajuste de la longitud de las
patas
Utilización del
trípode
B Ajuste
1 Retire el fijador de patas.
2 Despliegue las patas hasta
que el trípode se estabilice.
3 Abra las palancas de fijación
de longitud de las patas.
4 Ajuste la longitud de las
patas.
5 Cierre las palancas de
fijación de longitud de las
patas.
C Montaje de la
videocámara
Instale la batería e inserte un
casete en la videocámara antes
de montarla en el trípode.
1 Gire la palanca de bloqueo
del soporte de montaje de la
videocámara hacia la
izquierda para extraer dicho
soporte.
2 Alinee el pivote y el tornillo
de montaje de la cámara con
los orificios de la parte
inferior de la videocámara y
fije firmemente el tornillo.
3 Inserte el soporte de montaje
con la videocámara
acoplada en la cabeza del
trípode hasta que oiga un
chasquido. A continuación,
gire la palanca de bloqueo
del soporte de montaje hacia
la derecha para asegurarse
de que queda bloqueado.
4 Para nivelar la videocámara:
1 Desbloquee la rueda de
bloqueo del nivelador de
bola.
2 Ajuste el ángulo de la
cabeza del trípode de
modo que la burbuja del
nivelador quede a la
derecha dentro del anillo
rojo.
3 Bloquee la rueda de
bloqueo del nivelador de
bola.
Remote Control Tripod
3-061-695-12 (1)
VCT-1170RM
©2000 Sony Corporation Printed in Japan
Operating Instructions
Mode d‘emploi
Manual de instrucciones
Xxxxxxx
1
A
2
3
4
5
6
7
8
9
10
11
12
13
14
15
16
17
18
19
20
21
22
23
24
25
B
FrançaisEnglish
Español
1
3
5
2
4
C
2
1
3
2
1
4
2
13
WARNING
This equipment has been tested
and found to comply with the
limits for a Class B digital device,
pursuant to Part 15 of the FCC
Rules. These limits are designed
to provide reasonable protection
against harmful interference in a
residential installation. This
equipment generates, uses, and
can radiate radio frequency
energy and, if not installed and
used in accordance with the
instructions, may cause harmful
interference to radio
communications. However, there
is no guarantee that interference
will not occur in a particular
installation. If this equipment
does cause harmful interference to
radio or television reception,
which can be determined by
turning the equipment off and on,
the user is encouraged to try to
correct the interference by one or
more of the following measures:
– Reorient or relocate the
receiving antenna.
– Increase the separation between
the equipment and receiver.
– Connect the equipment into an
outlet on a circuit different from
that to which the receiver is
connected.
– Consult the dealer or an
experienced radio/TV
technician for help.
You are cautioned that any
changes or modifications not
expressly approved in this manual
could void your authority to
operate this equipment.
Features
The VCT-1170RM is a tripod for
video camera recorders and
features:
•A Remote Commander built in
the pan/tilt handle which
allows you to operate
(zooming, recording or photo
recording) the video camera
recorder with a remote
control jack. You can use the
Remote Commander on the
pan/tilt handle with an
ordinary grip (down position)
or a reverse grip (up position).
•A ball-level for quick and easy
level adjustment.
•Smooth panning/tilting with
the oil-cylinder pan/tilt
handle.
•A built-in counterbalance
mechanism to prevent the
tripod from toppling over.
Caution
•After recording, slide the
recording standby switch of
the pan/tilt handle to LOCK. If
you leave it on STANDBY, the
battery will wear down.
•Make sure that you hold on to
the video camera recorder
when removing it. The camera
mounting shoe automatically
comes off the tripod when you
unlock the camera mounting
shoe lock lever, so the video
camera may fall, if you are not
holding it.
•After using the tripod, remove
the video camera recorder,
close the legs and replace the
pan handle to the original
position. Never carry the
tripod with the video camera
recorder attached.
Cleaning
Clean the tripod with a soft
cloth lightly moistened with a
mild detergent solution. After
using the tripod at a location
subject to sea breezes, be sure to
wipe it clean with a dry cloth.
Identifying the Parts
A
1 Remote plug holder
Insert the remote plug when
not in use.
2 Remote control cord
3 Pan/tilt handle lock screw
4 Camera mounting screw
5 Pin
6 Camera mounting shoe
7 Tilt lock knob
8 Pan lock knob
9 Ball-level lock knob
10 Level
11 Tripod head
12 Camera mounting shoe lock
lever
13 Stay
14 Ferrule (with a spike)
15 Leg holder
16 Recording standby switch
17 START/STOP button (front)
18 ZOOM lever (front)
19 PHOTO mode button (front)
20 PHOTO mode button
(bottom)
21 START/STOP button
(bottom)
22 ZOOM lever (rear)
23 FRONT/REAR switch
24 Pan/tilt handle
25 Leg length adjustment lock
lever
Using the Tripod
B Setting the Tripod
1 Remove the leg holder.
2 Spread the legs until the
tripod becomes stable.
3 Unlock the leg length
adjustment lock levers.
4 Adjust the length of the legs.
5 Lock the leg length
adjustment lock levers.
C Mounting the Video
Camera Recorder
Install the battery pack and
insert a cassette in the video
camera recorder before
mounting it on the tripod.
1 Turn the camera mounting
shoe lock lever to the left to
remove the camera
mounting shoe.
2 Align the pin and the
camera mounting screw
with the holes on the bottom
of the video camera
recorder, and tighten the
screw firmly.
3 Insert the camera mounting
shoe with the video camera
recorder attached into the
tripod head until clicks.
Then, turn the camera
mounting shoe lock lever to
the right to make sure that it
is locked.
4 To make the camera level:
1 Unlock the ball-level
lock knob.
2 Adjust the angle of the
tripod head so that the
bubble in the level
moves inside the red
ring.
3 Lock the ball-level lock
knob.
Xxxxx

Panning and Tilting
D Adjusting the positon
of the pan/tilt handle
First determine the position in
which you want to use the pan/
tilt handle with an ordinary grip
(down position) or a reverse
grip (up position).
To use the pan/tilt handle
with a reverse grip (up
position)
(a) Using it with an ordinary
grip (down position)
(b) Using it with a reverse grip
(up position)
1 Loosen the pan/tilt handle
lock screw.
2 Turn the pan/tilt handle to a
reverse grip (up) position.
3 Tighten the pan/tilt handle
lock screw.
To adjust the vertical
position:
(c) Using it with an ordinary
grip (down position)
(d) Using it with a reverse grip
(up position)
1 Loosen the pan/tilt handle
lock knob.
2 Adjust the angle of the pan/
tilt handle.
3 Tighten the pan/tilt handle
lock knob.
To adjust the horizontal
position:
(e) Using it with an ordinary
grip (down position)
(f) Using it with a reverse grip
(up position)
4 Loosen the pan/tilt handle
lock knob.
5 Adjust the angle of the pan/
tilt handle.
6 Tighten the pan/tilt handle
lock knob.
E Panning/Tilting
Panning
1 Loosen the pan lock knob.
2 Adjust the position of the
video camera recorder by
moving the pan/tilt handle.
3 Tighten the pan lock knob.
Tilting
4 Loosen the tilt lock knob.
5 Adjust the position of the
video camera recorder by
moving the pan/tilt handle.
6 Tighten the tilt lock knob.
Note
Do not adjust torque weight
using the pan lock knob or the
tilt lock knob. Doing so may
cause a malfunction.
Do panning or tilting after
loosening each lock knob
properly.
Using the Remote
Commander
Refer to the operation manual of
the video camera recorder for
further information.
Connect the remote plug
securely to the remote
control
jack of the video camera
recorder. (F)
If the remote plug is not
connected securely, you may not
be able to operate the video
camera recorder.
Set the power switch of the
video camera recorder to
“CAMERA” and then to
recording standby mode.
F Recording
1 Connect the remote plug to
the remote
control jack on
the video camera recorder.
2 Slide the recording standby
switch on the pan handle
(front) to STANDBY.
Slide the recording standby
switch firmly until it clicks.
3 Select the Remote
Commander on the pan/tilt
handle by sliding the
FRONT/REAR switch.
FRONT: When you use the
Remote Commander on
the top surface of the
handle (using it with an
ordinary grip (down
position)).
REAR: When you use the
Remote Commander on
the bottom and the back
side of the handle (using it
with a reverse grip (up
position)).
4 Press the START/STOP
button to start recording.
To stop recording, press
START/STOP.
To resume recording, press it
again.
G Zooming
Slide the ZOOM lever towards
the T side for telephoto (subject
appears closer), and the W side
for wide-angle (subject appears
farther away). Depending on the
type of your video camera
recorder; if you slide the ZOOM
lever still more, the zooming
will be faster.
To Finish Recording
Slide the recording standby
switch to LOCK. The power of
the video camera recorder is
turned off.
H Recording with the
photo mode function
1 Press PHOTO lightly to
check the still picture.
(“PHOTO CAPTURE”
appears on the screen).
2 Press PHOTO deeper to take
the picture (“PHOTO REC”
flashes on the screen while
recording).
Notes
•Photo recording is not
available with some video
camera recorders.
•You cannot check still pictures
with some video camera
recorders.
•If you leave the video camera
recorder in Standby mode for
5 minutes, the video camera
recorder turns off
automatically. To resume
Standby mode, set the
recording standby switch to
LOCK once and then to
STANDBY.
When you are not using the
Remote Commander
Insert the remote plug into the
remote plug holder securely to
prevent the remote plug from
being broken.
Specifications
Maximum load
5 kg (11 lb)
Panning angle
360 degrees
Tilting angle
90 degrees down, 70 degrees
up
Stages of legs
3 stages
Remote control
Function: Recording start/
stop, standby/lock,
Zooming, Photo mode on/
off
Cord length: Approx.
420 mm (16
5
⁄8 inches)
Pan handle length: Approx.
380 mm (15 inches)
Dimensions
Maximum height: Approx.
1 505 mm
(59
3
⁄8 inches) (Legs spread at
25 degrees)
Minimum height: Approx.
700 mm (27
5
⁄8 inches) (Legs
spread), Approx. 735 mm
(29 inches) (Legs closed)
Mass
Approx. 3.3 kg (7 lb 4 oz)
Supplied accessories
Carrying case (1)
Operating instructions (3)
Design and specifications are
subject to change without
notice.
This mark indicates that this
product is a genuine accessory
for Sony video products.
When purchasing Sony video
products, Sony recommends
that you purchase accessories
with this “GENUINE VIDEO
ACCESSORIES” mark.
Panoramique et
inclinaison
D
Réglage de la position
de la poignée de
panoramique/inclinaison
Déterminez dans un premier
temps la position dans laquelle
vous souhaitez utiliser la poignée
de panoramique/inclinaison avec
une poignée ordinaire (position
basse) ou une poignée inversée
(position haute).
Pour utiliser la poignée de
panoramique/inclinaison
avec une poignée inversée
(position haute)
(a) Utilisation avec une poignée
normale (position basse)
(b) Utilisation avec une poignée
inversée (position haute)
1 Dévissez la vis de
verrouillage de la poignée
de panoramique/
inclinaison.
2 Tournez la poignée de
panoramique/inclinaison
pour en faire une poignée
inversée (position haute).
3 Revissez la vis de
verrouillage de la poignée
de panoramique/
inclinaison.
Pour régler la position verticale:
(c) Utilisation avec une poignée
normale (position basse)
(d) Utilisation avec une poignée
inversée (position haute)
1 Desserrez la molette de
verrouillage de la poignée
de panoramique/
inclinaison.
2 Ajustez l’angle de la poignée
de panoramique/
inclinaison.
3 Serrez la molette de
verrouillage de la poignée
de panoramique/
inclinaison.
Pour régler la position horizontale:
(e) Utilisation avec une poignée
normale (position basse)
(f) Utilisation avec une poignée
inversée (position haute)
4 Dévissez la mollette de
verrouillage de la poignée
de panoramique/
inclinaison.
5 Réglez l’angle de la poignée
de panoramique/
inclinaison.
6 Revissez la mollette de
verrouillage de la poignée
de panoramique/
inclinaison.
E Panoramiquer/Incliner
Panoramique
1
Desserrez la molette de
verrouillage du panoramique.
2 Réglez la position du
caméscope en déplaçant la
poignée de panoramique.
3
Serrez la molette de
verrouillage du panoramique.
Inclinaison
4 Desserrez la molette de
verrouillage d’élévation.
5 Réglez la position du
caméscope en déplaçant la
poignée de panoramique.
6 Serrez la molette de
verrouillage d’élévation.
Remarque
Ne réglez pas le contrepoids à
l’aide de la molette de
verrouillage de panoramique ou
la molette de verrouillage
d’inclinaison. Vous risqueriez
sinon de provoquer un
dysfonctionnement.
N’effectuez les réglages de
panoramique et d’inclinaison
qu’après avoir desserré
correctement chacune des
molettes de verrouillage.
Utilisation de la
télécommande
Référez-vous au mode d’emploi
du caméscope pour plus
d’informations.
Raccordez la fiche de
télécommande à la prise de
télécommande
du caméscope
.
(F)
Si la fiche de télécommande n’est
pas correctement positionnée,
vous risquez de ne pas pouvoir
utiliser le caméscope.Mettez
l’interrupteur du caméscope en
position “CAMERA” puis en
mode de pause d’enregistrement.
F Enregistrement
1 Raccordez la fiche de
télécommande à la prise de
commande à distance
du
caméscope.
2
Faites glisser le commutateur
de pause d’enregistrement de
la poignée de panoramique
(avant) sur STANDBY.
Faites glisser le commutateur
de pause d’enregistrement
fermement jusqu’ à ce qu’il
s’encliquette.
3
Sélectionnez la télécommande
sur la poignée de
panoramique/inclinaison en
faisant glisser le commutateur
AVANT/ARRIERE.
AVANT: Lorsque vous
utilisez la télécommande
sur la surface supérieure
de la poignée (Utilisation
avec une poignée normale
(position basse)).
ARRIERE: Lorsque vous
utilisez la télécommande
sur le bas et le côté arrière
de la poignée (Utilisation
avec une poignée inversée
(position haute)).
4 Appuyez sur la touche
START/STOP pour entamer
l’enregistrement.
Pour arrêter l’enregistrement,
appuyez sur la touche START/
STOP.
Appuyez sur ce même bouton
pour reprendre l’enregistrement.
G Zoom
Déplacez le levier ZOOM vers le
côté T pour le mode de téléobjectif
(le sujet semble plus proche), et
vers le côté W pour le mode de
grand-angle (le sujet semble plus
éloigné). Suivant le type de
caméscope dont vous disposez, le
zoom est plus rapide si vous
poussez un peu plus sur le levier
ZOOM.
Pour terminer l’enregistrement
Faites glisser le commutateur de
pause d’enregistrement sur
LOCK. Le caméscope est mis hors
tension.
H
Enregistrement avec la
fonction de mode photo
1
Appuyez à mi-course sur
PHOTO pour vérifier l’image
fixe. (“PHOTO CAPTURE”
apparaît sur l’écran.)
2 Appuyez complètement sur
PHOTO pour prendre la
photo. (“PHOTO REC”
clignote à l’écran pendant
l’enregistrement.)
Remarques
•Le mode d’enregistrement
photo n’est pas disponible sur
certains caméscopes.
•Sur certains caméscopes, vous
ne pouvez pas vérifier des
images fixes.
•
Si vous laissez le caméscope en
mode de veille pendant 5
minutes, le caméscope se met
automatiquement hors tension.
Pour restaurer le mode de
veille, réglez le commutateur
de veille d’enregistrement sur
la position LOCK et ramenez-le
ensuite sur STANDBY.
Lorsque vous n’utilisez pas
la télécommande
Insert the remote plug into
Introduisez fermement la fiche de
télécommande dans le support de
fiche de télécommande de façon à
éviter de la briser.
Spécifications
Charge maximum
5 kg (11 lb)
Angle de panoramique
360 degrés
Angle d’inclinaison
90 degrés vers le bas, 70
degrés vers le haut
Niveaux des pieds
3 niveaux
Télécommande
Fonction : Marche/arrêt
enregistrement, veille/
verrouillage, zoom, Mode
Photo activé/désactivé
Longueru de cordon :
Approx. 420 mm (16
5
⁄8 po)
Longueur de poignée de
panoramique : Approx. 380
mm (15 po)
Dimensions
Hauteur maximum :
Approx. 1.505 mm (59
3
⁄8 po)
(pieds déployés à 25 degrés)
Hauteur minimum :
Approx. 700 mm (27
5
⁄8 po)
(pieds déployés), Approx.
735 mm (29 po) (pieds
refermés)
Masse
Approx. 3,3 kg (7 lb 4 oz)
Accessoires fournis
Etui de transport (1)
Mode d’emploi (3)
Conception et spécifications
modifiables sans préavis.
Ce symbole indique que le
produit est un accessoire
d’origine pour les équipements
vidéo Sony.
Lors de l’achat d’équipements
vidéo Sony, Sony recommande
l’achat d’accessoires d’origine
affichant le symbole “GENUINE
VIDEO ACCESSORIES”.
FrançaisEnglish
Español
Panorámica e inclinación
D Ajuste la posición de
la palanca de
panoramización/
inclinación
En primer lugar, determine la
posición en la que desee utilizar
la palanca de panoramización/
inclinación con un fijador
normal (posición hacia abajo) o
un fijador inverso (posición
hacia arriba).
Para utilizar la palanca de
panoramización/inclinación con un
fijador inverso (posición hacia arriba)
(a)
Utilización con un fijador
normal (posición hacia abajo)
(b)
Utilización con un fijador
inverso (posición hacia arriba)
1 Afloje el tornillo de bloqueo
de la palanca de
panoramización/
inclinación.
2 Gire la palanca de
panoramización/inclinación
hasta una posición de
fijación inversa (hacia
arriba).
3 Apriete el tornillo de
bloqueo de la palanca de
panoramización/
inclinación.
Para ajustar la posición vertical:
(c) Utilización con un fijador
normal (posición hacia
abajo)
(d) Utilización con un fijador
inverso (posición hacia
arriba)
1
Afloje la rueda de bloqueo de
la palanca de
panoramización/inclinación.
2 Ajuste el ángulo de la
palanca de panoramización/
inclinación.
3 Apriete la rueda de bloqueo
de la palanca de
panoramización/
inclinación.
Para ajustar la posición horizontal:
(e)
Utilización con un fijador
normal (posición hacia abajo)
(f)
Utilización con un fijador
inverso (posición hacia arriba)
4 Afloje la rueda de bloqueo
de la palanca de
panoramización/
inclinación.
5 Ajuste el ángulo de la
palanca de panoramización/
inclinación.
6 Apriete la rueda de bloqueo
de la palanca de
panoramización/
inclinación.
E
Panoramización/inclinación
Panorámica
1 Afloje la rueda de bloqueo
de panoramización.
2 Ajuste la posición de la
videocámara moviendo la
palanca de panoramización/
inclinación.
3 Apriete la rueda de bloqueo
de panoramización.
Inclinación
4 Afloje la rueda de bloqueo
de inclinación.
5 Ajuste la posición de la
videocámara moviendo la
palanca de panoramización/
inclinación.
6 Apriete la rueda de bloqueo
de inclinación.
Nota
No ajuste el peso de torsión con
la rueda de bloqueo de
panoramización o inclinación. Si
lo hace, es posible que provoque
problemas de funcionamiento.
Realice la panoramización o
inclinación una vez que haya
aflojado todas las ruedas de
bloqueo correctamente.
Utilización del
mando a distancia
Si desea obtener información
detallada, consulte el manual de
instrucciones de la videocámara.
Conecte el enchufe del mando a
distancia firmemente a la toma
de mando a distancia
de la
videocámara. (F)
Si el enchufe del mando a
distancia no está conectado
firmemente, es posible que no
funcione la videocámara.
Sitúe el interruptor de
alimentación de la videocámara
en la posición “CAMERA” y, a
continuación, en el modo de
grabación en espera.
F Grabación
1 Conecte el enchufe del
mando a distancia a la toma
de mando a distancia de
la videocámara.
2 Deslice el interruptor de
modo de grabación en
espera de la palanca de
panoramización (frontal)
hasta la posición STANDBY.
Deslice el interruptor de
modo de grabación
firmemente hasta que
chasquee.
3 Seleccione el mando a
distancia situado en la
palanca de panoramización/
inclinación deslizando el
interruptor FRONT/REAR.
FRONT: Cuando el mando a
distancia se utiliza en la
parte superior de la
palanca (con un fijador
normal (posición hacia
abajo))
REAR: Cuando el mando a
distancia se utiliza en la
parte inferior y trasera de
la palanca (con un fijador
inverso (posición hacia
arriba)).
4 Pulse el botón START/STOP
para iniciar la grabación.
Para detener la grabación, pulse
el botón START/STOP.
Para reanudar la grabación,
vuelva a pulsarlo.
G Zoom
Deslice la palanca ZOOM hacia
el lado T para telefoto (el sujeto
aparece más cercano) y hacia el
lado W para gran angular (el
sujeto aparece más lejano).
Según el tipo de videocámara, si
desliza la palanca ZOOM aún
más, el zoom será más rápido.
Finalización de la grabación
Deslice hacia LOCK el
interruptor de modo de
grabación en espera. La
alimentación de la videocámara
se apagará.
H Grabación con la
función de modo
fotográfico
1 Pulse PHOTO ligeramente
para comprobar la imagen
fija (“PHOTO CAPTURE”
aparecerá en pantalla).
2 Pulse PHOTO firmemente
para filmar la imagen
(”PHOTO REC“ parpadea
en pantalla durante la
grabación).
Notas
•La grabación fotográfica no
está disponible con
determinadas videocámaras.
•No es posible comprobar
imágenes fijas con algunas
videocámaras.
•Si deja la videocámara en
modo de espera durante 5
minutos, ésta se apagará
automáticamente. Para
reanudar dicho modo, ajuste el
interruptor de modo de espera
de grabación en LOCK una
vez y, a continuación, en
STANDBY.
Cuando no utilice el mando
a distancia
Inserte firmemente el enchufe
del mando a distancia en el
portaenchufe para evitar que
dicho enchufe se rompa.
Especificaciones
Carga máxima
5 kg. (11 lb)
Angulo de panoramización
360 grados
Angulo de inclinación
90 grados hacia abajo y 70
hacia arriba
Posición de las patas
3 posiciones
Mando a distancia
Función: Inicio/detención
de la grabación, modo de
espera/bloqueo, zoom,
Activación/desactivación
del modo fotográfico
Longitud del cable: aprox.
420 mm (16
5
⁄8 pulgadas)
Longitud de la palanca de
panoramización: aprox. 380
mm (15 pulgadas)
Dimensiones
Altura máxima: 1.505 mm
(59
3
⁄8 pulgadas) aprox. (con
la patas extendidas en un
ángulo de 25 grados)
Altura mínima: 700 mm
(27
5
⁄8 pulgadas) aprox. (con
las patas extendidas), 735
mm (29 pulgadas) (con las
patas cerradas)
Masa
3,3 kg aprox (7 lb 4oz)
Accesorios suministrados
Estuche de transporte (1)
Manual de instrucciones (3)
El diseño y las especificaciones están
sujetos a cambio sin previo aviso.
Esta marca indica que este producto
es un accesorio genuino para
productos de vídeo Sony.
Al adquirir productos de vídeo
Sony, Sony recomienda accesorios
que presenten la marca “GENUINE
VIDEO ACCESSORIES”.
D
F
(a)
(b)
(c)
(d)
(e)
(f)
1
3
2
5
4
6
G
H
2
3
4
E
1
3
1
2
3
1
2
6
4
5
6
4
5
3
1
2
Panning and Tilting
D Adjusting the positon
of the pan/tilt handle
First determine the position in
which you want to use the pan/
tilt handle with an ordinary grip
(down position) or a reverse
grip (up position).
To use the pan/tilt handle
with a reverse grip (up
position)
(a) Using it with an ordinary
grip (down position)
(b) Using it with a reverse grip
(up position)
1 Loosen the pan/tilt handle
lock screw.
2 Turn the pan/tilt handle to a
reverse grip (up) position.
3 Tighten the pan/tilt handle
lock screw.
To adjust the vertical
position:
(c) Using it with an ordinary
grip (down position)
(d) Using it with a reverse grip
(up position)
1 Loosen the pan/tilt handle
lock knob.
2 Adjust the angle of the pan/
tilt handle.
3 Tighten the pan/tilt handle
lock knob.
To adjust the horizontal
position:
(e) Using it with an ordinary
grip (down position)
(f) Using it with a reverse grip
(up position)
4 Loosen the pan/tilt handle
lock knob.
5 Adjust the angle of the pan/
tilt handle.
6 Tighten the pan/tilt handle
lock knob.
E Panning/Tilting
Panning
1 Loosen the pan lock knob.
2 Adjust the position of the
video camera recorder by
moving the pan/tilt handle.
3 Tighten the pan lock knob.
Tilting
4 Loosen the tilt lock knob.
5 Adjust the position of the
video camera recorder by
moving the pan/tilt handle.
6 Tighten the tilt lock knob.
Note
Do not adjust torque weight
using the pan lock knob or the
tilt lock knob. Doing so may
cause a malfunction.
Do panning or tilting after
loosening each lock knob
properly.
Using the Remote
Commander
Refer to the operation manual of
the video camera recorder for
further information.
Connect the remote plug
securely to the remote
control
jack of the video camera
recorder. (F)
If the remote plug is not
connected securely, you may not
be able to operate the video
camera recorder.
Set the power switch of the
video camera recorder to
“CAMERA” and then to
recording standby mode.
F Recording
1 Connect the remote plug to
the remote
control jack on
the video camera recorder.
2 Slide the recording standby
switch on the pan handle
(front) to STANDBY.
Slide the recording standby
switch firmly until it clicks.
3 Select the Remote
Commander on the pan/tilt
handle by sliding the
FRONT/REAR switch.
FRONT: When you use the
Remote Commander on
the top surface of the
handle (using it with an
ordinary grip (down
position)).
REAR: When you use the
Remote Commander on
the bottom and the back
side of the handle (using it
with a reverse grip (up
position)).
4 Press the START/STOP
button to start recording.
To stop recording, press
START/STOP.
To resume recording, press it
again.
G Zooming
Slide the ZOOM lever towards
the T side for telephoto (subject
appears closer), and the W side
for wide-angle (subject appears
farther away). Depending on the
type of your video camera
recorder; if you slide the ZOOM
lever still more, the zooming
will be faster.
To Finish Recording
Slide the recording standby
switch to LOCK. The power of
the video camera recorder is
turned off.
H Recording with the
photo mode function
1 Press PHOTO lightly to
check the still picture.
(“PHOTO CAPTURE”
appears on the screen).
2 Press PHOTO deeper to take
the picture (“PHOTO REC”
flashes on the screen while
recording).
Notes
•Photo recording is not
available with some video
camera recorders.
•You cannot check still pictures
with some video camera
recorders.
•If you leave the video camera
recorder in Standby mode for
5 minutes, the video camera
recorder turns off
automatically. To resume
Standby mode, set the
recording standby switch to
LOCK once and then to
STANDBY.
When you are not using the
Remote Commander
Insert the remote plug into the
remote plug holder securely to
prevent the remote plug from
being broken.
Specifications
Maximum load
5 kg (11 lb)
Panning angle
360 degrees
Tilting angle
90 degrees down, 70 degrees
up
Stages of legs
3 stages
Remote control
Function: Recording start/
stop, standby/lock,
Zooming, Photo mode on/
off
Cord length: Approx.
420 mm (16
5
⁄8 inches)
Pan handle length: Approx.
380 mm (15 inches)
Dimensions
Maximum height: Approx.
1 505 mm
(59
3
⁄8 inches) (Legs spread at
25 degrees)
Minimum height: Approx.
700 mm (27
5
⁄8 inches) (Legs
spread), Approx. 735 mm
(29 inches) (Legs closed)
Mass
Approx. 3.3 kg (7 lb 4 oz)
Supplied accessories
Carrying case (1)
Operating instructions (3)
Design and specifications are
subject to change without
notice.
This mark indicates that this
product is a genuine accessory
for Sony video products.
When purchasing Sony video
products, Sony recommends
that you purchase accessories
with this “GENUINE VIDEO
ACCESSORIES” mark.
Xxxx
Transcripción de documentos
English 3-061-695-12 (1) Remote Control Tripod 1 3 Operating Instructions Mode d‘emploi Manual de instrucciones Xxxxxxx 5 2 4 C VCT-1170RM 2 1 ©2000 Sony Corporation Printed in Japan A 1 Features 3 16 2 3 4 5 7 19 18 17 1 8 9 10 20 21 11 4 12 22 13 2 23 24 1 3 14 15 This equipment has been tested and found to comply with the limits for a Class B digital device, pursuant to Part 15 of the FCC Rules. These limits are designed to provide reasonable protection against harmful interference in a residential installation. This equipment generates, uses, and can radiate radio frequency energy and, if not installed and used in accordance with the instructions, may cause harmful interference to radio communications. However, there is no guarantee that interference will not occur in a particular installation. If this equipment does cause harmful interference to radio or television reception, which can be determined by turning the equipment off and on, the user is encouraged to try to correct the interference by one or more of the following measures: – Reorient or relocate the receiving antenna. – Increase the separation between the equipment and receiver. – Connect the equipment into an outlet on a circuit different from that to which the receiver is connected. – Consult the dealer or an experienced radio/TV technician for help. You are cautioned that any changes or modifications not expressly approved in this manual could void your authority to operate this equipment. 6 25 Xxxxx B WARNING 2 Español Français The VCT-1170RM is a tripod for video camera recorders and features: •A Remote Commander built in the pan/tilt handle which allows you to operate (zooming, recording or photo recording) the video camera recorder with a remote control jack. You can use the Remote Commander on the pan/tilt handle with an ordinary grip (down position) or a reverse grip (up position). •A ball-level for quick and easy level adjustment. •Smooth panning/tilting with the oil-cylinder pan/tilt handle. •A built-in counterbalance mechanism to prevent the tripod from toppling over. Caution •After recording, slide the recording standby switch of the pan/tilt handle to LOCK. If you leave it on STANDBY, the battery will wear down. •Make sure that you hold on to the video camera recorder when removing it. The camera mounting shoe automatically comes off the tripod when you unlock the camera mounting shoe lock lever, so the video camera may fall, if you are not holding it. •After using the tripod, remove the video camera recorder, close the legs and replace the pan handle to the original position. Never carry the tripod with the video camera recorder attached. Cleaning Clean the tripod with a soft cloth lightly moistened with a mild detergent solution. After using the tripod at a location subject to sea breezes, be sure to wipe it clean with a dry cloth. Identifying the Parts A 1 2 3 4 5 6 7 8 9 10 11 12 13 14 15 16 17 18 19 20 21 22 23 24 25 Remote plug holder Insert the remote plug when not in use. Remote control cord Pan/tilt handle lock screw Camera mounting screw Pin Camera mounting shoe Tilt lock knob Pan lock knob Ball-level lock knob Level Tripod head Camera mounting shoe lock lever Stay Ferrule (with a spike) Leg holder Recording standby switch START/STOP button (front) ZOOM lever (front) PHOTO mode button (front) PHOTO mode button (bottom) START/STOP button (bottom) ZOOM lever (rear) FRONT/REAR switch Pan/tilt handle Leg length adjustment lock lever Using the Tripod Caractéristiques Nettoyage B Setting the Tripod Le VCT-1170RM est un trépied pour caméscopes intégrant les fonctions suivantes : •Une télécommande intégrée dans la poignée de panoramique/inclinaison qui vous permet de commander le caméscope (zoom, enregistrement ou enregistrement photo) via une prise de commande à distance . Vous pouvez utiliser une télécommande sur la poignée de panoramique/inclinaison avec une poignée ordinaire (position basse) ou une poignée inversée (position haute). •Un niveau à bulle pour une mise à niveau simple et rapide. •Des mouvements de panoramique/inclinaison tout en douceur grâce à une poignée de panoramique/ inclinaison à cylindre hydraulique. •Le mécanisme de contrepoids intégré empêche le trépied de basculer. Nettoyez le trépied avec un chiffon doux légèrement imbibé d’une solution de détergent non agressif. Après avoir utilisé le trépied dans un endroit exposé aux vents marins, frottez-le avec un chiffon sec. 1 2 3 4 5 Remove the leg holder. Spread the legs until the tripod becomes stable. Unlock the leg length adjustment lock levers. Adjust the length of the legs. Lock the leg length adjustment lock levers. C Mounting the Video Camera Recorder Install the battery pack and insert a cassette in the video camera recorder before mounting it on the tripod. 1 Turn the camera mounting shoe lock lever to the left to remove the camera mounting shoe. 2 Align the pin and the camera mounting screw with the holes on the bottom of the video camera recorder, and tighten the screw firmly. 3 Insert the camera mounting shoe with the video camera recorder attached into the tripod head until clicks. Then, turn the camera mounting shoe lock lever to the right to make sure that it is locked. 4 To make the camera level: 1 Unlock the ball-level lock knob. 2 Adjust the angle of the tripod head so that the bubble in the level moves inside the red ring. 3 Lock the ball-level lock knob. Attention •Après la prise de vue, ramenez le commutateur de veille d’enregistrement de la poignée de panoramique/inclinaison sur la position LOCK. Si vous le laissez sur STANDBY, la pile va s’épuiser inutilement. •Veillez à maintenir le caméscope lorsque vous l’enlevez du trépied. Le sabot de montage du caméscope s’enlève automatiquement du trépied lorsque vous déverrouillez le levier de blocage du sabot de montage et le caméscope risque donc de tomber si vous ne le maintenez pas. •Après avoir utilisé le trépied, retirez le caméscope, repliez les pieds et repositionnez la poignée de panoramique dans sa position originale. Ne transportez jamais le trépied alors que le caméscope se trouve toujours fixé dessus. Identification des composantes 2 3 4 5 6 7 8 9 10 11 12 13 14 15 16 17 18 19 20 21 22 23 24 25 B Réglage du trépied 1 2 3 4 5 A 1 Utilisation du trépied Support de fiche de télécommande Introduisez la fiche de télécommande lorsque vous ne l’utilisez pas. Cordon de télécommande Vis de blocage de poignée de panoramique/inclinaison Vis de montage du caméscope Ergot de positionnement Sabot de montage du caméscope Molette de verrouillage d’inclinaison Molette de verrouillage de panoramique Molette de verrouillage du niveau à bulle Niveau Tête du trépiedd Levier de verrouillage du sabot de montage du caméscope Support Ferrure (avec goujon) Support de pied Commutateur de veille d’enregistrement Bouton START/STOP (avant) Levier ZOOM (avant) Button de mode PHOTO (avant) Button de mode PHOTO (bas) Bouton START/STOP (bas) Levier ZOOM (arrière) Commutateur AVANT/ ARRIERE Poignée de panoramique/ inclinaison Levier de verrouillage de réglage de longueur de pied Enlevez le support de pied. Déployez les pieds jusqu’à ce que le trépied soit stable. Déverrouillez les leviers de réglage de la longueur des pieds. Ajustez la longueur des pieds. Verrouillez les leviers de réglage de la longueur des pieds. C Montage du caméscope Installez la batterie et insérez une cassette dans le caméscope avant de l’installer sur le trépied. 1 Tournez le levier de verrouillage du sabot de montage du caméscope vers la gauche pour déposer le sabot de montage du caméscope. 2 Alignez la broche et la vis de montage de la caméra sur les orifices situés dans le fond du caméscope et serrez fermement la vis. 3 Introduisez le sabot de montage du caméscope avec le caméscope dans la tête du trépied jusqu’à ce qu’il s’encliquette. Tournez ensuite le levier de verrouillage du sabot de montage du caméscope vers la droite pour le verrouiller. 4 Pour mettre le caméscope de niveau: 1 Déverrouillez la molette de verrouillage du niveau à bulle. 2 Ajustez l’angle de la tête du trépied de façon à ce que la bulle du niveau se place au centre du cercle rouge. 3 Verrouillez la molette de verrouillage du niveau à bulle. Funciones Limpieza La unidad VCT-1170RM es un trípode para videocámaras e incluye lo siguiente: •Mando a distancia en la palanca de panoramización/ inclinación que permite emplear la función de zoom, de grabación de la videocámara o de grabación fotográfica con una toma de mando a distancia . Es posible utilizar el mando a distancia en la palanca de panoramización/inclinación con un fijador normal (posición hacia abajo) o un fijador inverso (posición hacia arriba). •Nivelador de bola para realizar ajustes de nivel de forma rápida y sencilla. •Panoramización/inclinación uniforme mediante la palanca de panoramización/ inclinación con cilindro de aceite. •Mecanismo de contrapeso incorporado para evitar que el trípode se tambalee. Utilice un paño ligeramente humedecido en una solución detergente suave. Después de utilizar el trípode en un lugar expuesto a la brisa marina, utilice un paño seco para su limpieza. Identificación de los componentes A 1 2 3 4 5 6 7 8 Precaución 9 •Tras la grabación, deslice el interruptor de modo de espera de grabación de la palanca de panoramización/inclinación a la posición LOCK. Si lo deja en STANDBY, la pila se agotará. •Asegúrese de sujetar la videocámara al extraerla. El soporte de montaje de la cámara se desprende automáticamente del trípode al desbloquear la palanca de bloqueo de dicho soporte, por lo que la videocámara puede caerse si no la sujeta. •Tras utilizar el trípode, retire la videocámara, cierre las patas del trípode y vuelva a colocar la palanca de panoramización/inclinación en la posición original. No transporte nunca el trípode con la videocámara acoplada. 10 11 12 13 14 15 16 17 18 19 20 21 22 23 24 25 Portaenchufe del mando a distancia Inserte el enchufe del mando a distancia cuando no lo utilice. Cable del mando a distancia Tornillo de bloqueo de la palanca de panoramización/inclinación Tornillo de montaje de la videocámara Patilla Soporte de montaje de la videocámara Rueda de bloqueo de inclinación Rueda de bloqueo de panoramización Rueda de bloqueo del nivelador de bola Nivel Cabeza del trípode Palanca de bloqueo del soporte de montaje de la videocámara Fijador Férula (con una punta) Fijador de patas Interruptor del modo de espera de grabación Botón START/STOP (frontal) Palanca ZOOM (frontal) Botón de modo PHOTO (frontal) Botón de modo PHOTO (parte inferior) Botón START/STOP (parte inferior) Palanca ZOOM (parte trasera) Interruptor FRONT/REAR Palanca de panoramización/ inclinación Palanca de bloqueo del ajuste de la longitud de las patas Utilización del trípode B Ajuste 1 2 3 4 5 Retire el fijador de patas. Despliegue las patas hasta que el trípode se estabilice. Abra las palancas de fijación de longitud de las patas. Ajuste la longitud de las patas. Cierre las palancas de fijación de longitud de las patas. C Montaje de la videocámara Instale la batería e inserte un casete en la videocámara antes de montarla en el trípode. 1 Gire la palanca de bloqueo del soporte de montaje de la videocámara hacia la izquierda para extraer dicho soporte. 2 Alinee el pivote y el tornillo de montaje de la cámara con los orificios de la parte inferior de la videocámara y fije firmemente el tornillo. 3 Inserte el soporte de montaje con la videocámara acoplada en la cabeza del trípode hasta que oiga un chasquido. A continuación, gire la palanca de bloqueo del soporte de montaje hacia la derecha para asegurarse de que queda bloqueado. 4 Para nivelar la videocámara: 1 Desbloquee la rueda de bloqueo del nivelador de bola. 2 Ajuste el ángulo de la cabeza del trípode de modo que la burbuja del nivelador quede a la derecha dentro del anillo rojo. 3 Bloquee la rueda de bloqueo del nivelador de bola. WARNING This equipment has been tested and found to comply with the limits for a Class B digital device, pursuant to Part 15 of the FCC Rules. These limits are designed to provide reasonable protection against harmful interference in a residential installation. This equipment generates, uses, and can radiate radio frequency energy and, if not installed and used in accordance with the instructions, may cause harmful interference to radio communications. However, there is no guarantee that interference will not occur in a particular installation. If this equipment does cause harmful interference to radio or television reception, which can be determined by turning the equipment off and on, the user is encouraged to try to correct the interference by one or more of the following measures: – Reorient or relocate the receiving antenna. – Increase the separation between the equipment and receiver. – Connect the equipment into an outlet on a circuit different from that to which the receiver is connected. – Consult the dealer or an experienced radio/TV technician for help. You are cautioned that any changes or modifications not expressly approved in this manual could void your authority to operate this equipment. Features The VCT-1170RM is a tripod for video camera recorders and features: •A Remote Commander built in the pan/tilt handle which allows you to operate (zooming, recording or photo recording) the video camera recorder with a remote control jack. You can use the Remote Commander on the pan/tilt handle with an ordinary grip (down position) or a reverse grip (up position). •A ball-level for quick and easy level adjustment. •Smooth panning/tilting with the oil-cylinder pan/tilt handle. •A built-in counterbalance mechanism to prevent the tripod from toppling over. Caution Using the Tripod •After recording, slide the recording standby switch of the pan/tilt handle to LOCK. If you leave it on STANDBY, the battery will wear down. •Make sure that you hold on to the video camera recorder when removing it. The camera mounting shoe automatically comes off the tripod when you unlock the camera mounting shoe lock lever, so the video camera may fall, if you are not holding it. •After using the tripod, remove the video camera recorder, close the legs and replace the pan handle to the original position. Never carry the tripod with the video camera recorder attached. B Setting the Tripod Cleaning Clean the tripod with a soft cloth lightly moistened with a mild detergent solution. After using the tripod at a location subject to sea breezes, be sure to wipe it clean with a dry cloth. Identifying the Parts A 1 2 3 4 5 6 7 8 9 10 11 12 13 14 15 16 17 18 19 20 21 22 23 24 25 Remote plug holder Insert the remote plug when not in use. Remote control cord Pan/tilt handle lock screw Camera mounting screw Pin Camera mounting shoe Tilt lock knob Pan lock knob Ball-level lock knob Level Tripod head Camera mounting shoe lock lever Stay Ferrule (with a spike) Leg holder Recording standby switch START/STOP button (front) ZOOM lever (front) PHOTO mode button (front) PHOTO mode button (bottom) START/STOP button (bottom) ZOOM lever (rear) FRONT/REAR switch Pan/tilt handle Leg length adjustment lock lever 1 2 3 4 5 Remove the leg holder. Spread the legs until the tripod becomes stable. Unlock the leg length adjustment lock levers. Adjust the length of the legs. Lock the leg length adjustment lock levers. C Mounting the Video Camera Recorder Install the battery pack and insert a cassette in the video camera recorder before mounting it on the tripod. 1 Turn the camera mounting shoe lock lever to the left to remove the camera mounting shoe. 2 Align the pin and the camera mounting screw with the holes on the bottom of the video camera recorder, and tighten the screw firmly. 3 Insert the camera mounting shoe with the video camera recorder attached into the tripod head until clicks. Then, turn the camera mounting shoe lock lever to the right to make sure that it is locked. 4 To make the camera level: 1 Unlock the ball-level lock knob. 2 Adjust the angle of the tripod head so that the bubble in the level moves inside the red ring. 3 Lock the ball-level lock knob. English D F (a) Panning and Tilting 1 (b) D Adjusting the positon of the pan/tilt handle First determine the position in which you want to use the pan/ tilt handle with an ordinary grip (down position) or a reverse grip (up position). 3 2 (c) To use the pan/tilt handle with a reverse grip (up position) 1 2 (d) 3 (a) Using it with an ordinary grip (down position) (b) Using it with a reverse grip (up position) 1 Loosen the pan/tilt handle lock screw. 2 Turn the pan/tilt handle to a reverse grip (up) position. 3 Tighten the pan/tilt handle lock screw. To adjust the vertical position: 3 (c) Using it with an ordinary grip (down position) (d) Using it with a reverse grip (up position) 1 Loosen the pan/tilt handle lock knob. 2 Adjust the angle of the pan/ tilt handle. 3 Tighten the pan/tilt handle lock knob. 3 1 2 1 2 4 (e) (e) Using it with an ordinary grip (down position) (f) Using it with a reverse grip (up position) 4 Loosen the pan/tilt handle lock knob. 5 Adjust the angle of the pan/ tilt handle. 6 Tighten the pan/tilt handle lock knob. (f) 6 6 5 E Panning/Tilting 4 4 To adjust the horizontal position: Panning G 5 1 2 3 Loosen the pan lock knob. Adjust the position of the video camera recorder by moving the pan/tilt handle. Tighten the pan lock knob. Tilting 4 5 E 6 Loosen the tilt lock knob. Adjust the position of the video camera recorder by moving the pan/tilt handle. Tighten the tilt lock knob. Note 6 H 5 4 3 1 2 Do not adjust torque weight using the pan lock knob or the tilt lock knob. Doing so may cause a malfunction. Do panning or tilting after loosening each lock knob properly. Español Français Using the Remote Commander Refer to the operation manual of the video camera recorder for further information. Connect the remote plug securely to the remote control jack of the video camera recorder. (F) If the remote plug is not connected securely, you may not be able to operate the video camera recorder. Set the power switch of the video camera recorder to “CAMERA” and then to recording standby mode. F Recording 1 Connect the remote plug to the remote control jack on the video camera recorder. 2 Slide the recording standby switch on the pan handle (front) to STANDBY. Slide the recording standby switch firmly until it clicks. 3 Select the Remote Commander on the pan/tilt handle by sliding the FRONT/REAR switch. FRONT: When you use the Remote Commander on the top surface of the handle (using it with an ordinary grip (down position)). REAR: When you use the Remote Commander on the bottom and the back side of the handle (using it with a reverse grip (up position)). 4 Press the START/STOP button to start recording. To stop recording, press START/STOP. To resume recording, press it again. G Zooming Slide the ZOOM lever towards the T side for telephoto (subject appears closer), and the W side for wide-angle (subject appears farther away). Depending on the type of your video camera recorder; if you slide the ZOOM lever still more, the zooming will be faster. Notes •Photo recording is not available with some video camera recorders. •You cannot check still pictures with some video camera recorders. •If you leave the video camera recorder in Standby mode for 5 minutes, the video camera recorder turns off automatically. To resume Standby mode, set the recording standby switch to LOCK once and then to STANDBY. When you are not using the Remote Commander Insert the remote plug into the remote plug holder securely to prevent the remote plug from being broken. Specifications Maximum load 5 kg (11 lb) Panning angle 360 degrees Tilting angle 90 degrees down, 70 degrees up Stages of legs 3 stages Remote control Function: Recording start/ stop, standby/lock, Zooming, Photo mode on/ off Cord length: Approx. 420 mm (16 5⁄8 inches) Pan handle length: Approx. 380 mm (15 inches) Dimensions Maximum height: Approx. 1 505 mm (59 3⁄8 inches) (Legs spread at 25 degrees) Minimum height: Approx. 700 mm (27 5⁄8 inches) (Legs spread), Approx. 735 mm (29 inches) (Legs closed) Mass Approx. 3.3 kg (7 lb 4 oz) Supplied accessories Carrying case (1) Operating instructions (3) Design and specifications are subject to change without notice. To Finish Recording Slide the recording standby switch to LOCK. The power of the video camera recorder is turned off. H Recording with the photo mode function 1 2 Press PHOTO lightly to check the still picture. (“PHOTO CAPTURE” appears on the screen). Press PHOTO deeper to take the picture (“PHOTO REC” flashes on the screen while recording). This mark indicates that this product is a genuine accessory for Sony video products. When purchasing Sony video products, Sony recommends that you purchase accessories with this “GENUINE VIDEO ACCESSORIES” mark. Panoramique et inclinaison D Réglage de la position de la poignée de panoramique/inclinaison Déterminez dans un premier temps la position dans laquelle vous souhaitez utiliser la poignée de panoramique/inclinaison avec une poignée ordinaire (position basse) ou une poignée inversée (position haute). Pour utiliser la poignée de panoramique/inclinaison avec une poignée inversée (position haute) (a) Utilisation avec une poignée normale (position basse) (b) Utilisation avec une poignée inversée (position haute) 1 Dévissez la vis de verrouillage de la poignée de panoramique/ inclinaison. 2 Tournez la poignée de panoramique/inclinaison pour en faire une poignée inversée (position haute). 3 Revissez la vis de verrouillage de la poignée de panoramique/ inclinaison. Pour régler la position verticale: (c) Utilisation avec une poignée normale (position basse) (d) Utilisation avec une poignée inversée (position haute) 1 Desserrez la molette de verrouillage de la poignée de panoramique/ inclinaison. 2 Ajustez l’angle de la poignée de panoramique/ inclinaison. 3 Serrez la molette de verrouillage de la poignée de panoramique/ inclinaison. Pour régler la position horizontale: (e) Utilisation avec une poignée normale (position basse) (f) Utilisation avec une poignée inversée (position haute) 4 Dévissez la mollette de verrouillage de la poignée de panoramique/ inclinaison. 5 Réglez l’angle de la poignée de panoramique/ inclinaison. 6 Revissez la mollette de verrouillage de la poignée de panoramique/ inclinaison. E Panoramiquer/Incliner Panoramique 1 2 3 Desserrez la molette de verrouillage du panoramique. Réglez la position du caméscope en déplaçant la poignée de panoramique. Serrez la molette de verrouillage du panoramique. Inclinaison 4 5 6 Desserrez la molette de verrouillage d’élévation. Réglez la position du caméscope en déplaçant la poignée de panoramique. Serrez la molette de verrouillage d’élévation. Remarque Ne réglez pas le contrepoids à l’aide de la molette de verrouillage de panoramique ou la molette de verrouillage d’inclinaison. Vous risqueriez sinon de provoquer un dysfonctionnement. N’effectuez les réglages de panoramique et d’inclinaison qu’après avoir desserré correctement chacune des molettes de verrouillage. Utilisation de la télécommande Référez-vous au mode d’emploi du caméscope pour plus d’informations. Raccordez la fiche de télécommande à la prise de télécommande du caméscope. (F) Si la fiche de télécommande n’est pas correctement positionnée, vous risquez de ne pas pouvoir utiliser le caméscope.Mettez l’interrupteur du caméscope en position “CAMERA” puis en mode de pause d’enregistrement. F Enregistrement 1 Raccordez la fiche de télécommande à la prise de commande à distance du caméscope. 2 Faites glisser le commutateur de pause d’enregistrement de la poignée de panoramique (avant) sur STANDBY. Faites glisser le commutateur de pause d’enregistrement fermement jusqu’ à ce qu’il s’encliquette. 3 Sélectionnez la télécommande sur la poignée de panoramique/inclinaison en faisant glisser le commutateur AVANT/ARRIERE. AVANT: Lorsque vous utilisez la télécommande sur la surface supérieure de la poignée (Utilisation avec une poignée normale (position basse)). ARRIERE: Lorsque vous utilisez la télécommande sur le bas et le côté arrière de la poignée (Utilisation avec une poignée inversée (position haute)). 4 Appuyez sur la touche START/STOP pour entamer l’enregistrement. Pour arrêter l’enregistrement, appuyez sur la touche START/ STOP. Appuyez sur ce même bouton pour reprendre l’enregistrement. G Zoom Déplacez le levier ZOOM vers le côté T pour le mode de téléobjectif (le sujet semble plus proche), et vers le côté W pour le mode de grand-angle (le sujet semble plus éloigné). Suivant le type de caméscope dont vous disposez, le zoom est plus rapide si vous poussez un peu plus sur le levier ZOOM. Pour terminer l’enregistrement Faites glisser le commutateur de pause d’enregistrement sur LOCK. Le caméscope est mis hors tension. H Enregistrement avec la fonction de mode photo 1 2 Appuyez à mi-course sur PHOTO pour vérifier l’image fixe. (“PHOTO CAPTURE” apparaît sur l’écran.) Appuyez complètement sur PHOTO pour prendre la photo. (“PHOTO REC” clignote à l’écran pendant l’enregistrement.) Remarques •Le mode d’enregistrement photo n’est pas disponible sur certains caméscopes. •Sur certains caméscopes, vous ne pouvez pas vérifier des images fixes. •Si vous laissez le caméscope en mode de veille pendant 5 minutes, le caméscope se met automatiquement hors tension. Pour restaurer le mode de veille, réglez le commutateur de veille d’enregistrement sur la position LOCK et ramenez-le ensuite sur STANDBY. Lorsque vous n’utilisez pas la télécommande Insert the remote plug into Introduisez fermement la fiche de télécommande dans le support de fiche de télécommande de façon à éviter de la briser. Spécifications Charge maximum 5 kg (11 lb) Angle de panoramique 360 degrés Angle d’inclinaison 90 degrés vers le bas, 70 degrés vers le haut Niveaux des pieds 3 niveaux Télécommande Fonction : Marche/arrêt enregistrement, veille/ verrouillage, zoom, Mode Photo activé/désactivé Longueru de cordon : Approx. 420 mm (16 5⁄8 po) Longueur de poignée de panoramique : Approx. 380 mm (15 po) Dimensions Hauteur maximum : Approx. 1.505 mm (59 3⁄8 po) (pieds déployés à 25 degrés) Hauteur minimum : Approx. 700 mm (27 5⁄8 po) (pieds déployés), Approx. 735 mm (29 po) (pieds refermés) Masse Approx. 3,3 kg (7 lb 4 oz) Accessoires fournis Etui de transport (1) Mode d’emploi (3) Conception et spécifications modifiables sans préavis. Ce symbole indique que le produit est un accessoire d’origine pour les équipements vidéo Sony. Lors de l’achat d’équipements vidéo Sony, Sony recommande l’achat d’accessoires d’origine affichant le symbole “GENUINE VIDEO ACCESSORIES”. Panorámica e inclinación D Ajuste la posición de la palanca de panoramización/ inclinación En primer lugar, determine la posición en la que desee utilizar la palanca de panoramización/ inclinación con un fijador normal (posición hacia abajo) o un fijador inverso (posición hacia arriba). Para utilizar la palanca de panoramización/inclinación con un fijador inverso (posición hacia arriba) (a) Utilización con un fijador normal (posición hacia abajo) (b) Utilización con un fijador inverso (posición hacia arriba) 1 Afloje el tornillo de bloqueo de la palanca de panoramización/ inclinación. 2 Gire la palanca de panoramización/inclinación hasta una posición de fijación inversa (hacia arriba). 3 Apriete el tornillo de bloqueo de la palanca de panoramización/ inclinación. Para ajustar la posición vertical: (c) Utilización con un fijador normal (posición hacia abajo) (d) Utilización con un fijador inverso (posición hacia arriba) 1 Afloje la rueda de bloqueo de la palanca de panoramización/inclinación. 2 Ajuste el ángulo de la palanca de panoramización/ inclinación. 3 Apriete la rueda de bloqueo de la palanca de panoramización/ inclinación. Para ajustar la posición horizontal: (e) Utilización con un fijador normal (posición hacia abajo) (f) Utilización con un fijador inverso (posición hacia arriba) 4 Afloje la rueda de bloqueo de la palanca de panoramización/ inclinación. 5 Ajuste el ángulo de la palanca de panoramización/ inclinación. 6 Apriete la rueda de bloqueo de la palanca de panoramización/ inclinación. E Panoramización/inclinación Panorámica 1 2 3 Afloje la rueda de bloqueo de panoramización. Ajuste la posición de la videocámara moviendo la palanca de panoramización/ inclinación. Apriete la rueda de bloqueo de panoramización. Inclinación 4 5 6 Afloje la rueda de bloqueo de inclinación. Ajuste la posición de la videocámara moviendo la palanca de panoramización/ inclinación. Apriete la rueda de bloqueo de inclinación. Xxxx Nota No ajuste el peso de torsión con la rueda de bloqueo de panoramización o inclinación. Si lo hace, es posible que provoque problemas de funcionamiento. Realice la panoramización o inclinación una vez que haya aflojado todas las ruedas de bloqueo correctamente. Utilización del mando a distancia Si desea obtener información detallada, consulte el manual de instrucciones de la videocámara. Conecte el enchufe del mando a distancia firmemente a la toma de mando a distancia de la videocámara. (F) Si el enchufe del mando a distancia no está conectado firmemente, es posible que no funcione la videocámara. Sitúe el interruptor de alimentación de la videocámara en la posición “CAMERA” y, a continuación, en el modo de grabación en espera. F Grabación 1 Conecte el enchufe del mando a distancia a la toma de mando a distancia de la videocámara. 2 Deslice el interruptor de modo de grabación en espera de la palanca de panoramización (frontal) hasta la posición STANDBY. Deslice el interruptor de modo de grabación firmemente hasta que chasquee. 3 Seleccione el mando a distancia situado en la palanca de panoramización/ inclinación deslizando el interruptor FRONT/REAR. FRONT: Cuando el mando a distancia se utiliza en la parte superior de la palanca (con un fijador normal (posición hacia abajo)) REAR: Cuando el mando a distancia se utiliza en la parte inferior y trasera de la palanca (con un fijador inverso (posición hacia arriba)). 4 Pulse el botón START/STOP para iniciar la grabación. Para detener la grabación, pulse el botón START/STOP. Para reanudar la grabación, vuelva a pulsarlo. G Zoom Deslice la palanca ZOOM hacia el lado T para telefoto (el sujeto aparece más cercano) y hacia el lado W para gran angular (el sujeto aparece más lejano). Según el tipo de videocámara, si desliza la palanca ZOOM aún más, el zoom será más rápido. Finalización de la grabación Deslice hacia LOCK el interruptor de modo de grabación en espera. La alimentación de la videocámara se apagará. H Grabación con la función de modo fotográfico 1 2 Pulse PHOTO ligeramente para comprobar la imagen fija (“PHOTO CAPTURE” aparecerá en pantalla). Pulse PHOTO firmemente para filmar la imagen (”PHOTO REC“ parpadea en pantalla durante la grabación). Notas •La grabación fotográfica no está disponible con determinadas videocámaras. •No es posible comprobar imágenes fijas con algunas videocámaras. •Si deja la videocámara en modo de espera durante 5 minutos, ésta se apagará automáticamente. Para reanudar dicho modo, ajuste el interruptor de modo de espera de grabación en LOCK una vez y, a continuación, en STANDBY. Cuando no utilice el mando a distancia Inserte firmemente el enchufe del mando a distancia en el portaenchufe para evitar que dicho enchufe se rompa. Especificaciones Carga máxima 5 kg. (11 lb) Angulo de panoramización 360 grados Angulo de inclinación 90 grados hacia abajo y 70 hacia arriba Posición de las patas 3 posiciones Mando a distancia Función: Inicio/detención de la grabación, modo de espera/bloqueo, zoom, Activación/desactivación del modo fotográfico Longitud del cable: aprox. 420 mm (16 5⁄8 pulgadas) Longitud de la palanca de panoramización: aprox. 380 mm (15 pulgadas) Dimensiones Altura máxima: 1.505 mm (59 3⁄8 pulgadas) aprox. (con la patas extendidas en un ángulo de 25 grados) Altura mínima: 700 mm (27 5⁄8 pulgadas) aprox. (con las patas extendidas), 735 mm (29 pulgadas) (con las patas cerradas) Masa 3,3 kg aprox (7 lb 4oz) Accesorios suministrados Estuche de transporte (1) Manual de instrucciones (3) Panning and Tilting D Adjusting the positon of the pan/tilt handle First determine the position in which you want to use the pan/ tilt handle with an ordinary grip (down position) or a reverse grip (up position). To use the pan/tilt handle with a reverse grip (up position) (a) Using it with an ordinary grip (down position) (b) Using it with a reverse grip (up position) 1 Loosen the pan/tilt handle lock screw. 2 Turn the pan/tilt handle to a reverse grip (up) position. 3 Tighten the pan/tilt handle lock screw. To adjust the vertical position: (c) Using it with an ordinary grip (down position) (d) Using it with a reverse grip (up position) 1 Loosen the pan/tilt handle lock knob. 2 Adjust the angle of the pan/ tilt handle. 3 Tighten the pan/tilt handle lock knob. To adjust the horizontal position: (e) Using it with an ordinary grip (down position) (f) Using it with a reverse grip (up position) 4 Loosen the pan/tilt handle lock knob. 5 Adjust the angle of the pan/ tilt handle. 6 Tighten the pan/tilt handle lock knob. E Panning/Tilting Panning 1 2 3 Loosen the pan lock knob. Adjust the position of the video camera recorder by moving the pan/tilt handle. Tighten the pan lock knob. Tilting 4 5 6 Loosen the tilt lock knob. Adjust the position of the video camera recorder by moving the pan/tilt handle. Tighten the tilt lock knob. Note Do not adjust torque weight using the pan lock knob or the tilt lock knob. Doing so may cause a malfunction. Do panning or tilting after loosening each lock knob properly. Using the Remote Commander Refer to the operation manual of the video camera recorder for further information. Connect the remote plug securely to the remote control jack of the video camera recorder. (F) If the remote plug is not connected securely, you may not be able to operate the video camera recorder. Set the power switch of the video camera recorder to “CAMERA” and then to recording standby mode. F Recording 1 Connect the remote plug to the remote control jack on the video camera recorder. 2 Slide the recording standby switch on the pan handle (front) to STANDBY. Slide the recording standby switch firmly until it clicks. 3 Select the Remote Commander on the pan/tilt handle by sliding the FRONT/REAR switch. FRONT: When you use the Remote Commander on the top surface of the handle (using it with an ordinary grip (down position)). REAR: When you use the Remote Commander on the bottom and the back side of the handle (using it with a reverse grip (up position)). 4 Press the START/STOP button to start recording. To stop recording, press START/STOP. To resume recording, press it again. G Zooming Slide the ZOOM lever towards the T side for telephoto (subject appears closer), and the W side for wide-angle (subject appears farther away). Depending on the type of your video camera recorder; if you slide the ZOOM lever still more, the zooming will be faster. When you are not using the Remote Commander Insert the remote plug into the remote plug holder securely to prevent the remote plug from being broken. Specifications Maximum load 5 kg (11 lb) Panning angle 360 degrees Tilting angle 90 degrees down, 70 degrees up Stages of legs 3 stages Remote control Function: Recording start/ stop, standby/lock, Zooming, Photo mode on/ off Cord length: Approx. 420 mm (16 5⁄8 inches) Pan handle length: Approx. 380 mm (15 inches) Dimensions Maximum height: Approx. 1 505 mm (59 3⁄8 inches) (Legs spread at 25 degrees) Minimum height: Approx. 700 mm (27 5⁄8 inches) (Legs spread), Approx. 735 mm (29 inches) (Legs closed) Mass Approx. 3.3 kg (7 lb 4 oz) Supplied accessories Carrying case (1) Operating instructions (3) Design and specifications are subject to change without notice. To Finish Recording Slide the recording standby switch to LOCK. The power of the video camera recorder is turned off. H Recording with the photo mode function 1 El diseño y las especificaciones están sujetos a cambio sin previo aviso. 2 Esta marca indica que este producto es un accesorio genuino para productos de vídeo Sony. Al adquirir productos de vídeo Sony, Sony recomienda accesorios que presenten la marca “GENUINE VIDEO ACCESSORIES”. Notes •Photo recording is not available with some video camera recorders. •You cannot check still pictures with some video camera recorders. •If you leave the video camera recorder in Standby mode for 5 minutes, the video camera recorder turns off automatically. To resume Standby mode, set the recording standby switch to LOCK once and then to STANDBY. Press PHOTO lightly to check the still picture. (“PHOTO CAPTURE” appears on the screen). Press PHOTO deeper to take the picture (“PHOTO REC” flashes on the screen while recording). This mark indicates that this product is a genuine accessory for Sony video products. When purchasing Sony video products, Sony recommends that you purchase accessories with this “GENUINE VIDEO ACCESSORIES” mark.-
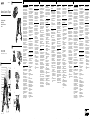 1
1
-
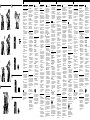 2
2


Sony VCT-1170RM Manual de usuario
- Categoría
- Accesorios para cámaras
- Tipo
- Manual de usuario
en otros idiomas
- français: Sony VCT-1170RM Manuel utilisateur
- English: Sony VCT-1170RM User manual
Artículos relacionados
-
Sony VCT-1100RM Manual de usuario
-
Sony VCT-870RM Manual de usuario
-
Sony VCT570RM Manual de usuario
-
-
-
-
-
-