LG LP0910WNR El manual del propietario
- Categoría
- Acondicionadores de aire móviles
- Tipo
- El manual del propietario

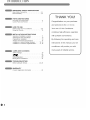
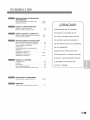
OWNER’S MANUAL
AIR CONDITIONER
Please read this manual carefully before operating
your set and retain it for future reference.
www.lgappliances.com
TYPE:PORTABLE AIR CONDITIONER
MODEL: LP0910WNR

Style Windows


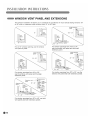
17
62


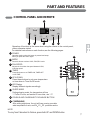
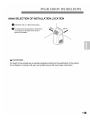
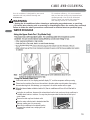
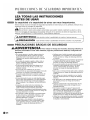
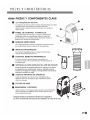
KEY PARTS AND COMPONENTS
6
1
2
6
8
7
2
1
4
3
3
5
SWIVELING CASTERS
INFRARED REMOTE CONTROLLER
6
Check all the accessories included in the package and
please refer to the installation instructions for their usage.
4
INTEGRATED HANDLES
EXHAUST AIR OUTLET VENT
Swiveling casters allow you to move the air conditioner easily
on most floor surfaces.
The remote controller allows you to adjust the temperature
and operate most functions of the air conditioner
from across the room.
AIR DISCHARGE
HOSE
Use the di
AND DIFFUSER
Use the diffuser and hose to connect the air conditioner to the
window installation kit to vent exhaust air outside.
Integrated handles provide a convenient grip when lifting the
air conditione
CONTROL PANEL AND DISPLAY
Easy-to-read digital display shows the set temperature and
indicator lights show the operating mode. Simple push buttons
make changing settings quick and easy.
Adjusting the horizontal louver up and down will change
vertial airflow.
The direction of air can be controlled wherever you want to cool
by adjusting the horizontal louver.
9
5
Dry
7
BOTTOM DRAIN PORT
Used when water tank is full or free of using long time.
Before moving the unit, drain the internal water collection
tank completely by using bottom drain port.
8
AIR FILTER
Insert the large adapter at end of the hose into the hole on the
back of the air conditioner.Align the pins on the connector with
the slots in the hole. Twist slightly clockwise until it locks into place.
9

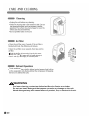
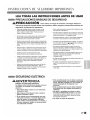
PART AND FEATURES
CONTROL PANEL AND REMOTE
For detailed instructions on each function,see the following pages.
POWER
Operation begins when this button is pressed and stops
when you press the button again.
MODE
Press this button to select COOL,FAN,DRY mode.
FAN SPEED
Adjusts the circulation fan speed between HIGH,
LOW fan speed.
TIMER
Press this button to set TIMER ON, TIMER OFF
or NO TIME
UP & DOWN
LED Display
Setting sleeping mode, the temperature will rise
1 °C after 2 hours, and another 2 hours later, rise 1 °C
NOTE
Operation of functions is the same when using the remote or the control panel,
unless otherwise stated.
1
2
4
5
6
Display different signals accordingly.
7
SLEEP MODE
8
CELSIUS AND FAHRENHEIT EXCHANGE BUTTON
To vary from Fahrenheit to Celsius, press both UP and DOWN button
5
2
1
8
8
1
3
9
4
7
1
2
4 3
5
6
Press these buttons to set room temperature
or time when in Time On/Off mode.
3
After setting mightiness, the unit will keep running no matter
what temperature it sets, and E4
E1 E2 protection works.
9
CONTINUOUS
Eng
li
sh
Dry
Dry

other

batteries:

USING THE CONTROLS
Control panel buttons shown. Operation using the remote control is the same, unless
specifically noted.
1. COOLING MODE
· Press MODE button to choose Cool
mode, the Cool mode indicator will flash.
·
Press UP or DOWN button to set room
temperature between
.
·
Press FAN button (or High/Low button)
to select high, low fan speed.
2. FAN MODE
· Press MODE button (or Fan button) to
choose Fan mode, the Fan mode indicator
will flash.
Select the fan speed by press FAN button
or press High / Low button directly.
· The temperature can not be set.
62 F to 86 F
NOTE
Always point the remote at the sensor. The remote may not work if the
sensor is in bright light or if there is not a clear path between the remote
and the sensor.
10
After setting continuousthe unit will keep
running no matter what temperature it sets,
and E4,E1,E2 protection works.
5. CONTINUOUS
·
3. TIMER MODE
· When the appliance is switch off, press
TIMER button to set timer-on.
·
Press Up or Down button to adjust time
from 1 hour to 24 hours. The Time
on indicator will flash.
·
When the appliance is running, press
TIMER button to set timer-off.
·
Press Up or Down button to adjust time
from 30 minutes to 24 hours. The Time
off indicator will flash.
Setting sleep mode, the temperature
will rise 1
after 2 hours, and another 2
hours later, rise 1
· Then it will keep steady and low fan blow.
4. SLEEP MODE
·
·
High fan blows.
Press MODE button to choose Dry mode,
the Dry mode indicator will flash.
6. DRY MODE
·
·
Under Dry mode, don’t install exhaust hose,
take out the drain plug, and lead the condensing
water to the container through water pipe.
· When first enter the Dry mode, if Ta≥59℉
the compressor starts; if Ta≤55℉, the
compressor stops; for other conditions, it keeps
the state as before.
·
Under Dry mode, fan motor acquiesces in
low speed. The fan speed cannot be changed;
·
Under Dry mode, the setting temperature is
invalid, and it indicates the ambient
temperature(50℉~95℉).


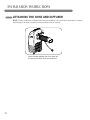
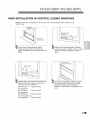
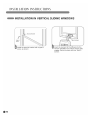
NOTE: The air conditioner is shipped with the hose installed. The hose may be removed for cleaning
and storage, if necessary. Simply reverse the steps below to remove.
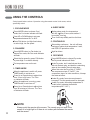
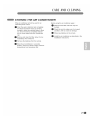
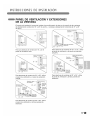
INSTALLATION INSTRUCTIONS
ATTACHING THE HOSE AND DIFFUSER
LOCK
UNLOCK
Insert the large adapte r end of the hose into
the hole on the back of the air c onditioner.
12


3


C A R E A N D C L E A N I N G
Your air conditioner is designed for year-round
operation with only minimal cleaning and
maintenance.
For maximum efficiency, it is recommended
that you have the cooling coils inspected and
cleaned annually. Your local LG Authorized
Service Center can provide this inspection
and cleaning service for a nominal fee.
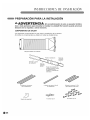
WARNING
• Unplug the air conditioner before cleaning or performing any maintenance or servicing.
• Be careful when cleaning coils or removing or reinstalling the filter—the cooling fins are sharp!
Failure to follow the above precautions could result in electrical shock or personal injury.
English
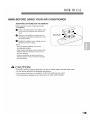
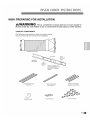
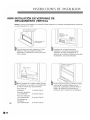
WATER DRAINAGE A
·
If the inside water is full , the display panel will display “FL”, and the compressor will stop running.
Please turn the machine off and move the machine to the place where can drain water, then unplug
the water-draining hole. After drainage, you can power it on and the machine will run again.
Unplug the air conditioner, disconnect the exhaust hose from the back, and move the air conditioner to
a suitable drain location or outdoors. You may also place a pan under the drain that will hold up to 1
quart of water.
When the internal water collection tank is full, the air conditioner will turn off until the tank is
emptied.
Remove the drain cap from the drain outlet.
Once the water collection tank is drained,reinstall the
drain cap, making sure it is on securely.
Place the air conditioner in the desired location,
reconnect the exhaust hose, and plug in the air
conditioner.
1
2
3
19
Using the bottom Drain Port
Dry(dehumidifying) Mode,

The air conditioner
·
· Wash the air filter by immersing it gently into warm
<about 104
(40
)>water with a neutral detergent,
rinse it and dry it thoroughly in a shaded place.
WARNING
For inner cleaning, contact an Authorized Service Center or a dealer.
Do not use harsh detergent that causes corrosion or damage on the unit.
Harsh detergent may also cause failure of product, fire, or electronic shock.

extended period of time:

FL

E4
FL

WARRANTY
LG PORTABLE AIR CONDITIONER LIMITED WARRANTY - USA
WH
AT THIS WARRANTY COVERS:
LG Electronics U.S.A., Inc. (“LG”) warrants your LG Portable Air Conditioner ("product") against defect in materials or workmanship
under normal household use, during the warranty period set forth below, LG will, at its option, repair or replace the product. This
limited warranty is valid only to the original retail purchaser of the product, is not assignable or transferrable to any subsequent
purchaser or user, and applies only when the product is purchased through an LG authorized dealer or distributor and used within
the United States (“U.S.”) including U.S. Territories.
Note: Replacement produc
ts and repair parts may be new or factory-remanufactured and are warranted for the remaining portion
of the original unit’s warranty period or ninety (90) days, whichever is longer. Please retain dated receipt or delivery ticket as
evidence of the Date of Purchase for proof of warranty (you may be required to submit a copy to LG or authorized representative).
WARRANTY PERIOD:
1 year from the Date of Purchase: Any internal/ func
tional Parts and Labor.
HOW SERVICE IS HAN
DLED: In-Home Service
In-home service will be provided during the warranty period subject to availability within the United States. In-home service may
not be available i
n all areas. To receive in-home service, the product must be unobstructed and accessible to service personnel. If
during in-home service repair cannot be completed, it may be necessary to remove, repair and return the product. If in-home
service is unavailable, LG may elect, at our option, to provide for transportation of our choice to and from a LG authorized service
center.
THIS LIMITED WARRANTY
DOES NOT COVER:
1. Ser
vic
e trips to deliver, pick up, or install the product or
for instruction on product use.
2. Replacing house fuses or resetting of circuit breakers,
correction of house wiring or plumbing, or correction of
product installation.
3. Damage or failure caused by leaky/ broken/ frozen water
pipes, restricted drain lines, inadequate or interrupted
water supply or inadequate supply of air.
4. Damage or failure caused by accidents, pests and vermin,
lightning, wind, fire, floods or acts of God.
5. Damage or failure resulting from misuse, abuse, improper
installation, repair or maintenance. Improper repair
includes use of parts not approved or specified by LG.
6
. Damage or failure caused by unauthorized modification or
alteration to the product.
7. Damage or failure caused by incorrect electrical current,
voltage, or plumbing codes.
8. Cosmetic damage, including scratches, dents, chips or
other damage to the finish of the product, unless such
damage results from defects in materials or
workmanship and is reported to LG within seven (7)
calendar days from the date of delivery.
9. Damage or missing items to any display, open box,
discounted, or refurbished product.
10. Product where the original factory serial numbers have
been remov
ed, defaced or changed in any way.
11. Repairs when product is used in other than normal and
usual household use (e.g. rental, commercial use,
offices, or recreational facilities) or contrary to the
instructions outlined in the owner’s manual.
12. The removal and reinstallation of the Product if it is
installed in an inaccessible location.
THIS
WARRANTY IS IN LIEU OF ANY OTHER WARRANTY, EXPRESS OR IMPLIED, INCLUDING AND WITHOUT LIMITATION TO, ANY
WARRANTY OF MERCHANTABILITY OR FITNESS FOR A PARTICULAR PURPOSE. TO THE EX
TENT ANY IMPLIED WARRANTY IS
REQUIRED BY LAW, THIS WARRANTY IS LIMITED IN DURATION TO THE TERM PERIOD EXPRESSED ABOVE. REPAIR OR
REPLACEMENT AS PROVIDED UNDER THIS WARRANTY IS THE EXCLUSIVE REMEDY FOR THE CUSTOMER. NEITHER THE
MANUFACTURER NOR ITS U.S. DISTRIBUTOR SHALL BE LIABLE FOR ANY INCIDENTAL, CONSEQUENTIAL, INDIRECT, SPECIAL, OR
PUNITIVE DAMAGES OF ANY NATURE, INCLUDING AND WITHOUT LIMITATION TO, LOST REVENUES OR
PROFITS, OR ANY OTHER
DAMAGE, WHETHER BASED IN CONTRACT, TORT, OR OTHERWISE.
SOME STATES DO NOT ALLOW THE EXCLUSION OR LIMITATION OF INCIDENTAL OR CONSEQUENTIAL DAMAGES OR LIMITATIONS
ON HOW LONG AN IMPLIED WARRANTY LASTS, SO THE ABOVE EXCL
USION
OR LIMITATION MAY NOT APPLY TO YOU. THIS
WARRA
NTY
GI
VES
Y
O
U S
PECI
FIC LE
GAL
RI
GHTS AND YOU MAY ALSO HAVE OTHER RIGHTS THAT VARY FROM STATE TO STATE.
HOW TO OBTAIN WARRANTY SERVICE & ADDITIONAL INFORMATION:
Call 1-800-243-0000 or visit our website at www.lg.com
.
Mail to: LG Customer Information Center (ATTN: CIC)
201 James Record Road, Huntsville, AL 35824


62
17


5
Dry
6
8
7

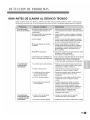
P I E Z A S Y CA R AC T E R Í S T I CA S
PANEL DE CONTROL Y CONTROL REMOTO
PODER
La operación se empieza al apretar el botón y se termina al
hacerlo otra vez.
MODO
Apriete este botón para elegir el modo de FRESCO, VENTILACIÓN y SECADO
FAN SPEED
Ajusta la velocidad del ventilador de circulación entre
baja , alta .
TEMPORIZADOR
Apriete el botón para establecer TEMPORIZADOR ENCENDIDO,
TEMPORIZADOR APAGADO o NO TIEMPO.
ARRIBA O ABAJO
PANTALLA LED
Al establecer el modo de suspención, la temperatura va a subir 1 C
después de 2 horas, y otras 2 horas después, 1 C más.
NOTA
El uso de funciones es el mismo cuando utilice el control remoto o el panel de
control, a menos que se indique lo contrario.
Para instrucciones detalladas de cada función, lea las páginas siguientes.
1
2
4
5
6
Muestran diferentes signos a respecto
7
MODO DE SUSPENSIÓN
8
BOTÓN DE CAMBIO ENTRE CELSIU Y FAHRENHEIT
Para cambiar de Fahrenheit a Celsius, apriete ambos botones ARRIBA y ABAJO.
5
2
1
8
8
1
3
9
4
7
1
2
4 3
5
6
Apriete los botones para establecer la temperatura del cuarto o
tiempo cuando está en modo de Tiempo Encendido/Apagado.
3
Después de estabalecer el modo de poderío, la unidad va a seguir
funcionando sin importar qué temperatura se ajuste, y la protección
de E4, E1, E2 trabajará.
9
CONTINUO
30
Dry
Dry


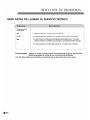
CÓMO USAR LOS CONTROLES
C Ó M O U T I L I Z A R E L A RT E FAC TO
A continuación pueden verse los botones del panel de control. La operación con el control
remoto es la misma, a menos que se especifique lo contrario.
1. MODO DE FRESCO
·
Apriete el botón de MODO para elegir el modo de
FRESCO, y el indicador de este modo centellará.
·
Apriete el botón de ARRIBA o ABAJO para establecer la
temperatura del cuarto de los 18 a los 30
.
·
Apriete el botón VELOCIDAD (o el botón ALTO/
BAJO) para elegir la velocidad del ventilador alta
o baja.
2. MODO DE VENTILACIÓN
·
Apriete el botón de MODO (o botón de Ventilación)
para elegir su modo de Ventilación, y el indicador
del mismo modo entrellará.
Elija la velocidad con apretar el botón de
VENTILACIÓN o marcar el botón de ALTO/
BAJO directamente.
·
La temperatura no se puede establecer.
NOTA
Siempre apunte el remoto en el sensor. El control remoto no puede funcionar
si el sensor está en la luz brillante o si no hay una ruta clara entre el remoto y
el sensor.
4. MODO DE SUSPENSIÓN
·
Al establecer el modo de suspención, la
temperatura subirá 1 C después de 2 horas, y
otras 2 horas después, un otro 1 C más.
·
Luego va a seguir estable y bajo un soplo de viento.
5. CONTINUO
·
Después de estabalecer el modo de poderío, la
unidad va a seguir funcionando sin importar qué
temperatura se ajuste, y la protección de E4, E1,
E2, E3 trabajará.
Soplará el viento alto
3. MODO DE TIEMPO
·
Cuando el aparato está apagado, apriete el
botón de Temporizador para establecer
Temporizador-encendido.
·
Apriete el botón de ARRIBA o ABAJO para
establecer el tiempo desde 30 minutos hasta
24 horas, y el indicador de tiempo entrellará.
·
Cuando el aparato está funcionando, apirete
el botón de Temporizador para establecer el
temporizador-apagado.
·
Apriete el botón de ARRIBA o ABAJO para
establecer el tiempo desde 30 minutos hasta
24 horas, y el indicador de tiempo entrellará.
6. MODO SECO
• Pulse el botón modo en seco para seleccionar dicho
modo, el indicador modo en seco parpadeará.
• En modo en seco, no instale manguera de escape,
extraiga el tapón de drenaje y dirija el agua
condensada hacia el contenedor a través de
la tubería de agua.
• La primera vez que utilice el modo en seco, si la
temperatura es ≥59 F(15 C)
, el compresor se pone en marcha;
si la temperatura es ≤55 F(13 C)
, el compresor se para;
en otras condiciones, el estado anterior se mantiene.
• En modo en seco, el ventilador del motor funciona a baja
velocidad.
• En modo en seco, la temperatura configurada no es válida,
indica la temperatura ambiente <50 F(10 C)~95 F(35 C)>
33
Español


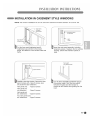
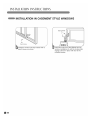
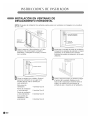
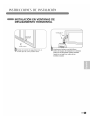
I N S T RU C C I O N E S D E I N S TA L AC I ÓN
CÓMO CONECTAR LA MANGUERA Y EL DIFUSOR
NOTA: El acondicionador de aire se envía con la manguera instalada. Si fuese necesario, la manguera
puede quitarse para limpieza o almacenamiento. Simplemente invierta los pasos siguientes para
quitarla.
LOCK
UNLOCK
Introduzca el extremo grande del adaptador
de la manguera dentro del orificio ubicado
en la parte trasera del acondicionador de
aire.
35
Español


Drinaje de agua
·
Si el agua interior está llena, la pantalla panel mostrará ¨FL¨, y el compresor terminará de funcionar.
Apague la máquina y muévala adonde puede drenar el agua, a continuación, desenchufe el agujero de agua
drenaje. Después del drenaje, puede encenderlo y la máquina volverá a trabajar.
Desconecte el aire acondicionado y la manguera de escape de la espalda, y mueva el aire acondicionado
a un lugar adecuado de drenaje o al aire libre. Usted también puede colocar un recipiente debajo de la
salida de la drenaje. Con el cual puede recoger hasta 1 quarto de agua.
Cuando el tanque interior de colección de agua está lleno, el aire acondicionado se apagará hasta que el cual se vacíe.
Quite el tapón de drenaje de la salida.
Una vez que el tanque de colección de agua se drene, vuelva a
instalar el tapón de drenaje confirmando que está en forma segura.
Coloque el aire condicionado en la ubicación deseada,
vuelva a conectar el tubo de escape y el aire
acondicionado.
1
2
3
42
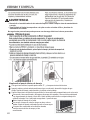
CUIDADO Y LIMPIE ZA
ADVERTENCIA
• Desenchufe el acondicionador de aire antes de limpiar o realizar cualquier clase de mantenimiento
o arreglo.
• Tenga cuidado al limpiar las serpentinas o al quitar o volver a instalar el filtro: ¡las aletas de
enfriamiento son filosas!
No seguir estas precauciones puede provocar una descarga eléctrica o lesiones personales.
Empleando el puerto inferior de drenaje

Acondicionador
ADVERTENCIA
Para una limpieza interior, póngase en contacto con un Centro de Servicios
Autorizado o un revendedor.
No utilice detergentes abrasivos que causan corrosión o dañan la unidad.
Los detergentes abrasivos pueden igualmente provocar un fallo del producto,
un incendio o una descarga electrónica.


FL

E4
FL

Garantía
GARANTÍA LIMITADA DEL AIRE ACONDICIONADO PORTATIL LG - EE.UU.
COBERTURA DE LA GARANTÍA:
LG Electronics Inc. (“LG”) garantiza que reparará o sustituirá, gratuitamente, su producto si resulta defectuoso en materiales o
mano de obra bajo condiciones normales de uso durante el periodo de garantía mencionado más abajo, efectivo a partir de
la fecha de compra del producto original por parte del consumidor. Esta garantía limitada sólo es válida para el comprador
original del producto y no es asignable ni transferible a ningún otro comprador o usuario final subsecuentes, y efectiva
únicamente cuando el producto se compra a través de un distribuidor autorizado de LG y se utiliza en los Estados Unidos ("EE
UU") o en cualquiera
de sus territorios.
Nota: Los recambios y piezas de repuesto pueden ser nuevos o estar reconstruidos de fábrica y están garantizados durante el
tiempo restante del periodo de garantía de la unidad original o noventa días (90), el periodo de los dos que sea más largo. Por
favor, guarde el recibo de compra o la nota de entrega como prueba de la fecha de compra como comprobante de garantía (se le
puede pedir que presente una copia a LG o a su representante autorizado).
PERIODO DE GARANTÍA:
1 año desde la fecha de compra: Cualquier repuesto interno/funcional y mano de obra
PROCESO DE SERVICIO: Servicio a domicilio
Los servicios a domicilio se prestarán durante el periodo de garantía sujeto a disponibilidad en los Estados Unidos. El servicio a
domicilio p
uede no estar disponible en todas las áreas. Para recibir asistencia técnica a domicilio, el producto debe estar en un
entorno despejado y accesible al personal técnico. Si durante el servicio a domicilio la reparación no se puede llevar a cabo, es
posible que sea necesario desplazarlo a nuestras instalaciones, repararlo y devolverlo a su hogar. Si este fuera el caso, LG puede
optar, a petición nuestra, a utilizar el transporte de nuestra elección para desplazar la unidad al y del centro de servicio
autorizado de LG.
ESTA GARANTÍA LIMITADA NO SE APLICA A:
1. Las visitas d
e Asistencia a domicilio para entregar, recoger
y/o instalar el producto, instruir o sustituir fusibles.
2. Sustitución de fusibles de la casa o reajuste de
interruptores de circuito, la corrección del cableado de la casa
o de la tubería, o la corrección de la instalación del producto.
3. Los daños o averías causados por fugas / roturas/
congelación de tuberías de agua, líneas de drenaje restringido,
suministro insuficiente de agua o interrumpido, o suministro
insuficiente de aire.
4. Los daños o averías causados por accidentes, plagas e
insectos, rayos, viento, fuego, inundaciones o actos de Dios.
5. Los daños o fallos o
casionados por el mal uso, abuso,
instalación inadecuada, reparación o mantenimiento. Se
considera reparación inadecuada aquella en que se hayan
utilizado piezas no aprobadas o especificadas por LG.
6. Los daños o averías causados por modificaciones no
autorizadas o alteraciones del producto.
7. Los daños o averías causados por la utilización de una
corriente eléctrica, tensión o código de plomería incorrectos.
8. Daños estéticos, incluyendo arañazos, abolladuras,
desportilladuras u otros daños en el acabado del producto, a
menos que dichos daños sean el resultado de defectos en los
materiales o mano de obra y se informe a LG en el plazo de
siete días
naturales (7) a partir de la fecha de entrega.
9. Los daños o la pérdida de componentes de cualquier
producto cuya caja haya sido abierta, haya sido objeto de un
descuento o se haya restaurado.
10. Los productos cuyos números de serie de fábrica
originales hayan sido quitados, borrados o cambiados de
ninguna manera.
11. Las reparaciones cuando el producto se utiliza para
cualquier cosa fuera de lo normal y del uso doméstico
habitual (por ejemplo su alquiler, uso comercial, en oficinas o
en instalaciones de ocio) o en contra de la instrucciones que
se indican en el manual del propietario.
12. La extracción y reinstalación del producto si está instalado
en un lugar inaccesible.
ESTA GARANTÍA SE OTORGA EN SUSTITUCIÓN O EXCLUSIÓN DE TODA OTRA GARANTÍA, EXPRESA O IMPLÍCITA, INCLUYENDO SIN
LIMITAR CUALQUIER GARANTÍA DE CALIDA
D O IDONEIDAD CON UN PROPÓSITO CONCRETO. EN LA MEDIDA EN QUE CUALQUIER
GARANTÍA IMPLÍCITA ES OBLIGADA POR LA LEY, ESTÁ LIMITADA EN DURACIÓN AL PERIODO DE GARANTÍA YA MENCIONADO. LA
REPARACIÓN O REEMPLAZO DE PIEZAS, SEGÚN LO ESTABLECIDO EN ESTA GARANTÍA, ES EL ÚNICO QUE PUEDE RECLAMAR EL
CLIENTE. NI EL FABRICANTE NI SU DISTRIBUIDOR EN LOS EE.UU. SE HACE RESPONSABLE DE CUALQUIER DAÑO (DERIVADO,
INDIRECTO, ESPECIAL O PENAL) DE CUALQUIER NATURALEZA, INCLUYENDO, SIN LIMITACION, LA PÉRDIDA DE INGRESOS O
BENEFICIOS O CUALQUIER OTRO TIPO DE DAÑO, AÚN BASADO EN UN CONTRATO, SEA UN AGRAVIO O DE CUALQUIER OTRA
MANERA.
ALGUNOS ESTADOS NO PERMITEN LA EXCLUSIÓN O LIMITACIÓN DE DAÑOS IMPREVISTOS O RESULTANTES, O LIMITACIONES A LA
DURACIÓN DE LAS GARANTÍAS IMPLÍCITAS, POR LO QUE LA EXCLUSIÓN O LIMITACIÓN MENCIONADA ANTERIORMENTE NO SERÁ
APLICABLE AL USUARIO. ESTA GARANTÍA L
E OTORGA DERECHOS LEGALES ESPECÍFICOS Y TAMBIÉN PUEDE TENER OTROS QUE
VARIARÁN DE UN ESTADO A OTRO.
COMO OBTENER EL SERVICIO DE ESTA GARANTÍA E INFORMACIÓN ADICIONAL:
Llame al 1-800-243-0000 o visite nuestra página web: www.lg.com.
Dirección de correo ordinario: LG Customer Information Center (ATTN: CIC)
201 James Record Road, Huntsville, AL 35824

1-800-243-0000
LG Customer Information Center
Register your product Online
www.lgappliances.com
LG ELECTRONICS,INC.
1000 Sylvan Ave.,Englewood Cliffs,NJ 07632
-
 1
1
-
 2
2
-
 3
3
-
 4
4
-
 5
5
-
 6
6
-
 7
7
-
 8
8
-
 9
9
-
 10
10
-
 11
11
-
 12
12
-
 13
13
-
 14
14
-
 15
15
-
 16
16
-
 17
17
-
 18
18
-
 19
19
-
 20
20
-
 21
21
-
 22
22
-
 23
23
-
 24
24
-
 25
25
-
 26
26
-
 27
27
-
 28
28
-
 29
29
-
 30
30
-
 31
31
-
 32
32
-
 33
33
-
 34
34
-
 35
35
-
 36
36
-
 37
37
-
 38
38
-
 39
39
-
 40
40
-
 41
41
-
 42
42
-
 43
43
-
 44
44
-
 45
45
-
 46
46
-
 47
47
-
 48
48


LG LP0910WNR El manual del propietario
- Categoría
- Acondicionadores de aire móviles
- Tipo
- El manual del propietario
en otros idiomas
- English: LG LP0910WNR Owner's manual
Artículos relacionados
-
LG LW5012 El manual del propietario
-
-
-
 WINTAIR LP0910WNR El manual del propietario
-
-
-
LG Electronics LP0711WNR El manual del propietario
-
-
-
LG LP1411SHR El manual del propietario
