National Geographic 9103000 El manual del propietario
- Tipo
- El manual del propietario
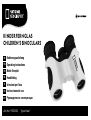
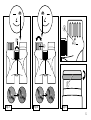
El National Geographic 9103000 es un binocular para niños que les permite explorar el mundo de forma segura y divertida. Con su aumento de 8x y un diámetro de lente de 21 mm, ofrece una visión clara y detallada de objetos lejanos. Su diseño robusto y ligero lo hace ideal para actividades al aire libre, como senderismo, camping y observación de aves. Además, cuenta con un enfoque central fácil de usar y oculares de goma plegables para una visualización cómoda, incluso para los usuarios que usan gafas.
El National Geographic 9103000 es un binocular para niños que les permite explorar el mundo de forma segura y divertida. Con su aumento de 8x y un diámetro de lente de 21 mm, ofrece una visión clara y detallada de objetos lejanos. Su diseño robusto y ligero lo hace ideal para actividades al aire libre, como senderismo, camping y observación de aves. Además, cuenta con un enfoque central fácil de usar y oculares de goma plegables para una visualización cómoda, incluso para los usuarios que usan gafas.


-
 1
1
-
 2
2
-
 3
3
-
 4
4
-
 5
5
-
 6
6
-
 7
7
-
 8
8
-
 9
9
-
 10
10
-
 11
11
-
 12
12
-
 13
13
-
 14
14
-
 15
15
-
 16
16
-
 17
17
-
 18
18
-
 19
19
-
 20
20
-
 21
21
-
 22
22
-
 23
23
-
 24
24
-
 25
25
-
 26
26
-
 27
27
-
 28
28
-
 29
29
-
 30
30
-
 31
31
-
 32
32
-
 33
33
-
 34
34
-
 35
35
-
 36
36


National Geographic 9103000 El manual del propietario
- Tipo
- El manual del propietario
El National Geographic 9103000 es un binocular para niños que les permite explorar el mundo de forma segura y divertida. Con su aumento de 8x y un diámetro de lente de 21 mm, ofrece una visión clara y detallada de objetos lejanos. Su diseño robusto y ligero lo hace ideal para actividades al aire libre, como senderismo, camping y observación de aves. Además, cuenta con un enfoque central fácil de usar y oculares de goma plegables para una visualización cómoda, incluso para los usuarios que usan gafas.
en otros idiomas
Artículos relacionados
-
National Geographic 9103000 El manual del propietario
-
Bresser 3x30 Children's Binoculars in different Colours El manual del propietario
-
-
National Geographic 9103500 El manual del propietario
-
National Geographic 9104000 El manual del propietario
-
-
National Geographic 6x21 Binoculars El manual del propietario
-
Otros documentos
-
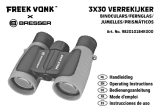 Freek Vonk 9820101000000 El manual del propietario
-
Bresser Junior 3x30 Children's Binoculars in different Colours El manual del propietario
-
Bresser 1821042 Manual de usuario
-
-
Bresser Junior 6x21 Binoculars for Kids El manual del propietario
-
Bresser Porro-Fernglas Manual de usuario
-
Bresser 1821043 Manual de usuario
