La página se está cargando...

8
Questions, problems, missing parts?
Before returning to the store, call Hampton Bay Customer Service
8 a.m. - 7 p.m., EST, Monday-Friday,
9 a.m. - 6 p.m., EST, Saturday
1-855-HD-HAMPTON
HAMPTONBAY.COM
Retain this manual for future use
7
HAMPTONBAY.com
Please contact 1-855-HD-HAMPTON for further assistance.
Troubleshooting
Problem Possible Cause Solution
The lights will not turn on.
A bulb is burned out. Replace the light bulb.
The power is off. Ensure the power supply is turned on.
There is a faulty switch. Test or replace the switch.
There is a faulty wire connection. Check the wiring.
A bulb is not making contact with terminal. Check position of terminal inside socket.
The fuse blows, or the circuit
breaker trips, when the light is
turned on.
There are crossed wires, or the power wire is
grounding out.
Discontinue use of the light string. Check
the wire connections. Contact a qualified
electrician or call the Customer Care Service
Team at 1-855-HD-HAMPTON.
6
HAMPTONBAY.com
Please contact 1-855-HD-HAMPTON for further assistance.
User Servicing Instructions
Grasp the plug and remove from the receptacle or other outlet device. Do not unplug by pulling on the cord.
Do not use any cleaners with chemicals, solvents, or harsh abrasives. Use only a dry, soft cloth to dust or wipe carefully.
To clean the fixture, disconnect the power by turning off the circuit breaker or by removing the fuse at the fuse box, and use a dry or
slightly dampened, clean cloth to wipe the exterior surface of the fixture.
Periodically inspect the wire and sockets for degradation due to weather, UV light or other damage.
Check the bulbs regularly for loose, broken, or unlit bulbs. Replace bulbs immediately. DO NOT OPERATE THE LIGHT STRING WITH ANY
MISSING BULBS, DAMAGED SOCKET/S, AND/OR DAMAGED BULBS.
To replace bulbs in the light string, unscrew the existing bulbs by lightly holding the socket in one hand and twisting the bulb
counter-clockwise. Bulbs may be tight in the sockets. This is normal to prevent moisture from getting into the socket.
Be sure to fill every socket of the light string (12 bulbs total).
Use only with type G, A, S bulbs 11 watts max
1006-695-149
2416J2-1

2
Table of Contents
Table of Contents 2
Safety Information 2
Warranty 4
What is covered 4
What is not covered 4
Pre-Installation 4
Planning Installation 4
Package Contents 4
Installation 5
User Servicing Instructions 6
Troubleshooting 7
Safety Information
For your protection and safety, carefully read and understand the information provided in this manual completely before attempting to assemble, install,
or operate this product. Failure to do so could lead to electrical shock, fire, or other injuries that could be hazardous or even fatal.
Before touching any wire, use a voltage tester to make sure it is not live.
Use tools with insulated handles and ladders made of wood or fiberglass.
To protect children, place a safety cover over any unused outlets.
Keep combustible material clear of bulbs. DO NOT allow the bulbs or sockets to come into contact with walls, ceilings, or fabrics associated with shades,
blinds or other materials.
NOT intended for installation in ceilings, soffits, cabinets or other enclosed spaces.
DO NOT submerge under water.
NOT intended for lighting aquariums.
When products are used in outdoor applications, connect the product to a Ground Fault Circuit Interrupting (GFCI) outlet. If one is not provided,
contact a qualified electrician for proper installation.
Do NOT mount or place near gas or electric heaters, fireplaces, candles or other similar sources of heat.
Do NOT secure the wiring of the product with staples or nails, or place on sharp hooks or nails, install only using the mounting means provided.
Do NOT let lamps rest on the supply cord or on any wire.
Do NOT use this product for other than its intended use.
Do NOT hang objects from cord, wire, light string or lamps.
Do NOT close doors or windows on the product or extension cords as this may damage the wire insulation.
Do NOT cover the product with cloth, paper or any material not part of the product when in use.
This product has a polarized plug (one blade is wider than the other) as a feature to reduce the risk of electric shock. This plug will fit in a polarized
outlet only one way. If the plug does not fit fully in the outlet, reverse the plug. If it still does not fit, contact a qualified electrician.
Do NOT use with an extension cord unless plug can be fully inserted. Do not alter or replace the plug.
This product is intended for all-year use.
Always unplug this product before installing or replacing lamps
For outdoor use only.
This is an electric product not a toy! To avoid risk of fire, burns, personal injury and electric shock it should not be played with or placed where small
children can reach it.
Do NOT place near standing areas of water, such as ponds and pools.
This string light is rated Max.1.1A Max. 132W, do NOT overload. Connect other string lights end-to-end up to a maximum of 1440 Watts total.
Insert the load fitting cover in the cord connector when not in use.
Risk of Fire. Keep lamps away from any combustible surface.
Replace only with the same type 11-Watt Max medium(E26) base lamp.
Read and follow all instructions that are on the product or provided with the product.
READ AND FOLLOW ALL SAFETY INSTRUCTIONS
SAVE THESE INSTRUCTIONS
IMPORTANT SAFETY INSTRUCTIONS
When using electrical products, basic precautions should always be followed including the following:
3
Safety Information
CAUTION: CONSULT A QUALIFIED ELECTRICIAN IF YOU HAVE ANY ELECTRICAL QUESTIONS.
If you have any non-electrical questions about this fixture, please call our Customer Service Team at
1-855-HD-HAMPTON or visit www.hamptonbay.com.
Please reference your Item (1006-695-149) or Model (2416J2-1).
DANGER: Before starting installation of this fixture or removal of a previous fixture, disconnect the power by turning off the circuit
breaker, removing the fuse at the fuse box, or tripping the breaker that controls that circuit. Tape a sign to the panel warning others to
leave the circuit alone while you work.
IMPORTANT: All bulbs must be OUTDOOR rated. Use of improperly rated bulbs can result in electric shock, fire,
product
and/or damage to
, property, or injury to self.
DO NOT use any bulb over 11 watts.
DO NOT exceed the maximum number of 10 light strings when connecting multiple strings.
DO NOT exceed the maximum total capacity of 1440 watts.
Calculate the total load by adding up the wattages used in each of the 12 sockets X the number of light strings.
IMPORTANT: The maximum distance to the receptacle is determined by the length of the cord provided and appropriate extension
cord if used.
IMPORTANT: The maximum distance between interconnected units is determined by the length of the cord provided and appropriate
extension cord if used.
4
Pre-Installation
TWO (2) YEAR WARRANTY FOR THE UNIT, NINETY (90) DAY WARRANTY FOR THE BULBS
PLANNING INSTALLATION
WHAT IS COVERED
WHAT IS NOT COVERED
The manufacturer warrants this fixture to be free from defects in materials and workmanship for a period of two (2) years from date of purchase.
The manufacturer warrants the included bulbs to be free from defects in materials and workmanship for a period of ninety (90) days from
date of purchase. This warranty applies only to the original consumer purchaser and only to products used in normal use and service. If this
product is found to be defective, the manufacturer’s only obligation, and your exclusive remedy, is the repair or replacement of the product at the
manufacturer’s discretion, provided that the product has not been damaged through misuse, abuse, accident, modifications, alteration, neglect,
or mishandling. This warranty shall not apply to any product that is found to have been improperly installed, set-up, or used in any way not in
accordance with the instructions supplied with the product. This warranty shall not apply to a failure of the product as a result of an accident,
misuse, abuse, negligence, alteration, faulty installation, or any other failure not relating to faulty material or workmanship. This warranty shall not
apply to the finish on any portion of the product, such as surface and/or weathering, as this is considered normal wear and tear.
The manufacturer does not warrant and specifically disclaims any warranty, whether expressed or implied, of fitness for a particular
purpose, other than the warranty contained herein. The manufacturer specifically disclaims any liability and shall not be liable for any
consequential or incidental loss or damage, including but not limited to any labor/expense costs involved in the replacement or repair
of said product. Contact the Customer Service Team at 1-855-HD-HAMPTON or visit www.hamptonbay.com.
Read all the instructions before installation.
IMPORTANT: Inspect the wire insulation for any cuts,
abrasions, or exposed copper that may have occurred
during shipping. If there is a defect in the wire, do not
attempt installation. Please call the Customer Service
Team at 1-855-HD-HAMPTON.
NOTE: Support cable and hardware are not
included (sold separately).
NOTE: You may use bulbs of different wattages
other than those included (sold separately). See
the chart below for details.
Warranty
USING BULBS OF DIFFERENT WATTAGES
Bulb Type
S14, Medium
(E26) Base (Included) 11 watts 10 strings
Bulb
Wattage Maximum Number
of Light Strings
USING LED BULBS
LED S14 1.4 watts 10 strings
10 strings
10 strings
1.4 watts
7-9 watts
LED A15
LED A19
Bulb Type Average
Wattage
Maximum Number
of Light Strings
PACKAGE CONTENTS
A
B
A#14 SJTW 2-Conductor Wire with
attached Medium Base (E26) Socket
1 light string
w/12 sockets
18 (12 + 6 spare)
S14, Medium Base (E26)
11W Incandescent Bulbs
B
Part QuantityDescription
5
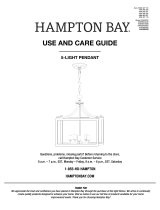
Installation
Preparing for installation
Suspending the light string
Installing bulbs
1
3
2
Disconnect the power at the source prior to attempting to install
or service the light string.
Prior to installing the bulb inside each socket, check the position
of the power contact point (brass terminal at center). It is
important that the position of the terminal is raised to around a
20 degree angle to ensure reliable contact with the bulb base.
If it is necessary to raise the position of the brass terminal, use
a small flat blade screwdriver to gently raise the position of the
blade. DO NOT repeatedly adjust this terminal as this can result
in breakage.
This light string requires 120V, 50/60Hz input and each light
string consumes 1.1 amps (132 watts). Use only with 120V AC
receptacles.
The light string must be securely attached to a support structure
at each end of each span. The maximum unsupported span
distance for the light string is 6 m/20 ft.
Secure the light string to the supporting hardware (eyebolts,
brackets, etc., not included) using cable ties (not included).
For spans exceeding 6 m/20 ft, use a properly rated cable
support system and cable ties (not included) and follow local
codes for suspended structures and loads.
The light sockets must be suspended so that the bulbs are facing
down ONLY. DO NOT mount the light string with the sockets facing
upward. Bulbs should hang freely in a downward direction with
a minimum of 7.6 cm/3 in. space from the nearest object. DO
NOT cluster the bulbs.
BEFORE PLUGGING IN THE LIGHT STRING, FILL EACH SOCKET
WITH A BULB. The socket is tall and the terminal is at the top,
inside of the socket. When inserting, turn the bulb slowly yet
firmly to fully secure.
After each socket has a bulb, cover the end of the light string
set with the end socket cover, then plug the light string into a
120V AC outlet and be sure each light bulb lights. If not, note
which one(s) did not light, ALWAYS UNPLUG LIGHT STRING,
then carefully turn the unlighted bulb(s) until they make
contact with the terminal at the top of the socket. Repeat
until all the bulbs light up.
Install or insert light string bulbs only during dry
and calm weather conditions. Ambient
temperatures around 18˚-35˚C / 65˚-95˚F are ideal
so the light string will be more flexible.
NOTE: Avoid damage to the insulation during
installation. DO NOT pierce or otherwise
compromise the outer covering of the wire or
socket, jacket, or sheathing. DO NOT secure the
light string to buildings or other structural
supports using nails, staples or other sharp,
conducting materials that may damage the cord.
Structural Support
Supporting
Hardware
6 m/20 ft maximum span between supports when free-hanging
NOTE: Support cable and hardware are not
included (sold separately).
IMPORTANT: When interconnecting multiple
light strings, prevent the connection from
separating. Mount to the support cable or use
twine or wire to connect the first and last sockets
via the mounting hole at the top of each.

ARTÍCULO N.º 1006-695-149
MODELO N.º 2416J2-1
GUÍA DE USO Y CUIDADO
JUEGO DE TIRA DE LUCES COMERCIAL DE 24'
¿Tiene preguntas o problemas, o le faltan piezas?
Antes de devolver a la tienda, llame a Atención al Cliente de Hampton Bay
Lunes a viernes de 8:00 a.m. a 7:00 p.m., EST,
sábado de 9:00 a.m. a 6:00 p.m., EST
1-855-HD-HAMPTON
HAMPTONBAY.COM
GRACIAS
crear productos de calidad diseñados para mejorar su hogar. Visítenos en línea para ver nuestra línea completa de productos disponibles para
sus necesidades de mejoramiento del hogar. ¡Gracias por elegir a Hampton Bay!
8
¿Tiene preguntas o problemas, o le faltan piezas?
Antes de devolver a la tienda, llame a Atención al Cliente de Hampton Bay
Lunes a viernes de 8:00 a.m. a 7:00 p.m., EST,
y los sábados de 9:00 a.m. a - 6:00 p.m., EST
1-855-HD-HAMPTON
HAMPTONBAY.COM
Guarde este manual para su uso futuro
7
HAMPTONBAY.com
Comuníquese al 1-855-HD-HAMPTON para recibir asistencia adicional.
Resolución de problemas
Problema Causa posible Solución
Las luces no encienden.
El foco está fundido. Reemplace el foco.
El suministro de alimentación está apagado. Asegúrese de que el suministro
Hay un interruptor defectuoso. Verifique o cambie el interruptor.
Hay una falla en la conexión de los cables. Revise el cableado.
La bombilla no hace contacto con el terminal. Revise la posición del terminal dentro
El fusible se funde o el disyuntor se
dispara cuando se enciende la luz.
Los cables están cruzados o el cable de
alimentación está haciendo conexión a tierra.
Deje de usar la tira de luces. Revise las
conexiones de los cables. Póngase en
contacto con un electricista cualificado
1-855-HD-HAMPTON.
6
HAMPTONBAY.com
Comuníquese al 1-855-HD-HAMPTON para recibir asistencia adicional.
Instrucciones de reparación para el usuario
Agarre el enchufe y extráigalo del tomacorriente u otro dispositivo de salida. No lo desenchufe tirando del cable.
No use limpiadores que contengan sustancias químicas, solventes o abrasivos agresivos. Use solo un paño seco y suave para limpiar
con cuidado.
Para limpiar la luminaria, desconecte la alimentación abriendo el disyuntor o quitando el fusible de la caja de fusibles, y utilice un
paño limpio, seco o ligeramente humedecido, para limpiar la superficie exterior de la luminaria.
Inspeccione periódicamente si hay degradación por el clima, luz ultravioleta u otros daños en el cable y los portalámparas.
Verifique si hay bombillas flojas, quemadas o apagadas. Reemplace y coloque las bombillas de inmediato. NO UTILICE LA TIRA DE LUCES
CON PORTALÁMPARAS DAÑADOS O SIN BOMBILLAS, O CON BOMBILLAS DAÑADAS.
Para reemplazar las bombillas de la tira de luces, desenrosque las bombillas sosteniendo el portalámparas con una mano y girando
Asegúrese de colocar una bombilla en cada portalámparas de la tira de luces (12 bombillas en total).
Usar solamente con bombillas tipo G, A y S de 11 vatios como máximo.

2
Índice
Índice 2
Información de seguridad 2
Garantía 4
Qué es lo que cubre 4
Qué es lo que no cubre 4
Antes de la instalación 4
Planificación de la instalación 4
Contenido del paquete 4
Instalación 5
Instrucciones de reparación por el usuario 6
Resolución de problemas 7
Información de seguridad
Para su protección y seguridad, lea detenidamente y comprenda por completo la información proporcionada en este manual antes de intentar armar,
instalar o utilizar este producto. No hacerlo podría provocar descargas eléctricas, incendios u otras lesiones que podrían ser peligrosas o fatales.
Antes de tocar un cable, use un voltímetro para verificar que no esté vivo.
Use herramientas con mangos aislados y escaleras hechas de madera o fibra de vidrio.
Para proteger a los niños, coloque un resguardo de seguridad sobre cualquier tomacorriente sin utilizar.
Mantenga el material combustible lejos de las bombillas. NO permita que las bombillas o portalámparas entren en contacto con paredes, techos,
persianas de tela, cortinas u otros materiales.
NO apto para instalar en techos, cielos rasos, gabinetes u otros espacios cerrados.
NO sumergir en agua.
NO apto para iluminar acuarios.
Cuando los productos se usen en exteriores,
proporciona uno, póngase en contacto con un
conecte el producto a un tomacorriente con interruptor de fallos de conexión a tierra (GFCI). Si no se
electricista calificado para que haga una instalación adecuada.
NO montar ni colocar cerca de estufas de gas o eléctricas, chimeneas, velas u otras fuentes de calor similares.
NO fijar los cables del producto con grapas o clavos, ni los coloque sobre ganchos o clavos filosos. Instalar utilizando solamente los medios de montaje
que se proporcionan.
NO permita que las luces descansen sobre el cable de alimentación o cualquier otro cable.
NO use este producto para fines distintos para los que ha sido diseñado.
NO cuelgue decoraciones u otros objetos del cordón, los alambres, la tira de luces o las bombillas.
NO cierre puertas o ventanas sobre el producto o las extensiones ya que esto podría dañar el aislamiento.
NO cubra el producto con telas, papel u otro material que no sea parte del producto mientras lo usa.
Este producto cuenta con un enchufe polarizado (una clavija es más ancha que la otra) con el fin de reducir el riesgo de descarga eléctrica. Este enchufe
encajará solamente de una manera en un tomacorriente polarizado. Si el enchufe no encaja completamente en el tomacorriente, invierta el enchufe.
NO lo use con un cable de extensión a menos que el enchufe pueda insertarse completamente. No altere ni reemplace el enchufe.
Este producto está diseñado para usarse durante todo el año.
Desenchufe siempre este producto antes de instalar o reemplazar las bombillas.
Solo para usar en exteriores.
Este es un producto eléctrico, ¡no un juguete! Para evitar riesgos de incendio, quemaduras, lesiones personales y descargas eléctricas, no se debe jugar
con este ni colocarse donde los niños pequeños puedan alcanzarlo.
NO lo coloque cerca de áreas de agua acumulada, como estanques y piscinas.
Esta tira de luces tiene una clasificación de 1.1 A, 132 vatios como máximo, NO la sobrecargue. Conecte otras tiras de luces por los extremos hasta un
total de 1440 vatios como máximo.
Inserte la tapa del accesorio de carga en el conector del cable cuando no esté en uso.
Riesgo de incendio. Mantenga las bombillas alejadas de cualquier superficie combustible.
Reemplazar solamente con la misma bombilla de base mediana (E26) de 11 vatios como máximo.
Lea y siga todas las instrucciones que se encuentran en el producto o que se suministran con el producto.
LEA Y SIGA TODAS LAS INSTRUCCIONES DE SEGURIDAD
GUARDE ESTAS INSTRUCCIONES
INSTRUCCIONES IMPORTANTES DE SEGURIDAD
Al usar productos eléctricos, siempre se deben seguir precauciones básicas, incluidas las siguientes:
3
Información de seguridad
PRECAUCIÓN: CONSULTE A UN TÉCNICO ELECTRICISTA CALIFICADO SI TIENE PREGUNTAS SOBRE ELECTRICIDAD.
Si tiene preguntas no relacionadas con la electricidad sobre esta lámpara, llame al Equipo de Servicio al Cliente al
1-855-HD-HAMPTON o visite www.hamptonbay.com.
Haga referencia a su número de SKU (1006-695-149) o de modelo (2416J2-1).
PELIGRO: Antes de instalar esta lámpara o de quitar la anterior, desconecte la energía eléctrica apagando la alimentación en el
disyuntor principal, sacando el fusible en la caja de fusibles o disparando el interruptor que controla ese circuito. Pegue una señal al
panel para advertir a otros que no toquen el circuito mientras usted trabaja.
IMPORTANTE: Todas las bombillas deben estar clasificadas para USO EN EXTERIORES.
El uso de bombillas con clasificación inadecuada puede provocar descargas eléctricas,
lesiones.
incendios y/o daños al producto y propiedad o
NO usar con ninguna bombilla de más de 11 vatios.
NO exceder el número máximo de 10 tiras de luces al conectar varias cadenas.
NO exceder la capacidad total máxima de 1440 vatios.
Calcule la carga total sumando los vatios que utiliza cada uno de los 12 enchufes x el número de tiras de luces.
IMPORTANTE: La distancia máxima al receptáculo está determinada por la longitud del cable provisto y el cable de extensión
apropiado si se usa.
IMPORTANTE: La distancia máxima entre las tiras interconectadas está determinada por la longitud del cable provisto y el cable de
extensión apropiado, si se usa.
4
Antes de la instalación
GARANTÍA DE DOS (2) AÑOS PARA LA UNIDAD Y DE NOVENTA (90) DÍAS PARA LAS BOMBILLAS
PLANIFICACIÓN DE LA INSTALACIÓN
QUÉ ES LO QUE CUBRE
QUÉ ES LO QUE NO CUBRE
El fabricante garantiza que esta luminaria estará libre de defectos en materiales y mano de obra por un período de dos (2) años a partir de la fecha
de compra. El fabricante garantiza que las bombillas incluidas estarán libres de defectos en materiales y mano de obra por un período de noventa
(90) días a partir de la fecha de compra. Esta garantía aplica solo al consumidor que hace la compra original y solo a productos que se usan para
servicio y uso normales. Si se encuentran defectos en este producto, la única obligación del fabricante, y su exclusivo remedio, es la reparación
o reemplazo del producto, a criterio del fabricante, suponiendo que el producto no ha sido dañado debido a uso inadecuado, abuso, accidente,
modificaciones, alteraciones, negligencia o manejo inadecuado. Esta garantía no aplicará a ningún producto que se determine que se instaló,
ajustó o usó inadecuadamente en cualquier manera que no sea congruente con las instrucciones proporcionadas con el producto. Esta garantía no
aplicará a una falla del producto que sea resultado de un accidente, uso indebido, abuso, negligencia, alteración, instalación con fallas, o cualquier
otra falla que no se relacione con mano de obra o material defectuoso. Esta garantía no aplicará al acabado de ninguna parte del producto como
puede ser la superficie y/o los efectos del clima, ya que esto se considera desgaste normal.
El fabricante no garantiza la idoneidad para cualquier propósito en particular y en especial renuncia a cualquier garantía expresa o implícita
sobre ella, aparte de la garantía contenida en el presente documento. El fabricante renuncia específicamente a cualquier responsabilidad,
y no será responsable de ningún daño o pérdida resultante o incidental, incluido pero sin limitarse a cualquier costo por mano de obra o
gastos incurridos en el reemplazo o reparación de dicho producto. Comuníquese con el equipo de servicio al cliente al 1-855-HD-HAMPTON
o visite www.hamptonbay.com.
Antes de instalar, lea todas las instrucciones.
IMPORTANTE: Inspeccione el material de aislamiento
del cable para asegurarse de que no tenga ninguna
cortadura, abrasiones o que se haya expuesto el cobre
realizar la instalación. Llame a nuestro equipo de
Atención al Cliente al 1-855-HD-HAMPTON.
NOTA: No se incluyen el cable de soporte ni el
herraje (se venden por separado).
NOTE: Puede usar bombillas de diferentes
vataje que las incluidas (se venden por
separado). Consulte la tabla a continuación
para ver más detalles.
Garantía
USO DE BOMBILLAS DE DIFERENTE VATAJE
Tipo de bombilla
S14, base mediana 11 vatios 10 tiras
Vataje de
la bombilla Número máximo
de tiras de luces
USO DE BOMBILLAS LED
LED S14 1.4 vatios 10 tiras
10 tiras
10 tiras
1.4 vatios
7-9 vatios
LED A15
LED A19
Tipo de
bombilla
Vataje
promedio
Número máximo
de tiras de luces
CONTENIDO DEL PAQUETE
A
B
ACable de 2 conductores #14 SJTW con
portalámparas de base media (E26)
1 tira de luces con
12 portalámparas
18 (12 + 6
Bombillas incandescentes S14
B
Pieza CantidadDescripción
5
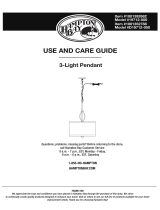
Instalación
Preparación para la instalación
Para colgar la tira de luces
Instalación de las bombillas
1
3
2
Desconecte la alimentación de la fuente antes de intentar
instalar o reparar la tira de luces.
Antes de instalar una bombilla dentro de cada portalámparas,
verifique la posición del punto de contacto (terminal de latón
en el centro). Es importante que la posición del terminal esté
elevado a aproximadamente un ángulo de 20 grados para
garantizar un contacto confiable con la base de la bombilla.
use un destornillador de cabeza plana pequeño para levantar
suavemente la posición de la hoja. NO ajuste repetidas veces
este terminal ya que puede romperlo.
La tira de luces debe estar bien fija a una estructura de soporte
en cada extremo. La distancia máxima sin apoyo para la tira de
luces comercial es de 6 m/20 pies.
Fije la tira de luces al herraje de montaje (armellas, soportes,
etc., no incluidos) usando amarres de cable (no incluidos).
Para longitudes que excedan los 6 m/20 pies, use un sistema
de soporte de cables de la clasificación apropiada y amarres
de cable (no incluidos) y siga las normas locales para las
cargas y estructuras suspendidas.
Los portalámparas deben estar suspendidos de manera que las
bombillas miren hacia abajo SOLAMENTE. NO monte la tira de
luz con los portalámparas mirando hacia arriba. Las bombillas
deben colgar libremente en dirección hacia abajo con un
mínimo de 7.6 cm/3 pulgadas de espacio desde el objeto más
cercano. NO agrupe las bombillas.
ANTES DE CONECTAR LA TIRA, COLOQUE UNA BOMBILLA EN
CADA PORTALÁMPARAS. El portalámparas es alto y el terminal
está en la parte superior del interior del portalámparas. Al colocar
la bombilla, gírela despacio pero con firmeza para asegurarla bien.
Una vez que todos los portalámparas tengan bombillas, cubra
el extremo de la tira de luces con la tapa de extremo y luego
conecte la tira de luces a un tomacorriente de 120 V CA y
asegúrese de que se enciendan todas las luces. De lo contrario,
fíjese cuales no se encendieron, DESCONECTE LA TIRA DE
LUCES, y gire con cuidado las bombillas apagadas hasta
que hagan contacto con el terminal en la parte superior del
portalámparas. Repita hasta que todas las bombillas enciendan.
Instale o vuelva a colocar bombillas en la tira de
luces solo durante condiciones climáticas secas
y tranquilas. Las temperaturas ambientales entre
18 y 35 °C / 65 y 95 °F son ideales para que la
tira de luces sea más flexible.
NOTA: Evite daños al aislamiento durante la
instalación. NO perfore o dañe de otra manera el
forro externo del cable o portalámparas, la funda
o la vaina. NO fije la tira de luces a edificios
puedan dañar el cable.
Soporte estructural
Herraje de
soporte
Distancia máxima de 6 m/20 pies entre apoyos cuando cuelga
NOTA: No se incluyen el cable de soporte ni el
herraje (se venden por separado).
IMPORTANTE: Cuando interconecte varias tiras
de luces, evite que se abra la conexión. Montar al
cable de soporte o usar cordel o cable para sujetar
el primer y último portalámparas mediante el
orificio de montaje encima de cada uno.
/