Guía de inicio rápido
Nokia XX
El paquete incluye:
•Tarjeta de activación
•Guía de inicio rápido
•Folleto Acerca de su teléfono
• Teléfono
• Cargador
•Cable USB-C
•PIN de la tarjeta SIM
Conguración inicial del teléfono:
El teléfono ya viene con una tarjeta SIM instalada.
Es posible que la batería del teléfono no esté
completamente cargada. Utilice el cable USB-C
yelcargador que vienen en el paquete para cargar
elteléfono completamente antes del primer uso.
Para encender el teléfono, mantenga presionado el
botón de encender/apagar y bloquear. Para apagar
el teléfono, presione simultáneamente el botón de
encender/apagar y bloquear y el botón para subir
elvolumen.
Realizar y recibir llamadas:
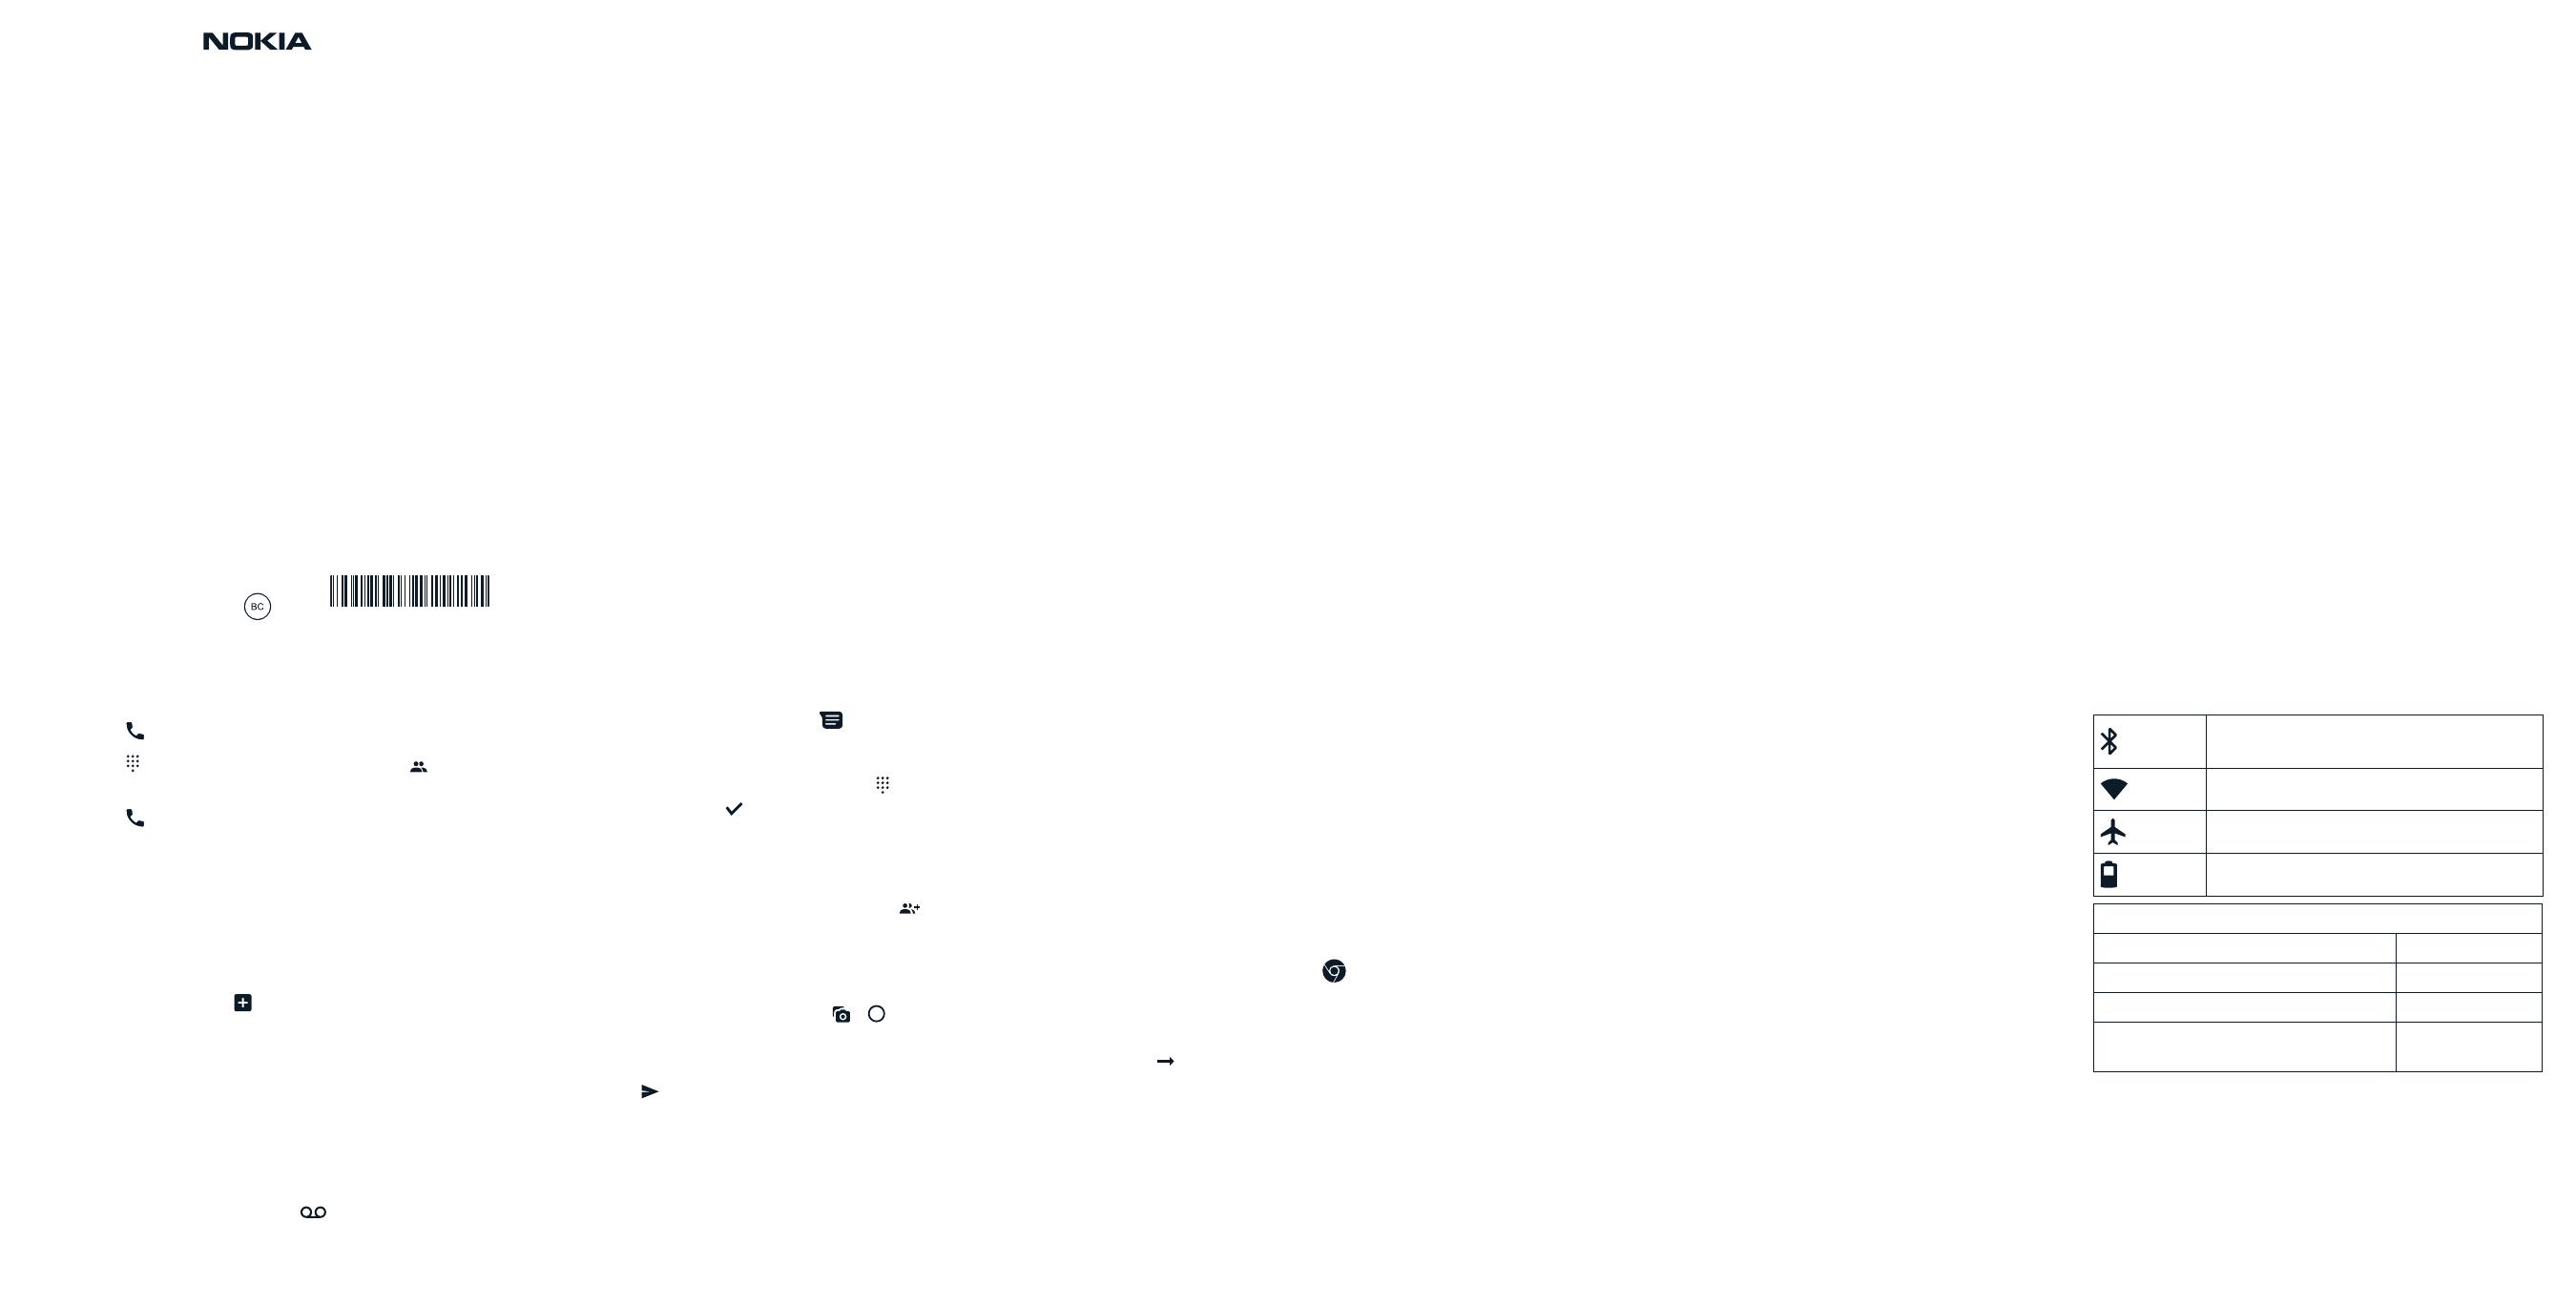
1. Presione .
2. Presione y escriba un número o presione
yseleccione el contacto al que desea llamar.
3. Presione .
Responder una llamada
Para responder una llamada cuando la pantalla está
desbloqueada, presioneCONTESTAR. Para responder
una llamada cuando la pantalla está bloqueada,
deslice el dedo hacia arriba.
Agregar un contacto
1. Presione Contactos > .
2. Complete la información.
3. Presione Guardar.
Congurar el correo de voz:
Para obtener instrucciones sobre cómo congurar
el correo de voz, comuníquese con su proveedor
deservicios. Cuando reciba un correo de voz nuevo,
en la barra de estado aparecerá . Deslice el dedo
hacia abajo y presione la noticación para escuchar
elcorreo de voz.
Congurar la cuenta de Google™:
Durante la conguración inicial del teléfono deberá
iniciar sesión en su cuenta de Google. Puede
omitireste paso y regresar a él siguiendo los pasos
acontinuación.
1. Presione Conguración > Contraseñas y cuentas>
Agregar cuenta > Google. Deberá conrmar el
método de bloqueo del teléfono, si es que lo tiene
congurado.
2. Escriba las credenciales de su cuenta de Google
ypresione Siguiente o, para crear una cuenta
nueva, presione Crear cuenta.
3. Siga las instrucciones que se muestran en
elteléfono.
Mensajes de texto e imagen:
1. Presione el icono de Mensajes .
2. Presione Iniciar chat.
3. Para añadir un destinatario, presione , escriba el
número y presione . Para agregar un destinatario
de los contactos existentes, empiece a escribir el
nombre y, cuando aparezca la lista de contactos,
presione el nombre del contacto deseado.
4. Para añadir más destinatarios, presione .
Después de elegir todos los destinatarios,
presioneSiguiente.
5. Escriba el mensaje en el cuadro de texto.
6. Para agregar una foto, presione y para
tomar una nueva foto, o bien, presione Galería
yseleccione una foto existente.
7. Presione .
Noticaciones y conguración rápida:
Cuando recibe nuevas noticaciones, como
mensajes o llamadas perdidas, aparecen iconos en
la parte superior de la pantalla. Para acceder a las
noticaciones, deslice el dedo hacia abajo desde
la parte superior de la pantalla. Para cerrar la vista,
deslice el dedo hacia arriba en la pantalla.
Conguración de seguridad:
Congurar un bloqueo de pantalla
Durante la conguración inicial del teléfono, deberá
elegir una opción de bloqueo de pantalla. Puede
omitir este paso y regresar a él siguiendo los pasos
acontinuación.
1. Presione Conguración > Seguridad >
Bloqueodepantalla.
2. Elija el tipo de bloqueo y siga las instrucciones
quese muestran en el teléfono.
Para activar una función, deslice el dedo hacia
abajo desde la parte superior de la pantalla y elija la
conguración rápida. Para ver más iconos, arrastre
elmenú de conguración rápida hacia abajo.
Activar Wi-Fi:
1. Presione Conguración > Red e Internet > Wi-Fi.
2. Active Usar Wi-Fi.
3. Seleccione la conexión que quiera usar.
Usar la Internet móvil:
1. Presione el icono de Chrome .
2. Escriba una palabra de búsqueda o una dirección
web en el campo de búsqueda.
3. Presione o seleccione uno de los resultados
propuestos.
Desbloquear el teléfono:
Presione el botón de encender/apagar y bloquear
eingrese al bloqueo de pantalla.
Congurar la autenticación facial
1. Presione Conguración > Seguridad >
Bloqueodecara.
2. Seleccione su método de bloqueo de pantalla de
respaldo y siga las instrucciones que se muestran
en el teléfono.
Mantenga los ojos abiertos y asegúrese de que su
cara esté completamente visible y que no quede
cubierta por ningún objeto, como gafas de sol o un
sombrero.
Desbloquear el teléfono con su cara
Para desbloquear el teléfono, simplemente encienda
la pantalla y mire la cámara.
Conectividad con Bluetooth®:
1. Presione Conguración > Dispositivos conectados>
Preferencias de conexión > Bluetooth.
2. Active Usar Bluetooth.
3. Asegúrese de que el dispositivo que está
emparejando esté encendido. Es posible que deba
iniciar el proceso de sincronización desde el otro
dispositivo.
Para obtener información detallada, consulte la
guía del usuario del otro dispositivo.
4. Presione Sincronizar dispositivo nuevo y presione
el dispositivo que quiera sincronizar en la lista de
dispositivos Bluetooth descubiertos.
5. Puede que le exijan que introduzca un código.
Paraobtener información detallada, consulte
laguía del usuario del otro dispositivo.
Iconos de noticación y estado:
La conexión de Bluetooth está
activada
Wi-Fi está activa
El modo avión está activo
Estado de la batería
Información de la agencia reguladora
Identicador de la FCC 2AJOTTA-1510
SAR máx. (W/kg): cabeza 1,11 W/kg
SAR máx. (W/kg): cuerpo 1,33 W/kg
HAC (compatible con aparatos
auditivos) y clasicación
M3/T3
HMD Global Oy es el titular exclusivo de la licencia de uso
de la marca Nokia para teléfonos y tabletas. Nokia es una
marca comercial de Nokia Corporation. Google y otras
marcas y logotipos relacionados son marcas comerciales
de Google LLC. La marca denominativa y los logotipos de
Bluetooth son propiedad de Bluetooth SIG, Inc. y cualquier
uso de estas marcas por parte de HMD Global se realiza
bajo licencia.
N151DL


 1
1
 2
2


 Tracfone TFLGL44VCP Guía del usuario
LG L L44VL Tracfone Guía del usuario
 Tracfone TFLGL62VCR Manual de usuario
LG Stylo L82VL Tracfone El manual del propietario
 LG Premier Premier LTE Tracfone Manual de usuario
LG Premier LTE Tracfone L61AL Manual de usuario


