

02
EN
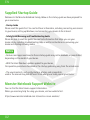
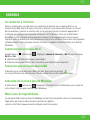
You can find the latest Huma support information.
When you need any help for using your Huma, visit our website first.
https://www.monsternotebook.com.tr/monster-cozum-merkezi/
Monster Notebook Support Website
Welcome to the Monster Notebook Family. Below is the startup guide we have prepared for
your new Huma.
• Startup Guide
Please read this guide first. You can find basic information, including connecting accessories
to your Huma, setting up Windows, and connecting your Huma to the Internet.
• Safety Guide/Recovery and Troubleshooting Guide
Please be sure to read this guide. You can find information that helps you use your
Huma safely, including troubleshooting FAQs as well as instructions on recovering your
Huma and creating recovery media.
• Features and apps mentioned in these startup guide may not be available or preinstalled,
depending on the model of your Huma.
• With the latest Windows updates applied to your Huma,
the operation procedures described in the startup guide may vary from the actual ones.
• The visual contents, such as illustrations, photos, and screenshots,
used in the manual may look different from what you actually see on your Huma.
Supplied Startup Guide
Notes

03
EN
Declaration of Conformity
Product bearing the CE marking comply with one or more of the following EU directives as
may be applicable.
- EMC Directive 2014/30/EU
- Low Voltage Directive 2014/35/EU
- Radio Equipment Directive 2014/53/EU
- RoHS Directive 2011/65/EU
- Eco Design Directive 2009/125/EC
- Commission Regulation ErP 617/2013/EU
Products with Radio Functionality (EMF)
This product incorporates a radio transmitting and receiving device.
For computers and notebook computers in normal use, a separation distance of 20 cm
ensures that radio frequency exposure levels comply with EU requirements.
Products designed to be operated at closer proximities, such as tablet computers,
comply with applicable EU requirements in typical operating positions.
Products can be operated without maintaining a separation distance unless otherwise
indicated in instructions specific to the product.
European Union Regulatory Notices

04
EN
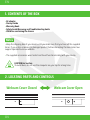
CAUTION Hot surface
To avoid burn, do not use the computer on your lap for a long time.
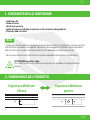
• AC adapter
• Startup Guide
• Warranty Book
• Safety Guide/Recovery and Troubleshooting Guide
• USB drive containing the drivers
• Keep the shipping box of your Huma until you make sure that you have all the supplied
items. If you notice a missing or damaged product, before discarding the box contact our
support specialists via our website.
• The supplied accessories were tested and found functional solely with your Huma.
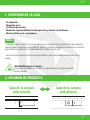
1. CONTENTS OF THE BOX
Notes
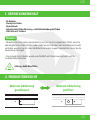
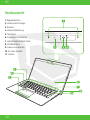
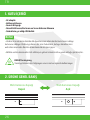
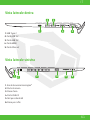
2. LOCATING PARTS AND CONTROLS
Webcam Cover Closed Webcam Cover Open

05
EN
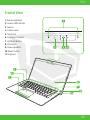
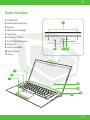
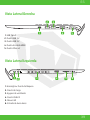
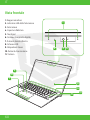
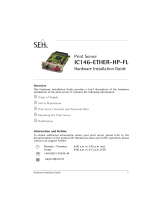
Frontal View
1
2 3 4
5
6
7
8
9
10
11
1. Dual microphones
2. Camera LED Indicator
3. Camera
4. Camera cover
5. Touch Pad
6. Fingerprint Scanner
7. Left/Right button
8. LCD screen
9. Stereo speakers
10. Power button
11. Keyboard

06
EN
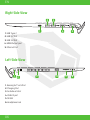
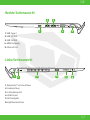
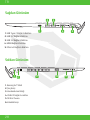
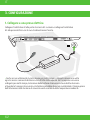
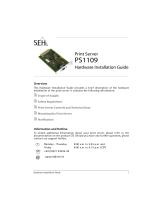
Right Side View
Left Side View
1 4 5
2 3
123 4 5 6
1. USB Type-C
2. USB 3.2 Port
3. USB 3.2 Port
4. HDMI Output port
5. Ethernet Port
1. Kensington® Lock Port
2. Charging Port
3. Air Exhaust Vent
4. USB 2.0 port
5. SD Slot
6. Headphone Jack

07
EN
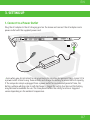
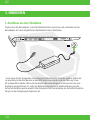
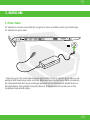
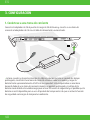
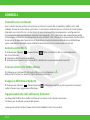
3. SETTING UP
Plug the AC adapter to the AC charging port on the Huma and connect the AC adapter and a
power outlet with the supplied power cord.
• Even when you do not intend to use your Huma for an extended period of time, connect it to
a power outlet at least every three months and charge the battery to around 50% of capacity.
If the computer is kept unplugged from a power outlet for an extended period of time, the
battery voltage will drop due to self-discharge to trigger the safety function and the battery
may become unavailable for use. The time period before the safety function is triggered
varies depending on the ambient temperature.
1. Connect to a Power Outlet

08
EN
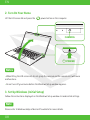
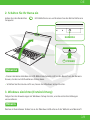
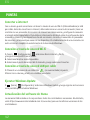
Follow the instructions displayed on the Windows Setup window to make initial settings.
Lift the LCD screen lid and press the power button on the computer.
• When lifting the LCD screen lid, do not grasp the area around the camera as it will cause
malfunctions.
• Do not turn off your Huma before the Windows Setup window appears.
Please refer to Windows Help or Microsoft’s website for more details.
3. Set Up Windows (Initial Setup)
2. Turn On Your Huma
Notes
Note
CAMERA
POWER

09
EN
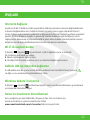
TIPS
With your Huma, you can connect to the Internet either via a Wi-Fi {wireless LAN) or
wired LAN network. Before connecting to the Internet, you need to select a connection service,
make a contract with an Internet service provider accordingly, and make the Internet
connection settings on the computer. For detailed information on the Internet connection
settings and required network devices, refer to the manual from your service provider and
the manual that came with your device. Establishing a successful connection to the Internet
completes Windows license authentication.
1. Select (start), (Settings), Network & Internet, and Wi-Fi, and then set Wi-Fi to On.
2. Select Show available networks.
3. Select the desired Wi-Fi access point, and then select Connect.
1. Plug one end of a LAN cable {not supplied) to the .
Ethernet port on your Huma and the other to your modem/router.
Connect to the Internet
Connecting via a Wi-Fi network
Connecting via a Wired LAN network
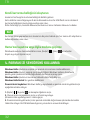
1. Select (start), (Settings), and Windows Update, and then follow the on-screen
instructions to update the Windows.
The USB drive included in the box contains all the drivers you need.
However, please visit https://www.monsternotebook.com.tr/suruculer/
for the latest versions of the drivers.
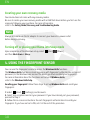
Running Windows Update
Updating Huma’s Software

10
EN
You can use the fingerprint sensor to access the Windows Hello functions.
The Windows Hello functions include signing in with fingerprint authentication instead of
password, to the Windows user account for which you have enrolled your fingerprint .
For more information about the functions and setup of Windows Hello,
refer to the Windows Hello help.
Enrolling your fingerprint Follow these steps to set up Windows Hello and enroll your
fingerprint.
1. Select (start), (Settings), and Accounts.
2. Select Sign-in options and set your password. If you have already set your password,
proceed to step 3.
3. Follow the on-screen instructions for each fingerprint authentication to enroll your
fingerprint. If you have not set a PIN, set it at the end of the procedure.
Your Huma does not come with any recovery media.
Be sure to create your own recovery media with a USB flash drive before you first use the
computer following your purchase. For more information,
refer to the Safety Guide/ Recovery and Troubleshooting Guide.
Upon completion of the Windows setup, select (start), (Power},
and then Shut down or Sleep.
Creating your own recovery media
Turning off or placing your Huma into Sleep mode
Always be sure to use the AC adapter to connect your Huma to a power outlet
before doing a recovery.
Note
4. USING THE FINGERPRINT SENSOR

11
EN
• The fingerprint authentication technology does not assure complete verification of personal
identity, nor do they guarantee absolute protection of your data and hardware.
Monster Notebook assumes no liabilities arising out of your use of or inability to use the
fingerprint sensor.
• The fingerprint recognition rate varies depending on your use of the fingerprint sensor.
They are not consistent among individuals as well.
• Keep the fingerprint sensor clean to prevent failures or malfunctions.
• Please be aware that your enrolled data for fingerprint authentication and face recognition
may be erased in the course of repair work to your Huma.
• When you enroll fingerprints, be sure to enroll more than one finger, in case of injuries.
• Depending on the state of your fingerprint or your use of the fingerprint sensor,
enrollment or authentication of the fingerprint may fail. When fingerprint authentication fails,
try the following:
- Use another finger.
- Clean the finger.
- Delete the fingerprint already enrolled, and then enroll it once again.
- During a dry season, such as winter, be sure to touch a metal object to discharge static
electricity from your body before scanning your fingerprint. Static electricity may cause
malfunctions of the fingerprint sensor.
Notes

DE
12
H5 V4.1
STARTUP-LEITFADEN

DE
13
Hier finden Sie die neuesten Informationen zum Huma-Support.
Wenn Sie Hilfe bei der Benutzung Ihres Huma benötigen,
besuchen Sie zuerst unsere Website.
https://www.monsternotebook.com.tr/monster-cozum-merkezi/
Monster-Notebook-Support-Website
Willkommen bei der Familie der Monster Notebooks. Nachfolgend finden Sie die
Bedienungsanleitung, die wir für Ihren neuen Huma erstellt haben.
• Startup-Leitfaden
Bitte lesen Sie zuerst dieses Startup-Leitfaden. Hier finden Sie grundlegende Informationen
wie das Anschließen von Zubehör an Ihr Huma, das Installieren von Windows und das
Verbinden Ihres Huma mit dem Internet.
• Sicherheitsleitfaden/Recovery- und Fehlerbehebungsleitfaden
Bitte lesen Sie unbedingt dieses Startup-Leitfaden. Hier finden Sie Informationen, die Ihnen
helfen, Ihr Huma sicher zu nutzen, einschließlich FAQs zur Fehlerbehebung sowie Anleitungen
zur Wiederherstellung Ihrer Huma und zur Erstellung von Wiederherstellungsmedien.
• Die in dieser Startup-Leitfaden erwähnten Funktionen und Anwendungen sind je nach
Ihrem Huma-Modell möglicherweise nicht verfügbar oder vorinstalliert.
• Wenn Sie die neuesten Windows-Updates auf Ihrem Huma installieren, können die im
Startup-Leitfaden beschriebenen Bedienungsabläufe von den tatsächlichen abweichen.
• Die visuellen Inhalte, wie z.B. Abbildungen, Fotos und Screenshots, können sich von dem
unterscheiden, was Sie tatsächlich auf Ihrer Huma sehen.
Startup-Leitfaden
Hinweise

DE
14
Konformitätserklärung
Produkte mit der CE-Aufschrift sind ordnungsmäßig im Einklang mit einer oder mehreren der
nachfolgenden EU-Richtlinien.
- Richtlinie für Elektromagnetische Verträglichkeit 2014/30/AB
- Niederspannungsrichtlinie 2014/35/AB
- Richtlinie für Funkanlagen 2014/53/AB
- RoHS-Richtlinie 2011/65/AB
- Eco-Design-Richtlinie 2009/125/AB
- Verordnung der Kommission ErP-Richtlinie 617/2013/AB
Produkte mit Funk-Funktionalität (EMF)
Dieses Produkt enthält ein Funkgerät zum Senden und Empfangen von Funksignalen.
Bei Computern und Laptops im normalen Gebrauch stellt der Trennungsabstand von 20 cm
sicher, dass die Hochfrequenz-Expositionswerte den EU-Richtlinien entsprechen.
Produkte wie z.B. Tablet-Computer, die für den Einsatz auf kürzere Distanzen ausgelegt sind,
erfüllen die geltenden EU-Richtlinien an typischen Einsatzorten.
Sofern in produktspezifischen Anweisungen nicht anders angegeben,
können Produkte ohne Einhaltung des Trennungsabstands betrieben werden.
Zulassungshinweis für die Europäische Union

DE
15
Achtung, Heiße Oberfläche
• AC-Adapter
• Startup-Leitfaden
• Garantiebuch
• Sicherheitsleitfaden/Recovery- und Fehlerbehebungsleitfaden
• USB-Stick mit Treibern
• Bewahren Sie Ihren Huma-Versandkarton auf, bis Sie sich vergewissert haben, dass Sie
alle mitgelieferten Teile erhalten haben. Falls Sie ein fehlendes oder beschädigtes Produkt
vorfinden, wenden Sie sich über die Website an unsere Support-Spezialisten, bevor Sie die
Verpackung entsorgen.
• Das mitgelieferte Zubehör wurde ausschließlich mit Ihrem Huma getestet und für
funktionsfähig befunden.
1. VERPACKUNGSINHALT
Hinweis
2. PRODUKTÜBERSICHT
Webcam-Abdeckung
geschlossen
Webcam-Abdeckung
geöffnet

DE
16
Vorderansicht
1
2 3 4
5
6
7
8
9
10
11
1. Doppelmikrofon
2. Kamera-LED-Anzeige
3. Kamera
4. Kamera Abdeckung
5. Touchpad
6. Fingerabdruck-Scanner
7. Linksklick/Rechtsklick-Taste
8. LCD-Bildschirm
9. Stereo-Lautsprecher
10. An-/Aus-Schalter
11. Tastatur

DE
17
Rechte Seitenansicht
Linke Seitenansicht
1 4 5
2 3
123 4 5 6
1. USB Type-C
2. USB 3.2 Port
3. USB 3.2 Port
4. HDMI-Ausgang
5. Ethernet Port
1. Kensington® Lock-Anschluss
2. Ladeanschluss
3. Luftauslassventil
4. USB 2.0 port
5. SD-Steckplatz
6. Kopfhöreranschluss

DE
18
3. EINRICHTEN
Stecken Sie den Netzadapter in den Netzladeanschluss des Huma und verbinden Sie den
Netzadapter mit dem mitgelieferten Netzkabel mit einer Steckdose.
• Auch wenn Sie Ihr Huma über einen längeren Zeitraum nicht benutzen wollen, sollten Sie
sie mindestens alle drei Monate an eine Steckdose anschließen und den Akku auf etwa
50 % Kapazität aufladen. Wenn der Computer über einen längeren Zeitraum nicht an eine
Steckdose angeschlossen ist, sinkt die Batteriespannung durch Selbstentladung und die
Sicherheitsfunktion wird ausgelöst. Die Zeitspanne bis zum Auslösen der Sicherheitsfunktion
hängt von der Umgebungstemperatur ab.
1. Anschluss an eine Steckdose

DE
19
Folgen Sie den Anweisungen im Windows-Setup-Fenster, um die ersten Einstellungen
vorzunehmen.
Heben Sie den Deckel des LCD-Bildschirms an und drücken Sie den Netzschalter am
Computer.
• Fassen Sie beim Anheben des LCD-Bildschirmdeckels nicht in den Bereich um die Kamera
herum, da dies zu Fehlfunktionen führen kann.
• Schalten Sie Ihre Huma nicht aus, bevor das Windows-Setup-Fenster.
Weitere Informationen finden Sie in der Windows-Hilfe oder auf der Website von Microsoft.
3. Windows einrichten (Ersteinrichtung)
2. Schalten Sie Ihr Huma ein
Hinweise
Hinweis
KAMERA
POWER

DE
20
1. Wahlen Sie (start), (Einstellungen), und Windows Update und folgen Sie dann den
Anweisungen auf dem Bildschirm, um Windows zu aktualisieren.
1. Stecken Sie ein Ende des LAN-Kabels
(nicht im Lieferumfang enthalten) in den Ethernet-Port Ihres Huma und das andere
Ende in Ihr Modem/Router.
1. Wählen (start), (Einstellungen), Netzwerk & Internet und Wi-Fi, und setzen Sie dann
Wi-Fi auf Ein
2. Sie Verfügbare Netzwerke anzeigen.
3. Wählen Sie den gewünschten Wi-Fi-Zugangspunkt aus und wählen Sie dann Verbinden.
TIPPS
Mit Ihrem Huma können Sie eine Verbindung zum Internet entweder über ein Wi-Fi (wireless
LAN) oder ein kabelgebundenes LAN-Netzwerk. Bevor Sie sich mit dem Internet verbinden
können, müssen Sie einen Verbindungsdienst auswählen, einen entsprechenden Vertrag mit
einem Internetdienstanbieter abschließen und die Internetverbindungseinstellungen auf dem
Computer vornehmen. Ausführliche Informationen zu den Internetverbindungseinstellungen
und den erforderlichen Netzwerkgeräten finden Sie in der Anleitung Ihres Dienstanbieters und
in dem Handbuch, das mit Ihrem Gerät geliefert wurde. Mit dem Aufbau einer erfolgreichen
Verbindung zum Internet ist die Authentifizierung der Windows-Lizenz abgeschlossen.
Verbindung zum Internet
Verbinden über ein Wi-Fi-Netzwerk
Verbinden über ein kabelgebundenes LAN-Netzwerk
Der im Lieferumfang enthaltene USB-Stick enthält alle Treiber die Sie benötigen. Für die
neuesten Treiberversionen besuchen Sie bitte die Seite:
https://www.monsternotebook.com.tr/suruculer/
Ausführen von Windows-Update
Aktualisierung von Huma-Software

DE
21
Wählen Sie nach Abschluss der Windows-Einrichtung (Start), (Energie),
und dann Herunterfahren oder Ruhezustand.
Sie können den Fingerabdrucksensor verwenden, um auf die Windows-Hello-Funktionen
zuzugreifen. Zu den Windows-Hello-Funktionen gehört die Anmeldung mit Fingerabdruck-
Authentifizierung anstelle eines Passworts bei dem Windows-Benutzerkonto, für das Sie
Ihren Fingerabdruck registriert haben. Weitere Informationen zu den Funktionen und der
Einrichtung von Windows-Hello finden Sie in der Windows-Hello-Hilfe.
Registrierung Ihres Fingerabdrucks Folgen Sie diesen Schritten, um Windows-Hello
einzurichten und Ihren Fingerabdruck zu registrieren.
1. Wählen sie (start), (Einstellungen), und Konten.
2. Wählen Sie Anmeldungsoptionen und legen Sie Ihr Passwort fest. Wenn Sie Ihr Passwort
bereits festgelegt haben, fahren Sie mit Schritt 3 fort.
3. Folgen Sie den Anweisungen auf dem Bildschirm für jede Fingerabdruck-Authentifizierung,
um Ihren Fingerabdruck zu registrieren. Wenn Sie keine PIN festgelegt haben, legen Sie sie
am Ende des Vorgangs fest.
Ihre Huma wird nicht mit einem Wiederherstellungsmedium geliefert.
Stellen Sie sicher, dass Sie Ihr eigenes Wiederherstellungsmedium mit einem USB-Flash-
Laufwerk erstellen, bevor Sie den Computer nach dem Kauf zum ersten Mal benutzen. Für
weitere Informationen finden Sie im Sicherheitsleitfaden/ Leitfaden zur Wiederherstellung
und Fehlersuche.
Erstellen Sie Ihre eigenen Wiederherstellungsmedien
Ausschalten oder Versetzen Ihres Huma in den Ruhemodus
Verwenden Sie immer das Netzteil, um Ihr Huma an eine Steckdose anzuschließen, bevor Sie
eine Wiederherstellung durchführen.
Hinweis
4. VERWENDUNG DES FINGERABDRUCKSENSORS

DE
22
• Die Fingerabdruck-Authentifizierungstechnologie gewährleistet weder eine vollständige
Überprüfung der persönlichen Identität, noch garantiert sie einen absoluten Schutz Ihrer
Daten und Hardware. Monster-Notebook übernimmt keine Haftung, die sich aus der Nutzung
oder der Unfähigkeit zur Nutzung des Fingerabdrucksensors ergibt.
• Die Erkennungsrate der Fingerabdrücke variiert, je nachdem, wie Sie den
Fingerabdrucksensor verwenden. Sie sind auch nicht bei allen Personen gleich.
• Halten Sie den Fingerabdrucksensor sauber, um Ausfälle oder Fehlfunktionen zu vermeiden.
• Bitte beachten Sie, dass Ihre registrierten Daten für die Fingerabdruck-Authentifizierung
und die Gesichtserkennung im Zuge von Reparaturarbeiten an Ihrem Huma gelöscht werden
können.
• Wenn Sie Ihre Fingerabdrücke registrieren, achten Sie darauf, dass Sie mehr als einen
Finger registrieren, für den Fall von Verletzungen.
• Je nach Zustand Ihres Fingerabdrucks oder Ihrer Verwendung des Fingerabdrucksensors,
kann die Registrierung oder Authentifizierung des Fingerabdrucks fehlschlagen. Wenn die
Authentifizierung des Fingerabdrucks fehlschlägt, versuchen Sie Folgendes:
- Verwenden Sie einen anderen Finger.
- Reinigen Sie Ihren Finger.
- Löschen Sie den bereits registrierten Fingerabdruck und registrieren Sie ihn dann erneut.
- Berühren Sie während einer trockenen Jahreszeit, z.B. im Winter, unbedingt einen
Metallgegenstand, um statische Elektrizität von Ihrem Körper abzuleiten, bevor
Sie Ihren Fingerabdruck scannen. Statische Elektrizität kann zu Fehlfunktionen des
Fingerabdrucksensors führen.
Hinweis

TR
23
H5 V4.1
BAŞLANGIÇ REHBERİ

TR
24
Güncel Huma destek bilgilerini burada bulabilirsiniz. Huma’nızın kullanımıyla ilgili
herhangi bir yardıma ihtiyacınız olduğunda, önce web sitemizi ziyaret edin.
https://www.monsternotebook.com.tr/monster-cozum-merkezi/
Monster Notebook Destek Web Sitesi
Monster Notebook Ailesine hoş geldiniz.
Yeni Huma’nız için hazırladığımız başlangıç rehberi aşağıdadır.
• Başlangıç Rehberi
Öncelikle lütfen bu başlangıç rehberini okuyun. Huma’nıza aksesuar bağlamak,
Windows’u kurmak ve Huma’nızı İnternet’e bağlamak gibi temel bilgileri
bu kılavuzda bulabilirsiniz.
• Güvenlik Kılavuzu/Kurtarma ve Sorun Giderme Kılavuzu
Lütfen bu başlangıç rehberini okuduğunuzdan emin olun. Sorun giderme SSS’lerinin yanı sıra
Huma’nızı kurtarma ve bellek oluşturma talimatları da dahil olmak üzere Huma’nızı güvenle
kullanmanıza yardımcı olacak bilgileri burada bulabilirsiniz.
• Bu başlangıç rehberinde bahsedilen özellikler ve uygulamalar, Huma’nızın modeline
bağlı olarak mevcut olmayabilir veya önceden yüklenmemiş olabilir.
• Huma’nıza yüklenen en son Windows güncellemeleri ile başlangıç rehberinde
açıklanan çalıştırma prosedürlerı̇ gerçek prosedürlerden farklı olabilir.
• Çizimler, fotoğraflar ve ekran görüntüleri gibi görsel içerikler, kılavuzda
kullanılanlar, Huma’nızda gerçekte görünenden farklı görünebilir
Başlangıç Rehberi
Notlar

TR
25
Uygunluk Beyanı
CE etiketi bulunan ürünler, aşağıdaki AB direktiflerinden biriyle veya daha fazlasıyla
gerektiği şekilde uyumludur.
- Elektromanyetik Uyumluluk Direktifi 2014/30/AB
- Alçak Gerilim Direktifi 2014/35/AB
- Radyo Ekipmanları Direktifi 2014/53/AB
- RoHS Direktifi 2011/65/AB
- Eco Design Direktifi 2009/125/AB
- Komisyon Tüzüğü ErP Direktifi 617/2013/AB
Radyo İşlevselliğine Sahip Ürünler (EMF)
Bu ürün radyo verici ve alıcı bir cihaz içermektedir. Normal kullanılan bilgisayarlar ve dizüstü
bilgisayarlar için 20 cm’lik ayrım mesafesi, radyo frekansına maruz kalma seviyelerinin
AB direktiflerine uygun olmasını güvence altına alır. Tablet bilgisayarlar gibi daha yakın
mesafelerde kullanılmak üzere tasarlanmış ürünler, tipik çalışma konumlarında geçerli AB
direktiflerine uygundur. Ürüne özel talimatlarda aksi belirtilmedikçe, ürünler ayrım mesafesi
korunmaksızın çalıştırılabilir.
Avrupa Birliği Düzenleyici Bildirimleri

TR
26
DİKKAT Sıcak yüzey
Yanmayı önlemek için bilgisayarı uzun süre kucağınızda kullanmayın.
• AC adaptör
• Kullanım Kılavuzu
• Garanti Kitapçığı
• Güvenlik Kılavuzu/Kurtarma ve Sorun Giderme Kılavuzu
• Sürücülerin yer aldığı USB bellek
• Verilen tüm ürünlerin elinizde olduğundan emin olana kadar Huma’nızın nakliye
kutusunu saklayın. Eksik veya hasarlı bir ürün bulursanız, kutuyu atmadan önce
web sitesi üzerinden Destek uzmanlarımızla iletişime geçin.
• Birlikte verilen aksesuarlar test edilmiş ve yalnızca Huma’nızla uyumlu olduğu görülmüştür.
1. KUTU İÇERİĞİ
Notlar
2. ÜRÜNE GENEL BAKIŞ
Web Kamerası Kapağı
Kapalı
Web Kamerası Kapağı
Açık

TR
27
2. ÜRÜNE GENEL BAKIŞ
Önden Görünüm
1
2 3 4
5
6
7
8
9
10
11
1. Çift Mikrofon
2. Kamera LED Göstergesi
3. Kamera
4. Web Kamerası Kapağı
5. Touch Pad
6. Parmak İzi Tarayıcı
7. Sol Tık/Sağ Tık Düğmesi
8. LCD ekran
9. Stereo hoparlörler
10. Güç düğmesi
11. Klavye

TR
28
Sağdan Görünüm
Soldan Görünüm
1 4 5
2 3
123 4 5 6
1. USB Type-C Bağlantı Noktası
2. USB 3.2 Bağlantı Noktası
3. USB 3.2 Bağlantı Noktası
4. HDMI Bağlantı Noktası
5. Ethernet Bağlantı Noktası
1. Kensington® Kilidi
2. Şarj Girişi
3. Havalandırma Deliği
4. USB 2.0 bağlantı noktası
5. SD Kart Yuvası
6. Kulaklık Girişi

TR
29
3. KURULUM
AC adaptörünü Huma üzerindeki AC şarj girişine takın ve birlikte verilen güç kablosuyla
AC adaptörünü prize takın.
• Huma’nızı uzun bir süre kullanmayacak olsanız bile, en az üç ayda bir prize takın ve pili
yaklaşık %50 kapasiteye kadar şarj edin. Bilgisayar uzun bir süre prize takılı tutulmazsa,
pil voltajı kendi kendine deşarj nedeniyle güvenlik işlevini tetikleyecek şekilde düşer ve
pil kullanılamaz hale gelebilir. Güvenlik işlevinin tetiklenmesinden önceki süre ortam
sıcaklığına bağlı olarak değişir.
1. Prize Takın

TR
30
LCD ekran kapağını kaldırın ve bilgisayar üzerindeki güç düğmesine basın.
Başlangıç ayarlarını yapmak için Windows Kurulum penceresinde görüntülenen
talimatları izleyin.
• LCD ekran kapağını kaldırırken, arızalara neden olacağından kameranın etrafındaki
alanı tutmayın.
• Windows Kurulum penceresi görünmeden önce Huma’nızı kapatmayın.
Daha fazla ayrıntı için lütfen Windows Destek’e veya Microsoft’un web sitesine göz atın.
3. Windows Kurulumu (İlk Kurulum)
2. Huma’nız Nasıl Açılır?
Notlar
Not
KAMERA
GÜÇ

TR
31
İPUÇLARI
Huma’nız ile Wi-Fi (kablosuz LAN) veya kablolu LAN ağı üzerinden internete bağlanabilirsiniz.
İnternete bağlanmadan önce, bağlantı hizmeti seçmeniz, buna uygun olarak bir İnternet
servis sağlayıcısıyla sözleşme yapmanız ve bilgisayarda İnternet bağlantı ayarlarını yapmanız
gerekir. İnternet bağlantı ayarları ve gerekli ağ cihazları hakkında ayrıntılı bilgi için servis
sağlayıcınızın kılavuzuna ve cihazınızla birlikte gelen kılavuza bakın. Başarılı şekilde internet
bağlantısı kurulduğunuda Windows lisans kimlik doğrulaması tamamlanır
1. (Başlat) , (Ayarlar) , Ağ ve İnternet ve Wi-Fi öğelerini seçin ve ardından
Wi-Fi öğesini Açık olarak ayarlayın.
2. Mevcut ağları göster öğesini seçin
3. İstediğiniz Wi-Fi erişim noktasını seçin ve ardından Bağlan öğesini seçin.
1. LAN kablosunun bir ucunu (ürünle birlikte verilmez) Huma’nızdaki Ethernet portuna
ve diğer ucunu modeminize/yönlendiricinize takın.
İnternete Bağlanın
Wi-Fi ile bağlantı kurma
Kablolu LAN ağı üzerinden bağlanma
1. (Başlat) , (Ayarlar) ve Windows Update’i seçin ve ardından Windows’u güncellemek
için ekrandaki talimatları izleyin.
Kutu içeriğinde yer alan USB bellek, ihtiyacınız olan tüm sürücüleri içerir.
Ancak sürücülerin en güncel sürümleri için lütfen
www.monsternotebook.com.tr/suruculer/ adresini ziyaret edin.
Windows Update’i Çalıştırma
Huma’nın Yazılımının Güncellenmesi

TR
32
Windows Hello işlevlerine erişmek için parmak izi sensörünü kullanabilirsiniz.
Windows Hello işlevleri, parmak izinizi kaydettiğiniz Windows kullanıcı hesabında
parola yerini parmak izi kimlik doğrulaması ile oturum açmayı içerir.
Windows Hello işlevleri ve kurulumu hakkında daha fazla bilgi için
Windows Hello Destek’ten yardım alabilirsiniz
Parmak izinizi kaydetme: Windows Hello’yu ayarlamak ve parmak izinizi kaydetmek için
aşağıdaki adımları izleyin.
1. (Başlat) (Ayarlar) ve Hesaplar öğelerini seçin.
2. Oturum açma seçeneklerini seçin ve şifrenizi ayarlayın.
Şifrenizi zaten ayarladıysanız 3. adıma geçin.
3. Parmak izinizi kaydetmek için her parmak izi kimlik doğrulaması işleminde ekrandaki
talimatları izleyin. Bir PIN belirlemediyseniz, prosedürün sonunda belirleyin.
Huma’nız herhangi bir kurtarma belleği ile birlikte gelmez.
Satın aldıktan sonra bilgisayarı ilk kez kullanmadan önce bir USB flash sürücü ile kendi
kurtarma belleğinizi oluşturduğunuzdan emin olun.
Daha fazla bilgi için, Güvenlik Kılavuzu/Kurtarma ve Sorun Giderme Kılavuzu’na bakın.
Windows kurulumu tamamlandıktan sonra, (başlat) , (Güç) ve ardından
Kapat veya Uyut öğesini seçin.
Kendi kurtarma belleğinizi oluşturun
Huma’nızı kapatma veya Uyku moduna geçirme
Kurtarma işlemi yapmadan önce Huma’nızı bir prize takmak için her zaman AC adaptörünü
kullandığınızdan emin olun.
Not
4. PARMAK İZİ SENSÖRÜNÜ KULLANMA

TR
33
• Parmak izi kimlik doğrulama teknolojisi, kişisel kimliğin tam olarak doğrulanmasını
sağlamadığı gibi verilerinizin ve donanımınızın tamamen korunmasını da garanti etmez.
• Monster Notebook, parmak izi sensörünü kullanmanızdan veya kullanamamanızdan
kaynaklanan hiçbir yükümlülüğü kabul etmez.
• Parmak izi tanıma oranı, parmak izi sensörünü kullanmanıza bağlı olarak değişir.
Buoranlar bireyler arasında da tutarlı değildir.
• Hataları veya arızaları önlemek için parmak izi sensörünü temiz tutun.
• Parmak izi kimlik doğrulama ve yüz tanıma için kayıtlı verilerinizin Huma’nızdaki tamir
çalışmaları sırasında silinebileceğini lütfen unutmayın.
• Parmak izlerini kaydederken, herhangi bir yaralanma durumuna karşın birden fazla
parmağınızı kaydettiğinizden emin olun.
• Parmak izinin durumuna veya parmak izi sensörünü kullanmanıza bağlı olarak,
parmak izinin kaydı veya kimlik doğrulaması başarısız olabilir.
Parmak izi kimlik doğrulaması başarısız olduğunda aşağıdakileri deneyin:
- Başka bir parmakla deneyin.
- Parmağınızı temizleyin.
- Kaydedilmiş parmak izini silin ve tekrar kaydedin.
- Kış gibi soğuk mevsimlerde, parmak izinizi taramadan önce vücudunuzdaki statik
elektriği boşaltmak için metal bir nesneye dokunduğunuzdan emin olun.
Statik elektrik parmak izi sensöründe arızalara neden olabilir.
Notlar

ES
34
H5 V4.1
GUÍA DE INICIO

ES
35
Aquí pueda encontrar la información de soporte de Huma más reciente.
Cuando necesite ayuda para usar su Huma, primero visite nuestro sitio web.
https://www.monsternotebook.com.tr/monster-cozum-merkezi/
Monster Notebook Sitio Web de Soporte
Bienvenido a la familia de Monster Notebook. Debajo está el guía de inicio de su nueva Huma.
• Guía de Inicio
Primero lea este guía de inicio, por favor. Pueda encontrar información básica, incluida la conexión
de accesorios a su Huma, la configuración de Windows y la conexión de su Huma a Internet.
• Manual de Seguridad/Manual de Recuperación y Solución de Problemas
Asegúrese de leer este guía de inicio, por favor. Pueda encontrar información que lo ayude a usar
su Huma de manera segura, incluidas las preguntas frecuentes sobre solución de problemas, así
como instrucciones sobre cómo recuperar su Huma y crear unidades de recuperación.
• Es posible que las funciones y aplicaciones mencionadas en este guía de inicio no estén
disponibles o preinstaladas, dependiendo del modelo de su Huma.
• Con las últimas actualizaciones de Windows aplicadas a su Huma, los procedimientos de
operación descritos en el guía de inicio pueden variar de los reales.
• El contenido visual, como ilustraciones, fotos y capturas de pantalla, que se usa en el manual
puede tener un aspecto diferente al que realmente se ve en su Huma.
Guía de Inicio
Notas

ES
36
Declaración de conformidad
Los productos que llevan el marcado CE cumplen con una o más de las siguientes
directivas de la UE, según corresponda.
- Directiva EMC 2014/30/UE
- Directiva de baja tensión 2014/35/UE
- Directiva de equipos radioeléctricos 2014/53/UE
- Directiva RoHS 2011/65/UE
- Directiva de diseño ecológico 2009/125/CE
- Reglamento de la Comisión sobre productos relacionados con la energía 617/2013/UE
Productos con funcionalidad de radio (CEM)
Este producto tiene un dispositivo de transmisión y recepción de radio.
En el caso de los ordenadores y portátiles de uso normal, una distancia de separación de 20
cm garantiza que los niveles de exposición a las radiofrecuencias cumplan los requisitos de la
UE. Los productos diseñados para funcionar a una distancia más cercana, como las tabletas,
cumplen con los requisitos de la UE aplicables en las posiciones típicas de funcionamiento.
Los productos pueden funcionar sin mantener una distancia de separación a menos que se
indique lo contrario en las instrucciones específicas del producto.
Avisos reglamentarios de la Unión Europea

ES
37
PRECAUCIÓN Superficie caliente
Para evitar quemaduras, no use la computadora en su regazo durante
mucho tiempo.
• AC adaptador
• Manual de inicio
• Certificado de garantía
• Manual de Seguridad/Manual de Recuperación y Solución de Problemas
• Memoria USB con los controladores
• Guarde la caja de envío de su Huma hasta que se asegure de que tiene todos los productos
suministrados. Si encuentra un producto faltante o dañado, póngase en contacto con nuestros
especialistas de soporte en el sitio web antes de desechar la caja.
• Los accesorios suministrados han sido probados y son compatibles únicamente con su
Huma.
1. CONTENIDO DE LA CAJA
Notas
2. RESUMEN DE PRODUCTO
Tapa de la cámara
web cerrada
Tapa de la cámara
web abierta

ES
38
Vista Frontal
1
2 3 4
5
6
7
8
9
10
11
1. Micrófonos Duales
2. Indicador LED de Cámara
3. Cámara
4. Tapa de la cámara web
5. Panel Táctil
6. Escáner de Huellas Digitales
7. Botón Izquierda/Derecha
8. Pantalla LCD
9. Altavoces estéreo
10. Botón de encendido
11. Teclado

ES
39
Vista Lateral Derecha
Vista Lateral Izquierda
1 4 5
2 3
123 4 5 6
1. USB Tipo-C
2. Puerto USB 3.2
3. Puerto USB 3.2
4. Puerto de salida HDMI
5. Puerto Ethernet
1. Kensington® Puerto de bloqueo
2. Puerto de Carga
3. Agujero de ventilación
4. Puerto USB 2.0
5. Ranura SD
6. Entrada de Auriculares

ES
40
3. CONFIGURACIÓN
Conecte el adaptador de CA al puerto de carga de CA del Huma y conecte a una toma de
corriente el adaptador de CA con el cable de alimentación suministrado.
• Incluso cuando no tenga la intención de utilizar su Huma durante un período de tiempo
prolongado, conéctelo a una toma de corriente al menos cada tres meses y cargue la
batería hasta aproximadamente el 50 % de su capacidad. Si la computadora se mantiene
desenchufada de una toma de corriente durante un período prolongado, el voltaje de la
batería caerá debido a la autodescarga para activar la función de seguridad y es posible que la
batería no esté disponible para su uso. El período de tiempo antes de que se active la función
de seguridad varía según la temperatura ambiente.
1. Conéctese a una toma de corriente

ES
41
Siga las instrucciones que se muestran en la ventana de configuración de Windows para
realizar la configuración inicial.
Levante la tapa de la pantalla LCD y presione el botón de encendido de computadora.
• Cuando levante la tapa de la pantalla LCD, no sujete el área alrededor de la cámara, ya que
podría causar fallas en el funcionamiento.
• No apague su Huma antes de que aparezca la ventana de configuración de Windows.
Consulte la Ayuda de Windows o el sitio web de Microsoft para obtener más detalles.
3. Configurar Windows (Configuración inicial)
2. Encienda Su Huma
Notas
Nota
CAMARA
ENERGIA

ES
42
PUNTAS
Con su Huma, puede conectarse a Internet a través de una red Wi-Fi (LAN inalámbrica) o LAN
por cable. Antes de conectarse a Internet, debe seleccionar un servicio de conexión, hacer un
contrato con un proveedor de servicios de Internet en consecuencia y configurar la conexión
a Internet en la computadora. Para obtener información detallada sobre la configuración de la
conexión a Internet y los dispositivos de red necesarios, consulte el manual de su proveedor
de servicios y el manual que viene con su dispositivo. El establecimiento de una conexión con
exito a Internet completa la autenticación de la licencia de Windows.
1. (İnicio), (Configuración), seleccione Red e Internet y Wi-Fi,
y luego establezca Wi-Fi en Activado.
2. Seleccione Mostrar redes disponibles.
3. Seleccione el punto de acceso Wi-Fi deseado y luego seleccione Conectar.
1. PConecte un extremo de un cable LAN (no suministrado) al puerto
Ethernet en su Huma y el otro a su módem/enrutador.
Conectar a internet
Conexión a través de una red Wi-Fi
Conexión a través de una red LAN por cable
1. (İnicio), (Configuración), Seleccione Windows Update y luego siga las instrucciones
en la pantalla para actualizar Windows.
La memoria USB incluida en la caja contiene todos los controladores necesarios. No obstante,
visite https://www.monsternotebook.com.tr/suruculer/ para ver las últimas versiones de los
controladores.
Ejecutar Windows Update
Actualización del software de Huma

ES
43
Una vez completada la configuración de Windows, seleccione (inicio), (Encendido}
y luego Apagar o Suspender.
Puede utilizar el sensor de huellas digitales para acceder a las funciones de Windows Hello.
Las funciones de Windows Hello incluyen iniciar sesión con autenticación de huella digital en
lugar de contraseña, a la cuenta de usuario de Windows para la que ha registrado su huella
digital.. Para obtener más información sobre las funciones y la configuración de Windows
Hello, consulte la ayuda de Windows Hello.
Registro de su huella digital: Siga estos pasos para configurar Windows Hello e registrar su
huella digital.
1. (İnicio), (Configuración) y despues seleccione Cuentas.
2. Seleccione las opciones de inicio de sesión y establezca su contraseña. Si ya ha establecido
su contraseña, continúe con el paso 3.
3. Siga las instrucciones en la pantalla para cada autenticación de huella digital para registrar
su huella digital. Si no ha establecido un PIN, configúrelo al final del procedimiento.
Su Huma no viene con ningúna unidad de recuperación. Asegúrese de crear su propia unidad
de recuperación con una unidad flash USB antes de usar la computadora por primera vez
después de su compra. Para obtener más información, consulte Manual de seguridad/Manual
de recuperación y solución de problemas.
Creación de sus propios unidades de recuperación
Apagar o poner su Huma en modo de suspensión
Siempre asegúrese de usar el adaptador de CA para conectar su Huma a una toma de
corriente antes de realizar una recuperación.
Nota
4. USO DEL SENSOR DE HUELLAS DIGITALES

ES
44
• La tecnología de autenticación de huellas digitales no asegura una verificación completa de
la identidad personal, ni garantiza la protección absoluta de sus datos y hardware.
• Monster Notebook no asume ninguna responsabilidad derivada del uso o la incapacidad de
usar el sensor de huellas digitales.
• La tasa de reconocimiento de huellas dactilares varía según el uso que haga del sensor de
huellas digitales. Tampoco son consistentes entre individuos.
• Mantenga limpio el sensor de huellas digitales para evitar fallas o mal funcionamiento.
• Tenga en cuenta que sus datos registrados para la autenticación de huellas digitales y el
reconocimiento facial pueden borrarse durante el trabajo de reparación de su Huma.
• Cuando registre huellas digitales, asegúrese de registrar más de un dedo, en caso de
lesiones.
• Según el estado de su huella digital o el uso que haga del sensor de huellas digitales, es
posible que falle el registro o la autenticación de la huella digital. Cuando falla la autenticación
de huellas dactilares, intente lo siguiente:
- Usar otro dedo
- Limpiar el dedo.
- Elimine la huella digital ya registrada y luego vuelva a registrarla.
- Durante una estación seca, como el invierno, asegúrese de tocar un objeto de metal
para descargar la electricidad estática de su cuerpo antes de escanear su huella digital. La
electricidad estática puede provocar un mal funcionamiento del sensor de huellas digitales.
Notas

FR
45
H5 V4.1
GUIDE DE DÉMARRAGE

FR
46
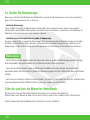
Vous pouvez trouver des informations récentes sur le soutien de l’Huma ici.
Quand vous avez besoin d’aide concernant l’Huma, visitez tout d’abord notre site internet.
https://www.monsternotebook.com.tr/monster-cozum-merkezi/
Site de soutien de Monster Notebook
Bienvenue dans la famille Monster Notebook. Le guide de démarrage que nous avons préparé
pour votre nouveau Huma est ci-dessous.
• Guide de démarrage
Lisez d’abord ce guide de démarrage s’il vous plaît. Vous pouvez trouver dans ce manuel les
informations essentielles telles que la connexion des accessoires à votre Huma, l’installation de
Windows et la connexion de votre Huma à Internet.
• Guide de sécurité/récupération et guide de dépannage
Assurez-vous de lire ce guide de démarrage. Vous y trouverez des informations pour vous aider
à utiliser votre Huma en toute sécurité, notamment les questions fréquemment posées sur le
dépannage, et des instructions pour la récupération de votre Huma et la création de mémoire.
• Les fonctions et les applications mentionnées dans ce guide de démarrage peuvent ne pas
être disponibles ou préinstallées sur certaines versions de votre Huma.
• Avec les dernières mises à jour de Windows installées sur votre Huma, les procédures
opérationnelles décrites dans le guide de démarrage peuvent être différentes des procédures
réelles.
• Les contenus visuels, comme les illustrations, les photos et les captures d’écran, utilisés dans
le manuel peuvent être différents de ce que vous voyez sur votre Huma.
Le Guide De Démarrage
Remarques

FR
47
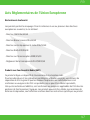
Déclaration de Conformité
Les produits portant le marquage CE sont conformes à une ou plusieurs des directives
européennes suivantes, le cas échéant.
- Directive CEM 2014/30/UE
- Directive Basse tension 2014/35/UE
- Directive sur les équipements radio 2014/53/UE
- Directive RoHS 2011/65/UE
- Directive sur l’écoconception 2009/125/CE
- Règlement de la Commission ErP 617/2013/UE
Produits avec Fonctionnalité Radio (EMF)
Ce produit intègre un dispositif de transmission et de réception radio.
Pour les ordinateurs et les ordinateurs portables en utilisation normale, une distance de
séparation de 20 cm garantit que les niveaux d’exposition aux radiofréquences sont
conformes aux exigences de l’UE. Les produits conçus pour être utilisés à proximité,
tels que les ordinateurs tablettes, sont conformes aux exigences applicables de l’UE dans les
positions de fonctionnement typiques. Les produits peuvent être utilisés sans maintenir de
distance de séparation, sauf indication contraire dans les instructions spécifiques au produit.
Avis Réglementaires de l’Union Européenne

FR
48
ATTENTION Surface chaud
Pour éviter les brûlures, n’utilisez pas l’ordinateur sur vos genoux trop longtemps.
• Adaptateur secteur
• Guide de démarrage
• Livret de garantie
• Guide de sécurité/récupération et guide de dépannage
• Mémoire USB avec pilotes
• Conservez votre emballage d’expédition Huma jusqu’à ce que vous soyez sûr d’avoir tous
les éléments fournis. Si vous trouvez un élément manquant ou endommagé, avant de jeter
l’emballage contactez nos experts du support via le site internet.
• Les accessoires fournis avec le produit ont été testés et trouvés fonctionnels uniquement
avec votre Huma.
1. CONTENU DE L’EMBALLAGE
2. APERÇU DU PRODUIT
L’obturateur de la
caméra fermé
L’obturateur de la
caméra ouvert
Remarques

FR
49
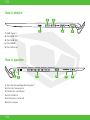
Vue avant
1
2 3 4
5
6
7
8
9
10
11
1. Microphones doubles
2. Indicateur LED de la caméra
3. Caméra
4. L’obturateur de la caméra
5. Pavé tactile
6. Scanner d’empreintes
7. Clic gauche/droit
8. Écran LCD
9. Haut-parleurs stéréo
10. Bouton d’alimentation
11. Clavier

FR
50
Vue à droite
Vue à gauche
1 4 5
2 3
123 4 5 6
1. USB Type-C
2. Port USB 3.2
3. Port USB 3.2
4. Port HDMI
5. Port Ethernet
1. Port de Verrouillage Kensington®
2. Port de chargement
3. Orifice de ventilation
4. Port USB 2.0
5. Fente pour carte SD
6. Prise casque

FR
51
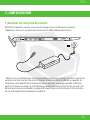
3. CONFIGURATION
Branchez l’adaptateur secteur sur le port de charge secteur de l’Huma et connectez
l’adaptateur secteur et une prise de courant avec le câble d’alimentation fourni.
• Même si vous n’utiliserez pas votre Huma pendant une longue période, brancher votre Huma
au moins une fois tous les trois mois et charger la batterie à environ 50% de sa capacité. Si
l’ordinateur reste débranché de la prise de courant pendant une longue période, la batterie
perd de sa tension en raison de l’autodécharge, déclenchant ainsi la fonction de sécurité et la
batterie peut devenir inutilisable. La période de temps avant le déclenchement de la fonction
de sécurité dépend de la température ambiante.
1. Brancher sur une prise de courant

FR
52
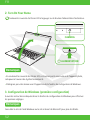
Suivez les instructions indiquées dans la fenêtre de configuration de Windows pour effectuer
les premiers réglages.
Soulevez le couvercle de l’écran LCD et appuyez sur le bouton d’alimentation l’ordinateur.
• En soulevant le couvercle de l’écran LCD, ne touchez pas la zone autour de l’appareil photo,
cela pourrait causer des dysfonctionnements.
• N’éteignez pas votre Huma avant l’apparition de la fenêtre de configuration de Windows.
Consultez le site de l’aide Windows ou le site internet de Microsoft pour plus de détails.
3. Configuration de Windows (première configuration)
2. Turn On Your Huma
CAMÉRA
ALIMENTATION
Remarques
Remarques

FR
53
CONSEILS
Grâce à votre Huma, vous pouvez vous connecter à Internet via un réseau Wi-Fi ou un
réseau local câblé. Avant de vous connecter à Internet, vous devez sélectionner un service
de raccordement, passer un contrat avec un fournisseur d’accès à Internet approprié et
configurer les réglages de connexion à Internet sur l’ordinateur. Pour des informations
détaillées sur les réglages de la connexion à internet et les équipements réseau requis,
reportez-vous au manuel de votre fournisseur d’accès et au manuel fourni avec votre appareil.
L’établissement d’une connexion réussie à Internet complète l’authentification de la licence
Windows.
1. Sélectionnez (démarrer), (réglages), réseau et internet, et Wi-Fi, puis choisissez
Wi-Fi sur On.
2. Sélectionnez Afficher les réseaux disponibles.
3. Sélectionnez le point d’accès Wi-Fi souhaité, puis sélectionnez Connecter.
1. Branchez une extrémité d’un câble LAN (non fourni avec le produit)
sur le port Ethernet de votre Huma et l’autre extrémité sur votre modem/routeur.
Se connecter à l’internet
Connexion par un réseau Wi-Fi
Connexion par un réseau local câblé
1. Sélectionnez (démarrer), (réglages), et la mise à jour de Windows, puis suivez les
instructions à l’écran pour mettre à jour Windows.
La mémoire USB contenue dans l’emballage contient tous les pilotes dont vous avez besoin.
Cependant, pour les versions les plus récentes des pilotes,
visitez le site https://www.monsternotebook.com.tr/suruculer/
Exécution de la mise à jour de Windows
Mise à jour du logiciel Huma

FR
54
Vous pouvez utiliser le capteur d’empreintes pour accéder aux fonctions de Windows Hello.
Les fonctions de Windows Hello comprennent la connexion avec l’authentification par em-
preinte au lieu du mot de passe au compte utilisateur Windows où vous avez enregistré votre
empreinte. Pour plus d’informations sur les fonctions et la configuration de Windows Hello,
consultez l’aide de Windows Hello.
Enregistrement de votre empreinte : Suivez ces instructions pour configurer Windows Hello
et enregistrer votre empreinte.
1. Sélectionnez (démarrer), (Réglages), et Comptes
2. Sélectionnez les options de connexion et définissez votre mot de passe. Si vous avez déjà
défini votre mot de passe, passez à l’étape 3.
3. Suivez les instructions à l’écran pour chaque authentification d’empreinte afin d’enregistrer
votre empreinte. Si vous n’avez pas défini de code PIN, définissez un code PIN à la fin de la
procédure.
Votre Huma n’est pas fourni avec un support de récupération.
Assurez-vous de créer votre propre support de récupération avec une clé USB avant d’utiliser
l’ordinateur pour la première fois après votre achat.
Pour plus d’informations, consultez le guide de sécurité/récupération et guide de dépannage.
À la fin de l’installation de Windows, sélectionnez (démarrer), (Alimentation),
et puis Eteindre ou Mettre en veille.
Creating your own recovery media
Éteindre ou passer votre Huma en mode veille
Assurez-vous toujours d’utiliser l’adaptateur secteur pour connecter votre Huma à une prise
de courant avant de faire une récupération.
UTILISATION DU CAPTEUR D’EMPREINTES DIGITALES
Remarques

FR
55
• La technologie d’authentification par empreinte ne garantit pas une vérification complète
de l’identité personnelle, ni ne garantit une protection complète de vos données et de votre
hardware.
• Monster Notebook décline toute responsabilité découlant de votre utilisation ou de votre
incapacité à utiliser le capteur d’empreintes.
• Le taux de reconnaissance des empreintes dépend de votre utilisation du capteur
d’empreintes. Ces taux ne sont pas non plus uniformes entre les individus.
• Maintenez le capteur d’empreintes propre pour éviter les erreurs ou les dysfonctionnements.
• Veuillez noter que vos données enregistrées pour l’authentification par empreinte et la
reconnaissance faciale peuvent être supprimées pendant les travaux de réparation de votre
Huma.
• Lorsque vous enregistrez des empreintes, assurez-vous d’enregistrer plus d’un doigt, en cas
de blessure.
• Selon l’état de votre empreinte ou votre utilisation du capteur d’empreintes, l’enregistrement
ou l’authentification de l’empreinte digitale peut échouer. Lorsque l’authentification par
empreinte échoue, essayez ce qui suit:
- Utilisez un autre doigt.
- Nettoyez votre doigt.
- Supprimez l’empreinte enregistrée et enregistrez-la à nouveau.
- Dans les saisons froides comme l’hiver, touchez un objet métallique pour décharger l’élec-
tricité statique de votre corps avant de scanner votre empreinte digitale. L’électricité statique
peut provoquer des dysfonctionnements du capteur d’empreintes.
Remarques

IT
56
H5 V4.1
GUIDA ALL’AVVIO

IT
57
Qui potete trovare informazioni aggiornate sull’assistenza Huma.
Quando avete bisogno di aiuto sull’uso del vostro Huma, visitare prima il nostro sito web.
https://www.monsternotebook.com.tr/monster-cozum-merkezi/
Sito Web di supporto per Monster Notebook
Benvenuto nella famiglia di Monster Notebook. Di seguito è riportato il guida all’avvio che
abbiamo preparato per il vostro nuovo Huma.
• Guida all’avvio
Prima di tutto leggere questo guida all’avvio. In questo manuale potete trovare le nozioni
di base come il collegamento di accessori al vostro Huma, la configurazione di Windows e il
collegamento del vostro Huma a Internet.
• Guida alla sicurezza/Guida al ripristino e alla risoluzione dei problemi
Assicurarsi di leggere questo guida all’avvio. Qui potete trovare informazioni per aiutarvi a
utilizzare il vostro Huma in modo sicuro, comprese le domande frequenti sulla risoluzione dei
problemi e le istruzioni per recuperare il vostro Huma e per creare supporti di ripristino.
• Le funzioni e le applicazioni menzionate in questo guida all’avvio potrebbero non essere
disponibili o non preinstallate a seconda del modello di Huma in uso.
• Con gli ultimi aggiornamenti di Windows installati sul vostro Huma, le procedure operative
descritte nel guida all’avvio potrebbero differire dalle procedure effettive.
• I contenuti visivi come illustrazioni, foto e schermate utilizzati nel manuale potrebbero avere
un aspetto diverso da quello che appare effettivamente sul vostro Huma.
Guida all’avvio
Note

IT
58
Dichiarazione di conformità
I prodotti recanti la marcatura CE sono conformi a una o più delle seguenti direttive UE, a
seconda dei casi applicabili.
- Direttiva EMC 2014/30/UE
- Direttiva Bassa Tensione 2014/35/UE
- Direttiva sulle apparecchiature radio 2014/53/UE
- Direttiva RoHS 2011/65/UE
- Direttiva sul design ecologico 2009/125/CE
- Regolamento della Commissione ErP 617/2013/UE
Prodotti con funzionalità radio (EMF)
Questo prodotto incorpora un dispositivo di trasmissione e ricezione radio.
Per computer e notebook in uso normale, una distanza di separazione di 20 cm garantisce
che i livelli di esposizione alle radiofrequenze siano conformi ai requisiti dell’UE. I prodotti
progettati per essere utilizzati a distanze più ravvicinate, come i tablet, sono conformi ai
requisiti UE applicabili nelle tipiche posizioni operative. I prodotti possono essere utilizzati
senza mantenere una distanza di separazione se non diversamente indicato nelle istruzioni
specifiche del prodotto.
Avvisi normativi dell’Unione Europea

IT
59
ATTENZIONE Superficie calda
Per evitare ustioni, non utilizzare il computer sul grembo per lunghi periodi di
tempo.
• Adattatore AC
• Guida all’avvio
• Libretto di garanzia
• Guida alla sicurezza/Guida al ripristino e alla risoluzione dei problemi
• Chiavetta USB con driver
• Conservare la tua scatola di spedizione Huma al sicuro finché non siete sicuri di avere tutti gli
articoli forniti. Se trovate un prodotto mancante o danneggiato, contattare i nostri specialisti
dell’assistenza o il vostro rivenditore tramite il sito web prima di gettare la scatola.
• Gli accessori inclusi sono stati testati e trovati compatibili soltanto con il vostro Huma.
1. CONTENUTO DELLA CONFEZIONE
Note
2. PANORAMICA DEL PRODOTTO
Copertura WebCam
chiusa
Copertura WebCam
aperta

IT
60
Vista frontale
1
2 3 4
5
6
7
8
9
10
11
1. Doppio microfono
2. Indicatore LED della fotocamera
3. Fotocamera
4. Copertura WebCam
5. Touchpad
6. Scanner di impronte digitali
7. Pulsante Sinistra/Destra
8. Schermo LCD
9. Altoparlanti stereo
10. Pulsante di accensione
11. Tastiera

IT
61
Vista laterale destra
Vista laterale sinistra
1 4 5
2 3
123 4 5 6
1. USB Type-C
2. Porta USB 3.2
3. Porta USB 3.2
4. Porta HDMI
5. Porta Ethernet
1. Foro di Sicurezza Kensington®
2. Porta di ricarica
3. Presa d’aria
4. Porta USB 2.0
5. Slot per scheda SD
6. Presa per cuffie

IT
62
3. CONFIGURAZIONE
Collegare l’adattatore AC alla porta di ricarica AC su Huma e collegare l’adattatore
AC alla presa elettrica con il cavo di alimentazione fornito.
• Anche se non utilizzerete il vostro Huma per molto tempo, collegarlo almeno una volta
ogni tre mesi e caricare la batteria a circa il 50% della capacità. Se il computer non viene
collegato per molto tempo, la tensione della batteria diminuisce a causa dell’autoscarica
attivando la funzione di sicurezza e la batteria potrebbe diventare inutilizzabile. Il tempo prima
dell’attivazione della funzione di sicurezza varia a seconda della temperatura ambiente.
1. Collegare a una presa elettrica

IT
63
Seguire le istruzioni visualizzate nella finestra di Configurazione di Windows per configurare
le impostazioni iniziali.
Sollevare il coperchio dello schermo LCD e premere il pulsante di accensione sul computer.
• Quando si solleva il coperchio dello schermo LCD, non afferrare l’area intorno alla fotocamera
poiché potrebbe causare malfunzionamenti.
• Non spegnere Huma prima che venga visualizzata la finestra di Configurazione di Windows.
Per maggiori dettagli, consultare il supporto di Windows o il sito web di Microsoft.
3. Configurazione di Windows (Configurazione iniziale)
2. Accendere il vostro Huma
Note
Nota
FOTOCAMERA
ENERGIA

IT
64
1. Selezionare (Avvio) ,(Impostazioni) , Rete e Internet e Wi-Fi e poi impostare
Wi-Fi su Attivato.
2. Seleziona Mostra reti disponibili.
3. Selezionare il punto di accesso Wi-Fi desiderato e poi selezionare Connetti.
CONSIGLI
Con il vostro Huma, potete connettervi a Internet tramite Wi-Fi (wireless LAN) o rete LAN
cablata. Prima di connettersi a Internet, è necessario selezionare un servizio di connessione,
stipulare un contratto con un fornitore di servizi Internet di conseguenza e configurare le
impostazioni della connessione Internet sul computer. Per i dettagli sulle impostazioni della
connessione Internet e sui dispositivi di rete richiesti, fare riferimento al manuale del fornitore
di servizi e al manuale fornito con il dispositivo. L’autenticazione della licenza di Windows
viene completata quando viene stabilita correttamente la connessione a Internet.
1. Collegare un’estremità del cavo LAN (non è in dotazione)
alla porta Ethernet su Huma e l’altra al modem/router.r.
Connettersi a Internet
Connessione Wi-Fi
Connessione rete LAN cablata
1. Selezionare (Avvio) , (Impostazioni) e Windows Update e poi seguire le istruzioni
sullo schermo per aggiornare Windows.
La chiavetta USB inclusa nella confezione contiene tutti i driver necessari.
Tuttavia, per le ultime versioni dei driver,
si prega di visitare https://www.monsternotebook.com.tr/suruculer/
Eseguire Windows Update
Aggiornamento del software di Huma

IT
65
Al termine della configurazione di Windows, selezionare (avvio) ,
(Accensione) e poi Spegni o Sospendi.
Potete utilizzare il sensore di impronte digitali per accedere alle funzioni di Windows Hello.
Le funzioni di Windows Hello includono l’accesso con l’autenticazione dell’impronta digitale
anziché la password all’account utente di Windows in cui è stata registrata l’impronta digitale.
Per maggiori informazioni sulle funzioni e sulla configurazione di Windows Hello, potete
ottenere assistenza dal Supporto di Windows Hello.
Registrare la vostra impronta digitale: Seguire i passaggi seguenti per configurare
Windows Hello e registrare la vostra impronta digitale.
1. Selezionare (Avvio) , (Impostazioni) e Account.
2. Selezionare Opzioni di accesso e impostare la vostra password. Se avete già impostato la
password, andare al passaggio 3.
3. Seguire le istruzioni sullo schermo per ogni processo di autenticazione tramite impronta
digitale per registrare la vostra impronta digitale. Se non avete impostato un PIN,
impostarlo al termine della procedura.
Il vostro Huma non viene fornito con nessun supporto di ripristino. Assicurarsi di creare il
vostro supporto di ripristino con un’unità flash USB prima di utilizzare il computer per la prima
volta dopo l’acquisto. Per maggiori informazioni, fare riferimento alla Guida alla sicurezza/
Guida al ripristino e alla risoluzione dei problemi.
Creazione del proprio supporto di ripristino
Spegnere il vostro Huma o metterlo in modalità Sospensione
Assicurarsi sempre di utilizzare l’adattatore AC per collegare il vostro Huma a una
presa elettrica prima di eseguire un ripristino.
Nota
4. UTILIZZO DEL SENSORE DI IMPRONTE DIGITALI

IT
66
• La tecnologia di autenticazione di impronte digitali non fornisce una verifica completa
dell’identità personale, né garantisce la protezione completa dei dati e dell’hardware
dell’utente.
• Monster Notebook declina ogni responsabilità derivante dall’uso o dall’impossibilità di
utilizzare il sensore di impronte digitali.
• La velocità di riconoscimento delle impronte digitali varia a seconda dell’utilizzo del sensore
di impronte digitali. Neanche questi tassi non sono coerenti tra gli individui.
• Tenere pulito il sensore di impronte digitali per evitare errori o malfunzionamenti.
• Tenere presente che i vostri dati registrati per l’autenticazione tramite impronta digitale e il
riconoscimento facciale potrebbero essere cancellati durante i lavori di riparazione sul vostro
Huma.
• Quando si registrano le impronte digitali, assicurarsi di registrare più di un dito in caso di
lesioni.
• A seconda dello stato dell’impronta digitale o dell’utilizzo del sensore di impronte digitali, la
registrazione o l’autenticazione dell’impronta digitale potrebbe non riuscire. Quando l’autenti-
cazione dell’impronta digitale non riesce, provare quanto segue:
- Provare con un altro dito.
- Pulire il dito.
- Eliminare l’impronta digitale registrata e registrarla nuovamente.
- Nelle stagioni fredde come l’inverno, assicurarsi di toccare un oggetto metallico per scaricare
l’elettricità statica dal vostro corpo prima di scansionare l’impronta digitale. L’elettricità statica
può causare malfunzionamenti nel sensore di impronte digitali.
Note

AR
67
H5 V4.1

AR
68
Monster Notebook
WindowsHuma
.Huma
/
.
.
.
. Huma
.
.
WindowsHuma
( )
.Monster Notebook
https://www.monsternotebook.com.tr/monster-cozum-merkezi/
.
.
.
Huma
Huma
Huma
Huma
Huma
Huma

AR
69
.
20
.
.
.
EMC 2014/30/EU
EU/35/2014
EU/53/2014
EU/65/2011
EC/125/2009
EU/2013/617
(EMF)
CE

AR
70
.1
.2
!
.
.
.
/
USB
.
Huma
Huma

AR
71
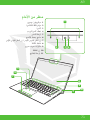
1
2 3 4
5
6
7
8
9
10
11
LED
/
LCD
.1
.2
.3
.4
.5
.6
.7
.8
.9
.10
.11

AR
72
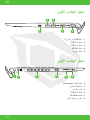
1 4 5
2 3
123 4 5 6
USB 3.2
USB 3.2
HDMI
USB 2.0
SD
.1
.1
.2
.2
.3
.3
.4
.4
.5
.5
.6
USBC
Kensington®

AR
73
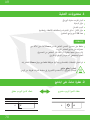
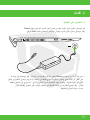
.3
.1
.
Huma
Huma
.
.
.
%50

AR
74
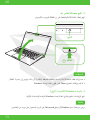
( )
Huma
Windows
.2
.3
.
.
.
LCD
WindowsMicroso
Windows
HumaWindows
,LCD.

AR
75
Wi Fi
LAN
Windows Update
Huma
.
.
. Windows
.
HumaWi-FiLAN
USB
.
Huma
.Windows
. /
.
.
()
LAN
Windows Update
()
( )
(Start)
Ethernet
Wi-FiWi-Fi
Wi-Fi
. .1
.1
.1
.2
.3
https://www.monsternotebook.com.tr/suruculer/

AR
76
Huma
Huma
.Windows Hello
.
.
:
Windows Hello
Windows Hello
Windows HelloWindows Hello
Windows .
.
/
USB
Windows ()().
. Huma
.3
.
.3
,()()
.
.
,PIN
.1
.2
.3

AR
77
-
-
-
-
.
.
.
.
.
.
.
:
.
Huma .
.
.
. .
Monster Notebook

TR
78
TURKEY - GERMANY - UK - UAE - N.CYPRUS
-
 1
1
-
 2
2
-
 3
3
-
 4
4
-
 5
5
-
 6
6
-
 7
7
-
 8
8
-
 9
9
-
 10
10
-
 11
11
-
 12
12
-
 13
13
-
 14
14
-
 15
15
-
 16
16
-
 17
17
-
 18
18
-
 19
19
-
 20
20
-
 21
21
-
 22
22
-
 23
23
-
 24
24
-
 25
25
-
 26
26
-
 27
27
-
 28
28
-
 29
29
-
 30
30
-
 31
31
-
 32
32
-
 33
33
-
 34
34
-
 35
35
-
 36
36
-
 37
37
-
 38
38
-
 39
39
-
 40
40
-
 41
41
-
 42
42
-
 43
43
-
 44
44
-
 45
45
-
 46
46
-
 47
47
-
 48
48
-
 49
49
-
 50
50
-
 51
51
-
 52
52
-
 53
53
-
 54
54
-
 55
55
-
 56
56
-
 57
57
-
 58
58
-
 59
59
-
 60
60
-
 61
61
-
 62
62
-
 63
63
-
 64
64
-
 65
65
-
 66
66
-
 67
67
-
 68
68
-
 69
69
-
 70
70
-
 71
71
-
 72
72
-
 73
73
-
 74
74
-
 75
75
-
 76
76
-
 77
77
-
 78
78


en otros idiomas
- français: Monster HUMA H5 Mode d'emploi
- italiano: Monster HUMA H5 Guida utente
- Deutsch: Monster HUMA H5 Benutzerhandbuch
- Türkçe: Monster HUMA H5 Kullanici rehberi
Otros documentos
-
Klarstein 10045662 El manual del propietario
-
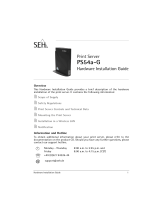
 SEH Computertechnik PS54-G Manual de usuario
-
SEH SEH InterCon PS54a-G Guía de instalación
-
 SEH Computertechnik PS54a-G Manual de usuario
-
3M Single Touch Displays Guía del usuario
-
-
-
 SEH Computertechnik IC146-ETHER-HP-FL Manual de usuario
-
Mares Bluelink Pro El manual del propietario
-
 SEH Computertechnik SEH PS1109 Manual de usuario


