
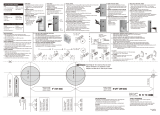
1-3/4”
(45 mm)
1-3/8”
(35 mm)
1-9/16”
(40 mm)
2-3/8” (60 mm)
Backset/Distance d'entrée de/Bocallave
2-3/4” (70 mm)
Backset/Distance d'entrée de/Bocallave
Ø 1-5/8” (41 mm)
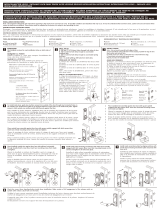
Fold here.
Place on door edge.
Pliez ici.
Placez sur le rebord de la porte.
Doble aqui.
Ponga en el borde de la puerta.
CAUTION:
DO NOT DRILL Ø41MM (1-5/8”) HOLE THROUGH ENTIRE DOOR. (READ INSTRUCTIONS CAREFULLY)
ATTENTION:
NE PAS PERCER LE TROU DE Ø41MM (1-5/8”) À TRAVERS LA PORTE ENTIÈRE. (LISEZ LES INSTRUCTIONS SOIGNEUSEMENT)
PRECAUCIÓN:
NO ATRAVIESE LA PUERTA AL PERFORAR EL ORIFICIO DE 41 MM (1-5/8”) DE DIÁMETRO. (LEA LAS INSTRUCCIONES DETENIDAMENTE)
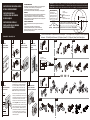
INSTRUCTIONS FOR INSTALLATION OF ONE-SIDED DEADBOLT
INSTRUCTIONS FOR INSTALLATION
OF ONE-SIDED DEADBOLT
INSTRUCTIONS POUR
L'INSTALLATION DU VERROU
À SENS UNIQUE
INSTRUCCIONES PARA LA
INSTALACIÓN DE UN CERROJO
MUERTO UNILATERAL
2 in 1
Press Button
Appuyer sur le bouton
Empuje el botón
2 3/8”(60 mm)
CARE AND MAINTENANCE
The following care instructions should be followed to ensure a long lasting finish.
1. Remove locks, or do not install locks, prior to painting your door.
2. Periodically clean with mild soap and a soft cloth only.
Do not use abrasives or harsh chemicals, and avoid sharp or scratching objects.
ENTRETIEN
Veuillez suivre les instructions de soin suivantes afin d’assurer la longévité du fini.
1. Enlevez les serrures ou ne les installez pas avant de peinturer la porte.
2. Nettoyez périodiquement avec du savon doux et un chiffon doux seulement.
N’utilisez pas d’abrasifs ou de produits chimiques forts et évitez les objets pointus
ou qui peuvent causer des éraflures.
CUIDADO Y MANTENIMIENTO
Para obtener un acabado duradero, realice las siguientes instrucciones de
cuidado.
1. Retire las trabas, o no las instale, antes de pintar la puerta.
2. Límpielas periódicamente con jabón y un paño suave únicamente.
No utilice productos químicos fuertes ni abrasivos y evite utilizar objetos
punzantes o que puedan provocar rayas.
C
L
C
L
Door Thickness
Door Thickness
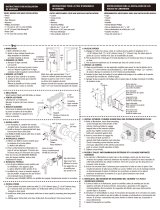
On the edge of a door, drill a latch hole with
diameter 25mm (1”) and depth 102mm (4”)
as previously marked. Then drill a center
hole 41mm (1-5/8") as marked until it just
passes the 25mm (1”) hole and make sure
not to break through to the opposite side.
En bordure de la porte, percez un trou de
25mm (1") de diamètre pour le verrou qui a
été marqué auparavant. Percez 102mm (4")
de profondeur. Ensuite, percez comme
marqué un trou central de 41mm (1-5/8") et
veillez à
ne pas briser du côté opposé.
En el borde de la puerta, perfore un orificio
para el cerrojo de 25 mm (1”) de diámetro
marcado previamente. Perfore hasta una
profundidad de 102 mm (4”). Luego perfore
un orificio central, según lo marcado, de
41 mm (1-5/8”), asegurándose de que
no
atraviese la puerta.
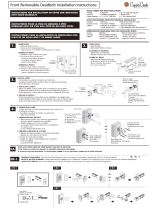
INSTALL LATCH
INSTALE EL PESTILLO
INSTALLER LE VERROU
INSTALL STRIKE
INSTALE LA PLACA
HEMBRA
INSTALLER LA GÂCHE
INSTALL THUMBTURN
INSTALE LA MARIPOSA
INSTALLER LE TOURNIQUET
54
6
LATCH
PESTILLO
VERROU
3
MARK DOOR
MARQUE LA PUERTA
MARQUER LA PORTE
DRILL HOLES
TALADRE LOS AGUJEROS
FORER LES TROUS
1
2
¹⁄₈” (3 mm)
1” (25 mm)
1
5
⁄8
” (41 mm)
D00-004P14 Rev.12/06 01
6 in 1
4 in 14 in 1
4 in 1
6 in 1
2 in 1
OR OU O
OR
OU
O
OR OU O
OR OU O
C
C
B
A
A
B
• Fixed Latch With 60mm Or 70mm Backset can not be adjusted • Cette Étape Est Pour Les Loquets De Sécurité Ajustables
Seulement
• El Pestillo Fijo Con Distancia 2-3/8 Pulgadas (60mm) O 2-3/4 Pulgadas (70mm) No Se Puede Ajustar
Drill 1” (25 mm) hole at
center of door edge.
Percez un trou de 1” dans le
centre du rebord de la porte.
Hacer un agujero de 1” en el
centro del borde de la puerta.
-
 1
1

Faultless D274-F Guía de instalación
- Tipo
- Guía de instalación
En otros idiomas
- français: Faultless D274-F Guide d'installation
- English: Faultless D274-F Installation guide
Documentos relacionados

Otros documentos
-
Kwikset 663 5 RCL RCS Guía de instalación
-
 Arctek D7S1 Guía de instalación
-
 Copper Creek DBZH3410TB Guía de instalación
-
Defiant B87L2 Guía de instalación
-
 Sure-Loc Hardware IN301-CDR 32D Guía de instalación
-
Design House 702456 Guía de instalación
-
-
Black & Decker Kwikset 663 Guía de instalación


