Huawei Ascend P6 El manual del propietario
- Categoría
- Teléfonos móviles
- Tipo
- El manual del propietario

Quick Start Guide
P6
Schnellstartanleitung
Guide de démarrage rapide
Guida di avvio rapido
Guía de inicio rápido
Guia de Início Rápido
Snelstartgids

i
English . . . . . . . . . . . . . . . . . . . . . . . . . . . . . . . . . . . . 1
Français . . . . . . . . . . . . . . . . . . . . . . . . . . . . . . . . . . . 7
Deutsch . . . . . . . . . . . . . . . . . . . . . . . . . . . . . . . . . . . 13
Italiano . . . . . . . . . . . . . . . . . . . . . . . . . . . . . . . . . . . . 19
Español. . . . . . . . . . . . . . . . . . . . . . . . . . . . . . . . . . . . 25
Português . . . . . . . . . . . . . . . . . . . . . . . . . . . . . . . . . . 31
Nederlands . . . . . . . . . . . . . . . . . . . . . . . . . . . . . . . . . 37
Contents

1
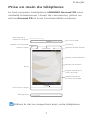
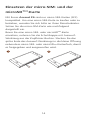
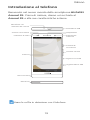
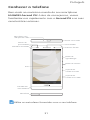
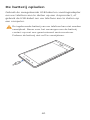
Getting to know your phone
Welcome to the brand new world of your HUAWEI
Ascend P6 smartphone! Before we begin, let's take a
quick look at the Ascend P6 and its external features.
Use the earphones supplied with your phone.
Micro USB port
Status indicator
Earpiece
Screen
Headset jack
Noise reduction
microphone
Proximity sensor
Micro-SIM card tray
Microphone
Power button
Volume button
Front camera
microSD card tray
English

2
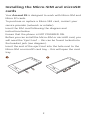
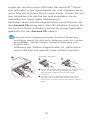
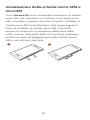
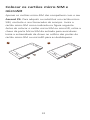
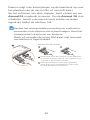
Installing the Micro-SIM and microSD
cards
Your Ascend P6 is designed to work with Micro-SIM and
Micro SD cards.
To purchase or replace a Micro-SIM card, contact your
service provider (network or retailer).
Insert the SIM card following the diagram and
instructions below.
Ensure that the phone is NOT POWERED ON.
Before you can install the Micro-SIM or microSD card, you
will need the ‘Eject tool’ – this can be found tucked into
the headset jack (see diagram).
Insert the end of the eject tool into the hole next to the
Micro-SIM or microSD card tray – this will open the card
tray.
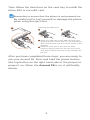
1
2

3
Then follow the directions on the card tray to install the
Micro-SIM or microSD card.
Remember to ensure that the phone is not powered on.
Be careful not to hurt yourself or damage the phone
when using the eject tool.
After you have completed these steps, you are ready to
use your Ascend P6. Press and hold the power button
(the top button on the right hand side of the phone) to
power it on. When the Ascend P6 is on, it will briefly
vibrate.
3
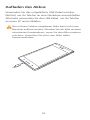
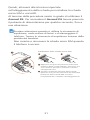
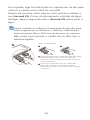
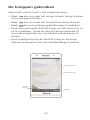
Inserting the SIM card
Ɇ ɇ
Place your SIM card in the SIM Card tray, and
gently press (to ensure that it is not protruding).
Then slide the tray into the slot as shown in the
diagram.
Ɇ
Once the front end of the card has been
inserted, apply pressure to the rear end of the
card tray to ensure the tray is fully inserted into
the slot.
ɇ
b
a
S
IM

4
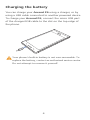
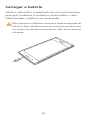
Charging the battery
You can charge your Ascend P6 using a charger, or by
using a USB cable connected to another powered device.
To charge your Ascend P6, connect the micro USB part
of the charger/USB cable to the slot on the top edge of
the phone.
Your phone's built-in battery is not user-removable. To
replace the battery, contact an authorised service centre.
Do not attempt to remove it yourself.

5
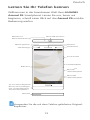
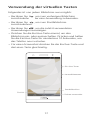
Using the buttons
Your Ascend P6 is designed to be simple to navigate.
From any screen, you can:
• Touch to return to the previous screen or exit an
application.
• Touch to return to the home screen.
• Touch to display recently used applications.
• Press and release the power button to turn the screen
on or off. Press and hold the power button for 10
seconds or more to restart your phone.
• Press the power and volume down buttons together to
take a screenshot.
Power button
Volume button
Recent
Home
Return

6
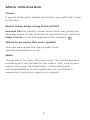
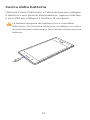
More information
Cover
If you’re looking for added protection, you will find a case
in the box.
Need more help using Ascend P6?
Ascend P6 has a built in help menu that will guide you
through many of the features of the phone.You will find
Help Centre in the Management File marked .
Want to browse the user guide?
You can download the user guides from
www.huaweidevice.co.uk.
Note
This guide is for your reference only. The actual product,
including but not limited to the colour, size, and screen
layout may vary. All statements, information and
recommendations in this guide do not constitute a
warranty of any kind, express or implied.

7
Prise en main du téléphone
Le tout nouveau smartphone HUAWEI Ascend P6 vous
souhaite la bienvenue ! Avant de commencer, jetons un
œil au Ascend P6 et à ses fonctionnalités externes.
Utilisez le micro-casque livré avec votre téléphone.
Écran
Microphone à
réduction de bruit
Microphone
Port micro-USB
Capteur de proximité Écouteur
Témoin d'état Appareil photo frontal
Bouton d'alimentation
Bouton de volume
Emplacement de la
carte microSD
Emplacement de
la carte micro-SIM
Prise micro-casque
Français

8
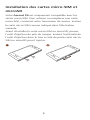
Installation des cartes micro-SIM et
microSD
Votre Ascend P6 est uniquement compatible avec les
cartes micro-SIM. Pour acheter ou remplacer une carte
micro-SIM, contactez votre fournisseur de service. Insérez
la carte micro-SIM comme indiqué dans l'illustration
suivante.
Avant d'installer la carte micro-SIM ou microSD, prenez
l'outil d'éjection du jack du casque. Insérez l'extrémité de
l'outil d'éjection dans le trou à côté du porte-carte micro-
SIM ou microSD pour l'éjecter.
1
2

9
Ensuite, suivez les instructions sur le porte-carte pour
installer la carte micro-SIM ou microSD.
Une fois ces étapes terminées, Ascend P6 est prêt à
l'emploi. Pour activer Ascend P6, maintenez le bouton
d'alimentation pendant quelques secondes jusqu'à ce
qu'il vibre.
Utilisez l'outil d'éjection avec précaution pour éviter de
vous blesser ou d'endommager le téléphone. Ne laissez
pas l'outil d'éjection à portée des enfants.
N'insérez pas ou ne retirez pas la carte micro-SIM si le
téléphone est allumé.
3
Insertion de la carte SIM
Ɇ ɇ
Afin de s’assurer de la bonne mise en place de
votre carte SIM, effectuer une pression sur
celle-ci pendant l’insertion dans le support prévu
à cet effet.
Ɇ
Maintenir la carte SIM en place pendant
l’insertion du support dans votre smartphone.
ɇ
b
a
S
IM

10
Chargement de la batterie
Utiliser le câble USB et l'adaptateur électrique fournis
pour brancher le téléphone à une prise de courant ou
connecter le téléphone à un ordinateur à l'aide du câble
USB.
La batterie intégrée du téléphone ne peut pas être retirée
par l'utilisateur. Pour la remplacer, il est nécessaire de
contacter un centre de service agréé. Ne pas essayer de
la retirer soi-même.

11
Utilisation des boutons
Opérations possibles de tous les écrans :
• Touchez pour revenir à l'écran précédent ou quitter
une application.
• Touchez pour revenir à l'écran d'accueil.
• Touchez pour afficher les applications récentes.
• Appuyez une fois sur le bouton d'alimentation pour
allumer ou éteindre l'écran. Maintenez le bouton
d'alimentation pendant 10 secondes ou plus pour
redémarrer le téléphone.
• Appuyez simultanément sur le bouton d'alimentation et
le bouton de volume vers le bas pour effectuer une
capture d'écran.
Bouton
d'alimentation
Bouton de
volume
Récent
Accueil
Retour

12
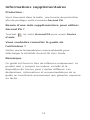
Informations supplémentaires
Protection :
Vous trouverez dans la boîte, une housse de protection
afin de protéger votre nouveau Ascend P6.
Besoin d'une aide supplémentaire pour utiliser
Ascend P6 ?
Touchez sur votre Ascend P6 pour ouvrir Centre
d'aide.
Vous souhaitez consulter le guide de
l'utilisateur ?
Visitez www.huaweidevice.com/worldwide pour
télécharger le HUAWEI Ascend P6 Use
r Guide.
Remarque
Ce guide est fourni à titre de référence uniquement. Le
produit réel, y compris sa couleur, sa taille et la
disposition de l'écran, peut s'avérer différent. Les
déclarations, informations et recommandations de ce
guide ne constituent aucunement une garantie, expresse
ou tacite.

13
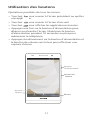
Lernen Sie Ihr Telefon kennen
Willkommen in der brandneuen Welt Ihres HUAWEI
Ascend P6 Smartphone! Lassen Sie uns, bevor wir
beginnen, schnell einen Blick auf das Ascend P6 und die
Bedienung werfen.
Verwenden Sie die mit dem Telefon gelieferten Original-
Kopfhörer.
Micro-USB-Anschluss
Näherungssensor Ohrhörer
Frontkamera
Statusanzeige
Bildschirm
Ein-/Aus-Taste
Micro-SIM
-Kartensteckplatz
Mikrofon
MicroSD
TM
-Kartensteckplatz
Mikrofon zur
Rauschunterdrückung
Lautstärketasten
3,5 mm Stereo-Kopfhörer
Buchse mit Schutzkappe
(inkl. Auswurfwerkzeug
für Kartensteckplätze)
Deutsch

14
Einsetzen der micro-SIM- und der
microSD
TM
-Karte
Mit Ihrem Ascend P6 sind nur micro-SIM-Karten (3FF)
kompatibel. Um eine micro-SIM-Karte zu kaufen oder zu
beziehen, wenden Sie sich bitte an Ihren Dienstanbieter.
Setzen Sie die micro-SIM-Karte wie nachfolgend
dargestellt ein.
Bevor Sie eine micro-SIM- oder microSD
TM
-Karte
einsetzen, nehmen Sie die Schutzkappe mit Auswurf-
Werkzeug aus der Kopfhörer-Buchse. Stecken Sie das
spitze Ende des Auswurf-Werkzeugs in die kleine Öffnung
neben dem micro-SIM- oder microSD
TM
-Kartenfach, damit
es freigegeben und ausgeworfen wird.
1
2

15
Legen Sie nun die micro-SIM oder die microSD
TM
-Karte
wie gefordert in die Kartenhalter ein und schieben diese
vorsichtig mit leichtem Druck in das Gerät. Achten Sie auf
den korrekten Sitz der Karten und vermeiden Sie ein
Verkanten im Gerät (siehe Abbildung 3).
Nachdem diese Schritte abgeschlossen sind, können Sie
das Ascend P6 verwenden. Zum Einschalten drücken Sie
die Ein/Aus-Taste und halten Sie sie für einige Sekunden
gedrückt, bis das Ascend P6 vibriert.
Seien Sie beim Umgang mit dem Auswurf-Werkzeug
vorsichtig, damit Sie sich nicht verletzen oder Ihr Telefon
beschädigen. Halten Sie das Auswurf-Werkzeug von
Kindern fern.
Während das Telefon eingeschaltet ist, sollte keine
micro-SIM-Karte eingesetzt oder entfernt werden.
3
SIM-Karte einlegen
Ɇ ɇ
Legen Sie die SIM-Karte korrekt ein und drücken
sie das vordere Ende der SIM-Karte in den
Kartenhalter während Sie den Einschub
einführen.
Ɇ
Schieben Sie nun den SIM-Kartenhalter unter
leichtem Druck vollständig in das Gerät ein.
Achten Sie auch hier auf den korrekten Sitz der
Karte.
ɇ
b
a
S
IM

16
Aufladen des Akkus
Verwenden Sie das mitgelieferte USB-Kabel und das
Netzteil, um Ihr Telefon an eine Steckdose anzuschließen.
Alternativ verwenden Sie das USB-Kabel, um Ihr Telefon
an einen PC anzuschließen.
Der in Ihrem Telefon eingebaute Akku kann nicht vom
Benutzer entfernt werden. Wenden Sie sich bitte an einen
autorisieren Kundendienst, wenn Sie den Akku ersetzen
möchten. Versuchen Sie nicht, den Akku selbst
herauszunehmen.

17
Verwendung der virtuellen Tasten
Folgendes ist von jedem Bildschirm aus möglich:
• Berühren Sie , um zum vorherigen Bildschirm
zurückzukehren oder eine Anwendung zu beenden.
• Berühren Sie , um zum Startbildschirm
zurückzukehren.
• Berühren Sie , um die zuletzt verwendeten
Anwendungen anzuzeigen.
• Drücken Sie die Ein/Aus-Taste einmal, um den
Bildschirm ein- oder auszuschalten. Drücken und halten
Sie die Ein/Aus-Taste für mindestens 10 Sekunden, um
das Telefon neu zu starten.
• Für einen Screenshot drücken Sie die Ein/Aus-Taste und
die Leiser-Taste gleichzeitig.
Ein-/Aus-Taste
Lautstärketasten
Startbildschirm
Zurück
Zuletzt verwendet

18
Weitere Informationen
Schutzhülle
Damit Sie noch länger viel Freude mit Ihrem Huawei
Ascend P6 haben, empfehlen wir Ihnen die beiliegende
Schutzhülle zu verwenden.
Benötigen Sie weitere Hilfe bei der Verwendung
des Ascend P6?
Berühren Sie auf dem Ascend P6, um das
Hilfecenter zu öffnen.
Möchten Sie das Benutzerhandbuch
herunterladen?
Unter www.huaweidevice.com/worldwide können Sie
das HUAWEI Ascend P6 Benutzerhandbuch
herunterladen.
Hinweis
Dieses Handbuch dient nur zu Ihrer Information. Das
eigentliche Produkt, einschließlich, aber nicht beschränkt
auf Farbe, Größe und Bildschirmlayout, kann davon
abweichen. Die Angaben, Informationen und
Empfehlungen in diesem Handbuch stellen weder eine
ausdrückliche noch eine stillschweigende Garantie dar.

19
Introduzione al telefono
Benvenuto nel nuovo mondo dello smartphone HUAWEI
Ascend P6. Prima di iniziare, diamo un'occhiata al
Ascend P6 e alle sue caratteristiche esterne.
Usare le cuffie in dotazione con il telefono.
Microfono
Microfono con
riduzione del rumore
Porta Micro USB
Sensore di vicinanza
Indicatore di stato
Altoparlante
Fotocamera
anteriore
Jack auricolare
Pulsanti volume
Pulsante di
accensione
Ingresso Micro SIM
Ingresso microSD
Schermo
Italiano

20
Installazione della scheda micro SIM e
microSD
Con il Ascend P6 sono compatibili unicamente le schede
micro SIM. Per acquistare o sostituire una scheda micro
SIM, contattare il proprio fornitore di servizi. Installare la
scheda micro SIM come illustrato nella figura seguente.
Prima di installare la scheda micro-SIM o microSD,
estrarre lo strumento di espulsione dalla presa della
cuffia. Inserire l'estremità dello strumento di espulsione
nel foro accanto all'alloggiamento della scheda micro-
SIM o microSD per rilasciarla.
1
2

21
Quindi, attenersi alle istruzioni riportate
sull'alloggiamento della scheda per installare la scheda
micro-SIM o microSD.
Al termine della procedura sarete in grado di utilizzare il
Ascend P6. Per accendere il Ascend P6 tenere premuto
il pulsante di alimentazione per qualche secondo, fino a
una vibrazione.
Prestare attenzione quando si utilizza lo strumento di
espulsione, onde evitare di ferirsi o di danneggiare il
telefono. Tenere lo strumento di espulsione lontano dalla
portata dei bambini.
Non inserire o rimuovere la scheda micro SIM quando
il telefono è acceso.
3
Installazione della scheda micro SIM
Ɇ ɇ
Applicare una poccola pressione sulla parte
anteriore della scheda SIM per assicurarsi che
non fuoriesca quando si inserisce il vassoio
nell'apposito slot.
Ɇ
Inserita l'estremità anteriore della scheda,
applicare una poccola pressione alle estremità
posteriore della scheda SIM e inserire
completamente il cassetto nell'alloggiamento.
ɇ
b
a
S
IM

22
Carica della batteria
Utilizzare il cavo USB fornito e l'alimentatore per collegare
il telefono a una presa di alimentazione, oppure utilizzare
il cavo USB per collegare il telefono al computer.
La batteria integrata del telefono non è removibile
dall'utente. Per sostituire la batteria, contattare un centro
di manutenzione autorizzato. Non tentare di rimuovere la
batteria.

23
Utilizzo dei pulsanti
Da tutte le schermate è possibile:
• Toccare per ritornare alla schermata precedente o
uscire da un'applicazione.
• Toccare per ritornare alla schermata principale.
• Toccare per visualizzare le applicazioni usate di
recente.
• Premere una volta il pulsante di accensione per
accendere e spegnere lo schermo. Tenere premuto il
pulsante di alimentazione per 10 secondi o più per
riavviare il telefono.
• Per fare uno screenshot, premere
contemporaneamente il pulsante di accensione e il
pulsante per abbassare il volume.
Home
Pulsante di
accensione
Pulsanti volume
Recenti
Indietro

24
Ulteriori informazioni
Cover
Dentro la scatola la cover per proteggere il tuo telefono .
Per ottenere maggiori informazioni sull'utilizzo
di Ascend P6?
Tocca sul Ascend P6 per aprire Guida.
Per sfogliare la guida per l'utente?
Visitare www.huaweidevice.com/worldwide per scaricare
la HUAWEI Ascend P6 User Guide.
Nota
Questa guida è fornita come riferimento. Il prodotto e,
senza limitazione, il colore, le dimensioni e il layout dello
schermo potrebbero variare. Tutte le dichiarazioni,
informazioni e suggerimenti presenti nella guida non
costituiscono garanzia di alcun tipo, né esplicita né
implicita.

25
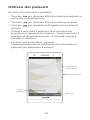
Información sobre el teléfono
Bienvenido al nuevo mundo del smartphone HUAWEI
Ascend P6. Antes de comenzar, echemos un vistazo al
Ascend P6 y sus características externas.
Use los auriculares suministrados con su teléfono.
Entrada para
auriculares
Pantalla
Puerto micro-USB
Indicador de estado
Altavoz
Micrófono
Botones de volumen
Botón de
encendido/apagado
Cámara delantera
Sensor de proximidad
Soporte para tarjeta
micro-SIM
Soporte para tarjeta
micro-SD
Micrófono para reducción
del ruido ambiental
Español

26
Instalación de las tarjetas micro-SIM y
micro-SD
Solo las tarjetas micro-SIM son compatibles con el
Ascend P6. Para adquirir o reemplazar la tarjeta micro-
SIM, comuníquese con su operador. Inserte la tarjeta
micro-SIM como se muestra en la figura que aparece a
continuación.
Para instalar la tarjeta micro-SIM o microSD, retire la
herramienta de extracción de la entrada para auriculares.
Inserte el extremo de la herramienta de extracción en el
orificio que se encuentra al lado del soporte de la tarjeta
micro-SIM o microSD para extraerlo.
1
2

27
Siga las instrucciones del soporte para instalar la tarjeta
micro-SIM o microSD.
Después de realizar todos estos pasos, ya puede utilizar el
Ascend P6. Mantenga pulsado el botón de encendido/
apagado durante unos segundos hasta que el Ascend P6
vibre al encenderse.
Sea cuidadoso con la herramienta de extracción, ya que
puede lastimarse o dañar el teléfono con ella. Mantenga la
herramienta de extracción fuera del alcance de los niños.
No inserte ni extraiga la tarjeta micro-SIM del
teléfono cuando esté encendido.
3
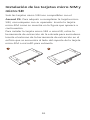
Inserción de la tarjeta SIM
Ɇ ɇ
Presione la parte final de la tarjeta SIM para
introducirla en la ranura.
Ɇ
Una vez introducida la parte delantera de la
tarjeta presione el extremo posterior para
introducirla completamente en la ranura.
ɇ
b
a
S
IM

28
Carga de la batería
Utilice el cable USB y el adaptador de alimentación
suministrados con el teléfono para conectarlo a una toma
de corriente, o utilice el cable USB para conectarlo al PC.
La batería del teléfono está integrada y no puede ser
extraída por el usuario. Para reemplazar la batería,
comuníquese con el centro de servicios autorizado. No
intente extraer la batería.

29
Uso de botones
En cualquier pantalla:
• Pulse para volver a la pantalla anterior o cerrar una
aplicación.
• Pulse para volver a la pantalla principal.
• Pulse para ver las aplicaciones usadas
recientemente.
• Pulse el botón de encendido/apagado una vez para
encender o apagar la pantalla. Mantenga pulsado dicho
botón durante 10 segundos o más para reiniciar el
teléfono.
• Pulse el botón de encendido/apagado y el botón para
bajar el volumen simultáneamente para hacer una
captura de pantalla.
Botón de
encendido/apagado
Botones de volumen
Inicio
Volver
Aplicaciones abiertas

30
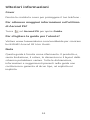
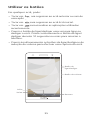
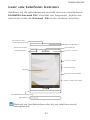
Más información
Cubierta de Protección
Para una mayor protección de su terminal encontrará una
funda protectora en el interior de la caja.
¿Necesita más ayuda en relación con el uso del
Ascend P6?
Pulse en el Ascend P6 para abrir el Centro de
ayuda.
¿Desea consultar la guía de usuario?
Visite www.huaweidevice.es/ para descargar la Guía de
usuario de Ascend P6 HUAWEI.
Nota
Esta guía solo tiene fines de referencia. El producto
adquirido puede presentar diferencias en cuanto al color,
tamaño, diseño de la pantalla, etc. Ninguna declaración,
información ni recomendación contenida en esta guía
constituye garantía de ningún tipo, expresa ni implícita.

31
Conhecer o telefone
Bem-vindo ao novíssimo mundo do seu smartphone
HUAWEI Ascend P6! Antes de começarmos, vamos
familiarizar-nos rapidamente com o Ascend P6 e as suas
características externas.
Utilize os auriculares fornecidos com o seu telefone.
Porta micro-USB
Indicador de estado
Auscultador
Ecrã
Entrada dos
auscultadores
Microfone
Botão do volume
Botão de
ligar/desligar
Câmara frontal
Sensor de
proximidade
Suporte do
cartão micro-SIM
Suporte do
cartão microSD
Microfone com
redução de ruído
Português

32
Colocar os cartões micro-SIM e
microSD
Apenas os cartões micro-SIM são compatíveis com o seu
Ascend P6. Para adquirir ou substituir um cartão micro-
SIM, contacte o seu fornecedor de serviços. Insira o
cartão micro-SIM como indicado na figura seguinte.
Antes de colocar o cartão micro-SIM ou microSD, retire a
chave da porta Micro-SIM da entrada para auriculares.
Insira a extremidade da chave no orifício das portas do
cartão micro-SIM ou microSD para as desbloquear.
1
2

33
Em seguida, siga as indicações no suporte do cartão para
colocar o cartão micro-SIM ou microSD.
Depois de concluir estes passos, está pronto a utilizar o
seu Ascend P6. Prima continuamente o botão de ligar/
desligar alguns segundos até o Ascend P6 vibrar para o
ligar.
Tenha cuidado ao utilizar a ferramenta de ejecção para
evitar magoar-se ou danificar o telefone. Mantenha a
chave da porta Micro-SIM fora do alcançe de crianças.
Não insira nem remova o cartão micro-SIM com o
telefone ligado.
3
Inserir o cartão SIM
Ɇ ɇ
Exerça pressão sobre a parte da frente do cartão
SIM para garantir que o mesmo não salta,
enquanto coloca a gaveta do cartão no interior
do seu telemóvel.
Ɇ
Assim que a parte da frente do cartão SIM
tenha sido inserida, faça pressão na parte
traseira do mesmo e insira totalmente a gaveta
na ranhura.
ɇ
b
a
S
IM

34
Carregar a bateria
Utilize o cabo USB e o adaptador de corrente fornecidos
para ligar o telefone à tomada ou então utilize o cabo
USB para ligar o telefone ao computador.
Não é possível o utilizador remover a bateria integrada do
telefone. Para substituir a bateria, entre em contacto com
um centro de assistência autorizado. Não tente remover
a bateria.

35
Utilizar os botões
Em qualquer ecrã, pode:
• Tocar em para regressar ao ecrã anterior ou sair de
uma aplicação.
• Tocar em para regressar ao ecrã Ecrã inicial.
• Tocar em para visualizar as aplicações utilizadas
recentemente.
• Premir o botão de ligar/desligar uma vez para ligar ou
desligar o ecrã. Prima continuamente o botão de ligar/
desligar durante 10 segundos ou mais para reiniciar o
telefone.
• Premir simultaneamente os botões de ligar/desligar e de
redução do volume para efectuar uma captura do ecrã.
Botão de
ligar/desligar
Botão do volume
Início
Voltar
Recente

36
Mais informações
Capa Protectora
Se procura uma protecção adicional, irá encontrar uma
capa protectora dentro da caixa.
Necessita de mais ajuda para utilizar o seu
Ascend P6?
Toque em no Ascend P6 para abrir Cent. ajuda.
Pretende procurar no manual de utilizador?
Visite www.huaweidevice.com/worldwide para transferir
o Guia do Utilizador HUAWEI Ascend P6.
Nota
Este manual serve apenas de referência. O produto real,
incluindo, entre outros, a cor, o tamanho e a disposição
do ecrã, pode variar. Todas as declarações, informações e
recomendações contidas neste manual não constituem
qualquer tipo de garantia, expressa ou implícita.

37
Leer uw telefoon kennen
Welkom bij de gloednieuwe wereld van uw smartphone
HUAWEI Ascend P6! Voordat we beginnen, kijken we
even kort naar de Ascend P6 en de externe functies.
Gebruik de hoofdtelefoon die bij uw telefoon werd
meegeleverd.
Micro USB-poort
Statuslampje
Scherm
Microfoon met
ruisonderdrukking
Afstandssensor
Micro-SIM-kaartsleuf
Oortelefoon
Volumeknop
Aan/Uit-knop
Voorste camera
MicroSD-kaartsleuf
Hoofdtelefoonaansluiting
Microfoon
Nederlands

38
De micro-SIM- en microSD-kaart
installeren
Alleen micro-SIM-kaarten zijn te gebruiken met uw
Ascend P6. Neem voor de aanschaf of vervanging van
een micro-SIM-kaart contact op met uw serviceprovider.
Plaats de micro-SIM-kaart zoals getoond in de volgende
afbeelding.
Voordat u de micro-SIM- of microSD-kaart plaatst, neemt
u het uitwerpmiddel uit de headsetaansluiting. Steek het
uiteinde van het uitwerpmiddel in het gaatje naast de
micro-SIM- of microSD- kaartsleuf om deze te openen.
1
2

39
Daarna volgt u de aanwijzingen op de kaartsleuf op voor
het plaatsen van de micro-SIM- of microSD-kaart.
Na het voltooien van deze stappen, bent u klaar om uw
Ascend P6 in gebruik te nemen. Om de Ascend P6 in te
schakelen, houdt u de aan/uit-toets enkele seconden
ingedrukt totdat de telefoon trilt.
Hanteer het uitwerpmiddel voorzichtig om uzelf niet te
verwonden of de telefoon niet te beschadigen. Houd het
uitwerpmiddel uit de buurt van kinderen.
Plaats of verwijder de micro-SIM-kaart niet wanneer
uw telefoon is ingeschakeld.
3
Plaatsen van de simkaart
Ɇ ɇ
Oefen druk uit op de voorkant van de SIM-kaart
om ervoor te zorgen dat het niet uitsteekt uit als
u de lade in de kaartsleuf plaatst.
Ɇ
Zodra de voorkant van de kaart is geplaatst,
oefen druk uit op de achterkant van de kaart
en steek de lade in de kaartsleuf.
ɇ
b
a
S
IM

40
De batterij opladen
Gebruik de meegeleverde USB-kabel en voedingsadapter
om uw telefoon aan te sluiten op een stopcontact, of
gebruik de USB-kabel om uw telefoon aan te sluiten op
een computer.
De ingebouwde batterij van uw telefoon kan niet worden
verwijderd. Neem voor het vervangen van de batterij
contact op met een geautoriseerd servicecentrum.
Probeer de batterij niet zelf te verwijderen.

41
De knoppen gebruiken
Vanuit elk scherm kunt u het volgende doen:
• Raak aan om naar het vorige scherm terug te keren
of om de app te sluiten.
• Raak aan om naar het startscherm terug te keren.
• Raak aan om onlangs gebruikte apps te bekijken.
• Druk eenmaal op de Aan/Uit-knop om het scherm in of
uit te schakelen. Houd de Aan/Uit-knop minimaal 10
seconden ingedrukt om uw telefoon opnieuw op te
starten.
• Druk tegelijkertijd op de Aan/Uit-knop en de knop
Volume omlaag om een schermafbeelding te maken.
Recent
Aan/Uit-knop
Volumeknop
Start
Terug

42
Meer informatie
Protector
Als u op zoek bent naar extra bescherming voor uw
toestel, vindt u in de verpakking een beschermhoes voor
uw toestel.
Meer hulp nodig bij Ascend P6?
Raak aan op uw Ascend P6 om Help-centrum te
openen.
Wilt u de gebruikershandleiding inzien?
Bezoek www.huaweidevice.com/worldwide om de
HUAWEI Ascend P6 Gebruikershandleiding te
downloaden.
Opmerking
Deze handleiding is uitsluitend bedoeld ter referentie. Het
daadwerkelijke product, met inbegrip van maar niet
beperkt tot de kleur, de afmetingen en de
schermindeling, kan hiervan afwijken. Geen van de
verklaringen, informatie en aanbevelingen in deze
handleiding houden enige vorm van garantie in, hetzij
expliciet of impliciet.

ModelHUAWEI P6-U06
Please visit
www.huaweidevice.com/worldwide/support/hotline
for recently updated hotline and email address in your
country or region.
3 1 0 1 0NVT _ 0 2
-
 1
1
-
 2
2
-
 3
3
-
 4
4
-
 5
5
-
 6
6
-
 7
7
-
 8
8
-
 9
9
-
 10
10
-
 11
11
-
 12
12
-
 13
13
-
 14
14
-
 15
15
-
 16
16
-
 17
17
-
 18
18
-
 19
19
-
 20
20
-
 21
21
-
 22
22
-
 23
23
-
 24
24
-
 25
25
-
 26
26
-
 27
27
-
 28
28
-
 29
29
-
 30
30
-
 31
31
-
 32
32
-
 33
33
-
 34
34
-
 35
35
-
 36
36
-
 37
37
-
 38
38
-
 39
39
-
 40
40
-
 41
41
-
 42
42
-
 43
43
-
 44
44
-
 45
45


Huawei Ascend P6 El manual del propietario
- Categoría
- Teléfonos móviles
- Tipo
- El manual del propietario
en otros idiomas
- français: Huawei Ascend P6 Le manuel du propriétaire
- italiano: Huawei Ascend P6 Manuale del proprietario
- Deutsch: Huawei Ascend P6 Bedienungsanleitung
- Nederlands: Huawei Ascend P6 de handleiding
- português: Huawei Ascend P6 Manual do proprietário