Lutec 6381501331 Guía de instalación
- Categoría
- Focos
- Tipo
- Guía de instalación
Este manual también es adecuado para

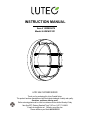
INSTRUCTION MANUAL
Model # 6381601331
Thank you for purchasing this Lutec Coastal fixture.
This product has been manufactured with the highest standards of safety and quality.
Questions, problems, missing parts?
Before returning please call or email our customer service hotline Monday-Friday
9am-5pm EST (Eastern Standard Time) Toll Free 1-(877) 714-8669
E-mail: [email protected] Website: www.lutec.com
Please reference your Model # 6381601331
LUTEC USA CUSTOMER SERVICE
Item # 1003928478

2
TABLE OF CONTENTS
Safety Information.........................................................2
Warranty......................................................................... 2
Package Contents........................................................3
SAFETY INFORMATION
Assembly Instruction
.................................................5-8
Care and Maintenance .................................................8
Troubleshooting
............................................................8
Please read and understand this entire manual before
attemp
ting
to operate or install the
product.
NOTICE:
This equipment has been tested and found to comply with
the
limits for a Class B digital device, pursuant to Part 15 of the
FCC
Rules.
These limits are designed to provide reasonable protection against
harmful
interference
in
a residential installation.This equipment generates, uses,
and can radiate radio frequency energy and,
if
not installed and used
in
accordance with the instructions, may cause harmful interference to radio
communications. However, there is no guarantee that interference
will not
occur in a particular installation. If this equipment does cause h
a
rmf
u
l
interference to radio or television reception, which can be determined by
turning the equipment off and on, the user is encouraged to try to correct
the interference by one or more of the following measures:
-
Reorient or relocate the receiving antenna.
-
Increase the separation between the equipment and rec
e
ive
r
.
-
Connect the equipment into an outlet on a circuit different from that
to which the receiver is connected.
-
Consult the dealer or an experienced rad
i
o
/
TV
technician for help.
This device complies with Part 15 of the
FCC
Rules. Operation is subject
to
the following two
conditions.
(1) This device may not caus
e harmful interference, and
(2) This device must accept any interference received,
inc
l
ud
ing
interference that may cause undesired operation.
WARNING:
This light fixture is designed to
fit
standard
junction boxes as defined by the National Electrical Code.
WARNING:
Consult a qualified electrician
if
you are
n
o
t
certain about the installation process. Always install
wiring
connections
in
accordance with local code, ordinances
a
nd
the National
E
l
ec
tric
Code.
WARNING:
Changes or modifications to this unit
not
expressly approved by the party responsible for
c
o
mplianc
e
could void the user’s authority to operate the
equipment.
WARNING:
Before
installing this fixture, turn off all power
to the fixture location by turning off power at the m
a
in
circuit breaker or fuse
box.
WARRANTY
The manufacturer warrants this lighting fixture to be free from defects in materials and workmanship for a period of five (5) years (excluding
the bulb) from
date
of purchase. This warranty applies only to the original consumer purchaser and only to products used in normal use
and service.
If this
product is found to be defective, the manufacturer's only obligation, and your exclusive remedy, is the repair or replacement
of the p
roduct
at the manufacturer's discretion, provided that the product has not been damaged through misuse, abuse, accident,
modifications,
alterations, neglect or mishandling. This warranty shall not apply to any product that is found to have been improperly
installed, set-u
p,
or
used in any way not in accordance with the instructions supplied with the product. This warranty shall not apply to a
failure of the
product
as a result of an accident, misuse, abuse, negligence, alteration, faulty installation, or any other failure not relating to
faulty material
or
workmanship. This warranty shall not apply to the finish on any portion of the product, due to weathering, as this is
considered normal
wear
and tear. The manufacturer does not warrant and specifically disclaims any warranty, whether express or implied,
of fitness for a
particular
purpose, other than the warranty contained herein. The manufacturer specifically disclaims any liability and shall
not be liable for
any
consequential or incidental loss or damage, including but not limited to, any labor
/
expense costs involved in the
replacement or repair
of
said
product.
Contact the Customer Service Team at 1-877-714-8669 or visit www.lutec.com
Installation ..................................................... 4
Hardware Contents ......................................................3
Tools Required
............................................................4..
...............

3
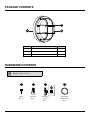
PACKAGE CONTENTS
NOTE:
Parts are not to scale.
Screw
Qty : 2
Part
Description
Quant
ity
A
Diffuser Cage
1
A
B
C
B
Diffuser
1
C
Fixture Pan
1
AA
BB
CC
DD
Wire Nut
Qty : 2
Mounting
Plate
Qty : 1
Secondary
Diffuser Ring
Qty : 1
CC1
Hex Nut
HARDWARE CONTENTS

4
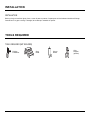
INSTALLATION
INSTALLATION
Before you begin to install this lighting fixture, ensure all parts are present. Compare parts with the Hardware Included and
P
ackage
Contents lists. If any part is missing or damaged, do not attempt to assemble the product.
TOOLS
REQUIRED (NOT INCLUDED)
Phillips
screwdriver
Step
ladder
Silicone
sealant
Wire
strippers
(optional)
TOOLS REQUIRED

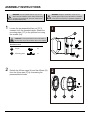
Loosen the pre-assembled hex nut (CC1)
screwed onto the threaded nipple. Attach the
mounting plate (CC) to the junction box using
the screws (AA).
1
CAUTION:
Turn the power off at the main circuit breaker or
fuse box. Never rely on the wall switch alone to turn off power.
Detach the diffuser cage (A) and the diffuser (B)
from the fixture pan (C) by unscrewing the
preassembled screws.
5
ASSEMBLY INSTRUCTIONS
2
CC
AA
Hardware used
CC
AA
Screw
Mounting plate
x2
x1
A
B
C
1
2
CC1
WARNING:
Consult a qualified electrician
if
you are
n
o
t
certain about the installation process. Always install
wiring
connections
in
accordance with local code, ordinances
a
nd
the National
E
l
ec
tric
Code.
WARNING:
Changes or modifications to this unit
not
expressly approved by the party responsible for
c
o
mplianc
e
could void the user’s authority to operate the
equipment.

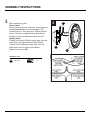
Wire connection guide:
Ground wire:
Wrap ground wire from outlet box around ground
screw preassembled on mounting plate (CC)
no less than 2 in. from wire end. Tighten ground
screw. If fixture is supplied with a ground wire,
connect to outlet ground wire with a wire nut.
Supply wires:
Connect the Neutral (White) supply wire from the
outlet box to the Neutral fixture wire (White).
Connect the Hot (Black) supply wire from the
outlet box to the Hot fixture wire (Black).
Tighten by wire nut (BB)
6
ASSEMBLY INSTRUCTIONS
3
BB
C
Hardware used
BB
Wire nut x2
3
CC

Secondary diffuser ring
5
7
ASSEMBLY INSTRUCTIONS
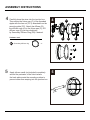
Apply silicone caulk (not included) completely
around the perimeter of the fixture where
the back plate meets the mounting surface to
prevent water from seeping into the junction box.
5
Carefully place the wires into the junction box.
Then secure the fixture pan (C) to the threaded
nipple with the hex nut (CC1) detached from the
mounting plate (CC). Attach the diffuser (B)
the diffuser cage (A) to the fixture pan (C), OR
diffuser cage (A) can be substituted
by Secondary Diffuser Ring (DD) if desired.
4
DD
CC
C
Hardware used
DD
x1
A
B
4
CC1

8
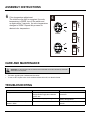
CARE AND MAINTENANCE
CAUTION:
Turn OFF
all power to the circuit at the main circuit breaker or fuse box. DO NOT rely on the wall
switch alone to turn off power.
□
This
lantern provides years of maintenance-free service
.
□
To clean, turn OFF
all power to the circuit and clean surfaces with a mild, non-abrasive cleaner.
ASSEMBLY INSTRUCTIONS
Color temperature adjustment:
The initial time the light is energized, the color
temperature is 3000K, turn off the switch and
on again within 3 seconds, the color temperature
changes to 5000K. Repeat this process for
desired color temperature.
6
6
3000K
5000K
OFF
ON
ON
TROUBLESHOOTING
Problem
Probable
Ca
use
So
l
u
ti
on
The light does not illuminate.
There may be a
poor connection between
the light and the supply wires inside
the
junction
box.
Turn off all power and check the wire
connections.
There is no power going to the
light.
Check that the switch is on and there
is
power to the light fixture.
After turn on-off-on, The color temperature
remains in 3000K.
The switch interval is more than 3 seconds. Turn off the switch and quickly turn it on in 3
seconds.

MANUAL DE INSTRUCCIONES
Gracias por comprar este accesorio de Lutec.
Este producto ha sido fabricado con los más altos estándares de seguridad y calidad.
¿Preguntas, problemas, piezas perdidas?
Antes de regresar, llame o envíe un correo electrónico a nuestra
línea de atención al cliente de lunes a viernes
9 am-5pm EST (hora estándar del este) Llamada gratuita 1- (877) 714-8669
Correo electrónico: [email protected] Sitio web: www.lutec.com
Por favor, haga referencia a su modelo # 6381601331
ATENCIÓN AL CLIENTE LUTEC USA
Artículo # 1003928478

Herramientas requeridas
Instrucciones de ensamblaje
Contenido del Hardware
Contenido del Paquete
Información de seguridad
Garantía
Lea y entienda este manual por completo antes de
intentar operar o instalar el producto.
PRECAUCIÓN: Antes de instalar esta lámpara,
desconecte la energía eléctrica en la ubicación de la
lámpara apagando la alimentación en el disyuntor
principal o en la caja de fusibles.
ADVERTENCIA: Esta lámpara está diseñada para
ajustarse a cajas de conexión estándares según el
Código Eléctrico Nacional.
ADVERTENCIA: Consulte a un electricista
calificado si no está seguro sobre el proceso de
instalación. Siempre instale las conexiones
eléctricas en conformidad con los códigos y
ordenanzas locales y el Código Eléctrico Nacional.
ADVERTENCIA: Los cambios o las modificaciones
a esta unidad que no sean aprobados en forma
expresa por la parte responsable del cumplimiento
pueden invalidar el permiso del usuario para usar el
equipo.
10
ÍNDICE
............................................ 10
......................................................................... 10
................................................11
INFORMACIÓN DE SEGURIDAD
...................................13-16
............................................16
............................................16
GARANTÍA
Instalación ..................................................... 12
..............................................11
..............................................12
................
Cuidado y mantenimiento
Resolución de problemas
El fabricante garantiza que esta lámpara estará libre de defectos en materiales y mano de obra por un periodo de cinco
(5) años (excluyendo la bombilla) a partir de la fecha de su compra. Esta garantía aplica sólo al consumidor que hace la
compra original y sólo a productos que se usan para serv
icio y uso normales. Si se encuentran defectos en este producto,
la única obligación del fabricante, y su exclusivo rem
edio, es la reparación o reemplazo del producto, a criterio del
fabricante, suponiendo que el producto no ha sido dañado debido a uso inadecuado, abuso, accidente, modificaciones,
alteraciones, negligencia o manejo inadecuado. Esta garantía no aplicará a ningún producto que se determine que se
instaló, ajustó o usó inadecuadamente en cualquier manera que no sea congruente con las instrucciones proporcionadas
con el producto. Esta garantía no aplicará a una falla del producto que sea resultado de un accidente, uso indebido,
abuso, negligencia, alteración, instalación con fallas, o cualquier otra falla que no
se relacione con mano de obra o
material defectuoso. Esta garantía no aplicará al acabado de ninguna porción del
producto, debido a factores climáticos,
ya que esto se considera desgaste normal. El fabricante no garantiza la idoneidad para cualquier propósito particular, y
específicamente renuncia a cualquier garantía expresa o implícita sobre ella, aparte de la garantía contenida en este
documento. El fabricante renuncia específicamente a cualquier responsabilidad, y no será responsable de ningún daño o
pérdida resultante o incidental, incluido pero sin limitarse a cualquier costo por mano de obra o gastos incurridos en el
reemplazo o reparación de dicho producto.
Comuníquese con el Equipo de Servicio al Cliente al 1-877-714-8669 o visite www.lutec.com.
NOTA: Las pruebas realizadas en este equipo permiten afirmar que
cumple con los límites de un dispositivo digital de Clase B, según lo
estipulado en la Sección 15 de las normas de la FCC. Estos límites
están diseñados para brindar una protección razonable contra la
interferencia dañina en una instalación residencial. Este equipo
genera, utiliza y puede emitir energía de radiofrecuencia y, si no se
instal
a y utiliza de acuerdo con las instrucciones, puede causar
interferencias perjudiciales en las radiocomunicaciones. Sin
embargo, no existe garantía de que no ocurra interferencia en una
instalación en particular. Si este equipo efectivamente causa
interferencia dañina a la recepción de radio o televisión, lo cual
puede determinarse apagando y encendiendo el equipo, se
recomienda al usuario que trate de
corregir la interferencia realizando
uno o varios de los siguientes pasos:
-
Cambiar de dirección o de lugar la antena receptora.
-
Aumentar la separación entre el equipo y el receptor.
-
Conectar el equipo en un tomacorriente en un circuito
diferente de donde esté conectado el receptor.
-
Consultar al concesionario o a un técnico de radio/TV con
experiencia para que le ayude. Este equipo cumple co
n la parte 15
de las reglas de la FCC. El funcionamiento está sujeto a las
siguientes dos condiciones.
(1)
Este dispositivo no puede causar interferencia dañina, y
(2)
Este dispositivo debe aceptar toda interferencia
recibida, incluso la que puede causar un funcionamiento
indeseado.

11
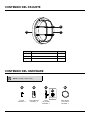
CONTENIDO DEL PAQUETE
NOTA:
Las partes no están a escala.
Pieza Descripción
Cantidad
A
Caja difusora
1
CONTENIDO DEL HARDWARE
B
Difusor
1
Tornillo
Cantidad : 2
C
Aro de fijación
1
AA
BB
CC
DD
Tuerca Blanca
Cantidad : 2
Placa
de montaje
Cantidad : 1
Anillo difusor
secundario
Cantidad : 1
CC1
Tuerca
Hexagonal
A
B
C

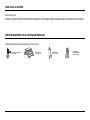
Antes de empezar a instalar esta lámpara, asegúrese de que estén todas las piezas. Compare las piezas con el Herraje
Incluido y con las listas de Contenido de los Paquetes. Si falta alguna pieza o está dañada, no intente armar el producto.
12
INSTALACIÓN
INSTALACIÓN
HERRAMIENTAS REQUERIDAS
(NO INCLUIDO)
HERRAMIENTAS REQUERIDAS
Destornillador
Phillips
Escalera
de mano
Sellador
de silicón
Alicates
pelacables
(opcional)

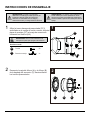
Afloje la tuerca hexagonal premontada (CC1)
atornillado en el mango de unión roscado. Adjunte la
placa de montaje (CC) a la caja de conexiones
utilizando los tornillos (AA).
1
Desmonte la caja del difusor (A) y el difusor (B)
de la bandeja del accesorio (C) desatornillando
los tornillos premontados.
13
INSTRUCCIONES DE ENSAMBLAJE
2
CC
AA
Hardware usado
CC
AA
Tornillo
Placa de montaje
x2
x1
1
2
CC1
ADVERTENCIA: Consulte a un electricista
calificado si no está seguro sobre el proceso de
instalación. Siempre instale las conexiones
eléctricas en conformidad con los códigos y
ordenanzas locales y el Código Eléctrico Nacional.
ADVERTENCIA: Los cambios o las modificaciones
a esta unidad que no sean aprobados en forma
expresa por la parte responsable del cumplimiento
pueden invalidar el permiso del usuario para usar el
equipo.
PRECAUCIÓN: Nunca confíe solamente en el
interruptor de pared para apagar la alimentación.
A
B
C

Guía de conexión de cables
Cable de tierra:
Envuelva el cable de tierra de la caja de salida
alrededor del tornillo del suelo premontado en la
barra transversal (CC) no menos de 2 pulg. desde
el extremo del cable. Apriete el tornillo de tierra.
Si el accesorio se suministra con un cable a tierra,
conecte al cable de toma de tierra con una tuerca
de cable.
Cables de alimentación:
Conecte el cable de alimentación Neutro (Blanco)
de la caja de salida al cable neutro del
accesorio (Blanco). Conecte el cable de
alimentación caliente (Negro) de la caja de salida
al cable de la luminaria caliente (Negro).
Apretar con tuerca de alambre (BB).
14
INSTRUCCIONES DE ENSAMBLAJE
3
Hardware usado
BB
Tuerca blanca x2
3
BB
C
CC

Anillo difusor secundario
5
15
INSTRUCCIONES DE ENSAMBLAJE
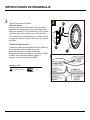
Aplique masilla de silicona (no incluida) alrededor
de todo el perímetro del accesorio donde la placa
posterior se encuentra con la superficie de
montaje para evitar que el agua se filtre en la caja
de conexiones.
Coloque cuidadosamente los cables en la caja de
conexiones. Luego asegure la bandeja del
accesorio (C) al mango de unión con la tuerca
hexagonal (CC1) separada de la placa de
montaje (CC). Coloque el difusor (B) la caja del
difusor (A) en la bandeja del accesorio (C), O
la caja difusora (A) puede ser sustituida.
por el anillo difusor secundario (DD) si se desea.
4
Hardware usado
DD
x1
5
DD
CC
C
A
B
4
CC1

16
INSTRUCCIONES DE ENSAMBLAJE
Ajuste de la temperatura de color:
La hora inicial en que la luz se energiza,
a temperatura del color, es 3000K, apague el
interruptor y enciéndalo de nuevo en 3 segundos,
la temperatura de color cambiará a 5000K. Repita
este proceso para obtener la temperatura de
color deseada.
6
6
3000K
5000K
OFF
ON
ON
CUIDADO Y MANTENIMIENTO
□
Este farol proporciona años de servicio sin mantenimiento.
□
Para limpiarlo, apague toda la alimentación al circuito y limpie las superficies con un detergente suave no abrasivo.
PRECAUCIÓN: Apague la alimentación en el disyuntor principal o caja de fusibles. NUNCA confíe
solamente en el interruptor de pared para apagar la alimentación.
RESOLUCIÓN DE PROBLEMAS
Problema Causa probable Solución
La luz no se enciende. Puede haber una mala conexión entre
la luz y los cables de alimentación
dentro de la caja de conexiones.
Revise las conexiones de los cables.
No hay alimentación en el farol. Compruebe que el interruptor esté
encendido y que haya energía en la
lámpara.
Después del encendido, la temperature del
color permanece en 3000K.
El interval de encendido es de más de 3
segundos.
Apage el interruptor y enciéndalo rápidamente
a los 3 segundos.
-
 1
1
-
 2
2
-
 3
3
-
 4
4
-
 5
5
-
 6
6
-
 7
7
-
 8
8
-
 9
9
-
 10
10
-
 11
11
-
 12
12
-
 13
13
-
 14
14
-
 15
15
-
 16
16


Lutec 6381501331 Guía de instalación
- Categoría
- Focos
- Tipo
- Guía de instalación
- Este manual también es adecuado para
En otros idiomas
- English: Lutec 6381501331 Installation guide
Documentos relacionados
-
 Lutec 5185903331 Guía de instalación
-
 Lutec 5283001330 Guía de instalación
-
 Lutec 6381702331 Guía de instalación
-
 Lutec 5274602331 Guía de instalación
-
 Lutec 5283001330 Guía de instalación
-
Lutec 5104006012 Manual de usuario
-
 Lutec 7140403331 Guía de instalación
-
 Lutec MIMO 5194901053 Manual de usuario
-
 Lutec 6255-CAM Guía de instalación
-
 Lutec ST1906-CAM Guía de instalación