Electrolux ESF65040X Manual de usuario
- Categoría
- Lavaplatos
- Tipo
- Manual de usuario

user manual
lietošanas instrukcija
manual de instrucciones
Dishwasher
Trauku mazgājamā mašīna
Lavavajillas
ESF65040

Electrolux. Thinking of you.
Share more of our thinking at www.electrolux.com
Contents
Safety information 2
Product description 3
Control panel 4
Use of the appliance 5
Setting the water softener 5
Use of dishwasher salt 6
Use of rinse aid 7
Loading cutlery and dishes 8
Use of detergent 10
Multitab function 11
Select and start a washing programme
11
Washing programmes 13
Care and cleaning 13
What to do if… 15
Technical data 16
Installation 16
Water connection 17
Electrical connection 18
Environment concerns 18
Subject to change without notice
Safety information
For your safety and correct operation of
the appliance, read this manual carefully
before installation and use. Always keep
these instructions with the appliance
even if you move or sell it. Users must
fully know the operation and safety fea-
tures of the appliance.
Correct use
• The appliance is designed exclusively for
domestic use.
• Only use the appliance to clean household
utensils that are applicable for dishwash-
ers.
• Do not put solvents in the appliance. Risk
of explosion.
• Put the knives and all items with sharp
points in the cutlery basket with their
points down. If not, put in a horizontal po-
sition in the upper basket.
• Use only branded products for dishwash-
ers (detergent, salt, rinse aid).
• If you open the door while the appliance is
in operation, hot steam can escape. Risk
of skin burns.
•Do not remove dishes from the dishwasher
before the end of the washing programme.
• When the washing programme is comple-
ted, disconnect the mains plug from the
mains socket and close the water tap.
• Only an authorised service engineer can
repair this appliance. Use only original
spare parts.
• Do not do repairs yourself to prevent injury
and damage to the appliance. Always con-
tact your local Service Force Centre.
General safety
• Persons (including children) with reduced
physical sensory, mental capabilities or
lack of experience and knowledge must
not use the appliance. They must have su-
pervision or instruction for the operation of
the appliance by a person responsible for
their safety.
• Obey the safety instructions from the man-
ufacturer of the dishwasher detergent to
prevent burns to eyes, mouth and throat.
• Do not drink the water from the dishwash-
er. Detergent residues can stay in your ap-
pliance.
• Always close the door when you do not
use the appliance to prevent injury and not
to stumble over the open door.
• Do not sit or stand on the open door.
Child safety
• Only adults can use this appliance. Chil-
dren must get supervision to make sure
that they do not play with the appliance.
• Keep all the packaging away from children.
There is a risk of suffocation.
• Keep all detergents in a safe area. Do not
let children touch the detergents.
• Keep children away from the appliance
when the door is open.
2 electrolux

Installation
• Make sure that the appliance is not dam-
aged because of transport. Do not con-
nect a damaged appliance. If necessary,
contact the supplier.
• Remove all packaging before first use.
• A qualified and competent person must do
the electrical installation.
• A qualified and competent person must do
the plumbing installation.
• Do not change the specifications or modify
this product. Risk of injury and damage to
the appliance.
• Do not use the appliance:
– if the mains cable or water hoses are
damaged,
– if the control panel, worktop or plinth
area are damaged, that you can get ac-
cess to the inner side of the appliance.
Contact your local Service Force Centre.
• Do not drill into the sides of the appliance
to prevent damage to hydraulic and elec-
trical components.
Warning! Carefully obey the
instructions for electrical and water
connections.
Product description
1 Upper basket
2 Water hardness dial
3 Salt container
4 Detergent dispenser
5 Rinse aid dispenser
6 Rating plate
7 Filters
8 Lower spray arm
9 Upper spray arm
10 Worktop
electrolux 3

Control panel
21 3 4 5
7 689
1 Programme guide
2 Programme knob
3 Start/cancel button (Start Cancel)
4 Multitab button (Multitab)
5 Delay start button (Delay)
6 Digital display
7 Indicator lights
8 Programme marker
9 Off position
Indicator lights
Wash phase Comes on when the washing phase or the rinsing phase operates.
Dry phase Comes on when the drying phase operates.
Multitab Comes on when you activate the multitab function Refer to 'Multitab func-
tion'.
Salt
1)
Comes on when it is necessary to fill the salt container. Refer to 'Use of
dishwasher salt'.
After you fill the container, the salt indicator light can continue to stay on for
some hours. This does not have an unwanted effect on the operation of the
appliance.
Rinse aid
1)
Comes on when it is necessary to fill the rinse aid container. Refer to 'Use of
rinse aid'.
1) When the salt and/or rinse aid containers are empty, the related indicator lights do not come on while
a washing programme operates.
Programme knob
• To switch on the appliance or to set a
washing programme, turn the programme
knob clockwise or counterclockwise. The
programme marker on the programme
knob must agree with one of the washing
programmes on the control panel. If the
programme marker agrees with a washing
programme, the digital display shows the
time duration of the programme. If the pro-
gramme marker does not agree with a
washing programme, the digital display
shows two horizontal bars.
• To switch off the appliance, turn the pro-
gramme knob until the programme marker
agrees with the off indicator.
Use the programme knob for these opera-
tions:
– To set the water softener. Refer to 'Setting
the water softener'.
4 electrolux

– To deactivate/activate the rinse aid dis-
penser. Refer to 'Multitab function'.
Start/cancel button
Use the start/cancel button for these opera-
tions:
• To start the washing programme. Refer to
the chapter 'Setting and starting a washing
programme'.
• To cancel a washing programme in pro-
gress. Refer to the chapter 'Setting and
starting a washing programme'.
• To set the water softener level. Refer to the
chapter 'Set the water softener'.
• To deactivate/activate the rinse aid dis-
penser. Refer to the chapter 'Multitab
function'.
Multitab button
Press this button to activate/deactivate the
multitab function. Refer to the chapter 'Mul-
titab function'.
Delay start button
Use the delay start button to delay the start
of the washing programme with an interval
between 1 and 19 hours. Refer to the chapter
'Setting and starting a washing programme'.
Digital display
The display shows:
• Adjusted level of the water softener.
• Activation/deactivation of the rinse aid dis-
penser (only with multitab function on).
• Programme duration.
• Remaining time to the end of the pro-
gramme.
• End of a washing programme, the digital
display shows a zero.
• Number of hours in delay start.
• Fault codes.
Setting mode
The appliance is in setting mode when:
• One or more phase indicator lights are on.
• The time duration of the programme flash-
es in the digital display.
The appliance must be in setting mode for
these operations:
– To set a washing programme.
– To set the water softener level.
– To deactivate/activate the rinse aid dis-
penser.
The appliance is not in setting mode when:
• One or more phase indicator lights are on.
• The time duration of the programme does
not flash.
In this condition cancel the programme to go
back to the setting mode. Refer to the chap-
ter 'Setting and starting a washing pro-
gramme'.
Use of the appliance
Refer to the following instructions for each
step of procedure:
1. Make a check if the water softener level
is correct for the water hardness in your
area. If necessary set the water softener.
2. Fill the salt container with dishwasher salt.
3. Fill the rinse aid dispenser with rinse aid.
4. Load cutlery and dishes into the dish-
washer.
5. Set the correct washing programme for
the type of load and soil.
6. Fill the detergent dispenser with the cor-
rect quantity of detergent.
7. Start the washing programme.
If you use combi detergent tablets ('3 in
1', '4 in 1', '5 in 1', etc.), refer to the
chapter 'Multitab function'.
Setting the water softener
The water softener removes minerals and
salts from the water supply. Minerals and
salts can have bad effect on the operation of
the appliance.
Water hardness is measured in equivalent
scales:
• German degrees (dH°).
• French degrees (°TH).
• mmol/l (millimol per litre - international unit
for the hardness of water).
•Clarke.
Adjust the water softener to the water hard-
ness in your area. If necessary, contact your
local water authority.
electrolux 5

Water hardness Water hardness setting
°dH °TH mmol/l Clarke manually electronically
51 - 70 91 - 125 9,1 - 12,5 64 - 88 2 10
43 - 50 76 - 90 7,6 - 9,0 53 - 63 2 9
37 - 42 65 - 75 6,5 - 7,5 46 - 52 2 8
29 - 36 51 - 64 5,1 - 6,4 36 - 45 2 7
23 - 28 40 - 50 4,0 - 5,0 28 - 35 2 6
19 - 22 33 - 39 3,3 - 3,9 23 - 27 2 5
15 - 18 26 - 32 2,6 - 3,2 18 - 22 1 4
11 - 14 19 - 25 1,9 - 2,5 13 - 17 1 3
4 - 10 7 - 18 0,7 - 1,8 5 - 12 1 2
< 4 < 7 < 0,7 < 5
1
1)
1
1)
1) No use of salt required.
You must set the water softener man-
ually and electronically.
Manual adjustment
The appliance is set at the factory at po-
sition 2.
1. Open the door.
2. Remove the lower basket.
3. Turn the water hardness dial to position
1 or 2 (refer to the chart).
4. Install the lower basket.
5. Close the door.
Electronic adjustment
The water softener is set at the factory
at level 5.
The appliance must be switched off.
1. Press and hold the start/cancel button.
Turn the programme knob counterclock-
wise until the programme marker agrees
with the first washing programme on the
control panel.
2. Release the start/cancel button when the
digital display shows the current setting.
Examples:
–
level 5 =
–
level 10 =
3. Press the start/cancel button to change
the water softener level. Every time you
press the button, the level increases.
4. Turn the programme knob to the off po-
sition to save the operation.
Use of dishwasher salt
Caution! Only use dishwashers salt.
Types of salt that are not applicable for
dishwashers cause damage to the water
softener.
Caution! Grains of salt and salty water
on the bottom of the appliance can
cause corrosion. Fill the appliance with
salt before you start a washing
programme to prevent corrosion.
Do these steps to fill the salt container:
1. Turn the cap anticlockwise to open the
salt container.
2. Fill the salt container with 1 litre of water
(only the first operation).
3. Use the funnel to fill the salt container with
salt.
6 electrolux

4. Remove the salt around the opening of
the salt container.
5. Turn the cap clockwise to close the salt
container.
It is normal that water overflows from the
salt container when you fill it with salt.
When you set electronically the water soft-
ener to level 1, the salt indicator light does
not stay on.
Use of rinse aid
Caution! Only use branded rinse aid for
dishwashers.
Do not fill the rinse aid dispenser with
other products (e.g. dishwasher clean-
ing agent, liquid detergent). This can
cause damage to the appliance.
Rinse aid makes it possible to dry the
dishes without streaks and stains.
Rinse aid is automatically added during
the last rinsing phase.
Do these steps to fill the rinse aid dispenser:
1. Press the release button (A) to open the
rinse aid dispenser.
2. Fill the rinse aid dispenser with rinse aid.
The mark 'max.' shows the maximum
level.
3. Remove the spilled rinse aid with an ab-
sorbent cloth to prevent too much foam
during the subsequent washing pro-
gramme.
4. Close the rinse aid dispenser.
Adjusting the rinse aid dosage
The rinse aid is set at the factory at position
4.
You can set the rinse aid dosage between
position 1 (lowest dosage) and position 6
(highest dosage).
electrolux 7

1. Turn the rinse aid dial to increase or de-
crease the dosage.
– Increase the dosage if there are water
droplets or limescale on the dishes.
– Decrease the dosage if there are
streaks, whitish stains or bluish layers
on the dishes.
Loading cutlery and dishes
Helpful hints and tips
Caution! Only use the appliance for
household utensils that are applicable
for dishwashers.
Do not use the appliance to clean objects
that can absorb water (sponges, household
cloths, etc.).
• Before you load cutlery and dishes, do
these steps:
– Remove all food remainings and debris.
– Make burnt, remaining food in pans soft.
• While you load cutlery and dishes, do
these steps:
– Load hollow items (e.g. cups, glasses
and pans) with the opening down.
– Make sure that water does not collect in
the container or in a deep base.
– Make sure that cutlery and dishes do not
lie inside one another.
– Make sure that cutlery and dishes do not
cover other cutlery and dishes.
– Make sure that glasses do not touch
other glasses.
– Put small objects in the cutlery basket.
• Plastic items and pans with non-stick
coatings can keep water droplets. Plastic
items do not dry as well as porcelain and
steel items.
• Put light items in the upper basket. Make
sure that the items do not move.
Caution! Make sure that the spray arms
can move freely before you start a
washing programme.
Warning! Always close the door after
you load or unload the appliance. An
open door can be dangerous.
Lower basket
Put saucepans, lids, plates, salad bowls and
cutlery in the lower basket. Arrange service
dishes and large lids around the edge of the
basket.
The rows of prongs in the lower basket can
be flat to load pots, pans and bowls.
8 electrolux

Cutlery basket
Warning! Do not put long-bladed knives
in a vertical position. Arrange long and
sharp cutlery horizontally in the upper
basket. Be careful with sharp items.
Put forks and spoons with the handles down.
Put knives with the handles up.
Mix spoons with other cutlery to prevent
them to bond together.
Use the cutlery grid. If the dimensions of the
cutlery prevent the use of the cutlery grid, you
can remove it.
Upper basket
The upper basket is for plates (maximum 24
cm in diameter), saucers, salad bowls, cups,
glasses, pots and lids. Arrange the items to
let water touch all surfaces.
Prevent to put plates in the first three
sectors in the front part of the basket.
Make sure the plates tilt forward.
Put glasses with long stems in the cup racks
with the stems up. For longer items, fold the
cup racks up.
Adjustment of the height of the upper
basket
If you put large plates in the lower basket, first
move the upper basket to the upper position.
Maximum height of the dishes
upper bas-
ket
lower
basket
Upper position 20 cm 31 cm
Lower position 24 cm 27 cm
Do these steps to move the upper basket to
the upper position:
1. Pull the basket out until it stops.
2. Carefully lift the two sides until the mech-
anism is engaged and the basket is sta-
ble.
electrolux 9

Do these steps to move the upper basket to
the lower position:
1. Pull the basket out until it stops.
2. Carefully lift the two sides upwards.
3. Hold the mechanism and let it fall back
down slowly.
Caution!
• Do not lift or lower the basket on one
side only.
• If the basket is in the upper position,
do not put cups on the cup racks.
Use of detergent
Only use detergents (powder, liquid or
tablet) that are applicable for dishwash-
ers.
Follow the data on the packaging:
• Dosage recommended by the manu-
facturer.
• Storage recommendations.
Do not use more than the correct quan-
tity of detergent to save an environment.
Do these steps to fill the detergent dispenser:
1. Open the lid of the detergent dispenser.
2. Fill the detergent dispenser (A) with de-
tergent. The marking shows the dosage:
20 = approximately 20 g of detergent
30 = approximately 30 g of detergent.
3. If you use a washing programme with
prewash phase, put more detergent in
the prewash detergent compartment (B).
A
B
4. If you use detergent tablets, put the de-
tergent tablet in the detergent dispenser
(A).
5. Close the lid of the detergent dispenser.
Press the lid until it locks into position.
10 electrolux

Different brands of detergent dissolve in
different times. Some detergent tablets
do not have the best cleaning results
during short washing programmes. Use
long washing programmes when you
use detergent tablets to fully remove the
detergent.
Multitab function
The multitab function is for combi detergent
tablets.
These tablets contain agents such as deter-
gent, rinse aid and dishwasher salt. Some
types of tablets can contain other agents.
Do a check if these tablets are applicable for
the local water hardness. Refer to the in-
structions from the manufacturer.
When you set the multitab function, it stays
on until you deactivate it.
The multitab function stops automatically the
flow of rinse aid and salt. The rinse aid indi-
cator light and salt indicator light are deacti-
vated.
The programme duration can increase if you
use the multitab function.
Activate or deactivate the multitab func-
tion before the start of a washing pro-
gramme.
You cannot activate or deactivate the
multitab function when the programme
operates. Cancel the washing pro-
gramme, then set the programme again.
To activate the multitab function:
• Press the multitab button. The multitab in-
dicator light comes on.
To deactivate the multitab function:
• Press the multitab button. The multitab in-
dicator light goes off.
Do these steps if the drying results
are not satisfactory:
1. Fill the rinse aid dispenser with rinse
aid.
2. Activate the rinse aid dispenser.
3. Set the rinse aid dosage to position
2.
• You can only activate or deactivate
the rinse aid dispenser when the mul-
titab function is activated.
To activate/deactivate the rinse aid dispens-
er:
The appliance must be switched off.
1. Press and hold the start/cancel button.
Turn the programme knob counterclock-
wise until the programme marker agrees
with the first washing programme on the
control panel.
2. Release the start/cancel button when the
display shows the water hardness level.
3. Turn the programme knob counterclock-
wise until the programme marker agrees
with the second washing programme on
the control panel.
4. The digital display shows the current set-
ting for the rinse aid dispenser.
Rinse aid dispenser de-
activated
Rinse aid dispenser ac-
tivated
5. Press the start/cancel button to change
the setting. The digital display shows the
new setting.
6. Turn the programme knob to the off po-
sition to save the operation.
To use normal detergent again:
1. Deactivate the multitab function.
2. Fill the salt container and rinse aid
dispenser.
3. Adjust the water hardness setting to
the highest level.
4. Do a washing programme without
dishes.
5. Adjust the water softener to the wa-
ter hardness in your area.
6. Adjust the rinse aid dosage.
Select and start a washing programme
Do these steps to set and start a washing
programme:
1. Close the door.
2. Turn the programme knob to set the
washing programme. Refer to the chap-
ter 'Washing programmes'.
electrolux 11

– The phase indicator light or lights for
the washing programme come on.
– The programme duration in the digital
display flashes.
3. Press the start/cancel button.
– The washing programme starts auto-
matically.
– When the programme starts, only the
indicator light of the phase in progress
stays on. Programme duration is on
with a static light.
When the washing programme oper-
ates, you cannot change the pro-
gramme. Cancel the washing pro-
gramme.
Warning! Only interrupt or cancel a
washing programme if necessary.
Caution! Open the door carefully. Hot
steam can come free.
Interrupting a washing programme
Open the door.
• The programme stops.
Close the door.
• The programme continues from the point
of interruption.
Cancelling a washing programme
• Press and hold the start/cancel button.
– In the digital display the time duration of
the programme flashes.
– One or more phase indicator lights are
on.
The washing programme is cancelled.
At this time you can do these steps:
1. Switch off the appliance.
2. Set a new washing programme.
Fill the detergent dispenser with detergent
before you set a new washing programme.
Setting and starting a washing
programme with delay start
1. Set a washing programme.
2. Press the delay start button until the dis-
play shows the necessary delay start time
for the washing programme. Delay start
time flashes in the digital display.
3. Press the start/cancel button.
– The countdown of the delay start
starts.
– The phase indicator lights of the wash-
ing programme go off.
– In the digital display the delay start time
is on with a static light.
When the countdown is completed, the
washing programme automatically starts
The phase indicator light of the phase in pro-
gress comes on.
Do not open the door during the count-
down to prevent interruption of the
countdown. When you close the door
again, the countdown continues from
the point of interruption.
Cancelling a delay start
1. Press and hold the start/cancel button.
– The phase indicator lights or light come
on.
– In the digital display, the time duration
of the washing programme comes on.
2. Press the start/cancel button to start the
washing programme.
End of the washing programme
Switch off the appliance in these conditions:
• The appliance stops automatically.
• The digital display shows a zero.
• The phase indicator lights are off.
For better drying results, keep the door ajar
for some minutes before you remove the
dishes.
Let the dishes cool down before you remove
them from the appliance. Hot dishes are
easily damaged.
Standby mode
If you do not switch off the appliance at the
end of the washing programme, the appli-
ance automatically goes into standby mode.
The standby mode decreases energy con-
sumption.
Three minutes after the end of the pro-
gramme, all indicator lights go off and the
digital display shows one horizontal bar.
Press a button to go back to the end-of-pro-
gramme mode.
12 electrolux

Washing programmes
Washing programmes
Programme
and pro-
gramme knob
position
Degree of soil Type of load Programme description
1)
Any Crockery, cutlery,
pots and pans
Prewash
Main wash up to 45°C or 70°C
1 or 2 intermediate rinses
Final rinse
Drying
2)
Normal or light soil Crockery and cutlery Main wash up to 60°C
Final rinse
Heavy soil Crockery, cutlery,
pots and pans
Prewash
Main wash up to 70°C
2 intermediate rinses
Final rinse
Drying
3)
Normal soil Crockery and cutlery Prewash
Main wash up to 50°C
1 intermediate rinse
Final rinse
Drying
Any Partial load (to be
completed later in the
day).
1 cold rinse (to prevent food
scraps to bond).
Detergent is not necessary with
this programme.
1) During the AUTO programme, the soil level of the dishes is given by how cloudy the water is. The
programme duration and consumptions can change. This depends if the appliance is fully or not and
on the level of soil on the dishes. The appliance adjusts automatically the temperature of the water
during the main wash.
2) This is the perfect daily programme to clean a not fully load. Ideal for a family of 4 persons who only
want to load breakfast and dinner crockery and cutlery.
3) Test programme for test institutes. Please refer to separate leaflet supplied, for test data.
Consumption values
Programme
Duration (in minutes)
1)
Energy (in kWh) Water (in litres)
- 1,1-1,7 11-22
- 0,9 9
- 1,8-2,0 22-24
- 1,0-1,1 13-15
- 0,1 4
1) The digital display shows the programme duration.
The pressure and temperature of the
water, the variations of power supply
and the quantity of dishes can change
these values.
Care and cleaning
Warning! Switch the appliance off
before you clean the filters.
electrolux 13

Cleaning the filters
Caution! Do not use the appliance
without the filters. Make sure that the
installation of the filters is correct.
Incorrect installation will cause
unsatisfactory washing results and
damage to the appliance.
If necessary, clean the filters. Dirty filters de-
crease the washing results.
The dishwasher has three filters:
1. coarse filter (A)
2. microfilter (B)
3. flat filter (C)
A
B
C
A
B
C
Do these steps to clean the filters:
1. Open the door.
2. Remove the lower basket.
3. To unlock the filter system, turn the han-
dle on the microfilter (B) approximately
1/4 anticlockwise.
4. Remove the filter system.
5. Hold the coarse filter (A) by the handle
with the hole.
6. Remove the coarse filter (A) from the mi-
crofilter (B).
7. Remove the flat filter (C) from the bottom
of the appliance.
D
8. Clean the filters below running water.
9. Put the flat filter (C) in the bottom of the
appliance. Install the flat filter correctly
under the two guide (D).
10. Put the coarse filter (A) in the microfilter
(B) and push the filters together.
11. Put the filter system in position.
12. To lock the filter system, turn the handle
on the microfilter (B) clockwise until it
lock in position.
13. Install the lower basket.
14. Close the door.
Do not remove the spray arms.
If the holes in the spray arms become clog-
ged, remove remaining parts of soil with a
cocktail stick.
External cleaning
Clean the external surfaces of the appliance
and control panel with a damp soft cloth.
Only use neutral detergents. Do not use
abrasive products, scouring pads or solvents
(acetone, trichloroethylene etc...).
14 electrolux

Frost precautions
Caution! Do not install the appliance
where the temperature is below 0 °C.
The manufacturer is not responsible for
damage because of frost.
If not possible, empty the appliance and
close the door. Disconnect the water inlet
hose and remove water from the water inlet
hose.
What to do if…
The appliance does not start or stops during
operation.
If there is a fault, first try to find a solution to
the problem yourself. If you cannot find a sol-
ution to the problem yourself, contact the
Service Force Centre.
Caution! Switch off the appliance
before you do the below suggested
corrective actions.
Fault code and malfunction Possible cause and solution
•
the digital display shows
The dishwasher does not fill with wa-
ter
• The water tap is blocked or furred with limescale.
Clean the water tap.
• The water tap is closed.
Open the water tap.
• The filter in the water inlet hose is blocked.
Clean the filter.
• The connection of the water inlet hose is not correct. The
hose can be kinked or squashed.
Make sure that the connection is correct.
•
the digital display shows
The dishwasher will not drain
• There is a blockage in the sink spigot.
Clean the sink spigot.
• The connection of the water drain hose is not correct. The
hose can be kinked or squashed.
Make sure that the connection is correct.
•
the digital display shows
The anti-flood device operates
• Close the water tap and contact your local Service Force
Centre.
The programme does not start • The appliance door is not closed.
Close the door.
• Mains plug is not connected in.
Put in the mains.
• The fuse has blown out in the household fuse box.
Replace the fuse.
• Delay start is set.
Cancel the delay start to start the programme immediately.
After the check, switch on the appliance. Set
the knob on the same washing programme
as before the malfunction.
The programme continues from the point of
interruption. If the malfunction shows again,
contact your Service Force Centre.
If the display shows a fault code, not descri-
bed in the chart, contact your Service Force
Centre.
These data are necessary to help you quickly
and correctly:
• Model (Mod.)
• Product number (PNC)
• Serial number (S.N.)
For these data, refer to the rating plate.
Write the necessary data here:
Model description : ..........
Product number : ..........
Serial number : ..........
electrolux 15

The cleaning results are not satisfactory
The dishes are not clean • The selected washing programme is not applicable for the type of
load and soil.
• The baskets are loaded incorrectly so that water cannot reach all
surfaces.
• Spray arms do not turn freely because of incorrect arrangement of
the load.
• The filters are dirty or not correctly installed.
• The quantity of detergent is too little or missing.
Limescales particles on the
dishes
• The salt container is empty.
• The water softener is adjusted on a wrong level.
• The salt container cap is not closed correctly.
The dishes are wet and dull • No rinse aid has been used.
• The rinse aid dispenser is empty.
There are streaks, milky spots
or a bluish coating on glasses
and dishes
• Decrease the rinse aid dosage.
Dry water drop signs on
glasses and dishes
• Increase rinse aid dosage.
• The detergent can be the cause.
Technical data
Dimensions Width cm 60
Height cm 85
Depth cm 61
Electrical connection - Voltage -
Overall power - Fuse
Information on the electrical connection is given on the rating plate
on the inner edge of the dishwasher door.
Water supply pressure Minimum 0,5 bar (0,05 MPa)
Maximum 8 bar (0,8 MPa)
Capacity Place settings 12
Installation
Fitting under a counter
Warning! Make sure that mains plug is
disconnected from the mains socket
during installation.
Put the appliance adjacent to a water tap and
a water drain. Remove the appliance work-
top to install it under a sink unit or a kitchen
worktop. Make sure that the dimensions of
the recess agree with the given dimensions.
Do these steps to remove the appliance
worktop:
1. Remove the rear screws (1).
16 electrolux

2. Pull the worktop from the behind the ap-
pliance (2).
3. Lift the worktop and move it from the front
slots (3).
4. Use the adjustable feet to adjust the level
of the appliance.
5. Install the appliance under the kitchen
worktop. Make sure that there are no
kinks in the water hoses and that the wa-
ter hoses are not squashed.
If a repair is necessary, the appliance must
be easily accessible for the engineer. Install
the appliance worktop to the appliance if you
want to use the dishwasher as a freestanding
appliance.
The plinth on freestanding appliance is not
adjustable.
Adjusting the level of the appliance
Make sure that the appliance is level to close
and seal the door correctly. If the level of the
appliance is correct, the door does not catch
on the sides of the cabinet. If the door does
not close correctly, loosen or tighten the ad-
justable feet until the appliance is level.
Water connection
Water inlet hose
Connected the appliance to a hot (max. 60°)
or cold water supply.
If the hot water comes from alternative sour-
ces of energy that are more environmentally
friendly (e.g. solar or photovoltaic panels and
aeolian), use a hot water supply to decrease
energy consumption.
Connect the inlet hose to a water tap with an
external thread of 3/4”.
Caution! Do not use connection hoses
from an old appliance.
The water pressure must be in the limits (refer
to 'Technical data'). Make sure that the local
water authority gives you the average mains
pressure in your area.
Make sure that there are no kinks in the water
inlet hose and that the water inlet hose is not
squashed or entangled.
Fit the locknut correctly to prevent water
leaks.
Caution! Do not connect the appliance
to new pipes or pipes that are not used
for a long time. Let the water run for
some minutes, then connect the inlet
hose.
The water inlet hose is double-walled and
has an inner mains cable and a safety valve.
The water inlet hose is under pressure only
while the water is running. If there is a leak in
the water inlet hose, the safety valve inter-
rupts the running water.
Be careful when you connect the water inlet
hose:
• Do not put the water inlet hose or the safe-
ty valve in water.
• If the water inlet hose or the safety valve is
damaged, immediately disconnect the
mains plug from the mains socket.
• Only let the Service Force Centre replace
the water inlet hose with safety valve.
Warning! Dangerous voltage
electrolux 17

Water drain hose
1. Connect the water drain hose to the sink
spigot and attach it under the work sur-
face. This prevents that the waste water
from the sink goes back into the appli-
ance.
2. Connect the water drain hose to a stand
pipe with vent-hole (minimum internal di-
ameter 4 cm).
max 85 cm
min 40 cm
max 400 cm
Make sure that the drain hose is not bent or
squashed to prevent that the water drains
does not drain correctly.
Remove the sink plug when the appliance
drains the water to prevent that the water
goes back into the appliance.
A drain hose extension must not be longer
than 2 m. The internal diameter must not be
smaller than the diameter of the hose.
If you connect the water drain hose to a trap
spigot under the sink, remove the plastic
membrane (A). If you do not remove the
membrane, remaining food can cause a
blockage in the drain hose spigot
The appliance has a security feature to
prevent that dirty water goes back into
the appliance. If, the spigot of the sink
has a 'non-return valve', this valve can
cause the appliance to drain incorrectly.
Remove the non-return valve.
Caution! Make sure that the water
couplings are tight to prevent water
leakage.
Electrical connection
Warning! The manufacturer is not
responsible if you do not follow these
safety precautions.
Ground the appliance according to safe-
ty precautions.
Make sure that the rated voltage and
type of power on the rating plate agree
with the voltage and the power of the lo-
cal power supply.
Always use a correctly installed shock-
proof socket.
Do not use multi-way plugs, connectors
and extension cables. There is a risk of
fire.
Do not replace the mains cable yourself.
Contact the Service Force Centre.
Make sure that the mains plug is acces-
sible after installation.
Do not pull the mains cable to discon-
nect the appliance. Always pull the
mains plug.
Environment concerns
The symbol on the product or on its
packaging indicates that this product may
not be treated as household waste. Instead
it should be taken to the appropriate
collection point for the recycling of electrical
and electronic equipment. By ensuring this
product is disposed of correctly, you will help
prevent potential negative consequences for
the environment and human health, which
could otherwise be caused by inappropriate
waste handling of this product. For more
detailed information about recycling of this
product, please contact your local council,
18 electrolux

your household waste disposal service or the
shop where you purchased the product.
The packaging materials are environmentally
friendly and can be recycled. The plastic
components are identified by markings, e.g.
>PE<, >PS<, etc. Discard the packaging
materials in the applicable container at the
community waste disposal facilities.
Warning! To discard the appliance,
follow the procedure:
• Pull the mains plug out of the socket.
• Cut off the mains cable and mains
plug and discard them.
• Discard the door catch. This prevents
the children to close themselves in-
side the appliance and endanger their
lives.
electrolux 19

Electrolux. Thinking of you.
Dalieties ar mums savā pieredzē un pārdomās vietnē
www.electrolux.com
Saturs
Drošības informācija 20
Izstrādājuma apraksts 21
Vadības panelis 22
Pirms pirmās ieslēgšanas 23
Ūdens mīkstinātāja iestatīšana 23
Trauku mazgātāja sāls izmantošana 25
Skalošanas līdzekļa izmantošana 25
Trauku un virtuves piederumu ievietošana
26
Mazgāšanas līdzekļa izmantošana 28
Multitab funkcija 29
Mazgāšanas programmas izvēle 30
Mazgāšanas programmas 31
Kopšana un tīrīšana 32
Ko darīt, ja ... 34
Tehniskie dati 35
Uzstādīšana 35
Ūdens padeves pieslēgšana 36
Elektrības padeves pieslēgšana 37
Apsvērumi par vides aizsardzību 37
Izmaiņu tiesības rezervētas
Drošības informācija
Pirms uzstādīšanas un lietošanas, kā arī,
lai nodrošinātu drošību un ierīces pareizu
lietošanu, rūpīgi izlasiet šo rokasgrāma-
tu. Ja ierīci pārvietojat vai pārdodat, sa-
glabājiet šos norādījumus. Ierīces lieto-
tājiem pilnībā jāiepazīstas ar darbības un
drošības funkcijām.
Izmantošana atbilstoši instrukcijai
•Šī ierīce ir paredzēta lietošanai tikai māj-
saimniecības apstākļos.
•Mazgājiet tikai tādus virtuves traukus, kas
paredzēti mazgāšanai trauku mazgājamās
mašīnās.
• Nelietojiet šķīdinātājus. Sprā
dzienbīstamī-
bas risks.
• Ievietojiet galda piederumu grozā nažus un
citus piederumus ar smailiem galiem, kas
vērsti uz leju. Ja tas nav iespējams, novie-
tojiet tos horizontālā stāvoklī augšējā gro-
zā.
• Lietojiet tikai trauku mazgājamām mašī-
nām paredzētus līdzekļus (mazgāšanas
līdzekli, specializēto sāli, skalošanas līdz-
ekli).
• Neatveriet ierīces durtiņas trauku mazgā-
jamās mašīnas darbības laikā, jo no ierīces
var izplūst sakarsēts tvaiks. Ādas apdegu-
mu risks.
•Neizņemiet no ierīces traukus pirms maz-
gāšanas programmas beigām.
•Kad mazgāšanas programma ir pabeigta,
atvienojiet ierīci no elektrotī
kla un aizgrie-
ziet ūdenskrānu.
•Šo ierīci drīkst remontēt tikai pilnvaroti teh-
niskās apkopes darbinieki. Lietojiet tikai
oriģinālas rezerves daļas.
•Lai nepieļautu savainojumus vai ierīces bo-
jājumus neremontējiet ierīci pašrocīgi. Lū-
dzu, sazinieties ar vietējo klientu apkalpo-
šanas centru.
Vispārīgi norādījumi par drošību
•Šo ierīci nedrīkst izmantot personas (tos-
tarp bērni), kuru fiziskās, garīgās spējas vai
pieredzes trūkums neļauj tiem droši izman-
tot ierīci. Tiem jānodrošina nepieciešamā
uzraudzība vai jāsniedz norādījumi par ie-
rīces darbību un drošību.
•Lai nepieļautu acu, mutes vai rī
kles apde-
gumus, ievērojiet trauku mazgāšanas ma-
šīnai paredzēto mazgāšanas līdzekļu ražo-
tāja norādījumus.
• Nedzeriet trauku mazgājamā mašīnā eso-
šo ūdeni. Ierīcē var būt mazgāšanas līdz-
ekļu paliekas.
•Lai nepieļautu savainojumus, aizķeroties
aiz trauku mazgājamās mašīnas atvērta-
jām durtiņām, aizveriet tās, ja ierīci nelieto-
jat.
•Nesēdiet un nekāpiet uz atvērtām ierīces
durtiņām.
20 electrolux

Bērnu drošība
•Šo ierīci drīkst lietot tikai pieaugušie. Ne-
ļaujiet maziem bērniem spēlēties ar ierīci.
•Glabājiet iesaiņojuma materiālus bērniem
nepieejamās vietās. Pastāv nosmakšanas
briesmas.
•Uzglabājiet mazgāšanas līdzekļus drošā
vietā. Neļaujiet bērniem pieskarties maz-
gāšanas līdzekļiem.
•Neļaujiet bērniem atrasties trauku mazgā-
jamās mašīnas tuvumā, ja ierīces durtiņas
ir atvērtas.
Uzstādīšana
•Pārbaudiet, vai ierīces piegādes laikā tai
nav radušies bojājumi. Neuzstādiet boj
ātu
ierīci. Ja nepieciešams, sazinieties ar ierī-
ces piegādātāju.
• Pirms ierīces pirmās lietošanas reizes no-
ņemiet iesaiņojuma materiālus.
•Ierīces elektrisko pieslēgumu drīkst veikt
tikai kvalificēts un zinošs elektriķis.
•Ierīces pieslēgumu ūdens piegādes sistē-
mai drīkst veikt tikai kvalificēts un zinošs
darbinieks.
•Nepārveidojiet šo ierīci un nemainiet trauku
mazgājamās mašīnas specifikācijas. Pre-
tējā gadījumā pastāv savainojumu un ierī-
ces bojājumu risks.
• Nelietojiet ierīci:
–ja ir bojāts strāvas kabelis vai ūdens šļū-
tenes;
–ja vadības panelis, darbvirsma vai ierī
ces
virspuse ir bojāta tā, ka var netraucēti
piekļūt trauku mazgājamās mašīnas
iekšpusē esošajām daļām.
Sazinieties ar klientu atbalsta centra dar-
biniekiem.
•Lai pasargātu hidrauliskās un elektiskās
sastāvdaļas, neurbiet ierīces sienas.
Brīdinājums Rūpīgi izpildiet elektriskā
un ūdens pieslēguma norādījumus.
Izstrādājuma apraksts
1 Augšējais grozs
2 Ūdens cietības skala
3 Specializētās sāls tvertne
4 Mazgāšanas līdzekļu dozators
5 Skalošanas līdzekļa dozators
6 Tehnisko datu plāksnīte
7 Filtri
8 Augšējais smidzinātājspārns
9 Apakšējais smidzinātājspārns
10 Darbvirsma
electrolux 21

Vadības panelis
21 3 4 5
7 689
1 Programmas norādes
2 Programmu pārslēgs
3 Taustiņš Sākt/Atcelt (Start Cancel)
4 Taustiņš Multitab (Multitab)
5 Atliktās ieslēgšanas taustiņš (Delay)
6 Digitālais displejs
7 Indikatori
8 Programmu marķieris
9 Izslēgts stāvoklis
Indikatori
Mazgāšanas fāze Mazgāšanas fāzes indikators iedegas, ja tiek aktivizēta mazgāšanas vai ska-
lošanas fāze.
Žāvēšanas fāze Žāvēšanas fāzes indikators iedegas, ja tiek aktivizēta žāvēšanas fāze.
Funkcija Multitab Funkcijas Multitab indikators iedegsies tad, ja tiks aktivizēta funkcija Multitab.
Sāls
1)
Specializētās sāls indikators iedegas tad, ja ir jāuzpilda specializētās sāls
nodalījums. Skatiet sadaļu "Specializētās sāls lietošana".
Pēc nodalījuma uzpildes, specializētās sāls indikators var degt vēl vairākas
stundas. Tas neietekmēs ierīces pareizu darbību.
Skalošanas līdzeklis
1)
Skalošanas līdzekļa indikators iedegas tad, ja ir jāuzpilda skalošanas līdzekļa
nodalījums. Skatiet sadaļu "Skalošanas līdzekļa lietošana".
1) Ja specializētās sāls un/vai skalošanas līdzekļa nodalījums ir tukšs, mazgāšanas programmas laikā
indikators neiedegsies.
Programmu pārslēgs
•Lai ieslēgtu ierīci vai iestatītu mazgāšanas
programmu, pagrieziet programmu pār-
slēgu pulksteņrādītāju kustības virzienā vai
pretēji pulksteņrādītāju kustības virzienam.
Programmu pārslēga atzīmei jāsakrīt ar at-
zīmi, kas atrodas uz vadības paneļa un no-
rāda uz konkrētu mazgāšanas program-
mu. Ja programmas atzīme sakrīt ar maz-
gāšanas programmu, displejā būs re-
dzams programmas darbības laiks. Ja
programmas atzīme nesakrīt ar mazgāša-
nas programmu, displejā būs redzamas
divas horizontālas joslas.
•Lai izsl
ēgtu ierīci, pagrieziet programmu
pārslēgu, līdz programmas atzīme atbilst
izslēgšanas taustiņa indikatoram.
Lietojiet programmu pārslēgu šādām darbī-
bām:
– ūdens mīkstinātāja iestatīšana. Skatiet sa-
daļu "Ūdens mīkstinātāja iestatīšana.
22 electrolux

–aktivizētu/deaktivizētu skalošanas līdzekļa
dozatoru. Skatiet sadaļu "Funkcija Multi-
tab.
Taustiņš Sākt/Atcelt
Lietojiet sākšanas/atcelšanas taustiņu šā-
dām darbībām:
• lai iestatītu mazgāšanas programmu. Ska-
tiet sadaļu "Mazgāšanas programmas ies-
tatīšana un aktivizēšana.
• Lai atcelt programmu tās darbības laikā.
Skatiet sadaļu "Mazgāšanas programmas
iestatīšana un aktivizēšana".
•iestatītu ūdens mīkstinātāja līmeni. skatiet
sadaļu "Ūdens mīkstinātāja iestatīšana".
•aktivizētu/deaktivizētu skalošanas līdzekļa
dozatoru. Skatiet sadaļ
u "Funkcija Multi-
tab".
Taustiņš Multitab
Nospiediet šo taustiņu, lai aktivizētu/deakti-
vizētu funkciju Multitab. Skatiet sadaļu
"Funkcija Multitab".
Atliktās ieslēgšanas taustiņš
Lietojiet atliktās ieslēgšanas taustiņu, lai ak-
tivizētu mazgāšanas programmu laika diapa-
zonā no 1 līdz 19 stundām. Skatiet sadaļu
"Mazgāšanas programmas iestatīšana un
aktivizēšana".
Digitālais displejs
Displejā tiks parādīts:
•pielāgots ūdens mīkstinātāja līmenis.
• skalošanas līdzekļa dozatora aktivizācija/
deaktivizācija (tikai, izmantojot funkciju
"Multitab").
• Programmas ilgums.
• laiks, kas atlicis līdz programmas beigām.
•Mazgāšanas programmas beigās digitāla-
jā displej
ā tiks parādīta nulle.
•atliktā starta stundu skaits.
•kļūdu kodi.
Iestatījumu režīms
Ierīce atradīsies iestatīšanas režīmā, ja:
• iedegsies vienas vai vairāku fāzu indikatori.
•Displejā tiks parādīts programmas darbī-
bas ilgums.
Trauku mazgājamai mašīnai jābūt iestatīša-
nas režīma, lai:
–iestatītu mazgāšanas programmu.
–iestatītu ūdens mīkstinātāja līmeni.
– aktivizētu/deaktivizētu skalošanas līdzekļa
dozatoru.
Ierīce atradīsies iestatīšanas režīmā, ja:
• iedegsies vienas vai vairāku fāzu indikatori.
• Nemirgos atlikušais programmas laiks.
Šajā gadījumā, lai atgrieztos iestatīšanas re-
žīmā, atceliet programmu. Skatiet sadaļu
"Mazgāšanas programmas iestatīšana un
aktivizēšana".
Pirms pirmās ieslēgšanas
Skatiet tālāk minētos katras darbības norā-
dījumus:
1. Pārbaudiet, vai ūdens mīkstinātāja līme-
nis atbilst ūdens cietības pakāpei vietā,
kurā ir uzstādīta ierīce. Ja nepieciešams,
iestatiet ūdens mīkstinātāju.
2. Piepildiet specializētās sāls nodalījumu ar
trauku mazgājamai mašīnai paredzētu
sāli.
3. Piepildiet skalošanas līdzekļa dozatoru ar
skalošanas līdzekli.
4. Ievietojiet trauku mazgājamā mašīnā gal-
da piederumus un traukus.
5. Iestatiet pareizu mazgāšanas program-
mu atbilstoši ievietotajam trauku daudz-
umam un netīrības līmenim.
6. Piepildiet mazgāšanas līdzekļu dozatoru
ar pareizu daudzumu mazgāšanas līdz-
ekļa.
7. Aktivizējiet mazgāšanas programmu.
Ja lietojat kombinētos mazgāšanas līdz-
ekļus tablešu veidā ("trīs vienā", "četri
vienā", "pieci vienā" u.c.), skatiet sadaļu
"Funkcija Multitab.
Ūdens mīkstinātāja iestatīšana
Ūdens mīkstinātājs neitralizē ūdenī esošās
minerālvielas un sāļus. Minerālvielas un sāļi
var ietekmēt trauku mazgājamās mašīnas
darbību.
Ūdens cietība tiek noteikta šādi:
electrolux 23

•vācu pakāpēs (dH°).
•franču pakāpēs (°TH).
• mmol/l (milimols uz litru ūdens - starptau-
tiska ūdens cietības mērvienība).
•Klarks.
Pielāgojiet ūdens mīkstinātāju atbilstoši
ūdens cietībai jūsu reģionā. Ja nepieciešams,
sazinieties ar vietējo ūdens piegādes dienes-
tu.
Ūdens cietība Ūdens cietības iestatīšana
°dH (vācu
ūdens cie-
tības mēr-
vienība)
°TH (fran-
ču ūdens
cietības
mērvienī-
ba)
mmol/l
(starptauti-
ska ūdens
cietības mēr-
vienība - mili-
molos)
Klarks manuāli elektroniski
51 - 70 91 - 125 9,1 - 12,5 64 - 88 2 10
43 - 50 76 - 90 7,6 - 9,0 53 - 63 2 9
37 - 42 65 - 75 6,5 - 7,5 46 - 52 2 8
29 - 36 51 - 64 5,1 - 6,4 36 - 45 2 7
23 - 28 40 - 50 4,0 - 5,0 28 - 35 2 6
19 - 22 33 - 39 3,3 - 3,9 23 - 27 2 5
15 - 18 26 - 32 2,6 - 3,2 18 - 22 1 4
11 - 14 19 - 25 1,9 - 2,5 13 - 17 1 3
4 - 10 7 - 18 0,7 - 1,8 5 - 12 1 2
< 4 < 7 < 0,7 < 5
1
1)
1
1)
1) Specializētās sāls lietošana nav nepieciešama.
Jums jāiestata ūdens mīkstinātājs vai nu
manuāli, vai elektroniski.
Manuālā iestatīšana
Ierīcē sākotnēji ir iestatīts 2. ūdens cietī-
bas līmenis.
1. Atveriet durtiņas.
2. Izņemiet apakšējo grozu.
3. Pagrieziet ūdens cietības skalu stāvoklī 1
vai 2 (skat. tabulu).
4. Ievietojiet apakšējo grozu.
5. Aizveriet durtiņas.
Elektroniskā iestatīšana
Ierīcē sākotnēji ir iestatīts 5. ūdens mīk-
stinātāja līmenis.
Trauku mazgājamā mašīna ir jāizslēdz.
1. Turiet nospiestu taustiņu Sākt/Atcelt. Pa-
grieziet programmu pārslēgu pretēji pulk-
steņrādītāju kustības virzienam, līdz pro-
grammas atzīme sakritīs ar vadības pa-
neļa pirmo mazgāšanas programmu.
2. Ja displejā parādās pašreizējais iestatī-
jums, atlaidiet sākšanas/atcelšanas tau-
stiņu.
Piemēri:
–
5. līmenis =
–
10. līmenis =
3. Nospiediet sākšanas/atcelšanas tausti-
ņu, lai mainītu ūdens mīkstinātāja līmeni.
Ik reizi nospiežot taustiņu, tiek palielināts
līmenis.
4. Pagrieziet programmu pārslēgu stāvoklī
Izslēgt, lai saglabātu darbību.
24 electrolux

Trauku mazgātāja sāls izmantošana
Uzmanību Lietojiet tikai trauku
mazgājamām mašīnām paredzētu sāli.
Sāls, kas nav paredzēta trauku
mazgājamām mašīnām, var sabojāt
ūdens mīkstinātāju.
Uzmanību Sāls graudiņi vai sālsūdens
ierīces apakšpusē var izraisīt koroziju.
Lai nepieļautu koroziju, uzpildiet
specializētās sāls nodalījumu pirms
mazgāšanas programmas
aktivizēšanas.
Lai uzpildītu specializētās sāls nodalīju-
mu, rīkojieties šādi:
1. pagrieziet specializētās sāls nodalījuma
vāciņu pretēji pulksteņrādītāju kustības
virzienam.
2. Piepildiet specializētās sāls nodalījumu ar
1 litru ūdens (tikai ierīces pirmās lietoša-
nas laikā).
3. Lai iepildī
tu sāli, lietojiet piltuvi.
4. Notīriet specializētās sāls iepildes vietu.
5. Pagrieziet specializētās sāls nodalījuma
vāciņu pulksteņrādītāju kustības virzienā,
lai aizvērtu nodalījumu.
Ja, iepildot sāli, ūdens pārlīst pāri sāls
nodalījuma malām, tā ir parasta parādī-
ba.
Iestatot ūdens mīkstinātāju elektroniski 1. lī-
menī, sāls indikators neiedegsies pastāvīgā
režīmā.
Skalošanas līdzekļa izmantošana
Uzmanību Lietojiet tikai trauku
mazgājamām mašīnām paredzētus
skalošanas līdzekļus.
Neiepildiet skalošanas līdzekļa dozatorā
citus līdzekļus (piemēram, trauku maz-
gājamās mašīnas tīrīšanas līdzekli, šķi-
dros mazgāšanas līdzekļus). Tas var ra-
dīt ierīces bojājumus.
Lietojot skalošanas līdzekli, uz traukiem
neparādīsies traipi un svītras.
Skalošanas līdzeklis tiek automātiski pie-
vienots pēdējās skalošanas laikā.
Lai piepildītu skalošanas līdzekļa nodalījumu,
rīkojieties, kā aprakstīts tālāk:
1. nospiediet fiksatoru (A), lai atvērtu skalo-
šanas līdzekļa dozatoru.
2. Piepildiet skalošanas līdzekļa dozatoru ar
skalošanas līdzekli. Atzīme "Max" (mak-
simāli).norāda uz maksimālo līmeni.
electrolux 25

3. Lai mazgāšanas programmas laikā ne-
pieļautu liela daudzuma putu veidošanos,
notīriet izlijušo skalošanas līdzekli, izman-
tojot absorbējošu drāniņu.
4. Aizveriet skalošanas līdzekļa dozatoru.
Skalošanas līdzekļa dozēšanas
regulēšana
Skalošanas līdzeklis sākotnēji ir iestatīts 4. lī-
menī.
Varat iestatīt skalošanas līdzekļa daudzumu
diapazonā no 1 līdz 6 (augstākais iestatī-
jums).
1. Lai palielinātu vai samazinātu līdzekļa
daudzumu, pagrieziet skalošanas līdzek-
ļa regulatoru.
– Palieliniet skalošanas līdzekļa daudz-
umu, ja uz traukiem redzami ūdens pi-
lienu vai kaļķakmens nogulšņu traipi.
– Samaziniet līdzekļa daudzumu, ja uz
traukiem ir redzami balti vai zilgani trai-
pi.
Trauku un virtuves piederumu ievietošana
Noderīgi padomi
Uzmanību Mazgājiet tikai tādus virtuves
traukus, kas paredzēti mazgāšanai
trauku mazgājamās mašīnās.
Nelietojiet ierīci, lai mazgātu priekšmetus, kas
uzsūc ūdeni (sūkļus, dvieļus, u.c.).
• Pirms galda piederumu un trauku ievieto-
šanas, rīkojieties šādi:
–notīriet produktu paliekas un netīrumus.
–notīriet virtuves traukos palikušās pro-
duktu atliekas.
• Ievietojot galda piederumus un traukus, rī-
kojieties šādi:
– ievietojiet traukus, piemēram, krūzītes,
glāzes un pannas ar atvērtajām pusēm
uz leju.
–Pārbaudiet, vai ūdens neuzkrājas noda-
lījumā vai ierīces pamatnē.
–Pārliecinieties, vai galda piederumi un
trauki nesaskaras.
–Pārbaudiet, vai galda piederumi un trau-
ki nepārklāj citus galda piederumus vai
traukus.
–Pārliecinieties, vai glāzes nesaskaras ar
citām glāzēm.
– Mazus priekšmetus novietojiet galda
piederumu grozā.
• Uz plastmasas priekšmetiem un pannām
ar nepiedegošu pārklājumu var saglabā-
ties ūdens pilieni. Šādi priekšmeti nenožūs
tik labi, kā porcelāna vai tērauda priekš-
meti.
• Novietojiet vieglus priekšmetus augšējā
grozā. Pārbaudiet, vai priekšmeti neizku-
stas.
Uzmanību Pirms mazgāšanas
programmas aktivizēšanas
pārliecinieties, vai netiek traucēta
izsmidzinātāju darbība.
Brīdinājums Pēc trauku ievietošanas
un izņemšanas aizveriet ierīces durtiņas.
Atvērtas ierīces durtiņas var radīt
bīstamību.
26 electrolux

Apakšējais trauku grozs
Novietojiet pannas, vākus, šķīvjus, salātu
bļodas un galda piederumus apakšējā grozā.
Izkārtojiet pusdienas šķīvjus un lielākus vākus
gar groza malām.
Apakšējā groza restīšu rindu var nolocīt, lai
atvieglotu katlu, pannu un bļodu ievietošanu.
Galda piederumu grozs
Brīdinājums Lai nepieļautu
savainojumus, nenovietojiet nažus ar
gariem asmeņiem vertikālā stāvoklī.
Novietojiet garus un asus galda
piederumus horizontāli augšējā grozā.
Apejoties ar asiem priekšmetiem, esiet
piesardzīgs.
Dakšiņas un karotes ar rokturiem uz leju.
Nažus ar rokturiem uz augšu.
Novietojiet karotes pamīšus ar citiem galda
piederumiem, lai tās nesaliptu kopā.
Izmantojiet galda piederumu restītes. Ja gal-
da piederumu lielums neļauj lietot restītes,
noņemiet tās.
Augšējais grozs
Augšējais grozs paredzēts šķīvjiem (maks,
diametrs 24 cm), bļodiņām, salātu bļodām,
krūzēm, glāzēm, katliem un vākiem. Novie-
tojiet priekšmetus tā, lai tiem pilnībā piekļūtu
ūdens.
Novietojiet šķīvjus augšējā groza aizmu-
gurē. Sasveriet tos uz priekšu.
Novietojiet glāzes ar garām kājiņām krūzīšu
plauktos ar kājiņām uz augšu. Lai novietotu
garākus priekšmetus, uzlociet krūzīšu plauk-
tus.
electrolux 27

Augšējā groza augstuma regulēšana
Ja apakšējā grozā novietojat lielus šķīvjus,
vispirms pārvietojiet augšējo grozu augstāk.
Maksimālais trauku augstums
augšējais
grozs
apakš-
ējais
grozs
Augšējā stāvoklī 20 cm 31 cm
Apakšējā stāvoklī 24 cm 27 cm
Lai pārvietotu augšējo grozu augstāk, rīko-
jieties šādi:
1. izbīdiet grozu ārā, līdz atdurei.
2. uzmanīgi paceliet abas puses uz augšu,
līdz mehānisms nofiksējas un grozs kļūst
stabils.
Lai pārvietotu augšējo grozu zemāk, rīkojie-
ties šādi:
1. izbīdiet grozu ārā, līdz atdurei.
2. uzmanīgi paceliet abas puses uz augšu.
3. satveriet mehānismu un ļaujiet tam lēni
pārvietoties atpakaļ uz leju.
Uzmanību
• Neceliet grozu uz augšu un nenolai-
diet uz leju, satverot tikai vienu pusi.
• Ja grozs atrodas augšējā stāvoklī, ne-
novietojiet krūzīšu plauktos krūzītes.
Mazgāšanas līdzekļa izmantošana
Lietojiet tikai trauku mazgājamām mašī-
nām paredzētus mazgāšanas līdzekļus
(pulveri, šķidrumu vai tabletes).
Ievērojiet uz iesaiņojuma minēto infor-
māciju:
•Ievērojiet ražotāja ieteikto dozējumu.
•Uzglabāšanas ieteikumi.
Lai saglabātu apkārtējo vidi, neizmanto-
jiet lielāku mazgāšanas līdzekļu daudz-
umu nekā paredzēts.
Lai uzpildītu mazgāšanas līdzekļu dozatoru,
rīkojieties šādi:
1. atveriet mazgāšanas līdzekļu dozatora
vāciņu.
2. iepildiet mazgāšanas līdzekļu dozatorā
mazgāšanas līdzekli ( A). Marķējums no-
rāda uz daudzumu:
20 = aptuveni 20 g mazgāšanas līdzekļa
30 = apmēram 30 g mazgāšanas līdzekļa.
3. Ja lietojat mazgāšanas programmu ar
priekšmazgāšanas fāzi, iepildiet papildu
mazgāšanas līdzekli priekšmazgāšanas
nodalījumā ( B).
28 electrolux

A
B
4. Ja lietojat mazgāšanas līdzekļus tablešu
veidā, ievietojiet tos mazgāšanas līdzekļu
dozatorā ( A).
5. Aizveriet mazgāšanas līdzekļu dozatora
vāciņu. Nospiediet vāciņu, līdz tas nofik-
sējas tam paredzētājā vietā.
Dažādu mazgāšanas līdzekļu izšķīšanas
laiks ir atšķirīgs. Daži mazgāšanas līdz-
ekļi tablešu veidā nenodrošina labākos
tīrīšanas rezultātus, aktivizējot īslaicīgas
mazgāšanas programmas. Lai pilnībā li-
kvidētu mazgāšanas līdzekļus, izmanto-
jot mazgāšanas līdzekļus tablešu veidā,
lietojiet ilglaicīgas mazgāšanas program-
mas.
Multitab funkcija
Funkcija Multitab ir paredzēta kombinētajiem
mazgāšanas līdzekļiem tablešu veidā.
Šajās tabletēs var būt gan mazgāšanas līdz-
ekļi, gan skalošanas līdzeklis un specializētā
sāls. Dažos tablešu veidos var būt arī citas
vielas.
Pārbaudiet, vai šo tablešu lietošana atbilst iz-
mantojamā ūdens cietības līmenim. Skatiet
ražotāja norādījumus.
Lietojot funkciju Multitab, tā paliek aktivizēta,
kamēr to neatceļat.
Funkcija Multitab automātiski aptur skaloša-
nas līdzekļa un specializētās sāls plūsmu.
Tiek deaktivizēts skalošanas līdzekļa un spe-
cializētās sāls indikators.
Ja lietojat funkciju Multitab, programmas dar-
bības laiks var palielināties.
Aktivizējiet/deaktivizējiet funkciju Multi-
tab pirms mazgāšanas programmas ak-
tivizēšanas.
Aktivizētas programmas laikā nevar ak-
tivizēt vai deaktivizēt funkciju Multitab.
Atceliet mazgāšanas programmu un
pēc tam iestatiet vēlreiz programmu.
Lai aktivizētu funkciju Multitab:
• nospiediet taustiņu Multitab. Iedegsies
funkcijas Multitab indikators.
Lai deaktivizētu funkciju Multitab:
• nospiediet taustiņu Multitab. Funkcijas
Multitab indikators nodzisīs.
electrolux 29

Ja žāvēšanas rezultāts ir neapmieri-
nošs, rīkojieties šādi:
1. Piepildiet skalošanas līdzekļa doza-
toru ar skalošanas līdzekli.
2. Aktivizējiet skalošanas līdzekļa doza-
toru.
3. Iestatiet skalošanas līdzekļa dozato-
ru 2. pozīcijā.
• Varat aktivizēt vai deaktivizēt skaloša-
nas līdzekļa dozatoru tikai tad, ja ir ak-
tivizēta funkcija Multitab.
Lai aktivizētu/deaktivizētu skalošanas līdzek-
ļa dozatoru:
Trauku mazgājamā mašīna ir jāizslēdz.
1. Turiet nospiestu taustiņu Sākt/Atcelt. Pa-
grieziet programmu pārslēgu pretēji pulk-
steņrādītāju kustības virzienam, līdz pro-
grammas atzīme sakritīs ar vadības pa-
neļa pirmo mazgāšanas programmu.
2. Ja displejā parādās ūdens cietības līme-
nis, atlaidiet sākšanas/atcelšanas tausti-
ņu.
3. Pagrieziet programmu pārslēgu pretēji
pulksteņrādītāju kustības virzienam, līdz
programmas atzīme sakritīs ar vadības
paneļa nākamo mazgāšanas program-
mu.
4. Displejā būs redzams skalošanas līdzekļa
dozatora pašreizējais iestatījums.
Skalošanas līdzekļa do-
zators
Skalošanas līdzekļa do-
zators
5. Nospiediet sākšanas/atcelšanas tausti-
ņu, lai mainītu iestatījumu. Displejā būs
redzams jaunais iestatījums.
6. Pagrieziet programmu pārslēgu stāvoklī
Izslēgt, lai saglabātu darbību.
Lai lietotu parasto mazgāšanas līdzekli:
1. deaktivizējiet funkciju Multitab;
2. uzpildiet specializētās sāls un skalo-
šanas līdzekļa dozatoru;
3. pielāgojiet ūdens cietības iestatījumu
augstākajā iespējamajā līmenī;
4. aktivizējiet mazgāšanas programmu,
neievietojot traukus;
5. pielāgojiet ūdens mīkstinātāju atbil-
stoši ūdens cietībai jūsu reģionā;
6. pielāgojiet skalošanas līdzekļa
daudzumu.
Mazgāšanas programmas izvēle
Lai iestatītu un aktivizētu mazgāšanas pro-
grammu, rīkojieties šādi:
1. Aizveriet durtiņas.
2. Pagrieziet programmu pārslēgu, lai iesta-
tītu mazgāšanas programmu. Skatiet sa-
daļu "Mazgāšanas programmas.
– Iedegsies fāzes indikators vai mazgā-
šanas programmas indikators.
–Displejā sāks mirgot programmas dar-
bības laiks.
3. Nospiediet taustiņu Sākt/Atcelt.
–Mazgāšanas programma tiek automā-
tiski aktivizēta.
– Programmai aktivizējoties, degs tikai
konkrētās mazgāšanas programams
fāzes indikators. Programmas darbī-
bas laiks sāks degt pastāvīgā režīmā.
Mazgāšanas programmai darbojoties,
nevar izvēlēties citu programmu. Maz-
gāšanas programmas atcelšana.
Brīdinājums Apturiet vai atceliet
mazgāšanas programmu tikai galējas
nepieciešamības gadījumā.
Uzmanību Durtiņas atveriet uzmanīgi.
No ierīces var izkļūt sakarsēts tvaiks.
Mazgāšanas programmas apturēšana
Atveriet durtiņas.
• Programma tiek apturēta.
Aizveriet durtiņas.
• Programma tiks turpināta no tās vietas, kur
tā tika pārtraukta.
Mazgāšanas programmas atcelšana
• Turiet nospiestu taustiņu Sākt/Atcelt.
–Displejā sāks mirgot programmas dar-
bības ilgums.
– iedegsies vienas vai vairāku fāzu indika-
tori.
Mazgāšanas programma ir atcelta.
Šajā laikā varat rīkoties šādi:
1. izslēdziet ierīci.
2. Iestatiet jaunu mazgāšanas program-
mu.
pirms jaunas mazgāšanas programmas
iestatīšanas, piepildiet mazgāšanas līdzek-
ļu dozatoru ar mazgāšanas līdzekli.
30 electrolux

Mazgāšanas programmas ar atliktā
starta funkciju iestatīšana un
aktivizēšana
1. Iestatiet mazgāšanas programmu.
2. Nospiediet atliktā starta taustiņu, līdz dis-
plejā būs redzama mazgāšanas pro-
grammas atliktā ieslēgšana. Displejā sāks
mirgot atliktā starta laiks.
3. Nospiediet taustiņu Sākt/Atcelt.
–Tiek aktivizēta laika atpakaļskaitīšana.
–Nodzisīs mazgāšanas programmas
konkrētās fāzes indikators.
–Displejā būs redzams atliktā starta
laiks, kas sāks degt pastāvīgā režīmā.
Kad laika atskaite būs beigusies, tiks auto-
mātiski aktivizēta mazgāšanas programma,
un konkrētās mazgāšanas programmas fā
-
zes indikators sāks degt pastāvīgā režīmā.
Lai nepieļautu laika atskaites apturēša-
nu, neatveriet ierīces durtiņas. Aizverot
durtiņas, laika atskaite atsākas no tās
vietas, kur tā tika pārtraukta.
Atliktā starta funkcijas atcelšana
1. Turiet nospiestu taustiņu Sākt/Atcelt.
– Iedegsies konkrētās mazgāšanas pro-
grammas vai mazgāšanas fāzes indi-
kators.
– Digitālajā displejā būs redzams maz-
gāšanas programmas darbības il-
gums.
2. Nospiediet taustiņu Sākt/Atcelt, lai aktivi-
zētu mazgāšanas programmu.
Mazgāšanas programmas beigas
Izslēdziet trauku mazgājamo mašīnu šādos
gadījumos:
•trauku mazgājamās mašīnas darbība tiek
automātiski apturēta;
• cipardisplejā parā
dās nulle;
•nodzisīs fāzu indikators.
Lai iegūtu labākus rezultātus, pirms trauku
izņemšanas uz dažām minūtēm daļēji atveriet
ierīces durtiņas.
Pirms trauku izņemšanas ļaujiet traukiem at-
dzist. Karsti trauki kļūst triecienneizturīgi.
Gaidstāves režīms
Ja mazgāšanas programmas beigās neiz-
slēgsiet ierīci, tā automātiski pārslēgsies
gaidstāves režīmā. Gaidstāves režīms sama-
zina elektroenerģijas patēriņu.
Trīs minūtes pēc programmas beigām no-
dzisīs visi indikatori, un displejā būs redzama
horizontā
la josla.
Nospiediet taustiņu, lai atgrieztos režīmā
Programmas beigas.
Mazgāšanas programmas
Mazgāšanas programmas
Programmas
un program-
mu pārslēga
stāvoklis
Netīrības pakāpe Trauku veids Programmas apraksts
1)
Jebkuri Trauki, galda piederu-
mi, katli un pannas
Priekšmazgāšana
Galvenā mazgāšana līdz 45 °C vai
70 °C
1 vai 2 starpskalošanas
Beigu skalošana
Žāvēšana
2)
Netīrumi normālā vai
nelielā daudzumā
Trauki un galda piede-
rumi
Galvenā mazgāšana līdz pat 60
°C
Beigu skalošana
Ļoti netīri Trauki, galda piederu-
mi, katli un pannas
Priekšmazgāšana
Galvenā mazgāšana līdz pat 70
°C
2 starpskalošanas
Beigu skalošana
Žāvēšana
electrolux 31

Programmas
un program-
mu pārslēga
stāvoklis
Netīrības pakāpe Trauku veids Programmas apraksts
3)
Vidēji netīri Trauki un galda piede-
rumi
Priekšmazgāšana
Galvenā mazgāšana līdz pat 50
°C
1 starpskalošana
Beigu skalošana
Žāvēšana
Jebkuri Daļēja ielāde (lai pa-
beigtu vēlāk tās pašas
dienas laikā).
1 skalošana aukstā ūdenī (lai no-
vērstu ēdienu palieku sacietēša-
nu).
Šajā programmā mazgāšanas
līdzeklis nav nepieciešams.
1) Programmas AUTO laikā trauku netīrības pakāpe tiek noteikta pēc tā, cik duļķains ir ūdens.
Programmas darbības ilgums un patēriņa dati var mainīties. Tas ir atkarīgs no tā, vai ierīce ir pilnībā
noslogota, kā arī no trauku netīrības pakāpes. Galvenās mazgāšanas laikā ierīce automātiski pielāgo
ūdens temperatūru.
2) Šī ikdienas programma ir paredzēta neliela daudzuma trauku mazgāšanai. Tā būs it īpaši noderīga 4
cilvēku ģimenes vajadzībām, kas vēlas nomazgāt tikai brokastu un māla traukus, kā arī galda
piederumus.
3) Testēšanas programma pā
rbaudes institūcijām. Lai iegūtu informāciju par testa datiem, lūdzu, skatiet
atsevišķo brošūru.
Patēriņa vērtības
Programma
Ilgums (minūtes)
1)
Enerģijas patēriņš
(kWh)
Ūdens (litri)
- 1,1-1,7 11-22
- 0,9 9
- 1,8-2,0 22-24
- 1,0-1,1 13-15
- 0,1 4
1) Displejā būs redzams programmas laiks.
Šīs vērtības var mainīties atkarībā no
ūdens spiediena un temperatūras, sprie-
guma parametriem, kā arī no ievietotā
trauku daudzuma.
Kopšana un tīrīšana
Brīdinājums Pirms ierīces tīrīšanas
izslēdziet to.
Filtru tīrīšana
Uzmanību Nelietojiet ierīci, ja tajā nav
filtru. Pārbaudiet, vai filtri ir uzstādīti
pareizi. Nepareiza filtru uzstādīšana var
radīt neapmierinošus mazgāšanas
rezultātus un ierīces bojājumus.
Ja nepieciešams, tīriet filtrus. Netīri filtri būti-
ski ietekmēs mazgāšanas rezultātus.
Trauku mazgājamai mašīnai ir trīs filtri:
1. rupjais filtrs (A)
2. mikrofiltrs (B)
3. plakanais filtrs (C)
32 electrolux

A
B
C
A
B
C
Lai tīrītu filtrus, rīkojieties šādi:
1. Atveriet durtiņas.
2. Izņemiet apakšējo grozu.
3. Lai atbloķētu filtru sistēmu, pagrieziet mi-
krofiltra (B) rokturi pretēji pulksteņrādītāju
kustības virzienam par aptuveni ¼ no pil-
na apgrieziena.
4. Izņemiet filtru sistēmu.
5. Satveriet rupjo filtru (A), izmantojot rokturi
ar atveri.
6. Izņemiet rupjo filtru (A) no mikrofiltra (B).
7. Izņemiet no ierīces pamatnes plakano fil-
tru (C).
D
8. Tīriet filtrus zem tekoša ūdens.
9. Ievietojiet plakano filtru (C) ierīces pamat-
nē. Uzstādiet plakano filtru pareizi zem
divām vadotnēm (D).
10. Ievietojiet rupjo filtru (A) mikrofiltrā (B) un
saspiediet abus kopā.
11. Ievietojiet filtru sistēmu tai paredzētajā
vietā.
12. Lai bloķētu filtru sistēmu, pagrieziet mi-
krofiltra (B) rokturi pulksteņrādītāju kustī-
bas virzienā, līdz tas nofiksējas.
13. Ievietojiet apakšējo grozu.
14. Aizveriet durtiņas.
Neizņemiet smidzinātājspārnus.
Ja smidzinātājspārnu atveres ir nosprostoju-
šās, iztīriet tās, izmantojot kokteiļu salmiņu.
Korpusa tīrīšana
Tīriet ierīces ārējās daļas un vadības paneli ar
mitru, mīkstu drāniņu. Lietojiet tikai neitrālus
tīrīšanas līdzekļus. Neizmantojiet abrazīvus
izstrādājumus, asus sūkļus vai šķīdinātājus
(acetonu, trihloretilēnu u.c.).
Aizsardzība pret sasalšanu
Uzmanību Neuzstādiet ierīci vietā,
kuras temperatūra ir zemāka par 0 °C.
Ražotājs neuzņemsies atbildību par
bojājumiem, kas radušies, novietojot
ierīci aukstā telpā.
Ja tas nav iespējams, iztukšojiet ierīci un aiz-
veriet durtiņas. Atvienojiet ūdens ieplūdes
šļūteni un ļaujiet no tās iztecēt ūdenim.
electrolux 33

Ko darīt, ja ...
Trauku mazgājamā mašīna neieslēdzas vai
apstājas darbības laikā.
Ja rodas kļūdas, vispirms mēģiniet tās no-
vērst pašrocīgi. Ja tas neizdodas, sazinieties
ar ierīces tirgotāju vai klientu apkalpošanas
centru.
Uzmanību Pirms veikt ieteiktās
problēmu novēršanas darbības,
izslēdziet trauku mazgājamo mašīnu.
Kļūdas kods un ierīces nepareiza
darbība
Iespējamie iemesli un risinājums
•
displejs rāda
Trauku mazgājamajā mašīna nepie-
pildās ar ūdeni
• Ūdenskrāns ir bloķēts ar kaļķa nogulsnēm.
Iztīriet ūdenskrānu.
• Ūdenskrāns ir aizgriezts.
Atgrieziet ūdenskrānu.
• Ūdens ieplūdes šļūtenes filtrs ir bloķēts.
Iztīriet filtru.
• Nepareizs ūdens ieplūdes šļūtenes pieslēgums. Šļūtene ir
salocījusies vai ir saspiesta.
Pārbaudiet, vai pieslēgums ir pareizs.
•
displejs rāda
Trauku mazgājamā mašīna neizsūk-
nē ūdeni
•Bloķēta izlietnes ūdens aizplūdes caurule.
Iztīriet izlietnes ūdens aizplūdes cauruli.
• Nepareizs ūdens aizplūdes šļūtenes pieslēgums. Šļūtene ir
salocījusies vai ir saspiesta.
Pārbaudiet, vai pieslēgums ir pareizs.
•
displejs rāda
Aktivizējusies ierīce pret ūdens no-
plūdēm
•Aizgrieziet ūdenskrānu un sazinieties ar klientu atbalsta cen-
tru.
Programma neaktivizējas • Nav aizvērtas ierīces durtiņas.
Aizveriet durtiņas.
•Ierīce nav pieslēgta elektrotīklam.
Pieslēdziet to elektrotīklam.
• Izdedzis mājas drošinātājs.
Nomainiet drošinātāju.
•Ir iestatīta atliktā starta funkcija.
Atceliet atlikto ieslēgšanu, lai aktivizētu programmu.
Pēc pārbaudes ieslēdziet ierīci. Iestatiet pār-
slēgu tās pašas mazgāšanas programmas
režīmā, kādā tā tika iestatīta pirms problēmu
rašanās.
Programma tiks turpināta no tās vietas, kur
tā tika pārtraukta. Ja problēmas atkārtojas,
sazinieties ar klientu apkalpošanas centru.
Lai sniegtu savlaicīgu un pareizu palīdzību,
norādiet šādus datus:
•Ierīces modeļa nosaukums (mod.)
•Izstrādājuma numurs (PNC)
•Sērijas numurs (S.N.)
Lai iegūtu šos datus, skatiet tehnisko datu
plāksnīti.
Pierakstiet nepieciešamos datus šeit:
Modeļa apraksts: ..........
Izstrādājuma numurs: ..........
Sērijas numurs: ..........
Mazgāšanas rezultāti nav apmierinoši
Trauki nav tīri •Izvēlētā mazgāšanas programma nav piemērota ievietoto trauku
veidam un netīrības līmenim.
• Trauki nav pareizi ievietoti grozos, tādēļ ūdens tiem nevar piekļūt.
• Ievietotie trauki un galda piederumi traucē izsmidzinātāju darbību.
• Filtri ir netīri vai nav pareizi uzstādīti.
•Pārāk mazs mazgāšanas līdzekļa daudzums vai tā nav vispār.
Uz traukiem ir kaļķakmens
nogulsnes
• Specializētās sāls nodalījums ir tukšs.
• Nepareizi iestatīts ūdens mīkstinātāja līmenis.
•Sāls nodalījuma vāciņš nav pareizi aizvērts.
34 electrolux

Mazgāšanas rezultāti nav apmierinoši
Trauki ir mitri un nespodri • Nav izmantots skalošanas līdzeklis.
• Skalošanas līdzekļa dozators ir tukšs.
Uz glāzēm un traukiem ir švī-
kas, pienaini plankumi un zil-
gans pārklājums
• Samaziniet skalošanas līdzekļa daudzumu.
Uz glāzēm un traukiem ir iz-
žuvušu ūdens pilienu traipi
• Palieliniet skalošanas līdzekļa daudzumu.
•Problēma var būt saistīta ar mazgāšanas līdzekli.
Tehniskie dati
Izmēri Platums (cm) 60
Augstums (cm) 85
Dziļums (cm) 61
Elektrības pieslēgums - Sprie-
gums - Kopējā jauda - Drošinā-
tājs
Informācija par elektrisko savienojumu ir atrodama uz datu plāks-
nītes, kas nostiprināta uz trauku mazgājamās mašīnas durtiņu sānu
malas.
Ūdens spiediens Minimāls 0,5 bāri (0,05 MPa)
Maksimāls 8 bāri (0,8 MPa)
Ietilpība Trauku komplekti 12
Uzstādīšana
Uzstādīšana zem virsmas
Brīdinājums Ierīces uzstādīšanas laikā
pārbaudiet, vai trauku amzgājamā
mašīna ir atvienota no elektrotīkla.
Novietojiet trauku mazgājamo mašīnu blakus
ūdenskrānam un ūdens aizplūdes sistēmai.
Noņemiet ierīces darba virsmu, lai uzstādītu
trauku mazgājamo mašīnu zem izlietnes vai
virtuves darba virsmas. Pārbaudiet, vai iebū-
vēšanai parezētā atvēruma izmēri sakrīt ar
sniegtajiem izmēriem.
Lai noņemtu ierīces darba virsmu,
rīkojieties šādi:
1. izņemiet mugurpuses skrūves (1);
2. izvelciet darba virsmu no ierīces aizmu-
gures puses (2);
3. paceliet darba virsmu un izņemiet to no
priekšējām atverēm (3);
electrolux 35

4. lietojiet regulējamās kājiņas, lai nolīmeņo-
tu ierīci.
5. Uzstādiet ierīci zem virtuves darba virs-
mas. Pārbaudiet, vai ūdens ieplūdes un
aizplūdes šļūtene nav saspiesta vai salo-
cīta.
Uzstādiet ierīci tā, lai remonta gadījumā tai
var piekļūt tehniskās apkopes darbinieki. Ja
vēlaties lietot trauku mazgājamo mašīnu kā
brīvstāvošu ierīci, uzstādiet ierīces darbvirs-
mu.
Atsevišķi stāvošai ierīcei pamatne nav regu-
lējama.
Ierīces nolīmeņošana
Pārbaudiet, vai ierīce ir nolīmeņota, lai varētu
pareizi aizv
ērt durtiņas. Ja ierīce nav pareizi
nolīmeņota, durtiņas saskarsies ar virtuves
mēbeļu daļām. Ja durtiņas nevar pareizi aiz-
vērt, pievelciet vai atslābiniet regulējamās kā-
jiņas, līdz ierīcve ir pilnībā nolīmeņota.
Ūdens padeves pieslēgšana
Ūdens ieplūdes šļūtene
Šo ierīci var pieslēgt gan karstā (maks. 60
°C), gan aukstā ūdens piegādes avotam.
Ja karstais ūdens tiek piegādāts no cita videi
nekaitīga avota (piemēram, izmantojot saules
enerģijas baterijas vai paneļus), lietojiet kar-
sto ūdeni, lai tādējādi samazinātu elektroenr-
ģijas patēriņu.
Pievienojiet ieplūdes šļūteni ūdens krānam ar
¾ collu ārējo vītni.
Uzmanību Nelietojiet nolietotu ierīču
šļūtenes.
Ūdens spiedienam ir jāatbilst noteiktiem pa-
rametriem (skatiet sadaļu "Tehniskie dati").
Sazinieties ar vietējo ūdens piegādes dienes-
tu un uzziniet informāciju par ūdens spiedie-
na parametriem.
Pārbaudiet, vai ūdens ieplūdes un aizplūdes
šļūtene nav saspiesta vai samezglojusies.
Lai nepieļautu ūdens noplūdes, pareizi pie-
velciet kontruzgriezni.
Uzmanību Nepievienojiet ierīci jaunām
ūdens sistēmas caurulēm vai caurulēm,
kas nav lietotas ilgu laiku. Ļaujiet ūdenim
notecēt dažas minūtes un tikai pēc tam
pievienojiet sistēmai ūdens ieplūdes
šļūteni.
Ūdens ieplūdes šļūtenei ir divkāršas sienas,
iekšējs strāvas kabelis un drošības vārsts.
Ūdens ieplūdes šļūtene ir zem spiediena tikai
tad, ja tajā plūst ūdens. Ja ūdens ieplūdes
šļūtenē rodas noplūdes, aizsargvārsts aptur
ūdens plūsmu.
Pievienojot ūdens ieplūdes šļūteni, esiet pie-
sardzīgs:
• neiegremdējiet ūdens ieplū
des šļūteni vai
aizsargvārstu ūdenī.
•Ja ūdens ieplūdes šļūtene vai aizsarg-
vārsts ir bojāts, nekavējoties atvienojiet ie-
rīci no elektrotīkla.
• Ūdens ieplūdes šļūteni ar aizsargvārstu
drīkst nomainīt tikai klientu apkalpošanas
centra darbinieki.
Brīdinājums Bīstams spriegums
Ūdens aizplūdes šļūtene
1. Pievienojiet ūdens aizplūdes šļūteni izliet-
nes ūdens aizplūdes sistēmai, un nosti-
priniet to zem darba virsmas. Tas nepie-
ļaus izlietotā ūdens ieplūšanu no izlietnes
atpakaļ ierīcē.
2. Pievienojiet ūdens aizplūdes šļūteni pie
stāvvada, izmantojot ventilācijas atveri
(minimālais iekšējais diametrs - 4 cm).
max 85 cm
min 40 cm
max 400 cm
Pārbaudiet, vai ūdens aizplūdes šļūtene nav
salocījusies vai saspiesta, un vai ūdens pa-
reizi aizplūst.
36 electrolux

Lai nepieļautu, ka ūdens ieplūst atpakaļ ierī-
cē, ūdens izsūknēšanas laikā izņemiet izliet-
nes tapu.
Ūdens aizplūdes šļūtenes pagarinājums ne-
drīkst būt garāks par 2 m. Sistēmas iekšējais
diametrs nedrīkst būt mazāks par šļūtenes
diametru.
Ja pievienojat ūdens aizplūdes šļūteni pie
zem izlietnes esošas ūdens aizplūdes sistē-
mas, noņemiet plastmasas membrānu (A).
Ja nenoņemsiet membrānu, ēdienu paliekas
var nobloķēt aizplūdes šļūteni
Ierīce ir aprīkota ar drošības sistēmu, kas
nepieļauj netīrā ūdens ieplūšanu atpakaļ
ierīcē. Ja izlietnes ūdens aizplūdes sis-
tēmai ir vienvirziena vārsts, šis vārsts var
ietekmēt trauku mazgājamās mašīnas
ūdens izsūknēšanas procesu. Noņemiet
vienvirziena vārstu.
Uzmanību Lai nepieļautu ūdens
noplūdes, pārbaudiet, vai
savienotājdetaļas ir cieši pievilktas.
Elektrības padeves pieslēgšana
Brīdinājums Ražotājs neuzņemsies
atbildību par bojājumiem, kas radušies,
neievērojot minētos drošības
norādījumus.
Iezemējiet trauku mazgājamo mašīnu at-
bilstoši drošības nosacījumiem.
Pārliecinieties, vai ierīces nominālais
spriegums un elektrības piegādes veids
atbilst mājas elektrosistēmas parame-
triem.
Uzstādiet pret elektrošoku drošu sienas
kontaktligzdu.
Nelietojiet daudzkanālu kontaktspraud-
ņus, savienotājus vai pagarinātājus. Pa-
stāv ugunsgrēka izraisīšanās risks.
Nenomainiet pašrocīgi strāvas kabeli.
Sazinieties ar klientu apkalpošanas cen-
tru.
Pārbaudiet, vai pēc ierīces uzstādīša-
nas, ir ērti pieejams strā
vas kabeļa kon-
taktspraudnis.
Lai atvienotu ierīci no elektrotīkla, nesat-
veriet strāvas kabeli. Satveriet tikai kon-
taktspraudni.
Apsvērumi par vides aizsardzību
Simbols uz produkta vai tā iepakojuma
norāda, ka šo produktu nedrīkst izmest
saimniecības atkritumos. Tas jānodod
attiecīgos elektrisko un elektronisko iekārtu
savākšanas punktos pārstrādāšanai.
Nodrošinot pareizu atbrīvošanos no šī
produkta, jūs palīdzēsiet izvairīties no
potenciālām negatīvām sekām apkārtējai
videi un cilvēka veselībai, kuras iespējams
izraisīt, nepareizi izmetot atkritumos šo
produktu. Lai iegūtu detalizētāku informāciju
par atbrīvošanos no šī produkta, lūdzu
sazinieties ar jūsu pašvaldību, saimniecības
atkritumu savākšanas dienestu vai veikalu,
kurā jūs iegādājā
ties šo produktu.
Iepakojuma materiāls ir dabai nekaitīgs un iz-
mantojams atkārtoti. Plastmasas sastāvda-
ļas tiek noteiktas pēc to apzīmējumiem, pie-
mēram, >PE<, >PS< un citiem. Lūdzu, atbrī-
vojieties no iesaiņojuma materiāliem atbilsto-
šās atkritumu savākšanas vietās.
electrolux 37

Brīdinājums Lai atbrīvotos no ierīces,
rīkojieties šādi:
• atvienojiet strāvas kabeļa kontakt-
spraudni no sienas kontaktligzdas;
•nogrieziet strāvas kabeli, kontakt-
spraudni un izmetiet to;
•sabojājiet durtiņu slēdzeni. Tas nepie-
ļaus to, ka mazi bērni ieslēdzas ierīcē,
tādējādi apdraudot savas dzīvības.
38 electrolux

Electrolux. Thinking of you.
Conozca mejor nuestros conceptos en www.electrolux.com
Índice de materias
Información sobre seguridad 39
Descripción del producto 40
Panel de mandos 41
Antes del primer uso 42
Ajuste del descalcificador de agua 43
Uso de sal para lavavajillas 44
Uso de abrillantador 44
Carga de cubiertos y vajilla 45
Uso de detergente 47
Función Multitab 48
Selección e inicio del programa de lavado
49
Programas de lavado 50
Mantenimiento y limpieza 51
Qué hacer si… 52
Datos técnicos 54
Instalación 54
Conexión de agua 55
Conexión eléctrica 56
Aspectos medioambientales 56
Salvo modificaciones
Información sobre seguridad
Por su seguridad y para garantizar el
funcionamiento correcto del aparato,
antes de instalarlo y utilizarlo por primera
vez lea atentamente este manual. Con-
serve siempre estas instrucciones con el
aparato, aunque lo cambie de lugar o lo
venda. Los usuarios deben conocer a la
perfección el funcionamiento y las ca-
racterísticas de seguridad del aparato.
Uso correcto
• Este aparato se ha diseñado exclusiva-
mente para uso doméstico.
• Utilice el aparato exclusivamente para el
lavado de utensilios del hogar adecuados
para lavavajillas.
• No introduzca disolventes en el aparato.
Riesgo de explosión.
• Los cuchillos y otros objetos con puntas
afiladas deben colocarse en el cesto para
cubiertos con la punta hacia abajo. Si no
lo hace así, colóquelos en posición hori-
zontal en el cesto superior.
• Utilice exclusivamente productos de mar-
ca (detergente, sal y abrillantador) adecua-
dos para lavavajillas.
• Si abre la puerta con el aparato en marcha,
puede salir vapor caliente. Riesgo de que-
maduras de piel.
• No retire platos del lavavajillas antes de
que finalice el programa de lavado.
• Cuando el programa de lavado haya con-
cluido, desenchufe el cable de la toma de
pared y cierre el grifo.
• Este aparato sólo debe ser reparado por
un técnico del servicio oficial. Utilice sólo
recambios originales.
• Para evitar lesiones personales y daños al
aparato, no intente repararlo por sus me-
dios. Póngase siempre en contacto con el
Centro de Servicio técnico.
Instrucciones generales de seguridad
• Las personas (incluidos niños) con disca-
pacidad física, sensorial o mental, o con
experiencia y conocimiento insuficientes,
no deben utilizar el electrodoméstico. Sólo
podrán utilizarlo bajo la supervisión o ins-
trucción de la persona responsable de su
seguridad.
• Siga las instrucciones de seguridad res-
pecto al detergente para lavavajillas sumi-
nistradas por el fabricante para evitar que-
maduras en ojos, boca y garganta.
• No beba el agua del lavavajillas. Podría ha-
ber restos de detergente en el aparato.
• Cierre siempre la puerta del aparato cuan-
do no lo utilice, para evitar que las perso-
nas sufran lesiones o tropiecen con la
puerta abierta.
• No se siente ni se ponga de pie sobre la
puerta abierta.
electrolux 39

Seguridad de los niños
• Este aparato sólo puede ser utilizado por
adultos. Es necesario supervisar a los ni-
ños para evitar que jueguen con el apara-
to.
• Mantenga todos los materiales de emba-
laje alejados de los niños. Existe riesgo de
asfixia.
• Mantenga los detergentes en un lugar se-
guro. No permita que los niños toquen los
detergentes.
• Mantenga a los niños alejados del aparato
cuando la puerta esté abierta.
Instalación
• Compruebe que el aparato no ha sufrido
daños en el transporte. No conecte el apa-
rato si está dañado. Si es necesario, con-
tacte al proveedor.
• Retire todo el material de embalaje antes
del primer uso.
• La instalación eléctrica de este aparato
debe estar a cargo de un profesional cua-
lificado y competente.
• La instalación de fontanería de este apa-
rato debe estar a cargo de un profesional
cualificado y competente.
• No altere las especificaciones ni modifique
este producto. Existe el riesgo de lesiones
personales y de daños para el aparato.
• No utilice el aparato:
– si el cable de alimentación o los tubos
de agua están dañados,
– si el panel de mandos, la superficie su-
perior o la zona inferior (base) presentan
daños, de modo que pudiera accederse
fácilmente al interior del aparato.
Póngase en contacto con el Centro de
Servicio técnico.
• No perfore los lados del aparato para no
producir daños en los componentes hi-
dráulicos y eléctricos.
Advertencia Siga atentamente las
instrucciones sobre las conexiones
eléctricas y de agua.
Descripción del producto
1 Cesto superior
2 Selector del ajuste de dureza del agua
3 Depósito de sal
4 Distribuidor de detergente
5 Distribuidor de abrillantador
6 Placa de datos técnicos
7 Filtros
8 Brazo aspersor inferior
40 electrolux

9 Brazo aspersor superior 10 Placa superior
Panel de mandos
21 3 4 5
7 689
1 Programas
2 Mando de programas
3 Tecla de inicio/cancelación (Start Cancel)
4 Tecla Multitab (Multitab)
5 Tecla de inicio diferido (Delay)
6 Visor digital
7 Indicadores luminosos
8 Indicador de programa
9 Apagado
Indicadores luminosos
Fase de lavado El indicador de fase de lavado se enciende cuando está en marcha la fase
de lavado o de aclarado.
Fase de secado El indicador de fase de secado se enciende cuando está en marcha la fase
de secado.
Función Pastilla múlti-
ple
El indicador de Multitab se enciende cuando está activa la función Multitab.
Sal
1)
El indicador de sal se enciende cuando es necesario recargar el recipiente
de sal. Consulte el capítulo 'Utilización de sal para lavavajillas'.
Después de llenar el recipiente, el indicador de sal permanece encendido
durante algunas horas. Esto no tiene efecto negativo alguno en el funciona-
miento del aparato.
Abrillantador
1)
El indicador luminoso de abrillantador se enciende cuando es necesario re-
cargar abrillantador. Consulte el capítulo 'Utilización del abrillantador'.
1) Si los recipientes de sal o abrillantador están vacíos, los indicadores correspondientes no se encienden
durante el funcionamiento del programa de lavado.
Mando de programas
• Para encender el aparato o elegir un pro-
grama de lavado, gire el mando de pro-
gramas hacia la derecha o la izquierda. El
indicador de programa del mando debe
coincidir con el programa de lavado que
se indica en el panel. Si el indicador de
programa coincide con el programa de la-
vado, el visor digital muestra la duración
del mismo. Si el indicador de programa no
coincide con un programa de lavado, el
electrolux 41

visor digital muestra dos barras horizonta-
les.
• Para apagar el aparato, gire el mando de
programas hasta hacerlo coincidir con el
indicador de apagado.
Utilice el mando de programas para estas
operaciones:
– Para ajustar el descalcificador de agua.
Consulte 'Ajuste del descalcificador de
agua'.
– Para activar/desactivar el distribuidor del
abrillantador. Consulte 'Función Multitab'.
Tecla de inicio/cancelación
Utilice la tecla de inicio/cancelación para es-
tas operaciones:
• Para iniciar un programa de lavado. Con-
sulte el capítulo 'Ajuste e inicio de un pro-
grama de lavado'.
• Para cancelar un programa de lavado en
marcha. Consulte el capítulo 'Ajuste e ini-
cio de un programa de lavado'.
• Para ajustar el nivel del descalcificador de
agua. Consulte el capítulo 'Ajuste del des-
calcificador de agua'.
• Para activar/desactivar el distribuidor del
abrillantador. Consulte el capítulo 'Función
Multitab'.
Tecla Multitab
Pulse esta tecla para activar/desactivar la
función Multitab. Consulte el capítulo 'Fun-
ción Multitab'.
Tecla de inicio diferido
Utilice la tecla de inicio diferido para retrasar
el inicio del programa de lavado entre 1 y 19
horas. Consulte el capítulo 'Ajuste e inicio de
un programa de lavado'.
Visor digital
El visor muestra:
• Nivel ajustado del descalcificador de agua.
• Activación/desactivación del distribuidor
de abrillantador (sólo con la función Multi-
tab activa).
• Duración del programa.
• Tiempo restante hasta la finalización del
programa.
• Fin de un programa de lavado, el visor di-
gital muestra un cero.
• Número de horas de inicio diferido.
• Códigos de error.
Modo de ajuste
El aparato está en modo de ajuste cuando:
• Uno o más indicadores de fase están en-
cendidos.
• La duración del programa parpadea en el
visor digital.
El aparato debe estar en modo de ajuste pa-
ra las siguientes operaciones:
– Para ajustar un programa de lavado.
– Para ajustar el nivel del descalcificador de
agua.
– Para activar/desactivar el distribuidor del
abrillantador.
El aparato no está en modo de ajuste cuan-
do:
• Uno o más indicadores de fase están en-
cendidos.
• No parpadea el indicador de tiempo res-
tante del programa.
En tal caso, cancele el programa para volver
al modo de ajuste. Consulte el capítulo 'Ajus-
te e inicio de un programa de lavado'.
Antes del primer uso
Consulte las instrucciones siguientes para
cada paso del procedimiento:
1. Haga una prueba para verificar si el nivel
de descalcificador de agua es correcto
para la dureza del agua de su zona. Si es
necesario, ajuste el descalcificador de
agua.
2. Llene el recipiente de sal con sal para la-
vavajillas.
3. Cargue el distribuidor de abrillantador.
4. Cargue los cubiertos y la vajilla en el la-
vavajillas.
5. Seleccione el programa de lavado ade-
cuado para el tipo y suciedad de la carga.
6. Llene el distribuidor de detergente con la
cantidad de detergente adecuada.
7. Inicie el programa de lavado.
Si utiliza pastillas de detergente combi-
nadas ('3 en 1', '4 en 1', '5 en 1', etc.),
consulte el capítulo 'Función Multitab'.
42 electrolux

Ajuste del descalcificador de agua
El descalcificador elimina los minerales y sa-
les del suministro de agua. Los minerales y
sales pueden tener un efecto negativo en el
funcionamiento del aparato.
La dureza del agua se mide en escalas equi-
valentes:
• Grados alemanes (dH°).
• Grados franceses (°TH).
• mmol/l (milimol por litro, unidad internacio-
nal de la dureza del agua).
•Clarke.
Ajuste el descalcificador de agua según la
dureza del agua de su zona. Si es necesario,
solicite información a la compañía local de
suministro de agua.
Dureza del agua Ajuste de dureza del agua
°dH °TH mmol/l Clarke manualmente electrónicamente
51 - 70 91 - 125 9,1 - 12,5 64 - 88 2 10
43 - 50 76 - 90 7,6 - 9,0 53 - 63 2 9
37 - 42 65 - 75 6,5 - 7,5 46 - 52 2 8
29 - 36 51 - 64 5,1 - 6,4 36 - 45 2 7
23 - 28 40 - 50 4,0 - 5,0 28 - 35 2 6
19 - 22 33 - 39 3,3 - 3,9 23 - 27 2 5
15 - 18 26 - 32 2,6 - 3,2 18 - 22 1 4
11 - 14 19 - 25 1,9 - 2,5 13 - 17 1 3
4 - 10 7 - 18 0,7 - 1,8 5 - 12 1 2
< 4 < 7 < 0,7 < 5
1
1)
1
1)
1) No es necesario utilizar sal.
El descalcificador de agua se debe ajus-
tar manual o electrónicamente.
Ajuste manual
El aparato se ajusta en fábrica en la po-
sición 2.
1. Abra la puerta.
2. Extraiga el cesto inferior.
3. Gire el selector de dureza del agua a la
posición 1 ó 2 (consulte la tabla).
4. Vuelva a colocar el cesto inferior.
5. Cierre la puerta.
Ajuste electrónico
El descalcificador de agua se ajusta en
fábrica en el nivel 5.
Desenchufe el aparato.
1. Mantenga pulsada la tecla de inicio/can-
celación. Gire el mando de programas a
la izquierda hasta que el indicador de
programa coincida con el primer progra-
ma de lavado del panel de mandos.
2. Suelte la tecla de inicio/cancelación
cuando el visor digital muestre el ajuste
actual.
Ejemplos:
–
nivel 5 =
–
nivel 10 =
3. Pulse la tecla de inicio/cancelación para
cambiar el nivel del descalcificador de
agua. El nivel aumenta con cada pulsa-
ción de la tecla.
4. Gire el mando de programas a la posición
de desconexión para memorizar el nuevo
dato.
electrolux 43

Uso de sal para lavavajillas
Precaución Utilice exclusivamente sal
específica para lavavajillas. Los tipos de
sal no indicados para lavavajillas dañan
el descalcificador de agua.
Precaución Los granos de sal o los
restos de agua salada pueden provocar
la corrosión del aparato. Para evitar la
corrosión, cargue la sal antes de iniciar
un programa de lavado.
Siga estos pasos para cargar el depósito
de sal:
1. Abra el depósito de sal girando la tapa
hacia la izquierda.
2. Llene el depósito de sal con 1 litro de
agua (sólo en la primera operación).
3. Utilice el embudo para echar la sal en el
depósito.
4. Elimine los restos de sal que puedan ha-
ber quedado en la entrada del depósito.
5. Cierre el depósito girando la tapa hacia la
derecha.
Es normal que el agua desborde el de-
pósito al cargar la sal.
El indicador de sal no se enciende si el nivel
del descalcificador se ajusta automática-
mente en 1.
Uso de abrillantador
Precaución Utilice exclusivamente
abrillantador de marca para lavavajillas.
No llene el distribuidor de abrillantador
con otro producto (por ej., agente lim-
piador de lavavajillas o detergente líqui-
do). El aparato podría dañarse.
El abrillantador permite que la vajilla se
seque sin rayas ni franjas.
El abrillantador se añade automática-
mente durante el último aclarado.
Siga estos pasos para llenar el distribuidor de
abrillantador:
1. Pulse la tecla de apertura (A) para abrir el
distribuidor.
2. Cargue el distribuidor de abrillantador. La
marca 'máx.' muestra el nivel máximo.
44 electrolux

3. Limpie las salpicaduras de abrillantador
con un paño absorbente para evitar que
se forme demasiada espuma en el si-
guiente lavado.
4. Cierre el distribuidor de abrillantador.
Ajuste de la dosis de abrillantador
El abrillantador se ajusta en fábrica en la po-
sición 4.
Puede ajustar la dosis de abrillantador entre
las posiciones 1 (dosis más baja) y 6 (dosis
más alta).
1. Gire el selector para aumentar o reducir
la dosis de abrillantador.
– Aumente la dosis si observa gotas de
agua o motas de cal en la vajilla tras el
lavado.
– Reduzca la dosis si observa rayas,
marcas blanquecinas o capas azula-
das en la vajilla.
Carga de cubiertos y vajilla
Consejos útiles
Precaución Utilice el aparato
exclusivamente con utensilios del hogar
adecuados para lavavajillas.
No utilice el aparato para lavar objetos que
absorban agua (esponjas, paños de limpie-
za, etc.).
• Antes de cargar cubiertos y vajilla, siga es-
tos pasos:
– Elimine todos los restos de comida y
desechos.
– Ablande los restos de comida pegada
de las cazuelas.
• Al cargar cubiertos y vajilla, siga estos pa-
sos:
– Coloque los objetos huecos (tazas, co-
pas y cazuelas) boca abajo.
– Cerciórese de que el agua no se acu-
mule en el recipiente ni en los fondos.
– Compruebe que cubiertos y platos no
quedan colocados unos dentro de
otros.
– Compruebe que cubiertos y platos no
quedan solapados entre sí.
– Cerciórese de que las copas no se to-
quen entre sí.
– Coloque los objetos pequeños en el
cesto de los cubiertos.
• Los objetos de plástico y las sartenes con
revestimiento antiadherente tienden a re-
tener gotas de agua. Los objetos de plás-
tico no se secan tan bien como los de por-
celana y de acero.
• Coloque los objetos ligeros en el cesto su-
perior. Compruebe que los objetos no se
mueven.
Precaución Antes de iniciar un
programa de lavado, compruebe que
los brazos aspersores giran sin
obstrucción.
Advertencia Después de cargar o
descargar el aparato, cierre siempre la
puerta. La puerta abierta puede ser
peligrosa.
electrolux 45

Cesto inferior
Utilice el cesto inferior para colocar cazuelas,
tapaderas, ensaladeras y cubertería. Ordene
los platos y las tapaderas grandes alrededor
del borde del cesto inferior.
Pliegue los dos soportes abatibles del cesto
inferior para colocar ollas, sartenes y ensala-
deras.
Cesto para cubiertos
Advertencia No coloque los cuchillos
de hoja larga en posición vertical.
Ordene los objetos largos y afilados en
el cesto superior y en posición
horizontal. Tenga cuidado al manejar
objetos afilados.
Inserte los tenedores y cucharas con los
mangos hacia abajo.
Inserte los cuchillos con los mangos hacia
arriba.
Si las puntas de los cuchillos sobresalen del
fondo del cesto, pueden obstaculizar el mo-
vimiento del brazo aspersor inferior. Para evi-
tarlo, inserte los cuchillos con los mangos
hacia abajo.
Mezcle las cucharas con otros cubiertos pa-
ra evitar que se acoplen entre sí.
Utilice la rejilla para cubiertos. Si el tamaño
de los cubiertos no permite utilizar la rejilla,
retírela.
Cesto superior
Utilice el cesto superior para colocar platos
(24 cm de diámetro máximo), salseras, en-
saladeras, tazas, vasos, ollas y tapaderas.
Ordene los objetos de modo que el agua lle-
gue a todas las superficies.
No coloque platos en los tres primeros
sectores de la parte frontal del cesto.
Compruebe que los platos se inclinan
hacia delante.
46 electrolux

Las copas y vasos altos se pueden colocar
invertidos en los estantes para tazas. Para
los objetos más altos, doble hacia arriba los
estantes para tazas.
Ajuste de la altura del cesto superior
Si coloca platos grandes en el cesto inferior,
desplace primero el cesto superior a la posi-
ción más alta.
Altura máxima de los platos
cesto su-
perior
cesto in-
ferior
Posición más alta 20 cm 31 cm
Posición más baja 24 cm 27 cm
Siga estos pasos para subir el cesto supe-
rior:
1. Tire del cesto hasta el tope.
2. Levante con cuidado los dos lados hasta
que el mecanismo se encaje y el cesto
quede estable.
Siga estos pasos para bajar el cesto supe-
rior:
1. Tire del cesto hasta el tope.
2. Levante con cuidado los dos lados.
3. Sujete el mecanismo y deje que descien-
da lentamente.
Precaución
• No suba ni baje el cesto sólo de un
lado.
• Si el cesto está en la posición más al-
ta, no coloque tazas en los estantes
para tazas.
Uso de detergente
Utilice sólo detergentes adecuados (en
polvo, líquido o en pastillas) para lava-
vajillas.
Siga las instrucciones del fabricante in-
dicadas en el envase:
• Dosis recomendada por el fabricante.
• Consejos sobre almacenamiento.
No utilice más de la cantidad correcta de
detergente para proteger el medio am-
biente.
Siga estos pasos para llenar el distribuidor de
detergente:
1. Abra la tapa del distribuidor de detergen-
te.
2. Llene el distribuidor de detergente ( A). La
marca indica la dosis correcta:
20 = unos 20 g de detergente
30 = unos 30 g de detergente.
electrolux 47

3. Si utiliza un programa de lavado con fase
de prelavado, ponga más detergente en
el compartimiento de prelavado ( B).
A
B
4. Si utiliza pastillas de detergente, coloque
la pastilla en el distribuidor de detergente
( A).
5. Cierre la tapa del distribuidor de deter-
gente. Presione la tapa hasta que encaje
en su lugar.
Las distintas marcas de detergente no
tardan lo mismo en disolverse. Algunas
pastillas de detergente no ofrecen los
mejores resultados de limpieza en los
programas de lavado breves. Si utiliza
pastillas de detergente, emplee progra-
mas de lavado prolongados para elimi-
nar por completo los restos de deter-
gente.
Función Multitab
La función Multitab es para pastillas de de-
tergente combinadas.
Son pastillas que contienen productos para
lavavajillas, como detergente, abrillantador y
sal. Algunos tipos de pastillas pueden con-
tener también otros productos.
Compruebe si las pastillas de detergente son
adecuadas para la dureza del agua de su
zona. Consulte las instrucciones del fabri-
cante.
La función Multitab seleccionada permane-
cerá activa hasta que la desactive expresa-
mente.
La función desactiva automáticamente la en-
trada de abrillantador y sal. Los indicadores
de abrillantador y sal no se encienden.
La función Multitab puede aumentar la dura-
ción del programa de lavado.
Active o desactive la función Multitab
antes de poner en marcha un programa
de lavado.
No es posible activar o desactivar la fun-
ción Multitab con un programa de lava-
do en marcha. Cancele el programa de
lavado y vuelva a ajustarlo.
Para activar la función Multitab:
48 electrolux

• Pulse la tecla Multitab. Se enciende el in-
dicador luminoso de la función.
Para desactivar la función Multitab:
• Pulse la tecla Multitab. Se apaga el indica-
dor luminoso de la función.
Si el resultado del secado no es sa-
tisfactorio, siga estos pasos:
1. Cargue el distribuidor de abrillanta-
dor.
2. Active el distribuidor de abrillantador.
3. Ajuste la dosis de abrillantador en la
posición 2.
• Sólo es posible activar o desactivar el
distribuidor de abrillantador cuando la
función Multitab está activa.
Para activar o desactivar el distribuidor de
abrillantador:
Desenchufe el aparato.
1. Mantenga pulsada la tecla de inicio/can-
celación. Gire el mando de programas a
la izquierda hasta que el indicador de
programa coincida con el primer progra-
ma de lavado del panel de mandos.
2. Suelte la tecla de inicio/cancelación
cuando el visor muestre el nivel de dureza
del agua.
3. Gire el mando de programas a la izquier-
da hasta que el indicador de programa
coincida con el segundo programa de la-
vado del panel de mandos.
4. El visor digital muestra el ajuste de abri-
llantador actual.
Distribuidor de abrillan-
tador desactivado
Distribuidor de abrillan-
tador activado
5. Pulse la tecla de inicio/cancelación para
cambiar el ajuste. El visor digital mostrará
el nuevo ajuste.
6. Gire el mando de programas a la posición
de desconexión para memorizar el nuevo
dato.
Para volver a utilizar detergente normal:
1. Desactive la función Multitab.
2. Llene de nuevo el depósito de sal y
el distribuidor de abrillantador.
3. Ajuste el valor de dureza del agua al
máximo.
4. Ejecute un programa de lavado con
el aparato vacío.
5. Ajuste el descalcificador de agua de
acuerdo con la de su zona.
6. Ajuste la dosis de abrillantador.
Selección e inicio del programa de lavado
Siga estos pasos para ajustar e iniciar un
programa de lavado:
1. Cierre la puerta.
2. Gire el mando de programas para ajustar
el programa de lavado. Consulte el capí-
tulo 'Programas de lavado'.
– Se encienden las luces o la luz del in-
dicador de fase del programa de lava-
do.
– El indicador de duración del programa
parpadea.
3. Pulse la tecla de inicio/cancelación.
– El programa de lavado se inicia de ma-
nera automática.
– Cuando el programa está en marcha
sólo permanece encendido el indica-
dor de fase. El indicador de duración
del programa se mantiene fijo.
Una vez iniciado, no es posible cambiar
el programa de lavado en marcha. Can-
cele el programa de lavado.
Advertencia Interrumpa o cancele un
programa de lavado sólo si es
necesario.
Precaución Abra la puerta con
cuidado. Puede salir vapor caliente.
Interrupción de un programa de lavado
Abra la puerta.
• El programa se detiene.
Cierre la puerta.
• El programa continúa a partir del punto en
que se interrumpió.
electrolux 49

Cancelación de un programa de lavado
• Mantenga pulsada la tecla de inicio/can-
celación.
– La duración del programa parpadea en
el visor digital.
– Uno o más indicadores de fase están
encendidos.
El programa de lavado se ha cancelado.
En ese momento puede realizar estas
operaciones:
1. Apagar el aparato.
2. Ajustar otro programa de lavado.
Llenar el distribuidor de detergente antes
de ajustar un nuevo programa de lavado.
Ajuste e inicio de un programa de lavado
con inicio diferido
1. Ajuste un programa de lavado.
2. Pulse la tecla de inicio diferido hasta que
el visor muestre el tiempo que desea re-
trasar el programa de lavado. El tiempo
seleccionado parpadea en el visor digital.
3. Pulse la tecla de inicio/cancelación.
– Comienza la cuenta atrás para el inicio
diferido.
– Se apaga el indicador de fase del pro-
grama de lavado.
– El visor digital muestra el tiempo de ini-
cio diferido con una luz fija.
El programa de lavado comenzará automá-
ticamente en cuanto se agote la cuenta
atrás. Se enciende el indicador de fase de
programa en marcha.
No abra la puerta del lavavajillas durante
la cuenta atrás para que no se interrum-
pa el proceso. Al cerrar la puerta de nue-
vo, la cuenta atrás continuará desde el
punto en que se haya interrumpido.
Cancelación de un inicio diferido
1. Mantenga pulsada la tecla de inicio/can-
celación.
– Se encienden las luces o la luz del in-
dicador de fase.
– En el visor digital aparece la duración
del programa de lavado.
2. Pulse la tecla de inicio/cancelación para
comenzar el programa de lavado.
Finalización del programa de lavado
Apague el aparato en estos casos:
• El aparato se detiene automáticamente.
• El visor digital muestra un cero.
• Los indicadores de fase se apagan.
Para mejorar los resultados del secado,
mantenga la puerta entreabierta durante
unos minutos antes de retirar la vajilla.
Espere a que la vajilla se enfríe antes de re-
tirarla del aparato. Los platos calientes se
dañan con facilidad.
Modo en espera
Si al finalizar el programa de lavado no se
apaga de inmediato, el lavavajillas pasa au-
tomáticamente al modo en espera. El modo
de espera reduce el consumo de energía.
Tres minutos después de terminar el progra-
ma, se apagan todos los indicadores y el vi-
sor digital muestra una barra horizontal.
Pulse una de las teclas para volver al modo
de fin de programa.
Programas de lavado
Programas de lavado
Programa y
posición del
mando
Grado de suciedad Tipo de carga Descripción del programa
1)
Cualquiera Vajilla, cubertería, ca-
cerolas y sartenes
Prelavado
Lavado principal de hasta 45 °C o
70 °C
1 o 2 aclarados intermedios
Aclarado final
Secado
2)
Suciedad normal o li-
gera
Vajilla y cubertería Lavado principal de hasta 60 °C
Aclarado final
50 electrolux

Programa y
posición del
mando
Grado de suciedad Tipo de carga Descripción del programa
Gran suciedad Vajilla, cubertería, ca-
cerolas y sartenes
Prelavado
Lavado principal de hasta 70 °C
2 aclarados intermedios
Aclarado final
Secado
3)
Suciedad normal Vajilla y cubertería Prelavado
Lavado principal de hasta 50 °C
1 aclarado intermedio
Aclarado final
Secado
Cualquiera Carga parcial (se
completará a lo largo
del día).
1 aclarado en frío (para evitar que
se peguen los restos de comida).
Este programa no necesita deter-
gente.
1) Durante el programa AUTO, es posible determinar el grado de suciedad de la vajilla por la turbiedad
del agua. La duración del programa y el consumo pueden variar. Esto depende de la cantidad de
carga del aparato y del grado de suciedad de la vajilla. La temperatura del agua se ajusta
automáticamente durante el lavado principal.
2) Este es el programa diario perfecto para cargas incompletas. Adecuado para las necesidades de una
familia de cuatro personas que sólo necesita cargar la vajilla y la cubertería del desayuno y la comida.
3) Programa de prueba para organismos de control. Para obtener información sobre los datos de prueba,
consulte el folleto aparte suministrado.
Valores de consumo
Programa
Duración (en minutos)
1)
Consumo de energía
(en kWh)
Agua (en litros)
- 1,1-1,7 11-22
- 0,9 9
- 1,8-2,0 22-24
- 1,0-1,1 13-15
- 0,1 4
1) El visor digital muestra la duración del programa.
La presión y temperatura del agua, así
como de las variaciones del suministro
de energía y la cantidad de platos, pue-
den cambiar estos valores.
Mantenimiento y limpieza
Advertencia Apague el aparato antes
de limpiar los filtros.
Limpieza de los filtros
Precaución No utilice el aparato sin
filtros. Compruebe que los filtros están
bien colocados. Su instalación
incorrecta provocará resultados de
lavado insatisfactorios y dañará el
aparato.
Limpie los filtros cuando sea necesario. Los
filtros sucios dificultan el lavado.
El lavavajillas tiene tres filtros:
1. filtro grueso (A)
2. microfiltro (B)
3. filtro plano (C)
electrolux 51

A
B
C
A
B
C
Siga estos pasos para limpiar los filtros:
1. Abra la puerta.
2. Extraiga el cesto inferior.
3. Abra el sistema de filtrado girando el asa
del microfiltro (B) aproximadamente 1/4
de vuelta a la izquierda.
4. Extraiga el sistema de filtrado.
5. Levante el filtro grueso (A) por el asa y
extraiga el conjunto.
6. Retire el filtro grueso (A) del microfiltro
(B).
7. Retire el filtro plano (C) del fondo del apa-
rato.
D
8. Limpie los filtros a fondo con agua co-
rriente.
9. Coloque el filtro plano (C) en la base del
aparato. Instale el filtro plano correcta-
mente debajo de las dos guías (D).
10. Inserte el filtro grueso (A) en el microfiltro
(B) y empújelos entre sí.
11. Coloque el sistema de filtrado en su po-
sición.
12. Gire el asa del microfiltro (B) a la derecha
hasta bloquear el sistema de filtrado en
su lugar.
13. Vuelva a colocar el cesto inferior.
14. Cierre la puerta.
No extraiga los brazos aspersores.
Si los orificios de los brazos aspersores están
obstruidos, elimine la suciedad con un palillo.
Limpieza del exterior
Limpie las superficies externas de la máquina
y del panel de mandos con un paño suave y
húmedo. Utilice sólo detergentes neutros.
No utilice productos abrasivos, estropajos ni
disolventes (acetona, tricloroetileno, etc.).
Precauciones contra la congelación
Precaución No instale el aparato en un
lugar donde la temperatura descienda
por debajo de 0 °C. El fabricante no se
hace responsable de daños producidos
por el hielo.
Si no es posible evitarlo, vacíe el aparato y
cierre la puerta. Desconecte el tubo de en-
trada de agua y haga salir el agua que pueda
contener.
Qué hacer si…
El aparato no se pone en marcha o se detie-
ne durante el funcionamiento.
Si existe un desperfecto, intente corregirlo.
Si no logra solucionar el problema, póngase
52 electrolux

en contacto con el Centro de Servicio técni-
co.
Precaución Apague el aparato antes
de llevar a cabo las acciones de
corrección recomendadas.
Código de error y fallo de funcio-
namiento
Causa y soluciones posibles
•
El visor digital muestra
El lavavajillas no carga agua
• El grifo está bloqueado o tiene incrustaciones calcáreas.
Limpie el grifo.
• El grifo está cerrado.
Abra el grifo.
• El filtro del tubo de entrada de agua está obstruido.
Limpie el filtro.
• La conexión del tubo de entrada de agua no es correcta. El
tubo podría estar doblado o aplastado.
Compruebe que la conexión es correcta.
•
El visor digital muestra
El lavavajillas no desagua
• El sumidero está obstruido.
Limpie el sumidero.
• La conexión del tubo de desagüe no es correcta. El tubo
podría estar doblado o aplastado.
Compruebe que la conexión es correcta.
•
El visor digital muestra
El dispositivo antiinundación está
funcionando
• Cierre el grifo y póngase en contacto con el Centro de ser-
vicio técnico.
El programa no se inicia • La puerta del aparato no está cerrada.
Cierre la puerta.
• El enchufe no está bien conectado.
Conecte bien el enchufe.
• Se ha quemado el fusible de la caja de fusibles de la vivienda.
Cambie el fusible.
• El inicio diferido está activado.
Cancele el inicio diferido para que el programa comience de
inmediato.
Después de la comprobación, encienda el
aparato. Coloque el mando en el mismo pro-
grama de lavado que estaba seleccionado
antes de producirse el desperfecto.
El programa continúa a partir del punto en
que se interrumpió. Si reaparece el fallo de
funcionamiento, llame al Centro de servicio
técnico.
Estos datos son necesarios para poder ayu-
darle de manera rápida y correcta:
• Modelo (Mod.)
• Número del producto (PNC)
• Número de serie (S.N.)
Para conocer esos datos, consulte la placa
de datos técnicos.
Escriba aquí los datos necesarios:
Descripción del modelo: ..........
Número del producto: ..........
Número de serie: ..........
Los resultados de limpieza no son satisfactorios
La vajilla no está limpia • El programa de lavado seleccionado no es adecuado para el tipo y
la suciedad de la carga.
• Los cestos se han cargado de manera incorrecta y el agua no llega
a todas las superficies.
• Los brazos aspersores no giran libremente por la disposición inco-
rrecta de la carga.
• Los filtros están sucios o instalados de forma incorrecta.
• Se ha utilizado poco o ningún detergente.
Depósitos de cal en la vajilla • El recipiente de sal está vacío.
• Se ha ajustado un nivel de descalcificador incorrecto.
• La tapa del recipiente de sal no está bien cerrada.
electrolux 53

Los resultados de limpieza no son satisfactorios
La vajilla aparece mojada y
deslucida
• No se utilizó abrillantador.
• El distribuidor de abrillantador está vacío.
Se ven rayas, puntos blancos
o una película azulada en co-
pas y platos
• Reduzca la cantidad de abrillantador.
Señales de gotas de agua se-
cas en copas y platos
• Aumente la dosis de abrillantador.
• La causa podría ser el detergente.
Datos técnicos
Medidas Ancho (cm) 60
Alto (cm) 85
Fondo (cm) 61
Conexión eléctrica - Voltaje -
Potencia total - Fusible
Los datos de la conexión eléctrica se indican en la placa de datos
técnicos, situada en el borde interno de la puerta del lavavajillas.
Presión del suministro de agua Mínima 0,5 bares (0,05 MPa)
Máxima 8 bares (0,8 MPa)
Capacidad Cubiertos 12
Instalación
Instalación debajo de una encimera
Advertencia Asegúrese de que el
enchufe está desconectado de la toma
de red durante la instalación.
Coloque el aparato junto a un grifo y un de-
sagüe. Retire la placa superior del aparato
para instalarlo debajo de un fregadero o de
una encimera de cocina. Compruebe que las
medidas de la cavidad coinciden con las del
aparato.
Siga estos pasos para retirar la placa
superior del aparato:
1. Extraiga los tornillos posteriores (1).
2. Tire de la placa superior desde la parte
trasera del aparato (2).
3. Levante la placa superior y extráigala de
las ranuras delanteras (3).
4. Utilice las patas ajustables para nivelar el
aparato.
5. Instale el aparato bajo la encimera de la
cocina. Asegúrese de que los tubos de
entrada de agua no queden doblados,
aplastados ni enredados.
54 electrolux

El aparato debe quedar accesible para faci-
litar su reparación o la intervención del per-
sonal técnico. Instale la placa superior del
aparato si desea utilizarlo como unidad in-
dependiente.
El zócalo de los aparatos de instalación in-
dependiente no es ajustable.
Ajuste del nivel del aparato
Compruebe que el aparato está nivelado pa-
ra poder cerrar y ajustar la puerta de manera
correcta. Si el nivel del aparato es correcto,
la puerta no rozará los laterales del mueble.
Si la puerta no cierra bien, afloje o apriete las
patas ajustables hasta obtener la nivelación
correcta.
Conexión de agua
Tubo de entrada de agua
Conecte el aparato a una toma de agua ca-
liente (máx. 60°) o fría.
Si el agua caliente procede de fuentes de
energía alternativas más ecológicas (por ej.,
placas solares, fotovoltaicas o de energía eó-
lica), utilice un suministro de agua caliente
que reduzca el consumo de energía.
Conecte el tubo de entrada a un grifo con
una rosca externa de 3/4".
Precaución No utilice tubos de
conexión de aparatos antiguos.
La presión del agua debe estar dentro de los
límites (consulte 'Datos técnicos'). Solicite a
la empresa de suministro de agua informa-
ción sobre la presión media de la red en su
zona.
Compruebe que el tubo de entrada de agua
no presenta dobleces y que no está aplas-
tado ni enredado.
Instale la contratuerca correctamente para
evitar fugas de agua.
Precaución No conecte el aparato a
tuberías nuevas o que no se hayan
utilizado durante mucho tiempo. Deje
correr el agua durante unos minutos y,
a continuación, conecte el tubo de agua.
El tubo de entrada de agua tiene doble pared
y lleva un cable eléctrico y una válvula de se-
guridad internos. Sólo está bajo presión
cuando pasa el agua. Si se produce una fuga
de agua en el tubo de entrada, la válvula de
seguridad interrumpe el suministro.
Tenga cuidado al conectar el tubo de entra-
da de agua:
• No sumerja el tubo de entrada de agua ni
la válvula de seguridad.
• Si el tubo de entrada de agua o la válvula
de seguridad sufren algún daño, desen-
chufe el aparato inmediatamente.
• Sólo el personal del Centro de servicio téc-
nico cuenta con autorización para sustituir
el tubo de entrada de agua con válvula de
seguridad.
Advertencia Voltaje peligroso
Tubo de desagüe
1. Conecte el tubo de desagüe al sumidero
y fíjelo bajo la superficie de la encimera.
Así evitará que el agua sucia del sumidero
regrese al aparato.
2. Conecte el tubo de desagüe a un tubo
vertical con orificio de ventilación (diáme-
tro interno mínimo de 4 cm).
max 85 cm
min 40 cm
max 400 cm
electrolux 55

Compruebe que el tubo de desagüe no está
doblado o aplastado ni impide la salida co-
rrecta del agua.
Retire el tapón del fregadero cuando desa-
güe la máquina para que el agua no regrese
al interior del aparato.
La longitud de una posible extensión del tubo
de desagüe no debe superar los 2 m. El diá-
metro interno no debe ser inferior al del tubo.
Si conecta el tubo de desagüe al sumidero,
bajo el fregadero, retire la membrana de
plástico (A). Si no retira la membrana, los re-
siduos de comida pueden bloquear la salida
del tubo de desagüe
El aparato cuenta con una función de
seguridad que impide que el agua sucia
regrese a la máquina. Si el desagüe lleva
una 'válvula antirretorno', podría impe-
dirse la salida correcta del agua del la-
vavajillas. Retire la válvula antirretorno.
Precaución Cerciórese de que las
conexiones de agua están bien
ajustadas para evitar fugas.
Conexión eléctrica
Advertencia El fabricante no se hace
responsable de las consecuencias de
no seguir las instrucciones de
seguridad.
Conecte el aparato a tierra según las
instrucciones de seguridad.
Compruebe que el voltaje nominal y el
tipo de suministro eléctrico que figuran
en la placa de datos técnicos coinciden
con los del suministro local.
Utilice siempre una toma con aislamien-
to de conexión a tierra correctamente
instalada.
No utilice enchufes o conectores múlti-
ples ni cables prolongadores. Existe
riesgo de incendio.
No cambie personalmente el cable de
alimentación. Póngase en contacto con
el Centro de servicio técnico.
Compruebe que el enchufe es accesible
después de la instalación.
No tire del cable de alimentación para
desconectar el aparato. Tire siempre del
enchufe.
Aspectos medioambientales
El símbolo que aparece en el aparato o
en su embalaje, indica que este producto no
se puede tratar como un residuo normal del
hogar. Se deberá entregar, sin coste para el
poseedor, bien al distribuidor, en el acto de
la compra de un nuevo producto similar al
que se deshecha, bien a un punto municipal
de recolección selectiva de equipos
eléctricos y electrónicos para su reciclaje. Al
asegurarse de que este producto se
desecha correctamente, usted ayudará a
evitar posibles consecuencias negativas
para el medio ambiente y la salud pública, lo
cual podría ocurrir si este producto no se
gestionara de forma adecuada. Para obtener
información más detallada sobre el reciclaje
de este producto, póngase en contacto con
el Ayuntamiento de su Municipio, ó con la
tienda donde lo compró.
Los materiales de embalaje son ecológicos y
se pueden reciclar. Los componentes plás-
ticos se identifican con marcas, por ej. >PE<,
>PS<, etc. Deseche los materiales de em-
56 electrolux

balaje en los contenedores de uso público
destinados a tal efecto.
Advertencia Para desechar el aparato,
siga este procedimiento:
• Extraiga el enchufe de la toma de red.
• Corte el cable y el enchufe y deséche-
los.
• Deseche el cierre de la puerta. Esto
evitará que los niños al jugar queden
atrapados dentro y pongan su vida en
peligro.
electrolux 57

58 electrolux

electrolux 59

156986551-00-062009
www.electrolux.com
www.electrolux.lv
Para comprar accesorios, consumibles y recambios en nuestra tienda online, por favor visite
nuestro site: www.electrolux.es
-
 1
1
-
 2
2
-
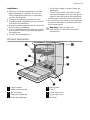 3
3
-
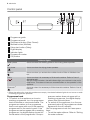 4
4
-
 5
5
-
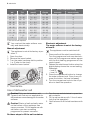 6
6
-
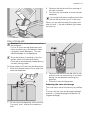 7
7
-
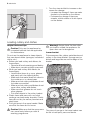 8
8
-
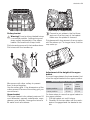 9
9
-
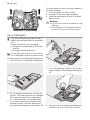 10
10
-
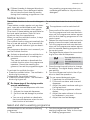 11
11
-
 12
12
-
 13
13
-
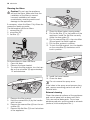 14
14
-
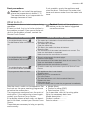 15
15
-
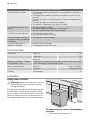 16
16
-
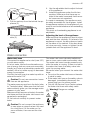 17
17
-
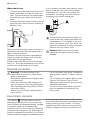 18
18
-
 19
19
-
 20
20
-
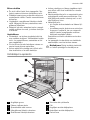 21
21
-
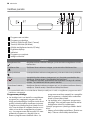 22
22
-
 23
23
-
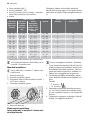 24
24
-
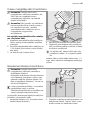 25
25
-
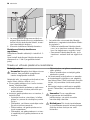 26
26
-
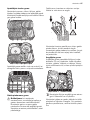 27
27
-
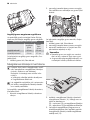 28
28
-
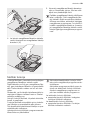 29
29
-
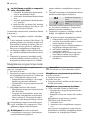 30
30
-
 31
31
-
 32
32
-
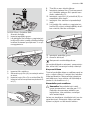 33
33
-
 34
34
-
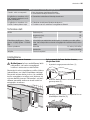 35
35
-
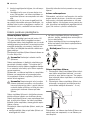 36
36
-
 37
37
-
 38
38
-
 39
39
-
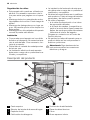 40
40
-
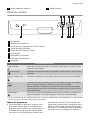 41
41
-
 42
42
-
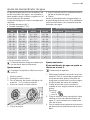 43
43
-
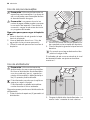 44
44
-
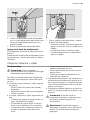 45
45
-
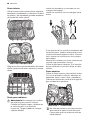 46
46
-
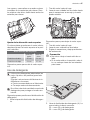 47
47
-
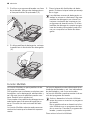 48
48
-
 49
49
-
 50
50
-
 51
51
-
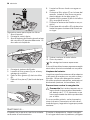 52
52
-
 53
53
-
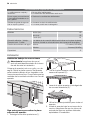 54
54
-
 55
55
-
 56
56
-
 57
57
-
 58
58
-
 59
59
-
 60
60


Electrolux ESF65040X Manual de usuario
- Categoría
- Lavaplatos
- Tipo
- Manual de usuario
en otros idiomas
- English: Electrolux ESF65040X User manual
Artículos relacionados
-
Electrolux ESF65040X Manual de usuario
-
-
Electrolux ESL68060 Manual de usuario
-
Electrolux ESL66010 Manual de usuario
-
-
-
-
-
Electrolux ESI66050X Manual de usuario
-