Aeg-Electrolux L82470BI Manual de usuario
- Categoría
- Lavadoras
- Tipo
- Manual de usuario

LAVAMAT 82470 BI
EN WASHING MACHINE USER MANUAL 2
ES LAVADORA MANUAL DE INSTRUCCIONES 35

CONTENTS
4 SAFETY INFORMATION
5 TECHNICAL INFORMATION
7 PRODUCT DESCRIPTION
8 CONTROL PANEL
10 WASHING PROGRAMMES
13 CONSUMPTION VALUES
14 FIRST USE
14 DAILY USE
18 HELPFUL HINTS AND TIPS
19 CARE AND CLEANING
23 TROUBLESHOOTING
26 INSTALLATION
32 BUILDING IN
ENVIRONMENT CONCERNS
Recycle the materials with the symbol . Put the packaging in applicable containers to
recycle it.
Help protect the environment and human health and to recycle waste of electrical and
electronic appliances. Do not dispose appliances marked with the symbol
with the
household waste. Return the product to your local recycling facility or contact your
municipal office.
VISIT OUR WEBSITE FOR:
- Products
- Brochures
- User manuals
- Trouble shooter
- Service information
www.aeg.com
LEGEND
Warning - Important Safety information.
General information and tips
Environmental information
Subject to change without notice.
2
www.aeg.com

FOR PERFECT RESULTS
Thank you for choosing this AEG product. We have created it to give you
impeccable performance for many years, with innovative technologies that help
make life simpler – features you might not find on ordinary appliances. Please spend
a few minutes reading to get the very best from it.
ACCESSORIES AND CONSUMABLES
In the AEG webshop, you’ll find everything you need to keep all your AEG
appliances looking spotless and working perfectly. Along with a wide range of
accessories designed and built to the high quality standards you would expect, from
specialist cookware to cutlery baskets, from bottle holders to delicate laundry bags…
Visit the webshop at:
www.aeg.com/shop
CUSTOMER CARE AND SERVICE
We recommend the use of original spare parts.
When contacting Service, ensure that you have the following data available. The
information can be found on the rating plate.
Model
PNC
Serial Number
ENGLISH
3

SAFETY INFORMATION
Before the installation and use, read this
manual carefully:
• For your safety and the safety of your
property
• To help the environment
• For the correct operation of the appli-
ance.
Always keep these instructions with the
appliance also if you move or give it to a
different person.
The manufacturer is not responsible if an
incorrect installation and use causes dam-
age.
CHILDREN AND VULNERABLE
PERSON SAFETY
• Do not let persons, children included,
with reduced physical sensory, reduced
mental functions or lack of experience
and knowledge use the appliance. They
must have supervision or instruction for
the operation of the appliance by a per-
son who is responsible for their safety.
Do not let children play with the appli-
ance.
• Keep all packaging away from children.
There is the risk of suffocation or injury.
• Keep all detergents away from children.
• Keep children and pets away from the
appliance when the door is open.
• Before you close the appliance door,
make sure that children and pets are
not into the drum.
• If the appliance has a child safety de-
vice, we recommend to activate it.
CHILD SAFETY DEVICE
• When you activate this device, you can-
not close the door. This prevents chil-
dren or pets to be closed in the drum.
To activate the device, turn it clockwise,
until the groove is horizontal. To deacti-
vate the device, turn it counterclock-
wise, until the groove is vertical.
GENERAL SAFETY
• Do not use the appliance for professio-
nal use. The appliance is only for do-
mestic use.
• Do not change the specifications of this
appliance. There is the risk of injury and
damage to the appliance.
• Do not put flammable products or
items that are wet with flammable
products in, near or on the appliance.
Risk of explosion or fire.
• Obey the safety instructions on the de-
tergent packaging to prevent burns to
eyes, mouth and throat.
• Make sure that you remove all metal
objects from the laundry. Hard and
sharp material can cause damage to
the appliance.
• Do not touch the glass of the door
while a programme operates. The glass
can be hot (only for front-loading appli-
ances).
CARE AND CLEANING
• Deactivate the appliance and discon-
nect the mains plug from the mains
socket.
• Do not use the appliance without the
filters. Make sure that the installation of
the filters is correct. An incorrect instal-
lation causes water leakages.
INSTALLATION
• The appliance is heavy, be careful when
you move it.
• Do not transport your appliance with-
out the transit bolts, you can damage
internal components and cause leak-
ages or malfunctions.
4
www.aeg.com

• Do not install and connect a damaged
appliance.
• Make sure to remove all packaging and
transport bolts.
• Make sure that the mains plug is dis-
connected from the mains socket dur-
ing installation.
• Only a qualified person must do the
electrical installation, the plumbing and
the installation of the appliance. This to
prevent the risks of structural damage
or injury.
• Do not install or use the appliance
where the temperature is less than 0 °C.
• When you install the appliance on a
carpet floor, make sure that there is air
circulation between the appliance and
the carpet. Adjust the feet to have the
necessary space between the appliance
and the carpet.
Water connection
• Do not connect the appliance with old
hoses already used. Only use new ho-
ses.
• Make sure not to cause damage to the
water hoses.
• Do not connect the appliance to new
pipes or pipes not used for a long time.
Let the water flow for some minutes,
then connect the inlet hose.
• The first time you use the appliance,
make sure that the water hoses and the
couplings do not have leakages.
Electrical connection
• Make sure that the appliance is earth-
ed.
• Make sure that the electrical informa-
tion on the rating plate agrees with the
power supply.
• Always use a correctly installed shock-
proof socket.
• Do not use multiple plugs and exten-
sion cables. There is a risk of fire.
• Do not replace or change the mains ca-
ble. Contact the service centre.
• Make sure not to cause damage to the
mains plug and cable.
• Connect the mains plug to the mains
socket only at the end of the installa-
tion. Make sure that there is access to
the mains plug after the installation.
• Do not pull the mains cable to discon-
nect the appliance. Always pull the
mains plug.
DISCARD THE APPLIANCE
1.
Disconnect the mains plug from the
mains socket.
2.
Cut off the mains cable and discard it.
3.
Discard the door catch. This prevents
children or pets to be closed in the
appliance. There is a risk of suffoca-
tion (only for front-loading applian-
ces).
TECHNICAL INFORMATION
Dimensions Width / Height / Depth 600 / 820 / 630 mm
Total depth 640 mm
Electrical connection: Voltage
Overall power
Fuse
Frequency
220-230 V
2000 W
10 A
50 Hz
Level of protection against ingress of solid particles
and moisture ensured by the protective cover, except
where the low voltage equipment has no protection
against moisture
IPX4
Water supply pressure Minimum 0,5 bar (0,05 MPa)
Maximum 8 bar (0,8 MPa)
ENGLISH
5

Water supply
1)
Cold water
Maximum load Cotton 7 kg
Spin speed Maximum 1400 rpm
1)
Connect the water inlet hose to a water tap with a 3/4'' thread.
6
www.aeg.com

PRODUCT DESCRIPTION
7 8 9
10
1 2
3
4
5
6
1
Detergent dispenser
2
Control panel
3
Door handle
4
Rating plate
5
Drain pump
6
Feet for the appliance level
7
Water drain hose
8
Mains cable
9
Water inlet hose
10
Feet for the appliance level
ACCESSORIES
1 2
34
1
Spanner
To remove the transit bolts.
2
Plastic caps
To close the holes on the rear side of
the cabinet after the removal of the
transit bolts.
3
Anti-flood inlet hose
To prevent possible leakage
4
Plastic hose guide
To connect the drain hose on the
edge of a sink.
ENGLISH
7

CONTROL PANEL
1 2 3 4 5 6 7 8 9
1
Programme selector dial
2
TEMPERATURE button (Temp.)
3
SPIN button (Centrif.)
4
OPTION button (Opciones)
5
OK button
6
TIME SAVING button (Ahorra Tiem-
po)
7
Display
8
START/PAUSE button (Start/Pausa)
9
DELAY START button (Inicio Diferido)
DISPLAY
C
I H G F E
A B D
A
Temperature indicator and COLD symbol.
B
Spin Speed indicator, RINSE HOLD , NIGHT CYCLE - symbols.
C
Programme progress display: PREWASH , MAIN WASH , RINSE
, SPIN , DRAIN , OVERDOSAGE
• The programme progress display shows the different phases of the
selected programme.
• During washing, a black line blinks under the running phase symbol.
At the end of each phase, the line stops blinking and remains on
If the symbol comes on, it indicates that too much detergent
has been used.
D
CHILD SAFETY LOCK - symbol.
E
DELAY START - symbol.
8
www.aeg.com

F
The display shows the following information:
• Duration of the selected programme
– After setting a programme, the duration is displayed in hours and
minutes (for example
).
– After the programme has started, the remaining time is updated
every minute.
• Delay start
– When setting a delay start, the display shows the delay time (20
hours max.) for about 3 seconds (for example
), and then it
shows again the programme duration.
– The delay time value decreases by one unit every hour and then,
one hour before the end of the programme, the time decreases ev-
ery minute.
• Incorrect option setting
– In case of wrong setting the display shows the message Err and the
yellow light of the button 8 starts blinking.
• Alarm codes
– If an operating problems occur, the display can show some alarm
codes, for example
(see chapter «Troubleshooting»).
• End of the programme
–
At the end of the programme the display shows blinking zero
,
the symbol
disappears and the door can be opened.
G TIME SAVING - option symbol.
H
DOOR - symbol
• This symbol indicates if the door can be opened:
– The symbol is on: the door cannot be opened. The appliance is
performing a washing programme.
– The symbol is off: the door can be opened. The washing pro-
gramme is finished.
I
Available options: PREWASH , STAIN , SENSITIVE , EXTRA
RINSE
ENGLISH
9

ACOUSTIC SIGNALS
The machine is provided with an acoustic
device, which sounds in the following ca-
ses:
• at the end of the cycle
• in the event of operating problems.
By pressing the 3 and 4 buttons simulta-
neously for some seconds, the acoustic
signal is deactivated (except for the
events of operating problems). By press-
ing these two buttons again, the acoustic
signal is reactivated.
CHILD SAFETY LOCK
This device permits you to leave the ap-
pliance unsupervised and not to worry
that children might be injured by or cause
damage to the appliance.
This function remains able also when the
washing machine is not working.
There are two different ways to set this
option:
• Before pressing button 8: it will be im-
possible to start the machine.
• after pressing button 8: it will be impos-
sible to change any other programme
or option.
To enable or disable this option press si-
multaneously for about 6 seconds buttons
4 and 5 until the symbol
comes on or
disappears from the display.
EXTRA RINSE OPTION
With this function you can keep the extra
rinse function permanently on when you
set a new programme.
• To activate the function press button 2
and button 3 at the same time until the
display shows the symbol
.
• To deactivate the function press button
2 and button 3 at the same time until
the symbol
goes off.
WASHING PROGRAMMES
Programme
Maximum and Minimum Temperature
Type of Laundry
Maximum Load
Cycle De-
scription
Options
Algodón
95° - Cold
Max. load 7 kg - Reduced load 3 kg
White and coloured cotton (normally soiled
items).
Main wash
Rinses
Long spin
SPIN REDUCTION
NIGHT CYCLE
RINSE HOLD
PREWASH
1)
STAIN
2)
SENSITIVE
EXTRA RINSE
TIME SAVING
3)
Sintéticos
60° - Cold
Max. load 3 kg - Reduced load 2 kg
Synthetic or mixed fabrics: underwear, col-
oured garments, non-shrink shirts, blouses.
Main wash
Rinses
Short spin
SPIN REDUCTION
NIGHT CYCLE
RINSE HOLD
PREWASH
1)
STAIN
2)
SENSITIVE
EXTRA RINSE
TIME SAVING
3)
10
www.aeg.com

Programme
Maximum and Minimum Temperature
Type of Laundry
Maximum Load
Cycle De-
scription
Options
Plancha Fácil
60° - Cold
Max. load 1 kg
Synthetic fabrics to be gentle washed and
spun.
The laundry is gently washed and spun to
avoid any creasing. Furthermore the machine
will perform additional rinses.
Main wash
Rinses
Short spin
SPIN REDUCTION
RINSE HOLD
PREWASH
1)
EXTRA RINSE
Delicados
40° - Cold
Max. load kg 3 - Reduced load kg 2
Delicate fabrics: acrylics, viscose, polyester.
Main wash
Rinses
Short spin
SPIN REDUCTION
NIGHT CYCLE
RINSE HOLD
PREWASH
1)
STAIN
2)
EXTRA RINSE
TIME SAVING
3)
Lana/Seda
40° - Cold
Max. load 2 kg
Machine washable wool as well as for hand
washable woollens and delicate fabrics.
Note: A single or bulky item may cause im-
balance. If the appliance doesn’t perform the
final spin phase, add more items, redistribute
the load manually and then select the spin-
ning programme.
Main wash
Rinses
Short spin
SPIN REDUCTION
NIGHT CYCLE
RINSE HOLD
Outdoor
40° - Cold
Max. load 2.5 kg
Sport clothes. Do not use any additives.
Main wash
Rinses
Short spin
SPIN REDUCTION
RINSE HOLD
EXTRA RINSE
Anti-Alergia
60°
Max. load 7 kg
White cotton items.
This programme removes micro-organisms
thanks to the washing by 60° C and adds on
rinse. In this way the wash is more effective.
Put a special additive for hygiene in the com-
partment
and set the Stain function.
Main wash
Rinses
Long spin
SPIN REDUCTION
RINSE HOLD
PREWASH
1)
STAIN
ENGLISH
11

Programme
Maximum and Minimum Temperature
Type of Laundry
Maximum Load
Cycle De-
scription
Options
Centrifugado
Max. load 7 kg
Separate spin for hand washed cotton gar-
ments and after programmes with Night Cy-
cle or Rinse Hold option set.
Turn the programme dial to Off before set-
ting this programme.
Reduce the spin speed if needed.
Drain
Long spin
SPIN REDUCTION
Descarga
Max. load 7 kg
For emptying out the water of the last rinse
in programmes with Night Cycle or Rinse
Hold option set.
Draining of
water
Aclarado delicados
Max. load 7 kg
Programme for rinsing and spinning items
which have been washed by hand. The ma-
chine performs some rinses, followed by a fi-
nal spin. The spin speed can be reduced.
Rinses
Long spin
SPIN REDUCTION
NIGHT CYCLE
RINSE HOLD
EXTRA RINSE
Tejidos Gruesos
60° - Cold
Max. load 3 kg
All items in jeans. Jersey made items with hi-
tech materials.
Main wash
Rinses
Short spin
SPIN REDUCTION
NIGHT CYCLE
RINSE HOLD
PREWASH
1)
20 Min. — 3 kg
30°
Max. load 3 kg
Quick wash for sport items, or cotton and
synthetic items lightly soiled or worn once.
Main wash
Rinses
Short spin
SPIN REDUCTION
Super Eco
Cold
Max. load 3 kg
Mixed fabrics (cotton and synthetic items)
4)
.
Main wash
Rinses
Short spin
SPIN REDUCTION
RINSE HOLD
EXTRA RINSE
Algodón Eco
60°
Max. load 7 kg
White and fast coloured cotton.
Normally soiled cotton items.
The appliance decreases the temperature
and extends the washing time to obtain a
good washing efficiency so saving energy.
Main wash
Rinses
Long spin
SPIN REDUCTION
NIGHT CYCLE
RINSE HOLD
PREWASH
1)
STAIN
SENSITIVE
EXTRA RINSE
12
www.aeg.com

Programme
Maximum and Minimum Temperature
Type of Laundry
Maximum Load
Cycle De-
scription
Options
Algodón Eco
40°
Max. load 7 kg
Fast coloured cotton.
Slightly soiled cotton items.
The appliance decreases the temperature
and extends the washing time to obtain a
good washing efficiency so saving energy.
Main wash
Rinses
Long spin
SPIN REDUCTION
NIGHT CYCLE
RINSE HOLD
PREWASH
1)
STAIN
SENSITIVE
EXTRA RINSE
Off
For cancelling the running programme or to
switch the machine off .
1)
If using liquid detergents, a programme without prewash must be selected..
2)
Stain option can be selected only at the temperature of 40°C or higher.
3)
If you select the Super Quick option by pressing button 6, we recommend that you reduce
the maximum load as indicated. Full loading is possible however with somewhat reduced
cleaning results.
4)
Use a special detergent for very low temperature
CONSUMPTION VALUES
CONSUMPTION VALUES
Programme
1)
Energy consumption
(KWh)
2)
Water consump-
tion (litre)
2)
White Cottons 95 °C 2.20 72
Cottons 60 °C 1.35 67
Cottons 40 °C 0.85 67
Synthetics 40 °C 0.55 42
Delicates 40 °C 0.55 63
Wool/ Handwash 30 °C 0.25 55
1)
Refer to the display for the programme time.
2)
The consumption information shown in this chart is indicative. It can vary depending on the
quantity and the type of laundry, on the temperature of the water supply and on the
ambient temperature.
Standard programmes for the
Energy Label consumption
values
The cotton 60 °C economy and cotton 40
°C economy are the standard cotton pro-
grammes for normally soiled cotton laun-
dry. They are suitable to clean normally
soiled cotton laundry and they are the
most efficient programmes in terms of
combined energy and water consumption
for washing that type of cotton laundry.
They agree with EN60456.
The actual water temperature may
differ from the declared cycle
temperature.
ENGLISH
13

FIRST USE
1.
To activate the drain system, put 2 li-
tre of water in the main wash com-
partment of the detergent dispenser.
2.
Put a small quantity of detergent in
the main wash compartment of the
detergent dispenser. Set and start a
programme for cotton at the highest
temperature without laundry. This re-
moves all possible dirt from the drum
and the tub.
DAILY USE
1.
Open the appliance door.
2.
Put the laundry in the drum, one item
at a time. Shake the items before you
put them in the appliance. Make sure
not to put too much laundry in the
drum.
3.
Close the door.
Make sure that no laundry stays between
the seal and the door. There is a risk of
water leakage or damage to the laundry.
FILLING THE DETERGENT AND ADDITIVES
MAX
The detergent compartment for the prewash phase, the soak pro-
gramme and for the stain function.
Add the detergent for prewash, soak and stain remover before
the start of the programme.
The detergent compartment for the washing phase.
If you use a liquid detergent, put it immediately before you start
the programme.
Liquid additives compartment (fabric conditioner, starch).
Put the product in the compartment before you start the pro-
gramme.
14
www.aeg.com

This is the maximum level for the quantity of liquid additives.
Always obey the instructions that you find on the packaging of the deter-
gent products.
SETTING THE PROGRAMME
(KNOB 1 )
Turn the programme selector dial to the
required programme.
The programme dial determines the type
of washing cycle (e.g. water level, drum
movement, number of rinses) and the
washing temperature according to the
type of laundry.
The pilot light of button 8 starts blinking.
The programme dial can be turned either
clockwise or anticlockwise.
= Reset programme / switching OFF
of the machine
If you turn the programme dial to
another programme when the ap-
pliance is working, the yellow pilot
light of button 8 blinks 3 times.
The display shows the message
Err to indicate a wrong selection.
The machine will not perform the
new set programme.
SETTING THE TEMPERATURE
(BUTTON 2)
When setting a programme, the
appliance automatically proposes
the default temperature provided
for that programme.
Press the button 2 repeatedly to increase
or decrease the temperature, if you want
your laundry to be washed at a different
temperature.
The cold wash is indicated with - - and the
symbol
.
For the maximum and the mini-
mum available wash water tem-
perature, see «Washing pro-
grammes».
SETTING THE SPIN SPEED
(BUTTON 3)
When setting a programme, the
appliance automatically proposes
the maximum spin speed provi-
ded for that programme.
Press the button 3 repeatedly to change
the spin speed.
RINSE HOLD
If setting this option the water of the last
rinse is not emptied out to prevent the
fabrics from creasing. At the end of the
programme,
and the symbol appear
on the display, the symbol
remains
lit, the light of button 8 goes off and the
door is blocked to indicate that the water
must be emptied out.
NIGHT CYCLE
If setting this option, the appliance does
not drain the water of the last rinse and
the laundry is not wrinkled. All spinning
phases are suppressed so the washing
programme becomes noiseless and it can
be set in the night or during the cheapest
power rate hours. In some programmes
the rinses are performed with more water.
At the end of the programme,
and the
symbol
appear on the display, the
symbol
remains lit, the light of but-
ton 8 goes off and the door is blocked to
indicate that the water must be emptied
out.
To empty out the water, please read
chapter «At the end of the pro-
gramme».
SETTING THE OPTIONS
(BUTTON 4)
Depending on the programme, different
functions can be combined.
Not all the options are compatible
among themselves. The symbols
of the incompatible options dis-
appear.
Anyway, if an option, which is not
compatible with the set washing
programme or any other option, is
selected, the Err message is dis-
played for few seconds and the
yellow pilot of button 8 light starts
blinking.
Set the options after you have set the pro-
gramme but before pressing the button
ENGLISH
15

8. Press the button 4: all the option sym-
bols appear on the display.
To scroll all the available options, press
the button 4. The relative symbol appears
on the display and starts blinking.
For the compatibility among the
options and the washing pro-
grammes see chapter «Washing
Programmes».
CONFIRM YOUR CHOICE
(BUTTON 5)
Press the button 5 to activate and confirm
your choice. A black dash appears under
the selected symbol to indicate that this
option has been set. Press the button 5 to
deactivate the option.
After setting the options, wait about few
seconds until the display gets back to the
default status. The symbols of the set op-
tions appear on the display.
PREWASH OPTION
Set the PREWASH option to prewash your
laundry at 30°C before the main wash.
The prewash ends with a short spin in pro-
grammes for cotton and synthetic fabrics,
whereas in the programmes for delicate
fabrics the water is only drained.
The symbol
appears on the display.
The Prewash option is recommended for
heavily soiled laundry.
STAIN OPTION
Set the STAIN option to treat heavily
soiled or stained laundry with stain remov-
er (extended main wash with time opti-
mized stain action phase). The symbol
appears on the display.
This option is not available with a temper-
ature lower than 40°C.
If you wish to perform a programme with
the STAIN option, put the stain remover
in the compartment
.
The PREWASH option and the STAIN op-
tion cannot be selected together.
SENSITIVE OPTION
Set the SENSITIVE option to reduce the
washing intensity. The symbol
appears
on the display. The appliance adds one
rinse.
The SENSITIVE option cannot be selected
with the EXTRA RINSE option.
The SENSITIVE option is recommended
to wash non fast colored items and for fre-
quently washed items.
EXTRA RINSE OPTION
This appliance is designed for saving wa-
ter. However, for people with a very deli-
cate skin (allergic to detergents) it may be
necessary to rinse the laundry using an ex-
tra quantity of water. The symbol
ap-
pears on the display.
SETTING THE TIME SAVING
OPTION (BUTTON 6)
This option allows you to modify the
washing time, automatically proposed by
the appliance.
Press the button 6 once
The symbol appears on the dis-
play. The washing duration will be re-
duced to wash daily soiled laundry.
Press the button 6 twice
The washing duration will be reduced
to wash lightly soiled laundry or items
that have been used or worn for a
short time.
The display shows the decreased washing
time.
STARTING THE PROGRAMME
(BUTTON 8)
Press the button 8 to start the pro-
gramme. The red light of the button 8
stops blinking.
The symbol
appears on the display
to indicate that the appliance has started
operating and the door is locked.
To interrupt a programme which is run-
ning, press the button 8: the red light of
the button 8 starts blinking.
To restart the programme from the point
at which it was interrupted, press the but-
ton 8 again. If you have chosen a delayed
start the machine will begin the count-
down.
If an incorrect option is selected, the yel-
low light of the button 8 blinks 3 times
and the message Err is displayed for a
few seconds.
16
www.aeg.com

SETTING THE DELAY START
(BUTTON 9)
Before you start the programme, if you
wish to delay the start, press the button 9
repeatedly, to set the desired delay.
The symbol
appears on the display.
The wash programme can be delayed
from 30 min. - 60 min. - 90 min., 2 hours
and then by 1 hour up to a maximum of
20 hours.
The set delay time value appears on the
display for about 3 seconds, then the du-
ration of the programme appears again.
Set this option after you have set the pro-
gramme and before you press the button
8.
You can modify or cancel the delay time
at any moment, before you press the but-
ton 8.
The door will be locked throughout the
delay time. If you wish to add laundry in
the appliance during the delay time, press
the button 8 to set the machine to pause.
When the symbol
disappears , the
door can be opened. Add the laundry,
close the door and press the button 8
again.
Setting the delayed start.
• Set the programme and the required
options.
• Set the delay start.
• Press button 8: the appliance starts its
hourly countdown. The programme
starts after the selected delay has ex-
pired.
Cancelling the delayed start
• Press the button 8 to set the appliance
to PAUSE;
•
Press button 9 until the symbol
’ is
displayed;
• Press the button 8 again to start the
programme.
The set delay can be changed on-
ly after you have set the washing
programme again.
The Delay Start cannot be set with Drain
programme.
ALTERING AN OPTION OR A
RUNNING PROGRAMME
It is possible to change some options be-
fore the programme carries it out. Before
you make any change, you must press the
button 8 to pause the appliance.
Changing a running programme is possi-
ble only by resetting it.
Turn the programme dial to
and then
to the new programme position.
Press the 8 button again to start the new
programme. The washing water in the tub
will not emptied out.
INTERRUPTING A
PROGRAMME
Press the button 8 to interrupt a pro-
gramme which is running, the corre-
sponding light starts blinking. Press the
button again to restart the programme.
CANCELLING A PROGRAMME
Turn the selector dial to to cancel a
programme which is running. Now you
can select a new programme.
OPENING THE DOOR AFTER
THE PROGRAMME HAS
STARTED
First press the button 8 to set the appli-
ance to pause by .
•
If the symbol
disappears, the
door can be opened;
•
If the symbol
doesn’t go off, it
means that the appliance is already
heating or that the water level is too
high. In this case the door cannot be
opened;
• If you cannot open the door but you
need to open it, you have to switch the
appliance off by turning the selector di-
al to
/Off. After a few minutes the
door can be opened (pay attention to
the water level and temperature!);
After closing the door, it is necessary to
set the programme again and to press the
button 8.
AT THE END OF THE
PROGRAMME
The appliance stops automatically, the
light of button 8 goes off. A blinking
appears on the display and the acoustic
ENGLISH
17

signal sounds for some minutes. The sym-
bol
disappears.
If you have chosen a programme or an
option that ends with water in the tub, fol-
low the below instruction to empty the
water out. The drum continues to run at
regular intervals until the water draining.
To empty the water out
• Turn the programme selector dial to
/Off.
• Set the DRAIN or SPIN programme.
• If needed, press the button 3 to reduce
the spin speed.
• Press the button 8.
• When the programme has finished the
display shows a blinking
. The sym-
bols
disappears. The door can
be opened.
Turn the programme selector dial to
/
Off to switch the appliance off. Remove
the laundry from the drum and carefully
check that the drum is empty.
If you do not intend to carry out another
wash, close the water tap. Leave the door
open to prevent the formation of mildew
and unpleasant smells.
Stand by : once the programme has fin-
ished after a few minutes the energy sav-
ing system will be enabled. The bright-
ness of the display is reduced. By pressing
any button the appliance will come out of
the energy saving status.
HELPFUL HINTS AND TIPS
THE LAUNDRY LOAD
• Divide the laundry in: white, coloured,
synthetics, delicates and wool.
• Obey the washing instructions that are
on the laundry care labels.
• Do not wash together white and col-
oured items.
• Some coloured items can discolour with
the first wash. We recommend that you
wash them separately for the first times.
• Button up pillowcases, close zippers,
hooks and poppers. Tie up belts.
• Empty the pockets and unfold the
items.
• Turn inside out multilayered fabrics,
wool and items with painted illustra-
tions.
• Remove hard stains.
• Wash with a special detergent heavy
soil stains.
• Be careful with the curtains. Remove
the hooks or put the curtains in a wash-
ing bag or pillowcase.
• Do not wash in the appliance :
– Laundry without hems or with cuts
– Underwired bras.
– Use a washing bag to wash small
items.
• A very small load can cause balance
problems with the spin phase. If this oc-
curs, adjust manually the items in the
tub and start the spin phase again.
STUBBORN STAINS
For some stains, water and detergent is
not sufficient.
We recommend that you remove these
stains before you put the items in the ap-
pliance.
Special stain removers are available. Use
the special stain remover that is applica-
ble to the type of stain and fabric.
DETERGENTS AND ADDITIVES
• Only use detergents and additives spe-
cially made for washing machines.
• Do not mix different types of deter-
gents.
• To help the environment, do not use
more than the correct quantity of deter-
gent.
• Obey the instructions that you find on
the on packaging of these products.
• Use the correct products for the type
and colour of the fabric, the pro-
gramme temperature and the level of
soil.
• If you use liquid detergents, do not set
the prewash phase.
• If your appliance has not the detergent
dispenser with the flap device, add the
liquid detergents with a dosing ball.
18
www.aeg.com

WATER HARDNESS
If the water hardness in your area is high
or moderate, we recommend that you use
a water softener for washing machines. In
areas where the water hardness is soft it is
not necessary to use a water softener.
To know the water hardness in your area,
contact your local water authority.
Obey the instructions that you find on the
packaging of the products.
Equivalent scales measure the water hard-
ness:
• German degrees (°dH).
• French degrees (°TH).
• mmol/l (millimol for each litre - interna-
tional unit for the hardness of water).
• Clarke degrees.
Water hardness table
Level Type
Water hardness
°dH °T.H. mmol/l Clarke
1 soft 0-7 0-15 0-1.5 0-9
2 medium 8-14 16-25 1.6-2.5 10-16
3 hard 15-21 26-37 2.6-3.7 17-25
4 very hard > 21 > 37 >3.7 >25
CARE AND CLEANING
WARNING!
Disconnect the appliance from the mains
supply before you clean it.
DESCALING
The water we use contains limescale. If it
becomes necessary, use a water softener
to remove limescales.
Use a special product made for washing
machines. Obey the instructions that you
find on the packaging of the manufactur-
er.
Do this separately from the laundry wash.
EXTERNAL CLEANING
Clean the appliance only with soap and
warm water. Fully dry all the surfaces.
CAUTION!
Do not use alcohol, solvents or
chemical products.
DOOR SEAL
Regularly examine the seal and remove all
objects from the inner part.
DRUM
Regularly examine the drum to prevent
limescale and rust particles.
Only use special products to remove rust
particles from the drum.
To do this:
• Clean the drum with special product for
stainless steel.
• Start a short programme for cotton at
the maximum temperature with a small
quantity of detergent.
ENGLISH
19

DETERGENT DISPENSER
To clean the dispenser:
MAX
1
2
1.
Press the lever.
2.
Pull the dispenser out.
MAX
3.
Remove the top part of the liquid ad-
ditive compartment.
4.
Clean all the parts with water.
5.
Clean the dispenser recess with a
brush.
6.
Put back the dispenser in the recess.
DRAIN PUMP
The pump should be inspected regularly
and particularly if:
• the appliance does not empty and/or
spin;
• the appliance makes an unusual noise
during draining due to objects such as
safety pins, coins etc. blocking the
pump;
• a problem with water draining is detec-
ted (see chapter “Troubleshooting” for
more details).
WARNING!
Before unscrewing the pump cov-
er, switch the appliance off and
remove the mains plug from the
socket.
Proceed as follows:
1.
Unplug the appliance.
2.
If it is necessary, wait until the water
has cooled down.
20
www.aeg.com

A
B
3.
Place a container close to the pump
to collect any spillage.
4.
Release the emergency emptying
hose (B), place it in the container and
remove its cap cover.
5.
When no more water comes out, un-
screw the pump cover (A) by turning
it anti-clockwise and remove the fil-
ter. Use pliers, if necessary.
Always keep a rag nearby to dry up
any water spillages when removing
the cover. Clean the filter under a
tap, to remove any traces of fluff.
6.
Remove foreign bodies and fluff from
the filter seat and from the pump im-
peller.
7.
Check carefully whether the pump
impeller rotates (it rotates jerkily). If it
doesn’t rotate, please contact your
Service Centre.
ENGLISH
21

8.
Put the cap back on the emergency
emptying hose and place the latter
back in its seat.
9.
Replace the filter into the pump by
inserting it correctly into the special
guides. Screw the pump cover firmly
by turning it clockwise.
WARNING!
When the appliance is in use and depend-
ing on the programme selected there can
be hot water in the pump.
Never remove the pump cover during a
wash cycle, always wait until the appliance
has finished the cycle, and is empty.
When refitting the pump cover, ensure it
is securely re-tightened so as to stop
leaks and young children being able to re-
move it.
THE INLET HOSE FILTER AND
THE VALVE FILTER
It could be necessary to clean the filters
when:
• The appliance does not fill with water.
• The appliance fills with the water for a
long time.
•
The indicator of button
8
flashes and
the display shows the related alarm. Re-
fer to 'Troubleshooting'.
WARNING!
Disconnect the mains plug from
the mains socket.
To clean the water inlet filters:
1.
Close the water tap.
2.
Remove the water inlet hose from the
water tap.
3.
Clean the filter in the inlet hose with a
stiff brush.
4.
Remove the inlet hose behind the
appliance.
5.
Clean the filter in the valve with a stiff
brush or a towel.
22
www.aeg.com

45°
20°
6.
Install again the inlet hose. Make sure
that the couplings are tight to pre-
vent leakages.
7.
Open the water tap.
EMERGENCY EMPTYING OUT
If the water is not discharged, proceed as
follows to empty out the appliance:
1.
pull out the plug from the power
socket;
2.
close the water tap;
3.
if necessary, wait until the water has
cooled down;
4.
place a bowl on the floor;
5.
place the end of the emergency emp-
tying hose into the bowl;
6.
Remove its cap. The water should
drain by gravity into the bowl. When
the bowl is full, put the cap back on
the hose. Empty the bowl;
Repeat the procedure until water
stops flowing out;
7.
clean the pump if necessary as previ-
ously described;
8.
replace the emergency emptying
hose in its seat after having plugged
it;
9.
screw the pump again.
FROST PRECAUTIONS
If the machine is installed in a place where
the temperature could drop below 0°C,
proceed as follows:
1.
close the water tap;
2.
unscrew the water inlet hose from the
tap;
3.
place the end of the emergency emp-
tying hose and that of the inlet hose
in a bowl placed on the floor. Let wa-
ter drain out;
4.
screw the water inlet hose back on;
5.
put the cap on the emergency empty-
ing hose again;
6.
reposition the emergency emptying
hose.
By doing this, any water remaining in the
machine is removed, avoiding ice forming
and consequently damage to the appli-
ance.
When you use the machine again, make
sure that the ambient temperature is
above 0°C.
TROUBLESHOOTING
Certain problems are due to lack of sim-
ple maintenance or oversights, which can
be solved easily without calling out an en-
gineer. Before contacting your local Serv-
ice Centre, please carry out the checks lis-
ted below.
During machine operation it is possible
that the yellow pilot light of button 8
blinks, one of the following alarm codes
appears on the display and at the same
time some acoustic signals sound every
20 seconds to indicate that the machine is
not working:
•
: problem with the water supply
•
: problem with the water draining
•
: door open
•
: anti-flooding system has activa-
ted
Once the problem has been eliminated,
press the button 8 to restart the pro-
gramme. If after all checks, the problem
persists, contact your local Service Centre.
ENGLISH
23

Problem Possible cause/Solution
The appliance does not
start:
The door has not been closed.
• Close the door firmly.
The plug is not properly inserted in the power socket.
• Insert the plug into the power socket.
There is no power at the socket.
• Check your domestic electrical installation.
The main fuse has blown.
•Replace the fuse.
The programme dial is not correctly positioned and
the button 8 has not been pressed.
• Please turn the programme dial and press the but-
ton 8 again.
The delay start has been set.
• If the laundry is to be washed immediately, cancel
the delay start.
The Child safety lock has been activated.
• Deactivate this device.
The appliance does not
fill:
The water tap is closed.
• Open the water tap.
The inlet hose is squashed or kinked.
• Check the inlet hose connection.
The filter in the inlet hose or the inlet valve filter are
blocked.
• Clean the water inlet filters.
The door is not properly closed.
• Close the door firmly.
The appliance fills then
empties immediately:
The end of the drain hose is too low.
• Refer to relevant paragraph in «Water drainage»
section in «Water drainage» chapter.
The applince does not
empty and/or does not
spin:
The drain hose is squashed or kinked.
• Check the drain hose connection.
The drain filter is clogged.
• Clean the drain filter.
You have set an option or a programme that ends with
the water still in the tub or a that eliminates all the
spinning phases.
• Set the draining or the spinning programme.
The laundry is not evenly distributed in the drum.
• Redistribute the laundry.
24
www.aeg.com

Problem Possible cause/Solution
There is water on the
floor:
You have used too much detergent or unsuitable de-
tergent (creates too much foam).
• Reduce the detergent quantity or use another one.
Check whether there are any leaks from one of the in-
let hose fittings. It is not always easy to see this as the
water runs down the hose; check to see if it is damp.
• Check the water inlet hose connection.
The drain or the inlet hose is damaged.
• Replace it with a new one.
The cap on the emergency emptying hose has not
been replaced or the filter has not been properly
screwed in after cleaning action.
• Refit the cap on the emergency emptying hose or
screw the filter fully in.
Unsatisfactory washing
results:
You have used too little detergent or unsuitable de-
tergent.
• Increase the detergent quantity or use another one.
Stubborn stains have not been treated prior to wash-
ing.
• Use commercial products to treat the stubborn
stains.
The correct temperature was not selected.
• Check if you have selected the correct temperature.
Excessive laundry load.
• Reduce the laundry load.
The door will not open:
The programme is still running.
• Wait the end of washing cycle.
The door lock has not been released.
•
Wait until the symbol
has gone off.
There is water in the drum.
• Set drain or spin programme to empty out the wa-
ter.
The appliance vibrates
or is noisy:
You have not removed the transit bolts and packing.
• Check the correct installation of the appliance.
The support feet have not been adjusted.
• Check the correct levelling of the appliance.
The laundry is not evenly distributed in the drum.
• Redistribute the laundry.
Maybe there is very little laundry in the drum.
• Load more laundry.
ENGLISH
25

Problem Possible cause/Solution
Spinning starts late or
the machine does not
spin:
The electronic unbalance detection device has cut in
because the laundry is not evenly distributed in the
drum. The laundry is redistributed by reverse rotation
of the drum. This may happen several times before
the unbalance disappears and normal spinning can re-
sume. If, after some minutes, the laundry is still not
evenly distributed in the drum, the machine will not
spin.
• The laundry load is perhaps to little, add more
items, redistribute the load manually and then se-
lect the spinning programme.
No water is visible in
the drum:
Appliances based on modern technology operate very
economically using very little water without affecting
performance.
The display shows the
alarm code
:
Anti-flooding system has activated.
• Pull out the plug from the power socket, close the
water tap and contact the Service Force Centre.
SERVICE
• Refer to the information supplied with
this appliance for guarantee condition
and point of contact. The information
to give to the service is on the rating
plate.
We recommend that you write the in-
formation here:
Model
(MOD.)
..................
Product number
(PNC)
..................
Serial number
(S.N.)
..................
INSTALLATION
UNPACKING
1.
Use the gloves. Remove the external
film. If necessary, use a cutter.
26
www.aeg.com

2.
Remove the cardboard top.
3.
Remove the polystyrene packaging
materials.
4.
Remove the internal film.
5.
Open the door. Remove the polystyr-
ene piece from the door seal and all
the items from the drum.
6.
Put one of the polystyrene packaging
elements on the floor behind the ap-
pliance. Carefully put down the appli-
ance with the rear side on it. Make
sure not to damage the hoses.
ENGLISH
27

1
2
7.
Remove the polystyrene protection
from the bottom.
8.
Pull up the appliance in vertical posi-
tion.
9.
Remove the power supply cable and
the drain hose from the hose holders.
10.
Remove the three bolts. Use the key
supplied with the appliance.
11.
Pull out the plastic spacers.
12.
Put the plastic caps in the holes. You
can find these caps in the user man-
ual bag.
28
www.aeg.com

WARNING!
Remove all the packaging and the
transit bolts before you install the
appliance.
We recommend that you keep the
packaging and the transit bolts for
when you move the appliance.
POSITIONING AND LEVELLING
• Install the machine on a flat hard floor.
• Make sure that air circulation around
the machine is not impeded by carpets,
rugs etc.
• Carefully level by screwing the adjusta-
ble feet in or out.
• After having levelled the appliance,
tighten the lock nuts.
• The appliance must be level and stable.
Never place cardboard, wood or
similar materials under the ma-
chine to compensate for any un-
evenness in the floor.
If it is impossible to avoid positioning the
machine next to a gas cooker or coalburn-
ing stove, an insulating panel covered
with aluminium foil on the side facing the
cooker or stove, must be inserted be-
tween the two appliances.
Before placing it on small tiles, apply a
rubber coating.
The water inlet hose and the drain hose
must not be kinked.
CAUTION!
The machine must not be installed
in rooms where the temperature
can drop below 0°C.
THE INLET HOSE
20
O
20
O
20
O
45
O
45
O
45
O
• Connect the hose to the appliance.
Turn the inlet hose only left or right.
Loose the ring nut to set it in the cor-
rect position.
ENGLISH
29

• Connect the water inlet hose to the
cold water tap with 3/4 thread.
CAUTION!
Make sure that there are no leaks
from the couplings.
Do not use an extension hose if
the inlet hose is too short. Contact
the service centre for the replace-
ment of the inlet hose.
Water-stop device
A
The inlet hose has a water stop device.
This device prevents water leaks in the
hose because of its natural ageing. The
red sector in the window «A» shows this
fault .
If this occur, close the water tap and con-
tact the service centre to replace the
hose.
WATER DRAINAGE
There are different procedures to connect
the drain hose:
With the plastic hose guide.
30
www.aeg.com

• On the edge of a sink.
• Make sure that the plastic guide cannot
move when the appliance drains. At-
tach the guide to the water tap or the
wall.
• To a stand pipe with vent-hole.
Refer to the illustration. Directly into a
drain pipe at a height of not less than
60 cm and not more than 100 cm. The
end of the drain hose must always be
ventilated , i.e. the inner diameter of
the drainpipe must be larger than the
external diameter of the drain hose.
Without the plastic hose guide.
• To a sink spigot.
Refer to the illustration. Put the drain
hose in the spigot and tighten it with a
clip. Make sure that the drain hose
makes a loop to prevent that remaining
particles go in the appliance from the
sink.
• Directly to a built-in drain pipe in the
room wall and tighten it with a clip.
You can extend the drain hose to
maximum 400 cm. Contact the
service centre for the other drain
hose and the extension.
ENGLISH
31

BUILDING IN
OVERVIEW
600 mm
555 mm
596 mm
170 mm
75 mm
100 mm
60 mm
min.
820 mm
min.
560 mm
818 mm
• This appliance has been designed to
be built into the kitchen furniture. The
recess should have the dimensions
shown in Fig 1.
Fig.1
Preparation and assembly of the door
• The machine is originally pre-arranged
for the assembly of a door opening
from right to left (Fig. 2).
Fig. 2
Ø 35 mm
14 mm
16-22 mm
22±1,5 mm
416
mm
X
595-598 mm
• Door
The dimensions of the door should be:
– width 595-598 mm
– thickness 16-22 mm
– the height X depends on the height
of the adjacent furniture's base (Fig.
3).
Fig. 3
32
www.aeg.com

1
2
• Hinges
To mount the hinges it is necessary to
drill two holes (dia. 35 mm, depth
12.5-14 mm depending on the depth of
door furniture) on the inner side of the
door. The distance between the holes
hobs fixing centres must be 416 mm.
The distance from upper edge of the
door to the centre of the hole depends
on the adjacent furniture's dimensions.
The hinges will be fixed to the door by
means of screws for wood 1 and 2 (Fig.
4) supplied with the appliance.
Fig. 4
B
A
• Mounting the door
Fix the hinges to the appliance by
means of the M5x15 screws . The hing-
es can be adjusted to compensate for
possible uneven thickness of the door.
To align the door perfectly it is necessa-
ry to loosen the screw , adjust the door
and tighten the screw A again (Fig. 5).
Do not remove the screw B (Fig.
5.
Fig. 5
A
B
C
• Counter-magnet
The appliance is prearranged for a
magnetic closure of the door. To ena-
ble a correct operation of this device, it
is necessary to screw the counter-mag-
net A (steel disk + rubber ring) into the
inner side of the door.
Its position must correspond to the
magnet B on the appliance (Fig. 6).
Do not remove the screw C.
Fig. 6
A
B
C
E
D
If the door has to be opened from left to
right, invert the position of the plates E ,
the magnet D and the plate C. Mount the
counter-magnet D and the hinges A as
previously described (Fig. 7 )
CAUTION!
Do not remove the screw B.
ENGLISH
33

Fig. 7
34
www.aeg.com

ÍNDICE DE MATERIAS
37 INFORMACIÓN SOBRE SEGURIDAD
38 INFORMACIÓN TÉCNICA
40 DESCRIPCIÓN DEL PRODUCTO
41 PANEL DE MANDOS
43 PROGRAMAS DE LAVADO
46 VALORES DE CONSUMO
47 PRIMER USO
47 USO DIARIO
52 CONSEJOS ÚTILES
53 MANTENIMIENTO Y LIMPIEZA
57 SOLUCIÓN DE PROBLEMAS
61 INSTALACIÓN
67 EMPOTRADO
ASPECTOS MEDIOAMBIENTALES
Recicle los materiales con el símbolo . Coloque el material de embalaje en los
contenedores adecuados para su reciclaje.
Ayude a proteger el medio ambiente y la salud pública, así como a reciclar residuos de
aparatos eléctricos y electrónicos. No deseche los aparatos marcados con el símbolo
junto con los residuos domésticos. Lleve el producto a su centro de reciclaje local o
póngase en contacto con su oficina municipal.
CONSULTE EN NUESTRO SITIO WEB:
- Productos
- Folletos
- Manuales del usuario
- Solución de problemas
- Información sobre servicios
www.aeg.com
NOTAS
Advertencia - Información importante sobre seguridad.
Datos y recomendaciones generales
Información medioambiental
Salvo modificaciones.
ESPAÑOL
35

PARA OBTENER RESULTADOS PERFECTOS
Gracias por escoger este producto AEG. Este artículo ha sido creado para ofrecer un
rendimiento impecable durante muchos años, con innovadoras tecnologías que
facilitarán su vida y prestaciones que probablemente no encuentre en
electrodomésticos corrientes. Por favor, dedique algunos minutos a la lectura para
disfrutar de todas sus ventajas.
ACCESORIOS Y CONSUMIBLES
En la página web de AEG, encontrará todo lo necesario para la perfecta limpieza y
funcionamiento de todos sus electrodomésticos AEG. Junto con una amplia gama
de accesorios diseñados y fabricados conforme a los elevados estándares de calidad
característicos de la marca, desde utensilios de cocina especializados a cestos de
cubiertos, desde portabotellas a bolsas para el lavado de prendas delicadas...
Visite la tienda web en
www.aeg.com/shop
ATENCIÓN Y SERVICIO AL CLIENTE
Le recomendamos que utilice recambios originales.
Cuando se ponga en contacto con el servicio técnico, asegúrese de tener a
mano los siguientes datos. Puede encontrar la información en la placa de
características.
Modelo
PNC
Número de serie
36
www.aeg.com

INFORMACIÓN SOBRE SEGURIDAD
Antes de instalar y usar el aparato, lea
atentamente este manual:
• Por su seguridad y la de su hogar
• Para respetar el medio ambiente
• Por el correcto funcionamiento del apa-
rato.
Guarde siempre estas instrucciones junto
con el aparato, aunque se mude o lo dé a
otra persona.
El fabricante no se hace responsable de
los daños causados por una instalación in-
correcta.
SEGURIDAD DE NIÑOS Y
PERSONAS VULNERABLES
• Este aparato no debe ser usado por ni-
ños, ni por personas con capacidades
físicas o mentales reducidas, ni por per-
sonas sin experiencia en el manejo del
aparato, a menos que lo hagan bajo las
instrucciones o la supervisión de la per-
sona responsable de su seguridad. No
deje que los niños jueguen con el apa-
rato.
• Mantenga los materiales de embalaje
alejados de los niños. Existe riesgo de
asfixia o lesiones.
• Mantenga todos los detergentes fuera
del alcance de los niños.
• Mantenga a los niños y mascotas aleja-
dos del lavavajillas cuando la puerta se
encuentre abierta.
• Antes de cerrar la puerta del electrodo-
méstico, asegúrese de que los niños y
las mascotas no estén en el tambor.
• Si el aparato dispone de dispositivo de
seguridad para niños, se recomienda
activarlo.
SEGURIDAD DE LOS NIÑOS
• Cuando se activa este dispositivo, no se
puede cerrar la puerta. De esta forma
evitará que los niños o mascotas que-
den encerrados en el tambor. Para acti-
var el dispositivo, gírelo hacia la dere-
cha hasta que la ranura esté en posi-
ción horizontal. Para desactivar el dis-
positivo, gírelo hacia la izquierda hasta
que la ranura esté en posición vertical.
INSTRUCCIONES GENERALES
DE SEGURIDAD
• No utilice el aparato para uso profesio-
nal. Este aparato está diseñado exclusi-
vamente para uso doméstico.
• No cambie las especificaciones de este
aparato. Existe riesgo de lesiones y da-
ños en el aparato.
• No coloque productos inflamables ni
objetos mojados con productos infla-
mables, dentro, cerca o encima del
aparato. Existe peligro de explosión o
incendio.
• Siga las instrucciones de seguridad del
envase de detergente para evitar que-
maduras en ojos, boca y garganta.
• Asegúrese de sacar todos los objetos
metálicos de la colada. Los objetos afi-
lados y duros pueden dañar el aparato.
• No toque el cristal de la puerta mien-
tras esté en marcha un programa. El
cristal puede estar muy caliente (solo
electrodomésticos de carga frontal).
MANTENIMIENTO Y LIMPIEZA
• Apague el aparato y desenchúfelo de la
toma de corriente.
• No utilice el aparato sin los filtros.
Compruebe que los filtros están instala-
dos correctamente. Una instalación in-
correcta puede provocar fugas de
agua.
INSTALACIÓN
• El aparato es pesado, tenga cuidado
cuando lo mueva.
• No transporte el electrodoméstico sin
los pasadores de transporte, puede da-
ñar los componentes internos y provo-
car fugas o fallos de funcionamiento.
ESPAÑOL
37

• No instale ni enchufe un aparato daña-
do.
• Asegúrese de quitar todos los pasado-
res del embalaje y transporte.
• Asegúrese de que el enchufe está des-
conectado de la toma de red durante la
instalación.
• La instalación, fontanería y conexiones
eléctricas del aparato debe realizarlas
tan sólo un técnico profesional homolo-
gado. De esta forma se evitarán riesgos
de daños estructurales y lesiones.
• No instale ni utilice el aparato en luga-
res con temperaturas inferiores a 0 ºC.
• Cuando instale el aparato en un suelo
enmoquetado, asegúrese de que el ai-
re circula entre el electrodoméstico y la
moqueta. Ajuste las patas para dispo-
ner del espacio necesario entre el apa-
rato y la moqueta.
Conexión de agua
• No conecte el aparato con tubos anti-
guos ya usados. Utilice únicamente tu-
bos nuevos.
• Asegúrese de no provocar daños en los
tubos de agua.
• No conecte el aparato a tuberías nue-
vas o que no se hayan utilizado durante
un periodo de tiempo largo. Deje co-
rrer el agua durante unos minutos y, a
continuación, conecte la manguera de
entrada.
• La primera vez que use el aparato, ase-
gúrese de que las mangueras y los aco-
plamientos no tengan fugas.
Conexión eléctrica
• Asegúrese de que el aparato está co-
nectado a tierra.
• Asegúrese de que las especificaciones
eléctricas de la placa coinciden con las
del suministro eléctrico de su hogar.
• Utilice siempre una toma con aislamien-
to de conexión a tierra correctamente
instalada.
• No utilice enchufes múltiples ni cables
prolongadores. Existe riesgo de incen-
dio.
• No sustituya ni cambie el cable de su-
ministro de red. Póngase en contacto
con el servicio técnico.
• Asegúrese de no provocar daños en el
enchufe ni en el cable.
• Conecte el enchufe a la toma de co-
rriente únicamente cuando haya termi-
nado la instalación. Asegúrese de tener
acceso al enchufe del suministro de red
una vez instalado el aparato.
• No desconecte el aparato tirando del
cable de conexión a la red. Tire siem-
pre del enchufe.
DESECHE EL APARATO.
1.
Desenchufe el aparato de la toma de
red.
2.
Corte el cable de conexión a la red y
deséchelo.
3.
Deseche el cierre de la puerta. De es-
ta forma evitará que los niños o mas-
cotas queden encerrados en el apara-
to. Existe riesgo de asfixia (solo para
electrodomésticos de carga frontal).
INFORMACIÓN TÉCNICA
Medidas Ancho / Altura / Fondo 600 / 820 / 630 mm
Profundidad total 640 mm
Conexión eléctrica: Voltaje
Potencia total
Fusible
Frecuencia
220-230 V
2000 W
10 A
50 Hz
38
www.aeg.com

El nivel de protección contra la entrada de partículas
sólidas y humedad está garantizado por la tapa pro-
tectora, excepto si el equipo de alta tensión no tiene
protección contra la humedad.
IPX4
Presión del suministro de
agua
Mínima 0.5 bares (0.05 MPa)
Máxima 8 bares (0.8 MPa)
Suministro de agua
1)
Agua fría
Carga máxima Algodón 7 kg
Velocidad de centrifuga-
do
Máxima 1400 rpm
1)
Conecte la manguera de entrada de agua a un grifo con rosca de 3/4 pulgadas.
ESPAÑOL
39

DESCRIPCIÓN DEL PRODUCTO
7 8 9
10
1 2
3
4
5
6
1
Dosificador de detergente
2
Panel de control
3
Tirador de la puerta
4
Placa de características
5
Bomba de desagüe
6
Pata para nivelación del aparato
7
Tubo de desagüe
8
Cable de alimentación
9
Conexión de agua
10
Pata para nivelación del aparato
ACCESORIOS
1 2
34
1
Llave inglesa
Para retirar los pasadores de trans-
porte.
2
Tapones de plástico
Para cerrar los orificios de la parte
posterior del armario, después de ex-
traer los pasadores de transporte.
3
Tubo de entrada antiinundación
Para evitar posibles fugas.
4
Guía de plástico de la manguera
Para conectar el tubo de desagüe en
el borde de un fregadero.
40
www.aeg.com

PANEL DE MANDOS
1 2 3 4 5 6 7 8 9
1
Selector de programas
2
Tecla TEMPERATURA (Temp.)
3
Tecla CENTRIFUGADO (Centrif.)
4
Tecla OPCIÓN (Opciones)
5
Tecla OK
6
Tecla AHORRO DE TIEMPO (Ahorra
Tiempo)
7
Pantalla
8
Tecla INICIO/PAUSA (Start/Pausa)
9
Tecla INICIO DIFERIDO (Inicio Diferi-
do)
PANTALLA
C
I H G F E
A B D
A
Indicador de temperatura y símbolo FRÍO .
B
Indicador de velocidad de centrifugado y símbolos de AGUA EN LA
CUBA
y CICLO NOCTURNO .
ESPAÑOL
41

C
Pantalla de progreso del programa: PRELAVADO , LAVADO PRINCI-
PAL
, ACLARADO , CENTRIFUGADO , DESCARGA , SO-
BREDOSIS
• La pantalla del curso del programa muestra las fases de lavado del
programa seleccionado.
• Durante un lavado, una línea negra parpadea debajo del símbolo co-
rrespondiente a la fase en curso. Cuando finaliza cada fase, la línea
deja de parpadear y permanece encendida.
Si se enciende el símbolo , indica que se ha utilizado dema-
siado detergente.
D
Símbolo BLOQUEO PARA NIÑOS .
E
Símbolo de INICIO DIFERIDO .
F
En la pantalla se muestra la siguiente información:
• Duración del programa seleccionado
– Tras seleccionar un programa, la duración del mismo se muestra en
horas y minutos (por ejemplo
).
– Una vez que se ha iniciado el programa, el tiempo restante se ac-
tualiza cada minuto.
• Inicio diferido
– Cuando se ajusta un inicio diferido, la pantalla muestra el tiempo
de retardo (20 horas máx.) durante unos 3 segundos (por ejemplo,
), y a continuación vuelve a mostrar la duración del programa.
– El valor del inicio diferido se reduce una unidad cada hora y, a con-
tinuación, cuando sólo queda una hora para que termine el progra-
ma, disminuye cada minuto.
• Selección de opción incorrecta
– En caso de que se realice un ajuste incorrecto, la pantalla muestra
el mensaje Err y la luz amarilla del botón 8 empieza a parpadear.
• Códigos de alarma
– Si se produce un problema de funcionamiento, la pantalla puede
mostrar algunos códigos de alarma, por ejemplo
(consulte el
capítulo «Solución de problemas»).
• Final del programa
–
Al final del programa, la pantalla muestra un cero intermitente
,
el símbolo
desaparece y la puerta se puede abrir.
G Símbolo de la opción AHORRO DE TIEMPO .
H
Símbolo de PUERTA
• Este símbolo indica si es posible abrir la puerta:
– El símbolo está encendido: no se puede abrir la puerta. El aparato
está ejecutando un programa de lavado.
– El símbolo está apagado: se puede abrir la puerta. El programa de
lavado ha finalizado.
I
Opciones disponibles PRELAVADO , MANCHAS , SENSIBLE
, ACLARADO EXTRA
42
www.aeg.com

SEÑALES SONORAS
La máquina incorpora un dispositivo acús-
tico que suena en los siguientes casos:
• al final del programa
• en caso de producirse problemas de
funcionamiento
Al pulsar las teclas 3 y 4 simultáneamente
durante unos segundos, se desactiva la
señal acústica (excepto en caso de pro-
blemas de funcionamiento). Si vuelve a
pulsar estas dos teclas, se reactivará la se-
ñal acústica.
BLOQUEO DE SEGURIDAD
PARA NIÑOS
Este dispositivo le permite dejar el elec-
trodoméstico sin supervisión sin tener
que preocuparse de si los niños pueden
sufrir lesiones o dañar el electrodomésti-
co
Esta función también permanece activada
cuando la lavadora no está en funciona-
miento.
Esta opción se puede ajustar de dos ma-
neras:
• Antes de pulsar el botón 8: es imposi-
ble poner la máquina en marcha
• después de pulsar la tecla 8: será impo-
sible cambiar cualquier otro programa
u opción.
Para activar o desactivar la opción, pulse
al mismo tiempo las teclas 4 y 5 durante 6
segundos hasta que el símbolo
apa-
rezca o desaparezca de la pantalla.
TECLA ACLARADO EXTRA
Con esta función puede guardar activada
la función de aclarado extra de forma per-
manente cuando ajuste un nuevo progra-
ma.
• Para activar la función, pulse la tecla 2 y
la tecla 3 al mismo tiempo hasta que la
pantalla muestre el símbolo
.
• Para desactivar la función, pulse la tecla
2 y la tecla 3 al mismo tiempo hasta
que se apague el símbolo
.
PROGRAMAS DE LAVADO
Programa
Temperaturas máxima y mínima
Tipo de prenda
Carga máxima
Descripción
del ciclo
Opciones
Algodón
95°- Frío
Carga máxima 7 kg - Carga reducida 3 kg
Algodón blanco y de color (suciedad nor-
mal).
Lavado prin-
cipal
Aclarados
Centrifuga-
do largo
REDUCCIÓN DEL
CENTRIFUGADO
CICLO NOCTUR-
NO
AGUA EN LA CUBA
PRELAVADO
1)
MANCHAS
2)
SENSIBLE
ACLARADO EXTRA
TIEMPO
3)
ESPAÑOL
43

Programa
Temperaturas máxima y mínima
Tipo de prenda
Carga máxima
Descripción
del ciclo
Opciones
Sintéticos
60° - Frío
Carga máxima 3 kg - Carga reducida 2 kg
Tejidos sintéticos o mezclas: ropa interior,
prendas de color, camisas que no encogen,
blusas.
Lavado prin-
cipal
Aclarados
Centrifuga-
do corto
REDUCCIÓN DEL
CENTRIFUGADO
CICLO NOCTUR-
NO
AGUA EN LA CUBA
PRELAVADO
1)
MANCHAS
2)
SENSIBLE
ACLARADO EXTRA
TIEMPO
3)
Plancha Fácil
60° - Frío
Carga máxima 1 kg
Tejidos sintéticos para lavado y centrifuga-
do suaves.
Se aplican ciclos de lavado y centrifugado
suaves para evitar que la ropa se arrugue.
Además, la máquina realiza aclarados adicio-
nales.
Lavado prin-
cipal
Aclarados
Centrifuga-
do corto
REDUCCIÓN DEL
CENTRIFUGADO
AGUA EN LA CUBA
PRELAVADO
1)
ACLARADO EXTRA
Delicados
40° - Frío
Carga máxima 3 kg - Carga reducida 2 kg
Tejidos delicados: acrílicos, viscosa, poliés-
ter.
Lavado prin-
cipal
Aclarados
Centrifuga-
do corto
REDUCCIÓN DEL
CENTRIFUGADO
CICLO NOCTUR-
NO
AGUA EN LA CUBA
PRELAVADO
1)
MANCHAS
2)
ACLARADO EXTRA
TIEMPO
3)
Lana/Seda
40° - Frío
Carga máxima 2 kg
Lana lavable a máquina, así como lanas de
lavado a mano y tejidos delicados.
Nota: Una prenda suelta o muy voluminosa
puede causar desequilibrio. Si el aparato no
realiza la fase de centrifugado final, añada
más prendas, redistribuya la carga manual-
mente y, a continuación, seleccione el pro-
grama de centrifugado.
Lavado prin-
cipal
Aclarados
Centrifuga-
do corto
REDUCCIÓN DEL
CENTRIFUGADO
CICLO NOCTUR-
NO
AGUA EN LA CUBA
Outdoor
40° - Frío
Carga máxima 2.5 kg
Ropa deportiva. No utilice aditivos.
Lavado prin-
cipal
Aclarados
Centrifuga-
do corto
REDUCCIÓN DEL
CENTRIFUGADO
AGUA EN LA CUBA
ACLARADO EXTRA
44
www.aeg.com

Programa
Temperaturas máxima y mínima
Tipo de prenda
Carga máxima
Descripción
del ciclo
Opciones
Anti-Alergia
60°
Carga máxima 7 kg
Prendas de algodón blanco.
Este programa elimina los microorganismos
gracias al lavado a 60° y un aclarado adicio-
nal. De este modo, el lavado es más eficaz.
Coloque un aditivo especial para higiene en
el compartimento
y seleccione la función
Manchas.
Lavado prin-
cipal
Aclarados
Centrifuga-
do largo
REDUCCIÓN DEL
CENTRIFUGADO
AGUA EN LA CUBA
PRELAVADO
1)
MANCHAS
Centrifugado
Carga máxima 7 kg
Centrifugado independiente para prendas
de algodón lavadas a mano y después de
programas con la opción Agua en la cuba o
Ciclo nocturno.
Gire el selector a Off antes de seleccionar
este programa.
Si es necesario, reduzca la velocidad de cen-
trifugado.
Descarga
Centrifuga-
do largo
REDUCCIÓN DEL
CENTRIFUGADO
Descarga
Carga máxima 7 kg
Para vaciar el agua del último aclarado en
programas con la opción Agua en la cuba o
Ciclo nocturno seleccionada.
Descarga
del agua de
lavado
Aclarado delicados
Carga máxima 7 kg
Programa para aclarar y centrifugar prendas
que se han lavado a mano. La lavadora reali-
za una serie de aclarados, seguidos de un
centrifugado final. Se puede reducir la velo-
cidad de centrifugado.
Aclarados
Centrifuga-
do largo
REDUCCIÓN DEL
CENTRIFUGADO
CICLO NOCTUR-
NO
AGUA EN LA CUBA
ACLARADO EXTRA
Tejidos Gruesos
60° - Frío
Carga máxima 3 kg
Todas las prendas vaqueras. Jerséis de ma-
teriales de alta tecnología.
Lavado prin-
cipal
Aclarados
Centrifuga-
do corto
REDUCCIÓN DEL
CENTRIFUGADO
CICLO NOCTUR-
NO
AGUA EN LA CUBA
PRELAVADO
1)
20 Min. — 3 kg
30°
Carga máxima 3 kg
Lavado rápido para ropa de deporte o pren-
das de algodón o sintéticas poco sucias o
que sólo se han llevado una vez.
Lavado prin-
cipal
Aclarados
Centrifuga-
do corto
REDUCCIÓN DEL
CENTRIFUGADO
ESPAÑOL
45

Programa
Temperaturas máxima y mínima
Tipo de prenda
Carga máxima
Descripción
del ciclo
Opciones
Super Eco
Frío
Carga máxima 3 kg
Tejidos mixtos (algodón y sintéticos)
4)
.
Lavado prin-
cipal
Aclarados
Centrifuga-
do corto
REDUCCIÓN DEL
CENTRIFUGADO
AGUA EN LA CUBA
ACLARADO EXTRA
Algodón Eco
60°
Carga máxima 7 kg
Algodón blanco o de color.
Prendas de algodón con suciedad normal.
El aparato reduce la temperatura y prolonga
el tiempo de lavado para obtener una buena
eficacia de lavado y ahorrar energía.
Lavado prin-
cipal
Aclarados
Centrifuga-
do largo
REDUCCIÓN DEL
CENTRIFUGADO
CICLO NOCTUR-
NO
AGUA EN LA CUBA
PRELAVADO
1)
MANCHAS
SENSIBLE
ACLARADO EXTRA
Algodón Eco
40°
Carga máxima 7 kg
Algodón de colores resistentes.
Prendas de algodón poco sucias.
El aparato reduce la temperatura y prolonga
el tiempo de lavado para obtener una buena
eficacia de lavado y ahorrar energía.
Lavado prin-
cipal
Aclarados
Centrifuga-
do largo
REDUCCIÓN DEL
CENTRIFUGADO
CICLO NOCTUR-
NO
AGUA EN LA CUBA
PRELAVADO
1)
MANCHAS
SENSIBLE
ACLARADO EXTRA
Off
Permite cancelar el programa en marcha o
apagar la máquina.
1)
Con un detergente líquido debe seleccionarse un programa sin prelavado.
2)
La opción de manchas sólo se puede seleccionar a una temperatura de 40°C o superior.
3)
Si ha seleccionado la opción Super rápido con la tecla 6, se recomienda reducir la carga
máxima como se indica. Puede utilizarse la carga completa, aunque con resultados de
limpieza ligeramente inferiores.
4)
Use un detergente especial para temperaturas muy bajas.
VALORES DE CONSUMO
VALORES DE CONSUMO
Programa
1)
Consumo energético
(KWh)
2)
Consumo de agua
(litros)
2)
Algodón blanco 95°C 2.20 72
Algodón 60 °C 1.35 67
Algodón 40 °C 0.85 67
Sintéticos 40 °C 0.55 42
46
www.aeg.com

Programa
1)
Consumo energético
(KWh)
2)
Consumo de agua
(litros)
2)
Delicados 40 °C 0.55 63
Lana/ Lavado a mano 30 °C 0.25 55
1)
Consulte en la pantalla la duración del programa.
2)
La información sobre consumo que se muestra en este gráfico es puramente indicativa.
Puede variar en función de la cantidad y el tipo de colada, de la temperatura del suministro
de agua y de la temperatura ambiente.
Programas estándar para los
valores de consumo de
etiqueta energética
Algodón ECO 60 °C y 40 °C son progra-
mas para algodón estándar para prendas
de algodón con suciedad normal. Son
adecuados para lavar colada de algodón
de suciedad normal y son los programas
más eficaces en cuanto a consumo de
agua y energía para el lavado de ese tipo
de prendas de algodón.
Cumplen la norma EN60456.
La temperatura real del agua pue-
de variar respecto a la temperatu-
ra declarada del ciclo.
PRIMER USO
1.
Para activar el sistema de desagüe,
vierta 2 litros de agua en el comparti-
mento de lavado principal del dosifi-
cador de detergente.
2.
Coloque una pequeña cantidad en el
compartimento de lavado principal
del dosificador. Ajuste e inicie un pro-
grama para algodón a la temperatura
más alta sin colada. De esta forma se
elimina toda la posible suciedad del
tambor y de la cuba.
USO DIARIO
1.
Abra la puerta del aparato.
2.
Introduzca las prendas en el tambor,
una por una. Sacuda las prendas an-
tes de colocarlas en el aparato. Ase-
gúrese de no colocar demasiada co-
lada en el tambor.
3.
Cierre la puerta del aparato.
Asegúrese de que no quedan prendas
enganchadas entre la puerta y el cierre.
Podría provocar fugas de agua y dañar la
colada.
ESPAÑOL
47

INTRODUCCIÓN DEL DETERGENTE Y LOS ADITIVOS
MAX
El compartimento del detergente para la fase de prelavado, el
programa de remojo y la función de manchas.
Añada el detergente para el prelavado, el remojo y el quitaman-
chas antes de iniciar el programa.
El compartimento de detergente para la fase de lavado.
Si utiliza detergente líquido, introdúzcalo inmediatamente antes
de iniciar el programa.
Compartimento para aditivos líquidos (suavizante, almidón).
Ponga el producto en el compartimento antes de iniciar el pro-
grama.
Es el nivel máximo para la cantidad de aditivos líquidos.
Cumpla siempre las instrucciones que se encuentran en el envase de los
productos de detergente.
SELECCIÓN DEL PROGRAMA
(SELECTOR 1)
Gire el selector de programas hasta dejar-
lo en el programa deseado.
El selector de programas determina el ti-
po de ciclo de lavado (por ejemplo, nivel
de agua, movimiento del tambor, número
de aclarados) y la temperatura de lavado
en función del tipo de colada.
El piloto del botón 8 empezará a parpa-
dear.
El selector de programas puede girarse
hacia la derecha y hacia la izquierda.
= Reinicio del programa o apagado
de la máquina.
Si gira el selector hasta otro pro-
grama mientras el aparato está
funcionando, el piloto amarillo de
la tecla 8 parpadeará 3 veces. La
pantalla muestra el mensaje Err
para indicar una selección inco-
rrecta. La máquina no pondrá en
marcha el nuevo programa selec-
cionado.
AJUSTE DE TEMPERATURA
(TECLA 2)
Cuando se selecciona un progra-
ma, el aparato indica de forma au-
tomática la temperatura predeter-
minada para ese programa.
Pulse la tecla 2 varias veces para aumen-
tar o reducir la temperatura si desea lavar
la ropa a una temperatura diferente a la
propuesta.
El lavado en frío se indica con - - y el sím-
bolo
.
Consulte las temperaturas máxi-
ma y mínima de lavado en «Pro-
gramas de lavado»
48
www.aeg.com

AJUSTE DE LA VELOCIDAD DE
CENTRIFUGADO (TECLA 3)
Cuando selecciona un programa,
el aparato propone de forma au-
tomática la velocidad de centrifu-
gado máxima para dicho progra-
ma.
Pulse la tecla 3 repetidamente para cam-
biar la velocidad de centrifugado.
AGUA EN LA CUBA
Al seleccionar esta opción, el agua del úl-
timo aclarado no se descarga para impe-
dir que los tejidos se arruguen. Cuando el
programa termina, en la pantalla aparece
y el símbolo , el símbolo per-
manece encendido, el piloto del botón 8
se apaga y la puerta se bloquea para indi-
car que es preciso descargar el agua.
CICLO NOCTURNO
Al seleccionar esta opción, el aparato no
descarga el agua del último aclarado para
impedir que la colada se arrugue. Todas
las fases de centrifugado se eliminan para
que el programa de lavado no haga rui-
do, de modo que se puede programar
por la noche o durante las horas en las
que la tarifa eléctrica es más económica.
En algunos programas se utiliza más agua
para los aclarados.
Cuando el programa termina, en la panta-
lla aparece
y el símbolo , el símbolo
permanece encendido, el piloto
del botón 8 se apaga y la puerta se blo-
quea para indicar que es preciso descar-
gar el agua.
Para descargar el agua, consulte el
apartado «Al final del programa».
AJUSTE DE LAS OPCIONES
(TECLA 4)
Existe la posibilidad de combinar distintas
funciones según el programa.
No todas las opciones son com-
patibles entre sí. Los símbolos de
las opciones no compatibles de-
saparecen.
Si se selecciona una opción no
compatible con el programa de
lavado configurado o cualquier
otra opción, aparece el mensaje
Err durante unos segundos y el
piloto amarillo del botón 8 co-
mienza a parpadear.
Ajuste las opciones después de elegir el
programa pero antes de pulsar el botón
8. Pulse la tecla 4: todos los símbolos de
las opciones desaparecen del indicador
Para desplazarse por las opciones dispo-
nibles, pulse el botón 4. El símbolo co-
rrespondiente aparece en la pantalla y co-
mienza a parpadear.
Consulte la compatibilidad de los
programas de lavado con las op-
ciones en el capítulo «Programas
de lavado».
CONFIRMAR SU SELECCIÓN
(TECLA 5)
Pulse la tecla 5 para activar y confirmar su
elección. Aparece un guión negro debajo
del símbolo seleccionado para indicar
que esta opción se ha establecido. Pulse
el botón 5 para desactivar la opción.
Después de ajustar las opciones, espere
unos segundos hasta que la pantalla vuel-
va a mostrar el estado predeterminado.
Los símbolos de las opciones selecciona-
das aparecen en la pantalla.
OPCIÓN PRELAVADO
Seleccione la opción PRELAVADO si de-
sea aplicar un ciclo de prelavado a 30°C
antes del lavado principal. El prelavado fi-
naliza con un breve centrifugado en pro-
gramas para algodón y tejidos sintéticos,
mientras que en el programa para tejidos
delicados el agua sólo se descarga.
El símbolo
aparece en la pantalla.
La opción de Prelavado se recomienda
para prendas muy sucias.
OPCIÓN MANCHAS
Seleccione la opción MANCHAS si desea
aplicar quitamanchas a ropa muy sucia o
con manchas (lavado principal extendido
con fase para manchas y tiempo optimiza-
do). El símbolo
aparece en la pantalla.
Esta opción no está disponible con tem-
peraturas inferiores a 40 °C
Si desea ejecutar un programa con la op-
ción MANCHAS, vierta el quitamanchas
en el compartimento
.
Las opciones PRELAVADO y MANCHAS
no se pueden seleccionar a la vez.
ESPAÑOL
49

OPCIÓN SENSIBLE
Ajuste la opción SENSIBLE para reducir la
intensidad de lavado. El símbolo
apa-
rece en la pantalla. El aparato añade un
aclarado.
Esta opción no se puede seleccionar con
la opción ACLARADO EXTRA.
La opción SENSIBLE se recomienda para
colores no sólidos y prendas que se de-
ben lavar con frecuencia.
OPCIÓN ACLARADO EXTRA
El aparato se ha diseñado para consumir
poca energía. No obstante, para personas
con piel muy delicada (alérgicas a los de-
tergentes) puede resultar necesario acla-
rar las prendas con una cantidad adicional
de agua. El símbolo
aparece en la
pantalla.
OPCIÓN AHORRO DE TIEMPO
(BOTÓN 6)
Esta opción le permite modificar el tiem-
po de lavado propuesto de forma auto-
mática por la lavadora
Pulse el botón 6 una vez
El símbolo aparece en la pantalla.
Se reducirá la duración del lavado pa-
ra ropa poco sucia de uso diario.
Pulse la tecla 6 dos veces.
La duración de lavado se reducirá pa-
ra lavar ropa poco sucia o prendas
utilizadas poco tiempo.
La pantalla muestra el tiempo reducido
de lavado.
INICIO DEL PROGRAMA
(TECLA 8)
Pulse el botón 8 para iniciar el programa.
La luz roja de la tecla 8 deja de parpa-
dear.
El símbolo
aparece en la pantalla
para indicar que el aparato se está po-
niendo en marcha y la puerta está blo-
queada.
Para interrumpir un programa en marcha,
pulse la tecla 8: la luz roja de la tecla 8
empieza a parpadear.
Para reiniciar el programa a partir del
punto de interrupción, pulse de nuevo la
tecla 8. Si ha seleccionado un intervalo de
inicio diferido, la lavadora comenzará la
cuenta atrás.
Si se selecciona una opción incorrecta, el
piloto amarillo de la tecla 8 parpadea 3
veces y el mensaje Err aparece durante
unos segundos.
AJUSTE DEL INICIO DIFERIDO
(TECLA 9)
Si desea retrasar el inicio, antes de ini-
ciar el programa, pulse la tecla 9 varias
veces para seleccionar el retardo que de-
see.
El símbolo
aparece en la pantalla. Pue-
de retrasar el programa de lavado 30 - 60
- 90 minutos, 2 horas y, a continuación, en
segmentos de 1 hora hasta un máximo de
20 horas.
El valor del intervalo de retraso seleccio-
nado se muestra en la pantalla durante
unos 3 segundos; a continuación, se vi-
sualiza de nuevo la duración del progra-
ma.
Ajuste esta opción después de elegir el
programa y antes de pulsar la tecla 8.
Es posible modificar o cancelar el inicio
diferido en cualquier momento antes de
pulsar el botón 8.
La puerta permanecerá bloqueada el
tiempo que dure el inicio diferido. Si de-
sea añadir prendas al aparato durante el
intervalo de retraso, pulse el botón 8 para
realizar una pausa en la máquina. La puer-
ta puede abrirse cuando desaparece el
símbolo
. Introduzca la ropa, cierre
la puerta y vuelva a pulsar la tecla 8.
Ajuste del inicio diferido.
• Seleccione el programa y las opciones
necesarias.
• Ajuste el inicio diferido.
•Pulse la tecla 8: el aparato inicia la
cuenta atrás horaria. El programa se ini-
cia una vez finalizado el intervalo de ini-
cio diferido seleccionado.
Cancelación del inicio diferido
•Pulse la tecla 8 para poner el aparato
en PAUSA;
•Pulse la tecla 9 hasta que aparezca el
símbolo
.
• Vuelva a pulsar la tecla 8 para iniciar el
programa.
50
www.aeg.com

El inicio diferido seleccionado só-
lo se podrá modificar una vez se
haya vuelto a seleccionar el pro-
grama de lavado.
El Inicio Diferido no puede seleccionarse
con el programa de descarga.
CAMBIO DE UNA OPCIÓN O
DE UN PROGRAMA EN
MARCHA
Es posible cambiar cualquier opción antes
de que el programa la ejecute. Antes de
realizar cambios, es necesario pulsar la
tecla 8 para poner el aparato en pausa.
El cambio de un programa en marcha só-
lo puede realizarse reajustándolo.
Gire el selector de programas hasta
y,
seguidamente, hasta la posición del nue-
vo programa.
Vuelva a pulsar la tecla 8 para iniciar el
nuevo programa. El agua de lavado de la
cuba no se vaciará.
INTERRUPCIÓN DE UN
PROGRAMA
Pulse la tecla 8 para interrumpir el progra-
ma en marcha; el piloto correspondiente
empieza a parpadear. Vuelva a presionar
el botón para reiniciar el programa.
CANCELACIÓN DE UN
PROGRAMA
Gire el selector de programas hasta
para cancelar un programa una vez que
está en marcha. Después puede seleccio-
nar otro programa.
APERTURA DE LA PUERTA
UNA VEZ INICIADO EL
PROGRAMA
Pulse primero la tecla 8 para poner el
aparato en pausa.
•
Si el símbolo
desaparece, la
puerta puede abrirse;
•
Si el símbolo
no se apaga, quiere
decir que el aparato ya está en fase de
calentamiento o que el nivel de agua es
demasiado alto. En este caso no se
puede abrir la puerta
• Si no puede abrir la puerta pero necesi-
ta hacerlo, apague el aparato girando
el selector de programas hasta la posi-
ción
/Off. La puerta podrá abrirse
pasados unos minutos (preste aten-
ción al nivel del agua y a la tempera-
tura).
Tras cerrar la puerta, vuelva a seleccionar
el programa y pulse el botón 8.
AL FINALIZAR EL PROGRAMA
El aparato se detiene automáticamente,
el piloto del botón 8 se apaga. Un
in-
termitente aparece en la pantalla y la se-
ñal acústica suena durante unos minutos.
El símbolo
desaparece.
Si ha seleccionado un programa o una
opción que finaliza con agua en la cuba,
siga las instrucciones que se indican a
continuación para vaciar el agua. El tam-
bor sigue funcionando a intervalos regula-
res hasta que se drena el agua.
Para descargar el agua
•
Gire el selector de programas a
/
Off.
• Seleccione el programa DESCARGA o
CENTRIFUGADO.
• si fuera necesario, pulse el botón 3 pa-
ra reducir la velocidad de centrifugado.
•Pulse la tecla 8.
• Cuando el programa finaliza, en la pan-
talla aparece un
intermitente. Los
símbolos
desaparecen. Se pue-
de abrir la puerta.
Gire el selector de programas hasta
/
Off para apagar el aparato. Retire las
prendas del tambor y cerciórese de que
el tambor queda vacío.
Si no va a realizar otro lavado, cierre la to-
ma del agua. Deje la puerta abierta para
evitar la aparición de moho y olores desa-
gradables.
Espera: tras terminarse el programa y
trascurridos algunos minutos, se habilita
el sistema de ahorro energético. El brillo
de la pantalla disminuye. Presione cual-
quier tecla para desactivar el sistema de
ahorro de energía del aparato.
ESPAÑOL
51

CONSEJOS ÚTILES
CARGAR LA COLADA
• Divida la colada en: ropa blanca, ropa
de color, ropa sintética, prendas delica-
das y prendas de lana.
• Siga las instrucciones de lavado que se
encuentran en las etiquetas de las
prendas.
• No lave juntas las prendas blancas y de
color.
• Algunas prendas de color pueden des-
teñir en el primer lavado. Se recomien-
da lavarlas por separado la primera vez.
• Abotone las fundas de almohadas y
cierre las cremalleras, los ganchos y los
broches. Ate las correas.
• Vacíe los bolsillos y despliegue las
prendas.
• Dé la vuelta a las prendas de varias ca-
pas, de lana y con motivos pintados.
• Retire las manchas difíciles.
• Lave con detergente especial las man-
chas difíciles.
• Tenga cuidado con las cortinas. Quite
los ganchos o coloque las cortinas en
una bolsa para lavadora o funda de al-
mohada.
• No lave en el aparato:
– Prendas sin dobladillos o desgarra-
das
– Sujetadores con aros.
– Use una bolsa para lavadora para la-
var las prendas pequeñas.
• Una carga muy pequeña puede provo-
car problemas de desequilibrio en la fa-
se de centrifugado. Si esto ocurre, ajus-
te manualmente las prendas en la cuba
e inicie de nuevo la fase de centrifuga-
do.
MANCHAS DIFÍCILES
Para algunas manchas, el agua y el deter-
gente no son suficientes.
Se recomienda eliminar estas manchas
antes de colocar las prendas en el apara-
to.
Existen quitamanchas especiales. Utilice
el quitamanchas especial adecuado al ti-
po de mancha y tejido.
DETERGENTES Y ADITIVOS
• Utilice solo detergentes y aditivos es-
pecialmente fabricados para lavadoras.
• No mezcle diferentes tipos de deter-
gentes.
• Para respetar el medio ambiente, no
ponga más detergente del necesario.
• Siga siempre las instrucciones que se
encuentran en el envase de estos pro-
ductos.
• Use los productos adecuados para el ti-
po y color del tejido, la temperatura del
programa y el grado de suciedad.
• Si utiliza detergente líquido, no ajuste
la fase de prelavado.
• Si el aparato no tiene el dosificador de
detergente con dispositivo de com-
puerta, añada los detergentes líquidos
con una bola dosificadora.
DUREZA AGUA
Si la dureza del agua de su zona es alta o
moderada, se recomienda usar un descal-
cificador de agua para lavadoras. En las
zonas en las que la dureza del agua sea
baja, no es necesario utilizar un descalcifi-
cador.
Póngase en comunicación con las autori-
dades correspondientes para conocer la
dureza del agua de su zona.
Siga siempre las instrucciones que se en-
cuentran en el envase de los productos.
Medida de la dureza del agua en escalas
equivalentes:
• Grados alemanes (°dH).
• Grados franceses (°TH).
• mmol/l (milimol por litro, unidad inter-
nacional de la dureza del agua).
• Grados Clarke.
52
www.aeg.com

Tabla de dureza del agua
Nivel Tipo
Dureza agua
°dH °T.H. mmol/l Clarke
1 blanda 0-7 0-15 0-1.5 0-9
2 intermedio 8-14 16-25 1.6-2.5 10-16
3 dura 15-21 26-37 2.6-3.7 17-25
4 muy dura > 21 > 37 >3.7 >25
MANTENIMIENTO Y LIMPIEZA
ADVERTENCIA
Desconecte el aparato de la fuente de ali-
mentación antes de limpiarlo.
DESCALCIFICACIÓN
El agua corriente que utilizamos suele
contener cal. Si es necesario, use un des-
calcificador de agua para eliminar la cal.
Use un producto especial para lavadoras.
Siga siempre las instrucciones que se en-
cuentran en el envase del fabricante.
Hágalo de forma separada del lavado de
la colada.
LIMPIEZA DEL EXTERIOR
Limpie el aparato solo con agua templada
y jabón. Seque completamente todas las
superficies.
PRECAUCIÓN
No utilice alcohol, disolventes ni
otros productos químicos.
JUNTA DE ESTANQUEIDAD DE LA PUERTA
Examine periódicamente la junta y extrai-
ga todos los objetos de la pieza interior.
TAMBOR
Examine periódicamente el tambor para
evitar la formación de cal y partículas de
óxido.
Utilice únicamente productos especiales
para eliminar la partículas de óxido del
tambor.
Proceda de la siguiente manera:
• Limpie el tambor con un producto es-
pecial para acero inoxidable.
• Inicie un programa corto para algodón
a la temperatura máxima con una pe-
queña cantidad de detergente.
ESPAÑOL
53

DOSIFICADOR DE DETERGENTE
Para limpiar el dosificador:
MAX
1
2
1.
Presione la palanca.
2.
Tire del dosificador hacia fuera.
MAX
3.
Retire la parte superior del comparti-
mento de aditivo líquido.
4.
Limpie todas las piezas con agua.
5.
Limpie el hueco del dosificador con
un cepillo.
6.
Vuelva a colocar el dosificador en el
hueco.
BOMBA DE DESAGÜE
El filtro debe inspeccionarse con regulari-
dad, especialmente en caso de que:
• el aparato no desagüe o no centrifu-
gue;
• el aparato presente un ruido extraño
durante la descarga porque haya obje-
tos, como imperdibles, monedas, etc.,
que obstruyan el filtro;
• se detecte un problema con el desagüe
del agua (consulte el capítulo “Solución
de problemas” para obtener más infor-
mación).
ADVERTENCIA
Antes de desatornillar la tapa de
la bomba, apague el aparato y
desenchúfelo de la toma de co-
rriente.
Proceda de la siguiente manera:
1.
Desconecte el enchufe de la toma de
corriente.
2.
Si es necesario, espere hasta que el
agua se enfríe.
54
www.aeg.com

A
B
3.
Coloque un recipiente cerca de la
puerta del filtro para recoger el líqui-
do que pueda derramarse.
4.
Saque la manguera de descarga de
emergencia (B), colóquela en el reci-
piente y quite el tapón.
5.
Cuando deje de salir agua, desenros-
que la tapa del filtro (A) girándola ha-
cia la izquierda y retire el filtro. Utilice
alicates si fuera necesario.
Tenga siempre a mano un trapo para
secar el agua que se derrame al ex-
traer la tapa. Limpie el filtro bajo el
grifo para eliminar los restos de pelu-
sas.
6.
Retire los cuerpos extraños y limpie
las pelusas del filtro y del rotor.
7.
Asegúrese de que el rotor del filtro
gira (gira con sacudidas). Si no gira,
póngase en contacto con el servicio
técnico.
ESPAÑOL
55

8.
Tapone de nuevo la manguera de
desagüe de emergencia y coloque la
manguera en su sitio.
9.
Vuelva a colocar el filtro en la bomba
insertándolo correctamente en las
guías especiales. Enrosque la tapa de
la bomba firmemente girándola hacia
la derecha.
ADVERTENCIA
Cuando la lavadora está en marcha, de-
pendiendo del programa seleccionado,
puede haber agua caliente en el filtro.
Nunca extraiga la tapa del filtro durante
un ciclo de lavado; espere siempre a que
la lavadora haya terminado el ciclo y esté
vacía. Al volver a colocar la tapa del filtro,
asegúrese de apretarla firmemente para
impedir que se produzcan fugas y que los
niños puedan sacarla.
EL FILTRO DEL TUBO DE
ENTRADA Y EL FILTRO DE LA
VÁLVULA
Podría ser necesario limpiar los filtros
cuando:
• El aparato no carga agua.
• El aparato llena con agua durante mu-
cho tiempo.
•
El indicador de la tecla
8
parpadea y
la pantalla muestra la alarma corres-
pondiente. Consulte "Solución de pro-
blemas".
ADVERTENCIA
Desenchufe el aparato de la toma
de red.
Limpieza de los filtros de entrada de agua:
1.
Cierre la toma de agua.
2.
Retire las tomas de entrada de agua
de los grifos.
3.
Limpie el filtro del tubo de entrada
con un cepillo rígido.
4.
Retire el tubo de entrada situado de-
trás del aparato.
5.
Limpie el filtro de la válvula con un
cepillo rígido o una toalla.
56
www.aeg.com

45°
20°
6.
Vuelva a colocar el tubo de entrada.
Cerciórese de que las conexiones es-
tán bien apretadas para evitar fugas.
7.
Abra el grifo.
DESCARGA DE EMERGENCIA
Si la lavadora no descarga, proceda de la
siguiente manera para vaciarla:
1.
desconecte el enchufe de la toma de
corriente;
2.
cierre la toma de agua;
3.
si es necesario, espere a que el agua
se enfríe;
4.
coloque un recipiente en el suelo;
5.
coloque el extremo de la manguera
de vaciado de emergencia en el reci-
piente;
6.
Quite el tapón de la manguera. El
agua debería verterse al recipiente
por acción de la gravedad. Cuando el
recipiente se llene, vuelva a taponar
la manguera. Vacíe el recipiente;
Repita el procedimiento hasta que
deje de salir agua;
7.
si es necesario, limpie la bomba co-
mo se ha descrito anteriormente;
8.
vuelva a colocar la manguera de des-
carga de emergencia en su lugar una
vez que la haya taponado;
9.
vuelva a colocar el filtro
MEDIDAS
ANTICONGELACIÓN
Si la lavadora se instala en un lugar en el
que la temperatura podría descender por
debajo de 0°C, tome las siguientes pre-
cauciones
1.
cierre la toma de agua;
2.
desatornille las tomas de entrada de
agua de los grifos;
3.
coloque el extremo de la manguera
de descarga de emergencia y el ex-
tremo de la manguera de entrada de
agua en un recipiente depositado en
el suelo. Deje salir el agua;
4.
vuelva a apretar la manguera de en-
trada de agua;
5.
vuelva a colocar el tapón de la man-
guera de vaciado de emergencia;
6.
coloque en su posición la manguera
de vaciado de emergencia.
Si hace esto extraerá el agua que quede
en la máquina y evitará que se forme hie-
lo y el electrodoméstico sufra desperfec-
tos
Cuando vuelva a utilizar la máquina, ase-
gúrese de que la temperatura ambiente
es superior a 0°C
SOLUCIÓN DE PROBLEMAS
Algunos problemas, que pueden deberse
sencillamente a falta de mantenimiento o
a descuidos, pueden resolverse sin nece-
sidad de llamar al servicio técnico. Antes
de ponerse en contacto con el centro de
servicio técnico local, realice las compro-
baciones indicadas en la lista siguiente.
Durante el funcionamiento de la lavadora,
es posible que el piloto amarillo del bo-
tón 8 parpadee, que aparezca en el indi-
cador uno de los códigos de error si-
guientes y que al mismo tiempo se emi-
tan algunas señales acústicas cada 20 se-
gundos para indicar que la lavadora no
está funcionando
•
: problema con el suministro de
agua
•
: problema con el desagüe
ESPAÑOL
57

•
: puerta abierta
•
: sistema anti-fugas activado
Cuando se haya solucionado el problema,
pulse la tecla 8 para reiniciar el programa
Si no consigue resolver el problema des-
pués de realizar todas las comprobacio-
nes pertinentes, póngase en contacto con
el centro de servicio técnico.
Problema Causa y soluciones posibles
El aparato no se inicia:
La puerta no está cerrada.
• Cierre bien la puerta.
El enchufe no está correctamente insertado en la to-
ma de corriente.
• Inserte el enchufe en la toma.
No hay tensión en la toma de corriente.
• Compruebe la instalación eléctrica doméstica.
Se ha fundido el fusible principal.
• Cambie el fusible.
El selector de programas no está situado correcta-
mente y no se ha pulsado la tecla 8.
• Gire el selector de programas y vuelva a pulsar la
tecla 8.
Se ha seleccionado el inicio diferido.
• Si el lavado va a realizarse de inmediato, cancele el
inicio diferido.
Se ha activado el bloqueo contra la manipulación por
niños.
• Desactive este dispositivo.
La lavadora no se llena:
El grifo de agua está cerrado.
• Abra el grifo.
La manguera de entrada de agua está doblada o re-
torcida.
• Compruebe la conexión de la manguera de entrada
de agua.
El filtro de la toma de entrada o el filtro de la válvula
de entrada están obstruidos.
• Limpie los filtros de entrada del agua.
La puerta no está bien cerrada.
• Cierre bien la puerta.
El aparato se llena pero
se vacía de inmediato:
El extremo de la manguera de desagüe está demasia-
do bajo.
• Consulte el apartado correspondiente de la sección
"Desagüe" del capítulo "Desagüe".
58
www.aeg.com

Problema Causa y soluciones posibles
El aparato no se vacía,
no centrifuga o ambas
cosas:
La manguera de desagüe está doblada o retorcida.
• Compruebe la conexión de la manguera de desa-
güe.
El filtro de descarga está obstruido.
• Limpie el filtro de descarga.
Se ha seleccionado una opción o programa que finali-
za con agua dentro de la cuba o que elimina todas las
fases de centrifugado.
• Seleccione el programa de descarga o de centrifu-
gado.
Las prendas no están uniformemente distribuidas en
el tambor.
• Vuelva a distribuir las prendas.
Hay agua en el suelo:
Se ha utilizado demasiado detergente o un detergen-
te inadecuado (que produce demasiada espuma).
• Reduzca la cantidad de detergente o utilice otro.
Compruebe si hay fugas en alguno de los racores de
la manguera de entrada de agua. No siempre resulta
fácil detectar las fugas, ya que el agua desciende por
la manguera; compruebe que el racor no está mojado.
• Compruebe la conexión de la manguera de entrada
de agua.
La manguera de desagüe o de entrada está dañada.
• Sustitúyala por una nueva.
No se ha vuelto a colocar el tapón de la manguera de
desagüe de emergencia o no se enroscado el filtro
adecuadamente después de la operación de limpieza.
• Vuelva a colocar el tapón en la manguera de desa-
güe de emergencia o enrosque el filtro hasta el to-
pe.
Los resultados del lava-
do no son satisfacto-
rios:
Se ha utilizado poco detergente o un detergente ina-
decuado.
• Aumente la cantidad de detergente o utilice otro.
No se han tratado las manchas difíciles antes de lavar
la ropa.
• Emplee productos comerciales para tratar las man-
chas difíciles.
No se ha seleccionado la temperatura adecuada.
• Compruebe si ha seleccionado la temperatura co-
rrecta.
Se han metido demasiadas prendas.
• Reduzca la carga.
ESPAÑOL
59

Problema Causa y soluciones posibles
La puerta no se abre:
El programa todavía no ha terminado.
• Espere hasta que finalice el ciclo de lavado.
No se ha desbloqueado el cierre de la puerta.
•
Espere a que el símbolo
se apague.
Hay agua en el tambor.
• Seleccione el programa de descarga o centrifugado
para vaciar el agua.
La lavadora vibra o ha-
ce mucho ruido:
No se han quitado los pasadores ni el material de em-
balaje.
• Compruebe la correcta instalación del aparato.
No se han ajustado las patas.
• Compruebe que el aparato está correctamente ni-
velado.
Las prendas no están uniformemente distribuidas en
el tambor.
• Vuelva a distribuir las prendas.
Es posible que haya muy pocas prendas en el tambor.
• Introduzca más prendas.
El centrifugado se re-
trasa o la máquina no
centrifuga:
El dispositivo que detecta desequilibrios en la carga
ha interrumpido el proceso debido a que las prendas
no están uniformemente distribuidas en el tambor. La
ropa se redistribuye mediante la rotación inversa del
tambor. Es posible que el tambor gire varias veces an-
tes de que deje de detectarse el problema y se reanu-
de el ciclo de centrifugado normal. Si la carga no se
ha distribuido de manera uniforme transcurridos unos
minutos, la máquina no centrifuga.
• Es posible que tenga poca carga. Añada más pren-
das, redistribuya la carga manualmente y, a conti-
nuación, seleccione el programa de centrifugado.
No se ve agua en el
tambor:
Los aparatos de tecnología moderna están diseñadas
para economizar y emplean muy poca agua sin que
ello afecte al rendimiento.
La pantalla muestra el
código de alarma
:
Sistema anti-fugas activado.
• Desconecte el enchufe de la toma de corriente, cie-
rre la toma de agua y póngase en contacto con el
centro de servicio técnico.
60
www.aeg.com

ASISTENCIA
• Consulte en la información proporcio-
nada con este electrodoméstico las
condiciones de garantía y el punto de
contacto. Los datos necesarios para el
servicio técnico se encuentran en la pla-
ca de características.
Es conveniente que los anote aquí:
Modelo
(Mod.)
..................
Número del producto
(PNC)
..................
Número de serie
(S.N.)
..................
INSTALACIÓN
DESEMBALAJE
1.
Utilice los guantes. Retire la película
externa. Si es necesario, utilice un cú-
ter.
2.
Retire la cubierta de cartón.
3.
Retire los materiales del embalaje de
poliestireno.
ESPAÑOL
61

4.
Retire la película interna.
5.
Abra la puerta. Retire la pieza de po-
liestireno de la junta de la puerta y
todos los elementos del tambor.
6.
Extienda uno de los materiales de
embalaje de poliestireno en el suelo
detrás del aparato. Baje con cuidado
el aparato sobre el lado posterior.
Tenga cuidado para no dañar los tu-
bos.
1
2
7.
Retire la protección de poliestireno
de la base.
8.
Levante el aparato hasta la posición
vertical.
62
www.aeg.com

9.
Retire el cable de alimentación y el
tubo de desagüe de los soportes de
los tubos.
10.
Suelte los tres pernos. Utilice la llave
suministrada con el aparato.
11.
Extraiga los separadores de plástico.
12.
Coloque los tapones de plástico en
los orificios. Encontrará los tapones
en la bolsa del manual de instruccio-
nes.
ADVERTENCIA
Retire todo el embalaje y los pa-
sadores de transporte antes de
instalar el aparato.
Se recomienda guardar el emba-
laje y los pasadores de transporte
para cuando traslade el aparato.
ESPAÑOL
63

COLOCACIÓN Y NIVELADO
• Instale la máquina en el suelo sobre
una superficie plana y rígida.
• Asegúrese de que el aire circula correc-
tamente alrededor de la lavadora aun-
que haya moqueta, alfombras, etc
• Para nivelar la máquina, enrosque o de-
senrosque las patas ajustables
• Apriete las tuercas de seguridad cuan-
do haya terminado de nivelar el apara-
to.
• El aparato debe estar nivelado y esta-
ble.
No coloque cartón, madera ni
otros materiales similares bajo la
máquina para compensar los des-
niveles del suelo.
Si no se puede evitar situar la máquina
cerca de una cocina de gas u horno de
carbón, debe insertarse entre los dos
electrodomésticos un panel aislante cu-
bierto con hoja de aluminio por la cara
expuesta a la cocina u horno
Si va a colocarla sobre losetas pequeñas,
aplique primero un revestimiento de go-
ma
La manguera de entrada de agua y la
manguera de descarga no deben estar re-
torcidas
PRECAUCIÓN
La máquina no debe instalarse en
estancias en las que la temperatu-
ra pueda descender por debajo
de 0°C
EL TUBO DE ENTRADA
20
O
20
O
20
O
45
O
45
O
45
O
• Conecte el tubo al aparato. Gire el tu-
bo de entrada solo a la derecha o a la
izquierda. Suelte la tuerca anular para
ajustarla en la posición correcta.
64
www.aeg.com

• Conecte el tubo de entrada de agua
fría a una toma de agua fría con rosca
de 3/4.
PRECAUCIÓN
Asegúrese de que no haya fugas
de los acoplamientos.
No utilice ningún tubo de exten-
sión si el tubo de entrada es de-
masiado corto. Póngase en con-
tacto con el servicio técnico para
cambiar el tubo.
Dispositivo antifuga
A
El tubo de entrada tiene un dispositivo
antifuga. Este dispositivo evita las fugas
de agua del tubo por el desgaste normal.
El sector rojo de la ventana «A» muestra
este fallo.
Si esto ocurre, cierre el grifo de agua y
póngase en contacto con el servicio técni-
co para cambiar el tubo.
DESAGÜE
Hay distintos procedimientos para conec-
tar el tubo de desagüe:
Con la guía de plástico.
ESPAÑOL
65

• En el borde de un fregadero.
• Asegúrese de que la guía de plástico
no se mueva cuando el aparato desa-
gua. Acople la guía al grifo de agua o a
la pared.
• A un tubo vertical con orificio de venti-
lación.
Consulte la ilustración. Directamente en
un tubo de desagüe a una altura míni-
ma de 60 cm y máxima de 100 cm. El
extremo de la manguera de desagüe
debe quedar siempre al aire; es decir,
el diámetro interior de la tubería de de-
sagüe debe ser mayor que el diámetro
exterior del tubo de desagüe.
Sin la guía de plástico.
• A un desagüe.
Consulte la ilustración. Coloque el tubo
de desagüe en el sumidero y asegúrela
con una brida. Asegúrese de que el tu-
bo de desagüe realiza un bucle para
evitar que las partículas restantes en-
tren en el aparato desde el fregadero.
• Directamente a un tubo de desagüe in-
tegrado en la pared de la habitación y
apretando con una brida.
Puede extender el tubo de desa-
güe hasta un máximo de 400 cm.
Póngase en contacto con el servi-
cio técnico para el otro tubo de
desagüe y la extensión.
66
www.aeg.com

EMPOTRADO
VISTA GENERAL
600 mm
555 mm
596 mm
170 mm
75 mm
100 mm
60 mm
min.
820 mm
min.
560 mm
818 mm
• Este aparato está diseñado para inte-
grarse en los muebles de cocina. El
hueco de instalación debe tener las di-
mensiones que se indican en la figura
1.
Fig. 1
Preparación y montaje de la puerta
• La lavadora viene preparada para que
la puerta pueda abrirse de derecha a iz-
quierda (fig. 2).
Fig. 2
Ø 35 mm
14 mm
16-22 mm
22±1,5 mm
416
mm
X
595-598 mm
• Puerta
La puerta debe tener las siguientes me-
didas:
– Anchura 595 - 598 mm
– Grosor 16 - 22 mm
– la altura X depende de la altura de la
base del mobiliario adyacente (fig. 3).
Fig. 3
ESPAÑOL
67

1
2
• Bisagras
Para poner las bisagras es preciso tala-
drar dos orificios (diámetro de 35 mm,
fondo 12,5 - 14 mm dependiendo del
fondo del mueble) por el lado interno
de la puerta. La distancia entre los cen-
tros de ambos orificios debe ser de 416
mm.
La distancia entre el borde superior de
la puerta y el centro del orificio depen-
de de las medidas del mueble adyacen-
te.
Las bisagras se fijan a la puerta con los
tornillos para madera 1 y 2 (fig. 4) que
se suministran con el aparato.
Fig. 4
B
A
• Montaje de la puerta
Fije las bisagras al aparato con los tor-
nillos M5x15. Las bisagras se pueden
ajustar para compensar cualquier posi-
ble variación de grosor de la puerta.
Para alinear bien la puerta es preciso
aflojar el tornillo, ajustar la puerta y
apretar de nuevo el tornillo A (fig. 5).
No quite el tornillo B (fig. 5).
Fig. 5
A
B
C
• Contraimán
El aparato está preparado para llevar
un cierre magnético instalado en la
puerta. Para que este dispositivo fun-
cione correctamente hay que atornillar
el contraimán A (disco de acero con
anillo de goma) por el lado interno de
la puerta.
Su posición debe coincidir con el imán
B del aparato (fig. 6).
No quite el tornillo C.
Fig. 6
68
www.aeg.com

A
B
C
E
D
Si la puerta se va a abrir de izquierda a
derecha, invierta la posición de las placas
E, el imán D y la placa C. Monte el contra-
imán D y las bisagras A según se ha des-
crito previamente (fig. 7).
PRECAUCIÓN
No quite el tornillo B.
Fig. 7
ESPAÑOL
69

70
www.aeg.com

ESPAÑOL
71

www.aeg.com/shop 132927170-A-502011
-
 1
1
-
 2
2
-
 3
3
-
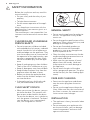 4
4
-
 5
5
-
 6
6
-
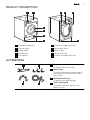 7
7
-
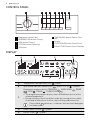 8
8
-
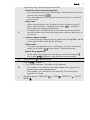 9
9
-
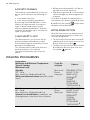 10
10
-
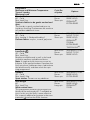 11
11
-
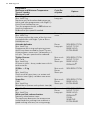 12
12
-
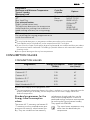 13
13
-
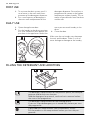 14
14
-
 15
15
-
 16
16
-
 17
17
-
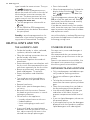 18
18
-
 19
19
-
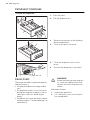 20
20
-
 21
21
-
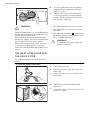 22
22
-
 23
23
-
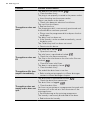 24
24
-
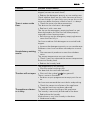 25
25
-
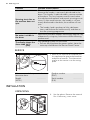 26
26
-
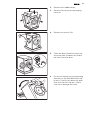 27
27
-
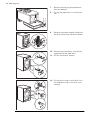 28
28
-
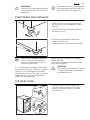 29
29
-
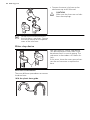 30
30
-
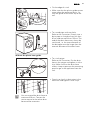 31
31
-
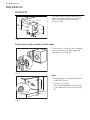 32
32
-
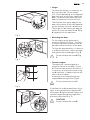 33
33
-
 34
34
-
 35
35
-
 36
36
-
 37
37
-
 38
38
-
 39
39
-
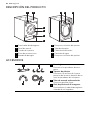 40
40
-
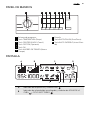 41
41
-
 42
42
-
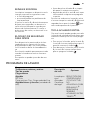 43
43
-
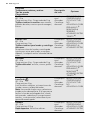 44
44
-
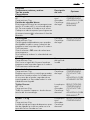 45
45
-
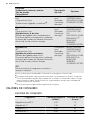 46
46
-
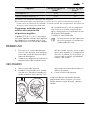 47
47
-
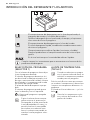 48
48
-
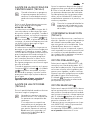 49
49
-
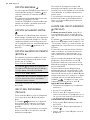 50
50
-
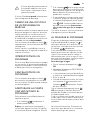 51
51
-
 52
52
-
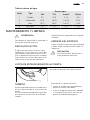 53
53
-
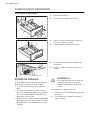 54
54
-
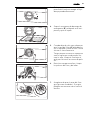 55
55
-
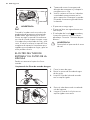 56
56
-
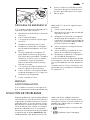 57
57
-
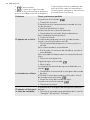 58
58
-
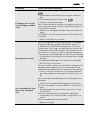 59
59
-
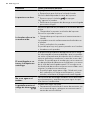 60
60
-
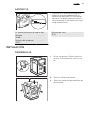 61
61
-
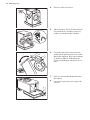 62
62
-
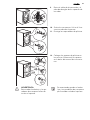 63
63
-
 64
64
-
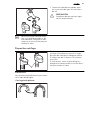 65
65
-
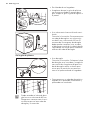 66
66
-
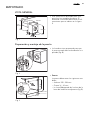 67
67
-
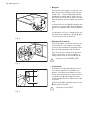 68
68
-
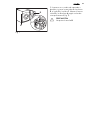 69
69
-
 70
70
-
 71
71
-
 72
72


Aeg-Electrolux L82470BI Manual de usuario
- Categoría
- Lavadoras
- Tipo
- Manual de usuario
en otros idiomas
- English: Aeg-Electrolux L82470BI User manual
Artículos relacionados
-
AEG L61270BI Manual de usuario
-
-
Aeg-Electrolux L61270BI Manual de usuario
-
AEG L82470BI Manual de usuario
-
-
-
AEG L87490FL Manual de usuario
-
-