
P/NO : MFL67735102
OWNER’S MANUAL
Please read this manual carefully before operating
your set and retain it for future reference.
TYPE : WALL MOUNTED INVERTER
AIR
CONDITIONER
www.lg.com
MODELS
Indoor Unit
VR122CL
NB1
VR182CL
NC1
VR242CL
NC1
Outdoor Unit
VR122CL
UB1
VR182CL
UC1
VR242CL
UC1
ENGLISH
ESPAÑOL

2
TIPS FOR SAVING ENERGY
ENGLISH
TIPS FOR SAVING ENERGY
Here are some tips that will help you minimize the power consumption when you use the air
conditioner. You can use your air conditioner more efficiently by referring to the instructions
below:
• Do not cool excessively indoors. This may be harmful for your health and may consume more
electricity.
• Block sunlight with blinds or curtains while you are operating the air conditioner.
• Keep doors or windows closed tightly while you are operating the air conditioner.
• Adjust the direction of the air flow vertically or horizontally to circulate indoor air.
• Speed up the fan to cool or warm indoor air quickly, in a short period of time.
• Open windows regularly for ventilation as the indoor air quality may deteriorate if the air con-
ditioner is used for many hours.
• Clean the air filter once every 2 weeks. Dust and impurities collected in the air filter may block
the air flow or weaken the cooling / dehumidifying functions.
For your records
Staple your receipt to this page in case you need it to prove the date of purchase or for warranty
purposes. Write the model number and the serial number here:
Model number :
Serial number :
You can find them on a label on the side of each unit.
Dealer’s name :
Date of purchase :

SAFETY PRECAUTIONS
IMPORTANT SAFETY INSTRUCTIONS
READ ALL INSTRUCTIONS BEFORE USING THE APPLIANCE.
Always comply with the following precautions to avoid dangerous situations and ensure peak
performance of your product
WARNING
It can result in serious injury or death when the directions are ignored
CAUTION
It can result in minor injury or product damage when the directions are ignored
WARNING
• Installation or repairs made by unqualified persons can result in hazards to you and others.
• Installation MUST conform with local building codes or, in the absence of local codes, with
the Nation Electrical Code NFPA 70/ANSI C1-1003 or current edition and Canadian Electrical
Code Part1 CSA C.22.1.
• The information contained in the manual is intended for use by a qualified service technician
familiar with safety procedures and equipped with the proper tools and test instruments.
• Failure to carefully read and follow all instructions in this manual can result in equipment mal-
function, property damage, personal injury and/or death.
Installation
• Use a standard circuit breaker and fuse conforming with the rating of the air conditioner. Fail-
ure to do so may result in electric shock or product failure.
• Contact an authorized service center when you install or relocate the air conditioner. Failure to
do so may result in serious injury or product failure.
• Always use a power plug and socket with a ground terminal.Failure to do so may result in
electric shock or product failure
• Install the panel and the cover of the control box safely. Failure to do so may result in explo-
sion or fire.
• Install a dedicated electric outlet and circuit breaker before you use the air conditioner. Failure
to do so may result in electric shock or product failure.
• Use a standard circuit breaker and fuse conforming with the rating of the air conditioner. Fail-
ure to do so may result in electric shock or product failure.
• Do not modify or extend the power cable. If the power cable or cord has scratches or skin
peeled off or deteriorated then it must be replaced. It may result in fire or electric shock.
• Be cautious when you unpack or install the air conditioner. Failure to do so may result in seri-
ous injury or product failure.
• Contact an authorized service center when you install or relocate the air conditioner. Failure to
do so may result in serious injury or product failure.
• Do not install the air conditioner on an unstable surface or where there may be a danger of it
falling. It may result in death, serious injury, or product failure.
!
!
!
3
ENGLISH

4
SAFETY PRECAUTIONS
ENGLISH
Operation
• Do not let the air conditioner run for a long time when the humidity is very high or when a door or
window has been left open. Failure to do so may result in product failure.
• Make sure that the power cord is not pulled or damaged while the air conditioner is operating. Fail-
ure to do so may result in fire, electric shock, or product failure.
• Do not place any objects on the power cord. It may result in electric shock or product failure.
• Do not turn on or off the air conditioner by plugging in or unplugging the power plug. It may result in
fire or electric shock.
• Do not touch, operate or repair the air conditioner with wet hands. It may result in electric shock or
product failure.
• Do not place a heater or other heating appliances near the power cable. It may result in fire, electric
shock, or product failure.
• Do not allow water to run into the air conditioner. It may result in explosion or fire.
• Do not leave flammable substances such as gasoline, benzene and thinner near the air conditioner.
It may result in explosion or fire.
• Do not use the air conditioner for an extended period of time in a small place without ventilation.
Ventilate the place regularly. Failure to do so may result in explosion or fire.
• When there is a gas leak, ventilate sufficiently before using the air conditioner again. Failure to do so
may result in explosion or fire.
• Unplug the power plug if there is a noise, smell or smoke coming from the air conditioner. Failure to
do so may result in explosion or fire.
• Stop operating and close the window in strom or hurricane.If possible remove the product from the
window before hurricane arrives
• Do not touch the electrostatic filter after opening the front grille. Failure to do so may result in elec-
tric shock or product failure.
• Contact an authorized service center when the air conditioner is submerged into water due to flood-
ing. Failure to do so may result in explosion or fire.
• Be cautious water could not enter the product
• Make sure to ventilate sufficiently when this air conditioner and a heating appliance such as a heater
are used simultaneously. Failure to do so may result in fire, serious injury, or product failure.
• Turn the main power off and unplug the power plug when you clean or repair the air conditioner.
Failure to do so may result in death, serious injury, or product failure.
• Unplug the power plug when the air conditioner is not used for an extended period of time. Failure
to do so may result in product failure.
• Do not place any objects on the air conditioner. It may result in product failure.
• For inner cleaning, contact an Authorized Service Center or a dealer. Do not use harsh detergent
that causes corrosion or damage on the unit. Harsh detergent may also cause failure of product, fire,
or electronic shock.

SAFETY PRECAUTIONS
CAUTION
Installation
• Make sure to check if there is a refrigerant leak after you install or repair the air conditioner. Failure
to do so may result in product failure.
• Install the drain hose properly for smooth drainage of condensed water. Failure to do so may result
in product failure.
• Keep level even when installing the product.
• Install the air conditioner where the noise from the outdoor unit or the exhaust gas will not incon-
venience the neighbors. Failure to do so may result in conflict between neighbors.
• When transporting the equipment, there should be at least 2 or more people, or a forklift. It may re-
sult in serious injury.
• Do not install the air conditioner where it will be exposed to sea wind (salt spray) directly. It may re-
sult in product failure.
Operation
• Do not expose people, animals or plants to the cold or hot wind from the air conditioner. It may re-
sult in serious injury.
• Do not use the product for special purposes, such as preserving foods, works of art, etc. It is a con-
sumer air conditioner, not a precision refrigeration system. It may result in death, fire or electric
shock.
• Do not block the inlet or outlet of air flow. It may result in explosion or product failure.
• Do not use strong cleaning agents or solvents when you clean the air conditioner, or spray water.
Use a smooth cloth. It may result in serious injury or product failure.
• Never touch the metal parts of the air conditioner when you remove the air filter. It may result in se-
rious injury or product failure.
• Do not place any objects on the air conditioner. It may result in product failure.
• Always insert the filter securely after cleaning. Clean the filter every two weeks or more often if
necessary.
• Do not insert hands or other objects through the air inlet or outlet while the air conditioner is operat-
ing. It may result in electric shock.
• Do not drink the water drained from the air conditioner. It may result in serious health complications.
• Use a sturdy stool or ladder when you clean, maintain or repair the air conditioner at a height. Failure
to do so may result in serious injury or product failure.
• Do not mix the batteries for the remote control with other types of batteries or mix new batteries
with used batteries. Failure to do so may result in product failure.
• Do not recharge or disassemble the batteries. Failure to do so may result in explosion, fire or serious
injury.
• Stop using the remote control if there is a battery fluid leak. If your cloth or skin is exposed to the
battery fluid from a leak, wash it off with clean water. Failure to do so may result in serious injury.
• If you swallow the battery fluid from a leak, wash out the inside of your mouth thoroughly and then
consult a doctor. Failure to do so may result in serious health complications.
!
5
ENGLISH

TABLE OF CONTENTS
2
TIPS FOR SAVING ENERGY
3 IMPORTANT SAFETY
INSTRUCTIONS
7 BEFORE USE
7 Components
8 Using the remote control
9 - Inserting batteries
9 - Installing the remote control holder
10 BASIC FUNCTIONS
10 Cooling your room
10 Heating your room
10 Removing humidity
11 Airing your room
11 Adjusting the fan speed
11 Adjusting the air flow direction
11 Setting the timer
11 - Setting the current time
12 - Turning on the air conditioner
automatically at a set time
12 - Turning off the air conditioner
automatically at a set time
12 - Canceling the timer setting
12 Setting sleep mode
13 ADVANCED FUNCTIONS
13 Changing room temperature quickly
13 Indoor air purification
13 - Auto Clean operation
14 Auto operation
14 Auto Changeover operation
15 Energy saving cooling mode
15 Display screen brightness
15 Operating the air conditioner without the
remote control
16 Restarting the air conditioner
automatically
17 MAINTENANCE
18 Cleaning the air filter
18 Cleaning the 3M Multi protection filter
19 TROUBLESHOOTING
19 Self-diagnosis function
19 Before requesting service
TABLE OF CONTENTS
6
ENGLISH

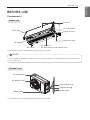
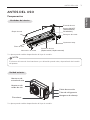
Air inlet vents
Air outlet vents
Base plate
Coolant piping
Connection wire
Drain hose
BEFORE USE
Components
Outdoor unit
Front grille
Air filter
Air inlet
On/ Off button
Signal receiver
Operation lamp
Air outlet
Air deflector
(Vertical louver & Horizontal vane)
NOTE
!
The number of operation lamps and their locations may vary, depending on the model of the
air conditioner.
7
BEFORE USE
ENGLISH
Indoor unit
* The feature can be changed according a type of model.
* The feature can be changed according a type of model.

BEFORE USE
8
ENGLISH
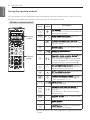
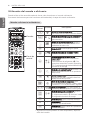
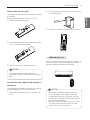
Using the remote control
You can operate the air conditioner more conveniently with the remote control. You will find the
buttons for the additional functions under the cover of the remote control.
Wireless remote control
Display
screen
Control
panel
JET
COOL
* Some functions may not be supported, depending on the
model.
Control
panel
Display
screen
Description
/
4
Fan button : Air come out from the in-
door unit below to the room without air
temperature change.
l
=
Sleep mode auto button*: Sets the
sleep mode auto operation.
e
y
Temperature adjustment buttons: Ad-
justs the room temperature when cool-
ing and heating.
d
- On/Off button: Turns the power on/off.
g
7
v
Indoor fan speed button: Adjusts the
fan speed.
f
AC
DE
Operation mode selection button*: Se-
lects the operation mode.
Cooling operation (A) / Auto operation
or auto changeover (C) / Dehumidify-
ing operation (D) / Air circulation (E)
{
N
Jet cooling/heating button*: Warms up
or cools down the indoor temperature
within a short period of time.
i
:
Air flow direction button: Adjusts the air
flow direction vertically.
k
S
Temperature display button: Displays
the room temperature. Press k for
5 sec, conversion °C / °F
mn
z
Timer button: Sets the current time and
the start / end time.
c
b
JG
Navigation and functions button*: Ad-
justs the time and sets the special
functions.
J: Auto clean / G: Operates energy
saving cooling
p
-
Set/clear button: Sets or cancels func-
tions.
r
-
Reset button : Resets the remote con-
trol settings.
\
LIGHT button: Adjusts the brightness
of the indoor unit display.

9
BEFORE USE
ENGLISH
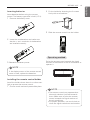
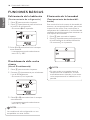
Inserting batteries
Insert batteries before using the remote
control. The battery type used is AAA (1.5 V).
1 Remove the battery cover.
2 Insert the new batteries and make sure
that the + and - terminals of the batteries
are installed correctly.
3 Reattach the battery cover.
Installing the remote control holder
Install the holder where there is no direct sun-
light to protect the remote control.
1 Choose a safe and easily-accessible place.
2 Fix the holder by fastening the 2 screws
firmly with a screwdriver.
3 Slide the remote control into the holder.
Point the remote control towards the signal
receiver at the bottom of the air conditioner to
operate it.
NOTE
!
If the display screen of the remote control
starts to fade, replace the batteries.
NOTE
!
• The remote control may operate other
electronic devices if pointed towards
them. Make sure to point the remote
control towards the signal receiver of
the air conditioner.
• For proper operation, use a soft cloth to
clean the signal transmitter and receiver.
Operating method

BASIC FUNCTIONS
10
ENGLISH
BASIC FUNCTIONS
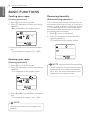
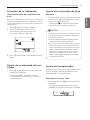
Cooling your room
(Cooling operation)
1 Press d to turn on the power.
2 Press f repeatedly to select the cooling
operation.
- A is displayed on the display screen.
3 Press u or v to set the desired tempera-
ture.
- The temperature range is 18°C - 30°C.
Heating your room
(Heating operation)
1 Press d to turn on the power.
2 Press f repeatedly to select the heating
operation.
- B is displayed on the display screen.
3 Press u or v to set the desired tempera-
ture.
- The temperature range is 16°C - 30°C
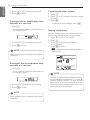
Removing humidity
(Dehumidifying operation)
This mode removes excess moisture from an
environment with high humidity or in the rainy
season, in order to prevent mold from setting
in. This mode adjusts the room temperature
and the fan speed automatically to maintain
the optimal level of humidity.
1 Press d to turn on the power.
2 Press f repeatedly to select the dehu-
midifying operation.
-
D is displayed on the display screen.
NOTE
!
• In this mode you cannot adjust the room
temperature, as it is adjusted automati-
cally. Also, the room temperature is not
displayed on the display screen.
NOTE
!
Cooling-only models do not support this
function.

11
BASIC FUNCTIONS
ENGLISH
Airing your room
(Air Circulation operation)
This mode only circulates the indoor air
without changing the room temperature. The
cooling lamp lights up in air circulation mode.
1 Press d to turn on the power.
2 Press / to select the air circulation opera-
tion.
- E is displayed on the display screen.
3 Press gto adjust the fan speed.
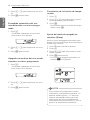
Adjusting the fan speed
1 Press grepeatedly to adjust the fan
speed.
- Select
5
if you want natural air.
The fan speed adjusts automatically.
Adjusting the air flow direc-
tion
1 To adjust the direction of the air flow hori-
zontally, press i repeatedly and select
the desired direction.
- Select H to adjust the direction of the air
flow automatically.
Setting the timer
You can use the timer function to save energy
and to use the air conditioner more efficiently.
Setting the current time
1 Press p and hold it for longer than 3 sec-
onds.
- The AM/PM icon flickers at the bottom of
the display screen.
NOTE
!
• Adjusting the air flow direction vertically
may not be supported, depending on
the model.
• Adjusting the air deflector arbitrarily may
cause product failure.
• If you restart the air conditioner, it starts
to operate with the previously set direc-
tion of air flow, so the air deflector may
not match the icon displayed on the re-
mote control. When this occurs, press
i to adjust the direction of the air flow
again.

BASIC FUNCTIONS
12
ENGLISH
2 Press
o
or
q
to select the minutes.
3 Press p to finish.
Turning on the air conditioner auto-
matically at a set time
1 Press m.
- The icon below flickers at the bottom of
the display screen.
2 Press
o
or
q
to select the minutes.
3 Press pto finish.
Turning off the air conditioner auto-
matically at a set time
1 Press n.
- The icon below flickers at the bottom of
the display screen.
2 Press
o
or
q
to select the minutes.
3 Press pto finish.
Canceling the timer setting
1 Press m.
2 Press m or n to select the timer setting
to cancel.
3 Press p.
- To cancel all timer settings, press
p.
Setting sleep mode
Use the sleep mode to turn off the air condi-
tioner automatically when you go to sleep.
1 Press dto turn on the power.
2 Press l
3 Press
o
or
q
to select the hour
(up to 7 hours).
4 Press pto finish.
-
T is displayed on the display screen in
sleep mode.
NOTE
!
In the Cooling and Dehumidifying modes,
the temperature increases by 1°C after 30
minutes and by a further 1°C after another
30 minutes for a more comfortable sleep.
The temperature increases with up to 2°C
from the preset temperature.
NOTE
!
After setting the time. current time will be
displayed.
NOTE
!
After setting the time. current time will be
displayed.

13
ADVANCED FUNCTIONS
ENGLISH
ADVANCED FUNCTIONS
The air conditioner offers some additional ad-
vanced functions.
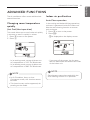
Changing room temperature
quickly
(Jet Cool/Heat operation)
This mode allows you to cool indoor air quickly
in summer or warm it quickly in winter.
1 Press dto turn on the power.
2 Press {.
- In jet cooling mode, strong air blows out
at a temperature of 18°C for 30 minutes.
- In jet heating mode, strong air blows out
at a temperature of 30°C for 30 minutes.
Indoor air purification
Auto Clean operation
In the cooling and dehumidifying operations,
moisture is generated inside the indoor unit.
Use the auto cleaning function to remove
such moisture.
1 Press dto turn on the power.
2 Press c.
-
J is displayed on the display screen.
- If you turn off the power, the fan oper-
ates for 30 minutes and cleans the inside
of the indoor unit.
NOTE
!
• In Air Circulation, Auto, or Auto
Changeover mode, this function cannot
be used.
• This function may not be supported, de-
pending on the model.
NOTE
!
Some buttons cannot be used while the
auto cleaning function is in operation.

ADVANCED FUNCTIONS
14
ENGLISH
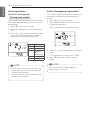
Auto Changeover operation
This mode changes the operation mode auto-
matically to maintain the set temperature
at ±2°C.
1 Press dto turn on the power.
2 Press frepeatedly to select the auto
changeover operation.
-
C is displayed on the display screen.
3 Press
o
or q to set the desired temper-
ature.
- The temperature range is 18°C - 30°C.
4 Press g repeatedly to select the fan
speed.
Cooling-only models
Auto operation
(Artificial intelligence)
In this mode, the fan speed and the tempera-
ture adjust automatically, based on the room
temperature.
1 Press dto turn on the power.
2 Press frepeatedly to select auto opera-
tion.
3 Press
o
or q to select the desired oper-
ation code if the temperature is higher or
lower than the desired temperature.
NOTE
!
This function may not be supported,
depending on the model.
Code Description
2 Cool
1 Cool slightly
0 Maintain
room
temperature
-1 Heat slightly
-2 Heat
NOTE
!
• In this mode, you cannot adjust the fan
speed, but you can set the air deflector
to rotate automatically.
• This function may not be supported, de-
pending on the model.

15
ADVANCED FUNCTIONS
ENGLISH
Energy saving cooling mode
This mode minimizes power consumption dur-
ing cooling and increases the set temperature
to the optimal level for a more comfortable en-
vironment.
1 Press dto turn the power on.
2 Press frepeatedly to select the cooling
operation.
3 Press b.
-
G is displayed on the display screen.
Display screen brightness
You can adjust the brightness of the indoor
unit display screen.
1 Press
\
repeatedly to set the bright-
ness to the desired level.
NOTE
!
This function may not be supported,
depending on the model.
Operating the air conditioner
without the remote control
You can use the On/Off button of the indoor
unit to operate the air conditioner when the
remote control is unavailable. However, the
fan speed is set to high.
1 Open the front cover.
- Lift up both sides of the cover slightly.
2 Press the On/Off button.
- For cooling and heating models, the oper-
ation mode changes, depending on the
room temperature.
- For cooling-only models, the temperature
is set to 22°C.
* The feature can be changed according a
type of model.
* The feature can be changed according a
type of model.
Room temp. Set temp.
Operation
mode
Below 21°C 24°C
Heating
operation
Above 21°C
and below
24°C
23°C
Dehumidify-
ing operation
Above 24°C 22°C
Cooling
operation
NOTE
!
This function may not be supported,
depending on the model.

ADVANCED FUNCTIONS
16
ENGLISH
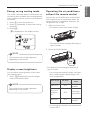
Disabling auto restart
NOTE
!
If you press and hold the On/Off button
for 3 – 5 seconds instead of 6 seconds,
the unit will switch to the test operation.
In the test operation, the unit blows out
strong air for cooling for 18 minutes and
then returns to the factory default set-
tings.
2 Press the On/Off button and hold it for 6
seconds.
- The unit will beep twice and the lamp will
blink 6 times.
- To re-enable the function, press the On/
Off button and hold it for 6 seconds. The
unit will beep twice and the blue lamp will
blink 4 times.
Restarting the air conditioner
automatically
When the air conditioner is turned on again
after a power failure, this function restores the
previous settings. This function is a factory de-
fault setting.
1 Open the front cover.
- Lift up both sides of the cover slightly.
* The feature can be changed according a
type of model.
* The feature can be changed according a
type of model.

MAINTENANCE
17
ENGLISH
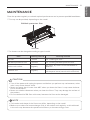
MAINTENANCE
Clean the product regularly to maintain optimal performance and to prevent possible breakdown.
* This may not be provided, depending on the model.
Item Cleaning interval Cleaning method
Air filter 2 weeks See “Cleaning air filter.”
3M Multi protection filter 1 months
See “Cleaning 3M Multi protection filter.”
Indoor unit surface Regularly
Use a soft, dry cloth. Do not use bleach or
abrasives.
Outdoor unit Regularly
Use steam to clean the heat exchanger coils
and the panel vents (consult with technician).
Air filter
3M Multi protection filter
CAUTION
• Turn off the power and unplug the power cord before you perform any maintenance; other-
wise it may cause electric shock.
• Never use water that is hotter than 40°C when you clean the filters. It may cause deforma-
tion or discoloration.
• Never use volatile substances when you clean the filters. They may damage the surface of
the product.
• Do not washed the 3M filter with water, because the filter can be damaged.
!
NOTE
!
• The location and shape of the filters may differ, depending on the model.
• Make sure to clean the heat exchanger coils of the outdoor unit regularly, as dirt collected
in the coils may decrease the operational efficiency or increase energy costs.
* The feature can be changed according a type of model.

18
MAINTENANCE
ENGLISH
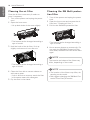
Cleaning the air filter
Clean the air filter once every 2 weeks or
more if necessary.
1 Turn off the power and unplug the power
cord.
2 Open the front cover.
- Lift up both sides of the cover slightly.
* The feature can be changed according a
type of model.
3 Hold the knob of the air filter, lift it up
slightly and remove it from the unit.
* The feature can be changed according a
type of model.
4 Clean the filter with a vacuum cleaner or
with warm water.
- If dirt is difficult to remove, wash the filter
in lukewarm water with detergent.
5 Dry the filter in the shade.
Cleaning the 3M Multi protec-
tion filter
1 Turn off the power and unplug the power
cord.
2 Open the front cover and remove the air
filter (see “Cleaning air filter”).
3 Pull out the 3M Multi protection filter
4 Use a vacuum cleaner to remove dirt, Do
not wash the 3M Multi Protection Filter
with water, because the filter can be dam-
aged.
NOTE
!
The location and shape of the filters may
differ, depending on the model.
NOTE
!
• The location of the filters may differ, de-
pending on the model.
• We suggest changing the 3M Multi Pro-
tection Filter Every 6 months.
* The feature can be changed according a
type of model.

TROUBLESHOOTING
19
ENGLISH
TROUBLESHOOTING
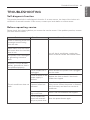
Self-diagnosis function
This product has a built-in self-diagnosis function. If an error occurs, the lamp of the indoor unit
will blink in 2 second intervals. If this occurs, contact your local dealer or service center.
Before requesting service
Please check the following before you contact the service center. If the problem persists, contact
your local service center.
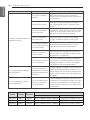
Problem Possible causes Corrective action
There is a burning smell and
a strange sound coming
from the unit.
-
Turn off the air conditioner, unplug the
power cord and contact the service center.
Water leaks from the indoor
unit even when the humidity
level is low.
The power cord is damaged
or generating excessive
heat.
A switch, a circuit breaker
(safety, ground) or a fuse is
not operated properly.
The air conditioner does not
work.
The air conditioner is
unplugged.
Check whether the power cord is plugged
into the outlet.
A fuse is blown or the
power supply is
blocked.
Replace the fuse or check if the circuit
breaker has tripped.
A power failure has
occurred.
Turn off the air conditioner when a power
failure occurs. When the power is restored,
wait 3 minutes, and then turn on the air
conditioner.
The voltage is too
high or too low.
Check if the circuit breaker has tripped.
The air conditioner
turned off automati-
cally at a preset time.
Press the power button again.

20
TROUBLESHOOTING
ENGLISH
Problem Possible causes Corrective action
The air conditioner does not
generate cool air.
Air is not circulating
properly.
Make sure that there are no curtains,
blinds or furniture blocking the front of the
air conditioner.
The air filter is dirty.
Clean the air filter once every 2 weeks.
See “Cleaning Air Filter” for more infor-
mation.
The room tempera-
ture is too high.
In summer, it may take some time to cool
indoor air. In this case, select the jet cool
operation to cool indoor air quickly.
Cold air is escaping
from the room.
Make sure that no cold air is escaping
through ventilation points in the room.
The desired tempera-
ture is higher than the
set temperature.
Set the desired temperature to a level
lower than the current temperature.
There is a heating
source nearby.
Avoid using a heat generator such as an
electric oven or a gas burner while the air
conditioner is in operation.
Air circulation opera-
tion is selected.
In the air circulation operation, air blows
from the air conditioner without cooling or
heating the indoor air. Switch the opera-
tion mode to the cooling operation.
It is not possible to adjust
the fan speed.
The auto operation,
jet operation or dehu-
midifying operation is
selected.
In some operation modes, such as the jet
or dehumidifying operation modes, you
cannot adjust the fan speed. Select an op-
eration mode in which you can adjust the
fan speed.
It is not possible to adjust
the temperature.
The air circulation op-
eration or jet opera-
tion is selected.
In some operation modes, such as the air
circulation or jet operation mode, you can-
not adjust the temperature. Select an op-
eration mode in which you can adjust the
temperature.
Model
Voltage
Frequency
Cooling
Power Current
VR122CL 220 V~ 60 Hz
NOR. 1 030 W / MAX. 1 280 W
NOR. 4.9 A / MAX. 5.8 A
VR182CL 220 V~ 60 Hz
NOR. 1 550 W / MAX. 1 800 W
NOR. 7.2 A / MAX. 9.6 A
VR242CL 220 V~ 60 Hz
NOR. 2 010 W / MAX. 2 200 W
NOR. 9.2 A / MAX. 10.4 A

MANUAL DEL PROPIETARIO
Por favor lea este manual detenidamente antes de
utilizar su equipo y guárdelo para consultas futuras.
TIPO : MONTADO EN LA PARED INVERTER
AIRE
ACONDICIONADO
www.lg.com
MODELOS
UNIDAD EVAPORADORA
VR122CL
NB1
VR182CL
NC1
VR242CL
NC1
UNIDAD CONDENSADORA
VR122CL
UB1
VR182CL
UC1
VR242CL
UC1
ESPAÑOL

2
CONSEJOS PARA AHORRAR ENERGÍA
ESPAÑOL
CONSEJOS PARA AHORRAR ENERGÍA
Estos consejos le ayudarán a reducir el consumo de energía cuando utilice el aire acondicionado.
Podrá utilizar el aparato de aire acondicionado de forma eficiente siguiendo estas instrucciones:
• No enfríe excesivamente los espacios. Puede ser nocivo para su salud y consumirá más elec-
tricidad.
• Evite el paso de la luz solar con persianas o cortinas cuando esté utilizando el aire acondi-
cionado.
• Mantenga las puertas y ventanas bien cerradas mientras tenga en funcionamiento el aire
acondicionado.
• Ajuste la dirección del flujo de aire vertical u horizontalmente para que circule el aire en el inte-
rior.
• Aumente la velocidad del ventilador para enfriar o calentar el aire interior con rapidez y en peri-
odo corto de tiempo.
• Abra las ventanas con regularidad para ventilar, porque la calidad del aire interior puede deteri-
orarse si se utiliza el aire acondicionado durante muchas horas.
• Limpie el filtro del aire una vez cada dos semanas. El polvo y las impurezas recogidas en el fil-
tro de aire puede bloquear el flujo de aire o debilitar las funciones de refrigeración / deshumid-
ificación.
Como referencia
Grape el justificante de compra en esta página, ya que será su prueba de compra para la garantía.
Escriba aquí el número de modelo y el número de serie:
Número de modelo:
Número de serie:
Los encontrará en una etiqueta en el lateral de cada unidad.
Nombre del distribuidor:
Fecha de compra:

INSTRUCCIONES DE SEGURIDAD IMPORTANTES
INSTRUCCIONES DE SEGURIDAD IMPORTANTES
LEA TODAS LAS INSTRUCCIONES ANTES DE UTILIZAR EL APARATO
Cumpla con las siguientes precauciones para evitar situaciones de peligro y garantizar un fun-
cionamiento óptimo de su producto.
ADVERTENCIA
Puede sufrir lesiones de gravedad o mortales si ignora las instrucciones
PRECAUCIÓN
Puede sufrir lesiones menores o dañar el producto si ignora las instrucciones
ADVERTENCIA
• Las instalaciones o reparaciones realizadas por personas no cualificadas pueden dar lugar a peli-
gros para usted y otras personas.
• La instalación DEBE cumplir con los códigos de construcción locales o, a falta de ellos, con el
Código Nacional Eléctrico NFPA 70/ANSI C1-1003 o la edición actual del Código Eléctrico Canadi-
ense Parte 1 CSA C.22.1.
• La información de este manual está dirigida a personal técnico cualificado, familiarizado con los
procedimientos de seguridad y equipado con las herramientas e instrumentos de prueba adecua-
dos.
• Lea detenidamente y cumpla con todas las instrucciones de este manual. De lo contrario, el
aparato podría no funcionar correctamente, o producirse lesiones graves o mortales y daños mate-
riales.
Instalación
• Utilice un disyuntor y un fusible estándar que cumplan con la clasificación del aparato de aire
acondicionado. En caso contrario, podría haber peligro de descargas eléctricas o fallos del aparato.
• Póngase en contacto con un servicio técnico autorizado para la instalación o cambio de ubicación
del aparato de aire acondicionado. En caso contrario, podría haber peligro de lesiones graves o fal-
los del aparato.
• Utilice un enchufe y una toma con conexión a tierra. En caso contrario, podría haber peligro de
descargas eléctricas o fallos del aparato.
• Instale correctamente el panel y la tapa de la caja de control. En caso contrario, podría haber peli-
gro de descargas eléctricas o incendio.
• Instale una toma eléctrica y un disyuntor dedicados antes de utilizar el aparato de aire acondi-
cionado. En caso contrario, podría haber peligro de descargas eléctricas o fallos del aparato.
• Utilice un disyuntor y un fusible estándar que cumplan con la clasificación del aparato de aire
acondicionado. En caso contrario, podría haber peligro de descargas eléctricas o fallos del aparato.
• Si el cordón de alimentación es dañado este debe ser reemplazado por el fabricante o por su
agente de servicio autorizado para evitar el riesgo.
• Tenga cuidado al desembalar o instalar el aparato de aire acondicionado. En caso contrario, podría
haber peligro de lesiones graves o fallos del aparato.
• Póngase en contacto con un servicio técnico autorizado para la instalación o cambio de ubicación
del aparato de aire acondicionado. En caso contrario, podría haber peligro de lesiones graves o fal-
los del aparato.
• No instale el aparato de aire acondicionado sobre una superficie inestable, porque podría caerse.
Podrían producirse lesiones graves o mortales o dañarse el producto.
!
!
!
ESPAÑOL
3

4
INSTRUCCIONES DE SEGURIDAD IMPORTANTES
ESPAÑOL
Funcionamiento
• No deje el aire acondicionado en funcionamiento durante un tiempo prolongado si la humedad es muy
alta o si se ha dejado abierta una puerta o una ventana. En caso contrario, podría dañarse el producto.
• Asegúrese de que el cable de alimentación no esté tenso o dañado con el aire acondicionado en fun-
cionamiento. En caso contrario, podría haber peligro de incendio, descargas eléctricas o fallos del aparato.
• No coloque ningún objeto sobre el cable de alimentación eléctrica. Podría sufrir una descarga eléctrica o
dañarse el aparato.
• No encienda o apague el aire acondicionado conectando o desconectando el enchufe. Podría causar un in-
cendio o descargas eléctricas.
• No toque, utilice ni repare el aparato de aire acondicionado con las manos mojadas. Podría sufrir una
descarga eléctrica o dañarse el aparato.
• No coloque un calefactor cualquier otro aparato de calefacción cerca del cable de alimentación.
Podría causar un incendio, descargas eléctricas o dañarse el aparato.
• No permita que entre agua el interior del aparato de aire acondicionado. Podría causar una explosión o un
incendio.
• No deje sustancias inflamables, como gasolina, benceno o disolvente cerca del aparato de aire acondi-
cionado. Podría causar una explosión o un incendio.
• No utilice el aire acondicionado durante periodos prolongados de tiempo en un lugar pequeño sin venti-
lación. Ventile el espacio con regularidad. En caso contrario, podría haber peligro de descargas eléctricas o
incendio.
• Cuando haya una fuga de gas, ventile la habitación antes de utilizar el aire acondicionado de nuevo.
En caso contrario, podría haber peligro de descargas eléctricas o incendio.
• Desconecte el enchufe si observa algún ruido, olor o humo provenientes del aparato de aire acondi-
cionado. En caso contrario, podría haber peligro de descargas eléctricas o incendio.
• Deje de utilizar el aire acondicionado y cierre las ventanas si se produce una tormenta o huracán.
Si es posible, retire el aparato de la ventana antes de la llegada del huracán.
• No toque el filtro electrostático tras abrir la rejilla delantera. En caso contrario, podría haber peligro de
descargas eléctricas o fallos del aparato.
• Póngase en contacto con un servicio técnico autorizado si el aparato de aire acondicionado ha quedado
sumergido en agua a causa de unas inundaciones. En caso contrario, podría haber peligro de descargas
eléctricas o incendio.
• Tenga cuidado y evita que se introduzca agua en el producto.
• Asegúrese de ventilar la estancia correctamente cuando se utilicen este aparato de aire acondicionado y
un aparato calefactor al mismo tiempo. En caso contrario, podría haber peligro de incendio, lesiones
graves o fallos del aparato.
• Antes de limpiar o reparar el aparato de aire acondicionado, apáguelo y desconéctelo de la red. En caso
contrario, podría haber peligro de incendio, lesiones graves o mortales o fallos del aparato.
• Desenchufe el aparato de aire acondicionado de la red cuando no vaya a utilizarlo durante un periodo de
tiempo prolongado. En caso contrario, podría dañarse el producto.
• No coloque ningún objeto sobre el aparato de aire acondicionado. Podrían producirse fallos de fun-
cionamiento.
• Para una limpieza interna, contacte con un centro de servicios autorizado o un revendedor. No utilice de-
tergentes abrasivos que puedan corroer o dañar la unidad. Los detergentes abrasivos pueden igualmente
generar un fallo del producto, incendio, o descarga.

INSTRUCCIONES DE SEGURIDAD IMPORTANTES
PRECAUCIÓN
Instalación
• Compruebe que no haya ninguna fuga de refrigerante tras la instalación o reparación del aparato.
En caso contrario, podría dañarse el producto.
• Instale la manguera de desagüe correctamente, para que se descargue con facilidad el agua condensada.
En caso contrario, podría dañarse el producto.
• Mantenga el nivel incluso durante la instalación del producto.
• Instale el aparato de aire acondicionado donde el ruido de la unidad de exterior o la salida de gas no mo-
lesten a sus vecinos. En caso contrario, podría producirse algún conflicto con los vecinos.
• El transporte del equipo deberá ser realizado al menos por dos personas o en una carretilla elevadora.
Podría sufrir lesiones de gravedad.
• No instale el producto donde esté expuesto directamente al viento del mar (sal). Podrían producirse fallos
de funcionamiento.
Funcionamiento
• No exponga directamente a las personas, animales o plantas al aire frío o caliente del aire acondicionado.
Podría sufrir lesiones de gravedad.
• No utilice el producto para fines especiales, como conservación de alimentos, obra de arte, etc. Se trata
de un aparato de aire acondicionado doméstico, no un sistema de refrigeración de precisión. Podría sufrir
lesiones mortales o causar un incendio o descargas eléctricas.
• No bloquee la entrada o la salida de aire. Podría producirse una explosión o fallos de funcionamiento.
• No utilice productos de limpieza agresivos o disolventes sobre el aparato de aire acondicionado, ni pul-
verice agua. Utilice un trapo suave. Podrían producirse lesiones graves o fallos del producto.
• No toque las partes metálicas del aparato de aire acondicionado cuando retire el filtro de aire. Podrían pro-
ducirse lesiones graves o fallos del producto.
• No coloque ningún objeto sobre el aparato de aire acondicionado. Podrían producirse fallos de fun-
cionamiento.
• Coloque el filtro correctamente tras la limpieza. Limpie el filtro cada dos semanas o con mayor frecuencia,
si es necesario.
• No introduzca las manos u otros objetos a través de la entrada de aire con el aire acondicionado en fun-
cionamiento. Puede causar una descarga eléctrica.
• No beba el agua expulsada del desagüe de un aparato de aire acondicionado. Podría suponer un peligro
grave para su salud.
• Utilice una banqueta resistente o una escalera para la limpieza, mantenimiento o reparación de un aparato
de aire acondicionado en altura. En caso contrario, podría haber peligro de lesiones graves o fallos del
aparato.
• No mezcle las pilas del mando a distancia con otros tipos de pilas, ni mezcle pilas nuevas y usadas.
En caso contrario, podría dañarse el producto.
• No recargue ni desmonte las pilas. En caso contrario, podría haber peligro de explosión, incendio o le-
siones graves.
• Deje de usar el mando a distancia si hay fugas en alguna de las pilas. Si la ropa o la piel entran en con-
tacto con el líquido de la pila, lávelas con agua limpia. En caso contrario, podría haber peligro de lesiones
graves.
• Si ingiere líquido de una pila con una fuga, lave el interior de la boca con agua abundante y acuda a un
médico. En caso contrario, podría ser peligroso para su salud.
!
ESPAÑOL
5

ÍNDICE
2 CONSEJOS PARA
AHORRAR ENERGÍA
3 INSTRUCCIONES DE SE-
GURIDAD IMPOR-
TANTES
7 ANTES DEL USO
7 Componentes
8 Utilización del mando a distancia
9 Colocación de las pilas
9 Instalación del soporte del mando a
distancia
10 FUNCIONES BÁSICAS
10 Enfriamiento de la habitación
10 Riscaldamento della vostra stanza
10 Eliminación de la humedad
11 Aireación de la habitación
11 Ajuste de la velocidad del ventilador
11 Ajuste de la dirección de flujo de aire
11 Ajuste del temporizador
11 Setting the current time
12 Encendido automático del aire acondi-
cionado a una hora programada
12 Apagado automático del aire acondi-
cionado a una hora programada
12 Cancelación de la función de tempo-
rizador
12 Ajuste del modo de apagado au-
tomático (Sleep)
13 FUNCIONES AVAN-
ZADAS
13 Cambio rápida de la temperatura de la
habitación
13 Purificación del aire interior
13 Funcionamiento de limpieza au-
tomática Auto Clean
14 Funcionamiento automático
14 Cambio automático
15 Modo de refrigeración con ahorro de
energía
15 Brillo de la pantalla
15 Utilización del aire acondicionado sin el
mando a distancia
16 Reinicio automático del aparato de aire
acondicionado
17 MANTENIMIENTO
18 Limpieza del filtro del aire.
18 Limpiar del filtro multi protección 3M
19 SOLUCIÓN DE PROBLE-
MAS
19 Función de autodiagnóstico
19 Antes de solicitar asistencia técnica
ÍNDICE
6
ESPAÑOL

Rejilla frontal
Filtro de aire
Entrada de aire
Botón ON/OFF
(ENCENDIDO/
APAGADO)
Receptor de señal
Operation lamp
Aberturas de salida
Deflector de aire
(Rejilla vertical / Rejilla horizontal)
ANTES DEL USO
Componentes
Unidades de interior
Unidad exterior
Aberturas de
entrada de aire
Aberturas de
salida de aire
Placa base
Tubo de refrigerante
Cable de conexión
Manguera de drenaje
NOTA
!
El número de luces de funcionamiento y su ubicación puede variar, dependiendo del modelo
del aparato.
ESPAÑOL
7
ANTES DEL USO
* La placa puede cambiar dependiendo del tipo de modelo.
* La placa puede cambiar dependiendo del tipo de modelo.

Utilización del mando a distancia
Puede utilizar el aire acondicionado de forma más cómoda con el mando a distancia.
Encontrará los botones para las funciones adicionales bajo la tapa del mando a distancia.
Mando a distancia inalámbrico
Pantalla
Panel de
control
JET
COOL
* Algunas funciones pueden no estar disponibles, dependi-
endo del modelo.
Panel de
control
Pantalla Descripción
/
4
BOTÓN DE CIRCULACIÓN DE AIRE
:
Utilizado para
hacer circular el aire del cuarto sin enfriarlo ni calentarlo.
l
=
Botón de modo Sleep (apagado automático)*:
Ajusta el funcionamiento del modo de apa-
gado automático.
e
y
Botone de ajuste de temperatura: Ajuste la
temperatura de la habitación durante el fun-
cionamiento de calor o frío.
d
-
Botón On/Off: Enciende/apaga el aparato.
g
7
v
Botón de velocidad del ventilador interior:
Ajusta la velocidad del ventilador.
f
AC
DE
Botón de selección de modo de fun-
cionamiento*: Selecciona el modo de fun-
cionamiento.
Funcionamiento de refrigeración (A) / Fun-
cionamiento automático o cambio automático
(C) / Funcionamiento de deshumidificación (D)
/ Circulación de aire (E)
{
N
Botón de Jet cool/calefacción*: Aumenta o re-
duce la temperatura interior en un periodo de
tiempo corto.
i
:
BOTÓN CHAOS SWING
:
Utilizado para iniciar o cesar
el movimiento de las palas y configurar la dirección ar-
riba/abajo deseada del flujo de aire.
k
S
Botón de visualización de temperatura: Mues-
tra la temperatura de la habitación. También cambia
la unidad de °C a °F si se pulsa durante 5 segundos.
mn
z
Botón del temporizador: Sirve para introducir la
hora actual y la hora de puesta en marcha /parada.
c
b
JG
Botón de navegación y funciones*: Ajusta la
hora y las funciones especiales.
J: Limpieza automática / G: Acciona el modo
de refrigeración de ahorro de energía
p
-
Botón Set/clear: Ajusta o cancela funciones.
r
-
Botón Reset : Pone a cero los ajustes del
aparato de aire acondicionado.
\
Botón de luz : Ajusta el brillo de la pantalla de
la unidad de interior
ANTES DEL USO
8
ESPAÑOL

Colocación de las pilas
Introduzca las pilas antes de utilizar el mando
a distancia.
Su utilizan pilas de tipo AAA (1,5 V CC)
1 Retire la tapa de las pilas.
2 Introduzca las pilas nuevas asegurándose
+ de - respetar la polaridad.
3 Vuelva a colocar la tapa de las pilas.
Instalación del soporte del mando a
distancia
Para proteger el mando a distancia, instale el
soporte alejado de la luz solar directa.
1 Elija una localización segura y de fácil ac-
ceso.
2 Fije el soporte apretando los 2 tornillos con
un destornillador.
3 Deslice el mando a distancia en el soporte.
Dirija el mando a distancia hacia el receptor de
señal de la parte inferior del aparato de aire
acondicionado para hacerlo funcionar.
NOTA
!
Si la pantalla del mando a distancia
comienza a perder intensidad, cambie las
pilas.
NOTA
!
• El mando a distancia puede accionar
otros aparatos si se dirige hacia ellos.
Asegúrese de dirigir el mando a distan-
cia hacia el receptor de señal del aparato
de aire acondicionado.
• Para un funcionamiento correcto, utilice
un trapo suave para el limpiar el trans-
misor de señal y el receptor.
Método de uso
ESPAÑOL
9
ANTES DEL USO

Enfriamiento de la habitación
(Funcionamiento de refrigeración)
1 Pulse d para encender el aparato.
2 Pulse f repetidamente para seleccionar
la función de refrigeración.
- Se muestra A en la pantalla.
3 Pulse u o v para seleccionar la temper-
atura deseada.
- La temperatura puede seleccionarse
entre 18°C y 30°C
Riscaldamento della vostra
stanza
(Uso di Riscaldamento)
1 Pulse d para encender el aparato.
2 Premere f ripetutamente per selezionare
l'uso di Riscaldamento.
- Se muestra B en la pantalla.
3 Pulse u o v para seleccionar la temper-
atura deseada.
- La temperatura puede seleccionarse
entre 16°C y 30°C
Eliminación de la humedad
(Funcionamiento de deshumidifi-
cación)
Este modo elimina el exceso de humedad del
entorno o en temporada de lluvias, para evitar
la aparición de moho. Este modo ajusta la
temperatura de la habitación y la velocidad del
ventilador automáticamente para mantener un
nivel óptimo de humedad.
1 Pulse d para encender el aparato.
2 Pulse f repetidamente para seleccionar
el funcionamiento de deshumidificación
- Se muestra
D en la pantalla.
NOTA
!
Los modelos de sólo refrigeración no son
compatibles con esta función.
NOTA
!
• En este modo no se puede ajustar la
temperatura de la habitación, se hace
automáticamente. Además, no se mues-
tra la temperatura de la habitación en la
pantalla.
FUNCIONES BÁSICAS
10
ESPAÑOL
FUNCIONES BÁSICAS

Aireación de la habitación
(Funcionamiento de circulación de
aire)
Este modo sólo hace circular el aire interior sin
cambiar la temperatura de la habitación. En el
modo de circulación se ilumina el indicador de
refrigeración.
1 Pulse d para encender el aparato.
2 Pulse / para seleccionar el fun-
cionamiento de circulación de aire.
- Se muestra E en la pantalla.
3 Pulse gpara ajustar la velocidad del venti-
lador.
Ajuste de la velocidad del ven-
tilador
1 Pulse grepetidamente para ajustar la ve-
locidad del ventilador.
- Seleccione R si desea aire natural.
La velocidad del ventilador se ajusta au-
tomáticamente.
Ajuste de la dirección de flujo
de aire
1 Para ajustar la dirección del aire horizontal-
mente, pulse i repetidamente y selec-
cione la dirección deseada.
- Seleccione H para ajustar automática-
mente la dirección del flujo de aire.
Ajuste del temporizador
Puede utilizar la función de temporizador para
ahorrar energía y utilizar el aparato de aire
acondicionado con más eficacia.
Setting the current time
1 Mantenga pulsado p durante más de 3
segundos.
- Comenzará a parpadear el icono de la
AM/PM en la parte inferior de la pantalla.
NOTA
!
• El ajuste de la dirección vertical del flujo
de aire puede no ser posible, dependi-
endo del modelo.
• El ajuste arbitrario del deflector puede
causar fallos de funcionamiento.
• Si reinicia el aire acondicionado, comen-
zará a funcionar con la dirección de flujo
de aire ajustada anteriormente; por esta
razón, la posición del deflector de aire
podría no corresponderse con el icono
del mando a distancia. Cuando esto
ocurra, pulse i para ajustar de nuevo
la dirección del aire.
ESPAÑOL
11
FUNCIONES BÁSICAS

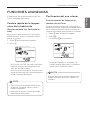
2 Pulse
o
o
q
para seleccionar los minu-
tos.
3 Pulse p para terminar.
Encendido automático del aire
acondicionado a una hora progra-
mada
1 Pulse m.
- Comenzará a parpadear el icono de la
parte inferior de la pantalla.
2 Pulse
o
o
q
para seleccionar los minu-
tos.
3 Pulse ppara terminar.
Apagado automático del aire acondi-
cionado a una hora programada
1 Pulse n.
- Comenzará a parpadear el icono de la
parte inferior de la pantalla.
2 Pulse
o
o
q
para seleccionar los minu-
tos.
3 Pulse ppara terminar.
Cancelación de la función de tempo-
rizador
1 Pulse m.
2 Pulse m o n para seleccionar el ajuste
del temporizador para cancelarlo.
3 Pulse p.
- Para cancelar todos los ajuste del tempo-
rizador, pulse
p.
Ajuste del modo de apagado au-
tomático (Sleep)
Utilice el modo de apagado automático para
apagar el aire acondicionado automáticamente
cuando vaya a dormir.
1 Pulse dpara encender el aparato.
3 Pulse l
4 Pulse
o
o
q
para seleccionar la horas
(hasta 7 horas).
5 Pulse ppara terminar.
- En el modo de apagado automático, se
muestra
T en la pantalla.
NOTA
!
En los modos de refrigeración y deshu-
midificación, la temperatura aumenta 1°C
después de 30 minutos y 1°C adicional
después de cada 30 minutos para que
usted pueda dormir confortablemente.
La temperatura aumenta hasta 2°C con re-
specto a la temperatura predefinida.
FUNCIONES BÁSICAS
12
ESPAÑOL

El aparato de aire acondicionado ofrece fun-
ciones avanzadas adicionales.
Cambio rápida de la temper-
atura de la habitación
(Funcionamiento Jet Cool/calefac-
ción)
Este modo le permite enfriar el aire interior
rápidamente en verano, o calentarlo rápida-
mente en invierno.
1 Pulse dpara encender el aparato.
2 Pulse {.
- En el modo Jet Cool, se emite una fuerte
corriente de aire a una temperatura de
18°C durante 30 minutos.
- En el modo de calor rápido, se emite una
fuerte corriente de aire a una temperatura
de 30°C durante 30 minutos.
Purificación del aire interior
Funcionamiento de limpieza au-
tomática Auto Clean
Durante el funcionamiento de refrigeración y
deshumidificación, se genera humedad dentro
de la unidad de interior. Utilice la función de
limpieza automática para eliminar la humedad.
1 Pulse dpara encender el aparato.
2 Pulse c.
- Se muestra
J en la pantalla.
- Si apaga el aparato, el ventilador fun-
cionará durante 30 minutos y limpiará el
interior de la unidad de interior.
NOTA
!
• Esta función no se puede utilizar en los
modos de circulación de aire, Auto o
cambio automático.
• Esta función puede no estar disponible,
dependiendo del modelo.
ESPAÑOL
13
FUNCIONES AVANZADAS
NOTA
!
Algunos botones no pueden utilizarse du-
rante el funcionamiento de limpieza au-
tomática.
FUNCIONES AVANZADAS

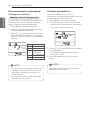
Funcionamiento automático
(Inteligencia artificial)
En este modo, la velocidad del ventilador y la
temperatura se ajustan automáticamente,
según la temperatura de la habitación.
1 Pulse dpara encender el aparato.
2 Pulse frepetidamente para seleccionar
el funcionamiento automático.
3 Pulse
o
o q para seleccionar el código
de funcionamiento deseado si la temper-
atura es superior o inferior a la temperatura
deseada.
Cambio automático
Este modo cambia el modo de fun-
cionamiento automáticamente para mantener
la temperatura seleccionada ±2°C
1 Pulse dpara encender el aparato.
2 Pulse fripetutamente per selezionare
l‘operazione di commutazione automatica.
- Se muestra
C en la pantalla.
3 Pulse
o
o q para seleccionar la temper-
atura deseada.
- La temperatura puede seleccionarse
entre 18°C y 30°C
4 Pulse g repeatedly to select the fan
speed.
FUNCIONES AVANZADAS
14
ESPAÑOL
NOTA
!
Esta función puede no estar disponible,
dependiendo del modelo.
Código
Descripción
2 Frío
Frío suave
Mantener
temperatura
de la habitación
Calor suave
Calor
1
0
-1
-2
NOTA
!
• En este modo no se puede ajustar la ve-
locidad del ventilador, pero sí se puede
hacer que el deflector de aire gire au-
tomáticamente.
• Esta función puede no estar disponible,
dependiendo del modelo.
Modelos sólo de refrigeración

Modo de refrigeración con
ahorro de energía
Este modo reduce el consumo de energía du-
rante la refrigeración y aumenta la temper-
atura seleccionada al nivel óptimo para lograr
un ambiente más agradable.
1 Pulse dto turn the power on.
2 Pulse frepetidamente para seleccionar la
función de refrigeración.
3 Pulse b.
- Se muestra
G en la pantalla.
Brillo de la pantalla
Se puede ajustar el brillo de la pantalla de la
unidad de interior.
1 Pulse
\
repetidamente para ajustar el
brillo al nivel deseado.
Utilización del aire acondi-
cionado sin el mando a distancia
Puede utilizar el botón On/Off de la unidad de
interior para utilizar el aire acondicionado
cuando no esté disponible el mando a distan-
cia. Sin embargo, la velocidad del ventilador se
ajustará en velocidad alta.
1 Abra la tapa frontal.
- Levante ligeramente ambos lados de la
tapa.
* La placa puede cambiar dependiendo del
tipo de modelo.
2 Pulse el botón On/Off.
* La placa puede cambiar dependiendo del
tipo de modelo.
- Para los modelos de frío y calor, cambia el
modo de funcionamiento, dependiendo
de la temperatura ambiente.
- Para modelos sólo de frío, la temperatura
se ajusta en 22°C
ESPAÑOL
15
FUNCIONES AVANZADAS
NOTA
!
Esta función puede no estar disponible,
dependiendo del modelo.
NOTA
!
Esta función puede no estar disponible,
dependiendo del modelo.
Temp
habitación
Ajuste temp
Modo de fun-
cionamiento
Menos de
21°C
24°C
Fun-
cionamiento
de calefacción
Más de 21°C
y menos de
24°C
23°C
Fun-
cionamiento
de deshumidi-
ficación
Más de 24°C 22°C
Fun-
cionamiento
de refrig-
eración

Reinicio automático del
aparato de aire acondicionado
Cuando se enciende de nuevo el aire acondi-
cionado después de un corte de suministro,
esta función restablece los ajustes previos.
Esta función es un ajuste de fábrica.
1 Abra la tapa frontal.
- Levante ligeramente ambos lados de la
tapa.
* La placa puede cambiar dependiendo del
tipo de modelo.
2 Pulse el botón On/Off y manténgalo pul-
sado durante 6 segundos.
- La unidad emitirá una señal acústica dos
veces y el indicador parpadeará 6 veces.
* La placa puede cambiar dependiendo del
tipo de modelo.
- Para reactivar la función, pulse el botón
On/Off y manténgalo pulsado durante 6
segundos. La unidad emitirá una señal
acústica dos veces y el indicador azul
parpadeará 4 veces.
FUNCIONES AVANZADAS
16
ESPAÑOL
Funzione di Riavvio automatico
NOTA
!
Si mantiene pulsado el botón On/Off du-
rante 3-5 segundos, en vez de 6 segun-
dos, la unidad cambiará al modo de
prueba de funcionamiento. En la prueba
de funcionamiento, la unidad emite una
fuerte corriente de aire frío durante 18
minutos y, posteriormente, vuelve a los
ajustes de fábrica.

MANTENIMIENTO
ESPAÑOL
17
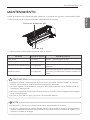
MANTENIMIENTO
Limpie el producto con regularidad para mantener un rendimiento óptimo y evitar posibles fallos.
* Esta función puede no estar disponible, dependiendo del modelo.
Elemento
Intervalo de limpieza
Método de limpieza
Filtro de aire 2 semanas Consulte “Limpieza del filtro de aire”
Filtro multi protección 3M 1 meses Consulte “Limpiar del Filtro multi protección 3M.”
Superficie de la unidad de interior Con regularidad
Utilice un trapo suave y seco. No utilice detergentes o
disolventes.
Unidad de exterior Con regularidad
Utilice vapor para limpiar los serpentines del intercambi-
ador térmico y las salidas de los paneles (consulte a un
técnico).
Filtro de aire
Filtro multi protección 3M
PRECAUCIÓN
• Apague el aparato y desconéctelo de la red antes de realizar cualquier trabajo de manten-
imiento; de lo contrario, podrían producirse descargas eléctricas.
• No utilice agua a una temperatura superior a 40°C para limpiar los filtros. Puede causar de-
formación y decoloración.
• No utilice sustancias volátiles para limpiar los filtros. Pueden dañar la superficie del aparato
de aire acondicionado.
• No lave el filtro 3M con agua, ya que el mismo podría dañarse.
!
NOTA
!
• La ubicación y forma de los filtros puede variar, dependiendo del modelo.
• Limpie los serpentines del intercambiador térmico de la unidad de exterior con regularidad,
porque la suciedad acumulada en los serpentines puede reducir la eficacia del aparato y au-
mentar los costes de energía.
* La placa puede cambiar dependiendo del tipo de modelo.

18
MANTENIMIENTO
ESPAÑOL
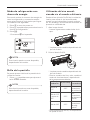
Limpieza del filtro del aire.
Limpie el filtro de aire una vez cada dos sem-
anas o más, si es necesario.
1 Apague el aparato y desconéctelo de la red.
2 Abra la tapa frontal.
- Levante ligeramente ambos lados de la
tapa.
* La placa puede cambiar dependiendo del
tipo de modelo.
3 Sujete la pestaña del filtro de aire, levántela
ligeramente y retírela del aparato.
* La placa puede cambiar dependiendo del
tipo de modelo.
4 Limpie los filtros con un aspirador o con
agua templada.
- Si tiene dificultad para eliminar la su-
ciedad, lave el filtro en agua templada con
detergente.
5 Seque el filtro a la sombra.
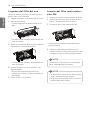
Limpiar del filtro multi protec-
ción 3M
1 Apague el aparato y desconéctelo de la red.
2 Abra la tapa frontal y retire el filtro de aire
(véase “Limpieza del filtro de aire”).
3 Extraiga el filtro multi protección 3M.
* La placa puede cambiar dependiendo del
tipo de modelo.
4 Utilice un aspirador para eliminar la su-
ciedad, No lave el filtro multi protección 3M
con agua, ya que el mismo podría dañarse.
NOTA
!
La ubicación y forma de los filtros puede
variar, dependiendo del modelo.
NOTA
!
• La ubicación y forma de los filtros puede
variar, dependiendo del modelo.
• Sugerimos que cambie el filtro multi pro-
tección 3M cada 6 meses.

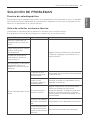
SOLUCIÓN DE PROBLEMAS
ESPAÑOL
19
Función de autodiagnóstico
Este producto tiene integrada una función de autodiagnóstico. Si se produce un error, el indicador
de la unidad de interior parpadeará en intervalos de 2 segundos. Si esto ocurre, póngase en con-
tacto con su distribuidor o un servicio técnico.
Antes de solicitar asistencia técnica
Compruebe lo siguiente antes de ponerse en contacto con el servicio técnico.
Si el problema no se soluciona, póngase en contacto con su servicio técnico.
Problema Causas posibles Acción correctiva
Hay olor a quemado y la
unidad emite un sonido ex-
traño.
-
Apague el aire acondicionado, desconecte
el enchufe y póngase en contacto con el
servicio técnico.
Fugas de agua de la unidad
interior, incluso con
humedad baja.
El cable de alimentación
está dañado o genera un
calor excesivo.
Un interruptor, un disyuntor
(seguridad, tierra) o un
fusible no funcionan correc-
tamente.
El aire acondicionado no fun-
ciona
El aparato de aire
acondicionado está
desconectado.
Compruebe que el enchufe está conectado
a la toma de red.
Se ha fundido un
fusible o la ali-
mentación eléctrica
está bloqueada.
Sustituya el fusible o compruebe si se ha
disparado el disyuntor.
Se ha producido un
fallo de corriente.
Apague el aparato de aire acondicionado
cuando se produzca un fallo de ali-
mentación eléctrica. Cuando se haya recu-
perado el suministro eléctrico, espere 3
minutos antes de volver a encender el aire
acondicionado.
La tensión es demasi-
ado baja o demasiado
alta.
Compruebe si se ha disparado el disyuntor.
El aire acondicionado
se apaga automática-
mente a una hora pre-
definida.
Pulse de nuevo el botón de encendido.
SOLUCIÓN DE PROBLEMAS

20
SOLUCIÓN DE PROBLEMAS
ESPAÑOL
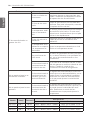
Problema Causas posibles Acción correctiva
El aire acondicionado no
genera aire frío.
El aire no circula cor-
rectamente.
Asegúrese de que no haya cortinas, per-
sianas o mobiliario que bloqueen el frente
del aparato de aire acondicionado.
El filtro de aire está
sucio.
Limpie el filtro del aire una vez cada dos
semanas. Para más información, consulte
“Limpieza del filtro de aire”.
La temperatura ambi-
ente es demasiado
alta.
En verano, puede necesitarse más tiempo
para enfriar el aire interior. En este caso,
seleccione el funcionamiento jet cool para
enfriar el aire rápidamente.
El aire frío sale de la
habitación.
Asegúrese de que no escape el aire frío a
través de puntos de ventilación de la
habitación.
La temperatura de la
habitación es superior
a la temperatura se-
leccionada.
Ajuste la temperatura deseada a un nivel
inferior a la temperatura actual.
Hay una fuente de
calor cerca.
No utilice un generador de calor, por ejem-
plo, un horno eléctrico o un quemador de
gas, con el aire acondicionado en fun-
cionamiento.
Se ha seleccionado el
funcionamiento de
circulación de aire.
En el caso de la circulación de aire, el aire
sale del aparato no enfría ni calienta el aire
interior. Cambie el modo de fun-
cionamiento al modo de refrigeración.
No se puede ajustar la ve-
locidad del ventilador.
Se ha seleccionado el
funcionamiento au-
tomático, jet cool o
deshumidificación.
En algunos de funcionamiento, como los
modos jet cool o deshumidificación, no se
puede ajustar la velocidad del ventilador.
Seleccione un modo de funcionamiento
en el que pueda ajustar la velocidad del
ventilador.
No se puede ajustar la tem-
peratura.
Se ha seleccionado el
funcionamiento de
circulación de aire o
jet cool.
En algunos de funcionamiento, como los
modos de circulación de aire o jet cool, no
se puede ajustar la velocidad del venti-
lador. Seleccione un modo de fun-
cionamiento en el que pueda ajustar la
temperatura.
Modelo
Voltaje
Frecuencia
Refrigeracion
Potencia Corriente
VR122CL 220 V~ 60 Hz NOR. 1 030 W / MAX. 1 280 W NOR. 4,9 A / MAX. 5,8 A
VR182CL 220 V~ 60 Hz NOR. 1 550 W / MAX. 1 800 W NOR. 7,2 A / MAX. 9,6 A
VR242CL 220 V~ 60 Hz NOR. 2 010 W / MAX. 2 200 W NOR. 9,2 A / MAX. 10,4 A

LG ELECTRONICS MEXICO, S.A. DE C.V.
Sor Juana lnés de la Cruz No. 555
Col. San Lorenzo Industrial
Tlalnepantla de Baz, Estado de México C.P. 54033
Tel. 5321 1919
Teléfono sin costo 01 800 347 1919
Página web http://www.lg.com.mx
-
 1
1
-
 2
2
-
 3
3
-
 4
4
-
 5
5
-
 6
6
-
 7
7
-
 8
8
-
 9
9
-
 10
10
-
 11
11
-
 12
12
-
 13
13
-
 14
14
-
 15
15
-
 16
16
-
 17
17
-
 18
18
-
 19
19
-
 20
20
-
 21
21
-
 22
22
-
 23
23
-
 24
24
-
 25
25
-
 26
26
-
 27
27
-
 28
28
-
 29
29
-
 30
30
-
 31
31
-
 32
32
-
 33
33
-
 34
34
-
 35
35
-
 36
36
-
 37
37
-
 38
38
-
 39
39
-
 40
40
-
 41
41


LG VR122CL Manual de usuario
- Categoría
- Acondicionadores de aire móviles
- Tipo
- Manual de usuario
en otros idiomas
- English: LG VR122CL User manual
Artículos relacionados
-
LG VM121CE El manual del propietario
-
LG VM182CJ Manual de usuario
-
LG SP242HN El manual del propietario
-
-
-
-
-
LG P09RL Standard Inverter V El manual del propietario
-
-
