La página se está cargando...

METRA. The World’s best kits.
™
metraonline.com
© COPYRIGHT 2004-2016 METRA ELECTRONICS CORPORATION
REV. 7/20/2016 INST02-3002
Installation instructions for part 02-3002
CAUTION!
All accessories, switches, climate controls panels, and
especially air bag indicator lights must be connected before cycling
the ignition. Also, do not remove the factory radio with the key in the
on position, or while the vehicle is running.
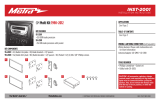
Works with any Metra GM J-body kit
• A) Mounting brackets • B) Tape strips
KIT FEATURES
KIT COMPONENTS
WIRING & ANTENNA CONNECTIONS (sold separately)
Wiring Harness: • 70-1858 / 70-1859 (amplified models)
Antenna Adapter: • 40-GM10
• Panel removal tool • 10mm socket wrench
TOOLS REQUIRED
GM SUV/Truck /Van 1995-2005
02-3002
A B
Dash Disassembly ..................................................2
Kit Assembly ...........................................................3
Table of Contents
APPLICATIONS
See application list inside cover

02-3002
2
1.
With the key in the on position, apply
the parking brake, place the shifter
into low gear, and then tilt the steering
wheel down as far as it will go
.
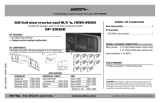
2. Unclip the factory dash panel,
unplug all switches, and then
remove the panel. (Figure A)
Note: Take precaution pulling the
panel over the factory hazard button
.
3. Depress the tabs securing the
factory radio and then remove.
Continue to kit assembly
Applications Dash Disassembly
CADILLAC
Escalade 1999-2000
Escalade 2002
Escalade EXT 2002
CHEVROLET
Astro 1996-2005
Express 1996-2000
Pickup 1995-2000
Silverado 1999-2002
Suburban 1995-2002
Tahoe 1995-2002
GMC
Pickup 1995-1998
Safari 1996-2005
Sierra 1999-2002
Sierra Classic 1999-2000
Sierra HD 2001-2002
Suburban 1995-1999
Savana 1996-2000
Yukon 1995-2002
Yukon XL 2000-2002
(Figure A)

02-3002
Kit Assembly
3
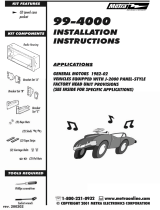
1.
Attach the 02-3002 brackets to the Metra
GM J-body kit (sold separately) using
the (2) carriage bolts and (2) Keps nuts
supplied
. (Figure A)
Astro / Express / Safari / Savana only:
Peel away the paper backings from the
tape strips and stick the strips to the
lower shelves of the mounting brackets.
(FIgure B)
2.
Follow the instructions provided with the
Metra GM J-body kit for installing the radio
.
3.
Locate the factory wiring harness and
antenna connector in the dash and
complete all necessary connections to the
radio. Metra recommends using the proper
mating adapter from Metra. Test the radio
for proper operation.
4. Slide the radio assembly into the dash
until the side clips engage. (Figure C)
5.
Reassemble the dash in reverse order of
disassembly
.
(Figure A)
(Figure B)
(Figure C)

METRA. The World’s best kits.
™
metraonline.com
© COPYRIGHT 2004-2016 METRA ELECTRONICS CORPORATION
REV. 7/20/2016 INST02-3002
KNOWLEDGE IS POWER
Enhance your installation and fabrication skills by
enrolling in the most recognized and respected
mobile electronics school in our industry.
Log onto www.installerinstitute.com or call
800-354-6782 for more information and take steps
toward a better tomorrow.
Metra recommends MECP
certified technicians
Installation instructions for part 02-3002
IMPORTANT
If you are having difficulties with the
installation of this product, please call our
Tech Support line at 1-800-253-TECH.
Before doing so, look over the instructions a
second time, and make sure the installation
was performed exactly as the instructions
are stated. Please have the vehicle apart
and ready to perform troubleshooting steps
before calling.

METRA. The World’s best kits.
™
metraonline.com
© COPYRIGHT 2004-2016 METRA ELECTRONICS CORPORATION
REV. 7/20/2016 INST02-3002
Instrucciones de instalación para la pieza 02-3002
¡PRECAUCIÓN!
Todos los accesorios, interruptores, paneles de con-
troles de clima y especialmente las luces del indicador de las bolsas
de aire deben estar conectados antes ciclar la ignición. Además, no
quite el radio de fábrica con la llave en la posición o de encendido ni
con el vehículo funcionando.
Funciona con cualquier Metra GM Kit de J-cuerpo
• A) Soportes de montaje • B) Tiras de cinta
CARACTERÍSTICAS DEL KIT
COMPONENTES DEL KIT
CABLEADO Y CONEXIONES DE ANTENA (se venden por separado)
Arnés de cableado: • 70-1858 / 70-1859 (modelos amplificados)
Adaptador de antena: • 40-GM10
• Herramienta para quitar paneles • llave de tubo 10mm
HERRAMIENTAS REQUERIDAS
GM SUV/Truck /Van 1995-2005
02-3002
A B
Desmontaje del tablero ..........................................2
Ensamble del kit .....................................................3
Indice
APLICACIONES
Ver interior de la portada

02-3002
2
1. Con la llave en la posición de
encendido, aplique el freno
de mano, ponga la palanca de
velocidades en marcha baja, y
después incline el volante hacia
abajo hasta donde llegue.
2. Desenganche el panel del tablero
de fábrica, desconecte todos los
interruptores y luego quite el panel.
(Figura A)
Nota: Tenga cuidado al jalar el
panel sobre el botón de las luces
intermitentes de fábrica
.
3. Presione las pestañas que sujetan
el radio de fábrica y luego quite.
Continúe con el ensamble del kit
Aplicaciones Desmontaje del tablero
CADILLAC
Escalade 1999-2000
Escalade 2002
Escalade EXT 2002
CHEVROLET
Astro 1996-2005
Express 1996-2000
Pickup 1995-2000
Silverado 1999-2002
Suburban 1995-2002
Tahoe 1995-2002
GMC
Pickup 1995-1998
Safari 1996-2005
Sierra 1999-2002
Sierra Classico 1999-2000
Sierra HD 2001-2002
Suburban 1995-1999
Savana 1996-2000
Yukon 1995-2002
Yukon XL 2000-2002
(Figura A)

02-3002
Ensamble del kit
3
1. Coloque los soportes 02-3002 con el kit
de cuerpo J de GM de Metra (se vende
por separado) usando los (2) pernos de
cabeza de hongo y las (2) tuercas keps
suministrados. (Figura A)
Astro / Express / Safari / Savana
solamente:
Despegue la soportes de papel de las
tiras de cinta y pegar las tiras a los
estantes inferiores de los soportes de
montaje. (Figura B)
2. Siga las instrucciones del kit de cuerpo
J de GM de Metra para instalar el radio.
3.
Localice el arnés de cableado de fábrica
y el conector de la antena en el tablero,
y haga todas las conexiones necesarias
al radio. Metra recomienda que use
adaptadores adecuados de acoplamiento
de Metra. Pruebe el radio para verificar
que funcione correctamente.
4. Deslice el conjunto de radio en el tablero
hasta que los ganchos laterales se
acoplan. (Figura C)
5. Vuelva a armar el tablero al revés de
como lo desarmó.
(Figura A)
(Figura B)
(Figura C)

METRA. The World’s best kits.
™
metraonline.com
© COPYRIGHT 2004-2016 METRA ELECTRONICS CORPORATION
REV. 7/20/2016 INST02-3002
KNOWLEDGE IS POWER
Enhance your installation and fabrication skills by
enrolling in the most recognized and respected
mobile electronics school in our industry.
Log onto www.installerinstitute.com or call
800-354-6782 for more information and take steps
toward a better tomorrow.
Metra recomienda técnicos
con certificación del Programa
de Certificación en Electrónica
Móvil (Mobile Electronics
Certification Program, MECP).
EL CONOCIMIENTO ES PODER
Mejore sus habilidades de instalación y
fabricación inscribiéndose en la escuela de
dispositivos electrónicos móviles más reconocida
y respetada de nuestra industria. Regístrese en
www.installerinstitute.com o llame al
800-354-6782 para obtener más información y
avance hacia un futuro mejor.
Instrucciones de instalación para la pieza 02-3002
IMPORTANTE
Si tiene dificultades con la instalación
de este producto, llame a nuestra línea
de soporte técnico al 1-800-253-TECH.
Antes de hacerlo, revise las instrucciones
por segunda vez y asegúrese de que la
instalación se haya realizado exactamente
como se indica en las instrucciones. Por
favor tenga el vehículo desarmado y listo
para ejecutar los pasos de resolución de
problemas antes de llamar.
1/8