
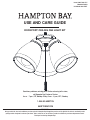
Item #1007 443 515
Model #52250
UL Model #LK-RPT
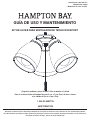
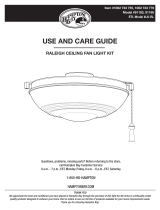
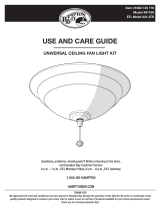
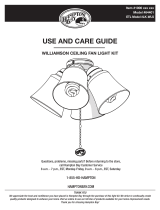
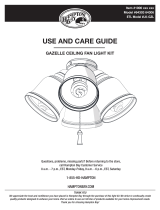
USE AND CARE GUIDE
ROCKPORT CEILING FAN LIGHT KIT
Questions, problems, missing parts? Before returning to the store,
call Hampton Bay Customer Service
8 a.m. - 7 p.m., EST, Monday-Friday, 9 a.m. - 6 p.m., EST, Saturday
1-855-HD-HAMPTON
HAMPTONBAY.COM
THANK YOU
We appreciate the trust and condence you have placed in Hampton Bay through the purchase of this light kit. We strive to continually create
quality products designed to enhance your home. Visit us online to see our full line of products available for your home improvement needs.
Thank you for choosing Hampton Bay!

2
Table of Contents ................................................................2
Safety Information ...............................................................2
Warranty ............................................................................... 2
Safety Information
Table of Contents
Warranty
CAUTION: To avoid accidental burning, allow the bulb
and glass shades to cool completely before touching or
replacing the glass shades or bulbs.
CAUTION: To reduce the risk of electrical shock, before
starting installation, disconnect the power by turning
off the circuit breaker or removing the fuse at the fuse
box. Turning the power off using the fan switch is not
sufcient.
The supplier warrants the light kit to be free from defects in workmanship and material present at time of shipment from the factory for three years
after the date of purchase by the original purchaser. We agree to correct such defects without charge or at our option replace with a comparable
or superior model if the product is returned. To obtain warranty service, you must present a copy of the receipt as proof of purchase. All costs of
removing and reinstalling the product are your responsibility. Damage to any part such as by accident, misuse, improper installation or by afxing
any accessories, is not covered by this warranty. Because of varying climatic conditions this warranty does not cover any changes in brass nish,
including rusting, pitting, corroding, tarnishing, or peeling. Brass nishes of this type give their longest useful life when protected from varying
weather conditions. Servicing performed by unauthorized persons shall render the warranty invalid. There is no other express warranty. Hampton
Bay hereby disclaims any and all warranties, including but not limited to those of merchantability and tness for a particular purpose to the extent
permitted by law. The duration of any implied warranty which cannot be disclaimed is limited to the time period as specied in the express warranty.
Some states do not allow a limitation on how long an implied warranty lasts, so the above limitation may not apply to you. The retailer shall not be
liable for incidental, consequential, or special damages arising out of or in connection with product use or performance except as may otherwise
be accorded by law. Some states do not allow the exclusion of incidental or consequential damages, so the above exclusion or limitation may not
apply to you. This warranty gives specic legal rights, and you may also have other rights which vary from state to state. This warranty supersedes
all prior warranties. Shipping costs for any return of product as part of a claim on the warranty must be paid by the customer.
Contact the Customer Service Team at 1-855-HD-HAMPTON or visit www.hamptonbay.com.
READ AND SAVE THESE INSTRUCTIONS.
CAUTION: To reduce the risk of electrical shock, this
light should be used only with the fan models listed
below:
WARNING: Changes or modications to this unit
not expressly approved by the party responsible
for compliance could void the user’s authority to
operate the equipment.
Models: 1005 071 850; 1004 755 222; 1004 755 230;
1001 673 208; 100 167 3215; 1001 673 210;
1002 263777; 1002 263 786; 1003 202 212;
1002 175 786
Manufactured by company:
Chien Luen Industries (Zhongshan) LTD
Pre-Installation ....................................................................3
Installation ............................................................................4
WARNING: This product must be installed in
accordance with the applicable installation code by
a person familiar with the construction and operation
of the product and the hazards involved.

3HAMPTONBAY.COM
Please contact 1-855-HD-HAMPTON for further assistance.
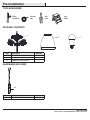
TOOLS REQUIRED
Phillips
screwdriver
Electrical
tape
Wire
cutter
Step
ladder
Part Description Quantity
A Light kit tter assembly 1
B Glass shades 3
C LED bulb, 6.5-watts maximum 3
PACKAGE CONTENTS
ABC
Pre-Installation
AA
Part Description Quantity
AA Pull Chain 1
HARDWARE INCLUDED

4
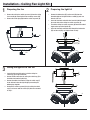
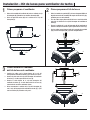
Preparing the light kit
Wiring the light kit to the fan
Preparing the fan
□Locate the blue and white wires inside the ceiling fan
switch cup (E) for light connection.
□Connect the blue wire from the ceiling fan switch cup (E) to
the black wire from the light kit (A).
□Connect the white wire from the ceiling fan switch cup (E)
to the white wire from the light kit (A) by connecting the
molded plugs together.
□Reattach the switch cup cover (D) to the ceiling fan switch
cup (E) and secure with the screws (BB) that were removed
in step 1.
□Remove the ceiling fan switch cup cover (D) from the ceiling
fan assembly by removing the three mounting screws (BB).
□Remove the center plug (CC) from the switch cup cover (D).
□Remove the lockwasher (EE) and hex nut (DD) from the
threaded nipple of the light kit tter assembly (A) and save
them for later use.
□Insert the black wire and white wire from the light kit through
the center hole of the ceiling fan switch cup cover (D).
□Thread the ceiling fan switch cup cover (D) onto the threaded
nipple on the top of the light kit (A).
□Insert the black wire and white wire through the lockwasher
(EE) and hex nut (DD), and tighten them securely.
2
3
1
D
BB
CC
Installation - Ceiling Fan Light Kit
D
DD
EE
A
BB
E
A
D

5HAMPTONBAY.COM
Please contact 1-855-HD-HAMPTON for further assistance.
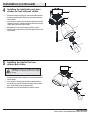
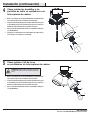
Installing the light kit for fans
without pull chains
Installing the light bulbs and glass
shades for fans with pull chains.
□Remove the compressing ring (FF) from the threadedsocket of
the light kit by turning thecompressing ringcounterclockwise
until it unlocks.
□Insert the glass shade (B) into the light kit cowling andturn
the compressing ring (FF) clockwise to tightenand secure the
glass shade. Repeat for theremaining shades.
□With power off, screw the LED bulbs (C)into the sockets.
□Remove the compressing ring (FF) from the threadedsocket of
the light kit by turning thecompressing ringcounterclockwise
until it unlocks.
□Insert the glass shade (B) into the light kit cowling andturn the
compressing ring (FF) clockwise to tightenand secure the glass
shade. Repeat for theremaining shades.
□With power off, screw the LED bulbs (C)into the sockets.
□Attach the pull chain extensions (AA) to the light pull chain and
fan pull chain.
5
4
Installation (continued)
CAUTION: You must rst turn the light on by using the
pull chain prior to using the remote control to operate
the light.
E
C
A
B
FF
AA
B
C
A
E
FF

Questions, problems, missing parts? Before returning to the store,
call Hampton Bay Customer Service
8 a.m. - 7 p.m., EST, Monday-Friday, 9 a.m. - 6 p.m., EST, Saturday
1-855-HD-HAMPTON
HAMPTONBAY.COM
Retain this manual for future use.
Net weight: 4 lb (1.82 kg)
This device complies with Part 15 of the FCC Rules. Operation is subject to the following two conditions:
(1) the device may not cause harmful interference, and (2) this device must accept any interference received, including interference that may cause
undesired operation.
Responsible Party - U.S. Contact Information: King of Fans, Inc 1951 NW 22nd Street, Fort Lauderdale, FL 33311, (954) 484-7500

Artículo núm. 1007 443 515
Modelo núm. 52250
Modelo de UL núm. LK-RPT
GUÍA DE USO Y MANTENIMIENTO
KIT DE LUCES PARA VENTILADOR DE TECHO ROCKPORT
¿Preguntas, problemas, piezas faltantes? Antes de devolver a la tienda,
llama al servicio al cliente de Hampton Bay entre 8 a.m. y 7 p.m. (Este), de lunes a viernes,
o los sábados de 9 a.m. a 6 p.m. (Este).
1-855-HD-HAMPTON
HAMPTONBAY.COM
GRACIAS POR TU COMPRA
Apreciamos la conanza que has depositado en Hampton Bay al comprar este kit de luces. Nos esforzamos en crear continuamente productos
de calidad diseñados para mejorar tu hogar. Visítanos por Internet para ver nuestra línea completa de productos disponibles a n de satisfacer tus
necesidades de mejoras del hogar. ¡Gracias por elegir Hampton Bay!

2
Tabla de contenido .............................................................. 2
Información de seguridad...................................................2
Garantía ................................................................................2
Información de seguridad
Tabla de contenido
Garantía
PRECAUCIÓN: Para evitar quemaduras accidentales, espera a
que la bombilla y la pantalla de vidrio se enfríen completamente
antes de tocarlas o reemplazar la pantalla de vidrio o las
bombillas.
PRECAUCIÓN: Para reducir el riesgo de descarga eléctrica,
antes de empezar la instalación, apaga el cortacircuitos o retira
el fusible en la caja correspondiente para cortar el suministro
de electricidad. Cortar el suministro de electricidad con el
interruptor del ventilador no es suciente.
El proveedor garantiza por tres años, a partir de la fecha de adquisición por el comprador original, que el kit de luces no presenta defectos de
fabricación ni de materiales al momento del envío desde la fábrica. Si el producto es devuelto, aceptamos reparar sus defectos sin cargo alguno o, a
nuestra discreción, reemplazarlo por un modelo similar o superior. Para obtener servicio de garantía tiene que presentar una copia del recibo como
comprobante de compra. Todos los costos de retiro y reinstalación del producto correrán por tu cuenta. Los daños a cualquier pieza por accidente,
instalación o uso inadecuado, o por montar cualquier accesorio, no están cubiertos por esta garantía. Puesto que las condiciones climáticas pueden
variar, esta garantía no cubre ningún cambio del acabado en latón, como óxido, perforación, corrosión, manchas o descascaramiento. Este tipo
de acabados en latón alargan la vida útil al proteger contra las condiciones climáticas cambiantes. Cualquier servicio prestado por personal no
autorizado invalidará la garantía. No hay ninguna otra garantía expresa. Por este medio y en el alcance permitido por la ley, Hampton Bay queda
exonerado de toda garantía, incluso, pero sin limitarse a ellas, aquellas de comercialización e idoneidad para un n determinado. La duración de
cualquier garantía implícita que no pueda negarse está limitada al período especicado en la garantía explícita. Algunos estados no permiten
limitaciones sobre la duración de las garantías implícitas, así que es posible que la limitación anterior no se aplique en su caso. El minorista no será
responsable por daños incidentales, emergentes ni especiales derivados del uso o funcionamiento del producto, excepto en los casos en los que
la ley así lo disponga. Algunos estados no permiten excluir ni limitar daños directos o indirectos, así que es posible que la limitación o exclusión
anterior no se aplique en este caso. Esta garantía otorga derechos legales especiales al cliente y es posible que también goce de otros derechos que
pueden variar según el estado. Esta garantía sustituye a todas las garantías anteriores. Los costos de envío en cualquier devolución de productos
como parte de una reclamación de garantía corren por cuenta del cliente.
Comuníquese con el equipo de servicio al cliente al 1-855-HD-HAMPTON o visite www.hamptonbay.com.
LEE Y GUARDA ESTAS INSTRUCCIONES.
PRECAUCIÓN: Para minimizar el riesgo de descarga eléctrica,
este kit de luces debe usarse sólo con los siguientes modelos
de ventilador:
ADVERTENCIA: Los cambios o modicaciones a esta unidad
sin previa aprobación expresa de la parte responsable de su
cumplimiento podrían anular el derecho del usuario a operar
el equipo.
Modelos: 1005 071 850; 1004 755 222; 1004 755 230;
1001 673 208; 100 167 3215; 1001 673 210;
1002 263777; 1002 263 786; 1003 202 212;
1002 175 786
Fabricado por la compañía:
Chien Luen Industries (Zhongshan) LTD
Preinstalación ......................................................................3
Instalación ............................................................................4
ADVERTENCIA: Este producto tiene que ser instalado de
acuerdo con los códigos pertinentes, por una persona
familiarizada con la estructura y operación del producto y
con los riesgos implícitos.

3HAMPTONBAY.COM
Llame al 1-855-HD-HAMPTON para mayor asistencia.
HERRAMIENTAS NECESARIAS
Destornillador
Phillips
Cinta de
electricista Cortacables Escalera
de tijera
Pieza Descripción Cantidad
A Ensamblaje del soporte del kit de luces 1
B Pantallas de vidrio 3
C Bombilla LED de 6.5 W como máximo 3
CONTENIDO DEL PAQUETE
ABC
Preinstalación
AA
Pieza Descripción Cantidad
AA Cadena del interruptor 1
HERRAJES INCLUIDOS

4
Cómo preparar el kit de luces
Cómo instalar el cableado
del kit de luces al ventilador
Cómo preparar el ventilador
□Localiza los cables azul y blanco dentro de la caja del
interruptor del ventilador de techo (E) para conectar las luces.
□Conecta el cable azul de la caja del interruptor del ventilador
de techo (E) al cable negro del kit de luces (A).
□Conecta el cable blanco de la caja del interruptor del
ventilador de techo (E) al cable blanco del kit de luces (A)
conectando los enchufes moldeados juntos.
□Alinea nuevamente la cubierta de la caja del interruptor (D)
con la caja del interruptor del ventilador de techo (E) y fíjala
con los tornillos (BB) retirados en el paso 1.
□Retira del ensamblaje del ventilador de techo su cubierta de caja
del interruptor (D) quitando los tres tornillos de montaje (BB).
□Retira el tapón del centro (CC) de la cubierta de la caja del
interruptor (D).
□Retira la arandela de seguridad (EE) y la tuerca hexagonal (DD) de la
boquilla enroscada del ensamblaje de acoples del kit de luces (A) y
guárdalas para usar más adelante.
□Pasa los cables negro y blanco del kit de luces a través del oricio
central de la cubierta de la caja del interruptor del ventilador de
techo (D).
□Enrosca la cubierta de la caja del interruptor (D) del ventilador de
techo en la boquilla roscada de la parte superior del kit de luces (A).
□Pasa los cables negro y blanco a través de la arandela de seguridad
(EE) y la tuerca hexagonal (DD), y ajústalas completamente.
2
3
1
D
BB
CC
Instalación - Kit de luces para ventilador de techo
D
DD
EE
A
BB
E
A
D

5HAMPTONBAY.COM
Llame al 1-855-HD-HAMPTON para mayor asistencia.
Cómo instalar el kit de luces
en ventiladores sin interruptores de cadena
Cómo instalar las bombillas y las
pantallas de vidrio en ventiladores con
interruptores de cadena
□Quita el aro compresor (FF) del portabombillas roscado del kit de
luces girando aquel hacia la izquierda hasta liberarlo.
□Inserta la pantalla de vidrio (B) en la cubierta del kit de luces y gira
el aro compresor (FF) hacia la derecha para ajustar y asegurar la
pantalla de vidrio. Repite para las pantallas restantes.
□Con la corriente desconectada, enrosca las bombillas LED (C) en
sus portabombillas.
□Engancha las extensiones de los interruptores de cadena (AA) a
estos últimos en la lámpara y el ventilador.
5
4
Instalación (continuación)
PRECAUCIÓN: Primero debes encender la luz usando
la cadena antes de usar el control remoto para operar
la luz.
E
C
A
B
FF
AA
B
C
A
E
FF

¿Preguntas, problemas, piezas faltantes? Antes de devolver a la tienda,
llama al servicio al cliente de Hampton Bay entre 8 a.m. y 7 p.m. (Este), de lunes a viernes,
o los sábados de 9 a.m. a 6 p.m. (Este).
1-855-HD-HAMPTON
HAMPTONBAY.COM
Conserva este manual para uso futuro.
Peso neto: 4 lb (1.82 kg)
Este dispositivo cumple con la Parte 15 de las Normas FCC. Su operación está sujeta a las dos condiciones siguientes:
(1) Este dispositivo no debe causar interferencia dañina y (2) tiene que aceptar cualquier interferencia recibida, incluyendo aquella que pudiera
afectar su funcionamiento.
Parte responsable - Información de contacto en EE. UU.: King of Fans, Inc 1951 NW 22nd Street, Fort Lauderdale, FL 33311, (954) 484-7500
-
 1
1
-
 2
2
-
 3
3
-
 4
4
-
 5
5
-
 6
6
-
 7
7
-
 8
8
-
 9
9
-
 10
10
-
 11
11
-
 12
12


Hampton Bay ROCKPORT 52250 Guía de instalación
- Tipo
- Guía de instalación
- Este manual también es adecuado para
en otros idiomas
Artículos relacionados
-
 Hampton Bay 52242 Guía de instalación
-
 Hampton Bay 91854 Guía de instalación
-
Hampton Bay 21907 Guía de instalación
-
-
 Hampton Bay 64401 Guía de instalación
-
 Hampton Bay 91183 Guía de instalación
-
 Hampton Bay 91169 Guía de instalación
-
 Hampton Bay 57231 Guía de instalación
-
 Hampton Bay 64401 Guía del usuario
-
 Hampton Bay 91306 Guía de instalación


