ProfiCare PC-HL 3116 Instrucciones de operación
- Tipo
- Instrucciones de operación

PC-HL3116_IM 29.06.23
Dieses Produkt ist nur für gut isolierte Räume oder für den gelegentlichen Gebrauch geeignet.
This product is only suitable for well insulated spaces or occasional use.
Dit product is niet geschikt voor gebruik als primaire verwarming.
Ce produit ne peut être utilisé que dans des locaux bien isolés ou de manière occasionnelle.
Este producto está indicado únicamente en lugares abrigados o para una utilización puntual.
Il presente prodotto non è adatto a funzioni di riscaldamento primario.
Ten produkt nie może służyć jako podstawowe źródło ogrzewania.
A termék helyiségek elsődleges fűtésére nem alkalmas!
Этот прибор пригоден только для хорошо изолированных комнат или для нечастого применения.
.
Bedienungsanleitung
Instruction Manual • Gebruiksaanwijzing • Mode d’emploi • Manual de instrucciones
Istruzioni per l’uso • Instrukcja obsługi / Gwarancja • Használati utasítás
Руководство по эксплуатации •
Wand-Keramik-Heizlüfter PC-HL 3116
Wall-mounted Ceramic Fan Heater • Keramische ventilatorkachel voor wandmontage
Chauffage à ventilateur céramique mural • Termoventilador cerámico de pared • Termoventilatore in ceramica a parete
Naścienny wentylator ceramiczny • Fali kerámia fűtőventilátor • Настенный керамический тепловентилятор

PC-HL3116_IM 29.06.23
Bedienungsanleitung ....................................................................................Seite 4
Instruction Manual ........................................................................................ Page 11
Gebruiksaanwijzing ................................................................................... Pagina 18
Mode d’emploi............................................................................................... Page 25
Manual de instrucciones .......................................................................... Página 32
Istruzioni per l’uso .....................................................................................Pagina 39
Instrukcja obsługi .......................................................................................Strona 46
Használati utasítás .......................................................................................Oldal 54
Руководство по эксплуатации .................................................................. стр. 61
72 ....................................................................................................................
2

PC-HL3116_IM 29.06.23
3
Übersicht der Bedienelemente
Overview of the Components • Overzicht van de bedieningselementen
Liste des différents éléments de commande • Indicación de los elementos de manejo
Elementi di comando • Przegląd elementów obsługi • A kezelőelemek áttekintése
Обзор деталей прибора •

4
PC-HL3116_IM 29.06.23
WICHTIG:
Lesen Sie unbedingt zuerst die separat beiliegenden Sicherheits-
hinweise.
Bedienungsanleitung
Vielen Dank, dass Sie sich für unser Produkt entschieden
haben. Wir wünschen Ihnen viel Freude mit dem Gerät.
Lesen Sie vor Inbetriebnahme dieses Gerätes die Be-
dienungsanleitung und die separat beiliegenden Sicher-
heitshinweise sehr sorgfältig durch. Bewahren Sie diese
Unterlagen inkl. Garantieschein, Kassenbon und nach
Möglichkeit den Karton mit Innenverpackung gut auf. Falls
Sie das Gerät an Dritte weitergeben, geben Sie auch immer
alle dazugehörigen Unterlagen mit.
Symbole in dieser Bedienungsanleitung
Wichtige Hinweise für Ihre Sicherheit sind besonders ge-
kennzeichnet. Beachten Sie diese Hinweise unbedingt, um
Unfälle und Schäden am Gerät zu vermeiden:
WARNUNG:
Warnt vor Gefahren für Ihre Gesundheit und zeigt mög-
liche Verletzungsrisiken auf.
ACHTUNG:
Weist auf mögliche Gefährdungen für das Gerät oder
andere Gegenstände hin.
Inhalt
Übersicht der Bedienelemente ..........................................3
Auspacken des Gerätes ..................................................... 4
Übersicht der Bedienelemente / Lieferumfang ................4
Warnhinweise für die Benutzung des Gerätes ................ 5
Anschlusswert .................................................................. 5
Umgang mit Batterien ......................................................5
Inbetriebnahme des Gerätes .............................................6
Wandmontage ................................................................. 6
Fernbedienung ................................................................ 7
Elektrischer Anschluss ..................................................... 7
Gerät einschalten ............................................................. 7
Notbedienung ...................................................................7
Anwendungshinweise ........................................................ 7
Bedienung............................................................................7
Ein- / Ausschalten ............................................................. 7
Schwenken der Luftklappe ..............................................7
Heizfunktion......................................................................7
Temperatur einstellen (Funktion TEMP) .......................... 7
Eingestellte Temperatur löschen ......................................8
Timer Funktion .................................................................8
Wochentimer einstellen ....................................................8
Eingestellten Wochentimer löschen.................................8
Erkennung für geöffnetes Fenster ...................................9
Betrieb beenden ...............................................................9
Überhitzungsschutz ...........................................................9
Reinigung .............................................................................9
Staub am Schutzgitter ......................................................9
Technische Daten ...............................................................9
Produktdatenblatt ...............................................................9
Entsorgung ........................................................................ 10
Batterieentsorgung .........................................................10
Bedeutung des Symbols „Mülltonne“ .............................10
Auspacken des Gerätes
1. Nehmen Sie das Gerät aus seiner Verpackung.
2. Entfernen Sie sämtliches Verpackungsmaterial, wie Fo-
lien, Füllmaterial, Kabelbinder und Kartonverpackung.
3. Prüfen Sie den Lieferumfang auf Vollständigkeit.
4. Sollte der Verpackungsinhalt unvollständig oder Beschä-
digungen feststellbar sein, nehmen Sie das Gerät nicht in
Betrieb. Bringen Sie es umgehend zum Händler zurück.
Übersicht der Bedienelemente /
Lieferumfang
Heizlüfter
1 Aussparungen
2 Display
3 Kontrollleuchte FAN (Ventilator)
4 Kontrollleuchte LOW (niedrig) (1000 Watt)
5 Kontrollleuchte HIGH (hoch) (2000 Watt)
6 Kontrollleuchte 24 / 7 (Wochentimer)
7 Kontrollleuchte TEMP (Temperatur)
8 Kontrollleuchte SWING (schwenken)
9 Netzschalter I / O (Ein- / Aus)
10 Taste START / STOP (starten / stoppen)
11 Abdeckung für die Heizstäbe / Luftauslass
12 Luftklappe

5
PC-HL3116_IM 29.06.23
Fernbedienung
1Gerät ein- bzw. ausschalten
2Schwenken der Luftklappe ein- bzw. ausschalten
3Erkennung für geöffnetes Fenster ein- bzw. aus-
schalten
4Zeitsteuerung aktivieren
5
OK
Eingabe bestätigen
6C
°
°
Deaktivieren der automatische Temperaturregelung
bzw. der wöchentliche Zeitsteuerung
7Temperatur verringern
8Batteriefach
9Temperatur erhöhen
10 Wöchentliche Zeitsteuerung einstellen
11 Automatische Temperaturregelung einstellen
12 Auswahl zwischen geringe Wärme (LOW), hohe
Wärme (HIGH) und Ventilatorbetrieb (FAN)
Ohne Abbildung
1 × Knopfzelle (CR 2025), bereits im Batteriefach der Fern-
bedienung eingelegt
2 × Dübel
2 × Schraube
Warnhinweise für die
Benutzung des Gerätes
• Das Heizgerät nicht unmittelbar unterhalb einer Wand-
steckdose aufhängen.
• Auf einen sicheren Abstand zwischen Stromkabel und
Gehäuse des Heizgeräts achten.
• Um eine Überhitzung des Heizgerätes zu vermeiden,
darf der Luftauslass nicht abgedeckt werden. Vorhänge,
Textilien und alle brennbaren Stoffe sind mindestens 1 m
vom Luftaustritt fernzuhalten.
• Das Heizgerät unter keinen Umständen in Räumen mit
explosivem Gas (z. B. Benzin) bzw. während der Arbeit
mit entammbarem Klebstoff oder Lösungsmittel (z. B.
beim Verkleben oder Lackieren von Parkett, PVC usw.)
benutzen.
• Das Heizgerät darf nicht in kleinen Räumen benutzt wer-
den, die von Personen bewohnt werden, die nicht selbst-
ständig den Raum verlassen können, es sein denn, eine
ständige Beaufsichtigung ist sichergestellt.
• Verstellen Sie den Schwenkmechanismus der Luftklappe
niemals mit der Hand. Der Mechanismus könnte Scha-
den nehmen.
• Wenn das Gerät nicht mehr benutzt wird, ziehen Sie
immer den Netzstecker aus der Steckdose.
Anschlusswert
Das Gerät kann eine Leistung von 2000 W aufnehmen.
ACHTUNG: Überlastung!
• Wenn Sie Verlängerungsleitungen benutzen, sollten
diese einen Leitungsquerschnitt von mindestens
1,5 mm² haben.
• Verwenden Sie keine Mehrfachsteckdose, da dieses
Gerät zu leistungsstark ist.
• Schließen Sie nicht noch weitere leistungsstarke
Geräte an den gleichen Stromkreis an.
Umgang mit Batterien
Batterien nicht auaden!
Batterien nicht öffnen!
Batterien nicht kurzschließen!
Von Kindern fernhalten!
Polarität (+ / −) beachten!
Explosionsgefahr!
Setzen Sie Batterien keiner hohen Wärme, wie z. B.
Sonnenschein, Feuer oder ähnlichem aus.
• Batterien können auslaufen und Batteriesäure verlieren.
Wird das Fernbedienung längere Zeit nicht genutzt, ent-
nehmen Sie die Batterien.
• Falls eine Batterie ausläuft, die Flüssigkeit nicht in die
Augen oder Schleimhäute reiben. Bei Berührung die
Hände waschen, die Augen mit klarem Wasser spülen.
Bei anhaltenden Beschwerden einen Arzt aufsuchen.
• Ungleiche Batterietypen und neue und gebrauchte Batte-
rien dürfen nicht zusammen verwenden werden.
• Batterien gehören nicht in den Hausmüll. Geben Sie ver-
brauchte Batterien bei zuständigen Sammelstellen oder
beim Händler ab.

6
PC-HL3116_IM 29.06.23
Inbetriebnahme des Gerätes
Eventuell sind empndliche Flächen, wie das Display, mit Folie ge-
schützt. Entfernen Sie diese Folien.
Wandmontage
Verwenden Sie das mitgelieferte Monta-
gematerial. Beachten Sie die folgenden
abgebildeten Montagezeichnungen.
• Achten Sie darauf, dass sich eine
Steckdose in der Nähe bendet. Die
Steckdose muss frei zugänglich sein.
• Vergewissern Sie sich vorher, dass
sich keine Leitungen in der Wand benden, die Sie bei der Mon-
tage beschädigen könnten.
• Bohren Sie die Löcher in einer Höhe von 2 m über dem Boden.
• Der Abstand zur Decke und zu den Wänden sollte mindestens
30 cm betragen.
1. Bohren Sie zwei Löcher mit einem Durchmesser
von 6 mm im Abstand von 315 mm.
2. Versehen Sie die Löcher mit den Dübeln und den Schrauben.
Lassen Sie die Schrauben circa 10 mm aus der Wand stehen.
3. Hängen Sie das Gerät mit den Aussparungen (A) an
die Schrauben. Schieben Sie das Gerät nun in Rich-
tung (B), um es zu xieren.
- Wenn Sie das Gerät wieder von der Wand nehmen möchten,
schieben Sie es von (B) zu (A) und heben das Gerät dann von
der Wand.

7
PC-HL3116_IM 29.06.23
Fernbedienung
Die Lithiumzelle im Batteriefach der Fern-
bedienung wurde für den Transport mit
einer Folie gesichert. Dadurch wird die Le-
bensdauer der Batterie verlängert. Vor dem
ersten Gebrauch muss die Folie entfernt
werden, damit die Fernbedienung einsatzbereit ist.
Achten Sie bei der Bedienung auf freie Sicht zwischen
Fernbedienung und dem Sensor im Display des Gerätes.
Wenn die Reichweite der Fernbedienung nachlässt, muss
die Batterie gewechselt werden. Gehen Sie zum Batterie-
wechsel wie folgt vor:
1. Drücken Sie die Verriegelung in Pfeil-
richtung (1).
2. Ziehen Sie die Halterung für die Knopf-
zelle aus der Fernbedienung (2).
3. Ersetzen Sie die Zelle durch eine
Batterie der gleichen Bauart (CR 2025).
Achten Sie auf die richtige Polarität.
4. Schieben Sie die Halterung wieder in das Batteriefach,
bis es einrastet.
Elektrischer Anschluss
1. Vergewissern Sie sich, dass Gerätespannung (siehe
Typenschild) und Netzspannung übereinstimmen.
2. Stellen Sie den Netzschalter an der rechten Seite vom
Gerät auf Position O.
3. Verbinden Sie den Netzstecker mit einer vorschriftsmä-
ßig installierten Schutzkontaktsteckdose.
Gerät einschalten
• Stellen Sie den Netzschalter an der rechten Seite vom
Gerät auf Position I. Das Gerät startet den Motor, um
die gegebenenfalls noch geöffnete Luftklappe zu ver-
schließen. Anschließend schaltet sich das Gerät in den
Standby-Modus.
• Die Bedienung erfolgt mittels Fernbedienung.
Notbedienung
Sie können das Gerät auch ohne Fernbedienung ein- und
ausschalten. Drücken Sie dazu die Taste START / STOP
neben dem Netzschalter.
1. Drücken Sie Taste, um das Gerät einzuschalten.
Das Gerät schaltet sich mit der Temperatur Einstellung
HIGH, Ventilator (FAN) und schwenken der Luftklappe
(SWING) ein.
2. Drücken Sie die Taste erneut, um das Gerät wieder
auszuschalten. Der Modus FAN wird für 30 Sekunden
gestartet und die Luftklappe wird geschlossen. Anschlie-
ßend schaltet sich das Gerät in den Standby-Modus.
Anwendungshinweise
• Das Gerät ist mit einem Überhitzungsschutz ausge-
stattet. Bei Erreichen einer Umgebungstemperatur von
51 °C schaltet sich das Gerät ab.
• Das Öffnen von Türen und Fenstern während des Heiz-
betriebes ist zu vermeiden, da dadurch die Heizwirkung
beeinträchtigt wird.
• Die aktuelle Umgebungstemperatur wird im Display
angezeigt.
• Das Gerät startet immer im Ventilator-Betrieb.
• Einstellungen können nur während des Betriebes vor-
genommen werden.
Bedienung
Ein- / Ausschalten
• Drücken Sie die Taste , um das Gerät einzuschalten.
Der Ventilator beginnt zu laufen. Die Kontrollleuchte FAN
leuchtet.
• Drücken Sie die Taste erneut, um das Gerät aus-
zuschalten. Wenn der Heizmodus aktiv war, wird der
Modus FAN für 30 Sekunden aktiviert und die Luftklappe
geschlossen. Danach schaltet das Gerät in den Standby-
Modus.
Schwenken der Luftklappe
Drücken Sie die Taste , um das Schwenken der Luft-
klappe ein- bzw. ausschalten. Die Kontrollleuchte SWING
leuchtet bei aktivierter Funktion.
Heizfunktion
Drücken Sie wiederholt die Taste , um zwischen den
folgenden Modi zu wechseln:
LOW =Geringe Temperatur und Ventilator.
Kontrollleuchte LOW und FAN leuchten.
HIGH =Hohe Temperatur und Ventilator.
Kontrollleuchte HIGH und FAN leuchten.
FAN =Nur der Ventilator ist aktiv.
Kontrollleuchte FAN leuchtet.
Temperatur einstellen (Funktion TEMP)
Das Gerät wählt automatisch die Heizstufe entsprechend
der eingestellten Temperatur. Sobald die eingestellte Tem-
peratur erreicht ist, schaltet das Gerät die Heizung ab.
Der einstellbare Temperaturbereich liegt zwischen 18 °C
und 45 °C.
1. Drücken Sie die Taste .
2. Stellen Sie die gewünschte Temperatur mit den Tasten
und ein.
3. Bestätigen Sie die Eingabe mit der Taste
OK
. Das ge-
wünschte Temperaturniveau wird automatisch gehalten.
Die Kontrollleuchte TEMP leuchtet. Dies zeigt an, dass die
Funktion aktiviert ist.

8
PC-HL3116_IM 29.06.23
Eingestellte Temperatur löschen
Gehen Sie wie folgt vor, um die zuvor eingestellte Tempera-
tur zu löschen:
1. Drücken Sie zuerst die Taste .
2. Um die Einstellung zu löschen, drücken Sie jetzt die
Taste C
°
°
. Die Kontrollleuchte TEMP erlischt.
Timer Funktion
Sie können das Gerät so einstellen, dass es für eine be-
stimmte Zeit in Betrieb ist.
1. Drücken Sie wiederholt die Taste , um zwischen einer
Stunde ( ) und acht Stunden ( ) auszuwählen. Die
Einstellung ( ) deaktiviert die Funktion.
2. Nach Ablauf der eingestellten Zeit ertönt ein Piepton und
das Gerät startet einen Countdown von 30 Sekunden.
Das Gerät schaltet nach Ablauf des Countdowns in den
Standby-Modus.
- Die aktivierte Funktion wird aus technischen Gründen
nicht angezeigt.
- Die Funktion kann nicht gewählt werden, wenn der
Wochentimer aktiv ist.
Wochentimer einstellen
• Der Wochentimer kann nicht eingestellt werden, wenn
sich das Gerät im Ventilator-Betrieb bendet.
• Der Wochentimer kann auch mit der Funktion TEMP,
der Funktion SWING und der Funktion „Erkennung für
geöffnetes Fenster“ kombiniert werden.
• Um den Wochentimer nutzen zu können, müssen Sie
zuerst die aktuelle Uhrzeit einstellen. Die aktuelle Uhrzeit
muss bei der Erstinbetriebnahme des Gerätes und jedes
Mal, wenn das Gerät vom Netz getrennt wird, eingestellt
werden.
• Die Wochentage werden durch folgende Ziffern im
Display angezeigt:
=
=
=
=
Montag
Dienstag
Mittwoch
Donnerstag
=
=
=
Freitag
Samstag
Sonntag
Aktuelle Uhrzeit einstellen:
1. Drücken Sie die Taste . Die Anzeige (Montag)
erscheint im Display.
2. Wählen Sie den aktuellen Wochentag mit der Taste
oder . Bestätigen Sie die Eingabe mit der Taste
OK
.
3. Eingabe der Stunden:
Im Display erscheint . Die Einstellung erfolgt mit den
Tasten / . Bestätigen Sie die Eingabe mit der Taste
OK
.
4. Eingabe der Minuten:
Im Display erscheint . Die Einstellung erfolgt mit den
Tasten / . Bestätigen Sie die Eingabe mit der Taste
OK
.
Wochentimer auswählen:
• Das Gerät verfügt über vorprogrammierte Wochentimer
( bis ) und einen individuell programmierbaren
Wochentimer ( ).
• Beim Wochentimer muss die Einstellung für alle
Wochentage vorgenommen werden. Es können nur
Stunden, keine Minuten eingestellt werden. Die Stopp-
zeit muss nach der Startzeit liegen.
• Wird der Wochentimer in dem ausgewählten Modus
eingestellt, läuft das Gerät bis zur Stoppzeit. Außer-
halb des gewählten Modus läuft der Ventilator noch
30 Sekunden weiter. Danach schaltet das Gerät in den
Standby-Modus.
• Die aktivierte Funktion wird durch Blinken der Kontroll-
leuchten 24 / 7 und LOW bzw. HIGH angezeigt. Sobald
sich das Gerät einschaltet, leuchten die Kontrollleuchten.
• Nachfolgend nden Sie eine Liste der vorprogrammier-
ten Wochentimer:
Modus Wochentage Uhrzeit
Montag – Sonntag 8:00 – 17:00
Montag – Sonntag 18:00 – 7:00*
Montag – Freitag 8:00 – 17:00
Montag – Freitag 18:00 – 7:00*
Samstag – Sonntag 0:00 – 23:59
* Das Gerät läuft bis zum nächsten Morgen.
1. Drücken Sie wiederholt die Taste , um den gewünsch-
ten Wochentimer auszuwählen.
2. Bestätigen Sie Ihre Auswahl mit der Taste
OK
.
3. Individuell programmierbaren Wochentimer:
Bei der Auswahl des Wochentimer erscheint jetzt die
Anzeige (Montag) im Display.
4. Wählen Sie den gewünschten Wochentag (Montag) bis
(Sonntag) mit der Taste oder . Bestätigen Sie die
Eingabe mit der Taste
OK
.
5. Stellen Sie jetzt die Startzeit mit der Taste oder ein.
6. Bestätigen Sie Ihre Auswahl mit der Taste
OK
.
7. Stellen Sie die Stoppzeit mit der Taste oder ein.
8. Bestätigen Sie die Eingabe mit der Taste
OK
, wenn Sie
einen weiteren Wochentag einstellen wollen. Ansonsten
warten Sie bis das Gerät langsam die Wochentage bis
durchläuft. Dabei wird dann die Voreinstellung über-
nommen.
Eingestellten Wochentimer löschen
Gehen Sie wie folgt vor, um den zuvor eingestellten Wo-
chentimer zu löschen:
1. Drücken Sie zuerst die Taste .
2. Um die Einstellung zu löschen, drücken Sie jetzt die
Taste C
°
°
. Die Kontrollleuchte 24 / 7 erlischt.

9
PC-HL3116_IM 29.06.23
Erkennung für geöffnetes Fenster
• Die Funktion kann nur ausgewählt werden, wenn sich
das Gerät in der Heizfunktion oder in der Funktion TEMP
bendet.
• Das Gerät führt in regelmäßigen Abständen eine Tempe-
raturkontrolle durch und schaltet sich ab, wenn die Tem-
peraturdifferenz zur vorherigen Umgebungstemperatur
drastisch absinkt. Im Display wird angezeigt.
1. Drücken Sie die Taste , um die Funktion einzuschal-
ten. Die Kontrollleuchte TEMP beginnt zu blinken.
2. Drücken Sie die Taste erneut, um die Funktion wieder
auszuschalten.
Betrieb beenden
1. Drücken Sie die Taste , um das Gerät auszuschalten.
Wenn der Heizmodus aktiv war, wird der Modus FAN für
30 Sekunden aktiviert und die Luftklappe geschlossen.
Danach schaltet das Gerät in den Standby-Modus.
2. Stellen Sie den Netzschalter an der rechten Seite vom
Gerät auf Position O.
3. Ziehen Sie dann den Netzstecker aus der Steckdose.
Überhitzungsschutz
Das Gerät ist mit einem Überhitzungsschutz ausgestattet,
der bei Überhitzung das Gerät automatisch ausschaltet.
1. Stellen Sie den Netzschalter an der rechten Seite vom
Gerät auf Position O. Ziehen Sie dann den Netzstecker
aus der Steckdose.
2. Lassen Sie das Gerät ca. 10 Minuten abkühlen, bevor
Sie es erneut verwenden.
- Sollte der Überhitzungsschutz das Gerät nach kurzer
Zeit wieder abschalten, liegt vermutlich ein Defekt vor.
Schalten Sie das Gerät wieder aus und trennen Sie es
vom Netz. Lassen Sie das Gerät von Ihrem Händler oder
unserem Service überprüfen.
Reinigung
WARNUNG:
• Ziehen Sie vor der Reinigung immer den Netzstecker
aus der Steckdose und warten Sie ab, bis das Gerät
abgekühlt ist.
• Das Gerät auf keinen Fall zum Reinigen ins Wasser
tauchen. Es könnte zu einem elektrischen Schlag oder
Brand führen.
ACHTUNG:
• Benutzen Sie keine Drahtbürste oder andere scheu-
ernde Gegenstände.
• Benutzen Sie keine scharfen oder scheuernden
Reinigungsmittel.
• Wischen Sie Staub mit einem trockenen Tuch ab.
• Flecken entfernen Sie mit einem mäßig feuchten Tuch.
Staub am Schutzgitter
Hat sich Staub am Schutzgitter gesammelt, kann dies zur
Überhitzung führen.
• Bürsten Sie den Staub vorsichtig ab.
oder
• Verwenden Sie die Polsterdüse Ihres Staubsaugers, um
den Staub zu entfernen.
Technische Daten
Modell: ................................................................. PC-HL 3116
Spannungsversorgung: ......................220 – 240 V~, 50 – 60 Hz
Leistungsaufnahme:....................................................2000 W
Schutzklasse: .......................................................................
Nettogewicht: ...........................................................ca. 2,4 kg
Technische und gestalterische Änderungen im Zuge stetiger
Produktentwicklungen vorbehalten.
Dieses Gerät wurde nach allen zutreffenden, aktuellen
CE-Richtlinien geprüft und nach den neuesten sicherheits-
technischen Vorschriften gebaut.
Produktdatenblatt
Modell PC-HL 3116
Angabe Symbol Wert Einheit Angabe Einheit
Wärmeleistung Nur bei elektrischen Speicher-Einzelraumheizgeräten:
Art der Regelung der Wärmezufuhr
Nennwärmeleistung Pnom 2,0 kW manuelle Regelung der Wärmezufuhr mit
integriertem Thermostat nein
Mindestwärme-
leistung (Richtwert) Pmin 1,0 kW manuelle Regelung der Wärmezufuhr mit Rückmeldung der
Raum- und / oder Außentemperatur nein
Maximale kontinuier-
liche Wärmeleistung Pmax, c 2,0 kW elektronische Regelung der Wärmezufuhr mit Rückmeldung
der Raum- und / oder Außentemperatur nein

10
PC-HL3116_IM 29.06.23
Hilfsstromverbrauch Wärmeabgabe mit Gebläseunterstützung nein
Bei Nennwärme-
leistung el
max N / A kW Art der Wärmeleistung / Raumtemperaturkontrolle
Bei Mindestwärme-
leistung el
min N / A kW einstuge Wärmeleistung, keine Raumtemperaturkontrolle nein
Im Bereitschafts-
zustand el
SB 0,0006 kW zwei oder mehr manuell einstellbare Stufen,
keine Raumtemperaturkontrolle nein
Raumtemperaturkontrolle mit mechanischem Thermostat nein
mit elektronischer Raumtemperaturkontrolle nein
elektronische Raumtemperaturkontrolle und
Tageszeitregelung nein
elektronische Raumtemperaturkontrolle und
Wochentagsregelung ja
Sonstige Regelungsoptionen
Raumtemperaturkontrolle mit Präsenzerkennung nein
Raumtemperaturkontrolle mit Erkennung offener Fenster ja
mit Fernbedienungsoption nein
mit adaptiver Regelung des Heizbeginns nein
mit Betriebszeitbegrenzung ja
mit Schwarzkugelsensor nein
Kontaktangaben Clatronic International GmbH, Industriering Ost 40, 47906 Kempen, Deutschland
N / A = nicht anwendbar
Entsorgung
Batterieentsorgung
Als Verbraucher sind Sie gesetzlich verpichtet,
gebrauchte Batterien / Akkus zurückzugeben.
Ihr Gerät enthält Batterien. Sind diese Batterien
verbraucht, beachten Sie Folgendes:
ACHTUNG:
Batterien / Akkus dürfen nicht mit dem Hausmüll entsorgt
werden!
• Entfernen Sie die Batterie(n) aus der Fernbedienung,
bevor Sie das Gerät entsorgen.
• Geben Sie verbrauchte Batterien bei zuständigen Sam-
melstellen oder beim Händler ab.
• Informationen über öffentlichen Sammelstellen erhalten
Sie in Ihrer Stadt oder Gemeinde.
Bedeutung des Symbols „Mülltonne“
Schonen Sie unsere Umwelt, Elektrogeräte ge-
hören nicht in den Hausmüll.
Nutzen Sie die für die Entsorgung von Elektro-
geräten vorgesehenen Sammelstellen und
geben dort Ihre Elektrogeräte ab, die Sie nicht
mehr benutzen werden.
Sie helfen damit die potenziellen Auswirkungen, durch
falsche Entsorgung, auf die Umwelt und die menschliche
Gesundheit zu vermeiden.
Sie leisten damit Ihren Beitrag zur Wiederverwertung, zum
Recycling und zu anderen Formen der Verwertung von
Elektro- und Elektronik-Altgeräten.
Informationen, wo die Geräte zu entsorgen sind, erhalten
Sie über Ihre Kommunen oder die Gemeindeverwaltungen.
Ihr Händler und Vertragspartner ist ebenfalls zur kosten-
freien Rücknahme des Altgerätes verpichtet.

PC-HL3116_IM 29.06.23
11
IMPORTANT:
Be sure to read the separately enclosed safety instructions rst.
Instruction Manual
Thank you for choosing our product. We hope you will enjoy
using the appliance.
Read the instruction manual and the separately enclosed
safety instructions very carefully before using this appliance.
Keep these documents, including the warranty certicate,
receipt and, if possible, the box with the inner packaging in
a safe place. If you pass the appliance on to a third party,
always include all the relevant documents.
Symbols in this Instruction Manual
Important information for your safety is specially marked.
It is essential to comply with these instructions in order to
avoid accidents and prevent damage to the appliance:
WARNING:
This warns you of dangers to your health and indicates
possible injury risks.
CAUTION:
This refers to possible hazards to the appliance or other
objects.
Content
Overview of the Components ............................................3
Unpacking the Appliance ................................................. 11
Overview of the Components / Scope of Delivery .........11
Warnings for the Use of the Appliance ..........................12
Connected Load .............................................................12
Handling Batteries ..........................................................12
Putting the Appliance into Operation ............................. 12
Wall Mounting ................................................................12
Remote control .............................................................. 13
Electric Connection ........................................................13
Switching the Appliance On ...........................................13
Easy Operation ..............................................................13
Notes for Use .....................................................................13
Operation ...........................................................................14
Switching On / Off ...........................................................14
Swivelling the Air Flap .................................................... 14
Heating Function ............................................................ 14
Setting the Temperature (TEMP Function) .................... 14
Deleting the Set Temperature ........................................ 14
Timer Function ...............................................................14
Setting the Weekly Timer ............................................... 14
Deleting the Set Week Timer ......................................... 15
Open Window Detection ................................................ 15
Ending Operation ...........................................................15
Overheat Protection .........................................................15
Cleaning ............................................................................. 15
Dust on the Protective Grille ..........................................15
Technical Data ...................................................................15
Product Data Sheet ...........................................................16
Disposal .............................................................................16
Battery Disposal ............................................................. 16
Meaning of the “Dustbin” Symbol ..................................16
Unpacking the Appliance
1. Remove the appliance from its packaging.
2. Remove all packaging material, such as foils, lling
material, cable ties and cardboard packaging.
3. Check the scope of delivery for completeness.
4. If the contents of the packaging are incomplete or if
damage can be detected, do not operate the appliance.
Return it to the dealer immediately.
Overview of the Components /
Scope of Delivery
Fan heater
1 Recesses
2 Display
3 Control lamp FAN (fan)
4 Control lamp LOW (low) (1000 watts)
5 Control lamp HIGH (high) (2000 watts)
6 Control lamp 24 / 7 (weekly timer)
7 Control lamp TEMP (temperature)
8 Control lamp SWING (swivel)
9 Mains switch I / O (on / off)
10 START / STOP button (start / stop)
11 Cover for the heating elements / air outlet
12 Air ap
Remote control
1Switching the appliance on or off
2Switching the swivel of the air ap on or off
3Activate / deactivate detection for open window
4Activate time control
5
OK
Conrm input
6C
°
°
Deactivate automatic temperature control or
weekly time control
7Decrease temperature
8Battery compartment
9Increase temperature
10 Set weekly time control
11 Set automatic temperature control
12 Select between low heat (LOW), high heat (HIGH)
and fan mode (FAN)

PC-HL3116_IM 29.06.23
12
Without Illustration
1 × Button cell (CR 2025), already inserted in the battery
compartment of the remote control
2 × Wall plug
2 × Screw
Warnings for the Use of the Appliance
• Do not hang the heater directly below a wall socket.
• Ensure that a safety distance is maintained between the
power cord and the housing.
• To prevent the heater from overheating, the air outlet
should not be covered. Curtains, textiles and all combus-
tible materials must be kept at least 1 m away from the
air outlet.
• Under no circumstances may the fan heater be used in
rooms with explosive gas (e. g. petrol) or while work is
being carried out with inammable adhesives or solvents
(e. g. when gluing or painting parquet, PVC etc.).
• Do not use this heater in small rooms when they are
occupied by persons not capable of leaving the room on
their own, unless constant supervision is provided.
• Never adjust the swivel mechanism of the air ap with
your hand. The mechanism could be damaged.
• When the appliance is no longer in use, always discon-
nect the mains plug from the socket.
Connected Load
The appliance supports a power input of 2000 W.
CAUTION: Overload!
• When using an extension cord, it must have a cable
cross-section of at least 1.5 mm².
CAUTION: Overload!
• Do not use a multiple socket as this appliance is too
powerful.
• Do not connect any other powerful devices to the
same electric circuit.
Handling Batteries
Do not charge batteries!
Do not disassemble batteries!
Do not short-circuit batteries!
Keep away from children!
Observe polarity (+ / −)!
Danger of explosion!
Do not expose batteries to intense heat, such as
sunshine, re or similar.
• Batteries can leak battery acid. If the remote control
will not be used for a longer period of time, remove the
batteries.
• If a battery leaks, do not rub the liquid into the eyes or
mucous membranes. In case of contact, wash hands,
rinse eyes with clean water. Seek medical attention if any
discomfort persists.
• Different battery types and new and used batteries must
not be used together.
• Batteries are not to be disposed of together with do-
mestic wastes. Return used batteries to the responsible
collection points or to the dealer.
Putting the Appliance into Operation
Sensitive surfaces, such as the display, may be protected with plas-
tic lm. Remove these plastic lms.
Wall Mounting
Use the mounting material supplied. Ob-
serve the following installation drawings.
• Make sure that there is a power socket
nearby. The socket must be freely
accessible.

PC-HL3116_IM 29.06.23
13
• Make sure beforehand that there are no cables in the wall that
could be damaged during installation.
• Drill the holes at a height of 2 m above the oor.
• The distance to the ceiling and walls should be at least 30 cm.
1. Drill two holes with a diameter of 6 mm at a dis-
tance of 315 mm.
2. Provide the holes with the wall plugs and the
screws. Leave the screws protruding about 10 mm from the wall.
3. Hang the appliance with the recesses (A) on the
screws. Now push the appliance in direction (B) to x it.
- When you want to take the appliance off the wall
again, slide it from (B) to (A) and then lift the appliance off the
wall.
Remote control
The lithium cell in the battery compartment
of the remote control has been secured with
a plastic lm for transport. This prolongs the
life of the battery. Before using the remote
control for the rst time, the plastic lm must be removed so
that it is ready for use.
When operating the appliance, make sure that there is a
clear line of sight between the remote control and the sen-
sor in the display of the appliance. When the range of the
remote control decreases, the battery must be changed. To
change the battery, proceed as follows:
1. Press the lock in the direction of the
arrow (1).
2. Pull the holder for the button cell out of
the remote control (2).
3. Replace the cell with a battery of the
same type (CR 2025). Make sure that
the polarity is correct.
4. Push the holder back into the battery compartment until
it clicks into place.
Electric Connection
1. Make sure the voltage of the appliance (see rating label)
matches the mains voltage to be used.
2. Set the mains switch on the right side of the appliance to
the O position.
3. Connect the mains plug with a properly installed earthed
socket.
Switching the Appliance On
• Set the mains switch on the right-hand side of the appli-
ance to position I. The appliance starts the motor to close
the air ap, which may still be open. The appliance then
switches to standby mode.
• The appliance is operated via the remote control.
Easy Operation
You can also switch the appliance on and off without the
remote control. To do so, press the START / STOP button
next to the mains switch.
1. Press the button to switch the appliance on.
The appliance switches on with the temperature setting
HIGH, fan (FAN) and swinging of the air ap (SWING).
2. Press the button again to switch the appliance off. The
FAN mode is started for 30 seconds and the air ap is
closed. The appliance then switches to standby mode.
Notes for Use
• The appliance is equipped with overheating protection.
When the ambient temperature reaches 51 °C, the
appliance switches off.
• Avoid opening doors and windows during heating opera-
tion, as this will impair the heating effect.
• The current ambient temperature is displayed.
• The appliance always starts in fan mode.
• Settings can only be made during operation.

PC-HL3116_IM 29.06.23
14
Operation
Switching On / Off
• Press the button to switch on the appliance. The fan
starts to operate. The control lamp FAN lights up.
• Press the button again to switch off the appliance. If
the heating mode was active, the FAN mode is activated
for 30 seconds and the air ap is closed. The appliance
then switches to standby mode.
Swivelling the Air Flap
Press the button to switch the air ap swinging on or
off. The control lamp SWING lights up when the function is
activated.
Heating Function
Press the button repeatedly to switch between the
following modes:
LOW =Low temperature and fan.
Control lamp LOW and FAN light up.
HIGH =High temperature and fan.
Control lamp HIGH and FAN light up.
FAN =Only the fan is active.
Control lamp FAN light up.
Setting the Temperature (TEMP Function)
The appliance automatically selects the heating level ac-
cording to the set temperature. As soon as the set tempera-
ture is reached, the appliance switches off the heating.
The adjustable temperature range is between 18 °C and
45 °C.
1. Press the button.
2. Set the desired temperature with the and buttons.
3. Conrm the entry with the
OK
button. The desired tem-
perature level is automatically maintained.
The control lamp TEMP lights up. This indicates that the
function is activated.
Deleting the Set Temperature
Proceed as follows to delete the previously set temperature:
1. First press the button.
2. To delete the setting, now press the C
°
°
button. The
control lamp TEMP goes out.
Timer Function
You can set the appliance to operate for a certain time.
1. Press the button repeatedly to select between one
hour ( ) and eight hours ( ). The setting ( ) disa-
bles the function.
2. After the set time has elapsed, a beep sounds and the
appliance starts a 30-second countdown. The appliance
switches to standby mode after the countdown has
elapsed.
- The activated function is not displayed for technical
reasons.
- The function cannot be selected when the weekly timer
is active.
Setting the Weekly Timer
• The weekly timer cannot be set when the appliance is in
fan mode.
• The weekly timer can also be combined with the TEMP
function, the SWING function and the “Open Window
Detection” function.
• To use the weekly timer, you must rst set the current
time. The current time must be set when the appliance
is rst put into operation and every time the appliance is
disconnected from the mains.
• The days of the week are indicated by the following digits
in the display:
=
=
=
=
Monday
Tuesday
Wednesday
Thursday
=
=
=
Friday
Saturday
Sunday
Set the Current Time:
1. Press the button. The indication (Monday) ap-
pears in the display.
2. Select the current day of the week with the or
button. Conrm the entry with the
OK
button.
3. Entering the hours:
appears in the display. The setting is made with the
/ buttons. Conrm the entry with the
OK
button.
4. Enter the Minutes:
appears in the display. The setting is made with the
/ buttons. Conrm the entry with the
OK
button.
Select the Weekly Timer:
• The appliance has pre-programmed week timers ( to
) and an individually programmable week timer ( ).
• With the weekly timer , the setting must be made for
all days of the week. Only hours can be set, not minutes.
The stop time must be after the start time.
• If the weekly timer is set in the selected mode, the appli-
ance runs until the stop time. Outside the selected mode,
the fan continues to run for 30 seconds. After that, the
appliance switches to standby mode.
• The activated function is indicated by the control lamps
24 / 7 and LOW or HIGH ashing. As soon as the appli-
ance switches on, the control lamps light up.
• The following is a list of the pre-programmed weekly
timers:
Mode Weekdays Time
Monday – Sunday 8:00 – 17:00
Monday – Sunday 18:00 – 7:00*
Monday – Friday 8:00 – 17:00

PC-HL3116_IM 29.06.23
15
Mode Weekdays Time
Monday – Friday 18:00 – 7:00*
Saturday – Sunday 0:00 – 23:59
* The appliance runs until the next morning.
1. Press the button repeatedly to select the desired
weekly timer.
2. Conrm your selection with the
OK
button.
3. Individually programmable weekly timer:
When selecting the week timer , the display now
shows (Monday).
4. Select the desired weekday (Monday) to (Sunday)
with the or button. Conrm the entry with the
OK
button.
5. Now set the start time with the or button.
6. Conrm your selection with the
OK
button.
7. Set the stop time with the or button.
8. Conrm the entry with the
OK
button if you want to set an-
other day of the week. Otherwise, wait until the appliance
slowly scrolls through the weekdays until . The default
setting is then applied.
Deleting the Set Week Timer
Proceed as follows to delete the previously set week timer:
1. First press the button.
2. To delete the setting, now press the C
°
°
button. The
control lamp 24 / 7 goes out.
Open Window Detection
• The function can only be selected when the appliance is
in the heating function or in the TEMP function.
• The appliance performs a temperature check at regular
intervals and switches off when the temperature dif-
ference from the previous ambient temperature drops
drastically. is shown in the display.
1. Press the button to switch on the function. The control
lamp TEMP starts ashing.
2. Press the button again to switch the function off.
Ending Operation
1. Press the button to switch off the appliance. If the
heating mode was active, the FAN mode is activated for
30 seconds and the air ap is closed. The appliance then
switches to standby mode.
2. Set the mains switch on the right side of the appliance to
the O position.
3. Then pull the mains plug out of the socket.
Overheat Protection
The appliance features an overheat protection mechanism
causing the appliance to switch off automatically in case of
overheating.
1. Set the mains switch on the right side of the appliance
to the O position. Then pull the mains plug out of the
socket.
2. Let the appliance cool down for approx. 10 minutes
before using it again.
- If the overheat protection mechanism causes the appli-
ance to switch off again after a short period, this might in-
dicate a defect. Switch off the appliance and disconnect
it from the mains. Have the appliance checked by your
dealer or our customer service.
Cleaning
WARNING:
• Always unplug the appliance from the mains before
cleaning and wait until the appliance has cooled down.
• Never immerse the appliance in water to clean it. This
may lead to electrical shock or re.
CAUTION:
• Do not use wire brushes or other abrasive materials.
• Do not use caustic or scouring agents.
• Wipe away dust with a dry cloth.
• Flecks can be removed with a suitably damp cloth.
Dust on the Protective Grille
If dust has collected on the protective grille, this can cause
overheating.
• Remove the dust by careful brushing.
or
• Use the upholstery nozzle of your vacuum cleaner to
remove the dust.
Technical Data
Model:.................................................................. PC-HL 3116
Power supply:.....................................220 – 240 V~, 50 – 60 Hz
Power consumption: ...................................................2000 W
Protection class: ...................................................................
Net weight: ....................................................... approx. 2.4 kg
The right to make technical and design modications in
the course of continuous product development remains
reserved.
This appliance has been tested according to all applicable,
current CE directives and built according to the latest safety
regulations.

PC-HL3116_IM 29.06.23
16
Product Data Sheet
Model identier PC-HL 3116
Item Symbol Value Unit Item Unit
Heat output Type of heat input, for electric storage local space heaters only
Nominal heat output Pnom 2.0 kW manual heat charge control, with integrated thermostat no
Minimum heat output
(indicative) Pmin 1.0 kW manual heat charge control with room and / or
outdoor temperature feedback no
Maximum continuous
heat output Pmax, c 2.0 kW electronic heat charge control with room and / or
outdoor temperature feedback no
Auxiliary electricity consumption fan assisted heat output no
At nominal heat
output el
max N. A. kW Type of heat output / room temperature control
At minimum heat
output el
min N. A. kW single stage heat output and no room temperature control no
In standby mode el
SB 0.0006 kW Two or more manual stages, no room temperature control no
with mechanic thermostat room temperature control no
with electronic room temperature control no
electronic room temperature control plus day timer no
electronic room temperature control plus week timer yes
Other control options
room temperature control, with presence detection no
room temperature control, with open window detection yes
with distance control option no
with adaptive start control no
with working time limitation yes
with black bulb sensor no
Contact details Clatronic International GmbH, Industriering Ost 40, 47906 Kempen, Germany
N. A. = not applicable
Disposal
Battery Disposal
As a consumer you are obliged by law to return old
batteries / accumulators.
Your appliance contains batteries. If these batter-
ies are spent, follow the instructions below:
CAUTION:
Batteries / rechargeable batteries must not be disposed of
with household waste!
• Remove the battery (batteries) from the remote control
before disposing of the appliance.
• Take spent batteries to the appropriate collection point
or to a dealer.
• Your town or local authority can provide information
about public collection points.
Meaning of the “Dustbin” Symbol
Protect our environment: do not dispose of elec-
trical equipment in the domestic waste.
Please return any electrical equipment that
you will no longer use to the collection points
provided for their disposal.
This helps avoid the potential effects of incorrect disposal
on the environment and human health.

PC-HL3116_IM 29.06.23
17
This will contribute to the recycling and other forms of
re-utilisation of electrical and electronic equipment.
Information concerning where the equipment can be
disposed of can be obtained from your local authority. Your
dealer and contractual partner is also obliged to take back
the old appliance free of charge.

PC-HL3116_IM 29.06.23
18
BELANGRIJK:
Lees eerst de apart bijgevoegde veiligheidsinstructies.
Gebruiksaanwijzing
Dank u voor het kiezen van ons product. Wij hopen dat u
het gebruik van het apparaat zult genieten.
Lees de gebruiksaanwijzing en de apart bijgevoegde
veiligheidsinstructies zorgvuldig door voordat u dit apparaat
in gebruik neemt. Bewaar deze documenten, inclusief het
garantiebewijs, de kassabon en, indien mogelijk, de doos
met de binnenverpakking op een veilige plaats. Als u het
apparaat aan een derde doorgeeft, voeg dan altijd alle
relevante documenten bij.
Symbolen in deze gebruiksaanwijzing
Belangrijke aanwijzingen voor uw veiligheid zijn speciaal
gekenmerkt. Neem deze aanwijzingen strikt in acht om
ongevallen en schade aan het apparaat te vermijden:
WAARSCHUWING:
Waarschuwt voor gevaren voor uw gezondheid en toont
mogelijk letsel risico’s.
LET OP:
Wijst op mogelijke gevaren voor het apparaat of andere
voorwerpen.
Inhoud
Overzicht van de bedieningselementen ...........................3
Het apparaat uitpakken ....................................................18
Overzicht van de bedieningselementen /
Omvang van de levering ..................................................18
Waarschuwingen voor het gebruik van het apparaat
....19
Aansluitingsvermogen ....................................................19
Omgaan met batterijen ..................................................19
Het apparaat in gebruik nemen ....................................... 19
Wandmontage ............................................................... 19
Afstandsbediening .........................................................20
Elektrische aansluiting ...................................................20
Het apparaat inschakelen ..............................................20
Eenvoudige bediening ...................................................21
Opmerkingen voor het gebruik .......................................21
Bediening ...........................................................................21
In- / uitschakelen ............................................................. 21
Luchtklep draaien ...........................................................21
Verwarmingsfunctie ........................................................21
Temperatuur instellen (TEMP-functie) ........................... 21
Ingestelde temperatuur wissen ......................................21
Timerfunctie ....................................................................21
Weektimer instellen ........................................................ 21
Ingestelde weektimer wissen ......................................... 22
Open venster detectie .................................................... 22
Beëindigen van de werking ............................................22
Bescherming tegen oververhitting ................................. 22
Reiniging ............................................................................ 22
Stof op het beschermrooster .........................................23
Technische gegevens .......................................................23
Productgegevensblad ......................................................23
Verwijdering .......................................................................24
Verwijdering van batterijen ............................................. 24
Betekenis van het symbool “vuilnisemmer” ................... 24
Het apparaat uitpakken
1. Neem het apparaat uit de verpakking.
2. Verwijder al het verpakkingsmateriaal, zoals folies, vul-
materiaal, kabelbinders en kartonnen verpakkingen.
3. Controleer de inhoud van de verpakking op volledigheid.
4. Als de inhoud van de verpakking onvolledig is of als er
beschadigingen kunnen worden vastgesteld, mag u het
apparaat niet in gebruik nemen. Breng het onmiddellijk
terug naar de dealer.
Overzicht van de bedieningselementen /
Omvang van de levering
Ventilatorkachel
1 Uitsparingen
2 Display
3 Controlelampje FAN (ventilator)
4 Controlelampje LOW (laag) (1000 watt)
5 Controlelampje HIGH (hoog) (2000 watt)
6 Controlelampje 24 / 7 (weekklok)
7 Controlelampje TEMP (temperatuur)
8 Controlelamp SWING (zwenken)
9 Netschakelaar I / O (aan / uit)
10 START / STOP toets (starten / stoppen)
11 Afdekking voor de verwarmingselementen / luchtuitlaat
12 Luchtklep
Afstandsbediening
1Apparaat in- of uitschakelen
2In- en uitschakelen van de zwenkbaarheid van de
luchtklep
3Detectie voor open raam activeren / deactiveren
4Tijdsturing activeren
5
OK
Invoer bevestigen
6C
°
°
Automatische temperatuurregeling of weektijdrege-
ling deactiveren
7Temperatuur verlagen
8Batterijvak

PC-HL3116_IM 29.06.23
19
9Temperatuur verhogen
10 Weektijdregeling instellen
11 Automatische temperatuurregeling instellen
12 Kiezen tussen lage warmte (LOW), hoge warmte
(HIGH) en ventilatormodus (FAN)
Zonder afbeelding
1 × Knoopcel (CR 2025), reeds geplaatst in het batterijvak
van de afstandsbediening
2 × Plug
2 × Schroef
Waarschuwingen voor het
gebruik van het apparaat
• Hang de verwarming niet direct onder een stopcontact.
• Zorg voor een veiligheidsafstand tussen het netsnoer en
de behuizing.
• Om oververhitting van de verwarming te voorkomen,
mag de luchtuitlaat niet worden afgedekt. Gordijnen,
textiel en alle brandbare materialen moeten op minstens
1 m afstand van de luchtuitlaat worden gehouden.
• In geen geval mag de ventilatorkachel worden gebruikt
in ruimten met explosief gas (bijv. benzine) of tijdens
werkzaamheden met brandbare lijmen of oplosmiddelen
(bijv. bij het lijmen of verven van parket, PVC enz.).
• Gebruik deze luchtverhitter niet in kleine ruimtes wan-
neer deze worden bewoond door personen die de ruimte
niet zelfstandig kunnen verlaten, tenzij er voortdurend
toezicht is.
• Verstel het draaimechanisme van de luchtklep nooit met
uw hand. Het mechanisme kan beschadigd raken.
• Trek altijd de stekker uit het stopcontact als het apparaat
niet meer wordt gebruikt.
Aansluitingsvermogen
Het apparaat ondersteunt een opgenomen vermogen van
2000 W.
LET OP: Overbelasting!
• Als u een verlengsnoer gebruikt, moet het een ka-
beldoorsnede van minstens 1,5 mm² hebben.
• Gebruik geen stekkerdoos, want dit apparaat is te
krachtig.
• Sluit geen andere krachtige apparaten aan op het-
zelfde elektrische circuit.
Omgaan met batterijen
Batterijen niet opladen!
Haal batterijen niet uit elkaar!
Batterijen niet kortsluiten!
Uit de buurt van kinderen houden!
Let op de polariteit (+ / −)!
Explosiegevaar!
Stel batterijen niet bloot aan intense hitte, zoals
zon, vuur en dergelijke
• Batterijen kunnen accuzuur lekken. Verwijder de bat-
terijen als de afstandsbediening langere tijd niet wordt
gebruikt.
• Als een batterij lekt, wrijf de vloeistof dan niet in de ogen
of slijmvliezen. In geval van contact, handen wassen,
ogen spoelen met schoon water. Zoek medische hulp als
het ongemak aanhoudt.
• Verschillende soorten batterijen en nieuwe en gebruikte
batterijen mogen niet samen worden gebruikt.
• Batterijen mogen niet samen met huisvuil worden
weggegooid. Lever gebruikte batterijen in bij de verant-
woordelijke inzamelpunten of bij de dealer.
Het apparaat in gebruik nemen
Gevoelige oppervlakken, zoals het display, kunnen beschermd zijn
met plastic folie. Verwijder deze plastic folie.
Wandmontage
Gebruik het meegeleverde montagemateriaal. Neem de volgende
installatietekeningen in acht.

PC-HL3116_IM 29.06.23
20
• Zorg ervoor dat er een stopcontact in
de buurt is. Het stopcontact moet vrij
toegankelijk zijn.
• Zorg er van tevoren voor dat er geen
kabels in de muur zitten die tijdens de
installatie beschadigd kunnen raken.
• Boor de gaten op een hoogte van 2 m
boven de vloer.
• De afstand tot het plafond en de muren moet minstens 30 cm
zijn.
1. Boor twee gaten met een diameter van 6 mm op
een afstand van 315 mm.
2. Voorzie de gaten van de pluggen en de schroeven. Laat de
schroeven ongeveer 10 mm uit de muur steken.
3. Hang het apparaat met de uitsparingen (A) aan de
schroeven. Duw nu het apparaat in de richting (B) om
het vast te zetten.
- Wanneer u het apparaat weer van de muur wilt halen, schuift u
het van (B) naar (A) en tilt u het apparaat van de muur.
Afstandsbediening
De lithiumcel in het batterijvakje van de
afstandsbediening is beveiligd met een
plastic folie voor transport. Dit verlengt
de levensduur van de batterij. Voordat u
de afstandsbediening voor het eerst gebruikt, moet u het
plasticfolie verwijderen, zodat de afstandsbediening klaar is
voor gebruik.
Zorg er bij de bediening van het apparaat voor dat er een
vrije zichtlijn is tussen de afstandsbediening en de sensor in
het display van het apparaat. Wanneer het bereik van de af-
standsbediening afneemt, moet de batterij worden vervan-
gen. Ga als volgt te werk om de batterij te vervangen:
1. Druk de vergrendeling in de richting van
de pijl (1).
2. Trek de houder voor de knoopcel uit de
afstandsbediening (2).
3. Vervang de cel door een batterij van hetzelfde type
(CR 2025). Let op de juiste polariteit.
4. Duw de houder terug in het batterijvak totdat deze
vastklikt.
Elektrische aansluiting
1. Controleer of de spanning van het apparaat (zie typepla-
tje) overeenkomt met de te gebruiken netspanning.
2. Zet de hoofdschakelaar aan de rechterkant van het
apparaat in stand O.
3. Sluit de netstekker aan op een correct geïnstalleerd
geaard stopcontact.
Het apparaat inschakelen
• Zet de hoofdschakelaar aan de rechterkant van het
apparaat in positie I. Het apparaat start de motor om de
luchtklep, die nog open kan zijn, te sluiten. Het apparaat
schakelt vervolgens over naar de stand-by modus.
• Het apparaat wordt bediend met de afstandsbediening.

PC-HL3116_IM 29.06.23
21
Eenvoudige bediening
U kunt het apparaat ook zonder afstandsbediening in- en
uitschakelen. Druk hiervoor op de START / STOP toets
naast de hoofdschakelaar.
1. Druk op de toets om het apparaat in te schakelen.
Het apparaat schakelt in met de temperatuurinstelling
HIGH, ventilator (FAN) en zwenken van de luchtklep
(SWING).
2. Druk nogmaals op de toets om het apparaat uit te scha-
kelen. De ventilatormodus wordt gedurende 30 secon-
den gestart en de luchtklep wordt gesloten. Het apparaat
schakelt vervolgens over naar de stand-bymodus.
Opmerkingen voor het gebruik
• Het apparaat is uitgerust met een oververhittingsbe-
veiliging. Als de omgevingstemperatuur 51 °C bereikt,
schakelt het apparaat uit.
• Vermijd het openen van deuren en ramen tijdens het
verwarmen, omdat dit het verwarmingseffect vermindert.
• De huidige omgevingstemperatuur wordt weergegeven.
• Het apparaat start altijd in de ventilatorstand.
• Instellingen kunnen alleen tijdens de werking worden
uitgevoerd.
Bediening
In- / uitschakelen
• Druk op de toets om het apparaat in te schakelen.
De ventilator begint te werken. Het controlelampje FAN
gaat branden.
• Druk nogmaals op de toets om het apparaat uit te
schakelen. Als de verwarmingsmodus actief was, wordt
de modus FAN gedurende 30 seconden geactiveerd en
wordt de luchtklep gesloten. Het apparaat schakelt dan
over naar de stand-bymodus.
Luchtklep draaien
Druk op de toets om het zwenken van de luchtklep in
of uit te schakelen. Het controlelampje SWING licht op
wanneer de functie geactiveerd is.
Verwarmingsfunctie
Druk herhaaldelijk op de toets om tussen de volgende
modi te schakelen:
LOW =Lage temperatuur en ventilator.
Het controlelampje LOW en FAN gaan branden.
HIGH =Hoge temperatuur en ventilator.
Controlelampje HIGH en FAN branden.
FAN =Alleen de ventilator is actief.
Controlelampje FAN brandt.
Temperatuur instellen (TEMP-functie)
Het apparaat kiest automatisch het verwarmingsniveau op
basis van de ingestelde temperatuur. Zodra de ingestelde
temperatuur is bereikt, schakelt het apparaat de verwarming
uit.
Het instelbare temperatuurbereik ligt tussen 18 °C en 45 °C.
1. Druk op de toets.
2. Stel de gewenste temperatuur in met de toetsen en
.
3. Bevestig de invoer met de
OK
toets. Het gewenste tem-
peratuurniveau wordt automatisch gehandhaafd.
Het controlelampje TEMP gaat branden. Dit geeft aan dat
de functie geactiveerd is.
Ingestelde temperatuur wissen
Ga als volgt te werk om de eerder ingestelde temperatuur
te wissen:
1. Druk eerst op de toets.
2. Druk nu op de C
°
°
toets om de instelling te wissen. Het
controlelampje TEMP gaat uit.
Timerfunctie
U kunt het apparaat zo instellen dat het gedurende een
bepaalde tijd werkt.
1. Druk herhaaldelijk op de toets om te kiezen tussen
één uur ( ) en acht uur ( ). De instelling ( ) scha-
kelt de functie uit.
2. Nadat de ingestelde tijd is verstreken, klinkt er een piep-
toon en begint het apparaat 30 seconden af te tellen. Na
aoop van het aftellen schakelt het apparaat over naar
de stand-bymodus.
- De geactiveerde functie wordt om technische redenen
niet weergegeven.
- De functie kan niet worden geselecteerd wanneer de
weektimer actief is.
Weektimer instellen
• De weektimer kan niet worden ingesteld als het apparaat
in de ventilatormodus staat.
• De weektimer kan ook worden gecombineerd met de
TEMP-functie, de SWING-functie en de functie “Open
venster detectie”.
• Om de weektimer te gebruiken, moet u eerst de huidige
tijd instellen. De huidige tijd moet worden ingesteld
wanneer het apparaat voor het eerst in gebruik wordt ge-
nomen en telkens wanneer het apparaat van het lichtnet
wordt losgekoppeld.
• De dagen van de week worden aangegeven door de
volgende cijfers op het display:
=
=
=
=
Maandag
Dinsdag
Woensdag
Donderdag
=
=
=
Vrijdag
Zaterdag
Zondag
Stel de huidige tijd in:
1. Druk op de toets. De aanduiding (maandag)
verschijnt op het display.

PC-HL3116_IM 29.06.23
22
2. Selecteer de huidige dag van de week met de toets of
. Bevestig de invoer met de
OK
toets.
3. Uren invoeren:
verschijnt op het display. De instelling wordt uitge-
voerd met de toetsen / . Bevestig de invoer met de
OK
toets.
4. Minuten invoeren:
verschijnt op het display. De instelling wordt uitge-
voerd met de toetsen / . Bevestig de invoer met de
OK
toets.
Selecteer de weektimer:
• Het apparaat heeft voorgeprogrammeerde weektimers
( tot ) en een individueel programmeerbare
weektimer ( ).
• Met de weektimer moet de instelling worden ge-
maakt voor alle dagen van de week. Alleen uren kunnen
worden ingesteld, geen minuten. De stoptijd moet na de
starttijd liggen.
• Als de weektimer is ingesteld in de geselecteerde
modus, draait het apparaat tot de stoptijd. Buiten de
geselecteerde modus blijft de ventilator nog 30 seconden
draaien. Daarna schakelt het apparaat over naar de
stand-bymodus.
• De geactiveerde functie wordt aangegeven door de
controlelampjes 24 / 7 en LOW of HIGH die knipperen.
Zodra het apparaat wordt ingeschakeld, gaan de contro-
lelampjes branden.
• Hieronder volgt een lijst met de voorgeprogrammeerde
weektimers:
Modus Weekdagen Tijd
Maandag – Zondag 8:00 – 17:00
Maandag – Zondag 18:00 – 7:00*
Maandag – Vrijdag 8:00 – 17:00
Maandag – Vrijdag 18:00 – 7:00*
Zaterdag – Zondag 0:00 – 23:59
* Het apparaat werkt tot de volgende ochtend.
1. Druk herhaaldelijk op toets om de gewenste weekti-
mer te selecteren.
2. Bevestig uw keuze met de
OK
toets.
3. Individueel programmeerbare weektimer:
Als je de weektimer selecteert, toont het display nu
(maandag).
4. Selecteer de gewenste weekdag (maandag) tot
(zondag) met de of toets. Bevestig de invoer met
de
OK
toets.
5. Stel nu de starttijd in met de of toets.
6. Bevestig uw keuze met de
OK
toets.
7. Stel de stoptijd in met de of toets.
8. Bevestig de invoer met de
OK
toets als u een andere
dag van de week wilt instellen. Wacht anders tot het
apparaat langzaam door de weekdagen tot scrollt. De
standaardinstelling wordt dan toegepast.
Ingestelde weektimer wissen
Ga als volgt te werk om de eerder ingestelde weektimer te
wissen:
1. Druk eerst op de toets.
2. Druk nu op de C
°
°
toets om de instelling te wissen. Het
controlelampje 24 / 7 gaat uit.
Open venster detectie
• Deze functie kan alleen worden geselecteerd als het
apparaat in de verwarmingsfunctie of in de TEMP-functie
staat.
• Het apparaat voert regelmatig een temperatuurcontrole
uit en schakelt uit wanneer het temperatuurverschil met
de vorige omgevingstemperatuur drastisch daalt.
wordt weergegeven op het display.
1. Druk op de toets om de functie in te schakelen. Het
controlelampje TEMP begint te knipperen.
2. Druk nogmaals op de toets om de functie uit te scha-
kelen.
Beëindigen van de werking
1. Druk op de toets om het apparaat uit te schakelen.
Als de verwarmingsmodus actief was, wordt de modus
FAN gedurende 30 seconden geactiveerd en wordt de
luchtklep gesloten. Het apparaat schakelt dan over naar
de stand-bymodus.
2. Zet de hoofdschakelaar aan de rechterkant van het
apparaat in stand O.
3. Trek vervolgens de stekker uit het stopcontact.
Bescherming tegen oververhitting
Het apparaat beschikt over een oververhittingsbeveiliging
waardoor het apparaat bij oververhitting automatisch wordt
uitgeschakeld.
1. Zet de hoofdschakelaar aan de rechterkant van het
apparaat in stand O. Trek vervolgens de stekker uit het
stopcontact.
2. Laat het apparaat ong. 10 minuten afkoelen voordat u
het weer gebruikt.
- Als het oververhittingsbeveiligingsmechanisme ervoor
zorgt dat het apparaat na korte tijd weer uitschakelt, kan
dit duiden op een defect. Schakel het apparaat uit en
trek de stekker uit het stopcontact. Laat het apparaat
controleren door uw dealer of onze klantenservice.
Reiniging
WAARSCHUWING:
• Trek altijd de stekker uit het stopcontact voordat u het
apparaat schoonmaakt en wacht tot het apparaat is
afgekoeld.

PC-HL3116_IM 29.06.23
23
WAARSCHUWING:
• Dompel het apparaat nooit onder in water om het te
reinigen. Dit kan leiden tot elektrische schokken of
brand.
LET OP:
• Gebruik geen staalborstels of andere schurende
materialen.
• Gebruik geen bijtende of schurende middelen.
• Veeg stof weg met een droge doek.
• Vlekken kunnen worden verwijderd met een voldoende
vochtige doek.
Stof op het beschermrooster
Als zich stof heeft verzameld op het beschermrooster, kan
dit oververhitting veroorzaken.
• Verwijder het stof door voorzichtig te borstelen.
of
• Gebruik het meubelmondstuk van uw stofzuiger om het
stof te verwijderen.
Technische gegevens
Model:.................................................................. PC-HL 3116
Stroomvoorziening: ............................220 – 240 V~, 50 – 60 Hz
Stroomverbruik: ........................................................... 2000 W
Beschermingsklasse: ...........................................................
Nettogewicht: ........................................................ ong. 2,4 kg
Het recht om technische en ontwerpaanpassingen te ma-
ken in de loop van voortdurende productontwikkeling blijft
voorbehouden.
Dit apparaat is getest volgens alle van toepassing zijnde,
huidige CE-richtlijnen en gebouwd volgens de meest
recente veiligheidsvoorschriften.
Productgegevensblad
Model PC-HL 3116
Item Symbool Waarde Eenheid Item Eenheid
Warmteafgifte Type warmte-input, uitsluitend voor elektrische
warmteopslagtoestellen
Nominale
warmteafgifte Pnom 2,0 kW Handmatige sturing van de warmteopslag,
met geïntegreerde thermostaat neen
Minimale warmte-
afgifte (indicatief) Pmin 1,0 kW Handmatige sturing van de warmteopslag,
met kamer- en / of buitentemperatuurfeedback neen
Maximale conti-
nue warmteafgifte Pmax, c 2,0 kW Elektronische sturing van de warmteopslag,
met kamer- en / of buitentemperatuurfeedback neen
Aanvullend elektriciteitsverbruik Door een ventilator bijgestane warmteafgifte neen
Bij nominale
warmteafgifte el
max n. v. t. kW Type warmteafgifte / sturing kamertemperatuur
Bij minimale
warmteafgifte el
min n. v. t. kW Eentrapswarmteafgifte,
geen sturing van de kamertemperatuur neen
In stand-by-
modus el
SB 0,0006 kW Twee of meer handmatig in te stellen trappen,
geen sturing van de kamertemperatuur neen
Met mechanische sturing van de kamertemperatuur door
thermostaat neen
Met elektronische sturing van de kamertemperatuur neen
Elektronische sturing van de kamertemperatuur plus
dag-tijdschakelaa neen
Elektronische sturing van de kamertemperatuur plus
week-tijdschakelaar ja

PC-HL3116_IM 29.06.23
24
Andere sturingsopties
Sturing van de kamertemperatuur,
met aanwezigheidsdetectie neen
Sturing van de kamertemperatuur, met openraamdetectie ja
Met de optie van afstandsbediening neen
Met adaptieve sturing van de start neen
Met beperking van de werkingstijd ja
Met black-bulbsensor neen
Contactgegevens Clatronic International GmbH, Industriering Ost 40, 47906 Kempen, Germany
n. v. t. = niet van toepassing
Verwijdering
Verwijdering van batterijen
Als consument bent u wettelijk verplicht om oude
batterijen / accu’s terug te brengen.
Uw apparaat bevat batterijen. Als deze batterijen
leeg zijn, volg dan de onderstaande instructies:
LET OP:
Batterijen / oplaadbare batterijen mogen niet met huishou-
delijk afval weggegooid worden!
• Verwijder de batterij(en) uit de afstandsbediening vóór
het wegwerpen van het apparaat.
• Gooi gebruikte batterijen weg bij een verzamelpunt of
breng ze naar uw verkooppunt.
• Uw gemeente kan u informatie verschaffen over verza-
melpunten voor batterijen.
Betekenis van het symbool “vuilnisemmer”
Bescherm ons milieu, elektrische apparaten ho-
ren niet in het huisafval.
Maak voor het afvoeren van elektrische appara-
ten gebruik van de voorgeschreven verzamel-
punten en geef daar de elektrische apparaten af
die u niet meer gebruikt.
Daardoor helpt u de potentiële effecten te voorkomen
die een verkeerde afvoer op het milieu en de menselijke
gezondheid kunnen hebben.
Op deze wijze levert u uw bijdrage aan het hergebruik, de
recycling en andere verwerkingsvormen voor oude elektro-
nische en elektrische apparaten.
Voor informatie over verzamelpunten voor uw apparaten
kunt u contact opnemen met uw gemeente of gemeen-
teadministratie. Uw dealer en contractpartner is bovendien
verplicht het oude apparaat gratis terug te nemen.

PC-HL3116_IM 29.06.23
25
IMPORTANT :
Veillez à lire d’abord les instructions de sécurité jointes séparé-
ment.
Mode d’emploi
Merci d’avoir choisi notre produit. Nous espérons que vous
saurez proter votre appareil.
Lisez très attentivement le mode d’emploi et les consignes
de sécurité jointes séparément avant d’utiliser cet appareil.
Conservez ces documents, y compris le certicat de garan-
tie, le reçu et, si possible, la boîte avec l’emballage intérieur
dans un endroit sûr. Si vous transmettez l’appareil à un
tiers, joignez toujours tous les documents pertinents.
Symboles de ce mode d’emploi
Les informations importantes pour votre sécurité sont
particulièrement indiquées. Veillez à bien respecter ces
indications an d’éviter tout risque d’accident ou d’endom-
magement de l’appareil :
AVERTISSEMENT :
Prévient des risques pour votre santé et des risques
éventuels de blessure.
ATTENTION :
Indique les risques pour l’appareil ou tout autre appareil.
Sommaire
Liste des différents éléments de commande ..................3
Déballage de l’appareil ..................................................... 25
Liste des différents éléments de commande /
Contenu de la livraison ....................................................25
Avertissements pour l’utilisation de l’appareil..............26
Puissance connectée .....................................................26
Manipulation des piles ...................................................26
Mise en utilisation de l’appareil ......................................26
Montage mural ..............................................................27
Télécommande .............................................................27
Branchement électrique ................................................. 28
Mise en marche de l’appareil ......................................... 28
Fonctionnement simple ..................................................28
Notes d’utilisation ............................................................. 28
Utilisation ........................................................................... 28
Mise en marche / arrêt .................................................... 28
Pivotement du volet d’air ................................................28
Fonction de chauffage ...................................................28
Réglage de la température (fonction TEMP) ................. 28
Effacement de la température réglée ............................28
Fonction minuterie ..........................................................28
Réglage de la minuterie hebdomadaire.........................28
Suppression de la minuterie hebdomadaire réglée .......29
Détection fenêtre ouverte ...............................................29
Fin de l’opération ............................................................29
Protection contre la surchauffe ......................................29
Nettoyage ...........................................................................30
Poussière sur la grille de protection ...............................30
Données techniques .........................................................30
Fiche de données du produit ..........................................30
Élimination .........................................................................31
Élimination des piles ......................................................31
Signication du symbole « Poubelle » ........................... 31
Déballage de l’appareil
1. Sortez l’appareil de son emballage.
2. Retirez tous les matériaux d’emballage, tels que les
feuilles, les matériaux de remplissage, les attaches de
câbles et les emballages en carton.
3. Vériez que le contenu de la livraison est complet.
4. Si le contenu de l’emballage est incomplet ou si des dom-
mages peuvent être détectés, n’utilisez pas l’appareil.
Retournez-le immédiatement au revendeur.
Liste des différents éléments de
commande / Contenu de la livraison
Chauffage par ventilateur
1 Encastrements
2 Afcheur
3 Témoin de contrôle FAN (ventilateur)
4 Témoin de contrôle LOW (bas) (1000 watts)
5 Témoin de contrôle HIGH (haute) (2000 watts)
6 Témoin de contrôle 24 / 7 (minuterie hebdomadaire)
7 Témoin de contrôle TEMP (température)
8 Témoin de contrôle SWING (pivot)
9 Interrupteur secteur I / O (marche / arrêt)
10 Bouton START / STOP (démarrage / arrêt)
11 Couvercle des éléments chauffants / sortie d’air
12 Volet d’air
Télécommande
1Allumer ou éteindre l’appareil
2Activer ou désactiver le pivotement du volet d’air
3Activer / désactiver la détection de fenêtre ouverte
4Activer le contrôle de l’heure
5
OK
Conrmer l’entrée
6C
°
°
Désactiver la régulation automatique de la tempé-
rature ou la régulation horaire hebdomadaire

PC-HL3116_IM 29.06.23
26
7Diminuer la température
8Compartiment à piles
9Augmenter la température
10 Régler le contrôle de l’heure hebdomadaire
11 Régler le contrôle automatique de la température
12 Sélection entre le mode basse température (LOW),
haute température (HIGH) et le mode ventilateur
(FAN)
Sans illustration
1 × Pile bouton (CR 2025), déjà insérée dans le comparti-
ment à piles de la télécommande
2 × Cheville
2 × Vis
Avertissements pour
l’utilisation de l’appareil
• Ne suspendez pas le chauffage directement sous une
prise murale.
• Veillez à respecter une distance de sécurité entre le
cordon d’alimentation et le boîtier.
• Pour éviter que le chauffage ne surchauffe, la sortie d’air
ne doit pas être couverte. Les rideaux, les textiles et tous
les matériaux combustibles doivent être éloignés d’au
moins 1 m de la sortie d’air.
• Le radiateur soufant ne doit en aucun cas être utilisé
dans des pièces où se trouvent des gaz explosifs (par
exemple de l’essence) ou pendant des travaux avec des
colles ou des solvants inammables (par exemple pour
coller ou peindre du parquet, du PVC, etc.).
• N’utilisez pas ce radiateur dans des pièces de petite
taille lorsqu’elles sont occupées par des personnes
incapables de quitter la pièce par leurs propres moyens,
à moins qu’une surveillance constante ne soit assurée.
• Ne jamais régler le mécanisme de pivotement du volet
d’air avec la main. Le mécanisme pourrait être endom-
magé.
• Lorsque l’appareil n’est plus utilisé, débranchez toujours
la che de la prise de courant.
Puissance connectée
L’appareil supporte une puissance absorbée de 2000 W.
ATTENTION : Surcharge !
• Si vous utilisez une rallonge, celle-ci doit avoir une
section de câble d’au moins 1,5 mm².
• N’utilisez pas de prise multiple car cet appareil est trop
puissant.
• Ne branchez pas d’autres appareils puissants sur le
même circuit électrique.
Manipulation des piles
Ne pas charger les piles !
Ne pas démonter les batteries !
Ne pas court-circuiter les piles !
Garder hors de portée des enfants !
Respecter la polarité (+ / −) !
Risque d’explosion !
N’exposez pas les piles à une chaleur intense,
comme le soleil, le feu ou autre.
• Les piles peuvent laisser échapper de l’acide de batterie.
Si le contrôle à distance n’est pas utilisé pendant une
période prolongée, retirez les piles.
• Si une pile fuit, ne frottez pas le liquide dans les yeux ou
les muqueuses. En cas de contact, se laver les mains,
rincer les yeux à l’eau claire. Consultez un médecin si un
malaise persiste.
• Les différents types de piles et les piles neuves et usa-
gées ne doivent pas être utilisées ensemble.
• Les piles ne doivent pas être jetées avec les ordures
ménagères. Rapportez les piles usagées aux points de
collecte compétents ou à votre revendeur.
Mise en utilisation de l’appareil
Les surfaces sensibles, telles que l’écran, peuvent être protégées
par un lm plastique. Détachez ces lms plastiques.

PC-HL3116_IM 29.06.23
27
Montage mural
Utilisez le matériel de montage fourni.
Respectez les schémas d’installation
suivants.
• Assurez-vous qu’une prise de courant
se trouve à proximité. La prise doit
être librement accessible.
• Assurez-vous au préalable qu’il n’y a
pas de câbles dans le mur qui pourraient être endommagés lors
de l’installation.
• Percez les trous à une hauteur de 2 m au-dessus du sol.
• La distance par rapport au plafond et aux murs doit être d’au
moins 30 cm.
1. Percez deux trous d’un diamètre de 6 mm à une
distance de 315 mm.
2. Prévoir les trous avec les chevilles et les vis. Laissez les vis dé-
passer d’environ 10 mm du mur.
3. Accrochez l’appareil avec les encoches (A) sur les vis.
Poussez ensuite l’appareil dans le sens (B) pour le
xer.
- Lorsque vous souhaitez retirer l’appareil du mur, faites-le glisser
de (B) à (A), puis soulevez l’appareil du mur.
Télécommande
La pile au lithium contenue dans le compar-
timent de la télécommande a été protégée
par un lm plastique pour le transport. Cela
permet de prolonger la durée de vie de la
pile. Avant d’utiliser la télécommande pour la première fois,
le lm plastique doit être retiré pour que la télécommande
soit prête à l’emploi.
Lors de l’utilisation de l’appareil, veillez à ce que la ligne de
visée entre la télécommande et le capteur de l’écran de
l’appareil soit dégagée. Lorsque la portée de la télécom-
mande diminue, la pile doit être remplacée. Pour changer la
pile, procédez comme suit :
1. Appuyez sur le verrou dans le sens de
la èche (1).
2. Retirez le support de la pile bouton de la
télécommande (2).
3. Remplacez la pile par une pile du même
type (CR 2025). Veillez à respecter la
polarité.
4. Remettez le support dans le compartiment à piles
jusqu’à ce qu’il s’enclenche.

PC-HL3116_IM 29.06.23
28
Branchement électrique
1. Assurez-vous que la tension de l’appareil (voir la plaque
signalétique) correspond à la tension du réseau à utiliser.
2. Placez l’interrupteur principal situé sur le côté droit de
l’appareil en position O.
3. Branchez la che d’alimentation sur une prise de courant
correctement installée et reliée à la terre.
Mise en marche de l’appareil
• Placez l’interrupteur secteur situé sur le côté droit de
l’appareil en position I. L’appareil démarre le moteur
pour fermer le clapet d’air, qui peut encore être ouvert.
L’appareil passe ensuite en mode veille.
• L’appareil est commandé par la télécommande.
Fonctionnement simple
Vous pouvez également éteindre et allumer l’appareil sans
la télécommande. Pour ce faire, appuyez sur le bouton
START / STOP situé à côté de l’interrupteur principal.
1. Appuyez sur le bouton pour allumer l’appareil.
L’appareil se met en marche avec la température réglée
sur HIGH, le ventilateur (FAN) et le volet d’air (SWING).
2. Appuyez à nouveau sur le bouton pour éteindre l’appa-
reil. Le mode FAN est lancé pendant 30 secondes et le
volet d’air est fermé. L’appareil passe ensuite en mode
veille.
Notes d’utilisation
• L’appareil est équipé d’une protection contre la sur-
chauffe. Lorsque la température ambiante atteint 51 °C,
l’appareil s’éteint.
• Évitez d’ouvrir les portes et les fenêtres pendant le
fonctionnement du chauffage, car cela nuit à l’effet de
chauffage.
• La température ambiante actuelle est afchée.
• L’appareil démarre toujours en mode ventilation.
• Les réglages ne peuvent être effectués que pendant le
fonctionnement.
Utilisation
Mise en marche / arrêt
• Appuyez sur la bouton pour mettre l’appareil en
marche. Le ventilateur commence à fonctionner. Le
témoin de contrôle FAN s’allume.
• Appuyez à nouveau sur la bouton pour éteindre l’ap-
pareil. Si le mode chauffage était actif, le mode FAN est
activé pendant 30 secondes et le volet d’air est fermé.
L’appareil passe ensuite en mode veille.
Pivotement du volet d’air
Appuyez sur la bouton pour activer ou désactiver l’oscil-
lation du volet d’air. Le témoin de contrôle SWING s’allume
lorsque la fonction est activée.
Fonction de chauffage
Appuyez plusieurs fois sur le bouton pour basculer entre
les modes suivants :
LOW =Basse température et ventilateur.
Les témoins de contrôle LOW et FAN s’allument.
HIGH =Température élevée et ventilateur.
Le témoin de contrôle HIGH et FAN s’allument.
FAN =Seul le ventilateur est actif.
Le témoin de contrôle FAN s’allume.
Réglage de la température (fonction TEMP)
L’appareil sélectionne automatiquement le niveau de chauf-
fage en fonction de la température réglée. Dès que la tem-
pérature réglée est atteinte, l’appareil arrête le chauffage.
La plage de température réglable est comprise entre 18 °C
et 45 °C.
1. Appuyez sur le bouton .
2. Réglez la température souhaitée à l’aide des boutons
et .
3. Conrmez la saisie à l’aide du bouton
OK
. Le niveau de
température souhaité est automatiquement maintenu.
Le témoin de contrôle TEMP s’allume. Cela indique que la
fonction est activée.
Effacement de la température réglée
Pour effacer la température réglée précédemment, procé-
dez comme suit :
1. Appuyez d’abord sur le bouton .
2. Pour effacer le réglage, appuyez maintenant sur le bou-
ton C
°
°
. Le témoin de contrôle TEMP s’éteint.
Fonction minuterie
Vous pouvez régler l’appareil pour qu’il fonctionne pendant
un certain temps.
1. Appuyez plusieurs fois sur le bouton pour choisir
entre une heure ( ) et huit heures ( ). Le réglage
( ) désactive la fonction.
2. Une fois le temps programmé écoulé, un signal sonore
retentit et l’appareil entame un compte à rebours de
30 secondes. L’appareil passe en mode veille à la n du
compte à rebours.
- Pour des raisons techniques, la fonction activée n’est
pas afchée.
- La fonction ne peut pas être sélectionnée lorsque la
minuterie hebdomadaire est activée.
Réglage de la minuterie hebdomadaire
• La minuterie hebdomadaire ne peut pas être réglée
lorsque l’appareil est en mode ventilation.
• La minuterie hebdomadaire peut également être com-
binée avec la fonction TEMP, la fonction SWING et la
fonction « Détection fenêtre ouverte ».

PC-HL3116_IM 29.06.23
29
• Pour utiliser la minuterie hebdomadaire, vous devez
d’abord régler l’heure actuelle. L’heure actuelle doit être
réglée lors de la première mise en service de l’appareil et
à chaque fois que l’appareil est débranché.
• Les jours de la semaine sont indiqués par les chiffres
suivants sur l’écran :
=
=
=
=
Lundi
Mardi
Mercredi
Jeudi
=
=
=
Vendredi
Samedi
Dimanche
Régler l’heure actuelle :
1. Appuyez sur le bouton . L’indication (lundi) appa-
raît à l’écran.
2. Sélectionnez le jour actuel de la semaine à l’aide des
boutons ou . Conrmez la saisie avec le bouton
OK
.
3. Saisir les heures :
L’indication apparaît à l’écran. Le réglage s’effectue
à l’aide des boutons / . Conrmez la saisie avec le
bouton
OK
.
4. Saisir les minutes :
L’indication apparaît à l’écran. Le réglage s’effectue
à l’aide des boutons / . Conrmez la saisie avec le
bouton
OK
.
Sélectionner la minuterie hebdomadaire :
• L’appareil dispose de minuteries hebdomadaires prépro-
grammées ( à ) et d’une minuterie hebdomadaire
programmable individuellement ( ).
• Avec la minuterie hebdomadaire , le réglage doit être
effectué pour tous les jours de la semaine. Seules les
heures peuvent être réglées, pas les minutes. L’heure
d’arrêt doit être postérieure à l’heure de départ.
• Si la minuterie hebdomadaire est réglée dans le mode
sélectionné, l’appareil fonctionne jusqu’à l’heure d’arrêt.
En dehors du mode sélectionné, le ventilateur continue
de fonctionner pendant 30 secondes. Ensuite, l’appareil
passe en mode veille.
• La fonction activée est indiquée par le clignotement des
témoins de contrôle 24 / 7 et LOW ou HIGH. Dès que
l’appareil se met en marche, les témoins de contrôle
s’allument.
• Voici la liste des programmations hebdomadaires pré-
programmées :
Mode Jours de la semaine Temps
Lundi – Dimanche 8:00 – 17:00
Lundi – Dimanche 18:00 – 7:00*
Lundi – Vendredi 8:00 – 17:00
Lundi – Vendredi 18:00 – 7:00*
Samedi – Dimanche 0:00 – 23:59
* L’appareil fonctionne jusqu’au lendemain matin.
1. Appuyez plusieurs fois sur le bouton pour sélection-
ner la minuterie hebdomadaire souhaitée.
2. Conrmez votre sélection à l’aide du bouton
OK
.
3. Programmation hebdomadaire individuelle :
Lorsque vous sélectionnez la minuterie hebdomadaire
, l’écran afche (lundi).
4. Sélectionnez le jour de semaine souhaité de (lundi) à
(dimanche) à l’aide du bouton ou . Conrmez la
saisie à l’aide du bouton
OK
.
5. Réglez maintenant l’heure de début à l’aide du bouton
ou .
6. Conrmez votre sélection à l’aide du bouton
OK
.
7. Réglez l’heure d’arrêt à l’aide du bouton ou .
8. Conrmez l’entrée avec le bouton
OK
si vous souhaitez
régler un autre jour de la semaine. Sinon, attendez que
l’appareil fasse déler lentement les jours de la semaine
jusqu’à . Le réglage par défaut est alors appliqué.
Suppression de la minuterie hebdomadaire réglée
Procédez comme suit pour supprimer la minuterie hebdo-
madaire précédemment réglée :
1. Appuyez d’abord sur le bouton .
2. Pour effacer le réglage, appuyez maintenant sur le bou-
ton C
°
°
. Le témoin de contrôle 24 / 7 s’éteint.
Détection fenêtre ouverte
• Cette fonction ne peut être sélectionnée que lorsque
l’appareil est en fonction chauffage ou en fonction TEMP.
• L’appareil effectue un contrôle de température à
intervalles réguliers et s’arrête lorsque la différence de
température par rapport à la température ambiante pré-
cédente diminue fortement. s’afche à l’écran.
1. Appuyez sur le bouton pour activer la fonction. Le
témoin de contrôle TEMP commence à clignoter.
2. Appuyez à nouveau sur le bouton pour désactiver la
fonction.
Fin de l’opération
1. Appuyez sur le bouton pour éteindre l’appareil. Si le
mode chauffage était actif, le mode FAN est activé pen-
dant 30 secondes et le volet d’air est fermé. L’appareil
passe ensuite en mode veille.
2. Placez l’interrupteur principal situé sur le côté droit de
l’appareil en position O.
3. Retirez ensuite la che d’alimentation de la prise de
courant.
Protection contre la surchauffe
L’appareil est équipé d’un mécanisme de protection contre
la surchauffe qui entraîne l’arrêt automatique de l’appareil
en cas de surchauffe.
1. Placez l’interrupteur principal situé sur le côté droit de
l’appareil en position O. Retirez ensuite la che d’alimen-
tation de la prise de courant.

PC-HL3116_IM 29.06.23
30
2. Laissez refroidir l’appareil pendant environ 10 minutes
avant de l’utiliser à nouveau.
- Si le mécanisme de protection contre la surchauffe fait
que l’appareil s’éteint à nouveau après une courte pé-
riode, cela peut indiquer un défaut. Éteignez l’appareil et
débranchez-le du réseau électrique. Faites contrôler l’ap-
pareil par votre revendeur ou par notre service clientèle.
Nettoyage
AVERTISSEMENT :
• Débranchez toujours l’appareil du secteur avant de le
nettoyer et attendez qu’il ait refroidi.
• Ne plongez jamais l’appareil dans l’eau pour le
nettoyer. Cela pourrait entraîner un choc électrique ou
un incendie.
ATTENTION :
• N’utilisez pas de brosses métalliques ou d’autres
matériaux abrasifs.
• N’utilisez pas de produits caustiques ou à récurer.
• Essuyez la poussière avec un chiffon sec.
• Les mouchetures peuvent être enlevées avec un chiffon
sufsamment humide.
Poussière sur la grille de protection
Si de la poussière s’accumule sur la grille de protection,
cela peut entraîner une surchauffe.
• Enlevez la poussière en la brossant soigneusement.
ou
• Utilisez l’embout pour meubles rembourrés de votre
aspirateur pour enlever la poussière.
Données techniques
Modèle : .............................................................. PC-HL 3116
Alimentation électrique : .....................220 – 240 V~, 50 – 60 Hz
Puissance absorbée : .................................................2000 W
Classe de protection : ..........................................................
Poids net : ..............................................................env. 2,4 kg
Nous nous réservons le droit d’apporter des modications
techniques ainsi que des modications de conception dans
le cadre du développement continu de nos produits.
Cet appareil a été testé conformément à toutes les direc-
tives CE applicables et actuelles et a été construit selon les
dernières réglementations en matière de sécurité.
Fiche de données du produit
Modèle PC-HL 3116
Caractéristique
Symbole
Valeur Unité Caractéristique
Unité
Puissance thermique Type d’apport de chaleur, pour les dispositifs de chauffage
décentralisés électriques à accumulation uniquement
Puissance thermique
nominale Pnom 2,0 kW contrôle thermique manuel de la charge
avec thermostat intégré non
Puissance thermique
minimale (indicative) Pmin 1,0 kW
contrôle thermique manuel de la charge avec réception
d’informations sur la température de la pièce et / ou exté-
rieure
non
Puissance thermique
maximale continue Pmax, c 2,0 kW
contrôle thermique électronique de la charge avec réception
d’informations sur la température de la pièce et / ou extérieure
non
Consommation d’électricité auxiliaire puissance thermique régulable par ventilateur non
À la puissance
thermique nominale el
max N. A. kW Type de contrôle de la puissance thermique /
de la température de la pièce
À la puissance
thermique minimale el
min N. A. kW contrôle de la puissance thermique à un palier,
pas de contrôle de la température de la pièce non
En mode veille el
SB 0,0006 kW contrôle à deux ou plusieurs paliers manuels,
pas de contrôle de la température de la pièce non
contrôle de la température de la pièce
avec thermostat mécanique non
contrôle électronique de la température de la pièce non

PC-HL3116_IM 29.06.23
31
contrôle électronique de la température de la pièce
et programmateur journalier non
contrôle électronique de la température de la pièce
et programmateur hebdomadaire oui
Autres options de contrôle
contrôle de la température de la pièce,
avec détecteur de présence non
contrôle de la température de la pièce,
avec détecteur de fenêtre ouverte oui
option contrôle à distance non
contrôle adaptatif de l’activation non
limitation de la durée d’activation oui
capteur à globe noir non
Coordonnées de contact
Clatronic International GmbH, Industriering Ost 40, 47906 Kempen, Germany
N. A. = non applicable
Élimination
Élimination des piles
En tant que consommateur, vous êtes tenu de rap-
porter les piles / batteries rechargeables usagés.
Votre appareil contient des piles. Si ces piles sont
usées, suivez les consignes suivantes :
ATTENTION :
Ne jetez pas les piles / batteries rechargeables avec les
déchets ménagers !
• Retirez la(les) pile(s) de la télécommande avant de jeter
l’appareil.
• Rapportez les piles usagées au point de collecte appro-
prié ou à votre détaillant.
• La ville ou l’autorité locale du lieu de votre domicile peut
vous donner des informations sur les points de collecte
publics.
Signication du symbole « Poubelle »
Protégez votre environnement, ne jetez pas vos
appareils électriques avec les ordures ména-
gères.
Utilisez, pour l’élimination de vos appareils
électriques, les bornes de collecte prévues à
cet effet où vous pouvez vous débarrasser des
appareils que vous n’utilisez plus.
Vous contribuez ainsi à éviter les impacts potentiels dans
l’environnement et sur la santé de chacun, causés par une
mauvaise élimination de ces déchets.
Vous contribuez aussi au recyclage sous toutes ses formes
des appareils électriques et électroniques usagés.
Vous trouverez toutes les informations sur les bornes
d’élimination des appareils auprès de votre commune ou
de l’administration de votre communauté. Votre revendeur
et partenaire contractuel est également tenu de reprendre
gratuitement l’ancien appareil.

PC-HL3116_IM 29.06.23
32
IMPORTANTE:
Asegúrese de leer primero las instrucciones de seguridad adjun-
tas por separado.
Manual de instrucciones
Le agradecemos la conanza depositada en este producto
y esperamos que disfrute de su uso.
Lea atentamente el manual de instrucciones y las instruc-
ciones de seguridad adjuntas por separado antes de utilizar
este aparato. Guarde estos documentos, incluyendo el
certicado de garantía, el recibo y, si es posible, la caja
con el embalaje interior en un lugar seguro. Si entrega el
aparato a un tercero, incluya siempre todos los documentos
pertinentes.
Símbolos en este manual de instrucciones
Advertencias importantes para su seguridad están seña-
ladas en especial. Siga estas advertencias incondicional-
mente, para evitar accidentes y daños en el aparato:
AVISO:
Advierte ante los peligros para su salud y demuestra
posibles riesgos de herida.
ATENCIÓN:
Indica los posibles riesgos para el aparato u otros
objetos.
Índice
Indicación de los elementos de manejo ..........................3
Desembalaje del aparato..................................................32
Indicación de los elementos de manejo /
Volumen de entrega ..........................................................32
Advertencias para el uso del aparato .............................33
Carga conectada ............................................................33
Manejo de las pilas ........................................................33
Puesta en funcionamiento del aparato ..........................33
Montaje en pared ..........................................................33
Mando a distancia ......................................................... 34
Conexión eléctrica ..........................................................34
Encendido del aparato ................................................... 34
Manejo sencillo ..............................................................35
Notas de uso .....................................................................35
Manejo ................................................................................ 35
Encendido y apagado ....................................................35
Giro de la trampilla de aire ............................................. 35
Función de calefacción ..................................................35
Ajuste de la temperatura (Función TEMP) ....................35
Borrar la temperatura ajustada ......................................35
Función de temporizador ...............................................35
Ajuste del temporizador semanal ..................................35
Borrar el temporizador semanal ajustado......................36
Detección de ventana abierta ........................................ 36
Finalización del funcionamiento .....................................36
Protección contra sobrecalentamiento ..........................36
Limpieza ............................................................................. 36
Polvo en la rejilla protectora ...........................................37
Datos técnicos ..................................................................37
Hoja de datos del producto .............................................37
Eliminación ........................................................................ 38
Eliminación de baterías ..................................................38
Signicado del símbolo “Cubo de basura” ....................38
Desembalaje del aparato
1. Saque el aparato de su embalaje.
2. Retire todo el material de embalaje, como las láminas, el
material de relleno, las bridas para cables y el embalaje
de cartón.
3. Compruebe que el volumen de entrega está completo.
4. Si el contenido del embalaje está incompleto o si se
detectan daños, no utilice el aparato. Devuélvalo inme-
diatamente al distribuidor.
Indicación de los elementos de manejo /
Volumen de entrega
Ventilador calefactor
1 Huecos
2 Pantalla
3 Lámpara de control FAN (ventilador)
4 Lámpara de control LOW (bajo) (1000 vatios)
5 Lámpara de control HIGH (alta) (2000 vatios)
6 Lámpara de control 24 / 7 (temporizador semanal)
7 Lámpara de control TEMP (temperatura)
8 Lámpara de control SWING (giratoria)
9 Interruptor de red I / O (encendido / apagado)
10 Botón START / STOP (inicio / parada)
11 Tapa de las resistencias / salida de aire
12 Tapa de aire
Mando a distancia
1Encendido y apagado del aparato
2Activación / desactivación del giro de la trampilla
de aire
3Activar / desactivar la detección de ventana abierta
4Activar el control de tiempo
5
OK
Conrmar entrada

PC-HL3116_IM 29.06.23
33
6C
°
°
Desactivar el control automático de la temperatura
o el control semanal de la hora
7Disminuir la temperatura
8Compartimento de pilas
9Aumentar la temperatura
10 Ajustar la regulación horaria semanal
11 Ajustar el control automático de temperatura
12 Seleccionar entre calor bajo (LOW), calor alto
(HIGH) y modo ventilador (FAN)
Sin ilustración
1 × Pila de botón (CR 2025), ya insertada en el comparti-
mento para pilas del mando a distancia
2 × Taco
2 × Tornillo
Advertencias para el uso del aparato
• No cuelgue la estufa directamente debajo de una toma
de corriente.
• Asegúrese de que se mantiene una distancia de seguri-
dad entre el cable de alimentación y la carcasa.
• Para evitar que la estufa se sobrecaliente, no cubra la
salida de aire. Las cortinas, los textiles y todos los mate-
riales combustibles deben mantenerse a una distancia
mínima de 1 m de la salida de aire.
• El aerotermo no debe utilizarse en ningún caso en recin-
tos con gases explosivos (p. ej. gasolina) ni mientras se
realicen trabajos con adhesivos o disolventes inama-
bles (p. ej. al pegar o pintar parquet, PVC, etc.).
• No utilice este calefactor en habitaciones pequeñas
cuando estén ocupadas por personas que no sean ca-
paces de salir solas de la habitación, a menos que haya
una supervisión constante.
• No ajuste nunca el mecanismo giratorio de la aleta de
aire con la mano. El mecanismo podría resultar dañado.
• Cuando deje de utilizar el aparato, desconecte siempre
el enchufe de la toma de corriente.
Carga conectada
El aparato admite una potencia de entrada de 2000 W.
ATENCIÓN: ¡Sobrecarga!
• Cuando utilice un cable alargador, éste debe tener
una sección mínima de 1,5 mm².
• No utilice una toma múltiple, ya que este aparato es
demasiado potente.
• No conecte otros aparatos potentes al mismo circuito
eléctrico.
Manejo de las pilas
¡No cargue las pilas!
¡No desmonte las pilas!
¡No cortocircuite las pilas!
¡Manténgalas fuera del alcance de los niños!
¡Respete la polaridad (+ / −)!
¡Peligro de explosión!
No exponga las pilas a un calor intenso, como el del
sol, el fuego o similares.
• Las pilas pueden tener fugas de ácido. Si no va a utilizar
el mando a distancia durante un periodo prolongado de
tiempo, extraiga las pilas.
• En caso de fuga de una pila, no se frote los ojos ni las
mucosas con el líquido. En caso de contacto, lávese las
manos y enjuáguese los ojos con agua limpia. Acuda al
médico si persisten las molestias.
• No deben utilizarse juntos distintos tipos de pilas ni pilas
nuevas y usadas.
• Las pilas no deben eliminarse junto con los residuos
domésticos. Devuelva las baterías usadas a los puntos
de recogida responsables o al distribuidor.
Puesta en funcionamiento del aparato
Las supercies sensibles, como la pantalla, pueden estar protegi-
das con películas de plástico. Retire estas películas de plástico.
Montaje en pared
Utilice el material de montaje suministrado. Observe los siguientes
planos de instalación.

PC-HL3116_IM 29.06.23
34
• Asegúrese de que hay una toma de
corriente cerca. La toma de corriente
debe ser libremente accesible.
• Asegúrese previamente de que no
haya cables en la pared que puedan
dañarse durante la instalación.
• Taladre los oricios a una altura de
2 m por encima del suelo.
• La distancia al techo y a las paredes debe ser de al menos 30 cm.
1. Taladre dos oricios de 6 mm de diámetro a una
distancia de 315 mm.
2. Coloque los tacos y los tornillos en los oricios. Deje que los tor-
nillos sobresalgan unos 10 mm de la pared.
3. Cuelgue el aparato con los huecos (A) en los tornillos.
Ahora empuje el aparato en la dirección (B) para -
jarlo.
- Cuando desee volver a retirar el aparato de la pared, deslícelo
desde (B) hacia (A) y, a continuación, levante el aparato de la
pared.
Mando a distancia
La célula de litio del compartimento de la
pila del mando a distancia se ha asegurado
con una película de plástico para el trans-
porte. Esto prolonga la vida útil de la pila.
Antes de utilizar el mando a distancia por primera vez, retire
la película de plástico para que esté listo para su uso.
Cuando maneje el aparato, asegúrese de que hay una lí-
nea de visión clara entre el mando a distancia y el sensor
de la pantalla del aparato. Cuando el alcance del mando a
distancia disminuye, es necesario cambiar la pila. Para
cambiar la pila, proceda de la siguiente manera:
1. Pulse el bloqueo en la dirección de la
echa (1).
2. Extraiga el soporte de la pila de botón
del mando a distancia (2).
3. Sustituya la pila por otra del mismo tipo
(CR 2025). Asegúrese de que la polaridad es correcta.
4. Vuelva a introducir el soporte en el compartimento de la
pila hasta que encaje.
Conexión eléctrica
1. Asegúrese de que el voltaje del aparato (véase la
etiqueta de características) coincide con el voltaje de red
que se va a utilizar.
2. Coloque el interruptor de red situado en el lateral dere-
cho del aparato en la posición O.
3. Conecte el enchufe de red a una toma con toma de
tierra correctamente instalada.
Encendido del aparato
• Ponga el interruptor de red situado en el lado derecho
del aparato en la posición I. El aparato pone en marcha
el motor para cerrar la trampilla de aire, que puede estar
aún abierta. A continuación, el aparato pasa al modo de
espera.
• El aparato se maneja con el mando a distancia.

PC-HL3116_IM 29.06.23
35
Manejo sencillo
También puede encender y apagar el aparato sin el mando
a distancia. Para ello, pulse el botón START / STOP situado
junto al interruptor de red.
1. Pulse el botón para encender el aparato.
El aparato se enciende con el ajuste de temperatura
HIGH, ventilador (FAN) y oscilación de la trampilla de
aire (SWING).
2. Pulse de nuevo el botón para apagar el aparato. El
modo FAN se activa durante 30 segundos y la trampilla
de ventilación se cierra. A continuación, el aparato pasa
al modo de espera.
Notas de uso
• El aparato está equipado con una protección contra el
sobrecalentamiento. Cuando la temperatura ambiente
alcanza los 51 °C, el aparato se apaga.
• Evite abrir puertas y ventanas durante el funcionamiento
de la calefacción, ya que esto perjudicará el efecto de
calentamiento.
• Se muestra la temperatura ambiente actual.
• El aparato arranca siempre en modo ventilador.
• Los ajustes sólo se pueden realizar durante el manejo.
Manejo
Encendido y apagado
• Pulse el botón para encender el aparato. El ventilador
se pone en funcionamiento. La lámpara de control FAN
se enciende.
• Pulse de nuevo el botón para apagar el aparato. Si
el modo de calefacción estaba activo, el modo FAN se
activa durante 30 segundos y la trampilla de ventilación
se cierra. A continuación, el aparato pasa al modo de
espera.
Giro de la trampilla de aire
Pulse el botón para activar o desactivar la oscilación de
la aleta de aire. La lámpara de control SWING se enciende
cuando la función está activada.
Función de calefacción
Pulse repetidamente el botón para cambiar entre los
siguientes modos:
LOW =Temperatura baja y ventilador.
La lámpara de control LOW y FAN se encienden.
HIGH =Temperatura alta y ventilador.
La lámpara de control HIGH y FAN se encienden.
FAN =Sólo está activo el ventilador.
La lámpara de control FAN se ilumina.
Ajuste de la temperatura (Función TEMP)
El aparato selecciona automáticamente el nivel de calefac-
ción en función de la temperatura ajustada. En cuanto se
alcanza la temperatura ajustada, el aparato desconecta la
calefacción.
El rango de temperatura ajustable oscila entre 18 °C y 45 °C.
1. Pulse el botón .
2. Ajuste la temperatura deseada con los botones y .
3. Conrme el ajuste con el botón
OK
. El nivel de tempera-
tura deseado se mantiene automáticamente.
La lámpara de control TEMP se enciende. Esto indica que
la función está activada.
Borrar la temperatura ajustada
Proceda de la siguiente manera para borrar la temperatura
ajustada anteriormente:
1. Pulse primero el botón .
2. Para borrar el ajuste, pulse ahora el botón C
°
°
. La lám-
para de control TEMP se apaga.
Función de temporizador
Puede ajustar el aparato para que funcione durante un
tiempo determinado.
1. Pulse repetidamente el botón para seleccionar entre
una hora ( ) y ocho horas ( ). El ajuste ( ) desac-
tiva la función.
2. Una vez transcurrido el tiempo ajustado, suena un pitido
y el aparato inicia una cuenta atrás de 30 segundos. Una
vez nalizada la cuenta atrás, el aparato pasa al modo
de espera.
- La función activada no se muestra por razones técnicas.
- La función no puede seleccionarse cuando el temporiza-
dor semanal está activado.
Ajuste del temporizador semanal
• El temporizador semanal no puede ajustarse cuando el
aparato está en modo ventilador.
• El temporizador semanal también se puede combinar
con la función TEMP, la función SWING y la función
“Detección de ventana abierta”.
• Para utilizar el temporizador semanal, primero debe
ajustar la hora actual. La hora actual debe ajustarse
cuando el aparato se pone en funcionamiento por
primera vez y cada vez que se desconecta de la red
eléctrica.
• Los días de la semana se indican mediante las siguien-
tes cifras en la pantalla:
=
=
=
=
Lunes
Martes
Miércoles
Jueves
=
=
=
Viernes
Sábado
Domingo

PC-HL3116_IM 29.06.23
36
Ajuste la hora actual:
1. Pulse el botón . En la pantalla aparece la indicación
(lunes).
2. Seleccione el día actual de la semana con el botón o
. Conrme la entrada con el botón
OK
.
3. Introducir las horas:
En la pantalla aparece . El ajuste se realiza con los
botones / . Conrme la entrada con el botón
OK
.
4. Introduzca los minutos:
En la pantalla aparece . El ajuste se realiza con los
botones / . Conrme la entrada con el botón
OK
.
Seleccione el temporizador semanal:
• El aparato dispone de temporizadores semanales pre-
programados ( a ) y de un temporizador semanal
programable individualmente ( ).
• Con el temporizador semanal , el ajuste debe reali-
zarse para todos los días de la semana. Sólo se pueden
ajustar las horas, no los minutos. La hora de parada
debe ser posterior a la hora de inicio.
• Si el temporizador semanal está ajustado en el modo
seleccionado, el aparato funciona hasta la hora de pa-
rada. Fuera del modo seleccionado, el ventilador sigue
funcionando durante 30 segundos. Después, el aparato
pasa al modo de espera.
• La función activada se indica mediante el parpadeo de
las lámparas de control 24 / 7 y LOW o HIGH. En cuanto
se enciende el aparato, se encienden las lámparas de
control.
• A continuación se indican los temporizadores semanales
preprogramados:
Modo Días de la semana Hora
Lunes – Domingo 8:00 – 17:00
Lunes – Domingo 18:00 – 7:00*
Lunes – Viernes 8:00 – 17:00
Lunes – Viernes 18:00 – 7:00*
Sábado – Domingo 0:00 – 23:59
* El aparato funciona hasta la mañana siguiente.
1. Pulse repetidamente el botón para seleccionar el
temporizador semanal deseado.
2. Conrme la selección con el botón
OK
.
3. Temporizador semanal programable individualmente:
Al seleccionar el temporizador semanal , la pantalla
muestra ahora (lunes).
4. Seleccione el día de la semana deseado (lunes) a
(domingo) con el botón o . Conrme la entrada con
el botón
OK
.
5. Ajuste ahora la hora de inicio con los botones o .
6. Conrme la selección con el botón
OK
.
7. Ajuste la hora de parada con los botones o .
8. Conrme la entrada con el botón
OK
si desea ajustar
otro día de la semana. De lo contrario, espere hasta
que el aparato se desplace lentamente por los días de
la semana hasta . A continuación, se aplicará el ajuste
predeterminado.
Borrar el temporizador semanal ajustado
Proceda de la siguiente manera para borrar el temporizador
semanal ajustado anteriormente:
1. Pulse primero el botón .
2. Para borrar el ajuste, pulse ahora el botón C
°
°
. La lám-
para de control 24 / 7 se apaga.
Detección de ventana abierta
• La función sólo puede seleccionarse cuando el aparato
está en la función de calefacción o en la función TEMP.
• El aparato realiza un control de temperatura a intervalos
regulares y se desconecta cuando la diferencia de
temperatura con respecto a la temperatura ambiente
anterior desciende drásticamente. En la pantalla aparece
.
1. Pulse el botón para activar la función. La lámpara de
control TEMP empieza a parpadear.
2. Pulse de nuevo el botón para desconectar la función.
Finalización del funcionamiento
1. Pulse el botón para apagar el aparato. Si el modo de
calefacción estaba activo, el modo FAN se activa du-
rante 30 segundos y la trampilla de ventilación se cierra.
A continuación, el aparato pasa al modo de espera.
2. Coloque el interruptor de red situado en el lado derecho
del aparato en la posición O.
3. A continuación, desenchufe la clavija de red.
Protección contra sobrecalentamiento
El aparato dispone de un mecanismo de protección contra
sobrecalentamiento que desconecta automáticamente el
aparato en caso de sobrecalentamiento.
1. Coloque el interruptor de red situado en el lado derecho
del aparato en la posición O. A continuación, desenchufe
la clavija de red.
2. Deje que el aparato se enfríe durante aprox. 10 minutos
antes de volver a utilizarlo.
- Si el mecanismo de protección contra sobrecalenta-
miento hace que el aparato se apague de nuevo des-
pués de un corto período de tiempo, esto podría indicar
un defecto. Apague el aparato y desconéctelo de la red
eléctrica. Haga revisar el aparato por su distribuidor o
por nuestro servicio de atención al cliente.
Limpieza
AVISO:
• Desenchufe siempre el aparato de la red eléctrica
antes de limpiarlo y espere a que se enfríe.

PC-HL3116_IM 29.06.23
37
AVISO:
• No sumerja nunca el aparato en agua para limpiarlo.
Podría provocar una descarga eléctrica o un incendio.
ATENCIÓN:
• No utilice cepillos de alambre ni otros materiales
abrasivos.
• No utilice agentes cáusticos o abrasivos.
• Limpie el polvo con un paño seco.
• Las motas pueden eliminarse con un paño conveniente-
mente humedecido.
Polvo en la rejilla protectora
Si se acumula polvo en la rejilla protectora, puede produ-
cirse un sobrecalentamiento.
• Elimine el polvo cepillando con cuidado.
o
• Utilice la boquilla para tapicerías de su aspiradora para
eliminar el polvo.
Datos técnicos
Modelo: ............................................................... PC-HL 3116
Alimentación: ......................................220 – 240 V~, 50 – 60 Hz
Consumo de energía: .................................................2000 W
Clase de protección: ............................................................
Peso neto: .......................................................... aprox. 2,4 kg
El derecho de realizar modicaciones técnicas y de diseño
en el curso del desarrollo continuo del producto esta
reservado.
Este aparato ha sido probado de acuerdo con todas las
directivas CE vigentes y construido de acuerdo con las
últimas normas de seguridad.
Hoja de datos del producto
Modelo PC-HL 3116
Partida Símbolo Valor Unidad Partida Unidad
Potencia caloríca Tipo de aportación de calor, únicamente para los aparatos
de calefacción local eléctricos de acumulación
Potencia caloríca
nominal Pnom 2,0 kW control manual de la carga de calor,
con termostato integrado no
Potencia caloríca
mínima (indicativa) Pmin 1,0 kW control manual de la carga de calor
con respuesta a la temperatura interior o exterior no
Potencia caloríca
máxima continuada Pmax, c 2,0 kW control electrónico de la carga de calor
con respuesta a la temperatura interior o exterior no
Consumo auxiliar de electricidad potencia caloríca asistida por ventiladores no
A potencia caloríca
nominal el
max N. A. kW Tipo de control de potencia caloríca / de temperatura interior
A potencia caloríca
mínima el
min N. A. kW potencia caloríca de un solo nivel,
sin control de temperatura interior no
En modo de espera el
SB 0,0006 kW Dos o más niveles manuales,
sin control de temperatura interior no
con control de temperatura interior mediante termostato
mecánico no
con control electrónico de temperatura interior no
control electrónico de temperatura interior y temporizador
diario no
control electrónico de temperatura interior y temporizador
semanal sí

PC-HL3116_IM 29.06.23
38
Otras opciones de control
control de temperatura interior con detección de presencia no
control de temperatura interior con detección de ventanas
abiertas sí
con opción de control a distancia no
con control de puesta en marcha adaptable no
con limitación de tiempo de funcionamiento sí
con sensor de lámpara negra no
Información de contacto Clatronic International GmbH, Industriering Ost 40, 47906 Kempen, Germany
N. A. = no aplicable
Eliminación
Eliminación de baterías
Como consumidor está obligado por la ley a reco-
ger pilas / acumuladores gastados.
Su aparato contiene baterías. Si las baterías están
gastadas, siga las instrucciones siguientes:
ATENCIÓN:
Las baterías / baterías recargables usados no deben
desecharse con los residuos domésticos.
• Retire la(s) batería(s) del mando a distancia antes de
desechar el aparato.
• Entregue las baterías gastadas a un punto de recogida
adecuado o a un comercio.
• Su ayuntamiento puede ofrecerle más información sobre
los puntos de recogida públicos.
Signicado del símbolo “Cubo de basura”
Proteja nuestro medio ambiente, aparatos eléc-
tricos no forman parte de la basura doméstica.
Haga uso de los centros de recogida previstos
para la eliminación de aparatos eléctricos y
entregue allí sus aparatos eléctricos que no
vaya a utilizar más.
Ayudará en evitar las potenciales consecuencias, a causa
de una errónea eliminación de desechos, para el medio
ambiente y la salud humana.
Con ello, contribuirá a la recuperación, al reciclado y a otras
formas de reutilización de los aparatos viejos eléctricos y
electrónicos.
La información cómo se debe eliminar los aparatos, se
obtiene en su ayuntamiento o su administración municipal.
Su distribuidor y socio contractual también está obligado a
recuperar el aparato antiguo sin coste alguno.

PC-HL3116_IM 29.06.23
39
IMPORTANTE:
Assicuratevi di leggere prima le istruzioni di sicurezza allegate
separatamente.
Istruzioni per l’uso
Grazie per aver scelto il nostro prodotto. Vi auguriamo un
buon utilizzo del dispositivo.
Prima di utilizzare l’apparecchio, leggere attentamente
le istruzioni per l’uso e le istruzioni di sicurezza allegate
separatamente. Conservare questi documenti, compreso il
certificato di garanzia, la ricevuta e, se possibile, la scatola
con l’imballaggio interno in un luogo sicuro. Se si cede
l’apparecchio a terzi, includere sempre tutti i documenti
pertinenti.
Simboli per questo manuale di istruzioni per l’uso
Le indicazioni importanti per la propria sicurezza sono
indicati appropriatamente. Osservare assolutamente queste
indicazioni, per evitare incidenti e danni all’apparecchio:
AVVISO:
Previene i rischi della propria salute ed indica possibili
rischi di ferite.
ATTENZIONE:
Indica possibili pericoli per l’apparecchio o altri oggetti.
Indice
Elementi di comando ..........................................................3
Disimballaggio dell’apparecchio ....................................39
Elementi di comando / Nella fornitura .............................39
Avvertenze per l’uso dell’apparecchio ........................... 40
Carico collegato .............................................................40
Manipolazione delle batterie ..........................................40
Messa in utilizzo dell’apparecchio ..................................40
Montaggio a parete .......................................................41
Telecomando ................................................................. 41
Collegamento elettrico ...................................................42
Accensione dell’apparecchio .........................................42
Funzionamento semplice ............................................... 42
Note per l’uso ....................................................................42
Utilizzo ................................................................................42
Accensione / Spegnimento ............................................. 42
Rotazione del deflettore ................................................. 42
Funzione di riscaldamento ............................................. 42
Impostazione della temperatura (funzione TEMP) ........ 42
Cancellazione della temperatura impostata ..................42
Funzione timer ...............................................................42
Impostazione del timer settimanale ...............................43
Cancellazione del timer settimanale impostato ............. 43
Rilevamento finestra aperta ........................................... 43
Fine del funzionamento ..................................................43
Protezione contro il surriscaldamento ...........................44
Pulizia ................................................................................. 44
Polvere sulla griglia di protezione .................................. 44
Dati tecnici ......................................................................... 44
Scheda tecnica del prodotto ...........................................44
Smaltimento ......................................................................45
Smaltimento batterie ......................................................45
Significato del simbolo “Eliminazione” ...........................45
Disimballaggio dell’apparecchio
1. Togliere l’apparecchio dal suo imballaggio.
2. Rimuovere tutto il materiale d’imballaggio, come pelli-
cole, materiale di riempimento, fascette e imballaggi di
cartone.
3. Controllare la completezza del contenuto dell’imballag-
gio.
4. Se il contenuto dell’imballaggio è incompleto o se si
rilevano danni, non mettere in funzione l’apparecchio.
Restituirlo immediatamente al rivenditore.
Elementi di comando / Nella fornitura
Riscaldatore a ventola
1 Incavi
2 Display
3 Lampada di controllo FAN (ventola)
4 Lampada di controllo LOW (basso) (1000 watt)
5 Lampada di controllo HIGH (alta) (2000 watt)
6 Lampada di controllo 24 / 7 (timer settimanale)
7 Lampada di controllo TEMP (temperatura)
8 Lampada di controllo SWING (orientabile)
9 Interruttore di rete I / O (acceso / spento)
10 Tasto START / STOP (avvio / arresto)
11 Coperchio degli elementi riscaldanti / uscita dell’aria
12 Sportello dell’aria
Telecomando
1Accensione o spegnimento dell’apparecchio
2Attivazione o disattivazione dell’oscillazione della
bocchetta di ventilazione
3Attivazione / disattivazione del rilevamento della
finestra aperta
4Attivazione della regolazione oraria
5
OK
Confermare l’ingresso

PC-HL3116_IM 29.06.23
40
6C
°
°
Disattivare la regolazione automatica della tempe-
ratura o la regolazione oraria settimanale
7Diminuire la temperatura
8Vano batteria
9Aumenta la temperatura
10 Impostare la regolazione oraria settimanale
11 Impostazione del controllo automatico della
temperatura
12 Selezione tra calore basso (LOW), calore alto
(HIGH) e modalità ventilatore (FAN)
Senza illustrazione
1 × Pile a bottone (CR 2025), già inserite nel vano batterie
del telecomando
2 × Tassello
2 × Vite
Avvertenze per l’uso dell’apparecchio
• Non appendere il riscaldatore direttamente sotto una
presa di corrente.
• Assicurarsi di mantenere una distanza di sicurezza tra il
cavo di alimentazione e l’involucro.
• Per evitare il surriscaldamento del riscaldatore, l’uscita
dell’aria non deve essere coperta. Tende, tessuti e tutti
i materiali combustibili devono essere tenuti ad almeno
1 m di distanza dall’uscita dell’aria.
• In nessun caso il termoventilatore può essere utilizzato
in locali con presenza di gas esplosivi (ad es. benzina) o
durante lavori con adesivi o solventi infiammabili (ad es.
durante l’incollaggio o la verniciatura di parquet, PVC,
ecc.).
• Non utilizzare il termoventilatore in stanze piccole se
occupate da persone non in grado di uscire da sole, a
meno che non sia prevista una supervisione costante.
• Non regolare mai il meccanismo di rotazione dell’air flap
con le mani. Il meccanismo potrebbe danneggiarsi.
• Quando l’apparecchio non viene più utilizzato, staccare
sempre la spina dalla presa di corrente.
Carico collegato
L’apparecchio è in grado di assorbire una potenza di
2000 W.
ATTENZIONE: Sovraccarico!
• Quando si utilizza una prolunga, questa deve avere
una sezione del cavo di almeno 1,5 mm².
• Non utilizzare una presa multipla perché l’apparecchio
è troppo potente.
• Non collegare altri dispositivi potenti allo stesso
circuito elettrico.
Manipolazione delle batterie
Non caricare le batterie!
Non smontare le batterie!
Non cortocircuitare le batterie!
Tenere lontano dai bambini!
Rispettare la polarità (+ / −)!
Pericolo di esplosione!
Non esporre le batterie a fonti di calore intenso,
come sole, fuoco o simili.
• Le batterie possono perdere acido. Se il telecomando
non viene utilizzato per un periodo di tempo prolungato,
rimuovere le batterie.
• Se una batteria perde, non strofinare il liquido negli occhi
o sulle mucose. In caso di contatto, lavarsi le mani e
sciacquare gli occhi con acqua pulita. Rivolgersi a un
medico se i disturbi persistono.
• Non è consentito utilizzare insieme tipi diversi di batterie
e batterie nuove e usate.
• Le batterie non devono essere smaltite insieme ai rifiuti
domestici. Restituire le batterie usate ai centri di raccolta
competenti o al rivenditore.
Messa in utilizzo dell’apparecchio
Le superfici sensibili, come il display, possono essere protette da
pellicole di plastica. Rimuovere queste pellicole di plastica.

PC-HL3116_IM 29.06.23
41
Montaggio a parete
Utilizzare il materiale di montaggio
fornito. Osservare i seguenti disegni di
installazione.
• Accertarsi che nelle vicinanze vi sia
una presa di corrente. La presa deve
essere liberamente accessibile.
• Accertarsi preventivamente che nella
parete non vi siano cavi che potrebbero danneggiarsi durante
l’installazione.
• Praticare i fori a un’altezza di 2 m dal pavimento.
• La distanza dal soffitto e dalle pareti deve essere di almeno
30 cm.
1. Praticare due fori del diametro di 6 mm a una di-
stanza di 315 mm.
2. Inserire nei fori i tasselli e le viti. Lasciare le viti
sporgere di circa 10 mm dalla parete.
3. Appendere l’apparecchio con gli incavi (A) sulle viti.
Spingere ora l’apparecchio in direzione (B) per fissarlo.
- Quando si desidera staccare nuovamente l’apparec-
chio dalla parete, farlo scorrere da (B) ad (A) e quindi sollevarlo
dalla parete.
Telecomando
La cella al litio nel vano batterie del teleco-
mando è stata protetta con una pellicola
di plastica per il trasporto. Ciò prolunga la
durata della batteria. Prima di utilizzare il
telecomando per la prima volta, è necessario rimuovere la
pellicola di plastica in modo che sia pronto per l’uso.
Quando si utilizza l’apparecchio, assicurarsi che vi sia una
chiara linea visiva tra il telecomando e il sensore sul display
dell’apparecchio. Quando la portata del telecomando dimi-
nuisce, è necessario sostituire la batteria. Per sostituire la
batteria, procedere come segue:
1. Premere il blocco in direzione della
freccia (1).
2. Estrarre il supporto della pila a tasto dal
telecomando (2).
3. Sostituire la pila con una dello stesso
tipo (CR 2025). Assicurarsi che la pola-
rità sia corretta.
4. Spingere nuovamente il supporto nel vano batterie fino a
farlo scattare in posizione.

PC-HL3116_IM 29.06.23
42
Collegamento elettrico
1. Assicurarsi che la tensione dell’apparecchio (vedi eti-
chetta) corrisponda alla tensione di rete da utilizzare.
2. Posizionare l’interruttore di rete sul lato destro dell’appa-
recchio in posizione O.
3. Collegare la spina di rete a una presa con messa a terra
installata correttamente.
Accensione dell’apparecchio
• Posizionare l’interruttore di rete sul lato destro dell’ap-
parecchio in posizione I. L’apparecchio avvia il motore
per chiudere lo sportello dell’aria, che potrebbe essere
ancora aperto. L’apparecchio passa quindi in modalità
standby.
• L’utilizzo dell’apparecchio avviene tramite il telecomando.
Funzionamento semplice
È possibile accendere e spegnere l’apparecchio an-
che senza il telecomando. A tal fine, premere il tasto
START / STOP accanto all’interruttore di rete.
1. Premere il tasto per accendere l’apparecchio.
L’apparecchio si accende con l’impostazione della
temperatura HIGH, la ventola (FAN) e l’oscillazione del
deflettore (SWING).
2. Premere nuovamente il tasto per spegnere l’apparec-
chio. La modalità FAN viene avviata per 30 secondi e
lo sportello dell’aria viene chiuso. L’apparecchio passa
quindi alla modalità standby.
Note per l’uso
• L’apparecchio è dotato di una protezione contro il
surriscaldamento. Quando la temperatura ambiente
raggiunge i 51 °C, l’apparecchio si spegne.
• Evitare di aprire porte e finestre durante il funzionamento
del riscaldamento per non compromettere l’effetto
riscaldante.
• Viene visualizzata la temperatura ambiente attuale.
• L’apparecchio si avvia sempre in modalità ventilatore.
• Le impostazioni possono essere effettuate solo durante
il funzionamento.
Utilizzo
Accensione / spegnimento
• Premere il tasto per accendere l’apparecchio. Il
ventilatore entra in funzione. La lampada di controllo
FAN si accende.
• Premere nuovamente il tasto per spegnere l’apparec-
chio. Se era attiva la modalità riscaldamento, la modalità
FAN viene attivata per 30 secondi e lo sportello dell’aria
viene chiuso. L’apparecchio passa quindi alla modalità
standby.
Rotazione del deflettore
Premere il tasto per attivare o disattivare l’oscillazione
del deflettore. La lampada di controllo SWING si accende
quando la funzione è attivata.
Funzione di riscaldamento
Premere ripetutamente il tasto per passare tra le se-
guenti modalità:
LOW =Bassa temperatura e ventilatore.
Le lampade di controllo LOW e FAN si accen-
dono.
HIGH =Alta temperatura e ventilatore.
La lampada di controllo HIGH e FAN si accen-
dono.
FAN =È attiva solo la ventilatore.
La lampada di controllo FAN si accende.
Impostazione della temperatura (funzione TEMP)
L’apparecchio seleziona automaticamente il livello di riscal-
damento in base alla temperatura impostata. Non appena
viene raggiunta la temperatura impostata, l’apparecchio
spegne il riscaldamento.
L’intervallo di temperatura regolabile è compreso tra 18 °C
e 45 °C.
1. Premere il tasto .
2. Impostare la temperatura desiderata con i tasti e .
3. Confermare l’immissione con il tasto
OK
. Il livello di tem-
peratura desiderato viene mantenuto automaticamente.
La lampada di controllo TEMP si accende. Ciò indica che la
funzione è attivata.
Cancellazione della temperatura impostata
Per cancellare la temperatura precedentemente impostata,
procedere come segue:
1. Premere prima il tasto .
2. Per cancellare l’impostazione, premere ora il tasto C
°
°
. La
lampada di controllo TEMP si spegne.
Funzione timer
È possibile impostare il funzionamento dell’apparecchio per
un determinato periodo di tempo.
1. Premere ripetutamente il tasto per scegliere tra un’ora
( ) e otto ore ( ). L’impostazione ( ) disattiva la
funzione.
2. Allo scadere del tempo impostato, viene emesso un
segnale acustico e l’apparecchio inizia un conto alla
rovescia di 30 secondi. Al termine del conto alla rovescia,
l’apparecchio passa alla modalità standby.
- Per motivi tecnici, la funzione attivata non viene visua-
lizzata.
- La funzione non può essere selezionata quando il timer
settimanale è attivo.

PC-HL3116_IM 29.06.23
43
Impostazione del timer settimanale
• Il timer settimanale non può essere impostato quando
l’apparecchio è in modalità ventilatore.
• Il timer settimanale può essere combinato con la
funzione TEMP, la funzione SWING e la funzione “Rile-
vamento finestra aperta”.
• Per utilizzare il timer settimanale, è necessario impostare
prima l’ora corrente. L’ora corrente deve essere impo-
stata alla prima messa in funzione dell’apparecchio e
ogni volta che l’apparecchio viene scollegato dalla rete.
• I giorni della settimana sono indicati dalle seguenti cifre
sul display:
=
=
=
=
Lunedì
Martedì
Mercoledì
Giovedì
=
=
=
Venerdì
Sabato
Domenica
Impostazione dell’ora corrente:
1. Premere il tasto . Sul display appare l’indicazione
(lunedì).
2. Selezionare il giorno della settimana in corso con i tasti
o . Confermare l’inserimento con il tasto
OK
.
3. Immissione delle ore:
Sul display appare l’indicazione . L’impostazione
viene effettuata con i tasti / . Confermare l’inseri-
mento con il tasto
OK
.
4. Immissione dei minuti:
Sul display appare l’indicazione . L’impostazione
viene effettuata con i tasti / . Confermare l’inseri-
mento con il tasto
OK
.
Selezionare il timer settimanale:
• L’apparecchio dispone di timer settimanali preprogram-
mati ( da a ) e di un timer settimanale programma-
bile individualmente ( ).
• Con il timer settimanale , l’impostazione deve essere
effettuata per tutti i giorni della settimana. È possibile
impostare solo le ore, non i minuti. L’ora di arresto deve
essere successiva all’ora di inizio.
• Se il timer settimanale è impostato nella modalità sele-
zionata, l’apparecchio funziona fino all’ora di arresto. Al
di fuori della modalità selezionata, il ventilatore continua
a funzionare per 30 secondi. Dopodiché, l’apparecchio
passa alla modalità standby.
• La funzione attivata è indicata dalle lampade di controllo
24 / 7 e dal lampeggiamento di LOW o HIGH. Non
appena l’apparecchio si accende, le lampade di controllo
si accendono.
• Di seguito sono elencati i timer settimanali preprogram-
mati:
Modalità Giorni settimanali Ora
Lunedì – Domenica 8:00 – 17:00
Lunedì – Domenica 18:00 – 7:00*
Lunedì – Venerdì 8:00 – 17:00
Modalità Giorni settimanali Ora
Lunedì – Venerdì 18:00 – 7:00*
Sabato – Domenica 0:00 – 23:59
* L’apparecchio funziona fino al mattino successivo.
1. Premere ripetutamente il tasto per selezionare il timer
settimanale desiderato.
2. Confermare la selezione con il tasto
OK
.
3. Timer settimanale programmabile individualmente:
Selezionando il timer settimanale , il display visua-
lizza ora (lunedì).
4. Selezionare il giorno della settimana desiderato da
(lunedì) a (domenica) con il tasto o . Confermare
l’inserimento con il tasto
OK
.
5. Confermare la selezione con il tasto
OK
.
6. Impostare l’ora di arresto con il tasto o .
7. Confermare l’immissione con il tasto
OK
se si desidera
impostare un altro giorno della settimana. In caso
contrario, attendere che l’apparecchio scorra lentamente
i giorni della settimana fino a . A questo punto viene
applicata l’impostazione predefinita.
Cancellazione del timer settimanale impostato
Per cancellare il timer settimanale precedentemente impo-
stato, procedere come segue:
1. Premere prima il tasto .
2. Per cancellare l’impostazione, premere ora il tasto C
°
°
. La
lampada di controllo 24 / 7 si spegne.
Rilevamento finestra aperta
• Questa funzione può essere selezionata solo quando
l’apparecchio è in funzione riscaldamento o in funzione
TEMP.
• L’apparecchio esegue un controllo della temperatura a
intervalli regolari e si spegne quando la differenza di tem-
peratura rispetto alla temperatura ambiente precedente si
riduce drasticamente. Sul display viene visualizzato .
1. Premere il tasto per attivare la funzione. La lampada
di controllo TEMP inizia a lampeggiare.
2. Premere nuovamente il tasto per disattivare la funzione.
Fine del funzionamento
1. Premere il tasto per spegnere l’apparecchio. Se
era attiva la modalità riscaldamento, la modalità FAN
viene attivata per 30 secondi e lo sportello dell’aria
viene chiuso. L’apparecchio passa quindi alla modalità
standby.
2. Posizionare l’interruttore di rete sul lato destro dell’appa-
recchio sulla posizione O.
3. Estrarre quindi la spina dalla presa di corrente.

PC-HL3116_IM 29.06.23
44
Protezione contro il surriscaldamento
L’apparecchio è dotato di un meccanismo di protezione
contro il surriscaldamento che ne provoca lo spegnimento
automatico in caso di surriscaldamento.
1. Posizionare l’interruttore di rete sul lato destro dell’appa-
recchio sulla posizione O. Estrarre quindi la spina dalla
presa di corrente.
2. Lasciare raffreddare l’apparecchio per circa 10 minuti
prima di utilizzarlo nuovamente.
- Se il meccanismo di protezione dal surriscaldamento fa
sì che l’apparecchio si spenga di nuovo dopo un breve
periodo, ciò potrebbe indicare un difetto. Spegnere
l’apparecchio e scollegarlo dalla rete elettrica. Far
controllare l’apparecchio dal rivenditore o dal nostro
servizio clienti.
Pulizia
AVVISO:
• Prima di procedere alla pulizia, scollegare sempre
l’apparecchio dalla rete elettrica e attendere che
l'apparecchio si sia raffreddato.
• Non immergere mai l’apparecchio in acqua per pulirlo.
Ciò potrebbe causare scosse elettriche o incendi.
ATTENZIONE:
• Non utilizzare spazzole metalliche o altri materiali
abrasivi.
ATTENZIONE:
• Non utilizzare agenti caustici o abrasivi.
• Eliminare la polvere con un panno asciutto.
• Le macchie possono essere rimosse con un panno
adeguatamente umido.
Polvere sulla griglia di protezione
La presenza di polvere sulla griglia di protezione può cau-
sare un surriscaldamento.
• Rimuovere la polvere con un’accurata spazzolatura.
oppure
• Utilizzare la bocchetta per imbottiti dell’aspirapolvere per
rimuovere la polvere.
Dati tecnici
Modello: ............................................................... PC-HL 3116
Alimentazione:....................................220 – 240 V~, 50 – 60 Hz
Consumo di energia: ................................................... 2000 W
Classe di protezione: ...........................................................
Peso netto: ...............................................................ca. 2,4 kg
Si riserva il diritto di apportare modiche tecniche e di
design nel corso dello sviluppo del prodotto.
Questo apparecchio è stato testato secondo tutte le
direttive CE in vigore e costruito secondo le ultime norme
di sicurezza.
Scheda tecnica del prodotto
Modello PC-HL 3116
Dato Simbolo Valore Unità Dato Unità
Potenza termica Tipo di potenza termica, solo per gli apparecchi
per il riscaldamento d’ambiente locale elettrici ad accumulo
Potenza termica
nominale Pnom 2,0 kW controllo manuale del carico termico, con termostato integrato no
Potenza termica
minima (indicativa) Pmin 1,0 kW controllo manuale del carico termico con riscontro
della temperatura ambiente e / o esterna no
Massima potenza
termica continua Pmax, c 2,0 kW controllo elettronico del carico termico con riscontro
della temperatura ambiente e / o esterna no
Consumo ausiliario di energia elettrica potenza termica assistita da ventilatore no
Alla potenza termica
nominale el
max N. A. kW Tipo di potenza termica / controllo della temperatura ambiente
Alla potenza termica
minima el
min N. A. kW potenza termica a fase unica senza controllo della temperatura
ambiente no
In modo stand-by el
SB 0,0006 kW
due o più fasi manuali senza controllo della temperatura am-
biente
no

PC-HL3116_IM 29.06.23
45
con controllo della temperatura ambiente tramite termostato
meccanico no
con controllo elettronico della temperatura ambiente no
con controllo elettronico della temperatura ambiente e
temporizzatore giornaliero no
con controllo elettronico della temperatura ambiente e
temporizzatore settimanale sì
Altre opzioni di controllo
controllo della temperatura ambiente con rilevamento
di presenza no
controllo della temperatura ambiente con rilevamento
di finestre aperte sì
con opzione di controllo a distanza no
con controllo di avviamento adattabile no
con limitazione del tempo di funzionamento sì
con termometro a globo nero no
Contatti Clatronic International GmbH, Industriering Ost 40, 47906 Kempen, Germany
N. A. = non applicabile
Smaltimento
Smaltimento batterie
I consumatori sono tenuti per legge a restituire bat-
terie / accumulatori scarichi.
Il dispositivo contiene batterie. Se queste batterie
sono esaurite, seguire le seguenti istruzioni:
ATTENZIONE:
Le batterie / batterie ricaricabili non devono essere smal-
tite con i rifiuti domestici!
• Rimuovere la (le) batteria (batterie) dal telecomando
prima di gettare l’apparecchio.
• Consegnare le batterie esaurite presso gli appositi centri
di raccolta o presso il proprio rivenditore.
• L’autorità locale o comunale può fornire informazioni su
centri di raccolta pubblici.
Significato del simbolo “Eliminazione”
Salvaguardare l’ambiente, gli elettrodomestici
non vanno eliminati come riuti domestici.
Per l’eliminazione degli elettrodomestici, fare
uso dei posti di raccolta previsti per questo tipo
e porre quegli elettrodomestici che non sono
più in uso.
Si contribuisce così ad evitare un effetto potenziale sull’am-
biente e sulla salute, dovuto magari ad una eliminazione
sbagliata.
Questo signica un contributo personale alla riutilizzazione,
al riciclaggio e altre forme di utilizzazione di elettrodomestici
ed apparecchi elettronici usati.
Si possono trovare le corrispondenti informazioni sugli
appositi luoghi di raccolta, nelle amministrazioni dei comuni.
Il vostro rivenditore e partner contrattuale è anche obbligato
a riprendere gratuitamente il vecchio apparecchio.

PC-HL3116_IM 29.06.23
46
WAŻNE:
Najpierw należy zapoznać się z oddzielnie załączoną instrukcją
bezpieczeństwa.
Instrukcja obsługi
Dziękujemy za wybór naszego produktu. Mamy nadzieję, że
korzystanie z urządzenia sprawi państwu radość.
Przed rozpoczęciem użytkowania urządzenia przeczytaj
uważnie instrukcję obsługi oraz oddzielnie załączone
wskazówki bezpieczeństwa. Przechowuj te dokumenty
wraz z kartą gwarancyjną, paragonem i, jeśli to możliwe,
pudełkiem z opakowaniem wewnętrznym w bezpiecznym
miejscu. Jeżeli przekazujesz urządzenie osobom trzecim,
dołącz zawsze wszystkie istotne dokumenty.
Symbole użyte w tej instrukcji obsługi
Ważne informacje dotyczące bezpieczeństwa użytkownika
są specjalnie wyróżnione. Koniecznie stosuj się do tych
wskazówek, aby uniknąć wypadków i uszkodzenia urzą-
dzenia:
OSTRZEŻENIE:
Ostrzega przed zagrożeniami dla zdrowia i wskazuje na
potencjalne ryzyka obrażeń.
UWAGA:
Wskazuje na potencjalne zagrożenia dla urządzenia lub
innych przedmiotów.
Spis treści
Przegląd elementów obsługi .............................................3
Rozpakowanie urządzenia ............................................... 46
Przegląd elementów obsługi / Zakres dostawy..............46
Ostrzeżenia dotyczące użytkowania urządzenia ..........47
Podłączone obciążenie .................................................. 47
Postępowanie z bateriami .............................................. 47
Uruchamianie urządzenia ................................................47
Montaż na ścianie .........................................................48
Pilot zdalnego sterowania ............................................. 48
Podłączenie elektryczne ................................................49
Włączanie urządzenia .................................................... 49
Łatwa obsługa ................................................................ 49
Uwagi dotyczące użytkowania ........................................49
Obsługa .............................................................................. 49
Włączanie / wyłączanie ...................................................49
Obracanie klapki powietrza ............................................49
Funkcja ogrzewania .......................................................49
Ustawianie temperatury (funkcja TEMP) ....................... 49
Usuwanie ustawionej temperatury .................................49
Funkcja timera ................................................................49
Ustawianie tygodniowego timera ................................... 50
Usuwanie ustawionego zegara tygodniowego .............. 50
Wykrywanie otwartego okna .......................................... 50
Zakończenie operacji .....................................................50
Ochrona przed przegrzaniem .......................................... 51
Czyszczenie ....................................................................... 51
Kurz na kratce ochronnej ...............................................51
Dane techniczne ................................................................51
Karta informacyjna produktu ..........................................51
Warunki gwarancji ............................................................52
Usuwanie ...........................................................................53
Usuwanie baterii .............................................................53
Znaczenie symbolu „Pojemnik na śmieci” ..................... 53
Rozpakowanie urządzenia
1. Wyjmij urządzenie z opakowania.
2. Usuń wszystkie materiały opakowaniowe, takie jak folie,
materiały wypełniające, opaski kablowe i opakowania
kartonowe.
3. Sprawdź, czy zawartość opakowania jest kompletna.
4. Jeżeli zawartość opakowania jest niekompletna lub
jeżeli widoczne są uszkodzenia, nie używaj urządzenia.
Natychmiast zwróć je do sprzedawcy.
Przegląd elementów obsługi /
Zakres dostawy
Termowentylator
1 Wnęki
2 Wyświetlacz
3 Lampka kontrolna FAN (wentylator)
4 Lampka kontrolna LOW (niski) (1000 W)
5 Lampka kontrolna HIGH (wysoka) (2000 W)
6 Lampka kontrolna 24 / 7 (timer tygodniowy)
7 Lampka kontrolna TEMP (temperatura)
8 Lampka kontrolna SWING (obrót)
9 Przełącznik zasilania I / O (wł. / wył.)
10 Przycisk START / STOP (uruchom / zatrzymaj)
11 Pokrywa elementów grzejnych / wylot powietrza
12 Klapa powietrza
Pilot zdalnego sterowania
1Włączanie lub wyłączanie urządzenia
2Włączanie lub wyłączanie obrotu klapy powietrza
3Aktywacja / dezaktywacja wykrywania otwartego
okna
4Aktywacja sterowania czasowego

PC-HL3116_IM 29.06.23
47
5
OK
Potwierdzenie wejścia
6C
°
°
Dezaktywacja automatycznej regulacji temperatury
lub tygodniowej regulacji czasu
7Obniżenie temperatury
8Komora baterii
9Zwiększenie temperatury
10 Ustawianie tygodniowej kontroli czasu
11 Ustawianie automatycznej regulacji temperatury
12
Wybór pomiędzy trybem niskiej temperatury (LOW),
wysokiej temperatury (HIGH) i wentylatora (FAN)
Bez ilustracji
1 × Ogniwo guzikowe (CR 2025), włożona do komory baterii
pilota zdalnego sterowania
2 × Kołek rozporowy
2 × Śruba
Ostrzeżenia dotyczące
użytkowania urządzenia
• Nie należy wieszać grzejnika bezpośrednio pod gniazd-
kiem ściennym.
• Należy zadbać o zachowanie bezpiecznej odległości
między przewodem zasilającym a obudową.
• Aby zapobiec przegrzaniu grzejnika, nie należy zakrywać
wylotu powietrza. Zasłony, tekstylia i wszelkie materiały
palne należy trzymać w odległości co najmniej 1 m od
wylotu powietrza.
• W żadnym wypadku nie wolno używać termowentylatora
w pomieszczeniach z gazem wybuchowym (np. ben-
zyną) lub podczas prac z użyciem łatwopalnych klejów
lub rozpuszczalników (np. podczas klejenia lub malowa-
nia parkietu, PCV itp.).
• Nie używać tego termowentylatora w małych pomiesz-
czeniach, gdy są one zajmowane przez osoby niezdolne
do samodzielnego opuszczenia pomieszczenia, chyba
że zapewniony jest stały nadzór.
• Nigdy nie reguluj mechanizmu obrotowego klapy
powietrza ręką. Może to spowodować uszkodzenie
mechanizmu.
• Gdy urządzenie nie jest już używane, należy zawsze
odłączać wtyczkę zasilania od gniazdka.
Podłączone obciążenie
Urządzenie obsługuje moc wejściową 2000 W.
UWAGA: Przeciążenie!
• W przypadku stosowania przedłużacza, musi on mieć
przekrój przewodu co najmniej 1,5 mm².
• Nie używaj gniazda wielokrotnego, ponieważ to urzą-
dzenie ma zbyt dużą moc.
• Nie podłączać żadnych innych urządzeń o dużej mocy
do tego samego obwodu elektrycznego.
Postępowanie z bateriami
Nie ładuj baterii!
Nie demontować baterii!
Nie doprowadzać do zwarcia baterii!
Trzymać z dala od dzieci!
Przestrzegać biegunowości (+ / −)!
Niebezpieczeństwo wybuchu!
Nie wystawiać baterii na działanie intensywnego
ciepła, np. słońca, ognia lub podobnych czynników.
• Z baterii może wyciekać kwas akumulatorowy. Jeśli pilot
zdalnego sterowania nie będzie używany przez dłuższy
czas, wyjmij baterie.
• Jeśli bateria wycieknie, nie należy wcierać płynu do oczu
lub błon śluzowych. W przypadku kontaktu należy umyć
ręce, przepłukać oczy czystą wodą. Zwrócić się o pomoc
do lekarza, jeśli dyskomfort utrzymuje się.
• Nie wolno używać razem różnych typów baterii oraz
nowych i zużytych baterii.
• Baterie nie mogą być wyrzucane razem z odpadami
domowymi. Zużyte baterie należy oddać do odpowie-
dzialnych punktów zbiórki lub do sprzedawcy.
Uruchamianie urządzenia
Wrażliwe powierzchnie, takie jak wyświetlacz, mogą być zabezpie-
czone plastikową folią. Folie te należy usunąć.

PC-HL3116_IM 29.06.23
48
Montaż na ścianie
Należy użyć dostarczonego materiału
montażowego. Należy przestrzegać po-
niższych rysunków montażowych.
• Upewnij się, że w pobliżu znajduje się
gniazdo zasilania. Gniazdo musi być
swobodnie dostępne.
• Upewnij się wcześniej, że w ścianie
nie ma żadnych kabli, które mogłyby zostać uszkodzone podczas
instalacji.
• Wywierć otwory na wysokości 2 m nad podłogą.
• Odległość od sutu i ścian powinna wynosić co najmniej 30 cm.
1. Wywierć dwa otwory o średnicy 6 mm w odległo-
ści 315 mm.
2. W otworach należy umieścić kołki rozporowe i śruby. Śruby po-
winny wystawać ze ściany na około 10 mm.
3. Zawieś urządzenie z wgłębieniami (A) na śrubach.
Teraz popchnij urządzenie w kierunku (B), aby je za-
mocować.
- Jeśli chcesz ponownie zdjąć urządzenie ze ściany, przesuń je
z (B) do (A), a następnie podnieś urządzenie ze ściany.
Pilot zdalnego sterowania
Ogniwo litowe w komorze baterii pilota
zdalnego sterowania zostało zabezpie-
czone plastikową folią na czas transportu.
Wydłuża to żywotność baterii. Przed pierw-
szym użyciem pilota zdalnego sterowania należy usunąć
plastikową folię, aby był on gotowy do użycia.
Podczas obsługi urządzenia należy upewnić się, że pomię-
dzy pilotem zdalnego sterowania a czujnikiem na wyświetla-
czu urządzenia znajduje się wolna linia wzroku. Gdy zasięg
pilota zdalnego sterowania zmniejszy się, należy wymienić
baterię. Aby wymienić baterię, wykonaj następujące czynno-
ści:
1. Naciśnij blokadę w kierunku wskazanym
strzałką (1).
2. Wyciągnąć uchwyt ogniwa guzikowego
z pilota zdalnego sterowania (2).
3. Wymień ogniwo na baterię tego samego
typu (CR 2025). Upewnij się, że bieguno-
wość jest prawidłowa.
4. Wciśnij uchwyt z powrotem do komory baterii, aż zatrza-
śnie się na swoim miejscu.

PC-HL3116_IM 29.06.23
49
Podłączenie elektryczne
1. Upewnij się, że napięcie urządzenia (patrz etykieta
znamionowa) odpowiada napięciu sieciowemu, które
będzie używane.
2. Ustaw przełącznik zasilania po prawej stronie urządzenia
w pozycji O.
3. Podłącz wtyczkę sieciową do prawidłowo zainstalowa-
nego gniazda z uziemieniem.
Włączanie urządzenia
• Ustaw przełącznik zasilania po prawej stronie urządzenia
w pozycji I. Urządzenie uruchomi silnik w celu zamknię-
cia klapy powietrza, która może być nadal otwarta.
Następnie urządzenie przełączy się w tryb gotowości.
• Urządzenie jest obsługiwane za pomocą pilota zdalnego
sterowania.
Łatwa obsługa
Urządzenie można również włączać i wyłączać bez użycia
pilota zdalnego sterowania. W tym celu naciśnij przycisk
START / STOP obok wyłącznika sieciowego.
1. Naciśnij przycisk, aby włączyć urządzenie.
Urządzenie włączy się z ustawieniem temperatury
HIGH, wentylatorem (FAN) i uchyleniem klapy powietrza
(SWING).
2. Naciśnij przycisk ponownie, aby wyłączyć urządzenie.
Tryb FAN zostanie uruchomiony na 30 sekund, a klapa
powietrza zostanie zamknięta. Następnie urządzenie
przełączy się w tryb gotowości.
Uwagi dotyczące użytkowania
• Urządzenie jest wyposażone w zabezpieczenie przed
przegrzaniem. Gdy temperatura otoczenia osiągnie
51 °C, urządzenie wyłączy się.
• Należy unikać otwierania drzwi i okien podczas pracy
w trybie ogrzewania, ponieważ spowoduje to pogorsze-
nie efektu ogrzewania.
• Wyświetlana jest aktualna temperatura otoczenia.
• Urządzenie zawsze uruchamia się w trybie wentylatora.
• Ustawienia można wprowadzać tylko podczas pracy
urządzenia.
Obsługa
Włączanie / wyłączanie
• Naciśnij przycisk , aby włączyć urządzenie. Wentylator
rozpocznie pracę. Lampka kontrolna FAN zaświeci się.
• Naciśnij ponownie przycisk , aby wyłączyć urządzenie.
Jeśli aktywny był tryb ogrzewania, tryb FAN zostanie
włączony na 30 sekund, a klapa powietrza zostanie
zamknięta. Następnie urządzenie przełączy się w tryb
gotowości.
Obracanie klapki powietrza
Naciśnij przycisk , aby włączyć lub wyłączyć uchylanie
klapy powietrza. Lampka kontrolna SWING świeci się, gdy
funkcja jest włączona.
Funkcja ogrzewania
Naciśnij kilkakrotnie przycisk , aby przełączać między
następującymi trybami:
LOW =Niska temperatura i wentylator.
Lampki kontrolne LOW i FAN zaświecą się.
HIGH =Wysoka temperatura i wentylator.
Zaświeci się lampka kontrolna HIGH i FAN.
FAN =Aktywny jest tylko wentylator.
Lampka kontrolna FAN świeci się.
Ustawianie temperatury (funkcja TEMP)
Urządzenie automatycznie wybiera poziom ogrzewania
zgodnie z ustawioną temperaturą. Po osiągnięciu ustawio-
nej temperatury urządzenie wyłącza ogrzewanie.
Regulowany zakres temperatury wynosi od 18 °C do 45 °C.
1. Naciśnij przycisk .
2. Ustaw żądaną temperaturę za pomocą przycisków
i .
3. Potwierdź ustawienie przyciskiem
OK
. Żądany poziom
temperatury jest utrzymywany automatycznie.
Lampka kontrolna TEMP zaświeci się. Oznacza to, że
funkcja jest aktywna.
Usuwanie ustawionej temperatury
Aby usunąć poprzednio ustawioną temperaturę, wykonaj
następujące czynności:
1. Najpierw naciśnij przycisk .
2. Aby usunąć ustawienie, naciśnij przycisk C
°
°
. Lampka
kontrolna TEMP zgaśnie.
Funkcja timera
Urządzenie można ustawić tak, aby działało przez okre-
ślony czas.
1. Naciśnij kilkakrotnie przycisk , aby wybrać od jednej
godziny ( ) do ośmiu godzin ( ). Ustawienie ( )
wyłącza tę funkcję.
2. Po upływie ustawionego czasu rozlegnie się sygnał
dźwiękowy i urządzenie rozpocznie 30-sekundowe odli-
czanie. Po zakończeniu odliczania urządzenie przełączy
się w tryb czuwania.
- Aktywowana funkcja nie jest wyświetlana z przyczyn
technicznych.
- Funkcji nie można wybrać, gdy aktywny jest tygodniowy
wyłącznik czasowy.

PC-HL3116_IM 29.06.23
50
Ustawianie tygodniowego timera
• Tygodniowego wyłącznika czasowego nie można usta-
wić, gdy urządzenie pracuje w trybie wentylatora.
• Tygodniowy programator czasowy można również
połączyć z funkcją TEMP, funkcją SWING i funkcją „Wy-
krywanie otwartego okna”.
• Aby korzystać z timera tygodniowego, należy najpierw
ustawić aktualny czas. Aktualny czas należy ustawić przy
pierwszym uruchomieniu urządzenia i za każdym razem,
gdy urządzenie jest odłączane od zasilania.
• Dni tygodnia są wskazywane przez następujące cyfry na
wyświetlaczu:
=
=
=
=
Poniedziałek
Wtorek
Środa
Czwartek
=
=
=
Piątek
Sobota
Niedziela
Ustawianie aktualnej godziny:
1. Naciśnij przycisk . Na wyświetlaczu pojawi się wska-
zanie (poniedziałek).
2. Wybierz bieżący dzień tygodnia za pomocą przycisku
lub . Potwierdź wprowadzenie za pomocą przycisku
OK
.
3. Wprowadzanie godzin:
pojawia się na wyświetlaczu. Ustawienia dokonuje
się za pomocą przycisków / . Potwierdź wprowa-
dzenie za pomocą przycisku
OK
.
4. Wprowadzanie minut:
pojawia się na wyświetlaczu. Ustawienia dokonuje
się za pomocą przycisków / . Potwierdź wprowa-
dzenie za pomocą przycisku
OK
.
Wybierz tygodniowy programator czasowy:
• Urządzenie posiada wstępnie zaprogramowane timery
tygodniowe ( do ) oraz indywidualnie programo-
wany timer tygodniowy ( ).
• W przypadku timera tygodniowego należy wpro-
wadzić ustawienia dla wszystkich dni tygodnia. Można
ustawić tylko godziny, a nie minuty. Czas zatrzymania
musi następować po czasie rozpoczęcia.
• Jeśli tygodniowy programator czasowy jest ustawiony
w wybranym trybie, urządzenie pracuje do czasu zatrzy-
mania. Poza wybranym trybem wentylator pracuje przez
30 sekund. Następnie urządzenie przełącza się w tryb
czuwania.
• Aktywowana funkcja jest sygnalizowana miganiem
lampek kontrolnych 24 / 7 i LOW lub HIGH. Po włączeniu
urządzenia lampki kontrolne zaświecą się.
• Poniżej znajduje się lista zaprogramowanych tygodnio-
wych timerów:
Tryb Dni tygodnia Czas
Poniedziałek – Niedziela 8:00 – 17:00
Poniedziałek – Niedziela 18:00 – 7:00*
Poniedziałek – Piątek 8:00 – 17:00
Tryb Dni tygodnia Czas
Poniedziałek – Piątek 18:00 – 7:00*
Sobota – Niedziela 0:00 – 23:59
* Urządzenie pracuje do następnego dnia rano.
1. Naciśnij kilkakrotnie przycisk , aby wybrać żądany
tygodniowy programator czasowy.
2. Potwierdź wybór przyciskiem
OK
.
3. Indywidualnie programowany tygodniowy programa-
tor czasowy:
Po wybraniu tygodniowego programatora czasowego
na wyświetlaczu pojawi się (poniedziałek).
4. Wybierz żądany dzień tygodnia od (poniedziałek) do
(niedziela) za pomocą przycisku lub . Potwierdź
wybór przyciskiem
OK
.
5. Teraz ustaw czas rozpoczęcia za pomocą przycisku
lub .
6. Potwierdź wybór przyciskiem
OK
.
7. Ustaw czas zakończenia za pomocą przycisku lub .
8. Potwierdź wpis przyciskiem
OK
, jeśli chcesz ustawić
inny dzień tygodnia. W przeciwnym razie poczekaj, aż
urządzenie powoli przewinie dni tygodnia do . Zostanie
wówczas zastosowane ustawienie domyślne.
Usuwanie ustawionego zegara tygodniowego
Aby usunąć poprzednio ustawiony zegar tygodniowy, wyko-
naj następujące czynności:
1. Najpierw naciśnij przycisk .
2. Aby usunąć ustawienie, naciśnij przycisk C
°
°
. Lampka
kontrolna 24 / 7 zgaśnie.
Wykrywanie otwartego okna
• Funkcję tę można wybrać tylko wtedy, gdy urządzenie
działa w trybie ogrzewania lub TEMP.
• Urządzenie przeprowadza kontrolę temperatury w re-
gularnych odstępach czasu i wyłącza się, gdy różnica
temperatury w stosunku do poprzedniej temperatury
otoczenia drastycznie spada. Na wyświetlaczu pojawi się
komunikat .
1. Naciśnij przycisk , aby włączyć funkcję. Lampka kon-
trolna TEMP zacznie migać.
2. Naciśnij przycisk ponownie, aby wyłączyć funkcję.
Zakończenie operacji
1. Naciśnij przycisk , aby wyłączyć urządzenie. Jeśli ak-
tywny był tryb ogrzewania, tryb FAN zostanie włączony
na 30 sekund, a klapa powietrza zostanie zamknięta.
Następnie urządzenie przełączy się w tryb gotowości.
2. Ustaw przełącznik zasilania po prawej stronie urządzenia
w pozycji O.
3. Następnie wyciągnij wtyczkę z gniazdka.

PC-HL3116_IM 29.06.23
51
Ochrona przed przegrzaniem
Urządzenie posiada mechanizm zabezpieczający przed
przegrzaniem, powodujący automatyczne wyłączenie urzą-
dzenia w przypadku przegrzania.
1. Ustaw przełącznik zasilania po prawej stronie urządzenia
w pozycji O. Następnie wyciągnij wtyczkę z gniazdka.
2. Przed ponownym użyciem pozostawić urządzenie na
ok. 10 minut do ostygnięcia.
- Jeśli mechanizm ochrony przed przegrzaniem powoduje,
że urządzenie po krótkim czasie ponownie się wyłącza,
może to wskazywać na usterkę. Wyłączyć urządzenie
i odłączyć je od sieci. Zleć kontrolę urządzenia sprze-
dawcy lub naszemu działowi obsługi klienta.
Czyszczenie
OSTRZEŻENIE:
• Przed czyszczeniem zawsze odłączaj urządzenie od
sieci i poczekaj, aż urządzenie ostygnie.
• Nigdy nie zanurzaj urządzenia w wodzie, aby je
wyczyścić. Może to doprowadzić do porażenia prądem
lub pożaru.
UWAGA:
• Nie należy używać szczotek drucianych ani innych
materiałów ściernych.
UWAGA:
• Nie używać środków żrących lub szorujących.
• Kurz należy wytrzeć suchą szmatką.
• Plamy można usunąć za pomocą odpowiednio wilgotnej
szmatki.
Kurz na kratce ochronnej
Jeśli na kratce ochronnej zebrał się kurz, może to spowodo-
wać przegrzanie.
• Usunąć kurz przez ostrożne szczotkowanie.
lub
• Użyj dyszy do tapicerki w odkurzaczu, aby usunąć kurz.
Dane techniczne
Model:.................................................................. PC-HL 3116
Zasilanie: ............................................220 – 240 V~, 50 – 60 Hz
Pobór mocy: ................................................................ 2000 W
Klasa ochronności: ...............................................................
Waga netto: ..............................................................ok. 2,4 kg
Zastrzegamy sobie prawo wprowadzania zmian technicz-
nych i projektowych w trakcie ciągłego rozwoju produktu.
To urządzenie zostało przetestowane zgodnie z wszystkimi
obowiązującymi, aktualnymi dyrektywami CE i zbudowane
zgodnie z najnowszymi przepisami bezpieczeństwa.
Karta informacyjna produktu
Model PC-HL 3116
Parametr Ozna-
czenie
War-
tość
Jed-
nostka Parametr Jed-
nostka
Moc cieplna
Sposób doprowadzania ciepła wyłącznie w przypadku
elektrycznych akumulacyjnych miejscowych ogrzewaczy
pomieszczeń
Nominalna moc cieplna Pnom 2,0 kW ręczny regulator doprowadzania ciepła z wbudowanym
termostatem nie
Minimalna moc cieplna
(orientacyjna) Pmin 1,0 kW ręczny regulator doprowadzania ciepła z pomiarem
temperatury w pomieszczeniu lub na zewnątrz nie
Maksymalna stała moc
cieplna Pmax, c 2,0 kW elektroniczny regulator doprowadzania ciepła z pomia-
rem temperatury w pomieszczeniu lub na zewnątrz nie
Zużycie energii elektrycznej na potrzeby własne moc cieplna regulowana wentylatorem nie
Przy nominalnej mocy
cieplnej el
max n. d. kW Rodzaj mocy cieplnej / regulacja temperatury w pomieszcze-
niu
Przy minimalnej mocy
cieplnej el
min n. d. kW jednostopniowa moc cieplna bez regulacji temperatury
w pomieszczeniu nie
W trybie czuwania el
SB 0,0006 kW co najmniej dwa ręczne stopnie bez regulacji tempera-
tury w pomieszczeniu nie

PC-HL3116_IM 29.06.23
52
mechaniczna regulacja temperatury w pomieszczeniu za
pomocą termostatu nie
elektroniczna regulacja temperatury w pomieszczeniu nie
elektroniczna regulacja temperatury w pomieszczeniu ze
sterownikiem dobowym nie
elektroniczna regulacja temperatury w pomieszczeniu ze
sterownikiem tygodniowym tak
Inne opcje regulacji
regulacja temperatury w pomieszczeniu z wykrywaniem
obecności nie
regulacja temperatury w pomieszczeniu z wykrywaniem
otwartego okna tak
z regulacją na odległość nie
z adaptacyjną regulacją startu nie
z ograniczeniem czasu pracy tak
z czujnikiem ciepła promieniowania nie
Dane teleadresowe Clatronic International GmbH, Industriering Ost 40, 47906 Kempen, Germany
n. d. = nie dotyczy
Warunki gwarancji
Przyznajemy 24 miesiące gwarancji na produkt licząc od
daty zakupu.
W tym okresie będziemy bezpłatnie usuwać w terminie
14 dni od daty dostarczenia wadliwego sprzętu z kartą
gwarancyjną do miejsca zakupu wszystkie uszkodzenia
powstałe w tym urządzeniu na skutek wady materiałów
lub wadliwego wykonania, naprawiając oraz wymieniając
wadliwe części lub (jeśli uznamy za stosowne) wymieniając
całe urządzenie na nowe.
Sprzęt do naprawy powinien być dostarczony w komplecie
wraz z dowodem zakupu oraz z ważną kartą gwarancyjną
do sprzedawcy w miarę możliwości w oryginalnym opako-
waniu lub innym odpowiednim dla zabezpieczenia przed
uszkodzeniem. W razie braku kompletnego opakowania fa-
brycznego, ryzyko uszkodzenia sprzętu podczas transportu
do i z miejsca zakupu ponosi reklamujący.
Naprawa gwarancyjna nie dotyczy czynności przewidzianych
w instrukcji obsługi, do wykonania których zobowiązany jest
użytkownik we własnym zakresie i na własny koszt.
Gwarancja nie obejmuje:
• mechanicznych, termicznych, chemicznych uszkodzeń
sprzętu i wywołanych nimi wad,
• uszkodzeń powstałych w wyniku działania sił zewnętrz-
nych takich jak wyładowania atmosferyczne, zmiana
napięcia zasilania i innych zdarzeń losowych,
• nieprawidłowego ustawienia wartości napięcia elektrycz-
nego, zasilanie z nieodpowiedniego gniazda zasilania,
• sznurów połączeniowych, sieciowych, żarówek, baterii,
akumulatorów,
• uszkodzeń wyrobu powstałych w wyniku niewłaściwego
lub niezgodnego z instrukcją jego użytkowania, przecho-
wywania, konserwacji, samowolnego zrywania plomb
oraz wszelkich przeróbek i zmian konstrukcyjnych doko-
nanych przez użytkownika lub osoby niepowołane,
• roszczeń z tytułu parametrów technicznych wyrobu, o ile
są one zgodne z podanymi przez producenta,
• prawidłowego zużycia i uszkodzeń, które mają nieistotny
wpływ na wartość lub działanie tego urządzenia.
Karta gwarancyjna bez pieczątki sklepu, daty sprzedaży, nie
wypełniona, źle wypełniona, ze śladami poprawek, nieczy-
telna wskutek zniszczenia, bez możliwości ustalenia miejsca
sprzedaży oraz dołączonego dowodu zakupu jest nieważna.
Korzystanie z usług gwarancyjnych nie jest możliwe po
upływie daty ważności gwarancji. Gwarancja na części lub
całe urządzenie, które są wymieniane kończy się, wraz
z końcem gwarancji na to urządzenie.
Wszystkie inne roszczenia, wliczając w to odszkodowania
są wykluczone chyba, że prawo przewiduje inaczej. Rosz-
czenia wykraczające poza tą umowę nie są uwzględniane
przez tą gwarancję.
Gwarancja na sprzedany towar konsumpcyjny nie wyłącza,
nie ogranicza ani nie zawiesza uprawnień kupującego
wynikających z niezgodności towaru z umową.

PC-HL3116_IM 29.06.23
53
Gwarancja oraz zawarte w niej warunki obowiązują na
terenie Rzeczpospolitej Polskiej.
Dystrybutor:
CTC Clatronic Sp. z o.o
Ul. Brzeska 1
45-960 Opole
Usuwanie
Usuwanie baterii
Jako użytkownicy mają Państwo zgodny z prawem
obowiązek do zwrotu zużytych baterii bądź aku-
mulatorów.
Państwa urządzenie posiada baterie. Jeśli te bate-
rie zostały zużyte, należy postępować zgodnie z poniższymi
instrukcjami:
UWAGA:
Nie wolno wyrzucać baterii / akumulatorów z odpadami
gospodarstwa domowego!
• Wyjąć baterię z pilota przed utylizacją urządzenia.
• Zużyte baterie należy przekazać do odpowiedniego
punktu zbiórki lub dilera.
• W miejskich lub lokalnych instytucjach rządowych można
uzyskać informacje na temat punktów zbiórki.
Znaczenie symbolu „Pojemnik na śmieci”
Proszę oszczędzać nasze środowisko, sprzęt
elektryczny nie należy do śmieci domowych.
Proszę korzystać z punktów zbiorczych, prze-
widzianych do zdawania sprzętu elektrycznego,
i tam proszę oddawać sprzęt elektryczny,
którego już nie będą Państwo używać.
Tym sposobem pomagają Państwo unikać potencjalnych
następstw niewłaściwego usuwania odpadów, mających
wpływ na środowisko i zdrowie ludzi.
Tą drogą przyczyniają się Państwo do ponownego użycia,
do recyklingu i do innych form wykorzystania starego
sprzętu elektrycznego i elektronicznego.
Informacje, gdzie można zdać sprzęt, otrzymają Państwo
w swoich urzędach komunalnych lub w administracji gminy.
Twój sprzedawca i partner umowny jest również zobowią-
zany do bezpłatnego odbioru starego urządzenia.

PC-HL3116_IM 29.06.23
54
FONTOS:
Először feltétlenül olvassa el a külön mellékelt biztonsági utasítá-
sokat.
Használati utasítás
Köszönjük, hogy a termékünket választotta. Reméljük,
elégedetten használja majd a készüléket.
A készülék használata előtt nagyon gyelmesen olvassa
el a használati útmutatót és a külön mellékelt biztonsági
utasításokat. Tartsa ezeket a dokumentumokat, beleértve
a jótállási jegyet, a blokkot és lehetőség szerint a belső
csomagolással ellátott dobozt is, biztonságos helyen. Ha a
készüléket harmadik félnek adja tovább, mindig mellékelje
az összes vonatkozó dokumentumot.
A használati útmutatóban található szimbólumok
Az ön biztonságára vonatkozó utasítások kifejezetten meg
vannak különböztetve. Kérjük, mindenképpen ügyeljen
ezekre annak érdekében, hogy elkerülje a baleseteket és a
készülék károsodását:
FIGYELMEZTETÉS:
Egészségét károsító veszélyforrásokra gyelmeztet és
rámutat a lehetséges sérülési lehetőségekre.
VIGYÁZAT:
Lehetséges veszélyre utal, mely a készülékben vagy más
tárgyakban kárt tehet.
Tartalom
A kezelőelemek áttekintése ...............................................3
A készülék kicsomagolása ..............................................54
A kezelőelemek áttekintése / A csomag tartalma ..........54
A készülék használatára vonatkozó gyelmeztetések
...55
Csatlakoztatott terhelés .................................................55
Elemek kezelése ............................................................ 55
A készülék üzembe helyezése .........................................55
Falra szerelés ................................................................56
Távirányító .....................................................................56
Elektromos csatlakozás .................................................57
A készülék bekapcsolása ...............................................57
Könnyű kezelhetőség .....................................................57
Használati megjegyzések ................................................57
Működés .............................................................................57
Be- / kikapcsolás ............................................................. 57
A légcsappantyú elfordítása ........................................... 57
Fűtés funkció .................................................................. 57
A hőmérséklet beállítása (TEMP funkció) ......................57
A beállított hőmérséklet törlése ......................................57
Időzítő funkció ................................................................57
A heti időzítő beállítása ..................................................57
A beállított heti időzítő törlése ........................................ 58
Nyitott ablak érzékelése ................................................. 58
Működés befejezése ...................................................... 58
Túlmelegedés elleni védelem .......................................... 58
Tisztítás .............................................................................. 58
Por a védőrácson ........................................................... 59
Műszaki adatok .................................................................59
Termék adatlap ..................................................................59
Hulladékkezelés ................................................................60
Az elemek megsemmisítése .......................................... 60
A „kuka” piktogram jelentése..........................................60
A készülék kicsomagolása
1. Vegye ki a készüléket a csomagolásából.
2. Távolítson el minden csomagolóanyagot, például
fóliákat, töltőanyagot, kábelkötegelőket és kartoncso-
magolást.
3. Ellenőrizze a szállítási terjedelem teljességét.
4. Ha a csomagolás tartalma hiányos, vagy ha sérülések
észlelhetők, ne működtesse a készüléket. Azonnal
juttassa vissza a kereskedőhöz.
A kezelőelemek áttekintése /
A csomag tartalma
Ventilátoros fűtés
1 Bemélyedések
2 Kijelző
3 Vezérlőlámpa FAN (ventilátor)
4 Vezérlőlámpa LOW (alacsony) (1000 watt)
5 Vezérlőlámpa HIGH (magas) (2000 watt)
6 Vezérlőlámpa 24 / 7 (heti időzítő)
7 Vezérlőlámpa TEMP (hőmérséklet)
8 Vezérlőlámpa SWING (forgatható)
9 Hálózati kapcsoló I / O (be / ki)
10 START / STOP gomb (indítás / leállítás)
11 Fedél a fűtőelemekhez / légkivezető nyíláshoz
12 Levegőcsappantyú

PC-HL3116_IM 29.06.23
55
Távirányító
1A készülék be- és kikapcsolása
2A légkamra elforgatásának be- vagy kikapcsolása
3
Nyitott ablak érzékelésének aktiválása / kikapcsolása
4Időszabályozás aktiválása
5
OK
A bemenet megerősítése
6C
°
°
Automatikus hőmérséklet-szabályozás vagy heti
időszabályozás kikapcsolása
7Hőmérséklet csökkentése
8Elemtartó rekesz
9Növeli a hőmérsékletet
10 Heti időzítés beállítása
11 Automatikus hőmérséklet-szabályozás beállítása
12 Választás az alacsony hőfok (LOW), a magas hő-
fok (HIGH) és a ventilátor üzemmód (FAN) között
Ábra nélkül
1 × Gombelem (CR 2025), már behelyezve a távirányító
elemtartójába
2 × Dugó
2 × Csavar
A készülék használatára
vonatkozó gyelmeztetések
• Ne akassza a fűtőtestet közvetlenül a fali aljzat alá.
• Ügyeljen arra, hogy a tápkábel és a ház között bizton-
sági távolságot tartson.
• A fűtőberendezés túlmelegedésének megakadályozása
érdekében a légkivezető nyílást nem szabad letakarni.
Függönyöket, textíliákat és minden éghető anyagot lega-
lább 1 m távolságra kell tartani a légkivezetéstől.
• A fűtőventilátort semmilyen körülmények között nem
szabad robbanásveszélyes gázzal (pl. benzinnel) teli
helyiségekben, illetve gyúlékony ragasztó- vagy oldó-
szerekkel végzett munka közben (pl. parketta, PVC stb.
ragasztásakor vagy festésekor) használni.
• Ne használja ezt a fűtőtestet kis helyiségekben, ha
azokban olyan személyek tartózkodnak, akik nem képe-
sek önállóan elhagyni a helyiséget, kivéve, ha állandó
felügyeletet biztosítanak.
• Soha ne állítsa be kézzel a légzsilip forgatószerkezetét.
A mechanizmus megsérülhet.
• Ha a készüléket már nem használja, mindig húzza ki a
hálózati dugót a konnektorból.
Csatlakoztatott terhelés
A készülék 2000 W felvett teljesítményt támogat.
VIGYÁZAT: Túlterhelés!
• Hosszabbító kábel használata esetén annak legalább
1,5 mm²-es kábelkeresztmetszettel kell rendelkeznie.
• Ne használjon többszörös aljzatot, mivel ez a készülék
túl nagy teljesítményű.
• Ne csatlakoztasson más nagy teljesítményű készülé-
ket ugyanarra az elektromos áramkörre.
Elemek kezelése
Ne töltse az elemeket!
Ne szerelje szét az elemeket!
Ne zárja rövidre az elemeket!
Gyermekektől távol tartandó!
Tartsa be a polaritást (+ / −)!
Robbanásveszély!
Ne tegye ki az elemeket intenzív hőnek, például
napsütésnek, tűznek vagy hasonlónak.
• Az elemekből akkumulátorsav szivároghat. Ha a távirá-
nyítót hosszabb ideig nem fogja használni, vegye ki az
elemeket.
• Ha az elem szivárog, ne dörzsölje a folyadékot a szembe
vagy a nyálkahártyára. Érintkezés esetén mosson kezet,
öblítse ki a szemet tiszta vízzel. Ha bármilyen kellemet-
len érzés fennáll, forduljon orvoshoz.
• Különböző típusú elemeket, valamint új és használt
elemeket nem szabad együtt használni.
• Az elemeket nem szabad a háztartási hulladékkal együtt
ártalmatlanítani. A használt elemeket vigye vissza az
illetékes gyűjtőhelyekre vagy a kereskedőhöz.
A készülék üzembe helyezése
Az érzékeny felületeket, például a kijelzőt, műanyag fóliával lehet
védeni. Távolítsa el ezeket a műanyag fóliákat.

PC-HL3116_IM 29.06.23
56
Falra szerelés
Használja a mellékelt szerelési anyagot.
Tartsa be az alábbi szerelési rajzokat.
• Győződjön meg róla, hogy van a kö-
zelben konnektor. Az aljzatnak szaba-
don hozzáférhetőnek kell lennie.
• Előzetesen győződjön meg arról, hogy
a falban nincsenek olyan kábelek,
amelyek a szerelés során megsérülhetnek.
• A lyukakat a padlótól 2 m magasságban fúrja ki.
• A mennyezettől és a faltól legalább 30 cm távolságnak kell lennie.
1. Fúrjon két 6 mm átmérőjű lyukat 315 mm távol-
ságban.
2. A lyukakat lássa el a dugókkal és a csavarokkal. A csavarokat
kb. 10 mm-re hagyja kiállni a falból.
3. Akassza a készüléket a mélyedésekkel (A) a csa-
varokra. Most tolja a készüléket a rögzítéshez a (B)
irányba.
- Ha a készüléket ismét le akarja venni a falról, csúsztassa a
készüléket (B) irányból (A) irányba, majd emelje le a készüléket
a falról.
Távirányító
A távirányító elemtartójában lévő lítiumcellát
a szállításhoz műanyag fóliával rögzítették.
Ez meghosszabbítja az akkumulátor élettar-
tamát. A távirányító első használatba vétele előtt a műanyag
fóliát el kell távolítani, hogy a távirányító használatra kész
legyen.
A készülék működtetésekor ügyeljen arra, hogy a távirá-
nyító és a készülék kijelzőjén lévő érzékelő között szabad
rálátás legyen. Ha a távirányító hatótávolsága csökken, az
elemet ki kell cserélni. Az elem cseréjéhez a következőkép-
pen járjon el:
1. Nyomja meg a zárat a nyíl irányába (1).
2. Húzza ki a gombelem tartóját a távirá-
nyítóból (2).
3. Cserélje ki a cellát egy azonos típusú
elemmel (CR 2025). Ügyeljen a helyes
polaritásra.
4. Nyomja vissza a tartót az elemtartóba, amíg be nem
kattan a helyére.

PC-HL3116_IM 29.06.23
57
Elektromos csatlakozás
1. Győződjön meg arról, hogy a készülék feszültsége (lásd
a címke címkéjét) megfelel a használni kívánt hálózati
feszültségnek.
2. Állítsa a készülék jobb oldalán lévő hálózati kapcsolót
O állásba.
3. Csatlakoztassa a hálózati csatlakozót egy megfelelően
felszerelt földelt aljzatba.
A készülék bekapcsolása
• Állítsa a készülék jobb oldalán lévő hálózati kapcsolót
az I állásba. A készülék elindítja a motort, hogy bezárja
az esetleg még nyitott légzsilipet. A készülék ezután
készenléti üzemmódba kapcsol.
• A készülék működtetése a távirányítóval történik.
Könnyű kezelhetőség
A készüléket a távirányító nélkül is be- és kikapcsol-
hatja. Ehhez nyomja meg a hálózati kapcsoló melletti
START / STOP gombot.
1. A készülék bekapcsolásához nyomja meg a gombot.
A készülék a HIGH hőmérséklet-beállítással, a venti-
látorral (FAN) és a légterelő csappantyú kilengésével
(SWING) kapcsol be.
2. A készülék kikapcsolásához nyomja meg ismét a
gombot. A FAN üzemmód 30 másodpercre elindul, és
a légterelő csappantyú bezáródik. Ezután a készülék
készenléti üzemmódba kapcsol.
Használati megjegyzések
• A készülék túlmelegedés elleni védelemmel van felsze-
relve. Ha a környezeti hőmérséklet eléri az 51 °C-ot, a
készülék kikapcsol.
• Kerülje az ajtók és ablakok nyitását fűtési üzem közben,
mert ez rontja a fűtési hatást.
• A kijelzőn megjelenik az aktuális környezeti hőmérséklet.
• A készülék mindig ventilátor üzemmódban indul.
• A beállítások csak működés közben végezhetők el.
Működés
Be- / kikapcsolás
• A készülék bekapcsolásához nyomja meg a gombot.
A ventilátor működésbe lép. A FAN ellenőrző lámpa
kigyullad.
• A készülék kikapcsolásához nyomja meg újra a gom-
bot. Ha a fűtési üzemmód aktív volt, a FAN üzemmód
30 másodpercre aktiválódik, és a légzsilip bezáródik. A
készülék ezután készenléti üzemmódba kapcsol.
A légcsappantyú elfordítása
Nyomja meg az gombot a légzsilip lengésének be- vagy
kikapcsolásához. A funkció aktiválásakor a vezérlőlámpa
SWING világít.
Fűtés funkció
A gomb ismételt megnyomásával válthat a következő
üzemmódok között:
LOW =Alacsony hőmérséklet és ventilátor.
A vezérlőlámpa LOW és FAN világít.
HIGH =Magas hőmérséklet és ventilátor.
A vezérlőlámpa HIGH és a FAN világít.
FAN =Csak a ventilátor aktív.
A FAN vezérlőlámpa világít.
A hőmérséklet beállítása (TEMP funkció)
A készülék automatikusan kiválasztja a fűtési szintet a beál-
lított hőmérsékletnek megfelelően. Amint a készülék eléri a
beállított hőmérsékletet, a készülék kikapcsolja a fűtést.
A beállítható hőmérsékleti tartomány 18 °C és 45 °C között
van.
1. Nyomja meg a gombot.
2. Állítsa be a kívánt hőmérsékletet a és gombokkal.
3. Erősítse meg a bevitelt az
OK
gombbal. A kívánt hőmér-
sékleti szint automatikusan fenntartásra kerül.
A TEMP ellenőrző lámpa kigyullad. Ez jelzi, hogy a funkció
aktiválva van.
A beállított hőmérséklet törlése
A korábban beállított hőmérséklet törléséhez a következő-
képpen járjon el:
1. Először nyomja meg a gombot.
2. A beállítás törléséhez most nyomja meg a C
°
°
gombot. A
TEMP vezérlőlámpa kialszik.
Időzítő funkció
Beállíthatja, hogy a készülék egy bizonyos ideig működjön.
1. Nyomja meg többször a gombot az egy óra ( ) és
nyolc óra ( ) közötti választáshoz. A beállítás ( )
kikapcsolja a funkciót.
2. A beállított idő letelte után egy hangjelzés hallatszik, és
a készülék 30 másodperces visszaszámlálásba kezd.
A visszaszámlálás letelte után a készülék készenléti
üzemmódba kapcsol.
- Az aktivált funkció technikai okokból nem jelenik meg a
kijelzőn.
- A funkció nem választható ki, ha a heti időzítő aktív.
A heti időzítő beállítása
• A heti időzítő nem állítható be, amikor a készülék ventilá-
tor üzemmódban van.
• A heti időzítő a TEMP funkcióval, a SWING funkcióval és
a „Nyitott ablak érzékelése” funkcióval is kombinálható.
• A heti időzítő használatához először az aktuális időt kell
beállítani. Az aktuális időt a készülék első üzembe he-
lyezésekor és minden alkalommal, amikor a készüléket
leválasztják a hálózatról, be kell állítani.

PC-HL3116_IM 29.06.23
58
• A hét napjait a következő számjegyek jelzik a kijelzőn:
=
=
=
=
Hétfő
Kedd
Szerda
Csütörtök
=
=
=
Péntek
Szombat
Vasárnap
Az aktuális idő beállítása:
1. Nyomja meg a gombot. A kijelzőn megjelenik a
(hétfő) jelzés.
2. Válassza ki a hét aktuális napját a vagy gombbal.
Erősítse meg a bejegyzést az
OK
gombbal.
3. Az órák beírása:
A kijelzőn megjelenik a . A beállítás a / gombok-
kal történik. Erősítse meg a bejegyzést az
OK
gombbal.
4. A percek beírása:
A kijelzőn megjelenik a . A beállítás a / gombok-
kal történik. Erősítse meg a bejegyzést az
OK
gombbal.
Válassza ki a Heti időzítőt:
• A készülék rendelkezik előre beprogramozott heti időzí-
tőkkel ( – ) és egy egyénileg programozható heti
időzítővel ( ).
• A heti időzítőnél a beállítást a hét minden napjára
el kell végezni. Csak órák állíthatók be, percek nem. A
leállítási időnek a kezdési idő után kell lennie.
• Ha a heti időzítő be van állítva a kiválasztott üzemmód-
ban, a készülék a leállítási időpontig működik. A kivá-
lasztott üzemmódon kívül a ventilátor 30 másodpercig
tovább működik. Ezt követően a készülék készenléti
üzemmódba kapcsol.
• Az aktivált funkciót a vezérlőlámpák 24 / 7 és LOW vagy
HIGH villogása jelzi. Amint a készülék bekapcsol, a
vezérlőlámpák kigyulladnak.
• Az alábbiakban az előre beprogramozott heti időzítők
listája következik:
Mód Hétköznapok Idő
Hétfő – Vasárnap 8:00 – 17:00
Hétfő – Vasárnap 18:00 – 7:00*
Hétfő – Péntek 8:00 – 17:00
Hétfő – Péntek 18:00 – 7:00*
Szombat – Vasárnap 0:00 – 23:59
* A készülék másnap reggelig üzemel.
1. Nyomja meg többször a gombot a kívánt heti időzítő
kiválasztásához.
2. Erősítse meg a választást az
OK
gombbal.
3. Egyénileg programozható heti időzítő:
A heti időzítő kiválasztásakor a kijelzőn most (hétfő)
jelenik meg.
4. Válassza ki a kívánt hétköznapot (hétfő) és (vasárnap)
között a vagy gombbal. Erősítse meg a bejegyzést
az
OK
gombbal.
5. Most állítsa be a kezdési időt a vagy gombbal.
6. Erősítse meg a választást az
OK
gombbal.
7. Állítsa be a leállítási időt a vagy gombbal.
8. Ha egy másik hétköznapot szeretne beállítani, erősítse
meg a bejegyzést az
OK
gombbal. Ellenkező esetben
várjon, amíg a készülék lassan végiglapozza a hétköz-
napokat -ig. Ekkor az alapértelmezett beállítás kerül
alkalmazásra.
A beállított heti időzítő törlése
A korábban beállított heti időzítő törléséhez a következő-
képpen járjon el:
1. Először nyomja meg a gombot.
2. A beállítás törléséhez most nyomja meg a C
°
°
gombot. A
24 / 7 vezérlőlámpa kialszik.
Nyitott ablak érzékelése
• A funkció csak akkor választható ki, ha a készülék fűtési
funkcióban vagy TEMP funkcióban van.
• A készülék rendszeres időközönként hőmérséklet-elle-
nőrzést végez, és kikapcsol, ha a hőmérsékletkülönbség
a korábbi környezeti hőmérséklethez képest drasztiku-
san lecsökken. a kijelzőn megjelenik.
1. A funkció bekapcsolásához nyomja meg a gombot. A
TEMP ellenőrző lámpa villogni kezd.
2. A funkció kikapcsolásához nyomja meg újra a gombot.
Működés befejezése
1. Nyomja meg az gombot a készülék kikapcsolásához.
Ha a fűtési üzemmód aktív volt, a FAN üzemmód
30 másodpercre aktiválódik, és a légzsilip bezáródik. A
készülék ezután készenléti üzemmódba kapcsol.
2. Állítsa a készülék jobb oldalán lévő hálózati kapcsolót O
állásba.
3. Ezután húzza ki a hálózati dugót a konnektorból.
Túlmelegedés elleni védelem
A készülék túlmelegedésvédelmi mechanizmussal rendel-
kezik, amely túlmelegedés esetén a készülék automatikus
kikapcsolását eredményezi.
1. Állítsa a készülék jobb oldalán lévő hálózati kapcsolót O
állásba. Ezután húzza ki a hálózati dugót a konnektorból.
2. Hagyja a készüléket kb. 10 percig lehűlni, mielőtt újra
használná.
- Ha a túlmelegedés elleni védőmechanizmus rövid idő
után újra kikapcsolja a készüléket, ez hibára utalhat.
Kapcsolja ki a készüléket, és húzza ki a hálózatból.
Ellenőriztesse a készüléket kereskedőjével vagy ügyfél-
szolgálatunkkal.
Tisztítás
FIGYELMEZTETÉS:
• Tisztítás előtt mindig húzza ki a készüléket a hálózat-
ból, és várja meg, amíg a készülék lehűl.

PC-HL3116_IM 29.06.23
59
FIGYELMEZTETÉS:
• Soha ne merítse a készüléket vízbe a tisztításhoz. Ez
áramütést vagy tüzet okozhat.
VIGYÁZAT:
• Ne használjon drótkefét vagy más csiszolóanyagot.
• Ne használjon maró vagy súrolószereket.
• A port száraz ruhával törölje le.
• A foltok megfelelően nedves ruhával eltávolíthatók.
Por a védőrácson
Ha a védőrácson por gyűlt össze, az túlmelegedést okozhat.
• A port óvatos ecseteléssel távolítsa el.
vagy
• Használja a porszívó kárpitos fúvókáját a por eltávolí-
tásához.
Műszaki adatok
Modell: ................................................................. PC-HL 3116
Tápegység: ........................................220 – 240 V~, 50 – 60 Hz
Energiafogyasztás: .....................................................2000 W
Védelmi osztály: ...................................................................
Nettó súly: ................................................................kb. 2,4 kg
A műszaki és kivitelezési módosítások jogát a folyamatos
termékfejlesztés miatt fenntartjuk.
Ezt a készüléket az összes vonatkozó, hatályos CE-irány-
elvnek megfelelően tesztelték, és a legújabb biztonsági
előírásoknak megfelelően gyártották.
Termék adatlap
Modell PC-HL 3116
Jellemző Jel Érték Mérté-
kegység Jellemző Mérté-
kegység
Hőteljesítmény Csak a hőtárolós elektromos egyedi helyiségfűtő berendezések
esetében: A hőbevitel típusa
Névleges
hőteljesítmény Pnom 2,0 kW Kézi töltésszabályozás beépített termosztáttal nem
Minimális hőteljesít-
mény (indikatív) Pmin 1,0 kW Kézi töltésszabályozás beltéri és / vagy
kültéri hőmérséklet-visszacsatolással nem
Maximális folyamatos
hőteljesítmény Pmax, c 2,0 kW Elektronikus töltésszabályozás beltéri és / vagy
külső hőmérséklet-visszacsatolással nem
Kiegészítő villamosenergia-fogyasztás Ventilátorral segített hőleadás nem
A névleges
hőteljesítményen el
max N. A. kW A teljesítmény, illetve a beltéri hőmérséklet szabályozásának
típusa
A minimális
hőteljesítményen el
min N. A. kW Egyetlen állás, beltéri hőmérséket-szabályozás nélkül nem
Készenléti
üzemmódban el
SB 0,0006 kW Két vagy több kézi szabályozású állás, beltéri
hőmérséklet-szabályozás nélkül nem
Mechanikus termosztátos beltéri hőmérséklet-szabályozás nem
Elektronikus beltéri hőmérséklet-szabályozás nem
Elektronikus beltéri hőmérséklet-szabályozás és napszak
szerinti szabályozás nem

PC-HL3116_IM 29.06.23
60
Elektronikus beltéri hőmérséklet-szabályozás és heti
szabályozás igen
Más szabályozási lehetőségek
Beltéri hőmérséklet-szabályozás jelenlét-érzékeléssel nem
Beltéri hőmérséklet-szabályozás nyitottablak-érzékeléssel igen
Távszabályozási lehetőség nem
Adaptív bekapcsolásszabályozás nem
Működési idő korlátozása igen
Feketegömb-érzékelővel ellátva nem
Kapcsolatfelvételi adatok Clatronic International GmbH, Industriering Ost 40, 47906 Kempen, Germany
N. A. = nem alkalmazható
Hulladékkezelés
Az elemek megsemmisítése
Vásárlóként Önt törvény kötelezi a régi elemek /
akkumulátorok visszavitelére.
A készülék elemeket tartalmaz. Ha az elemek
lemerültek, kövesse az alábbi utasításokat:
VIGYÁZAT:
Az elemeket / akkumulátorokat tilos a háztartási hulla-
dékba dobni!
• Mielőtt a készüléket kidobja, vegye ki az elemet a
távirányítóból.
• A lemerült elemeket vigye egy megfelelő gyűjtőpontba
vagy vissza a forgalmazóhoz.
• A gyűjtőpontokról a városi vagy helyi önkormányzat
szolgálhat felvilágosítással.
A „kuka” piktogram jelentése
Kímélje környezetünket, az elektromos készülé-
kek nem a háztartási szemétbe valók!
Használja az elektromos készülékek ártalmat-
lanítására kijelölt gyűjtőhelyeket, ott adja le
azokat az elektromos készülékeit, amelyeket
többé már nem kíván használni!
Ezzel segítséget nyújt ahhoz, hogy elkerülhetők legyenek
azok a hatások, amelyeket a helytelen „szemétre dobás”
gyakorolhat a környezetre és az emberi egészségre.
Ezzel hozzájárul az újrahasznosításhoz, a recyclinghoz és a
kiöregedett elektromos és elektronikus készülékek értékesí-
tésének egyéb formáihoz.
Az önkormányzatoknál vagy a polgármesteri hivatalokban
tájékoztatást kaphat arról, hogy hova viheti a kiselejtezett
készülékeket. Az Ön kereskedője és szerződéses partnere
köteles a régi készüléket is ingyenesen visszavenni.

PC-HL3116_IM 29.06.23
61
ВАЖНО:
Обязательно сначала прочитайте отдельно прилагаемые
инструкции по технике безопасности.
Руководство по эксплуатации
Спасибо за выбор нашего продукта. Надеемся, он вам
понравится.
Перед использованием данного прибора внимательно
прочитайте инструкцию по эксплуатации и отдельно
прилагаемые инструкции по технике безопасности.
Храните эти документы, включая гарантийный талон,
чек и, по возможности, коробку с внутренней упаковкой
в надежном месте. Если вы передаете прибор третьему
лицу, всегда прикладывайте к нему все соответствую-
щие документы.
Символы применяемые в
данном руководстве пользователя
Важные рекомендации для обеспечения вашей без-
опасности обозначены по особенному. Обязательно
следуйте этим рекомендациям, чтобы предотвратить
несчастный случай или поломку изделия:
ПРЕДУПРЕЖДЕНИЕ:
Предупреждает об опасности для здоровья и возмож-
ном риске получения травмы.
ВНИМАНИЕ:
Указывает на возможную опасность для изделия и
других окружающих предметов.
Содержание
Обзор деталей прибора ...................................................3
Распаковка прибора ....................................................... 61
Обзор деталей прибора / Комплект поставки ...........61
Предупреждения по использованию прибора.........62
Подключенная нагрузка ...............................................62
Обращение с батареями ............................................. 62
Ввод прибора в эксплуатацию ....................................63
Настенный монтаж ...................................................... 63
Дистанционное управление ....................................... 64
Электрическое подключение ......................................64
Включение прибора .....................................................64
Простое управление ....................................................64
Примечания по использования ................................... 64
Эксплуатация ................................................................... 64
Включение / выключение .............................................64
Переключение воздушной заслонки ..........................64
Функция нагрева ........................................................... 64
Установка температуры (функция TEMP) .................64
Удаление заданной температуры ..............................65
Функция таймера .......................................................... 65
Установка недельного таймера .................................. 65
Удаление установленного таймера недели .............. 65
Обнаружение открытого окна .....................................66
Окончание работы .......................................................66
Защита от перегрева ......................................................66
Чистка ................................................................................ 66
Пыль на защитной решетке ........................................66
Технические данные ......................................................66
Утилизация ....................................................................... 66
Утилизация аккумулятора ...........................................66
Значение символа «корзина» .....................................66
Распаковка прибора
1. Извлеките прибор из упаковки.
2. Удалите все упаковочные материалы, такие как
фольга, наполнитель, кабельные стяжки и картонная
упаковка.
3. Проверьте комплект поставки на комплектность.
4. Если содержимое упаковки неполное или если можно
обнаружить повреждения, не эксплуатируйте прибор.
Немедленно верните его дилеру.
Обзор деталей прибора /
Комплект поставки
Тепловентилятор
1 Ниши
2 Дисплей
3 Контрольная лампа FAN (вентилятор)
4 Контрольная лампа LOW (низкий) (1000 Вт)
5 Контрольная лампа HIGH (высокая) (2000 Вт)
6 Контрольная лампа 24 / 7 (недельный таймер)
7 Контрольная лампа TEMP (температура)
8 Контрольная лампа SWING (поворот)
9 Сетевой выключатель I / O (вкл. / выкл.)
10 Кнопка START / STOP (запуск / остановка)
11 Крышка для нагревательных элементов / выход
воздуха
12 Воздушная заслонка

PC-HL3116_IM 29.06.23
62
Дистанционное управление
1Включение или выключение прибора
2Включение или выключение поворота воздуш-
ной заслонки
3Активация / деактивация обнаружения открытого
окна
4Активировать контроль времени
5
OK
Подтверждение ввода
6C
°
°
Деактивировать автоматический контроль тем-
пературы или недельный контроль времени
7Снижение температуры
8Батарейный отсек
9Увеличить температуру
10 Установить еженедельный контроль времени
11 Установите автоматический контроль темпе-
ратуры
12 Выбор между режимом низкого нагрева (LOW),
высокого нагрева (HIGH) и режимом вентиля-
тора (FAN)
Без рисунка
1 × Миниатюрный элемент питания (CR 2025), уже
вставленный в батарейный отсек пульта дистанци-
онного управления
2 × Дюбель
2 × Винт
Предупреждения по
использованию прибора
• Не подвешивайте обогреватель непосредственно
под розеткой.
• Обеспечьте безопасное расстояние между шнуром
питания и корпусом.
• Во избежание перегрева обогревателя не следует
закрывать отверстие для выхода воздуха. Занавески,
текстиль и все горючие материалы должны нахо-
диться на расстоянии не менее 1 м от отверстия для
выхода воздуха.
• Ни в коем случае не используйте тепловентилятор в
помещениях с взрывоопасным газом (например, бен-
зином) или при проведении работ с использованием
легковоспламеняющихся клеев или растворителей
(например, при склеивании или покраске паркета,
ПВХ и т.д.).
• Не используйте этот обогреватель в небольших
помещениях, если в них находятся люди, не спо-
собные самостоятельно покинуть помещение, за
исключением случаев, когда за ними осуществляется
постоянный присмотр.
• Никогда не регулируйте поворотный механизм
воздушной заслонки руками. Механизм может быть
поврежден.
• Когда прибор больше не используется, всегда отсое-
диняйте сетевую вилку от розетки.
Подключенная нагрузка
Прибор поддерживает потребляемую мощность
2000 Вт.
ВНИМАНИЕ: Перегрузка!
• При использовании удлинителя, он должен иметь
сечение кабеля не менее 1,5 мм².
• Не используйте многоместные розетки, так как
этот прибор слишком мощный.
• Не подключайте другие мощные приборы к той же
электрической цепи.
Обращение с батареями
Не заряжайте батареи!
Не разбирайте батареи!
Не допускайте короткого замыкания батарей!
Держать вдали от детей!
Соблюдайте полярность (+ / −)!
Опасность взрыва!
Не подвергайте батареи сильному нагреву,
например, солнечным лучам, огню и т.п.
• Из батареек может вытекать батарейная кислота.
Если Дистанционное управление не будет исполь-
зоваться в течение длительного периода времени,
извлеките батарейки.
• Если батарейка протекает, не втирайте жидкость в
глаза или слизистые оболочки. В случае контакта
вымойте руки, промойте глаза чистой водой. При
сохранении неприятных ощущений обратитесь за
медицинской помощью.
• Не допускается совместное использование батарей
разных типов, а также новых и использованных
батарей.
• Батарейки нельзя выбрасывать вместе с бытовыми
отходами. Возвращайте использованные батареи в
ответственные пункты сбора или дилеру.

PC-HL3116_IM 29.06.23
63
Ввод прибора в эксплуатацию
Чувствительные поверхности, такие как дисплей, могут быть
защищены пластиковой пленкой. Удалите эти пластиковые
пленки.
Настенный монтаж
Используйте прилагаемый монтаж-
ный материал. Соблюдайте следую-
щие монтажные чертежи.
• Убедитесь, что поблизости есть
розетка. К розетке должен быть сво-
бодный доступ.
• Заранее убедитесь, что в стене нет
кабелей, которые могут быть повреждены при монтаже.
• Просверлите отверстия на высоте 2 м над полом.
• Расстояние до потолка и стен должно составлять не менее
30 см.
1. Просверлите два отверстия диаметром 6 мм
на расстоянии 315 мм.
2. В отверстия вставьте дюбели и винты. Оставьте шурупы вы-
ступающими примерно на 10 мм из стены.
3. Подвесьте прибор с углублениями (A) на шурупы.
Теперь надавите на прибор в направлении (B),
чтобы зафиксировать его.
- Когда вы захотите снова снять прибор со стены, сдвиньте
его из направления (B) в направление (A), а затем подни-
мите прибор со стены.

PC-HL3116_IM 29.06.23
64
Дистанционное управление
Литиевый элемент в батарейном отсеке
дистанционного управления защищен
пластиковой пленкой для транспорти-
ровки. Это продлевает срок службы
батарейки. Перед первым использованием пульта
дистанционного управления необходимо снять пласти-
ковую пленку, чтобы он был готов к работе.
При управлении прибором убедитесь, что между пуль-
том дистанционного управления и датчиком на дисплее
прибора есть четкая линия видимости. Если дальность
действия пульта дистанционного управления уменьша-
ется, необходимо заменить батарейку. Чтобы заменить
батарейку, выполните следующие действия:
1. Нажмите на замок в направлении
стрелки (1).
2. Вытащите держатель кнопочного
элемента из пульта дистанционного
управления (2).
3. Замените элемент батарейкой того
же типа (CR 2025). Убедитесь, что полярность
правильная.
4. Вставьте держатель обратно в батарейный отсек до
щелчка.
Электрическое подключение
1. Убедитесь, что напряжение прибора (см. табличку
с техническими характеристиками) соответствует
используемому напряжению сети.
2. Установите сетевой выключатель на правой стороне
прибора в положение O.
3. Подключите сетевую вилку к правильно установлен-
ной заземленной розетке.
Включение прибора
• Установите сетевой выключатель на правой стороне
прибора в положение I. Прибор запустит двигатель,
чтобы закрыть воздушную заслонку, которая может
быть еще открыта. Затем прибор переключается в
режим ожидания.
• Управление прибором осуществляется с помощью
пульта дистанционного управления.
Простое управление
Включать и выключать прибор можно и без пульта
дистанционного управления. Для этого нажмите кнопку
START / STOP рядом с сетевым выключателем.
1. Нажмите кнопку, чтобы включить прибор.
Прибор включается с настройкой температуры
HIGH, вентилятором (FAN) и поворотом воздушной
заслонки (SWING).
2. Нажмите кнопку еще раз, чтобы выключить прибор.
Режим FAN включается на 30 секунд и воздушная
заслонка закрывается. Затем прибор переключается
в режим ожидания.
Примечания по использования
• Прибор оснащен защитой от перегрева. Когда темпе-
ратура окружающей среды достигает 51 °C, прибор
выключается.
• Не открывайте двери и окна во время работы обо-
гревателя, так как это ухудшает эффект обогрева.
• На дисплее отображается текущая температура
окружающей среды.
• Прибор всегда запускается в режиме вентилятора.
• Настройки могут быть выполнены только во время
работы.
Эксплуатация
Включение / выключение
• Нажмите кнопку , чтобы включить прибор. Венти-
лятор начинает работать. Загорается контрольная
лампа FAN.
• Снова нажмите кнопку , чтобы выключить прибор.
Если был активен режим нагрева, режим FAN
включается на 30 секунд и воздушная заслонка
закрывается. Затем прибор переключается в режим
ожидания.
Переключение воздушной заслонки
Нажмите кнопку , чтобы включить или выключить по-
ворот воздушной заслонки. Контрольная лампа SWING
загорается, когда функция активирована.
Функция нагрева
Несколько раз нажмите кнопку для переключения
между следующими режимами:
LOW =Низкая температура и вентилятор.
Загораются контрольные лампы LOW и FAN.
HIGH =Высокая температура и вентилятор.
Загорается контрольная лампа HIGH и FAN.
FAN =Активен только вентилятор.
Загорается контрольная лампа FAN.
Установка температуры (функция TEMP)
Прибор автоматически выбирает уровень нагрева в со-
ответствии с заданной температурой. При достижении
заданной температуры прибор отключает нагрев.
Диапазон регулируемой температуры составляет от
18 °C до 45 °C.
1. Нажмите кнопку .
2. Установите желаемую температуру с помощью
кнопок и .
3. Подтвердите ввод кнопкой
OK
. Желаемый уровень
температуры поддерживается автоматически.
Загорается контрольная лампа TEMP. Это означает, что
функция активирована.

PC-HL3116_IM 29.06.23
65
Удаление заданной температуры
Для удаления ранее установленной температуры вы-
полните следующие действия:
1. Сначала нажмите кнопку .
2. Чтобы удалить настройку, нажмите кнопку C
°
°
. Кон-
трольная лампа TEMP погаснет.
Функция таймера
Вы можете настроить прибор на работу в течение опре-
деленного времени.
1. Нажмите кнопку несколько раз, чтобы выбрать
между одним часом ( ) и восемью часами ( ).
Настройка ( ) отключает функцию.
2. По истечении установленного времени раздается
звуковой сигнал, и прибор начинает 30-секундный
обратный отсчет. По окончании обратного отсчета
прибор переключается в режим ожидания.
- Активированная функция не отображается по техни-
ческим причинам.
- Функция не может быть выбрана, если активирован
недельный таймер.
Установка недельного таймера
• Недельный таймер нельзя установить, если прибор
находится в режиме вентилятора.
• Недельный таймер также можно комбинировать с
функцией TEMP, функцией SWING и функцией «Об-
наружение открытого окна».
• Чтобы использовать недельный таймер, сначала не-
обходимо установить текущее время. Текущее время
должно быть установлено при первом включении
прибора в эксплуатацию и при каждом отключении
прибора от сети.
• Дни недели обозначаются на дисплее следующими
цифрами:
=
=
=
=
Понедельник
Вторник
Среда
Четверг
=
=
=
Пятница
Суббота
Воскресенье
Установка текущего времени:
1. Нажмите кнопку . На дисплее появится индикация
(понедельник).
2. Выберите текущий день недели с помощью кнопки
или . Подтвердите ввод кнопкой
OK
.
3. Ввод часов:
появляется на дисплее. Настройка производится
кнопками / . Подтвердите ввод кнопкой
OK
.
4. Введите минуты:
появляется на дисплее. Настройка производится
кнопками / . Подтвердите ввод кнопкой
OK
.
Выберите недельный таймер:
• Прибор имеет предварительно запрограммирован-
ные недельные таймеры ( – ) и индивидуально
программируемый недельный таймер ( ).
• При использовании недельного таймера необхо-
димо установить все дни недели. Можно установить
только часы, но не минуты. Время остановки должно
быть после времени начала.
• Если недельный таймер установлен в выбранном
режиме, прибор работает до времени остановки.
Вне выбранного режима вентилятор продолжает
работать в течение 30 секунд. После этого прибор
переключается в режим ожидания.
• Активированная функция обозначается миганием
контрольных ламп 24 / 7 и LOW или HIGH. Как только
прибор включается, контрольные лампы загораются.
• Ниже приведен список запрограммированных не-
дельных таймеров:
Режим Будни Время
Понедельник – Воскресенье 8:00 – 17:00
Понедельник – Воскресенье 18:00 – 7:00*
Понедельник – Пятница 8:00 – 17:00
Понедельник – Пятница 18:00 – 7:00*
Суббота – Воскресенье 0:00 – 23:59
* Прибор работает до следующего утра.
1. Несколько раз нажмите кнопку , чтобы выбрать
нужный недельный таймер.
2. Подтвердите выбор кнопкой
OK
.
3. Индивидуально программируемый недельный
таймер:
При выборе недельного таймера на дисплее
теперь отображается (понедельник).
4. Выберите нужный день недели с (понедельник) по
(воскресенье) с помощью кнопки или . Подтвер-
дите ввод кнопкой
OK
.
5. Теперь установите время старта с помощью кнопки
или .
6. Подтвердите выбор кнопкой
OK
.
7. Установите время остановки с помощью кнопки
или .
8. Подтвердите ввод кнопкой
OK
, если вы хотите
установить другой день недели. В противном случае
подождите, пока прибор медленно прокрутит список
дней недели до . После этого будет применена
настройка по умолчанию.
Удаление установленного таймера недели
Чтобы удалить ранее установленный недельный тай-
мер, выполните следующие действия:
1. Сначала нажмите кнопку .
2. Чтобы удалить настройку, нажмите кнопку C
°
°
. Кон-
трольная лампа 24 / 7 погаснет.

PC-HL3116_IM 29.06.23
66
Обнаружение открытого окна
• Эта функция может быть выбрана только в том слу-
чае, если прибор находится в режиме нагрева или в
режиме TEMP.
• Прибор выполняет проверку температуры через
регулярные интервалы времени и отключается, если
разница температур резко снижается по сравнению
с предыдущей температурой окружающей среды. На
дисплее отображается .
1. Нажмите кнопку , чтобы включить функцию. Кон-
трольная лампа TEMP начинает мигать.
2. Нажмите кнопку еще раз, чтобы выключить функцию.
Окончание работы
1. Нажмите кнопку , чтобы выключить прибор. Если
был активен режим нагрева, режим FAN включается
на 30 секунд и воздушная заслонка закрывается.
Затем прибор переключается в режим ожидания.
2. Установите сетевой выключатель на правой стороне
прибора в положение O.
3. Затем выньте сетевую вилку из розетки.
Защита от перегрева
Прибор оснащен механизмом защиты от перегрева,
который автоматически отключает прибор в случае
перегрева.
1. Установите сетевой выключатель на правой стороне
прибора в положение O. Затем выньте сетевую
вилку из розетки.
2. Дайте прибору остыть в течение примерно 10 минут,
прежде чем использовать его снова.
- Если механизм защиты от перегрева заставляет при-
бор снова выключаться через некоторое время, это
может указывать на неисправность. Выключите при-
бор и отсоедините его от сети. Обратитесь к дилеру
или в нашу сервисную службу для проверки прибора.
Чистка
ПРЕДУПРЕЖДЕНИЕ:
• Перед чисткой всегда отключайте прибор от сети и
дождитесь, пока он остынет.
• Никогда не погружайте прибор в воду для очистки.
Это может привести к поражению электрическим
током или пожару.
ВНИМАНИЕ:
• Не используйте проволочные щетки или другие
абразивные материалы.
• Не используйте едкие или чистящие средства.
• Вытирайте пыль сухой тканью.
• Пятна можно удалить с помощью достаточно влаж-
ной ткани.
Пыль на защитной решетке
Если на защитной решетке скопилась пыль, это может
привести к перегреву.
• Удалите пыль осторожной щеткой.
или
• Используйте насадку для обивки пылесоса для
удаления пыли.
Технические данные
Модель: .............................................................. PC-HL 3116
Электропитание: ..............................220 – 240 В~, 50 – 60 Гц
Потребляемая мощность: ....................................... 2000 Вт
Класс защиты: ....................................................................
Вес нетто: ..........................................................прибл. 2,4 кг
Сохранено право на технические и конструкционные
изменения в рамках продолжающейся разработки
продукта.
Данный прибор был протестирован в соответствии со
всеми применимыми действующими директивами CE
и изготовлен в соответствии с последними правилами
безопасности.
Утилизация
Утилизация аккумулятора
Пользователь по закону обязан возвратить ис-
пользованные аккумуляторы и / или аккумуля-
торные комплекты.
Устройство содержит батареи. Если эти батареи израс-
ходованы, следуйте инструкциям ниже:
ВНИМАНИЕ:
Батарейки не являются бытовыми отходами!
• Извлеките батарейку (батарейки) из пульта дистан-
ционного управления перед утилизацией прибора.
• Батарейки требуется утилизировать в специальные
контейнеры или своему дилеру.
• Ваш город или местные органы власти могут предо-
ставить информацию о общественных пунктах сбора.
Значение символа «корзина»
Защита окружающей среды: не допускается
утилизация электроприборов вместе с быто-
выми отходами.
Утилизация устаревшей техники и неис-
правных электроприборов производится в
городских приёмных пунктах.
Не допускайте неправильной утилизации отходов. Это
наносит вред окружающей среде и оказывает негатив-
ное воздействие на здоровье людей.

PC-HL3116_IM 29.06.23
67
Оказывайте содействие программе утилизации и дру-
гим формам переработки электронной и электрической
техники.
Информацию о пунктах утилизации бытовой техники
можно получить в местных органах власти. Ваш дилер
и партнер по договору также обязан бесплатно принять
старый прибор.

PC-HL3116_IM 29.06.23
68
PC-HL 3116 .....................................................................................:
60–50 240–220 ............................:
2000 ...............................................................................:
II ................................................................................................ :
24 ...................................................................:
.
.
. /
.
:
:
!
• ()
.
•
.
•
.
« »
:
.
.
.
.
.
.
•
.TEMP
•
.
.
1 . TEMP .
.
2 ..
1 . .
. 30 FAN
.
2 ..O
3 ..
.
1 . .O
.
2 .. 10
-
.
.
.
:
•
.
• .
.
:
•.
•.
•.
•.
.
•.
•.

PC-HL3116_IM 29.06.23
69
:
.
.FAN LOW
=LOW
.
.FAN HIGH
=HIGH
.
.FAN
=FAN
(TEMP )
.
.
18
. 45
1 ..
2 ..
3 . .
OK
.
.TEMP
.
:
1 ..
2 . . C
°
°
.TEMP
.
1 . ( )
. ( ) .( )
2 .
. . 30
- . - .
•.
• TEMP
.« » SWING
• .
.
•:
=
=
=
=
=
=
=
1 .. () .
2 . .
.
OK
3 .:
/ .
.
OK
.
4 .:
/ .
.
OK
.
• ( )
.( )
• .
.
.
•
30 .
. .
• 24 / 7
. .HIGH LOW
•:
17:00–8:00 –
*7:00–18:00 –
17:00–8:00 –
*7:00–18:00 –
23:59–0:00 –
. *
1 ..
2 ..
OK
3 . :
. ()
4 . () ()
.
OK
.
5 ..
6 ..
OK
7 ..
8 . .
OK
. .
:
1 ..
2 . . C
°
°
.24 / 7

PC-HL3116_IM 29.06.23
70
• 2
.
•
. 30
1 .
6
.315
2 .
.
.10
3 .
.(A)
. (B)
-
(A) (B)
.
.
.
.
.
.
:
1 ..(1)
2 .
.(2)
3 . .(CR 2025)
.
4 .
.
1 . ( )
.
2 . /
.O
3 .
.
• /
.I
.
.
•.
.
. START / STOP
1 ..
HIGH
.(SWING) (FAN)
2 . .
. 30 FAN
.
• .
. 51
•
.
•.
•.
•.
/
• . .
.FAN
• .
. 30 FAN
.
.
. SWING

PC-HL3116_IM 29.06.23
71
•
.
. .
•
.
• .
.
.
.
.
.
• .
.
•
.
(CR2025) ×1
×2
×2
•.
•.
• .
1
.
•
( )
)
.( PVC
•
.
• .
.
•
.
. 2000
! :
•
. 15
•
.
•.
!
!
!
!
!
!
.
• .
.

PC-HL3116_IM 29.06.23
72
:
.
. .
. .
.
.
.
:
:
.
:
.
3 .......................................................................
72 .......................................................................
72 ............................................... /
71 ..................................................................
71 ......................................................................................
71 ...........................................................................
71 ....................................................................................
71 ......................................................................
70..........................................................................
70...................................................................................
70.......................................................................................
70.....................................................................................
70 .....................................................................
70 ............................................................................................
70..................................................................... /
70...............................................................................
69 .....................................................................................
69 ...................................................(TEMP )
69 ...............................................................
69 .....................................................................................
69 ........................................................................
69 ........................................................
68 ......................................................................
68 ......................................................................................
68 ................................................................
68 ............................................................................................
68 ...........................................................
68 ....................................................................................
68 .............................................................................
68 ...........................................................................
68 ..............................................................« »
1 ..
2 .
.
3 ..
4 .
. .
/
1
2
() FAN 3
( 1000) () LOW 4
( 2000) () HIGH 5
( ) 24 / 7 6
( ) TEMP 7
( ) SWING 8
(/) O/I 9
(/ ) START/STOP 10
/ 11
12
1
2
/ 3
4
OK
5
C
°
°
6
7
8
9
10
11
(LOW)
(FAN) (HIGH)12

PC-HL3116_IM 29.06.23

Internet: www.procare-germany.de
Made in P.R.C.
PC-HL 3116
PC-HL3116_IM 29.06.23
Stand 06 / 2023
-
 1
1
-
 2
2
-
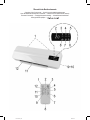 3
3
-
 4
4
-
 5
5
-
 6
6
-
 7
7
-
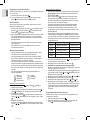 8
8
-
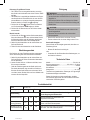 9
9
-
 10
10
-
 11
11
-
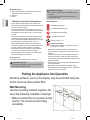 12
12
-
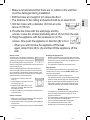 13
13
-
 14
14
-
 15
15
-
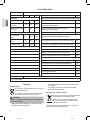 16
16
-
 17
17
-
 18
18
-
 19
19
-
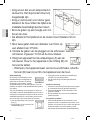 20
20
-
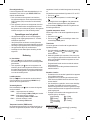 21
21
-
 22
22
-
 23
23
-
 24
24
-
 25
25
-
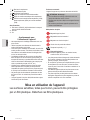 26
26
-
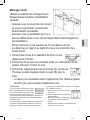 27
27
-
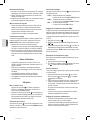 28
28
-
 29
29
-
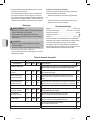 30
30
-
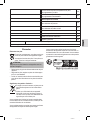 31
31
-
 32
32
-
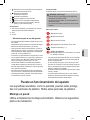 33
33
-
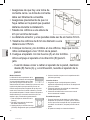 34
34
-
 35
35
-
 36
36
-
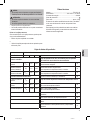 37
37
-
 38
38
-
 39
39
-
 40
40
-
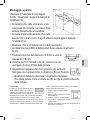 41
41
-
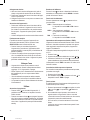 42
42
-
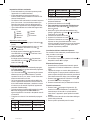 43
43
-
 44
44
-
 45
45
-
 46
46
-
 47
47
-
 48
48
-
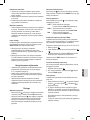 49
49
-
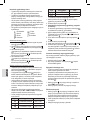 50
50
-
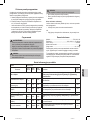 51
51
-
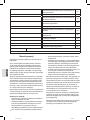 52
52
-
 53
53
-
 54
54
-
 55
55
-
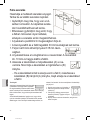 56
56
-
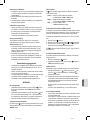 57
57
-
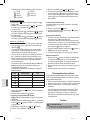 58
58
-
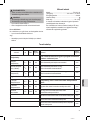 59
59
-
 60
60
-
 61
61
-
 62
62
-
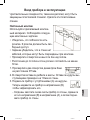 63
63
-
 64
64
-
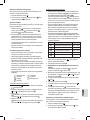 65
65
-
 66
66
-
 67
67
-
 68
68
-
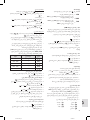 69
69
-
 70
70
-
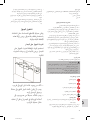 71
71
-
 72
72
-
 73
73
-
 74
74


ProfiCare PC-HL 3116 Instrucciones de operación
- Tipo
- Instrucciones de operación
en otros idiomas
- français: ProfiCare PC-HL 3116 Mode d'emploi
- italiano: ProfiCare PC-HL 3116 Istruzioni per l'uso
- Deutsch: ProfiCare PC-HL 3116 Bedienungsanleitung
- Nederlands: ProfiCare PC-HL 3116 Handleiding
- polski: ProfiCare PC-HL 3116 Instrukcja obsługi
Artículos relacionados
Otros documentos
-
 Olimpia Splendid Caldo Up T Manual de usuario
-
Klarstein 10045432 El manual del propietario
-
-
-
-
Suntec Wellness BATHROOM HEATER HEAT STREAM 2000 SLIM El manual del propietario
-
Clatronic EK 6022 El manual del propietario
