
MANUAL DE INSTRUCCIONES
MINI HORNO
CON
CONVECCIÓN
MODELOS SVMH1220 SVMH1350 SVMH1480
ANTES DE SU USO LEA ATENTAMENTE ESTE MANUAL

2
¡ATENCIÓN!
ESTE APARATO FUNCIONA CON UNA TENSIÓN DE 230 V, PARA
EVITAR UNA POSIBLE DESCARGA ELÉCTRICA NO TRATE DE
ABRIRLO. Este aparato no tiene parte alguna que pueda ser reparada por
usted
mismo, en caso de un mal funcionamiento no lo manipule, acuda a un
Servicio
Técnico Oficial.
Una vez agotada la vida útil de este producto eléctrico, no lo tire a
la basura doméstica.
Deposítelo en el contenedor adecuado de un punto limpio de su
localidad, para su posterior reciclado.
Este producto cumple con la Directiva Europea RoHS
(2011/65/UE), sobre la restricción de uso de determinadas
sustancias peligrosas en aparatos eléctricos y electrónicos.
¡MUY IMPORTANTE!
Esta señal avisa que la zona donde esté ubicada puede
adquirir altas
temperaturas. Después de utilizar el horno no
toque estas
superficies y espere a que se enfríen.
INTRODUCCIÓN
El horno de sobremesa con convección SVAN modelos SVMH1220
SVMH1350 SVMH1480
de diseño compacto y con múltiples funciones,
hacen de este producto
el electrodoméstico idóneo. Entre otras, incorpora las
siguientes
características
:
Capacidad: 22/35/48 Litro
Potencia: 1300/1500/1800
Vatios.
Puerta del horno con doble cristal templado.
Iluminación interior
Temporizador hasta 60 minutos.
Indicador luminoso de funcionamiento.
Control de temperatura: 90 °C a 230 °C.
Múltiples modos de funcionamiento: calor en la parte superior, calor en la
parte inferior, calor en la parte superior e inferior, calor en la parte superior
con convección o calor en la parte superior e inferior con convección.
Accesorios incluidos: Bandeja recoge migas/jugos, bandeja esmaltada,
parrilla y asa para la bandeja/parrilla.

3
ANTES DE CONECTAR EL APARATO
Lea atentamente estas instrucciones y guárdelas para un posterior
uso.
Antes de usar por primera vez el horno, deberá lavar los accesorios
incluidos (bandeja, parrilla, etc.) con agua jabonosa o en el
lavavajillas.
Con el fin de eliminar los restos de aceite procedentes de la
fabricación deberá poner el horno en funcionamiento durante 15
minutos en el modo Horno (calor en la parte superior e inferior)
y a la máxima temperatura.
Las primeras veces que use el horno es posible que desprenda
algo de olor, esto es normal y no significa un mal funcionamiento.
Compruebe que el voltaje de su toma de corriente es de 220 - 240 V
y que está dotada de toma de tierra.
La seguridad eléctrica de este aparato se garantiza solamente en caso
de que esté conectado a un enchufe con una toma de tierra eficaz, tal
y como prevén las normas de seguridad vigentes.
El fabricante declina cualquier responsabilidad por los daños
derivados por la falta de toma de tierra en la instalación. En caso
de duda, consulte a un profesional.
Si precisa de la utilización de un prolongador, utilice solamente un
prolongador que esté en buenas condiciones, con enchufe con
toma de tierra y que sea adecuado para la
potencia del aparato.
No deje el cable de red por debajo del horno, que entre en
contacto con superficies calientes y no lo encaje en la puerta o la
zona de bisagras, pues corre el riesgo de dañar o cortar la funda
aislante del cable de red.
Después de quitar el embalaje, verifique que el aparato no esté
dañado. En caso de duda no lo utilice y póngase en contacto
con el personal de asistencia técnica.
No deje al alcance de los niños el embalaje (bolsas,
poliestireno, etc.), ya que son una fuente potencial de peligro.

4
El fabricante declina cualquier responsabilidad por los daños
derivados de un uso inadecuado, incorrecto o imprudente del
aparato.
MEDIDAS DE SEGURIDAD
Los niños no deben jugar con este aparato.
La limpieza y el mantenimiento a realizar por parte del usuario no
puede ser realizado por niños, a no ser que sean mayores de 8 años
y estén supervisados.
Este aparato no puede ser usado por niños (de edad inferior a
8 años) o personas con capacidades físicas, sensoriales o
mentales reducidas o sin experiencia y conocimiento, a menos que
hayan recibido instrucciones apropiadas sobre el uso del aparato y
sean supervisadas por un adulto.
El incumplimiento de estas advertencias e instrucciones de
seguridad podría dar como resultado quemaduras o lesiones.
Este aparato está diseñado solamente para uso doméstico, no
profesional. No se aceptará ninguna responsabilidad y la garantía
carecerá de validez en caso de uso inadecuado o incumplimiento
de las instrucciones.
No se aleje cuando prepare alimentos con exceso de grasa o aceite.
Estos materiales pueden incendiarse en caso de
sobrecalentamiento.
Para reducir el riesgo de incendio, descargas eléctricas o lesiones
corporales personales, NO obstruya ni introduzca objetos en las
ranuras de ventilación.
Mantenga el aparato fuera del alcance de los niños, las superficies
del horno así como los recipientes, pueden alcanzar temperaturas
elevadas.
Si observa humo o fuego en el interior del horno, mantenga la
puerta cerrada para sofocar las llamas y desenchúfelo de la red
eléctrica.
Este horno está diseñado para su uso en interior no lo utilice en el
exterior. Evite la exposición a la lluvia, humedad u otros fenómenos
atmosféricos.

5
NO almacene materiales inflamables en el interior del horno.
Corren el riesgo de inflamarse si enciende el horno sin retirarlas
previamente. Utilice el aparato únicamente para el fin que éste ha
sido desarrollado.
Utilice siempre manoplas de cocina o las asas (suministradas)
cuando manipule las bandejas o los recipientes.
Desenchufe el horno cuando no lo vaya a usar durante un largo
periodo de tiempo, cuando se produzca un corte del suministro
eléctrico, o “salte” un fusible o automático o durante el proceso de
limpieza.
Procure que la toma de corriente donde esté conectado el
aparato sea fácilmente accesible. Para desconectar el horno de la
red eléctrica tire suavemente de la clavija del enchufe. Nunca lo
haga estirando del cable.
No utilice utensilios no recomendados por el fabricante.
No coloque el horno encima de cocinas, u hornos microondas.
Extreme las precauciones cuando manipule las bandejas, parrillas o
recipientes, cuando estos están todavía calientes.
NO cubra las barras calefactoras con papel de aluminio, esto
aumentaría la acumulación de calor y modificaría los tiempos de
cocción.
Utilice recipientes específicos para hornos; metal, cristal
templado, barro, etc. NUNCA utilice recipientes de plástico,
papel, cartón, etc.
La superficie exterior del horno adquiere altas temperaturas, por lo
cual, para evitar quemaduras no toque estas superficies cuando el
horno esté en funcionamiento y no coloque objetos de plástico,
cartón o inflamables próximos al horno.
Cuando la puerta del horno esté abierta NO se apoye en ella y no
coloque objetos sobre la misma.
En caso de avería, anomalías, sí el horno se ha caído, sí la puerta
de cristal templado está dañada, la clavija, el cable u otras partes
presentan deterioro desenchufe el aparato y no intente repararlo
por su cuenta. Póngase en contacto con el Servicio Técnico Oficial
SVAN más cercano.

6
INSTALACIÓN
1.
Coloque el horno sobre una superficie estable y nivelada, alejado de
lugares
calientes, con alta humedad o cerca de materiales inflamables
(aceite, cortinas,
trapos, etc.).
2.
Para asegurar una ventilación adecuada, deje al menos 10 cm de
separación a
cada lado del horno y unos 30 cm en la parte superior. NO
obstruya las ranuras
de ventilación.
3.
Desenrolle totalmente el cable de alimentación y enchufe la clavija del
aparato a la red eléctrica.
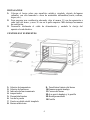
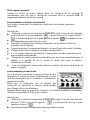
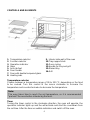
CONTROLES Y ELEMENTOS
1.
Selector de temperatura
2.
Selector de funciones
3.
Indicador de funcionamiento
4.
temporizador
5.
Pies antideslizantes
6.
Asa de la puerta
7.
Puerta con doble cristal templado
8.
Barras calefactoras
9.
Pared lateral interior del horno
10.Ranuras soporte bandeja
11.Carcasa del horno
12.
Asa para la bandeja y la parrilla
13.
Bandeja esmaltada
14.Parrilla

7
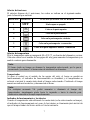
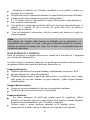
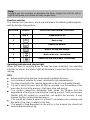
Selector de funciones
El selector dispone de 6 posiciones, las cuales se indican en el siguiente
cuadro
junto la función que realizan:
POSICIÓN
SÍMBOLO
FUNCIÓN QUE REALIZA EL HORNO
1
OFF
Modo reposo o apagado
2
Calor en la parte superior
3
Calor en la parte inferior
4
Calor en la parte superior e inferior
5
Calor en la parte superior + convección
6
Calor en la parte superior e inferior + convección
Selector de temperatura
Elija la temperatura entre un margen de 90 a 230 °C, en función del alimento a
cocinar.
Gire este control en el sentido de las agujas del reloj para aumentar la
temperatura y en
sentido contrario para disminuirla.
Nota:
El horno tarda un tiempo en alcanzar la temperatura seleccionada, por lo
que se
recomienda “precalentar” el horno antes de introducir los alimentos.
Temporizador
Al girar el control en el sentido de las agujas del reloj, el horno se pondrá en
funcionamiento, el indicador de funcionamiento se iluminará y el temporizador
se
activará e iniciará la cuenta atrás desde el tiempo seleccionado. Finalizado
el tiempo
sonará una indicación acústica y desconectará el horno.
Nota:
En cualquier momento Vd. podrá aumentar o disminuir el tiempo del
temporizador, simplemente gírelo hacia la izquierda o hacia la derecha para
disminuir o aumentar el tiempo respectivamente.
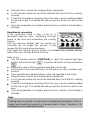
Indicador de funcionamiento y luz interior
Cuando el temporizador está realizando la cuenta atrás (se ha seleccionado un
tiempo),
el indicador de funcionamiento así como la luz interior se iluminarán
para avisar de
que el temporizador del horno está en funcionamiento.

8
CONSEJOS
Antes de introducir los alimentos le recomendamos precalentar el horno.
Utilice recipientes aptos para hornos (resistentes a altas temperaturas).
El tiempo necesario para la cocción de los alimentos depende del tamaño
y calidad de los mismos.
Procure abrir la puerta del horno lo menos posible, utilice la ventana de la
puerta del horno para comprobar el proceso ¡Ahorrará tiempo y energía¡.
El sistema por convección distribuye el calor por el interior del horno y
aumenta la temperatura de los alimentos por lo que acelera el proceso de
cocción. Hasta que se familiarice con el sistema por convección, no
desatienda el proceso, puede suceder que el tiempo de cocción disminuya.
También deberá dejar un espacio de al menos 3 cm entre el recipiente y
las paredes del horno, para permitir el flujo de aire caliente.
El peso de los alimentos depositados en la parrilla o en la bandeja
esmaltada no debe superar los 2 kg aproximadamente.
Distribuya los alimentos por toda la zona de la parrilla o de la bandeja
esmaltada para obtener un cocinado uniforme.
Si las piezas son de tamaño medio, a la mitad del proceso deberá darles la
vuelta y así obtener un resultado homogéneo.
ACCESORIOS
Dependiendo del alimento a cocinar, deberá utilizar el accesorio adecuado:
Parrilla
Utilice este accesorio para tostar, hornear o cocinar en recipientes adecuados
para hornos (bandejas de cristal o barro, moldes de pastelería, etc.).
En asados y gratinados se recomienda utilizar conjuntamente con la bandeja
esmaltada, para recoger los posibles derrames de jugos y grasas.
Bandeja esmaltada
Para pasteles jugosos y asados. Puede utilizarla para recuperar los jugos o la
grasa cuando realice gratinados sobre la parrilla.
MODOS DE FUNCIONAMIENTO
Utilice uno de los siguientes modos de funcionamiento descritos, en función
del tipo de alimento a cocinar, según su experiencia y la receta elegida.

9
Modo reposo o apagado
Cuando no utilice el horno, deberá situar los controles en la posición de
desconectado, para ello gire el selector de funciones hacia la posición OFF, el
temporizador deberá estar en la posición 0.
Funcionamiento en el modo convencional
En el modo convencional, el sistema por convección (aire caliente) permanece
desactivado.
Modo de uso
Mediante el selector de funciones (FUNCTION) elija el tipo de calor
deseado:
posición 2 calor en la parte superior ( ), posición 3 calor en la
parte inferior (
) o la posición 4 calor en la parte superior e inferior ( )
Precalentar el horno
a la temperatura que especifique la receta.
Introduzca el alimento en la bandeja esmaltada o en la parrilla si utiliza un
recipiente con el alimento.
Después seleccione la temperatura deseada o la especificada en la receta.
Mediante
el temporizador elija el tiempo de cocinado correspondiente.
5 ó 10 minutos antes de que finalice el tiempo seleccionado compruebe
que se
está cocinando correctamente.
Para probar la comida antes de retirarla del horno, use el asa suministrada
para la
bandeja o la parrilla. El asa le servirá de ayuda para sacar la
comida o
introducirla en el horno.
Una vez finalizada la elaboración, sitúe los controles del horno en el modo
de
reposo o apagado.
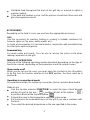
Funcionamiento por convección
En el modo por convección se genera un flujo de
aire
caliente en el interior del horno, distribuyendo
el calor
de forma homogénea en los alimentos y
acelerando el
proceso de cocción.
Hasta que se familiarice con el sistema por
convección no desatienda el proceso, puede
suceder
que el tiempo de cocción disminuya.
También deberá dejar un espacio de al menos 3 cm entre el recipiente y las
paredes
del horno, para permitir el flujo de aire caliente.
Modo de uso
Mediante el selector de funciones (FUNCTION) elija el tipo de calor
deseado:
posición 5 calor en la parte superior ( ) o la posición 6 calor
en la parte
superior e inferior ( ).
Precalentar el horno a la temperatura que especifique la receta.

10
Introduzca el alimento en la bandeja esmaltada o en la parrilla si utiliza un
recipiente con el alimento.
Después seleccione la temperatura deseada o la especificada en la receta.
Mediante
el temporizador elija el tiempo de cocinado correspondiente.
5 ó 10 minutos antes de que finalice el tiempo seleccionado compruebe
que se
está cocinando correctamente.
Para probar la comida antes de retirarla del horno, use el asa suministrada
para la
bandeja o la parrilla. El asa le servirá de ayuda para sacar la
comida o
introducirla en el horno.
Una vez finalizada la elaboración, sitúe los controles del horno en el modo
de
reposo o apagado.
Nota:
Los tiempos de cocinado están basados en alimentos que se encuentran a
la
temperatura de la nevera. La carne o alimentos congelados deberán de
cocinarse
durante un período de tiempo más largo. Por lo tanto, es
recomendable usar un
termómetro para carne.
MANTENIMIENTO Y LIMPIEZA
Antes de proceder a la limpieza desconecte la unidad de la red eléctrica. Y
asegúrese
que el horno esté totalmente frío.
No utilice alcohol ni productos abrasivos y no permita que el aparato entre en
contacto
con agentes volátiles como gasolina, disolventes, insecticidas, etc.
Limpieza del exterior
Limpie la parte exterior con un paño húmedo y seguidamente con otro seco.
Evite
que entre agua por los orificios de ventilación.
Mantenga siempre limpia la puerta por ambos lados y las juntas de cierre.
Limpie
estas partes con un paño húmedo con agua templada y jabón.
Después séquelas
cuidadosamente.
Limpieza de los accesorios
Limpie los accesorios después de cada uso con un producto antigrasa.
También podrá lavar los accesorios en el lavavajillas.
Limpieza del interior
No utilice estropajos de metal que puedan rayar las superficies, utilice
productos de limpieza específicos para hornos. Para manchas tenaces,
límpielas
después de un precalentamiento a 90 °C durante 30 segundos.
Algunos jugos y grasas producen manchas en la bandeja recoge
migas/jugos de aluminio, que no se limpian con los productos de limpieza.

11
Utilice la bandeja esmaltada con el fin de evitar que los jugos y grasas
caigan
en la bandeja recoge migas/jugos.
Para la limpieza de las resistencias situadas en la parte superior e inferior
del
horno, utilice una bayeta impregnada en agua jabonosa y efectúe la
limpieza
con movimientos longitudinales.
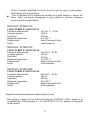
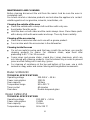
MODELO: SVMH1220
CARACTERÍSTICASTÉCNICAS
Tensión de alimentación
Consumo máximo
Capacidad
Margen de temperatura
Temporizador
Puerta
220-240. V ~ 50 Hz
1300 W
22 litros
90 a 230 °C
hasta 60 minutos
Doble
cristal templado
MODELO: SVMH1350
CARACTERÍSTICAS TÉCNICAS
Tensión de alimentación
Consumo máximo
Capacidad
Margen de temperatura
Temporizador
Puerta
220-240 V ~ 50 Hz
1500 W
35 litros
90 a 230 °C
hasta 60 minutos
Doble
cristal templado
MODELO: SVMH1480
CARACTERÍSTICAS TÉCNICAS
Tensión de alimentación
Consumo máximo
Capacidad
Margen de temperatura
Temporizador
Puerta
220-240 V ~ 50 Hz
1800 W
48 litros
90 a 230 °C
hasta 60 minutos
Doble
cristal templado
Especificaciones técnicas sujetas a cambio sin previo aviso.
Este producto cumple con las Directivas Europeas 2014/30/EU (EMC) relativa
a la
Compatibilidad Electromagnética y la 2014/35/EU(LVD) en materia de
seguridad
de baja tensión.

INSTRUCTION MANUAL
ELECTRIC OVEN
MODELOS SVMH1220 SVMH1350 SVMH1480
PLEASE READ THIS MANUAL BEFORE OPERATION

2
ATTENTION!
THIS UNIT RUNS voltage 230V, TO AVOID POSSIBLE ELECTRIC SHOCK
DO NOT ATTEMPT TO OPEN IT. This apparatus has no part that can be
repaired by yourself, in case of a malfunction not handle, contact an
authorized service.
Waste electrical products must not be disposed of with household
waste. This equipment should be taken to your local recycling
centre for safe treatment.
This product complies with European Directives RoHS
(2011/65/UE), on the restriction of use of certain dangerous
substances in electrical and electronic appliances.
VERY IMPORTANT!
This signal indicates that the area where it is located, can acquire
high temperatures due to steam. To manipulate the lid wait until it
is completely cold or use gloves, oven gloves or a thick cloth.
INTRODUCTION
The Desktop oven with convection SVAN models SVMH1220 SVMH1350
SVMH1480 of
compact design and multiple functions make this product
the ideal
appliance. Among others, it includes the following features:
Capacity: 22/35/48 liters.
Power: 1300/1500/1800
watts.
Oven door with double tempered glass.
Interior lighting
Timer up to 60 minutes.
Operating indicator light.
Temperature control: 90 ° C to 230 ° C.
Multiple modes of operation: heat in the upper part, heat in the lower part,
heat in the upper and lower part, heat in the upper part with convection or
heat in the upper and lower part with convection.
Accessories included: crumb / juice tray, enameled tray, grill and handle for
tray / grill.

3
BEFORE CONNECTING THE APPLIANCE
Read these instructions and save them for later use carefully.
Before using the oven for the first time, you should wash the
accessories included (tray, grill, etc.) with soapy water or in the
dishwasher.
In order to remove traces of oil from the manufacture must put
the oven in operation for 15 minutes in the oven mode (heat at
the top and bottom) and the maximum temperature.
The first few times you use the oven may peel off some smell,
this is normal and not a malfunction.
Check that the voltage of your outlet is 220-240 V and is
provided grounding.
The electrical safety of this appliance is only guaranteed if it is
connected to an outlet with a efficient earth, as envisaged
safety regulations in force.
The manufacturer is not liable for damage caused by the lack
of grounding in the installation. If in doubt, consult a
professional.
If you need to use an extension cord, use only an extension
cord that is in good condition with grounded plug and is
suitable for the power of the appliance.
Do not leave the power cord below the oven, which comes into
contact with hot surfaces and do not fit in the door hinges or
the area because you risk damaging or cutting the insulating
sheath of the cable network.
After removing the packaging, check that the appliance is not
damaged. If in doubt do not use it and contact the technical
support staff.
Keep out of reach of children packaging (bags, polystyrene,
etc.) because they are a potential source of danger.
The manufacturer declines any liability for damages resulting
from improper, incorrect or careless use of the appliance.

4
SECURITY MEASURES
Children should not play with this device.
Cleaning and maintenance by the user can not be done by
children unless they are older than 8 years and are
supervised.
This device can not be used by children (under the age of 8
years) or persons with or without experience and knowledge
reduced physical, sensory or mental capabilities, unless they
have received appropriate on using the appliance instructions
and be supervised by an adult .
Failure to follow these warnings and safety instructions could
result as a result burns or injury.
This appliance is designed only for domestic use,
not professional. The brand does not accept any
responsibility and the guarantee will not apply in case of
misuse or failure to follow instructions.
Do not walk away when preparing foods with excess fat or oil.
These materials can catch fire if it overheats.
To reduce the risk of fire, electric shock or personal injury, do
not block or insert objects into the ventilation slots.
Keep out of reach of children, the oven surfaces and
containers, can reach high temperatures.
If you see smoke or fire in the oven, keep the door closed to
smother the flames and unplug it from the mains.
This oven is designed for indoor use do not use outdoors.
Avoid exposure to rain, moisture or other atmospheric
phenomena.
DO NOT store flammable materials inside the oven. Catch fire
risk if you turn the oven without prior removal. Use the device
only for the purpose it was developed.
Always use oven mitts or handles (supplied) when handling
trays or containers.
Unplug the oven when they go unused for a long period of
time, when a power outage occurs, or "skip" a fuse or circuit or
during the cleaning process.

5
Make sure the outlet where the device is connected is easily
accessible. To disconnect the oven from the mains pull the
plug from the socket. you do never pull on the cable.
Do not use not recommended by the manufacturer utensils.
Do not place the oven above kitchens, or microwave ovens.
Use extreme caution when handling trays, racks or containers,
when they are still hot.
DO NOT cover the heating rods with aluminum foil, this would
increase the heat build and modify cooking times.
Use specific containers for ovens; metal, tempered glass, clay,
etc. NEVER use plastic containers, paper, cardboard, etc.
The outer surface of the furnace becomes high temperatures,
therefore, to avoid burns do not touch these surfaces when the
oven is in operation and no objects plastic, cardboard or
flammable near the oven.
When the oven door is open Do not lean on it and do not place
objects on it.
In case of failure, anomalies, if the oven has fallen, yes
tempered glass door is damaged, the plug, the cord or other
parts show deterioration unplug the appliance and do not
attempt to repair it yourself. Contact our Customer Service
nearest SVAN.
INSTALLATION
1.
Place the oven on a stable, level surface, away from hot areas with high
humidity or near flammable materials (oil, curtains, cloths, etc.).
2.
To ensure proper ventilation, leave at least 10 cm apart on each side of the
oven and 30 cm at the top. DO NOT obstruct the ventilation slots.
3.
Fully unroll the cord and plug the appliance plug into the mains.

6
CONTROLS AND ELEMENTS
1.
Temperature selector
2.
Function selector
3.
Operation indicator
4.
timer
5.
Anti-slip feet
6.
Door handle
7.
Door with double tempered glass
8.
Heating rods
9.
Interior side wall of the oven
10.
Tray support slots
11.
Oven casing
12.Handle for tray and grill
13.Glazed tray
14.Grill
Temperature selector
Choose between a temperature range of 90 to 230 °C, depending on the food
to be cooked. Turn this control in the sense clockwise to increase the
temperature and counterclockwise to decrease the temperature.
Note:
The oven takes time to reach the set temperature, so it is recommended
"preheat" the oven before introducing the food.
Timer
Turning the timer control in the clockwise direction, the oven will operate, the
operation indicator lights up and the will activate and start the countdown from
the set time. After the time an audible indication and switch off the oven.

7
Note:
Anytime you can increase or decrease the timer, simply turn it to the left or
right to decrease or increase the time respectively.
Function selector
The selector has 6 positions, which are indicated in the following table together
with the function they perform:
POSITION
SYMBOL
FUNCTION PERFORMING THE OVEN
1
OFF
Sleep mode or off
2
Heat on top
3
Heat at the bottom
4
Heat at the top and bottom
5
Heat on the top + convection
6
Heat at the top and bottom + convection
Operating indicator and interior light
When the timer is counting down (a time has been selected), the operation
indicator as well as the interior light will illuminate to warn that the oven timer is
running.
TIPS
Before entering the food we recommend to preheat the oven.
Use containers suitable for ovens (resistant to high temperatures).
The time required for the cooking depends on the size and quality thereof.
Try not to open the oven door as little as possible, use the window of the
oven door to check the process. It will save time and energy.
The system convection distributes heat inside the furnace and the
temperature of food by accelerating the cooking process. Until you become
familiar with the system by convection, not neglect the process, it may
happen that the cooking time decreases.
You should also leave a space of at least 3 cm between the container and
the walls of the oven, to allow hot air flow.
The weight of food deposited on the grill or in the enamel tray should not
exceed approximately 2 kg.

8
Distribute food throughout the area of the grill tray or enamel to obtain a
uniform cooking.
If the parts are medium in size, half the process should turn them over and
get a homogeneous result.
ACCESSORIES
Depending on the food to cook, you must use the appropriate accessory:
Grill
Use this accessory for roasting, baking or cooking in suitable containers for
furnaces (glass or clay pans, pastry molds, etc.).
In roasts and casseroles it is recommended in conjunction with enamelled tray
to collect juice spills and grease.
Enameled tray
For moist cakes and roasts. You can use to recover the juices or fat when
making casseroles on the grill.
MODES OF OPERATION
Use one of the following operating modes described, depending on the type of
food to be cooked, depending on their experience and the recipe chosen.
Sleep mode or off
When you do not use the oven, you must place the controls in the off position,
to do this turn the function selector to the OFF position, the timer must be in
position 0.
Operation in conventional mode
In conventional mode, the system by convection (hot air) remains deactivated.
Mode of use
Use the function selector (FUNCTION) to select the type of heat desired:
position 2 heat at the top ( ), position 3 heat at the bottom ( )
or
position 4 heat at the top and bottom ( ).
Preheat the oven to the temperature specified in the recipe.
Put the food in the enameled tray or on the grill if you use a container with
the food.
Then select the desired temperature or the one specified in the recipe.

9
Using the timer, choose the corresponding cooking time.
5 or 10 minutes before the end of the selected time check that it is cooking
correctly.
To test the food before removing it from the oven, use the handle provided
for the tray or grill. The handle will help you get the food out or put it in the
oven.
Once the preparation is complete, place the oven controls in the standby or
off mode.
Operation by convection
In the convection mode, a flow of hot air is
generated inside the oven, distributing the heat
evenly in the food and accelerating the cooking
process.
Until you become familiar with the system by
convection do not neglect the process, it may
happen that the cooking time decreases.
You should also leave a space of at least 3 cm between the container and the
walls of the oven, to allow the flow of hot air.
Mode of use
Use the function selector (FUNCTION) to select the desired heat type:
position 5 heat at the top ( ) or position 6 heat at the top and bottom
().
Preheat the oven to the temperature specified in the recipe.
Put the food in the enameled tray or on the grill if you use a container with
the food.
Then select the desired temperature or the one specified in the recipe.
Using the timer, choose the corresponding cooking time.
5 or 10 minutes before the end of the selected time check that it is cooking
correctly.
To test the food before removing it from the oven, use the handle provided
for the tray or grill. The handle will help you get the food out or put it in the
oven.
Once the preparation is complete, place the oven controls in the standby or
off mode.
Note
:
Cooking times are based on foods found to refrigerator temperature. Meat or
frozen food should be cooked for a longer period of time. Therefore, it is
advisable to use a meat thermometer.

10
MAINTENANCE AND CLEANING
Before cleaning disconnect the unit from the mains. And be sure the oven is
completely cold.
Do not use alcohol or abrasive products and not allow the appliance to contact
volatile agents such as gasoline, solvents, insecticides, etc.
Cleaning the outside of the oven
Clean the outside with a damp cloth and then with a dry one.
Avoid water from the vents.
Hold the door on both sides and the seals always clean. Clean these parts
with a damp cloth with warm water and soap. Then dry them carefully.
Cleaning of the accessories
Clean the accessories after each use with a grease product.
You can also wash the accessories in the dishwasher.
Cleaning inside the oven
Do not use metal scouring pads that may scratch the surfaces, use specific
cleaning products for ovens. For stubborn stains, wipe them after
preheating to 90 ° C for 30 seconds.
Some juices and grease stains, crumb tray / juices aluminum, which are
not cleaned with cleaning products. Use the enamel tray in order to prevent
juices and fats falling into crumb tray / juices.
For cleaning of resistance at the top and bottom of the oven, use a cloth
soaked in soapy water and make cleaning with longitudinal movements.
Model: SVMH1220
TECHNICAL SPECIFICATIONS
Operating voltage
Power consumption
Oven capacity
Temperature range
Timer control
Oven door
220-240 V ~ 50 Hz
1300 W
22 liters
90 to 230 °C
60 minutes
Double tempered glass
Model: SVMH1350
TECHNICAL SPECIFICATIONS
Operating voltage
220-240 V ~ 50 Hz
Power consumption
1500W
Oven capacity
35 liters
Temperature range
90 to 230 °C

11
Timer control 60 minutes
Oven door Double tempered glass
Model: SVMH1480
TECHNICAL SPECIFICATIONS
Operating voltage
220-240 V ~ 50 Hz
Power consumption
1800W
Oven capacity
48 liters
Temperature range
90 to 230 °C
Timer control 60 minutes
Oven door Double tempered glass
Specifications subject to change without notice.
This product complies with the European Directives 2014/30/EU (EMC –
Electromagnetic Compatibility) and the 2014/35/EU (LVD – Low Voltage
Directive) relative to Low Tension Security.
-
 1
1
-
 2
2
-
 3
3
-
 4
4
-
 5
5
-
 6
6
-
 7
7
-
 8
8
-
 9
9
-
 10
10
-
 11
11
-
 12
12
-
 13
13
-
 14
14
-
 15
15
-
 16
16
-
 17
17
-
 18
18
-
 19
19
-
 20
20
-
 21
21
-
 22
22


Svan SVMH1350 El manual del propietario
- Tipo
- El manual del propietario
en otros idiomas
- English: Svan SVMH1350 Owner's manual
Otros documentos
-
GE PT9800SH1SS El manual del propietario
-
Fulgor Milano F6PDF364GS1 Manual de usuario
-
-
GE PT7800DH5WW El manual del propietario
-
-
Whirlpool AKP 463/IX Guía del usuario
-
-
Whirlpool AKZ 481/IX Guía del usuario
-
-