Truper Max MAX-40M El manual del propietario
- Categoría
- Motosierras inalámbricas
- Tipo
- El manual del propietario

Manual
MAX-40M
ModelCode
MAX-40M
Applies for:
102491
ENGLISH
ESPAÑOL
40 V
Service
Repair the tool in a Authorized Service Center
using only identical spare parts.
This will ensure that the safety of the power tool is maintained.
Work area
Keep your work area clean, and well lit.
Cluttered and dark areas may cause accidents.
Never use the tool in explosive atmospheres, such as in the
presence of flammable liquids, gases or dust.
Sparks generated by power tools may ignite the flammable material.
Keep children and bystanders at a safe distance while operating
the tool.
Distractions may cause loosing control.
Electrical Safety
The tool plug must match the power outlet. Never modify
the plug in any way. Do not use any adapter plugs with
grounded power tools.
Modified plugs and different power outlets increase the risk of electric shock.
Avoid body contact with grounded surfaces, such as pipes,
radiators, electric ranges and refrigerators.
The risk of electric shock increases if your body is grounded.
Do not expose the tool to rain or wet conditions.
Water entering into the tool increases the risk of electric shock.
Do not force the cord. Never use the cord to carry, lift or unplug
the tool. Keep the cord away from heat, oil, sharp edges or
moving parts.
Damaged or entangled cords increase the risk of electric shock.
When operating a tool outdoors, use an extension cord suitable
for outdoor use.
Using an adequate outdoor extension cord reduces the risk of electric shock.
If operating the tool in a damp location cannot be avoided, use
a ground fault circuit interrupter (GFCI) protected supply.
Using a GFCI reduces the risk of electric shock.
Personal safety
Stay alert, watch what you are doing and use common sense
when operating a tool. Do not use a power tool while you are
tired or under the influence of drugs, alcohol or medication.
A moment of distraction while operating the tool may result in personal injury.
Use personal protective equipment. Always wear eye
protection.
Protective equipment such as safety glasses, anti-dust mask, non-skid shoes,
hard hats and hearing protection used in the right conditions significantly
reduce personal injury.
Prevent unintentional starting up. Ensure the switch is in the
“OFF” position before connecting into the power source and /
or battery as well as when carrying the tool.
Transporting power tools with the finger on the switch or connecting power
tools with the switch in the “ON” position may cause accidents.
Remove any wrench or vice before turning the power tool on.
Wrenches or vices left attached to rotating parts of the tool may result in
personal injury.
Do not overreach. Keep proper footing and balance at all times.
This enables a better control on the tool during unexpected situations.
Dress properly. Do not wear loose clothing or jewelry. Keep
hair, clothes and gloves away from the moving parts.
Loose clothes or long hair may get caught in moving parts.
If you have dust extraction and recollection devices connected
onto the tool, inspect their connections and use them correctly.
Using these devices reduce dust-related risks.
Power Tools Use and Care
Do not force the tool. Use the adequate tool for your
application.
The correct tool delivers a better and safer job at the rate for which it was designed.
Do not use the tool if the switch is not working properly.
Any power tool that cannot be turned ON or OFF is dangerous and should be
repaired before operating.
Disconnect the tool from the power source and / or battery
before making any adjustments, changing accessories or
storing.
These measures reduce the risk of accidentally starting the tool.
Store tools out of the reach of children. Do not allow persons
that are not familiar with the tool or its instructions to
operate the tool.
Power tools are dangerous in the hands of untrained users.
The machine must not be used by children or persons with
reduced physical, sensory or mental capacities; nor by persons
with no experience or knowledge in its use, unless they are
supervised by a person responsible for their safety or have
received prior instructions on the use of the machine.
Children must be supervised to ensure that they do not play with the machine.
Service the tool. Check the mobile parts are not misaligned or
stuck. There should not be broken parts or other conditions that
may affect its operation. Repair any damage before using the
tool.
Most accidents are caused due to poor maintenance to the tools.
Keep the cutting accessories sharp and clean.
Cutting accessories in good working conditions are less likely to bind and are
easier to control.
Use the tool, components and accessories in accordance with
these instructions and the projected way to use it for the type of
tool when in adequate working conditions.
Using the tool for applications different from those it was designed for, could
result in a hazardous situation.
Use and care of the battery-operated tool
Recharge only with the charger specified by .
A charger that is suitable for one type of battery pack may create a risk of fire when
used with another battery pack.
Use power tools only with specifically designated battery packs.
Use of any other battery packs may create a risk of injury and fire.
When battery pack is not in use, keep it away from other metal
objects, like paper clips, coins, keys, nails, screws, or other
small metal objects, that can make a connection from one
terminal to another.
Shorting the battery terminals together may cause burns or a fire.
Under abusive conditions, liquid may be ejected from the
battery; avoid contact. If contact accidentally occurs, flush with
water. If liquid contacts eyes, additionally seek medical help.
Liquid ejected from the battery may cause irritation or burns.
Read the user’s manual thoroughly
before operating this tool.
CAUTION
Cordless
Chain Saw

2
Technical Data
Power Specifications
General power tools safety warnings
Safety warnings for using ChainSaws
Parts
Preparation
Safety Devices
Oil Supply
Bar and Chain Assembly
Start Up
Cutting Operation
Felling and Bucking
Cutting Branches and Pruning
Adjustments and Maintenance
Troubleshooting
Notes
Authorized Service Centers
Warranty policy
3
3
4
5
8
9
10
11
11
14
15
16
18
19
21
22
23
24
MAX-40M
Service
Repair the tool in a Authorized Service Center
using only identical spare parts.
This will ensure that the safety of the power tool is maintained.
Work area
Keep your work area clean, and well lit.
Cluttered and dark areas may cause accidents.
Never use the tool in explosive atmospheres, such as in the
presence of flammable liquids, gases or dust.
Sparks generated by power tools may ignite the flammable material.
Keep children and bystanders at a safe distance while operating
the tool.
Distractions may cause loosing control.
Electrical Safety
The tool plug must match the power outlet. Never modify
the plug in any way. Do not use any adapter plugs with
grounded power tools.
Modified plugs and different power outlets increase the risk of electric shock.
Avoid body contact with grounded surfaces, such as pipes,
radiators, electric ranges and refrigerators.
The risk of electric shock increases if your body is grounded.
Do not expose the tool to rain or wet conditions.
Water entering into the tool increases the risk of electric shock.
Do not force the cord. Never use the cord to carry, lift or unplug
the tool. Keep the cord away from heat, oil, sharp edges or
moving parts.
Damaged or entangled cords increase the risk of electric shock.
When operating a tool outdoors, use an extension cord suitable
for outdoor use.
Using an adequate outdoor extension cord reduces the risk of electric shock.
If operating the tool in a damp location cannot be avoided, use
a ground fault circuit interrupter (GFCI) protected supply.
Using a GFCI reduces the risk of electric shock.
Personal safety
Stay alert, watch what you are doing and use common sense
when operating a tool. Do not use a power tool while you are
tired or under the influence of drugs, alcohol or medication.
A moment of distraction while operating the tool may result in personal injury.
Use personal protective equipment. Always wear eye
protection.
Protective equipment such as safety glasses, anti-dust mask, non-skid shoes,
hard hats and hearing protection used in the right conditions significantly
reduce personal injury.
Prevent unintentional starting up. Ensure the switch is in the
“OFF” position before connecting into the power source and /
or battery as well as when carrying the tool.
Transporting power tools with the finger on the switch or connecting power
tools with the switch in the “ON” position may cause accidents.
Remove any wrench or vice before turning the power tool on.
Wrenches or vices left attached to rotating parts of the tool may result in
personal injury.
Do not overreach. Keep proper footing and balance at all times.
This enables a better control on the tool during unexpected situations.
Dress properly. Do not wear loose clothing or jewelry. Keep
hair, clothes and gloves away from the moving parts.
Loose clothes or long hair may get caught in moving parts.
If you have dust extraction and recollection devices connected
onto the tool, inspect their connections and use them correctly.
Using these devices reduce dust-related risks.
Power Tools Use and Care
Do not force the tool. Use the adequate tool for your
application.
The correct tool delivers a better and safer job at the rate for which it was designed.
Do not use the tool if the switch is not working properly.
Any power tool that cannot be turned ON or OFF is dangerous and should be
repaired before operating.
Disconnect the tool from the power source and / or battery
before making any adjustments, changing accessories or
storing.
These measures reduce the risk of accidentally starting the tool.
Store tools out of the reach of children. Do not allow persons
that are not familiar with the tool or its instructions to
operate the tool.
Power tools are dangerous in the hands of untrained users.
The machine must not be used by children or persons with
reduced physical, sensory or mental capacities; nor by persons
with no experience or knowledge in its use, unless they are
supervised by a person responsible for their safety or have
received prior instructions on the use of the machine.
Children must be supervised to ensure that they do not play with the machine.
Service the tool. Check the mobile parts are not misaligned or
stuck. There should not be broken parts or other conditions that
may affect its operation. Repair any damage before using the
tool.
Most accidents are caused due to poor maintenance to the tools.
Keep the cutting accessories sharp and clean.
Cutting accessories in good working conditions are less likely to bind and are
easier to control.
Use the tool, components and accessories in accordance with
these instructions and the projected way to use it for the type of
tool when in adequate working conditions.
Using the tool for applications different from those it was designed for, could
result in a hazardous situation.
Use and care of the battery-operated tool
Recharge only with the charger specified by .
A charger that is suitable for one type of battery pack may create a risk of fire when
used with another battery pack.
Use power tools only with specifically designated battery packs.
Use of any other battery packs may create a risk of injury and fire.
When battery pack is not in use, keep it away from other metal
objects, like paper clips, coins, keys, nails, screws, or other
small metal objects, that can make a connection from one
terminal to another.
Shorting the battery terminals together may cause burns or a fire.
Under abusive conditions, liquid may be ejected from the
battery; avoid contact. If contact accidentally occurs, flush with
water. If liquid contacts eyes, additionally seek medical help.
Liquid ejected from the battery may cause irritation or burns.
Contents
CAUTION
Keep this manual for future references.
The illustrations in this manual are for reference
only. They might be different from the real tool.
To gain the best performance of
the tool, prolong the duty life,
make the Warranty valid if
necessary, and to avoid hazards
of fatal injuries please read and
understand this Manual before
using the tool.
ENGLISH

3
Code
Description
Voltage
Motor speed
Chain speed
Bar length
Oil tank for the chain
Chain pitch Chain gauge
MAX-40M
102491
Cordless Chain Saw
11 000 RPM
62 ft/s
4.7 oz
Weight (without bar) 8.1 lb
Print sprocket 6 sprockets
Vibration Front handle: 10 ft/s2 / Rear handle: 6.5 ft/s2
3/8” 0.05”
16”
Technical Data
Batteries
Input: Voltage:127 V Frequency: 60 Hz Current: 2 A
Output: 21.5 V 3 A
Charger
The power cord of the charger has a cable tie type: Y
The construction class of the tool is: Class III
The construction class of the charger is: Reinforced insulation
Ion-lithium 20 V 4 Ah | Charging time: 1 h 20 min approx.
40 V
Power Specifications
Double insulated tools are equipped with a polarized plug (one blade is wider
than the other). This plug will fit into any polarized outlet and will only fit one way. If the plug does
not fit in the socket, turn it over. If it still does not fit, contact a qualified electrician or install a polarized
plug. Do not alter the plug in any way. Double insulation eliminates the need for a grounded
three-part power cord or grounded electrical power system.
When using an extension cord, be sure to use a gauge heavy enough to
carry the current your tool will draw. An undersized wire will cause line voltage drops, resulting in loss of power and motor
overheating. The following table shows the correct size to use depending on cord length and the nameplate amp rating of
the tool. If in doubt use the next higher gauge.
Service
Repair the tool in a Authorized Service Center
using only identical spare parts.
This will ensure that the safety of the power tool is maintained.
Work area
Keep your work area clean, and well lit.
Cluttered and dark areas may cause accidents.
Never use the tool in explosive atmospheres, such as in the
presence of flammable liquids, gases or dust.
Sparks generated by power tools may ignite the flammable material.
Keep children and bystanders at a safe distance while operating
the tool.
Distractions may cause loosing control.
Electrical Safety
The tool plug must match the power outlet. Never modify
the plug in any way. Do not use any adapter plugs with
grounded power tools.
Modified plugs and different power outlets increase the risk of electric shock.
Avoid body contact with grounded surfaces, such as pipes,
radiators, electric ranges and refrigerators.
The risk of electric shock increases if your body is grounded.
Do not expose the tool to rain or wet conditions.
Water entering into the tool increases the risk of electric shock.
Do not force the cord. Never use the cord to carry, lift or unplug
the tool. Keep the cord away from heat, oil, sharp edges or
moving parts.
Damaged or entangled cords increase the risk of electric shock.
When operating a tool outdoors, use an extension cord suitable
for outdoor use.
Using an adequate outdoor extension cord reduces the risk of electric shock.
If operating the tool in a damp location cannot be avoided, use
a ground fault circuit interrupter (GFCI) protected supply.
Using a GFCI reduces the risk of electric shock.
Personal safety
Stay alert, watch what you are doing and use common sense
when operating a tool. Do not use a power tool while you are
tired or under the influence of drugs, alcohol or medication.
A moment of distraction while operating the tool may result in personal injury.
Use personal protective equipment. Always wear eye
protection.
Protective equipment such as safety glasses, anti-dust mask, non-skid shoes,
hard hats and hearing protection used in the right conditions significantly
reduce personal injury.
Prevent unintentional starting up. Ensure the switch is in the
“OFF” position before connecting into the power source and /
or battery as well as when carrying the tool.
Transporting power tools with the finger on the switch or connecting power
tools with the switch in the “ON” position may cause accidents.
Remove any wrench or vice before turning the power tool on.
Wrenches or vices left attached to rotating parts of the tool may result in
personal injury.
Do not overreach. Keep proper footing and balance at all times.
This enables a better control on the tool during unexpected situations.
Dress properly. Do not wear loose clothing or jewelry. Keep
hair, clothes and gloves away from the moving parts.
Loose clothes or long hair may get caught in moving parts.
If you have dust extraction and recollection devices connected
onto the tool, inspect their connections and use them correctly.
Using these devices reduce dust-related risks.
Power Tools Use and Care
Do not force the tool. Use the adequate tool for your
application.
The correct tool delivers a better and safer job at the rate for which it was designed.
Do not use the tool if the switch is not working properly.
Any power tool that cannot be turned ON or OFF is dangerous and should be
repaired before operating.
Disconnect the tool from the power source and / or battery
before making any adjustments, changing accessories or
storing.
These measures reduce the risk of accidentally starting the tool.
Store tools out of the reach of children. Do not allow persons
that are not familiar with the tool or its instructions to
operate the tool.
Power tools are dangerous in the hands of untrained users.
The machine must not be used by children or persons with
reduced physical, sensory or mental capacities; nor by persons
with no experience or knowledge in its use, unless they are
supervised by a person responsible for their safety or have
received prior instructions on the use of the machine.
Children must be supervised to ensure that they do not play with the machine.
Service the tool. Check the mobile parts are not misaligned or
stuck. There should not be broken parts or other conditions that
may affect its operation. Repair any damage before using the
tool.
Most accidents are caused due to poor maintenance to the tools.
Keep the cutting accessories sharp and clean.
Cutting accessories in good working conditions are less likely to bind and are
easier to control.
Use the tool, components and accessories in accordance with
these instructions and the projected way to use it for the type of
tool when in adequate working conditions.
Using the tool for applications different from those it was designed for, could
result in a hazardous situation.
Use and care of the battery-operated tool
Recharge only with the charger specified by .
A charger that is suitable for one type of battery pack may create a risk of fire when
used with another battery pack.
Use power tools only with specifically designated battery packs.
Use of any other battery packs may create a risk of injury and fire.
When battery pack is not in use, keep it away from other metal
objects, like paper clips, coins, keys, nails, screws, or other
small metal objects, that can make a connection from one
terminal to another.
Shorting the battery terminals together may cause burns or a fire.
Under abusive conditions, liquid may be ejected from the
battery; avoid contact. If contact accidentally occurs, flush with
water. If liquid contacts eyes, additionally seek medical help.
Liquid ejected from the battery may cause irritation or burns.
ENGLISH
WARNING
WARNING Avoid the risk of electric shock or severe injury. When the power cable gets damaged
it should only be replaced by the manufacturer or at a Authorized Service Center.
The build quality of the electric insulation is altered if spills or liquid gets into the tool while in use.
Do not expose to rain, liquids and/or dampness.
Before gaining access to the terminals all power sources should be disconnected.
from 0 A and up to 10 A
from 10 A and up to 13 A
from 13 A and up to 15 A
from 15 A and up to 20 A
18 AWG(*)
16 AWG
14 AWG
8 AWG
3 (one grounded)
from 5.9’ to 49.2’ | higher than 49.2’
Ampere
Capacity Number of
Conductors Extension gauge
* It is safe to use only if the extensions have a built-in artifact for over current protection.
AWG = American Wire Gauge. Reference: NMX-J-195-ANCE
WARNING When operating power tools outdoors, use a grounded
extension cable labeled “For Outdoors Use”. These extensions are specially designed for
operating outdoors and reduce the risk of electric shock.
WARNING
WARNING
16 AWG
14 AWG
12 AWG
6 AWG

4ENGLISH
Service
Repair the tool in a Authorized Service Center
using only identical spare parts.
This will ensure that the safety of the power tool is maintained.
General power tools
safety warnings
This tool is in compliance
with the Official Mexican Standard
(NOM - Norma Oficial Mexicana).
Work area
Keep your work area clean, and well lit.
Cluttered and dark areas may cause accidents.
Never use the tool in explosive atmospheres, such as in the
presence of flammable liquids, gases or dust.
Sparks generated by power tools may ignite the flammable material.
Keep children and bystanders at a safe distance while operating
the tool.
Distractions may cause loosing control.
Electrical Safety
The tool plug must match the power outlet. Never modify
the plug in any way. Do not use any adapter plugs with
grounded power tools.
Modified plugs and different power outlets increase the risk of electric shock.
Avoid body contact with grounded surfaces, such as pipes,
radiators, electric ranges and refrigerators.
The risk of electric shock increases if your body is grounded.
Do not expose the tool to rain or wet conditions.
Water entering into the tool increases the risk of electric shock.
Do not force the cord. Never use the cord to carry, lift or unplug
the tool. Keep the cord away from heat, oil, sharp edges or
moving parts.
Damaged or entangled cords increase the risk of electric shock.
When operating a tool outdoors, use an extension cord suitable
for outdoor use.
Using an adequate outdoor extension cord reduces the risk of electric shock.
If operating the tool in a damp location cannot be avoided, use
a ground fault circuit interrupter (GFCI) protected supply.
Using a GFCI reduces the risk of electric shock.
Personal safety
Stay alert, watch what you are doing and use common sense
when operating a tool. Do not use a power tool while you are
tired or under the influence of drugs, alcohol or medication.
A moment of distraction while operating the tool may result in personal injury.
Use personal protective equipment. Always wear eye
protection.
Protective equipment such as safety glasses, anti-dust mask, non-skid shoes,
hard hats and hearing protection used in the right conditions significantly
reduce personal injury.
Prevent unintentional starting up. Ensure the switch is in the
“OFF” position before connecting into the power source and /
or battery as well as when carrying the tool.
Transporting power tools with the finger on the switch or connecting power
tools with the switch in the “ON” position may cause accidents.
Remove any wrench or vice before turning the power tool on.
Wrenches or vices left attached to rotating parts of the tool may result in
personal injury.
Do not overreach. Keep proper footing and balance at all times.
This enables a better control on the tool during unexpected situations.
Dress properly. Do not wear loose clothing or jewelry. Keep
hair, clothes and gloves away from the moving parts.
Loose clothes or long hair may get caught in moving parts.
If you have dust extraction and recollection devices connected
onto the tool, inspect their connections and use them correctly.
Using these devices reduce dust-related risks.
Power Tools Use and Care
Do not force the tool. Use the adequate tool for your
application.
The correct tool delivers a better and safer job at the rate for which it was designed.
Do not use the tool if the switch is not working properly.
Any power tool that cannot be turned ON or OFF is dangerous and should be
repaired before operating.
Disconnect the tool from the power source and / or battery
before making any adjustments, changing accessories or
storing.
These measures reduce the risk of accidentally starting the tool.
Store tools out of the reach of children. Do not allow persons
that are not familiar with the tool or its instructions to
operate the tool.
Power tools are dangerous in the hands of untrained users.
The machine must not be used by children or persons with
reduced physical, sensory or mental capacities; nor by persons
with no experience or knowledge in its use, unless they are
supervised by a person responsible for their safety or have
received prior instructions on the use of the machine.
Children must be supervised to ensure that they do not play with the machine.
Service the tool. Check the mobile parts are not misaligned or
stuck. There should not be broken parts or other conditions that
may affect its operation. Repair any damage before using the
tool.
Most accidents are caused due to poor maintenance to the tools.
Keep the cutting accessories sharp and clean.
Cutting accessories in good working conditions are less likely to bind and are
easier to control.
Use the tool, components and accessories in accordance with
these instructions and the projected way to use it for the type of
tool when in adequate working conditions.
Using the tool for applications different from those it was designed for, could
result in a hazardous situation.
Use and care of the battery-operated tool
Recharge only with the charger specified by .
A charger that is suitable for one type of battery pack may create a risk of fire when
used with another battery pack.
Use power tools only with specifically designated battery packs.
Use of any other battery packs may create a risk of injury and fire.
WARNING! Read carefully all safety warnings and instruction listed below. Failure to comply with any of
these warnings may result in electric shock, fire and / or severe damage. Save all warnings and instructions for
future references.
When battery pack is not in use, keep it away from other metal
objects, like paper clips, coins, keys, nails, screws, or other
small metal objects, that can make a connection from one
terminal to another.
Shorting the battery terminals together may cause burns or a fire.
Under abusive conditions, liquid may be ejected from the
battery; avoid contact. If contact accidentally occurs, flush with
water. If liquid contacts eyes, additionally seek medical help.
Liquid ejected from the battery may cause irritation or burns.

5
• Keep this in mind. Safety is a combination of common
sense, alert mind and knowledge of the tool operation.
• Please read carefully the manual before
using the chain saw. Be aware of the safety measures, the
Alert symbols and the Danger, Warning and Attention
Symbol labels pasted on the tool. These safety measures
are alert you and to help you avoid possible injuries or
fatal accidents. However, they do not eliminate the
danger involved in mishandling the chain saw. The tool
when used with care and for the job it is intended will
render many safe and reliable services.
• Aided with this manual get familiar with the chain saw.
Keep it in a safe and handy place to consult frequently
and to teach other chain saw users. Learn its uses,
limitations and also the possible specific dangers.
• Chain saws are specifically designed
to cut wood. Do not try to cut any other materials.
• Never allow untrained people to use
the chain saw.
• Operate the chain saw only when visibility and light
conditions are adequate to see clearly.
Kickback is the sudden and strong movement off the cut
and towards the operator made by the running tool. It
can make the operator losing control or even severe
personal injury. Usually, kickback happens when the nose
of the cut bar touches an object or the cutting chain is
pinched into the material to be cut. To avoid this
dangerous situation the following measures must be
used:
• Keep all the guards and safety devices incorporated to
the chain saw well-kept and in place.
• When operating a chain saw be always alert and avoid
being used to the tool make you stop paying attention to
the cutting job.
• With the chain saw switched on, hold it
firmly with both hands. Set the right hand in the rear handle
and the left hand in the front handle. Both handles need to
be encircled by your fingers and with your thumbs bent
under the handles (A). This way of holding has the least
chance of failing when kickback occurs. By keeping the
thumbs in the same side of the other fingers is dangerous
because it greatly diminishes your control over the tool if
kickback occurs.
• Operate the chain saw with your left arm totally straight
and outstretched.
• DO NOT allow the nose of the cut bar
make contact with both the material you are about to cut
and obstacles such as logs, branches, fences or any other
material that could touch the cut bar while operating the
chain saw.
• Always cut with the engine running at maximum speed.
Press the trigger switch all the way and keep a stable
cutting speed.
• Do not overreach or cut objects out of
reach or higher than your chest.
• Keep the cutting chain sharp and in optimal conditions.
• Use only spare bars and chains specified by
.
Right way to hold
the chain saw
Wrong way to hold
the chain saw
DANGER
DANGER
DANGER
WARNING
CAUTION
WARNING
General To Prevent Kickback
A
ENGLISH
Service
Repair the tool in a Authorized Service Center
using only identical spare parts.
This will ensure that the safety of the power tool is maintained.
Work area
Keep your work area clean, and well lit.
Cluttered and dark areas may cause accidents.
Never use the tool in explosive atmospheres, such as in the
presence of flammable liquids, gases or dust.
Sparks generated by power tools may ignite the flammable material.
Keep children and bystanders at a safe distance while operating
the tool.
Distractions may cause loosing control.
Electrical Safety
The tool plug must match the power outlet. Never modify
the plug in any way. Do not use any adapter plugs with
grounded power tools.
Modified plugs and different power outlets increase the risk of electric shock.
Avoid body contact with grounded surfaces, such as pipes,
radiators, electric ranges and refrigerators.
The risk of electric shock increases if your body is grounded.
Do not expose the tool to rain or wet conditions.
Water entering into the tool increases the risk of electric shock.
Do not force the cord. Never use the cord to carry, lift or unplug
the tool. Keep the cord away from heat, oil, sharp edges or
moving parts.
Damaged or entangled cords increase the risk of electric shock.
When operating a tool outdoors, use an extension cord suitable
for outdoor use.
Using an adequate outdoor extension cord reduces the risk of electric shock.
If operating the tool in a damp location cannot be avoided, use
a ground fault circuit interrupter (GFCI) protected supply.
Using a GFCI reduces the risk of electric shock.
Personal safety
Stay alert, watch what you are doing and use common sense
when operating a tool. Do not use a power tool while you are
tired or under the influence of drugs, alcohol or medication.
A moment of distraction while operating the tool may result in personal injury.
Use personal protective equipment. Always wear eye
protection.
Protective equipment such as safety glasses, anti-dust mask, non-skid shoes,
hard hats and hearing protection used in the right conditions significantly
reduce personal injury.
Prevent unintentional starting up. Ensure the switch is in the
“OFF” position before connecting into the power source and /
or battery as well as when carrying the tool.
Transporting power tools with the finger on the switch or connecting power
tools with the switch in the “ON” position may cause accidents.
Remove any wrench or vice before turning the power tool on.
Wrenches or vices left attached to rotating parts of the tool may result in
personal injury.
Do not overreach. Keep proper footing and balance at all times.
This enables a better control on the tool during unexpected situations.
Dress properly. Do not wear loose clothing or jewelry. Keep
hair, clothes and gloves away from the moving parts.
Loose clothes or long hair may get caught in moving parts.
If you have dust extraction and recollection devices connected
onto the tool, inspect their connections and use them correctly.
Using these devices reduce dust-related risks.
Power Tools Use and Care
Do not force the tool. Use the adequate tool for your
application.
The correct tool delivers a better and safer job at the rate for which it was designed.
Do not use the tool if the switch is not working properly.
Any power tool that cannot be turned ON or OFF is dangerous and should be
repaired before operating.
Disconnect the tool from the power source and / or battery
before making any adjustments, changing accessories or
storing.
These measures reduce the risk of accidentally starting the tool.
Store tools out of the reach of children. Do not allow persons
that are not familiar with the tool or its instructions to
operate the tool.
Power tools are dangerous in the hands of untrained users.
The machine must not be used by children or persons with
reduced physical, sensory or mental capacities; nor by persons
with no experience or knowledge in its use, unless they are
supervised by a person responsible for their safety or have
received prior instructions on the use of the machine.
Children must be supervised to ensure that they do not play with the machine.
Service the tool. Check the mobile parts are not misaligned or
stuck. There should not be broken parts or other conditions that
may affect its operation. Repair any damage before using the
tool.
Most accidents are caused due to poor maintenance to the tools.
Keep the cutting accessories sharp and clean.
Cutting accessories in good working conditions are less likely to bind and are
easier to control.
Use the tool, components and accessories in accordance with
these instructions and the projected way to use it for the type of
tool when in adequate working conditions.
Using the tool for applications different from those it was designed for, could
result in a hazardous situation.
Use and care of the battery-operated tool
Recharge only with the charger specified by .
A charger that is suitable for one type of battery pack may create a risk of fire when
used with another battery pack.
Use power tools only with specifically designated battery packs.
Use of any other battery packs may create a risk of injury and fire.
When battery pack is not in use, keep it away from other metal
objects, like paper clips, coins, keys, nails, screws, or other
small metal objects, that can make a connection from one
terminal to another.
Shorting the battery terminals together may cause burns or a fire.
Under abusive conditions, liquid may be ejected from the
battery; avoid contact. If contact accidentally occurs, flush with
water. If liquid contacts eyes, additionally seek medical help.
Liquid ejected from the battery may cause irritation or burns.
Safety warnings for
Using Chain saws

6
• Keep co-workers away when starting or operating the
chain saw. A safe distance is 4,5 meters (15 feet) between
every worker. Make sure passersby or animals are further
away from the work area when you start and operate the
machine. A safe area is at least double the height of the
tallest trees in the felling zone.
• After starting the motor, verify the cutting chain in not
coming into contact with any object.
• Set both feet firmly in the ground. Do
not operate the chain saw if standing in an unstable area,
such as scaffolding, ladders, trees, etc. Only highly
qualified people and adequate safety gear can operate a
chain saw up in a tree.
• Do not start cutting until the work area is clear, feet
perfectly stable on the ground and an escape route that
takes into account the felled tree.
• Never operate the chain saw
single-handedly. Otherwise the operator and third parties
will get injured.
• Keep every part of your body away from the cutting
chain when the motor is running.
• Do not cut small vines or shrubs (smaller than 3”
diameter).
• Use extreme caution when cutting
small shrubs and young trees. The slim material could get
pinched in the saw chain and be thrown with great force
towards you.
• TUse extreme caution when cutting
branches under pressure. When cutting, the branch
might whiplash back to its original position, therefore
hitting the operator. Take this in mind and stay away from
the branch trajectory.
• Stay alert to the chain saw reaction when
cutting big trunks. Because of reaction forces dependent of
the direction of the chain movement and (the upper or lower)
edge of the cut bar used, the chain saw might be pushed
towards the operator (B), or could be pulled towards the
trunk (C).
• Never use the chain saw when tired, sick or under the effects of drugs, alcohol o medication.
• Wear clothes adequate for chain saw operation: tight fitting clothes, thick slacks, safety non-skid
boots, heavy-duty protective gloves, safety goggles or protective lenses with side protection compliant
with the ANSI Z87.1 Standard, head and hearing protectors. Also recommended are overalls, jeans
and chaps, as well as wide vision full masks.
• Remove from your person any accessory or lose clothing that could get caught into the moving chain.
Hold long hair up above your shoulders.
• Verify the chain saw is in perfect conditions. Do not turn it on is not well adjusted or not completely assembled so it will
work safely.
• Verify the cutting chain stops moving when releasing the trigger switch. In the event the chain is not stopping when
releasing the trigger switch, turn off the chain saw and go to a Authorized Service Center to fix the
problem.
• Do not turn on the chain saw if assembled with any device or accessory not specified in this Manual.
• Verify the chain saw handles are clean, dry and free of oil or fuel.
• Make sure the work area is an open and well-ventilated area.
• Always carry the chain saw switched off
and with the chain brake engaged, the cut bar facing back
and sheathed and the muffler away from the body.
• Turn off the chain saw and apply the
chain brake before setting it idle. DO NOT leave it running
while unattended.
• Service and repairs on the chain saw
have to be carried out only by highly trained staff. A bad
service job may cause an accident with fatal consequen-
ces.
DANGER
DANGER
DANGER
Safety warnings for
Using Chain saws
WARNING
WARNING
WARNING
WARNING
Before operating the chain saw
When operating the chain saw After Operating the Chain saw
CAUTION
CAUTION
CAUTION
B
C
ENGLISH
Service
Repair the tool in a Authorized Service Center
using only identical spare parts.
This will ensure that the safety of the power tool is maintained.
Work area
Keep your work area clean, and well lit.
Cluttered and dark areas may cause accidents.
Never use the tool in explosive atmospheres, such as in the
presence of flammable liquids, gases or dust.
Sparks generated by power tools may ignite the flammable material.
Keep children and bystanders at a safe distance while operating
the tool.
Distractions may cause loosing control.
Electrical Safety
The tool plug must match the power outlet. Never modify
the plug in any way. Do not use any adapter plugs with
grounded power tools.
Modified plugs and different power outlets increase the risk of electric shock.
Avoid body contact with grounded surfaces, such as pipes,
radiators, electric ranges and refrigerators.
The risk of electric shock increases if your body is grounded.
Do not expose the tool to rain or wet conditions.
Water entering into the tool increases the risk of electric shock.
Do not force the cord. Never use the cord to carry, lift or unplug
the tool. Keep the cord away from heat, oil, sharp edges or
moving parts.
Damaged or entangled cords increase the risk of electric shock.
When operating a tool outdoors, use an extension cord suitable
for outdoor use.
Using an adequate outdoor extension cord reduces the risk of electric shock.
If operating the tool in a damp location cannot be avoided, use
a ground fault circuit interrupter (GFCI) protected supply.
Using a GFCI reduces the risk of electric shock.
Personal safety
Stay alert, watch what you are doing and use common sense
when operating a tool. Do not use a power tool while you are
tired or under the influence of drugs, alcohol or medication.
A moment of distraction while operating the tool may result in personal injury.
Use personal protective equipment. Always wear eye
protection.
Protective equipment such as safety glasses, anti-dust mask, non-skid shoes,
hard hats and hearing protection used in the right conditions significantly
reduce personal injury.
Prevent unintentional starting up. Ensure the switch is in the
“OFF” position before connecting into the power source and /
or battery as well as when carrying the tool.
Transporting power tools with the finger on the switch or connecting power
tools with the switch in the “ON” position may cause accidents.
Remove any wrench or vice before turning the power tool on.
Wrenches or vices left attached to rotating parts of the tool may result in
personal injury.
Do not overreach. Keep proper footing and balance at all times.
This enables a better control on the tool during unexpected situations.
Dress properly. Do not wear loose clothing or jewelry. Keep
hair, clothes and gloves away from the moving parts.
Loose clothes or long hair may get caught in moving parts.
If you have dust extraction and recollection devices connected
onto the tool, inspect their connections and use them correctly.
Using these devices reduce dust-related risks.
Power Tools Use and Care
Do not force the tool. Use the adequate tool for your
application.
The correct tool delivers a better and safer job at the rate for which it was designed.
Do not use the tool if the switch is not working properly.
Any power tool that cannot be turned ON or OFF is dangerous and should be
repaired before operating.
Disconnect the tool from the power source and / or battery
before making any adjustments, changing accessories or
storing.
These measures reduce the risk of accidentally starting the tool.
Store tools out of the reach of children. Do not allow persons
that are not familiar with the tool or its instructions to
operate the tool.
Power tools are dangerous in the hands of untrained users.
The machine must not be used by children or persons with
reduced physical, sensory or mental capacities; nor by persons
with no experience or knowledge in its use, unless they are
supervised by a person responsible for their safety or have
received prior instructions on the use of the machine.
Children must be supervised to ensure that they do not play with the machine.
Service the tool. Check the mobile parts are not misaligned or
stuck. There should not be broken parts or other conditions that
may affect its operation. Repair any damage before using the
tool.
Most accidents are caused due to poor maintenance to the tools.
Keep the cutting accessories sharp and clean.
Cutting accessories in good working conditions are less likely to bind and are
easier to control.
Use the tool, components and accessories in accordance with
these instructions and the projected way to use it for the type of
tool when in adequate working conditions.
Using the tool for applications different from those it was designed for, could
result in a hazardous situation.
Use and care of the battery-operated tool
Recharge only with the charger specified by .
A charger that is suitable for one type of battery pack may create a risk of fire when
used with another battery pack.
Use power tools only with specifically designated battery packs.
Use of any other battery packs may create a risk of injury and fire.
When battery pack is not in use, keep it away from other metal
objects, like paper clips, coins, keys, nails, screws, or other
small metal objects, that can make a connection from one
terminal to another.
Shorting the battery terminals together may cause burns or a fire.
Under abusive conditions, liquid may be ejected from the
battery; avoid contact. If contact accidentally occurs, flush with
water. If liquid contacts eyes, additionally seek medical help.
Liquid ejected from the battery may cause irritation or burns.

7
Safety warnings for
Using Chain saws
Service
Repair the tool in a Authorized Service Center
using only identical spare parts.
This will ensure that the safety of the power tool is maintained.
Work area
Keep your work area clean, and well lit.
Cluttered and dark areas may cause accidents.
Never use the tool in explosive atmospheres, such as in the
presence of flammable liquids, gases or dust.
Sparks generated by power tools may ignite the flammable material.
Keep children and bystanders at a safe distance while operating
the tool.
Distractions may cause loosing control.
Electrical Safety
The tool plug must match the power outlet. Never modify
the plug in any way. Do not use any adapter plugs with
grounded power tools.
Modified plugs and different power outlets increase the risk of electric shock.
Avoid body contact with grounded surfaces, such as pipes,
radiators, electric ranges and refrigerators.
The risk of electric shock increases if your body is grounded.
Do not expose the tool to rain or wet conditions.
Water entering into the tool increases the risk of electric shock.
Do not force the cord. Never use the cord to carry, lift or unplug
the tool. Keep the cord away from heat, oil, sharp edges or
moving parts.
Damaged or entangled cords increase the risk of electric shock.
When operating a tool outdoors, use an extension cord suitable
for outdoor use.
Using an adequate outdoor extension cord reduces the risk of electric shock.
If operating the tool in a damp location cannot be avoided, use
a ground fault circuit interrupter (GFCI) protected supply.
Using a GFCI reduces the risk of electric shock.
Personal safety
Stay alert, watch what you are doing and use common sense
when operating a tool. Do not use a power tool while you are
tired or under the influence of drugs, alcohol or medication.
A moment of distraction while operating the tool may result in personal injury.
Use personal protective equipment. Always wear eye
protection.
Protective equipment such as safety glasses, anti-dust mask, non-skid shoes,
hard hats and hearing protection used in the right conditions significantly
reduce personal injury.
Prevent unintentional starting up. Ensure the switch is in the
“OFF” position before connecting into the power source and /
or battery as well as when carrying the tool.
Transporting power tools with the finger on the switch or connecting power
tools with the switch in the “ON” position may cause accidents.
Remove any wrench or vice before turning the power tool on.
Wrenches or vices left attached to rotating parts of the tool may result in
personal injury.
Do not overreach. Keep proper footing and balance at all times.
This enables a better control on the tool during unexpected situations.
Dress properly. Do not wear loose clothing or jewelry. Keep
hair, clothes and gloves away from the moving parts.
Loose clothes or long hair may get caught in moving parts.
If you have dust extraction and recollection devices connected
onto the tool, inspect their connections and use them correctly.
Using these devices reduce dust-related risks.
Power Tools Use and Care
Do not force the tool. Use the adequate tool for your
application.
The correct tool delivers a better and safer job at the rate for which it was designed.
Do not use the tool if the switch is not working properly.
Any power tool that cannot be turned ON or OFF is dangerous and should be
repaired before operating.
Disconnect the tool from the power source and / or battery
before making any adjustments, changing accessories or
storing.
These measures reduce the risk of accidentally starting the tool.
Store tools out of the reach of children. Do not allow persons
that are not familiar with the tool or its instructions to
operate the tool.
Power tools are dangerous in the hands of untrained users.
The machine must not be used by children or persons with
reduced physical, sensory or mental capacities; nor by persons
with no experience or knowledge in its use, unless they are
supervised by a person responsible for their safety or have
received prior instructions on the use of the machine.
Children must be supervised to ensure that they do not play with the machine.
Service the tool. Check the mobile parts are not misaligned or
stuck. There should not be broken parts or other conditions that
may affect its operation. Repair any damage before using the
tool.
Most accidents are caused due to poor maintenance to the tools.
Keep the cutting accessories sharp and clean.
Cutting accessories in good working conditions are less likely to bind and are
easier to control.
Use the tool, components and accessories in accordance with
these instructions and the projected way to use it for the type of
tool when in adequate working conditions.
Using the tool for applications different from those it was designed for, could
result in a hazardous situation.
Use and care of the battery-operated tool
Recharge only with the charger specified by .
A charger that is suitable for one type of battery pack may create a risk of fire when
used with another battery pack.
Use power tools only with specifically designated battery packs.
Use of any other battery packs may create a risk of injury and fire.
When battery pack is not in use, keep it away from other metal
objects, like paper clips, coins, keys, nails, screws, or other
small metal objects, that can make a connection from one
terminal to another.
Shorting the battery terminals together may cause burns or a fire.
Under abusive conditions, liquid may be ejected from the
battery; avoid contact. If contact accidentally occurs, flush with
water. If liquid contacts eyes, additionally seek medical help.
Liquid ejected from the battery may cause irritation or burns.
• Use only Truper Max chargers to charge
the tool battery. Using any other charger may result in fire
or risk of injury.
• Use only batteries specifically designed
for the tool. Other batteries may create a risk of fire or
explosion.
• Connect the charger to a 127 V~(AC) alternating current
supply only.
• Do not use the charger outdoors.
• Watch polarity “+/-” when charging.
• Never recharge a battery that is leaking.
• Do not use batteries or the charger for purposes other
than those for which they were designed.
• Do not modify the contacts of the battery or the charger.
• Never expose batteries to temperatures above 266°F as
this may cause an explosion.
• Never expose batteries to fire, they could
explode.
• Batteries should be kept away from any
metallic object such as paper clips, coins, keys, nails,
screws or any other object that could cause the terminals
to make contact, since it would cause a short circuit that
could cause burns or fire.
• Under extreme conditions, battery fluid
may leak. If so, avoid any contact. If accidental contact
occurs, wash with abundant water, rinse with lemon juice
and vinegar. If the liquid enters in contact with the eyes,
wash with abundant water during several minutes and look
for medical help immediately. The liquid expelled from the
batteries could cause irradiation or burns.
• To maximize battery life, fully discharge
the battery at least once a month. Do not leave the battery
uncharged for more than three months. Always charge the
battery to its maximum capacity. Before using the machine
for the first time, charge the battery for a minimum of 1.5
hours.
• Avoid stopping constantly while operating the tool to
prevent damage to the battery.
• Do not dispose of batteries in fire, the battery may
explode. Consult local codes for possible special disposal
instructions.
• Do not open or mutilate batteries. Released electrolyte is
corrosive and may cause eye or skin damage. May be
toxic if swallowed.
• Do not charge the battery in the rain or in damp places.
Batteries and charger
DANGER
DANGER
DANGER
DANGER
CAUTION
CAUTION
CAUTION
ENGLISH

8
Parts
Service
Repair the tool in a Authorized Service Center
using only identical spare parts.
This will ensure that the safety of the power tool is maintained.
Work area
Keep your work area clean, and well lit.
Cluttered and dark areas may cause accidents.
Never use the tool in explosive atmospheres, such as in the
presence of flammable liquids, gases or dust.
Sparks generated by power tools may ignite the flammable material.
Keep children and bystanders at a safe distance while operating
the tool.
Distractions may cause loosing control.
Electrical Safety
The tool plug must match the power outlet. Never modify
the plug in any way. Do not use any adapter plugs with
grounded power tools.
Modified plugs and different power outlets increase the risk of electric shock.
Avoid body contact with grounded surfaces, such as pipes,
radiators, electric ranges and refrigerators.
The risk of electric shock increases if your body is grounded.
Do not expose the tool to rain or wet conditions.
Water entering into the tool increases the risk of electric shock.
Do not force the cord. Never use the cord to carry, lift or unplug
the tool. Keep the cord away from heat, oil, sharp edges or
moving parts.
Damaged or entangled cords increase the risk of electric shock.
When operating a tool outdoors, use an extension cord suitable
for outdoor use.
Using an adequate outdoor extension cord reduces the risk of electric shock.
If operating the tool in a damp location cannot be avoided, use
a ground fault circuit interrupter (GFCI) protected supply.
Using a GFCI reduces the risk of electric shock.
Personal safety
Stay alert, watch what you are doing and use common sense
when operating a tool. Do not use a power tool while you are
tired or under the influence of drugs, alcohol or medication.
A moment of distraction while operating the tool may result in personal injury.
Use personal protective equipment. Always wear eye
protection.
Protective equipment such as safety glasses, anti-dust mask, non-skid shoes,
hard hats and hearing protection used in the right conditions significantly
reduce personal injury.
Prevent unintentional starting up. Ensure the switch is in the
“OFF” position before connecting into the power source and /
or battery as well as when carrying the tool.
Transporting power tools with the finger on the switch or connecting power
tools with the switch in the “ON” position may cause accidents.
Remove any wrench or vice before turning the power tool on.
Wrenches or vices left attached to rotating parts of the tool may result in
personal injury.
Do not overreach. Keep proper footing and balance at all times.
This enables a better control on the tool during unexpected situations.
Dress properly. Do not wear loose clothing or jewelry. Keep
hair, clothes and gloves away from the moving parts.
Loose clothes or long hair may get caught in moving parts.
If you have dust extraction and recollection devices connected
onto the tool, inspect their connections and use them correctly.
Using these devices reduce dust-related risks.
Power Tools Use and Care
Do not force the tool. Use the adequate tool for your
application.
The correct tool delivers a better and safer job at the rate for which it was designed.
Do not use the tool if the switch is not working properly.
Any power tool that cannot be turned ON or OFF is dangerous and should be
repaired before operating.
Disconnect the tool from the power source and / or battery
before making any adjustments, changing accessories or
storing.
These measures reduce the risk of accidentally starting the tool.
Store tools out of the reach of children. Do not allow persons
that are not familiar with the tool or its instructions to
operate the tool.
Power tools are dangerous in the hands of untrained users.
The machine must not be used by children or persons with
reduced physical, sensory or mental capacities; nor by persons
with no experience or knowledge in its use, unless they are
supervised by a person responsible for their safety or have
received prior instructions on the use of the machine.
Children must be supervised to ensure that they do not play with the machine.
Service the tool. Check the mobile parts are not misaligned or
stuck. There should not be broken parts or other conditions that
may affect its operation. Repair any damage before using the
tool.
Most accidents are caused due to poor maintenance to the tools.
Keep the cutting accessories sharp and clean.
Cutting accessories in good working conditions are less likely to bind and are
easier to control.
Use the tool, components and accessories in accordance with
these instructions and the projected way to use it for the type of
tool when in adequate working conditions.
Using the tool for applications different from those it was designed for, could
result in a hazardous situation.
Use and care of the battery-operated tool
Recharge only with the charger specified by .
A charger that is suitable for one type of battery pack may create a risk of fire when
used with another battery pack.
Use power tools only with specifically designated battery packs.
Use of any other battery packs may create a risk of injury and fire.
When battery pack is not in use, keep it away from other metal
objects, like paper clips, coins, keys, nails, screws, or other
small metal objects, that can make a connection from one
terminal to another.
Shorting the battery terminals together may cause burns or a fire.
Under abusive conditions, liquid may be ejected from the
battery; avoid contact. If contact accidentally occurs, flush with
water. If liquid contacts eyes, additionally seek medical help.
Liquid ejected from the battery may cause irritation or burns.
ENGLISH
Chain
Cover
Sprocket
Wheel
Power
Switch
Motor
Cover Rear Handle
Base
Chain Tension
Knob
Chain Cover
Locking Lever
Chain
Cover
Mounting
Surface
Rear
Handle Low Kickback
saw chain
Oil Deposit
Cap
Front
Handle Switch
Lock
Guide Bar
Bar cover
Front Guard /
Chain Brake
Battery
receptacle (right)
Battery
receptacle (left)
Battery charger
Batteries

9
Preparation
ENGLISH
Considerations for the use of batteries
Batteries charge
• The batteries come DISCHARGED from the factory. They
will need to be charged for approximately 1.5 hours before
use.
• The normal charging temperature is from 32 °F to 113 °F.
Out of that range the load is suspended automatically until it
reaches the correct temperature, he normal discharge /
working temperature is 32 °F to 167 °F. If 167 °F is exceeded
the electronic control shuts off power to the tool until the
temperature reaches the optimum temperature range again.
When the battery is under normal voltage during work, the
tool stops working.
• Between each charge, give the charger 15 minutes of rest.
• In a hot environment or after prolonged use, the battery
may become too hot to recharge. Allow the battery to cool
down before attempting to recharge it.
1. Connect the charger plug into a 127 V~ .
2. Insert the batteries into the charger by sliding them in
as shown in the image. The red light should come on,
indicating that charging has started.
• When the batteries are fully charged, the green light will
turn on and the red light will turn off.
• Disconnect the charger from the mains after charging is
complete.
• If the red light flashes, it is a sign that the battery has a
heating delay; Wait until the battery temperature is in the
proper range before you can charge.
• The red light stays on exceeding the recommended
charging time or if the red and green light flash
alternately, it is a sign that the battery is defective; You
must replace it or go to an Authorized Service Center
1
2
• Once the batteries are charged, insert them into their
respective receptacles on both sides of the tool.
• Slide each battery into its socket until you hear a click to
make sure they are seated correctly.
• To remove the battery, press the latch (A) and slide the
battery out.
• To make sure the batteries are charged, press the
indicator button (B) next to each battery. The color of the
light indicates the charge level.
Batteries
• The tool is equipped with a system that
automatically stops the tool to prolong both its useful life and
that of the batteries, this happens in the following cases:
Overload. When the tool is forced, the battery consumes
abnormally high current levels. Suspend overexertion work
and turn the tool back on.
Overheating. Let the tool and battery cool before turning it
back on.
Over-discharge. The battery level is low. In this case,
remove the battery from the tool and charge it.
Tool/battery protection system
CAUTION
NOTE: Depending on the conditions of use and ambient
temperature, the indication may differ slightly from the
actual capacity.
Remaining battery capacity
Indicator
lamp
Illuminated
OFF
Green
Orange
Red
50% to 100%
Orange
Red
25% to 50%
Red
10% to 25%
A
B

c
o
n
t
r
a
g
o
l
p
e
10
• The chain brake (A) function is to stop quickly the chain
movement and protects the hand in case of kickback.
(See page 5). It is designed taking in consideration the
predictable movement of kickback, which sends the cut
bar upwards and towards the operator, so when the brake
is pushed with the left hand, the chain stops immediately.
• Test the chain brake every time you
turn on the chain saw and before you start cutting:
• With the motor running and pressing the trigger switch,
push with the back of your left hand the chain brake
towards the cut bar. When doing this
movement DO NOT let go the front handle. Just turn your
left hand forward until it touches the brake and push it.
• If for any reason the brake does not stop the chain, DO NOT
operate the chain saw. Turn it off and have it repaired in a
Authorized Service Center..
• If the brake is working properly, the cutting chain will stop immediately. To
disengage the brake, hold the upper side of the guard and pull towards you until
you hear it snap.
• Remember the chain saw brake does not prevent the kickback.
It is a safety device to avoid possible injury after the kickback happens.
• Keep in mind that even with the proper maintenance, in field use
conditions, the chain brake function cannot be considered totally safe. Be alert at all
times. Use adequate cutting techniques and always use the rest of the safety devices.
• This type of chain has cleaning teeth (depth gauge) placed before each cutting
tooth to prevent it enters too deeply into the wood and gets pinched causing the
kickback.
• To replace worn chains, use only Low-Kickback certified chains.
• Take into consideration that the chain wears out with regular
use or with the filing process. It loses its capability to lessen the possibility of
kickback, therefore; you need to use extra caution.
• When the working life of the cut bar (C) is finished, replace it
with an identical bar.
• The smaller the nose radius in the cut bar is, the capacity to
decrease the possibility of kickback will be less.
Cut Bar
Chain Brake
Low Kickback Chain (B)
Safety Devices
WARNING
WARNING
WARNING
WARNING
WARNING
WARNING
CAUTION
CAUTION
CAUTION
C
B
Changing Direction
of the Left Hand
to Activate the
Chain Brake A
ENGLISH

Bar and Chain Assembly
• Before mounting the bar and chain, familiarize yourself
with the operation of the chain slack adjustment knob
(B), which allows you to mount and adjust the cutter bar
without additional tools.
• The knob has two independent turning mechanisms:
the center one holds the bar cover (C) in place, while the
outer one adjusts the chain tension.
• To remove or secure the bar cover use the central
mechanism: keep the button (D) pressed to raise the
lever, then turn it to loosen or tighten (E).
• To loosen or tighten the chain tension turn the outer
mechanism of the knob (F).
Tension adjustment knob
11
E
C
D
B
F
Oil Supply
• Use oil for bars, chains and their lubrication systems,
specially designed to work in a wide range of
temperatures without any dilution. Using SAE 10W30 oil is
recommended.
• Oil level should be checked every 20 minutes through
the oil level window (A). The tank should be filled up
when the level is below the MIN mark.
• Do not use dirty, used or
contaminated oil. The oil pump, the bar or the chain
might get damaged.
• Clean the surface around the oil tank cap to avoid
contamination.
• Loosen slowly the oil tank cap.
• By carefully avoiding spills pour oil in the tank with the help
of an oil funnel.
• Before re-capping the oil tank, check and clean the joints.
• Place immediately the oil tank cap and tighten by hand.
• Clean any spilled oil.
CAUTION
Oil Supply for Cut Bar and Chain
A
ENGLISH

12
• Never start the motor before having
first assembled the cut bar, chain and chain cover.
Otherwise, the operator would be exposed to severe
personal injury.
• Remove the batteries.
• Pull back the chain brake to be sure it is in the operating
position (see page 10).
• To handle the chain safely and to avoid
cuts, use heavy-duty protective gloves.
• To remove the chain cover (E) lift the lever (D) as
indicated on page 11.
• Turn the lever anti-clockwise until it loosens its screw and
remove the cover (E).
Traction
Sprockets
Streighten
Displacement Direction
Cut
Sprockets Advance
Slot
Advance
Cut Bar
WARNING
CAUTION
D
E
• Set the chain flat on a flat and clean surface making an
oval shape near the cut bar and straighten any crooked
link. The cutting teeth should face the chain movement
direction, otherwise reverse the chain position.
• Set the chain traction sprockets in the bar groove.
• Place the chain so that is set loose in the rear side of the
bar.
Bar and Chain Assembly

13
I H
• Lift the bar with the chain and set it into the saw. Pass
the mounting knob (F) through the bar groove and the
loose space between the bar and the chain around the
sprocket wheel (G).
• Mount the chain cover and tighten the knob (H) just a
little bit to secure the chain cover. This way the bar is
released and then you can proceed with the chain
tightening.
Loose Chain
Adjusted Chain
Right tightness with
dilated chain
Bar and Chain Assembly
Chain Tightening
• Turn the chain tightening knob (I) until the chain is
snug against the bar and with the traction links inserted
in the bar groove.
• Lift the nose of the cut bar to look for any looseness in
the chain. If so, turn the knob again ½ turn to give more
tension to the chain. Repeat this process until no
looseness is present between the chain and the bar.
• Tighten the knob (H) firmly to secure the chain cover.
• To verify if the chain is not too tight, try moving it by
hand. If the chain gets stuck or is hard to move you need
to slightly loosen the knob to tighten the chain, only ¼ of
a turn. Lift the nose of the bar and tighten back the knob
to secure the chain cover before checking again the chain
tightness.
• To verify if the tightness of a chain that was dilated by the
heat produced while cutting is adequate, the distance
between the lower side of the cut bar and the chain links
must be 0,05” (J).
J1,3 mm
(0,05”)
When tensing a hot chain, it can tighten in
excess when it cools down. Verify the “cold tension”
before using it again.
F
G
ENGLISH
NOTICE

Start Up
14
• Double check the chain is not making contact with any
object.
• Keep the switch lock pressed (C) to unblock it (B).
The switch block prevents accidental startups.
• Press the switch lock (B) so that the chain starts
advancing.
Turning ON
• To stop the chain, release the trigger switch (B).
• It is normal that the chain keeps moving a couple of
seconds after releasing the trigger switch. As an additional
safety measure, activate the chain brake (see page 10).
Turning OFF
C
B
ENGLISH

Cutting operation
15
Cut Axis
Basic Cutting Procedures
If you lack of previous experience using chain saws and to
get familiar with its use, it is recommended to practice
sawing small logs (not smaller than 20 cm in diameter),
supported by a sawhorse and using the following
technique:
• Adopt a right posture facing the log. The chain saw
should be idle.
• Press the throttle trigger to get to the highest speed.
• Start cutting setting the bar onto the log.
• Keep the motor in high speed all the time.
• Allow the chain to do its job applying slight pressure
downwards with the chain saw. Never try to force the cut.
Otherwise, the chain, bar or motor might get damaged.
• Release the trigger switch as soon as finishing the cut.
You will avoid unnecessary wear in the chain, bar o motor.
Cutting Correct Position
• Both feet should be evenly set on firm ground. Your
body weight well balanced. The left foot should be slightly
forward from your right foot.
• Hold the chain saw as indicated in the Safety Standards
for Chain saws section (pg. 5).
• Keep your right arm straight; to stand the kickback
forces do not bend your elbow.
• Always keep the cut axis to your right; it keeps your
body free from the cut axis in case of kickback.
• To avoid tension in arms and back, keep the chain saw
close to your body.
• Do not try to hold the chain saw in a left-handed
position.
Cut Axis
Left arm straight
Cut Axis
ENGLISH

Felling and Bucking
16
Debris Area
First Cut
Third
Cut
Notch
Wedge
Hinge
Second Cut
45°
40°
180°
45°
Preparations to Fell
• Set ahead at least two escape paths. Clear the area from
any obstacle. The optimal escape path is 180° opposite to
the falling tree direction and with a 45° margin in both
sides.
• To estimate the how the tree will drop,
consider wind force and direction. Examine
the tree’s inclination and balance as well as
placement of the largest branches.
• Verify the tree has no dead branches,
which could fall onto you while cutting.
How to Fell Trees
• Cut a notch 1/3 of the trunk diameter on the side of the
tree in the direction of falling.
• The notch takes two cuts. The first one is horizontal and
the second one at 40°.
• It is important to make the cuts in that
order to avoid wood residues pinching and trapping the
bar and being shot with force onto any direction.
• The third cut is made opposite to the notch side. Must
be horizontal and placed at 2” above the horizontal cut in
the notch but not reaching it. Leave 1/10 diameter of trunk
between the notch and the third cut to make a “hinge”.
This guides the falling tree and avoids unexpected
trajectories or violent separation from its stump.
• To avoid the uncontrolled falling of the
tree, never reach the notch with third cut.
• When cutting trees with a large diameter, stop the rear
cut before reaching such a depth that will make the tree
to sit and trap the bar.
• Before going on with the cut, fit a plastic or wood wedge
into the cut to keep it open.
Felling Restrictions. Do not attempt this EVER!
• Do not cut down trees under heavy rain or while strong winds are blowing. Wait for suitable weather.
• Do not cut down trees when people or animals are in the area. The safe distance standards for passersby are explained
in “When Using the Chain saw” on the Safety Standards for Chain saws section; page 6.
• Do not cut down trees without estimating first an escape path. Avoid getting crushed by the felled tree!
• Do not cut extremely slender trees.
• Do not cut big trees with dead branches, loose bark or hollow trunks.
Professional loggers operating heavy log pushing or dragging equipment is needed.
• Do not cut trees near power lines or buildings.
Felling Route
Safest Escape Path
Limits for Felling Trees. Leave this job to professionals!
E
s
c
a
p
e
S
c
o
p
e
CAUTION
CAUTION
• Inserting the wedges may be enough to the tree.
Otherwise you need to insert the bar nose to continue to
cut without removing the wedges until the “hinge” is
made.
• Introducing the bar nose into the cut
must be performed only by professionals.
• Once the tree starts to fall, turn off the saw and
immediately set it on the ground. Move down your
optimal escape path. Be alert all the time in case of
contingency.
• While making the third cut pay
attention to the behavior of the crown to verify the tree
falls in the programmed direction. If for any reason the
tree starts falling in the wrong direction or the chain saw
is pinched in the falling tree, drop it and run for your life!
WARNING
WARNING
F
a
l
l
i
n
g
r
o
u
t
e
1/3 of
theTrunk
1/10 of the trunk
5 cm (2”)
ENGLISH

17
• While cutting large trunks it is useful to use wedges into
the cut to prevent the bar from being pinched by the
trunk when it sits into place.
• If the trunk diameter is too large, it will be necessary to
fit the bar nose into the trunk to keep on cutting without
removing the wedges until finishing.
Introducing the bar nose into the cut
must be performed only by professionals.
• Bucking is when cutting a tree limb after being felled.
• While bucking, cut only one trunk at a time.
• To cut small branches support them on a sawhorse or
between two larger trunks.
• If the ground in the bucking area is
uneven stand in the higher side to avoid being run over
by the cut branches.
• Stay alert all the time. Oftentimes it is
difficult to predict the direction the branches will take
when cut. Also, sometimes it is not possible avoid the bar
from being pinched.
First Cut
Second Cut
Anchor Root
Sawhorse
Wedge
Load
Load
Felling and Bucking
Anchor Root Cutting
• Anchor roots are those roots that stick out too much
from the ground. When they are too big may make the
felling job too difficult. They must be removed before
felling.
• First, make a horizontal cut through the root, some
centimeter up the ground.
• Then make a downward vertical cut and leveled to the
trunk to separate the root and to the bar from being
pinched.
• It is important to make the cuts in that
order to avoid wood residues pinching and trapping the
bar, and being shot with force onto any direction.
WARNING
WARNING
WARNING
CAUTION
Bucking
Bucking with a Wedge
• Make the first cut at 1/3 depth of the trunk diameter. Then make a 2/3 depth cut on the opposite side. See the diagram to
determine where to make the first cut and to avoid the bar from being pinched by the trunk weight.
Bucking Trunks under Tension
First Cut
(1/3)
Final
Cut
Final Cut
First Cut
(1/3)
ENGLISH

18
Bucking the
Top of the Trunk Bucking Below
the Trunk
Reaction Reaction
Felling and Bucking
Cutting Branches and Pruning
T
e
n
s
i
o
n
R
e
l
e
a
s
e
Bucking the Top of the Trunk
• Setting the lower side of the bar against the trunk, start
cutting the upper side of the trunk.
• Apply pressure downwards.
• Stay alert to the chain saw reaction force.
It will pull it towards the trunk.
• Felling, the same as trimming and pruning, should be
done slowly and very carefully and following the Safety
Standards (see pages 5 and 6).
• When cutting a branch keep the tree between you and
the chain saw.
• Never cut branches standing on top of
a ladder, hanging from the tree or standing onto a
platform or trunk. It is extremely dangerous. Let the
professional people take care of the branches you cannot
reach standing on the ground and above your chest.
CAUTION
Bucking Below the Trunk
• Setting the upper side of the bar against the trunk, start
cutting the lower side of the trunk.
• Apply slight pressure upwards.
• Stay alert to the chain saw reaction force.
It will pull it towards the trunk.
Cutting Operation
• To avoid the falling branch to pull out the bark from the
tree do not cut level with the trunk.
• Make the first cut at 1/3 depth of the branch diameter.
Then make a second cut at 2/3 depth of the branch
diameter in the opposite side.
• Finish cutting the branch with a third cut, this time level
with the trunk to allow the bark to grow back and seal the
cut.
• When the branch is too thick cut sections to avoid a
violent detachment.
Spring Poles
• Spring poles are any trunk, branch or young tree being
held down by the pressure of a second trunk or branch,
accumulating tension and releasing great force if the
pressure is released.
• Spring poles are very dangerous. They
can hit the operator causing severe injury and/or causing
to lose control of the chain saw. Be always aware of that
possibility.
CAUTION
DANGER
DANGER
First Cut
(1/3) deep
Spring Pole
Final
Cut
Second cut
(2/3) deep
Load
ENGLISH

19
Chain saw Chain Maintenance
Sharpening of the Chain
• The chain needs sharpening if the wood shavings
generated when cutting are small and dusty; when
needing to force the bar trough the wood or when the
chain is cutting sideways.
• Sharpening of the chain must be done with the chain
mounted and tight on the bar (see page 11) and with the
chain saw shut off.
• Use a 5/32” (4 mm) round file.
• Be careful to file all the teeth to the
angles specified in the image being careful to give them
the same length. Only uniform teeth get a safe and right
cut.
• Sharpen all the teeth, one by one. First those on the
right side, then, those on the left side. To travel from one
tooth to the other move the chain little by little so each
time you file a tooth it should sit in the middle of the bar.
• Keep the file level with the upper top-plate in the tooth.
Keep the file from leaning or balancing. Apply slight but
firm pressure moving only to the front of the tooth.
Remove the file each time you move back.
• Give each tooth a few passes.
• Remove the steel shavings produced while filing with a
wire brush.
• Using the chain saw with a badly
sharpened or dull chain at high speed could damage the
motor.
• Operating the chain saw with the
wrong or blunt chain increases the risk of kickback.
• Using the chain saw with a damaged
chain may cause severe injury.
• The chain is very sharp. Use
heavy-duty protective gloves.
• If the cutting chain is dull due to
contact with nails, stones or sand and mud present in the
wood, have it re-sharpened by a
Authorized Service Center.
• To make smooth and fast cuts, the cutting chain needs
maintenance periodically.
• Shut off the chain saw before maintenance and service.
• Use heavy-duty protective gloves.
Adjustments and Maintenance
CAUTION
CAUTION
CAUTION
WARNING
WARNING
WARNING
WARNING
Top Plate Top Plate
Right Hand
Cutting Edge
Top Plate
Cutting Edge
Top Plate
Cutting Edge
Left Hand
Cutting Edge
Toe
Chain Axis Chain Axis
Chain Direction
Rivet
Depth
Gauge
Groove Groove
Basic
Tooth
Body
Basic
Tooth
Body
Heel Heel
Toe
Depth
Gauge
Right Hand
Cutter Link
Top Plate
Cutting Edge
Correct Filing Angle
Filing
Direction
Left Hand
Cutter Link
30°
30°
80°
Any angle different from the one
specified causes damage to the motor, bar and chain, and
increases the risk of violent kickback.
ENGLISH

20
Direction
Cutting Link
Depth Gauge
Depth
Gauge
Flat
File
Depth Gauge
Jointing Tool
Adjustments and Maintenance
A
B
Chain Depth Gauge
Bar Maintenance
• The chain has cleaning teeth (Depth Gauge) placed in
front of each tooth. Their design avoids getting too deep
into the wood getting pinched and causing kickback.
• Depth gauges should be checked each time you file the
chain in order to get the correct height in the top plate.
• The difference in height on the depth gauge and the top
plate should always be 0,025” (0,6 mm).
• If due to normal wear / or filing of the chain the
difference is less, use a calibrating instrument and a flat
file to even and verify the difference to 0,025” (0,6 mm).
• File only the depth gauges. Do it towards the same
direction as of the adjacent tooth being careful not to
touch its cutting edge.
• After matching the difference on all the cleaning teeth,
file each one and restore the original rounded shape (A).
• The cutting bar has to be cleaned in the end of the work
day and checked closely to identify wear and possible
damage.
• The appearance of minute grooves or bumps in the bar
rails is due to normal wear and should be smoothed
down with a file as soon as identified.
• Clean debris from the lubrication orifice and the chain slot.
• After a week working with the chain saw, reverse the bar
to distribute its normal wear and maximize its useful life (B).
• After a week working with the chain saw lubricate the
bar if it has a sprocket wheel in the nose. Use a grease
syringe to apply the lubricant into the lubrication orifice.
• If the rail has such wear that is not allowing the chain to
rest in its side, if widened or broken; or the bar is bent,
replace it with a new one.
0,6 mm
(0,025”)
ENGLISH

21
Adjustments and Maintenance
Troubleshooting
Chain saw Storage
When storing the chain saw for a month or longer
consider the following:
• Drain the bar and chain oil tank completely into an
approved oil container.
• Clean the chain saw thoroughly.
• Store the unit in a ventilated area, away from corrosive
agents such as garden chemical products or deicing salts.
Keep it away from children.
Lubrication
The tool bearings have high grade lubricant and when
used under regular conditions it lubricates for life. No
lubrication needed.
• Never try to start the motor if ALL the
chain saw parts are not assembled in place. Otherwise,
the parts may fracture and be shot towards the operator.
It also damages the tool and makes the warranty void.
WARNING
• Remember to disconnect the tool before cleaning or
maintenance.
• TAll the tool components are an important part of the
insulating system and should only receive maintenance in
a Authorized Service Center.
• EVERY TIME you service the tool ask for original
spare parts.
• When cleaning the plastic parts, do not use solvents.
Most of the plastic materials are susceptible to damage
when using commercial solvents.
• To clean sooth, coal or dust; use a clean cloth or
pressurized air.
A DVERTENNEVER expose to brake fluid,
petroleum based products, penetrating oils, etc. They are
made of chemical substances that could damage or
destroy plastic.
When using pressurized air to clean
particles ALWAYS use safety eyeglasses with lateral
protection or a facemask. If there is too much dust, use a
dust mask as well.
• It is not advisable to use this tool for large jobs with
fiberglass, gypsum wallboard, plaster or gypsum. Their
particles are highly abrasive to components on any power
tool.
WARNING
WARNING
Bar and chain are too
hot and give off
smoke.
The motor starts and
runs but the chain is
not moving.
The motor starts and
runs; the chain moves
but is not cutting.
• The oil tank in the chain is empty.
• Too much tension in the chain.
• The chain brake is activated.
• Too much tension in the chain.
• The chain and the cutting bar are not
properly assembled.
• The chain and / or bar is damaged.
• The chain is dull.
• The chain is assembled the wrong way.
• Fill up the oil tank. Remember too fill up every
time the level is below the “MIN” mark.
• Reduce the chain tension. (See page 13).
• Release the chain brake. (See page 10).
• Reduce tension in the chain. (See page 13).
• Chain and bar need to be assembled correctly.
(See pages 12 and 13).
• Replace and assemble similar chain and / or bar.
• File the chain. (See page 19).
• Assemble the chain in the right direction.
Problem Cause Solution
ENGLISH

22
Notes
ENGLISH

23
ENGLISH
Authorized Service Centers
In the event of any problem contacting a Truper Authorized Service Center, please see our webpage www.truper.com
to get an updated list, or call our toll-free numbers 800 690-6990 or 800-018-7873 to get information about the
nearest Service Center.
AGUASCALIENTES
BAJA
CALIFORNIA
BAJA
CALIFORNIA SUR
CAMPECHE
CHIAPAS
CHIHUAHUA
CIUDAD DE
MÉXICO
COAHUILA
COLIMA
DURANGO
ESTADO DE
MÉXICO
GUANAJUATO
GUERRERO
HIDALGO
JALISCO
MICHOACÁN
MORELOS
NAYARIT
NUEVO LEÓN
OAXACA
PUEBLA
QUERÉTARO
QUINTANA ROO
SAN LUIS
POTOSÍ
SINALOA
SONORA
TABASCO
TAMAULIPAS
TLAXCALA
VERACRUZ
YUCATÁN
DE TODO PARA LA CONSTRUCCIÓN
GRAL. BARRAGÁN #1201, COL. GREMIAL, C.P. 20030,
AGUASCALIENTES, AGS. TEL.: 449 994 0537
SUCURSAL TIJUANA
AV. LA ENCANTADA, LOTE #5, PARQUE INDUSTRIAL EL
FLORIDO II, C.P 22244, TIJUANA, B.C.
TEL.: 664 969 5100
FIX FERRETERÍAS
FELIPE ÁNGELES ESQ. RUIZ CORTÍNEZ S/N, COL. PUEBLO
NUEVO, C.P. 23670, CD. CONSTITUCIÓN, B.C.S.
TEL.: 613 132 1115
TORNILLERÍA Y FERRETERÍA AAA
AV. ÁLVARO OBREGÓN #324, COL. ESPERANZA
C.P. 24080 CAMPECHE, CAMP. TEL.: 981 815 2808
FIX FERRETERÍAS
AV. CENTRAL SUR #27, COL. CENTRO, C.P. 30700,
TAPACHULA, CHIS. TEL.: 962 118 4083
SUCURSAL CHIHUAHUA
AV. SILVESTRE TERRAZAS #128-11, PARQUE INDUSTRIAL
BAFAR, CARRETERA MÉXICO CUAUHTÉMOC, C.P. 31415,
CHIHUAHUA, CHIH. TEL. 614 434 0052
FIX FERRETERÍAS
EL MONSTRUO DE CORREGIDORA, CORREGIDORA # 35,
COL. CENTRO, C.P. 06060, CUAUHTÉMOC, CDMX.
TEL: 55 5522 5031 / 5522 4861
SUCURSAL TORREÓN
CALLE METAL MECÁNICA #280, PARQUE INDUSTRIAL
ORIENTE, C.P. 27278, TORREÓN, COAH.
TEL.: 871 209 68 23
BOMBAS Y MOTORES BYMTESA DE MANZANILLO
BLVD. MIGUEL DE LA MADRID #190, COL. 16 DE
SEPTIEMBRE, C.P. 28239, MANZANILLO, COL.
TEL.: 314 332 1986 / 332 8013
TORNILLOS ÁGUILA, S.A. DE C.V.
MAZURIO #200, COL. LUIS ECHEVERRÍA, DURANGO,
DGO.TEL.: 618 817 1946 / 618 818 2844
SUCURSAL CENTRO JILOTEPEC
PARQUE INDUSTRIAL # 1, COL. PARQUE INDUSTRIAL
JILOTEPEC, JILOTEPEC, EDO. DE MÉX. C.P. 54257
TEL: 761 782 9101 EXT. 5728 Y 5102
CÍA. FERRETERA NUEVO MUNDO S.A. DE C.V.
AV. MÉXICO - JAPÓN #225, CD. INDUSTRIAL, C.P. 38010,
CELAYA, GTO. TEL.: 461 617 7578 / 79 / 80 / 88
CENTRO DE SERVICIO ECLIPSE
CALLE PRINCIPAL MZ.1 LT. 1, COL. SANTA FE, C.P. 39010,
CHILPANCINGO, GRO. TEL.: 747 478 5793
FERREPRECIOS S.A. DE C.V.
LIBERTAD ORIENTE #304 LOCAL 30, INTERIOR DE PASAJE
ROBLEDO, COL. CENTRO, C.P. 43600, TULANCINGO,
HGO. TEL.: 775 753 6615 / 775 753 6616
SUCURSAL GUADALAJARA
AV. ADOLFO B. HORN # 6800, COL: SANTA CRUZ DEL
VALLE, C.P.: 45655, TLAJOMULCO DE ZUÑIGA, JAL.
TEL.: 33 3606 5285 AL 90
FIX FERRETERÍAS
AV. PASEO DE LA REPÚBLICA #3140-A, COL.
EX-HACIENDA DE LA HUERTA, C.P. 58050, MORELIA,
MICH. TEL.: 443 334 6858
FIX FERRETERÍAS
CAPITÁN ANZURES #95, ESQ. JOSÉ PERDIZ, COL.
CENTRO, C.P. 62740, CUAUTLA, MOR.
TEL.: 735 352 8931
HERRAMIENTAS DE TEPIC
MAZATLAN #117, COL. CENTRO, C.P. 63000, TEPIC, NAY.
TEL.: 311 258 0540
SUCURSAL MONTERREY
CARRETERA LAREDO #300, 1B MONTERREY PARKS,
COLONIA PUERTA DE ANÁHUAC, C.P. 66052, ESCOBEDO,
NUEVO LEÓN, TEL.: 81 8352 8791 / 81 8352 8790
FIX FERRETERÍAS
AV. 20 DE NOVIEMBRE #910, COL. CENTRO, C.P. 68300,
TUXTEPEC, OAX. TEL.: 287 106 3092
SUCURSAL PUEBLA
AV PERIFÉRICO #2-A, SAN LORENZO ALMECATLA,
C.P. 72710, CUAUTLACINGO, PUE.
TEL.: 222 282 8282 / 84 / 85 / 86
ARU HERRAMIENTAS S.A DE C.V.
AV. PUERTO DE VERACRUZ #110, COL. RANCHO DE
ENMEDIO, C.P. 76842, SAN JUAN DEL RÍO, QRO.
TEL.: 427 268 4544
FIX FERRETERÍAS
CARRETERA FEDERAL MZ. 46 LT. 3 LOCAL 2, COL EJIDAL,
C.P. 77710 PLAYA DEL CARMEN, Q.R.
TEL.: 984 267 3140
FIX FERRETERÍAS
AV. UNIVERSIDAD #1850, COL. EL PASEO, C.P. 78320,
SAN LUIS POTOSÍ, S.L.P. TEL.: 444 822 4341
SUCURSAL CULIACÁN
AV. JESÚS KUMATE SUR #4301, COL. HACIENDA DE LA
MORA, C.P. 80143, CULIACÁN, SIN.
TEL.: 667 173 9139 / 173 8400
FIX FERRETERÍAS
CALLE 5 DE FEBRERO #517, SUR LT. 25 MZ. 10, COL.
CENTRO, C.P. 85000, CD. OBREGÓN, SON.
TEL.: 644 413 2392
SUCURSAL VILLAHERMOSA
CALLE HELIO LOTES 1, 2 Y 3 MZ. #1, COL. INDUSTRIAL,
2A ETAPA, C.P. 86010, VILLAHERMOSA, TAB.
TEL.: 993 353 7244
VM ORINGS Y REFACCIONES
CALLE ROSITA #527 ENTRE 20 DE NOVIEMBRE Y GRAL.
RODRÍGUEZ, FRACC. REYNOSA, C.P. 88780, REYNOSA,
TAMS. TEL.: 899 926 7552
SERVICIOS Y HERRAMIENTAS INDUSTRIALES
PABLO SIDAR #132, COL . BARRIO DE SAN BARTOLOMÉ,
C.P. 90970, SAN PABLO DEL MONTE, TLAX.
TEL.: 222 271 7502
LA CASA DISTRIBUIDORA TRUPER
BLVD. PRIMAVERA. ESQ. HORTENSIA S/N, COL.
PRIMAVERA C.P. 93308, POZA RICA, VER.
TEL.: 782 823 8100 / 826 8484
SUCURSAL MÉRIDA
CALLE 33 #600 Y 602, LOCALIDAD ITZINCAB Y MULSAY,
MPIO. UMÁN, C.P. 97390, MÉRIDA, YUC.
TEL.: 999 912 2451

24
102491 MAX-40M
www.truper.com
06-2022
ENGLISH
Warranty
policy
Code Model Brand
Stamp of the business. Delivery date:
Warranty. Duration: 5 year. Coverage: parts, components and workmanship against manufacturing or operating
defects, except if used under conditions other than normal; when it was not operated in accordance with the
instructive; was altered or repaired by personnel not authorized by Truper®. To make the warranty valid, only
present the product in the establishment where you bought it or in Corregidora 35, Centro, Cuauhtémoc, CDMX,
06060, where you can also purchase parts, components, consumables and accessories. The costs of
transportation of the product that derive from its fulfillment of its service network are included. Truper will not
require any proof of purchase to make the warranty effective. Phone number 800-018-7873. Made in China.
Imported by Truper, S.A. de C.V. Parque Industrial 1, Parque Industrial Jilotepec, Jilotepec, Edo. de Méx.
C.P. 54257, Phone number 761 782 9100.

24 ESPAÑOL
102491 MAX-40M
Póliza de
Garantía
www.truper.com
06-2022
Código Modelo Marca
Sello del establecimiento comercial. Fecha de entrega:
Garantía. Duración: 5 años. Cobertura: piezas, componentes y mano de obra contra defectos de fabricación o
funcionamiento, excepto si se usó en condiciones distintas a las normales; cuando no fue operado conforme
instructivo; fue alterado o reparado por personal no autorizado por Truper®. Para hacer efectiva la garantía
únicamente presente el producto en el establecimiento donde lo compró o en Corregidora 35, Centro,
Cuauhtémoc, CDMX, 06060, donde también podrá adquirir partes, componentes, consumibles y accesorios.
Incluye los gastos de transportación del producto que deriven de su cumplimiento de su red de servicio. Truper
no solicitará ningún tipo de comprobante de pago para hacer efectiva la garantía. Tel. 800-018-7873. Made
in/Hecho en China. Importador Truper, S.A. de C.V. Parque Industrial 1, Parque Industrial Jilotepec, Jilotepec, Edo.
de Méx. C.P. 54257, Tel. 761 782 9100.

En caso de tener algún problema para contactar un Centro de Servicio Autorizado Truper
®
consulte nuestra página
www.truper.com donde obtendrá un listado actualizado, o llame al: 800 690 6990 u 800-018-7873 donde le
informarán cuál es el Centro de Servicio más cercano.
AGUASCALIENTES
BAJA
CALIFORNIA
BAJA
CALIFORNIA SUR
CAMPECHE
CHIAPAS
CHIHUAHUA
CIUDAD DE
MÉXICO
COAHUILA
COLIMA
DURANGO
ESTADO DE
MÉXICO
GUANAJUATO
GUERRERO
HIDALGO
JALISCO
MICHOACÁN
MORELOS
NAYARIT
NUEVO LEÓN
OAXACA
PUEBLA
QUERÉTARO
QUINTANA ROO
SAN LUIS
POTOSÍ
SINALOA
SONORA
TABASCO
TAMAULIPAS
TLAXCALA
VERACRUZ
YUCATÁN
DE TODO PARA LA CONSTRUCCIÓN
GRAL. BARRAGÁN #1201, COL. GREMIAL, C.P. 20030,
AGUASCALIENTES, AGS. TEL.: 449 994 0537
SUCURSAL TIJUANA
AV. LA ENCANTADA, LOTE #5, PARQUE INDUSTRIAL EL
FLORIDO II, C.P 22244, TIJUANA, B.C.
TEL.: 664 969 5100
FIX FERRETERÍAS
FELIPE ÁNGELES ESQ. RUIZ CORTÍNEZ S/N, COL. PUEBLO
NUEVO, C.P. 23670, CD. CONSTITUCIÓN, B.C.S.
TEL.: 613 132 1115
TORNILLERÍA Y FERRETERÍA AAA
AV. ÁLVARO OBREGÓN #324, COL. ESPERANZA
C.P. 24080 CAMPECHE, CAMP. TEL.: 981 815 2808
FIX FERRETERÍAS
AV. CENTRAL SUR #27, COL. CENTRO, C.P. 30700,
TAPACHULA, CHIS. TEL.: 962 118 4083
SUCURSAL CHIHUAHUA
AV. SILVESTRE TERRAZAS #128-11, PARQUE INDUSTRIAL
BAFAR, CARRETERA MÉXICO CUAUHTÉMOC, C.P. 31415,
CHIHUAHUA, CHIH. TEL. 614 434 0052
FIX FERRETERÍAS
EL MONSTRUO DE CORREGIDORA, CORREGIDORA # 35,
COL. CENTRO, C.P. 06060, CUAUHTÉMOC, CDMX.
TEL: 55 5522 5031 / 5522 4861
SUCURSAL TORREÓN
CALLE METAL MECÁNICA #280, PARQUE INDUSTRIAL
ORIENTE, C.P. 27278, TORREÓN, COAH.
TEL.: 871 209 68 23
BOMBAS Y MOTORES BYMTESA DE MANZANILLO
BLVD. MIGUEL DE LA MADRID #190, COL. 16 DE
SEPTIEMBRE, C.P. 28239, MANZANILLO, COL.
TEL.: 314 332 1986 / 332 8013
TORNILLOS ÁGUILA, S.A. DE C.V.
MAZURIO #200, COL. LUIS ECHEVERRÍA, DURANGO,
DGO.TEL.: 618 817 1946 / 618 818 2844
SUCURSAL CENTRO JILOTEPEC
PARQUE INDUSTRIAL # 1, COL. PARQUE INDUSTRIAL
JILOTEPEC, JILOTEPEC, EDO. DE MÉX. C.P. 54257
TEL: 761 782 9101 EXT. 5728 Y 5102
CÍA. FERRETERA NUEVO MUNDO S.A. DE C.V.
AV. MÉXICO - JAPÓN #225, CD. INDUSTRIAL, C.P. 38010,
CELAYA, GTO. TEL.: 461 617 7578 / 79 / 80 / 88
CENTRO DE SERVICIO ECLIPSE
CALLE PRINCIPAL MZ.1 LT. 1, COL. SANTA FE, C.P. 39010,
CHILPANCINGO, GRO. TEL.: 747 478 5793
FERREPRECIOS S.A. DE C.V.
LIBERTAD ORIENTE #304 LOCAL 30, INTERIOR DE PASAJE
ROBLEDO, COL. CENTRO, C.P. 43600, TULANCINGO,
HGO. TEL.: 775 753 6615 / 775 753 6616
SUCURSAL GUADALAJARA
AV. ADOLFO B. HORN # 6800, COL: SANTA CRUZ DEL
VALLE, C.P.: 45655, TLAJOMULCO DE ZUÑIGA, JAL.
TEL.: 33 3606 5285 AL 90
FIX FERRETERÍAS
AV. PASEO DE LA REPÚBLICA #3140-A, COL.
EX-HACIENDA DE LA HUERTA, C.P. 58050, MORELIA,
MICH. TEL.: 443 334 6858
FIX FERRETERÍAS
CAPITÁN ANZURES #95, ESQ. JOSÉ PERDIZ, COL.
CENTRO, C.P. 62740, CUAUTLA, MOR.
TEL.: 735 352 8931
HERRAMIENTAS DE TEPIC
MAZATLAN #117, COL. CENTRO, C.P. 63000, TEPIC, NAY.
TEL.: 311 258 0540
SUCURSAL MONTERREY
CARRETERA LAREDO #300, 1B MONTERREY PARKS,
COLONIA PUERTA DE ANÁHUAC, C.P. 66052, ESCOBEDO,
NUEVO LEÓN, TEL.: 81 8352 8791 / 81 8352 8790
FIX FERRETERÍAS
AV. 20 DE NOVIEMBRE #910, COL. CENTRO, C.P. 68300,
TUXTEPEC, OAX. TEL.: 287 106 3092
SUCURSAL PUEBLA
AV PERIFÉRICO #2-A, SAN LORENZO ALMECATLA,
C.P. 72710, CUAUTLACINGO, PUE.
TEL.: 222 282 8282 / 84 / 85 / 86
ARU HERRAMIENTAS S.A DE C.V.
AV. PUERTO DE VERACRUZ #110, COL. RANCHO DE
ENMEDIO, C.P. 76842, SAN JUAN DEL RÍO, QRO.
TEL.: 427 268 4544
FIX FERRETERÍAS
CARRETERA FEDERAL MZ. 46 LT. 3 LOCAL 2, COL EJIDAL,
C.P. 77710 PLAYA DEL CARMEN, Q.R.
TEL.: 984 267 3140
FIX FERRETERÍAS
AV. UNIVERSIDAD #1850, COL. EL PASEO, C.P. 78320,
SAN LUIS POTOSÍ, S.L.P. TEL.: 444 822 4341
SUCURSAL CULIACÁN
AV. JESÚS KUMATE SUR #4301, COL. HACIENDA DE LA
MORA, C.P. 80143, CULIACÁN, SIN.
TEL.: 667 173 9139 / 173 8400
FIX FERRETERÍAS
CALLE 5 DE FEBRERO #517, SUR LT. 25 MZ. 10, COL.
CENTRO, C.P. 85000, CD. OBREGÓN, SON.
TEL.: 644 413 2392
SUCURSAL VILLAHERMOSA
CALLE HELIO LOTES 1, 2 Y 3 MZ. #1, COL. INDUSTRIAL,
2A ETAPA, C.P. 86010, VILLAHERMOSA, TAB.
TEL.: 993 353 7244
VM ORINGS Y REFACCIONES
CALLE ROSITA #527 ENTRE 20 DE NOVIEMBRE Y GRAL.
RODRÍGUEZ, FRACC. REYNOSA, C.P. 88780, REYNOSA,
TAMS. TEL.: 899 926 7552
SERVICIOS Y HERRAMIENTAS INDUSTRIALES
PABLO SIDAR #132, COL . BARRIO DE SAN BARTOLOMÉ,
C.P. 90970, SAN PABLO DEL MONTE, TLAX.
TEL.: 222 271 7502
LA CASA DISTRIBUIDORA TRUPER
BLVD. PRIMAVERA. ESQ. HORTENSIA S/N, COL.
PRIMAVERA C.P. 93308, POZA RICA, VER.
TEL.: 782 823 8100 / 826 8484
SUCURSAL MÉRIDA
CALLE 33 #600 Y 602, LOCALIDAD ITZINCAB Y MULSAY,
MPIO. UMÁN, C.P. 97390, MÉRIDA, YUC.
TEL.: 999 912 2451
23
ESPAÑOL
Centros de Servicio Autorizados

22
Notas
ESPAÑOL

21
Ajustes y mantenimiento
Solución de problemas
Almacenamiento de la motosierra
En caso de que almacene la motosierra durante un mes o
más, tome en cuenta las siguientes consideraciones:
• Drene todo el contenido del tanque de aceite de la barra
y la cadena en un recipiente de uso aprobado para aceite.
• Limpie la motosierra por completo.
• Almacene la unidad en un espacio ventilado, apartado
de agentes corrosivos como productos químicos para
jardín o sales para derretir hielo y lejos del alcance de los
niños.
Lubricación
Los rodamientos de la herramienta tienen lubricante de
alto grado para mantenerla lubricada de por vida cuando
se usa en condiciones normales. No requiere lubricación.
• Jamás intente arrancar el motor
sin TODAS las partes de la motosierra montadas
firmemente cada una en su lugar correspondiente.
De lo contrario las piezas pueden fracturarse y ser
disparadas hacia el operador, además de estropear
la motosierra e invalidar la garantía.
ADVERTENCIA
• Recuerde remover las baterías de la herramienta antes
de limpiarla o darle mantenimiento.
• Todos los componentes de la herramienta son parte
importante del sistema de aislamiento y solamente se les
debe dar mantenimiento en un Centro de Servicio
Autorizado .
• Cuando mande la herramienta a mantenimiento, pida
SIEMPRE refacciones originales .
• Cuando limpie las partes de plástico, evite usar
solventes. La mayoría de los materiales plásticos son
susceptibles a dañarse con varios tipos de solventes
comerciales.
• Para limpiar suciedad, carbón o polvo use un trapo
limpio o aire a presión.
A DVERTENCIANUNCA se debe poner la
herramienta en contacto con aceite para frenos,
productos con base de petróleo, aceites penetrantes, etc.
Contienen substancias químicas que pueden dañar o
destruir el plástico.
Cuando use aire a presión para
limpiar partículas use SIEMPRE lentes de seguridad con
protectores laterales o careta, en caso de expulsar mucho
polvo, use también una mascarilla contra polvo.
• No es recomendable que esta herramienta se use para
trabajos extensos en materiales de fibra de vidrio, cartón
de yeso, emplastecidos o yeso, ya que sus partículas son
altamente abrasivas para los componentes de cualquier
herramienta eléctrica.
ADVERTENCIA
ADVERTENCIA
La barra y la cadena
están muy calientes y
despiden humo.
El motor arranca y
funciona, pero la
cadena no avanza.
El motor arranca y
funciona, la cadena
avanza pero no corta.
• El tanque de aceite de la cadena esta vacío.
• La cadena está demasiado tensa.
• El freno de la cadena está activado.
• La cadena está demasiado tensa.
• La cadena y la barra de corte no están bien
ensambladas.
• La cadena y/o la barra de corte están
dañadas.
• La cadena está desafilada.
• La cadena está montada al revés.
• Llene el tanque de aceite. Recuerde que debe
ser llenado cada vez que el nivel esté por debajo
de la marca “MIN”.
• Disminuya el tensado de la cadena (consulte la
página 13).
• Desactive el freno de la cadena (consulte la
página 10).
• Disminuya el tensado de la cadena (consulte la
página 13).
• Ensamble adecuadamente la cadena y la barra
de corte (consulte las páginas 12 y 13).
• Reemplace la cadena y/o la barra de corte por
otra(s) igual(es).
• Afile la cadena (consulte la página 19).
• Monte de nuevo la cadena con la dirección
correcta.
Problema Causa Solución
ESPAÑOL

Avance
Calibre de profundidad
del eslabón de corte Calibre de
profundidad
Lima
plana
Igualador de
calibre de
profundidad
Ajustes y mantenimiento
A
B
Calibre de profundidad de la cadena
Mantenimiento de la barra de corte
• La cadena cuenta con dientes limpiadores (calibres de
profundidad) situados adelante de cada diente de corte
para evitar que estos entren demasiado en la madera y se
atasquen generando un contragolpe.
• Los calibres de profundidad deben de ser revisados
cada vez que afile la cadena para verificar que tengan la
altura adecuada con respecto a la placa superior de los
dientes de corte.
• La diferencia en la altura de los calibres de profundidad
y los dientes de corte debe de ser siempre de 0,6 mm
(0,025”).
• Si por el desgaste normal y/o afilado de la cadena la
diferencia es menor, utilice un instrumento de calibración
de profundidad y una lima plana para igualar y verificar la
diferencia a 0,6 mm (0,025”).
• Lime sólo los calibres de profundidad. Hágalo en la
misma dirección en que limó el diente de corte adyacente
teniendo cuidado de no tocar su esquina de corte.
• Después de igualar la diferencia de todos los dientes
limpiadores lime cada uno para devolverles su forma
original redondeando su parte frontal (A).
• La barra de corte debe de ser limpiada al final de la
jornada de trabajo y también debe ser revisada minuciosa-
mente para identificar su desgaste o posibles daños.
• La aparición de minúsculos surcos o protuberancias en
los rieles de la barra se deben a un desgaste normal por
el uso de la motosierra, que deben de alisarse con una
lima en cuanto sean identificados.
• Limpie todas las impurezas del orificio de lubricación y
la ranura de la cadena de corte.
• Después de una semana de trabajo invierta la barra de
corte para distribuir su desgaste natural y prolongar al
máximo su vida útil (B).
• Después de una semana de trabajo lubrique la barra de
corte si es que cuenta con rueda dentada en la punta.
Para ello utilice una jeringa de grasa para aplicar el
lubricante en el orificio de lubricación.
• En caso de que el riel presente desgaste que no permita
a la cadena descansar en su costado, que esté
ensanchado o partido, o que la barra de corte esté
doblada, reemplace la barra completa por otra nueva.
0,6 mm
(0,025”)
20 ESPAÑOL

Mantenimiento de la cadena de corte
Afilado de la cadena de corte
• La cadena requiere afilarse si las virutas de madera que
genera la motosierra al cortar son pequeñas y
polvorientas, cuando es necesario forzar la barra de corte
a través de la madera para realizar el corte o cuando la
cadena corta hacia un lado.
• El afilado de la cadena se debe de hacer con ella
montada y tensada en la barra de corte (consulte la
página 13 ) y con el motor de la motosierra apagado.
• Use una lima redonda con un diámetro de 4 mm
(5/32”).
• Tenga cuidado de afilar todos los
dientes a los ángulos especificados en la imagen y a la
misma longitud, pues sólo con dientes uniformes se logra
un corte adecuado y seguro.
• Afile todos los dientes uno por uno, primero todos los
del lado derecho y después todos los del izquierdo. Para
pasar de un diente a otro recorra la cadena sólo un poco
de manera que cada vez que afile un diente lo haga
sobre la parte media de la barra de corte.
• Mantenga la lima al nivel de la placa superior del diente
de corte. No permita que la lima se incline o balanceé.
Aplique una presión leve pero firme, haciendo el
movimiento sólo hacia la parte frontal del diente. Separe
la lima del diente en cada movimiento de regreso.
• De unas pocas pasadas a cada diente.
• Con un cepillo de alambre retire las limaduras de acero
producidas durante el afilado.
• Operar la motosierra con la cadena
mal afilada o desafilada puede dañar el motor por la
velocidad excesiva.
• Operar la motosierra con la
cadena mal afilada o desafilada aumenta el riesgo de
contragolpe.
• Operar la motosierra con la
cadena dañada puede causar lesiones serias.
• La cadena de corte está muy
afilada, para su manejo use guantes protectores para
trabajo pesado.
• Si la cadena de corte se ha
desafilado por haber hecho contacto con clavos o piedras,
o por lodo y arena presentes en la madera; permita que
sea afilada en un Centro de Servicio Autorizado
.
• Para que la motosierra haga cortes lisos y rápidos la
cadena de corte debe de contar con un mantenimiento
adecuado periódicamente.
• Apague la motosierra antes de realizar cualquier tarea
de mantenimiento.
• Use guantes protectores para trabajo pesado.
Ajustes y mantenimiento
ATENCIÓN
ATENCIÓN
ATENCIÓN
ADVERTENCIA
ADVERTENCIA
ADVERTENCIA
ADVERTENCIA
Placa
superior Placa
superior
Diente
derecho
Diente
de corte
Diente
de corte
Diente
izquierdo
Puntera
Eje de la cadena Eje de la cadena
Dirección de la cadena
Remache
Calibre de
profundidad
Garganta Garganta
Placa
lateral
Placa
lateral
Talón Talón
Puntera
Calibre de
profundidad
eslabón de corte
derecho
ángulos correctos
de afilado de los
dientes de corte
dirección de
afilado
eslabón de corte
izquierdo
30°
30°
80°
Cualquier otro ángulo que no sea
el especificado disminuye la calidad del corte, produce
daños al motor, la barra y la cadena; y aumenta el riesgo
de un contragolpe violento.
19
ESPAÑOL

Trozado por
arriba del tronco Trozado por
debajo del tronco
reacción reacción
Tala y Tronzado
Desramado y Poda
L
i
b
e
r
a
c
i
ó
n
d
e
t
e
n
s
i
ó
n
Tronzado por arriba del tronco
• Comience el corte por el lado superior del tronco con la
parte inferior de la barra de corte contra el tronco.
• Ejerza presión leve hacia abajo.
• Mantenga atención a la reacción de la
motosierra, la fuerza de reacción la jalará hacia el tronco.
• Al igual que la tala el trabajo de poda y desramado debe
hacerse con calma, sumo cuidado y siguiendo las
advertencias de seguridad (consulte las páginas 5 y 6).
• Cuando corte una rama mantenga el árbol entre usted y
la cadena de corte.
• Jamás corte las ramas subido a una
escalera, colgado del árbol o parado en una plataforma o
un tronco pues es extremadamente peligroso. Deje que
un profesional se encargue de las ramas que no alcance
parado en el suelo y sobrepasen la altura de su pecho.
ATENCIÓN
Tronzado por debajo del tronco
• Comience el corte por el lado inferior del tronco con la
parte superior de la barra de corte contra el tronco.
• Ejerza presión leve hacia arriba.
• Mantenga atención a la reacción de la
motosierra, la fuerza de reacción la empujará hacia el
operador.
Operación de corte
• Cuando corte una rama no haga el corte a ras del
tronco para evitar que la rama al caer desprenda la
corteza del tronco.
• Efectúe un primer corte con una profundidad de 1/3 del
diámetro de la rama. Después realice un segundo corte
de 2/3 del lado opuesto.
• Finalice el corte de la rama con un tercer corte a ras del
tronco para dejar que la corteza crezca y selle el corte.
• En caso de que la rama sea demasiado grande haga el
corte por secciones para evitar un desprendimiento
violento.
Pértigas
• Por pértigas nos referimos al tronco, rama o árbol joven
que ha sido doblado por la presión de otro tronco o rama
acumulando tensión que es liberada con fuerza si la
presión se suelta.
• Las pértigas son muy peligrosas pues
pueden golpear al operador provocando una lesión de
grave y/o hacerle perder el control de la motosierra. Esté
siempre atento a esta posibilidad.
ATENCIÓN
PELIGRO
PELIGRO
Primer
corte (1/3)
Pértiga
Corte
final
Segundo
corte (2/3)
Carga
18 ESPAÑOL

• En troncos muy gruesos es conveniente introducir cuñas
en el corte para evitar que la barra de corte sea atrapada
por el tronco al asentarse en su lugar mientras es cortado.
• Si el diámetro del tronco es demasiado grande habrá
que introducir la punta de la barra en el corte para poder
continuar con el corte sin retirar las cuñas y continuarlo
hasta terminar el trabajo. La
operación de introducir la punta de la barra en el corte
debe de ser realizada sólo por profesionales.
• Por tronzado nos referimos al corte de un tronco de
árbol después de haber sido talado.
• Durante el tronzado corte siempre un tronco a la vez.
• Apoye los troncos pequeños en un caballete de aserrar
o en medio de dos troncos más grandes juntos para
cortarlos.
• Si el terreno está desnivelado en
el área de tronzado sitúese siempre en el lado más alto
mientras realiza los cortes para evitar que las partes
cortadas no rueden sobre usted.
• Manténgase alerta en todo
momento, pues a veces es difícil predecir la dirección que
tomarán los troncos al ser cortados y no siempre es
posible evitar que la barra de corte sea atrapada por los
troncos.
Primer corte
Segundo corte
Parte residual
(raíz zanca)
Caballete
de aserrar
Cuña
Carga
Carga
Tala y Tronzado
Corte de raíces zancas
• Por raíces zancas nos referimos a las raíces que
sobresalen demasiado del suelo desde el tronco. Cuando
son muy grandes pueden dificultar el talado del árbol, por
lo que deben de ser removidas antes del talado.
• Primero se debe de hacer un corte horizontal a través
de la raíz a algunos centímetros del suelo.
• Después realice un corte vertical hacia abajo y al ras del
tronco para separar la raíz sin que atrape la barra de corte.
• Es importante realizar los cortes en
ése orden para evitar que la pieza de madera residual se
apoye en la barra de corte atrapándola o sea lanzada con
fuerza con dirección indeterminada.
ADVERTENCIA
ADVERTENCIA
ADVERTENCIA
ATENCIÓN
Tronzado
Tronzado con cuña
• Efectúe un primer corte con una profundidad de 1/3 del diámetro del tronco. Después termine con un segundo corte de
2/3 del lado opuesto. Consulte el diagrama para determinar dónde realizar el primer corte y evitar que la barra de corte sea
atrapada por el tronco al doblarse por su propio peso.
Tronzado de troncos bajo presión
Primer
corte (1/3)
Corte
final
Corte
final
Primer
corte (1/3)
17
ESPAÑOL

Área de
desechos
Primer corte
Tercer
corte
Muesca
Cuña
Bisagra
Segundo corte
45°
40°
180°
45°
Tala y Tronzado
Preparativos para tala de árboles
• Planifique al menos dos rutas de escape y despeje el
área para no bloquearlas. La ruta de escape óptima es a
180° de la trayectoria calculada de caída del árbol con un
margen de 45° hacia ambos lados.
• Para calcular la caída del árbol considere
la dirección y fuerza del viento, la
inclinación y equilibrio del árbol y la
ubicación de sus ramas más grandes.
• Revise que el árbol no tenga ramas
muertas que puedan caer sobre usted
mientras esté cortándolo.
Cómo cortar un árbol
• Corte una muesca de 1/3 del diámetro del tronco del
lado calculado para su caída.
• Esta muesca se debe realizar por medio de dos cortes,
el primero horizontal y el segundo a 40°.
•Es importante realizar los cortes en
ése orden para evitar que el pedazo de madera residual
se apoye en la barra de corte atrapándola o sea lanzada
con fuerza con dirección indeterminada.
• El tercer corte debe hacerse en el lado opuesto a la
muesca. Debe ser horizontal y quedar como mínimo a 5
cm (2”) por arriba del corte horizontal de la muesca y no
llegar hasta ella, dejando entre la muesca y el tercer corte
una distancia de 1/10 del diámetro del tronco para formar
una bisagra que controle la caída del árbol, evitando
movimientos o trayectorias inesperadas durante su caída
o la separación violenta del árbol de su cepa.
• Nunca realice el tercer corte hasta
llegar a la muesca, de lo contrario el árbol podría caer de
forma incontrolada.
• Cuando corte árboles de diámetro grande detenga el
corte trasero antes de llegar a una profundidad que haga
que el árbol se asiente y atrape la barra de corte.
• Antes de continuar con el corte introduzca unas cuñas
de madera o plástico poco a poco en el corte para
mantenerlo abierto.
Restricciones para tala de árboles. ¡No lo haga por ningún motivo!
• No corte árboles bajo lluvia o viento intensos. Espere a que el tiempo se calme.
• No corte árboles con personas o animales en la zona. La distancia segura para los transeúntes se explica en el apartado
“Al operar la motosierra” de las Advertencias de Seguridad para uso de motosierras en la página 5.
• No corte árboles sin calcular previamente su línea de caída para evitar ser aplastado.
• No corte árboles extremadamente delgados.
• No corte árboles grandes con ramas podridas, corteza suelta o troncos huecos,
se necesita de equipo pesado de empuje o arrastre operado por profesionales.
• No corte árboles cerca de cables eléctricos o edificios.
Trayectoria de caída
Escape óptimo
Límites para tala de árboles. ¡Deje estas tareas a profesionales!
M
a
r
g
e
n
d
e
e
s
c
a
p
e
ATENCIÓN
ATENCIÓN
• El introducir las cuñas puede ser suficiente para derribar
el árbol, de lo contrario habrá que introducir la punta de
la barra de corte para poder continuar con el corte sin
retirar las cuñas y continuarlo hasta formar la bisagra.
• La operación de introducir la
punta de la barra en el corte debe de ser realizada sólo
por profesionales.
• En cuanto el árbol comience a caer, apague la
motosierra y deposítela en el suelo de inmediato. Retírese
por la ruta de escape óptimo sin dejar de prestar atención
por si se presentara cualquier eventualidad.
• Durante el tercer corte fíjese en
el comportamiento de la copa del árbol constantemente
para asegurarse de que su caída mantiene la dirección
programada. Si por alguna razón el árbol comienza a caer
en una dirección equivocada o la motosierra es atrapada
durante la caída, ¡suéltela y corra para ponerse a salvo!
ADVERTENCIA
ADVERTENCIA
T
r
a
y
e
c
t
o
r
i
a
d
e
c
a
í
d
a
1/3 del
tronco
1/10 del tronco
5 cm (2”)
16 ESPAÑOL

Eje de corte
Operación de corte
Procedimientos básicos de corte
Si no cuenta con experiencia previa del uso de
motosierras, se recomienda que practique con unos
cuantos troncos pequeños (no menos de 20 cm de
diámetro) apoyados en un caballete para aserrar para
familiarizarse con su uso siguiendo la siguiente técnica:
• Adopte una postura correcta frente al tronco con la
motosierra en marcha lenta.
• Presione el gatillo del acelerador para que el motor
alcance su máxima velocidad.
• Inicie el corte colocando la barra de corte sobre el tronco.
• Mantenga en todo momento el motor a su máxima
velocidad durante el corte.
• Permita que la cadena de corte haga su trabajo
aplicando una leve presión hacia abajo con la motosierra.
No intente forzar el corte en ningún momento, de lo
contrario podría dañar la cadena, la barra o el motor.
• Suelte el gatillo interruptor tan pronto como termine el
corte, así evitará desgastes innecesarios en la cadena, la
barra o el motor.
Postura correcta para el corte
• Ambos pies deben estar apoyados en suelo firme, con
el peso de su cuerpo bien equilibrado, el pie izquierdo
debe de estar ligeramente más adelante que el derecho.
• Sostenga la motosierra como se indica en la sección de
Advertencias de seguridad para uso de motosierras
(página 5).
• Mantenga el brazo izquierdo recto sin doblar el codo
para tolerar la fuerza de un contragolpe.
• Mantenga siempre el eje de corte a su derecha. Para
que su cuerpo quede libre de estar en el eje de corte en
caso de un contragolpe.
• Sostenga la motosierra cerca del cuerpo para evitar
tensión en los brazos y en la espalda.
• No intente sostener la motosierra en posición zurda.
Eje de corte
brazo
izquierdo recto
Eje de corte
15
ESPAÑOL

Puesta en marcha
• Asegúrese de que la cadena no esté haciendo contacto
con ningún objeto.
• Mantenga presionado el seguro del interruptor (C) para
desbloquear el gatillo interruptor (B).
El seguro del interruptor evita encendidos accidentales.
• Presione completamente el gatillo interruptor (B) para
que la cadena comience a avanzar.
Encendido
• Para detener la cadena suelte el gatillo interruptor (B).
• Es normal que la cadena siga moviéndose unos
segundos después de soltar el gatillo interruptor. Como
medida adicional de seguridad active el freno de la
cadena (consulte la página 10).
Apagado
C
B
14 ESPAÑOL

Cuando se tensa una cadena que está caliente,
se puede apretar mucho cuando se enfríe. Verifique la
“tensión en frío” antes de volverla a usar.
13
• Levante la barra con la cadena y colóquela en la sierra
haciendo pasar el perno de montaje (F) por la ranura
de la barra, y el espacio holgado entre la barra y la
cadena alrededor de la rueda dentada (G).
• Monte la cubierta de la cadena y gire un poco la
palanca (H) en sentido horario para apenas asegurar la
cubierta de la cadena de manera que la barra quede
libre y así pueda proceder con el tensado de la cadena
adecuadamente.
Cadena holgada
Cadena ajustada
Tensión correcta con
la cadena dilatada
Montaje de la barra y la cadena
F
G
Tensado de la cadena
I H
• Gire la perilla de ajuste (I) para tensar la cadena hasta
que la cadena quede ajustada a la barra sin ninguna
holgura y con los eslabones de tracción insertados en la
ranura de la barra.
• Levante la punta de la barra de corte para verificar si
queda alguna holgura en la cadena. De ser así gire de
nuevo la perilla para tensar la cadena 1/2 vuelta. Repita
el procedimiento hasta que no exista ninguna holgura
entre la cadena y la barra.
• Apriete firmemente la palanca (H) para asegurar la
cubierta de la cadena.
• Para verificar que la cadena no está demasiado apretada
intente desplazarla con la mano. Si la cadena se atora o
cuesta trabajo moverla gire levemente la palanca para
aflojar la cubierta de la cadena y gire la perilla para tensar
la cadena sólo 1/4 de vuelta. Levante la punta de la barra
y apriete la palanca para asegurar la cubierta de la cadena
antes de revisar de nuevo la tensión de la cadena.
• Para asegurarse de que la tensión de la cadena dilatada
por el calor producido por el corte es la adecuada, la
distancia entre la parte inferior de la barra y los eslabones
de la cadena deben ser de 1.3 mm (0.05”) (J).
J1,3 mm
(0,05”)
AVISO
ESPAÑOL

D
E
12
• Nunca arranque el motor sin
antes haber instalado la barra de corte, la cadena de corte
y la cubierta de la cadena. Ya que expondría al operador a
una lesión seria.
• Retire las baterías.
• Tire del freno de la cadena hacia atrás para asegurarse
de que está en posición de funcionamiento (consulte la
página 10).
• Utilice guantes protectores para
trabajo pesado para manipular la cadena con seguridad y
evitar cortes.
• Para retirar la cubierta de la cadena (E) levante la
palanca (D) como se indica en la página 11.
• Gire la palanca en sentido antihorario hasta desprender
su tornillo y retire la cubierta (E).
Dientes de
tracción
enderece
Dirección de desplazamiento
Dientes de
corte Avance
Ranura
Avance
Barra de corte
Montaje de la barra y la cadena
ADVERTENCIA
ATENCIÓN
• Extienda la cadena en una superficie plana y limpia
formando un óvalo junto a la barra de corte y enderece
cualquier eslabón retorcido. Los dientes de corte deben
de estar en la dirección de desplazamiento de la cadena,
de lo contrario invierta la posición de la cadena.
• Coloque los dientes de tracción de la cadena en la
ranura de la barra.
• Acomode la cadena de tal forma que quede holgada en
la parte posterior de la barra.

E
Abastecimiento de aceite
Montaje de la barra y la cadena
• Use aceite para barras, cadenas y sus sistemas de
lubricación formulado para desempeñarse en una amplia
gama de temperaturas sin requerir ninguna dilución. Se
recomienda usar aceite SAE 10W30
• El nivel de aceite debe revisarse cada 20 minutos de uso
mirando por la ventana del nivel de aceite (A). El tanque
debe rellenarse cuando el nivel esté por debajo de la
marca MIN.
• No use aceite sucio, usado o
contaminado de ninguna forma. Puede dañarse la bomba
de aceite, la barra o la cadena.
• Limpie la superficie alrededor de la tapa del tanque de
aceite para evitar su contaminación.
• Afloje lentamente la tapa del tanque de aceite.
• Teniendo cuidado de evitar derrames, vierta el aceite en el
tanque con ayuda de un embudo.
• Antes de tapar el tanque de aceite revise y limpie las juntas.
• Coloque de inmediato la tapa del tanque de aceite y
apriételo con la mano.
• Limpie todo derrame de aceite.
ATENCIÓN
Abastecimiento de aceite para barra y cadena de corte
A
C
D
B
F
• Antes de montar la barra y la cadena familiarícese con el
funcionamiento de la perilla de ajuste de tensión de la
cadena (B), que le permite montar y ajustar la barra de
corte sin necesidad de utilizar herramientas adicionales.
• La perilla tiene dos mecanismos de giro independientes:
el central mantiene la cubierta de la barra (C) en su lugar,
mientras que el exterior ajusta la tensión de la cadena.
• Para retirar o asegurar la cubierta de la barra utilice el
mecanismo central: mantenga apretado el botón (D) para
poder levantar la palanca y después gírela para aflojar o
apretar (E).
• Para aflojar o apretar la tensión de la cadena gire el
mecanismo exterior de la perilla (F).
Perilla de ajuste de tensión
11
ESPAÑOL

c
o
n
t
r
a
g
o
l
p
e
• El freno de la cadena (A) tiene la función de detener
con rapidez el desplazamiento de la cadena y brindar
protección al operador en caso de un contragolpe
(consulte la página 5). Esta diseñado considerando el
movimiento predecible del contragolpe, que lanza la
barra de corte hacia arriba y hacia el operador, de manera
que cuando el freno es empujado por la mano izquierda
la cadena se detiene inmediatamente.
• Pruebe el freno de la cadena cada vez
que encienda la motosierra y antes de comenzar a cortar:
• Con el motor en marcha y apretando el gatillo
interruptor empuje con el dorso de la mano izquierda el
freno de la cadena hacia la barra de corte. Cuando
lo haga NO suelte el mango delantero, sólo gire su mano izquierda
hacia adelante hasta hacer contacto con el freno y empujarlo.
• Si por alguna razón el freno no detiene la
cadena, NO opere la motosierra, apáguela y llévela a reparar a un
Centro de Servicio Autorizado .
• Si el freno funciona correctamente la cadena de corte se detendrá
de inmediato. Para desactivar el freno sostenga la parte superior de
la guarda y tire de ella hacia usted hasta escuchar un chasquido.
• Recuerde que el freno de la cadena no
evita el contragolpe, es un dispositivo de seguridad para evitar
posibles lesiones después de producido un contragolpe.
• Recuerde que incluso con el
mantenimiento adecuado, en condiciones de uso de campo el
funcionamiento del freno de la cadena no puede considerarse
totalmente seguro. Manténgase alerta en todo momento, utilice
técnicas de corte adecuadas y siempre utilice el resto de los
dispositivos de seguridad.
• Este tipo de cadena cuenta con dientes limpiadores
(calibres de profundidad) situados adelante de cada
diente de corte para evitar que estos entren demasiado
en la madera y se atasquen generando un contragolpe.
• Sólo utilice cadenas certificadas
como de contragolpe bajo para sustituir las cadenas
gastadas.
• Considere que a medida que la
cadena se va desgastando por el uso normal o el proceso
de afilado va perdiendo su capacidad para disminuir la
posibilidad de un contragolpe y debe tener mayor
precaución.
• Al terminar la vida útil de la barra
de corte (C) reemplácela por otra idéntica de marca
.
• Entre menor sea el radio de la punta
de la barra de corte su capacidad de disminuir la
posibilidad de un contragolpe será menor.
Giro de la mano
izquierda para
accionar el freno
de la cadena
Barra de corte
Freno de la cadena
Cadena de corte de contragolpe bajo (B)
Dispositivos de seguridad
ADVERTENCIA
ADVERTENCIA
ADVERTENCIA
ADVERTENCIA
ADVERTENCIA
ADVERTENCIA
ATENCIÓN
ATENCIÓN
ATENCIÓN
A
C
B
10 ESPAÑOL

Preparación
9
ESPAÑOL
1
2
A
Consideraciones para el uso de baterías
Carga de las baterías
• Las baterías viene DESCARGADA de fábrica. Será necesario
cargarlas aproximadamente 1.5 horas antes de usarlas.
• La temperatura normal de carga es de 0 °C a 45 °C Fuera
de este rango se suspende la carga automáticamente hasta
que alcance la temperatura correcta. La temperatura normal
de descarga / trabajo es de 0 °C a 75 °C Si los 75 °C se
exceden, el control electrónico apaga la energía de la
herramienta hasta que la temperatura alcance de nuevo el
rango óptimo de temperatura. Cuando la batería está debajo
de la tensión normal durante el trabajo, la herramienta deja
de funcionar.
• Entre cada carga, de al cargador 15 minutos de descanso.
• Después de un uso prolongado o en ambientes cálidos, la
batería podría calentarse demasiado para ser recargada.
Permita que la batería se enfríe antes de intentar recargarla.
• La herramienta está equipada con un
sistema que detiene automáticamente la herramienta para
prolongar tanto su vida útil como la de las baterías, esto
sucede en los siguientes casos:
Sobrecarga. Cuando se fuerza la herramienta la batería
consume niveles de corriente anormalmente altos. Suspenda
el trabajo de sobreesfuerzo y encienda de nuevo la
herramienta.
Sobrecalentamiento. Deje que la herramienta y la batería
se enfríen antes de volver a encenderla.
Sobredescarga. El nivel de la batería no es suficiente. En
este caso, retire y cargue las baterías.
1. Conecte la clavija del cargador en un tomacorriente de
127 V~
2. Inserte las baterías en el cargador deslizándola como se
muestra en la imagen. La luz roja deberá encenderse,
indicando que la carga se ha iniciado.
• Cuando las baterías se encuentren completamente
cargada, la luz verde se encenderá y la roja se apagará.
• Desconecte el cargador de la corriente una vez
concluida la carga.
• Si la luz roja parpadea es señal de que la batería tiene
un retraso por calentamiento; espere a que la
temperatura de la batería se encuentre en el rango
adecuado para poder cargar.
• La luz roja permanece encendida superando el tiempo
recomendado de carga o si la luz roja y verde parpadea
alternativamente es señal que la batería está defectuosa;
debe reemplazarla o recurrir a un Centro de Servicio
Autorizado
• Una vez cargadas las baterías, insértelas en sus
respectivos receptáculos a ambos lados de la herramienta.
• Deslice cada batería en su receptáculo hasta escuchar un
click para asegurarse de que estén bien colocadas.
• Para retirar las baterías presione el seguro (A) y deslice la
batería hacia afuera.
• Para asegurarse de que las baterías estén cargadas
presione el botón indicador (B) al lado de cada batería. El
color de la luz indica el nivel de carga.
Baterías
Sistema de protección
herramienta / batería
ATENCIÓN
NOTA: Según las condiciones de uso y la temperatura
ambiente, la indicación puede diferir ligeramente de la
capacidad real.
Capacidad restante de la batería
Luces
indicadora
Iluminado
Apagado
VERDE
NARANJA
ROJO
50% a 100%
NARANJA
ROJO
25% a 50%
ROJO
10% a 25%
B

Perilla para tensar
la cadena
Palanca de
liberación de
la cubierta
Cubierta de
la cadena
Rueda
dentada
Interruptor
Cubierta
del motor Base del mango
posterior
Cubierta de
la cadena
Mango
posterior
Seguro del
interruptor
Funda para barra
8ESPAÑOL
Superficie
de montaje
de la barra
Cadena antirebote
Tapón del
tanque de aceite
de cadena
Mango
delantero
Barra guia
Guarda delantera /
Freno de la cadena
Receptáculo
de batería (derecha)
Receptáculo
de batería (izquierda)
Cargador de baterías
Baterías
Partes

7
para uso de motosierras
Advertencias de Seguridad
ESPAÑOL
• Utilice únicamente cargadores Truper Max
para cargar la batería de la herramienta. Usar otro cargador
puede provocar un incendio o riesgos de lesión.
• Use únicamente baterías diseñadas
específicamente para la herramienta. Otras baterías podrían
generar riesgos de lesión o incendio.
• Conecte el cargador únicamente a un suministro de
corriente alterna de 127 V~(c.a.).
• No use el cargador a la intemperie.
• Respete la polaridad “+/-” al cargar.
• Nunca recargue una batería que presente goteo de
líquidos.
• No use baterías o el cargador para propósitos distintos para
los cuales fueron diseñados.
• No modifique los contactos de la batería ni del cargador.
• Nunca exponga las baterías a temperaturas superiores a
130 °C esto puede provocar una explosión.
• Nunca exponga las baterías al fuego,
podrían explotar.
• Las baterías deben mantenerse alejadas
de cualquier objeto metálico como clips, monedas, llaves,
clavos, tornillos o cualquier otro objeto que pudiera hacer
que las terminales hagan contacto; pues provocaría un
cortocircuito que podría ocasionar quemaduras o incendios.
• Bajo condiciones extremas, el líquido de
la batería podría derramarse. De ser así, evite cualquier
contacto. De ocurrir contacto accidental, lave con agua
abundante, enjuague con jugo de limón y vinagre. Si el
líquido entrara en contacto con los ojos, lave con agua
abundante durante varios minutos y busque ayuda médica
de inmediato. El líquido expulsado de las baterías podría
causar irradiación o quemaduras.
• Para maximizar la vida útil de la batería
descárguela por completo por lo menos una vez al mes. No
deje la batería sin recargar por más de tres meses. Siempre
cargue la batería a su máxima capacidad. Antes de usar la
máquina por primera vez, cargue la batería por un mínimo
de 1.5 horas.
•Evite detenerse constantemente mientras opera la
herramienta, para evitar daños a la batería.
• No tire las baterías al fuego. La pila puede explotar.
Consulte los códigos locales para conocer las posibles
instrucciones especiales de eliminación.
• No abra ni mutile las baterías. El electrolito liberado es
corrosivo y puede causar daños en los ojos o en la piel.
Puede ser tóxico si se ingiere.
• No cargue la batería bajo la lluvia o en lugares húmedos.
Baterías y cargador
PELIGRO
PELIGRO
PELIGRO
PELIGRO
ATENCIÓN
ATENCIÓN
ATENCIÓN

• Mantenga atención a la reacción de la
motosierra al cortar troncos grandes, por la fuerza de reacción
la motosierra puede ser empujada hacia el operador (B) o
jalada hacia el tronco (C) según la dirección del movimiento
de la cadena, que depende del borde de la barra de corte
(superior o inferior) que se esté utilizando para cortar.
• Mantenga alejados a sus compañeros de trabajo de la
motosierra mientras la arranca u opera, una distancia
segura es de 4.5 metros (15 pies) entre los trabajadores.
Asegúrese de que transeúntes o animales se encuentren
aún más lejos del área de trabajo antes de arrancar y
operar la motosierra, una distancia segura es de cuando
menos el doble de la altura de los árboles más altos en la
zona de tala.
• Asegúrese de que la cadena de corte no esté en
contacto con algún objeto antes de arrancar el motor.
• Mantenga ambos pies apoyados
firmemente en el piso. No opere la motosierra si se
encuentra parado en una superficie inestable como
escaleras, andamios, árboles, etc. Sólo personal altamente
calificado puede operar la motosierra subido en un árbol
y con el equipo de seguridad adecuado.
• No comience a cortar hasta que tenga despejada el área
de trabajo, los pies bien firmes sobre el piso y una ruta de
retirada considerando la caída del árbol.
• Jamás opere la motosierra con una
sola mano. De lo contrario pueden resultar lesionados el
operador, y demás personas presentes.
• Mantenga todas las partes del cuerpo alejadas de la
cadena de corte cuando esté funcionando el motor.
• No corte enredaderas ni ramas demasiado pequeñas
(de menos de 76 mm [3”] de diámetro).
• Tenga extrema precaución al cortar
broza pequeña y árboles jóvenes, ya que el material
delgado puede quedar atrapado en la cadena de la sierra
y ser lanzado hacia usted con fuerza.
• Tenga extrema precaución al
cortar ramas que se encuentren bajo presión. Al realizar
el corte la rama puede regresar con fuerza a su posición
original y en su camino golpear al operador. Tenga esto
en consideración para estar en todo momento fuera de la
trayectoria de la rama.
• Nunca utilice la motosierra cuando esté cansado, enfermo, o se encuentre bajo los efectos de alguna
droga, alcohol o medicamento.
• Equípese con ropa adecuada para operar la motosierra: ropa ajustada, pantalones gruesos, botas de
seguridad antideslizantes, guantes protectores para trabajo pesado, gafas de seguridad o anteojos
protectores con protección lateral bajo la norma ANSI Z87.1, protección para los oídos y la cabeza. Los
overoles, pantalones vaqueros y zahones o chaparreras, así como careta completa de visión amplia
están recomendados.
• Retírese cualquier accesorio o ropa holgada que pueda ser atrapado por la cadena de corte en
movimiento. Recójase el cabello para que quede por arriba del nivel de los hombros.
• Asegúrese de que la motosierra se encuentre en perfectas condiciones. No la encienda si se encuentra mal ajustada o
no está armada completamente de manera que funcione de forma segura.
• Asegúrese de que la cadena de corte deje de moverse cuando se suelte el gatillo interruptor. En caso de que la cadena
no se detenga al soltar el gatillo interruptor, apague la motosierra y acuda a un Centro de Servicio Autorizado
para solucionar el problema.
• No encienda la motosierra si tiene cualquier accesorio o dispositivo que no esté especificado en este instructivo.
• Asegúrese de que los mangos de la motosierra se encuentren limpios, secos y libres de aceite.
• Asegúrese de que el área de trabajo se encuentra en un área abierta y libre de obtáculos.
• Siempre traslade la motosierra
apagada y con el freno de la cadena de corte puesto, la
barra de corte hacia atrás y enfundada.
• Apague la motosierra y aplique
el freno de la cadena antes de ponerla en reposo. NO la
deje en funcionamiento sin prestarle atención.
• El servicio y reparación de la
motosierra debe de ser realizado sólo por personal
altamente capacitado. Una tarea de servicio mal realizada
puede ocasionar un accidente de consecuencias fatales.
6
para uso de motosierras
PELIGRO
PELIGRO
PELIGRO
Advertencias de seguridad
ADVERTENCIA
ADVERTENCIA
ADVERTENCIA
ADVERTENCIA
Antes de operar la motosierra
Al operar la motosierra
Después de operar la motosierra
ATENCIÓN
ATENCIÓN
ATENCIÓN
B
C
ESPAÑOL

Forma correcta de
sostener la motosierra
Forma incorrecta de
sostener la motosierra
A
• Recuerde que la seguridad es una combinación de
sentido común, mente alerta y conocimiento del
funcionamiento de la herramienta.
• Lea cuidadosamente el instructivo
antes de comenzar a utilizar la motosierra. Preste atención
a las reglas de seguridad, a los símbolos de alerta y a los
avisos de peligro, advertencia y atención del instructivo y
de las etiquetas adheridas a la herramienta. Estas reglas
de seguridad son para alertarlo y que pueda evitar
posibles lesiones, incluso fatales; sin embargo no
eliminan el peligro que implica una mala operación de la
motosierra. Si utiliza correctamente la motosierra, y sólo
para los fines especificados, le brindará muchos años de
servicio seguro y confiable.
• Familiarícese con la motosierra con ayuda de este
instructivo, guárdelo en un lugar seguro y a la mano para
poder consultarlo con frecuencia e instruir a futuros
operadores de la motosierra. Aprenda sus usos,
limitaciones, así como sus posibles peligros específicos.
• Las motosierras están diseñadas
exclusivamente para cortar madera, no intente cortar otro
tipo de material.
• Jamás permita que personas sin la
instrucción adecuada operen la motosierra.
• Opere la motosierra sólo cuando la visibilidad y las
condiciones de luz sean adecuadas para ver claramente.
Por contragolpe nos referimos al movimiento repentino y
con fuerza que sufre la herramienta en funcionamiento
hacia afuera del corte en dirección del operador, que
puede hacerle perder el control o incluso provocarle una
lesión corporal seria. Por lo regular es ocasionado cuando
la punta de la barra de corte toca un objeto o la cadena
de corte es atrapada por el material a cortar. Para evitarlo
se deben tomar las siguientes precauciones:
• Mantenga en buen estado y en su lugar todas las guardas
y dispositivos de seguridad incorporados a la motosierra.
• Al operar la motosierra manténgase siempre alerta y no
permita que la familiaridad con su uso haga que le preste
menos atención mientras la está operando.
• Sostenga firmemente con ambas
manos la motosierra cuando esté encendida. Coloque la
mano derecha en el mango trasero y la izquierda en el
mango delantero, ambos mangos deben estar rodeados por
los dedos con los pulgares doblados bajo los mangos (A).
Esta forma de sujeción es la que tiene menos
probabilidad de fallar ante un contragolpe. Mantener los
pulgares del mismo lado del resto de los dedos es
peligrosa al disminuir en gran medida el control de la
motosierra ante un contragolpe.
• Opere la motosierra con el brazo izquierdo rígido y
totalmente extendido.
• NO permita que la punta de la barra
de corte entre en contacto con el material a cortar ni con
ningún obstáculo como troncos, ramas, cerca, o cualquier
otra cosa con la que pueda pegar al estar operando la
motosierra.
• Siempre corte con el motor funcionando a máxima
velocidad. Oprima completamente el gatillo del
interruptor y mantenga una velocidad de corte estable.
• No trate de alcanzar o cortar objetos
fuera de su alcance, ni arriba de la altura del pecho.
• Mantenga la cadena de corte afilada y en óptimas
condiciones.
• Sólo utilice barras y cadenas de repuesto especificadas
por .
5
PELIGRO
PELIGRO
PELIGRO
ADVERTENCIA
ATENCIÓN
ADVERTENCIA
Generales Para evitar contragolpes
ESPAÑOL
Advertencias de seguridad
para uso de motosierras
Cuando la batería no esté en uso, manténgala alejado de
objetos metálicos como clips, monedas, llaves, tornillería o
cualquier objeto que pueda hacer conexión entre las terminales.
Un cortocircuito entre las terminales puede ocasionar quemaduras o incendio.
En condiciones severas, puede derramarse líquido de la batería;
evite el contacto. Si hay contacto accidental, lave la zona con
agua. Si hay contacto con los ojos, busque ayuda médica.
El líquido derramado puede causar irritación o quemaduras.
Servicio
Repare la herramienta en un Centro de Servicio Autorizado
usando sólo piezas de repuesto idénticas.
Para mantener la seguridad de la herramienta.

4ESPAÑOL
Área de trabajo
Mantenga el área de trabajo limpia y bien iluminada.
Las áreas desordenadas y obscuras son propensas a accidentes.
No maneje la herramienta en ambientes explosivos, como en
presencia de líquido, gas o polvo inflamables.
Para evitar chispas que puedan encender material inflamable.
Mantenga alejados a niños y curiosos al operar la herramienta.
Las distracciones pueden hacer que pierda el control.
Seguridad eléctrica
La clavija de la herramienta debe coincidir con el tomacorrien-
te. Nunca modifique una clavija. No use ningún tipo de
adaptador para clavijas de herramientas puestas a tierra.
Modificar clavijas y enchufes diferentes aumentan el riesgo de
choque eléctrico.
Evite el contacto del cuerpo con superficies puestas a tierra
como tuberías, radiadores, cocinas eléctricas y refrigeradores.
Hay un mayor riesgo de choque eléctrico si el cuerpo está puesto a tierra.
No exponga la herramienta a la lluvia o condiciones de humedad.
El agua que ingresa en la herramienta aumenta el riesgo de choque eléctrico.
No fuerce el cable. Nunca use el cable para transportar, levantar
o desconectar la herramienta. Mantenga el cable lejos del calor,
aceite, orillas afiladas o piezas en movimiento.
Los cables dañados o enredados aumentan el riesgo de choque eléctrico.
Cuando maneje una herramienta en exteriores, use una
extensión especial para uso en exteriores.
El uso de una extensión adecuada para exteriores reduce el riesgo de choque
eléctrico.
Si el uso de la herramienta en un lugar húmedo es inevitable,
use una alimentación protegida por un interruptor de circuito
de falla a tierra (GFCI).
El uso de un GFCI reduce el riesgo de choque eléctrico.
Seguridad personal
Esté alerta, vigile lo que está haciendo y use el sentido común
cuando maneje una herramienta. No la use si está cansado o
bajo la influencia de drogas, alcohol o medicamentos.
Las distracciones al operar herramientas pueden causar un daño personal.
Use equipo de seguridad. Use siempre protección para los ojos.
El uso de equipo de seguridad como lentes de seguridad, mascarilla antipolvo,
zapatos antideslizantes, casco y protección para los oídos en condiciones
apropiadas, reduce de manera significativa los daños personales.
Evite arranques accidentales. Asegúrese de que el interruptor
está en posición “apagado” antes de conectar a la fuente de
alimentación y/o a la batería o transportar la herramienta.
Transportar herramientas eléctricas con el dedo sobre el interruptor o
conectar herramientas eléctricas que tienen el interruptor en posición de
“encendido” puede causar accidentes.
Retire cualquier llave o herramienta de ajuste antes de arrancar
la herramienta eléctrica.
Las llaves o herramientas que quedan en las partes rotativas de la
herramienta pueden causar un daño personal.
No sobrepase su campo de acción. Mantenga ambos pies bien
apoyados en el suelo y conserve el equilibrio en todo momento.
Esto permite un mejor control de la herramienta en situaciones inesperadas.
No vista ropa suelta o joyas. Mantenga su pelo, su ropa y
guantes alejados de las piezas en movimiento.
Ropa, pelo suelto o accesorios pueden ser atrapados por las piezas en movimiento.
En caso de contar con dispositivos de extracción y recolección
de polvo conectados a la herramienta, verifique sus conexiones
y úselos correctamente.
El uso de estos dispositivos reduce los riesgos relacionados con el polvo.
Uso y cuidados de la herramienta
No fuerce la herramienta. Use la herramienta adecuada para el
trabajo a realizar.
La herramienta adecuada trabaja mejor y es más segura cuando se usa al ritmo
para el que fue diseñada.
No use la herramienta si el interruptor no funciona.
Cualquier herramienta eléctrica que no pueda encenderse o
apagarse es peligrosa y debe repararse antes de ser operada.
Desconecte la herramienta de la fuente de corriente y/o de la
batería antes de ajustarla, cambiar accesorios o almacenarla.
Estas medidas reducen el riesgo de arrancar la herramienta accidentalmente.
Almacene las herramientas fuera del alcance de los niños y no
permita su manejo por personas no familiarizadas con las
herramientas o con las instrucciones.
Las herramientas eléctricas son peligrosas en manos no entrenadas.
La máquina no debe de ser utilizada por niños ni por personas
con capacidades físicas, sensoriales o mentales reducidas;
tampoco por personas sin experiencia o conocimientos en su
uso, a menos que estén supervisadas por una persona
responsable de su seguridad o reciban instrucciones previas
sobre el uso de la máquina.
Los niños deben de estar bajo supervisión para asegurarse de que no jueguen
con la máquina.
Dele mantenimiento a la herramienta. Compruebe que
las partes móviles se muevan libremente, que no haya
piezas rotas u otras condiciones que puedan afectar su
operación. Repare cualquier daño antes de usar la herramienta.
El escaso mantenimiento de las herramientas produce accidentes.
Mantenga los accesorios de corte afilados y limpios.
Los accesorios de corte en buenas condiciones son menos probables de
trabarse y más fáciles de controlar.
Use la herramienta de acuerdo al instructivo y de la forma
prevista para el tipo de herramienta, en condiciones adecuadas.
El uso de la herramienta para aplicaciones diferentes para las que
está diseñada podría causar una situación de peligro.
Advertencias generales de seguridad
para herramientas eléctricas
¡ADVERTENCIA! Lea detenidamente todas las advertencias de seguridad y todas las instrucciones que se
enlistan a continuación. La omisión de alguna de ellas puede dar como resultado un choque eléctrico, incendio y/o
daño serio. Conserve las advertencias y las instrucciones para futuras referencias.
Esta herramienta cumple
con la Norma Oficial
Mexicana (NOM).
Uso y cuidado de la herramienta a baterías
Recargue sólo con el cargador especificado por .
Usar un cargador distinto puede ocasionar peligro de incendio.
Use baterías específicamente diseñadas para la herramienta.
El uso de cualquier otra batería puede ocasionar peligro de daños e incendio.

3
Código
Descripción
Tensión
Velocidad del motor
Velocidad de cadena
Longitud de barra
Tanque de aceite para la cadena
Paso de la cadena Calibre de la cadena
MAX-40M
102491
Motosierra inalámbrica
11 000 r/min
19 m/s
140 ml (4.7 oz)
Peso (sin barra,
cadena y baterías ) 3.7 kg
Rueda dentada de impusion 6 dientes
Vibración Mango delantero: 3.0 m/s2 / Mango trasero: 2.0 m/s2
9.5 mm (3/8”) 1.3 mm (0.05”)
40 cm (16”)
Especificaciones técnicas
ESPAÑOL
Baterías
Entrada: Tensión:127 V Frecuencia:60 Hz Corriente:2 A
Salida: 21.5 V 3 A
Cargador
El cable de alimentación del cargador tiene sujeta-cables tipo: Y
La clase de construcción de la herramienta es: Clase III
La clase de construcción del cargador es: Aislamiento reforzado
Ion-litio 20 V 4 Ah | Tiempo de carga: 1 hora 20 minutos aproximadamente
40 V
Si el cable de alimentación se daña, éste debe ser reemplazado por el fabricante o Centro de Servicio
Autorizado , con el fin de evitar algún riesgo de descarga o accidente considerable.
La construcción del aislamiento eléctrico de esta herramienta es alterado por salpicaduras o
derramamiento de líquidos durante su operación. No la exponga a la lluvia, líquidos y/o humedad.
Antes de obtener acceso a las terminales, todos los circuitos de alimentación deben ser desconectados.
Requerimientos eléctricos
de 0 A hasta 10 A
de 10 A hasta 13 A
de 13 A hasta 15 A
de 15 A hasta 20 A
18 AWG(*)
16 AWG
14 AWG
8 AWG
16 AWG
14 AWG
12 AWG
6 AWG
3 (uno a tierra)
de 1.8 m a 15 m | mayor de 15 m
Capacidad en
Amperes Número de
conductores Calibre de extensión
* Se permite utilizarlo siempre y cuando las extensiones mismas cuenten con un artefacto de protección contra sobrecorriente.
AWG = Calibre de alambre estadounidense (American Wire Gauge). Referencia: NMX-J-195-ANCE
Las herramientas de doble aislamiento están equipadas con una clavija
polarizada (una pata es más ancha que la otra). Esta clavija cabe en cualquier enchufe polarizado y
sólo puede conectarse de una forma. Si la clavija no cabe en el enchufe, voltéelo. Si aún así no cabe,
póngase en contacto con un electricista calificado o instale un enchufe polarizado. No altere la clavija
en forma alguna. El doble aislamiento elimina la necesidad de un cable de corriente de tres partes
con conexión a tierra o de un sistema de corriente eléctrica con conexión a tierra.
Al usar un cable de extensión, asegúrese de usar el calibre suficiente para transportar la corriente que
consumirá su herramienta. Un cable de un calibre inferior ocasionará caídas de tensión en la línea, teniendo como resultado
pérdida de potencia y sobrecalentamiento del motor. La siguiente tabla muestra el tamaño correcto que debe usarse
dependiendo de la longitud del cable y de la capacidad de amperes indicada en la placa de datos de la herramienta. Si tiene
dudas use el siguiente calibre más alto.
Al operar herramientas eléctricas en exteriores, utilice una extensión
aterrizada marcada como “Uso exterior” marca . Estas extensiones son
especiales para el uso en exteriores y reducen el riesgo de sufrir una descarga eléctrica.
ADVERTENCIA
ADVERTENCIA
ADVERTENCIA
ADVERTENCIA
ADVERTENCIA

Í
ndice
2
Especificaciones técnicas
Requerimientos eléctricos
Advertencias generales de
seguridad para herramientas eléctricas
Advertencias de seguridad
para uso de motosierras
Partes
Preparación
Dispositivos de seguridad
Abastecimiento de aceite
Montaje de la barra y la cadena
Puesta en marcha
Operación de corte
Talado y Tronzado
Desramado y Poda
Ajustes y Mantenimiento
Solución de problemas
Notas
Centros de Servicio Autorizados
Póliza de Garantía
3
3
4
5
8
9
10
11
11
14
15
16
18
19
21
22
23
24
MAX-40M
ESPAÑOL
Guarde este Instructivo para futuras referencias.
Los gráficos de este Instructivo son para
referencia, pueden variar del aspecto real de la
herramienta.
Para poder sacar el máximo
provecho de la herramienta,
alargar su vida útil, hacer válida
la garantía en caso de ser
necesario y evitar riesgos o
lesiones graves, es fundamental
leer este Instructivo por
completo antes de usar la
herramienta.
ATENCIÓN

Instructivo de
Motosierra
inalámbrica
MAX-40M
ModeloCódigo
MAX-40M
Este Instructivo es para:
102491
ATENCIÓN Lea este Instructivo por completo
antes de usar la herramienta.
ESPAÑOL
ENGLISH
40 V
-
 1
1
-
 2
2
-
 3
3
-
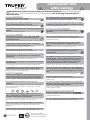 4
4
-
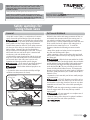 5
5
-
 6
6
-
 7
7
-
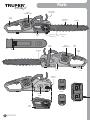 8
8
-
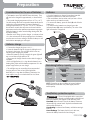 9
9
-
 10
10
-
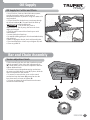 11
11
-
 12
12
-
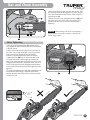 13
13
-
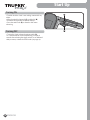 14
14
-
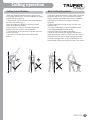 15
15
-
 16
16
-
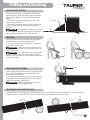 17
17
-
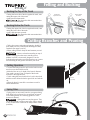 18
18
-
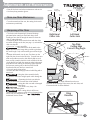 19
19
-
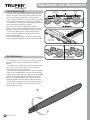 20
20
-
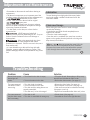 21
21
-
 22
22
-
 23
23
-
 24
24
-
 25
25
-
 26
26
-
 27
27
-
 28
28
-
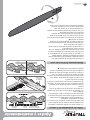 29
29
-
 30
30
-
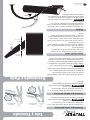 31
31
-
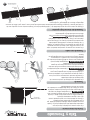 32
32
-
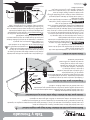 33
33
-
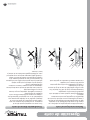 34
34
-
 35
35
-
 36
36
-
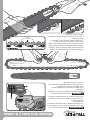 37
37
-
 38
38
-
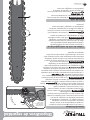 39
39
-
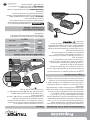 40
40
-
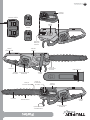 41
41
-
 42
42
-
 43
43
-
 44
44
-
 45
45
-
 46
46
-
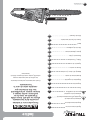 47
47
-
 48
48


Truper Max MAX-40M El manual del propietario
- Categoría
- Motosierras inalámbricas
- Tipo
- El manual del propietario
en otros idiomas
- English: Truper Max MAX-40M Owner's manual
Otros documentos
-
STIHL MSA 120 C-BQ Manual de usuario
-
-
-
Craftsman CMCCS660E1 El manual del propietario
-
-
DeWalt DCCS670BW1DT612 Manual de usuario
-
Hitachi DH 36DL Safety Instructions And Instruction Manual
-
DeWalt DCCS690B Manual de usuario
-
STIHL MSA 161 T Manual de usuario
-
Truper CALA-A3 El manual del propietario