
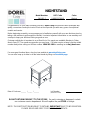
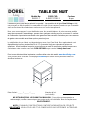
Model Number: UPC Code: Color:
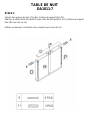
DA1011-7 0-65857-17181-5 Walnut
Date of Purchase: _____ / _____ / _____ Lot Number:
(taken from carton)
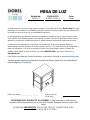
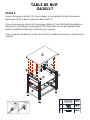
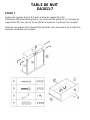
NIGHTSTAND
Congratulations on your latest furniture purchase! Dorel Living furniture has been developed with
quality, convenience and style in mind. We trust it will provide you with many years of exceptional
comfort and service.
Before beginning assembly, we encourage you to familiarize yourself with your new furniture piece by
taking a few minutes to go through this booklet. It contains important information on our warranty and
care tips to keep your furniture looking as good as new.
Customer satisfaction is important to us at Dorel Asia. Our agents are available Monday to Friday
8am to 5pm (EST) to answer any question you may have. For faster service, always have the model
number ready when calling our toll free number 1-800-295-1980 or emailing us at d[email protected] .
For more great furniture ideas, check out our website at www.dorelliving.com
You can also keep up to date on all the latest trends by liking our Facebook page.
DO NOT RETURN PRODUCT TO THE STORE. If a part is missing or damaged, contact
our customer service department. We will replace the part FREE of charge.
NOTE: THIS INSTRUCTION BOOKLET CONTAINS IMPORTANT SAFETY INFORMATION.
PLEASE READ AND KEEP FOR FUTURE REFERENCE.

*
Ensure all parts and components are present before beginning assembly.
*
Assemble on a soft, smooth surface to prevent damage to the product finish.
*
A Phillips head screw driver is not included.
*
DO NOT use power tools.
*
* Assembly will require two people.
*
Dorel warrants its product to be free from defects in material and workmanship and
agrees to remedy any such defect. This warranty covers 1 year from the date of original
purchase. This warranty is valid only upon presentation of proof of purchase. This is solely
limited to the repair or replacement of defective furniture components and no assembly
labor is included. This warranty does not apply to any product which has been improperly
assembled, subjected to misuse or abuse or which has been altered or repaired in any
way. This warranty gives you specific legal rights and you may also have other rights
which vary from State to State.
Dust regularly with a soft, lint-free cloth to prevent soil build-up. A damp cloth may be
used occasionally to clean surface. Dry immediately. Do not use any abrasives that may
damage finish. Excessive exposure to sunlight and extreme changes in temperature and
moisture can damage wood furniture.
WARNING: Should this product become damaged, and/or
components are broken or missing, DO NOT USE.
CUSTOMER SERVICE
NOTES:
CARE AND CLEANING
Montreal, Quebec
12345 Albert-Hudon Boulevard, Suite 100
Do not use the unit if it is damaged or broken.
CALL 1-800-295-1980
If you have any questions about this product, contact our customer service representative
first!
Check bolts/screws periodically and tighten them if necessary.
LIMITED WARRANTY
Estimated assembly time: 60 minutes.
MAINTENANCE
E-MAIL: [email protected]
Canada H1G 3L1
You can also order parts by writing to the address listed below. Please include the product
model number, color and a detailed description of the part.
Customer Service Department No. 413

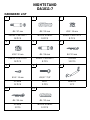
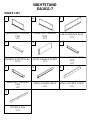
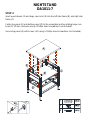
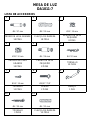
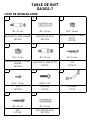
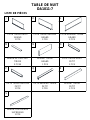
HARDWARE LIST
1 2 3
4 5 6
7 8 9
10 11
NIGHTSTAND
DA1011-7
HANDLE
1 PC
Ø5/32" * 7/8"
Ø13 * 10 mm
SMALL CAM LOCK
8 PCS
Ø4 * 25 mm
SCREW
12 PCS
Ø4 * 30 mm
Ø6 * 25 mm
Ø6 * 37 mm
Ø8 * 32 mm
Ø15 * 12 mm
Ø6 * 36 mm
LARGE CAM LOCK
18 PCS
WOOD DOWEL
18 PCS
LARGE CAM BOLT
18 PCS
SCREW
12 PCS
BOLT
2 PCS
SMALL CAM BOLT
8 PCS
Ø3.5 * 15 mm
SCREW
3 PCS
WOOD DOWEL
12 PCS

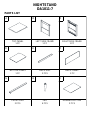
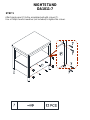
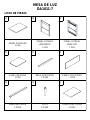
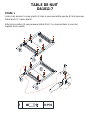
PARTS LIST
A B C
D E F
G H I
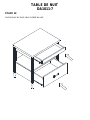
FRONT RAIL
2 PCS
LEG
4 PCS
DRAWER BOTTOM
2 PCS
BOTTOM PANEL
1 PC
BACK RAIL
2 PCS
BACK PANEL
1 PC
NIGHTSTAND
DA1011-7
TOP PANEL
1 PC
LEFT SIDE FRAME
1 PC
RIGHT SIDE FRAME
1 PC

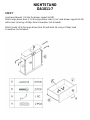
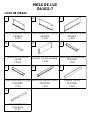
PARTS LIST
J K L
M N O
P Q R
S
SMALL LEFT DRAWER
SIDE
1 PC
SMALL DRAWER BACK
1 PC
SMALL DRAWER FRONT
1 PC
TOP BACK RAIL
1 PC
DRAWER SUPPORT RAIL
2 PCS
LARGE DRAWER FRONT
1 PC
SMALL RIGHT DRAWER
SIDE
1 PC
NIGHTSTAND
DA1011-7
LARGE RIGHT DRAWER
SIDE
1 PC
LARGE LEFT DRAWER
SIDE
1 PC
LARGE DRAWER BACK
1 PC

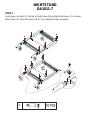
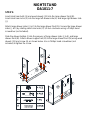
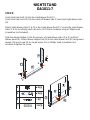
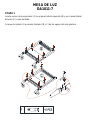
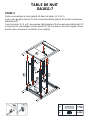
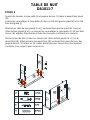
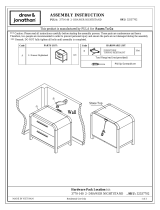
STEP 1
NIGHTSTAND
DA1011-7
Insert large cam bolts (1) into the left side frame (B) and right side frame (C) as shown.
Attach legs (H) to the side frames (B & C) by rotating the legs clockwise.

STEP 2
NIGHTSTAND
DA1011-7
Insert large cam locks (4) into the rails (E, S & G).
Insert wood dowels (2) into the left side frame (B) and right side frame (C).
Secure rails (E, S & G) to the left side frame (B) and right side frame (C) by rotating the
large cam locks (4) 1/2 turn clockwise using a Phillips head screwdriver (not included).

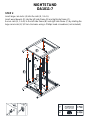
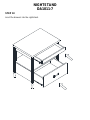
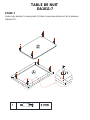
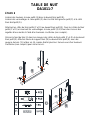
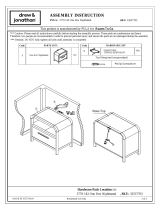
STEP 3
NIGHTSTAND
DA1011-7
Insert large cam bolts (1) into the top panel (A) and bottom panel (D).

STEP 4
NIGHTSTAND
DA1011-7
Insert wood dowels (2) and large cam locks (4) into the left side frame (B) and right side
frame (C).
Fasten top panel (A) and bottom panel (D) to the assembled unit by rotating large cam
locks (4) 1/2-turn clockwise using a Phillips head screwdriver (not included).
Secure top panel (A) with screws (10) using a Phillips head screwdriver (not included).

STEP 5
NIGHTSTAND
DA1011-7
Attach back panel (F) to the assembled unit with screws (7).
Use a Phillips head screwdriver (not included) to tighten the screws.

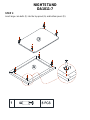
STEP 6
NIGHTSTAND
DA1011-7
Insert small cam bolts (5) and wood dowels (11) into the large drawer front (N).
Insert small cam locks (3) into the large left drawer side (K) and large right drawer side
(J).
Attach large drawer sides (J & K) to the large drawer front (N). Secure the large drawer
sides (J & K) by rotating small cam locks (3) 1/2-turn clockwise using a Phillips head
screwdriver (not included).
Slide the drawer bottom (I) into the grooves of large drawer sides (J & K) and large
drawer front (N). Attach drawer support rail (M) to the large drawer front (N) using wood
dowels (11) and screw (6) as shown below. Use a Phillips head screwdriver (not
included) to tighten the screw.

STEP 7
NIGHTSTAND
DA1011-7
Insert wood dowels (11) into the drawer support rail (M).
Attach large drawer back (L) to the large drawer sides (J & K) and drawer support rail (M)
with screws (6) using a Phillips head screwdriver (not included).
Attach handle (9) to the large drawer front (N) with bolts (8) using a Phillips head
screwdriver (not included).

STEP 8
NIGHTSTAND
DA1011-7
Insert small cam bolts (5) into the small drawer front (R).
Insert small cam locks (3) into the small left drawer side (P) and small right drawer side
(O).
Attach small drawer sides (P & O) to the small drawer front (R). Secure the small drawer
sides (P & O) by rotating small cam locks (3) 1/2-turn clockwise using a Phillips head
screwdriver (not included).
Slide the drawer bottom (I) into the grooves of small drawer sides (P & O) and front
drawer panel (R). Attach drawer support rail (M) to the small drawer front (R) using wood
dowels (11) and screw (6) as shown below. Use a Phillips head screwdriver (not
included) to tighten the screw.

STEP 9
NIGHTSTAND
DA1011-7
Insert wood dowels (11) into the drawer support rail (M). Attach small drawer back (Q) to
the small drawer sides (P & O) and drawer support rail (M) with screws (6).
Use a Phillips head screwdriver (not included) to tighten the screws.

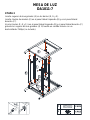
STEP 10
NIGHTSTAND
DA1011-7
Insert the drawers into the nightstand.

That's it! You've finished assembling your nightstand.
DA1011-7
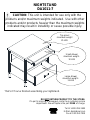
NIGHTSTAND
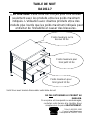
CAUTION: This unit is intended for use only with the
products and/or maximum weights indicated. Use with other
products and/or products heavier than the maximum weights
indicated may result in instability or cause possible injury.
DO NOT RETURN PRODUCT TO THE STORE.
If a part is missing or damaged, contact our customer service
department. We will replace the part FREE of charge.
Tel #: 1-800-295-1980
E-Mail: [email protected]
Fax #: 514-353-7819
NEED HELP!
CALL US FOR ASSISTANCE
1-800-295-1980
DO NOT RETURN PRODUCT TO STORE
E-MAIL:[email protected]
Top panel
maximum weight
25 LBS
Small drawer
maximum weight -
10 LBS
Large drawer
maximum weight -
15 LBS

MODEL #: DA1011-7
PLEASE DO NOT RETURN THIS PRODUCT TO THE STORE
PLEASE CONTACT CUSTOMER SERVICE REPRESENTATIVES AT THE FOLLOWING
NUMBERS SHOULD THERE BE ANY MISSING OR DEFECTIVE PART(S).
Customer Service Fax Number 514-353-7819
Request Date:
Name:
Shipping Address:
Street & Number:
City & State:
Zip Code:
Day Time Phone Number:
(including area code)
Date & Place of Purchase:
Part(s) description and quantity (Please be sure to list model number or SKN number):
Email: [email protected]
Customer Service
Customer Service Representative Mailing Address:
Customer Service Phone Number 1-800-295-1980
Customer Service Department No. 413, 12345 Albert-Hudon Boulevard, Suite 100, Montreal, QC, Canada, H1G 3L1

Modelo No: CODIGO UPC: Color:
DA1011-7 0-65857-17181-5 Nogal
Fecha de compra: _____ / _____ / _____ Número de lote:
(en la caja)
MESA DE LUZ
¡Felicitaciones por su nueva compra de un mueble! Los muebles de la línea Dorel Living han sido
diseñados con la calidad, la comodidad y el estilo en mente. Estamos seguros de que este mueble
le servirá por muchos años con su comodidad excepcional.
Le recomendamos que antes de comenzar a armarlo se familiarice con su nueva compra y tome
unos minutos de su tiempo para leer este manual. Contiene información importante sobre nuestra
garantía y consejos de cuidados para que su mueble siempre conserve su apariencia de nuevo.
Le damos mucha importancia a Dorel Asia a la satisfacción de nuestros clientes. Nuestros
representantes están disponibles de lunes a viernes de 8 h a 17 h (hora del este) para responder a
todas sus preguntas. Con el fin de acelerar el servicio, por favor tenga a mano el número de
modelo cuando llame a nuestro número sin coste 1-800-295-1980 o por correo electrónico a
Para obtener más ideas de muebles inspirantes, visite nuestro sitio web en www.dorelliving.com
También puede mantenerse informado de todas las últimas tendencias suscribiéndose a
nuestra página en Facebook.
NO DEVUELVA EL PRODUCTO A LA TIENDA. Si falta una pieza o está dañada,
contacte nuestro departamento de servicio a la clientela. Reemplazaremos la pieza SIN
cargo.
NOTA: ESTE MANUAL DE INSTRUCCIONES CONTIENE INFORMACIÓN DE
SEGURIDAD IMPORTANTE. POR FAVOR, LÉALO Y CONSÉRVELO PARA
CONSULTARLO EN EL FUTURO.

* Se necesita un destornillador en cruz (no incluido).
* El armado y la manipulación pueden requerir dos personas.
* El tiempo de armado se estima en 60 minutos.
GARANTÍA LIMITADA
Dorel garantiza que este producto está libre de defectos de material y mano de obra y se
compromete a remediar cualquiera de esos defectos. Esta garantía cubre 1 año a partir de la
fecha de compra original. Esta garantía es válida únicamente si se presenta una prueba de
compra. Esto se limita solamente a la reparación o reemplazo de componentes defectuosos de
los muebles y no incluye el trabajo de armado. Esta garantía no se aplica a ningún producto que
haya sido armado de manera inadecuada, sujeto a un mal uso o abuso o que haya sufrido
cualquier tipo de alteración o reparación. Esta garantía le da las derechas legales específicas y
usted puede también tener otras derechas que varíen de estado al estado.
ADVERTENCIA: Si este producto se ha dañado,
y/o sus componentes están rotos o faltan, NO LO USE.
* No use herramientas eléctricas.
* No use la unidad si está dañado o roto.
CUIDADO Y LIMPIEZA
Límpiela regularmente con un paño suave para evitar la acumulación de suciedad.
Ocasionalmente se puede usar un paño húmedo para limpiar la superficie. Séquela
inmediatamente. No utilice productos abrasivos que puedan dañar la terminación. Una
exposición excesiva a la luz del sol y a cambios extremos de temperatura y humedad puede
dañar los muebles de madera.
MANTENIMIENTO
Verifique las arandelas/tornillos periódicamente y ajústelos si es necesario.
Montreal, Quebec
Canadá H1G 3L1
Correo electrónico: [email protected]
AVERTENCIA
* Para evitar que se raye, por favor retire todo el embalaje y ármelo sobre una superficie
limpia y suave.
* Ensamble sobre una superficie suave, lisa para evitar daños en el acabado del producto.
SERVICIO A LA CLIENTELA
Si faltan piezas o tiene alguna pregunta sobre este producto, ¡primero contacte nuestro representante de
servicio a la clientela!
LLAME AL 1-800-295-1980
También puede pedir piezas escribiendo a la dirección indicada abajo. Por favor incluya el número de
modelo, color y una descripción detallada de la pieza.
Departamento de Servicio a la Clientela No. 413
12345 Albert-Hudon Boulevard, Suite 100

LISTA DE ACCESORIOS
1 2 3
4 5 6
7 8 9
10 11
Ø4 * 30 mm
Ø6 * 25 mm
TORNILLO
3 PZAS
CLAVIJA DE MADERA
12 PZAS
Ø3.5 * 15 mm
Ø5/32" * 7/8"
TORNILLO
12 PZAS
PERNO
2 PZAS
MANIJA
1 PZA
Ø15 * 12 mm
Ø6 * 36 mm
Ø4 * 25 mm
SEGURO DE LEVA
GRANDE
18 PZAS
PERNO DE LEVA
PEQUEÑO
8 PZAS
TORNILLO
12 PZAS
MESA DE LUZ
DA1011-7
Ø6 * 37 mm
Ø8 * 32 mm
Ø13 * 10 mm
PERNO DE LEVA GRANDE
18 PZAS
CLAVIJA DE MADERA
18 PZAS
SEGURO DE LEVA
PEQUEÑO
8 PZAS

LISTA DE PIEZAS
A B C
D E F
G H I
BARA ANTERIOR
2 PZAS
PATA
4 PZAS
FONDO DEL CAJÓN
2 PZAS
PANEL INFERIOR
1 PZA
BARA POSTERIOR
2 PZAS
PANEL POSTERIOR
1 PZA
MESA DE LUZ
DA1011-7
PANEL SUPERIOR
1 PZA
PANEL LATERAL
IZQUIERDO
1 PZA
PANEL LATERAL
DERECHO
1 PZA

LISTA DE PIEZAS
J K L
M N O
P Q R
S
BARA POSTERIOR
SUPERIOR
1 PZA
LADO IZQUIERDO CAJÓN
PEQUEÑO
1 PZA
LADO POSTERIOR CAJÓN
PEQUEÑO
1 PZA
FRENTE CAJÓN
PEQUEÑO
1 PZA
BARRA DE SOPORTE
CAJÓN
2 PZAS
FRENTE CAJÓN GRANDE
1 PZA
LADO DERECHO CAJÓN
PEQUEÑO
1 PZA
MESA DE LUZ
DA1011-7
LADO DERECHO CAJÓN
GRANDE
1 PZA
LADO IZQUIERDO CAJÓN
GRANDE
1 PZA
LADO POSTERIOR CAJÓN
GRANDE
1 PZA

ETAPA 1
MESA DE LUZ
DA1011-7
Inserte pernos de leva grandes (1) en el panel lateral izquierdo (B) y en el panel lateral
derecho (C) como ilustrado.
Coloque las patas (H) a paneles laterales (B y C) de las agujas del reloj giratorio.

ETAPA 2
MESA DE LUZ
DA1011-7
Inserte seguros de leva grandes (4) en los barras (E, G y S).
Inserte clavijas de madera (2) en el panel lateral izquierdo (B) y en el panel lateral
derecho (C).
Una los barras (E, G y S) con el panel lateral izquierdo (B) y el panel lateral derecho (C)
girando los seguros de leva grandes (4) 1/2 vuelta en sentido horario con un
destornillador Phillips (no incluido).

ETAPA 3
MESA DE LUZ
DA1011-7
Inserte pernos de leva grandes (1) en el panel superior (A) y panel inferior (D).

ETAPA 4
MESA DE LUZ
DA1011-7
Inserte clavijas de madera (2) y seguros de leva grandes (4) en el panel lateral izquierdo
(B) y el panel lateral derecho (C).
Coloque el panel superior (A) y panel inferior (D) sobre la unidad ya armada girando los
seguros de leva grandes (4) 1/2 vuelta en sentido horario utilizando un destornillador
Phillips (no incluido).
Fije más firmemente el panel superior (A) con tornillos (10) utilizando un destornillador
Phillips (no incluido).

ETAPA 5
MESA DE LUZ
DA1011-7
Una el panel posterior (F) al marco ya armado con tornillos (7).
Utilice un destornillador Phillips (no incluido) para ajustar los tornillos.

ETAPA 6
MESA DE LUZ
DA1011-7
Inserte pernos de leva pequeños (5) y clavijas de madera (11) en el frente cajón grande
(N).
Inserte seguros de leva pequeños (3) en el lado izquierdo del cajón grande (K) y el lado
derecho del cajón grande (J).
Una los lados del cajón grandes (K y J) con el frente cajón grande (N). Fije los lados del
cajón grandes (K y J) girando los seguros de leva pequeños (3) 1/2 vuelta en sentido
horario con un destornillador Phillips (no incluido).
Deslice el fondo del cajón (I) en las ranuras de los lados del cajón grandes (K y J) y
frente cajón grande (N). Una la barra de soporte cajón (M) con la frente cajón grande (N)
utilizando clavijas de madera (11) y tornillos (6) como ilustrado. Utilice un destornillador
Phillips (no incluido) para ajustar los tornillos.

ETAPA 7
MESA DE LUZ
DA1011-7
Inserte clavijas de madera (11) en la barra de soporte cajón (M).
Una el lado posterior cajón grande (L) con los lados del cajón grande (K y J) y barra de
soporte cajón (M) utilizando tornillos (6) y destornillador Phillips (no incluido).
Instale una manija (9) en el frente cajón grande (N) con pernos (8) utilizando
destornillador Phillips (no incluido).

ETAPA 8
MESA DE LUZ
DA1011-7
Inserte pernos de leva pequeños (5) en el frente cajón pequeño (R).
Inserte seguros de leva pequeños (3) en el lado izquierdo del cajón pequeño (P) y el lado
derecho del cajón pequeño (O).
Una los lados del cajón pequeños (P y O) con el frente cajón pequeño (R). Fije los lados
del cajón pequeños (P y O) girando los seguros de leva pequeños (3) 1/2 vuelta en
sentido horario con un destornillador Phillips (no incluido).
Deslice el fondo del cajón (I) en las ranuras de los lados del cajón pequeños (P y O) y
frente cajón pequeño (R). Una la barra de soporte cajón (M) con la frente cajón pequeño
(R) utilizando clavijas de madera (11) y tornillos (6) como ilustrado. Utilice un
destornillador Phillips (no incluido) para ajustar los tornillos.

ETAPA 9
MESA DE LUZ
DA1011-7
Inserte clavijas de madera (11) en la barra de soporte cajón (M).
Una el lado posterior cajón pequeños (Q) con los lados del cajón pequeños (P y O) y barra
de soporte cajón (M) utilizando tornillos (6).
Utilice un destornillador Phillips (no incluido) para ajustar los tornillos.

ETAPA 10
MESA DE LUZ
DA1011-7
Inserte todos los cajones en la mesa de luz.

¡Listo! ¡Ya ha terminado de ensamblar su mesa de luz.
MESA DE LUZ
DA1011-7
PRECAUCIÓN: Esta unidad está prevista únicamente
para ser usada con los productos y el peso máximo
indicados. El usarla con otros productos más pesados que el
peso máximo indicado puede provocar inestabilidad y causar
heridas.
NO DEVUELVA EL PRODUCTO A LA TIENDA.
Si falta una pieza o está dañada, contacte nuestro departamento
de servicio a la clientela. Reemplazaremos la pieza SIN cargo.
Tel #: 1-800-295-1980
Correo electrónico: [email protected]
Fax #: 514-353-7819
NEED HELP!
CALL US FOR ASSISTANCE
1-800-295-1980
DO NOT RETURN PRODUCT TO STORE
E-MAIL:DAS@DOREL.COM
PESO MÁXIMO POR
CAJÓN GRANDE 15 LBS
PESO MÁXIMO POR
CAJÓN PEQUEÑO 10
LBS
PESO MÁXIMO SOBRE LA
MESA 25 LBS

MODELO #: DA1011-7
POR FAVOR, NO DEVUELVA ESTE PRODUCTO A LA TIENDA
Número de fax del Servicio a la Clientela 514-353-7819
Fecha de pedido:
Nombre:
Dirección de envío:
Calle y número:
Ciudad y Estado:
Código postal:
Teléfono para llamar de día:
(incluyendo código regional)
Fecha y lugar de compra:
Descripción de pieza(s) y cantidad: (Por favor, asegúrese de incluir número de modelo o número SKN)
Servicio a la Clientela
POR FAVOR, CONTACTE LOS REPRESENTANTES DEL SERVICIO A LA CLIENTELA A
LOS SIGUIENTES NÚMEROS SI FALTA UNA PIEZA O ESTÁ DEFECTUOSA.
Número de teléfono del Servicio a la Clientela 1-800-295-1980
Dirección postal del Servicio a la Clientela:
Departamento de Servicio a la Clientela No. 413, 12345 Albert-Hudon Boulevard, Suite 100, Montreal, QC, Canada, H1G 3L1
Email: das@dorel.com

Modèle No: CODE CUP: Couleur:
DA1011-7 0-65857-17181-5 Noyer
Date d'achat : _____ / _____ / _____ Numéro de lot :
(sur la boîte)
TABLE DE NUIT
Félicitations pour votre dernier achat d’un meuble ! Les meubles de la ligne Dorel Living ont été
conçus ayant en tête la qualité, la commodité et le style. Nous sommes convaincus que ce meuble
vous servira durant de nombreuses années avec un confort exceptionnel.
Nous vous encourageons à vous familiariser avec les caractéristiques de votre nouveau meuble
avant de commencer l’assemblage ; prenez donc quelques minutes pour lire ce manuel. Il contient
de l’information importante concernant notre garantie et des conseils d’entretien pour vous assurer
de garder votre meuble aussi beau qu’aux premiers jours.
La satisfaction de nos clients est important pour nous chez Dorel Asia. Nos représentants sont
disponibles du lundi au vendredi de 8 h à 17 h (heure de l’est) pour répondre à toutes vos
questions. Afin d’accélérer le service, ayez toujours en main le numéro de modèle lorsque vous
contacterez notre numéro sans frais 1-800-295-1980 ou par courriel à [email protected].
Pour trouver d’autres idées inspirantes, veuillez visiter notre site web à www.dorelliving.com.
Vous pouvez aussi souscrire à notre page Facebook pour être à la fine pointe de toutes les
dernières tendances.
NE RETOURNEZ PAS LE PRODUIT AU MAGASIN. Si une pièce est manquante ou
endommagée, veuillez communiquer avec notre service à la clientèle. Nous la remplacerons
GRATUITEMENT.
NOTE: CE MANUEL D'INSTRUCTIONS CONTIENT INFORMATION DE SÉCURITÉ
IMPORTANTE. VEUILLEZ LE LIRE ET LE CONSERVER POUR RÉFÉRENCE ULTÉRIEURE.

* Un tournevis à tête cruciforme (non inclus) est nécessaire.
ENTRETIEN
Veuillez vérifier les boulons et les vis périodiquement et serrez-les si cela s'avère nécessaire.
GARANTIE LIMITÉE
Dorel garantit que ce produit est exempt de tout défaut de matériaux et de fabrication et
s'engage à remédier à un tel défaut. Cette garantie a une validité de 1 an à compter de la date
originelle d'achat. Cette garantie est valide uniquement sur présentation de la preuve d'achat.
Elle est strictement limitée à la réparation ou remplacement de pièces défectueuses et ne couvre
pas les travaux d'assemblage. Cette garantie ne s'applique pas à un produit qui a été assemblé
incorrectement, qui a fait l'objet d'un mauvais usage ou d'abus, qui a été modifié ou réparé.
Cette garantie vous accorde des droits légaux spécifiques, mais vous pouvez avoir d'autres
droits qui varient selon les États.
MISE EN GARDE : Si ce produit et endommagé, et/ou il lui manque
des composantes ou elles sont brisées, NE L'UTILISEZ PAS.
* NE PAS UTILISER d'outils électriques.
* Ne pas utiliser si il est endommagé ou brisée.
* Deux personnes peuvent être nécessaires pour l'assemblage et la manipulation.
* Le temps d'assemblage estimé est de 60 minutes.
ENTRETIEN ET NETTOYAGE
Époussetez régulièrement avec un chiffon doux et sans charpie pour empêcher la poussière de
s'accumuler. Essuyez immédiatement. N'utilisez pas des produits nettoyants abrasifs sur le
cadre de métal, car cela pourrait endommager la finition. Une exposition excessive au soleil et
aux changements extrêmes de température et de l'humidité peut endommager le bois.
Montréal, Québec
Canada H1G 3L1
COURRIEL : [email protected]
NOTES :
* Veuillez vous assurer d'avoir toutes les pièces et composantes avant de commencer
l'assemblage.
* Monter sur une surface douce, lisse pour éviter d'endommager la finition du produit.
SERVICE À LA CLIENTÈLE
Si une pièce est manquante, ou pour toute question concernant ce produit, veuillez d'abord communiquer avec
notre représentant de service à la clientèle!
APPELEZ AU 1-800-295-1980
Vous pouvez aussi commander des pièces en écrivant à l'adresse indiquée ci-dessous. Veuillez inclure le numéro
de modèle du produit, la couleur et une description détaillée de la pièce.
Service à la clientèle No. 413
12345 Boulevard Albert-Hudon, bureau 100

LISTE DE QUINCAILLERIE
1 2 3
4 5 6
7 8 9
10 11
Ø4 * 30 mm
Ø6 * 25 mm
VIS
3 PCES
GOUJON DE BOIS
12 PCES
Ø3.5 * 15 mm
Ø5/32" * 7/8"
VIS
12 PCES
BOULON
2 PCES
POIGNÉE
1 PCE
Ø15 * 12 mm
Ø6 * 36 mm
Ø4 * 25 mm
VERROUILLAGE À CAME
GRAND
18 PCES
BOULON À CAME PETIT
8 PCES
VIS
12 PCES
TABLE DE NUIT
DA1011-7
Ø6 * 37 mm
Ø8 * 32 mm
Ø13 * 10 mm
BOULON À CAME GRAND
18 PCES
GOUJON DE BOIS
18 PCES
VERROUILLAGE À CAME
PETIT
8 PCES

LISTE DE PIÈCES
A B C
D E F
G H I
BARRE AVANT
2 PCES
PATTE
4 PCES
FOND DU TIROIR
2 PCES
PANNEAU INFÉRIEUR
1 PCE
BARRE ARRIÈRE
2 PCES
PANNEAU POSTÉRIEUR
1 PCE
TABLE DE NUIT
DA1011-7
PANNEAU DU DESSUS
1 PCE
PANNEAU LATÉRAL
GAUCHE
1 PCE
PANNEAU LATÉRAL
DROIT
1 PCE

LISTE DE PIÈCES
J K L
M N O
P Q R
S
BARRE POSTÉRIEUR
SUPÉRIEUR
1 PCE
CÔTÉ TIROIR GAUCHE
PETIT
1 PCE
CÔTÉ ARRIÉRÉ TIROIR
PETIT
1 PCE
DEVANT TIROIR
PETIT
1 PCE
BARRE DE SUPPORT
TIROIR
2 PCES
DEVANT TIROIR
GRAND
1 PCE
CÔTÉ TIROIR DROIT
PETIT
1 PCE
TABLE DE NUIT
DA1011-7
CÔTÉ TIROIR DROIT
GRAND
1 PCE
CÔTÉ TIROIR GAUCHE
GRAND
1 PCE
CÔTÉ ARRIÉRÉ TIROIR
GRAND
1 PCE

ÉTAPE 1
TABLE DE NUIT
DA1011-7
Insérez des boulons à came grands (1) dans le panneau latéral gauche (B) et le panneau
latéral droit (C) comme illustré.
Attachez les pattes (H) aux panneaux latéral (B et C) en tournant dans le sens des
aiguilles d'une montre.

ÉTAPE 2
TABLE DE NUIT
DA1011-7
Insérez verrouillages à came grands (4) dans les barres (E, G et S).
Insérez des goujons de bois (2) dans le panneau latéral gauche (B) et dans le panneau
latéral droit (C).
Fixez les barres (E, G et S) au panneau latéral gauche (B) et au panneau latéral droit (C)
en tournant les verrouillages à came grands (4) 1/2 tour dans le sens des aiguilles d'une
montre avec un tournevis cruciforme (non compris).

ÉTAPE 3
TABLE DE NUIT
DA1011-7
Insérez des boulons à came grands (1) dans le panneau du dessus (A) et panneau
inférieur (D).

ÉTAPE 4
TABLE DE NUIT
DA1011-7
Insérez des goujons de bois (2) et verrouillages à came grands (4) dans le panneau
latéral gauche (B) et dans le panneau latéral droit (C).
Placez le panneau du dessus (A) et panneau inférieur (D) sur l'unité déjà assemblée en
tournant les verrouillages à came grands (4) 1/2 tour dans le sens des aiguilles d'une
montre en utilisant le tournevis cruciforme (non compris).
Fixez le panneau du dessus (A) avec des vis (10) en utilisant le tournevis cruciforme (non
compris).

ÉTAPE 5
TABLE DE NUIT
DA1011-7
Fixez le panneau postérieur (F) au cadre déjà assemblé avec des vis (7).
Utilisez un tournevis cruciforme (non compris) pour serrer les vis.

ÉTAPE 6
TABLE DE NUIT
DA1011-7
Insérez des boulons à came petits (5) et goujons de bois (11) dans le devant tiroir grand
(N).
Insérez des verrouillages à came petits (3) dans le côté tiroir gauche grand (K) et le côté
tiroir droit grand (J).
Attachez les côtés du tiroir grands (K et J) au devant tiroir gauche grand (N). Fixez les
côtés du tiroir grands (K et J) en tournant les verrouillages à came petits (3) 1/2 tour dans
le sens des aiguilles d'une montre à l'aide d'un tournevis cruciforme (non compris).
Glissez le fond du tiroir (I) dans les rainures des côtés du tiroir grands (K et J) et de
devant tiroir (N). Attachez barre de support tiroir (M) au devant tiroir grand (N) avec des
goujons de bois (11) et des vis (6) comme illustré plus bas. Servez-vous d'un tournevis
cruciforme (non compris) pour serrer les vis.

ÉTAPE 7
TABLE DE NUIT
DA1011-7
Insérez des goujons de bois (11) dans la barre de support tiroir (M).
Attachez le côté arriéré tiroir grand (L) aux côtés du tiroir grands (K et J) et barre de
support tiroir (M) avec des vis (6) en utilisant le tournevis cruciforme (non compris).
Attachez une poignée (9) au devant tiroir grand (N) avec des boulons (8) à l'aide d'un
tournevis cruciforme (non compris).

ÉTAPE 8
TABLE DE NUIT
DA1011-7
Insérez des boulons à came petits (5) dans le devant tiroir petit (R).
Insérez des verrouillages à came petits (3) dans le côté tiroir gauche petit (P) et le côté
tiroir droit petit (O).
Attachez les côtés du tiroir petits (P et O) au devant tiroir petit (R). Fixez les côtés du tiroir
petits (P et O) en tournant les verrouillages à came petits (3) 1/2 tour dans le sens des
aiguilles d'une montre à l'aide d'un tournevis cruciforme (non compris).
Glissez le fond du tiroir (I) dans les rainures des côtés du tiroir petits (P et O) et de devant
tiroir petit (R). Attachez barre de support tiroir (M) au devant tiroir petit (R) avec des
goujons de bois (11) et des vis (6) comme illustré plus bas. Servez-vous d'un tournevis
cruciforme (non compris) pour serrer les vis.

ÉTAPE 9
TABLE DE NUIT
DA1011-7
Insérez des goujons de bois (11) dans la barre de support tiroir (M).
Attachez le côté arriéré tiroir petit (Q) aux côtés du tiroir petits (P et O) et barre de support
tiroir (M) avec des vis (6).
Utilisez un tournevis cruciforme (non compris) pour serrer les vis.

ÉTAPE 10
TABLE DE NUIT
DA1011-7
Insérez tous les tiroirs dans la table de nuit.

Voilà! Vous avez terminé d'assembler votre table de nuit.
TABLE DE NUIT
DA1011-7
ATTENTION: Cette unité est conçue pour être utilisée
seulement avec les produits et/ou les poids maximum
indiqués. L'utilisation avec d'autres produits et/ou des
produits plus lourds que les poids maximum indiqués peut
entraîner de l'instabilité et causer des blessures.
NE PAS RETOURNER LE PRODUIT AU
MAGASIN.
Si une pièce est manquante ou endommagée,
contactez notre Service à la clientèle. Nous
remplacerons la pièce GRATUITEMENT.
Tél #: 1-800-295-1980
Courriel: [email protected]
Télécopieur #: 514-353-7819
NEED HELP!
CALL US FOR ASSISTANCE
1-800-295-1980
DO NOT RETURN PRODUCT TO STORE
E-MAIL:DAS@DOREL.COM
Poids maximum pour
tiroir grand 15 lbs
Poids maximum pour
tiroir petit 10 lbs
Poids maximum sur le
dessus 25 lbs

MODÈLE #: DA1011-7
S.V.P. NE PAS RETOURNER CE PRODUIT AU MAGASIN
S.V.P. CONTACTEZ NOS REPRÉSENTANTS DU SERVICE À LA CLIENTÈLE AUX
NUMÉROS SUIVANTS SI VOUS AVEZ DES PIÈCES MANQUANTES OU DÉFECTUEUSES.
Date de la demande :
Nom :
Adresse de livraison :
Numéro & Rue :
Ville & Province :
Code Postal :
No. de téléphone (jour) :
(incluant le code régional)
Date & Nom du Magasin :
Description & quantité de pièce(s): S.V.P. ne pas oublier le numéro de modèle ou de SKU)
Service à la Clientèle
No. de téléphone du Service à la clientèle: 1-800-295-1980
Courriel: da[email protected]
No. du télécopieur du Service à la clientèle: 514-353-7819
Adresse postale du Service à la clientèle :
Département du Service à la clientèle No. 413, 12345, boul. Albert-Hudon, Suite 100, Montréal, QC, H1G 3L1
-
 1
1
-
 2
2
-
 3
3
-
 4
4
-
 5
5
-
 6
6
-
 7
7
-
 8
8
-
 9
9
-
 10
10
-
 11
11
-
 12
12
-
 13
13
-
 14
14
-
 15
15
-
 16
16
-
 17
17
-
 18
18
-
 19
19
-
 20
20
-
 21
21
-
 22
22
-
 23
23
-
 24
24
-
 25
25
-
 26
26
-
 27
27
-
 28
28
-
 29
29
-
 30
30
-
 31
31
-
 32
32
-
 33
33
-
 34
34
-
 35
35
-
 36
36
-
 37
37
-
 38
38
-
 39
39
-
 40
40
-
 41
41
-
 42
42
-
 43
43
-
 44
44
-
 45
45
-
 46
46
-
 47
47
-
 48
48
-
 49
49
-
 50
50
-
 51
51


Dorel Living DA1011-7 Instrucciones de operación
- Tipo
- Instrucciones de operación
- Este manual también es adecuado para
en otros idiomas
- français: Dorel Living DA1011-7 Mode d'emploi
Artículos relacionados
-
Dorel Living DL1008-7 El manual del propietario
-
-
-
-
-
-
Dorel Living DL1010TB-10 Manual de usuario
Otros documentos
-
Dorel NIGHTSTAND DL8417-7 Manual de usuario
-
-
-
 Dorel Home Furnishings DA7608-1SIL El manual del propietario
-
BABY RELAX Baby Relax DA7924-1 Manual de usuario
-
-
-
Linon Williams Coffee Table Ant White Assembly Instructions
-
 drew & jonathan 32537702 Assembly Instructions
-
 drew & jonathan 33537703 Assembly Instructions


